Leaderboard


Popular Content
Showing content with the highest reputation on 09/18/2018 in all areas
-
Samsung 960 EVO Using PCIe adapter in a 4x PCIe slot nothing else, no hack needed. Sometimes the on-board slot uses only 1x speed which looks like what yours is using. get a cheap $10 PCIe adapter.4 points
-
Hi Sir, install-updater.sh is unused to build the package (or to install the updater with the package), and not sure why is there or who ever used it...probably some old tests about installing for-one-user instead of for-all-users. About setting the deployment target to 10.13 this just disallow old OSes to run or compile the program and there is no one warning produced by the actual CloverPrefpane.xcodeproj in Xcode 10 GM unless you decide to upgrade the settings proposed by Xcode to use ARC (which would eventually require some changes) instead of the actual manual memory retain/release cycles which is still perfectly fine, more the linker is still supporting snow leopard.2 points
-
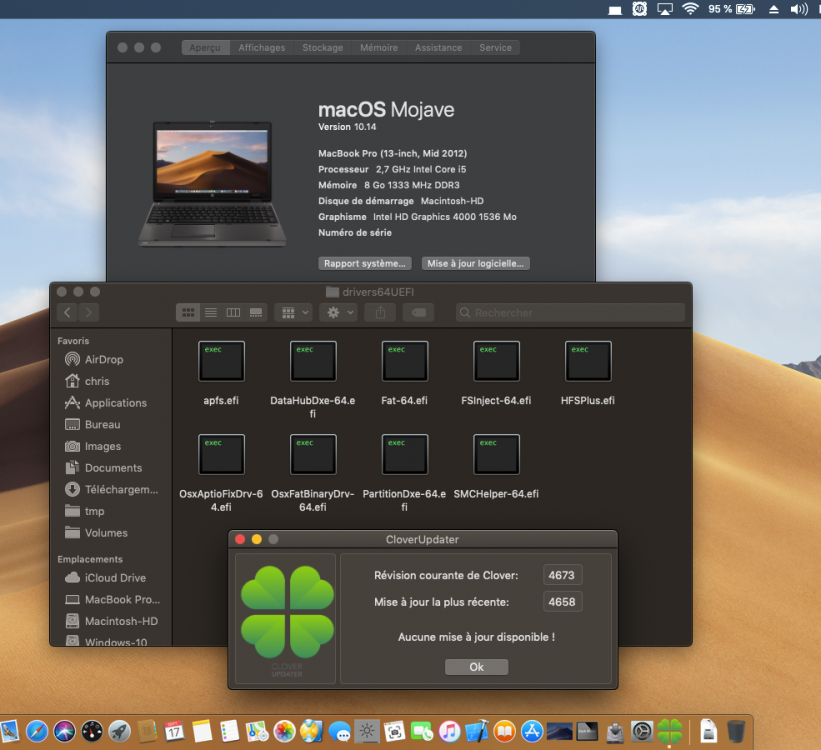
Yes I test lots of revision but I preferred apfs.efi2 points
-

Version 2.0.2
2,624 downloads
Mac Tweaks Easily take charge of macOS's internals.1 point -

Version 2.0
29,984 downloads
Please read me: Ever since macOS Mojave came out (I mean the first DP) Apple removed the support for Atheros based WiFi Adapters from the IO80211Family.kext, so to fix it we need to add the AirPortAtheros40.kext to the Extensions manually. After each clean install the AirPortAtheros40.kext needs to be installed and after clean installing Mojave DPs after few times I decides to create this app to save some time. How to use it: This application will install the missing AirPortAtheros40.kext into /System/Library/Extensions and after the installation is done and once you reboot your computer the Atheros based WiFi adapters will be enabled. The installation is the first step of the process and it is fast but the next steps which are repairing the permission on /System/Library/Extensions and rebuilding the system caches might take a while so please wait until you were asked to reboot your computer. I'm using a TP-Link WDN4800 with an Atheros chipset and it works on other similar hardware. If this app helped you please consider donating; any amount is appreciated.1 point -
Introduction The H370 chipset powers 8th generation Intel Core-i CPUs. Even though the name H370 rings comparable to Z370, the H370 is based on newer silicon. This it also requires some new approaches compared to the Z370. An example would be on-die USB 3.1 and WiFi support. Since this guide is not a "hold-your-hand-every-step" guide, I assume you know: Clover installation and configuration How to create an install medium for MacOS Access and configure the BIOS Have heard of ACPI patching (I'm a newb at this myself) What works Sleep (via DSDT edits and emulated NVRAM) On-board Audio (via AppleALC and native AppleHDA) Native power management (without any kext or patch) All USB ports (and only those present are active) iGPU for both acceleration and display dGPU (I'm running an Nvidia GTX 1080) Untested NIC --> I'm using WiFi only What doesn't work Native NVRAM via AptioMemoryFix.efi DMVT Pre-alloc higher than 64MB (but not necessary) Community additions User @Panzerschiffe added a helpful post, altering this guide for user with AMD cards and not needing on-board sound. He also runs Mojave, which I don't run yet. Changes to the guide: 22.5.18: Added SSDT hot-patching to enable sleep, replacing DSDT static patching as an alternative. 23.5.18: Add iMac18,1 as alternative SMBIOS config for those relying on the iGPU for output 25.6.18: Added update info 28.8.18: Small changes for clarity, changed info for afps loading & updated USB patch for 13.6 04.10.18: Update to Mojave will come once Mojave is more mature 02.12.18: Removed unnecessary patches, fakepciid and audio patch method & linked to AMD post & added whatevergreen.kext as replacement for previous GPU kexts 02.03.19: Removed unnecessary fakeid and ig_platform_id injections, ACPI patches - this is all handled by whatevergreen & lilu. In testing is a Framebuffer patch, see this post. 04.03.19: Added Germany keyboard layout and updated pre-patched DSDT.aml removed DSDT patching 1. Installation This guide heavy inspired by the work of /u/corpnewt of /r/hackintosh and his (sorta) Vanilla guide 1.1 Create the install media for MacOS Follow this, if you are using a Mac to start off with. If you are totally new to MacOS, then please check the basic guide Creation of an installer media in windows or linux 1.2 Install Clover on the install media Using the Clover installer, ensure you are installing to the USB medium you are using for the installer. Chose the following options, leaving the others on default: UEFI driver: AptioMemoryFix UEFI driver: ApfsDriverLoader UEFI booting only Install to ESP You have to get your hands on an apfs.efi. A google search can help, or extracting it from the Installer package. Make sure you procure a version matching the MacOS version you are about to install. Place the apfs.efi in drivers64UEFI. 1.2 Adjust the config.plist for the installer You can use the config.plist attached as a guideline, but take a look at it before and at least adjust the SMBIOS - otherwise it won't boot. Attention: The attached plist contains audio patches introduced by a post-install step. If you run into problems, you might remove those. It also contains a manual slide value, which should normally not be needed, but works fine for me. It is also tuned for usage with an Nvidia Pascal dGPU as main GPU. The config you create now should serve you nicely for install and running the system. Take care of adding the following basics: SMBIOS: iMac18,3 - You can generate a serial number via Clover Configurator. The creation of a proper SMBIOS is covered in many guides to good extend Note: If you aim at using the iGPU for output, a user reported that iMac18,1 works better - since iMac18,3 produces severe flicker. I'm now also testing 18,1 Look at the graphics section and adjust the injection for Intel to your situation Fixes Patches Devices Graphics Important: Change 0x59120003 to 0x59120000 if you don't use a dGPU as your main display Driver and instead use the iGPU for output. Also note. SMBIOS iMac18,1 has been reported to work better in this configuration. But 18,3 works fine for me. Kernel and Kext patches 1.3 kexts and friends Add the supplied SSDT-UAIC.aml to "patched" - it limits the injected USB Ports to the actual number and ports valid for this board. Required kexts on "Other": FakeSMC.kext Whatevergreen.kext Lilu.kext AppleALC.kext IntelMausiEthernet.kext in case you're running Ethernet USBInjectAll.kext with the HCI-300-series-injector.kext --> These two should be installed to /L/E after install We are leaving sound out at the moment, this is something for post-install. 1.4 Check BIOS and install You should be ready for install. But before you reboot, please take a look at your BIOS and set it up accordingly (copied from the aforementioned guide and adapted): Load Optimized Defaults Disable VT-d setting If your system has Secure Boot Mode, disable it Enable CSM - This is sometimes needed to dual screens to work Set OS Type to Windows 8/10 or OtherOS - I have not seen a difference Turn off internal Serial and Parallel port Turn off Network stack for boot Turn off wake-on-lan (for now) Set XHCI Handoff to enabled Don't enable decode over 4G Depending on your GPU, set priority for boot Set internal GPU (iGPU) to enable - not auto or disabled Set DMVT pre-alloc min to 64MB and max to 128MB. For this selection to appear you might need to reboot after setting iGPU to enable Set USB legacy to enabled Activate XMP profile 1 f your Ram has it (mine doesn't and I added the timings manually) Set ERP to enable, disable platform power management (I need to do more research if this could be enabled) I've attached my current BIOS config "hack2". You can place that on a fat32 drive (the EFI partition of your install USB drive might be an idea) and see if it loads. It's made for and with the F2 BIOS. The install itself should be like other MacOS Hackintosh installs with it several reboots and ensuring to select the correct boot device in Clover. 2. Post-install 2.1 Install clover on target This is a no-brainer, but install a fresh copy of Clover on your target medium. During install select again AptioMemoryFix but also additionally EmuVariableUefi-64.efi Install RC scripts on target volume because otherwise NVRAM doesn't seem to work After the install, copy config.plist contents of "Other" content of "patched" to your new clover install. 2.2 Edit ACPI for slumber Choose one option, not both. The hot-patch is experimental, but for the moment it is stable. 2.2.1 Edit DSDT No more need for manual DSDT patching. If you still do it, you might run into unstable sleep. SSDT hot-patching + sane clover.config edits are enough This is necessary only once on initial install and every time, you edit or upgrade the BIOS. The DSDT.aml attached to this post might work for your system or give you a file to compare to. Don't expect it to work for you, though. EDIT: Since moving from F2 BIOS to F12 I did not repatch and sleep is still somewhat reliable. But to be 100% sure, you can still follow these steps. I won't go into the details of DSDT extraction and patching. There are better guides (the linked guide is a rip-off of rehabman's guide from a different forum). Please follow such a guide to extract your ACPI data. Locate and disassemble the DSDT with the newest iasl binary you can put your hands on, then open it with MacIASL in its newest version you can find (Hint: Here is a good source) You can check if the version is new enough if MacIASL doesn't throw error upon compiling a freshly extracted DSDT.aml or DSDT.dst Add rehabmans repo (as per linked guide) and apply the following patches: Rename _DSM to _XDSM Fix _WAK Arg0 v2 USB3 _PRW 0x6D Skylake (instant wake) Find the CNVW device and remove the _PWR function there. Compile the DSDT and place it in "patched". 2.2.2 Use SSDT hot-patching Instead of having to re-extract and re-patch the DSDT on every BIOS change or update, Hardware change one can also use ACPI hot-patching. It's a combination of config.plist patches and an SSDT, which is hot-patched into the ACPI (if I understand the process correctly) You need to add this SSDT-GPRW.aml to your Clover folder in the designated position at Clover/ACPI/patched You need to add this patch to your config.plist. It goes into the DSDT patch section Note: This works for me, but the patch removes the _PRW method from all devices in the DSDT. This could have side-effects. So far, I have seen none. At the moment I'm also not applying any other patch, compared with the additional edits I made to the DSDT method before. 2.3 Install kexts to system As mentioned in the install section, it's better to follow rehabman's instruction and install USBinjectAll.kext to /L/E: sudo cp -R Release/USBInjectAll.kext /Library/Extensions sudo touch /System/Library/Extensions && sudo kextcache -u / 2.4 Enable onboard Audio - Install AppleALC kext Make sure your EFI partition is mounted and that you have a vanilla AppleHDA kext available. See below for a guide how to get a vanilla AppleHDA if needed Note: Our Audio codec is ALC887 and it's running with layout ID 1. Download the newest AppleALC kext from here and install it together with lilu.kext from here into your usual /clover/kexts/others location. Done. No scripts or config.plist patches necessary. Add layout ID 1 to config.plist, if it's not there yet: <key>Audio</key> <dict> <key>Inject</key> <integer>1</integer> <key>ResetHDA</key> <true/> </dict> If you previously installed any audio patches, please follow this guide to "vanilla-ize" your install. 2.5 Optional steps for Graphics If you have a dGPU, now it's the time to install its drivers and adjust the config.plist for it. The detaisl are specific to your GPU and thus of scope of this guide. Yet, my supplied config.plist is ready to be used with Nvidia Pascal cards and using the Nvidia web driver. Whatevergreen.kext helps with Intel iGPU and NVIDIA dGPU fixes. At the moment I'm also testing out a special bootflag: 'shikigva=12' to enable faster rendering in Final Cut Pro X. Without whatevergreen.kext and a shikigva bootflag, rendering in final cut seem very slow. 2.5.1 Framebuffers If you're facing problems with output from your internal GPU, you can try the framebuffer patches listed by @BackwardMac: 2.6 Install a proper keyboard layout You might not be using a fancy Apple branded keyboard. If you use a PC keyboard, you might be annoyed by the differing layout and usage of keys. As a German, you might find yourself quitting applications, since alt gr + Q won't add an @, but quit your current application. To fix this, you can simply install a different keyboard layout. Copy it to /Library/Keyboard Layouts/ and chose the layout in System Preferences, Keyboard in the section "Other". Deleting the previously selecting layout makes sure that only this one is used. Nice little trick. A keyboard layout for German keyboards is attached and works wonders 3. Updating Updating inside 10.3.x/ 10.4.x point updates doesn't require much attention: Download the update from the AppStore as any Mac would do Allow the system to reboot Before booting MacOS with Clover, make sure to disable extra drivers for dGPUs which require non-native support. If using an Nvidia dGPU: Remove "nvda_drv=1" from your boot arguments and disable Nvidia injection If using a non natively supported AMD card, do the same for AMD (I'm not using AMD, thus I cannot be specific) Boot into the newly created Install MacOS partition Repeat this process until the Install partition is gone Boot MacOS again, still following 3., and potentially install updated drivers Your Audio might require re-patching 4. ToDo Move away from static DSDT patching to SSDT hotpatching --> requires my work Native NVRAM --> requires developer work Audio without AppleHDA patching --> requires developer work 5. Thanks to @MaLd0nfor helping finding the right way with the DSDT @RehabMan, for being a legend and helping me out patching @toleda, for audio patches for the 300 series /u/corpnewt, for his superb vanilla guide @wmchris for his super XPS 9550 guide and introducing me to hot-patching @Panzerschiffe for his addition to this guide all the developers of clover and it's awesomeness SSDT-UIAC.aml win-germany.keylayout
 1 point
 -
Version 1.9
6,595 downloads
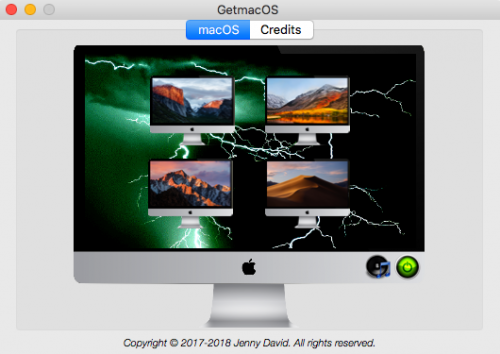
A tool that searches Appstore for missing macOSes. Every year when a new macOS is released, the older ones get missing in Appstore. Making the Appstore's search button completely useless! For example, if you are searching for Sierra or El Capitan now, you may NEVER find it anymore using the search button. As a result, this tool was developed to resolve that issue. Here's an app that communicates with Appstore and allows you to download your desired vanilla macOS (even the older ones). GetmacOS.mov Have a great day and enjoy the tool. Credits: Talat A. Ozcan ~ Outstanding app icon designs. Cyberdevs ~ App's termination code1 point -

Version 10.14.x
41,285 downloads
Patched OSInstaller.framework to allow macOS 10.14 installation on MBR HFS+ partition. To use those patched files you must follow HowTo to create an USB installer. You can't just run the app downloaded from Mac App Store. The patch is made base on 落下爱@pcbeta 10.10.x MBR patch method, and more patch for 10.14 HFS Firmware check by crazybirdy. What is this patched OSInstaller doing? 1. Patch the MBR check, allow macOS 10.14 installation on MBR partition. 2. Patch the Firmware check, bypass the error of "An error occurred while verifying firmware". 3. Patch to stop auto-convert to APFS , "ConvertToAPFS=false" is no longer worked with 10.14. 4. This patched MBR OSInstaller will never convert to APFS, and will always install as HFS+ partition. 5. This patched MBR OSInstaller method works with both MBR HFS+ and GPT HFS+ partition (GPT+recovery). No longer need to set new SMbiosversion, FirmwareFeatures, and FirmwareFeaturesMask with this MBR-patch. What's the difference between createinstallmedia method, MBR-Manual-Method, and MBR-Automatic-Method? As the following.... 1. createinstallmedia method, needs stage 1, stage 2 installation process, which is worked with GUID partition only, always convert to APFS format. 2. MBR-Manual-Method (same as 10.12), install via stage 2 manually, which is worked with both MBR and GUID, HFS+ and APFS, will never convert the partition format. We can manually format as MBR or GPT, HFS+ or APFS on installation screen like as 10.12. We can manually select MBR HFS+ partition to install 10.13 and 10.14 on installation screen now. Needn't to update the MBR-Manual-Method files, it will still work on 10.13, and 10.14 future versions, I think so. It can be installed as Fresh installation on formated blank partition only, but can't be installed as update from previous version. 3. MBR-Automatic-Method (new for 10.13+), install via stage 2 automatically, which is worked with both MBR and GUID, HFS+ and APFS, will never convert the partition format. It can be installed as Fresh installation on formated blank partition, and can be installed as update from previous version. How to make 10.14 installer for MBR (MBR-Manual-Method)? Just use EasyMBR-InstallerMaker to make installer, it works with both MBR and GPT. Read HowTo inside the dmg first, same as 10.12. Read HowTo Q/A Q5. How to patch to work with CPU SSE4.1 only for Mojave? Read HowTo Q/A Q6. How to download the full installer app via swscan.apple.com, instead of App Store? Read HowTo Q/A Q7. How to update 10.14.x combo-update to MBR and GPT with installScript directly? How to make 10.14 installer for MBR (MBR-Automatic-Method)? Just use 14MBRinstallerMaker to make installer, it works with both MBR and GPT. Read HowTo inside the dmg first, same as 10.13. Read HowTo Q/A Q5. How to patch to work with CPU SSE4.1 only for Mojave? Read HowTo Q/A Q6. How to download the full installer app via swscan.apple.com, instead of App Store? Read HowTo Q/A Q7. How to update 10.14.x combo-update to MBR and GPT with installScript directly? And, need a SMBIOS supported with /System/Library/CoreServices/PlatformSupport.plist. Q6. How to download the full installer app via swscan.apple.com, instead of App Store? A6. Some people download installer app from App Store, and get only 18 MB size, not the complete installer app (5.68 GB). You should boot to 10.12, or 10.13 to download it again from App Store, or use script Q6-DownloadFullApp/installScript_1014fullapp to download the full installer app via swscan.apple.com.1 point -
- Make full service for macOS kexts easily. - Latest Kext Utility v2.6.6 for mac OS 10.5-10.13 macOS "Sierra" Super Speed Edition FULL version with KU_config.plist © cVad 2008-2016 Improved version utility from russian MAC community. Description: Super speed repair permissions for all system folders: /System/Library/Extensions and /Library/Extensions; Starts a update (rebuild) system caches: NEW! Starts a update (rebuild) system kernelcache_* for OS X with Extensions.mkext standart cache file (OS X 10.6): Install multiple kext files simultaneously; Kext Utility.app/Contents/Resources/KU_config.plist for ON|OFF some KU functions; KU can automatically add/remove boot args: "-v" for verbose boot, "kext-dev-mode=1" for load unsigned kexts in MAC OS X "Yosemite" and "rootless=0" for perform any repair permissions operation in com.apple.Boot.plist and Unbelievable! in NVRam ; Patch msdosfs.kext Info.plist for add OSBundleRequired="Console". That provides access to an EFI partition in single user mode (disabled for 10.10 and up); Update a records about the unsigned installed kexts in the AppleKextExcludeList.kext (disabled for 10.10 and up); Pack kext files to mkext cache file; UnPack mkext cache files. Note: The latest KU uses highly modified high-speed method of repair kexts. To all kexts granted the same rights (a little more liberal, than it is necessary). This saves a lot of time and nervous when installing and configuring the MAC OS X. On the system performance, is not affected. After installing and configuring the system, if there is free time, run "Disk Utility", and repair the kexts, according to their native permissions. Default config: Troubleshooting: Some thoughts on the repairing of the kexts permissions: Enjoy ... Feel free to click "like" cvad Kext_Utility.app.v2.6.4.zip Kext_Utility.app.v2.6.4.zip.md5.txt Kext_Utility.app.v2.6.5.zip Kext_Utility.app.v2.6.5.zip.md5.txt Kext_Utility.app.v2.6.6.zip Kext_Utility.app.v2.6.6.zip.md5.txt1 point
-
@gengik84 sta installando, appena finisce continuo nel vecchio post sullo stesso pc ma nella sezione di sierra o ne apro uno nuovo In high sierra?1 point
-
tutto ok ora sei un mito. per cambiare smbios basta cambiarlo da cong e salvare giusto ? ho provato MP 6,1 e iM 18,2 il pc si avvia ma il monitor non cambia nulla con MP 5.1 non si avvia. quale sarebbe quella più indicata al mio HW ?1 point
-
tranquillo ... siete fin troppo gentili e disponibili ... senza di voi non ci sarei mai riuscito. grazie infinite a tutti.1 point
-
Ok, grazie.1 point
-
Finally I successfully boot into macOS Mojave GM with my LGA 775 CPU! Ur brilliant job will be much appreciated!! GTX Titan Black matches up with dark mode so much!! OS: Windows 10 Pro for Workstation + macOS Sierra 10.12.6 + macOS Moja 10.14.x +Clover + MBR Processor: Intel(R) Core(TM)2 Quad CPU Q9650 @3 GHz Motherboard: GA P43T S3L GPU: NVIDIA GeForce GTX TITAN Black 6G RAM: 16 GB 1333 MHz DDR3 Sound:Realtek ALC 888 Network: Realtek RTL8168D/8111D1 point
-
1 point
-
olá http://www.sourcegear.com/diffmerge/ boa sorte1 point
-
Just Upgrade to this version
 1 point
 -
No difference performance and apfs.efi as no relation of the boot speed I think for me its FilVault Drivers because without the boot speed is more fast1 point
-
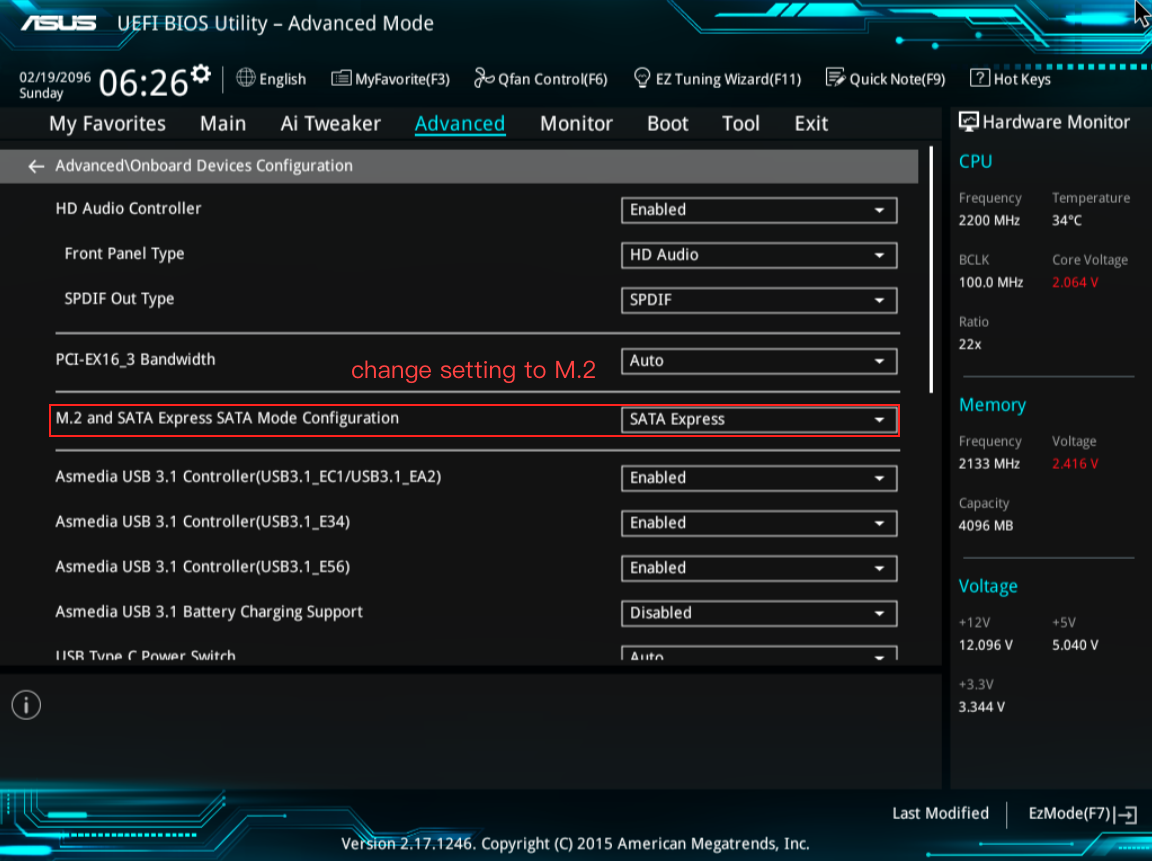
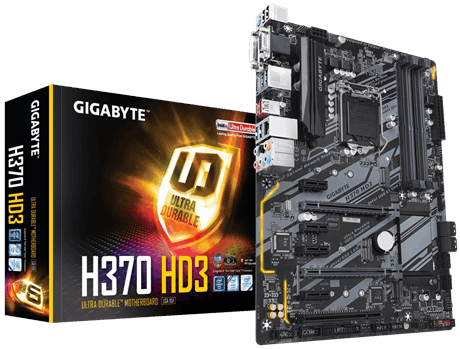
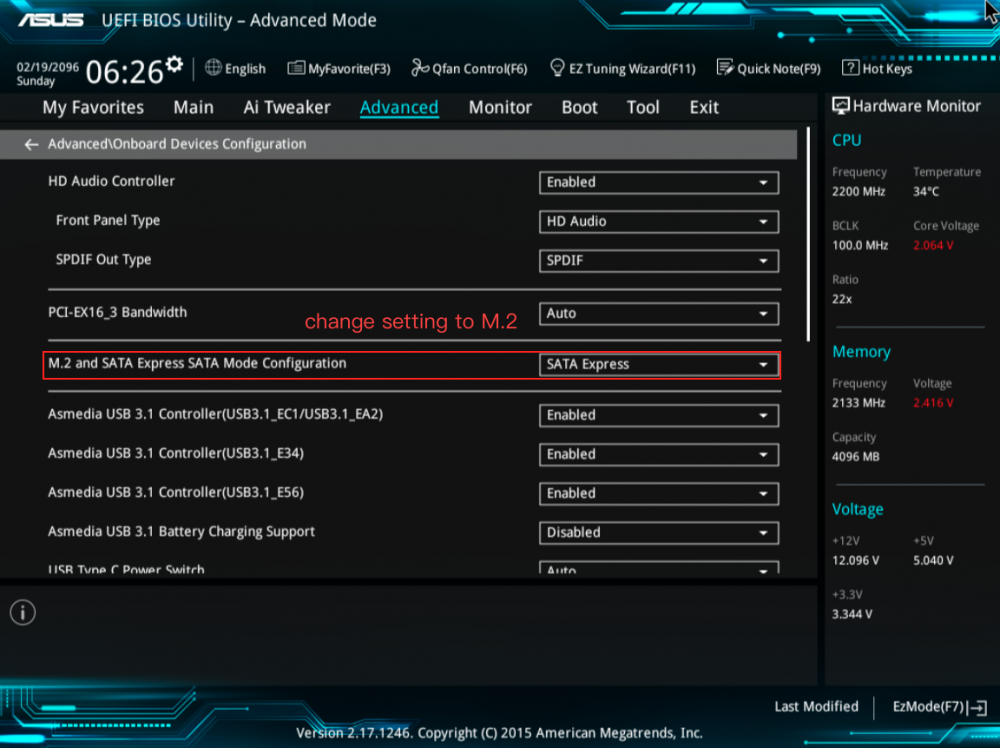
Check BIOs settings because your manual says: The M.2 shares SATA mode with SATA Express. Change this item before installing M.2 SATA devices. Default setting is SATA Express Onboard Devices Configuration > M.2 and SATA Express Mode Configuration > M.21 point
-
Thank you JennyDavid1 point
-
You can change this setting to try.
 1 point
 -
hi, found this thread very helpful, but how to activate GPU sensors monitoring on this RX VEGA 64? does anyone here have working sensor with their Vega? this is my working kext (at least for me), testing using LuxMark, Rise of the tomb raider and Fortnite, no lag, no freeze and no crash...hope will be "fixed" by apple with the final Mojave AMD10000Controller.kext.zip1 point
-
Version 1.3.8 Released - Fixed bug AppleIntelFramebuffer port-number should be connecter index + 4 or 0 for internal (RehabMan)1 point
-
Haha I don't know why it's so good... Maybe something to do with the i9 CPU and the motherboard which has plenty of bandwidth? I'm not a technical guy One thing with all these tests is to run the activity monitor to make sure the disk isn't indexing (comes up as mdworker) As an aside and a bit off topic, it always pays to go to sys prefs, spotlight, privacy and exclude all your other disks from the indexing...1 point
-
AptioInputFix-64.efi is good anyway. It fix a problem with my keyboard after sleep (first key pressed remains pressed), and I can awake the PC by just moving the mouse, no otherwise. This is a good driver in any cases. IMHO all those drivers should remain where they are since the package already allow to deselect all them: if I'm not mistaken they allow an unencrypted fusion corestoage volume to be loaded as well? If true they are just essential, and w/o them... is just a custom configuration...1 point
-
not sure if this would help those of a technical capability this website which is graphics card only (not sure if its a hackintosh or real mac site) https://egpu.io/forums/mac-setup/macos-10-14-mojave-beta/paged/6/ some interesting scripts and progress reading through this section from page 1 to 61 point
-
hai visionato anche questa guida1 point
-
Da Preferenze di Sistema -> iCloud -> Dettagli Account -> Dispositivi rimuovi eventuali doppioni del tuo pc. Comunque non ti conviene insistere, perché i server di Apple di classificano come spam.1 point
-
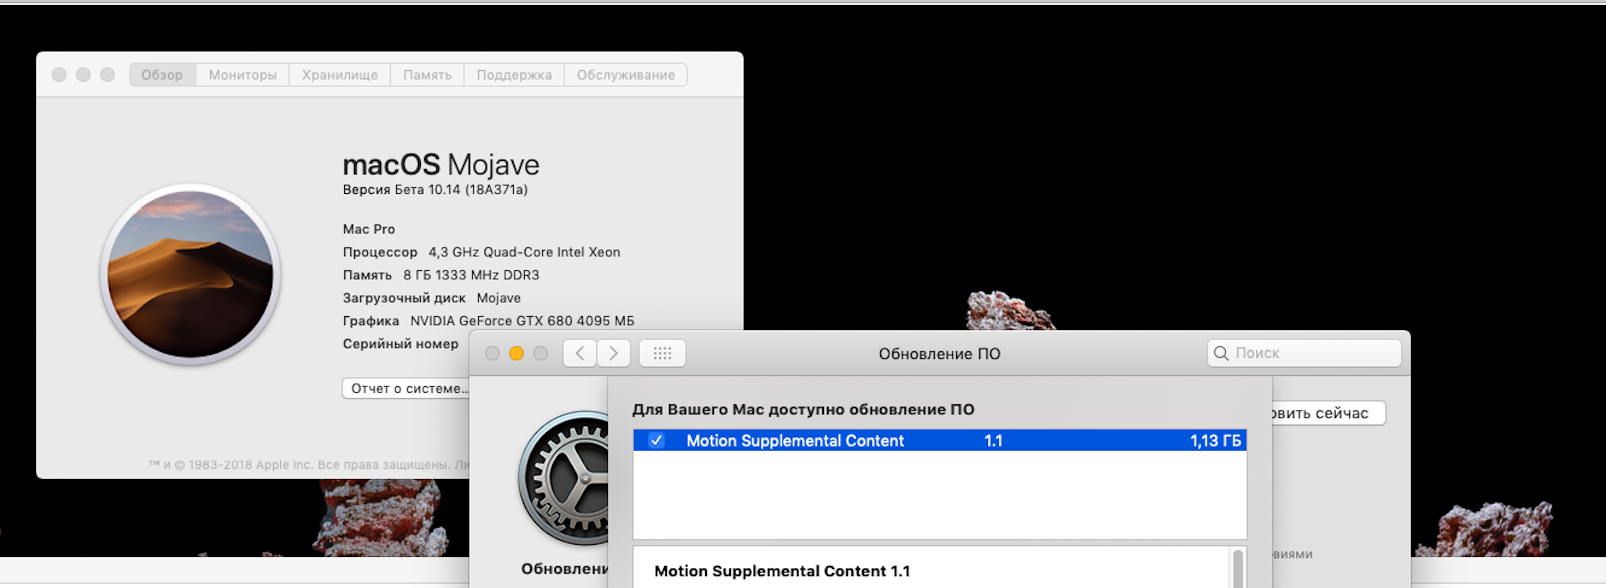
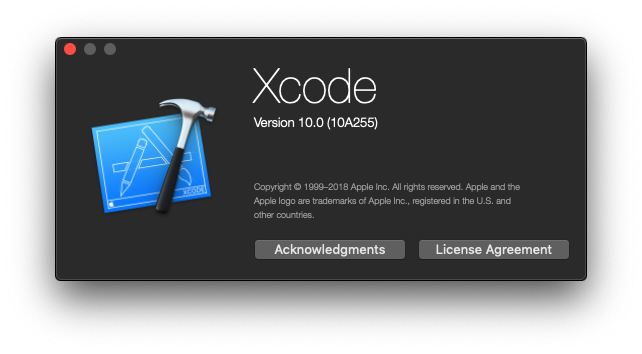
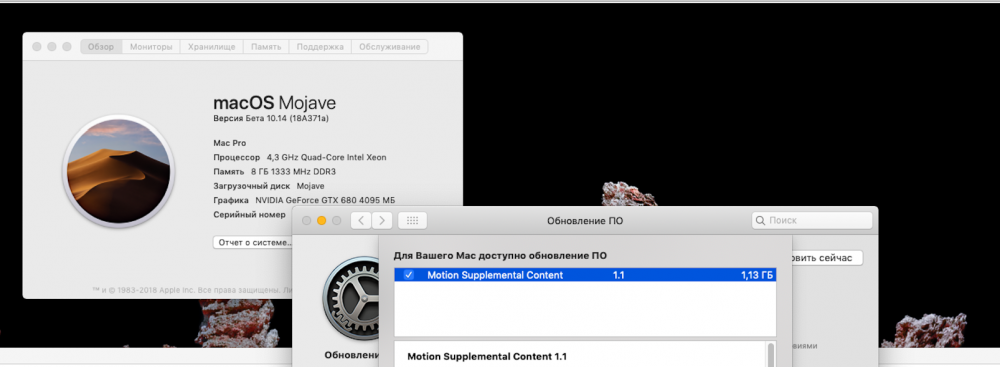
I confirm it after moving to macOS Mojave on my main SSD of my HP ProBook 6570B The boot on an APFS SSD Trim enabler activate is much faster (twice as fast) having no FileVault Drivers Here are my UEFI drivers Note I use the last drivers apfs.efi from Mojave 10.14 (18A389) Clover compile in Mojave 10.14 (18A389) UDK2018, Xcode Version 10.0 (10A254a)
 1 point
 -
Joshua60 (a new release of FakeSMC by RehabMan is out) LiLu and plagins.
 1 point
 -
a new release of FakeSMC by RehabMan is out1 point
-
Keep us informed1 point
-
Version 18A389 installed perfectly and, for the first time, I am able to use AppleALC and have AppleHDA working, including HDMI audio. VirtualSMC is working great and I never would have thought there would be an improvement on FakeSMC. The Mojave Beta experience has been very positive for me and my laptop's performance has been very good, operating temperatures are lower and the only thing that still needs improvement is the temperature of my NVMe drive, which still feels hot when my laptop is sitting on my lap. I'm looking forward to the release of Mojave so that 3rd-party app developers will update their apps to be fully compatible with Mojave.1 point
-
I have a t470, and needed to inject 29 instead of 28 for sound on my laptop. My trackpad was not working well. I installed the latest VoodoPS2Controller kext from RehabMan on tonymac, and my trackpad works great. Your milage may vary.1 point
-
I've been through that thread twice now, and all I can find is words of encouragement and our staff wanting to know when your site would be back online: "Good luck!/The Forum are amazing, congrats for your efforts!/Congrats for all efforts of OSXLatitude crew". That's hardly the ridicule of which you accuse them On a related note, I remember we too had issues with the utf8 converter and a legacy character encoding that littered "?" over our content. @smx was a rockstar and helped me build our own converter that was much more robust at fixing character issues Yes, we are working hard fixing things up! We moved servers last week, and the performance has been significantly more reliable than in the past. You can see a really nice downward trend on the site loading time I've also been fixing up several skin issues that were on the TODO list, and have a few ideas percolating on an improved front page. On my current TODO list is to: (1) restore the chat, (2) improve the rules page to be simpler, (3) redesign the homepage, and (4) finish fixing the theme issues From a management perspective, running this site is significantly more complex than your own since we do not own the site. This means until last week we didn't have access to the live server, we can't make revenue/ads changes, can't make large changes without some oversight and overall have significantly less control over our future. We do the best we can given the resources we have, and I do believe we are on the right track going forward This site has been through quite the history behind the scenes, and in some ways it's amazing we're still here :p I always appreciate specific actionable feedback . I'm not sure about video width embedding - having it resize based on the users monitor seems the most intuitive, although I do have a small screen so they are usually quite narrow and natural. Any recommendation on the width?
 1 point
 -
Many people have issues if apfs gets loaded onto their HDD, it’s good for SSDs but kills performance of mechanical drives. This is a good tool if it works for users with that problem IMO. Apfs is new and has some bugs like having 3 or 4 visible boot options of which only 2 are necessary. With multiple drives connected it gets crowded unless you know how to hide the partitions in clover GUI settings. I can see this being useful for many folks that dont have the knowledge to manipulate apfs formats.1 point
-
Hey Rico, You seem to know a bit about these issues and was wondering if you could help me? Using a Radeon R9 280X in High Sierra with only one monitor working. The second one is getting a signal but displaying only a black screen. Both worked flawlessly in previous versions of OSX. I've been working at this for months with no joy and followed the steps above too. When I replace the aforementioned kexts with the Sierra versions my one working monitor defaults to what could be said is a VGA display with weird colours. I agree with your logic that it's a kext issue and therefore by replacing the kexts that worked in Sierra they should also work in High Sierra but that isn't the case for me. It has me wondering if the 3000 kexts are the correct versions for HS? Any further input? Thanks **EDIT** I am convinced it's the DVI that's broken under High Sierra. Dual monitors still works OK in Ubuntu and Windows 10 so it isn't a hardware issue. Definitely software related. System Prefs picks up both monitors (See image) https://imgur.com/a/qylUp **EDIT2** I was right DVI was not set up correctly. I had to edit a kext file adding frame buffer settings. All sorted now1 point
-
They definitely removed Web Driver - 387.10.10.15.15.108 from the catalog0 points