Leaderboard


Popular Content
Showing content with the highest reputation since 04/19/2023 in all areas
-
Meanwhile, I fixed `AppleXcpmForceBoost` quirk: https://github.com/acidanthera/OpenCorePkg/commit/4cc7ac246d99ee3033a651cb7587ec39b6ad13b7. Enjoy23 points
-
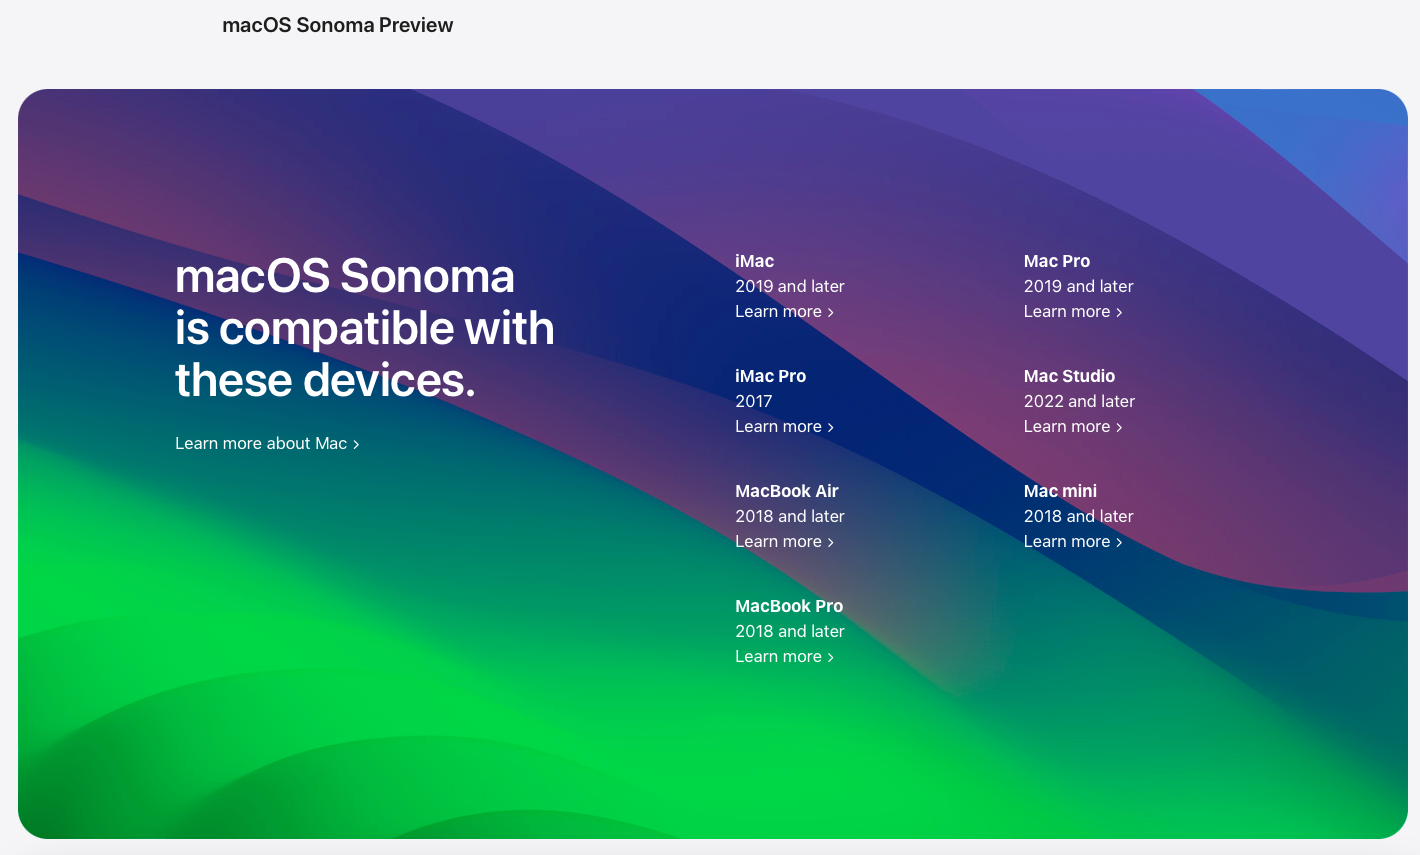
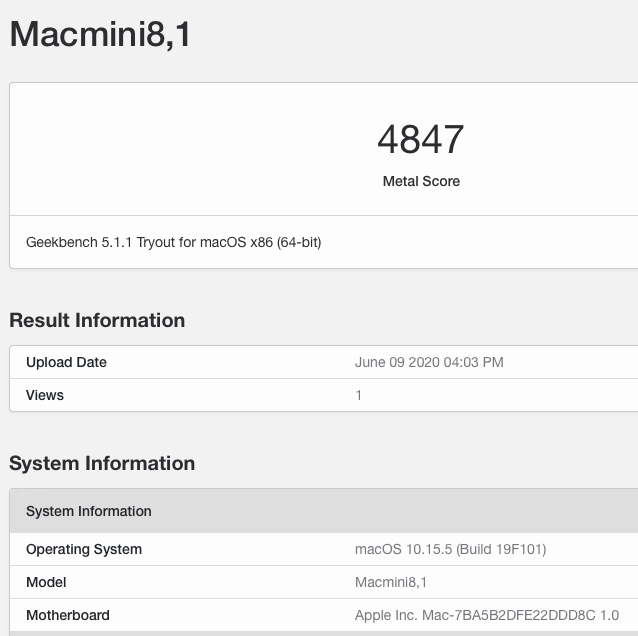
Supported SMBIOSes for macOS Sonoma: iMac19,1 iMac19,2 iMac20,1 iMac20,2 iMacPro1,1 MacBookAir9,1 MacBookPro15,1 MacBookPro15,2 MacBookPro15,3 MacBookPro15,4 MacBookPro16,1 MacBookPro16,2 MacBookPro16,3 MacBookPro16,4 Macmini8,1 MacPro7,1
 23 points
 -
👉 Rules Our goal is ensure that the forum remains a helpful & friendly place to learn about how to run Mac OS X on non-Apple hardware, and of course other general banter. We want you to be able to discuss anything and everything here, and to do so we ask that you check out these guidelines for forum use. Do not upload anywhere else files when developers specifically ask not to. We take this matter very seriously, as developers are the very heart of our community. No Flaming. This includes racism, threatening, personal attacks, victimization or hateful content. Retaliation will not be tolerated either; if a member has broken a rule, please use the report feature on the forum and the staff will deal with the situation appropriately. No posting of direct or indirect links to warez or pirated pieces of software, this includes cracks, serials and torrents. Do not publicly argue the decision of a moderator. If you disagree with a moderator take it up with them in private via PM. Only one (1) login is allowed per member. Duplicate accounts will be banned or deleted. Bumping of posts is not permitted. Other than being less annoying it also keeps the posts more informative. Meaningless and useless posts may be removed at Moderator's discretion. Only post your post once (1). This keeps the forum cleaner and makes it easier to find what you are looking for. No advertising or business offers of any kind. No posting of copyrighted material. This includes copying and pasting news articles from news websites. Attached materials must come with clear descriptions of what they are and what they do, linking to this information elsewhere is not sufficient. Materials derived from Open Source must include source code, as well as an explanation of what has been done to it. Discussion of P2P, torrent sites, or similar download sites of any kind will not be tolerated. We do not want to know your illegal downloading habits. Do not post spyware or any other malware. This includes linking to other sites which may contain it. Posting just to promote another site, product, or service (spamming) is not allowed. This site is not here for you to promote your own or anyone else's material. Discussion of commercial spin-offs of the OSx86 scene is allowed if it’s to understand their existence, but no discussion of how to use them, nor any support for these commercial spin-offs are allowed as they are not in the spirit of the OSx86 scene. Example of commercial spin-off: tonymacx86. Why InsanelyMac does not support tonymacx86 VERY IMPORTANT: PLEASE READ! (ABOUT TONYMACX86 AND iATKOS M / Y / EC / SR) 👉 Posting Guidelines If you have a question please do your best to use the search feature and search the forum before creating a new topic. Post in the correct forum and read the forum description. This will make sure that your post will not be removed. Pick an appropriate title and tags (if any) for your post. A good title makes it easier to find what you are looking for. Using informative tags allows for improved searching of related topics. All posts must be clearly written and easy to read. For example, if you have long blocks of text, use the Code option, etc. Limit "empty lines" as much as possible, use punctuation where you can and be concise. Posts may be edited for this reasons by InsanelyMac staff at their discretion. Please remember that you are in a public forum, a bit of courtesy is always welcome. It's always nice to start by saying "Hi" or "Hello" before asking a question or seeking help. Also a "thank you" would be appreciated, especially if the help you get is effective. Your topic does not deserve any more attention than others seeking help hence topic titles must reflect their content, and topic titles containing things like: 'please help' 'look here' 'cash reward' 'urgent' or other inaccurate descriptions will be removed. This includes all-caps titles. Give your hardware specs when necessary (asking for support) and any other time where it may be beneficial to have them listed. Watch this video to guide you how to do that: [Video] How to add a signature. 👉 Signatures, Avatars and Nicks Keep your signature/avatar clean and tidy - should you receive a PM from the staff regarding your signature/avatar, please make the requested alterations or it may be removed/shortened appropriately. To keep pages loading fast for everyone, we request that your signatures and avatars contain no animations or high-definition graphics of any kind. Signatures should be no more than 6 lines of text using a regular font. If you can't fit all of your system specs in that you'd like, why not create a small graphic to contain the information? They should also contain no referral or affiliate program graphics. Avatars should be in "good taste," a qualification that is broad enough to let us determine what is and isn't. Goth-devil-child-wild-eyed-in-the-violent-blackness probably qualifies as being in bad taste. Nothing offensive, pornographic, or vulgar. Nicknames must be readable by the system (without question marks). This will ensure that your nickname can be searched, and that other users can contact you. They should also not contain staff member groups (administrator, moderator, developer, etc.) to prevent confusion. Nicknames should also show respect to the community, thus nothing containing offensive language. Email addresses must be real. Accounts not in line with the last two rules will be edited or deleted without warning. 👉 Policing Do not publicly discuss the decision of a moderator. If there is any issue with a decision of a staff member PM them or contact an admin. Moderators have the ability to suspend or impose posting restrictions upon accounts based on the user's history. Records are kept to keep track of user's behavior and point out repeat offenders. Attempts to circumvent posting restrictions will lead to your account being banned, and any other accounts affiliated with your account being banned also. These rules cover a broad spectrum and are set up to preserve a free and open (and fun) place for discussion. They, in conjunction with common sense and good judgment, should steer you in the right direction. We're all human and we know that people make mistakes... but that's also not an excuse. More rules are subject to appear on this board as we see fit, so please check back from time to time for your own benefit. Thanks for joining our community and helping make it the best it can be. In case the rules localizations should differ, the English rules are the standard.
 23 points
 -
How long Apple will give support, I don't know... But one thing that I know is, we from InsanelyMac will continue to give support to all of you!21 points
-
Useful information: Direct link (thanks to aben) Release Notes Creating macOS Sonoma.app (thanks to matxpa)
 20 points
 -
macOS Sonoma Beta 1 direct link build 23A5257q: https://swcdn.apple.com/content/downloads/23/44/032-94352-A_DB05J15QWT/4x91v0yzolyiat5cat76ieu0h78aeu3d03/InstallAssistant.pkg18 points
-
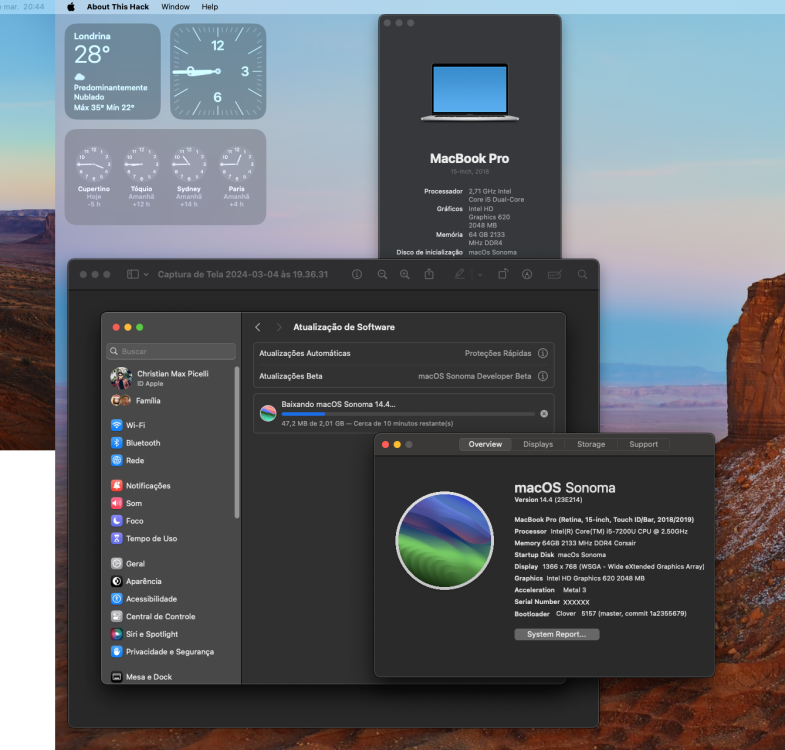
This is not my project. Origin is https://github.com/0xCUB3/About-This-Hack which came from https://github.com/8itCat/About-This-Hack But when I took new one I encounter a problem with signing. I have no paid Apple developer account so I prohibited from compile the application. It is not working with crash About This Hack.app/Contents/Frameworks/Sparkle.framework/Versions/B/Sparkle' not valid for use in process: mapped file has no Team ID and is not a platform binary (signed with custom identity or adhoc?)), bla-bla-bla... So I found old fork and improve it. It works. I also add my new features "Acceleration". Memory manufacture (first one) and Serial always hidden. Also link to our forum instead of Dortania. It is located in https://github.com/CloverHackyColor/About-This-Hack There is also release version.
 15 points
 -
here OK.
 15 points
 -
Everething is nice and smooth with OTA Update Clover 5157 Aorus Raptor Lake i9-13900k Lenovo Kaby Lake E470 i5-7200-U

 14 points
 -
Long live IM14 points
-
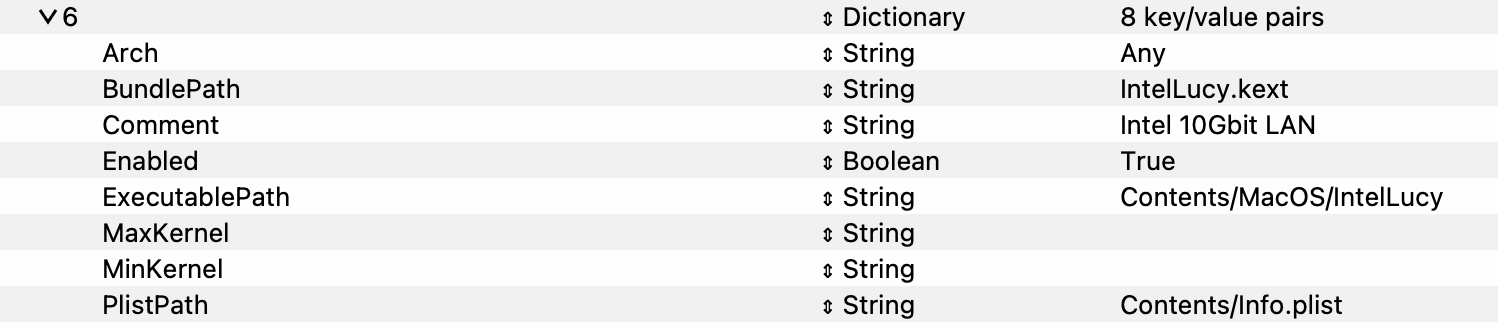
This project is dedicated to Lucy, my lovely little indoor tiger. IntelLucy is an open source driver for the Intel X500 family of 10 GBit Ethernet controllers. Key Features of the Driver Supports Intel X520, X540, X550 and 82598 Ethernet adapters. Support for multisegment packets relieving the network stack of unnecessary copy operations when assembling packets for transmission. No-copy receive and transmit. Only small packets are copied on reception because creating a copy is more efficient than allocating a new buffer. TCP segmentation offload with IPv4 and IPv6. Support for TCP/IPv4, UDP/IPv4, TCP/IPv6 and UDP/IPv6 checksum offload. Large Receive Offload: TCP/IPv4 packet streams are identified by the NIC and reassembled to large packets for handover to the network stack eliminating the overhead of packet header processing. Supports jumbo frames up to 9000 bytes (strongly recommended for 10 GBit/s operation). Designed to work with High Sierra and above. Supports Wake on LAN tagging. Supports hardware VLAN (untested). Support for Energy Efficient Ethernet (EEE) is planned for future releaes. No need for hardware modifications anymore (used to be required for SmalltreeIntel8259x.kext). Compatible with AppleVTD but also works fine with AppleVTD disabled. The driver is published under GPLv2. Current Status IntelLucy has been successfully tested with Catalina, Monterey, Ventura and Sonoma and is ready for use in production systems starting with version 1.0.0. Thanks to jumbo frame support, performance is much better than com.apple.DriverKit-AppleEthernetIXGBE. VLAN support has been fixed and tested in version 1.0.0 and is fully working now. I can't test Wake on LAN because I don't have an adapter with WoL support. Tested Configurations X520-DA1 with the following media: Passive DAC cable: working 10GBase-SR SFP+ modules: working 1000Base-T SFP modules: working X540-TA1: working (see note below). X540-TA2: both ports working (see note below). Known Issues Manual media selection doesn't work. The link is always established with the highest data rate both link partners support, i.e. 10 Gbit/s if both endpoints support it, 1 Gbit/s if the link partner is a Gigabit device, etc. As DAC cables and fibre optics usually are fixed-speed devices, only RJ-45 ports are affected by this limitation. Try to avoid media with flow control enabled as it might cause repeated connection drops due to transmitter hangs and serious performance issues. For WoL to work you need 4 things: An adapter which supports WoL (only a few X520 adapters support WoL). A mainboard which supports WoL from an add-in card. WoL must be enabled in the UEFI setup. Proper ACPI tables for MacOS to support wakeup. Installation Use OpenCore to inject the driver: Getting the driver A prebuilt binary is available in the download section: https://www.insanelymac.com/forum/files/file/1061-intellucy/ Source code can be found on GitHub: https://github.com/Mieze/IntelLucy Changelog Version 1.0.3 (2024-04-17): Disabled ASPM for the X520 adapters as it is broken and may case erratic behaviour. Enabled ASPM on X540 and X550 provided they report ASPM compliance. Fixed a link status reporting issue for RJ-45 ports (X540 and X550). Removed support for 10 Mbit/s data rate (unsupported on X520 and X540). Resolved a conflict between adaptive interrupt throttling and Receive See Coalescing. Version 1.0.0 (2024-04-07): Fixed relaxed ordering of PCIe transactions. Fixed and tested VLAN support. Version 1.0.0d9 (2024-03-27): Improved transmit performance. Version 1.0.0d6 (2024-03-20): Added support for Intel 82598. Version 1.0.0d5 (2024-03-19): First public release. IntelLucy configuration Parameters explained The Info.plist file contains a section with configuration parameters ("Driver Parameters") which will be explained in the following section: enableTSO4: Enables support for TCP segmentation Offload with IPv4. Using TSO4 the NIC receives large TCP/IPv4 packets from the network stack to be split up into smaller packets to be transmitted of the network. TSO4 is a major performance feature and required to achieve TCP transmission rates near wire speed. enableTSO6: Enables support for TCP segmentation Offload with IPv6. enableWakeOnAddr: Currently unused. enableASPM: Enables Active State Power Management (ASPM) on X540 and X550. rxBufferSize4k: Use 4KB receive data buffers instead of 2KB buffers. rxCoalescing: Enabled the use of Receive Side Coalescing which is the receive side counterpart of TSO4. The NIC identifies TCP/IPv4 packets belonging to a TCP stream, coalesces them into large packets (up to 64KB) and hands them over to the network stack reducing header processing overhead. Enabling rxCoalescing enforces the use of 4KB receive buffers. µsPollTime10G: Under heavy load receive and transmit interrupts are disabled and the NIC is polled periodically for packets waiting to be processed. This feature greatly reduces CPU load while operating at full speed. The polling period is given in µs and used when 10G Bit/s link speed is established. µsPollTime2G: Same as µsPollTime10G but for link speed 2.5 Bit/s (X550 only). µsPollTime5G: Same as µsPollTime10G but for link speed 5 Bit/s (X550 only) µsRxItrTime: Interrupt throttling is important to achieve high data rates while keeping CPU load low. This parameter determines the minimum timespan between two receiver interrupts in µs. Values below 10 enable adaptive throttling. µsTxItrTime: Same as µsRxItrTime but for the receiver interrupt.

 13 points
 -
AMD patches work always well as usual
 13 points
 -
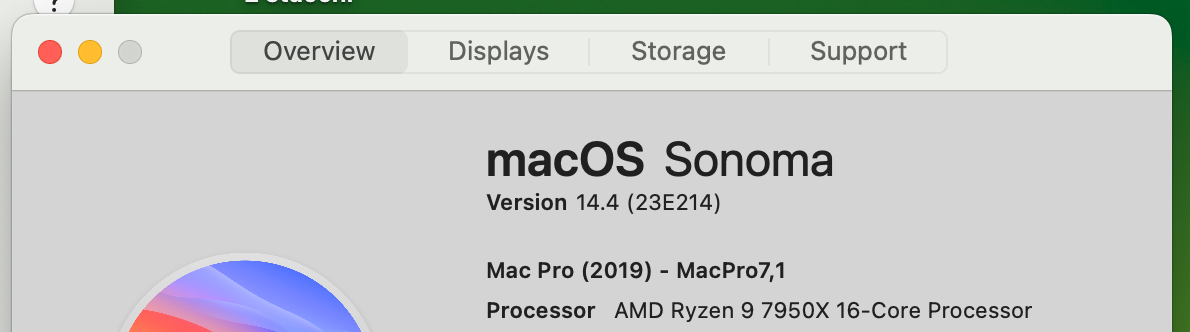
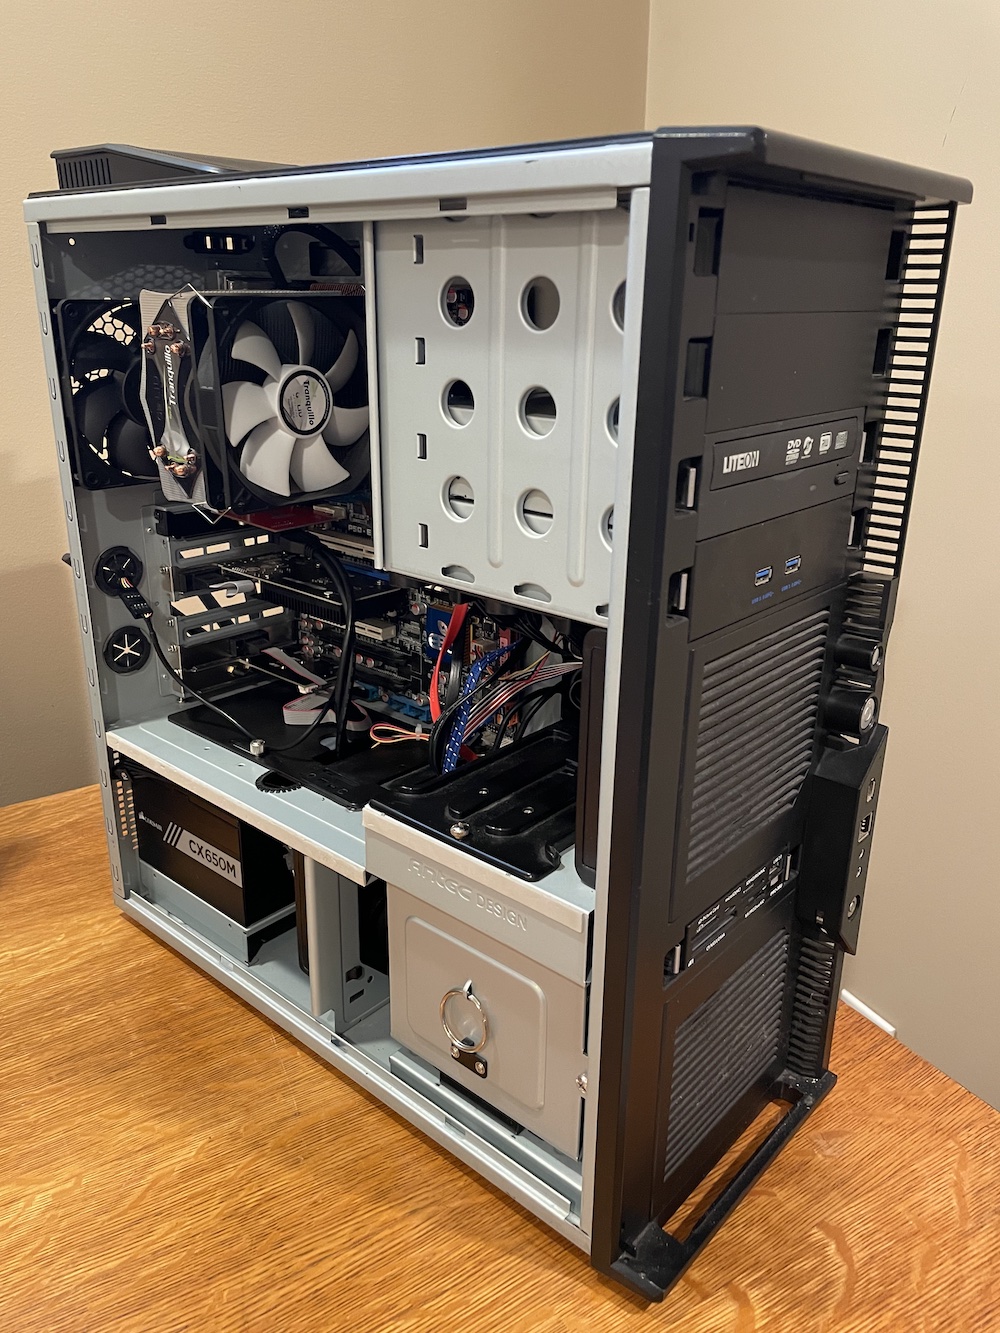
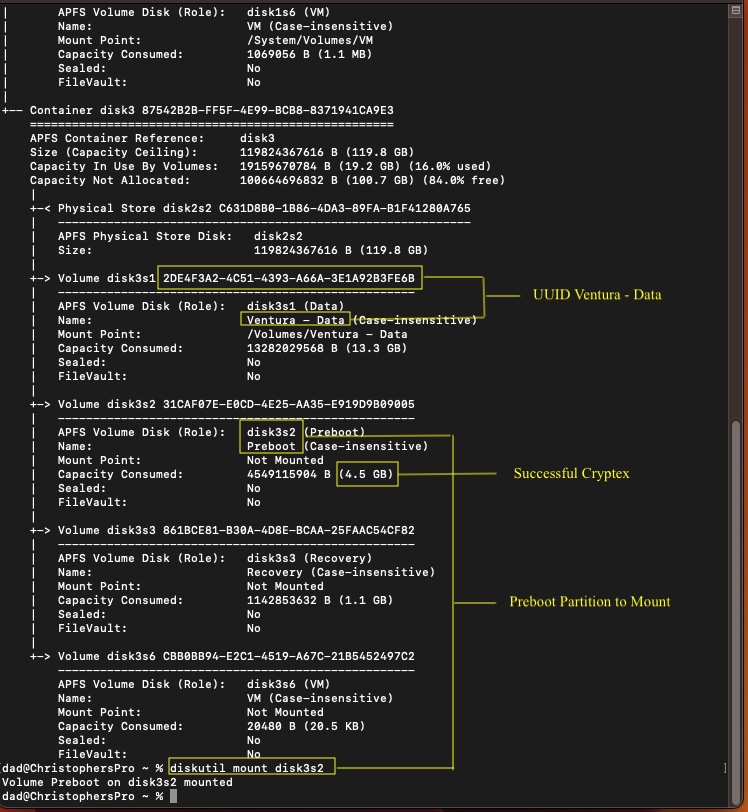
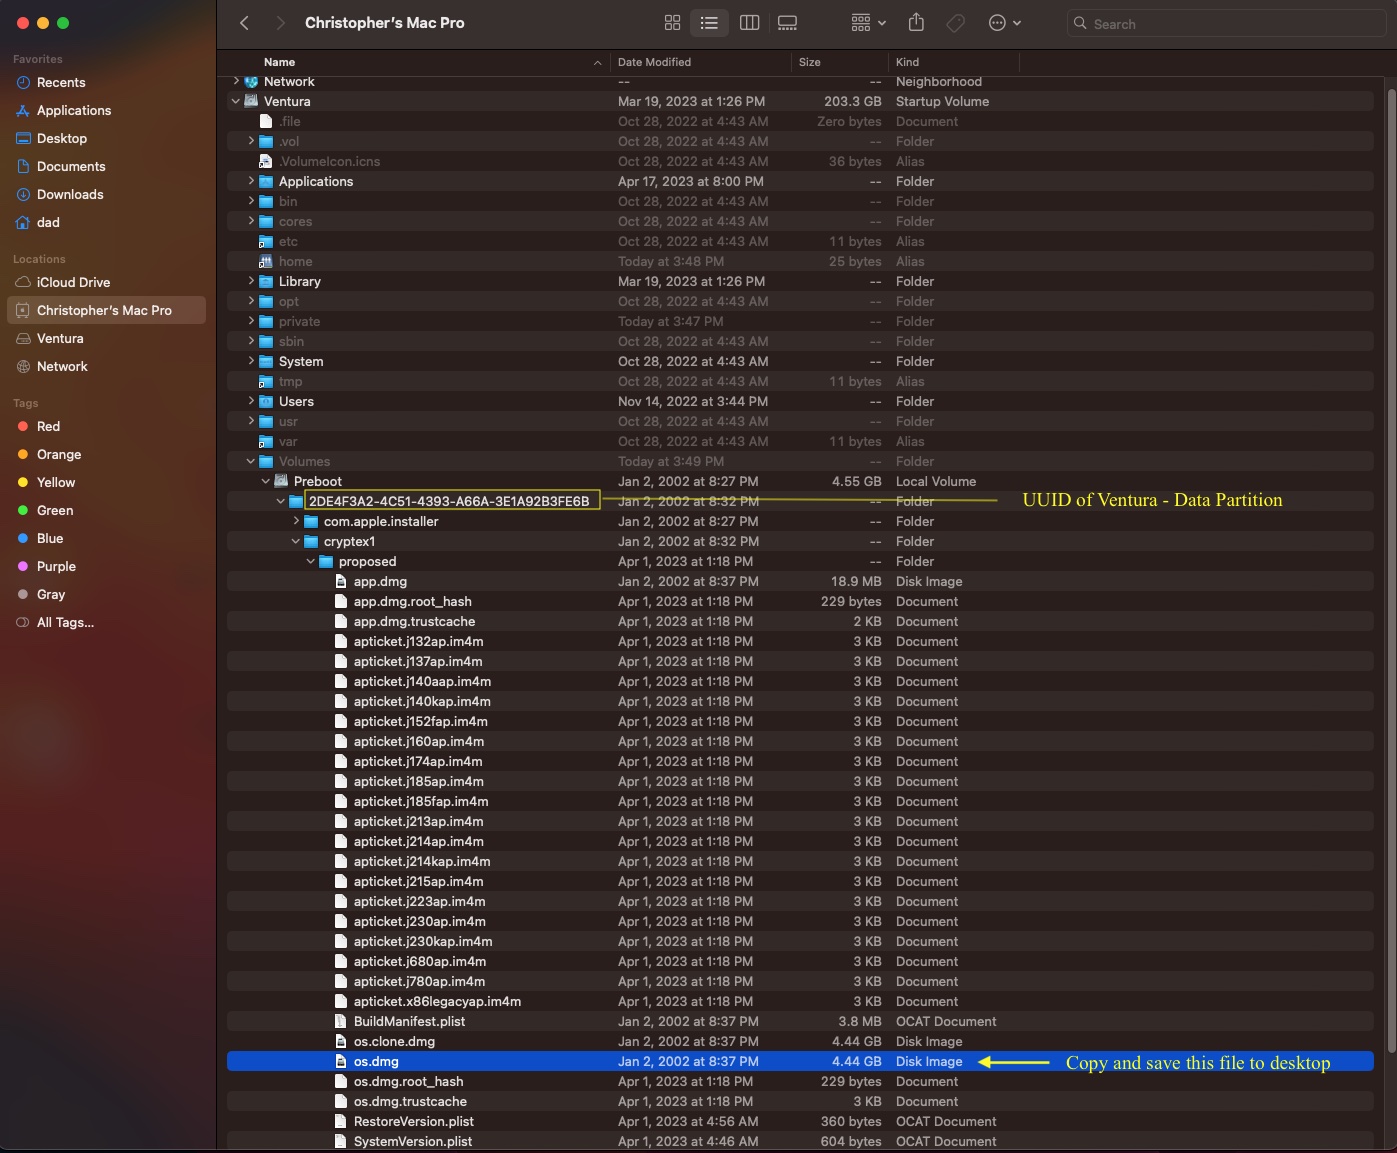
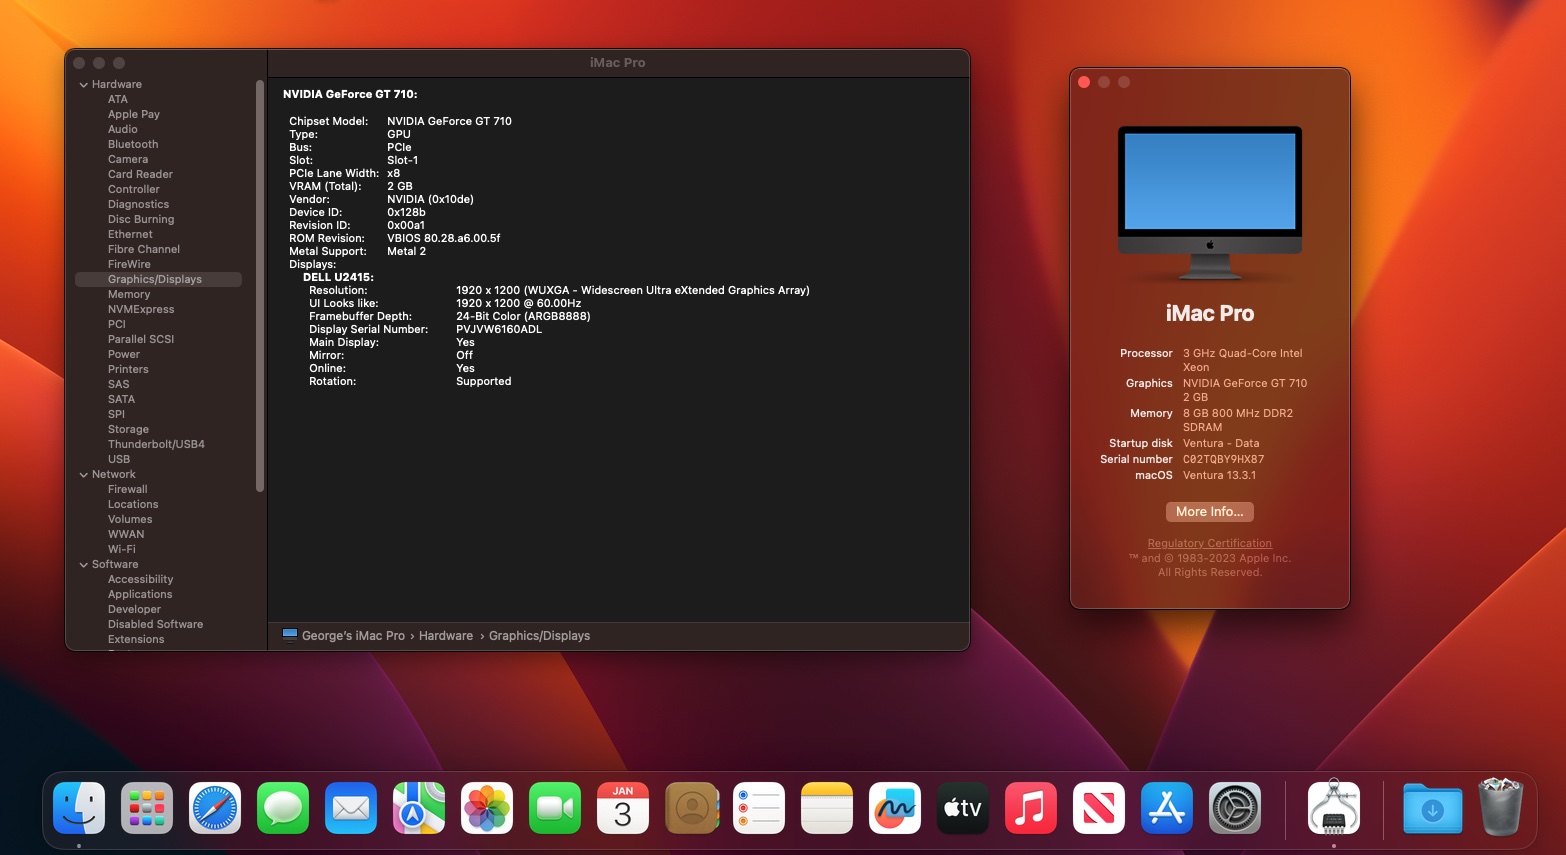
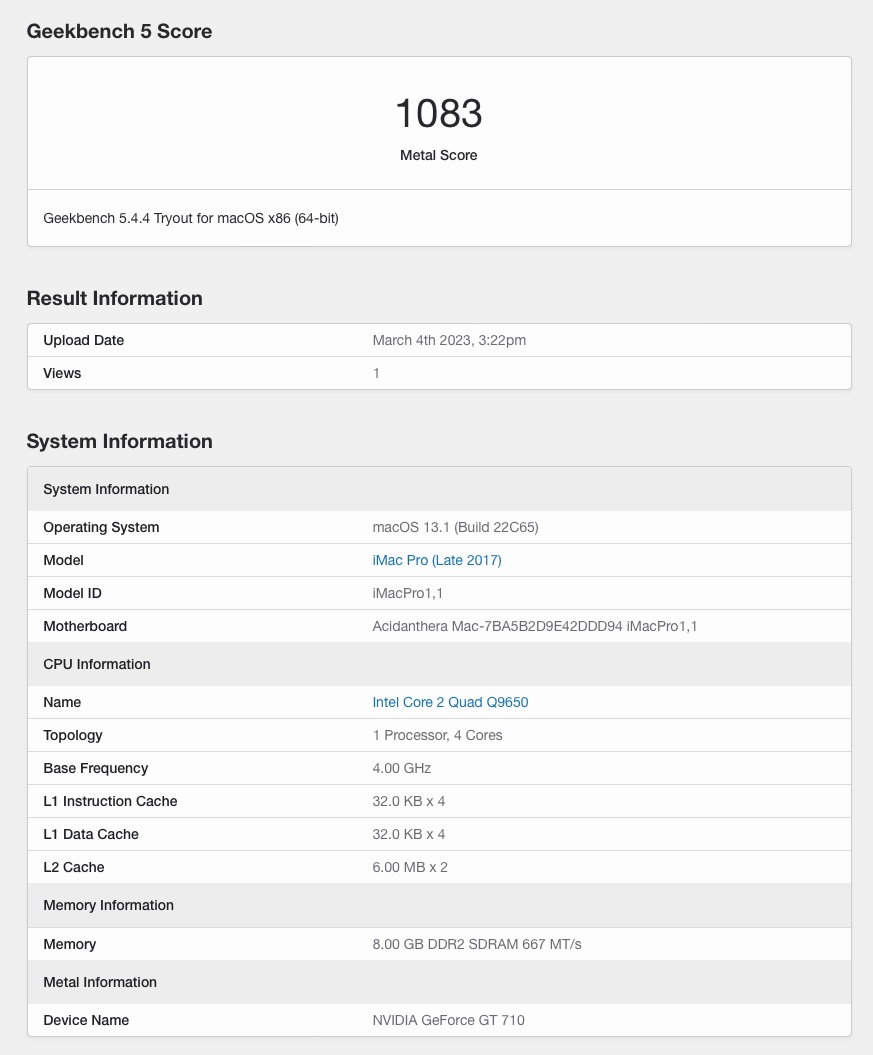
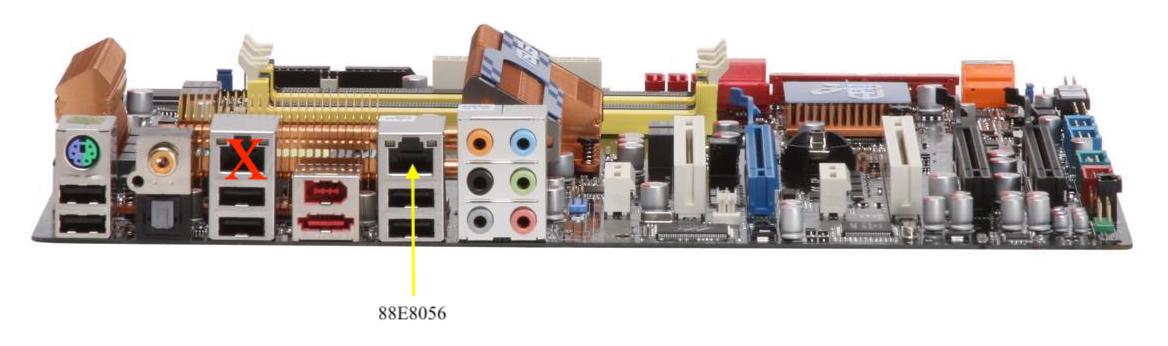
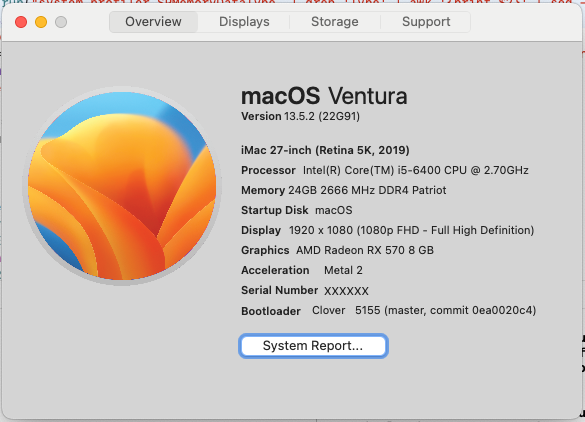
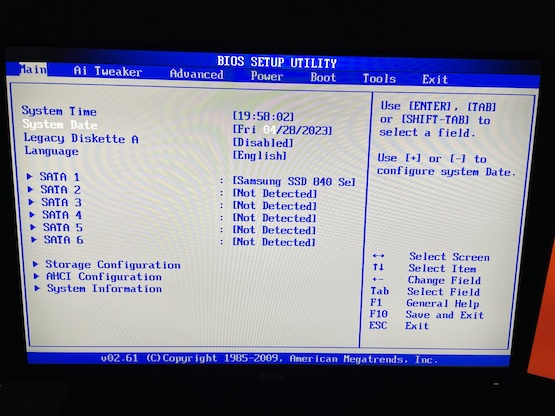
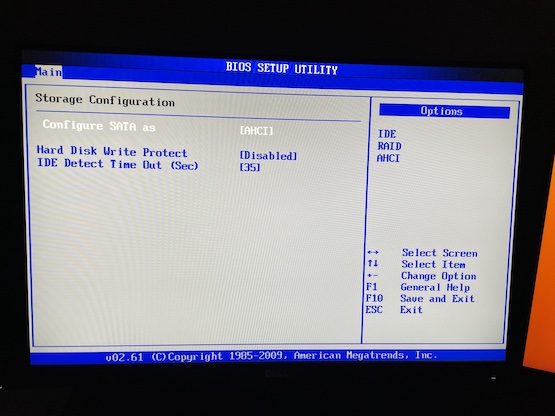
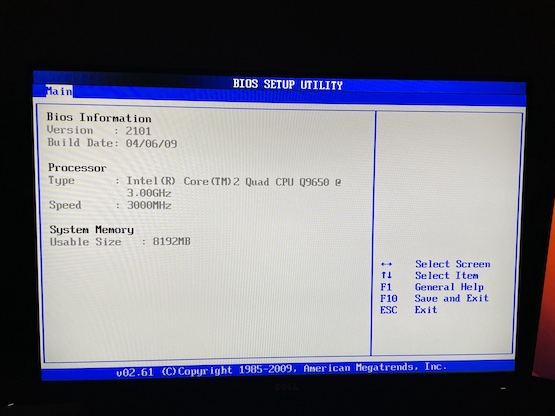
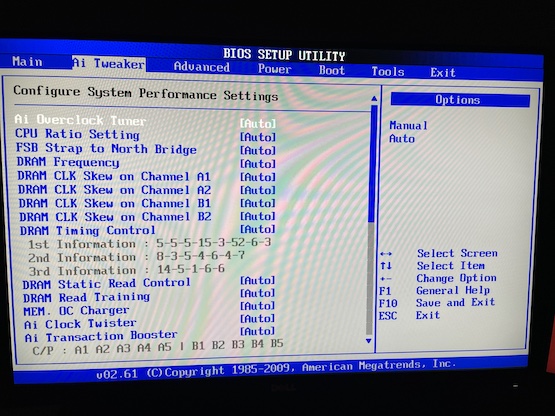
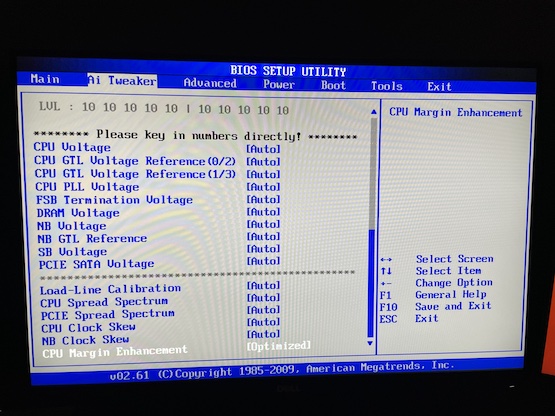
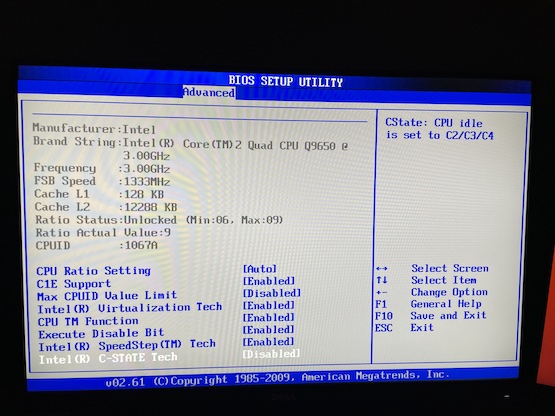
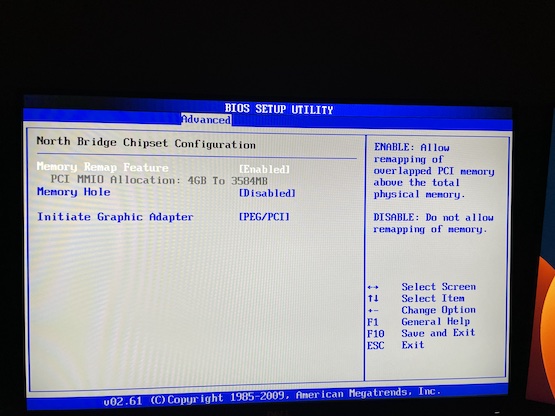
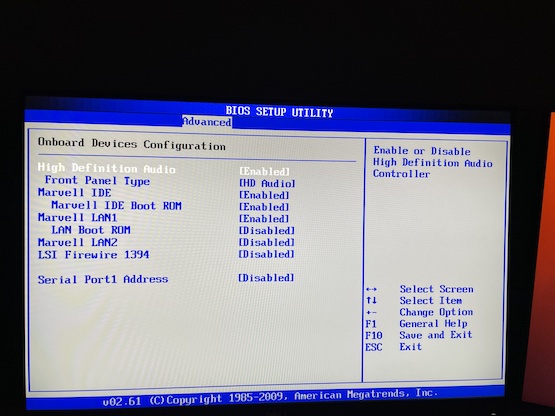
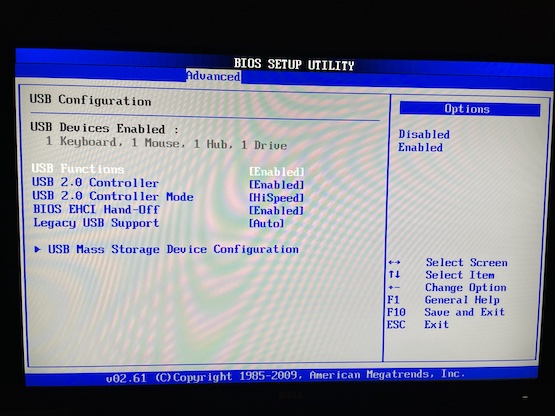
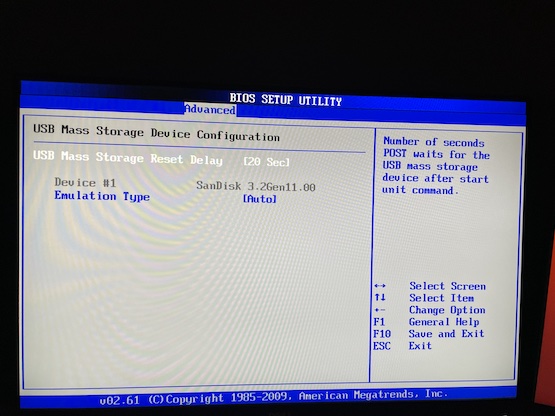
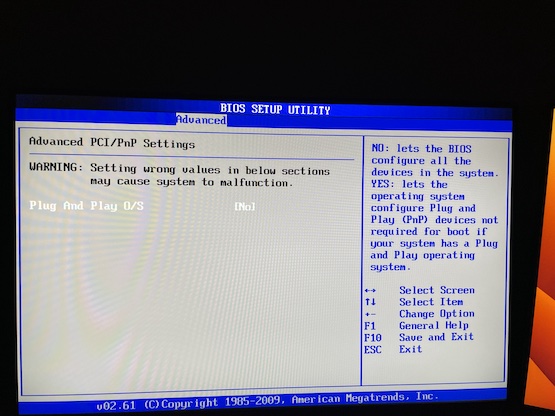
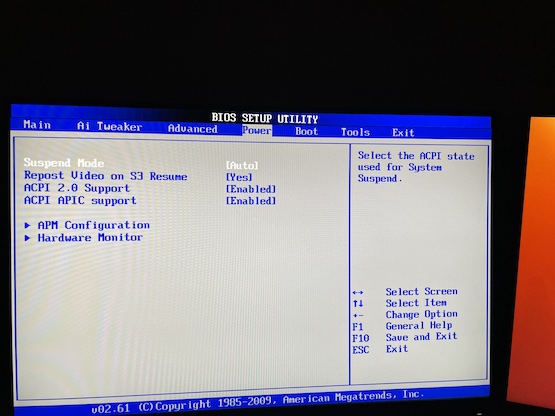
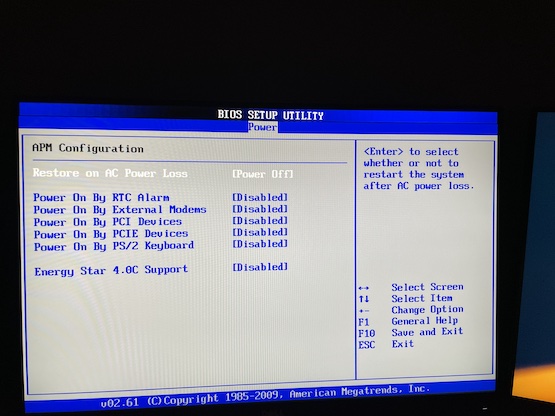
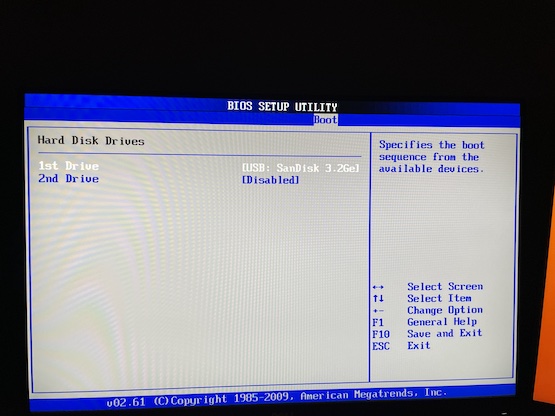
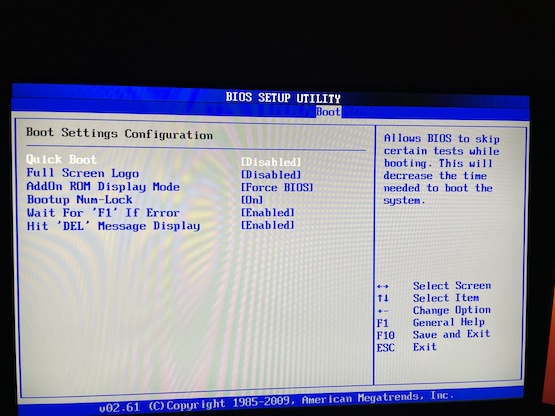
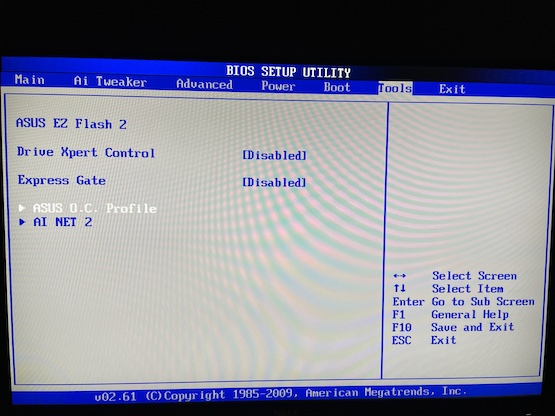
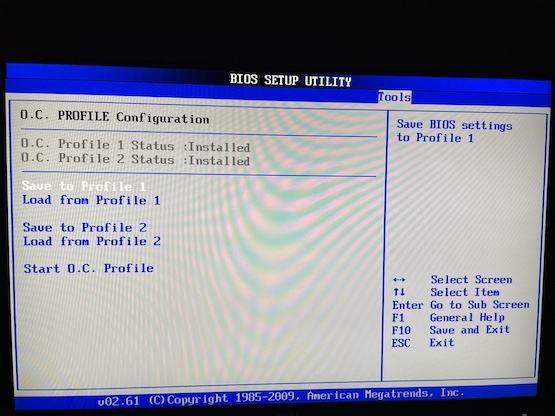
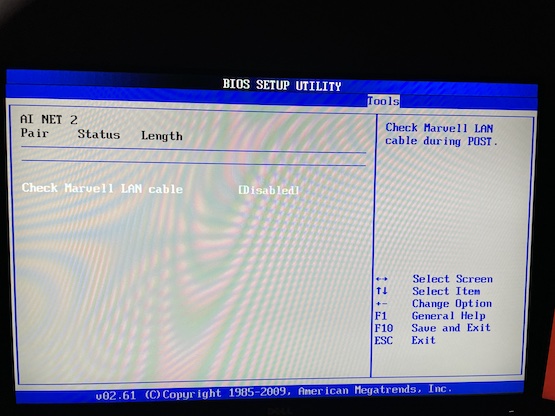
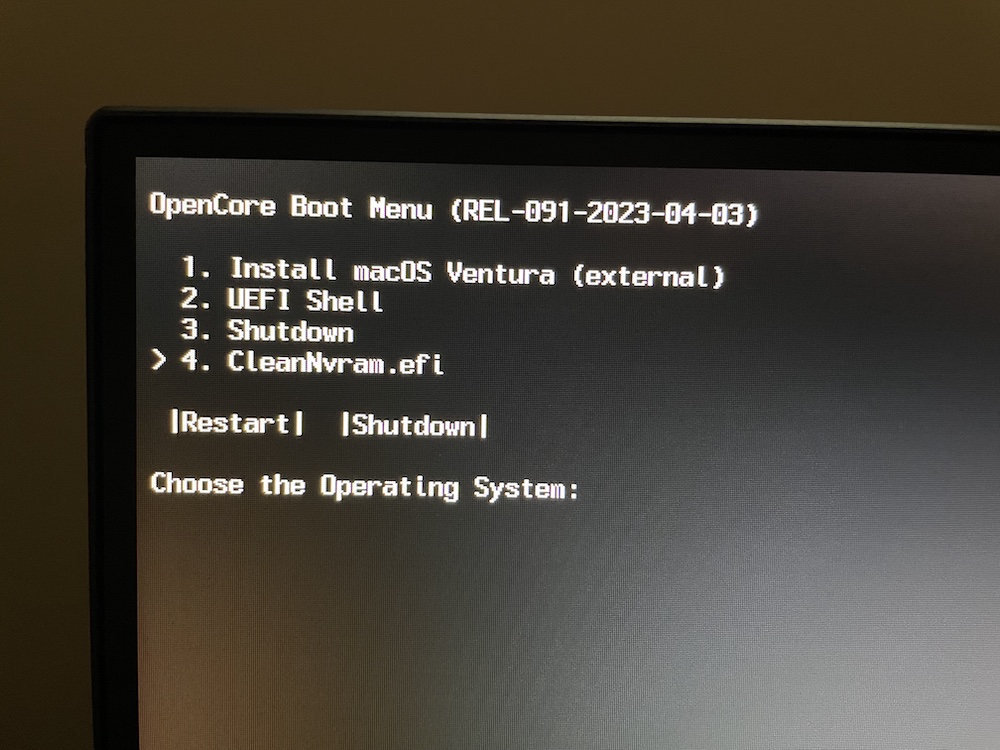
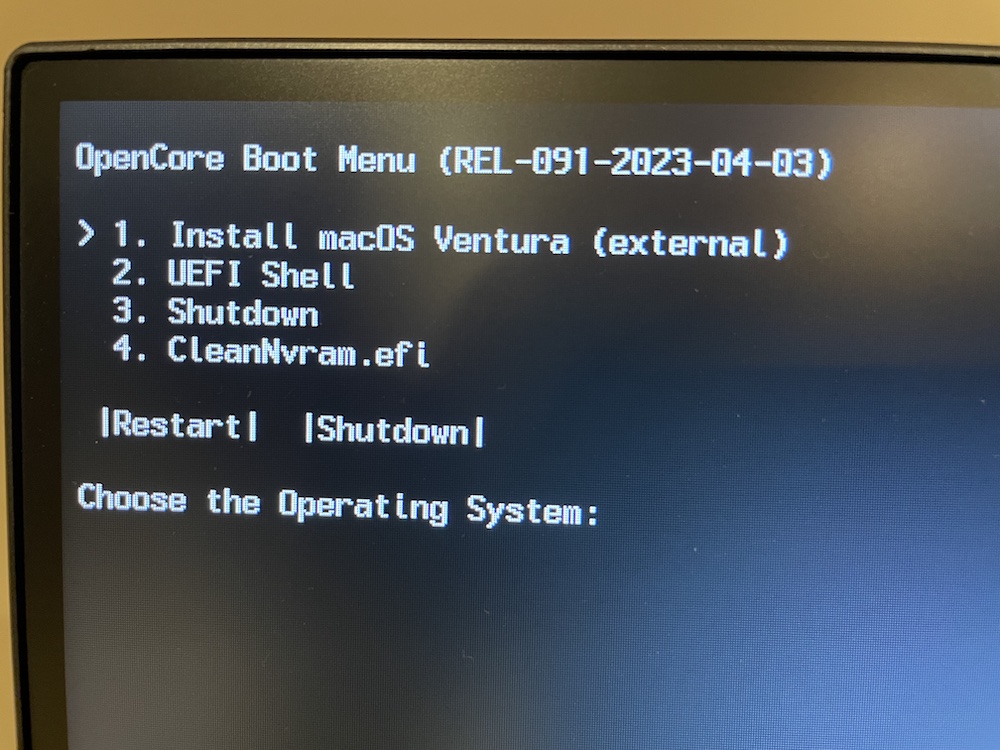
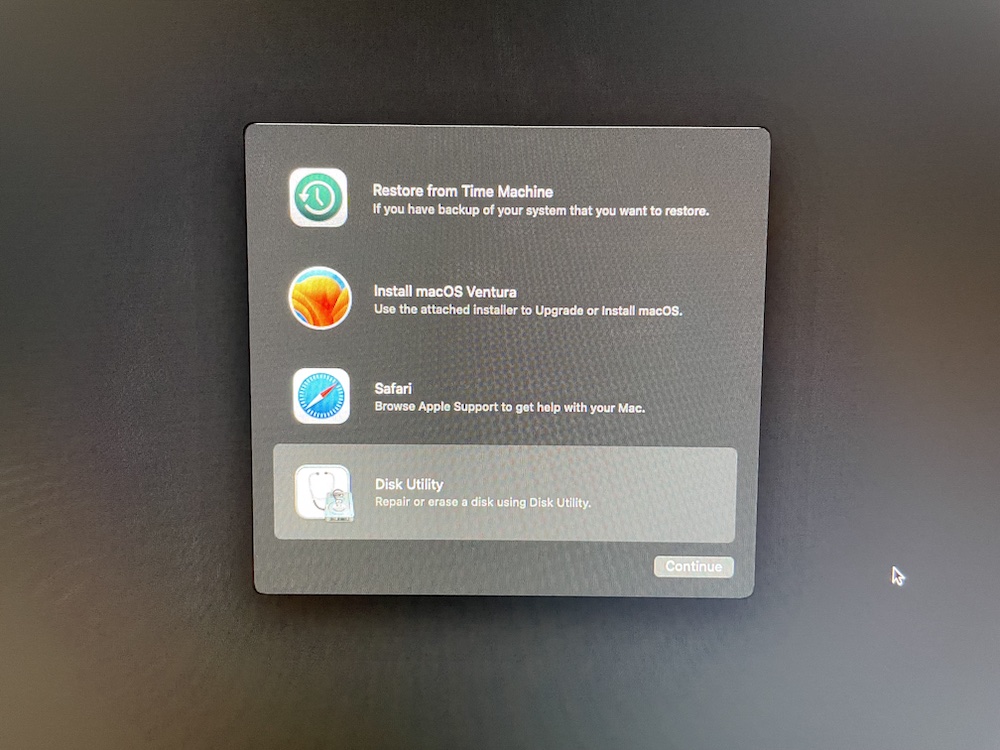
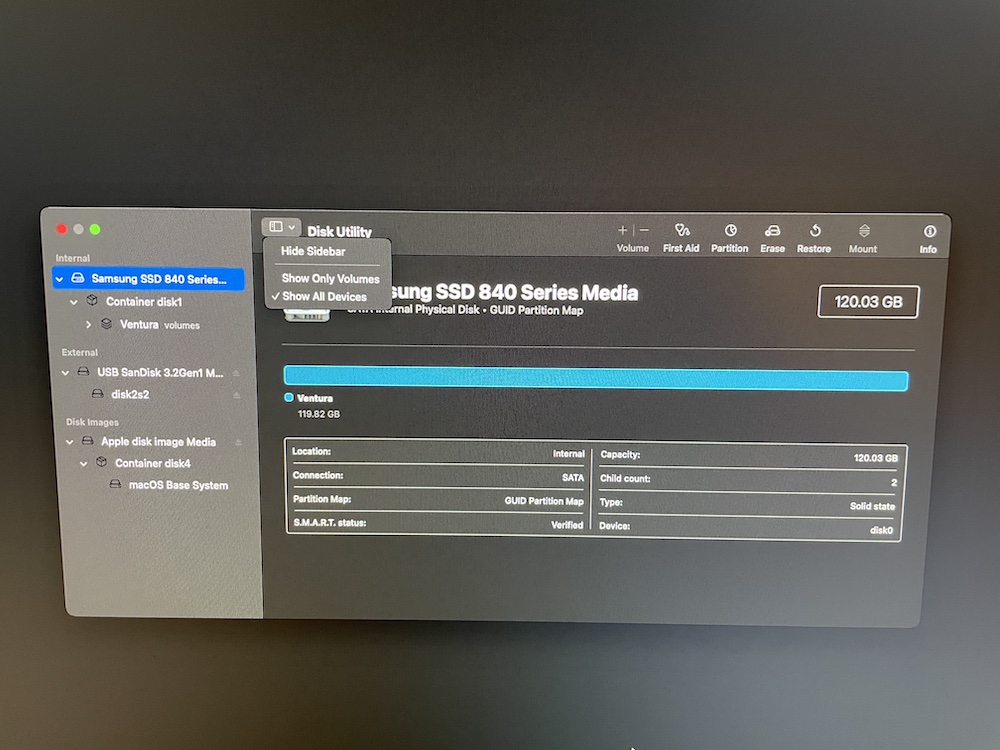
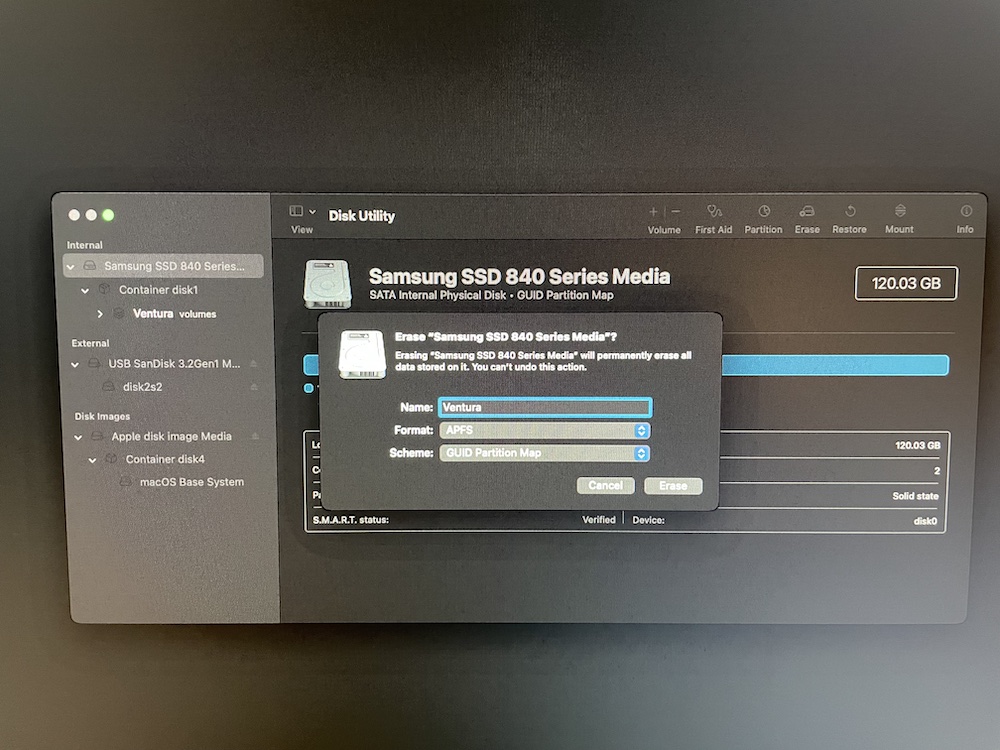
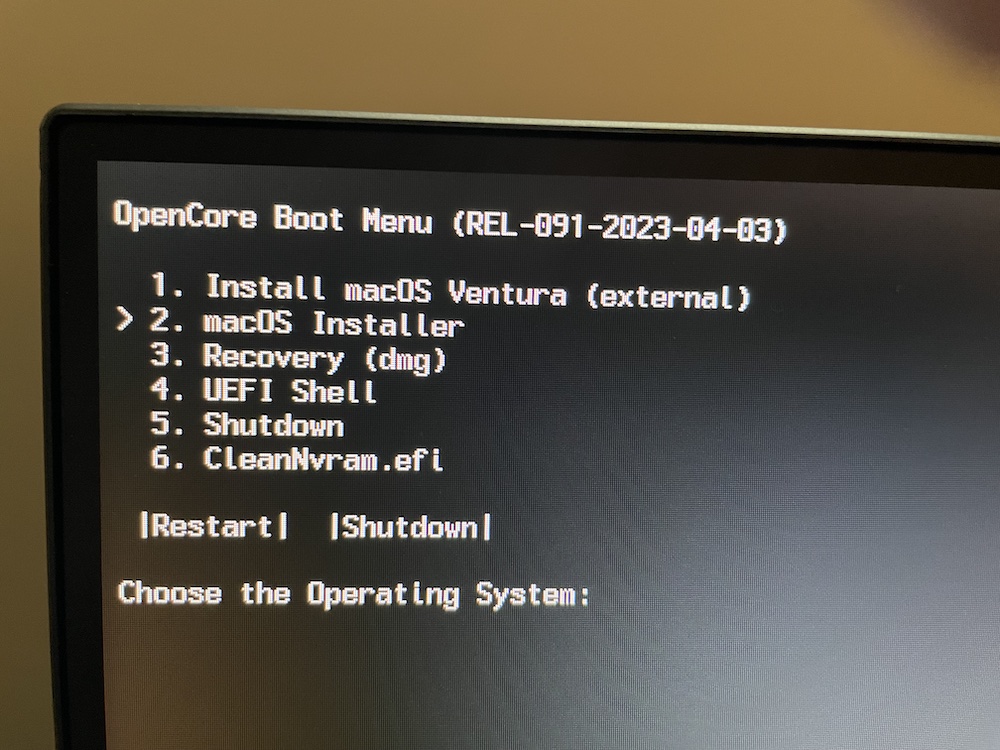
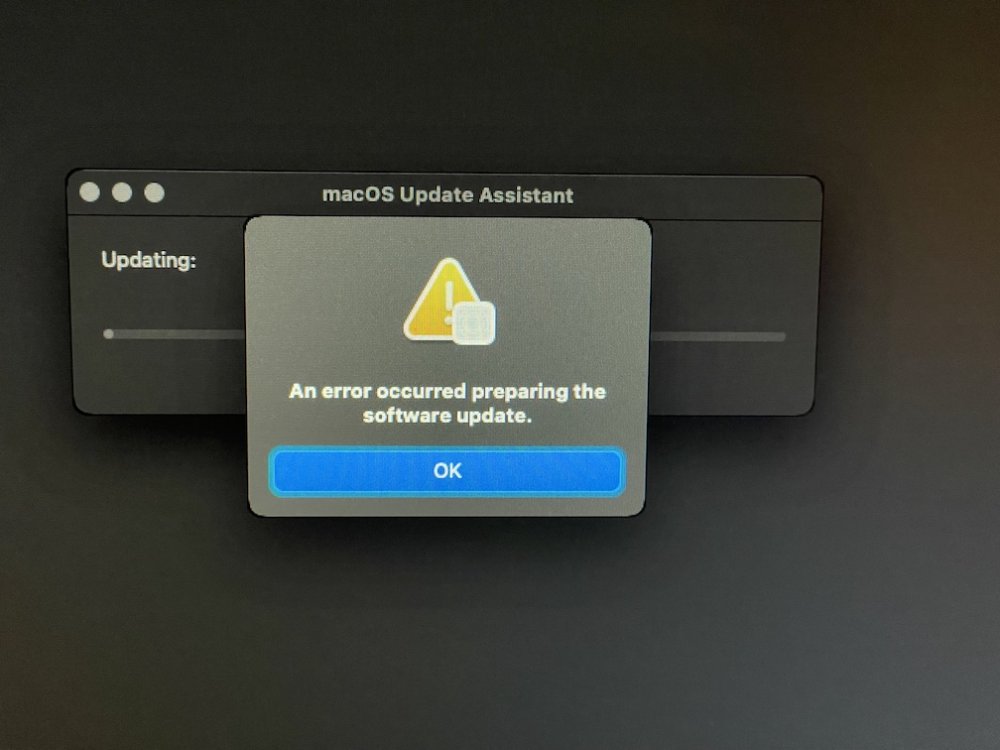
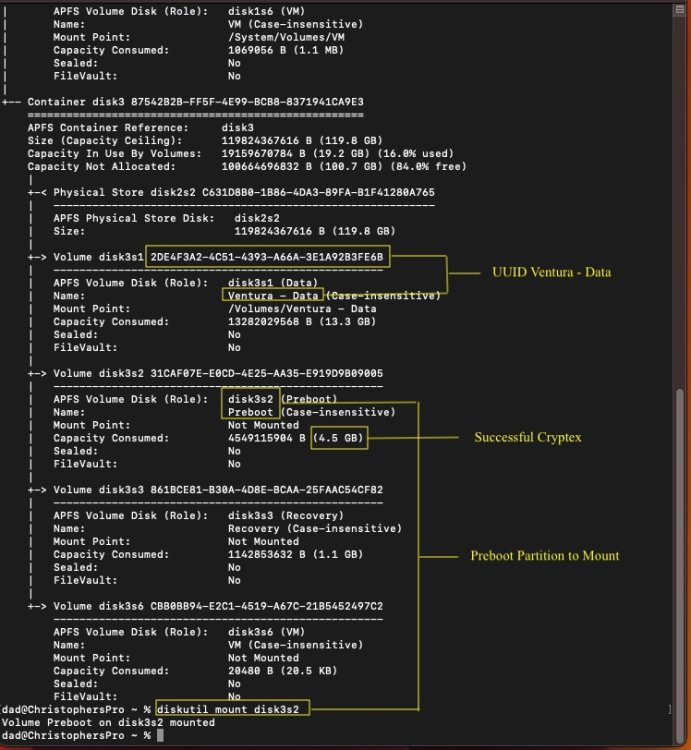
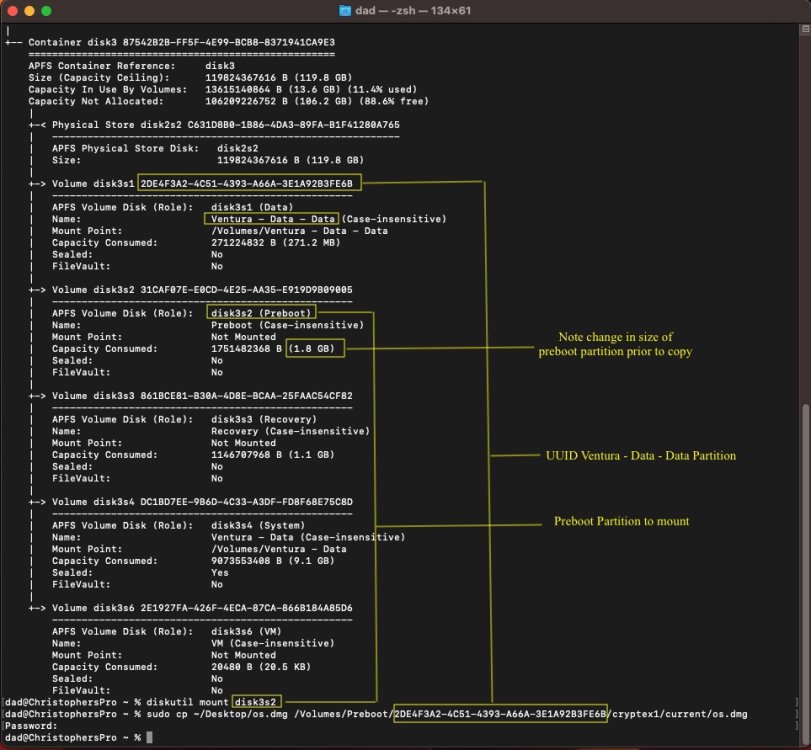
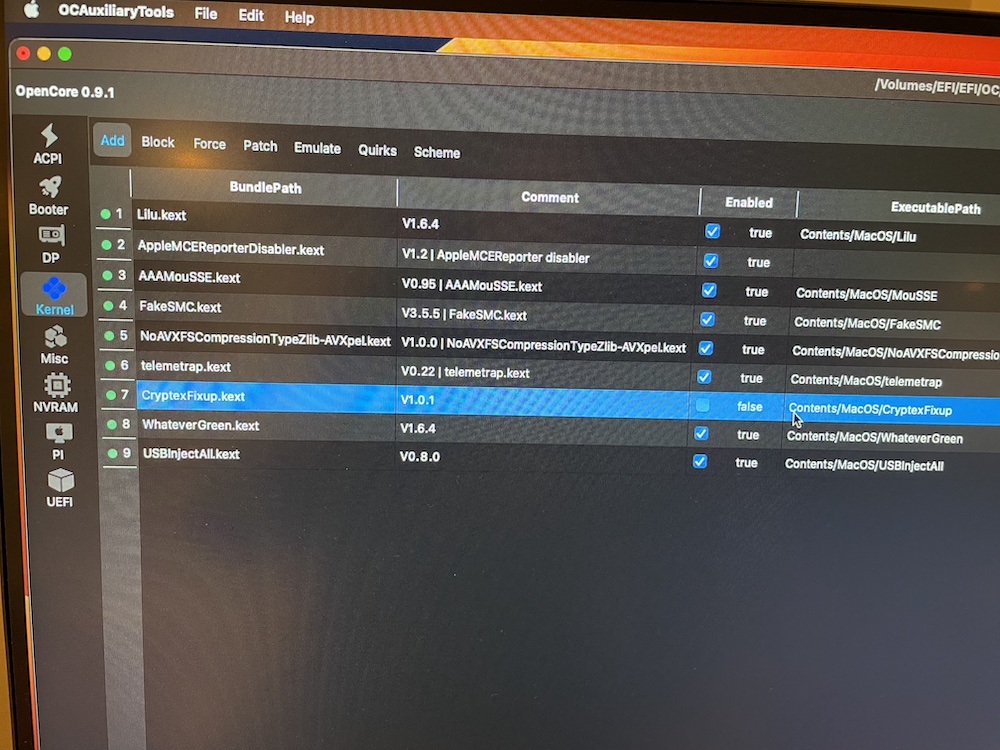
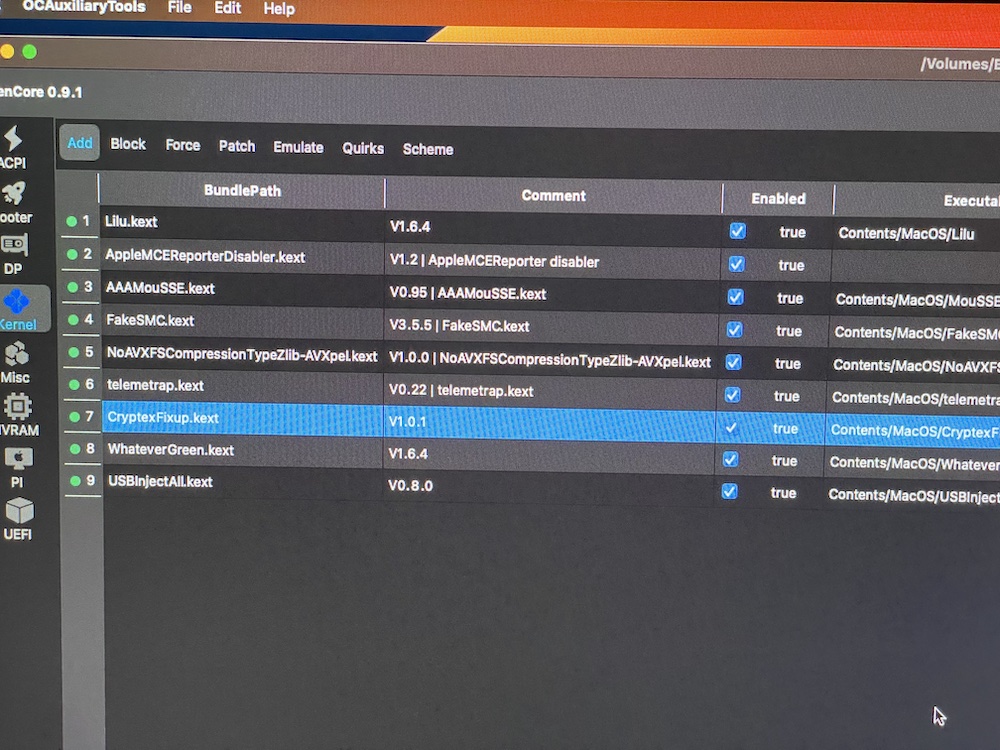
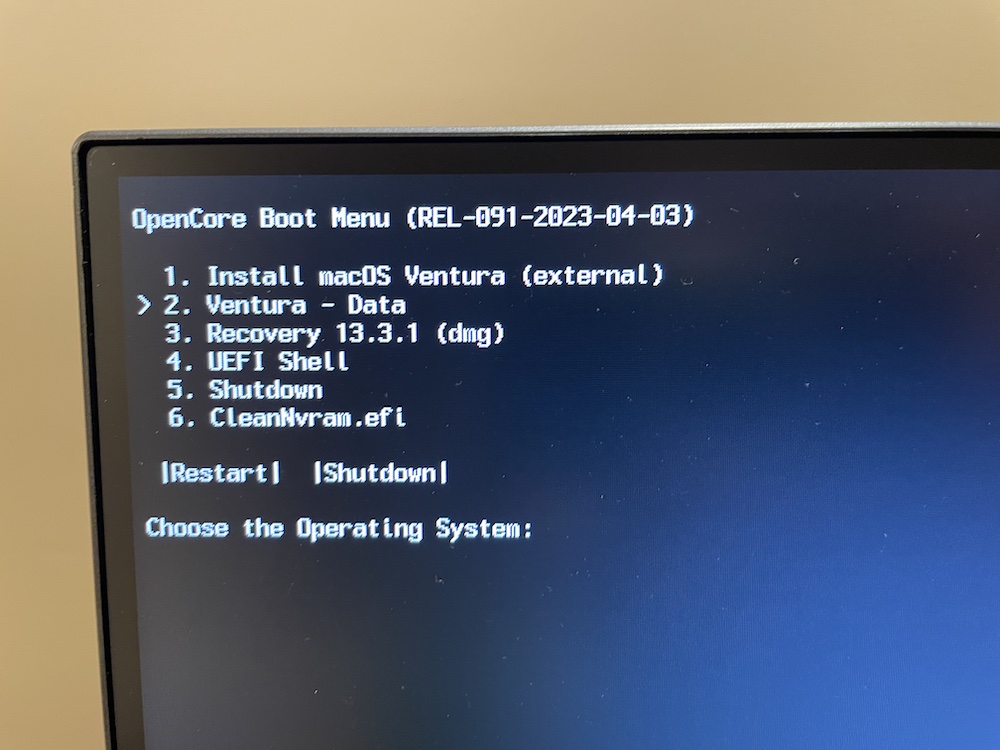
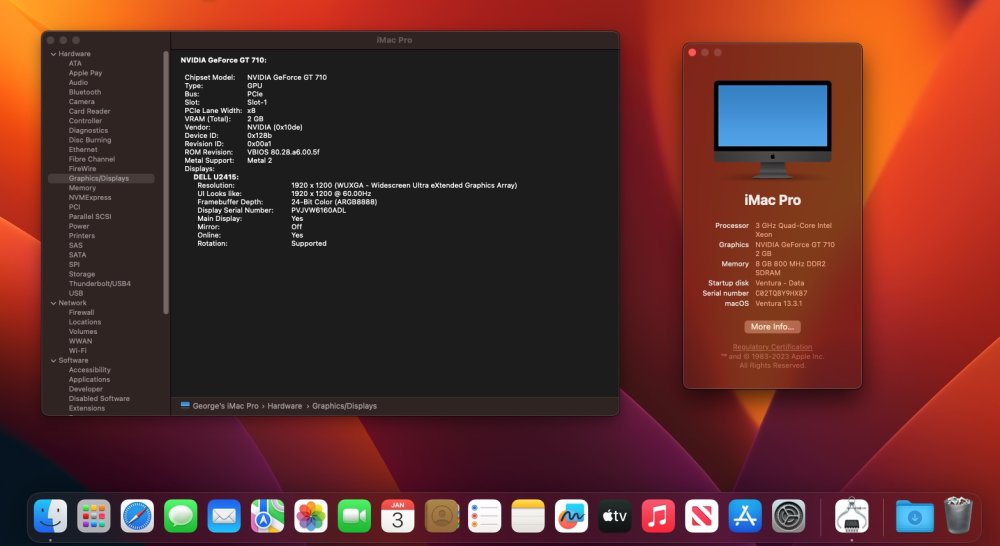
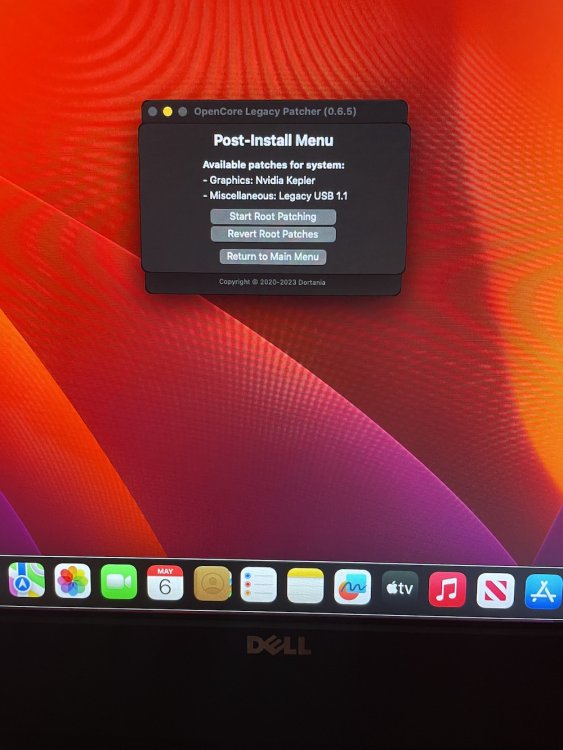
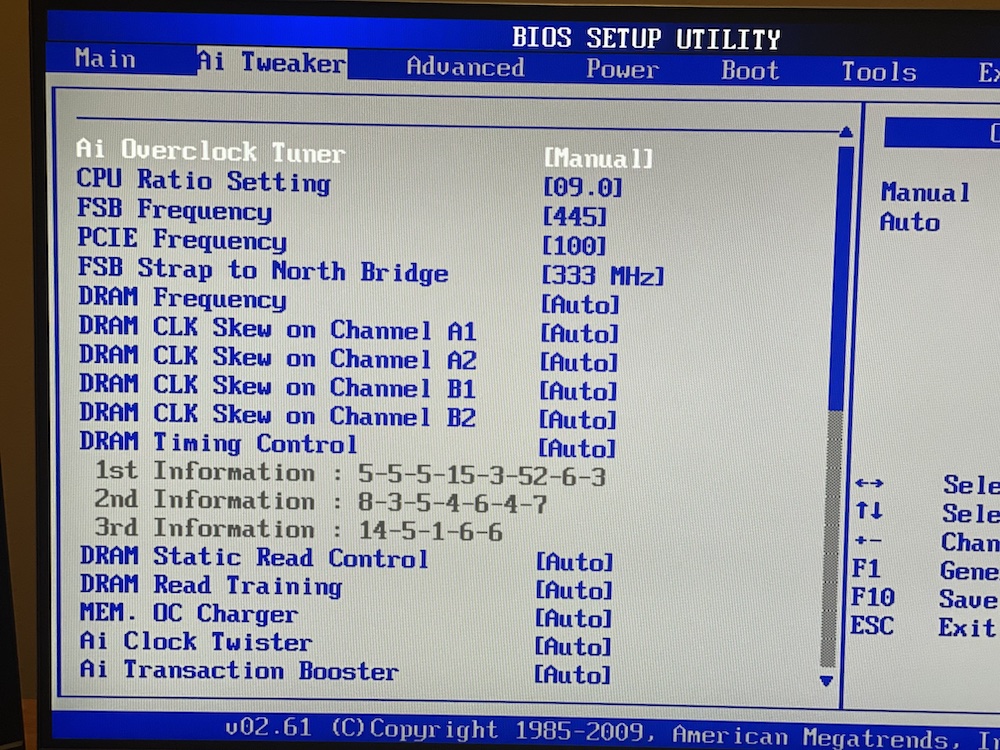
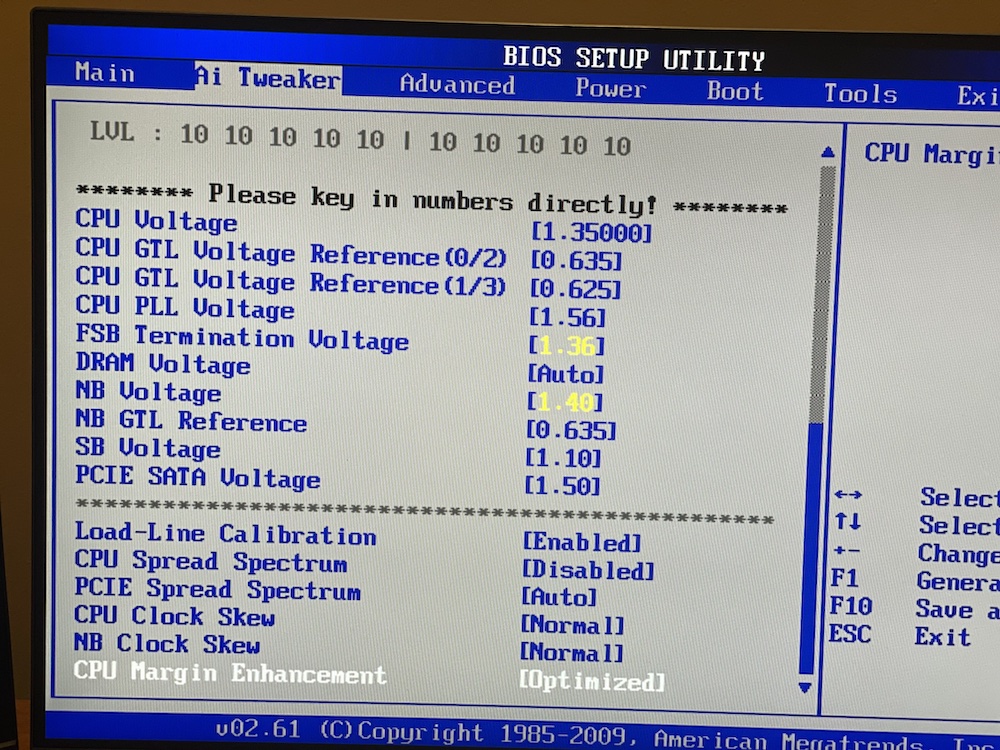
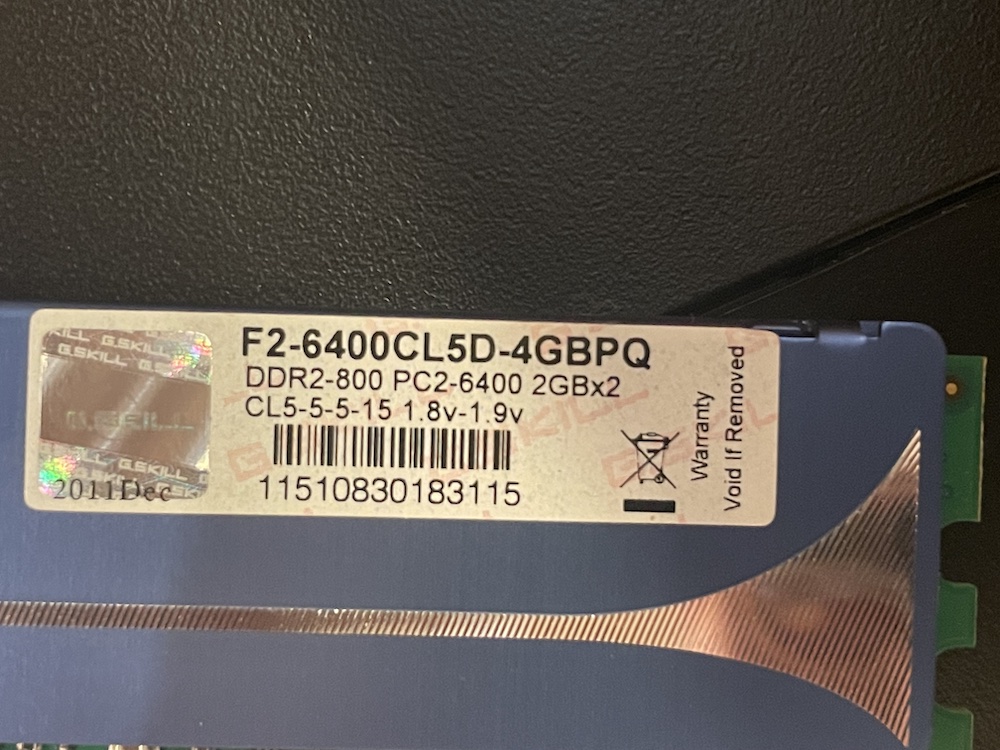
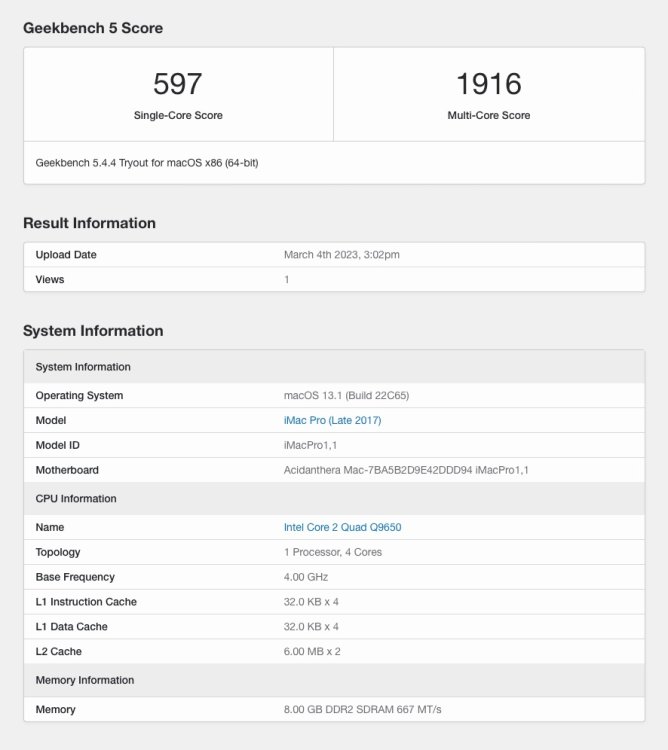
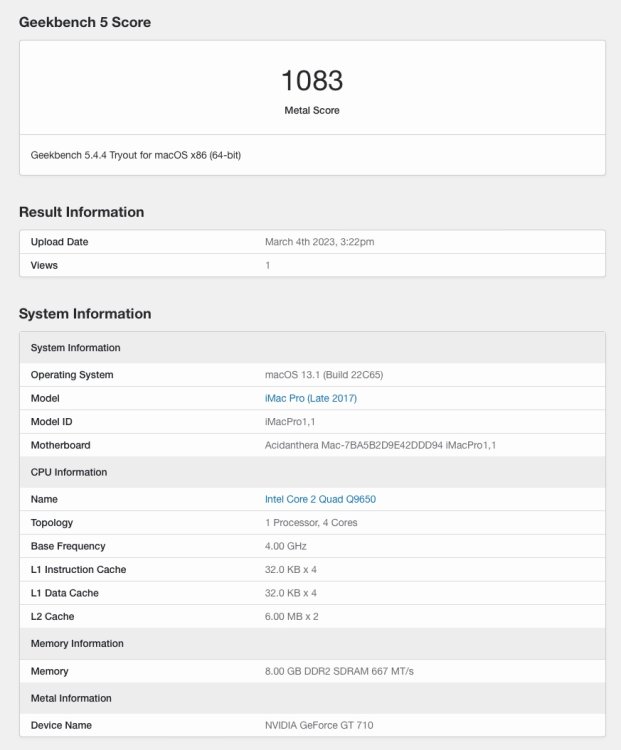
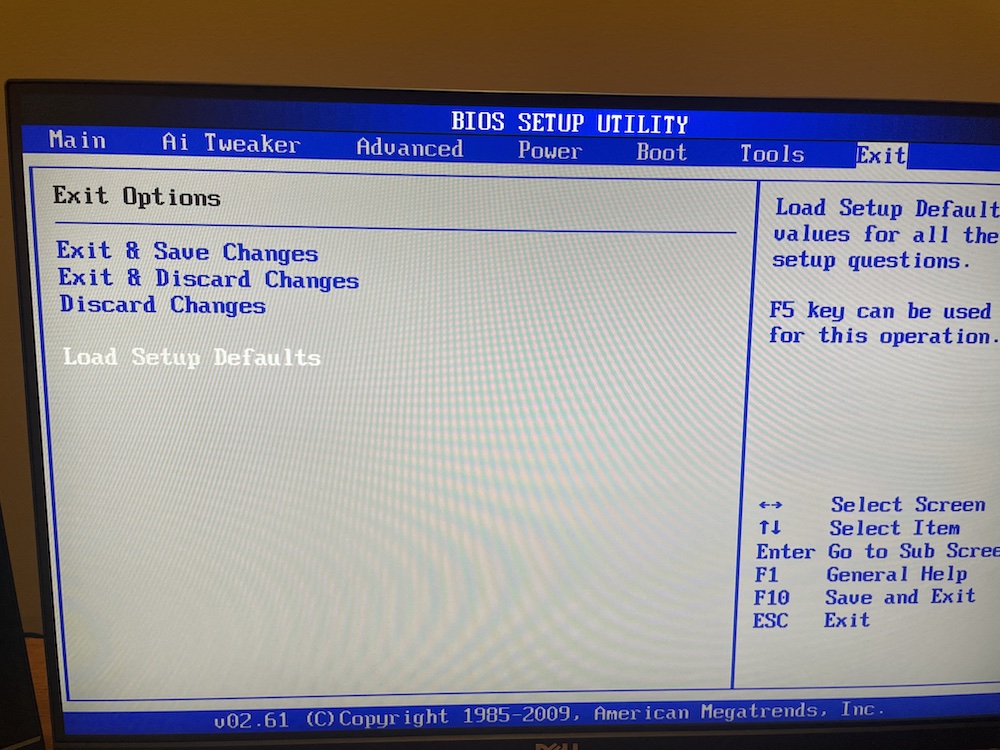
This is a legacy build which has been a favorite of mine for many years. The Asus P5Q-E was released in 2008. It is based on the the Intel P45 chipset and uses the LGA 775 socket. The Q9650 (also released in 2008) is a Penryn quad-core processor based on the Yorkfield architecture. I am using an MSI NVIDIA GeForce GT 710 graphics card which I have had for many years and has been kept alive thanks to the work of the OpenCore Legacy Patcher team. I have been installing macOS on this system for the past 10 years. Ventura will probably be the last. I initially accomplished running Monterey and Ventura on this system by performing the installation on a more modern system (Gigabyte Z490 Vision G / Intel i5-10600k) and then transferring the disk. This actually works quite well and is probably the easiest approach. This basically requires using the CryptexFixup kext with the -crypt_force_avx boot argument to force installation of the Rosetta Cryptex. This CPU lacks support for the AVX2.0 instruction set. I recently saw this post by @fusion71au describing a solution for the "Error preparing software update" that I had previously encountered while attempting to perform a clean installation. This motivated me to make another attempt on my system. This is a modification of his approach. Although many might find this a worthless exercise, I believe that there are still enough Intel Core 2 Duo/Quad enthusiasts out there that might find this useful or at least interesting. Let me state for the record that I am not a programmer or have any formal training on computer systems. I'm just a wannabe user sharing his experience. If any of my instructions, statements or descriptions sound novice or uninformed they probably are. Feel free to criticize and correct but, please be kind. For those who just want to get on with it, you can download my EFI files below: Install EFI download here Post-Install EFI download here Software Used 1. gibMacOS 1. OpenCore 0.9.1 2. OCAuxillaryTools as my Plist editor 3. OpenCore Legacy Patcher (OCLP) 0.6.5 First, let me start by saying that doing a clean install on a system this old is very tricky. The smallest of things will cause it to fail. I have done my best to include important details but I'm sure I've failed to mention something. I am happy to field questions but my technical knowledge is very shallow. Hardware Setup I strongly recommend the following: Disconnect all (and I mean ALL) unnecessary parts and devices including PCI-e boards, SATA and USB devices. The only PCI-e device which you should have installed is your graphics card, the only SATA device your install SSD and the only USB devices attached should be your keyboard/mouse (more on that below) and installation USB flash-drive. Use a USB Hub to connect your keyboard/mouse. Ventura no longer supports UHCI/OHCI USB 1.1 which is required on this board to support your USB mouse/keyboard. This is easily remedied by using a USB hub which forces the use of USB 2.0. I am using a Belkin F5U234 which is USB 2.0 hub. I have not tested a USB 3.0 hub, but I assume it should work as well. BIOS Setup I strongly suggest that you start by using the CMOS jumper to clear all BIOS and NVRAM settings. Turn off or disconnect the power supply, move the CMOS jumper, wait at least 30 seconds, return the jumper, then restore power to the board. This motherboard does have native NVRAM but it is not fully functional with respect to macOS. It does, however, store many OpenCore and system settings and needs to be cleared. I have also discovered that using OpenCore's CleanNVRAM utility alone is not sufficient, at least during installation. Powering up after clearing the CMOS will force you to press [F1] to enter the BIOS. Start by going to [EXIT] and selecting [Load Setup Defaults]. Then select [Exit and Save Changes]. On restart, re-enter the BIOS by pressing the DELETE key. Enter the following changes in the BIOS settings: Main > Legacy Diskette A > [Disabled] (macOS does not support Floppy disks) Main > Storage Configuration > Configure SATA as > [AHCI] (recommended for SSD) Advanced > CPU Configuration > Intel C-STATE Tech > [Disabled] (Critical!!) Onboard Devices Configuration > Marvell LAN2 > [Disabled] (Unable to enable this LAN) Onboard Devices Configuration > LSI Firewire > [Disabled] (probably optional but I don’t need) Onboard Devices Configuration > Serial Port1 Address > [Disabled] (generally recommended during installation unless using to debug) Power > Repost Video on S3 Resume > [Yes] (Can’t remember why I enabled this) Power > ACPI 2.0 Support > [Enabled] (Useful for making SSDT’s) Boot > Boot Device Priority > 1st Boot Device > [USB: Your Installation Flash-Drive] Boot > Hard Disk Drives > 1st Drive > [USB: Your Installation Flash-Drive] Boot > Boot Settings Configuration > Quick Boot [Disabled] (Critical!!) Boot > Boot Settings Configuration > Full Screen Logo > [Disabled] (Optional) Tools > Drive Xpert Control > [Disabled] (Optional) Tools > Express Gate > [Disabled] (Optional but no-one uses) Screen shots of my BIOS are below: After entering the above BIOS settings, save them under [Tools] > [Asus O.C Profile] > [Save to Profile 1 or Profile2] A few notes on the BIOS settings: It is very important that you [Disable] Intel C-State Tech as OpenCore (unlike Clover) is unable to adjust for Intel's C/ P states. For the purist out there, there is a work-around described in this post. I did not feel that enabling this feature was all that important, particularly since this is really just a "for play" build. You really do need to [Disable] [Quick Boot]. For a long time I was unconvinced that this really mattered but it does. I also found it very convenient to insert the USB flash-drive that you will be using for the installation while changing your BIOS settings and select it as the primary boot device. Your saved settings will remember your USB flash-drive as the primary boot device obviating the need to manually enter into the boot menu which is F8 on this board. Every time you need to start this installation over, I recommend you go through the following process: turning off the power supply, clearing the CMOS using the jumper, turning on the power supply, re-enter the BIOS and loading your saved BIOS settings. Creating the USB Flash-Drive Install Disk I used gibMacOS to download the most recent version of Ventura which, as of this writing, is 13.3.1. Your USB flash-drive should be at least 16 GB. I am using a Sandisk Ultra 32 GB. I detailed tutorial of using gibMacOS to download and create the Install USB is nicely described in this tutorial. After completion, your USB flash-drive will be renamed Install macOS Ventura After completing the above, you need to open the EFI partition of your USB flash-drive and copy the Install EFI file and rename it to EFI. You also need to install the OpenCore DuetPkg to your EFI partition as described here (Scroll down this page and open the Spoiler labeled “Setting up Legacy Boot”). Your USB install flash-drive will not boot without the DuetPkg installed as this is not a UEFI board. Notes about My OpenCore Settings: I am using SMBIOS iMacPro 1,1 both during installation and post-installation. Although the hardware of this system most closely resembles iMac 10,1, this SMBIOS appears to work quite well and is still supported by Ventura. The Q9650 is recognized as a Xenon processor and is actually closely related to the Xenon X3360. 2. I have included serial numbers which are the same for both installation and post-installation files. I’m not using them but you will probably want to change. 3. The following boot arguments are used: -no_compat_check - despite the fact that SMBIOS iMacPro 1,1 is compatible with Ventura, this boot argument was critically important during installation. However, its was not necessary post-installation and thus is omitted from my post-installation file. amfi_get_out_of_my_way=0x1 - necessary to allow OCLP to install graphics acceleration patches. Seems to also be necessary on post-installation. Note that the correct value for Ventura is “0x1” not “1”. -amd_no_dgpu_accel - necessary to disable graphics acceleration and avoid panic until OCLP can be applied. This is removed on post-installation. keepsyms=1 - I really don’t understand this one. Based on my reading, I thought this was only necessary for debugging but this installation fails without it. Maybe someone can explain it to me. Removed on post-installation. alcid=7 - used to enable on-board audio. Only included on post-installation. 4. Kexts used: AAAMouSSE.kext - provides SSE4.2 instruction set emulation which this CPU lacks. Critical! System not will not load without it. AppleALC.kext - used with alcid=7 AppleMCEReporterDisabler.kext - Critical! Will panic on boot without it FakeSMC.kext - preferred over VirtualSMC for legacy systems. Also provides for better monitoring. Lilu.kext - Routine AppleYukon2_88E8056.kext - Enables on-board Marvell ethernet controller. This kext was created by me with the help of @Slice NoAVXFSCompressionTypeZlib-AVXpel.kext - critical! Disabling causes immediate panic on boot telemetrap.kext - Critical to boot! USBInjectAll.kext - Only used for install. Ports mapped post install USBMapLegacy.kext - Port mapping created by USBMap and used post-install WhateverGreen.kext - Not really sure this is needed as OCLP seems to take care of graphics support for the GT 710. Including it doesn’t seem to create any conflicts IntelCPUMonitor.kext - Use with HWMonitorSMC GeForceSensor.kext - Use with HWMonitorSMC 5. ACPI Files: SSDT-EC - Disables native embedded controller SSDT-XPTS - Fixes shut-down SSDT-HPET - Patches out legacy IRQ’s 0, 2 and 8 The Installation After you have created and saved your BIOS settings, I suggest that you start over by turning off your power supply and again clearing the CMOS using the jumper. At this point, make sure to attach your SSD. I used a Samsung 840 PRO 128 GB attached to SATA1. Insert your installation USB flash-drive directly into a back panel USB port of the motherboard. Do not use a USB hub. Turn the power supply back on, select F1 to enter the BIOS and then load your saved BIOS settings under [Asus O.C. Profile]. Enter [Exit and Save Changes] which will cause reboot. From this point, the installation should take place without powering off your computer. Your computer will shutdown several times, but do NOT disconnect or turn off the power supply. Doing so during the installation seems to change saved settings and will produce a different outcome. After restart, you should boot into the OpenCore menu if you have selected your installation USB flash-drive as the primary boot device in your BIOS settings. Alternatively, you can select F8 during post. You will be greeted with OpenCore's spartan menu sans OpenCanopy as per the Dortania guide recommendations. I suggest initially selecting option [CleanNvram.efi]. Although clearing the CMOS with the jumper (performed above) should have also cleaned the NVRAM, I do it again just to make sure. You will then need to reboot by selecting option [Restart]. After re-booting and again being presented with the OpenCore menu, select option [1. Install macOS Ventura (external)] This will bring up the Apple's install/recovery menu. Start by selecting [Disk Utility] to erase and format your SSD. Note, make sure to select the dropdown under the [View] button and select [Show all Devices] so that you erase and format the entire disk and not just a container. After closing out Disk Utility, select [Install macOS Ventura]. This will walk through the usual "agreement menu" and eventually to the target disk menu where you select your SSD. Stage 1 installation will then begin. If everything goes well, installation occurs over 5 stages with 4 reboots. Getting through the first stage should be uneventful. After completion of Stage 1, system will auto-reboot into the OpenCore menu. Select [2. macOS Installer] to begin Stage 2. Getting through Stage 2 is the most difficult part of this installation. The culprit is the CryptexFixup.kext that produces “An error occurred preparing the software update" : I have performed this installation over 50x and have had a few occasions where I have managed to get through Stage 2 without producing this error. Unfortunately, I have been unable to identify conditions where I can faithfully reproduce this result. If you are successful in getting through Stage 2, then the rest of this installation will likely complete without incident. You can skip directly to Step 7 below. If you encounter this error during your first attempt, I suggest that you try repeating the installation several times before moving on to Plan B: 6. PLAN B: The good news is that all may not be lost if you encounter the above error during stage 2. As described by @fusion71au in this post, the installation may be salvageable as long as the dyld cache file (os.dmg) has been written to the pre-boot partition. Unlike his experience, however, I did not find it necessary to identify and add msg-product-url. This might have something to do with the fact that this motherboard does have some form of native NVRAM. I am unable to confirm this, however, as performing a dump of all NVRAM values after Stage 1 using dmpstore does not seem to identify msg-product-url as a stored value. Regardless, identification and manual installation of msg-product-url did not appear to affect the success or failure of the installation in my experience using this board. What was successful, however, is copying the dyld cache file os.dmg from the SSD preboot partition, re-running stage 2 and 3 with CryptexFixup disabled, then copying back the os.dmg file to the pre-boot partition of the SSD and re-enabling CryptexFixup for stages 4 and 5. @fusion71au gets full credit for describing this technique. The one thing I did differently was, rather than re-booting into an older macOS within the same system, I disconnected my installation SSD and USB install flash-drive and attached it directly to a 2nd working hackintosh . I did this because I did not want to change or delete any stored NVRAM values by booting into another macOS version. I also saved the os.dmg file to my desktop rather than my USB flash-drive in the interest of transfer speed. I have repeated this installation numerous times and needed a quicker work-flow. Re-running the second stage with CryptexFixup disabled was 100% successful in getting through Stage 2 in my experience. Here is my description of that process: After encountering the above error, do a controlled shutdown by exiting out of the error message and selecting [Shut Down] from the Apple menu (top left). This EFI contains an SSDT that fixes shutdown. Disconnect both the installation SSD and USB flash-drive and attach them to a second mac or hackintosh. Do not turn off the power supply to the Asus P5Q-E board. I then attached the install SSD directly to a SATA port on my Gigabyte Z490 Vision G system also running Ventura. Using a USB to SATA adapter or enclosure also works but is slower. You now need to identify the pre-boot partition of your install SSD. Open terminal and enter: diskutil apfs list Look for a pre-boot volume that is greater than 4 GB. This confirms that CryptexFixup has extracted the necessary non-AVX 2.0 shared dyld cache. If the pre-boot volume is about 1.8 GB then the necessary cache files were not extracted and this installation as described will not be successful. If this occurs, again all is not lost as you can obtain the necessary cache file using the method described in this post. I should state that I do not have any experience with this. Mount the target pre-boot partition using the following terminal command: diskutil mount <preboot diskXsY> Now make note of the UUID associated with the Ventura - Data partition. Example in the spoiler below: Using finder, go to folder /Volumes/Preboot/<UUID Ventura -Data Partition>/cryptex1/proposed where you will find the necessary os.dmg file. Simply right-click copy and paste to your desktop Mount the EFI partition of your USB Install flash-drive and open the config.plist file using your plist editor. I am using OCAuxillaryTools. Disable the CryptexFixup kext, save, close and eject. Also eject your install SSD. Re-connect your SSD and USB flash-drive to your Asus P5Q-E system and reboot into the USB flash-drive OpenCore menu. Again select [2. macOS Installer]. Stage 2 will be attempted again. Because CryptexFixup is now disabled, this will cause the pre-boot partition to be over-written, deleting the os.dmg file that we need. This is why it was saved to our desktop. If everything goes as planned, Stage 2-repeat should complete successfully then auto reboot. After the OpenCore menu loads, again select [2. macOS Installer] from the OpenCore menu to begin Stage 3. Allow Stage 3 to complete and auto-reboot back into your OpenCore menu. This time select [Shutdown]. After shutdown is complete, again disconnect both your SSD and USB flash-drive (WITHOUT turning off your power supply) and reconnect to your second mac/hack. We are now going to transfer back the os.dmg file that we previously saved to the desktop of our second hack/Mac. Identify and mount your pre-boot partition as described above. Again make note of the UUID of the volume now labeled Ventura - Data - Data. Transferring back the os.dmg file requires use of the following terminal command. You cannot simply copy and paste. sudo cp ~/Desktop/os.dmg /Volumes/Preboot/<UUID>/cryptex1/current/os.dmg See my example: You also need to again mount and open the EFI partition of your USB install flash-drive, open config.plist, and re-enable the CryptexFixup kext. Eject the SSD and USB flash-drive, reconnect to your Asus system and reboot. This time select [2. Ventura - Data] which will begin the start of the relatively short 4th Stage with auto-reboot back into the OpenCore menu. After OpenCore menu reloads, select [2. Ventura - Data] again to begin the fifth and final stage which should lead you to the joyous Apple macOS “Select Your Country or Region” menu. When I made my first attempt to make my way through the selections, I thought that my system was frozen. As it turns out, because graphics acceleration is turned off, advancing through the menu selections is painfully slow due to a massive response lag. Eventually you should reach your final destination which is your desktop. You can identify that graphics acceleration is not enabled by the black border surrounding the dock icons. At this point, you can enable graphics acceleration by installing the Open Core Legacy Patcher v0.6.5. You will need internet access for this program to function so connect an ethernet cable to the lower LAN port (see pic below under post-installation). This port is enabled using the AppleYukon2_88E8056 kext included with the Install EFI. After opening the program, select [Post-Install Menu]. You will be given the option of installing two patches, one for your legacy graphics card (in my case a Kepler based GT 710) and enabling Legacy USB 1.1. In my experience using this board, installing these patches successfully enabled graphics acceleration but did NOT restore USB 1.1 for the mouse/keyboard. 9. Rebooting after installing the OCLP patch should confirm enabling of GPU acceleration Post Installation Mount and open the EFI partition of your SSD and copy and paste the Post Install EFI file. Remember to rename it to EFI. Remember to also install the DuetPkg as was described above for your USB Install flash-drive or it will not boot. Emulated NVRAM: As I eluded to earlier, this board does have a form of native NVRAM but it is not fully functional. In my post-install config.plist I have selected settings to activate emulated NVRAM as per instructions in the Dortania guide. Note, you will need to run the LogoutHook program from terminal on your system to make it functional. Details are in the linked Dortania guide. Ethernet: This board has two Marvell Yukon Gigabit LAN controllers, the 88E8056 and 88E800. Only the 88E8056 is usable and is made functional using the included AppleYukon2_88E8056.kext Audio: This board uses the ADI AD2000B audio chipset which is still supported by the AppleALC.kext using the alcid=7 boot argument. Interestingly, attempting to use layout-id in device properties as recommended in the Dortania guide does not work. I have no explanation for this. USB: Ports on this board were mapped using USBMap producing the USBMapLegacy.kext which is included in the Post Install EFI. I’m not sure that mapping is really necessary as the number of ports easily falls below Apple’s 15 port limit. As stated above, USB ports on this system use USB 1.1 for HDI devices like mouse/keyboard which is no longer supported in Ventura. Also as I noted above, Open Core Legacy Patcher was not successful in enabling USB 1.1 on my system. Your experience may differ. What did work was using a USB 2.0 hub which I chose to use. Earlier versions of the Open Legacy Patcher created conflict with PCI-e USB-3.0 cards but, starting with version 0.6.5, this has been corrected. For those interested in inserting a USB 3.0 PCI-e card, I recommend one that is natively supported. I am using an Inateck KT4006 which uses the Fresco Logic FL1100 chipset. It has been supported by macOS for quite some time and continues to be so under Ventura. It works very well on this system. Wifi/Bluetooth: I am using this PCI-e card which uses the Broadcom BCM94360CD chip. This is another card with native support. This card has a 9-pin female USB motherboard header connector which is necessary for Bluetooth to work. I discovered that connecting this to the board’s internal USB headers did not work. What did work is using this cable to connect to either my USB 2.0 hub or to my USB 3.0 PCI-e card. Graphics: As I noted above, I am using a MSI GT 710 which I have have had for many years. OCLP 0.6.5 does a nice job of enabling graphics acceleration. Be careful attempting to use anything more modern like a RX 580 as many of these cards require UEFI and will not work on Legacy BIOS boards. Power Management: As best I can determine, a SMBIOS of iMacPro 1,1 seems to provide good power management for this CPU without the need for any additional kexts. On stock speeds it idles at about 2.00 GHz and appropriately ramps up to 3.00 GHz with demand. With a modest overclock to 4.03 GHz, idle sits at about 2.6 GHz. For anyone interested in my overclock settings and RAM info see spoiler below: Hardware Monitoring: The Post Install EFI contains kexts for board monitoring using HWMonitorSMC. Note, the newer version of this program HWMonitorSMC2 does not work on this board. Sleep: I have never been able to get sleep working on this system. I also have never made it a priority to fix as I don’t really use it. Services: Apple services such as iMessage, FaceTime, Airdrop, handoff and continuity (including camera) seem to work. I can also make and receive calls through my iPhone. Performance: As you might expect, a system this old is not going to be competitive with modern systems but I have found it be surprisingly functional for basic tasks such as internet browsing, music streaming, word processing and coding. I am currently employing an overclock of 4.03 GHz. You certainly would not want to attempt audio/video editing or modern gaming. Still, I am amazed at how well this CPU/motherboard has held up. For those interested, I am including Geekbench scores below: Closing Comments: As you might have already surmised, maintaining this system has been a labor of love. This was my first hackintosh and feels like a close friend. I have several hackintosh builds which are far more capable, but there is a certain joy and satisfaction which I derive that is unique to this system. I have a lot of good memories attached to using it and will be sad to see it finally retired. In a certain way, this post represents my requiem to this loyal system and to the eventual sunsetting of the hobby that I have come to love. Update 8/8/23: I have successfully updated to Ventura 13.5 via online updates. In order to receive this update you have to enable Secure Boot in OpenCore. I used Misc -> Security -> SecureBootModel -> j137. I am still on OpenCore 0.9.1 with the same kexts. This update will delete the changes made by OpenCore Legacy Patcher thus disabling graphics acceleration. My system successfully booted back into my login screen with VGA graphics. You then need to disable Secure Boot in OpenCore to re-install OCLP 0.6.5 which will re-enable graphics acceleration.


 13 points
 -
OpenCore 0.9.6 is out. Although there is only 1 change in config.plist (useful only for Max OS X 10.4 and 10.5), the code continues to receive improvements and fixes. https://github.com/acidanthera/OpenCorePkg/releases Main changes Database: Updated builtin firmware versions for SMBIOS Fixed hang while generating boot entries on some systems Docs: Update requirements for OpenLegacyBoot Fixed build on Windows (avoiding null output file) Added FixupAppleEfiImages quirk to fix errors in boot.efi images of early Mac OS X (10.4 and 10.5). The quirk is never applied during the Apple secure boot path for newer macOS and is only needed for loading Mac OS X 10.4 and 10.5, and even then only if the firmware itself includes a modern image loader as current builds of OpenDuet. config.plist Booter >> Quirks: added FixupAppleEfiImages (Boolean). Default value is False. Kexts AppleALC 1.8.7 (thanks @deeveedee ).13 points
-
Direct download link: https://swcdn.apple.com/content/downloads/26/09/042-58988-A_114Q05ZS90/yudaal746aeavnzu5qdhk26uhlphm3r79u/InstallAssistant.pkg13 points
-
RC2 seeded ... done ...

 13 points
 -
I have fixed ForceAquantiaEthernet quirk on OC master. Credit goes to @Shikumo.13 points
-
Some updates on my journey that started with 3 hours of sleep more or less (thx to 600mg of caffeine intake). Here's what I'm actually """studying""" on: Before doing these stupid analysis, I ran `kmutil showloaded > OS_CODENAME.txt` both on my stable Ventura 13.4 and macOS Sonoma 14 Beta 1. You can find the txt in the attachments. Let's start with IO80211LegacyFamily kext, which is missing from macOS Sonoma. Let's look at the Info.plist which contains the OSBundleLibraries (basically a list of dependencies): IO80211LegacyFamily has the following OSBundleLibraries: ... <key>OSBundleLibraries</key> <dict> <key>com.apple.driver.AppleMobileFileIntegrity</key> <string>1.0.1</string> <key>com.apple.driver.corecapture</key> <string>1.0.0</string> <key>com.apple.iokit.CoreAnalyticsFamily</key> <string>1.0</string> <key>com.apple.iokit.IONetworkingFamily</key> <string>3.0</string> <key>com.apple.iokit.IOSkywalkFamily</key> <string>1.0</string> <key>com.apple.kec.corecrypto</key> <string>1.0</string> <key>com.apple.kpi.bsd</key> <string>15.0.0</string> <key>com.apple.kpi.iokit</key> <string>15.0.0</string> <key>com.apple.kpi.libkern</key> <string>15.0.0</string> <key>com.apple.kpi.mach</key> <string>15.0.0</string> <key>com.apple.kpi.private</key> <string>15.0.0</string> <key>com.apple.kpi.unsupported</key> <string>15.0.0</string> </dict> ... Trying to inject IO80211FamilyLegacy alone raises an error since IOSkywalkFamily cannot be patched (vtable stuff, I don't know, I don't work for Apple nor acidanthera yet) I tried replacing pretty every networking related kext without any success (probably need root-patching but I want to use vanilla options if possible). Below a few things I noticed between Sonoma and Ventura (paired Sonoma-Ventura) < 54 11 0xffffff800249a000 0x16ff4 0x16ff4 com.apple.iokit.IONetworkingFamily (3.4) 3595A42C-1185-344D-AA32-FB2073E2407D <9 8 7 6 3 1> > 51 11 0xffffff8002c30000 0x16ff4 0x16ff4 com.apple.iokit.IONetworkingFamily (3.4) F349EF33-2C2B-32F4-BE0F-284D3A56E2DF <9 8 7 6 3 1> < 56 5 0xffffff8003f8c000 0xce000 0xce000 com.apple.iokit.IOSkywalkFamily (1.0) 035A9AD9-6CDE-362F-8DEC-B664BC6431EC <55 54 9 8 7 6 3 1> > 53 5 0xffffff8002f7d000 0x2d000 0x2d000 com.apple.iokit.IOSkywalkFamily (1.0) 035A9AD9-6CDE-362F-8DEC-B664BC6431EC <52 51 9 8 7 6 3 1> < 55 2 0xffffff80026f3000 0x5000 0x5000 com.apple.driver.mDNSOffloadUserClient (1.0.1b8) A660606B-5FC6-35F4-9B2F-B7007A9C4F03 <54 8 6 3 1> > 52 2 0xffffff8002e8a000 0x5000 0x5000 com.apple.driver.mDNSOffloadUserClient (1.0.1b8) BA6FE987-65DB-34CE-AAA0-CEBB09C55B21 <51 8 6 3 1> Next tests I'll do will probably replace IO80211Family from OpenCore, hoping at least it boots and no issue so far pops up. Will keep updated if anything changes sonoma_kmutil.txt ventura_kmutil.txt13 points
-
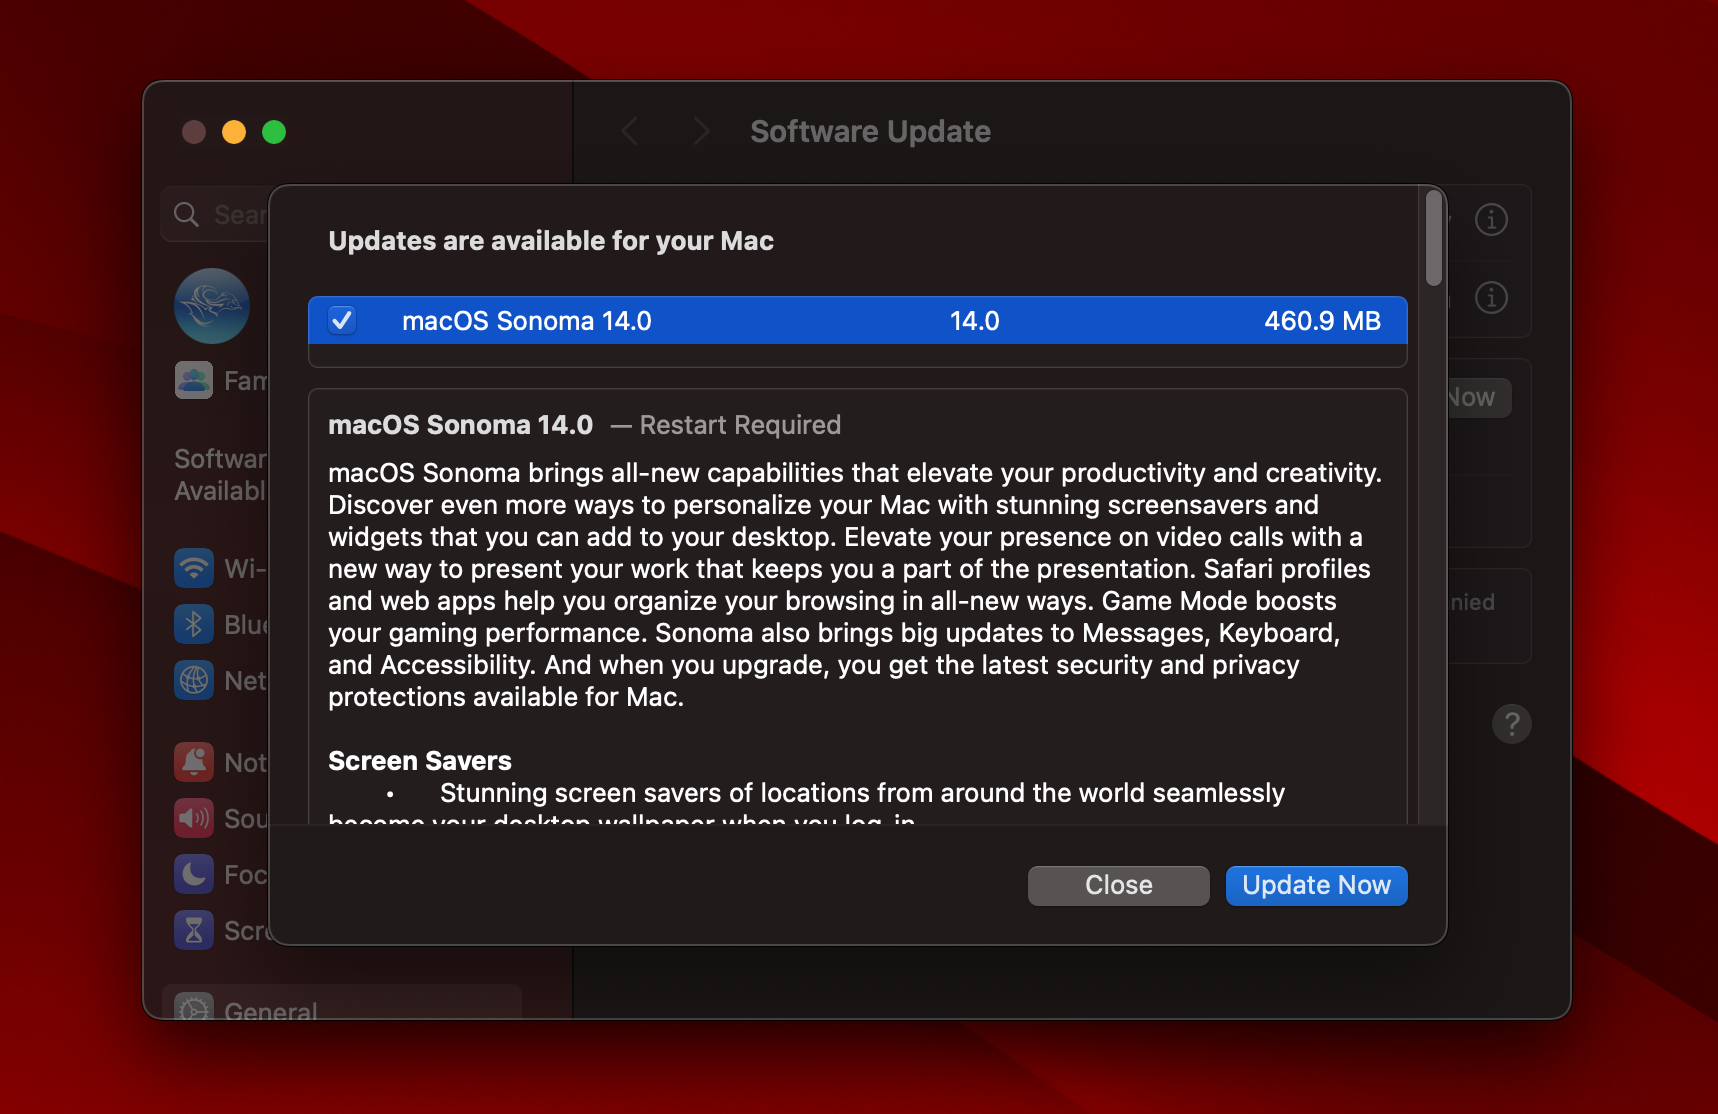
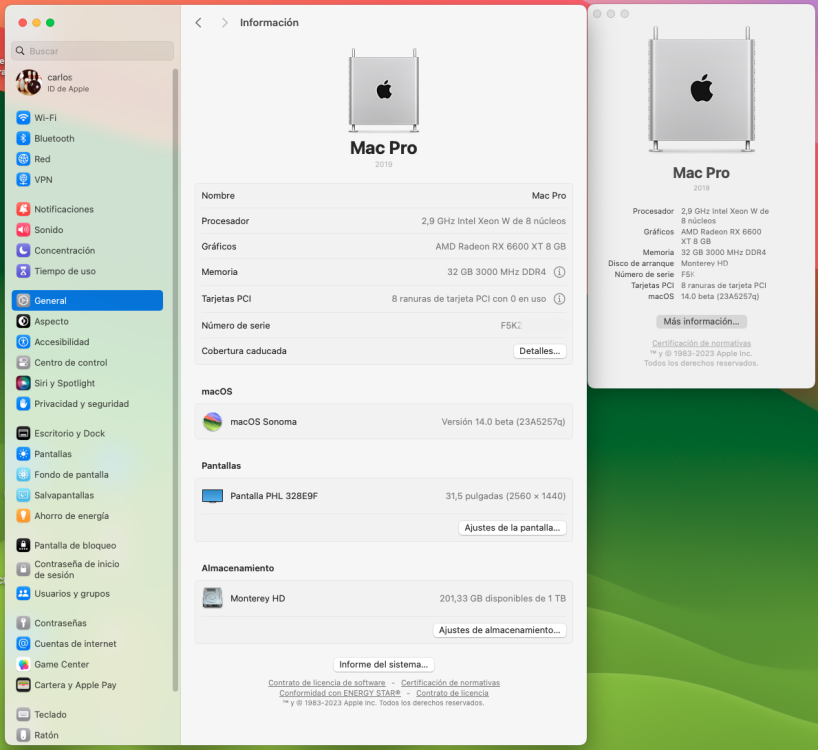
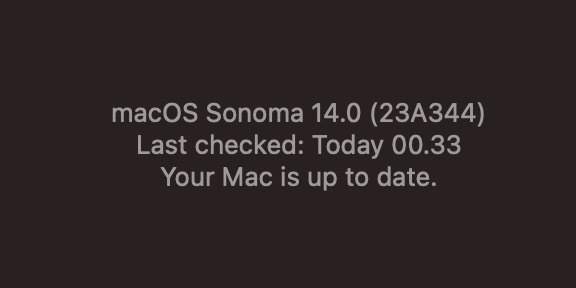
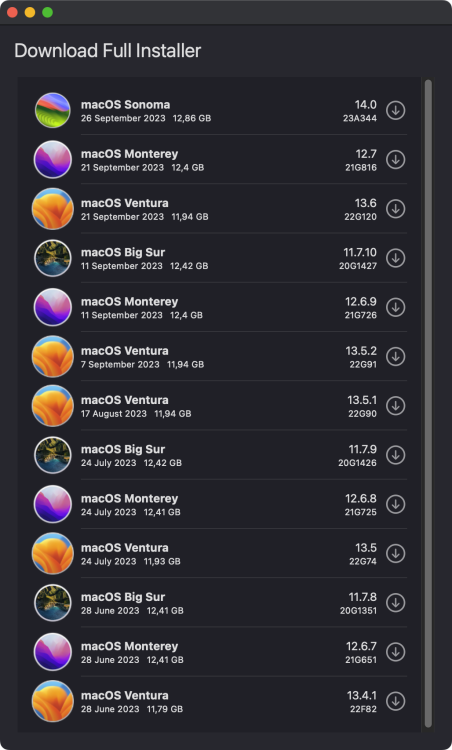
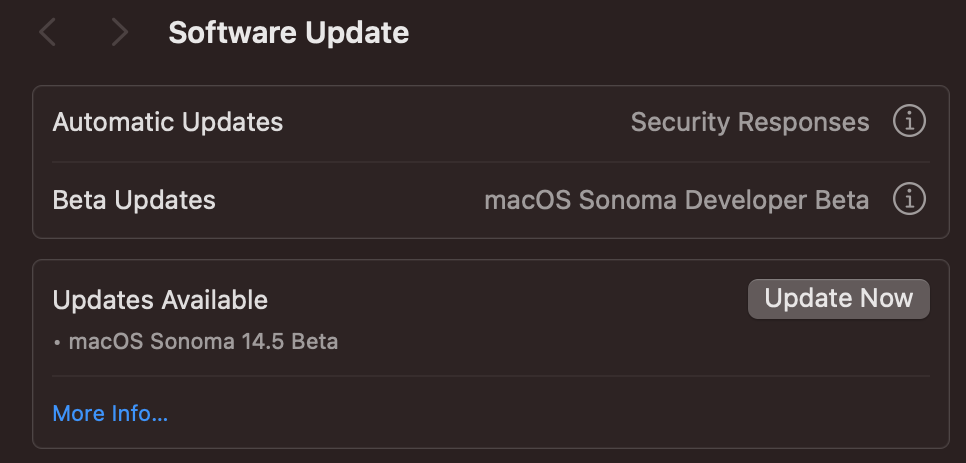
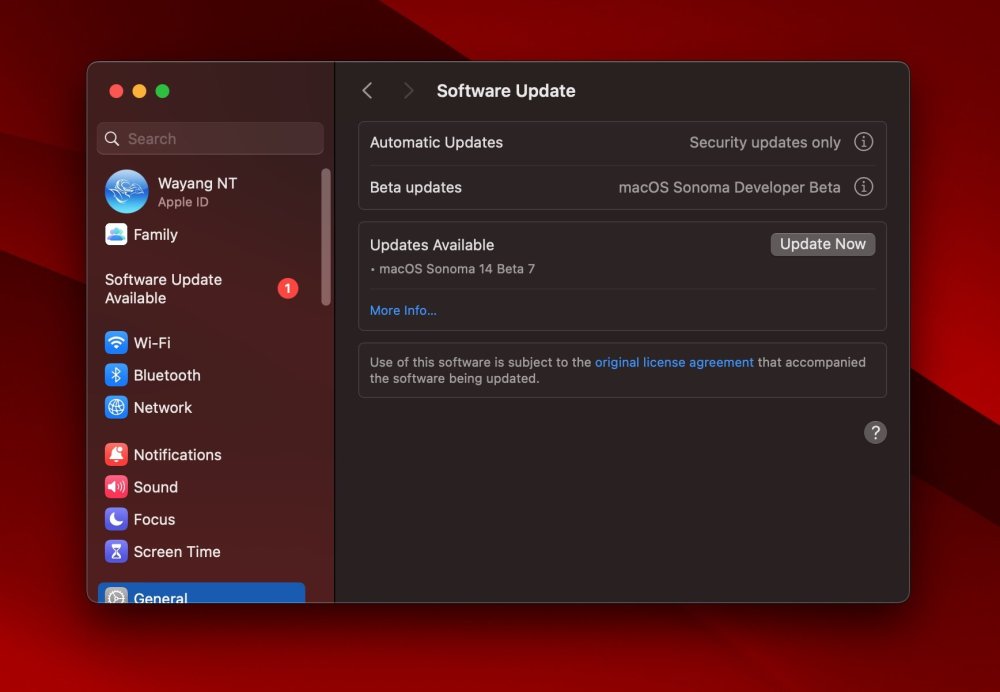
Preface Sonoma required fewer changes to OpenCore and kexts than were necessary to install older systems such as Big Sur, which was a big challenge for developers. This time, minor changes allowed Sonoma to be installed almost immediately after the first beta version was released. Of course, there have been problems to work hard on, not all solved as of today. For now I will note the loss of Wi-Fi with Broadcom chipsets used in Mac models before 2017 and in Fenvi PCI-e cards, widely used in Hackintoshes. A fix has been provided by the OCLP team. Hardware Motherboard Gigabyte Z390 Aorus Elite CPU Intel i9-9900K GPUs: iGPU Intel UHD 630 / AMD Radeon RX 6600 XT Audio Realtek ALC1220 Ethernet Intel I219V7 Wi-Fi + BT Fenvi FV-T919 (BCM94360CD). BIOS settings (F10h version) CFG Lock: Disabled CSM: Disabled VT-d: Disabled Fast Boot: Disabled OS Type: Windows 8/10 WHQL Platform Power Management: Disabled XHCI Hand-Off: Enabled Network Stack: Disabled Wake on LAN: Disabled Secure Boot: Disabled Integrated Graphics: Enabled DVMT Pre-allocated: 256M o higher. What works well? dGPU AMD as main card iGPU in headless mode Shutdown, restart and sleep Ethernet Sound (also HDMI) USB ports (USB port map for this board) Bluetooth Fenvi T919. What's not working well? Fenvi T919 Wi-Fi: macOS Sonoma has dropped support for all Broadcom Wi-Fi present on Macs before 2017. Fenvi T919 and HB1200 have BCM4360 chipsets (not supported) so Wi-Fi does not work in Sonoma. Bluetooth works fine. This is a serious inconvenience because functions related to the Apple ecosystem (Airdrop, Continuity Camera, etc.) are also lost. A fix is proposed later. Installing macOS Sonoma I have updated macOS Ventura to Sonoma but creating USB boot media to install from scratch is another option for those who prefer to do it that way. It is advisable to have macOS 13.4 Ventura or later System Settings >> Software Update >> Beta Updates >> click on the info icon >> Disabled Choose macOS Sonoma 14.0 Or get the app from App Store. To create the USB installation media so you can install Sonoma from scratch: Get the complete installation package from Apple's servers. I use the app Download Full Installer (original by scriptingosx), main window shows all versions available for download from Big Sur to Sonoma. The package is downloaded as InstallAssistant-14.0-build.number.pkg, double click on the package to generate Install macOS Sonoma.app in the Applications folder Format a USB stick of at least 16Gb with GUID partition scheme and Mac OS Plus (journaled) format, name it (e.g. USB) Open Terminal and run this command sudo /Applications/Install\ macOS\ Sonoma.app/Contents/Resources/createinstallmedia --volume /Volumes/USB --no-interaction At the end, you can reboot from the USB device and begin Sonoma installation. OpenCore and EFI folder Update OpenCore and extensions to Sonoma compatible versions. OpenCore, at least version 0.9.4. Settings used with macOS Ventura may work with macOS Sonoma. Updating OpenCore and kexts, there are no significant changes to the config.plist file, which may be the same for both systems. For the update to be successful, 2 parameters in config.plist related to security must be adjusted: SecureBootModel=Default or x86legacy (Apple Secure Boot as Default sets the same model as in SMBIOS and x86legacy is designed for SMBIOS that lack T2 chip and virtual machines) SIP enabled (csr-active-config=00000000). It is advisable to have Gatekeeper enabled (sudo spctl –master-enable in Terminal). These security options can be changed after installation as they are not required out of updating macOS. Note: in last versions of Ventura, sudo spctl –master-enable (or disable) has been replaced by sudo spctl –global-enable (or disable). For now, both commands work fine. config.plist I get best results with iMac19.1 SMBIOS and the iGPU enabled in BIOS. These are the main details when configuring config.plist. ACPI ACPI: SSDT-EC-USBX.aml, SSDT-PLUG.aml and SSDT-PMC.aml. SSDT-AWAC.aml is not required on my system but, if in doubt, add it because it does not cause any harm if it is present without being needed ACPI >> Quirks: all = False Booter Booter >> Quirks: AvoidRuntimeDefrag, DevirtualiseMmio, ProtectUefiServices, ProvideCustomSlide, RebuildAppleMemoryMap, SetupVirtualMap and SyncRuntimePermissions = True Booter >> ResizeAppleGpuBars=-1 DeviceProperties >> Add PciRoot(0x0)/Pci(0x2,0x0) AAPL,ig-platform-id | Data | 0300913E device-id | Data | 9B3E0000 enable-metal | Data | 01000000 rps-control | Data | 01000000 PciRoot(0x0)/Pci(0x1.0x0)/Pci(0x0.0x0)/Pci(0x0.0x0)/Pci(0x0.0x0) unfairgva | Number | 6 PciRoot(0x0)/Pci(0x1F,0x3) layout-id | Data | 07000000 PciRoot(0x0)/Pci(0x14,0x0) acpi-wake-type | Data | 01 acpi-wake-gpe | Data | 6D Kernel Kernel > Add: Sonoma compatible kexts, Lilu.kext in the first place, UTBMap.kext specific for this motherboard Kernel >> Quirks: CustomSMBIOSGuid, DisableIoMapper, DisableIoMapperMapping, DisableLinkeditJettison, PanicNoKextDump and PowerTimeoutKernelPanic = True Kernel >> Quirks: SetApfsTrimTimeout = 0 Misc Misc >> Boot: HibernateMode=None, PickerAttributes=144, PickerVariant=Default, ShowPicker=True Misc >> Debug: AppleDebug, ApplePanic and DisableWatchDog = True, Target=3 Misc >> Security: AllowSetDefault=True, BlacklistAppleUpdate=True, ExposeSensitiveData=6, SecureBootModel=x86legacy or Default NVRAM WriteFlash=True Add >> 7C436110-AB2A-4BBB-A880-FE41995C9F82: boot-args >> agdpmod=pikera csr-active-config >> 00000000 run-efi-updater >> No Delete >> 7C436110-AB2A-4BBB-A880-FE41995C9F82: boot-args and csr-active-config PlatformInfo Generic >> iMac19.1 UpdateDataHub, UpdateNVRAM and UpdateSMBIOS = True UpdateSMBIOSMode >> Custom UEFI UEFI >> Quirks: EnableVectorAcceleration and RequestBootVarRouting = True UEFI >> Quirks >> ResizeGpuBars=-1. Notes about software updates There are 3 SMBIOS that I can use on my PC: iMac19,1 / iMacPro1,1 / MacPro7,1. My favorite is iMac19.1. Regarding the updates that are notified in Software Update and the size of the update (full or incremental package), there are some conditions to take into account. About obtaining Update notification iMac19.1 model (2019 iMac 27″) lacks a T2 security chip and, when using this SMBIOS model, you receive update notifications iMacPro1,1 (iMac Pro 27″, late 2017) and MacPro7,1 (Mac Pro 2019) models do have a T2 chip and, when using these SMBIOS models, you do not receive update notifications iMacPro1,1 and MacPro7,1 models receive update notifications if configured as vmm (virtual machine): revpatch=sbvmm in boot-args along with RestrictEvents.kext. About the size of the update (full or incremental) Systems where the OCLP root patch has not been applied or has been reverted: - iMac19,1 can get incremental updates - iMacPro1,1 and MacPro7,1 require revpatch=sbvmm in boot-args along with RestrictEvents.kext to get incremental updates, without this setting you get full update packages All systems that have the OCLP root patch applied receive full-size updates. In summary, using iMac19.1 you get update notifications but the updates are full size. After the system is updated, RestrictEvents.kext and the boot argument can be disabled because they are not required for normal Sonoma operation. Broadcom Wi-Fi stops working in Sonoma EFI with OpenCore 0.9.5 iMac19,1 SMBIOS iGPU enabled in BIOS AMD as main card config.plist as base config, try this by default config-fenvi.plist if you have a Broadcom wifi card supported on Ventura but not on Sonoma (OCLP root patch also needed), it must be renamed to config.plist Add your own serial numbers (they are empty). EFI with OpenCore 0.9.6 EFI with OpenCore 0.9.7 EFI with OpenCore 0.9.8 EFI with OpenCore 0.9.9 EFI 0.9.5 Sonoma.zip
 12 points
 -
Lenovo All fine Thanks all you guys
 12 points
 -
Full Installer https://swcdn.apple.com/content/downloads/62/31/042-78233-A_YIMC5ZQM8T/yj7iay56cmvc2cux0qm55lfweb2u90euyo/InstallAssistant.pkg
 12 points
 -
12 points
-
OpenCore 0.9.5 is out. You can get it from Acidanthera. Main changes Added UEFI quirk ShimRetainProtocol, allowing OpenCore chained from shim to verify Linux using shim's certificates. It requests Linux shim to keep protocol installed for subsequent image loads. This option is only required if chaining OpenCore from shim. It must be set in order to allow OpenCore to launch items which are verified by certificates present in shim, but not in the system Secure Boot database. Added OpenLegacyBoot driver for supporting legacy OS booting. config.plist UEFI >> quirks: added ShimRetainProtocol (Boolean). Failsafe value is False. Drivers OpenLegacyBoot.efi: it aims to detect and boot legacy installed operating systems. Usage: Install Windows or another legacy operating system as normal if this has not been done earlier (OpenLegacyBoot is not involved in this stage and may be unable to boot from installation media such as a USB device) Reboot into OpenCore: the installed legacy operating system should appear and boot directly from OpenCore when selected. OpenLegacyBoot does not require any additional filesystem drivers such as OpenNtfsDxe.efi to be loaded for base functionality, but loading them will enable the use of .contentDetails and .VolumeIcon.icns files for boot entry. Note: MBR (Master Boot Record) installations of Windows are legacy and will not be supported without the OpenLegacyBoot driver. Tools Renamed ShimToCert folder as ShimUtils; added new tools: shim-make.tool sbat-info.tool unsign-efi-sig-list.tool and update shim-to-cert.tool. Read /Utilities/ShimUtils/README.md for extended info. In summary "the new recommended way to boot OpenCore + OpenLinuxBoot + Secure Boot is to make a user build of Shim. The vendor certificates and revocation lists extracted from the distro shimx64.efi files are combined and signed by you, into your own build of Shim; in this approach, these vendor certificates should NOT also be included in the system Secure Boot database, and should be removed if you added them previously." Kexts AppleALC 1.8.5 MacHyperVSupport 0.9.5.12 points
-
OpenCore 0.9.4 is out. Get it from Acidanthera. Main changes Kernel >> Quirks: fixed ForceAquantiaEthernet on macOS 14 beta 2. Kernel >> Quirks: improved LapicKernelPanic on legacy macOS. Misc >> Boot: added InstanceIdentifier to identify OC instance; added the ability to target .contentVisibility files to specific OC instances. Allowed .contentVisibility in the same boot FS root locations as `.VolumeIcon.icns`, in order to survive macOS updates (non-Apple files next to the Apple bootloader are removed by macOS updates). The .contentVisibility file may be placed next to the boot loader (BOOTx64.efi) or in the boot folder, e.g.: - /Volumes/{ESP}/EFI/BOOT/.contentVisibility - /System/Volumes/Preboot/{GUID}/System/Library/CoreServices/.contentVisibility As of now, it may also be placed in absolute root folders related to a boot entry, for example: - /System/Volumes/Preboot/{GUID}/.contentVisibility - /System/Volumes/Preboot/.contentVisibility - /Volumes/{ESP}/.contentVisibility. config.plist Misc >> Boot: added InstanceIdentifier (String). Default value is empty. Most of us are not going to use this new feature. Kexts AppleALC 1.8.4 BrcmPatchRAM 2.6.8 EmeraldSDHC 0.1.1 Lilu 1.6.7 NVMFix 1.1.1 WhateverGreen 1.6.6. Don't just look at the seemingly short list of changes, transparent to the user there are many more changes and fixes. Note: for people interested in the InstanceIdentifier new feature, please look at the OpenCore Configuration.pdf (section 8.1.1: Boot Algorithm and .contentVisibility file). The .contentVisibility file, when present, may optionally target only specific instances of OpenCore. Its contents are [{Instance-List}:](Disabled|Auxiliary). If a colon (:) is present, the preceding Instance-List it is a comma separated list of InstanceIdentifier values (example: OCA,OCB:Disabled). When this list is present, the specified visibility is only applied if the InstanceIdentifier of the current instance of OpenCore is present in the list. When the list is not present, the specified visibility is applied for all instances of OpenCore.12 points
-
Sonoma Beta 3 23A5286g Full Installer https://swcdn.apple.com/content/downloads/25/58/042-06331-A_J3SK37ZPVW/a6x4qllf9rcgs2phc7mjyo6v1bpqb87anf/InstallAssistant.pkg12 points
-
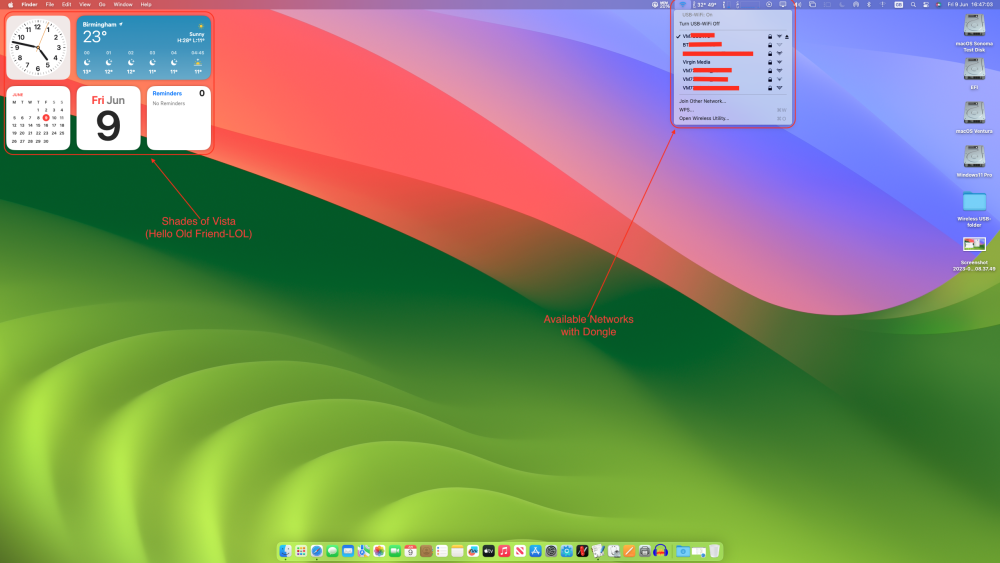
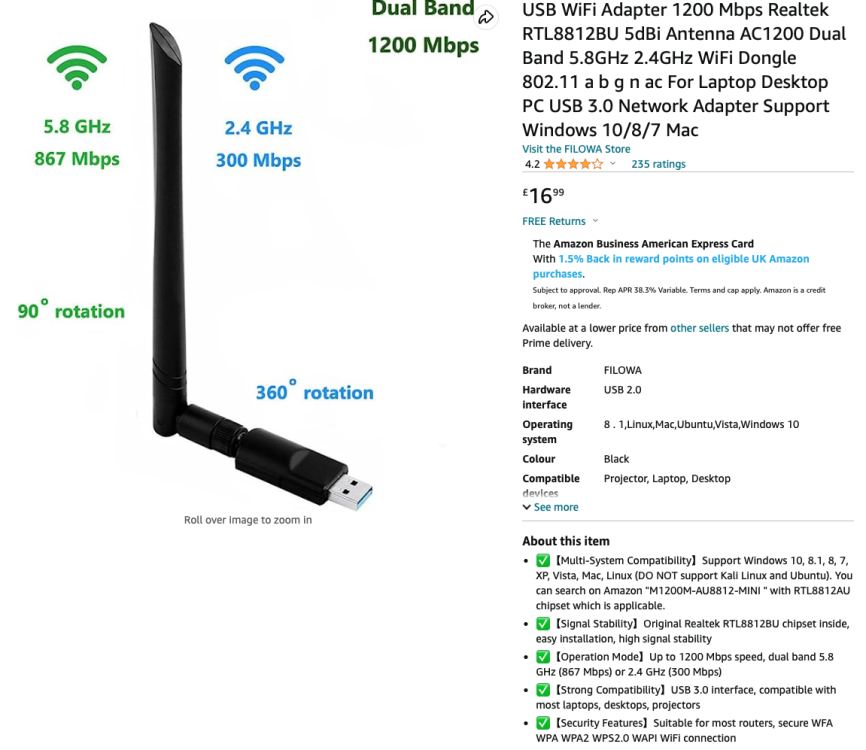
Ok - as promised here is the report from the clutch of USB dongles I ordered and tested (don't laugh but I actually ordered 5 not 4 - the things I do for you guys ) Three of the orders came today. The one in the pic attached worked best with the strongest signal and possible the best of the bunch because of dual band. You need to use @chris1111 Big Sur app along with the two kexts attached here. In summary in my opinion this solution is suited for mobility only i.e a laptop for connection purpose only. You still don't get the function of 'AirDrop' and 'Hand Off' to iPhone Camera as with the Fenvi T-919 Card in Ventura. In truth, I will be keeping the one that gave the best result (in the pic) for emergencies (or as the wife puts it.....'more rubbish to clutter the place) and return the others. So there you have it, hopefully I won't be penalised for all the Returns. PS - The one caveat I disliked, you need to permanently disable SIP for the app to work or you'll get a pop up about it being damaged and should be deleted. RtWlanU.kext.zip RtWlanU1827.kext.zip RealtekRTL8111.kext.zip
 12 points
 -
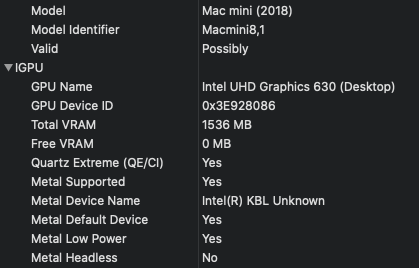
I have installed macOS Sonoma 14.0 Beta 1 on my Intel 7th Gen KBL Core i3-7100 CPU, HD 630 iGPU and activated QE/CI acceleration. ✨ I only modified the following parts in the EFI folder used in macOS Ventura 13.x. Add the -lilubetaall boot arg to boot-args in NVRAM - Add in Config.plist Change SMBIOS to iMac19,1 model in Config.plist Modify SMBIOS to iMac19,1 model in Info.plist of USBMap.kext
 12 points
 -
For bootable USB sudo /Applications/Install\ macOS\ 14\ beta.app/Contents/Resources/createinstallmedia --volume /Volumes/yourdiskname12 points
-
Main changes Added Kernel >> DisableIoMapperMapping quirk (credits to @Casey_S.J.). Requirement: macOS 13.3 (not required for older). Patch for macOS 13.3+ to fix WiFi, Thunderbolt and Ethernet issues on systems where the following conditions are present (all must be true): - Apple VTD is enabled (VT-d enabled in BIOS): - One or more Reserved Memory Regions exist in System DMAR - More than 16GB memory installed - iGPU enabled. On Comet Lake and older Intel Core processors, this quirk is needed when all of the above conditions are true. Motherboards such as Asus Z690 and Z790 do not have Reserved Memory Regions and the iGPU on these processors is not compatible with macOS, so the are not affected by the issue. But many Z370, Z390, Z490... boards are affected. Not needed on AMD systems. When Apple Secure Boot is enabled, single user mode is always disabled. EfiBoot, at least as of 13.3.1, no longer filters -s argument from command-line, so OpenCore fixes it forcing disabling single user mode when Apple Secure Boot is enabled. Improved GopBurstMode on systems where it's not needed or with non-standard GOP implementations: enabled GopBurstMode even with natively supported graphic cards. If console GOP works, we assume it's configured correctly; however we do enable GopBurstMode as it can still provide noticeable speed up on some systems (e.g. MacPro5,1 with GT120). Fixed issue to patch force-injected kexts (processing kext Patch after adding the kext). Fixed ExternalDiskIcons quirk on macOS 13.3+ >> setting patch count to 2 on macOS 13.3+ (Darwin 22.4.0) keeping patch count to 1 on older macOS. Improved built-in text renderer in the console. Added UEFI >> Output >> InitialMode option to allow fine control over text renderer operating mode. Fixed ACPI quirks RebaseRegions and SyncTableIds: these quirks are special and must be processed after all other ACPI changes since they can only be applied on the final ACPI configuration including all the patches and added tables. Implemented minor improvements in Apple PickerMode: disable builtin picker timeout on unbootable selection from Apple picker; change from INFO to WARN if cannot start requested Apple picker. Fixed crash when gathering system report on virtualised CPUs. Fixed unnecessary warning when first booting with emulated NVRAM: Lower 'Emulated NVRAM load failed' message from WARN to INFO since it is expected on first boot with new emulated NVRAM. config.plist Kernel >> Quirks >> added DisableIoMapperMapping (Boolean). Default value is False. Set it True if you have Wifi or Ethernet or Thunderbolt issues on macOS 13.3+ when AppleVTD is enabled. UEFI >> Output >> added InitialMode (String): selects the internal ConsoleControl mode in which TextRenderer will operate. Available values are Auto, Text and Graphics. Text and Graphics specify the named mode. Auto uses the current mode of the system ConsoleControl protocol when one exists, defaulting to Text mode otherwise. Default value is Auto. Kexts AppleALC 1.8.2 BrcmPatchRAM 2.6.6 Lilu 1.6.5 RestrictEvents 1.1.1.12 points
-
1st beta ... no drama ...
 11 points
 -
( OCLP 1.4.3 nightly still works 🙃 )11 points
-
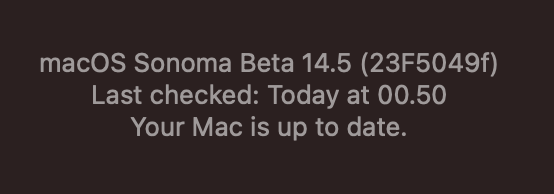
macOS Sonoma 14.5 (23F5049f) Full Installer http://swcdn.apple.com/content/downloads/08/26/052-63603-A_72I9KV9QUS/flhemtlnjiql8wqx40cz7i2i5tjfqt84ny/InstallAssistant.pkg11 points
-
Done all ok
 11 points
 -
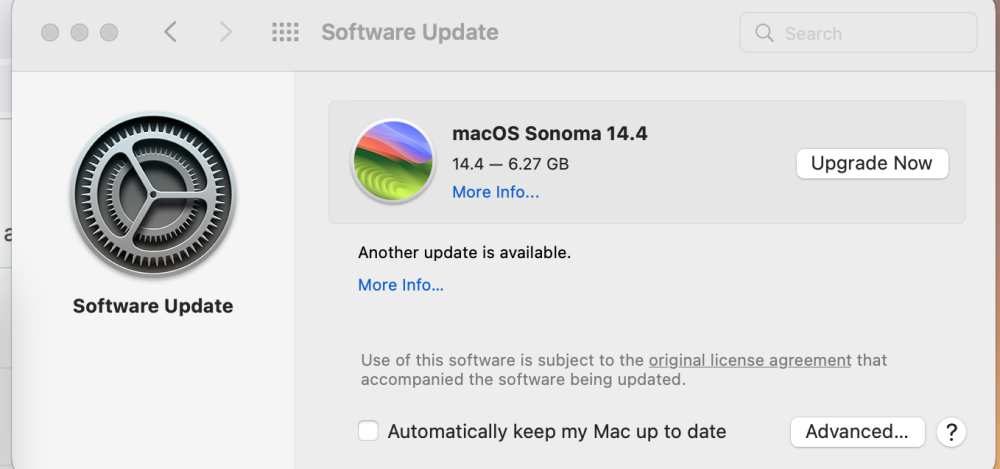
...just spotted while trying to upgrade from Monterey 😋
 11 points
 -
Easy update to OpenCore 0.9.9, there are internal changes but nothing to do by end user. Get it from Acidanthera. Mainchanges Fixed incorrect warning in ocvalidate Updated Launchd.command to work with macOS Sonoma Fixed an incorrectly labelled MacBookPro11,3 model code in macserial Improved macrecovery download logic for slow connections Config.plist Nothing to do. Kexts Nothing new.11 points
-
Release OCLP 1.4.0 https://github.com/dortania/OpenCore-Legacy-Patcher/releases11 points
-
Hi everyone, I'm in the process to upgrade the OpenCore component of Clover to the latest 0.9.7. It means that I will have to do a dozen of commits before you can try it. I'm just saying that to avoid you wasting time compiling and trying. I'll post a new message as soon as it is supposed to work. Should be in the next 48 hours.11 points
-
HackBeast 2024 Hackintosh with Z790 Aorus Master X, i9 14900k, Corsair MP600 Pro XT and DDR5 8000mhz(Run at 7600mhz) Installation Guide HERE -Hardware- Mobo - Z790 Aorus Master X Processor - Intel Core i9 14900K SSD - Corsair MP600 Pro XT GPU - RX6900XT is comming Case - Lian Li 011 Dynamic XL Cooler - Corsair iCUE H170i ELITE LCD XT Thermal Grizzly Carbonaut -EFI folder- EFI folder HERE -Screenshots- Credits: Slice, Kabyl, usr-sse2, jadran, Blackosx, dmazar, STLVNUB, pcj, apianti, JrCs, pene, FrodoKenny, skoczy, ycr.ru, Oscar09, xsmile, SoThOr, RehabMan, Download-Fritz, Zenit432, cecekpawon, Intel, Apple, Oracle, Chameleon Team, crazybirdy, Mieze, Mirone, Oldnapalm, netkas, Elconiglio, artut-pt, ErmaC, Pavo, Toleda, Master Chief and family, bcc9, The King, PMheart, Sherlocks, Micky1979, vit9696, vandroiy2013, Voodoo Team, Pike R. Alpha, lvs1974, Austere.J, CVad, headkaze, onemanosx, erroruser, Jenny David, Sampath007, Facebook Hackintosh community, Facebook Olarila community and many, many, many others!11 points
-
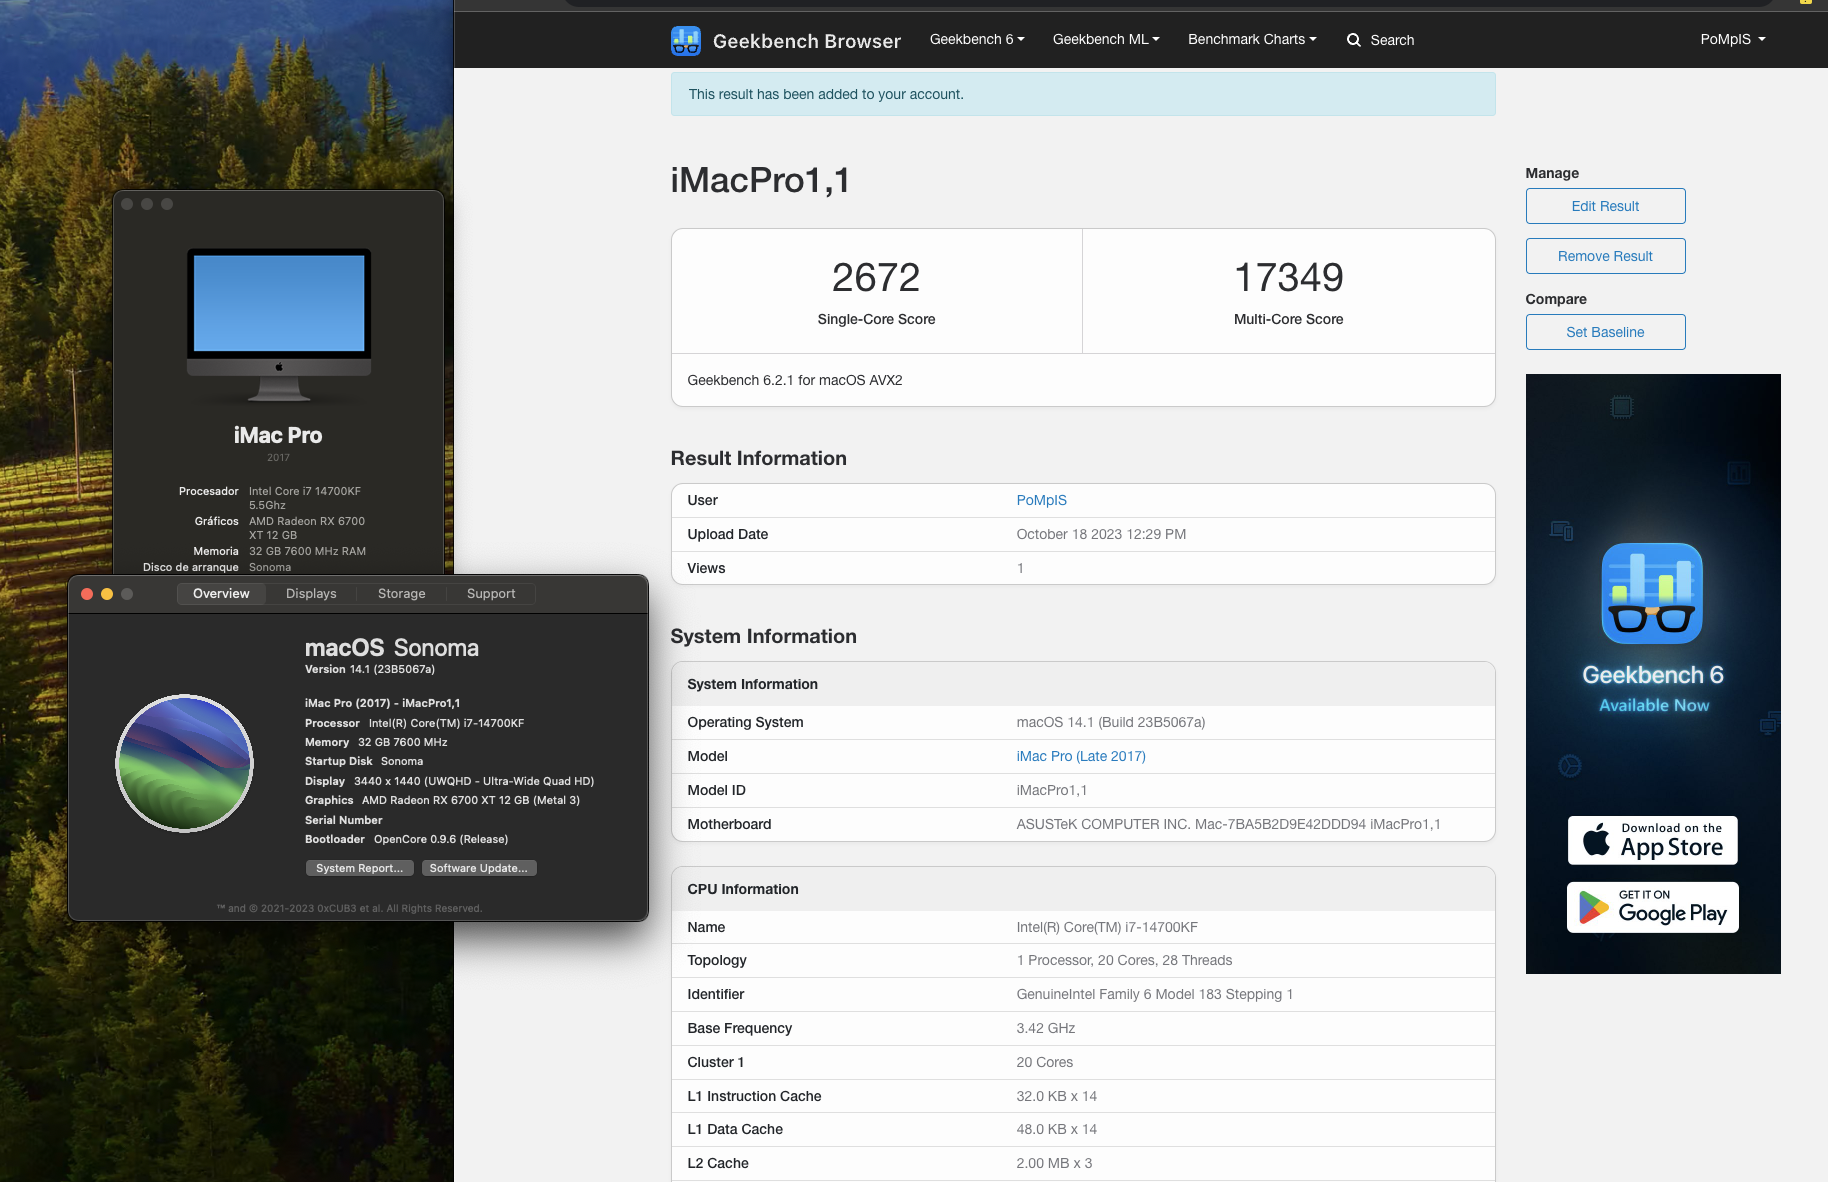
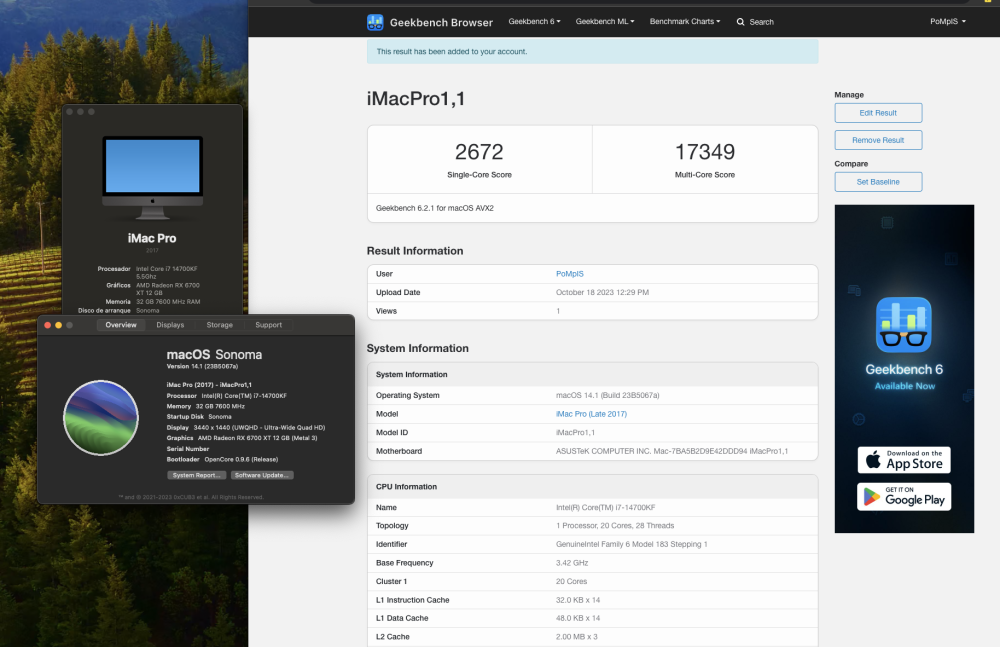
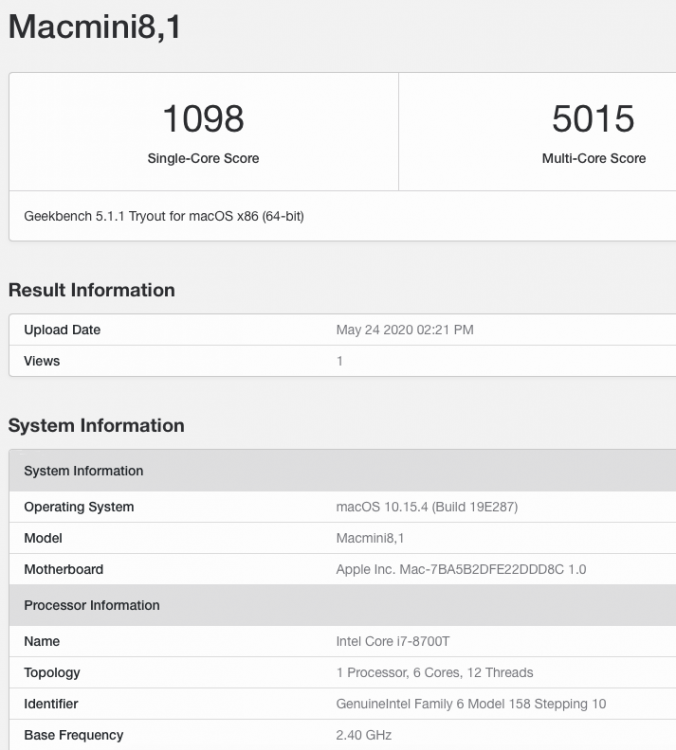
First test with the new Intel 14 series 😁 https://browser.geekbench.com/v6/cpu/3138537
 11 points
 -
macOS Sonoma 14.0 RC (23A339)
 11 points
 -
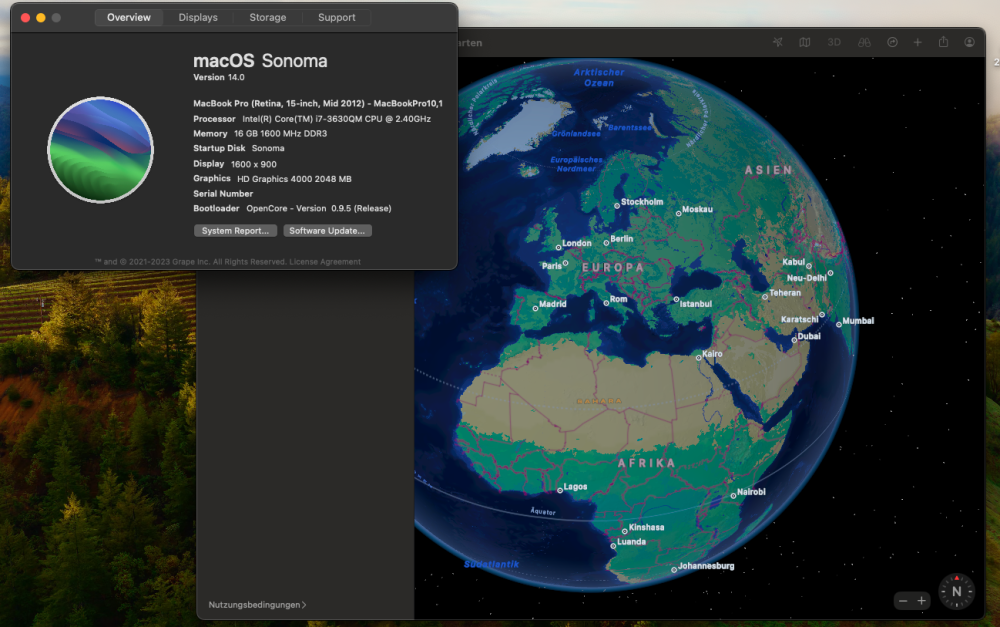
New kext for enabling Advanced Maps on Intel platform: https://github.com/narcyzzo/AdvancedMap So now you can get a Globe view.
 11 points
 -
beta7 seeded ...
 11 points
 -
New default wallpaper 🙃 " Sonoma Horizon "

 11 points
 -
A note from @dhinakg to read before using OCLP: https://github.com/dortania/OpenCore-Legacy-Patcher/pull/1077#issuecomment-1646934494 "Hackintosh notes While the project is designed for legacy Mac hardware, we know the community is quite interested in our development of Broadcom patches. For those who wish to use the Broadcom patches on non-standard machines such as Hackintoshes, see below: Enabling Patching support for modern Broadcom Cards (Click to Expand) To use our current patches, you'll need to ensure the following: System Integrity Protection is set to 0x803csr-active-config | data | 03080000 Reset NVRAM or add csr-active-config to Delete to ensure the new variable is set AMFI is disabled boot-args | string | amfi=0x80 Secure Boot Model is set to Disabled Following kexts are blocked: com.apple.iokit.IOSkywalkFamily Set the Strategy of the blocked kext to "Exclude" (Reference) Set MinKernel to 23.0.0 to ensure patches only apply on Sonoma Following kexts are injected: IOSkywalk.kext IO80211FamilyLegacy.kext Kext has a child, AirPortBrcmNIC.kext, ensure this is injected as well Set MinKernel to 23.0.0 to ensure patches only apply on Sonoma Once these are injected, you can run OpenCore-Patcher's Post-Install option and root patch. On reboot, Wireless support should be restored assuming your machine was configured correctly to the above."11 points
-
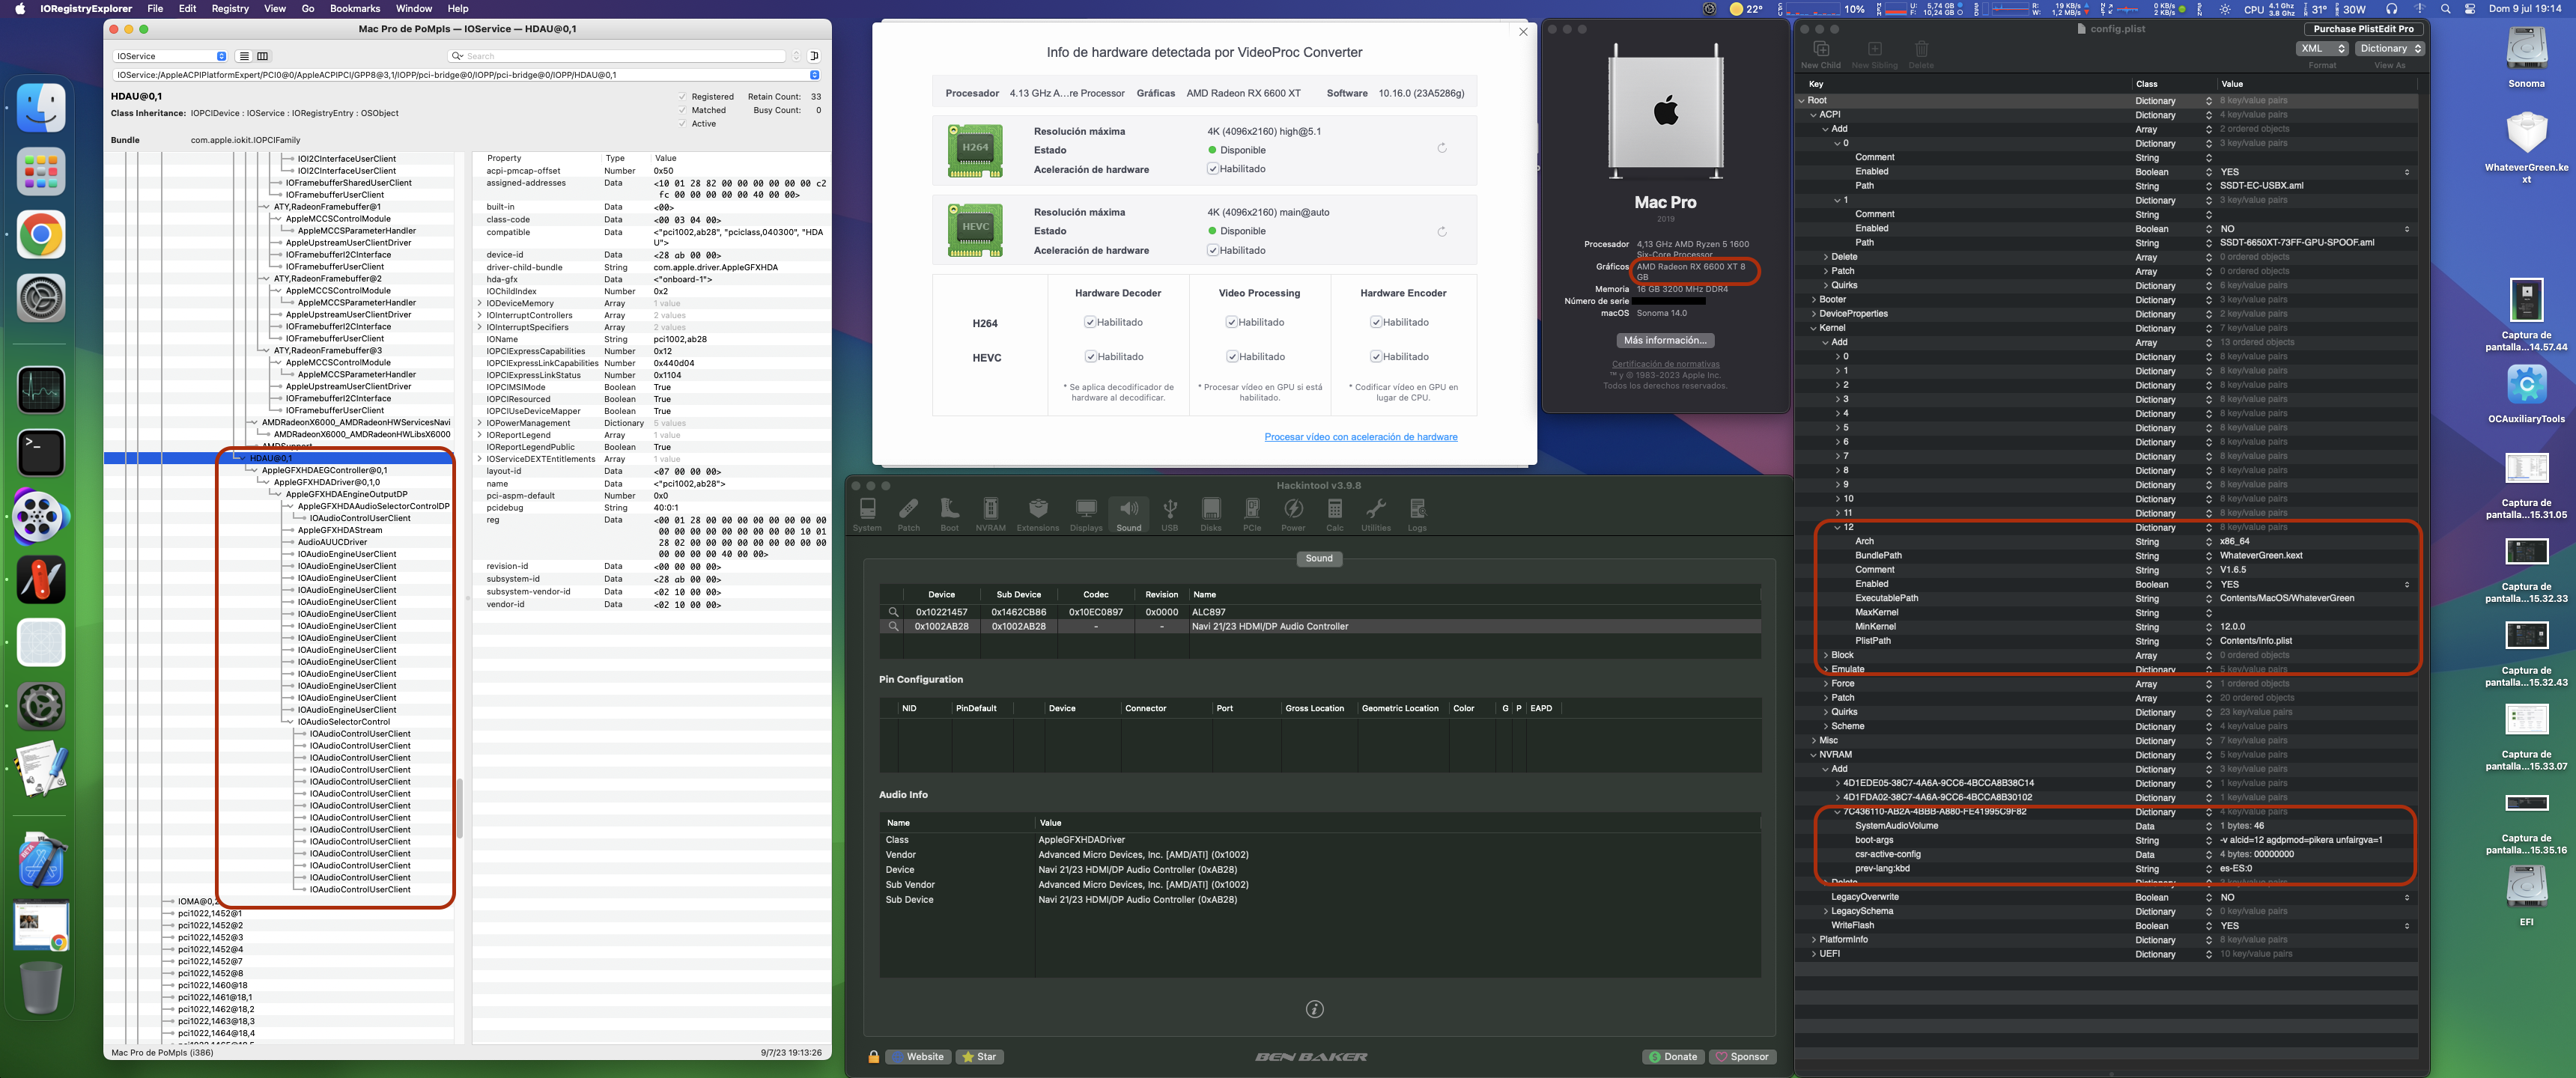
@cankiulascmnfye @miliuco I already did the SSDT with the HDAU device included and it didn't work either But it's already solved. 😆 There must be some incompatibility in the bios of the 6650xt with WEG+Sonoma and my MSI B450 I have flashed the 6650xt with the bios of the RX6600XT.. and..... It works now!!! I don't need SSDT-Spoof, or anything in Config plist.. it just works... And I have HDMI/DP audio and it works perfect appleTV, Prime Video, Netflix.... ..it was worth the effort 👌 Now it works 100%.... Well almost 100% because the wiffi does not work, I don't know if you have noticed 🤣 Thanks a lot for the help guys 🤗
 11 points
 -
Colour me a crazy old man, although I use Ventura as my daily driver with Big Sur and Monterey in reserve to fall back on, it irks me to not have a functioning WIFI connection in Sonoma so I ordered four different WIFI USB adapters from Amazon. I plan to keep which ever one works the best and return the ones that does not, in the meantime I am hoping a breakthrough will be found to implement the Broadcom cards we have working in Ventura and before. Although I have internet connection with ethernet, I miss Face Time connectivity and AirDrop when I boot Sonoma. My problem stems from being retired, having too much time on my hands and PTS.11 points
-
Good afternoon (3:17 PM at my place). Still haven't found a way to get some rest but nevermind. I'm downloading the KDK for macOS 14, to check if IOPCIFamily changed or not. Hope that the only thing changed are just the kexts and not the PrivateFrameworks honestly...11 points
-
Tried the last things but without root-patching this won't be even possible... As far as I've seen, Wi-Fi stack on macOS is more likely a combination of KEXTs (possibly also DEXTs) and Frameworks (KernelCollections and /System/Library/PrivateFrameworks) and without a proper root-patching (as OCLP does) it will never work... I abandon the ship of "fixing IO80211FamilyLegacy supported Wi-Fi cards" as I don't see any light out of the tunnel. Still glad to have learned something about KDK and OpenCore Kernel/Block mechanism11 points
-
macOS Sonoma Dell OptiHack 7050 SKL into KBL OC 0.9.2
 11 points
 -
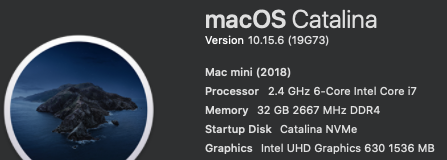
********************************************************************************** In this thread, I have fully documented the installation of macOS on my HP EliteDesk 800 G4 / G5 Mini. It is a PERFECT HackMini8,1 and is running very well for me without any issues. I hope this documentation helps you to install macOS on your hack. Please leave feedback if you think there is anything I can improve and let me know if you have any questions. ********************************************************************************** Background This is my first "modern" hack supporting UEFI and my first hack using Clover "on-the-fly" patches. My previous hacks Laptop: Thinkpad T61 / Nvidia NVS 140m Laptop: Dell Latitude E6410 / Nvidia G3100m Desktop: Gigabyte G31 / GeForce 9600 Desktop: Biostar TH55HD / Sapphire Pulse RX580 (Google "Catalina Biostar TH55HD" and look for user name deeveedee) are all perfectly running Catalina and I patched them all "manually" - all DSDT patches applied with MaciSL with virtually no Clover on-the-fly patching and all booted Legacy Clover. This UEFI hack was MUCH easier and took about 20 hours vs. a combined hundreds of hours for the old hacks. I wanted a hack that was a little more future proof and I think this is it. I hope you enjoy this as much as I am enjoying it. It is a perfect MacMini8,1. My system specs HP EliteDesk 800 G5 Mini (I9-9900 / UHD 630 / Q370 Chipset / 32GB DDR4 RAM) (also own 800 G5 Mini with i7-9700, 800 G4 Mini with i7-8700 and have owned 800 G4 Mini with i7-8700T - all work perfectly) 3 x DP Ports (connected to monitors using DP -> DVI adapters) 6 x USB 3.1 1 x USB Type-C 3.1 2 x NVMe SSD (M.2 PCIe x4 2280/2230 combo ports) 1 x SATA6 SSD 1 x Intel Ethernet RJ-45 Conexant CX20632 Audio Codec I am not using Wi-Fi. See below in "What is not tested" for Wi-Fi solutions. macOS Installation Important: You MUST BE LOGGED-IN to download attachments from this forum See macOS installation steps for OC and CLOVER here See Known Issues here for additional installation steps that may not yet be included in my attached config files See OC and CLOVER EFIs in attached to this post See BIOS configuration in attached BIOS configuration PDF document See how I developed my installation methodology here See references here See instructions here for installing two M.2 2280 NVMe SSDs and one SATA HD / SSD What is not working DRM (no hackintosh solution for DRM with UHD 630 iGPU) Everything else that I have tested is working perfectly What is not tested USB c 3.1 port (I have partially tested the USB 3 functionality of the port and it seems to be working fine with the USBPorts.kext in the attached EFI .zip archives) Wi-Fi / Bluetooth I am not currently using Wi-Fi/Bluetooth in this hack, but starting with Sonoma, Broadcom Wi-Fi is not supported without 3rd-party macOS root patches. I am not in favor of installing Open Core Legacy Patcher (OCLP) root-patches to enable Broadcom Wi-Fi (see my opinion here). If you need basic Wi-Fi/Bluetooth (and don't care about Apple-specific functions like Airdrop), I recommend Open Wireless project to enable Intel Wi-fi/Bluetooth. I don't believe that OCLP Wi-Fi root-patches are safe for secure computing operations (e.g., online banking or even accessing your Facebook page). If you prefer Broadcom Wi-Fi/Bluetooth, replace intel Wi-Fi with Broadcom Wi-Fi here and here. What is working Everything not mentioned above Sleep / Wake Multiple displays with IGPU graphics acceleration, hot pluggable display ports and DP->DVI adapters USB 3.1 ports Audio (internal speaker and headphone jack) Ethernet Microphone / front-right audio port (tested with CTIA-style 4-connector headset) Known Issues and their solutions - see here BIOS Version / Configuration Tested BIOS Versions for G4 Mini: 02.11.01 Rev.A or 02.12.00 Rev.A or 02.14.01 Rev.A, 02.15.00 Rev.A, 02.16.00 Rev.A, 02.17.00 Rev.A, 02.19.00 Rev.A, 02.20.01 Rev A, 02.21.00 Rev.A Tested BIOS Versions for G5 Mini: 02.07.01 Rev.A, 02.08.00 Rev.A, 02.09.00 Rev.A, 02.10.01 Rev.A, 02.11.00 Rev.A, 02.12.00 Rev.A, 02.12.10 Rev.A, 02.13.00 Rev.A, 02.14.01 Rev.A, 02.15.00 Rev.A See attached BIOS configuration in PDF document "HP EliteDesk 800 G4 Mini BIOS Configuration.pdf" Intel ME must be enabled for proper sleep / wake of UHD 630 UHD 630 Framebuffer Patching See here and here to understand my graphics properties for use with WhateverGreen.kext Read this to see my attempt at graphics patching without WhateverGreen.kext (WEG) to get a better understanding of what WEG is doing Current Versions Ventura 13.6.3 OpenCore 0.9.6 Lilu.kext 1.6.7 WhateverGreen.kext 1.6.6 AppleALC.kext 1.8.7 IntelMausi.kext 1.0.7 RestrictEvents.kext 1.1.3 VirtualSMC 1.3.2 NVMeFix.kext 1.1.1 Elements of this implementation that you may not see in other hacks HPET is disabled for the reason stated here RTC memory size is patched (like CLOVER's "Fix RTC") instead of using RtcMemoryFixup.kext for reasons here ScreenShots OC0.9.6-EFI-R001.zip HP EliteDesk 800 G4 Mini BIOS Configuration.pdf CLOVER-r5122-v6.zip


 10 points