Leaderboard


Popular Content
Showing content with the highest reputation on 07/01/2020 in all areas
-
I prefer to account Mojave to be the last good system.6 points
-
I hope you are right and that the dance begins4 points
-
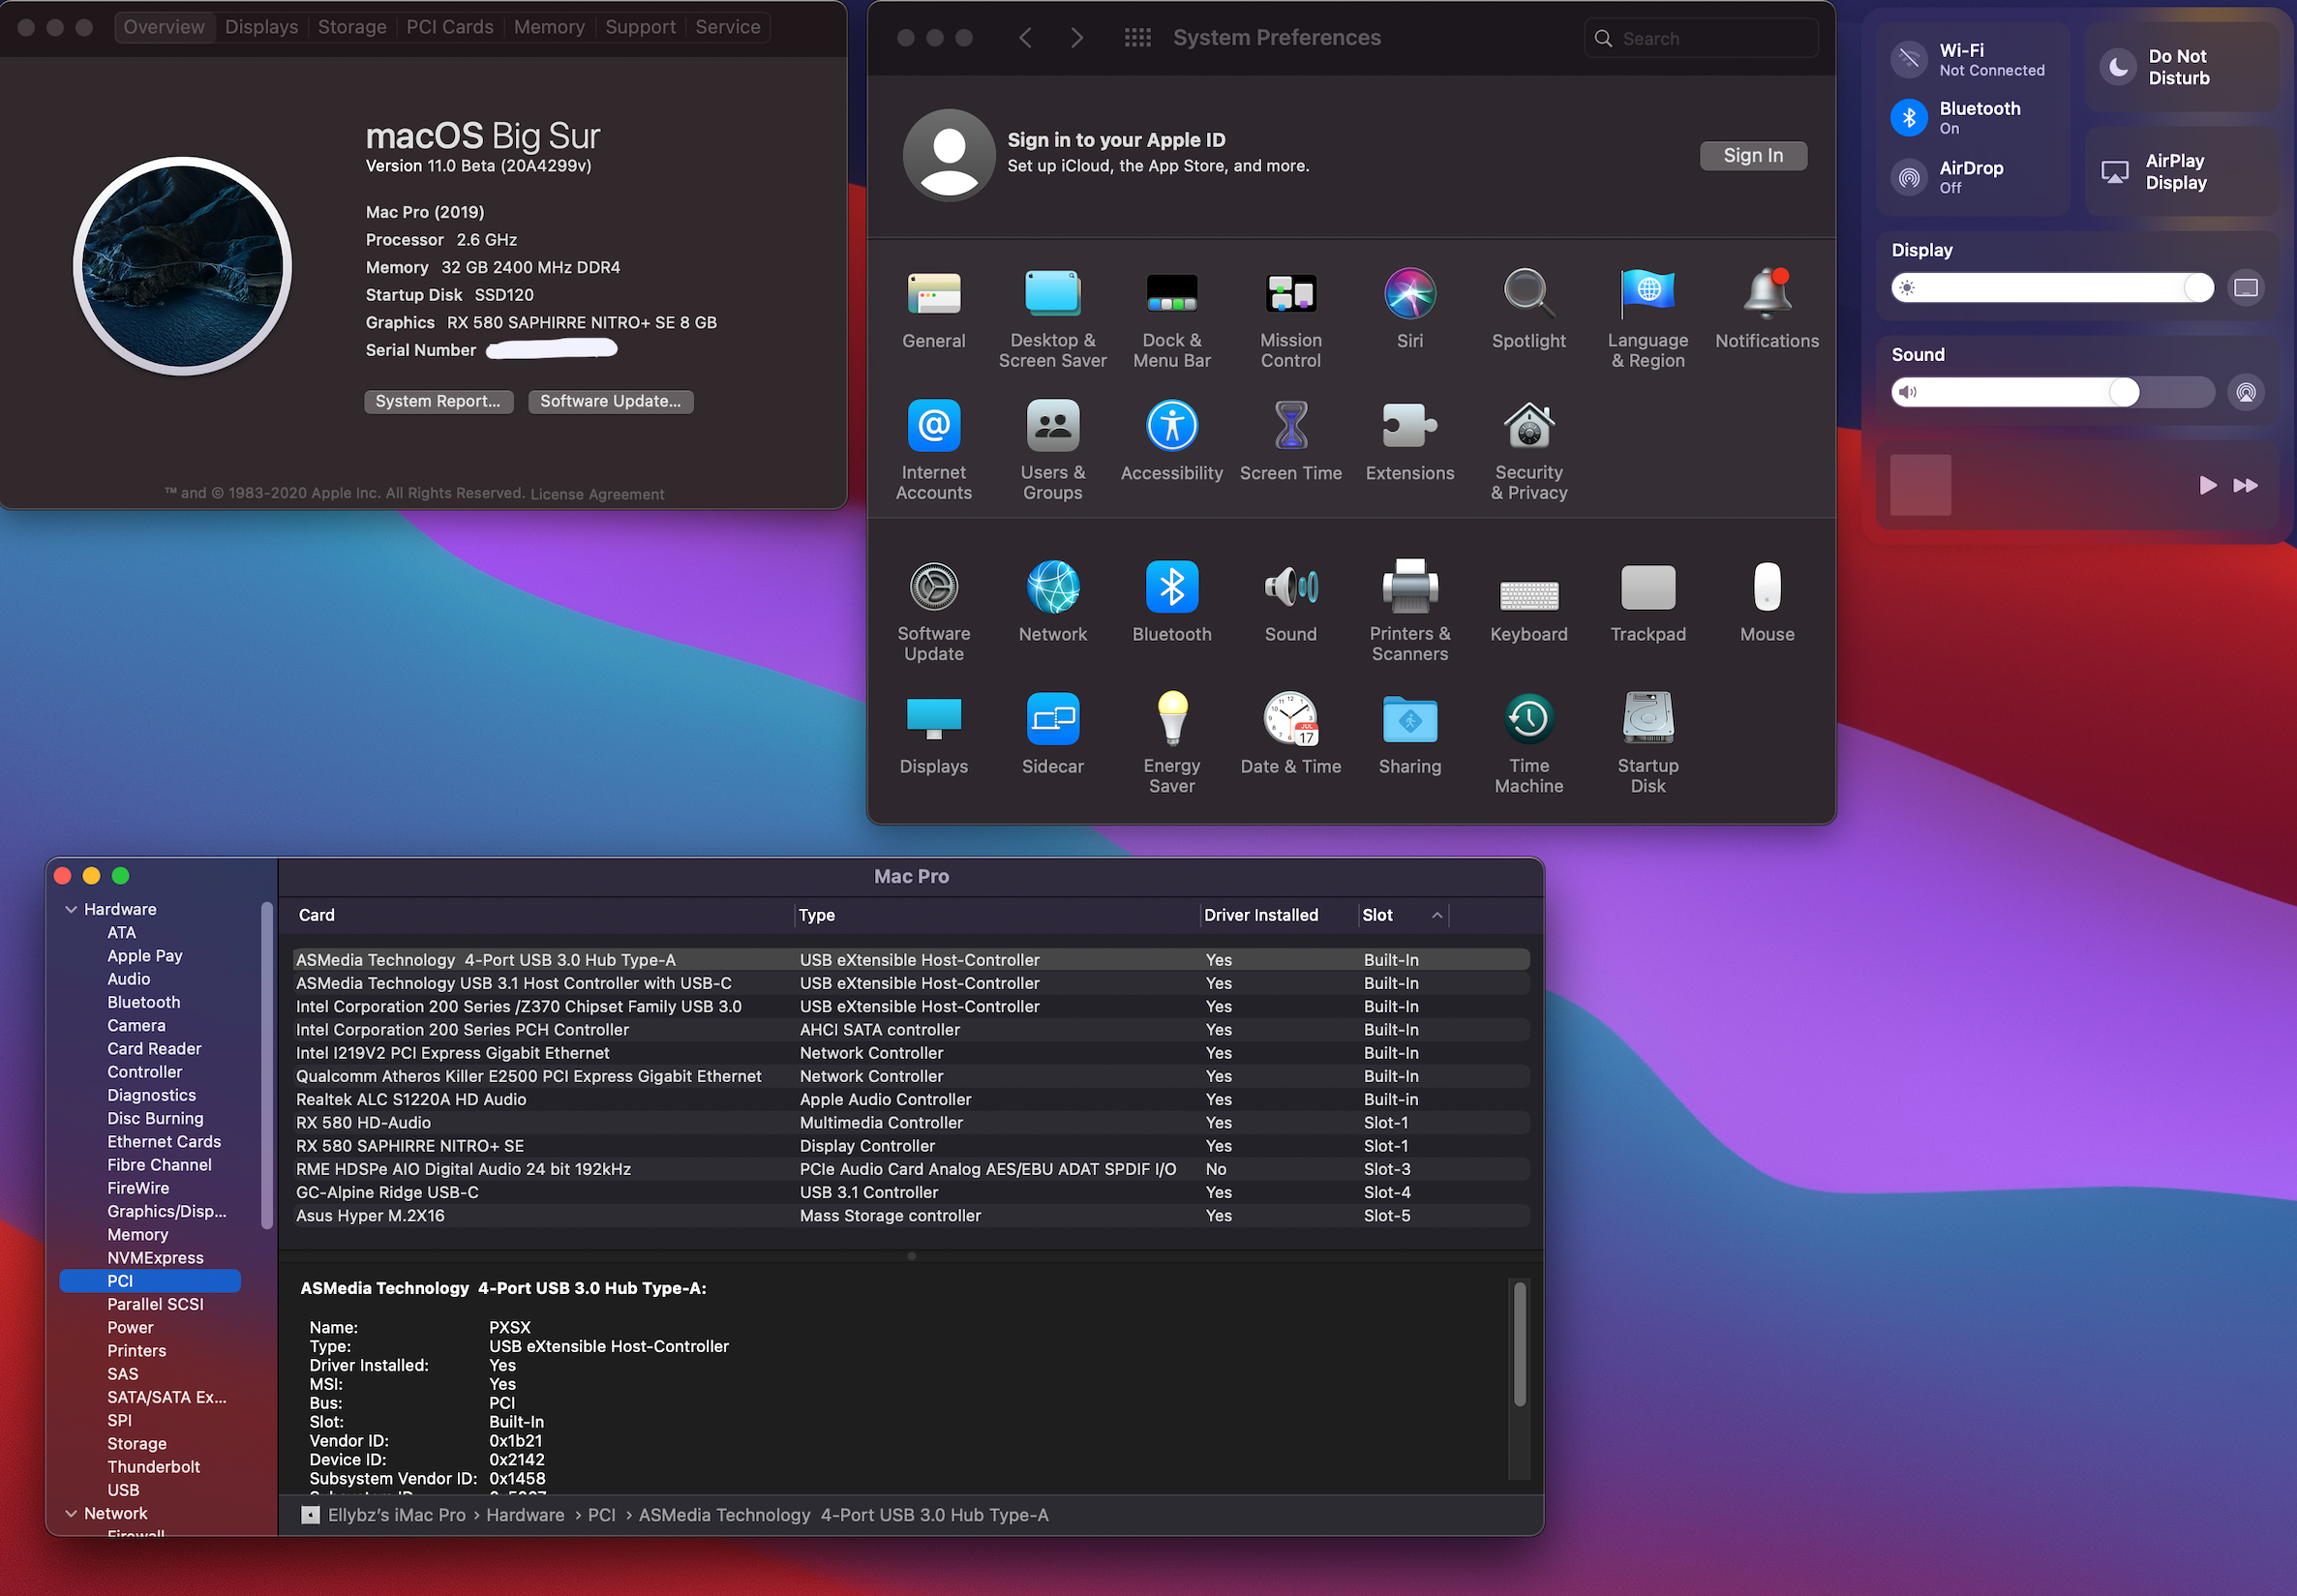
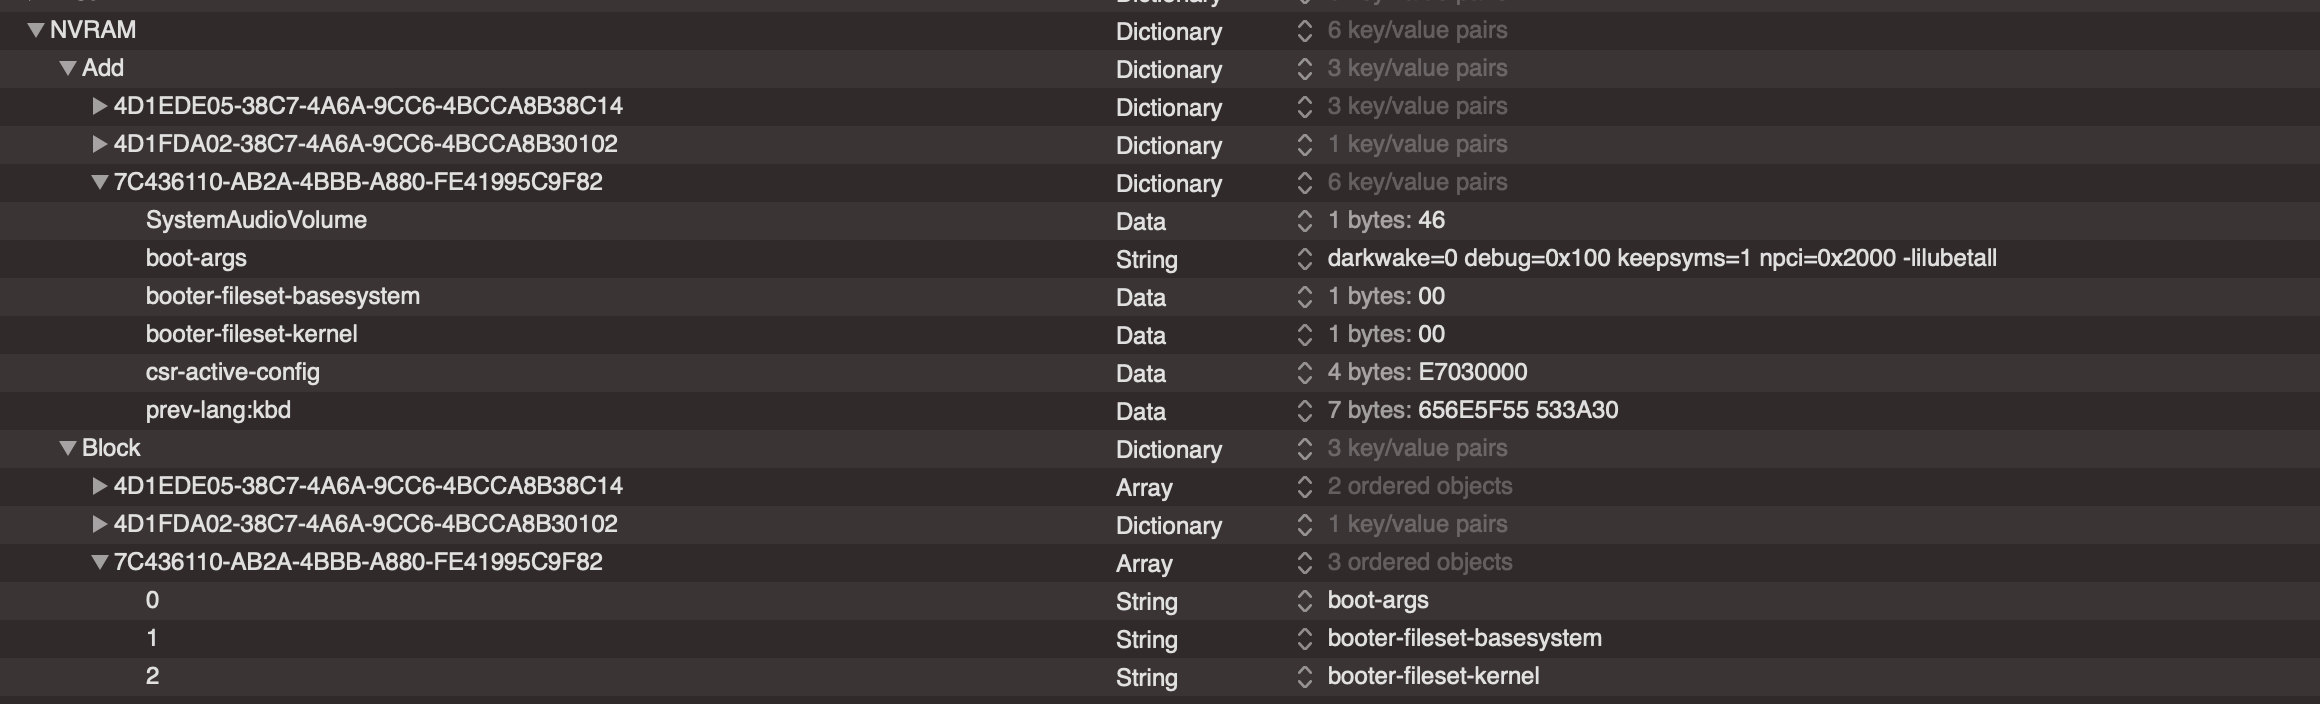
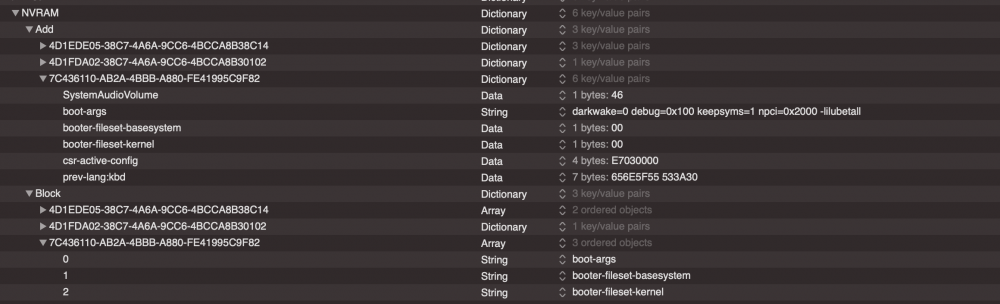
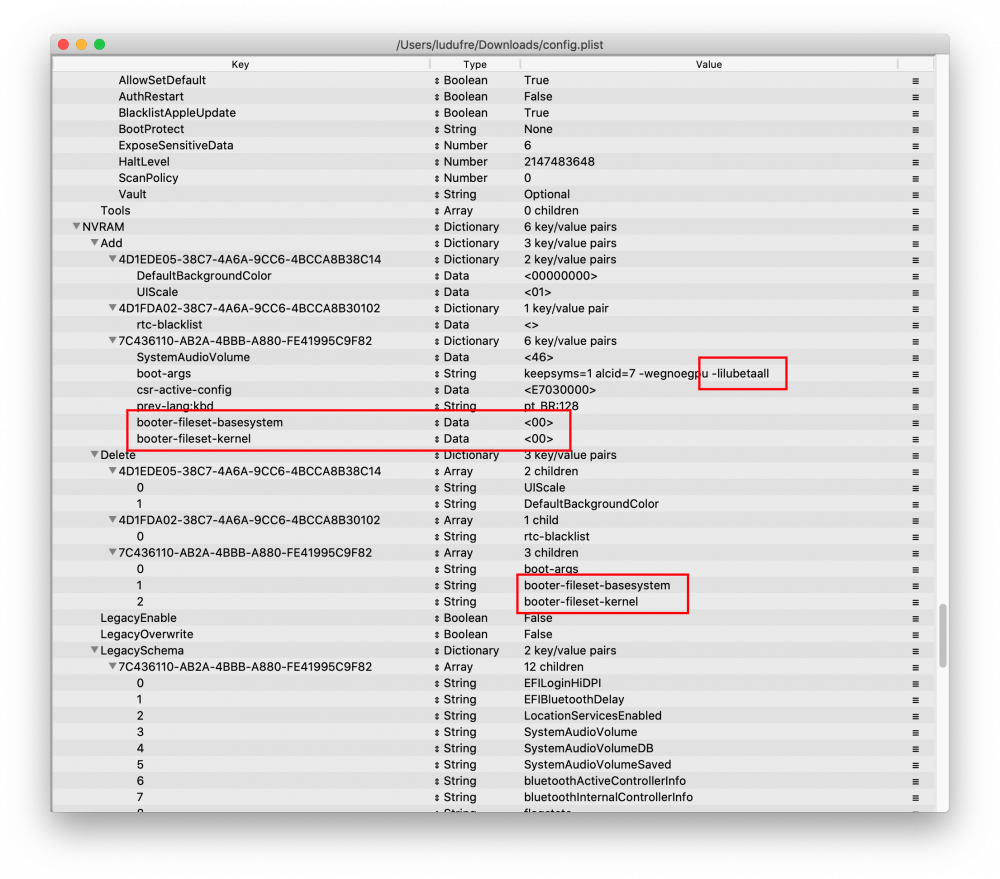
In case anyone was wondering... It is still possible to boot Big Sur with OpenCore NDK-059 As long as you update the kexts, drivers, etc, and the elements below, you're good to go. In your config.plist: 1-Disable AvoidRuntimeDefrag 2-NVRAM/Add : 7C436110-AB2A-4BBB-A880-FE41995C9F82 : booter-fileset-basesystem / Data=0 7C436110-AB2A-4BBB-A880-FE41995C9F82 : booter-fileset-kernel / Data=0 3 -NVRAM/Block ( String ) 7C436110-AB2A-4BBB-A880-FE41995C9F82 : booter-fileset-basesystem 7C436110-AB2A-4BBB-A880-FE41995C9F82-: booter-fileset-kernel 4- boot args: Lilubetaall (Not needed with RX580 ) First part of installation was done via VMware Fusion / OSX Mojave ( Installer dowloaded thru Catalina Software update ) Not working (Yet ) : Airplay & Sleep functions BT, Audio ( except RME PCIe) , DP, TB3 are working. I don't use Wifi. Enjoy!


 3 points
 -
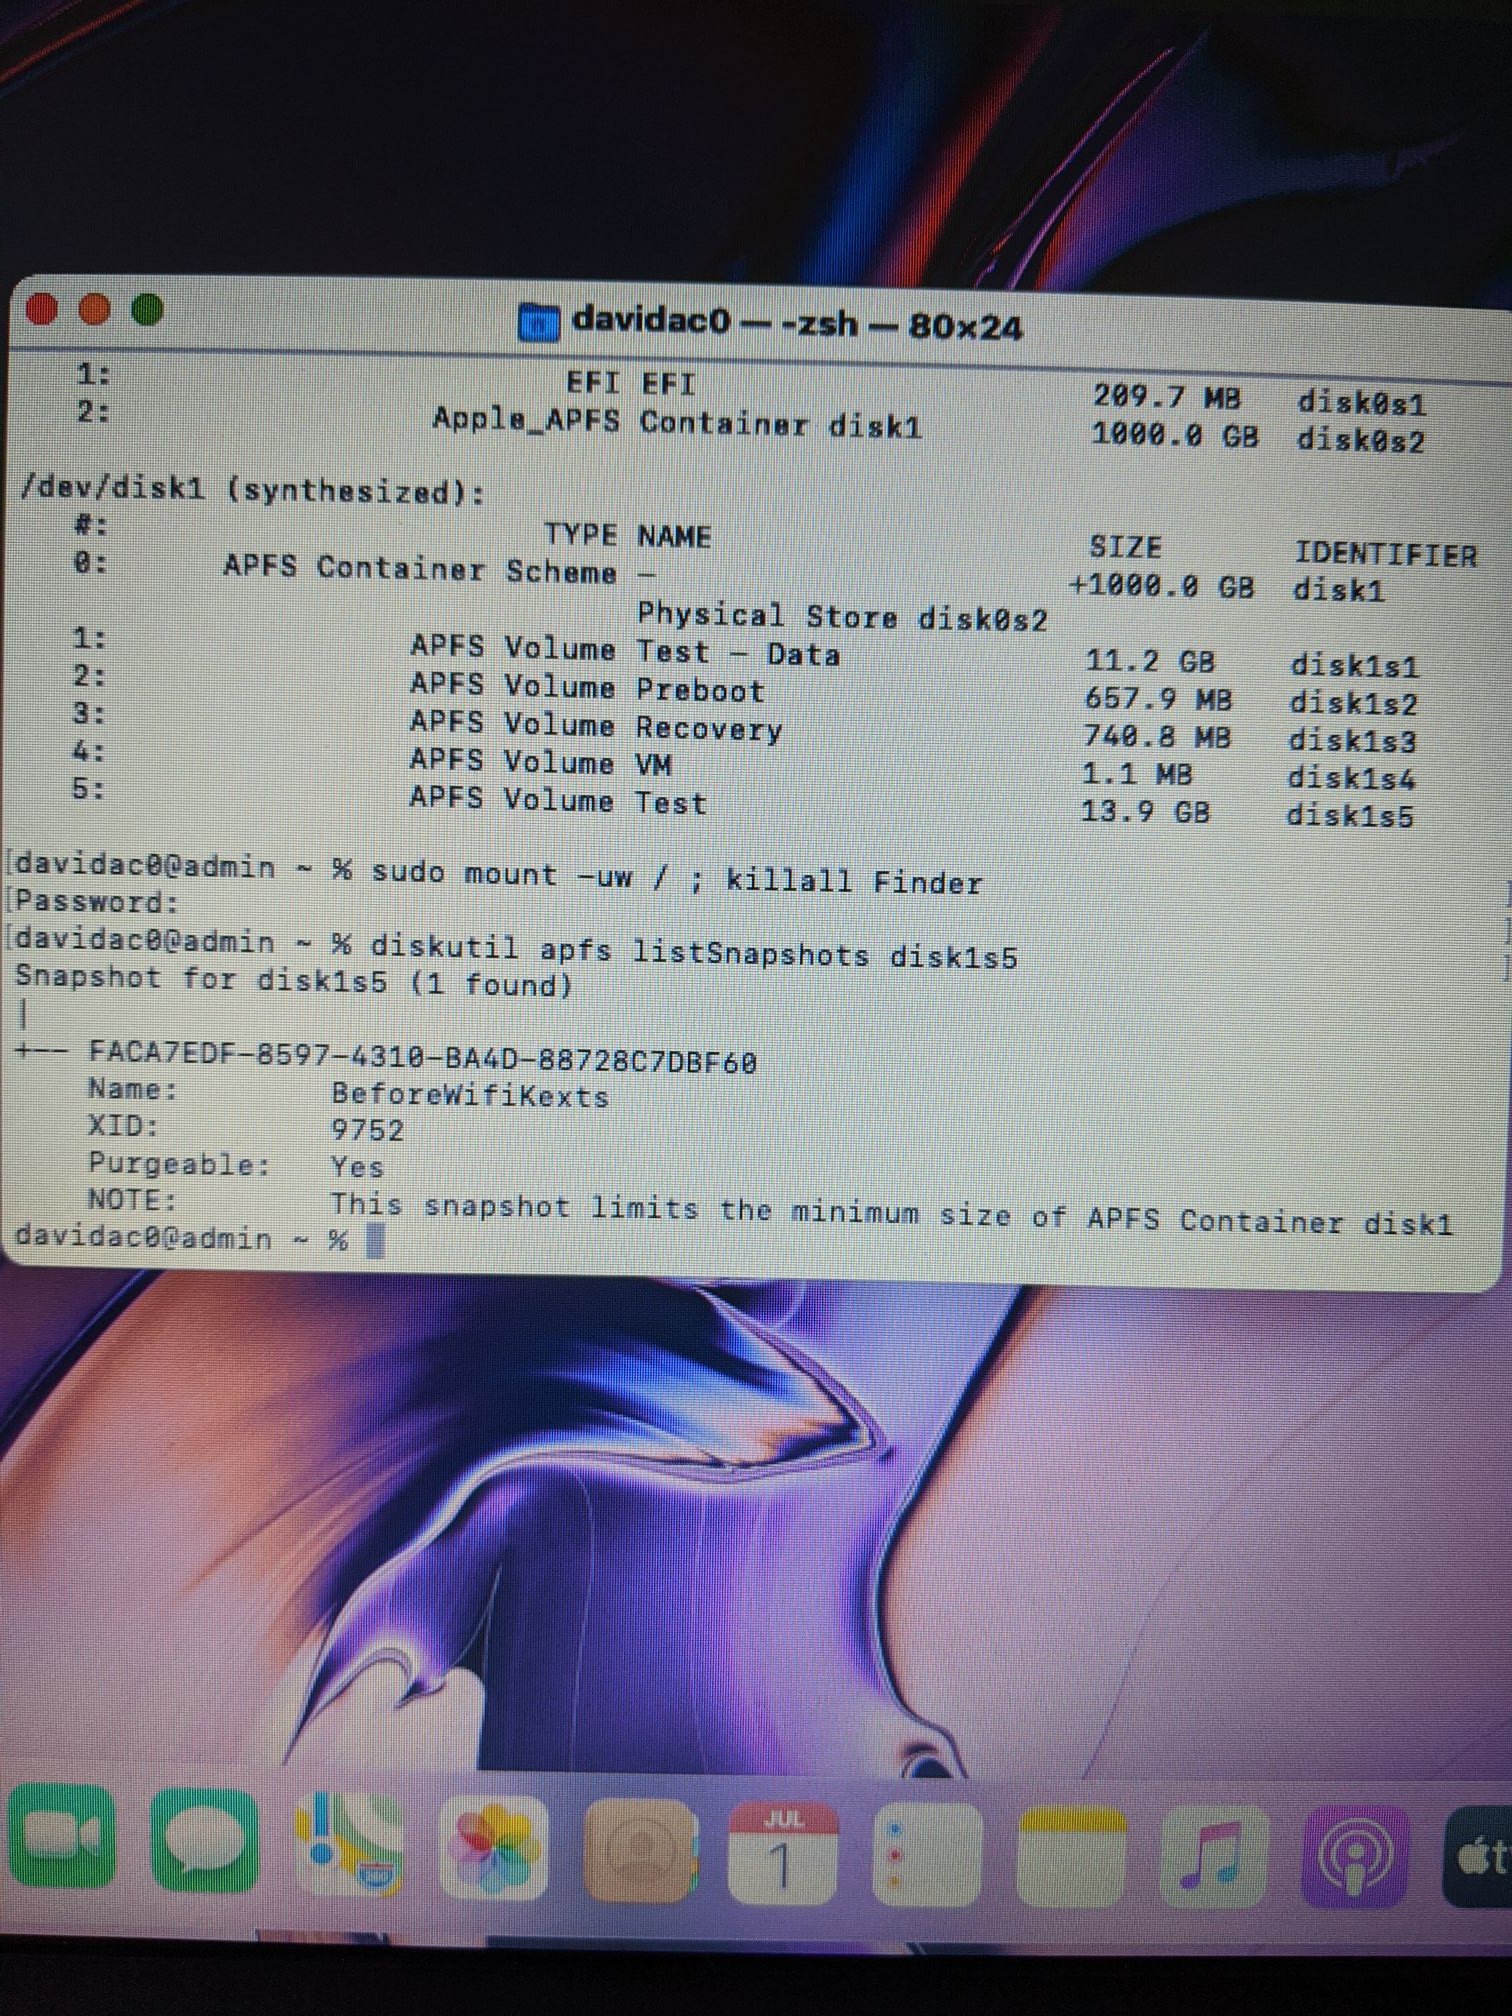
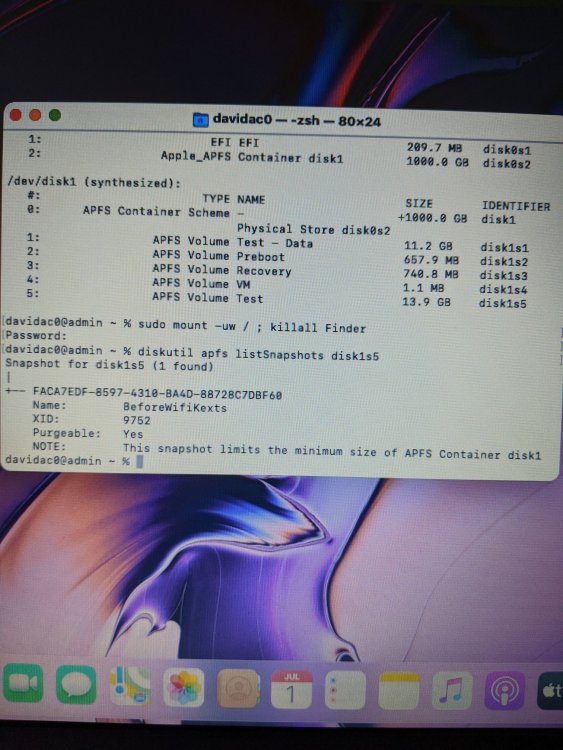
@pico joeFollowing the steps, before that you have to modify in opencore in the section NVRAM - csr-active-config with the value FFFFFFFF instead of 67000000 -Boot into Big Sur or a BS recovery/install disk diskutil mount diskXsY the real system volume (not the root snapshot, which will already be mounted at diskXsYsZ) -Remount it as readwrite: sudo mount -uw /Volumes/<Volume\ Name> (In my case /Volumes/Test\ 1) -Make a snapshot /System/Library/Filesystems/apfs.fs/Contents/Resources/apfs_systemsnapshot -s "BeforeWifiKexts" -v /Volumes/<Volume\ Name> - Check Snapshots on System : diskutil apfs listSnapshots diskdiskXsY There should be 2 Snapshots, one called beforewifikexts. - Make backup snapshot bootable, notice “-r” instead of “-s”: /System/Library/Filesystems/apfs.fs/Contents/Resources/apfs_systemsnapshot -r "BeforeWifiKexts" -v /Volumes/<Volume\ Name> -Reboot Sudo reboot - Mount System disk sudo diskutil mount diskXsY -Remount it as readwrite: sudo mount -uw /Volumes/<Volume\ Name> (In my case /Volumes/Test\ 1) - CheckSnapshots on System : diskutil apfs listSnapshots diskdiskXsY - Delete Snapshot Sudo diskutil apfs deleteSnapshot disk1s5 -uuid UUIDHERE (replace disk1s5 and UUIDHERE with corresponding values, just leave the snapshot beforewifikexts) - sudo reboot - You can Mount s/w sudo mount -uw / All credit to Andrey Viktorov for his guidance in medium, and to @AsentientBot
 2 points
 -
Hello after a couple days I got Mac OS big sure running on my laptop Dell latitude E7470 i7 6th 16 gigs of ram Intel hd 520 bcm94360cs cars works natively What works Bluetooth (choppy audio) WiFi Battery icon Sound What doesn’t work still testing Sleep ?IMG_1511.HEIC2 points
-
Thanks once again. I never compiled for source so I stick with the release versions. Audio is now working!2 points
-
As already mentioned in the guide. You need to use the Kexts compiled directly from the source code (because they are more recent). But, follow mine attached. And again: Add -lilubetaall to your config.plist's boot-args, otherwise it won't work. Arquivo Comprimido.zip2 points
-
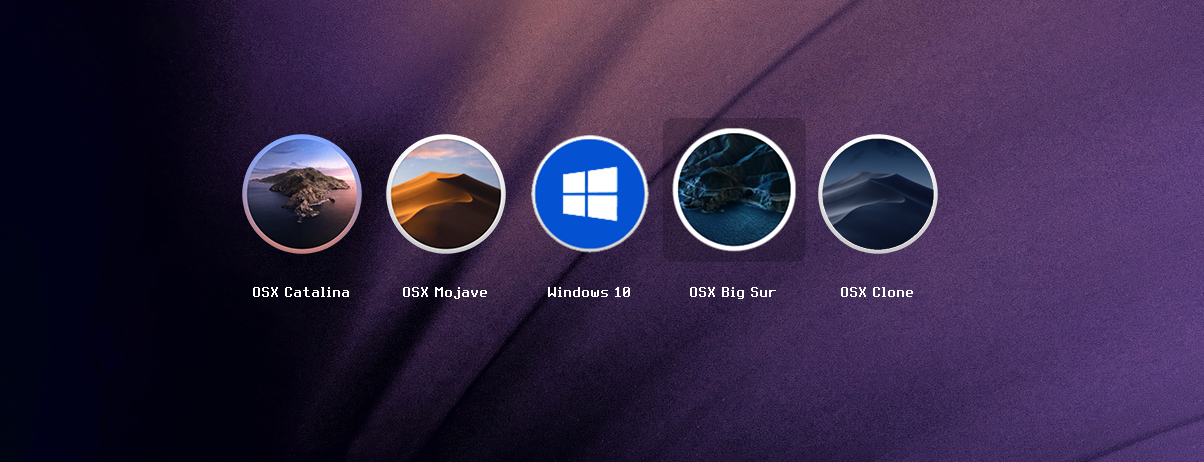
OpenCanopy_Pick_and_Mix_Icons_3 Building on the last set and slowly adding to the collection I've included the missing, non-mandatory, Other and External icons that OpenCanopy looks for. There are now also some white external drives, some Microsoft and Microsoft Windows 10 ones and a preliminary few internal drives with labels. I think it may be good to eventually have some kind of visual repository for these where it will be easy to scroll through and maybe just download the ones of interest... Anyway thats for later, for now I'll just keep posting a handful as I create them.2 points
-
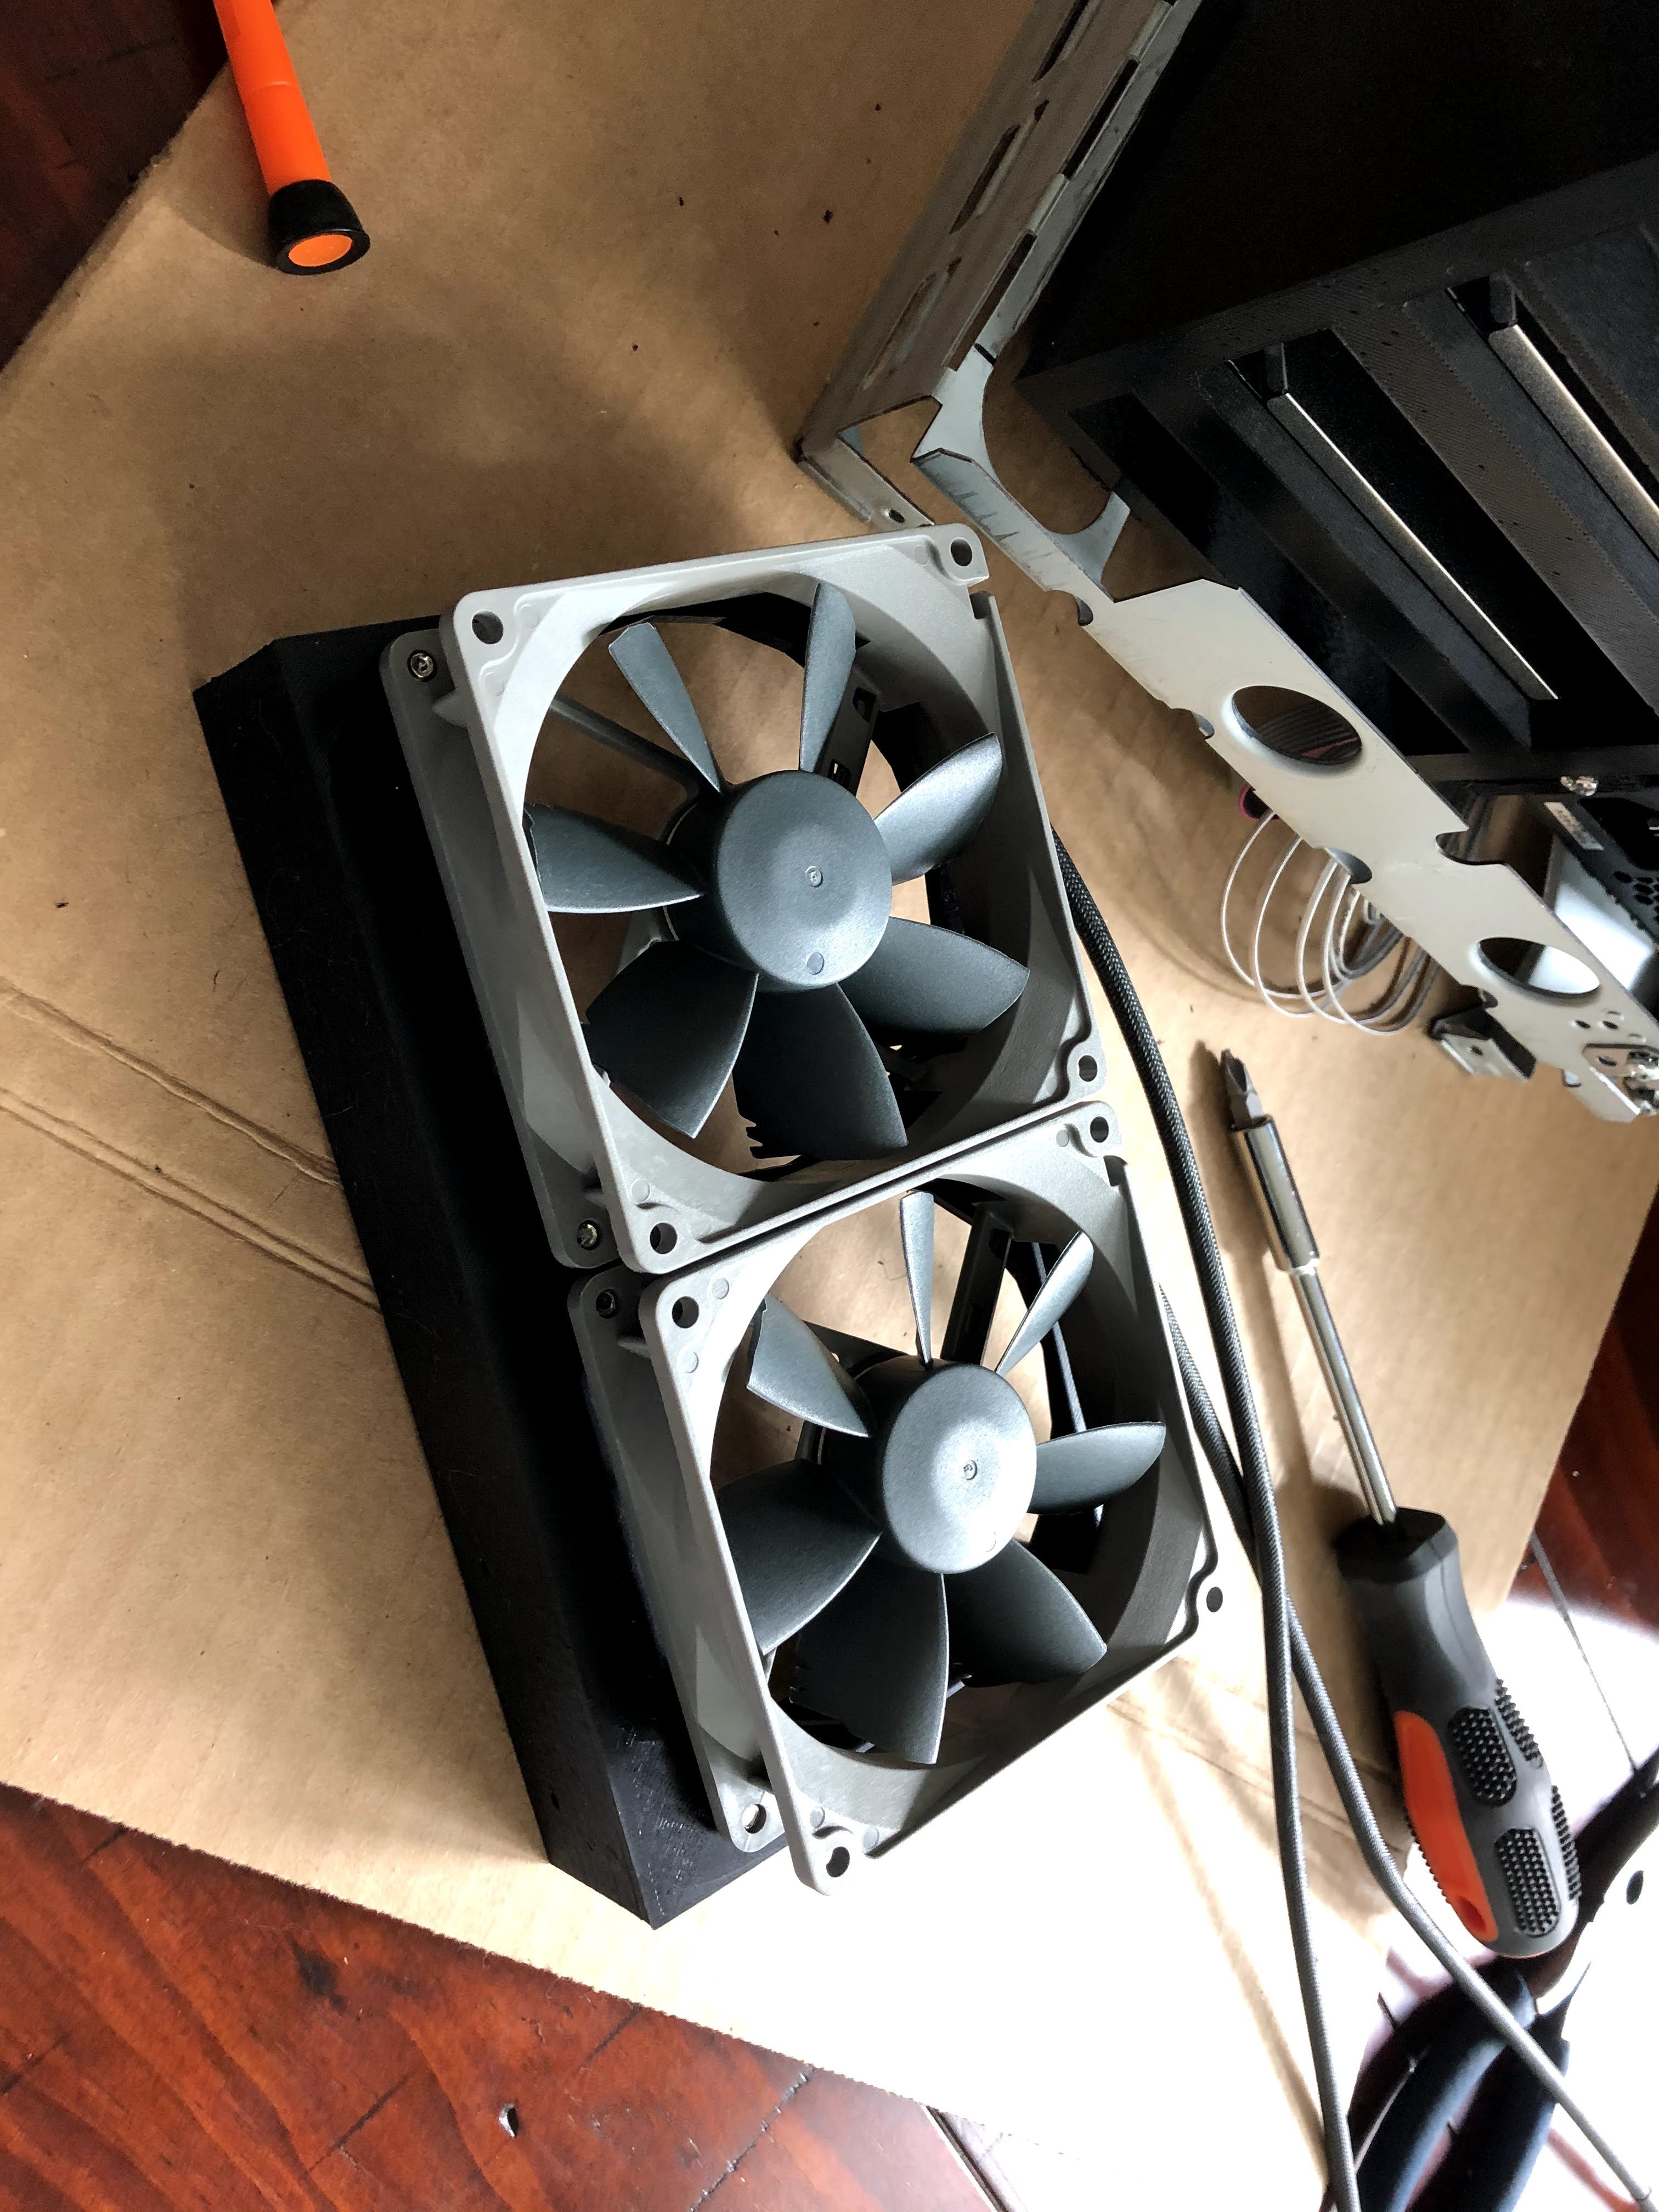
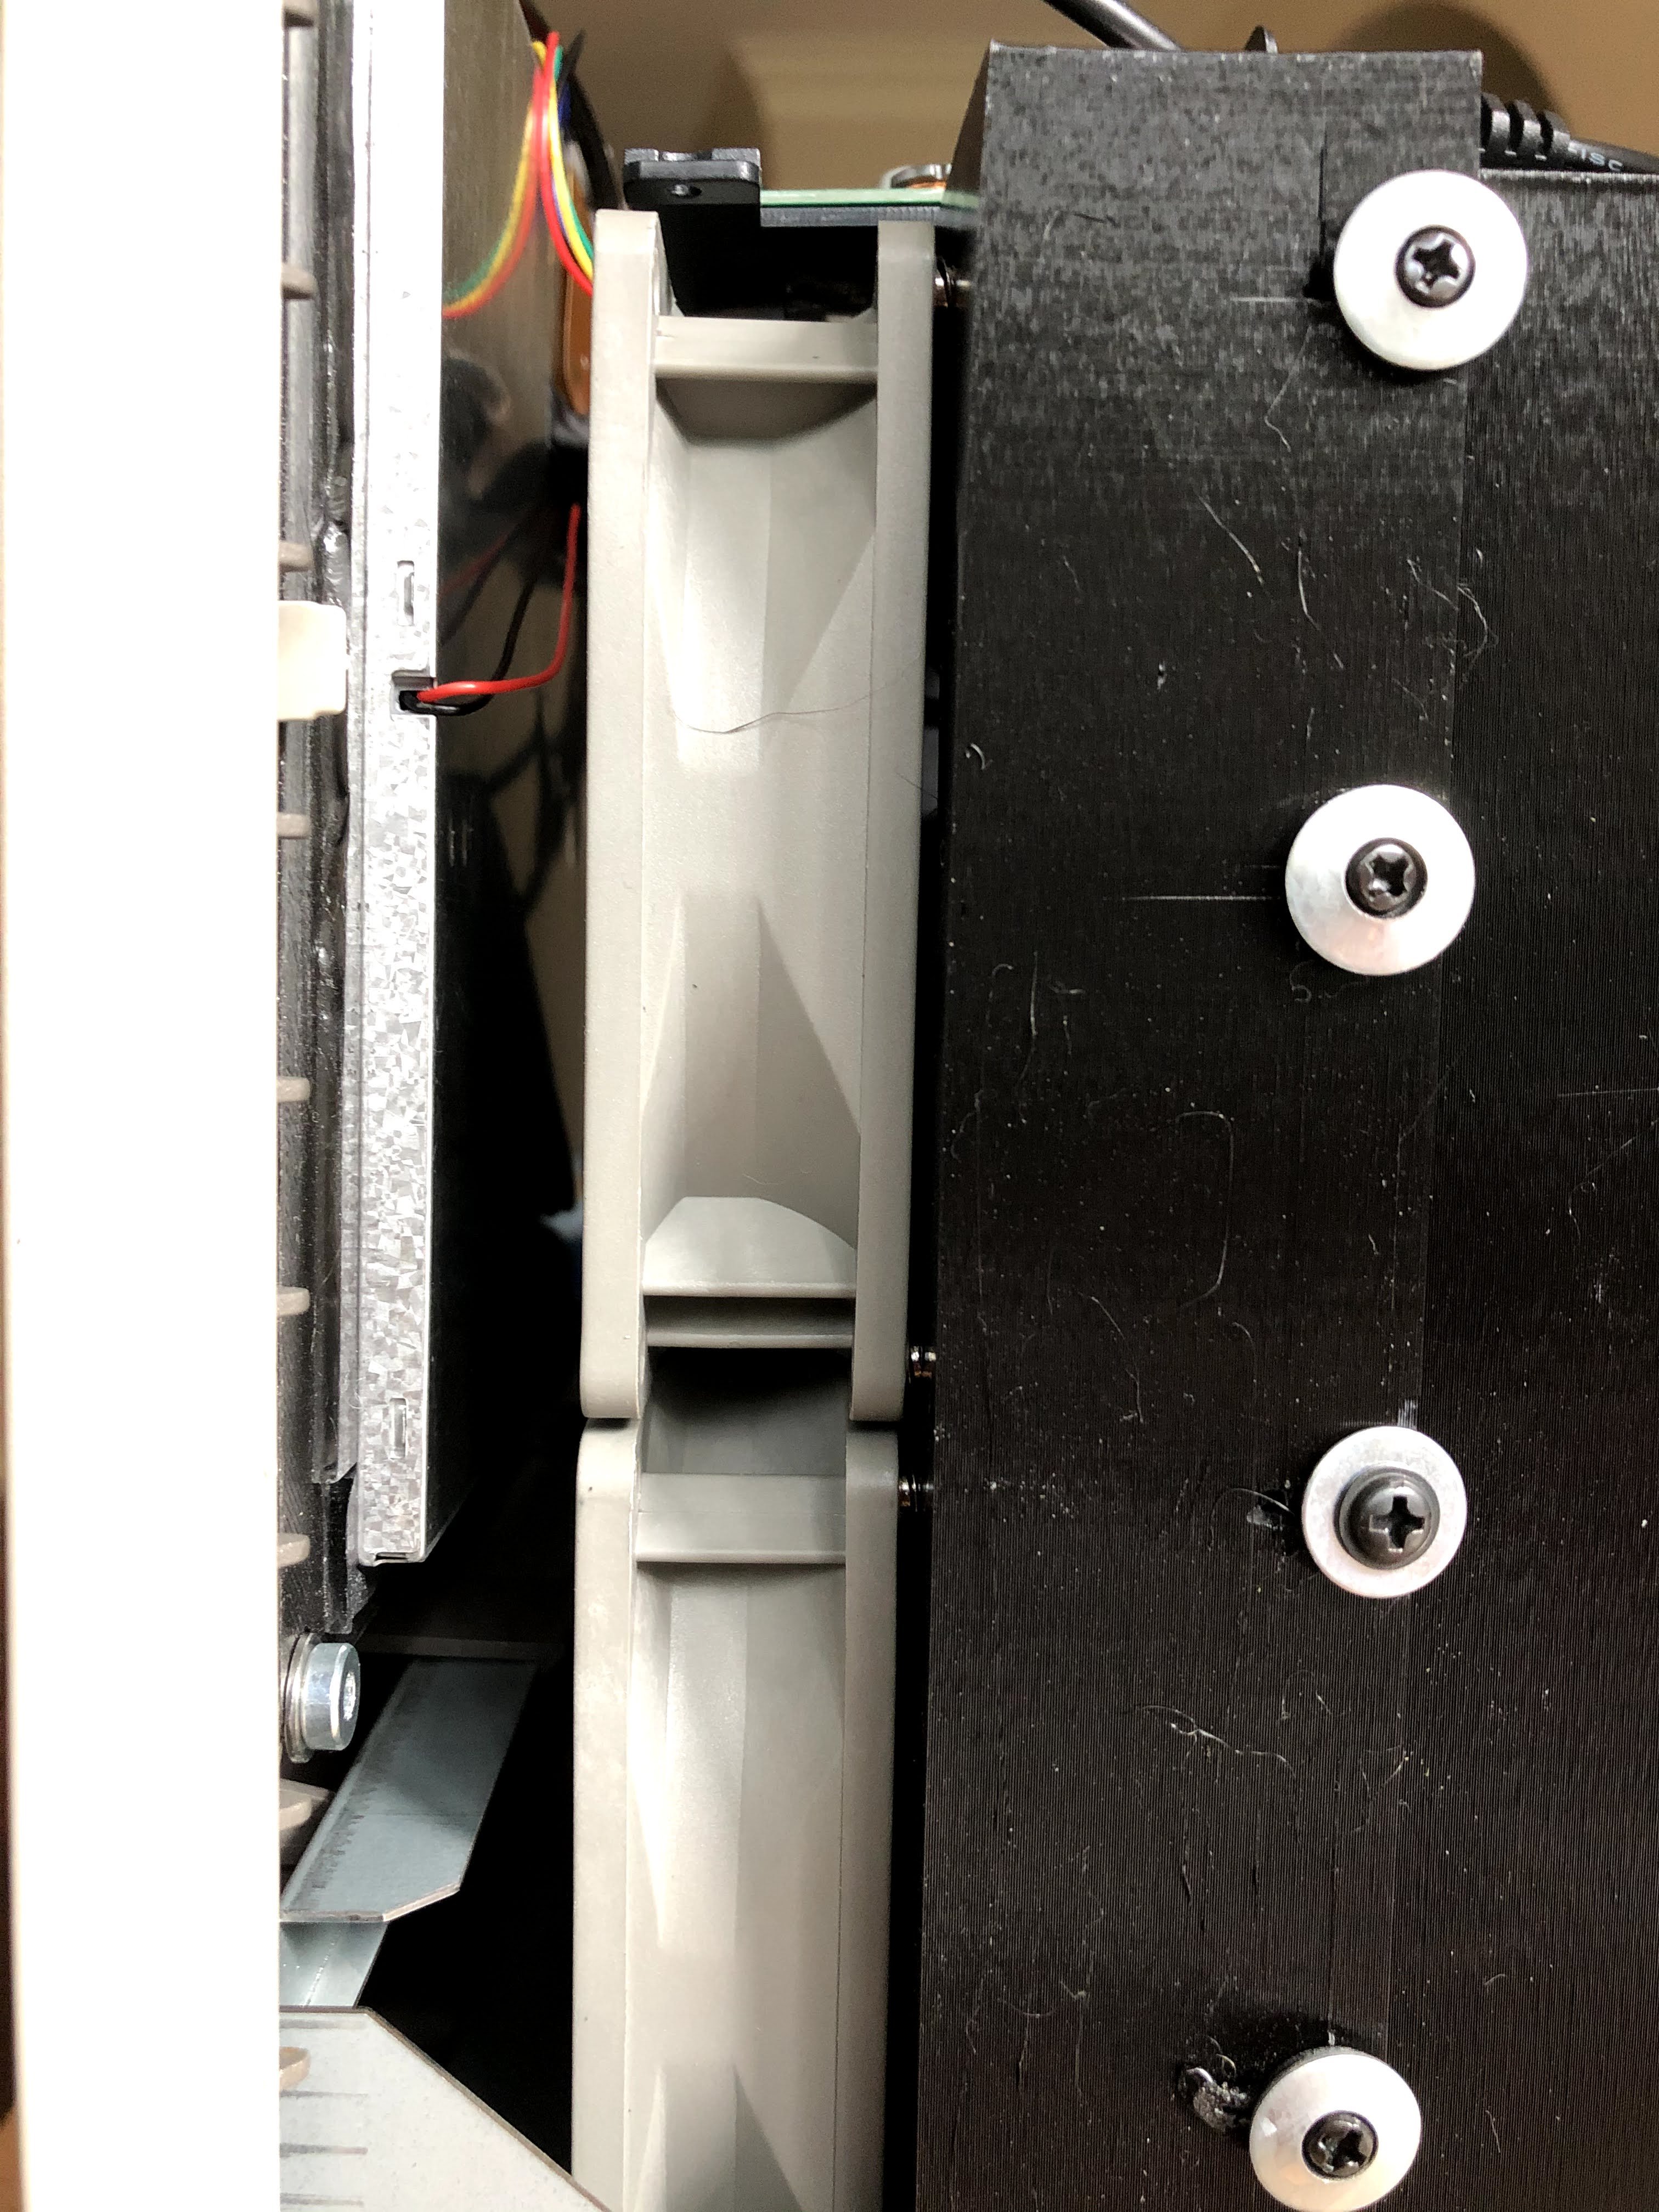
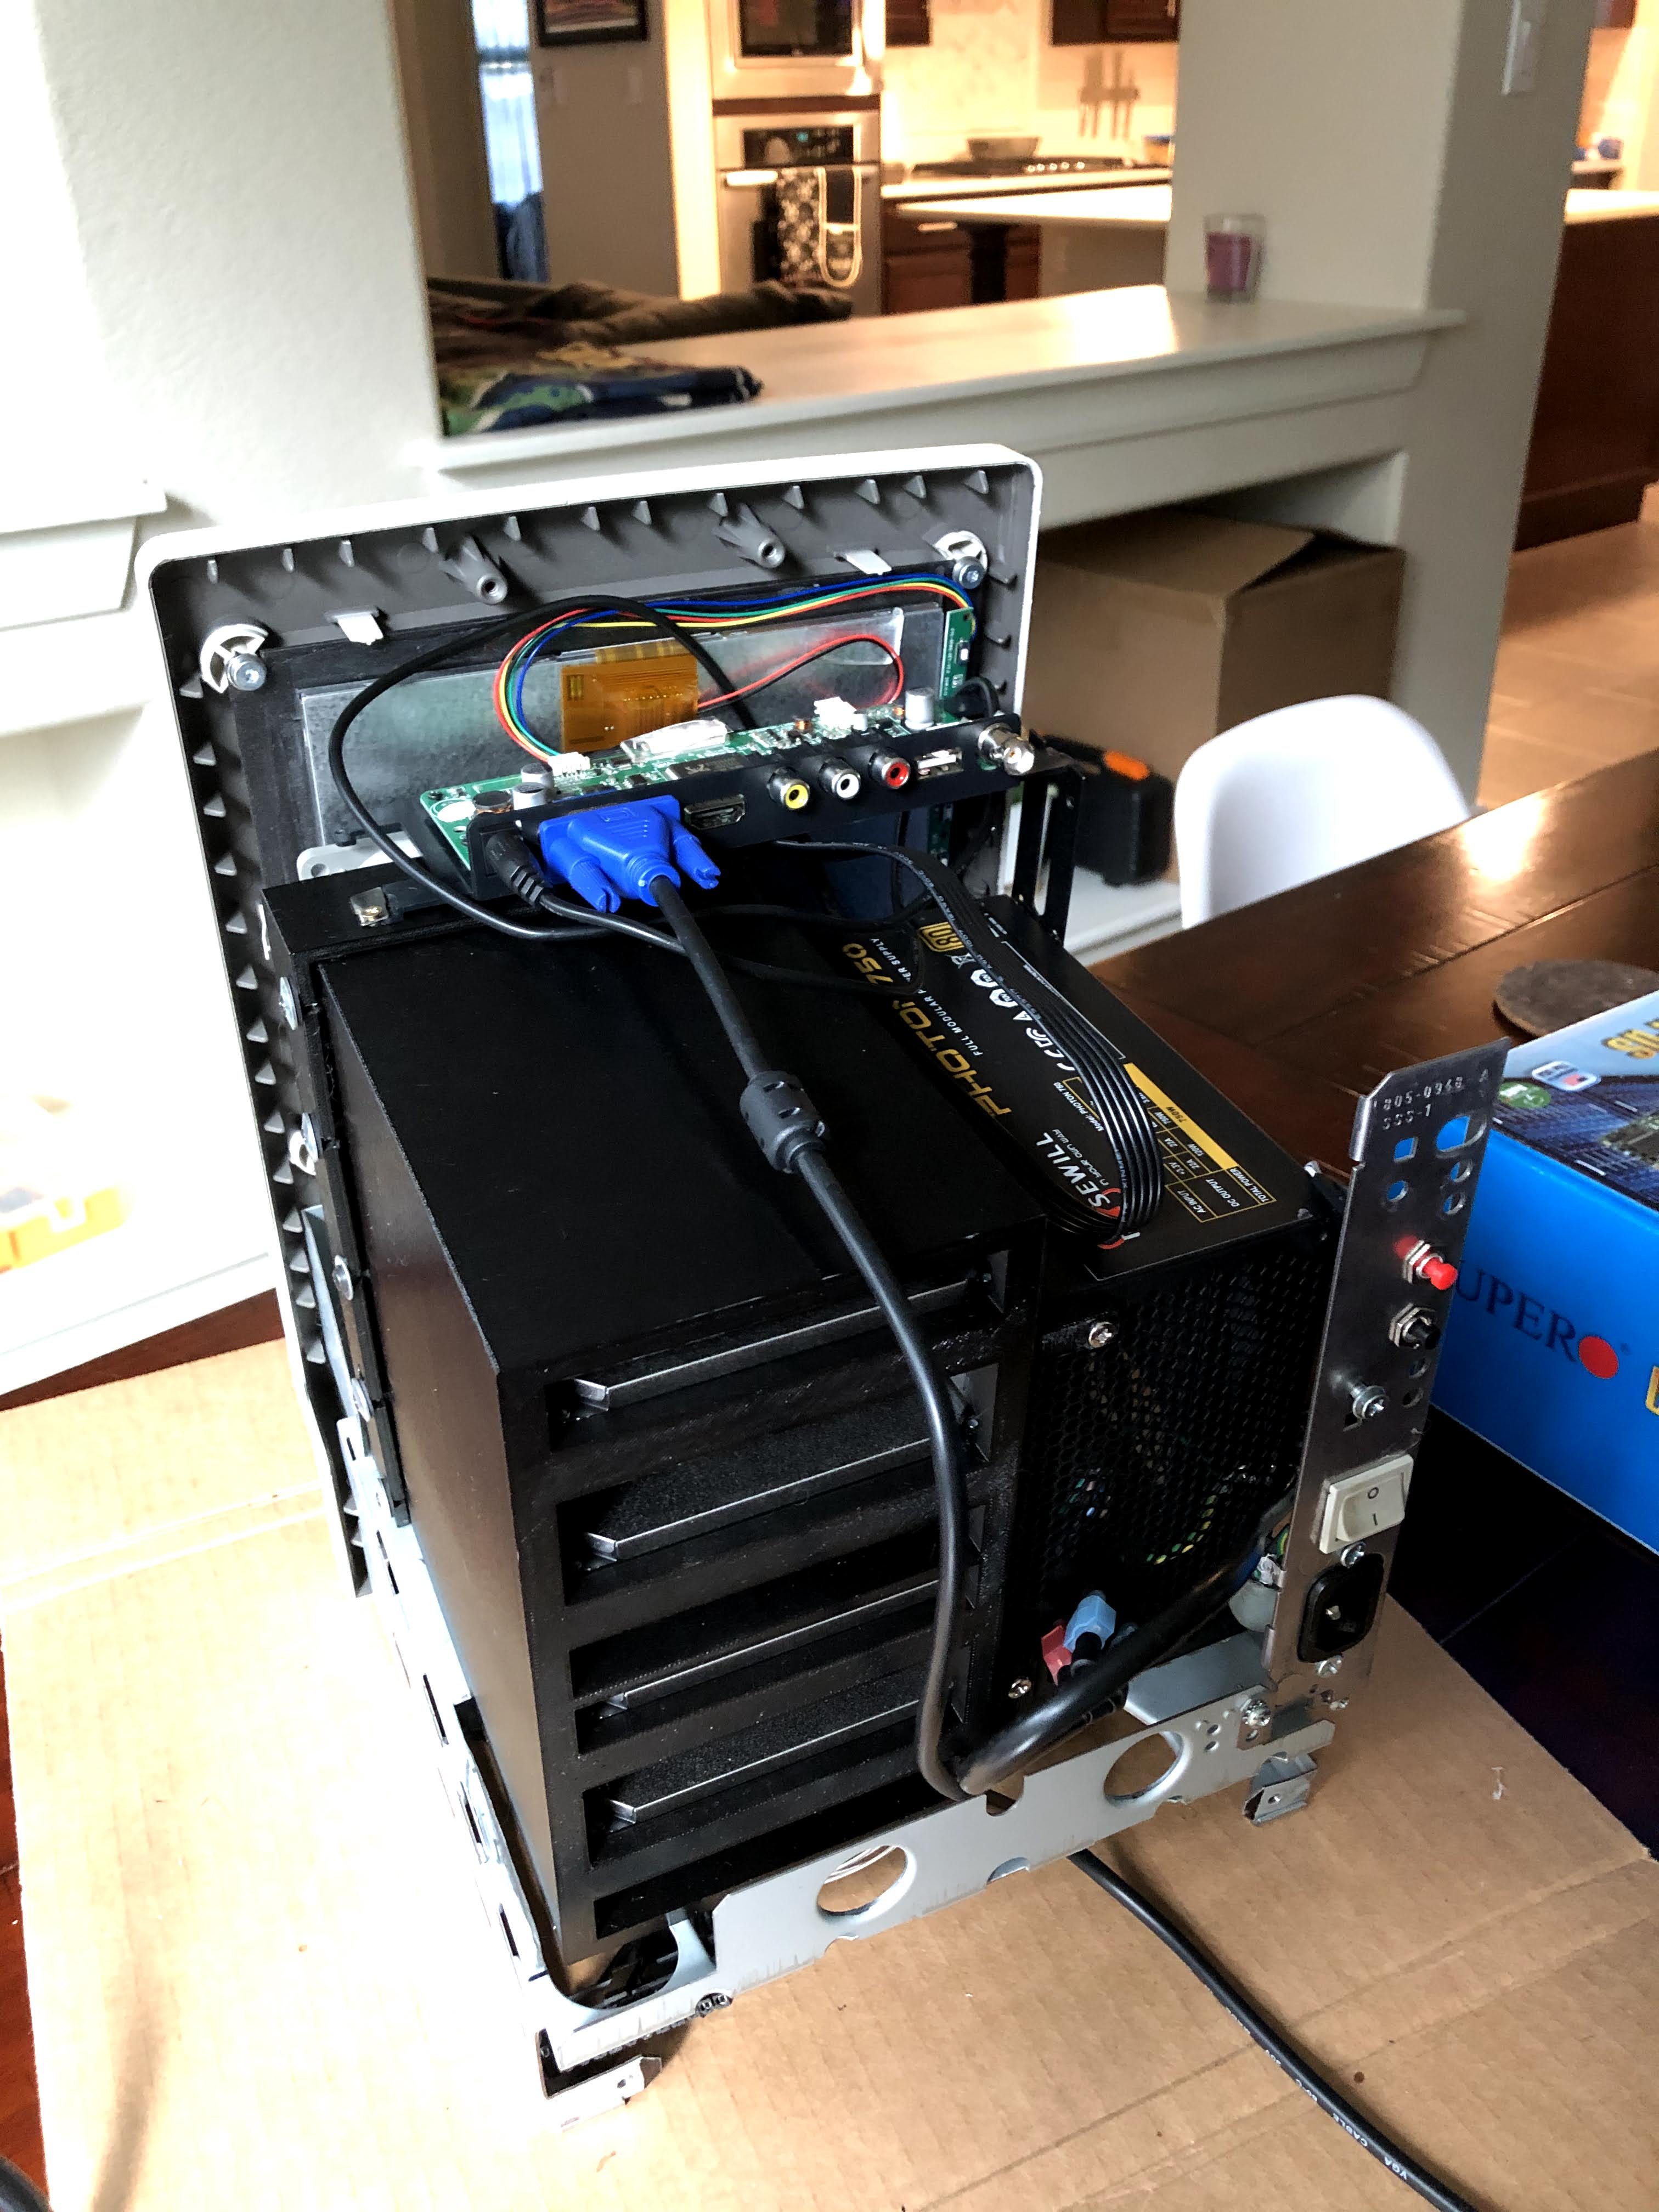
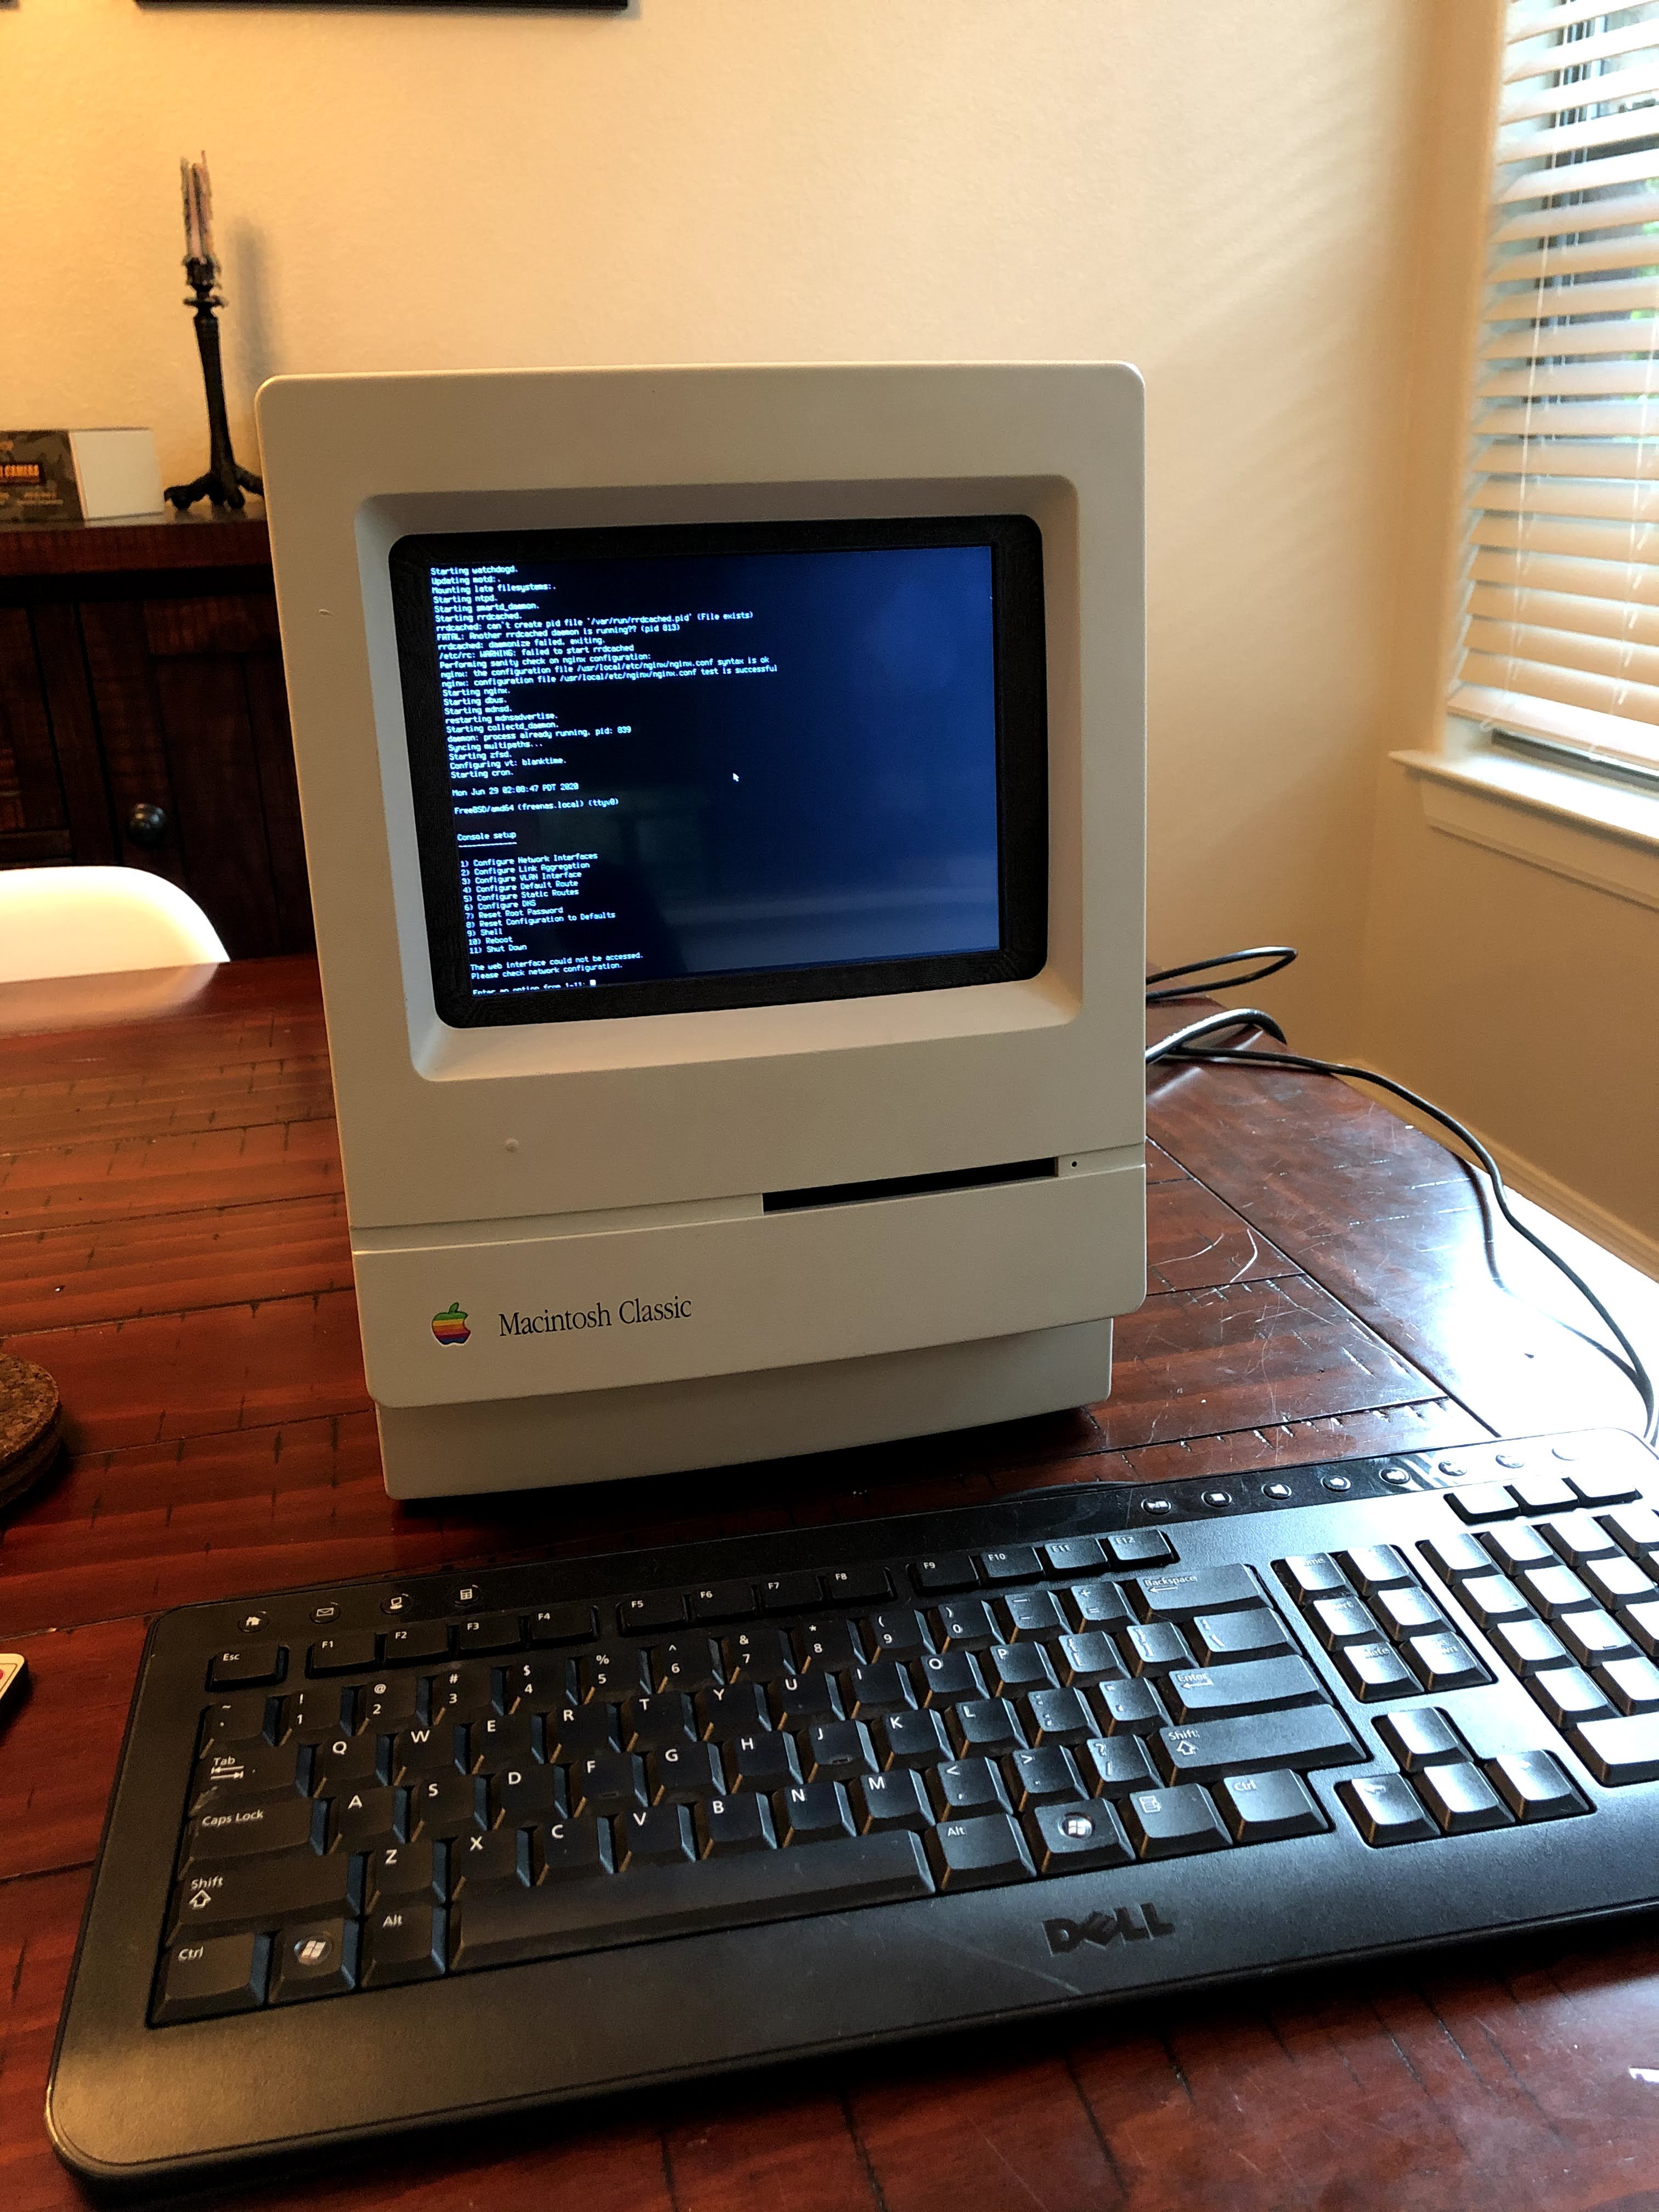
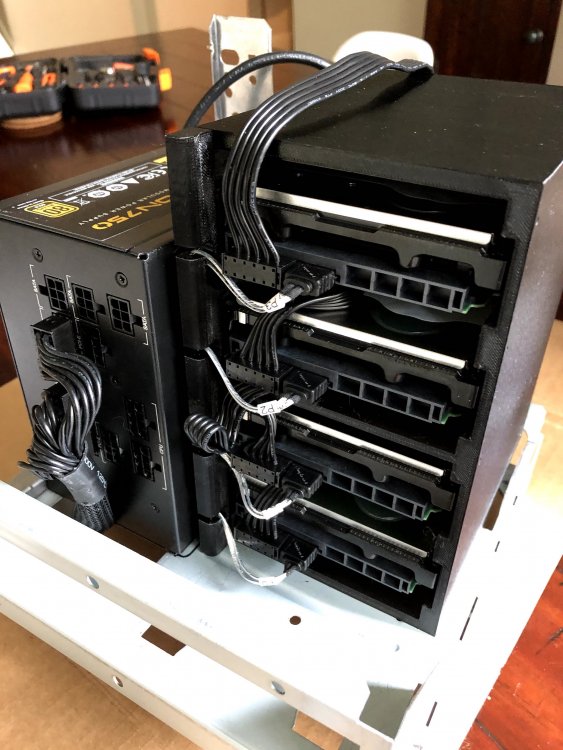
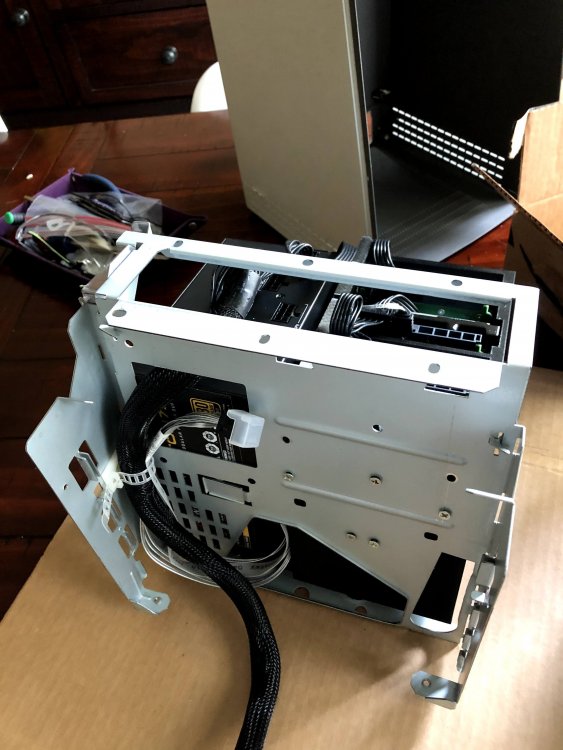
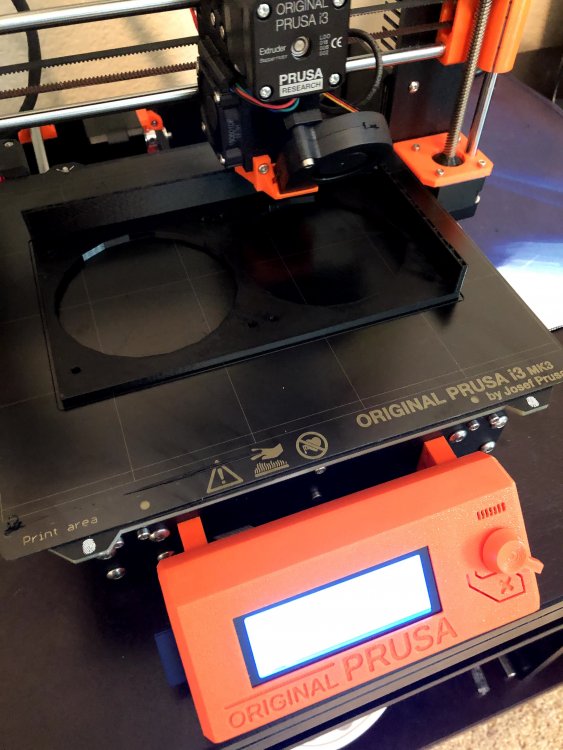
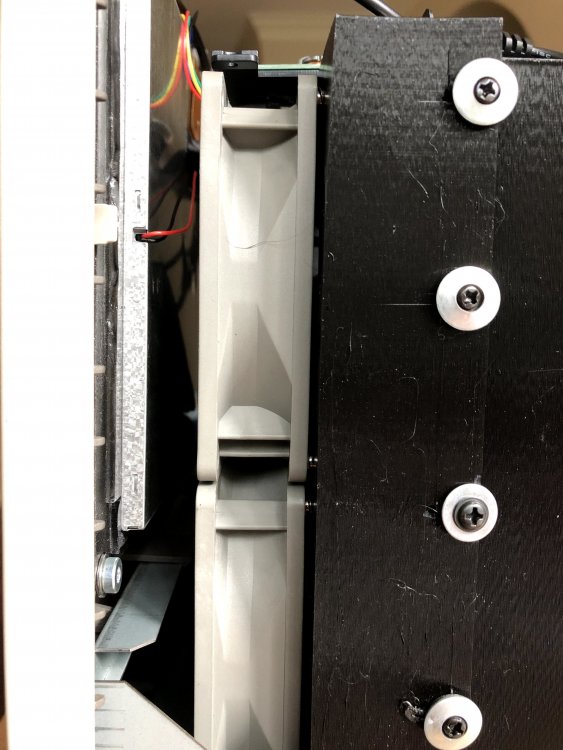
SATA cables with cable arm installed Cable routing 3D printed a plate that holds the 92mm noctua fans The print came out a bit stringy, and my choice of mounting hardware doesn't help. I'm not thrilled about how this looks and will probably redo it the next time I have the case open. Shot from the back of the new LVDS board location Some last minute testing before buttoning her up. Completed and living happily with my case modded G4 in Akkala Ancient Tech Lab Final parts list: 1x Vintage Mac Classic 1x Supermicro A2SDi-8C-HLN4F logic board 1x Rosewill PHOTON Series 750W 4x HGST Ultrastar HUH721212ALE600 12TB 2x Crucial 16GB 288-Pin DDR4-2400 2x Noctua NF-B9 redux-1600 PWM fan 1x Everflow 60mm Dual Ball Bearing PWM Fan 1x YWD-801 8” VGA 4:3 LCD display 1x Samsung 64GB FIT Plus USB Flash Drive 1x Spare power cord (for PS relocation) 2x momentary N/O SPST switch Custom parts made: 1x display bezel (PLA) 1x rear I/O sheild (PLA) 1x 4-bay drive cage (PLA) 1x drive bay fan plate (PLA) 4x logic board mounts (PLA) 4x CPU fan clip (ABS) Consumables: Assortment of heat shrink tubing Rosin core solder Double-stick tape Assortment of sheetmetal screws and nuts About 1/2 roll of PLA Some glue gun sticks Time w/o design work: 20 hours Time w/design work: 32 hours


 2 points
 -
Some boards do not have a visible option for CFG Lock. For those cases the Bootloaders offer options to not write to the MSR. An other way is to disable CFG Lock in the BIOS despite the fact that there is no option available in the user interface. One way to do so is to use UEFITool, ifrextract and a patched Grub. Which is not only cumbersome, also it will work only, if the storage used for CFG Lock is in a certain varstore. Generally speaking CFGLock.efi does what those tools do, but the only user interaction needed is to confirm that you want to toggle the CFG Lock value (on to off/off to on) and it works regardless where the CFG Lock option resides, as long as the BIOS has a CFG Lock option - hidden or not - in their HiiDatabase. It is an EFI Application. Install it in the Tools folder of your OpenCore EFI and enter it under Misc->Tools in the config.plist. The EFI must not be able to boot MacOS, it must just be able to show the picker. It should also run as an application from the UEFI shell, but I haven't tested this. CFGLock.efi.zip1 point
-
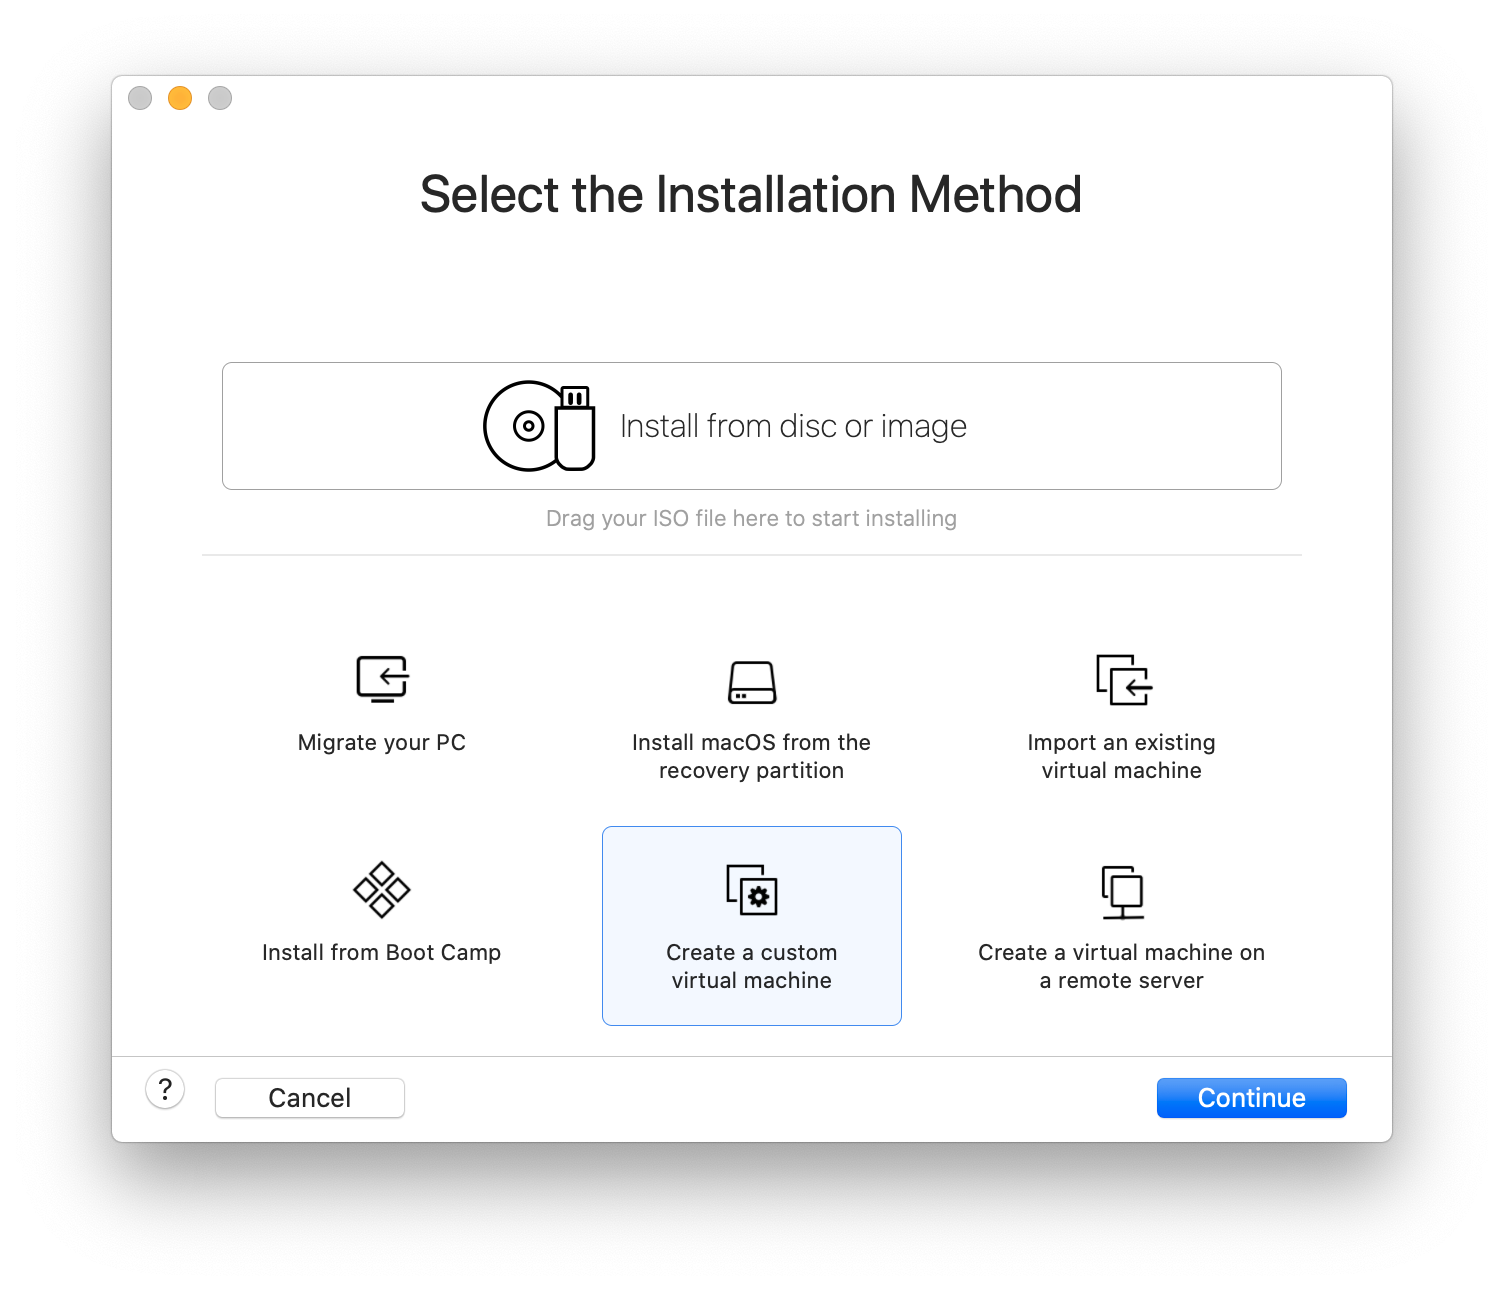
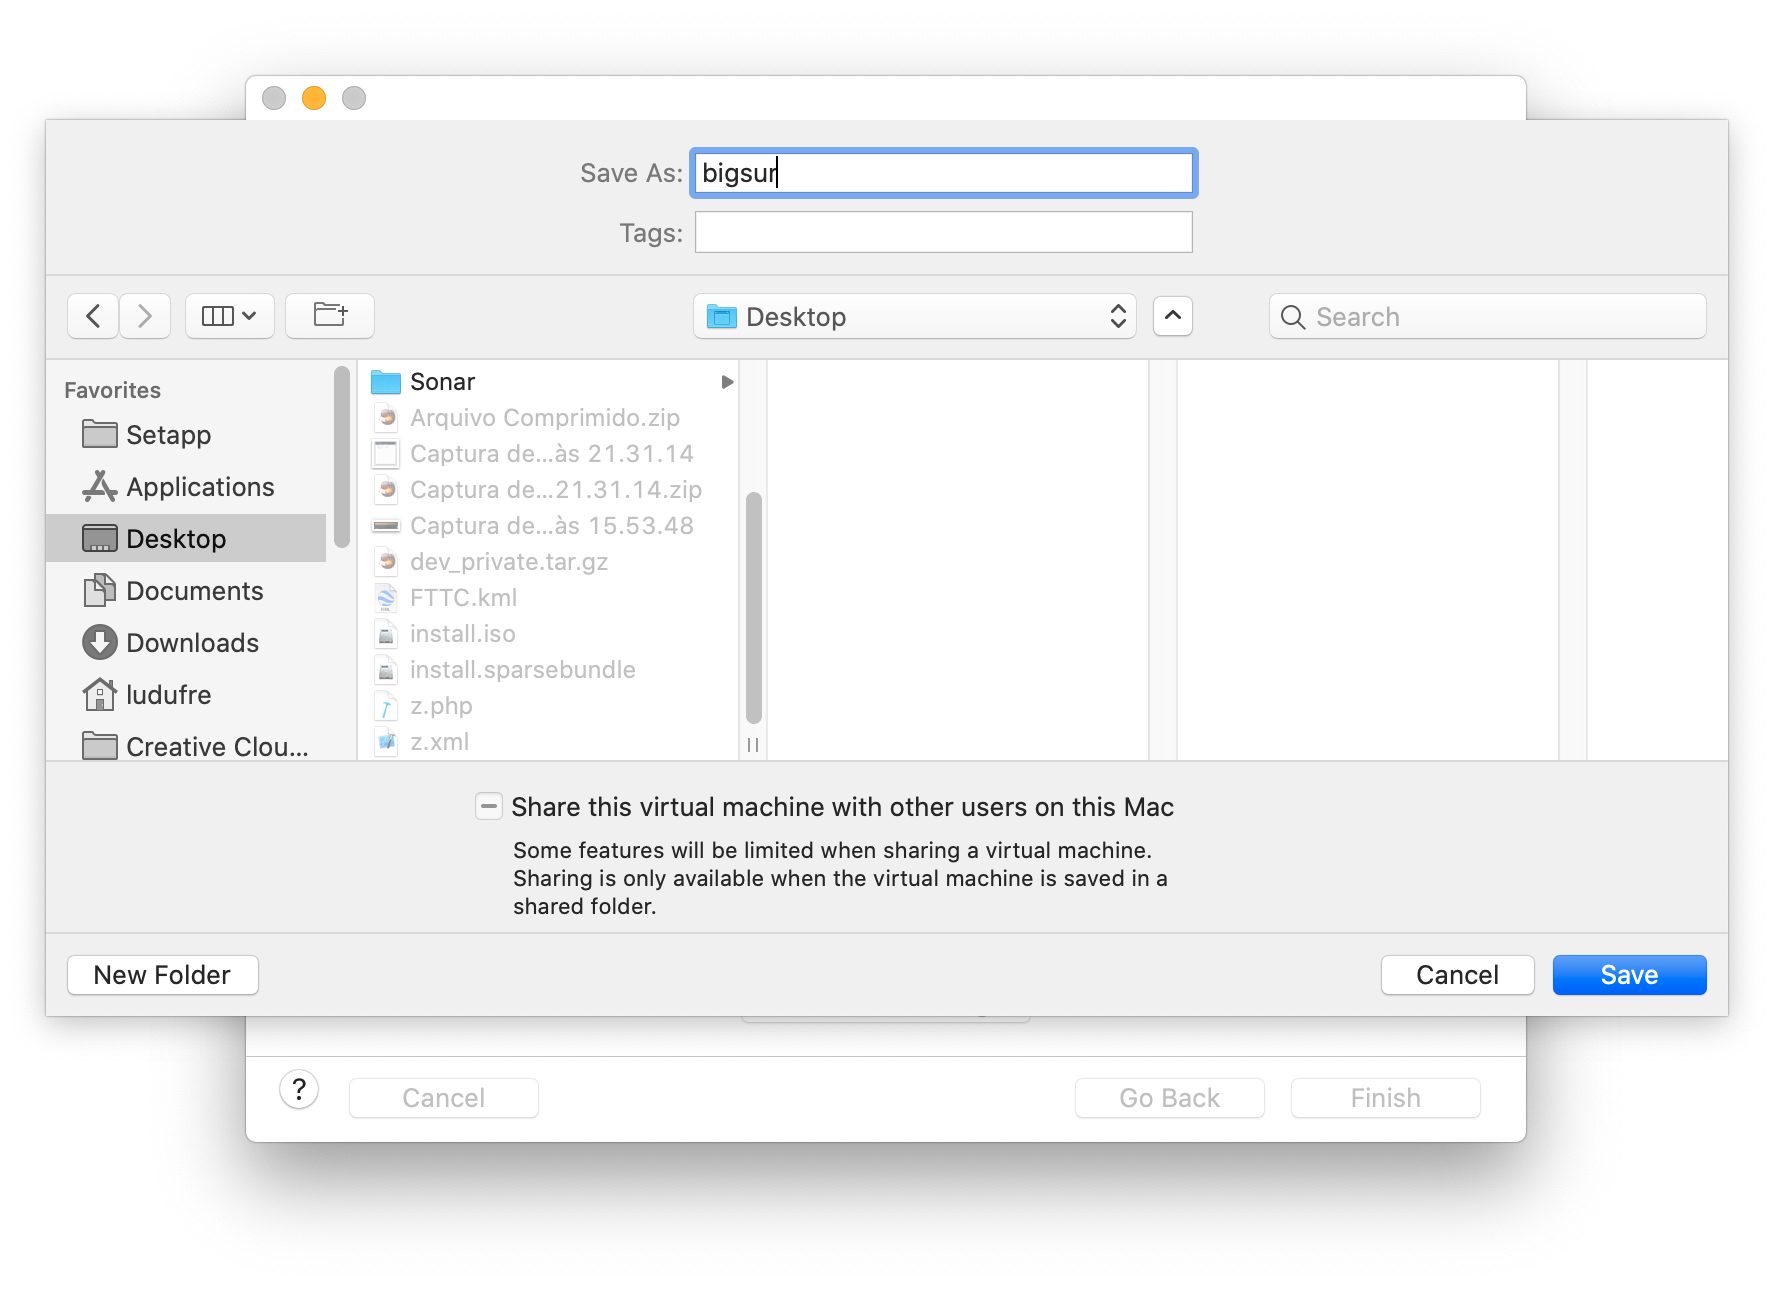
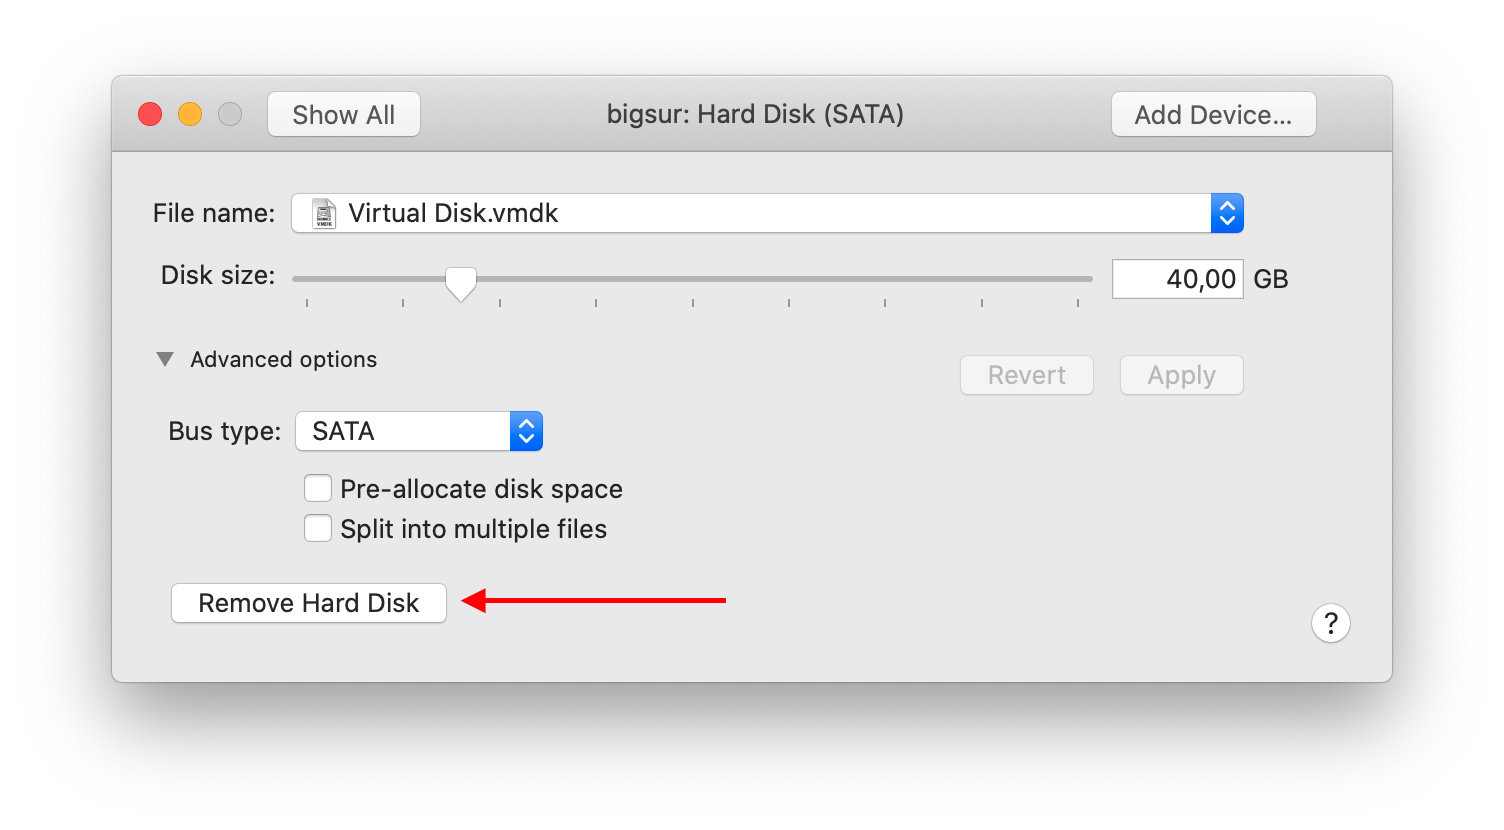
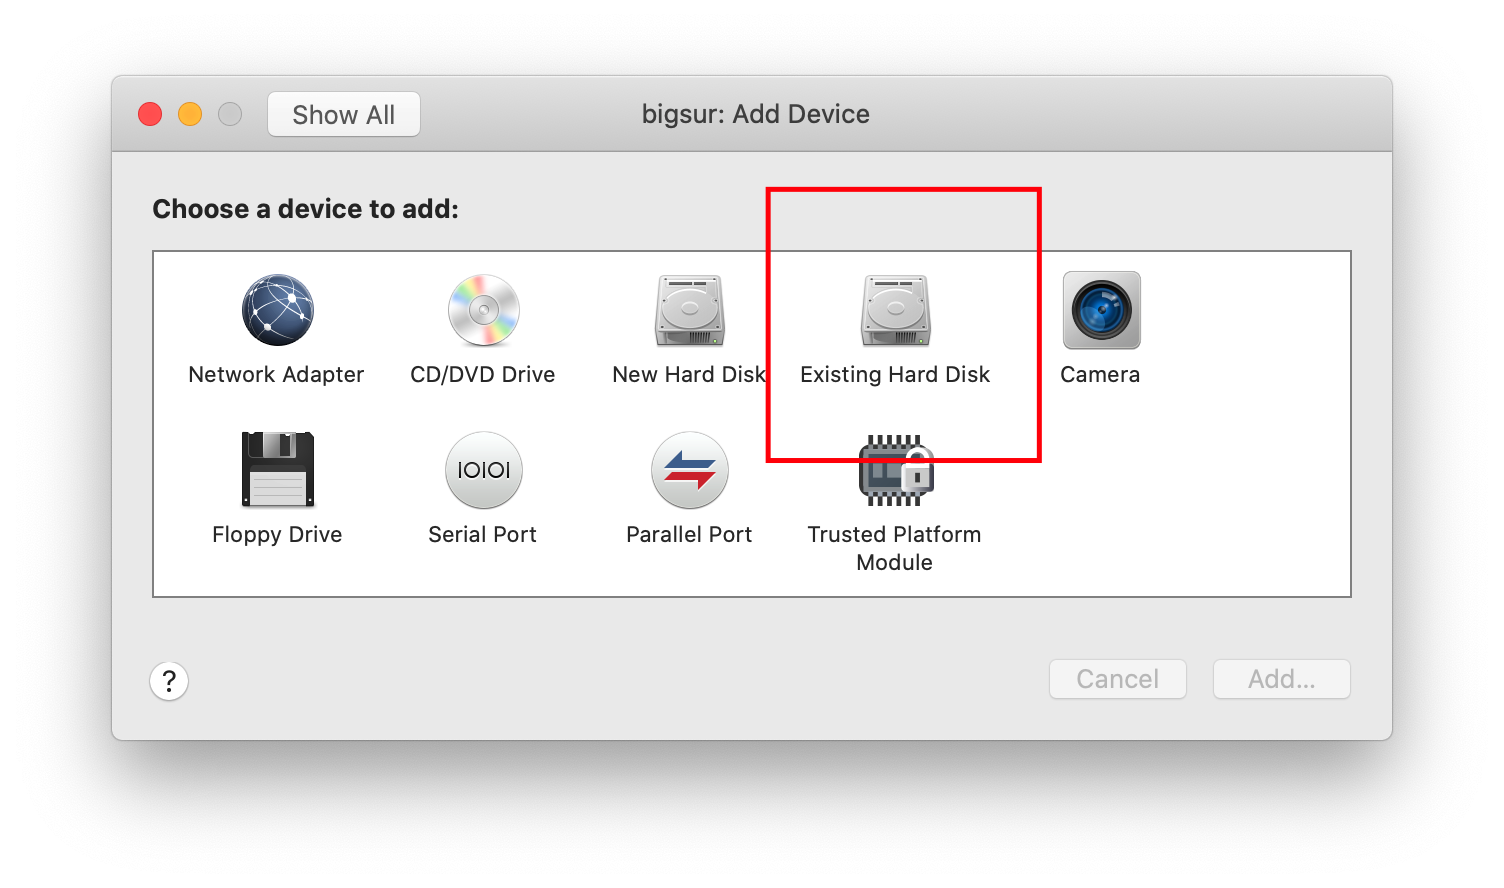
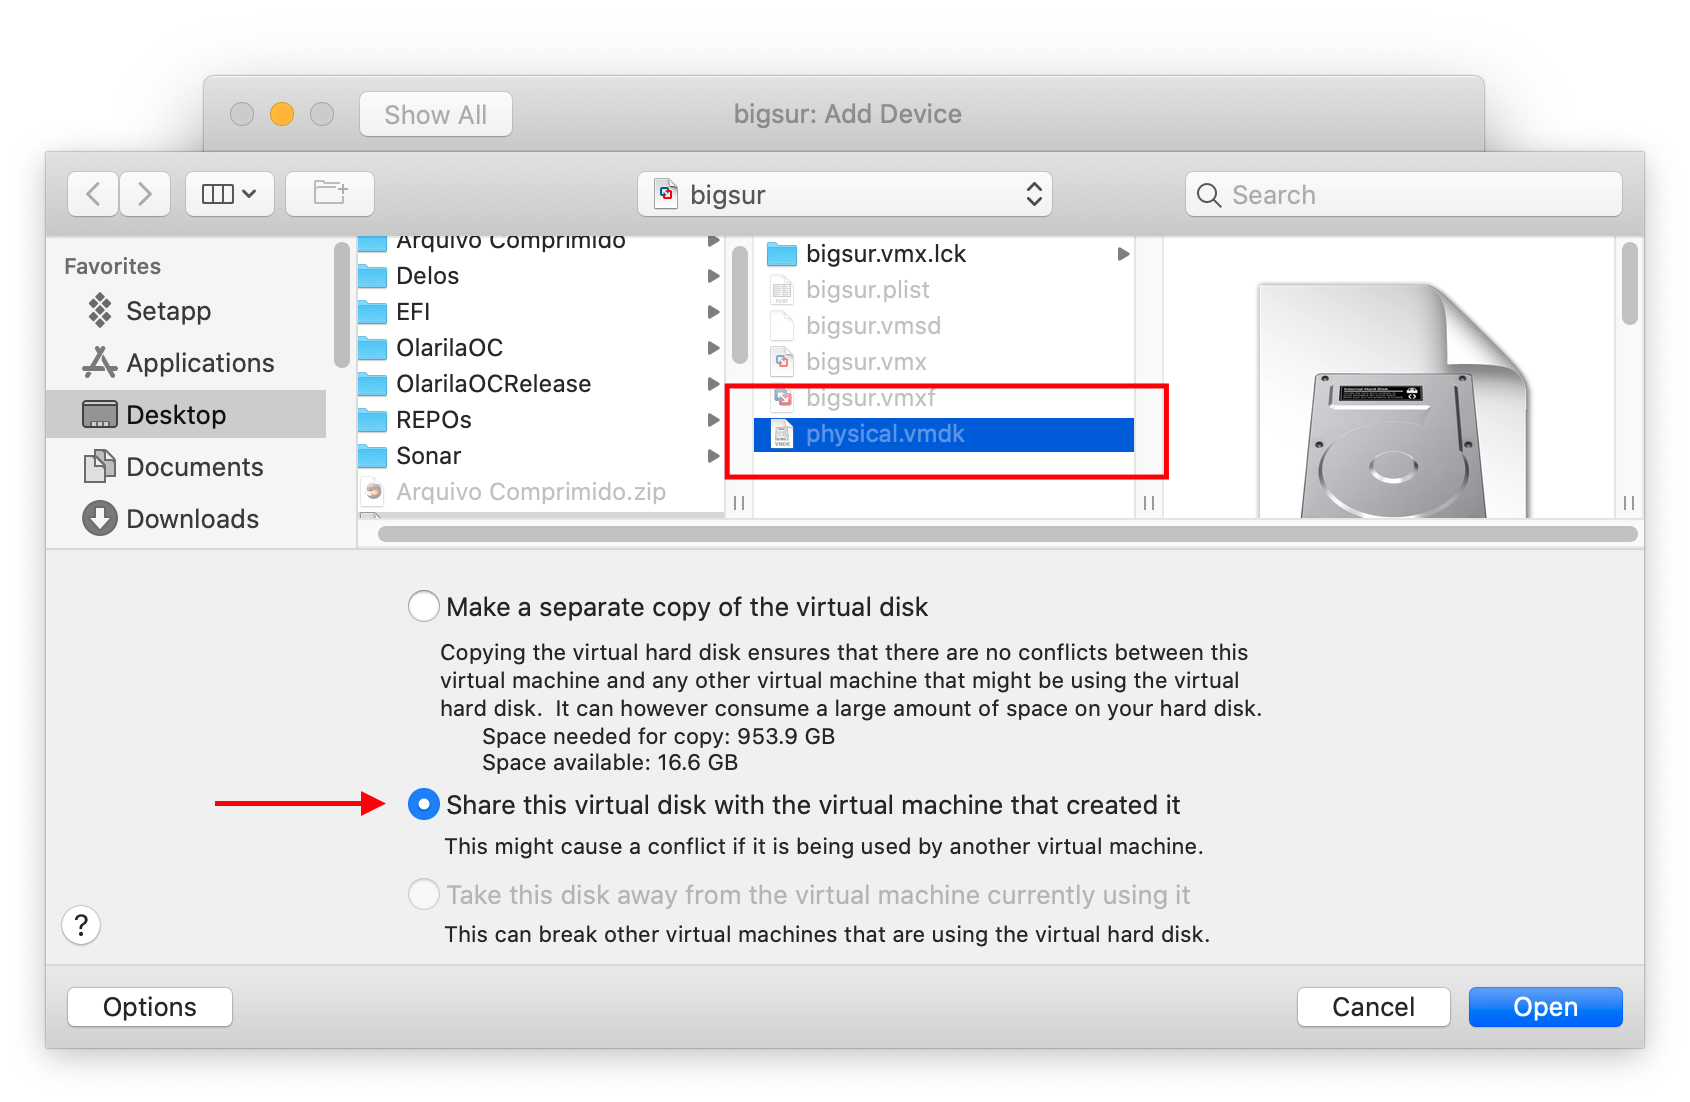
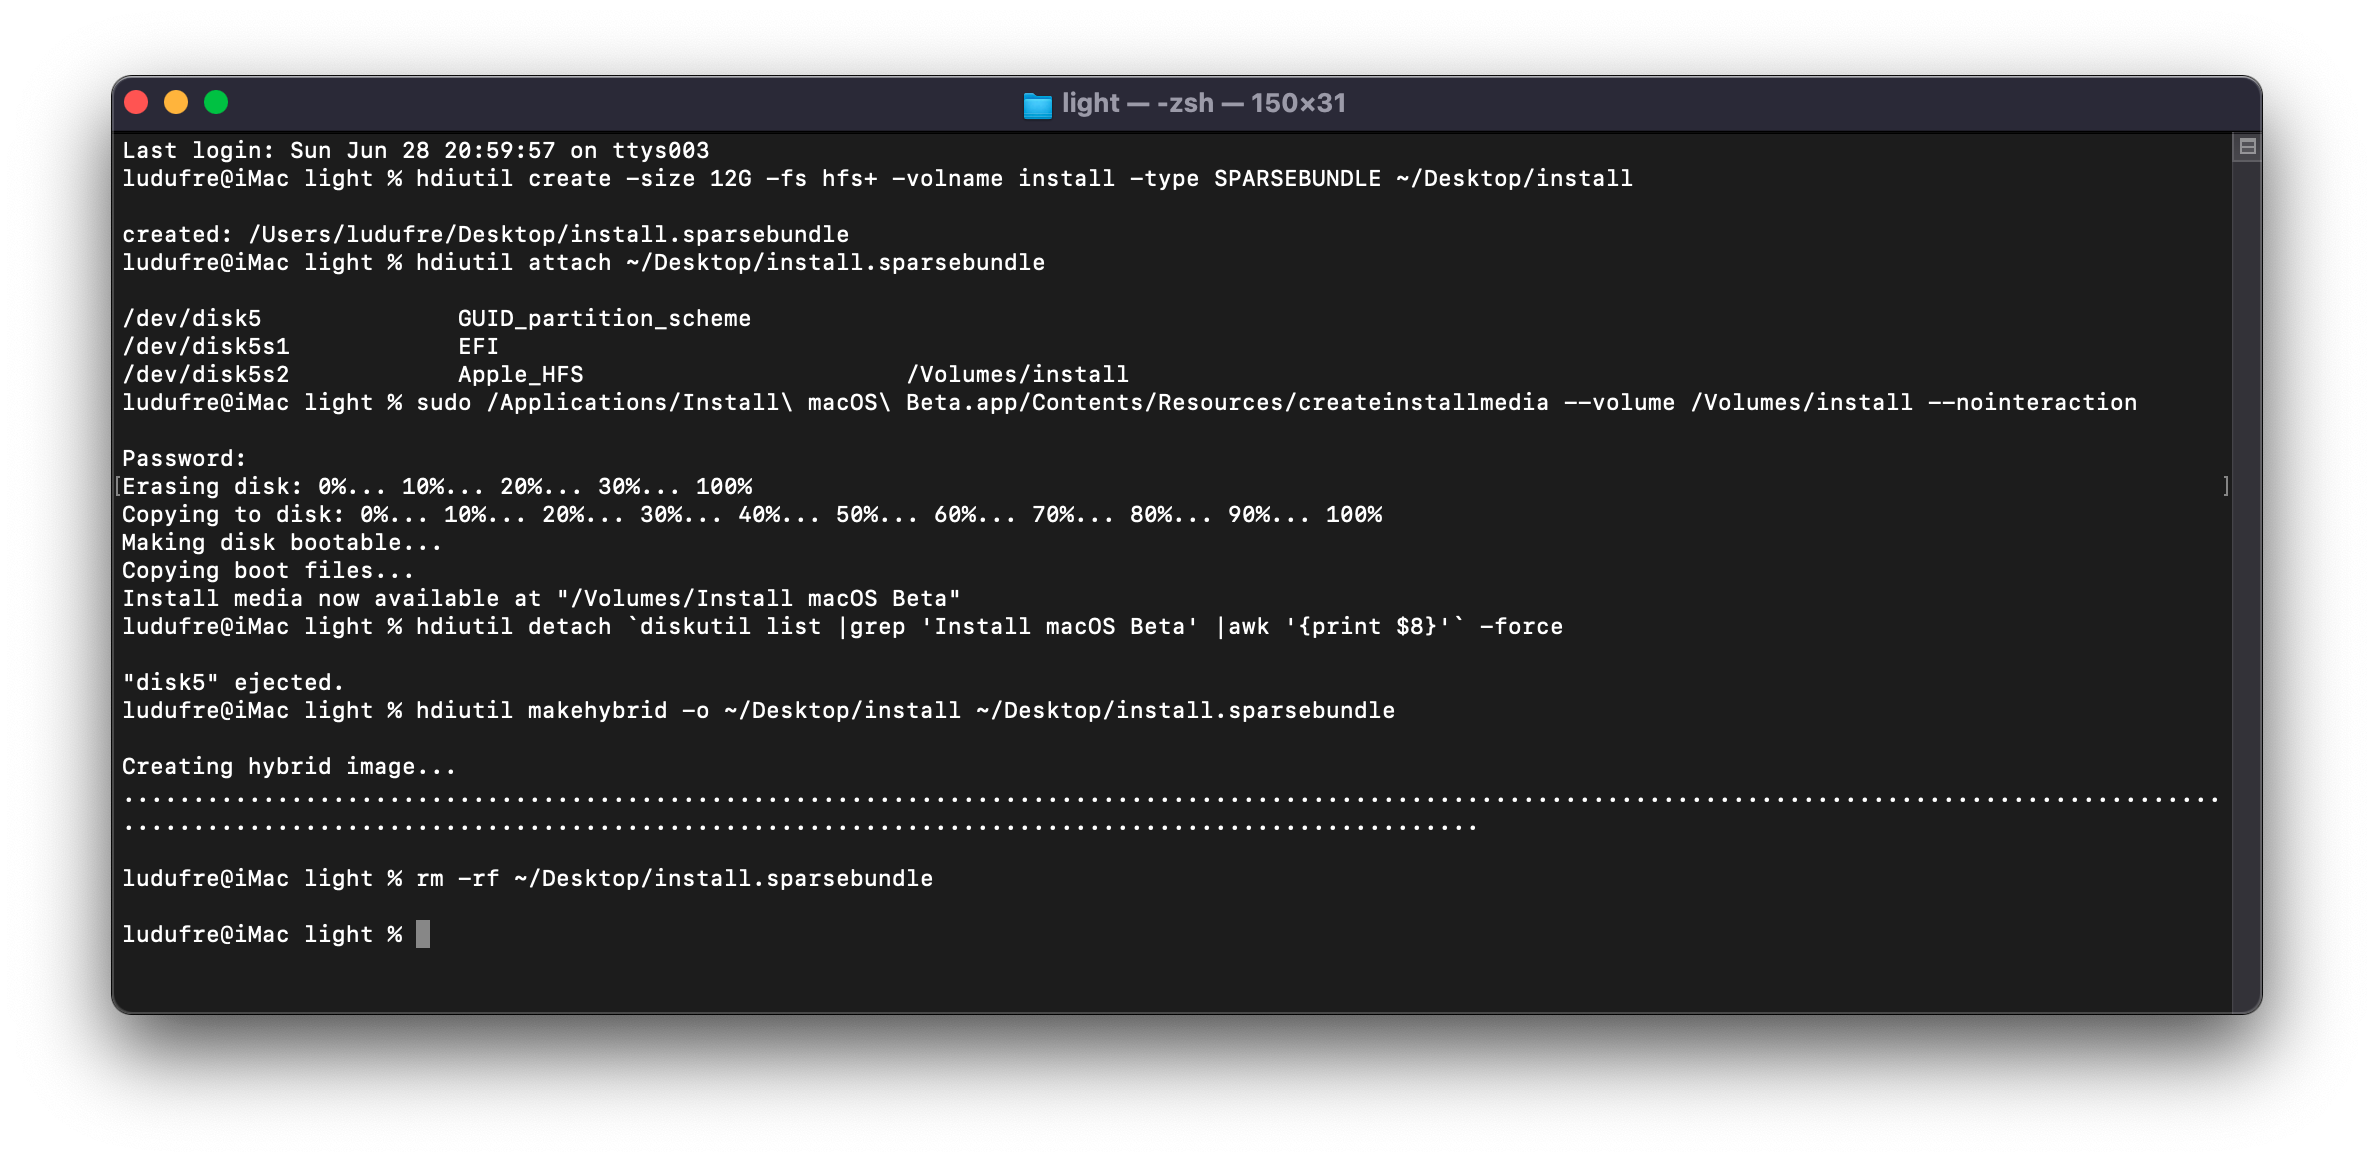
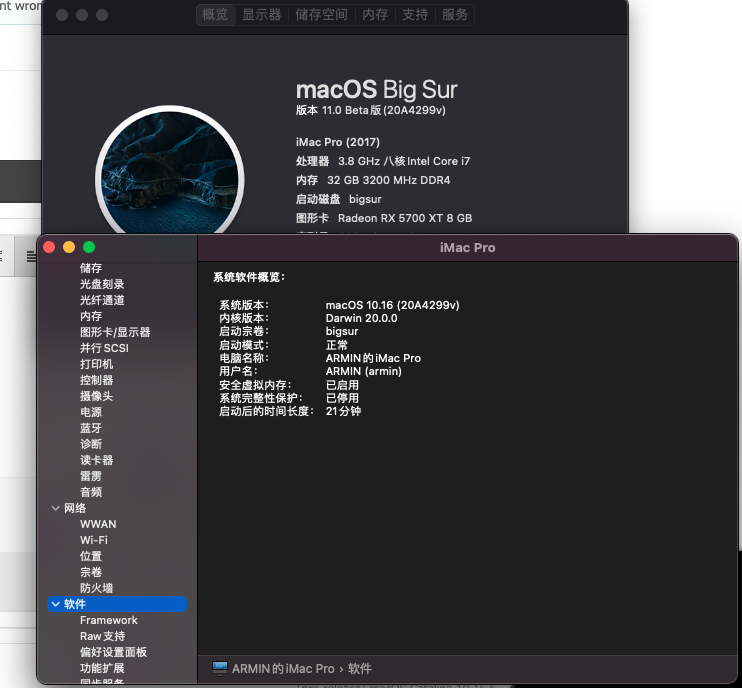
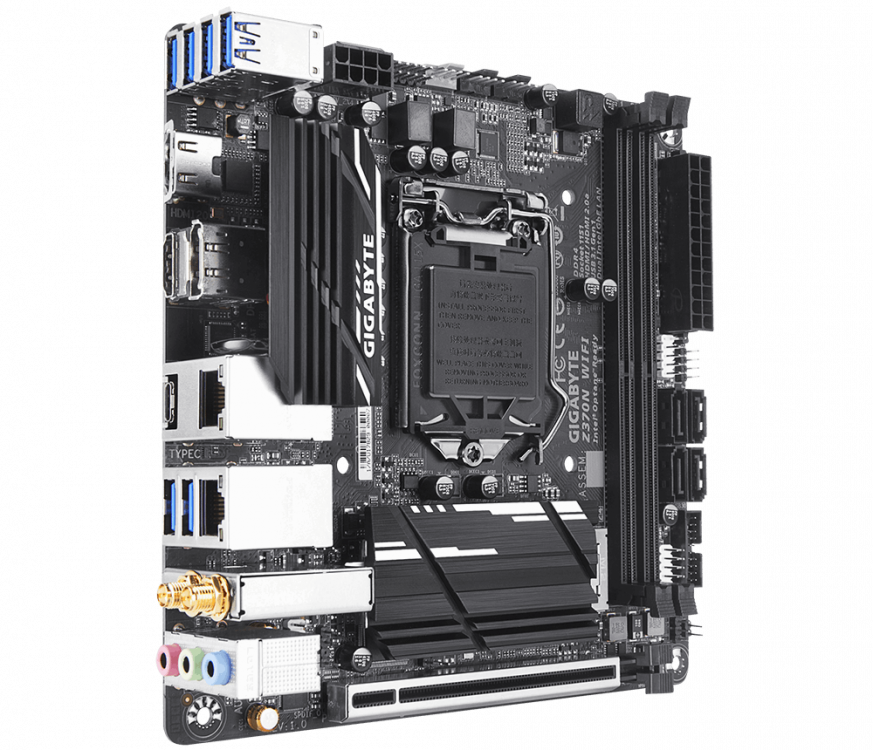
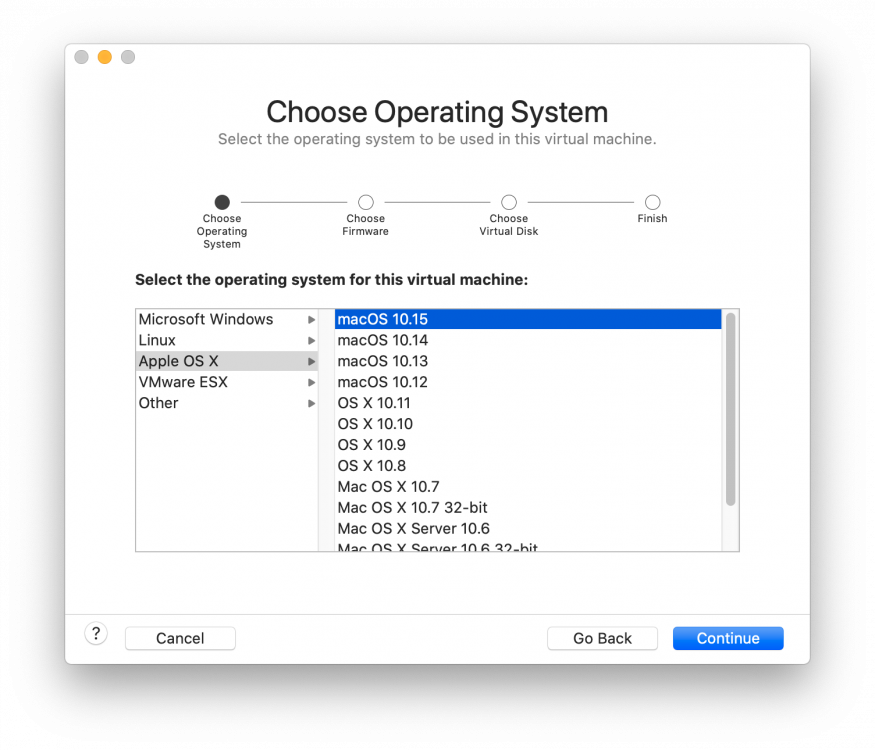
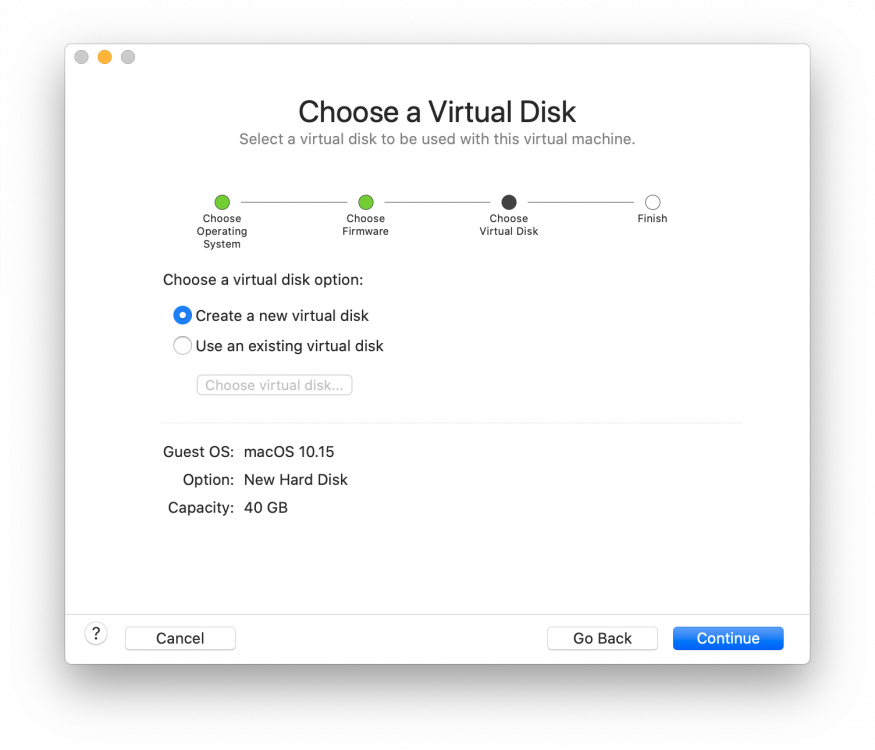
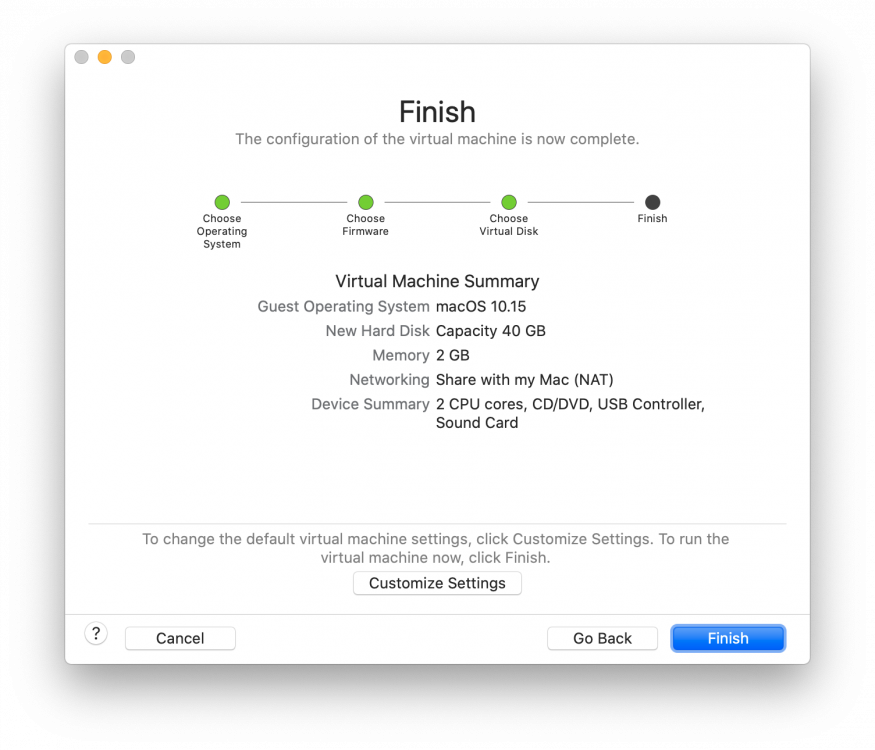
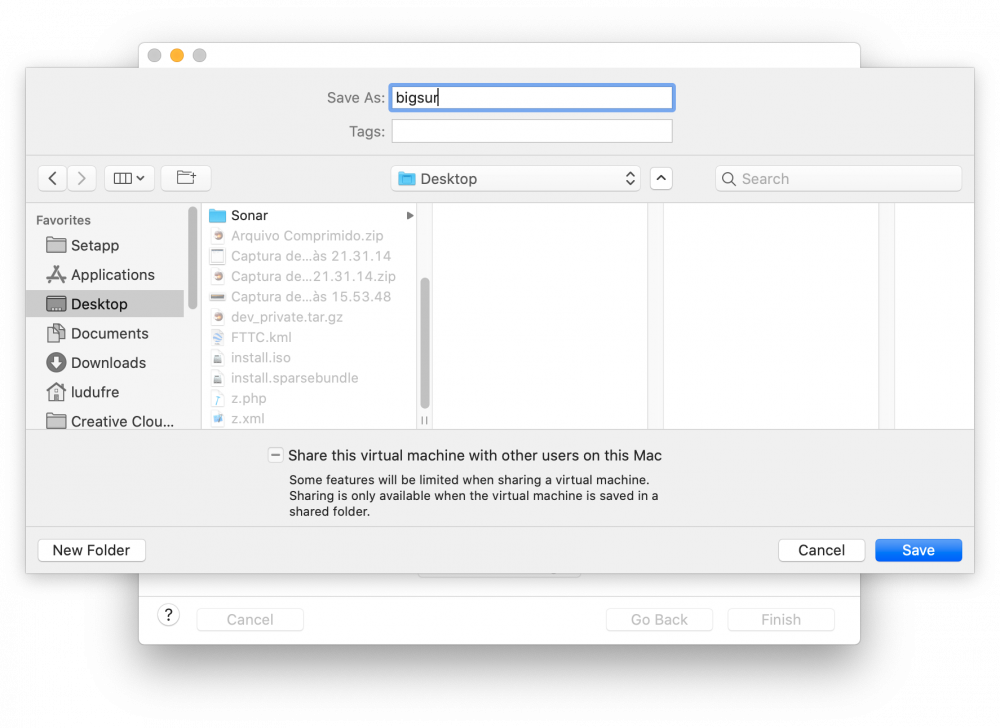
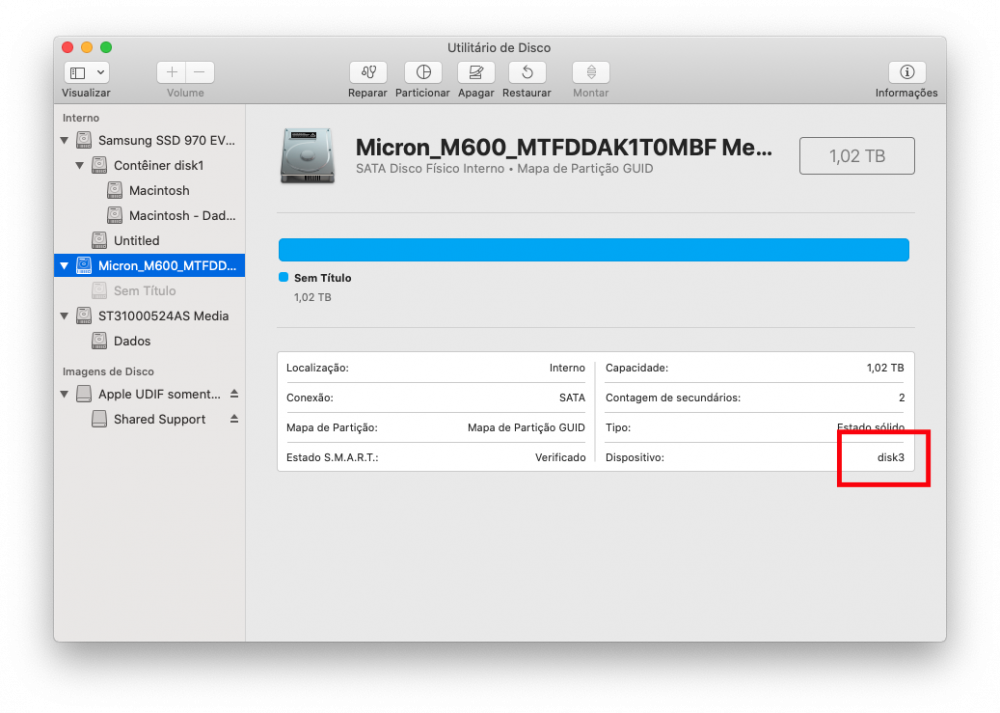
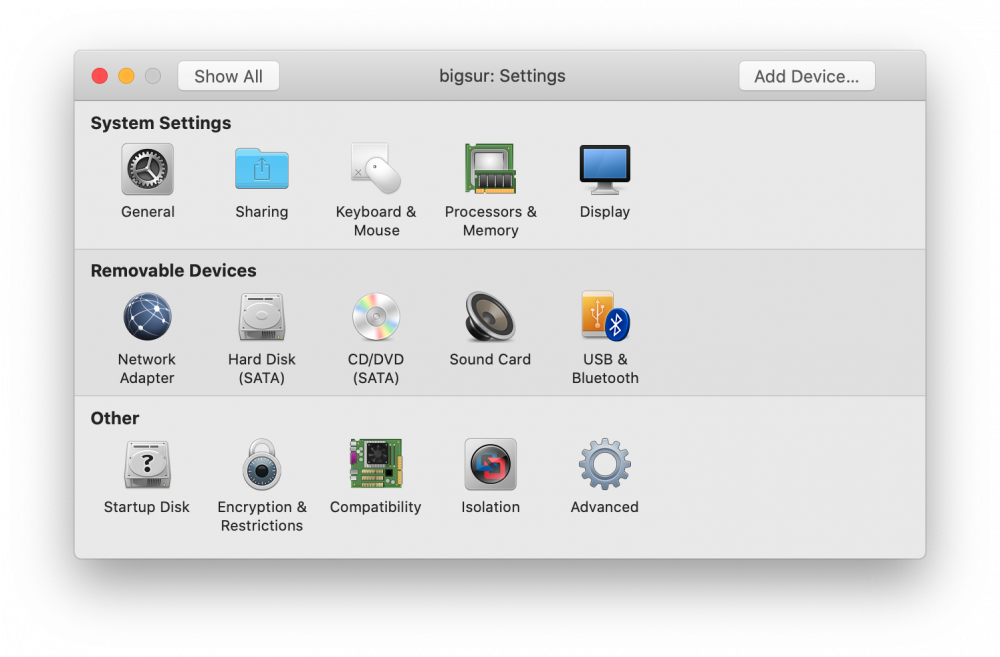
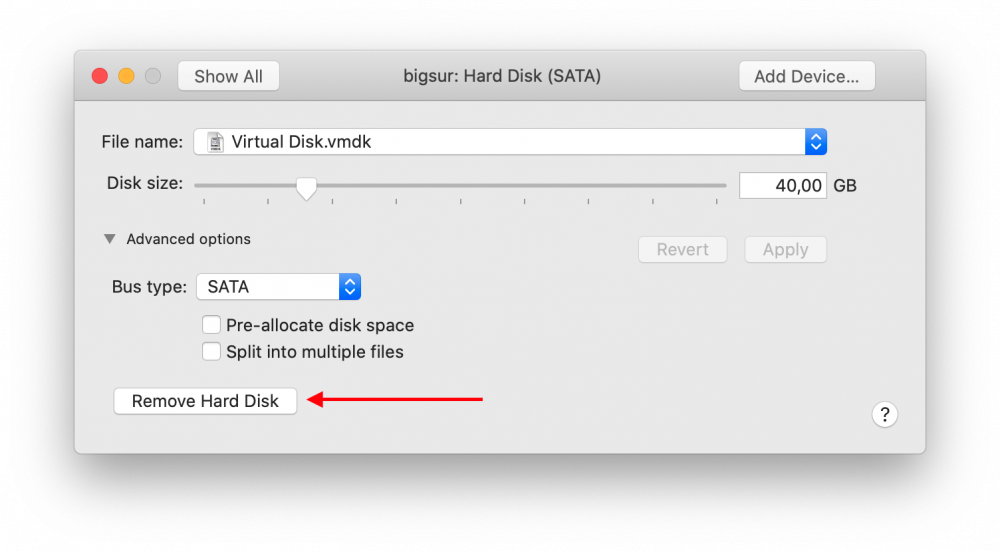
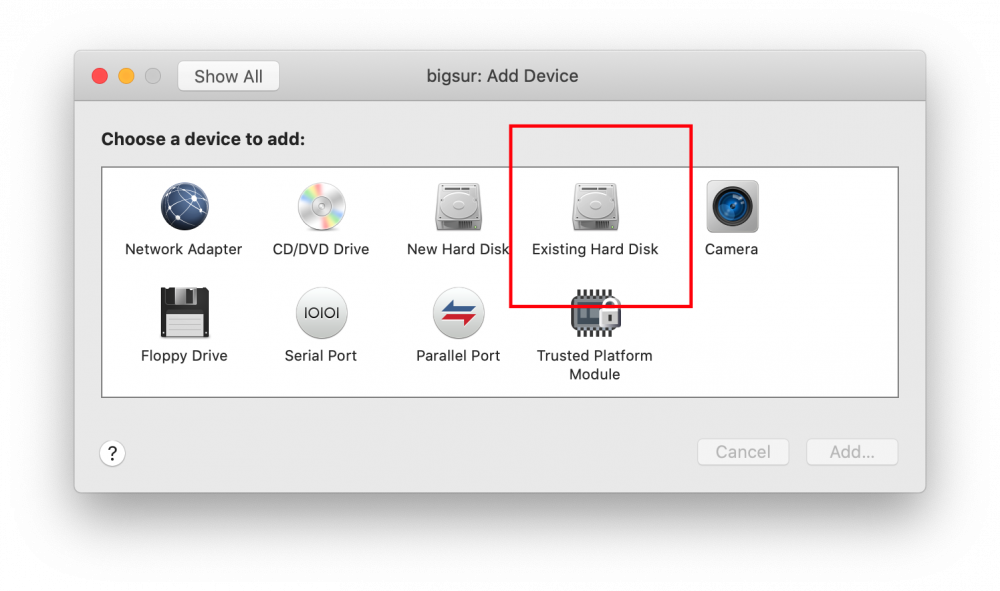
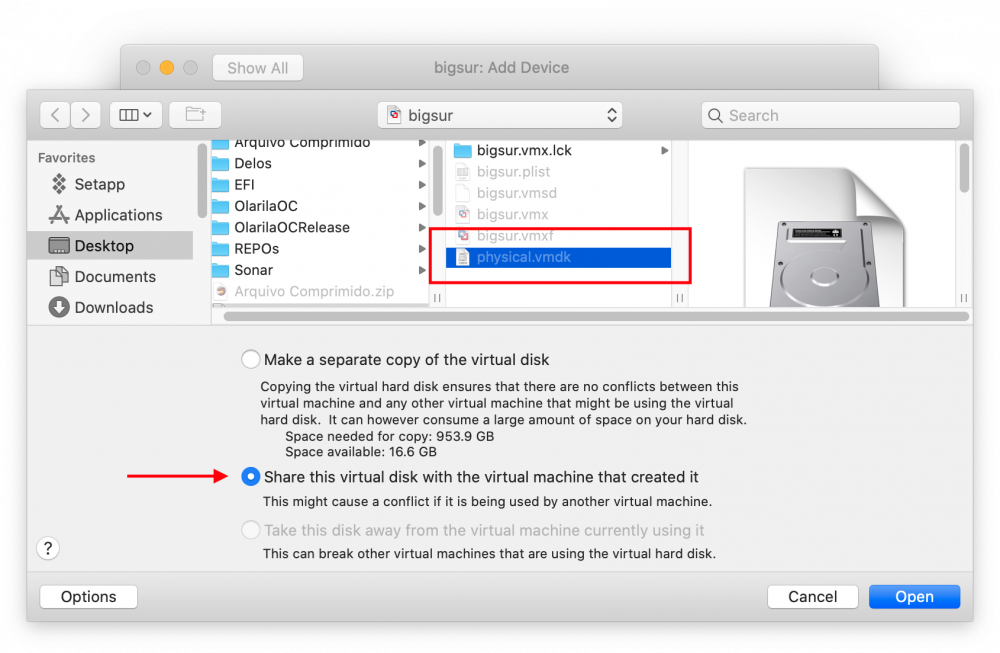
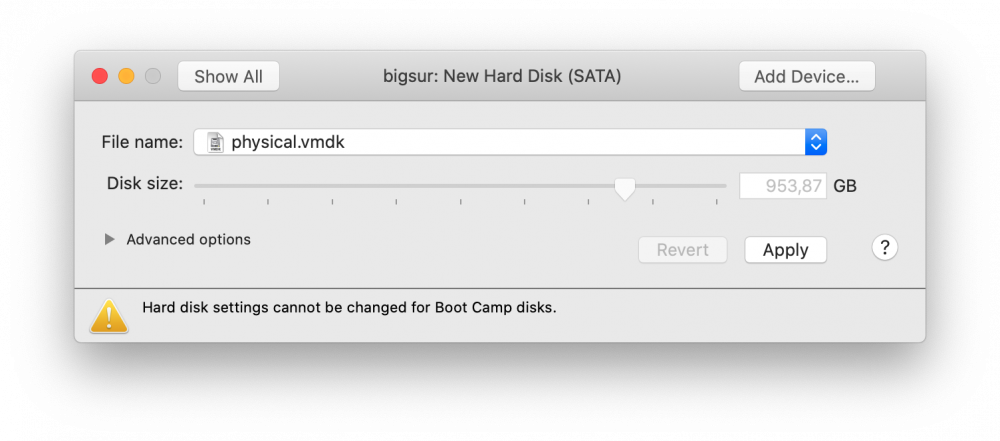
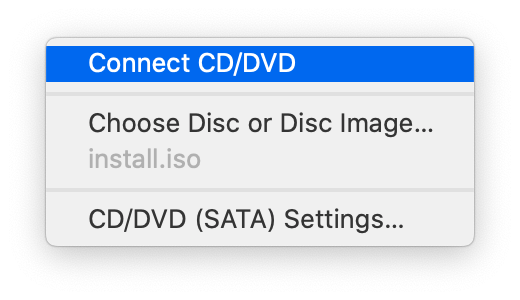
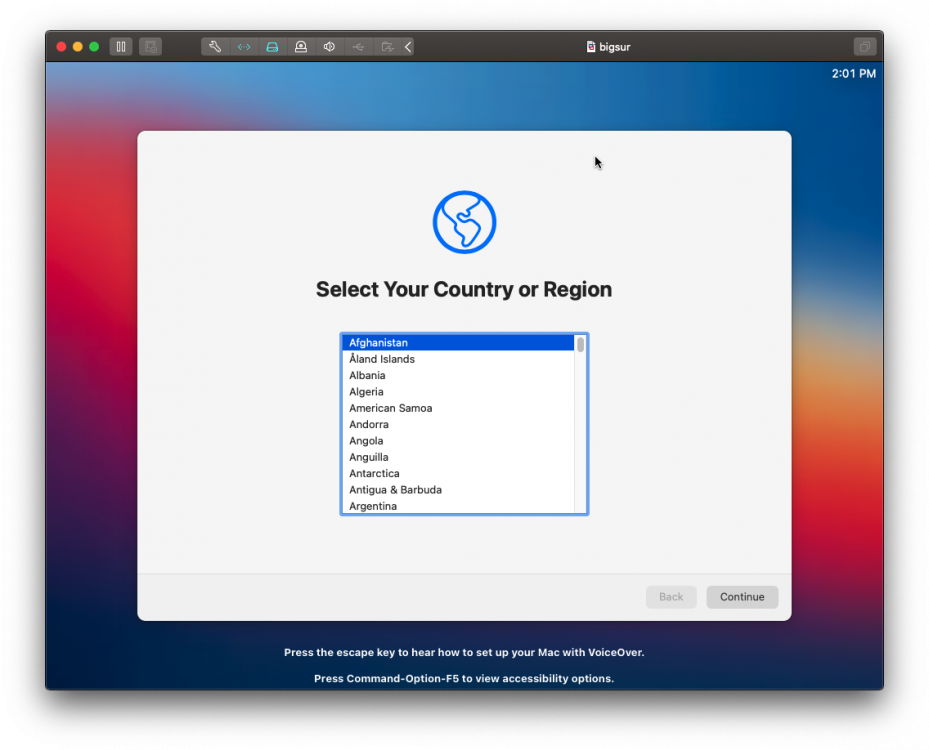
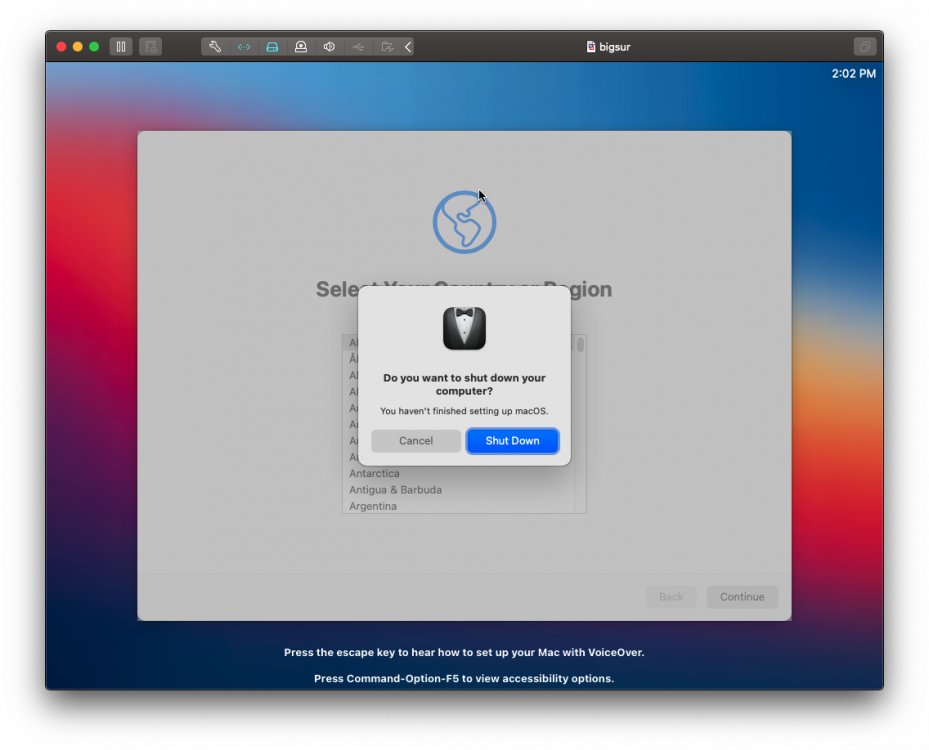
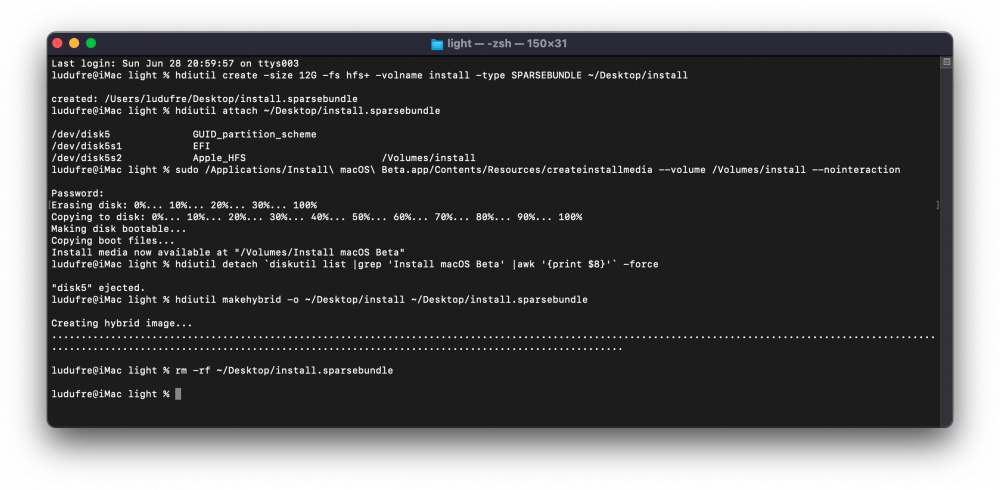
Installing macOS Big Sur 11.0 DP1 on Gigabyte Z370N WIFI + i7 8700K + UHD 630 Changelog: 06/28/2020 22:05h GMT-0 - Replaced detach command when creating ISO. - Thanks @ham4ever - Added instruction to run one line at time. 06/27/2020 02:37h GMT-0 - iMessage works too. Just not at first boot. 06/26/2020 18:54h GMT-0 - First version. What works and what does not - Processor: Intel Core i7-8700K -> Work. All SpeedStep stages.- Video Card: Intel UHD 630 -> Work. QE/CI and Metal.- Chipset: Intel Z370 -> Work.- HDMI 2.0 (1st) -> Work. - HDMI (2nd) -> Work. - DP -> Work. - Audio: ALC1220 -> Work. - HDMI Audio -> Work.- WiFi/Bluetooth -> Not work. Replaced with BCM94360CS2. - Ethernet (1st) -> Work.- Ethernet (2nd) -> Work.- USB3.0 -> Work.- Sleep -> Work. - Airdrop, Handoff, Instant Hotspot and Continuity -> Work after replaced wireless. Todo - Fix iMessage (other iServices works perfectly) - Nothing Disclaimer! Bootloaders are currently unable to start the installation. The solution is to use a virtual machine and use a physical disk (additional, USB or SATA, NVME) as a target in the installation. Change the OpenCore compiled from the source code, and add some entries in NVRAM through config.plist. This is not the best solution. But it is the only way at the moment. There are some ready-made images available out there, but I prefer not to use them and create a clean installation. What you need to install - Running install of macOS - Already working OpenCore with this setup - Create bootable ISO file - Spare Disk/SSD- macOS Big Sur DP1 install app- Latest OpenCore + Kexts compiled from sources - Some KEXTs and SSDT patches UEFI configuration My BIOS is F10 (I use an 8th generation processor, so I don't need to upgrade) You can configure manually or load my BIOS profile. Manually: - Shutdown and insert the flash.- Power on with DEL pressed to enter BIOS setup.- Change value: BIOS - CSM Support to Disabled- Change value: BIOS - Secure Boot to Disabled- Change value: Peripherals - Initial Display to IGP- Change value: Chipset - VT-d to DISABLE- Change value: Chipset - Internal Graphics to ENABLE- Save & Exit Setup or, BIOS profile You can use one of my BIOS profiles attached bellow. It's two versions. One stock and another with overclock [5.0 GHz] - Put the profile in the root of the flash drive at EFI partition. - Restart with DEL pressed to enter BIOS setup. - Go to Save & Exit. - Select Load Profiles. - Select last option and then the flasdrive in the list. - And finally choose MACOS_STOCK or MACOS_5GHZ. - Save & Exit Setup How create bootable ISO file Download Big Sur DP1 Run this command on Temrinal: sudo /System/Library/PrivateFrameworks/Seeding.framework/Resources/seedutil enroll DeveloperSeed Go to System Updater and download the Install macOS Beta app. Create ISO Then run on Terminal (One line at a time): hdiutil create -size 12G -fs hfs+ -volname install -type SPARSEBUNDLE ~/Desktop/install hdiutil attach ~/Desktop/install.sparsebundle sudo /Applications/Install\ macOS\ Beta.app/Contents/Resources/createinstallmedia --volume /Volumes/install --nointeraction hdiutil detach `diskutil list |grep 'Install macOS Beta' |awk '{print $8}'` -force hdiutil makehybrid -o ~/Desktop/install ~/Desktop/install.sparsebundle rm -rf ~/Desktop/install.sparsebundle Now you have install.iso on desktop. How create create the virtual machine and install to disk/SSD Download and install the trial version of the VMware Fusion from their site. I'm used the version 11.5.5. - Create a custom virtual machine - Operating System: Apple OS X - macOS 10.15 - Create a new virtual disk (The size doesn't matter, We'll delete later) - Click in "Customize Settings" - Save the VM on desktop with name: bigsur - Insert the spare disk/SSD on PC (reboot if necessary) and identify what /dev/diskX is. You can look on Disk Utility.app: - Create VMDK that point to it: sudo diskutil unmountDisk diskX /Applications/VMware\ Fusion.app/Contents/Library/vmware-rawdiskCreator create /dev/diskX fullDevice ~/Desktop/bigsur.vmwarevm/physical sata - Edit the virtual machine settings created previously - Click in Hard Disk (SATA) and delete it (Remove Hard Disk) - Then add the physical disk - There's a bug in Fusion. To select the physical.vmdk, right click then "Quick Look", then "Share virtual disk with the virtual machine that created it" - Click Apply. - Now mount de install.iso - Start the VM and install as usual until: Disk Utility, format GUID with APFS (VMware Virtual SATA Hard Drive Media), Install macOS, wait few reboots and stop at first boot wizard. This can take up to 45 minutes. It may seem like it is stopped, but it is not. - Press Command + Q and shutdown (usually WIN + Q) - Close VMware Fusion. Copy OpenCore to EFI - Mount the EFI with: sudo diskutil mount diskXs1 - Copy your current working OpenCore EFI to that mounted EFI. - Download mine attached or Update your OpenCore, Kexts and driver UEFI. - You can use the @MaLd0n script attached to compile all (OlarilaOC.command.zip) - If using mine add your MLB, ROM, SystemUUID and SystemSerialNumber. (see how to) - Add following items do config.plist: NVRAM -> Add -> 7C436110-AB2A-4BBB-A880-FE41995C9F82 -> boot-args -> -lilubetaall (append) NVRAM -> Add -> 7C436110-AB2A-4BBB-A880-FE41995C9F82 -> booter-fileset-basesystem + Data + <00> NVRAM -> Add -> 7C436110-AB2A-4BBB-A880-FE41995C9F82 -> booter-fileset-kernel + Data + <00> NVRAM -> Delete -> 7C436110-AB2A-4BBB-A880-FE41995C9F82 -> booter-fileset-basesystem NVRAM -> Delete -> 7C436110-AB2A-4BBB-A880-FE41995C9F82 -> booter-fileset-kernel Done! Boot from the new disk/SSD and finish de first boot wizard. And last but not least I would like to thank the following community members, by making these dream possible:@crushers, @snatch, @apianti, @blackosx, @blusseau, @dmazar, @slice2009, @autumnrain, @phpdev32, @EMlyDinEsH, @RehabMan, @Scellow, @mitch_de, @Shailua, @Andy Vandijck, @maxfierke, @ArturXXX, @LexHimself, @brumas, @khamsakamal48, @MaLd0n, @joedm and @vit9696 and all others members involved directly or indirectly. Attachments MACOS_5GHZ MACOS_STOCK OlarilaOC.command.zip EFI.zip


 1 point
 -
Well it's here folks. macOS Big Sur on AMD. Thanks to Algrey for the base patches and NoOne for the Big Sur updates. Absolutely no support will be given for this for the time being as it's the very first beta and is understandably buggy and unstable. Experimental patches for 17h CPUs can be found here, https://github.com/AMD-OSX/AMD_Vanilla/tree/experimental-opencore Note that there's no way to boot the installer using these patches. A VM must be used to install. You'll have to work it out by your self. From my testing everything is working as it should currently. I've got all iServices working including iMessage. Sleep works without modification etc.1 point
-
Intel what GEN ?1 point
-
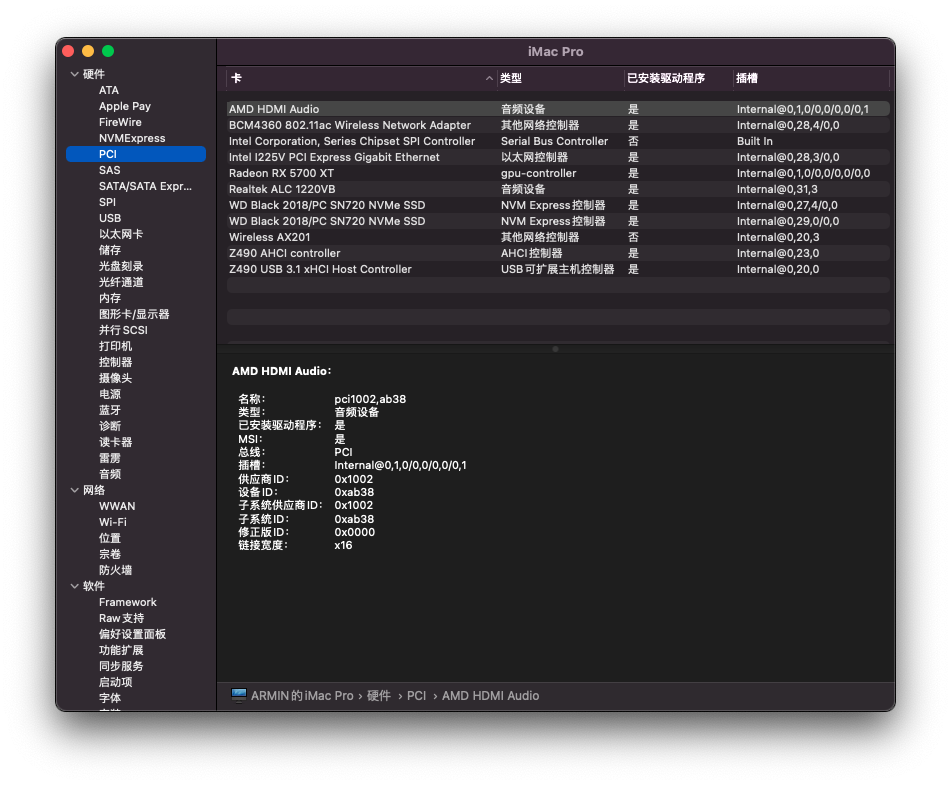
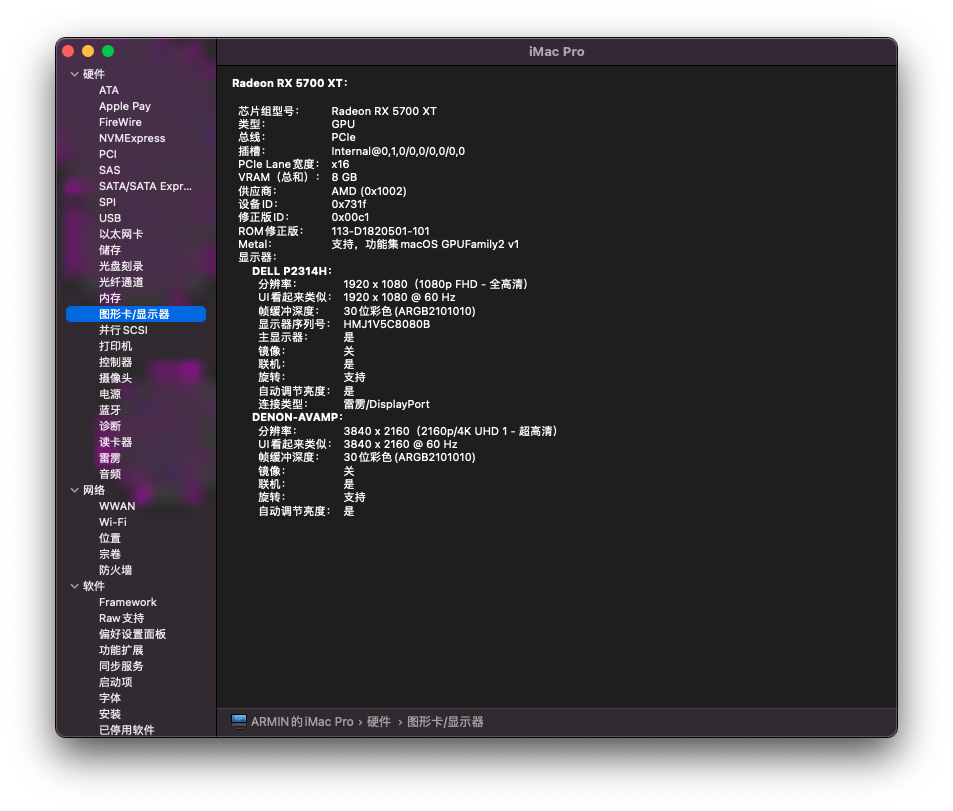
yes good Motherboard: Gigabyte z490 aorus ultra motherboard supports CPU 10900k / 10700k (Intel z490 / LGA 1200) CPU:I7 10700K Graphics card: public version of AMD radon RX 5700 XT 8g gddr6 game graphics card Memory: g.skill 16gbx2 DDR4 3200 frequency desktop memory module sniper x (camouflage black) Hard disk: m.2 x2 250gwd_ Black sn750, western data 1TB SSD m.2 interface (nvme protocol) WD_ BLACK SN750 Network card: bcm4360cs two antenna version, Intel i225v 2.5gbe perfect, Intel ax201 has no driver at present Sound card: alc1220-vb config.plist.zip


 1 point
 -
@Cyberdevs Just downloaded Bios for my mobo. Rufus i already have. Thank you for the link. I will try that. I'll let you how it went.1 point
-
Give this a try it might force the system to boot from the backup BIOS https://www.overclockers.com/forums/showthread.php/697533-GUIDE-Forcing-backup-BIOS-on-Gigabyte-motherboards1 point
-
@Donw35 Yes but it is impressive for first developer beta to be that good. I'm using on my MacBook as main system and testing on external SSD on Hackintosh, over USB-C it's as fast as Sata anyway.1 point
-
@dzontra I don't get it are you able to boot into the BIOS finally or not or is it still the black screen, if so the only thing that comes to mind is to create a bootable DOS USB with Rufus and then create a batch file which loads the BIOS flash software automatically, remove all the attached HDD/SSDs and hope that the system boots from the USB disk and once it's booted automatically updates the BIOS and hopefully after reboot you'll be able to get in BIOS settings. You might need to do some research on how to create the batch file (it's been ages since everyone had to do that) and hope that it fixes the issue otherwise you have to send the mainboard to GigaByte and ask then to fix it for you. The file that needs to be running the executable files is called Autoexec.bat which is the part of DOS operating system.1 point
-
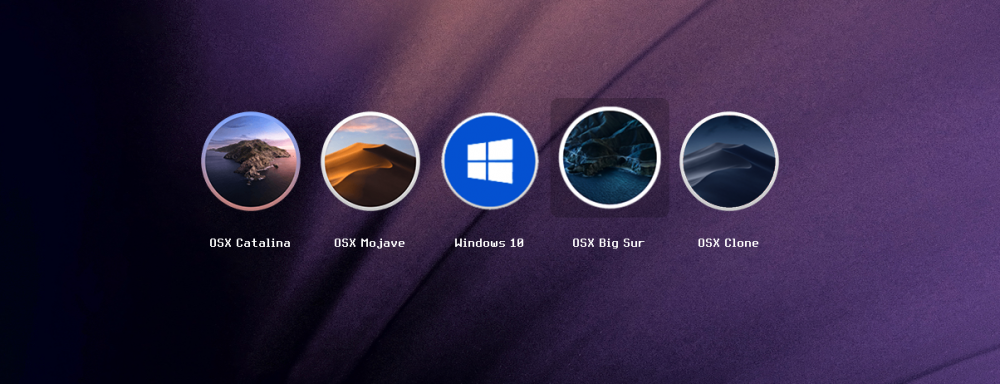
Beautiful. Does OpenCanopy even discern between other OSs?1 point
-
OpenCanopy_Pick_and_Mix_Icons_4 I have generated dark and light Microsoft Windows 10 and Apple HardDrive icons with stronger desktop images to give the user choice over the more subtler ones posted previously. There are now some internal and external generic Linux icons and also light and dark HardDrive icons for 15 Linux distro's.1 point
-
https://browser.geekbench.com/v5/cpu/27645031 point
-
Thanks. I used to use that in the Snow Leopard days but now use device-id injection via DSDT. macOS works fine with the device-id injection. The problem is Legacy boot with OpenDuet. OpenDuet does not "see" the SATA drives so cannot boot macOS. The Old Duet pkg worked and that's what I am using but that has other issues.1 point
-
I must have overlooked this, as this is unsupported, and related logs make no sense afterwards. A lot changed since then, and the SATA driver is now very different. We could try to debug this in private, but I am not yet fully positive when. I will create a PM and will post some test builds sooner or later.1 point
-
Is done. Works like a charm. Thanks1 point
-
I have already applied all your patches for a Haswell-E processor on a chinese x99 motherboard and i've got to tell you that it's working absolutely stable with no panic or problems and the also the power management is working fantastic the processor wont get more than 3.00 Ghz when all cores are on max usage but it trows better results on geekbench and cinebench than the other configurations, by the way im using the bootstrap method Motherboard: HUANANZHI X99-F8 Processor: Intel Xeon E5 2678 V3 OS: Mac OS 11.0 - Big Sur1 point
-
Thanks a lot man, im will try a clean install, but im got many error like Gigamaxx...im using Russian image and work fine on my disk nvme. Muito obrigado camarada, que baita tutorial!!!! Manja muito hein!!! Eu nunca mexi com VM..manjo nada...!! Deus abençoe!!!1 point
-
Hi to all , after long time waiting, i have Bigsur ssd working i am booting from ssd connected to usb holder, how can i clone the ssd to my internal ssd, any ideas to try, or it is not possible for now, i tried carbon copy , but nothing seems to be copied as i can see 3 partitions in the bigsur ssd, also when i boot it, i cant access the internal ssd disk.. hope to hear any reply , thank you1 point
-
No worries!! btw I've been using OpenCore for about 5 months1 point
-
That maybe so Chris1111 be we will be dancing with joy when we manage to break it and send Apple back to the drawing board1 point
-
In my MacBookPro the same SSD on the BS system has no problem opening the audio menu on the bar or the notification or wifi menu but in the Hack I have a spining beach ball 5 , 6 seconds before it appears So its not a bugy Beta issue its a non compatible machine for the lattes new Mac System On the real Mac BS is verry cool and works great Exemple: installation kext in Library/Extensions no issue on real Mac and on the Hack we have error with the new kernel extension management its really pain full1 point
-
macOS Catalina 10.15.6 beta 3 (19G60d)1 point
-
Dang! You have really been busy!1 point
-
Booting with OpenCore NDK 059 - X299 Gigabyte Gaming 7 -I9 7980xe First part of installation done via VMware Fusion / OSX Mojave Not working (Yet ) : AirDrop & Sleep functions BT, Audio ( except RME PCIe) , DP, TB3 are working.

 1 point
 -
Hey @ludufre thanks for your help. I combined my Catalina info with your kext and updated smbios and oc 6 and I am in Big Sur right now. Only issue so far is audio.1 point
-
my T-RyZo ringrazia1 point
-
Try AAPL,ig-platform-id = 00009B3E1 point
-
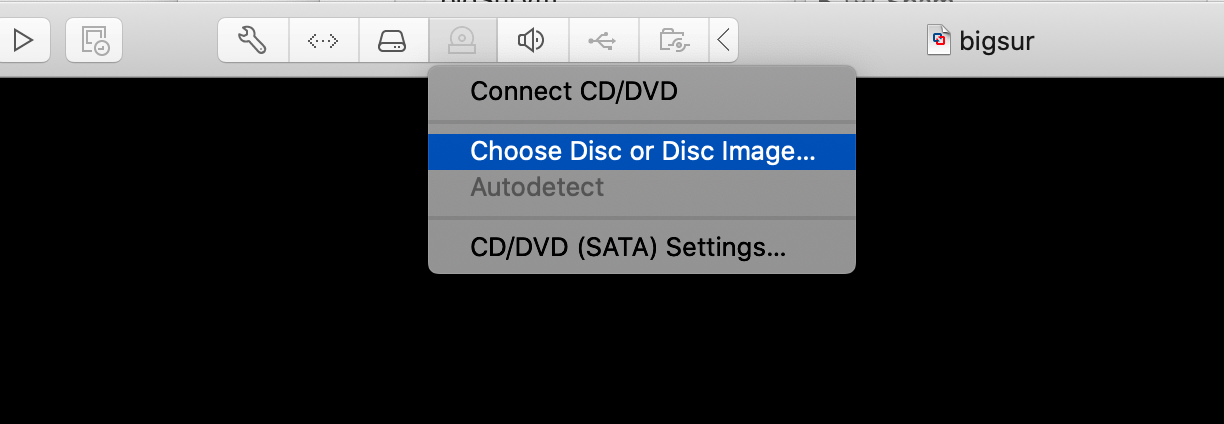
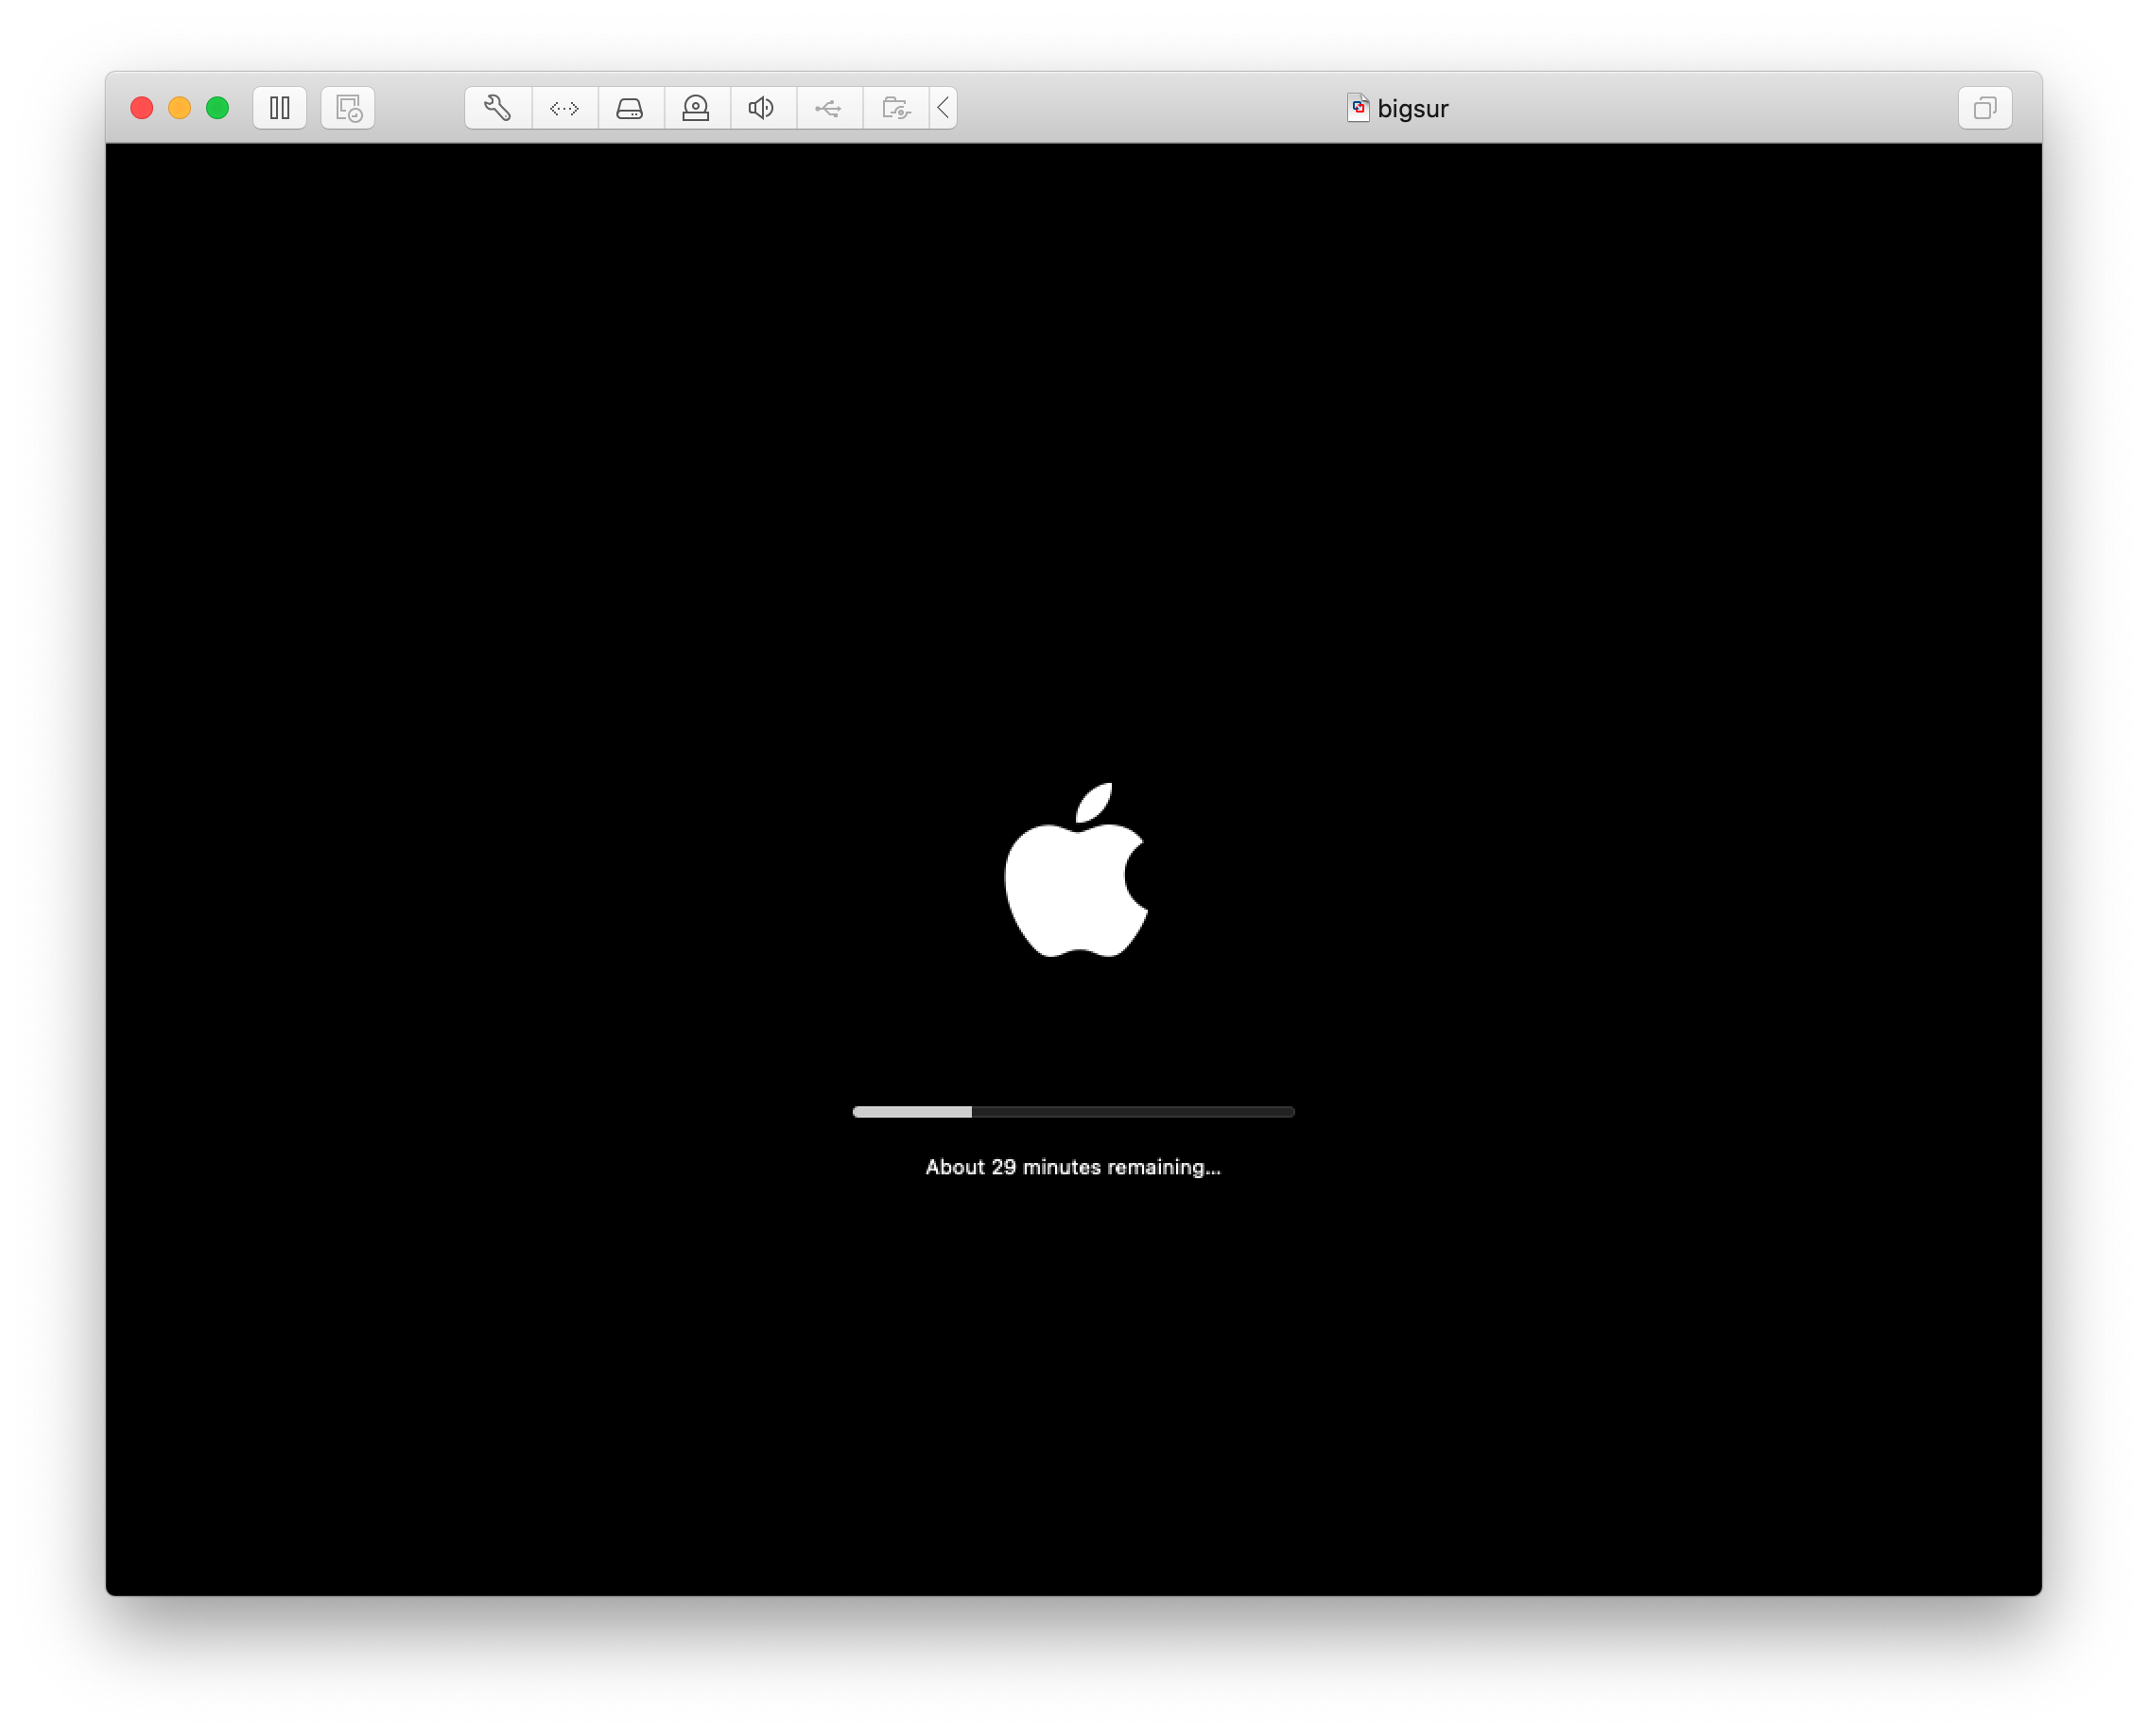
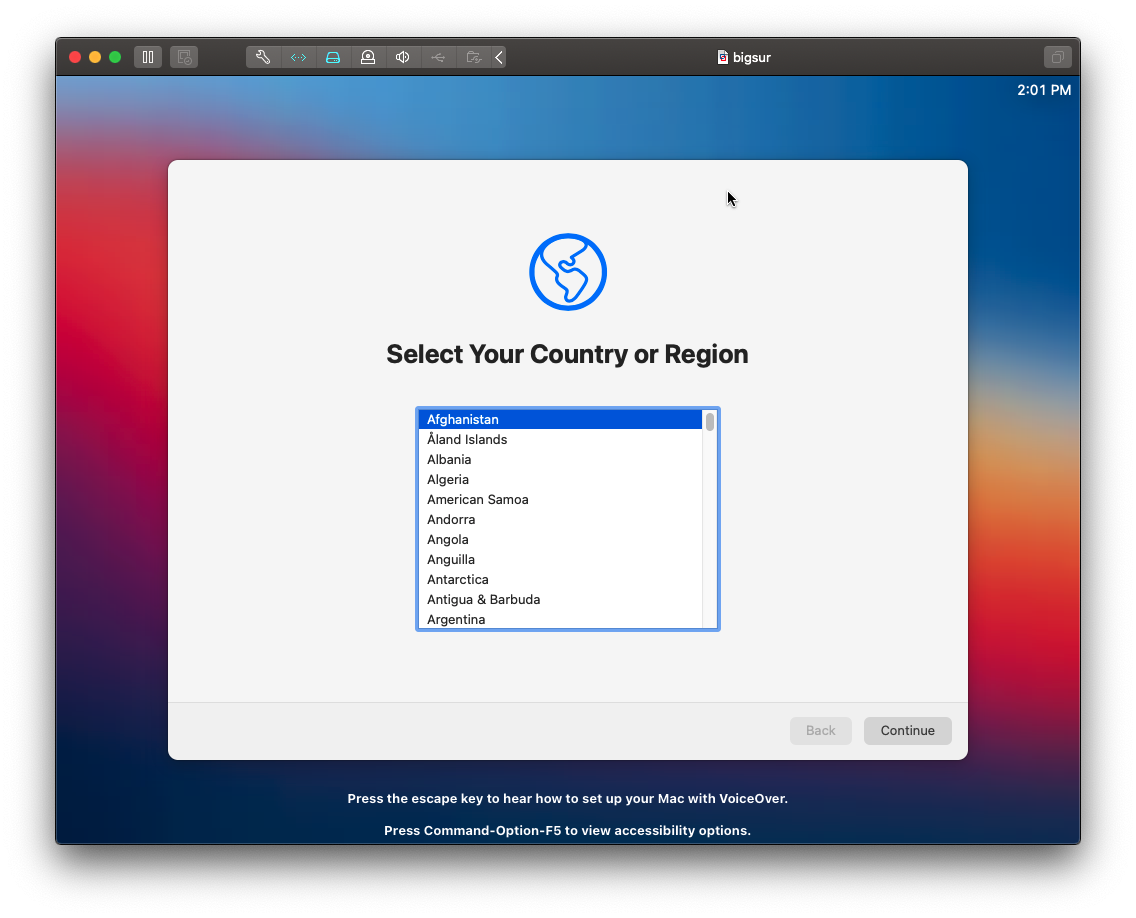
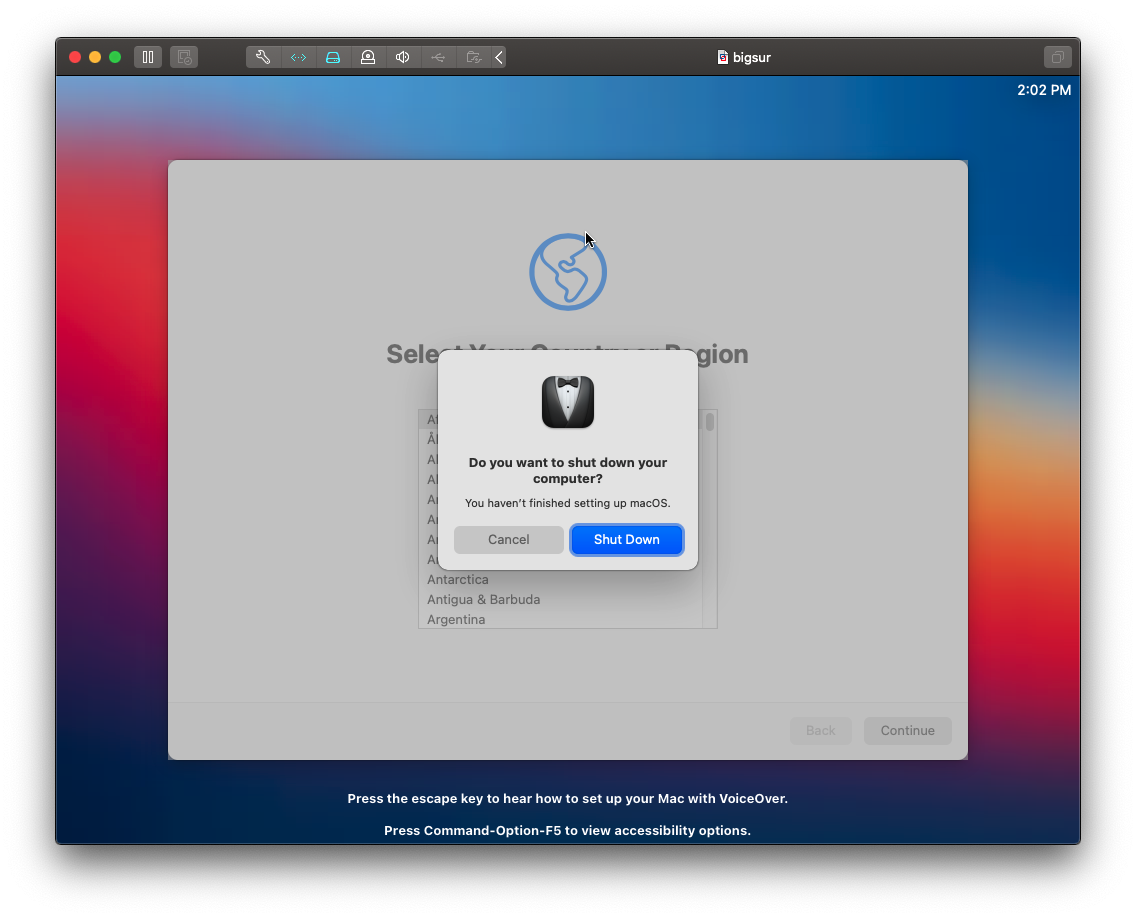
No, you can use one partition APFS. When you format, this is buged, solution: 1) format paritition APFS to APFS => result: bug 2) format disk to APFS => result: good THIS TWO STEPs IS VERY IMPORTANT Now you can install to disk, on parititon APFS. When install is on first configuration (after 29mins of install), shutdown virtual machine. Create new virtual disk and plug in your virtual machine. Restart machine virtual on ISO (installer) In disk utility, create image of disk to your new virtual disk extract in your macOS the vmdk where is are macOS11.dmg. mount macOS11.dmg dd paritition of your disk (exemple, disk28 to disk1) disk1 is APFS paritition of disks0s3 of disk0, understand ? OK ! You are okey, you can boot in your real hackintosh1 point
-
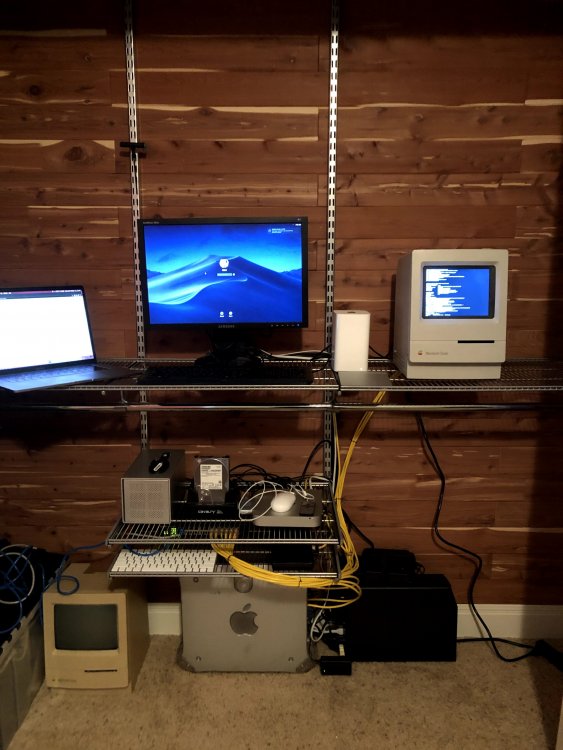
Hi all! This is my modded Powermac budget/mid workstation. Mainly for Linux dev work. Triple boot: Ubuntu, MacOS (openCore), Windows. SPECS: AMD Ryzen 5 3600X MSI B450M MORTAR MAX HyperX 32GB (2x16GB) 3200MHz CL16 Fury Sapphire RX 5500XT 4GB Seasonic Focus GX 650W 80 Plus Gold ADATA 512GB XPG SX8200 Pro (MacOS/openCore) ADATA 256GB XPG SX8200 Pro (Ubuntu) Crucial BX500 120GB SATA (Windows) be quiet! Shadow Rock 3 120mm be quiet! Pure Wings 2 PWM 80mm 4 x be quiet! Pure Wings 2 PWM 92mm ASUS BT400 Bluetooth 4.0 USB1 point
-
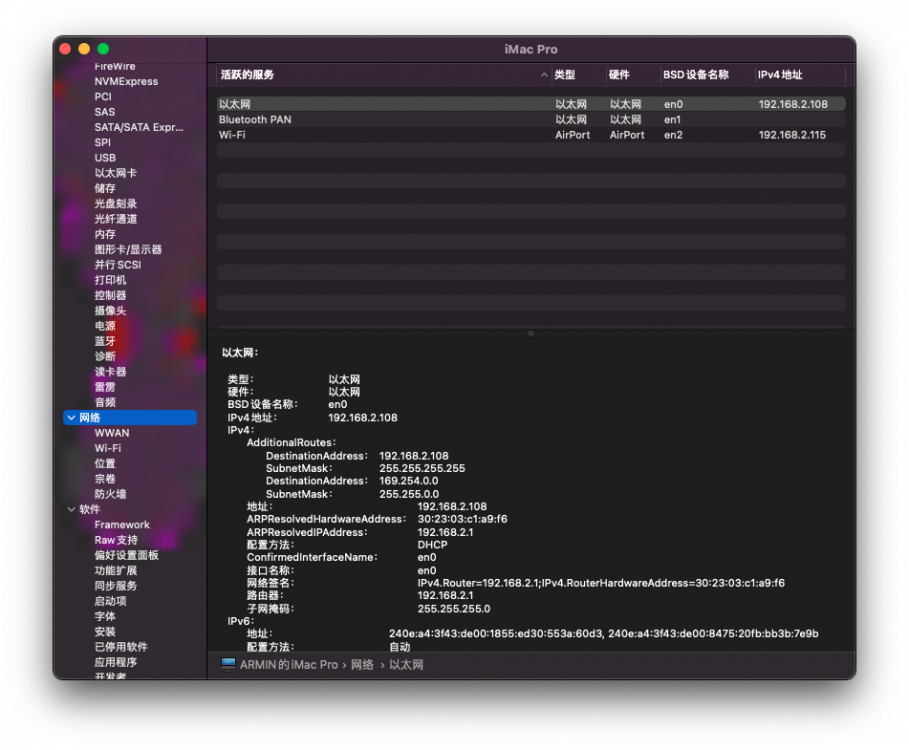
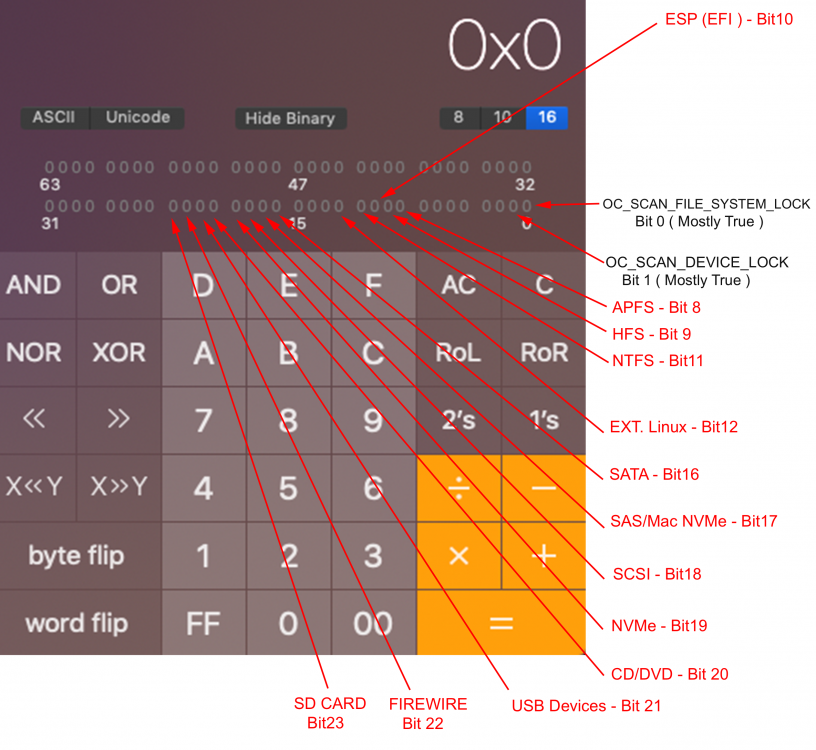
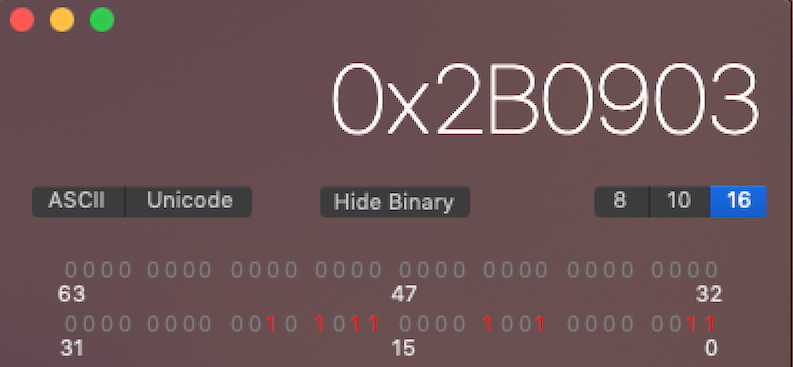
Here is a simple and effective method to get your ScanPolicy value: Let’s say your config has Windows (NTFS) & MacOS (APFS) on Sata & NVMe Drives, but you’d also like to scan your USB for OS Installation purpose. 1- Enter your Calculator in MacOS ( Programmer : CMD3 ) You’ll have this window. Without entering any numeric values, you just need to click on the desired binary value (in front of the red arrow) to switch it from 0 to 1 ( 0= False / 1=True ) By clicking on the desired values the big Hex value will appear: FSL + DL+ APFS+NTFS+SATA+SAS/Mac NVMe +NVMe+USB 0. + 1. + 8. + 11. + 16. + 17. + 19. + 21. ( Note that the ESP Value =0 so no EFI will be scanned.) By converting that HEX value to Decimal ( Any Hex Converter ) You’ll get 0x2B0903 -> 2820355 ( Your New Scan Policy ) Done !
 1 point
 -
https://applelife.ru/threads/dampy-originalnyx-makov.2943712/page-2#post-8061171 point
-
petr ati otluda. rodom moget ti znaesh pochemu moi hub keeps on crushing0 points
-
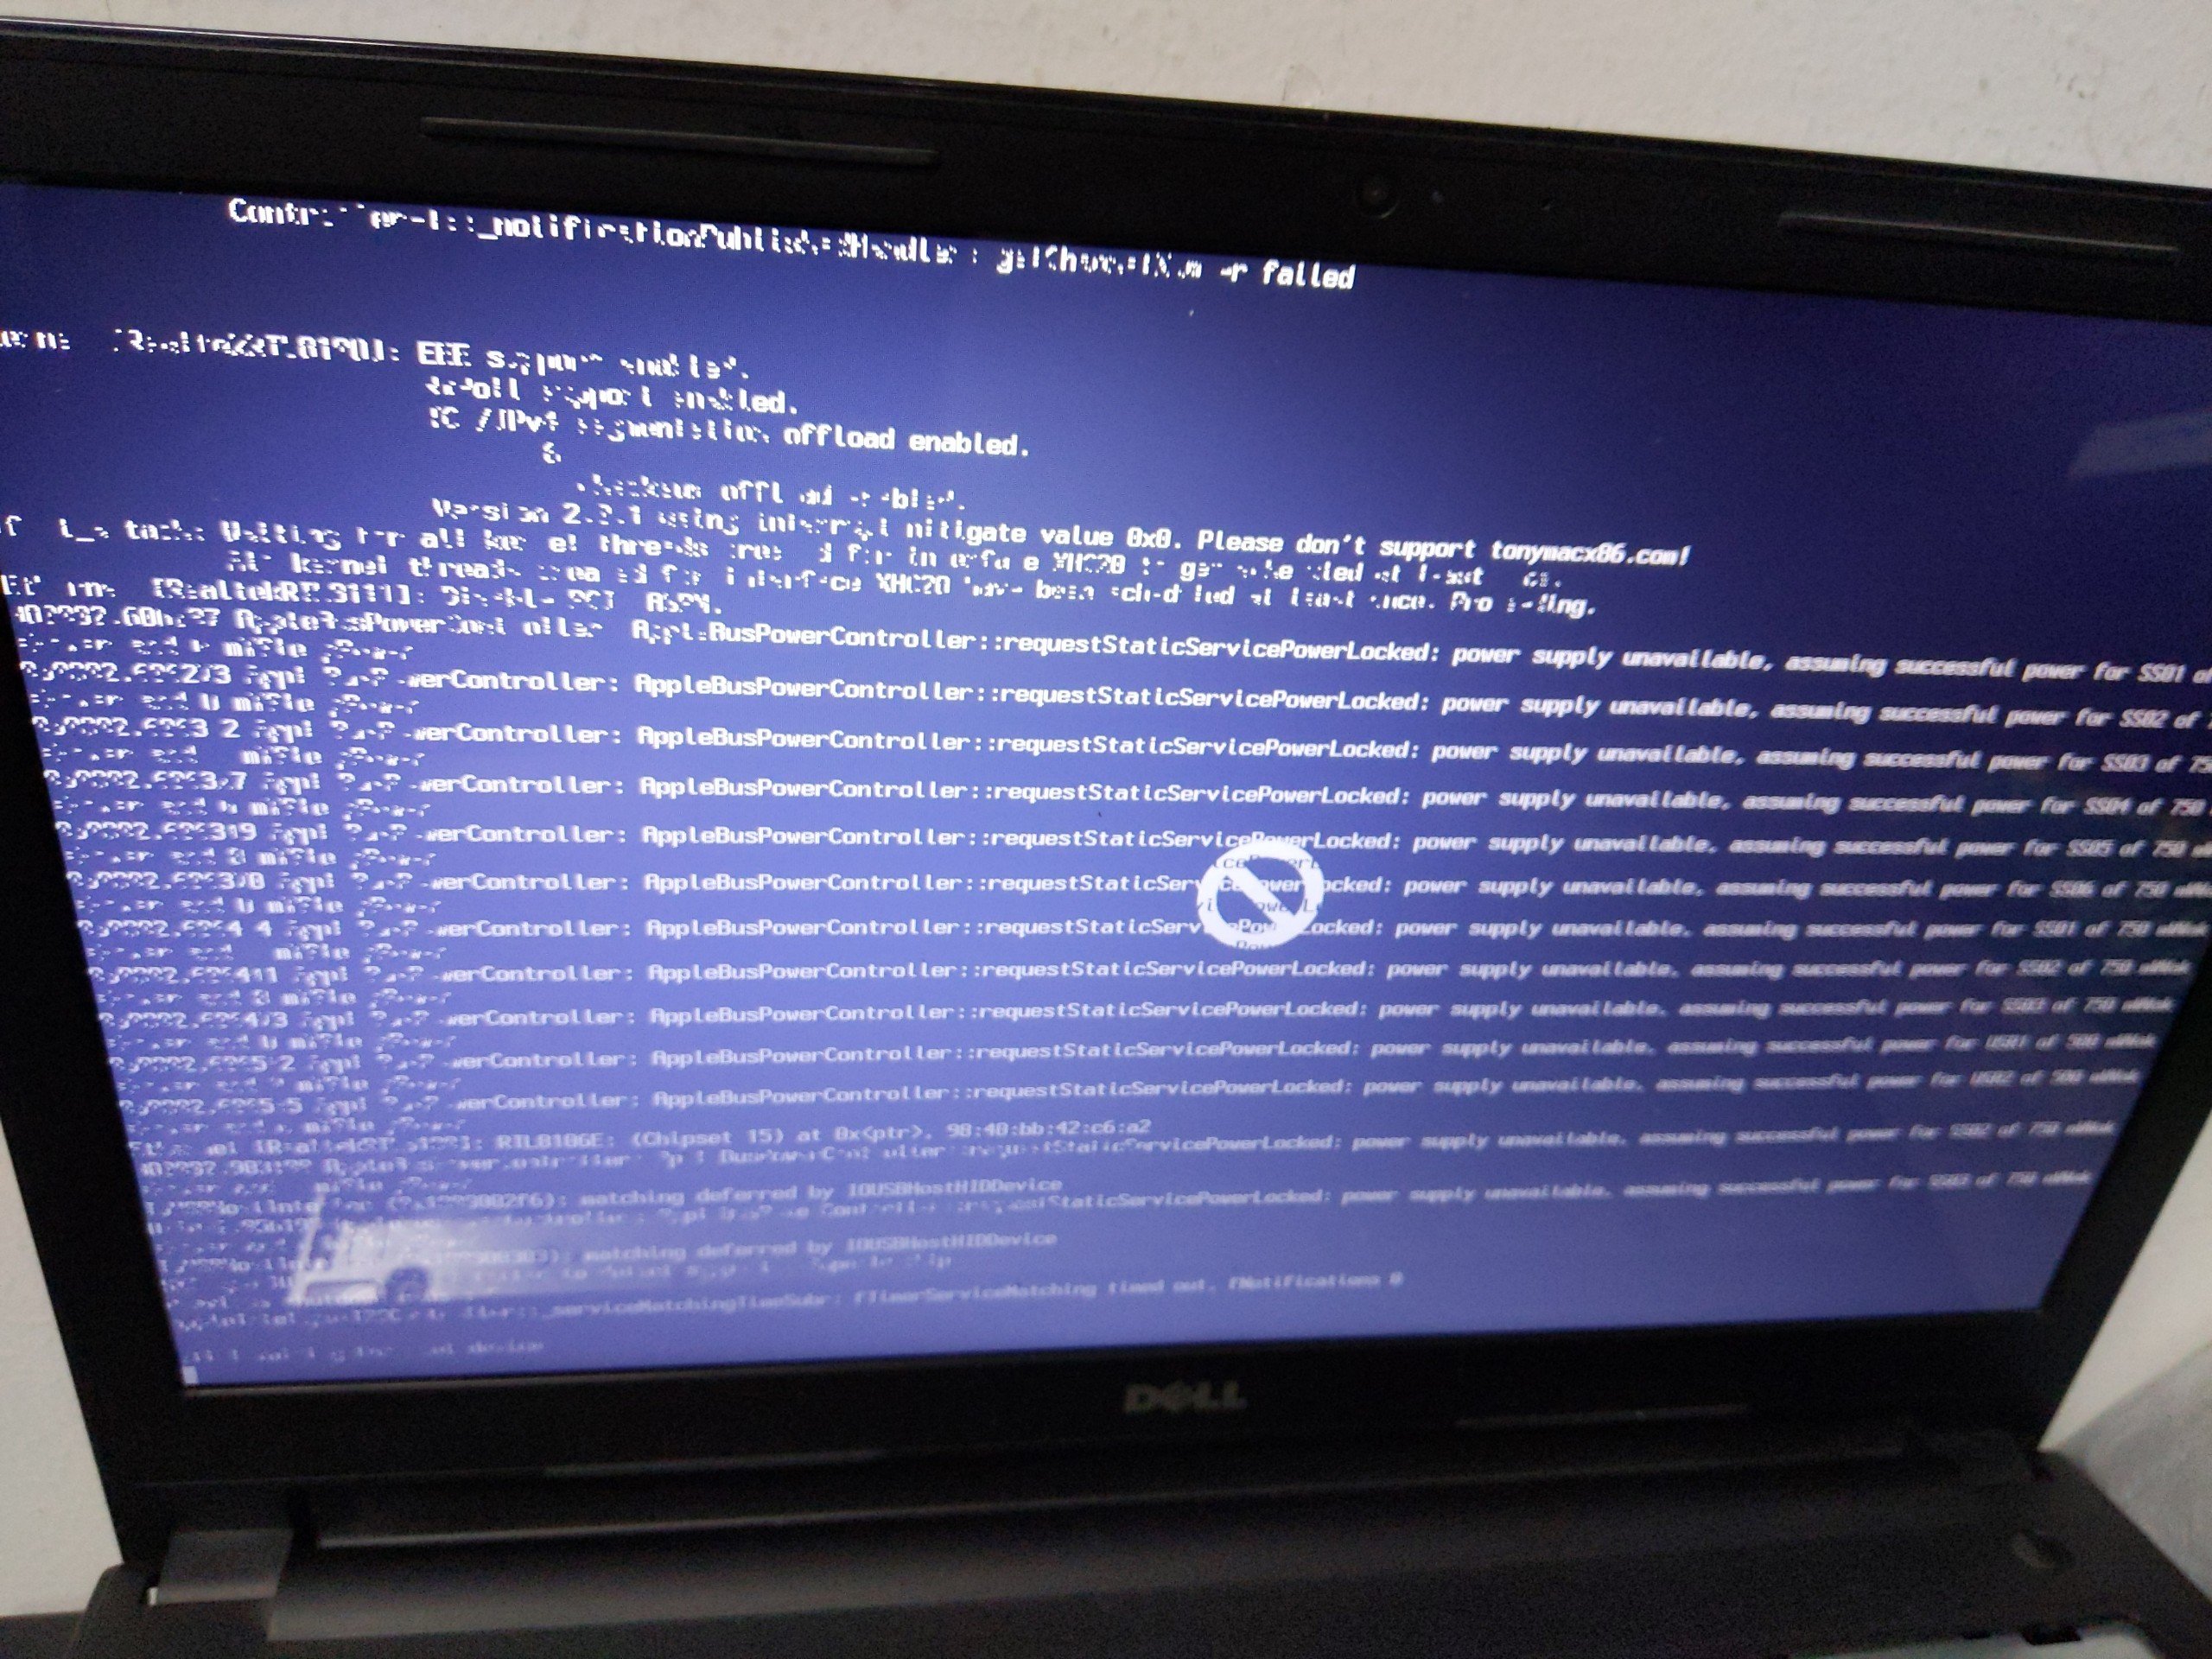
I installed from vmware to ssd external, I booted via USB, the installation was successful, but when I put it on computer via SATA port, error appear end line erorrs: still wait for root device what happen??? tks!
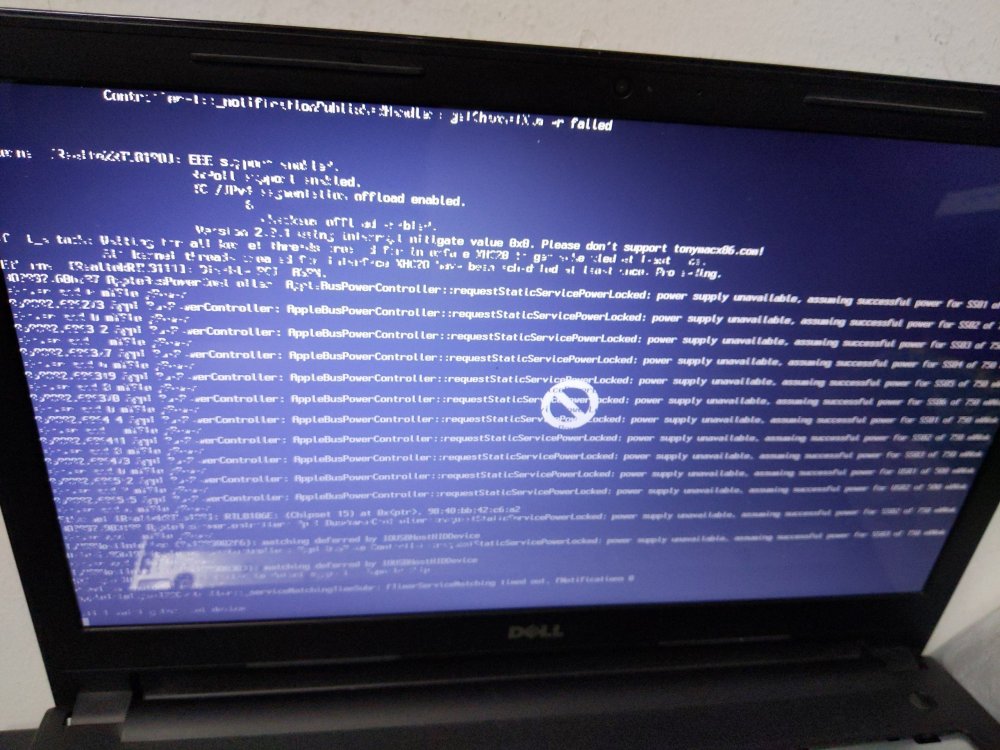 0 points
 -
Some guys know how to make this card Broadcom BCM943224hms working on BS its work perfect on 10.15 I try latest AirportBrcmFixup compilation my self and not working thanks0 points