Leaderboard


Popular Content
Showing content with the highest reputation on 08/04/2018 in Posts
-
Well, what do you know? It works! Thank you!
 4 points
 -
Guys try r46364 points
-
check if work DSDT.aml.zip2 points
-
I have never used EFICheckDisabler.kext and don't have this popup issue that others are having.2 points
-
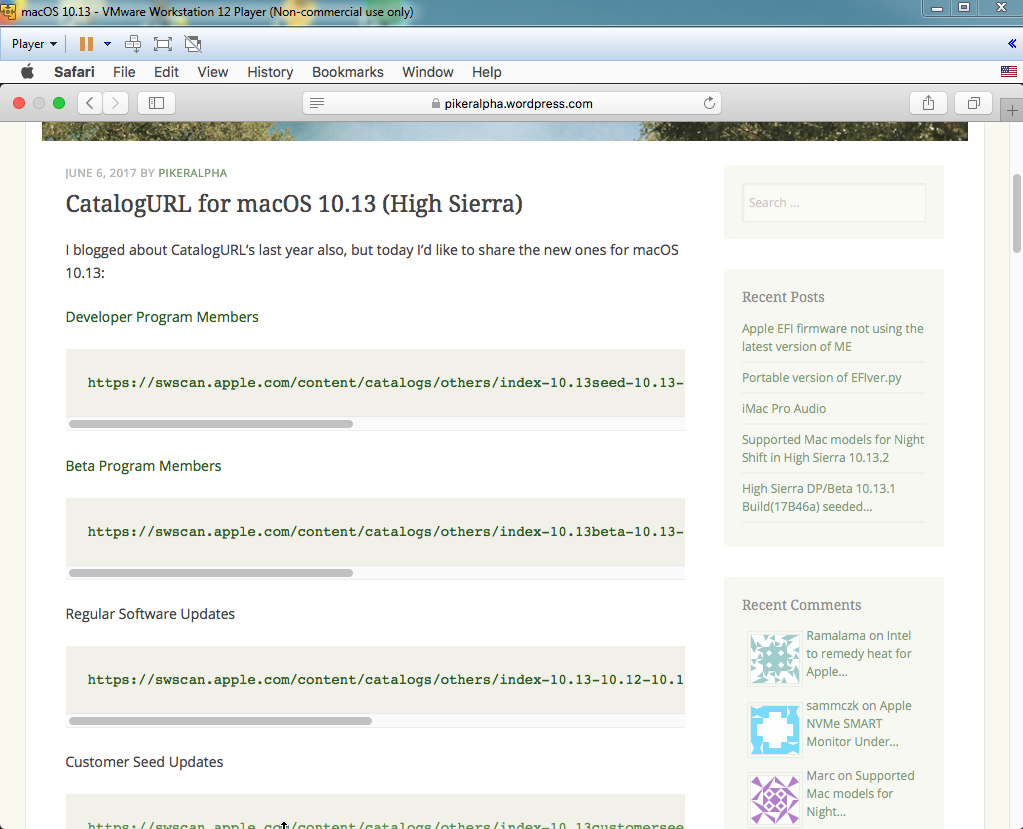
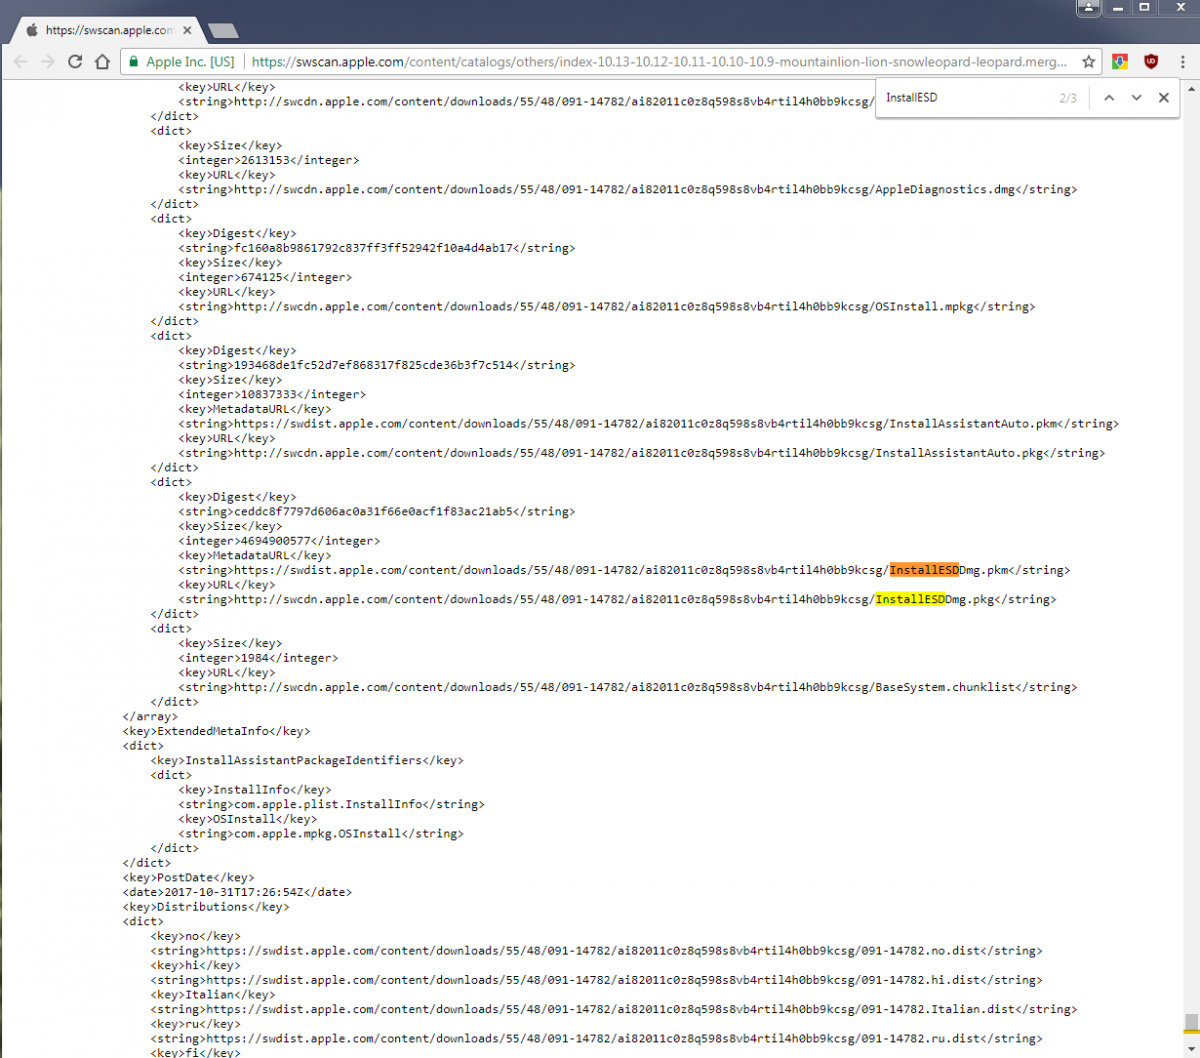
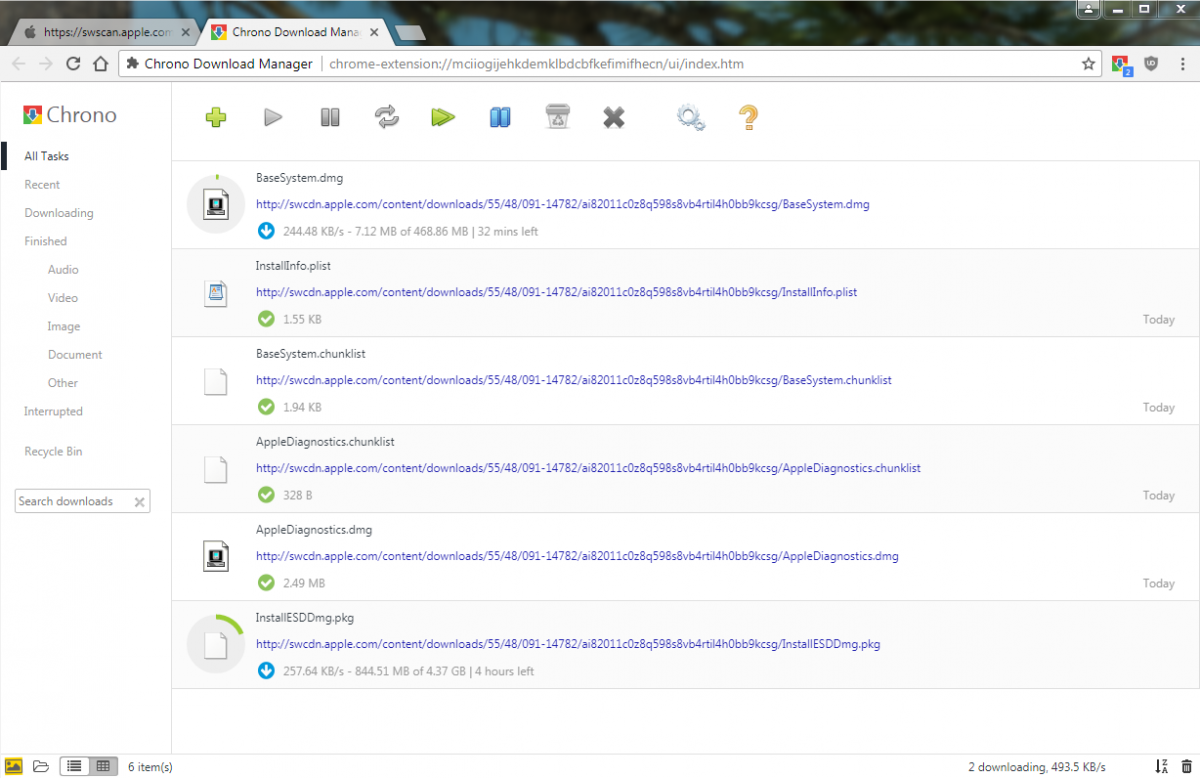
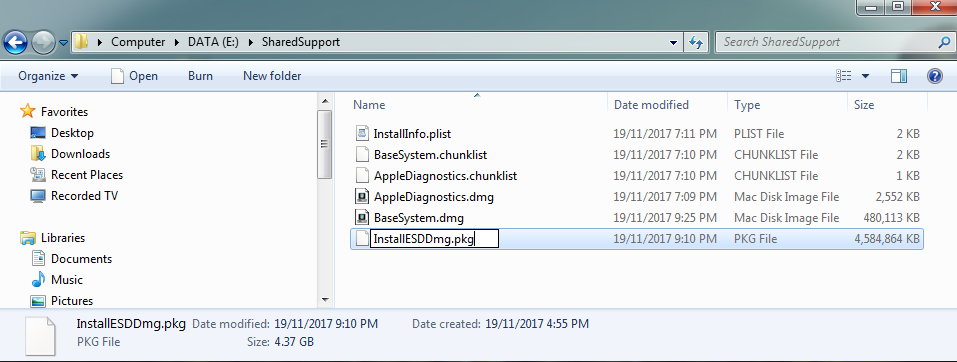
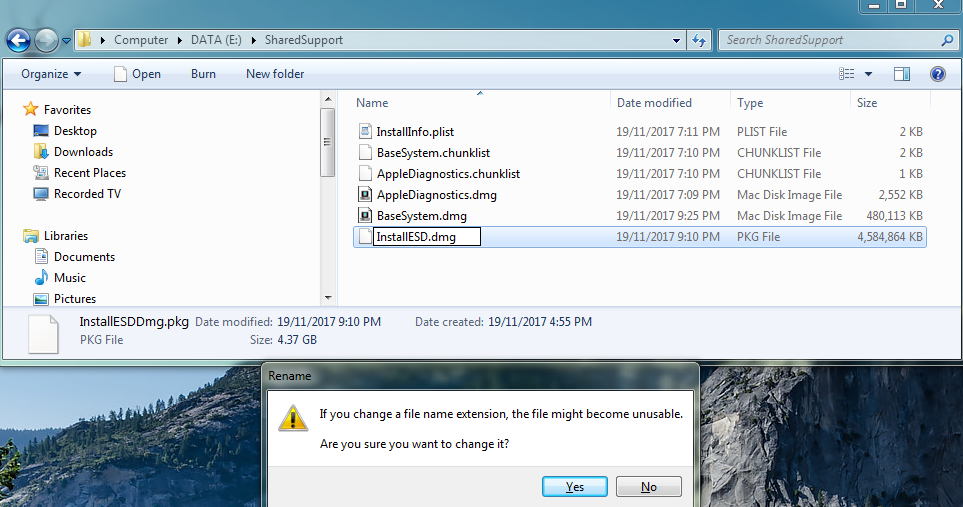
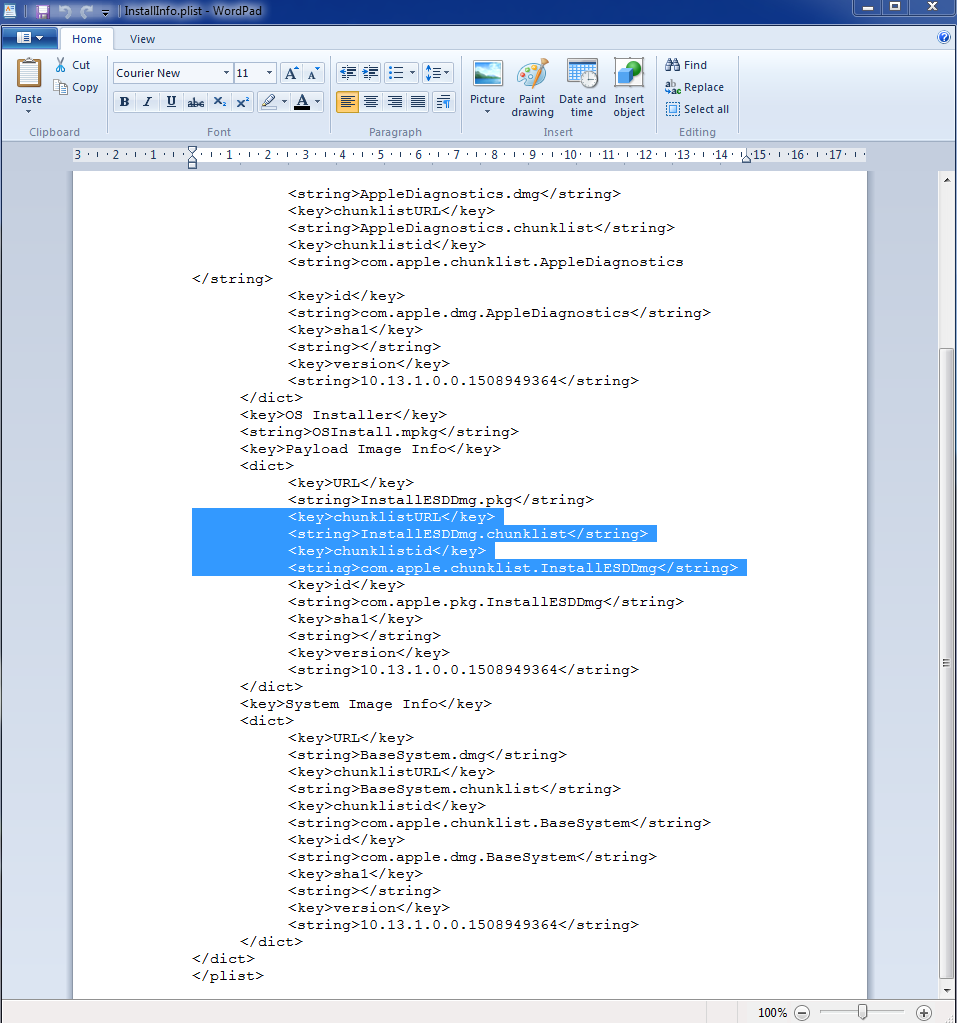
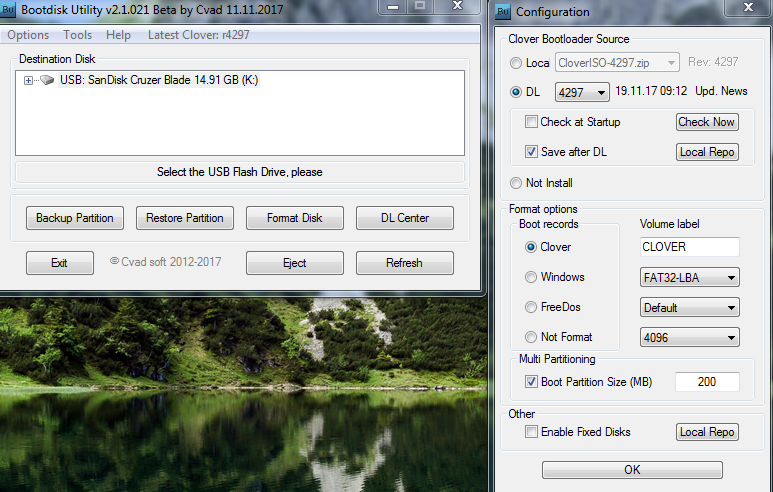
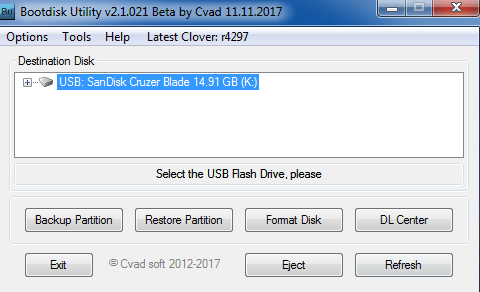
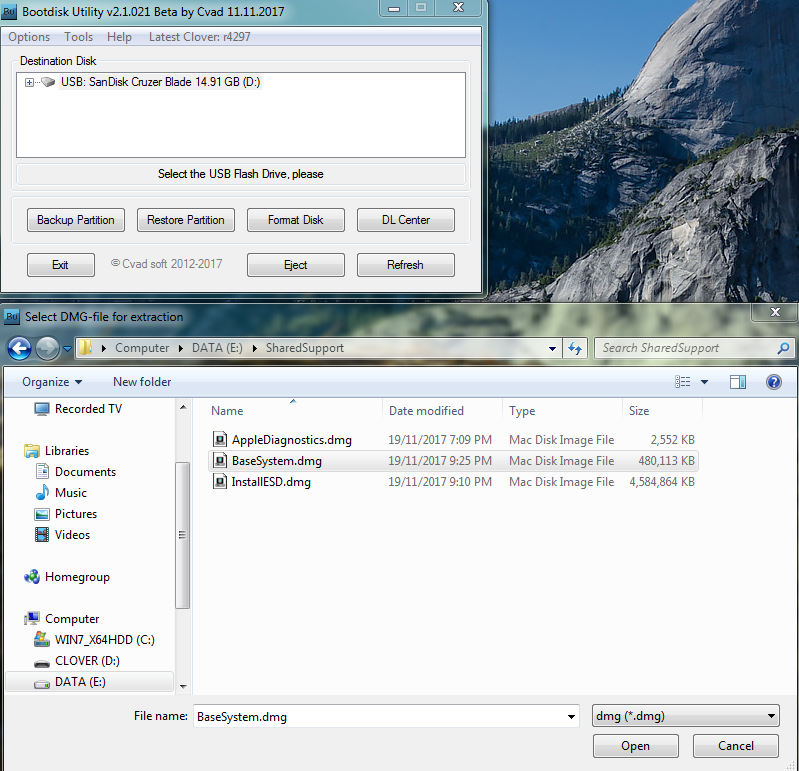
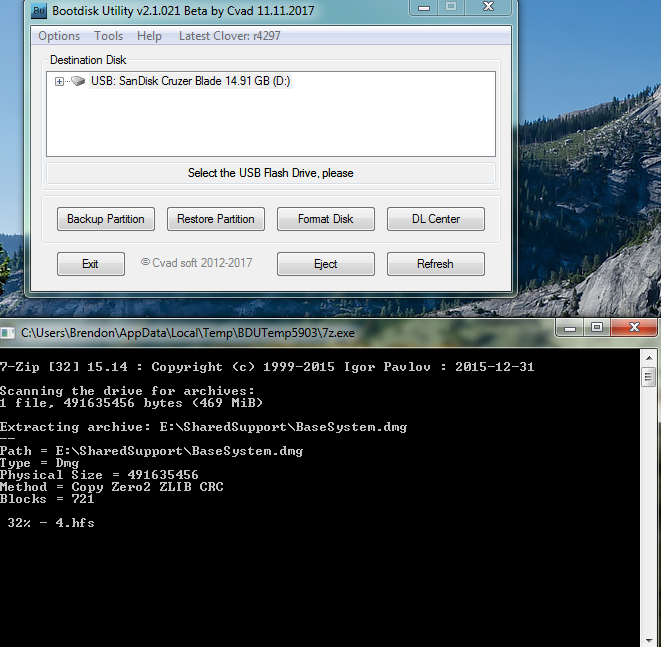
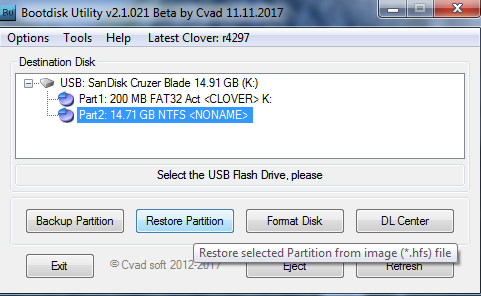
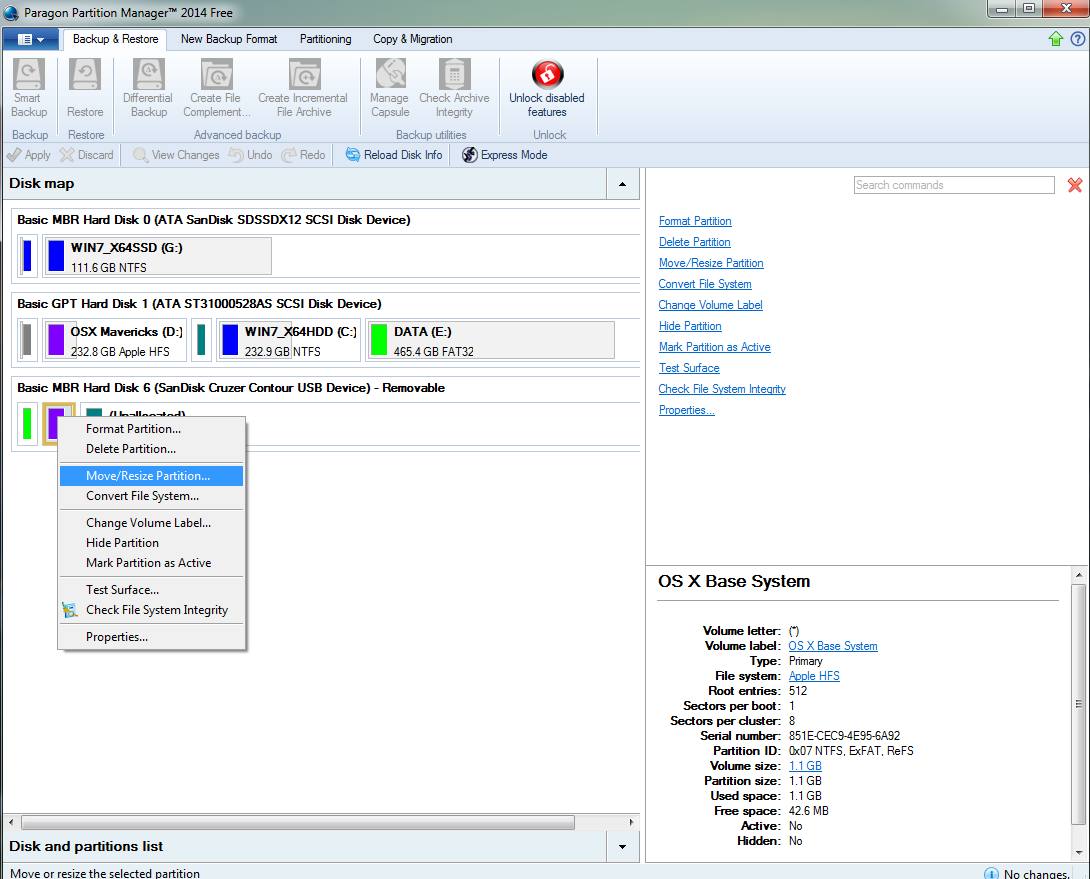
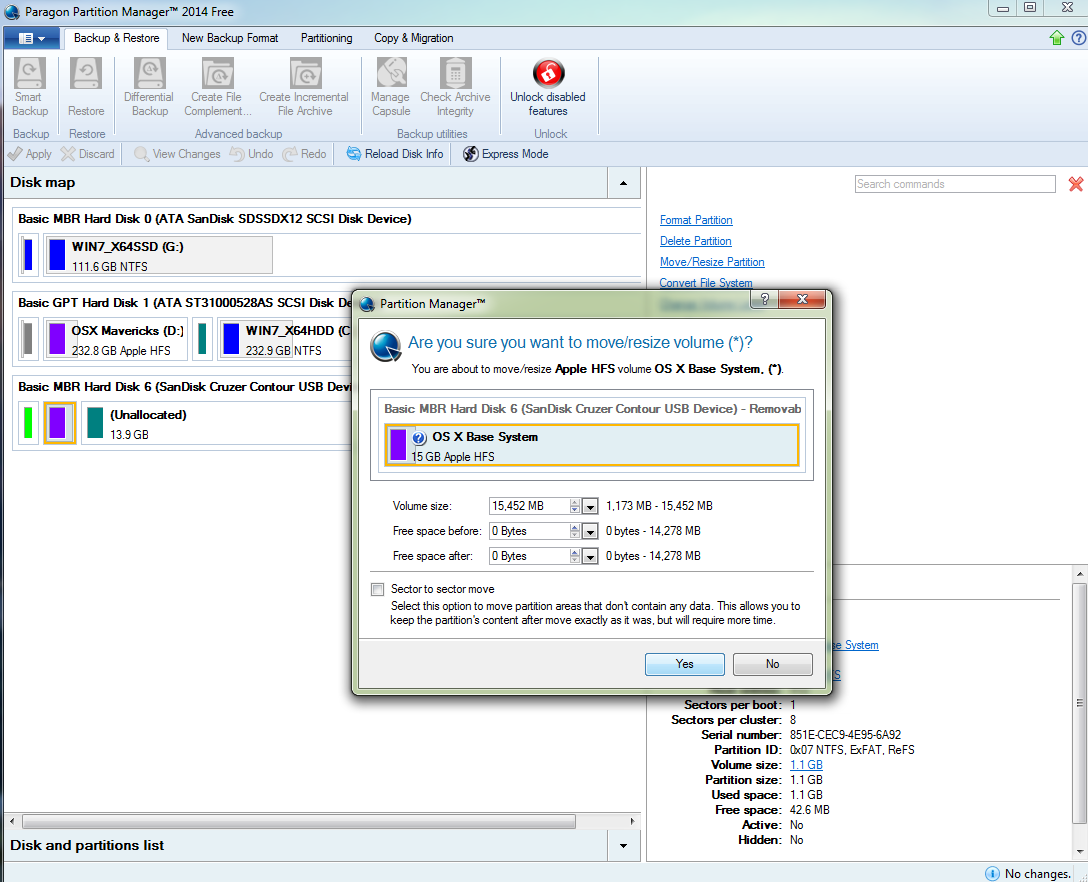
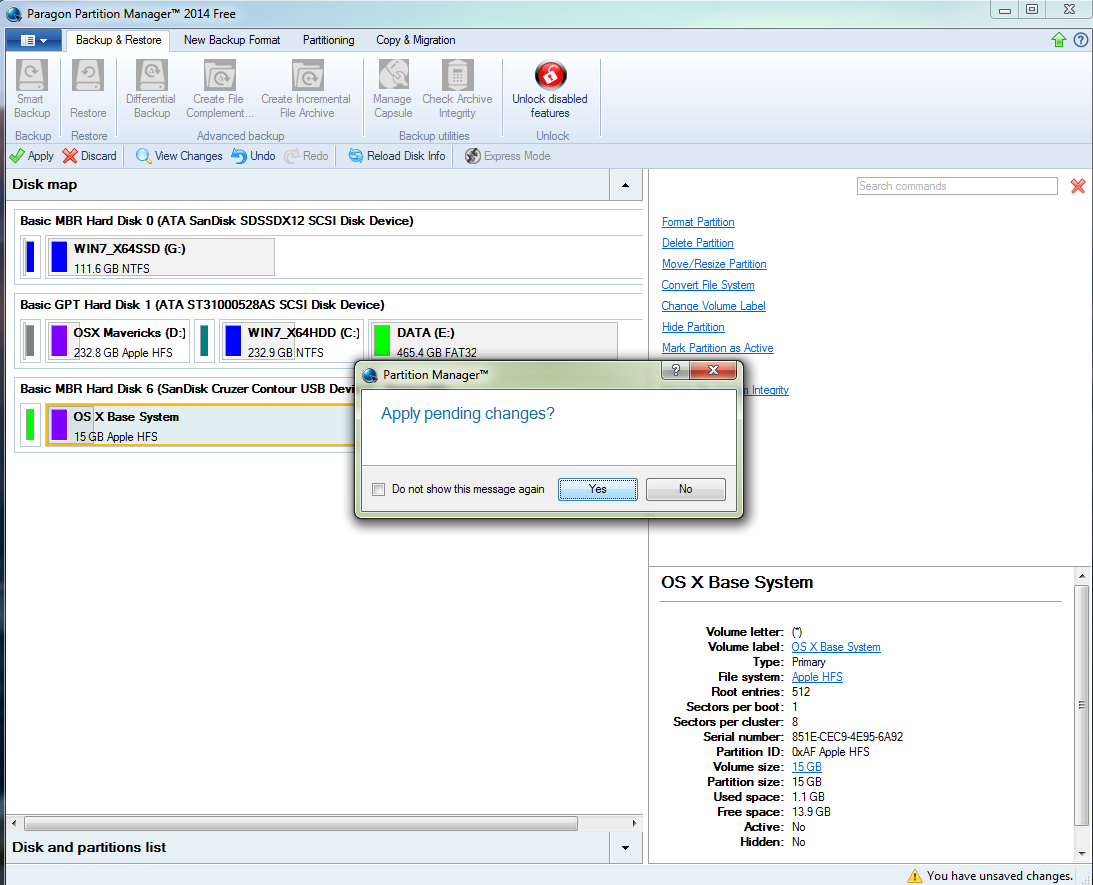
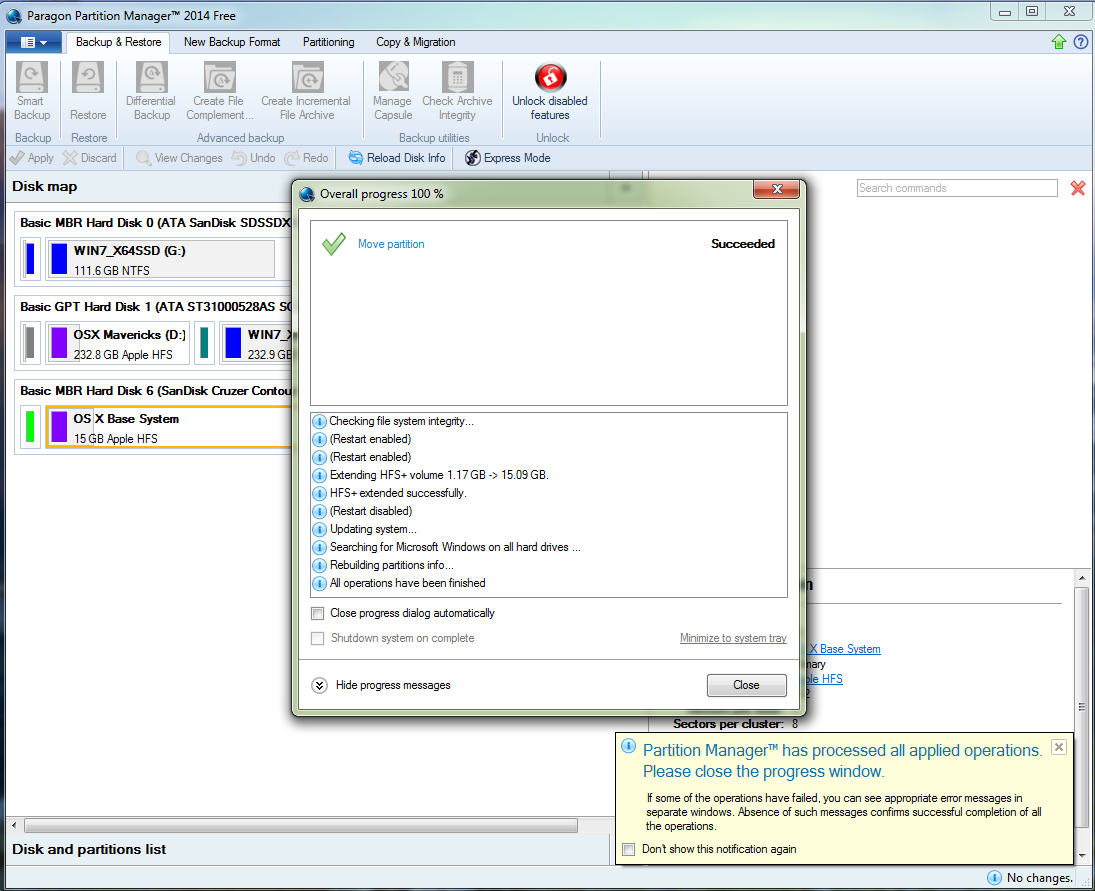
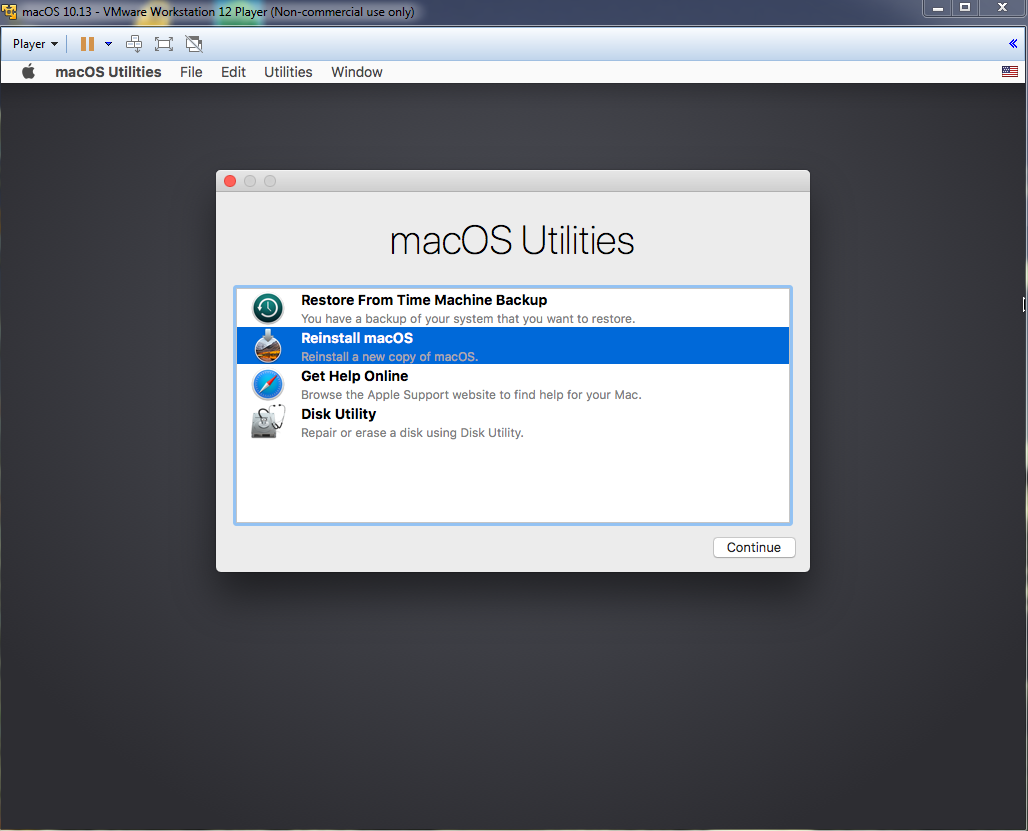
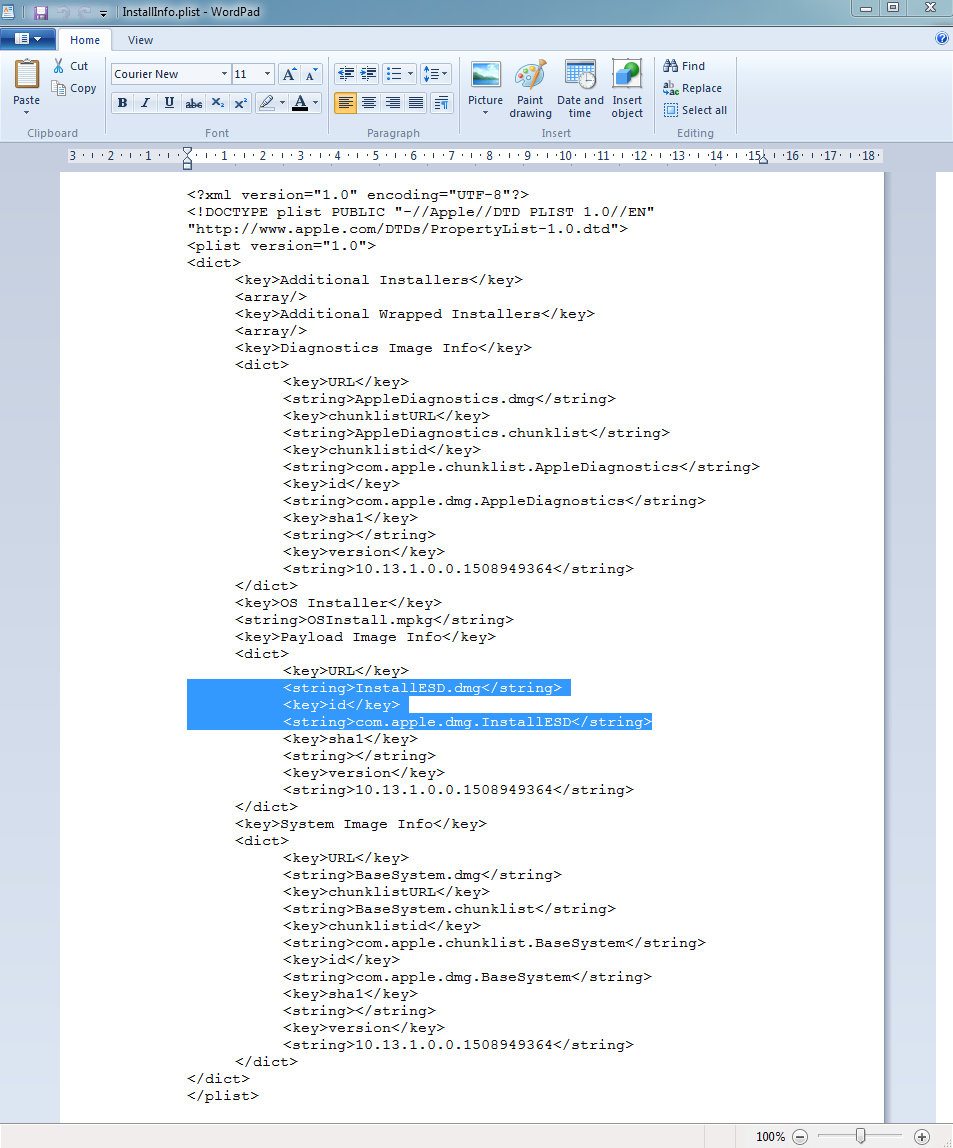
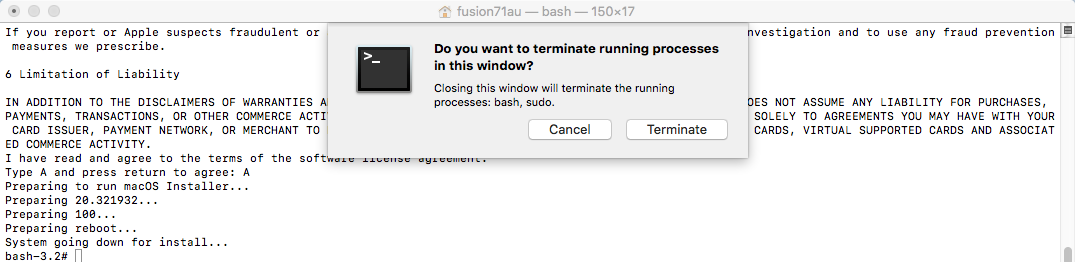
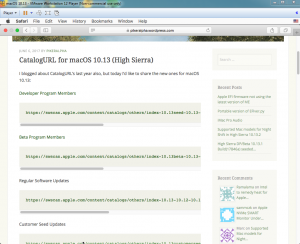
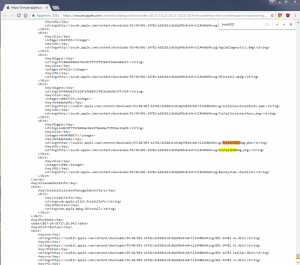
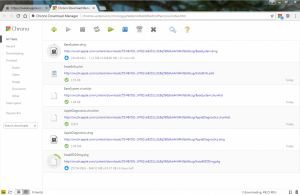
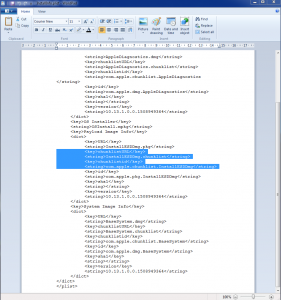
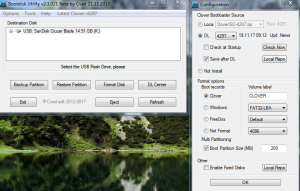
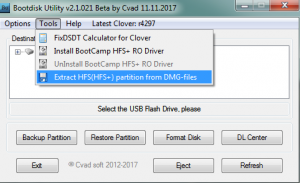
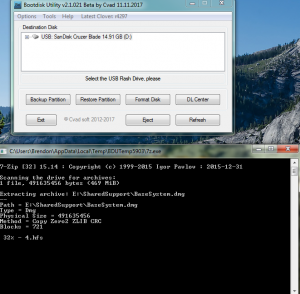
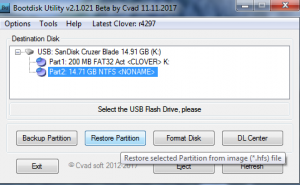
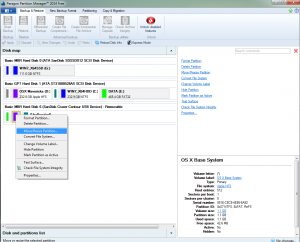
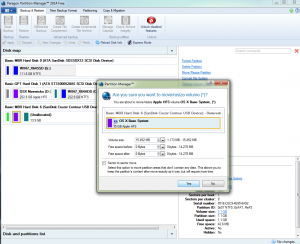
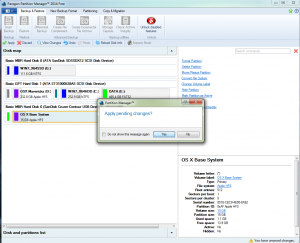
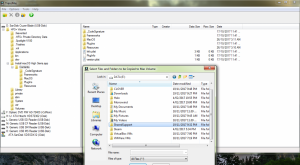
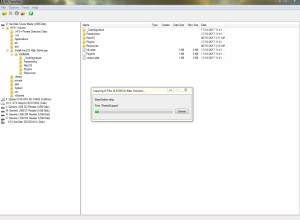
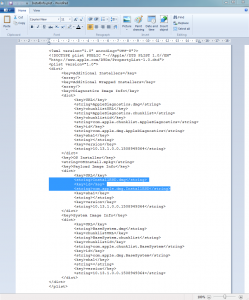
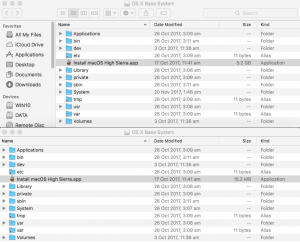
Making a High Sierra USB Installer Entirely From Scratch in Windows This is a proof of concept tutorial, to show it's possible to create a vanilla High Sierra installer, entirely from scratch, in Windows (even without App Store downloaded "Install macOS High Sierra.app" from a real Mac ). @PikeRAlpha's link to Apple's Software Catalog provides us with all the URLs necessary to download the needed files directly from Apple instead of some dubious source from the internet... Pre-Requisites 8GB or larger USB drive. Edit: Recommend 16GB or larger for macOS Catalina 10.16 Boot Disk Utility v2.1.2017rev021b from @CVAD TransMac (free 15 day trial) Paragon Hard Disk Manager Free Download Installer Files Directly from Apple 1) Browse Apple's Regular Software Catalog and find the URLs to download the following 6 installer files... BaseSystem.dmg BaseSystem.chunklist InstallInfo.plist InstallESDDmg.pkg AppleDiagnostics.dmg AppleDiagnostics.chunklist (Hint - search page for "InstallESD" to find its URL and others nearby) to a folder named "SharedSupport" on your Windows NTFS drive. A browser download manager (eg Chrono for Chrome, dTA for FireFox) is handy since InstallESD is >4GB ---> allows you to pause/resume interrupted download... 2) Rename InstallESDDmg.pkg to InstallESD.dmg 3) Edit InstallInfo.plist with WordPad/text editor to remove the chunklistURL and chunklistid keys for InstallESD, and renaming it from InstallESDDmg.pkg to InstallESD.dmg (example of edited file attached to this post)... Note: You can verify the SHA1 checksum of your InstallESD.dmg and BaseSystem.dmg with the correct ones at this website. Boot Disk Utility to format the Installer USB and Restore OS X Base System HFS partition 1. Format USB with BDU & latest Clover ---> creates boot files in CLOVER partition + second FAT partition 2. Extract 4.hfs from \SharedSupport\BaseSystem.dmg with BDU --> save to it's local folder 3. Restore 4.hfs to USB second partition with BDU ---> 2nd partition becomes bootable "OS X Base System" Paragon Hard Disk Manager to extend HFS Partition to its Full Extent Open Paragon Partition Manager Free and resize the second partition of the USB drive to the full size allowed. Don't forget to apply the changes at the end... Transmac to Copy "SharedSupport" folder to OS X Base System 1. Open the TransMac program and navigate to the HFS+ Volume/Install macOS High Sierra.app/Contents folder. Right click anywhere in the empty space on the RHS pane and select "Copy Here"... 2. In the next stage, select the "SharedSupport" folder we created above as the "Files and Folders to be copied to the Mac Volume"... Clover Settings Clover configuration is required now. The default config.plist (in the Clover FAT32 partition of the USB) maybe sufficient to boot your machine if you’re lucky. If not, the hackintosh-vanilla-desktop-guide has some good explanations on the various settings available and also offers sample configuration files based on CPU type. Also, look at the Clover Wiki, Clover Instructions and Clover Configuration Thread for pointers and edit /EFI/Clover/config.plist accordingly with Wordpad or Notepad. The location of the important configuration files for Clover are summarized below config.plist--->EFI/CLOVER folder DSDT.aml with or without SSDT.aml--->EFI/CLOVER/ACPI/patched (don't need one if your DSDT is auto patched by Clover in config.plist) Kexts eg FakeSMC, NullCPUPowerManagement --->EFI/CLOVER/kexts/<osx version> or /Other. NB BootDiskUtility by default already has FakeSMC.kext installed here. You may need to add VoodooPS2Controller for your laptop keyboard/trackpad to work. If UEFI booting, you will most likely need one of the OsxAptioFixDrv-64 drivers copied from /EFI/CLOVER/drivers-off/drivers64UEFI to /EFI/CLOVER/drivers64UEFI. If you want to use the installer to run High Sierra in Windows on VMware, you can follow my guide to set up the Virtual Machine and replace Clover's default config with EFI_Clover for VMware (which is compatible to run in VMware). In the screenshots below, I have attached the USB Installer (in this case PhysicalDrive7) to my macOS Virtual Machine. Reboot the system to the USB installer to install High Sierra ... What happens if we don't have access to TransMac or Paragon Hard Disk Manager? Not a problem, as long as we get "OS X Base System" bootable, we can launch terminal from the Utilities Menu to copy the SharedSupport folder over to the Installer app. In essence, we will build the full installer app = 5GB+ on the target HD eg "Macintosh HD", by copying both the "small" installer app = 15MB (on "OS X Base System") and the SharedSupport folder from the NTFS volume (mounted in this example on /Volumes/DATA)... -bash-3.2# cd / -bash-3.2# cp -R Install\ macOS\ High\ Sierra.app /Volumes/Macintosh\ HD/ -bash-3.2# cp -R /Volumes/DATA/SharedSupport /Volumes/Macintosh\ HD/Install\ macOS\ High\ Sierra.app/Contents/ ...then start installation with the startosinstall utility... -bash-3.2# /Volumes/Macintosh\ HD/Install\ macOS\ High\ Sierra.app/Contents/Resources/startosinstall --volume /Volumes/Macintosh\ HD --converttoapfs NO --applicationpath /Volumes/Macintosh\ HD/Install\ macOS\ High\ Sierra.app The above steps can be automated with the attached "startosinstall.command" script, which will assemble "Install macOS High Sierra.app" on "Macintosh HD" and launch the startosinstall utility targeting the "Macintosh HD" volume. Copy/download to "Macintosh HD", then run in terminal (after attaching DATA USB with /Shared Support folder)... cd "/Volumes/Macintosh HD" chmod +x startosinstall.command ./startosinstall.command Updated Download Links for macOS Mojave 10.14.6_18G103 Browse Apple's Regular Software Catalog and find the URLs to download the following 6 installer files... BaseSystem.dmg BaseSystem.chunklist InstallInfo.plist InstallESDDmg.pkg AppleDiagnostics.dmg AppleDiagnostics.chunklist Note: In Mojave, Apple has removed the --converttoapfs NO and --applicationpath arguments from the startosinstall utility.... eg to use startosinstall for the above section "What happens if we don't have access to TransMac or Paragon Hard Disk Manager?", the syntax is now -bash-3.2# /Volumes/Macintosh\ HD/Install\ macOS\ Mojave.app/Contents/Resources/startosinstall --volume /Volumes/Macintosh\ HD This basically means that for Mojave, the default installation will always convert the target volume to the apfs file system. Updated Download Links for macOS Catalina 10.15.6_19G73 Browse Apple's Regular Software Catalog and find the URLs to download the following 6 installer files... BaseSystem.dmg BaseSystem.chunklist InstallInfo.plist InstallESDDmg.pkg AppleDiagnostics.dmg AppleDiagnostics.chunklist startosinstall.command.zip InstallInfo.plist_edited_10.13.6.zip InstallInfo.plist_edited_10.14.6.zip InstallInfo.plist_edited_10.15.6.zip


 1 point
 -
First off, this guide would not be possible without the help and experience of many experienced members, coders, and moderators. Many thanks to Bronya for creating the Kernels, Boot, and Various other files that allow Chameleon and Clover to boot and run Sierra on Ryzen systems. In a very short time Bronya has done an incredible job of providing functionality on Ryzen systems on OS X. Many thanks, again. I would also like to thank and credit Spakk, Shanee, Aikimoa, Gils/Papeircul, Chris1111 and the many testers and moderators that helped in the testing and help threads. I forgot to mention jaytarang92 who created a patcher (RyzenPatcher) using terminal to make Ryzen/chameleon install almost automatic, I have a feeling he will soon have a Clover version which will help everyone and speed the process. I have tested and repeated a procedure for creating a Clover based USB installer and Install guide for AMD Ryzen systems for macOS Sierra 12.4-12.5+. It will require downloading and compiling the files and apps listed below. It will require a working Mac or mackintosh. I also attached a video zip that reflects most of the steps. There are other methods for creating a USB installer but this is a simple method that has been repeatable for 3 consecutive installs. It works, but requires extra edits which may be a good thing because software updates often remove and replace files so these methods are needed for AppStore updates recovery. It's a Start! *****Update 8/1/17 Sierra 12.6 is not working for creating a USB installer if you have an earlier version of Sierra 12.3-12.5 the USB can be made and used. If all you have is version 12.6 then make the install on a SSD or HDD using either a data port (internal) or with a USB to Data converter/adapter. You can load and instal directly to the disk and then follow post 2 instructions and do the disk edit package included. Follow the video as well. Update: Nvidia Web drivers are not working to full potential, users are reporting approximately 50% or less performance compared to windows or Intel Hackintosh builds. AMD HD 7xxx (some R7, R9 series), and HD 8xxx (R9 series) and RX cards are working well, but not to full potential vs. Intel Hackintosh builds. Older Nvidia cards with "native drivers" in OS X are working well and do not require any fixes. For questions or comments about performance and or hardware compatibility please use this thread for support. http://www.insanelymac.com/forum/topic/325841-ryzen-macos-sierra-post-install-troubleshooting-nvidia-other-drivers-audio-hardware-compatibility-etc/?do=findComment&comment=2472842 Required materials: 1). macOS Sierra, create an Apple account and dowmnload the latest version of Sierra and place in Applications. If you click on Launcher (Rocket Ship) it should appear there. 2). Kext Wizzard! Very important. 3). Clover r4077 boot loader. ( Update, Clover version 4114 can be used instead of version 4077). 4). Pandoras Box, here at InsanelyMac in downloads section. 5). Clover Configurator. 6). Ryzen Clover Essentials package (attached). 7). 8gb or larger empty and GUID formatted USB stick. Run Disk Utility to erase and format in "Mac Extended Journaled". 8). A HDD or SSD erased and formatted same as above. 9). Any kexts or special drivers needs for your particular hardware like ethernet or wifi fixes, graphics drivers etc.. 10). Patience and perserverance. BIOS Settings. Serial Port=disabled, also may be labeled Super IO Configuration= disabled. XMP detection enabled (Ram frequency settings) XHCI Handoff= enabled EHCI Handoff= enabled HPET= enabled Power on by keyboard= enabled any key ( for sleep and deep sleep option). Open Pandora and select "Create Bootloader", select macOS Sierra and select install location (USB). Next, click on the Custom Kernel tab and go to top of window that pops up. Click on the Custom Kernel tab and scroll to location of your risen essentials package and select 16.5 kernel. It should appear in the window next to tab and check that you have USB and Sierra also loaded in the installer windows in Pandora. Hit "Start" button and wait (15-30 min + -). After instal is complete it will ask you if you want to instal Clover or chameleon, choose clover. When the Clover window opens check to see that UEFI and ESP boxes are checked in top left corner. Don't worry about other settings just go to bottom left and hit install. Now you have a pandora installer icon and an EFI (clover) folder on desktop. Open the EFI folder and open the Ryzen essentials EFI folder from package. Drag the Boot64EFI folder to the EFI (USB) and replace it. Next drag the Clover folder to the same EFI tab and choose replace option, don't merge this one. You should now have replaced all the clover files for the USB installer. Now, open the Pandora Installer and open the Kernel_16.5 folder packet. Open the usr folders for both windows and drag the Kernel16.5 files to the Installer usr folder and select "Merge" option. I did them one at a time, standalone, local and bin. Next, open the "System" folder on installer and then "Library" scroll to "Extrensions" folder and open. Drag the Extensions files from Kernel 16.5 folder to Installer Extensions folder tab. Choose replace option. Close Extensions folder tab when done. Open frameworks folder on Installer and got to kernel 16.5 files and drag Frameworks files one at a tine to Frameworks folder tab. you should get replace or Merge option. Choose Merge option. Close folder tab when done. Scroll to Kernel folder on Installer and open. there will be 2 kernels there, remove both top trash and drag the Kernel 16.5 kernel to installer Kernel folder tab, choose replace. Next, scroll to PreLinked Kernel folder and replace in same manner as above. ***** Now run Kext Wizzard and make sure to select the proper target disk "Pandora Installer". You should now have a bootable USB installer. However once Sierra is installed you will need to make all these edits again on the fresh install disk. Repeat the above process and also use the post install "Library" files. This not System-Library, it is in the Library folder prior to System on main disk partition. Choose the "Merge" option for App support and replace for Pref panes. Make al the ediis to the new Disk installation, then run Clover boot loader 4077 make sure to select the proper disk (fresh install) and then replace the files with the EFI files provided that were used for the USB installer. Open the Config.plist folder that matches your system Graphics hardware and drag it to the Clover Folder "tab" and follow "replace" prompts see zip attached to config folder. Edit the config.plist for your CPU frequency before booting. you can do this by using cursor arrows at clover boot menu. Use right pointer arrow to scroll to "options" hit enter and scroll to Boot Args. npci=0x3000 busratio=36 (current setting) Set bus ratio to your GHz for example 3000MHz = busratio=30, 3200MHz = busratio=32 etc.. On first boot hit the space bar at clover screen (after setting bus ratio above) and select: Verbose, Single User, KeepSymbols, Don't Reboot on Panic, and Debug Kexts options, scroll to bottom hit return and the enter to boot. It should stop at Root: type in "mount -uw" hit enter, type "fsck -fy" hit enter and wait then type "exit". All of these are done without the " " marks. It will either boot into Sierra or stop very close to booting. reboot if necessary and just hit enter. If you get booted run Kext wizard and then try a reboot. After you are configured and it boots Please use Clover Configurator to reset serial number UUID and MLB. These are provided for now but if everyone has the same numbers it could be problematic so create your own unique set up. Clover Configurator will do it all for you once you get the hang of it. Update: Here is the new Sierra 12.6 kernel package. kernel_ryzen_10.zip See here a video guide: . Video Guide for Clover USB Installer.USB Installer Clover Sierra Ryzen.m4v.zip Ryzen USB Installer Essentials v3.0.zip Ryzen Disk Edit Essentials v3.0.zip1 point
-
So I have now become semi-retired and have more time to go back to looking at the unlocker code. My plans are to start a 3.0 version which includes: Specifically for Workstation 14 and Fusion 10 ESXi support 6.0-6.7 if possible Remove the non-Server check for versions 10.5 (Leopard) & 10.6 (Snow Leopard) Tools download needs to get 2 ISOs depending on the version of macOS running in the guest A simple way to bootstrap a new macOS High Sierra VM directly from Apple software download repos AMD for recent CPUs using CPUID masking techniques (will need volunteers with Ryzen systems) Now this is not going to happen overnight as I am enjoying some freedom after 30+ years in the software industry and I have other projects both IT and non-IT related that will also take my attention. Do you, the great InsanelyMac community, have any suggestions that I can look into for the future?1 point
-
Thank you @Pavo it is worked. Finally, I passed gIOScreenLockState and update successfully but no sound anymore. Could it be that you removed layout-id from config.plist? What is the CodecCommander.kext? I never use it before. I am usually keeping my kexts inside L/E? What should I do move to kexts to L/E or leave it Clover/Others folder?1 point
-
When you get the gIOScreenLockState, message, it means that your video drivers could not load. That can happen for a variety of reasons. It happened to me on my laptop because I could not find a way to disable my Nvidia GPU and my laptop does not support dual graphics. Others have had different reasons. If you suspect the problem is with your video card, you might try to disable it in BIOS and use the GPU that is onboard with your CPU just to install the update. If you can then boot, you can try to install the video drivers you need for your RX 560. Once they're installed, you can try to boot with the RX 560 enabled. It wouldn't surprise me if your video kexts aren't loading because they are not within the prelinked kernel for the update. It's worth a try at least.1 point
-
Try this EFI, you had a few things in your config that you didn't need and I also converted all your DSDT patches to single SSDT patches, which will allow you to be able to update your motherboard firmware without having to rematch your DSDT every single time. Also on the phase 1 of the updater if you have multi-monitors connected it will give you a black screen, known issue with RX 5xx series. telepati_EFI.zip1 point
-
thank you so much. I used it for applehda patching and it works.1 point
-
Nice! Enjoy!1 point
-
G'morning, Allan. I didn't had time to venture into my hack yesterday, so I couldn't answer you on the same day. This is the wake reason after 5 mins: 2018-08-04 11:31:33.067843-0300 localhost kernel[0]: (AppleACPIPlatform) AppleACPIPlatformPower Wake reason: GIGE XDCI It doesn't wake instantly anymore after I pulled out keyboard's dongle - I'll learn to _PRW patch so I won't have to remove the USB every time I wake from sleep. Lag after wake still persists badly. I'm starting to think myself this might be related to native power management not working 100% for me. Gonna try different SMBIOS + ssdtPRgen and see how it goes.1 point
-
It works fine Great job Thanks1 point
-
@darkbluecode non so la versione del bios, dovresti chiedere a @simo230999br usa questo config.plist config.plist.zip e non usare dsdt Replace config.plist and don't use dsdt1 point
-
Do you mean a real Mac? If not, then AppleALC can be modified so you can choose between speakers and headphones.1 point
-
ok... salvati questa EFI intanto usa il tuo hack, testalo un po' e divertiti...1 point
-
i3 7100 updated to beta 5 without any problem1 point
-
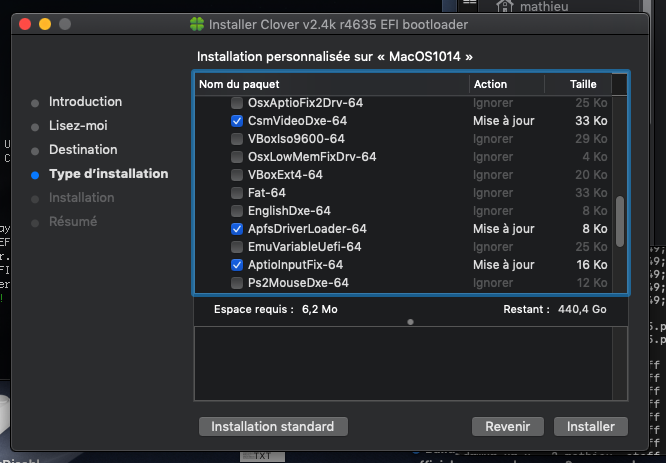
Thank you for this clarification, which gives the cause of the problem of alphabetical order under Mojave (apfs). As on High Sierra, the drivers list includes the mandatory and then the additional drivers. These two groups are affected by the problem indicated on 10.14. I don't know if there is a solution.1 point
-
Fatto :-) IOREG.zip1 point
-
This happens if you compile Clover on an apfs volume. Alphabetical order is maintained if compiled on an HFS+ volume (but mandatory drivers show first, then optional drivers in "drivers-Off", in alphabetical order) eg
 1 point
 -
eccoli!!! Archivio.zip1 point
-
Noooooo, hai fixato trackpad, tastiera, audio e batteria, GENIACCIO!!!! Per quanto riguarda la grafica ancora mi viene indicata quella integrata. Allego. Simone’s MacBook Pro.zip
 1 point
 -
Hi Guys Great Job Thanks a lot @Slice @vector sigma @Sherlocks @arsradu for theirs work and their remarks. I test two UDK2018 script: they work well on Mojave with Xcode 10 beta 5. A small detail though: the Clover logo would not appear in dark mode I have a problem with the alphabetical order of UEFI drivers
 1 point
 -
Anyone else lost his Lan Ports? With the newest beta I don't have any lan devices... Anyone any idea ? imac.zip1 point
-
mi fai un ioreg e hack_info.. almeno controllo?1 point
-
true truth1 point
-
i alway kept FakeSMC in /EFI/CLOVER/kexts/Other. i never FakeSMC installation issue. 1. official Clover 2. Build_Clover.command Clover 3. https://github.com/Dids/clover-builder/releases1 point
-
Yeah, but in this case, it was all automatic. Good thing I was paying attention to the log, so I could see what was it doing. :))) Otherwise, it would continue to be a mystery forever.1 point
-
All fine from my side. I mean, I already switched to it on all my systems. So yeah, from my experience, I'd say we could use it by default.1 point
-
Correct. I was talking about Clover (which...doesn't seem to be the case) removing FakeSMC.kext (and ONLY FakeSMC.kext) from Clover/kexts/Other. Not adding it. :)) It will not added it, cause it doesn't have it anywhere.1 point
-
If the kext was install with some other clover package which had the kext then new package will consider that the option is unchecked and will remove it. If you always use official installer then it will never happen.1 point
-
I think @arsradu talking of existing one. Clover doesn't provide it for installation even though an old copy is present inside the ThirdParty directory, but is unused.1 point
-
IMHO can't happen, or better to say not by Clover. Each Payload is just a cpio archive and this program doesn't overwrite existing folders or files while instead create missing ones, like can be the /EFI/CLOVER/kexts directory. So if that instead is happening the only guilty is cpio and we cannot do nothing and cause can be only the problematic file due to some weired circumstances. I can only advice to sosbitute your fakesmc with a new one and delete all the copies. Good, and thanks to you for testing.1 point
-
I never get this kext on ../Other folder upon Clover pkg install #FYI #EDIT: Just installed latest rev, still get no FakeSMC.kext on ../Other dir
 1 point
 -
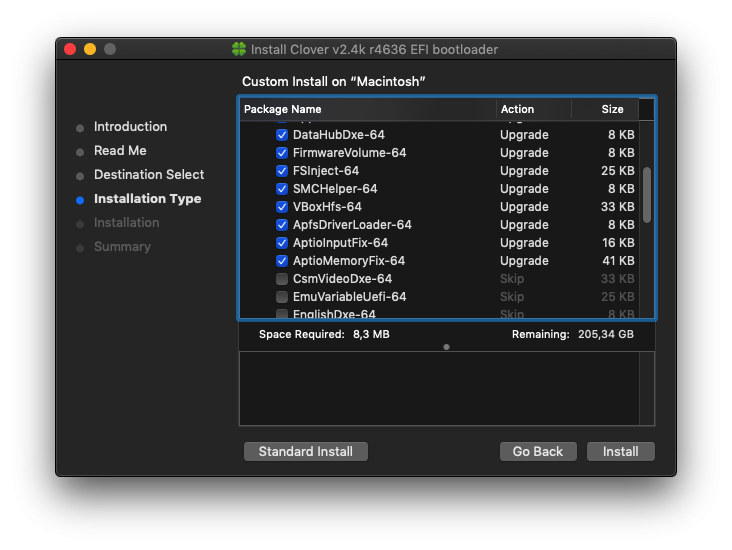
I see. So Beta 2 doesn't have this issue, but Beta 4 and 5 do. So yeah, looks like an Xcode bug... Anyway, I promised I'll make a new clean install in Mojave. And...here I am. Yes, it does work. Clover 4634 can now be built successfully with Xcode Beta 5. And...I see what you did there. LOL ========= Translating Resources ======== /Users/jimmy/src/UDK2018/Clover/CloverPackage/package/../../../../opt/local Updating 'en' strings file for CloverUpdater... done Updating 'en' strings file for Clover Preference Panel... done Updating strings file for Clover Preference Panel... done (190 entries) Updating 'en' strings file for CloverUpdater... done Generating de interface... done Generating es interface... done Generating fr interface... done Generating hr interface... done Generating id interface... done Generating it interface... done Generating ja interface... done Generating ko interface... done Generating lv interface... done Generating nl interface... done Generating pl interface... done Generating pt-BR interface... done Generating pt interface... done Generating ro interface... done Generating ru interface... done Generating tr interface... done Generating uk interface... done Generating vi interface... done Generating zh_CN interface... done Generating zh_TW interface... done Building CloverUpdater application... [XCODE] Updating 'en' strings file for Clover Preference Panel... done Generating de interface... done Generating es interface... done Generating fr interface... done Generating hr interface... done Generating id interface... done Generating it interface... done Generating ja interface... done Generating ko interface... done Generating lv interface... done Generating nl interface... done Generating pl interface... done Generating pt-BR interface... done Generating pt interface... done Generating ro interface... done Generating ru interface... done Generating tr interface... done Generating uk interface... done Generating vi interface... done Generating zh_CN interface... done Generating zh_TW interface... done Updating strings file for Clover Preference Panel... done Check de strings... done Check en strings... done Check es strings... done Check fr strings... done Check hr strings... done Check id strings... done Check it strings... done Check ja strings... done Check ko strings... done Check lv strings... done Check nl strings... done Check pl strings... done Check pt-BR strings... done Check pt strings... done Check ro strings... done Check ru strings... done Check tr strings... done Check uk strings... done Check vi strings... done Check zh_CN strings... done Check zh_TW strings... done Building CloverPrefpane preference... [XCODE] ================= Making all in boot1-install ================= [XCODE] boot1-install ================= Making all in partutil ================= [XCODE] partutil ================= Making all in bdmesg ================= [XCODE] bdmesg ================= Making all in clover-genconfig ================= [XCODE] clover-genconfig ------------------------------- Building Clover Install Package ------------------------------- ====================== Preinstall ====================== [BUILD] Pre ===================== Installation ===================== [BUILD] UEFI.only ================== Target ESP ========================== [BUILD] Target.ESP =================== BiosBoot =========================== [BUILD] BiosBoot ===================== Utils ============================ [BUILD] Utils ===================== EFI folder ======================= [BUILD] EFIFolder ===================== BootLoaders ====================== [BUILD] AltBoot [BUILD] bootNo [BUILD] boot0af [BUILD] boot0ss ====================== CloverEFI ======================= [BUILD] cloverEFI.64.sata ======================== Themes ======================== [BUILD] metal [BUILD] BGM [BUILD] CloverThemeManager ================= drivers64 mandatory ================== [BUILD] AppleImageCodec-64 [BUILD] AppleUITheme-64 [BUILD] AppleKeyAggregator-64 [BUILD] XhciDxe-64 [BUILD] FSInject-64 [BUILD] FirmwareVolume-64 [BUILD] SMCHelper-64 ===================== drivers64 ======================== [BUILD] GrubISO9660-64 [BUILD] ApfsDriverLoader-64 [BUILD] GrubEXFAT-64 [BUILD] GrubNTFS-64 [BUILD] GrubUDF-64 =============== drivers64 UEFI mandatory =============== [BUILD] AppleImageCodec-64.UEFI [BUILD] AppleUITheme-64.UEFI [BUILD] DataHubDxe-64.UEFI [BUILD] AppleKeyAggregator-64.UEFI [BUILD] VBoxHfs-64.UEFI [BUILD] FSInject-64.UEFI [BUILD] FirmwareVolume-64.UEFI [BUILD] SMCHelper-64.UEFI =================== drivers64 UEFI ===================== [BUILD] HashServiceFix-64.UEFI [BUILD] UsbMouseDxe-64.UEFI [BUILD] OsxAptioFix3Drv-64.UEFI [BUILD] OsxFatBinaryDrv-64.UEFI [BUILD] UsbKbDxe-64.UEFI [BUILD] PartitionDxe-64.UEFI [BUILD] OsxAptioFix2Drv-64.UEFI [BUILD] CsmVideoDxe-64.UEFI [BUILD] VBoxIso9600-64.UEFI [BUILD] OsxLowMemFixDrv-64.UEFI [BUILD] VBoxExt4-64.UEFI [BUILD] Fat-64.UEFI [BUILD] EnglishDxe-64.UEFI [BUILD] ApfsDriverLoader-64.UEFI [BUILD] EmuVariableUefi-64.UEFI [BUILD] AptioInputFix-64.UEFI [BUILD] Ps2MouseDxe-64.UEFI [BUILD] VBoxExt2-64.UEFI [BUILD] AptioMemoryFix-64.UEFI [BUILD] NvmExpressDxe-64.UEFI [BUILD] OsxAptioFixDrv-64.UEFI ===================== RC Scripts ======================= [BUILD] rc.scripts.on.target [BUILD] rc.scripts.on.all.volumes [BUILD] rc.scripts.core ================= Optional RC Scripts ================== [BUILD] disable_sleep_proxy_client ==================== Clover Prefpane =================== [BUILD] CloverPrefpane ================= Post ================= [BUILD] Post -------------------------- Building process complete! -------------------------- Build info. =========== Package name: Clover_v2.4k_r4634.pkg MD5: c7da4311fae84f44f120b2c7874f07c0 Version: v2.4k Stage: v2.4k Date/Time: 2018-08-03 14:19:57 Built by: jimmy Copyright 2012-2018 adding: Clover_v2.4k_r4634.pkg (deflated 0%) adding: Clover_v2.4k_r4634.pkg.md5 (stored 0%) total 46016 drwxr-xr-x 9 jimmy staff 288 Aug 3 14:22 . drwxr-xr-x 14 jimmy staff 448 Aug 3 14:22 .. -rw-r--r--@ 1 jimmy staff 11566527 Aug 3 14:22 Clover_v2.4k_r4634.pkg -rw-r--r-- 1 jimmy staff 68 Aug 3 14:22 Clover_v2.4k_r4634.pkg.md5 -rw-r--r-- 1 jimmy staff 11530801 Aug 3 14:22 Clover_v2.4k_r4634.zip drwxr-xr-x 3 jimmy staff 96 Aug 3 14:21 Resources drwxr-xr-x 6 jimmy staff 192 Aug 3 14:22 build drwxr-xr-x 3 jimmy staff 96 Aug 3 14:22 package drwxr-xr-x 6 jimmy staff 192 Aug 3 14:22 utils logout Saving session... ...copying shared history...cp: /Users/jimmy/.bash_history: Permission denied ...saving history...-bash: /Users/jimmy/.bash_history: Permission denied truncating history files... ...completed. [Process completed] So...in a word: thank you! I guess that's two words. lol1 point
-
Guys, in the meantime, since this is the second time this happens...is there any way that Clover could just remove FakeSMC.kext from Clover/kexts/Other upon installation? It's the second time this happens, and I don't think it's a coincidence. And it's a bit annoying, cause that's one of the things you really cannot boot without. And it's the only thing that's missing from the kexts folder. Could you, please, take a look if the post-install script does something funny here?1 point
-
Let me know then , last night I've set up a new hack (asus) and finally I was able to see the error 65 you mentioned that is nothing than a known bug in Xcode 10 build system (it is already in the radar ). Basically new Xcode didn't find generated resources (by ibtool) for just a matter of timing (they get generated, but Xcode looks for it before are in place) and my workaround is just to create and traslate xibs before invoke the make file.... so stuff are already there.1 point
-
Yep, it does. And the ro.po file itself already has the necessary translations for PrefPane, for as far as I could see. I mean, I should probably be more confident about this, cause I added them there. :))) But yeah...not sure why it doesn't use them... Maybe there's something missing somewhere. But I don't think it will just not display any of those translations and only in PrefPane... That seems weird. Also, even weirder is the fact that it seems to work for KO. :)) I mean...what the hell? :))1 point
-
@arsradu please try r4634 and let me know1 point
-
As I see prefPane contains only en.lproj. I don't know how to do it with other languages. But Clover package already contains ro.po file.1 point
-
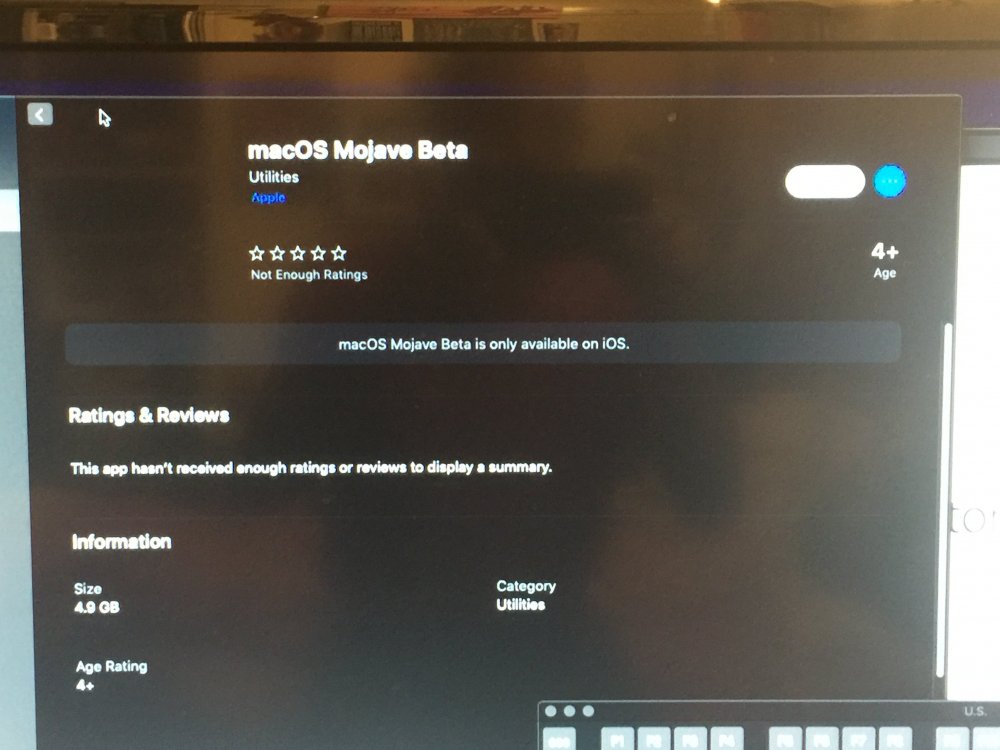
WTF Apple? lol do they know something we do not? HAHAHHA that was me trying to download the new beta update on a Skylake desktop emulating smbios IM18,1
 1 point
 -
Threadripper hacked for Thinderbolt 3 support! Cool! https://www.pcgamer.com/amp/complex-threadripper-hack-gets-intels-thunderbolt-3-working-on-amd-hardware/1 point
-
Here you go. Untested but should work. Sierra Ryzen.zip1 point
-
Update Lilu and IntelGraphicsFixup to the latest versions , use -lilubetaall and -igfxbeta boot flags1 point
-
Well, it has always been clear that this patch will most likely fail after the next update of the driver. Try to use the "built-in" patch which should still work as it doesn't rely on any specific code pattern.
 1 point
 -
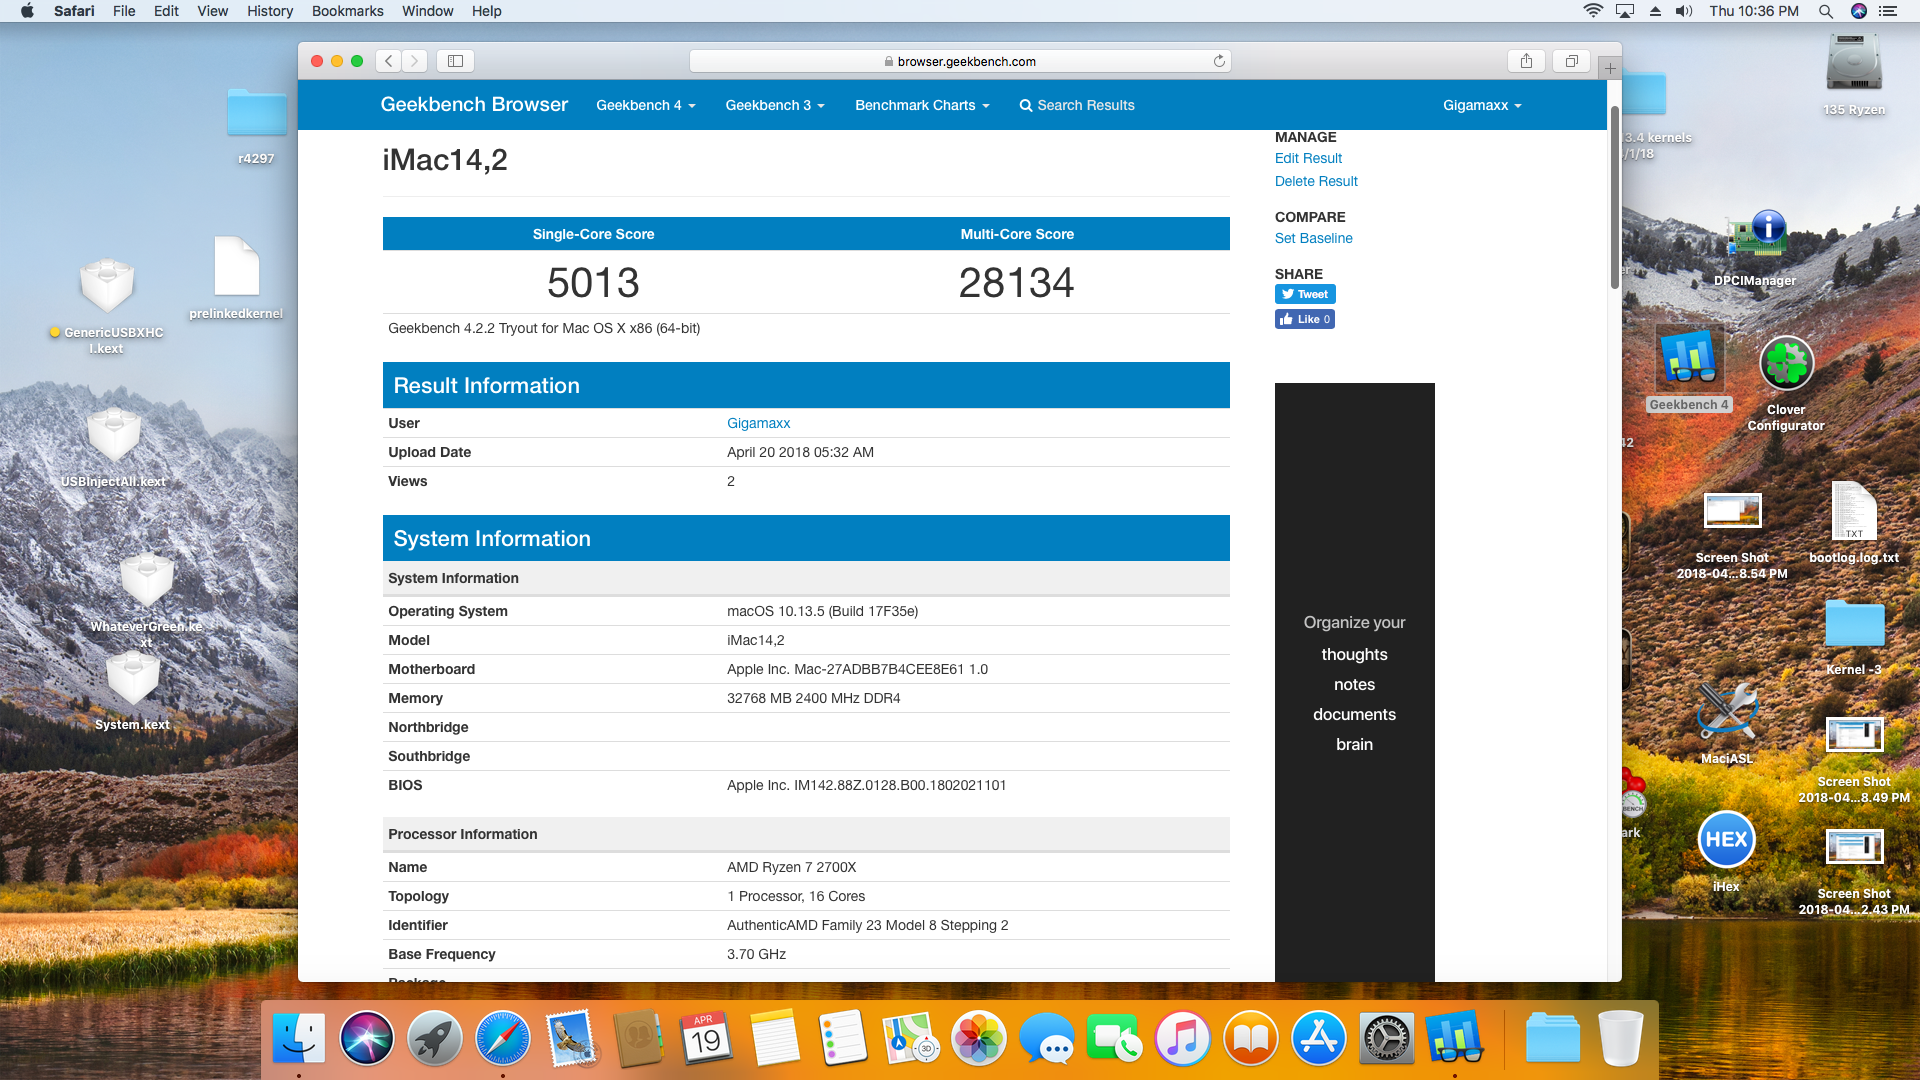
Ryzen 7 2700X with Gigabyte X470 Gaming mobo works. Higher clocks, better scores It has 2 power steppngs (Geekbench) always stuck with one on the 1700.

 1 point
 -
The is the Post-Install topic following the Ryzen Clover Installation Guide for macOS Sierra. If you have yet to install Sierra on your Ryzen machine, check out that thread for help installing. Here we can discuss post install troubleshooting such as well known issues with NVIDIA Drivers, audio interfaces, etc. Here is one workaround for audio that I am using - My audio was not working and I spent days trying to get it to work (ASUS Prime X370 Pro) to no avail. Eventually I bought this for $10 and it worked immediately with no drivers or setup: https://www.amazon.com/gp/product/B072BMG9TB/ref=oh_aui_detailpage_o02_s00?ie=UTF8&psc=1 One question for starters, I am using a Radeon R9 280x with no graphics injection. If I put my Ryzen build to sleep, it changes power states correctly. When Powered back on, the monitors don't turn on. I don't know if this is related to the GPU, or just an issue in general, but in any case I would appreciate any help!1 point
-
Hello everyone! Thanks for info and tutorials! I have some problems with 10.13, so maybe someone knows solution 1. Ryzen 5 1600X. Results of Cinebench tests are 20% worse than the same in Windows 10. Is it possible to force CPU to work up to 100%? 2. VoodooHDA. Sound delay (as I can see I'm not the only one ). 3. There is "IOConsoleUsers: gIOScreenLockState 3, hs 0, bs 0, now 0, sm 0x0" and little freeze about 2 seconds before boot. Used kexts: FakeSMC.kext NullCPUPowerManagement.kext Lilu.kext WhateverGreen.kext No any fixes enabled in my config.plist.1 point
-
Part 2 Continued Configuration. This may work on cloned or fresh installs Update: Ryzen Patcher has been updated to use 16.5 kernel and added folders. It will do step 2 Post USB disk edit automatically. https://www.google.com/url?sa=t&rct=j&q=&esrc=s&source=web&cd=2&ved=0ahUKEwi75qqp28fUAhUC6WMKHTFwC44QFggpMAE&url=http%3A%2F%2Fwww.insanelymac.com%2Fforum%2Ftopic%2F323547-ryzenpatcher-thread-for-channeling-info-about-updates%2F&usg=AFQjCNHjTptOLkfcT6eN9mh53RKq8Yz3OQ&sig2=gRwmwuddOQ_eA5rlqEWkeQ After you have loaded Sierra on the disk drive using the USB installer, you need to connect the Ssd to a working Mac or Hackintosh and make the same edits to the disk. I updated the Essentials package and it contains USB files and Post instal files it will. Be labeled #2.5. For this disk edit section use the Post install folder in the essentials package. I made a video for this edit but I'm waiting on YouTube to finish. I ran into an issue with the prelinked kernel install and tried booting and reached the familar error kernel failed to load (0x9). I repeated the edit dragging the prelinkedkernel to the trash and then it loaded the second time,I also replaced the kernel at the same time. I did a first boot method and just after waiting for the rebuilding of kernels my keyboard battery went out and I wasn't able to hit exit. It looked bad. I rebooted and adjusted busratio and hit enter. Apple pops progress bar progresses and then blam I'm in. This is a good video for kernel placement/panic recovery. I had to cut it down a bit to get it to fit. Stay tuned for more updates. From bbmatias3 if anyone needs help installing their nvidia web drivers this is how i did it. right after my fresh install, i booted via injection nvidia in the clover menu before boot(do not boot via nvidia web/ it will boot but drivers have not been installed) . once i logged into my mac the screen look all wrong. if you go to about mac it should say you have a couple mb under your graphics card. i decided to change my macs definition to imac 14,2. via clover configuration. then i decided to install the nvidia web drivers and kept getting this error that the installation failed. i have a gtx 1080ti so what i did is extract the web driver with Pacifist, put kexts in System/Library/Extentions and run KextUtility then run kextwizard reboot now you boot with (nvidia web via clover) you no longer need to inject nvidia. the resolution should be good.(nvidia control panel is not going to work) just reinstall web driver and reboot and it will work!! Thanks, bbmatias3 this will help. Define external drivers as internal to fix yellow drive icons: ADD this to KernelsandKextstopatch section in clover. <dict> <key>Name</key> <string>AppleAHCIPort</string> <key>Find</key> <data>RXh0ZXJuYWw=</data> <key>Replace</key> <data>SW50ZXJuYWw=</data> </dict> Thanks from post #50 motoxnate Update: Here is the Sierra 12.6 kernel package. kernel_ryzen_10.zip Ryzen Disk Edit Essentials v3.0.zip1 point