Leaderboard


Popular Content
Showing content with the highest reputation on 05/22/2018 in all areas
-
I think few hours will be enough for Sherlocks to explore new kernel and propose patches for Clover. Radeon cards will work just with RadeonDeinit=YES, it is system independent.4 points
-
3 points
-
I just start this topic to express my idea to this forum about doing a chellenge, this challenge is about installing the new mac os version of mac os that will be presented at the wwdc. The challenge is very simple, is to try to install the new mac os beta version, which will be presented at the wwdc, in an hackintosh, as fast as we can. Last year, my friends and I succeeded in 20 hours from the release of the new beta, but this year with more computers and a much faster internet connection, I plan to do it in less time, and also since I'm a subscriber to the apple developer program, I can download the new software immediately. I do not want some sort of race o competition, but just something to do a collaborative effort and being the first commiunity to succeed in that. Among other things, I will go to see live the presentation of the wwdc from the Italian ios developer academy and some of my friends have managed to go in person to the wwdc. what do you think about this idea? will you join the challenge and try to be the first to install the new macOS 10.14 beta on an hackintosh?2 points
-
I need them for my work as a developer, i just saved the money i earned working for a company for some months. But i got most of the ios stuff for free, because family and friends do not need them or upgraded to newer stuff, for the hackintoshes my hobby is to collect computer parts of all kinds, mostly stuff i get for cheap used in local markets and on ebay (my favorites are ms-dos and late 90s stuff like 3dfx cards), only 2 machines were built on purpose with brand new parts, but as always, i have to save money for a while to buy something, and also the mac are gifts i recived in the past from friends and family. The only mac i bougth with my own maney is my macbook pro 15 inc 2017 i bougth with the scolarship's money i earned at the italian ios developer academy (yes i did study there and i know some people at apple too, but my passion is hacking and doing interesting stuff with my machines and also i love all the flexibility that a custom desktop gives to me) so i am not rich, and the only prize here is the satisfaction of a successfoul installation2 points
-
2 points
-
Osx86.net online now! iPB is killing forums like madman2 points
-
im up to try it. when is the release date2 points
-
Rev 4487 Fixed a feature introduced by rev 4466.2 points
-
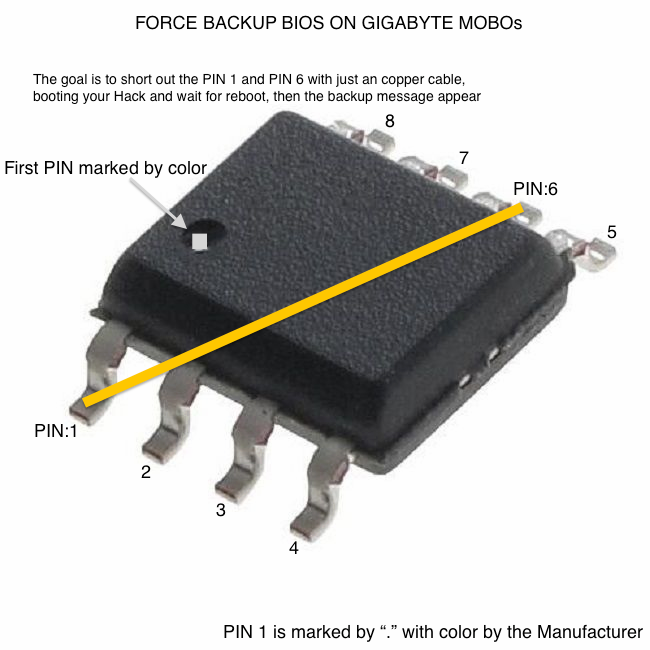
PLEASE READ CAREFULLY THIS GUIDE AS IT'S BEING UPDATED FRECENTLY Notice: THE LATEST ROM's DOESN'T WORK, MANUFACTURER FOUND TRICK FOR THAT BIOSES TO BE CORRUPTED AFTER MODIFICATION Guy's, please, you have to be responsible for your machine as in the same way you want to Hackintosh,but never hurry up to manufacturers technical support, because they can find that files on the M_BIOS, so they do more complications to find our how to hack! Assume that you're aware about to do a bios hack on protected ROM, assume that if something goes wrong. You have to find how to solve the problem, if brick by yourself, search for a solution to help, but never go to the manufacturer! And finally read carefully the guide, i have here, all the things for you, to make your hack ready. So don't forget some steps to lack at some point! Again don't use latest bios updates, just use MMTool the latest supposed to work with 100 Series, and UEFITool. I added to the repository MMTool, to update CPU Microcodes that are important since last CPU Vulnerability! I've tested Z170 chipset and i confirm that it work, but to be in ROM: - Do not try on 64 Mbit chip, because simply it will not let you insert up to 3 files, so don't - Your board must have 128 Mbit chip - Do not change the name of ORIGINAL ROM file that need to be modded, do just save and not save as! - Use UEFITool for replacing modules body and use only save (overwrite that ROM) and not save as! Space on the ROM is more than available on 128 Mbit, and to flash you need FPT-DOS files for 100 Series and do it with USB bootable So you have to decompress "Setup" driver, as we do with CORE_DXE. Once done, you can insert other drivers using MMTOOL or UEFITool and insert them one by one, the first need to be the first the second need to be the second and etc... I'll attach that files one by one for FFS extension: AcpiPatcher and KernextPatcher have to be in the top of the nested Volume, as they are absolutely needed before other drivers get loaded, same thing should happen if on ESP, so one for dropping OEM _DSM, devices rename and the other for Kernel and Kexts to patch. -The oficial UEFTW Patchers from @cecekpawon are available in GitHub repos here these drivers aren't posted here, because of frequently updated, so i have to do that on each update, i prefer to put link for user own download and to get more informations about that tools and for proper knowledge. 1- Btrfs.ffs.zip 2- EXFat.ffs.zip insert it after Btrfs 3- EmuVariableUefi-64.ffs.zip insert it after EXFat and Before HfsPlus 4- HfsPlus.ffs.zip Updated Drivers 1,2,3,4 have to follow the patchers on the Top of the nested Volume 5- HermitShellX64.ffs.zip 6- FakeSMC 234f2 FFS.zip For i7 CPU's 7- FakeSMC 233f10 FFS.zip For i5 CPU's 8- InjectorCompress (Rev1.3).ffs.zip 10 Series [8086:A102] ready, for 20 and 30 Series you need to add it by yourself 9- HorizontalTheme.ffs.zip 10- OzmosisDefaults.ffs.zip - OzmosisDefaults.plist.zip iMac17,1 Full example 11- Ozmosis.ffs.zip High Sierra @cecekpawon version a- Ozmosis.ffs.zip Mojave @TypeThree version b- KernextPatcher.ffs.zip Mojave version but the plist work by @TypeThree, to put on the top of the nested volume with the AcpiPatcher UEFITool Releases page Working Directory: 100 Series.zip IMPORTANT - Now because iMac17,1 uses 2 different SMC's for i5 and i7, edit your already FakeSMC or download the 233f10 if you have i5 and 234f2 if you have i7 - Keep you updated about editing SMBios here - If you got only one error while you're inserting the files on the ROM, don't save it, or don't use it, you don't have to see any error at all Ozmosis related Options: Start-up HotKeys ================ 'Function' || 'Shortcut' || 'Notes' ===================||======================||========= Disable Ozmosis || Escape || Press at start-up, screen will flash red to indicate Ozmosis is disabled. Reset NVRAM || Option+Command+P+R || From F12 menu, Ozmosis GUI, Shell or BIOS Setup. Start Ozmosis GUI || Option/Home || It can be controlled with mouse only for now. Safe Boot Mode || Shift || Verbose Mode || Command+V || Single-User Mode || Command+S || 32 Bit Boot Mode || 3+2 || Start Up In 32 Bit Mode 64 Bit Boot Mode || 6+4 || Start Up In 64 Bit Mode Mac/PC Keyboard Legend ====================== 'Mac' Key || 'PC' Key Option || Alt Command || WinLogo Added the ability to control graphics and audio injection using NVRAM variables, complete list of variables: Default Settings 1F8E0C02-58A9-4E34-AE22-2B63745FA101 ====================================================== 'Key' || 'Value' || 'Note/Example' ==============================||=========||================================== AcpiLoaderMode || INTEGER || Control ACPI Loader UserInterface || BOOLEAN || Display User Interface/GUI TimeOut || INTEGER || Time-out In Seconds DisableAtiInjection || BOOLEAN || De/activate ATI GFX device property injection AtiFramebuffer || STRING || Name of the specific ATI framebuffer DisableNvidaInjection || BOOLEAN || De/activate Nvidia GFX device property injection DisableIntelInjection || BOOLEAN || De/activate Intel GFX device property injection DisableVoodooHda || BOOLEAN || Disables loading VoodooHDA from firmware EnableVoodooHdaInternalSpdif || BOOLEAN || Enable/Disable onboard S/PDIF header when using VoodooHDA from firmware DisableBootEntriesFilter || BOOLEAN || Disables filtering of firmware generated boot entries AAPL,snb_platform_id || INTEGER || AAPL,ig-platform-id || INTEGER || BootEntryTemplate || STRING || $label $guid DarwinDiskTemplate || STRING || $label $platform $major $minor $build DarwinRecoveryDiskTemplate || STRING || $label $platform $major $minor $build Examples: ========= !! Note on VoodooHDA, it covers ONLY the onboard codec and is enabled for the moment only for ALC892/ALC1150 !! !! For discrete graphics HDMI/DP audio AppleHDA is used instead. Those who use internal GPU (IGPU) only will !! !! have to disable VoodooHda and use AppleHda for HDMI/DP audio !! To Disable loading VoodooHda.kext from Firmware sudo nvram 1F8E0C02-58A9-4E34-AE22-2B63745FA101:DisableVoodooHda=%01 To Enable loading VoodooHda.kext from Firmware sudo nvram 1F8E0C02-58A9-4E34-AE22-2B63745FA101:DisableVoodooHda=%00 Changing ATI Framebuffers ========================= sudo nvram 1F8E0C02-58A9-4E34-AE22-2B63745FA101:AtiFramebuffer=Futomaki Or based on VendorSubsystemId sudo nvram 1F8E0C02-58A9-4E34-AE22-2B63745FA101:AtiFramebuffer10029440=Futomaki Or based on pci addressing sudo nvram 1F8E0C02-58A9-4E34-AE22-2B63745FA101:AtiFramebuffer00.01.00=Futomaki Changing AAPL,ig-platform-id ============================ sudo nvram 1F8E0C02-58A9-4E34-AE22-2B63745FA101:AAPL,ig-platform-id=0x01620005 Changing AcpiLoader Mode ============================ Add The Following Values Together For Default Acpi Loader Mode ACPI_LOADER_MODE_DISABLE 0x00000000 ACPI_LOADER_MODE_ENABLE 0x00000001 ACPI_LOADER_MODE_DUMP 0x00000002 ACPI_LOADER_MODE_WINDOWS 0x00000008 ACPI_LOADER_MODE_UPDATE_LEGACY 0x00000040 Default Value : ACPI_LOADER_MODE_ENABLE | ACPI_LOADER_MODE_DARWIN | ACPI_LOADER_MODE_UPDATE_LEGACY = 0x45 To Change sudo nvram 1F8E0C02-58A9-4E34-AE22-2B63745FA101:AcpiLoaderMode=0x45 Note: They can also be controlled by using Defaults.plist placed on boot hard-drive efi system partition and path is /EFI/OZ/Defaults.plist, see bellow for example. WARNING! Defaults.plist will override the one found in firmware and values are used only if variables are not already added. For example if you want to set BiosVersion using Defaults.plist and was already set by Defaults from Firmware, you will need to do a 4 finger NVRAM reset or delete the BiosVersion variable from shell, for the new one to be used. Default Settings Example of Modifications on Defaults.plist =========================================================== // If AcpiLoaderMode NEEDS to be changed, change second line, put desired value, then add both line in Defaults.plist <key>AcpiLoaderMode</key> <integer>0x45</integer> // If UserInterface NEEDS to be enabled on every boot, change second line and set to true, then add both line in Defaults.plist <key>UserInterface</key> <false/> // If TimeOut NEEDS to be changed, change second line and put desired value in seconds, then add both line in Defaults.plist <key>TimeOut</key> <integer>5</integer> // If DisableAtiInjection NEEDS to be enabled, change second line bellow and set to true, then add both line in Defaults.plist <key>DisableAtiInjection</key> <false/> // If AtiFramebuffer NEEDS to be changed, modify second line bellow and set to correct one, then add both line in Defaults.plist <key>AtiFramebuffer</key> <string>ReplaceMe</string> !! WARNING DisableAtiInjection needs to be set to false to function !! // If DisableNvidaInjection NEEDS to be enabled, change second line bellow and set to true, then add both line in Defaults.plist <key>DisableNvidaInjection</key> <false/> // If DisableIntelInjection NEEDS to be enabled, change second line bellow and set to true, then add both line in Defaults.plist <key>DisableIntelInjection</key> <false/> // If AAPL,snb_platform_id NEEDS to be changed, change second line bellow and set to correct one, then add both line in Defaults.plist <key>AAPL,snb_platform_id</key> <integer>0x00030010</integer> !! WARNING DisableIntelInjection needs to be set to false to function !! // If AAPL,ig-platform-id NEEDS to be changed, modify second line bellow and set to correct one, then add both line in Defaults.plist <key>AAPL,ig-platform-id</key> <integer>0x0166000A</integer> !! WARNING DisableIntelInjection needs to be set to false to function !! // If DisableVoodooHda NEEDS to be enabled, change second line bellow and set to true, then add both line in Defaults.plist <key>DisableVoodooHda</key> <false/> // If EnableVoodooHdaInternalSpdif NEEDS to be enabled, change second line bellow and set to true, then add both line in Defaults.plist <key>EnableVoodooHdaInternalSpdif</key> <false/> !! WARNING DisableVoodooHda needs to be set to false to function !! // If DisableBootEntriesFilter NEEDS to be enabled, change second line bellow and set to true, then add both line in Defaults.plist <key>DisableBootEntriesFilter</key> <false/> You don't have to put Fat or PartitionDxe, or EnhancedFat or Extfs! EmuVariableUefi-64 is needed on some Mobo's that have NVRAM writing problem you will have to insert OzmosisDefaults.ffs already ready (must suitable), do the UEFITool at your own risk for only replacing it's RAW body! For flashing the 128 Mbit chip here's the files and how to: 1- Make USB Bootable with RUFUS soft and choose DOS files from the attached zip 2- Copy a whole of files inside the provided zip and paste them into that USB you just created 3- Save a backup ROM using @BIOS 4- Rename your Ozmosis BIOS ROM to bios.bin and copy paste it to the USB 5- Reboot and press F12 to select booting from USB, wait until all the steps finished FPT files are for GIGABYTE Z170 only fpt_DOS-Z170.zip As some 64Mb Mobo ROM's, you'll have to setup the BIOS: - Windows 8/10 WHQL - CSM Disabled - I/O Ports disabled - Super I/O disabled - HPET to disabled - VT-D disabled Here's the efi files for who want to try on Efi\Directory: - EmuVariableUefi-64.efi.zip - EXFat.efi.zip - HfsPlus.efi.zip - Ozmosis.efi.zip - BOOTX64.efi.zip - Defaults.plist.zip iMac17,1 - HorizontalTheme.bin.zip - FakeSMC 234f2 Kexts.zip - Injector (Rev1.3).kext.zip 10 Series [8086:A102] ready - Ozmosis.efi.zip KernextPatcher.efi.zip KernextPatcher.plist.zip Mojave @TypeThree version "they absolutely have to be used together in order to work otherwise fail" Installation inputs: * Your hd must be the first bootable: Disk0 1- Register drivers: a- From F12 boot menu select (UEFI OS) b- fs0: c- cd efi d- bcfg driver add 1 HfsPlus.efi "HfsPlus" [choose what driver to add after HfsPlus as a second 2 and third 3 etc...] You can choose at any time to change that order from bios setup 2- HDD: In some cases, when you open Disk Utility the drive that need to be Formated to install macOS on it doesn't appear, so you have to close Disk Utility go to the Main install screen and then go back to Disk Utility, now you should see the drive 3- ACPI (DSDT or SSDT's) Patched DSDT or some SSDT's are needed in order to reach both the Installation and the post Installation, but you have to care about that this will be Motherboard and/or Manufacturer specific, i'll do it for GIGABYTE boards as it's simple to do it as always # Multiple SSDT: DTGP.dsl.zip - GfxSsdt.dsl.zip - GpuSsdt.dsl.zip - HdfSsdt.dsl.zip Please modify with your ALCXXXX Codec name, Codec-ID and Layout-id desired - LanSsdt.dsl.zip - MeiSsdt.dsl.zip - SatSsdt.dsl.zip - UsbSsdt.dsl.zip They are build with MaciASL 1.4(269) using iASL: 5.0A-20131218 but you can open them with later version and save them # DSDT & SSDT's: - Under GBTBoardSMI module, there are a list of all ACPI Freeform modules that contain them on raw format, it start with DSDT, you just need to extract them as .aml and start patching as you like. - GIGABYTE compiled them with iasl 20160422, so you can start patching them with that compiler version from RehabMan bitbucket MaciASL-2016-0423 and RehabMan bitbucket MaciASL-20161210 which is the same one. [Thanks to RehabMan] - Use UEFITool for only replacing that raw body and overwrite that rom once you finished replacing the ACPI files, don't use save as, always save (overwrite) that rom GIGABYTE 100 Series 128 Mbit Chip repository: This repos will contain only last revision and version for 128 Mbit ROM's with all required files "except AppleALC" on EXTERNAL LINK due to files size, but it require time! If you need to change any FakeSMC or other kexts then you just have to replace them using MMTool, but care that they have GUID number, so you can use cecekpawon yod-KextToFfs.sh , drag your kexts with others by order, in order to have the same GUID number Dropbox Repos ROMs added: GA-Z170X-ULTRA GAMING.F23g GA-Z170X-UD5 TH F22d GA-Z170X-UD5 TH F23f GA-Z170X-Designare F23d GA-Z170MX-Gaming 5 F22c GA-Z170X-Gaming 7 F22i GA-Z170X-Gaming 7-EK F22i GA-Z170X-Gaming 7-EU F22i GA-Z170X-Gaming 6 F23c GA-Z170X-Gaming 5 F23c GA-Z170X-UD3 Ultra F23e GA-Z170X-Gaming GT F22c GA-Z170X-SOC FORCE F20i PLEASE SHARE YOUR SUCCESS HERE FOR OTHERS Here's video tuts: Insert Ozmosis and stuffs on the ROM: FakeSMC SMC update: ACPI Patching on the ROM is the next video, but it need time Quick look-up for GIGABYTE BIOS CHIP: Sorry guys, if it not worked for you, check again what you missed, so remember to not skip some steps! I'm currently updating this guide, more steps or files or tweaks will be added CREDITS: InsanelyMac, The HermitCrab Labs, @Allan, @xpamamadeus, @THe KiNG, @CodeRush, @MaLd0n, @cecekpawon, @TypeThree, @crusher., @Slice, @STLVNUB, @RehabMan, @vit9696, @Mieze, @Rampage Dev, for any kind of help "Tools, rom, kexts, knowledge".... MMTool.exe.zip
 1 point
 -
1 point
-
@ellaosx: This is just a cosmetic issue which is caused by slight differences between the Xcode 8 and 9 build rules. There is no need to worry! Mieze1 point
-
Updated Clover Builder.app v1.1.5 Added to distr HFSPlus-64.efi and FakeSMC.kext. @SavageAUS Updated Clover Builder.app v1.1.6 Added to distr apfs.efi. Enjoy.1 point
-
I already had a chance to do it, i was honored by cecekpawon to test Ozmosis on High Sierra, and I was one of the first users that installed HS with only Ozmosis. It's a lot of reboots, trying SMBios changes, FakeSMC's and a couple of things, until we found that the FirmwareFeatures and FirmwareFeaturesMask had to be taken from real Mac DMI and convert them to Decimal, I'm with you my friend, I'll try that, the only problem left is, downloading this beta, as I have account but not enrolled on the Apple Developer!1 point
-
Me too, but I followed this post on page 6 from okrasit (my hero) - And used one of the strings straight after it that suited my GPU.1 point
-
take a shot CLOVER.zip if have problem, reboot, press O key in Clover boot screen, go to Acpi Patching/DSDT Name and put DSDT02.aml and remove DSDT.aml in clover/acpi/patched1 point
-
HWSensors-3_r150 Here is my log:1 point
-
Please, replace the HfsPlus.ffs that's on the ROM with the one on the repos, because i just changed it. You have to put SSDT's in the Load folder, or wait the next video for patching ACPI on the ROM. For the GUI, change the UserInterface from NO to YES, and change the TimeOut from 0 to 5 or what you want. You just have to add it in the OzmosisDefaults. Just download the OzmosisDefaults.plist from the repos, change the ig-platform-id, serials, boot-args, but don't change the FirmwareFeatures and FirmwareFeaturesMask! On the first post, i'm adding them one by one, there's some changes !1 point
-
Yeah!!1 point
-
Thank you for your video. I followed the video and now I have a bios that works better. But Ozmosis still does not work. cmd + alt + p + r Works, but I do not have any features like GUI ... thank you1 point
-
@Dmos Hey bro, thank you for this great news.1 point
-
Do not warry, as a developer on apple platoforms, i own 3 macs, 6 hackintoshes, 6 iphones and 2 ipads (yes for proper debug you need a lot of devices, and also i use them for other things rather than being just debugging) but ironically no free external drives, so i will proceed in that way i told. But i can just give to you the kernelcache with fakesmc alredy inside, made from my mac, which will work on your systems too, and because i know all the possible black screen and such problems, i will just use a machine with native supported gfx and an smbios which will not give me a black screen. people with black screen problems should use a different smbios, or change the gfx card they use, or wait that clover team releases a version of clover with working kext injection on the new mac os release and the to use lilu and his plugin kexts with all the beta boot args.1 point
-
If you have a real mac then the process can be faster. 1. Attach USB external HDD to the macbook. 2. Install new OS until first restart. 3. Reboot to original system and place FakeSMC and Ethernet (!) driver into SLE. 4. Move the drive to hackintosh 5. Continue installation with moving your data from "other Mac", i.e. from previous installation. There is a possible problem if someone accustomed to use Lilu to make graphics. They expected to get black screen. I have no real Mac so I am out of the competition.1 point
-
I've also updated the topic description1 point
-
I come up a new idea. can I add PP_PhmSoftPowerPlayTable info in kext just like RX VEGA it can help macOS recognize GPU working status1 point
-
Theme by Allan Nyholm...
 1 point
 -
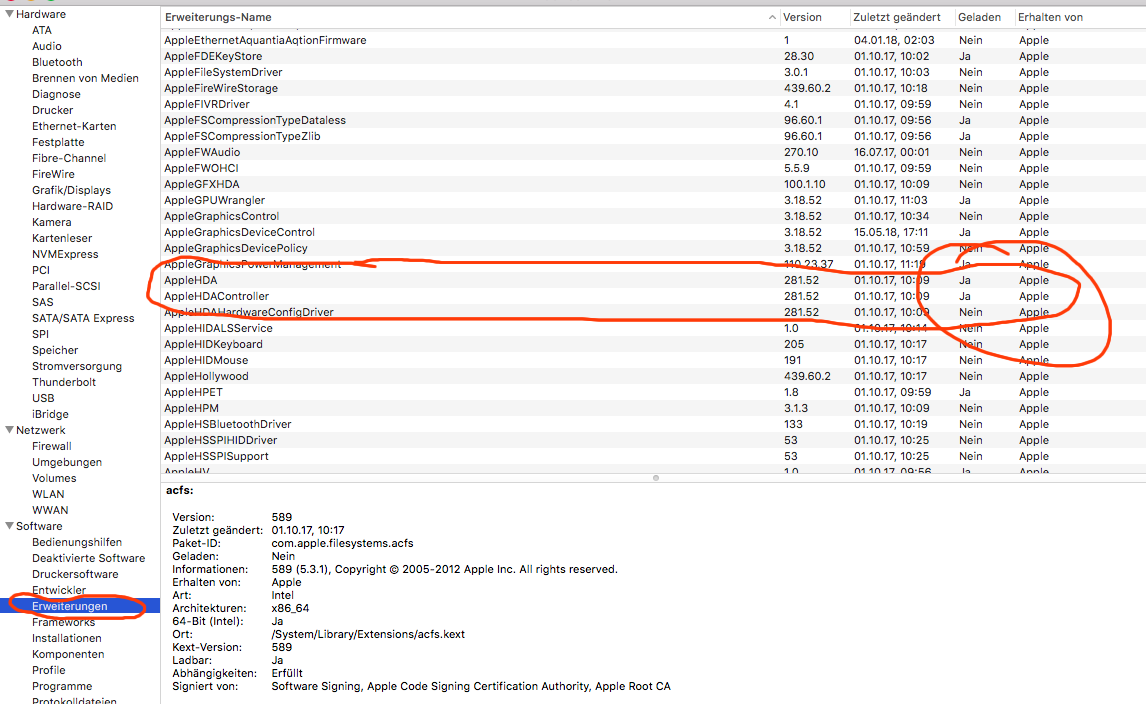
Audio is activated in the BIOS ??? DSDT.aml is in EFI/Clover/ACPI/patched/ ??? Check System Information Extensions in Utilities: Let KextUtility run again for cache rebuild
 1 point
 -
If a non-programmer will be able to install new OS then it will be a challenge whose internet is faster. There will be a question who first find a workaround to install new OS if it will not work on hackintosh for some new reason.1 point
-
I compiled rev150 from sources. All is fine! Just a question. What are the numbers at USB devices in monitoring column ? May be can show here real current (amperage)?
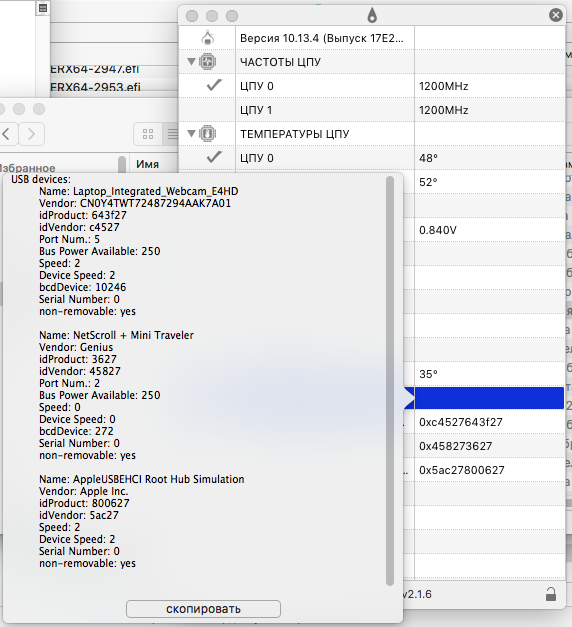 1 point
 -
disable wake lan in bios1 point
-
i do this ever year in the first hour of its release its to easy1 point
-
It is done r4486. from Patches_for_EDK2 - Patches based on EDK2 from Patches_for_UDK2018 - Patches based on UDK20181 point
-
i mean just doing something to run it first, for the issues just use the forum, the challenge will just about getting the new mac os version to work on an hackintosh as fast as possible, and after a couple of days, just close the thing and create more detailed threads about how to do it, and issues we have discovered1 point
-
4485 Bluetooth is fix here thanks again
 1 point
 -
1 point
-
After a couple of weeks of health problems, i am back, i have uploaded the pre-release branch of tinu, i am doing a final release candidate build of tinu, which you can download here: https://dl.dropboxusercontent.com/s/nvzss51qcieynve/TINU.zip The final release candidate is basically the last pre-release of this new version of tinu 2 and it's almost equal to the final release version, the only difference is that the release candidate is made to make sure that everything works and it's fine before releasing it to the pubblic as a release, so giving me the time to listen and fix the issues and missplacements reported by you, so i invite everyone to try it and try to find as many thigs to fix as you can, so i can pubblish the final release with the fixes you requested included. The source code is available into the development branch of the github repo as usual.1 point
-
REV 4476 - 4478 Added ebuild.sh option '-D NO_CLOVER_SHELL' to disable building of Clover-modified shell. Vanilla shell lib is built for bdmesg.efi, and vanilla shell binary can be taken from edk2/ShellBinPkg (see --edk2shell option for ebuild.sh). Reengineered the patch to GetBestLanguage() function found in MdePkg/Library/UefiLib so that 6 other patched sources can be eliminated. The eliminated patched files are Patches_for_EDK2/MdeModulePkg/Library/UefiBootManagerLib/BmDriverHealth.c Patches_for_EDK2/MdeModulePkg/Library/UefiHiiLib/HiiString.c Patches_for_EDK2/MdeModulePkg/Universal/HiiDatabaseDxe/ConfigKeywordHandler.c Patches_for_EDK2/MdeModulePkg/Universal/HiiDatabaseDxe/ConfigRouting.c Patches_for_EDK2/MdeModulePkg/Universal/HiiDatabaseDxe/Font.c Patches_for_EDK2/MdeModulePkg/Universal/PlatformDriOverrideDxe/PlatDriOverrideDxe.c Make sure to revert the removed patches in EDK2 tree to their original form.1 point
-
Clover 44961 point
-
I've had this problem with dual Titan X's (Maxwell) since 10.13.3. The only driver I've found that works with dual cards running MacOS 10.13.4 is 378.10.10.10.25.106. I also have NividiaGraphicsFixUp.kxet installed as well.1 point
-
I think I already saw a such message before (server issue, forum update) and the forum has always been back. And I'm sure it will be the case again. ;)1 point
-
Thanks for the feedback. I never had to use anything in El Capitan to get the GTX 285 working as I am using native built in drivers. In El Capitan I only have KP's when I try using the Nvidia web drivers. To me that is strange because the web drivers are specifically built for sysdef 5.1 machines and directly support the old GTX 285, at least that is according to Nvidia the distributors of the web drivers. All other sysdefs used with the web driver are classified as beta efforts by Nvidia. I believe that my hardware matches sysdef 5.1 Apple MacPro's fairly closely, although I could be wrong and would welcome some guidance in this regard as well. I am running Clover 3763 without a DSTD.aml. In my AppleGraphicsDevicePolicy.kext my Mac-board ID is already set to "none" without me having had to do anything, unless there is something else I need to do that I am unaware of, if so kindly elaborate, as I am sure that if I get the web drivers working in El Capitan my Sierra problems will also be over. As I metioned earlier the mere presence of the web driver causes the machine to be unusable, I cannot even get into Vesa graphics mode, the machine KP's before reaching the desktop. The only cure to return the machine to normal is to remove the web drivers. What appears to me has happened is that the new built in drivers in Sierra inherited some code from the older web drivers that were used for El Capitan and that is why Sierra is also not working for me. Again therefore getting the 15A1004 web drivers working in El Capitan will probably reveal what needs to be done to get Sierra working with it's built in or web drivers. Some more thoughts on that would be most welcome.1 point