Leaderboard


Popular Content
Showing content with the highest reputation on 06/16/2019 in all areas
-
I don't think this would qualify for adding to bugtracker so am posting it here. I've spotted in the Configuration.pdf that some 'Default value' settings for booleans read NO rather than false. This is the case for the following: 7.4 Debug Properties ---------------------- 1. DisableWatchDog 10.2 Properties ---------------------- 1. ConnectDrivers 10.3 Protocols Properties ---------------------- 2. ConsoleControl 10.4 Quirks Properties ---------------------- 2. IgnoreInvalidFlexRatio 3. IgnoreTextInGraphics 4. ProvideConsoleGop6 points
-
Fixed at https://github.com/acidanthera/OpenCorePkg/commit/7045dbaaa978a7045dcf2561514304b14bd76d2a, thanks!5 points
-
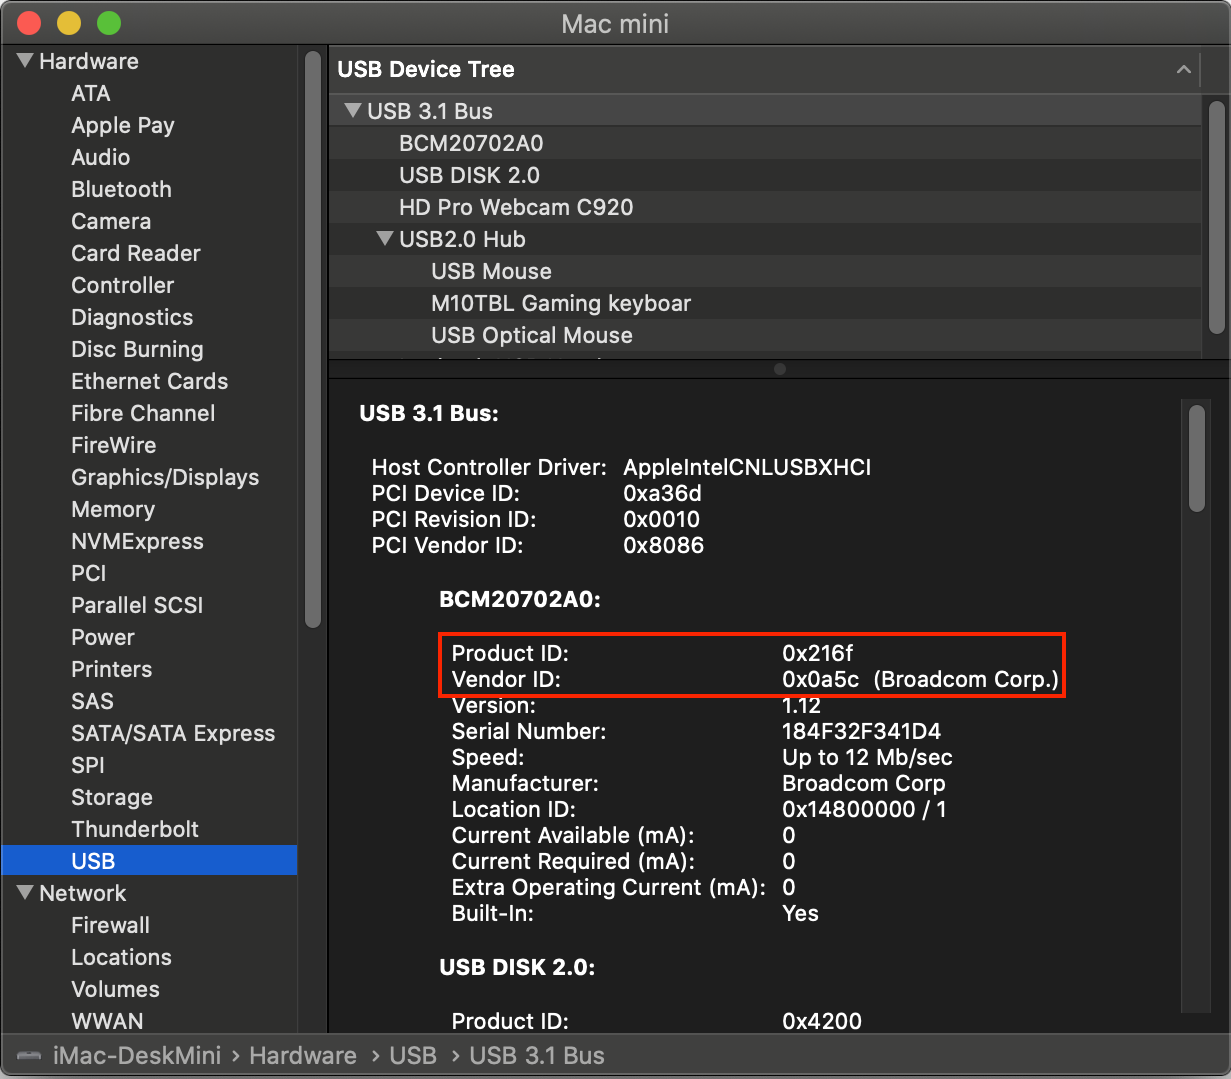
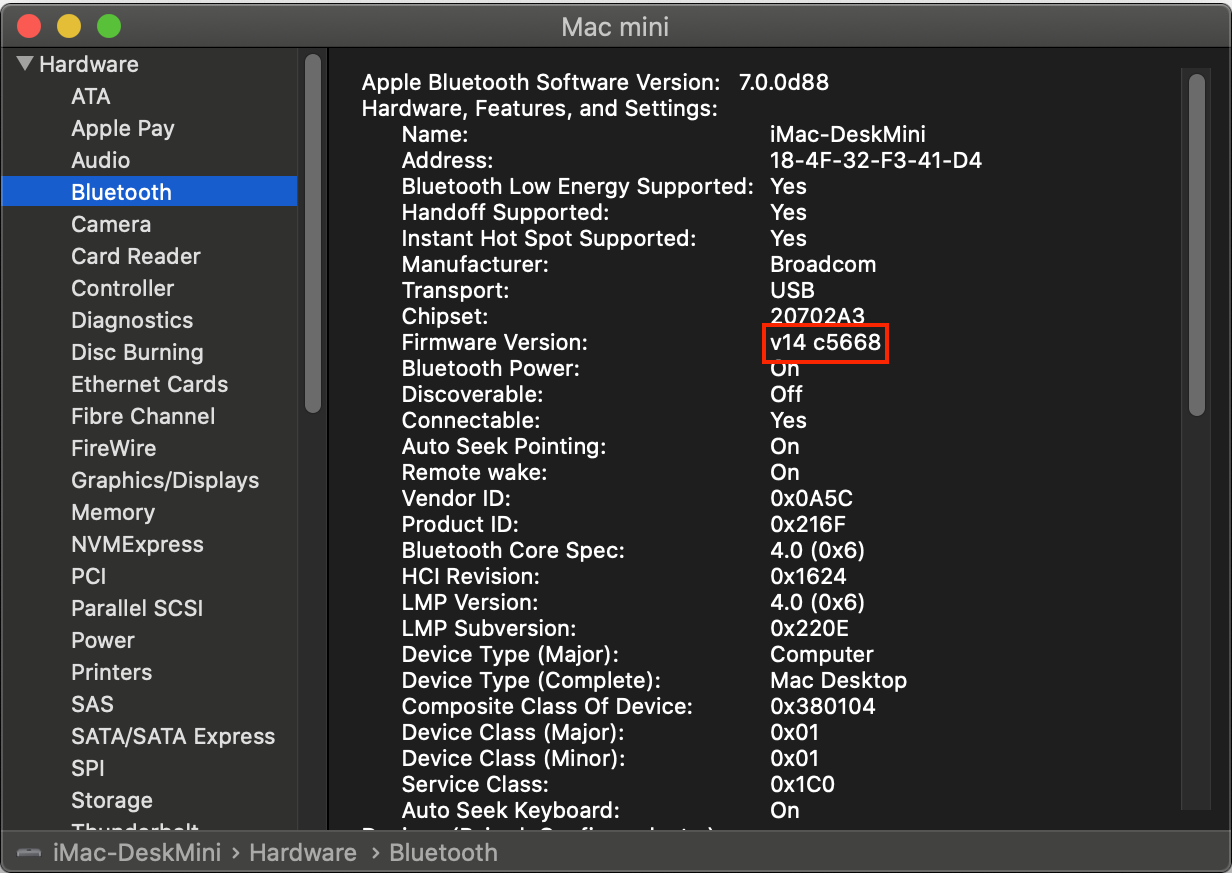
I'm just going to run through some of the changes I made to RehabMan's BrcmPatchRAM project for it to function in macOS Catalina. I don't really have time to go any further with it but hopefully my research and testing can help get an official working version out. I'm using BrcmFirmwareData.kext, BrcmPatchRAM2.kext and BrcmBluetoothInjector.kext and place them inside EFI/CLOVER/kexts/Other BrcmBluetoothInjector.kext was not required on previous macOS releases but is on Catalina because of the following missing IOCatalogue methods: kxld[com.no-one.BrcmPatchRAM2]: The following symbols are unresolved for this kext: kxld[com.no-one.BrcmPatchRAM2]: IOCatalogue::addDrivers(OSArray*, bool) kxld[com.no-one.BrcmPatchRAM2]: IOCatalogue::removeDrivers(OSDictionary*, bool) kxld[com.no-one.BrcmPatchRAM2]: IOCatalogue::startMatching(OSDictionary*) Since these methods are no longer available they must be removed from the project. The easiest way to do this is to comment out publishPersonality() and publishResourcePersonality() methods from BrcmPatchRAM.cpp / BrcmPatchRAM.h. Also remove all calls to these methods in BrcmPatchRAM.cpp. The next issue is dealing with the 0xe00002c2 error when reading and writing to the BRCM hardware. Starting with BrcmPatchRAM::continuousRead() and BrcmPatchRAM::readCompletion() we need to add an kIODirectionIn option. ie. mReadBuffer = IOBufferMemoryDescriptor::inTaskWithOptions(kernel_task, kIODirectionIn, 0x200); IOReturn result = mReadBuffer->prepare(kIODirectionIn); IOReturn result = me->mReadBuffer->complete(kIODirectionIn); Next in BrcmPatchRAM::bulkWrite we need to add kIODirectionOut options. if (IOMemoryDescriptor* buffer = IOMemoryDescriptor::withAddress((void*)data, length, kIODirectionOut)) if ((result = buffer->prepare(kIODirectionOut)) == kIOReturnSuccess) if ((result = buffer->complete(kIODirectionOut)) != kIOReturnSuccess) Now that we don't have IOCatalogue::addDrivers, IOCatalogue::removeDrivers and IOCatalogue::startMatching methods to switch from using the uploader driver to native macOS driver we have to use BrcmBluetoothInjector.kext instead. So my Bluetooth device is a BCM20702A0 with VendorID 0x0A5C and ProductID 0x216F (Dell DW1560 4352+20702 M.2) located in internal USB port HS14. So I'll use it as an example for the following modifications. In BrcmPatchRAM2-Info.plist we need the following entry. Note the addition of the IOProbeScore. When the kext is loaded it will call BrcmPatchRAM::probe which will update the firmware and return NULL and then the BrcmBluetoothInjector.kext should load instead. <key>0a5c_216f</key> <dict> <key>CFBundleIdentifier</key> <string>com.no-one.$(PRODUCT_NAME:rfc1034identifier)</string> <key>DisplayName</key> <string>DW1560 Bluetooth 4.0 LE</string> <key>FirmwareKey</key> <string>BCM20702A1_001.002.014.1443.1572_v5668</string> <key>IOClass</key> <string>BrcmPatchRAM2</string> <key>IOMatchCategory</key> <string>BrcmPatchRAM2</string> <key>IOProviderClass</key> <string>IOUSBHostDevice</string> <key>IOProbeScore</key> <integer>4000</integer> <key>idProduct</key> <integer>8559</integer> <key>idVendor</key> <integer>2652</integer> </dict> In BrcmBluetoothInjector-Info.plist we need the following entry. Note again the addition of the IOProbeScore. We want the BrcmBluetoothInjector.kext to load the macOS kext after the firmware has been uploaded to the hardware. Since BrcmBluetoothInjector.kext has not been updated in a long time you may need to add your hardware manually to the plist. Note that your Bluetooth device VendorID / ProductID is not the same as your WiFi hardware and will not show up in your PCI list. You will need to look at the USB ports to get this info. <key>0a5c_216f</key> <dict> <key>CFBundleIdentifier</key> <string>com.apple.iokit.BroadcomBluetoothHostControllerUSBTransport</string> <key>IOClass</key> <string>BroadcomBluetoothHostControllerUSBTransport</string> <key>IOProviderClass</key> <string>IOUSBHostDevice</string> <key>IOProbeScore</key> <integer>3000</integer> <key>idProduct</key> <integer>8559</integer> <key>idVendor</key> <integer>2652</integer> </dict> You will know the firmware is uploaded when its version in About This Mac->System Report...->Bluetooth shows something like: Firmware Version: v14 c5668 If it shows 4096 then the upload has failed. I will attach my compiled versions for people to help test. I'm not 100% sure if this is method is going to work so I'd appreciate feedback on it. Downloads (acidanthera)

 2 points
 -
Yep!!!!! - Can confirm it works, not only that for the first time correctly registering as external Drive - Thanks griven for the query and huge thanks to crazybirdy for the solution2 points
-
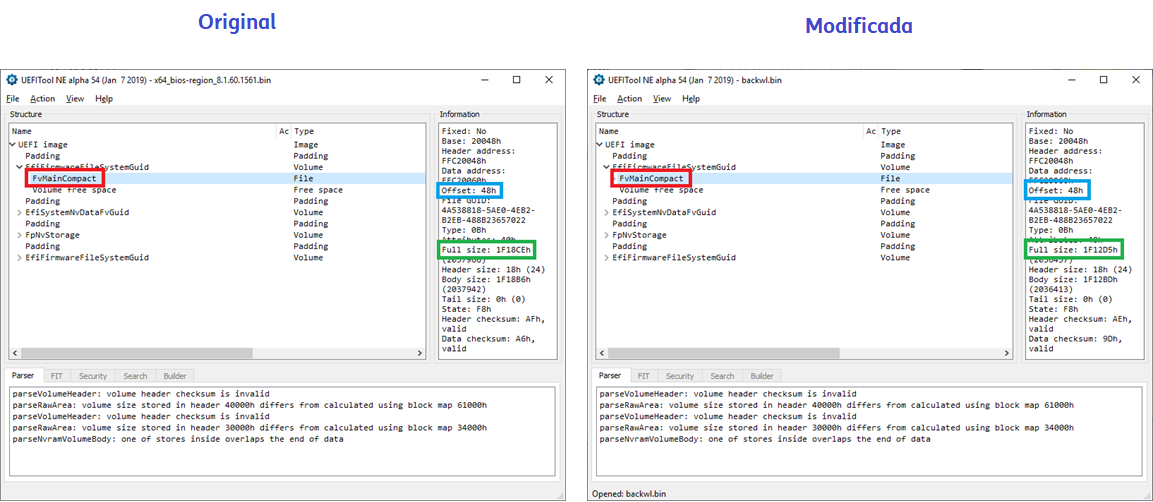
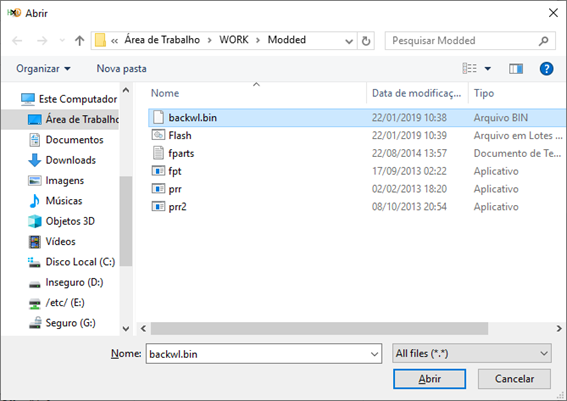
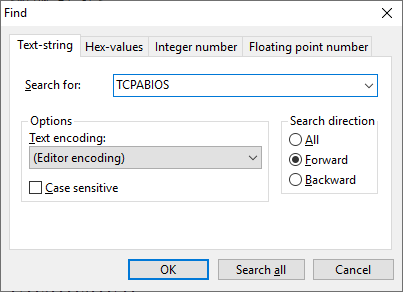
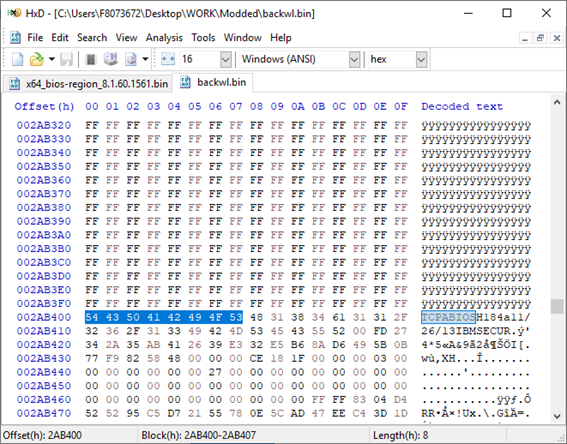
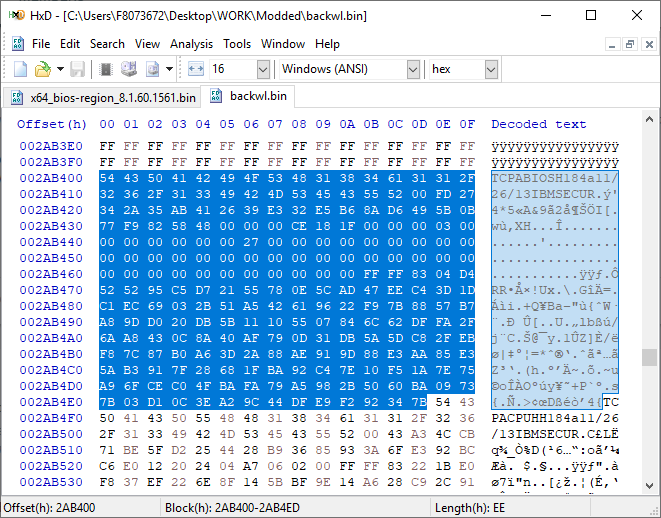
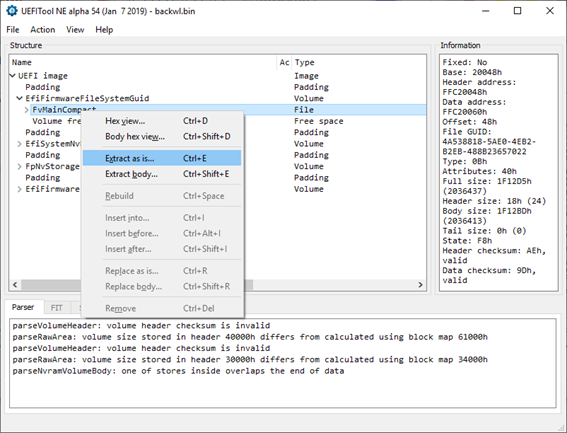
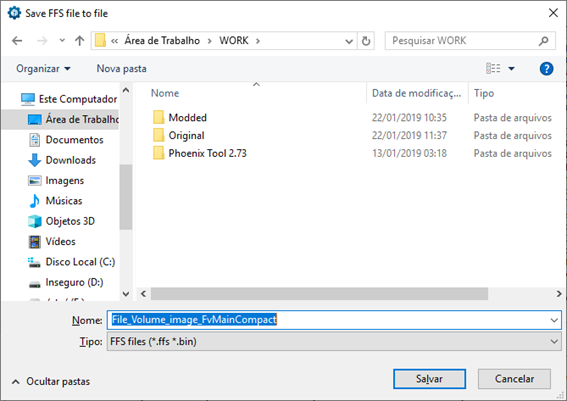
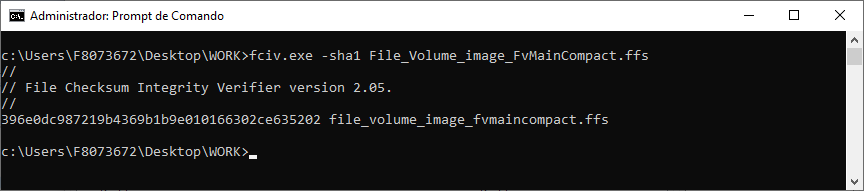
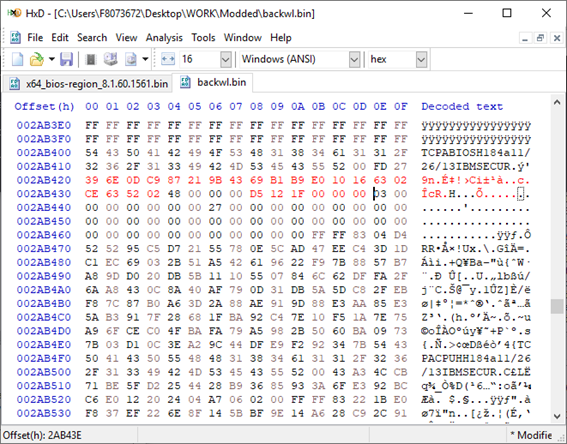
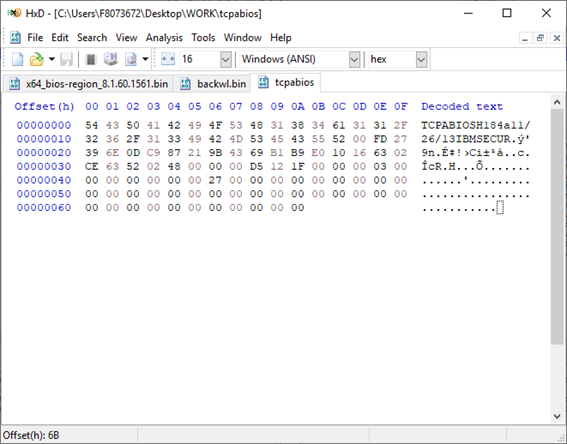
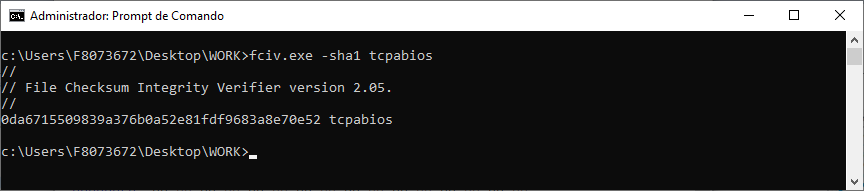
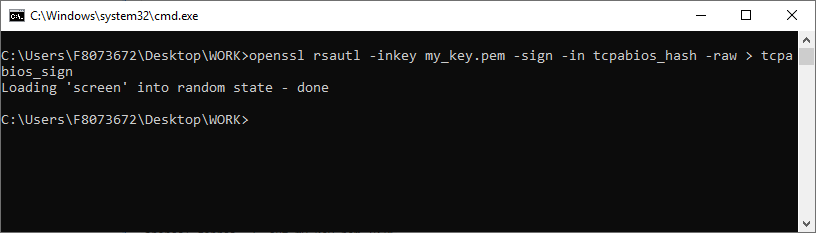
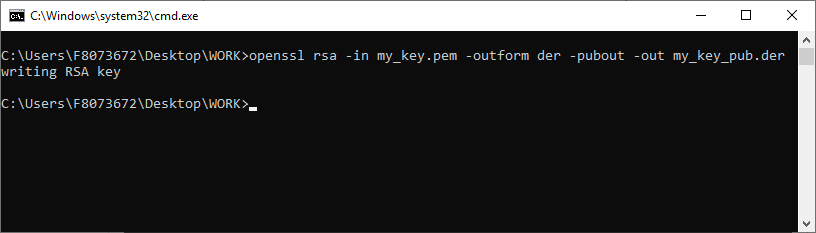
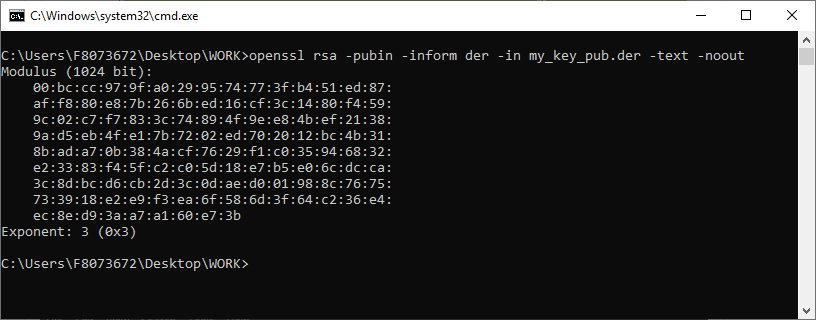
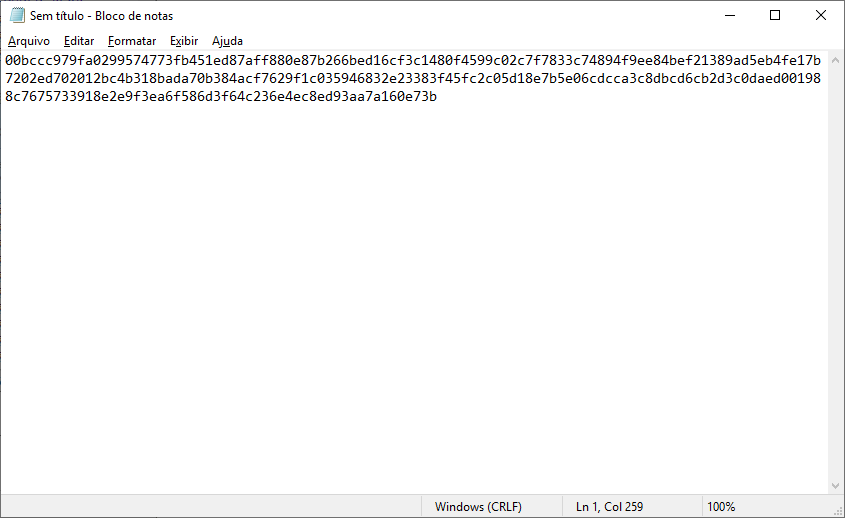
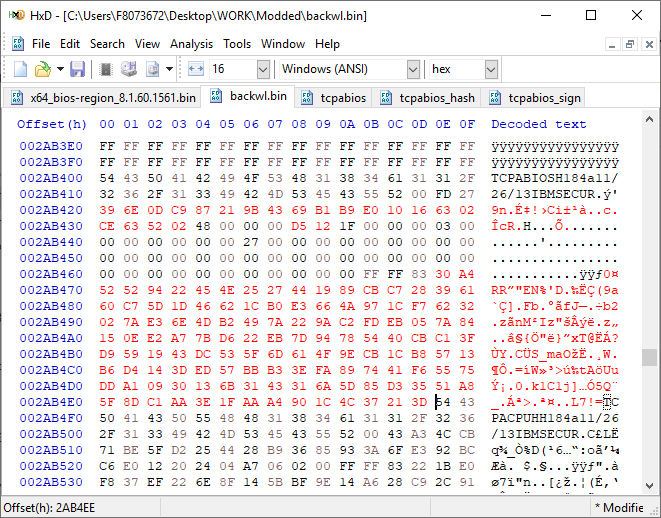
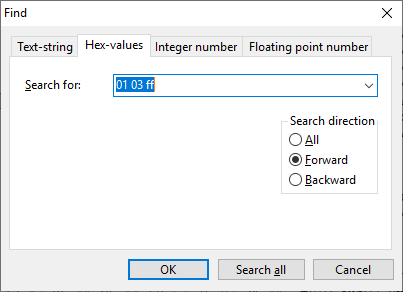
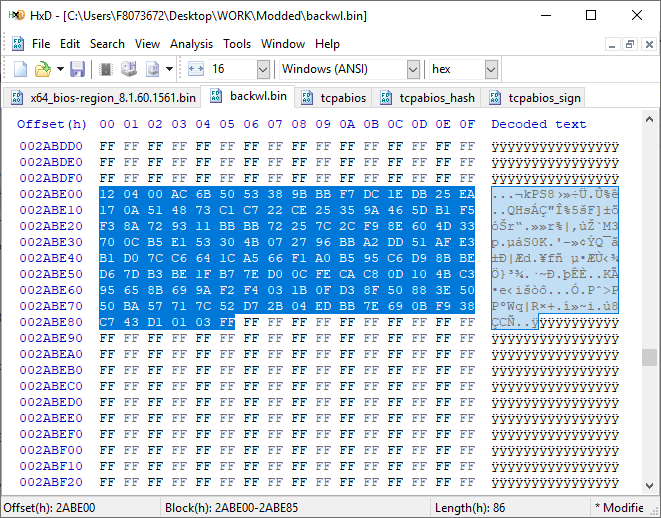
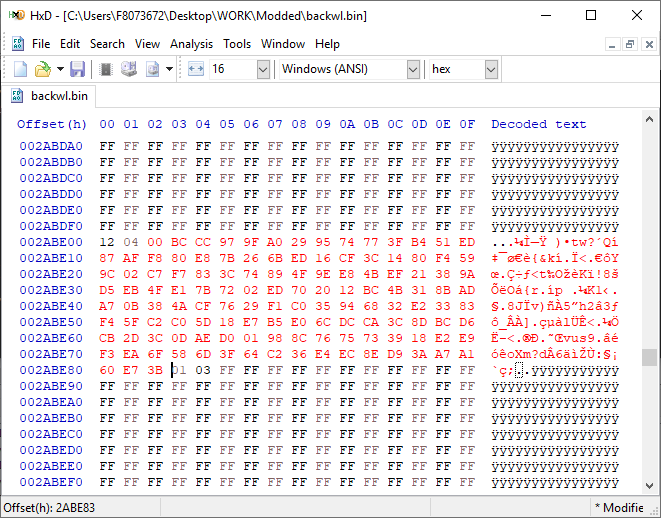
[GUIDE] Fix Insyde H2O BIOS signature (5 beeps on Lenovo) I recently bought a Lenovo L440 laptop to install the Mojave macOS and I replaced the wireless card with the DW1560 because the current one is not compatible. I discovered that there was a whitelist of enabled cards that manufacturers are adopting recently (in my case it uses a Phoenix Insyde BIOS H2O). I searched the BIOS Modding forums and found people who did the patch for me. But after replacing the BIOS I noticed that the computer keep beeping 5 times every time I boot. So, I went deeper into this issue and that's when I figured out how to solve it. Then I created this guide based on the information I found in some Russian forums. Preface When the BIOS integrity test fails, some Intel AMT functionality stops working and a sequence of 5 whistles is issued twice at boot. After modifying to remove whitelist (enable unauthorized WI-FI cards), unlock MSR 0xe2 (hackintosh), enable advanced menu, etc. the BIOS will not pass the integrity test causing this problem. This integrity check is done through the RSA signature of the BIOS block called TCPABIOS (more information below) with the public key in modulus 3 format also stored in the BIOS. This TCPABIOS block stores the checksums of each BIOS volume. What we will do is generate new checksum for those volumes that have been modified, generate a RSA (private and public) key pair, sign that block with the private key, and replace the public key. Tools needed - EFITool NE alpha 54: https://github.com/LongSoft/UEFITool/releases - HxD 2.1.0: https://mh-nexus.de/en/hxd/ - OpenSSL: http://gnuwin32.sourceforge.net/packages/openssl.htm (Download -> Binaries) - Microsoft File Checksum Integrity Verifier (FCIV.exe): https://www.microsoft.com/en-us/download/details.aspx?id=11533 Step by step Let's open the modified BIOS, locate the TCPABIOS block and understand its anatomy. 1. Open the BIOS with HxD (We will use the modded BIOS in the MyDigitalLife.com forum by the Serg008 user for the Lenovo B590 laptop in this guide) 2. Find the word TCPABIOS: 3. The block starts with TCPABIOS and ends before TCPACPUH 4. Anatomy: 54 43 50 41 42 49 4F 53 48 31 38 34 61 31 31 2F 32 36 2F 31 33 49 42 4D 53 45 43 55 52 00 FD 27 34 2A 35 AB 41 26 39 E3 32 E5 B6 8A D6 49 5B 0B 77 F9 82 58 48 00 00 00 CE 18 1F 00 00 00 03 00 00 00 00 00 00 00 27 00 00 00 00 00 00 00 00 00 00 00 00 00 00 00 00 00 00 00 00 00 00 00 00 00 00 00 00 00 00 00 00 00 00 00 00 FF FF 83 04 D4 52 52 95 C5 D7 21 55 78 0E 5C AD 47 EE C4 3D 1D C1 EC 69 03 2B 51 A5 42 61 96 22 F9 7B 88 57 B7 A8 9D D0 20 DB 5B 11 10 55 07 84 6C 62 DF FA 2F 6A A8 43 0C 8A 40 AF 79 0D 31 DB 5A 5D C8 2F EB F8 7C 87 B0 A6 3D 2A 88 AE 91 9D 88 E3 AA 85 E3 5A B3 91 7F 28 68 1F BA 92 C4 7E 10 F5 1A 7E 75 A9 6F CE C0 4F BA FA 79 A5 98 2B 50 60 BA 09 73 7B 03 D1 0C 3E A2 9C 44 DF E9 F2 92 34 7B Gray: Name and Block Information Red: Volume Information (Checksum and Header) Blue: Separation of the list of volumes and the block signature Green: Signature of the TCPABIOS block are the last 128 bytes List of Volumes: Each volume has the format: 00 FD 27 34 2A 35 AB 41 26 39 E3 32 E5 B6 8A D6 49 5B 0B 77 F9 82 58 48 00 00 00 CE 18 1F 00 00 00 03 00 00 00 00 00 (Prefix 3 bytes + checksum 20 bytes + offset 4 bytes + volume size 6 bytes + end delimiter 6 bytes) The volumes are enumerated and use the first byte in the prefix for this (00 FD 27), starting at 0. The BIOS used in this example has only one volume, but in the case of more than one volume, it would be: 00 FD 27 .., 01 FD 27 ..., 02 FD 27 ... - Checksum is SHA1 calculation of the volume. - Offset is the volume position within the BIOS. The bytes are inverted, in this case it would be 00 00 00 48, equals to 48h - Volume Size is also with the bytes inverted, then: 1F18CEh Then that's it. We need to correct this information (checksum, offset and size) 5. To extract the volumes open the BIOS with the UEFITool and see how to identify the volumes (our example there is only one volume if there were others would also be inside EfiFirmwareFileSystemGuid): In the original BIOS, circled in red we can see our volume. Note that in blue we have offset and green the size. Exactly as we checked up on HxD. In the modified BIOS we see that the size is different: Original: 1F18CEh Modified: 1F12D5h (we'll need this later) 6. Let's extract this volume to calculate the checksum by choosing the "Extract as is ..." 7. Use this command to get the checksum of this volume: fciv.exe -sha1 File_Volume_image_FvMainCompact.ffs Now we have the checksum that is 396e0dc987219b4369b1b9e010166302ce635202 8. Replace the information in the TCPABIOS block: Note that the volume size must have the bytes inverted, so if the total is 6 bytes and is 1F12D5h, becomes D5 12 1F 00 00 00 in place of CE 18 1F 00 00 00. If the offset is different, also perform the same process by inverting the bytes. Checksum change from 34 2A 35 AB 41 26 39 E3 32 E5 B6 8A D6 49 5B 0B 77 F9 82 58 to 39 6E 0D C9 87 21 9B 43 69 B1 B9 E0 10 16 63 02 CE 63 52 02 Do this for each volume in the BIOS. 9. Now we need to generate the checksum of the whole TCPABIOS block but without considering the last 131 bytes, that is to dismiss FF FF 83 + 80 bytes from the previous signature. Copy to a new file in HxD and save as tcpabios Use the command to generate the checksum of this block: fciv.exe -sha1 tcpabios Checksum of TCPABIOS block: 0da6715509839a376b0a52e81fdf9683a8e70e52 Create a new file in HxD and add 108 bytes with 00 and paste the checksum at the end and save as tcpabios_hash, thus: 10. Now let's generate the RSA private key with modulus 3: openssl genrsa -3 -out my_key.pem 1024 Sign the file tcpabios_hash: openssl rsautl -inkey my_key.pem -sign -in tcpabios_hash -raw > tcpabios_sign Now enjoy to generate the public key: openssl rsa -in my_key.pem -outform der -pubout -out my_key_pub.der And generate public key modulus 3: openssl rsa -pubin -inform der -in my_key_pub.der -text -noout Copy and paste the key into a text file to use soon. Remove all ":" and put everything on a single line, thus: 11. Open the tcpabios_sign file in HxD, copy the contents and replace the signature at the end of the TCPABIOS block: 12. Now let's locate the location of the public key in the BIOS and replace it. This key starts with 12 04 and ends with 01 03 FF and is after the TCPABBLK block. The key looks like this: 12 04 + 81 bytes + 01 03 FF. Search for 01 03 FF to locate more easily. Verify that before the 81 bytes have bytes 12 04 to make sure you found. Now substitute for the public key that was annotated in the text file previously, thus: Save and you're ready. Your BIOS is signed and ready.


 1 point
 -
@Jonnie99 @Fubra Support can answer this for us.1 point
-
Well wow damn Typo... Sorry guys it's working as before if you get thinks right... So I can confirm that Name Find Replace Comment MatchOS com.apple.driver.AppleAHCIPort 40600200 00000000 Patch Hotplug with just 8 zeros it's working like a charm in Mojave and Catalina as well. Please forget about my stupid question Thanks to @crazybirdy for pointing me into the right direction.1 point
-
Did it work on Mojave? it should be 8 zero as 00000000, not 9 zero as your post. The Catalina patch code is the same as Mojave if not change too much. Find --> 40600200 Replace --> 000000001 point
-
@chris1111 unfortunately this one isn't working anymore. The "find" Term can not be found in Catalinas AHCIPort.kext I guess we need a new solution for Hotplug Issues in Catalina.1 point
-
Do yourself a favor and put the Radeon card on slot 1 for your hack to work properly. That's what I do. I'm running Vega 56 + a nv 2070 for gaming. Nothing much to change.1 point
-
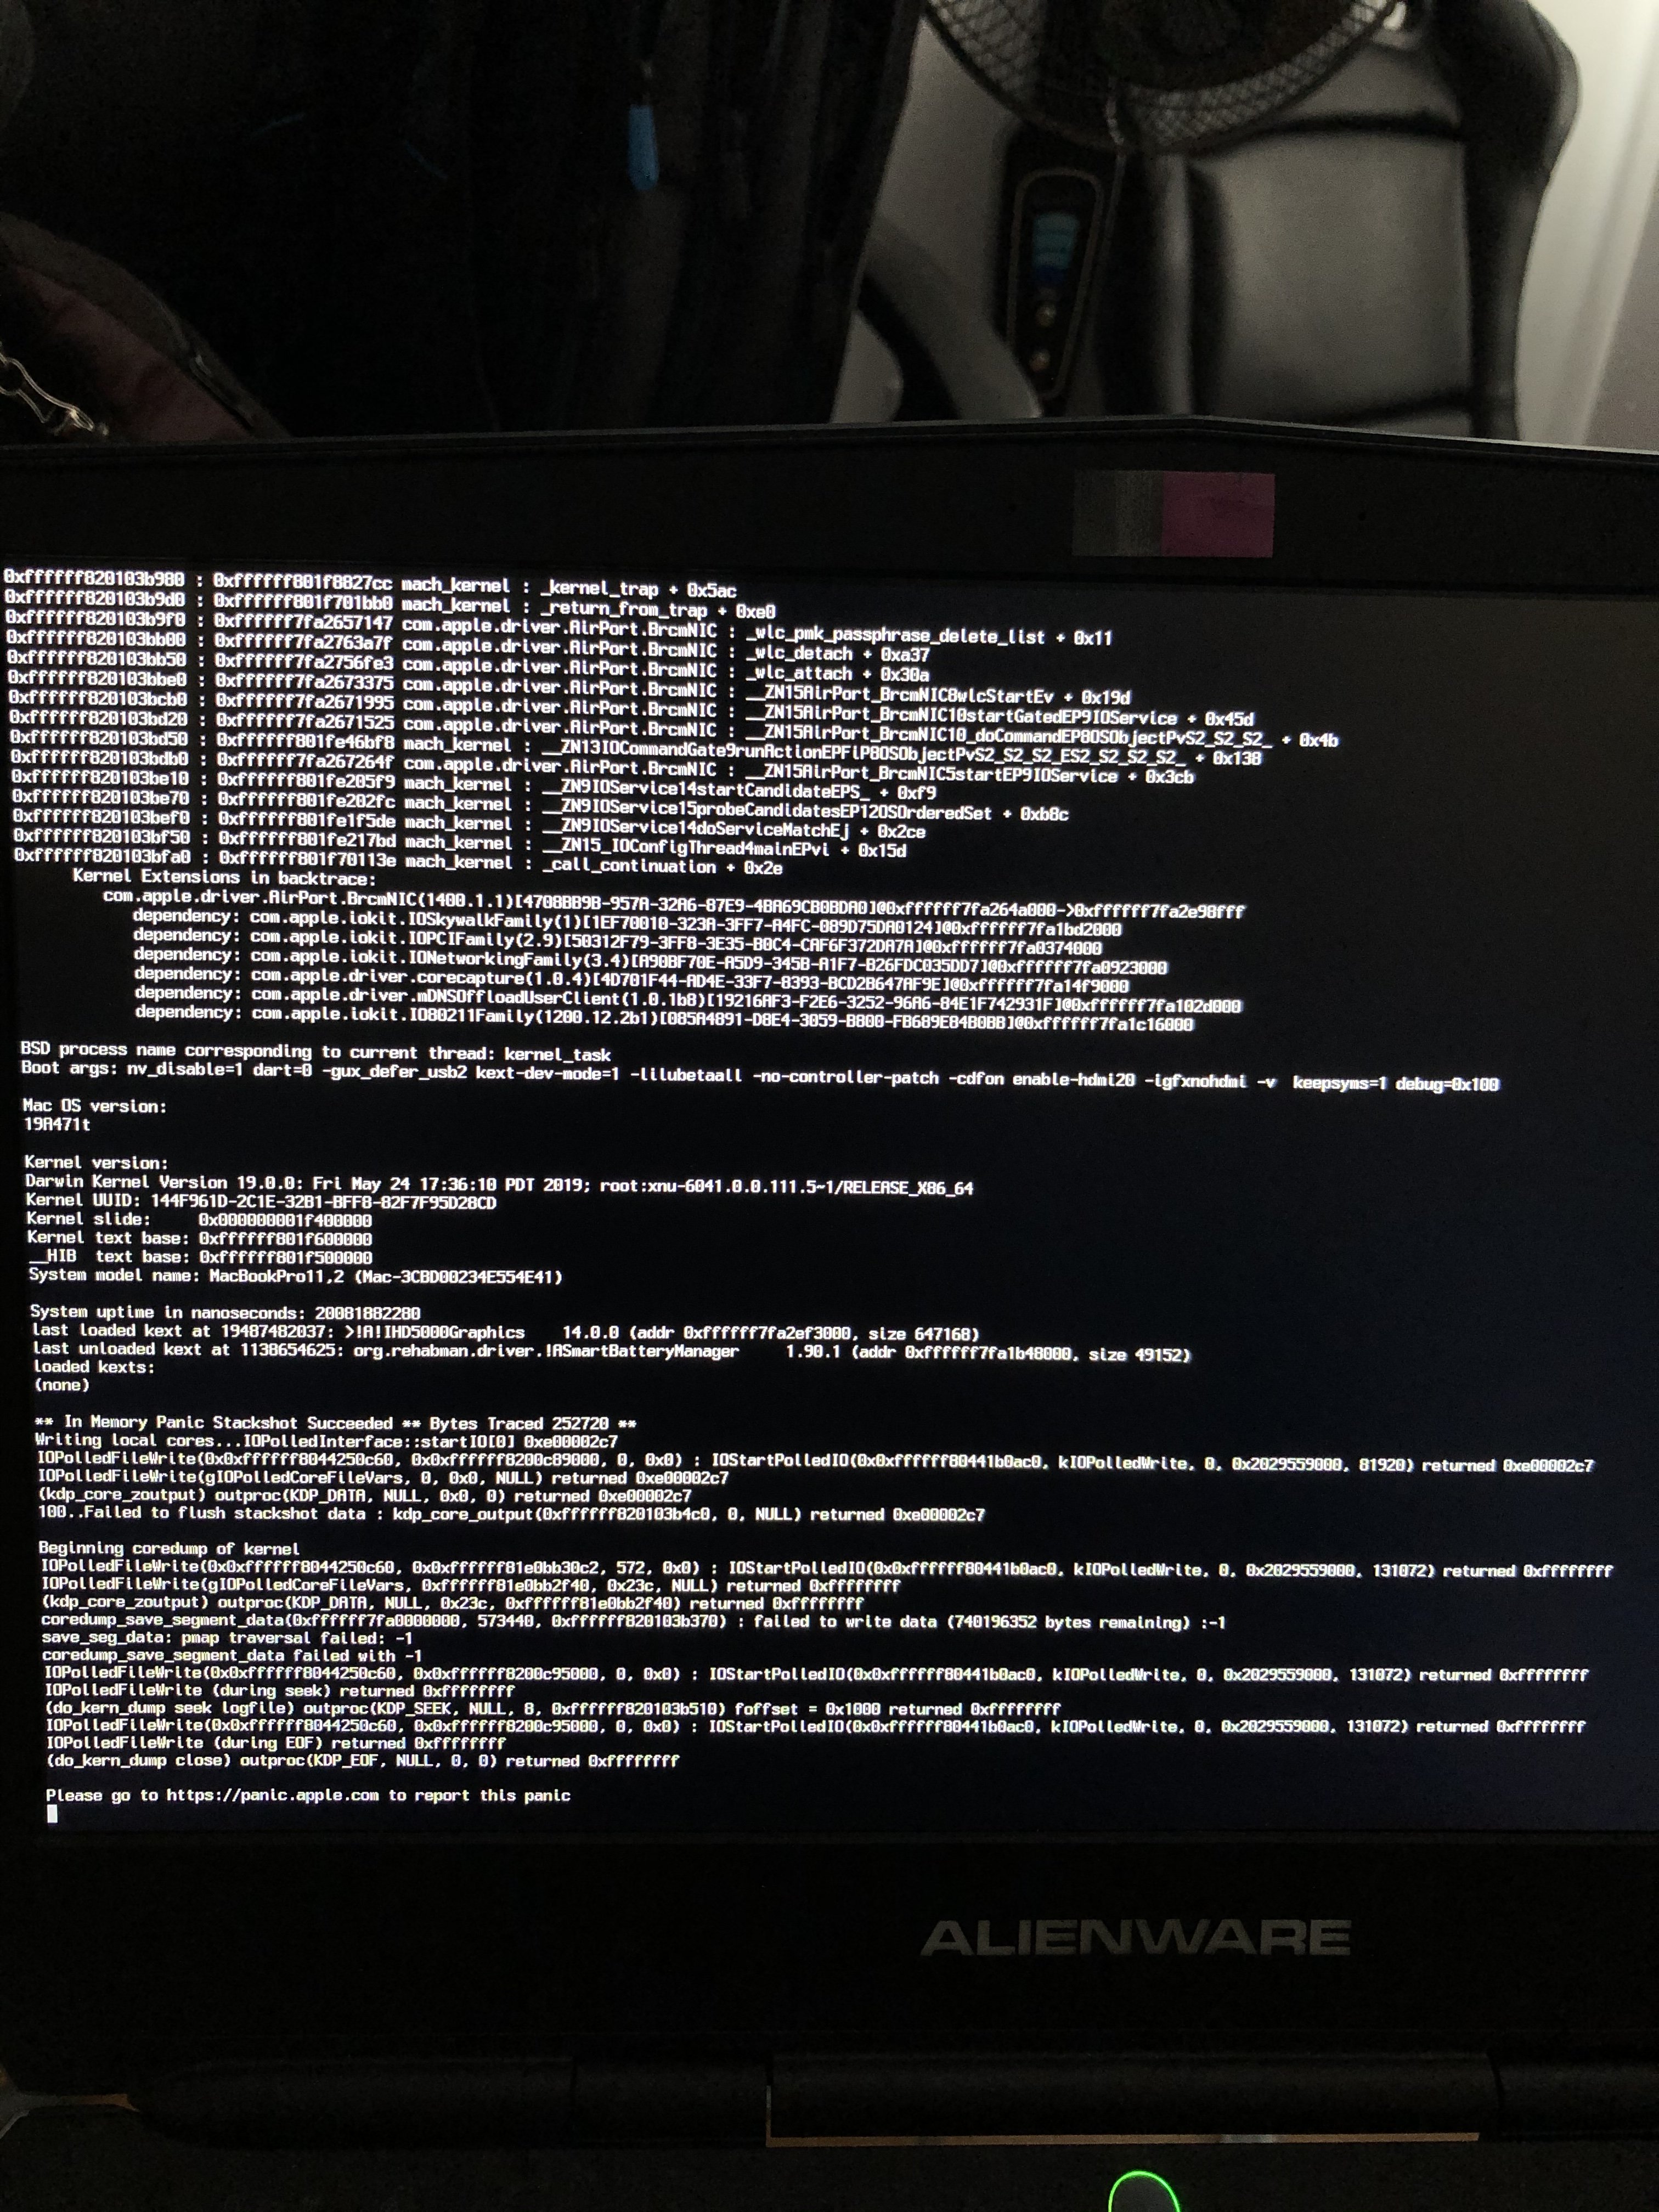
Now The kernel panic has changed
 1 point
 -
I don't have any problems after wake. I need to power cycle my machine to clear the firmware on the BT hardware. I've always placed my BT kexts in EFI/CLOVER/kexts/Other. If you need to place them in L/E you need to use BrcmFirmwareRepo.kext instead of BrcmFirmwareData.kext. Looking at the source code to BrcmNonPatchRAM2.kext you can see it does not stay resident to re-upload during wake. Note in BrcmPatchRAM.h the following define: // 10.11 works better if probe simply exits after updating firmware #define NON_RESIDENT 1 So I'm using the same principle except instead of using IOCatalogue::addDrivers, IOCatalogue::removeDrivers and IOCatalogue::startMatching to switch out the drivers (which are not available in Catalina) I'm using BrcmBluetoothInjector.kext which will load the macOS drivers after the BrcmNonPatchRAM2.kext exits probe, returning NULL, which tells macOS to try a different driver.1 point
-
A new Clover dark theme named "Underground" is available on repo. #EDIT: Updated to v1.1. Enjoy! "SmoothDark" theme has been dropped from SF, but it's still available here if you're interested. Thanks.
 1 point
 -
I had time to test this morning and using OC without my patched DSDT works great. And even better, I had a sleep issue which I always knew was ACPI related but could not find the time/be arsed to fix, and now sleep works which proves my DSDT was borked! Thanks guys1 point
-
I answer to Vinble, quote his post. Please1 point
-
1 point
-
Really strange, Bugfix. I would run MEMTEST from a GNU/Linux Live DVD to check for faulty RAM. (Knoppix is an option, if you don´t have Live DVD around. http://www.knopper.net/knoppix-mirrors/index-en.html ) Alternatively you could try swapping (upgrading) RAM, if you can find some cheap (8GB) bricks to hunt down the error. Heat may be an issue too, if your CPU is throttled due to overheating?1 point
-
Hopefully this would be the changes for XCPM, I don't want to duplicate the usage again, please see my old posts for 10.13 and 10.14 as well: https://www.insanelymac.com/forum/topic/334898-pre-release-macos-mojave/?page=2&tab=comments#comment-2616660 (10.14) https://www.insanelymac.com/forum/topic/324194-pre-release-macos-high-sierra/?page=3#entry2435885 (10.13) And these are the new patches: XCPM patches 10.15 _cpuid_set_info Find: 72 3c d0 77 50 0f b6 c0 Repl: xx 3c d0 77 50 0f b6 c0 _xcpm_bootstrap Find: 8D 43 C4 3C 22 77 22 Repl: 8D 43 xx 3C 22 77 22 _xcpm_SMT_scope_msrs #1 Find: BE060000005DE908000000 Repl: BE060000005DC390909090 _xcpm_SMT_scope_msrs #2 Find: 31 D2 E8 3E FD FF FF Repl: 31 D2 90 90 90 90 90 _xcpm_core_scope_msrs Find: 31 D2 E8 51 FD FF FF Repl: 31 D2 90 90 90 90 90 _xcpm_pkg_scope_msrs Find: 31 D2 E8 74 FD FF FF Repl: 31 D2 90 90 90 90 90 disable all msrs above Find: BE 06 00 00 00 5D E9 08 00 00 00 0F 1F 84 00 00 00 00 00 55 Repl: BE 06 00 00 00 5D E9 08 00 00 00 0F 1F 84 00 00 00 00 00 C3 Performance patch (credit to @vit9696) Find: C1E3084863D389D048C1EA20 Repl: C1E308B800FF000031D290901 point
-
FWIW: I used this tool to go from 10.14.4 to 10.14.5. http://dosdude1.com/mojave/ I created the USB installer (with my Clover bundle in ESP) and installed on top of 10.14.4. and then ran the Post Install Tool set to MBP8,1 from this USB Installer. Not entirely sure what all was changed - presumably it fixes the frameworks to allow HD 3000 to work!1 point
-
Cleaning up the boot devices goes like this, just to let you know. t3chman posted this in the Lenovo forums in 2013.1 point
-
@goodguess: related the unwanted uefi boot options. I had the same issue a couple of years ago. I don't remember exactly the method I used, but it was not difficult to get rid of them. Start with a search for "clean uefi boot options", and refine your search from there, you'll find videos and examples as well on how to do it. I see in your signature you use macos Sierra with T420. You use tluck's ESP files (if so, the most recent, or older ones), or your own?1 point
-
these files inject an alternate EDID - rather that default/built-in EDID for your LCD. these are the EDID extracted and corrected (set to RGB only mode etc) from other LCD vendors such as LGD that seem to work better than the common/inferior standard from AUO. Historically these fix problems such as white screen, glitches, and ring buffer hangs. config.EDID-2e2.plist config.EDID-2e3.plist config.EDID-366.plist These 2 are for using the unsupported OS Mojave based on LCD size - sets model to MBP9,1 instead of MBP8,1 as well sets a few gfx properties needed. config.mojave.1366x768.plist config.mojave.1600x900.plist Some folks were seeing problems when Clover was asked to patch the DSDT - most of the patching was redundant with the provided DSDT. so now there are 2 versions - one that does a number of patches to patch the built-in DSDT (i.e. when you don't provide one) and a config.plist that does almost nothing to the DSDT since over the years - way before the current SSDT/hot-patch approach was devised - manual edits were made to the DSDT. config.patchDSDT.plist - does some patching. config.plist (default) - only fixes regions So one should start with config.plist if there are glitches, then try config.EDID-2e2 or EDID-2e3 if you are on Mojave - presumable means you know what are doing! - then you need start with this one - which injects EDID-2e3. Note: I am actually using EDID-2e2. the name/number ie 2e3 is representative of the product id encoded in the EDID string - for example: 00FFFFFF FFFFFF00 30E4E302 00000000 FF140104 801F1178 E2338599 56559127 17505400 00000101 01010101 01010101 01010101 0101AE24 405A6084 1A303020 350036AE 1000001A 401F4080 60841A30 30203500 36AE1000 00180000 00FE004C 656E6F76 6F0A2020 20202020 000000FE 00313630 30783930 300A2020 202000C6 which means vendor_id 30E4 and product_id E302 - which is byte swapped to mean 02E3 there are corresponding Displayoverride files that match vendor/product_id to provide a better gamma and color space definition. Note: The 2e2 EDID worked great for many years (and 5 OS releases - 10.8-10.12) but when HighSierra (and now Mojave) came out glitches and freezes were back for many. Mostly with an AUO LCD and/or less than 16GB of memory. But sad to say, seems like HD 3000 models - such as the trusty T420 - are at EOL with the latest macOS. - My son has a T420 with 16GB and LGD model LCD on HighSierra and it works quite well for him. - My T420 has 8GB and AUO LCD and it hangs about every 3 days. i can often revive it by 1-2 sleep/wake cycles (or remote shell to reboot). So I don't use it as my main machine anymore.1 point
-
With the wireless whitelist removal some AMT features are also disabled with the mod and on some Lenovo you get 5 beeps (twice) on boot. This is because of RSA signature that as verified on boot. I can fix that. If anyone want, send me the DUMP of the current patched BIOS. Soon I will make a guide so you can do it alone. [EDIT]1 point