Leaderboard

.thumb.jpeg.7082d67b3394c9399e80144027a7b397.jpeg)

Popular Content
Showing content with the highest reputation on 03/06/2019 in all areas
-
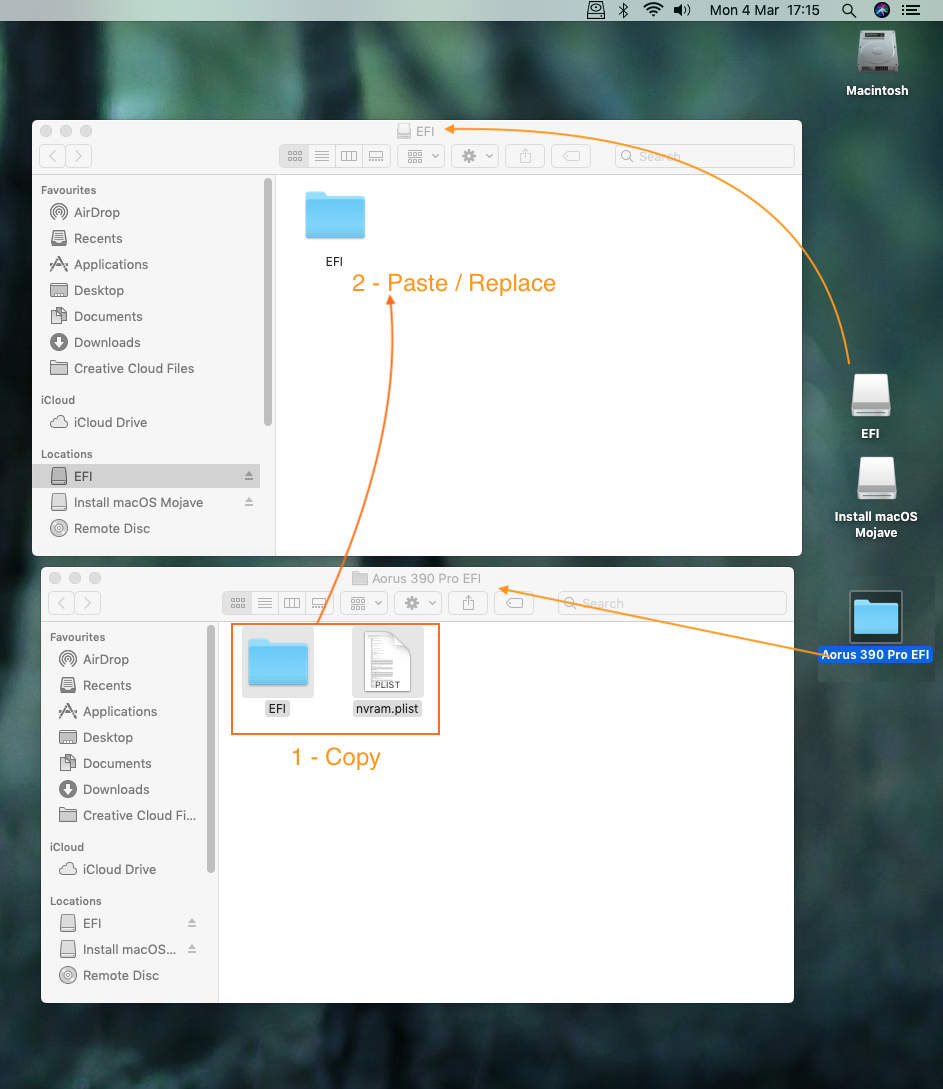
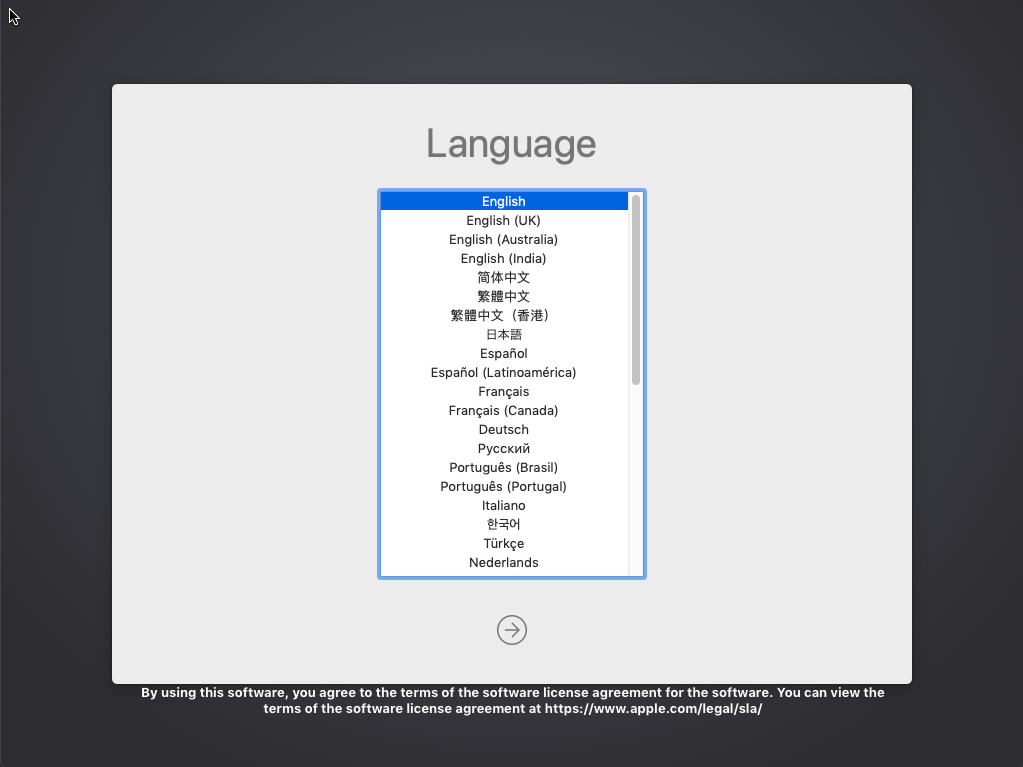
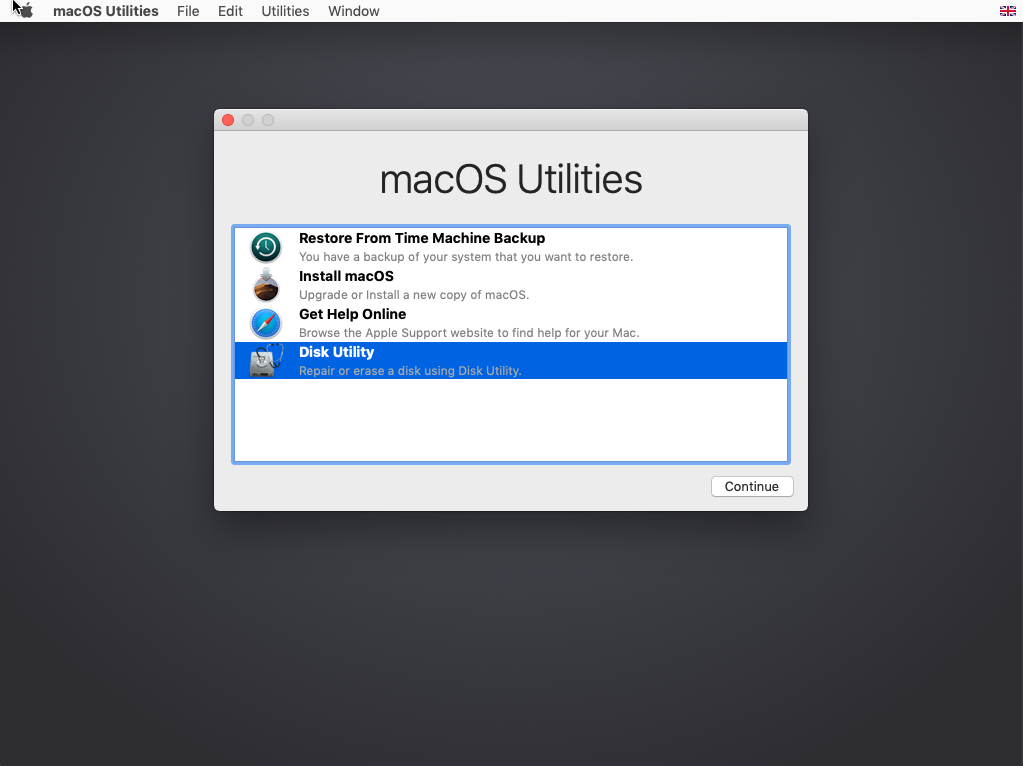
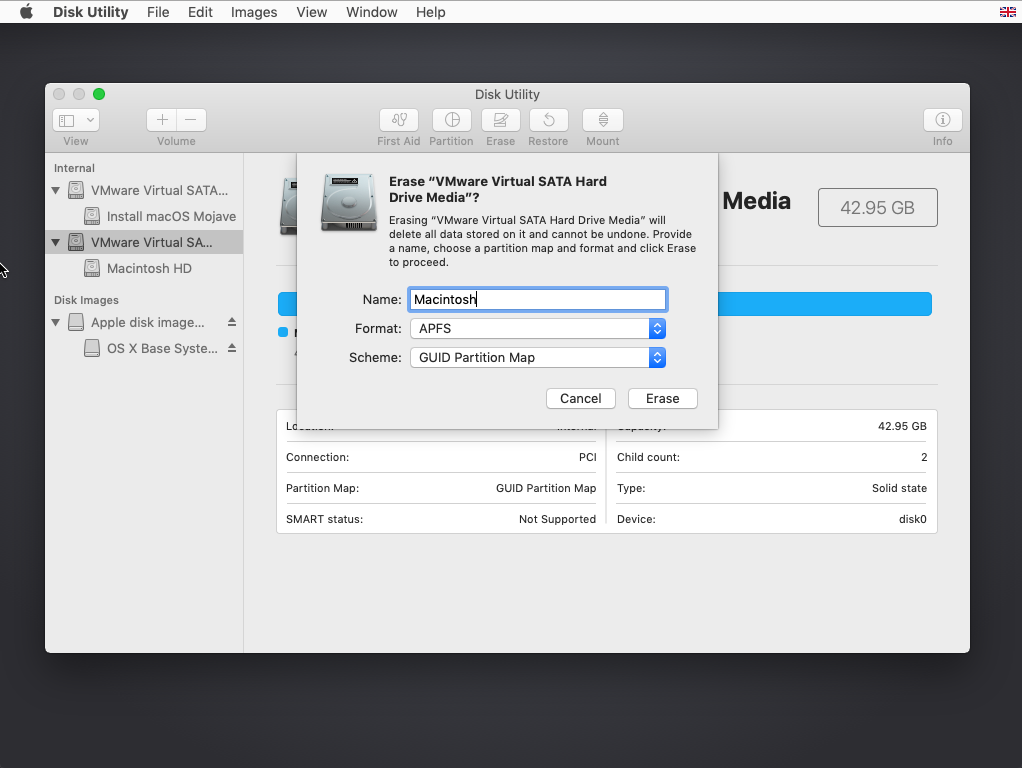
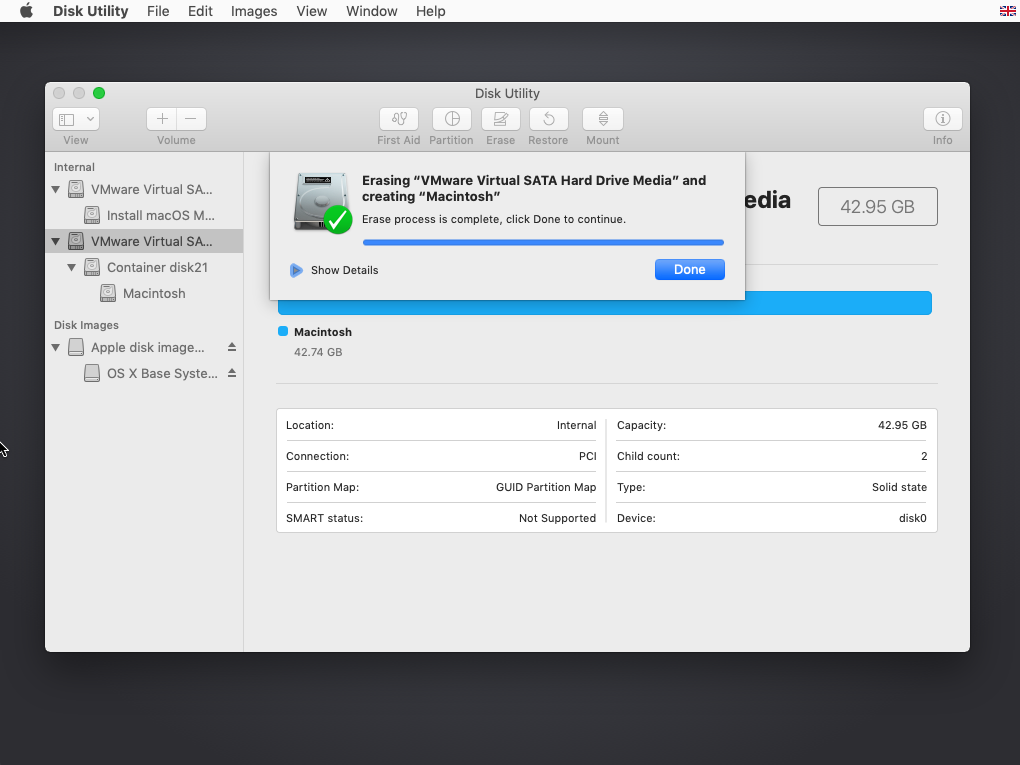
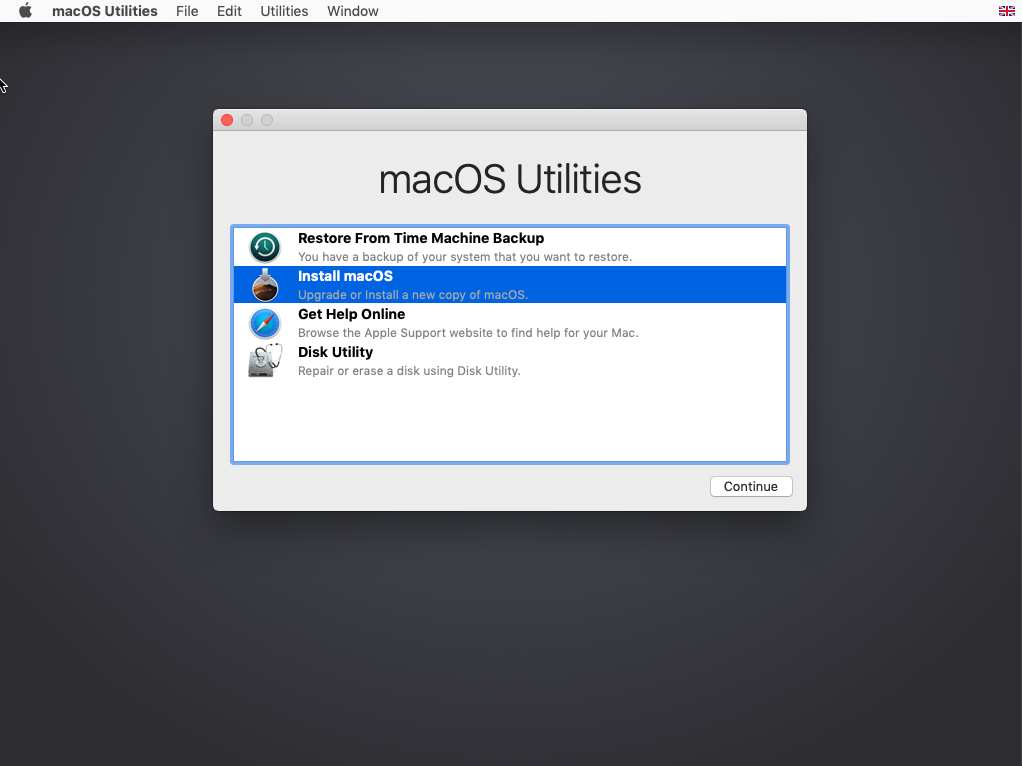
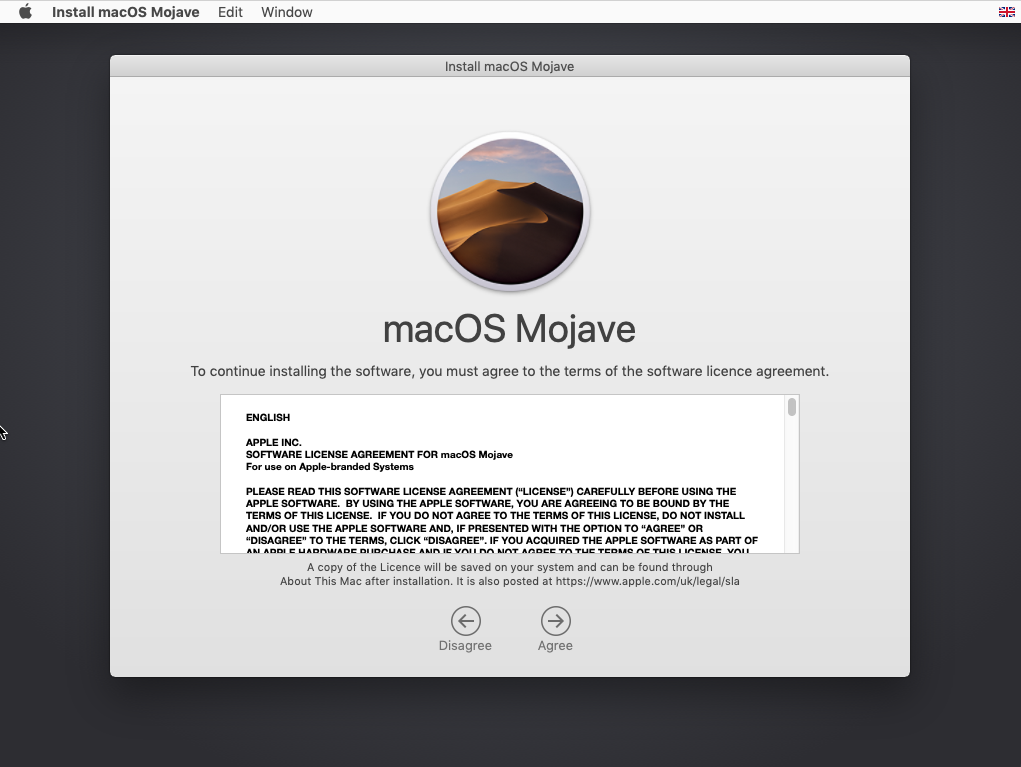
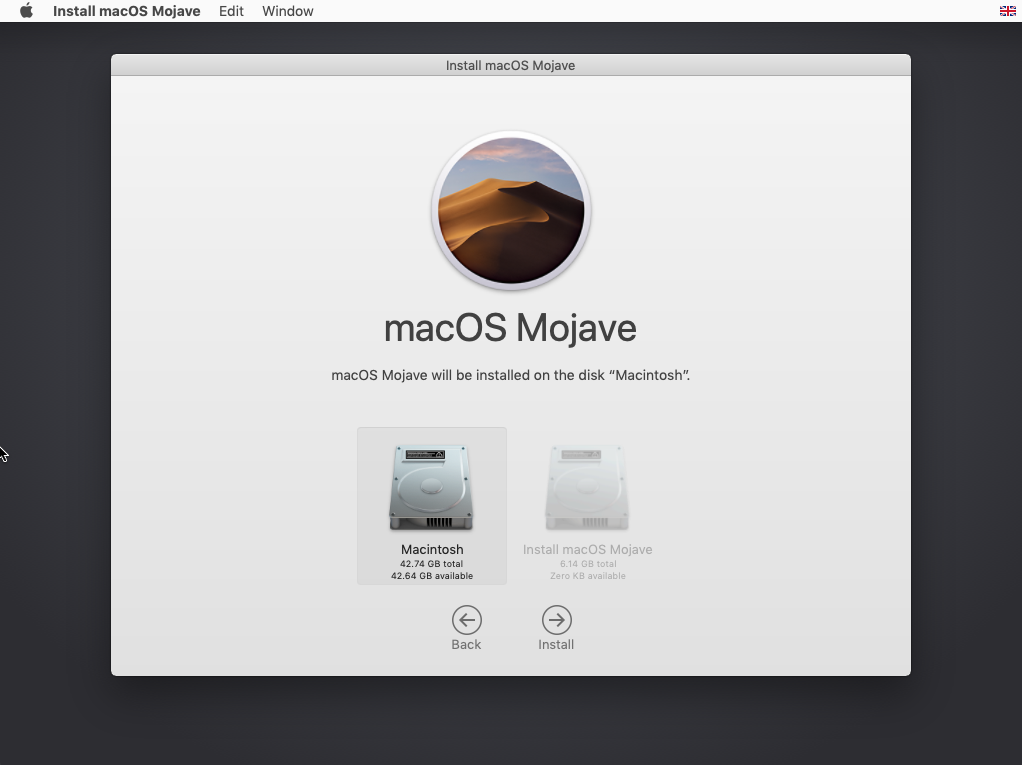
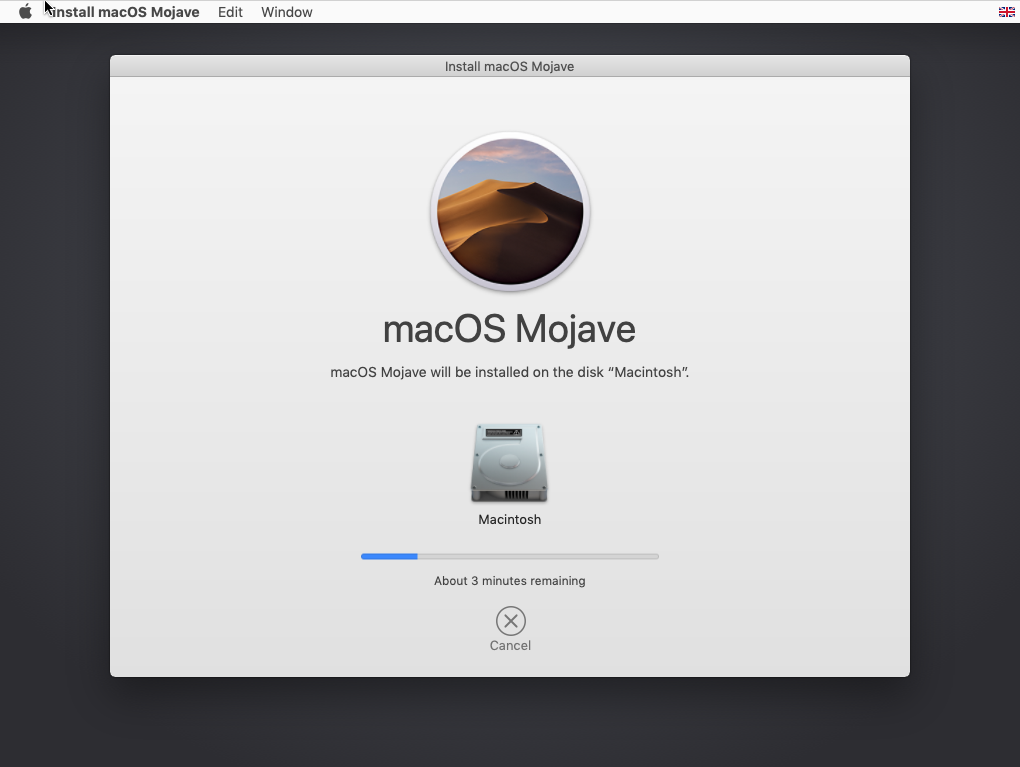
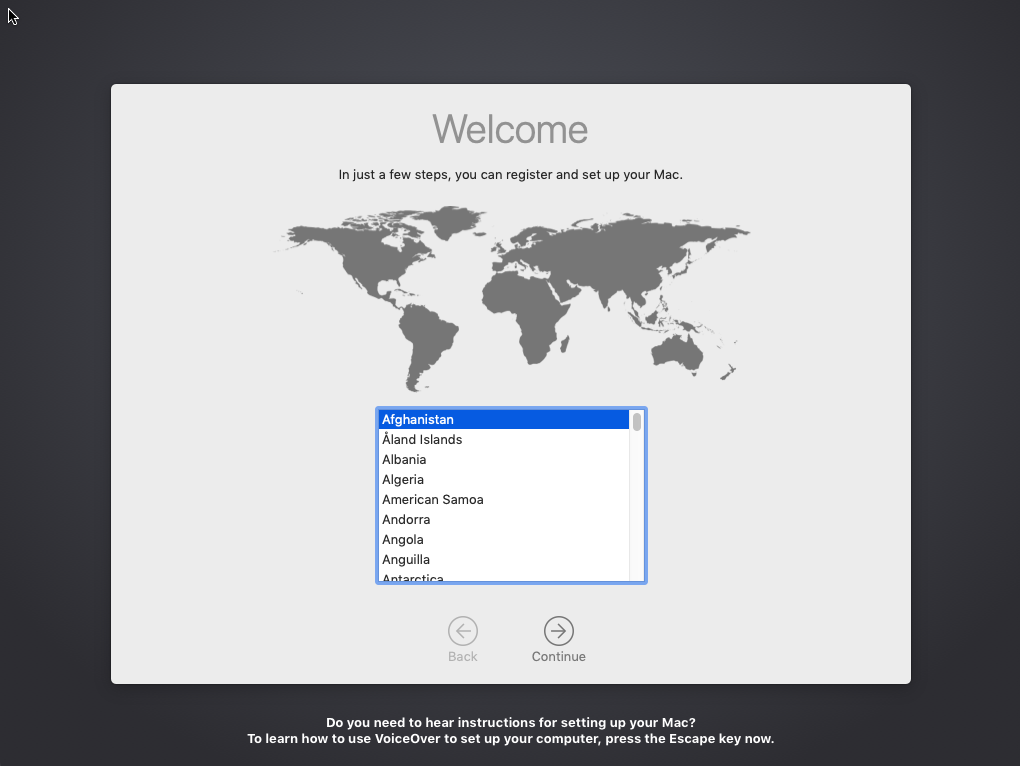
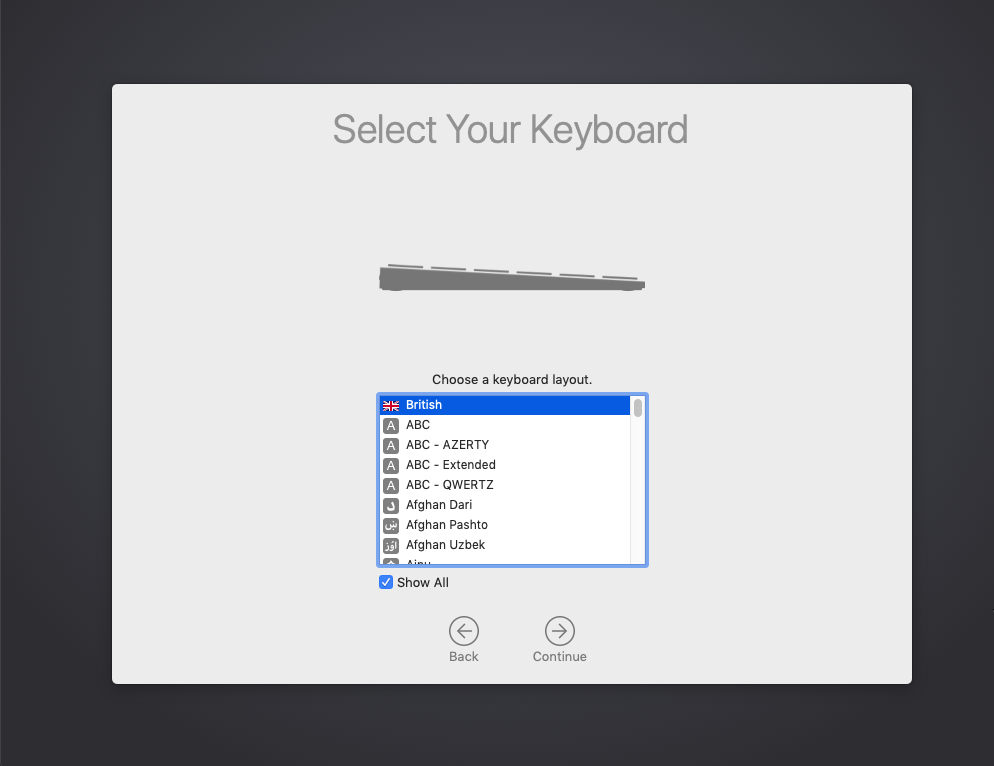
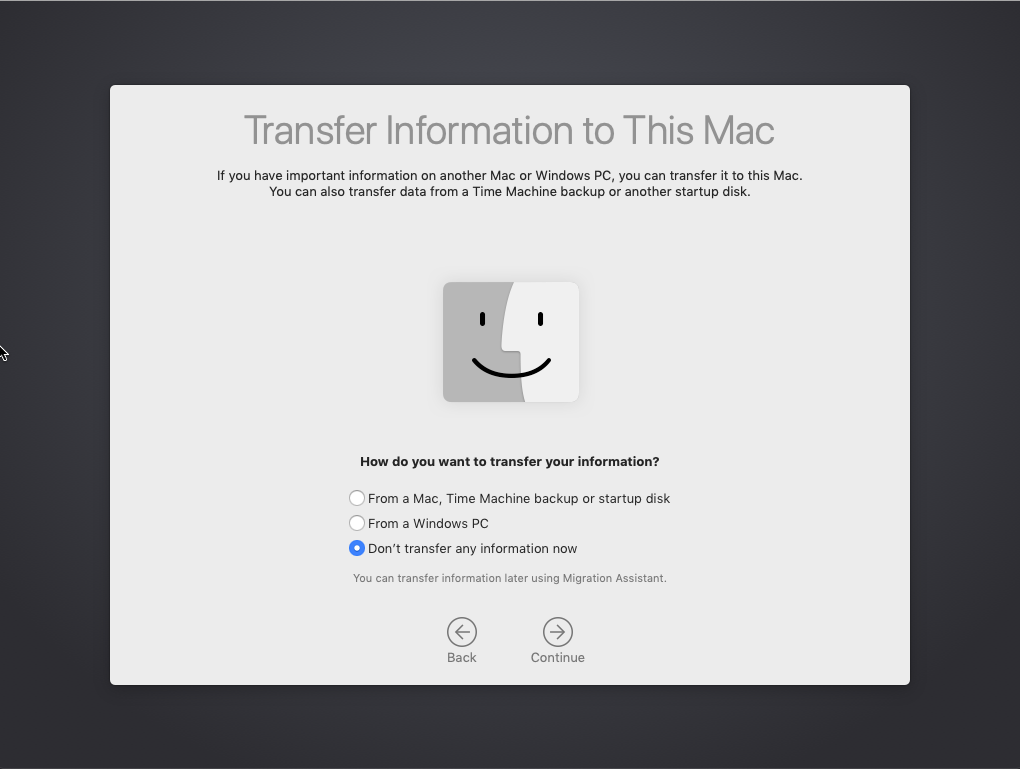
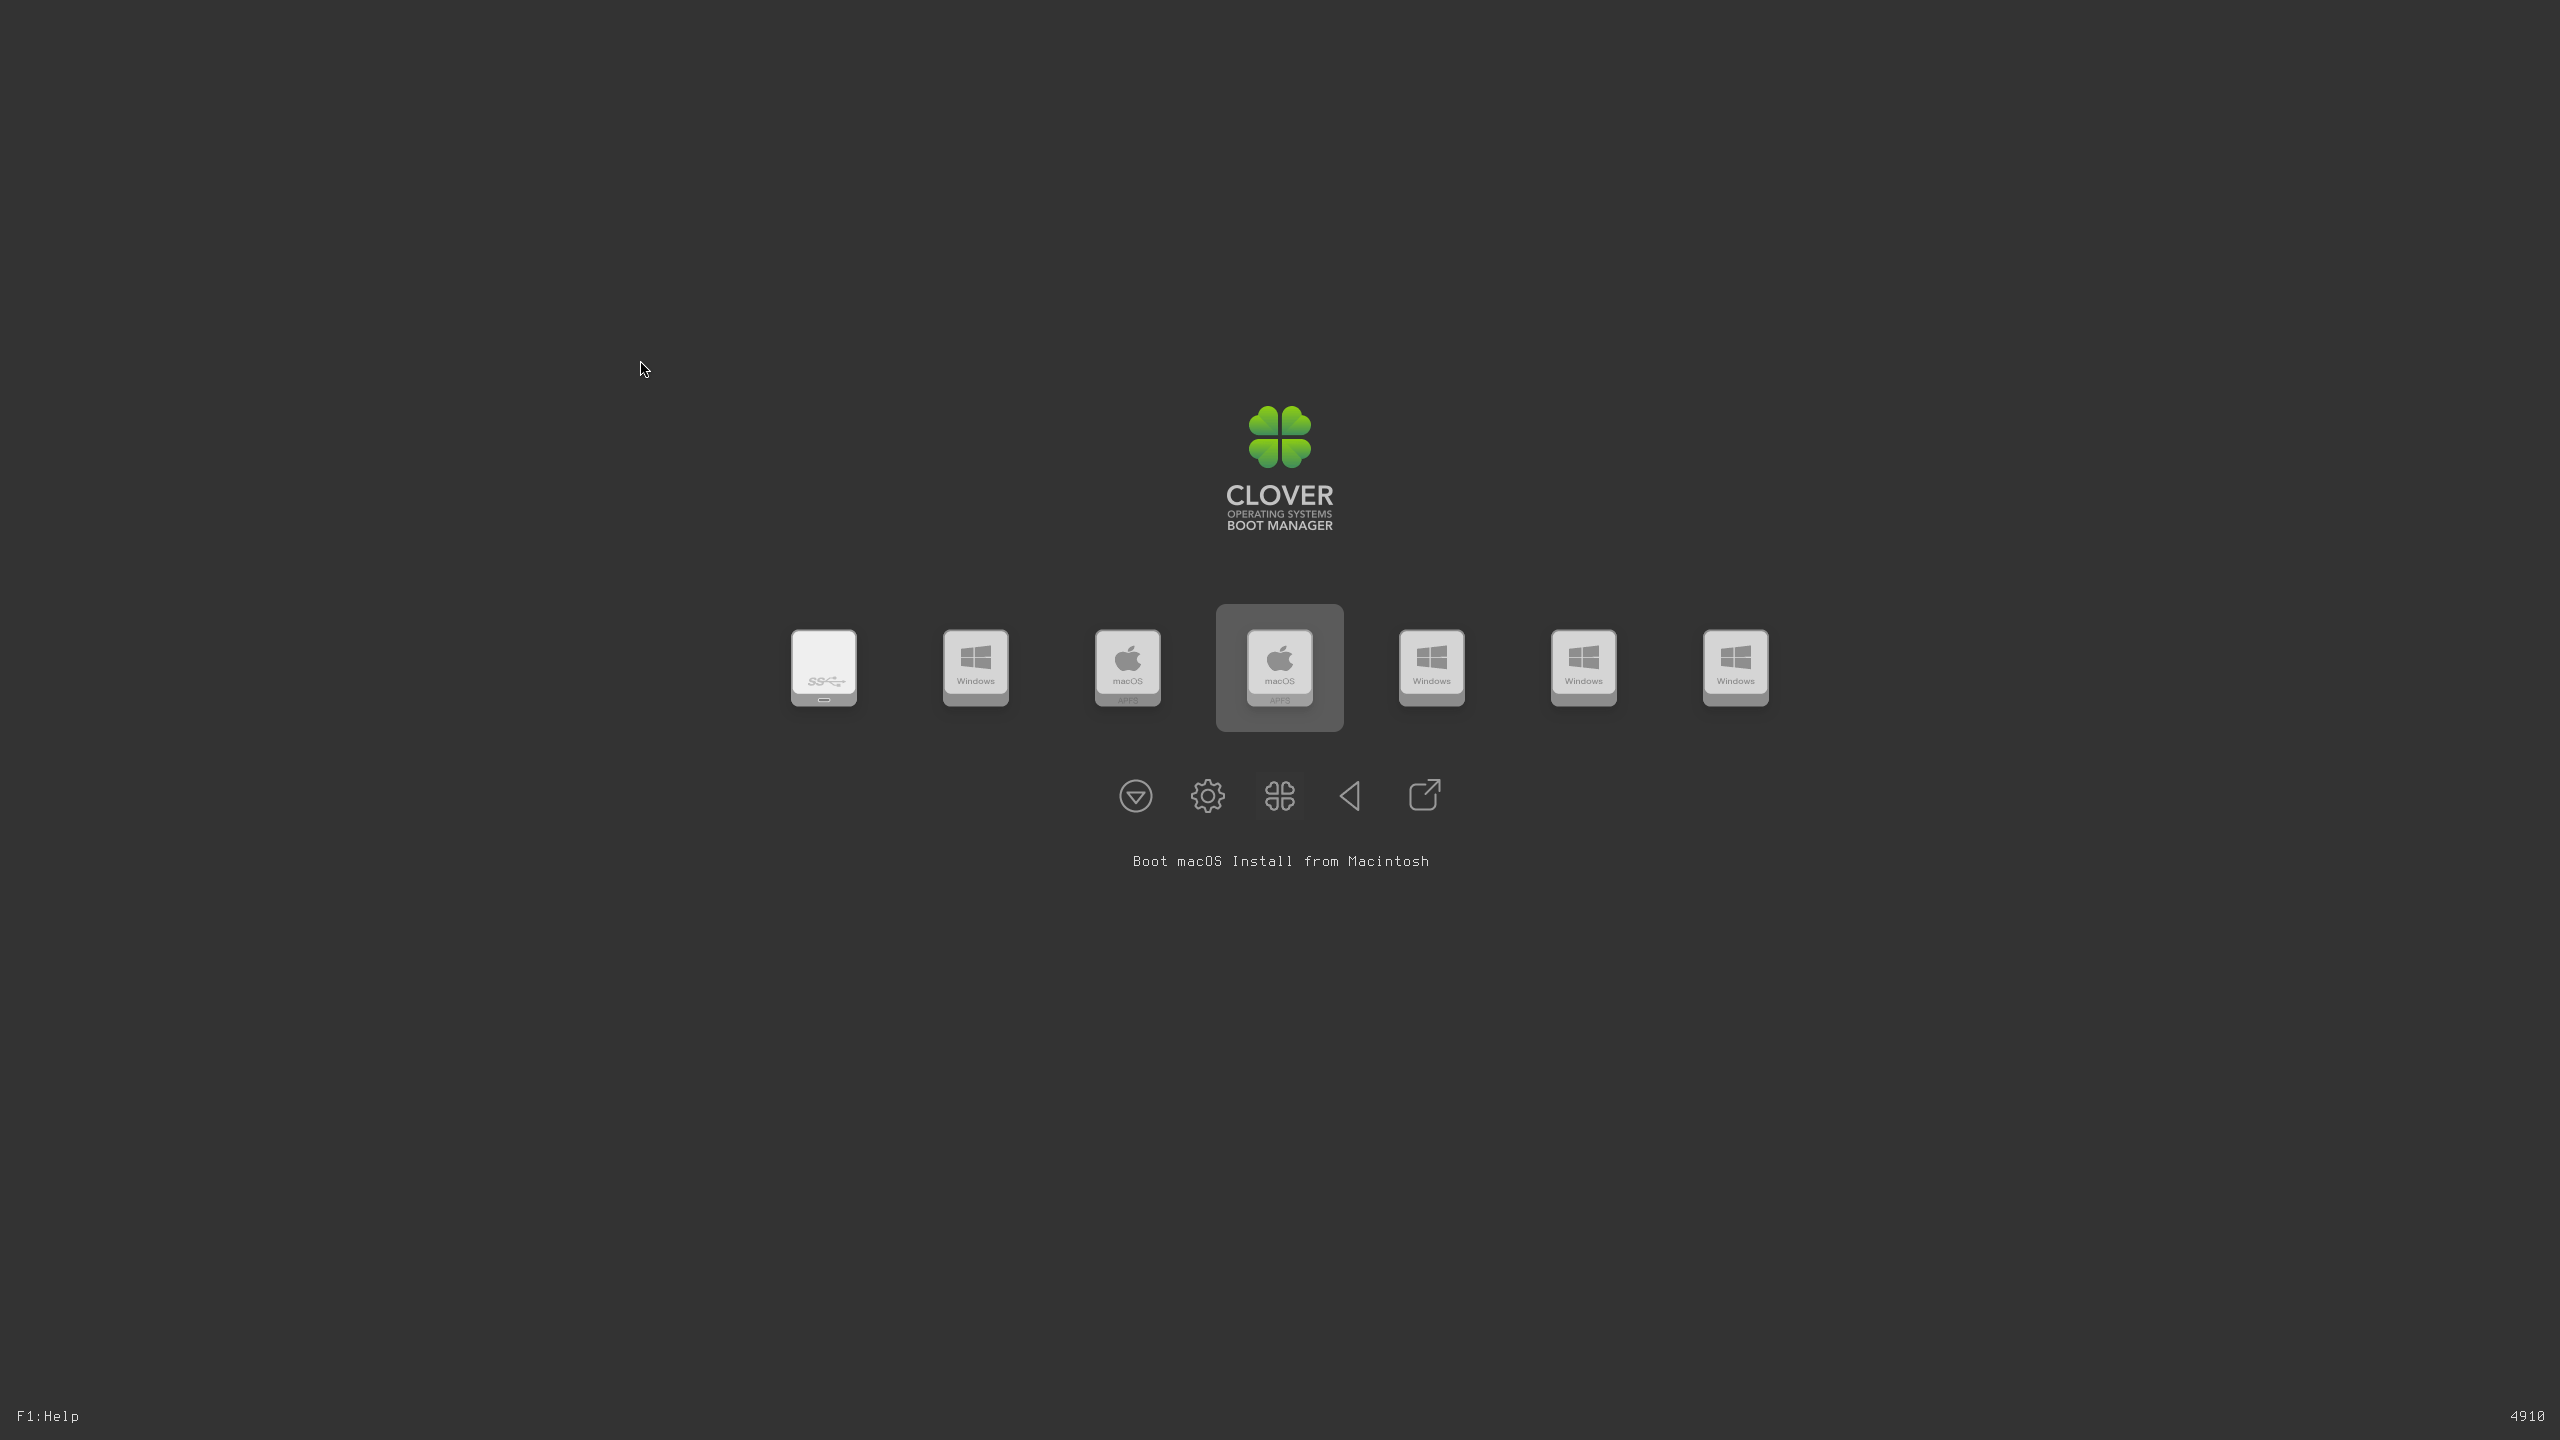
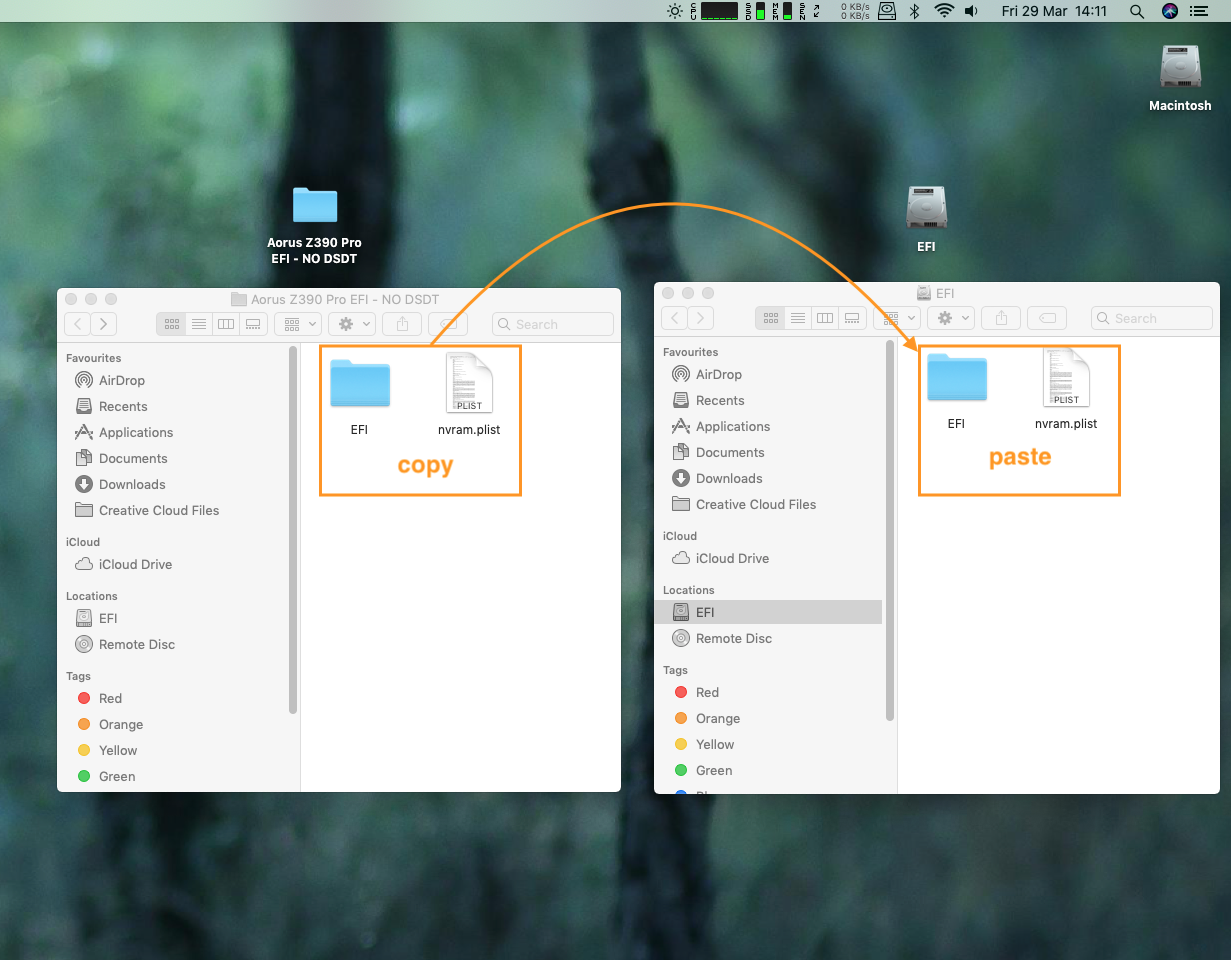
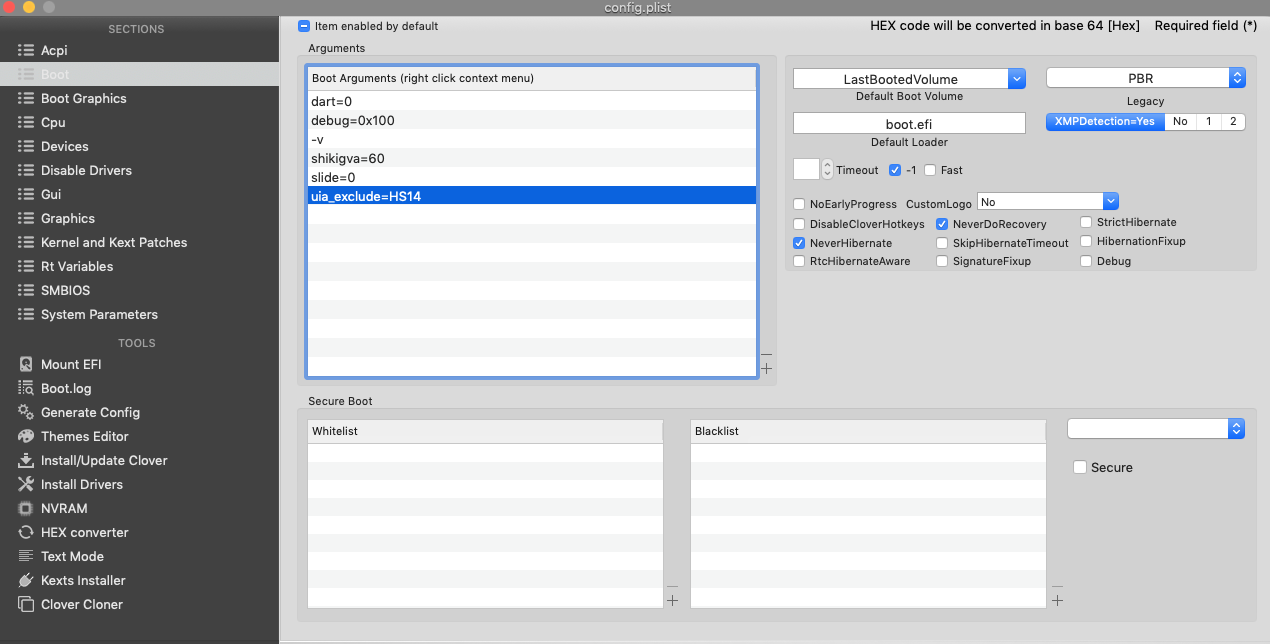
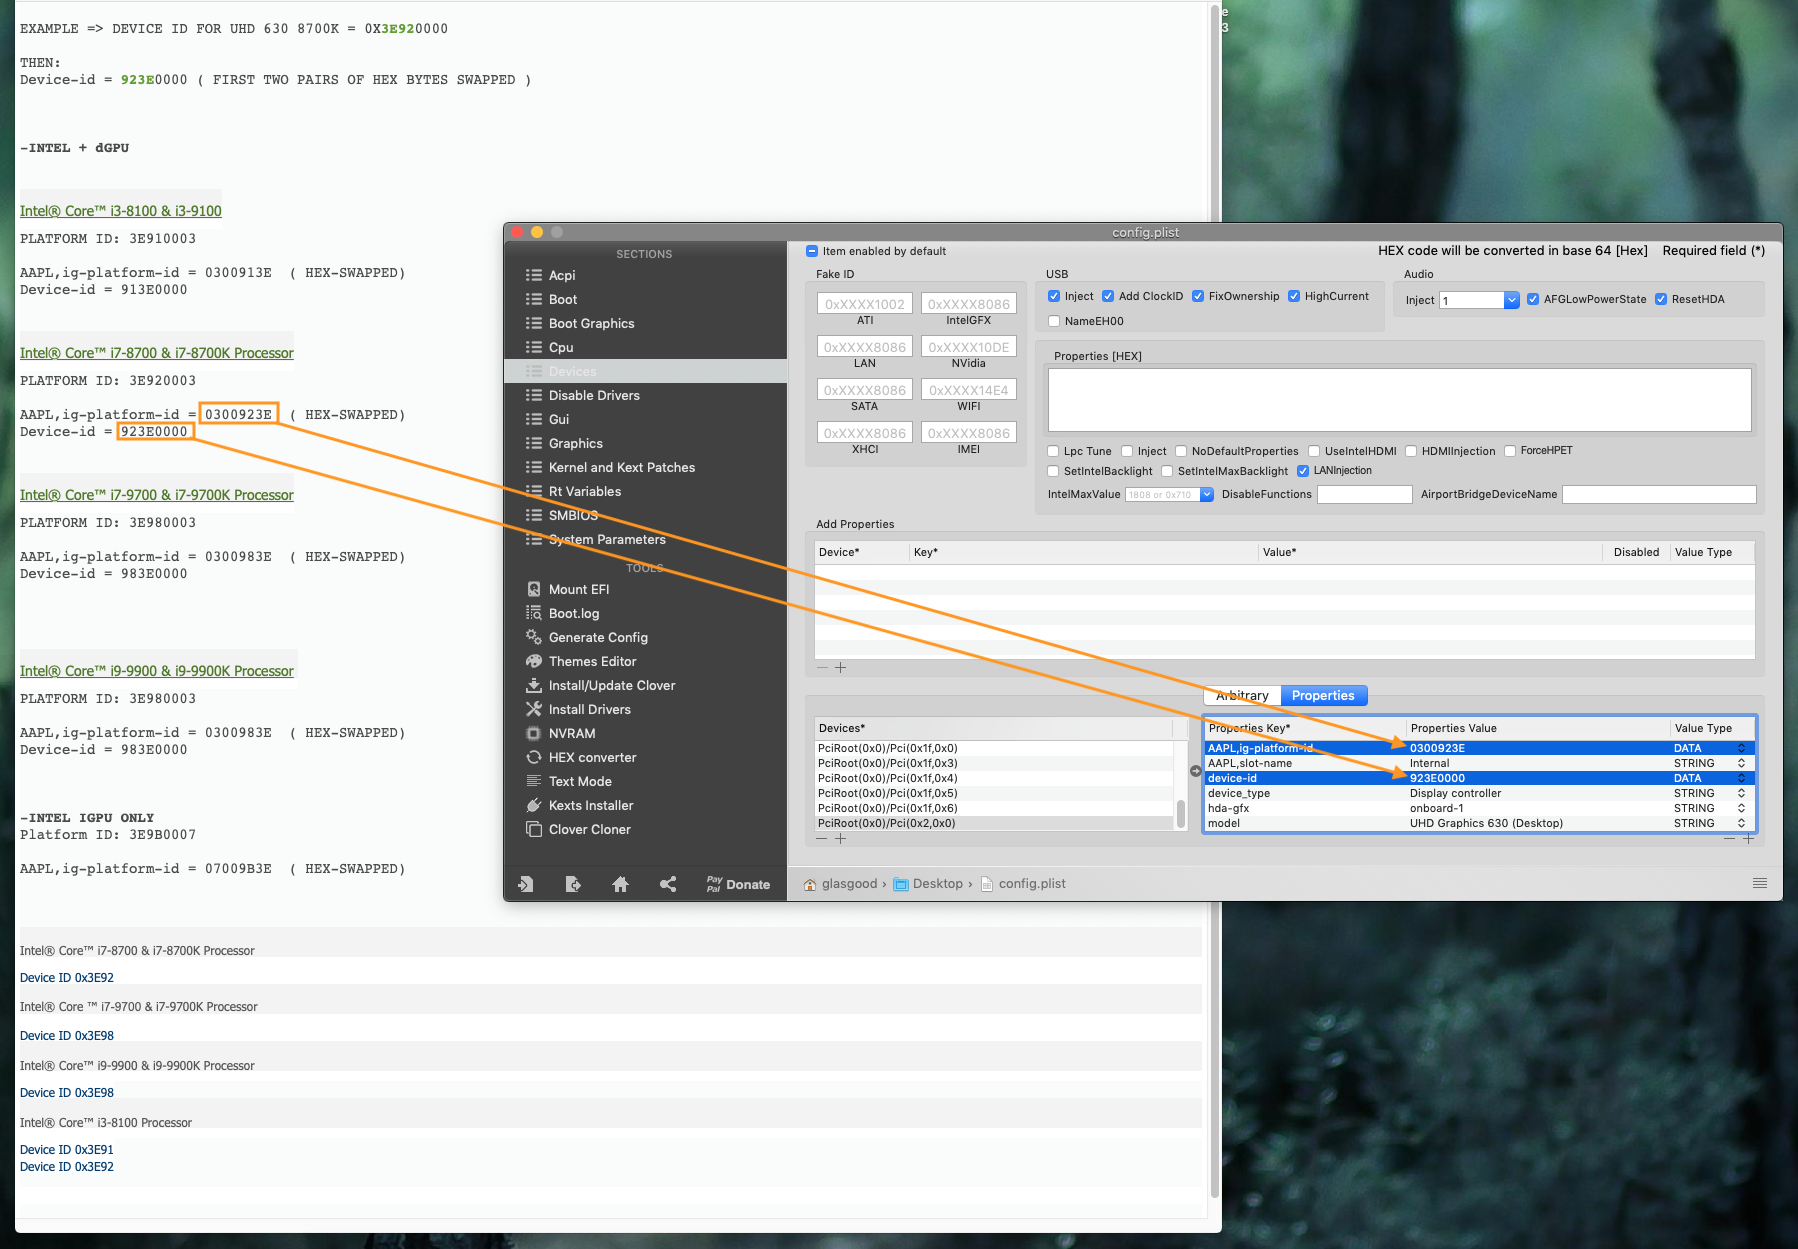
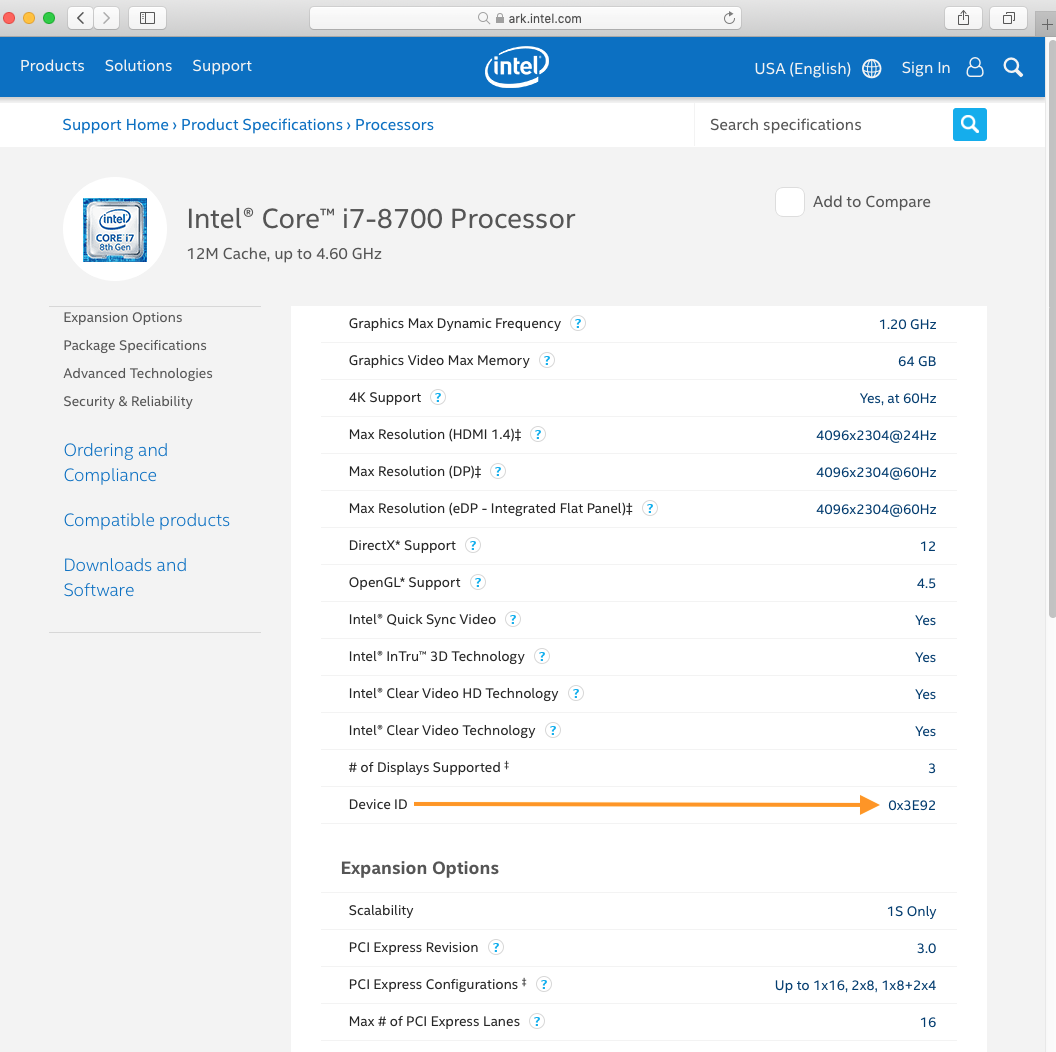
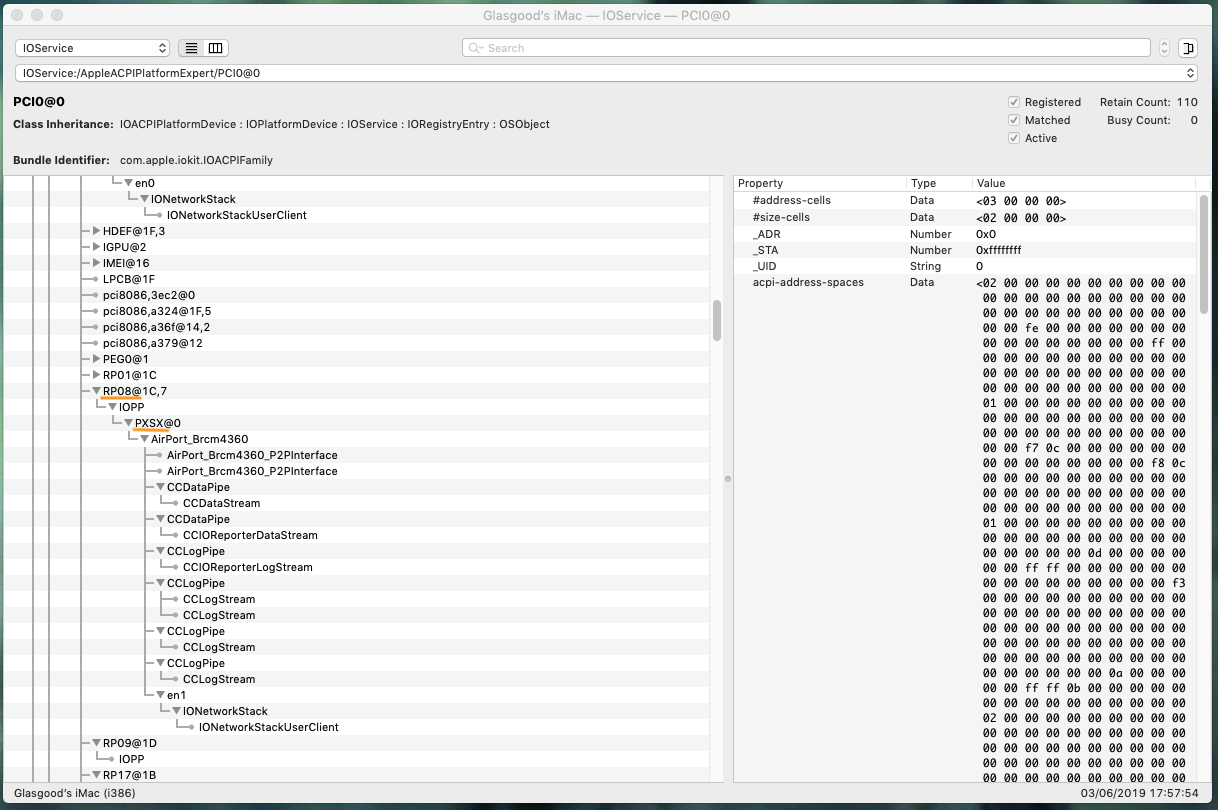
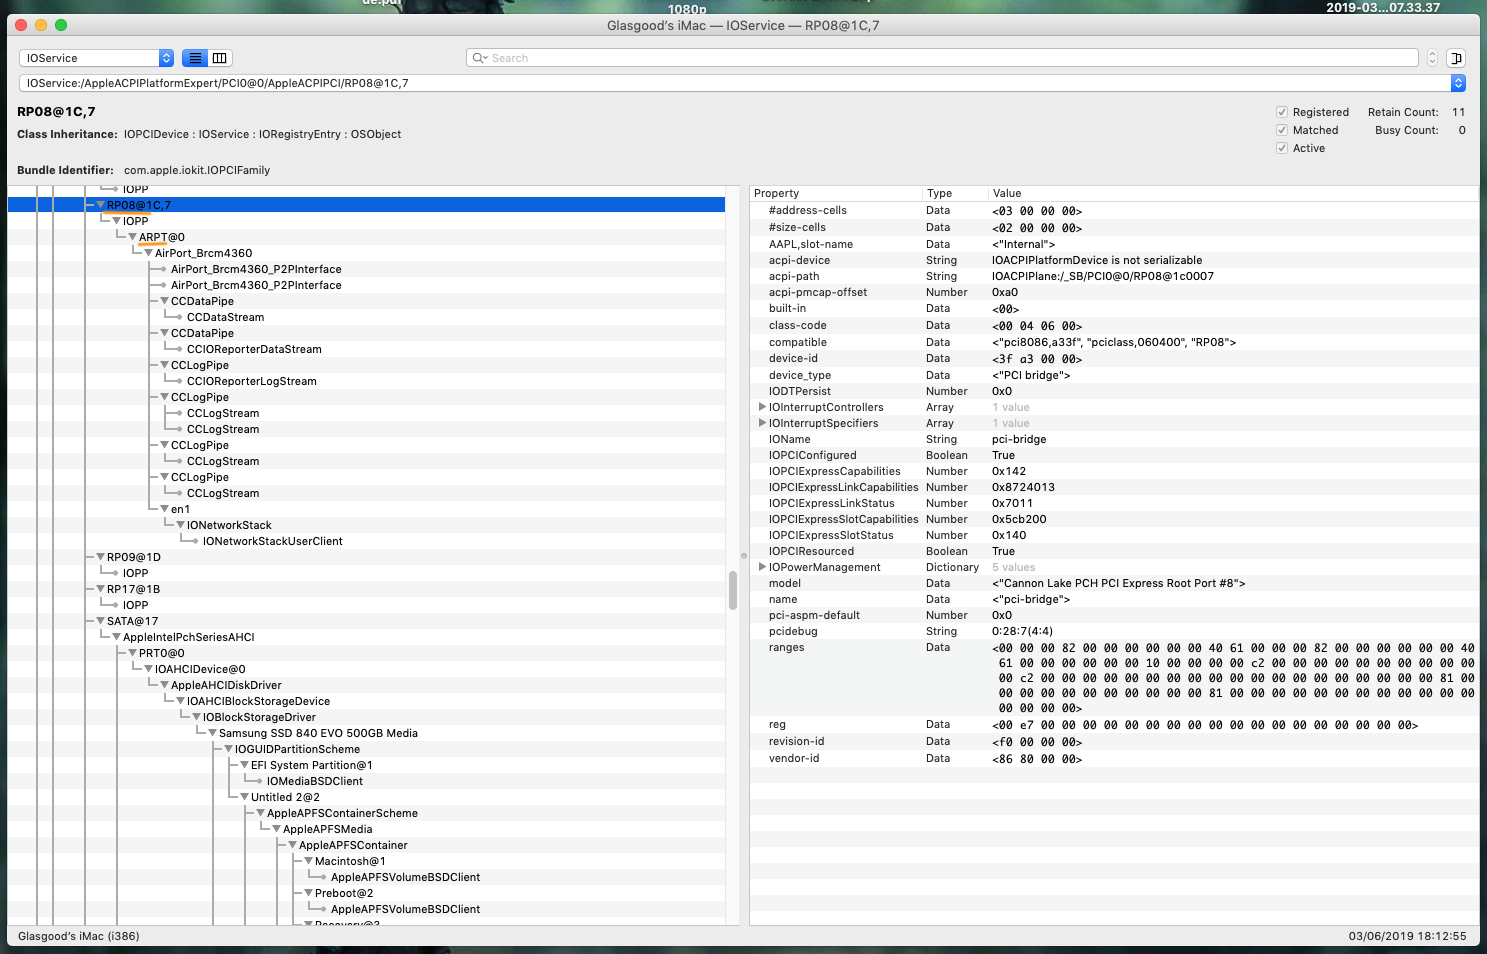
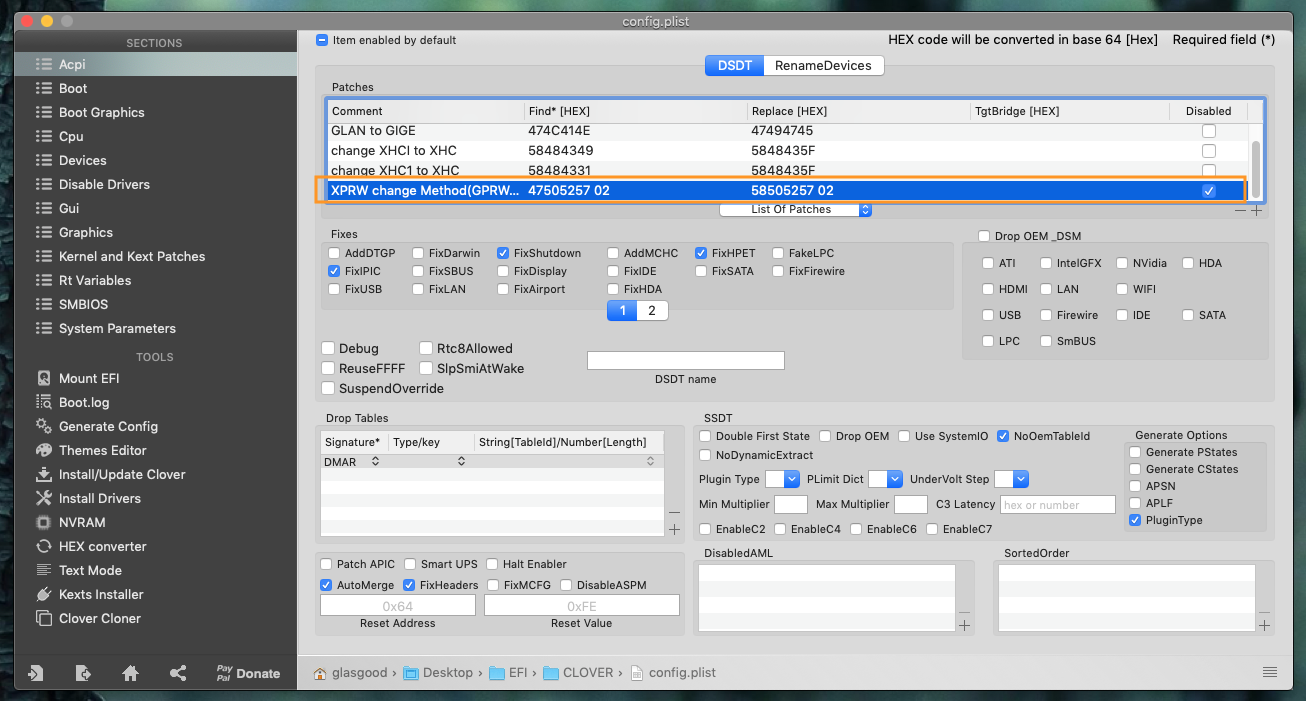
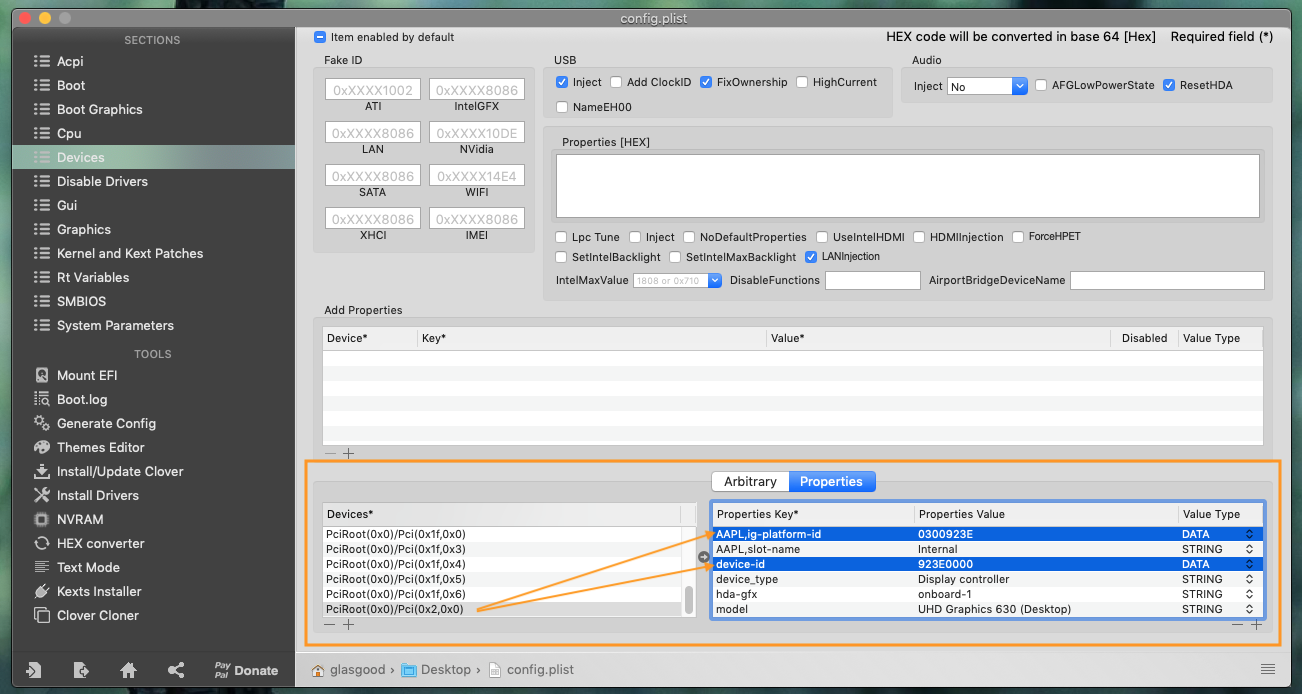
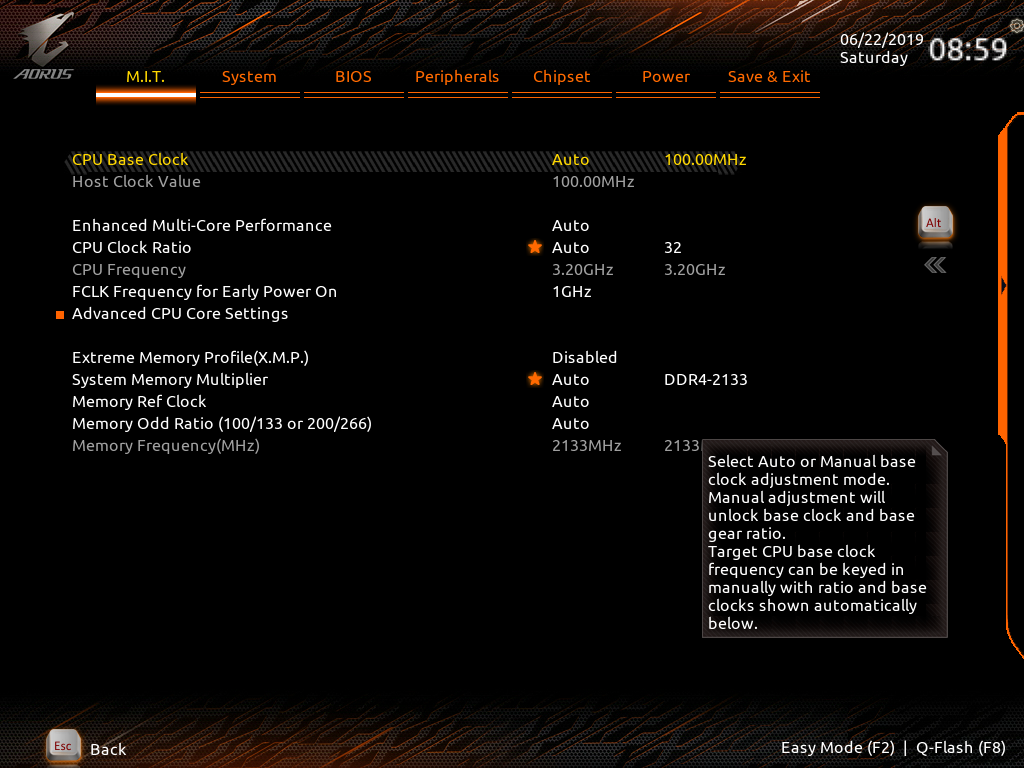
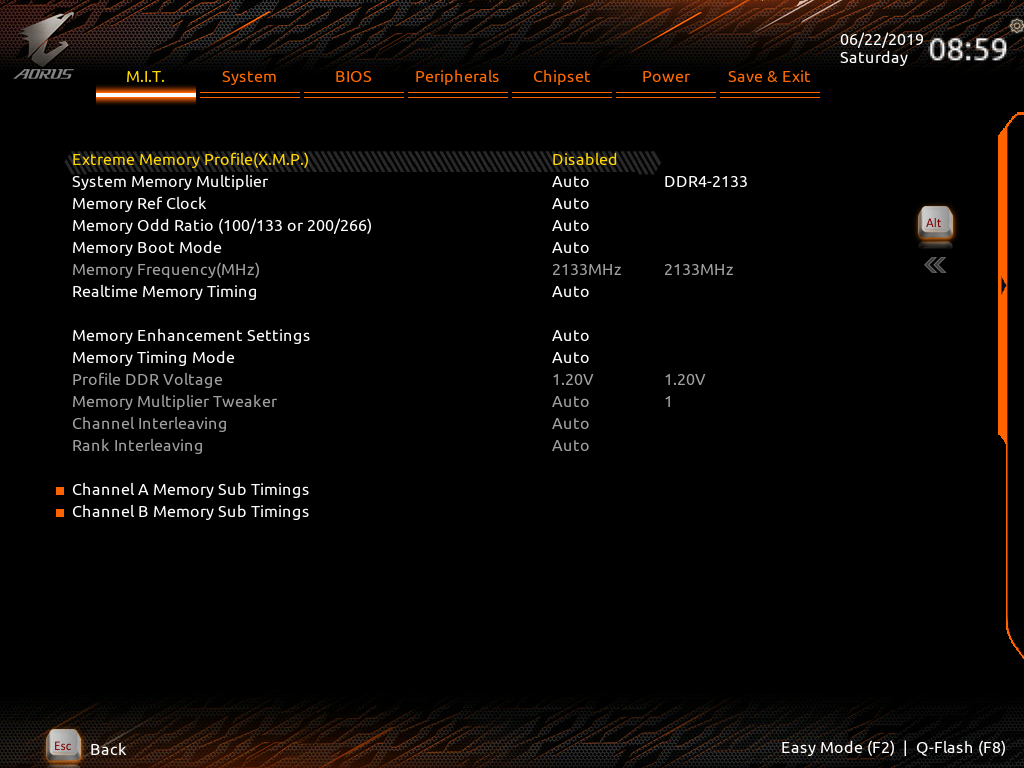
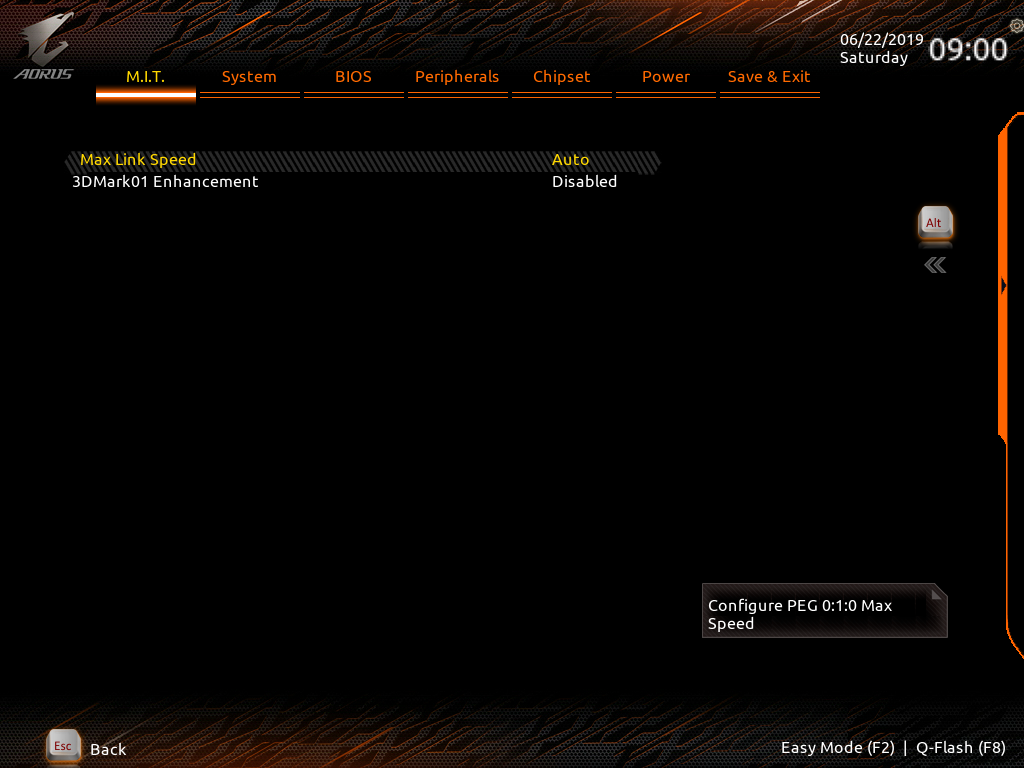
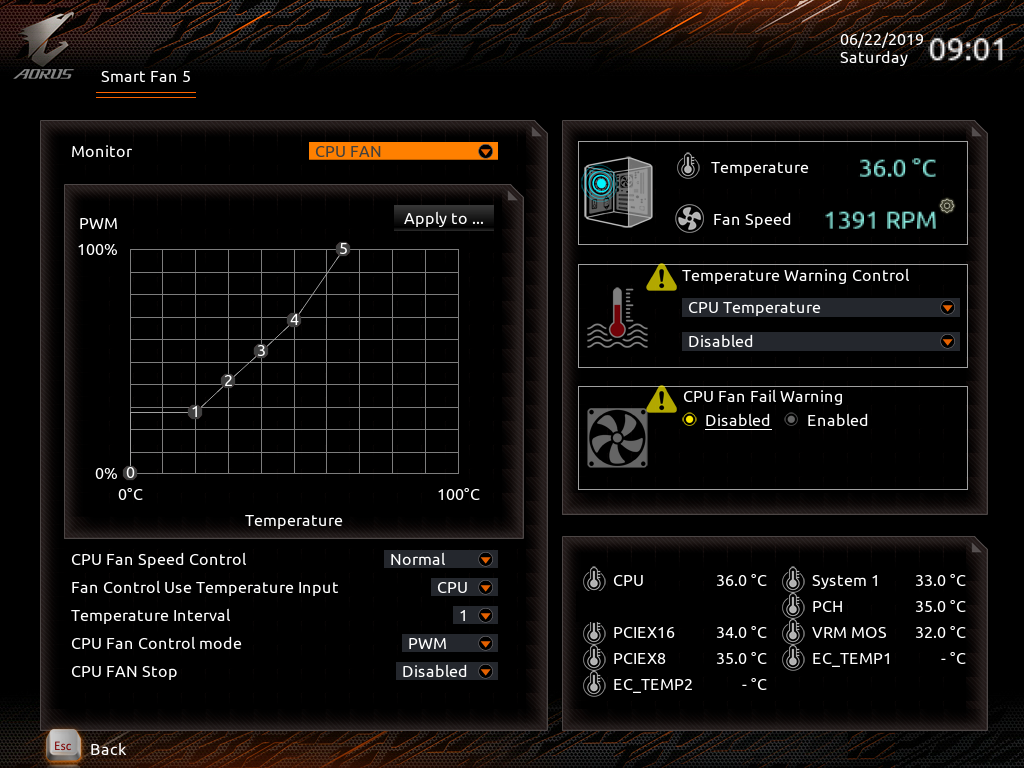
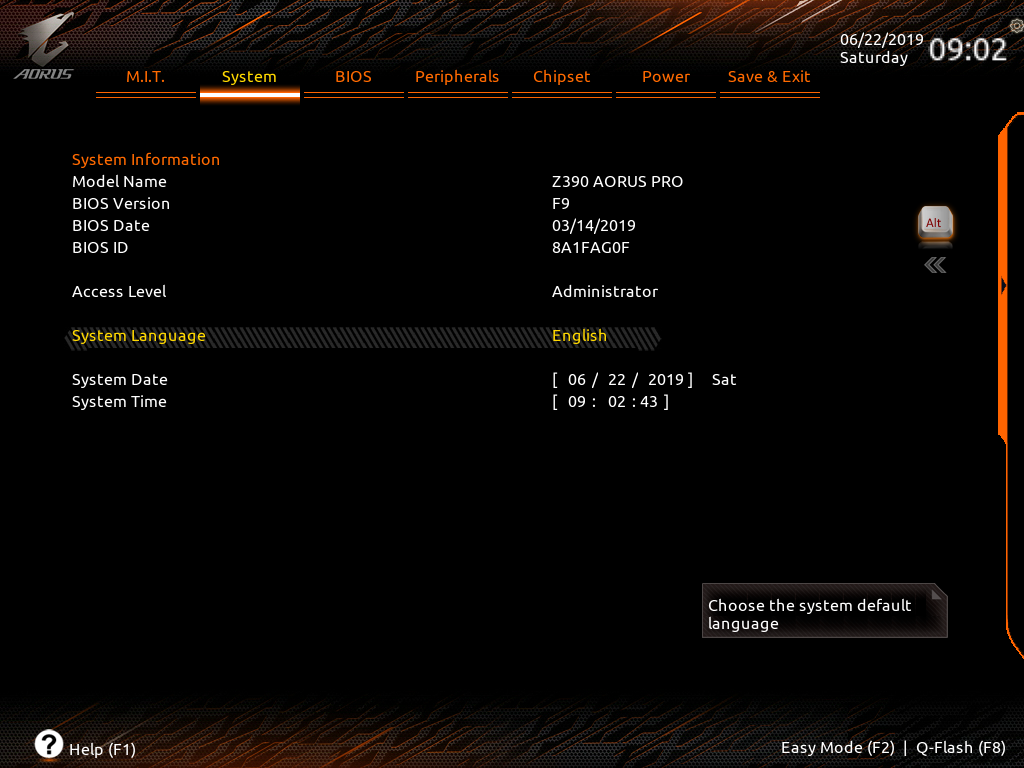
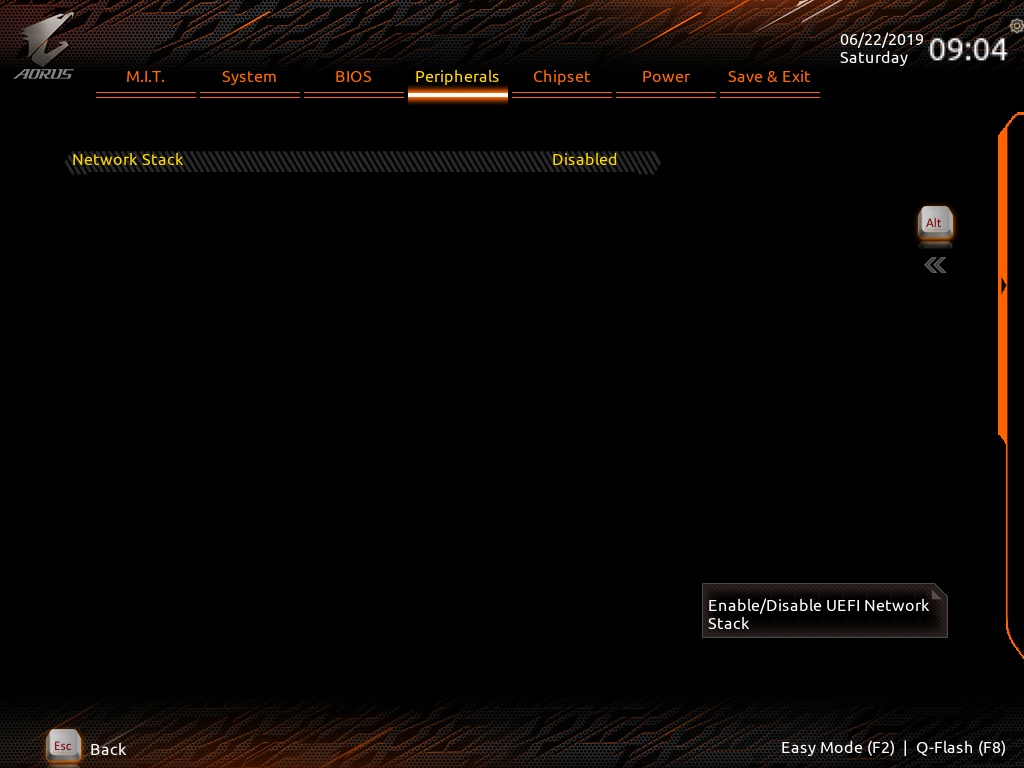
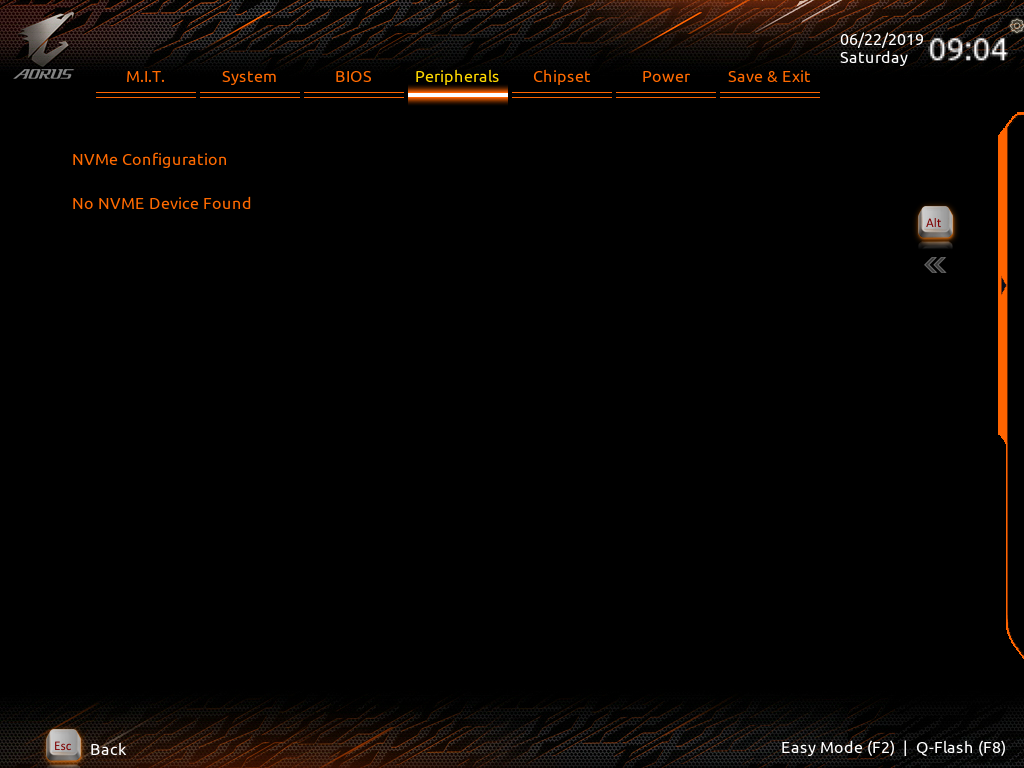
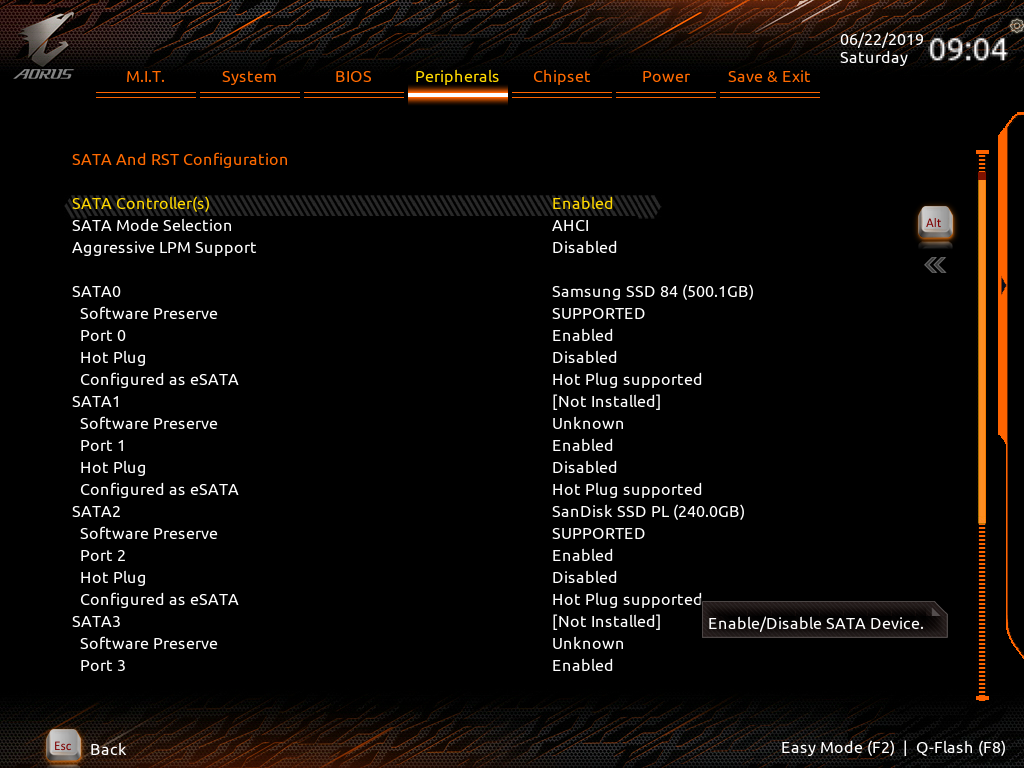
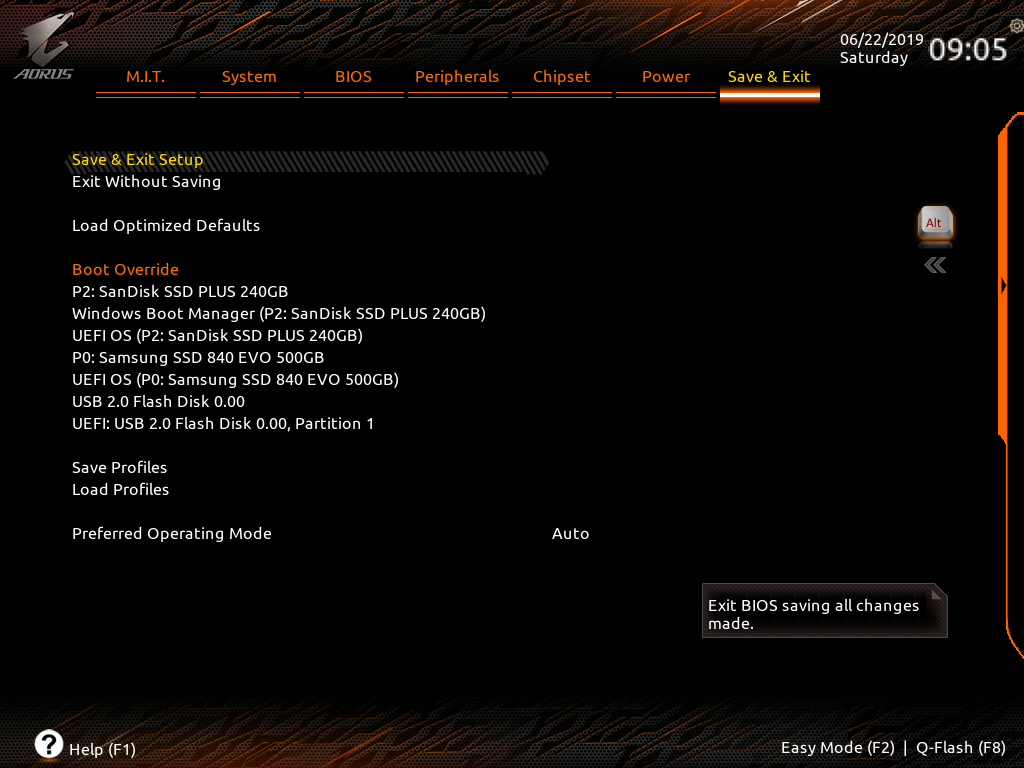
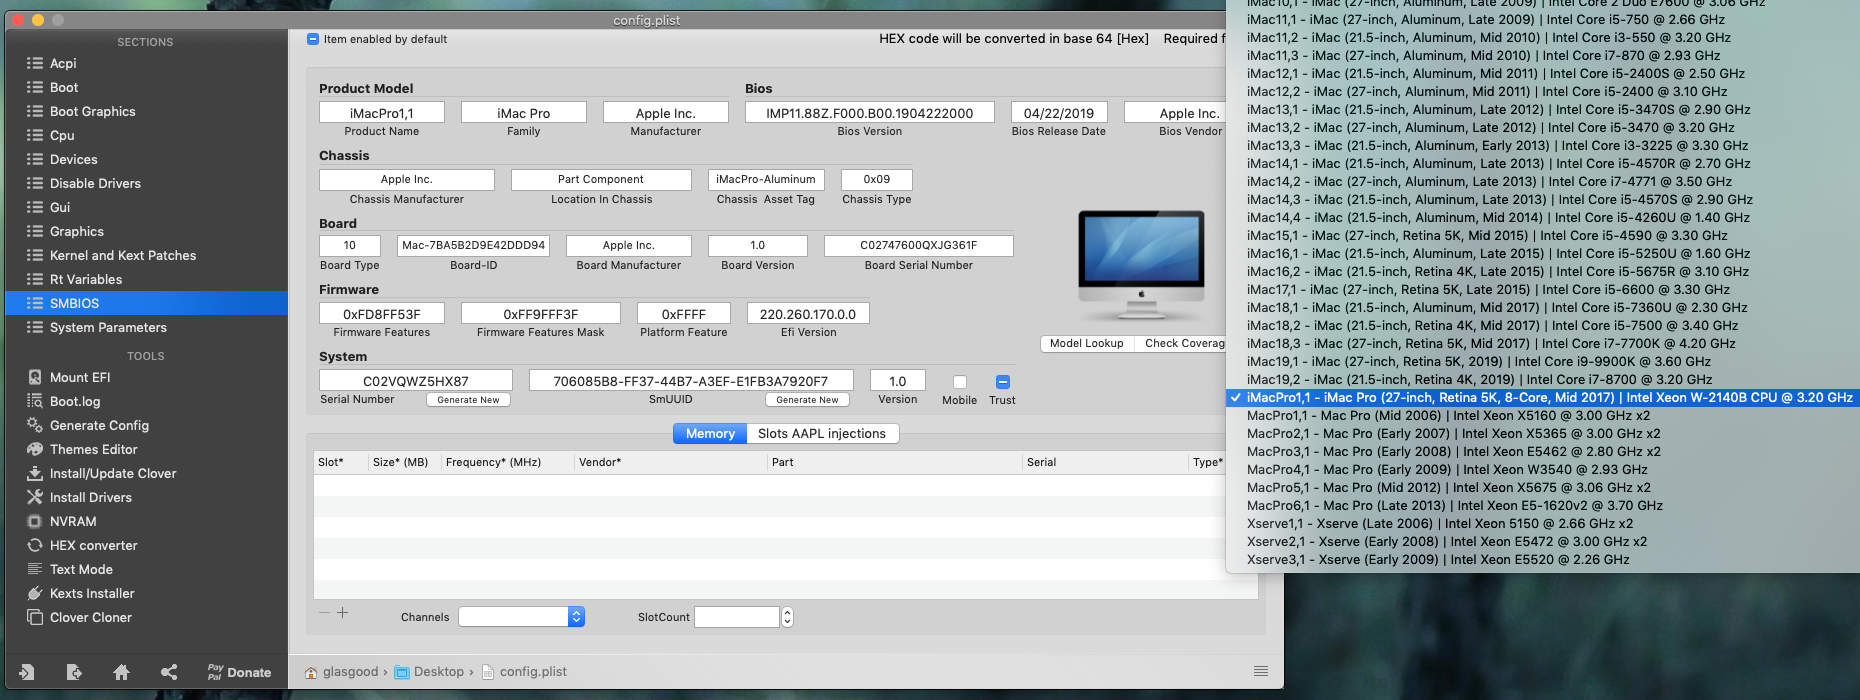
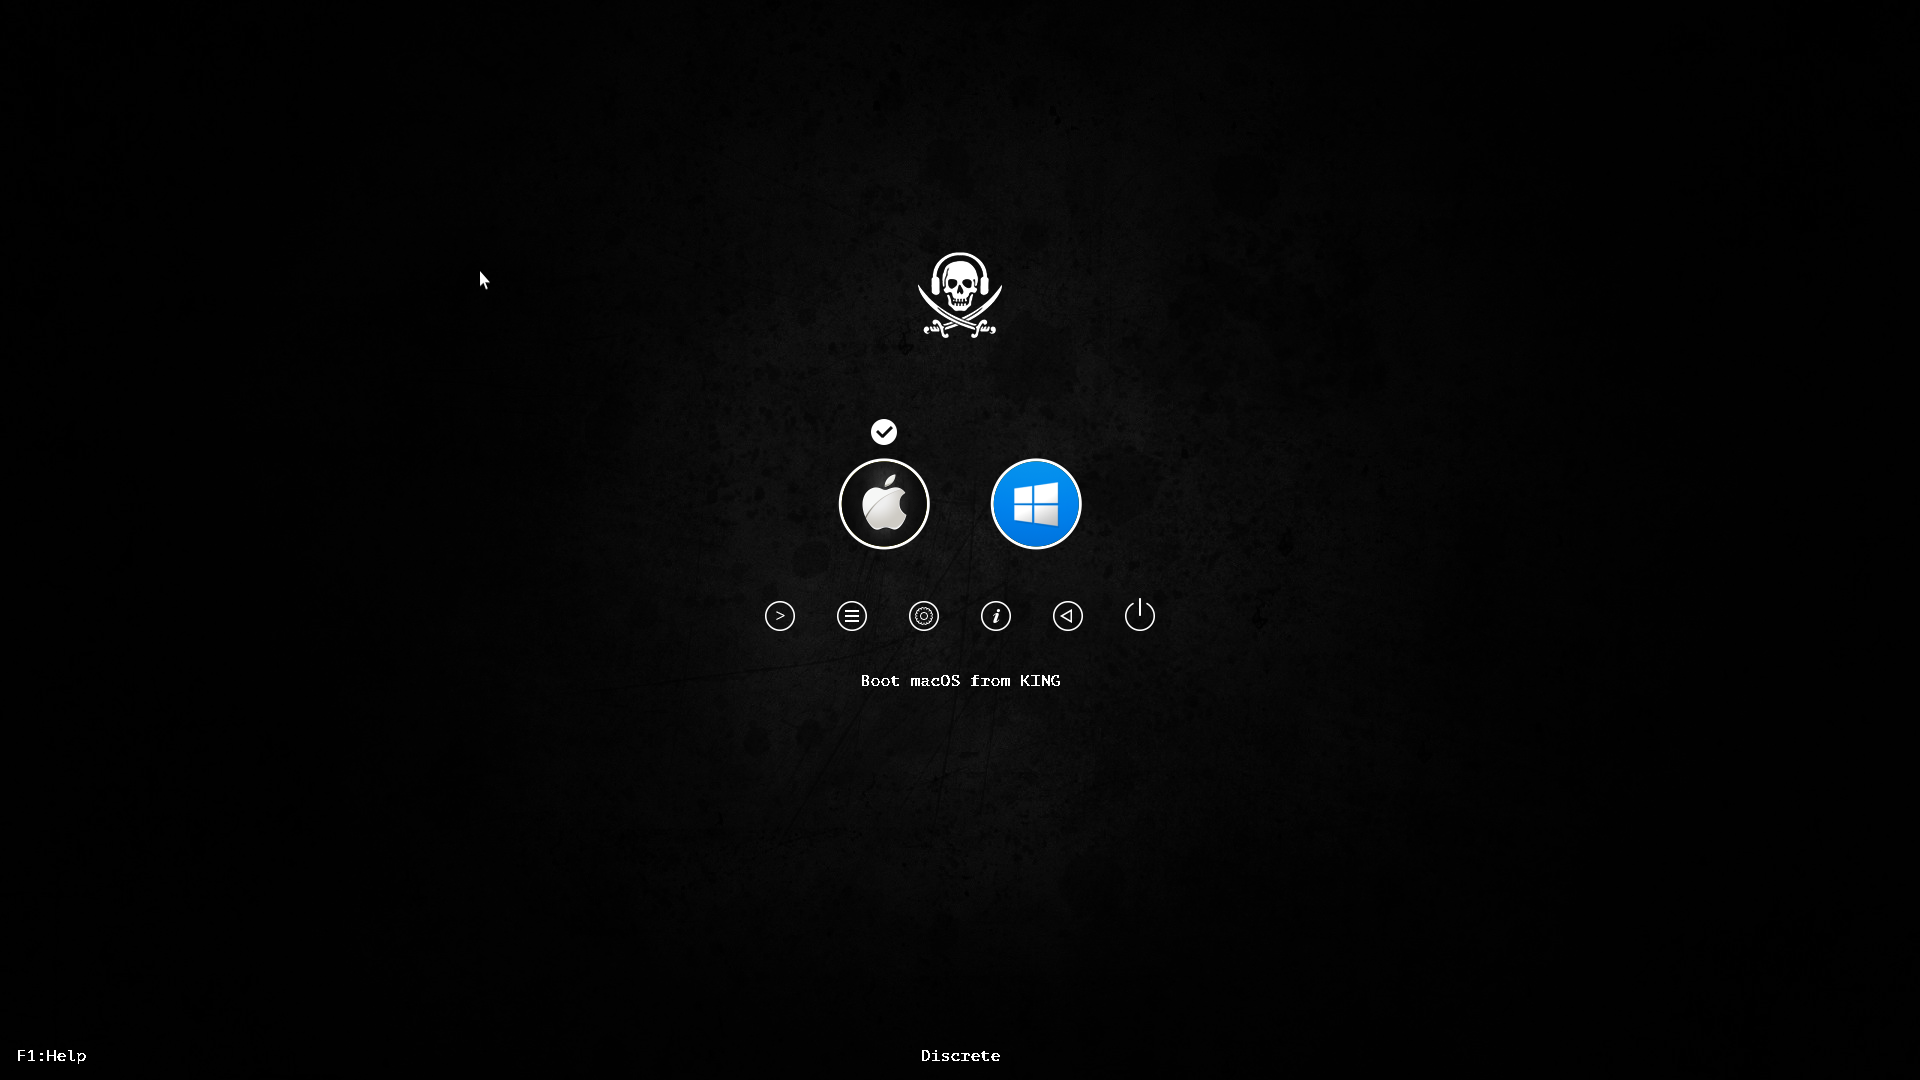
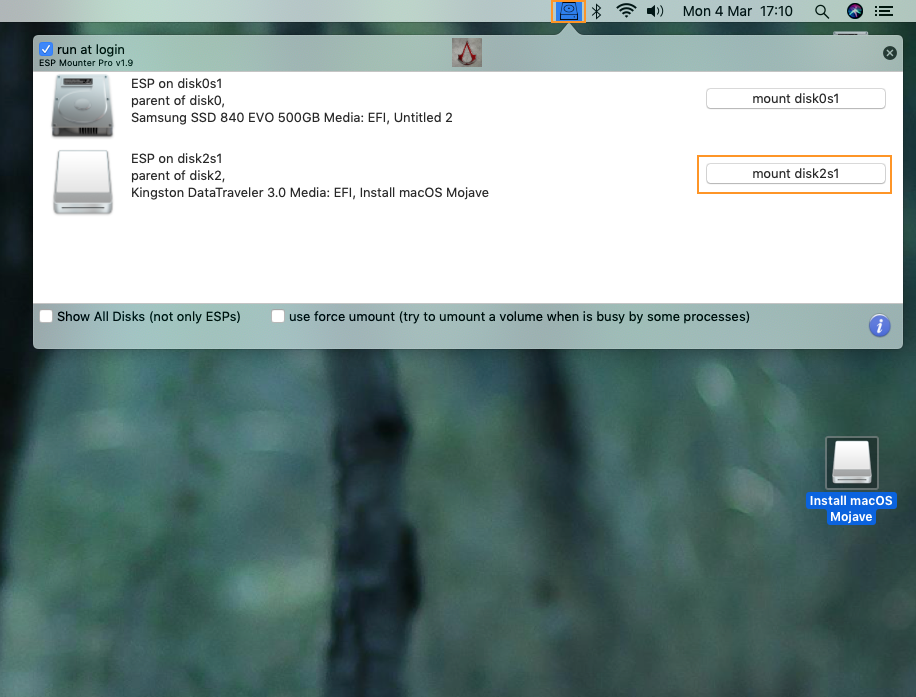
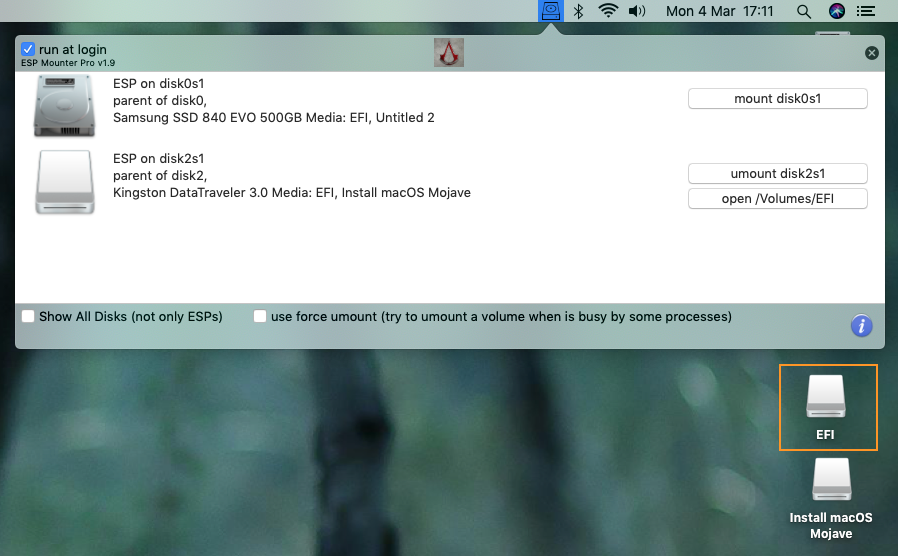
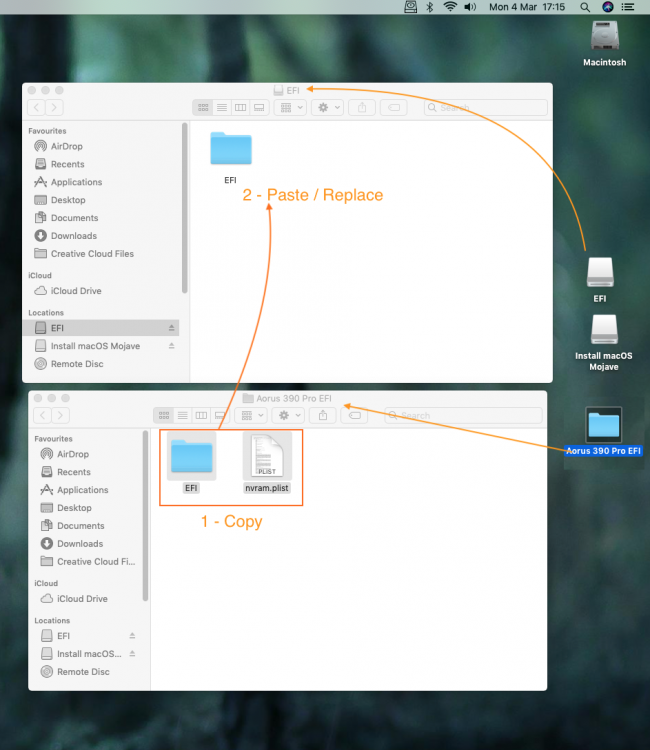
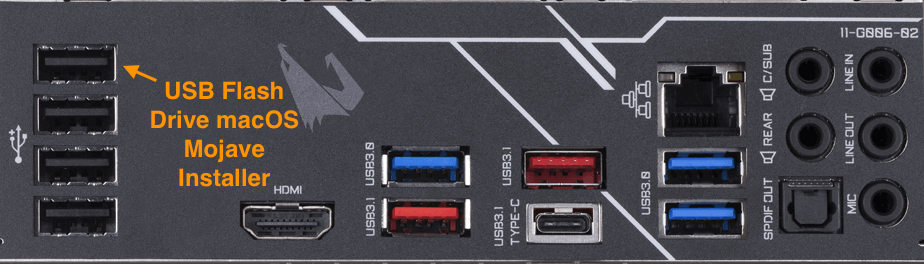
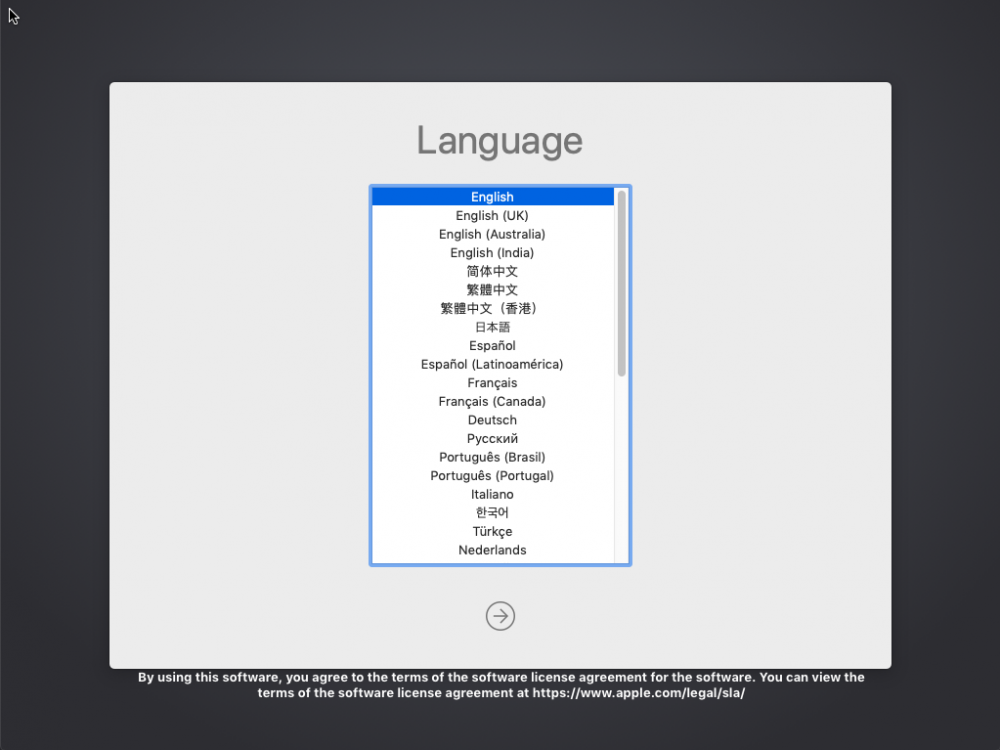
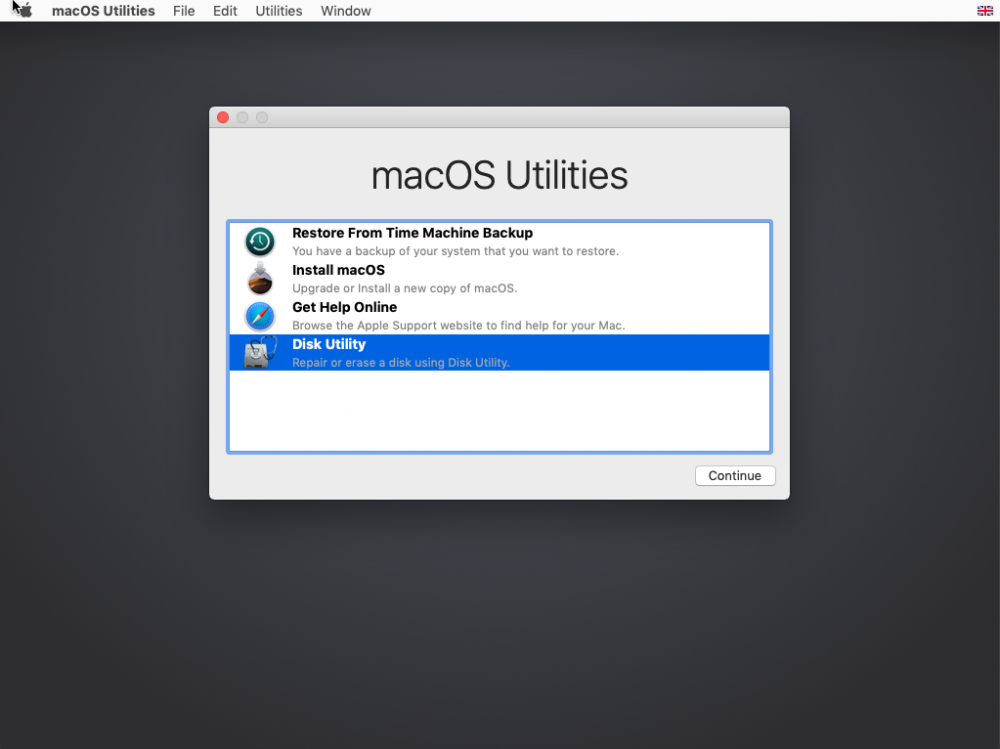
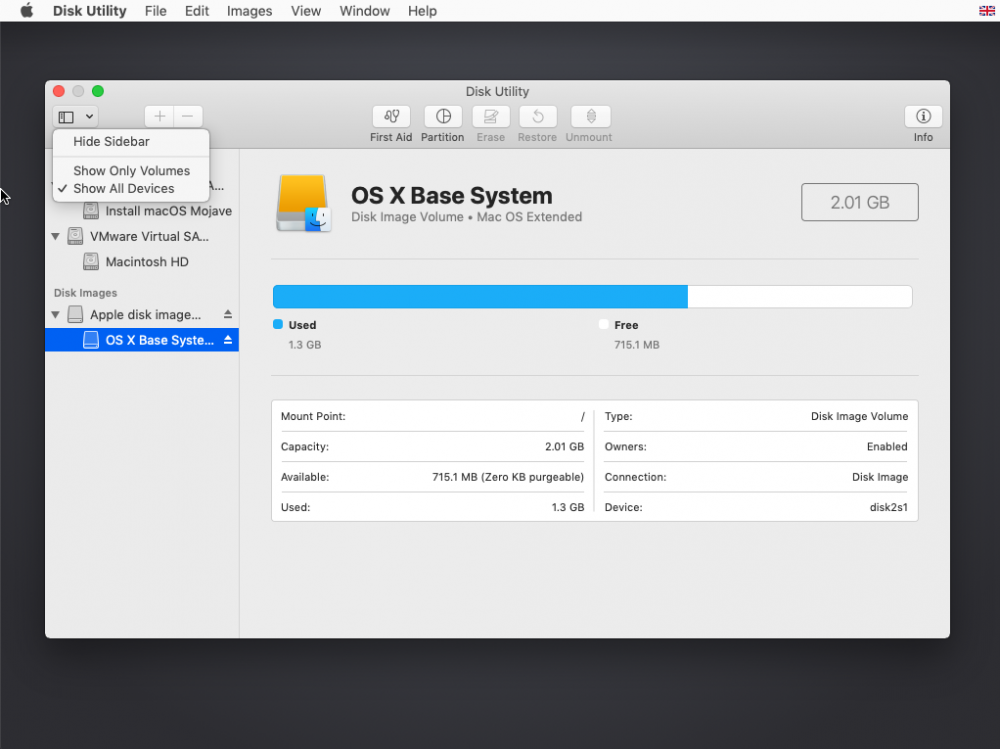
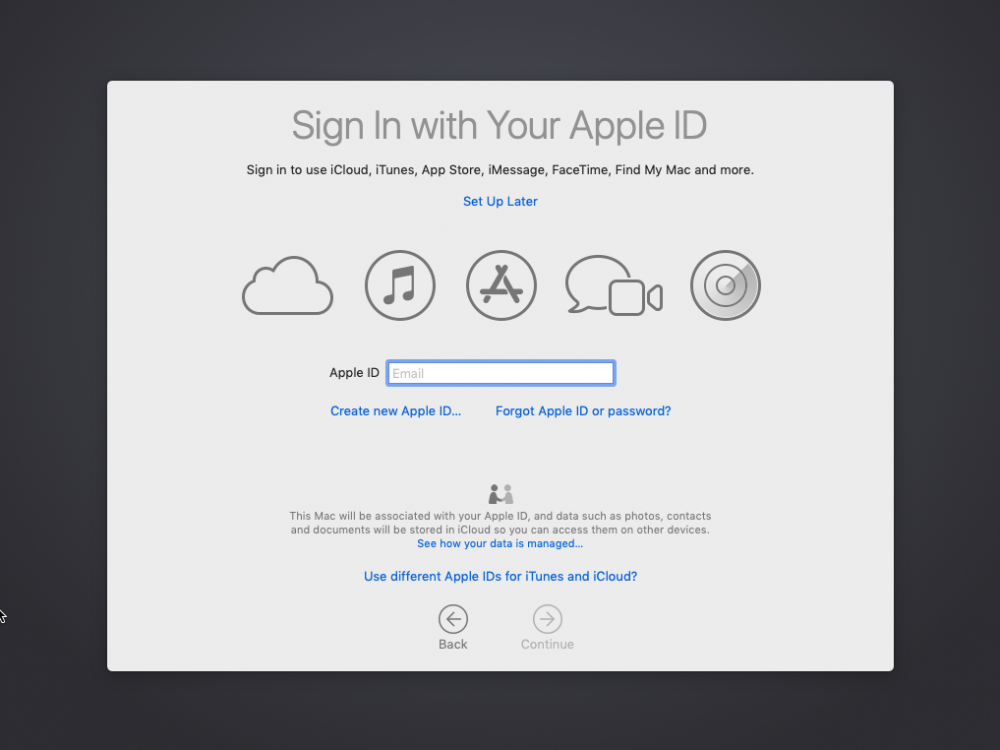
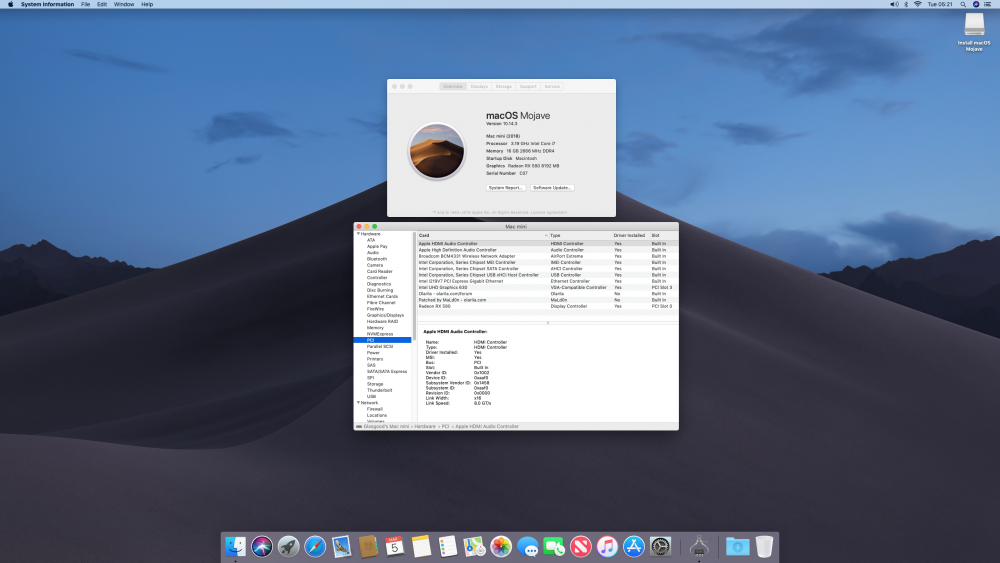
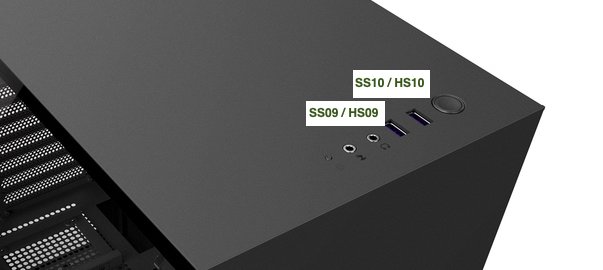
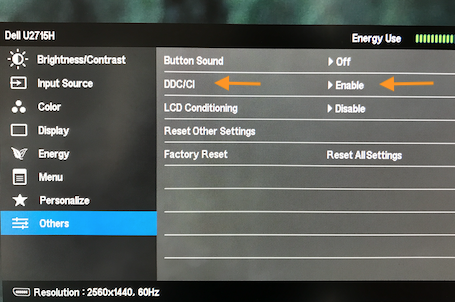
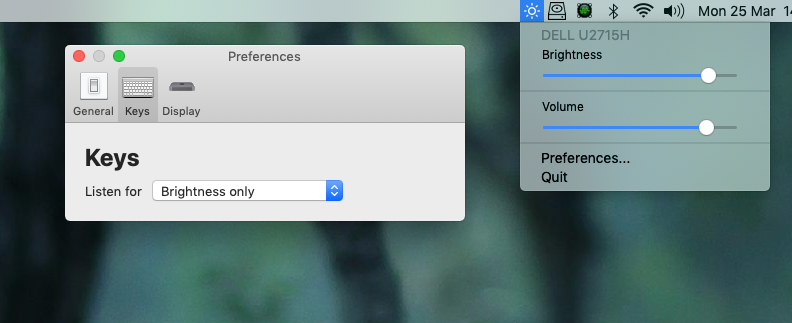
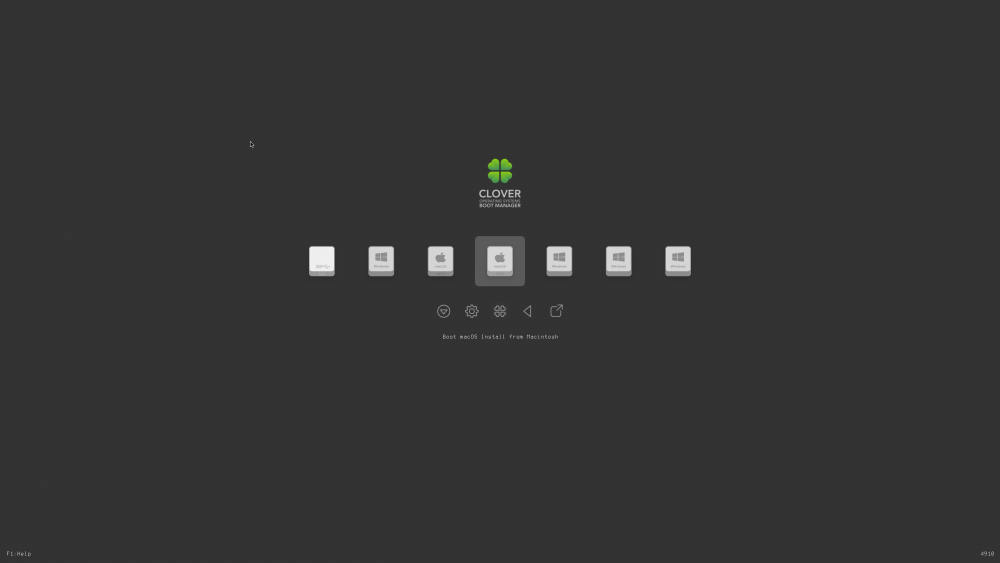
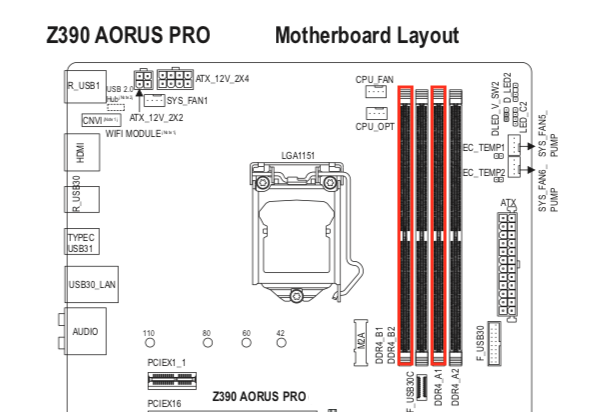
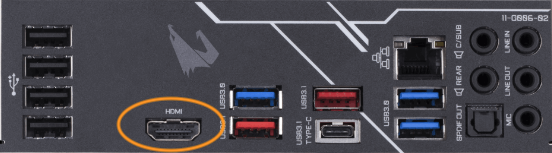
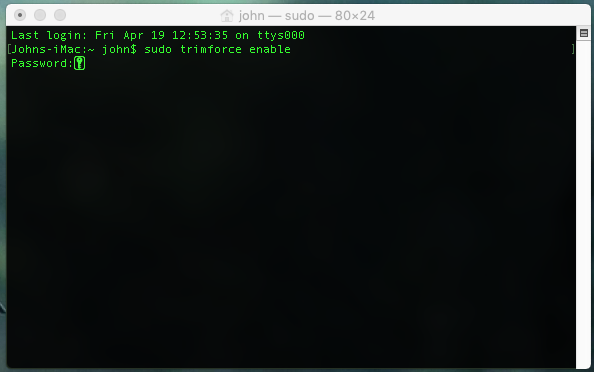
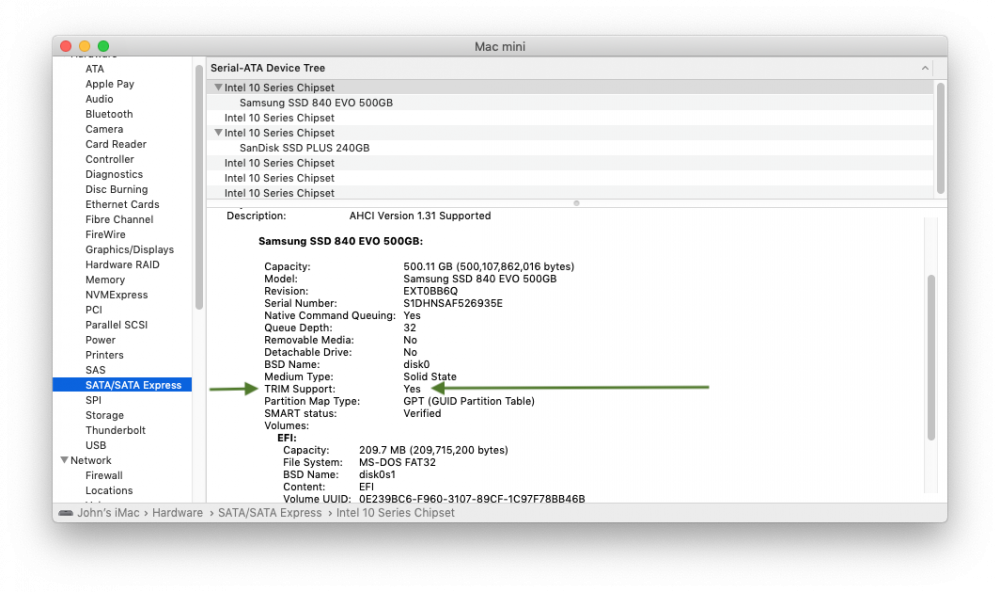
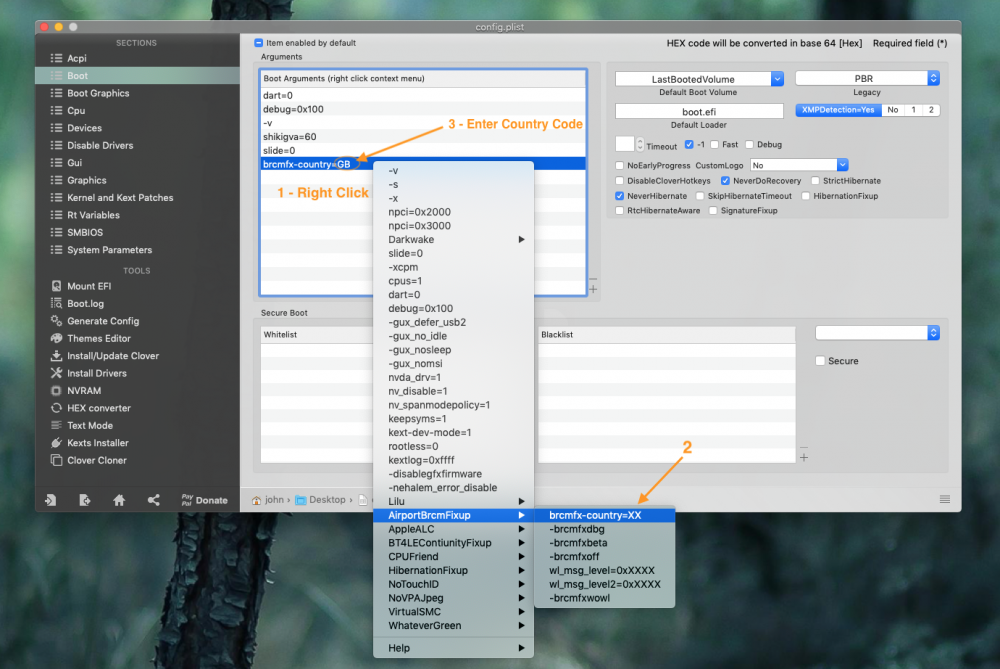
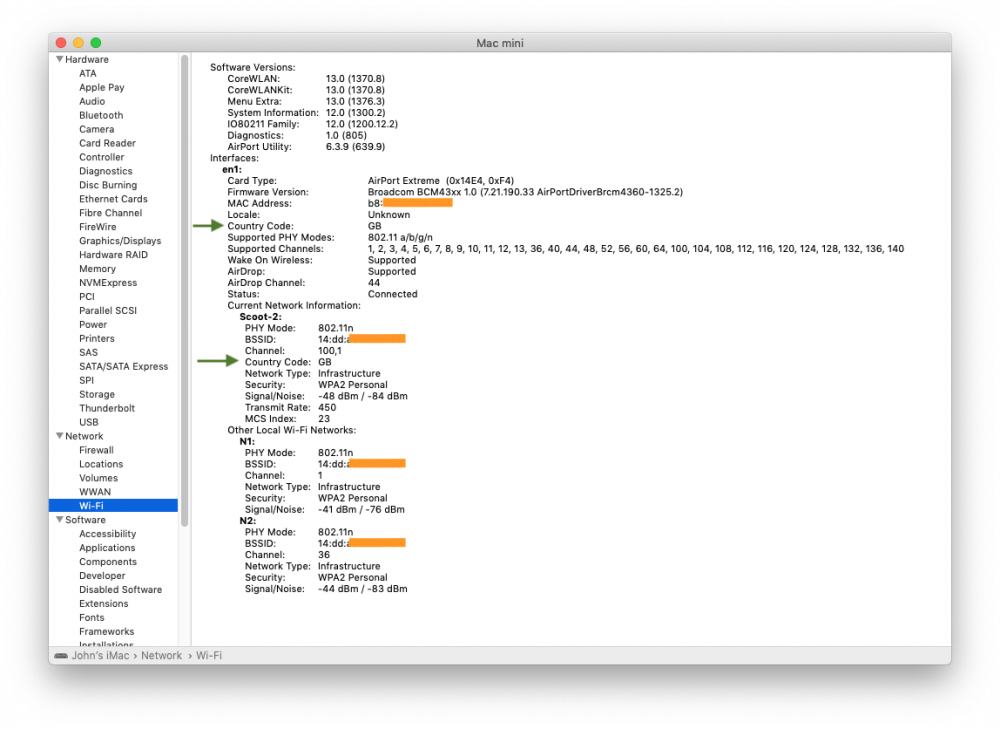
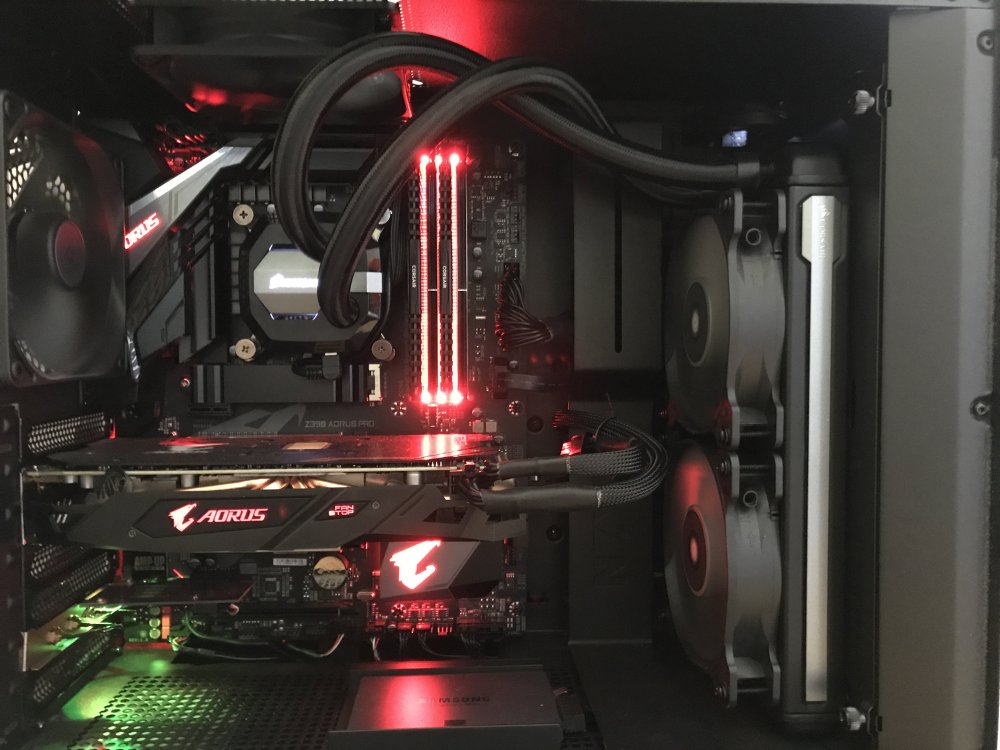
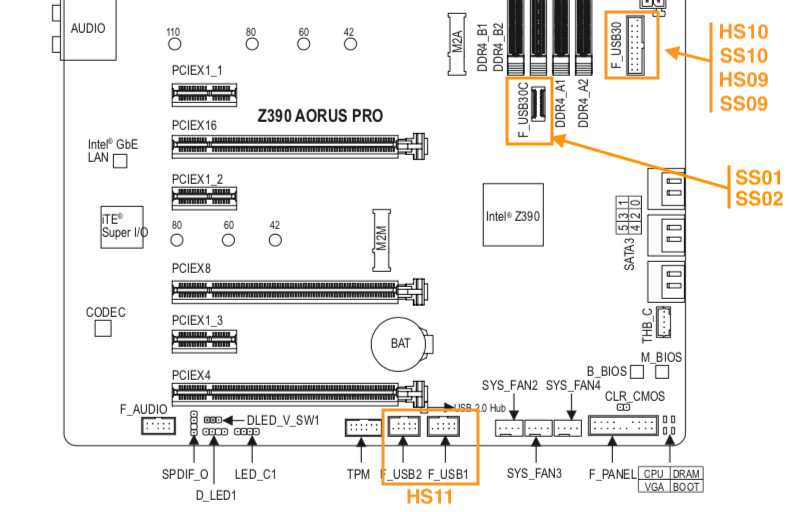
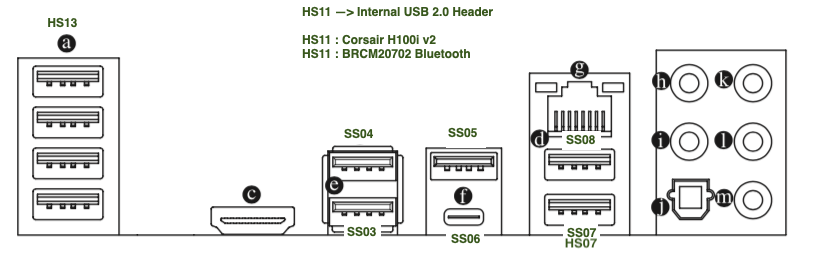
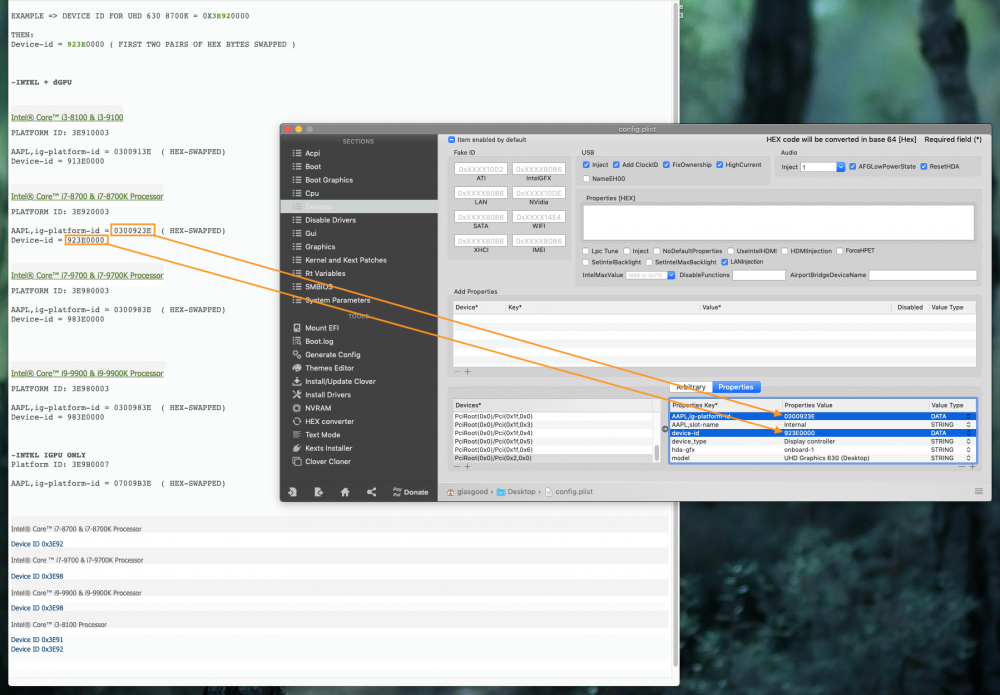
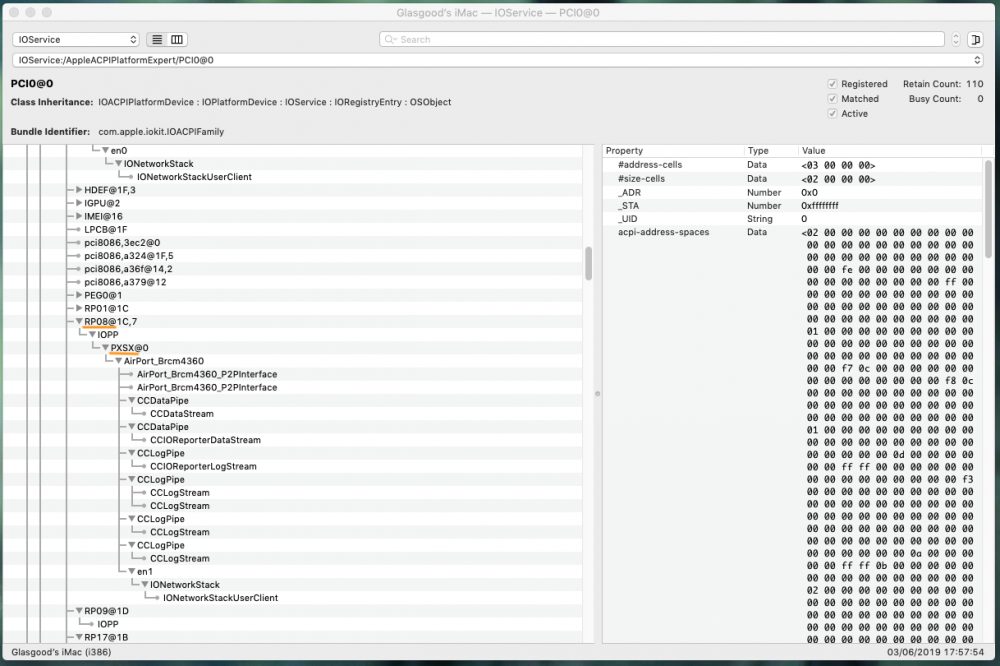
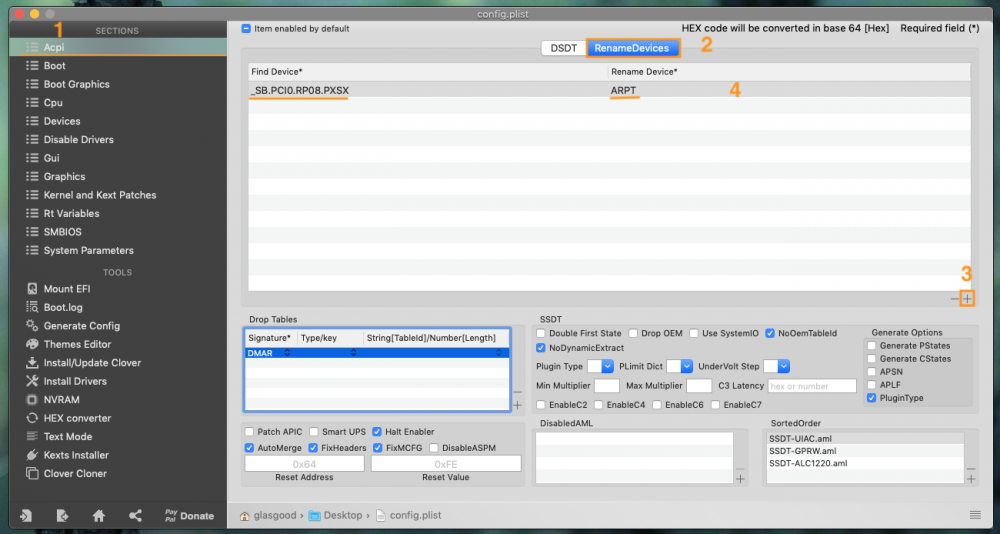
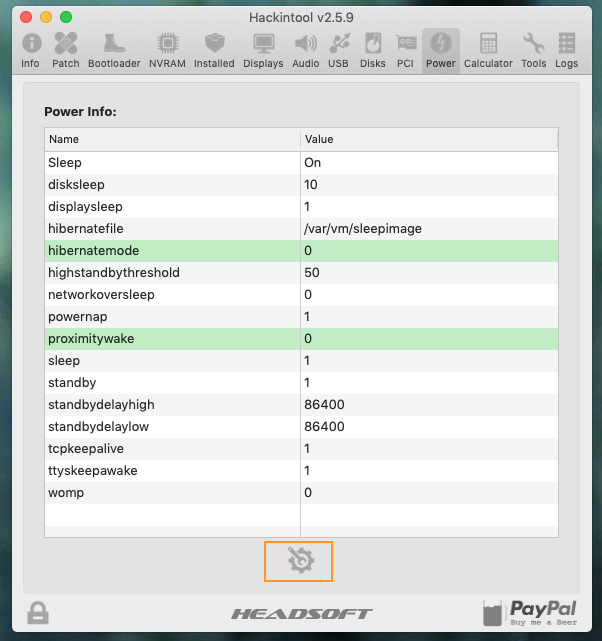
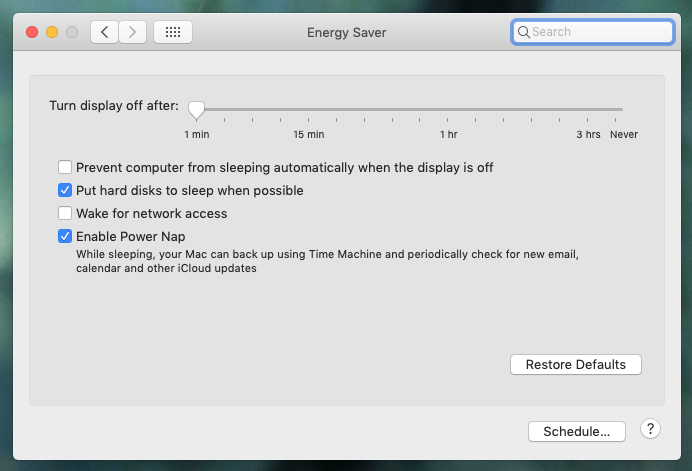
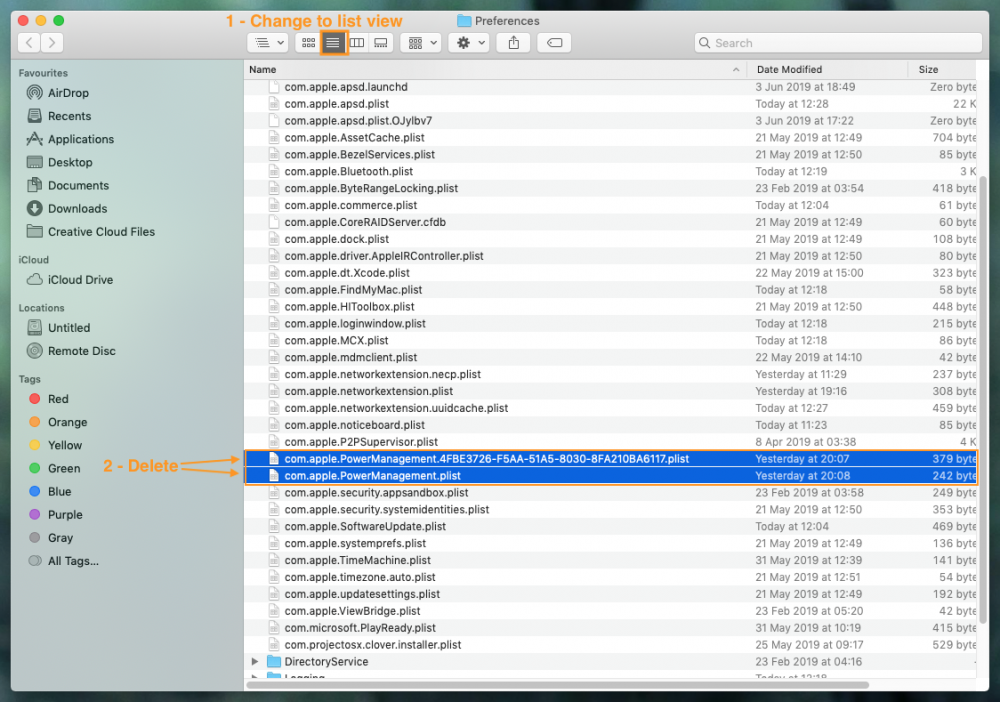
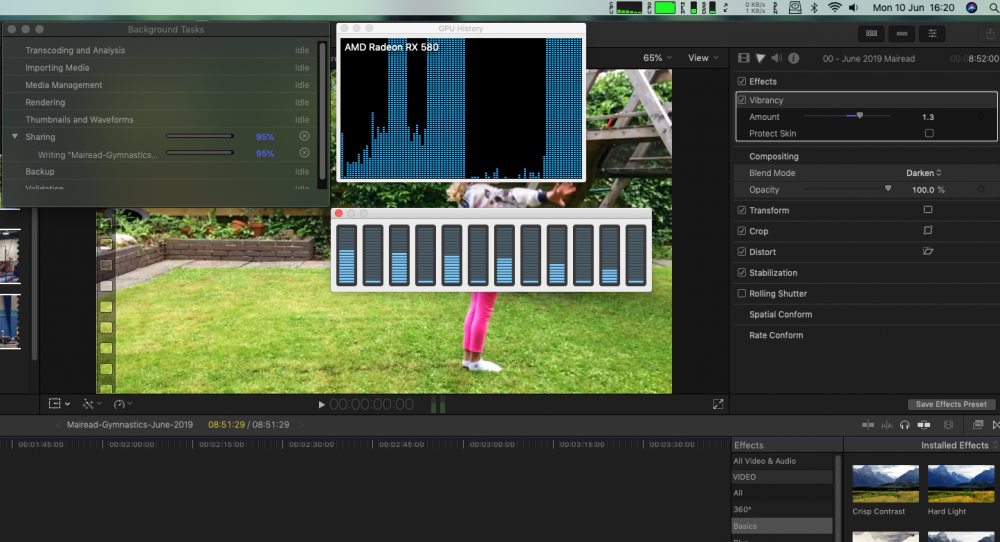
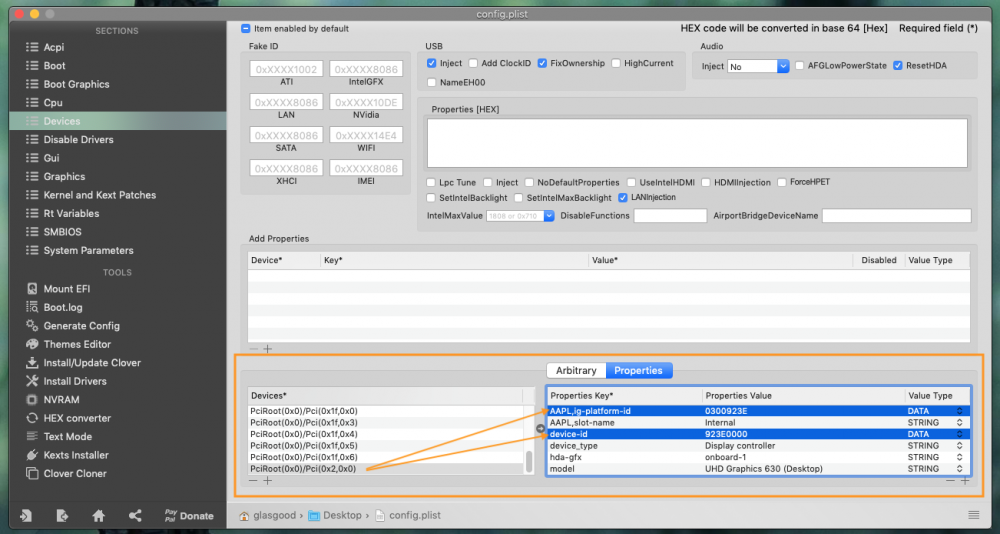
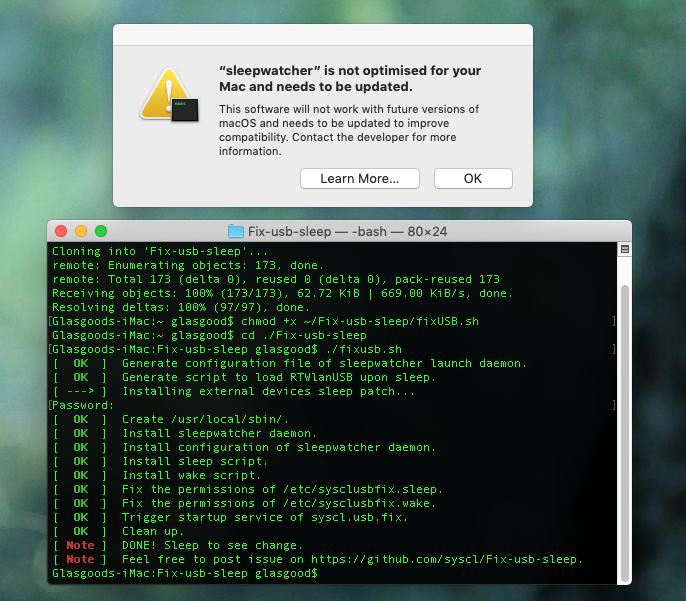
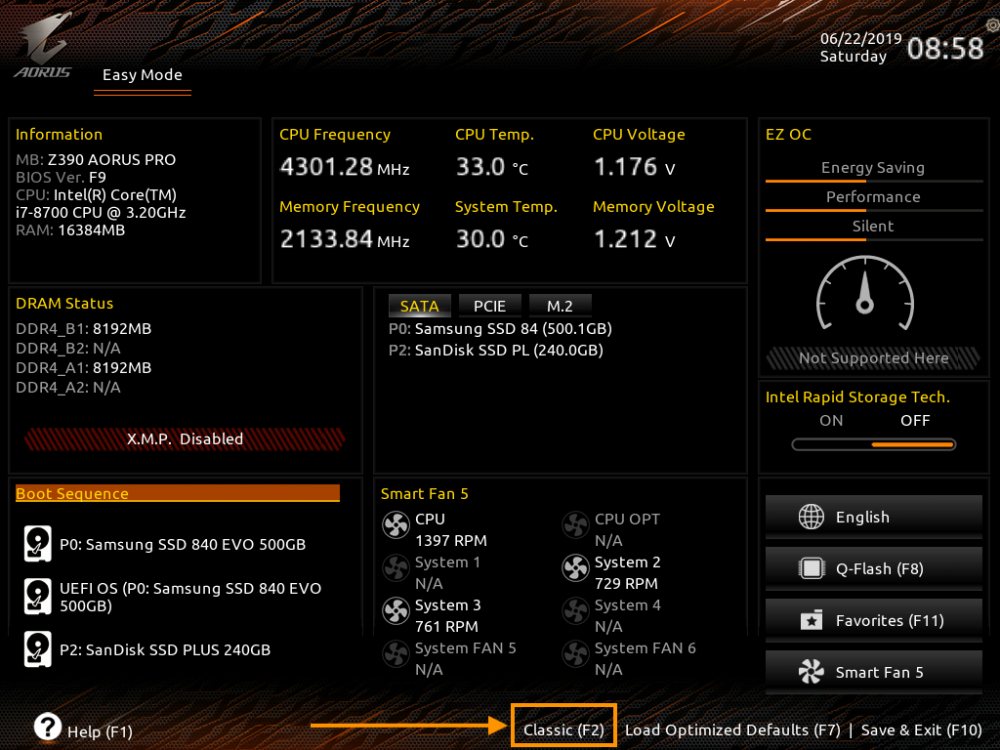
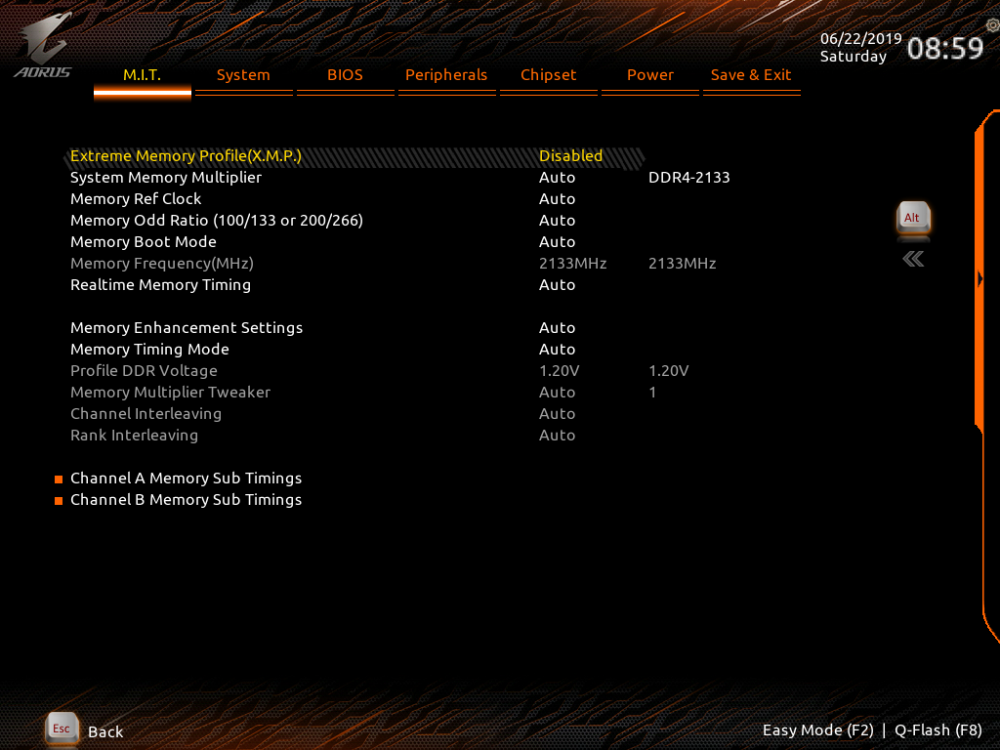
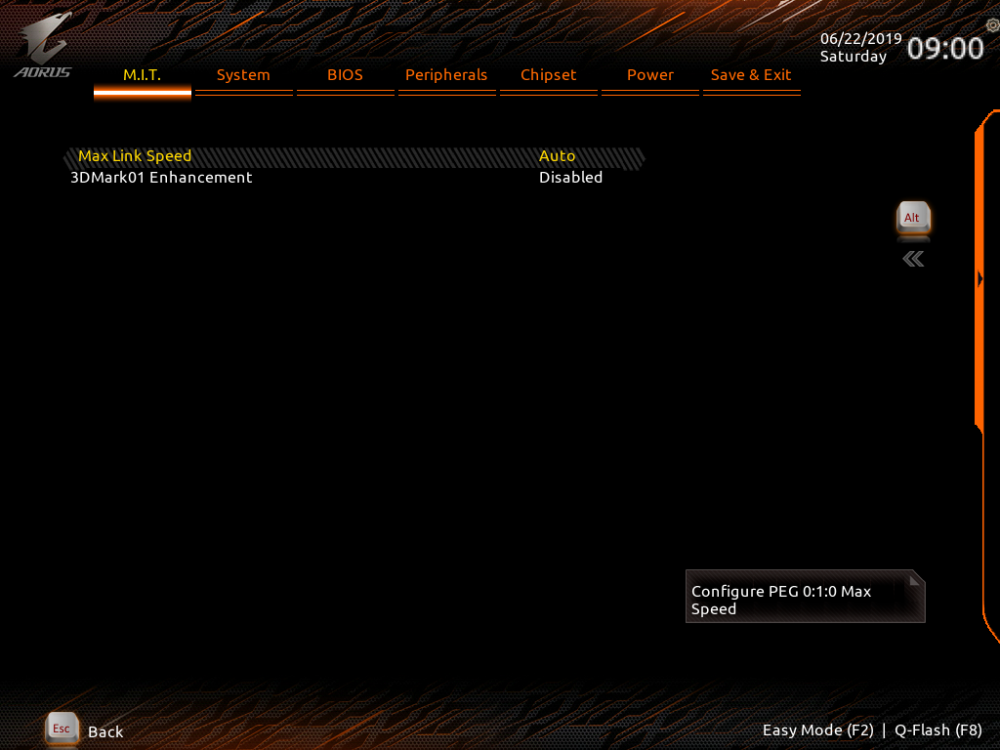
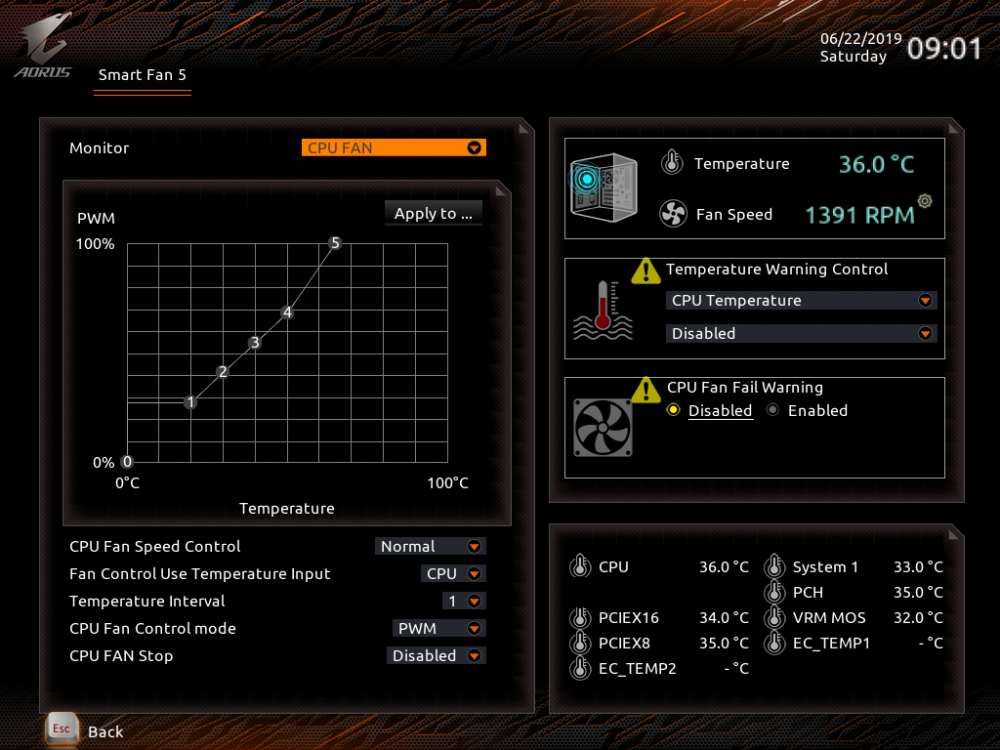
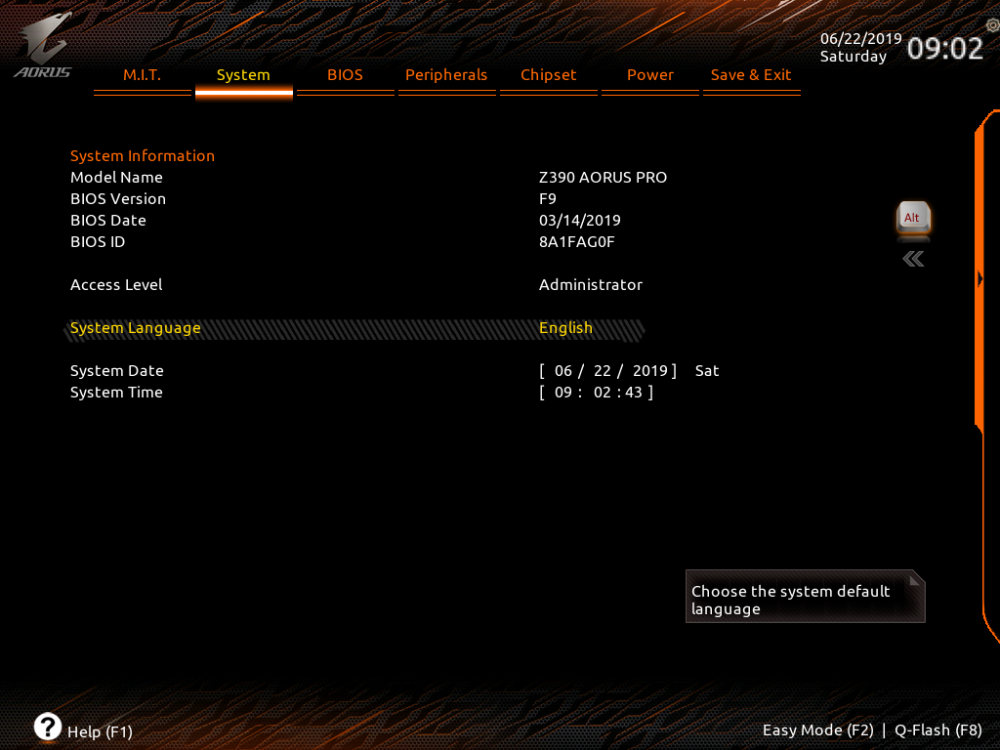
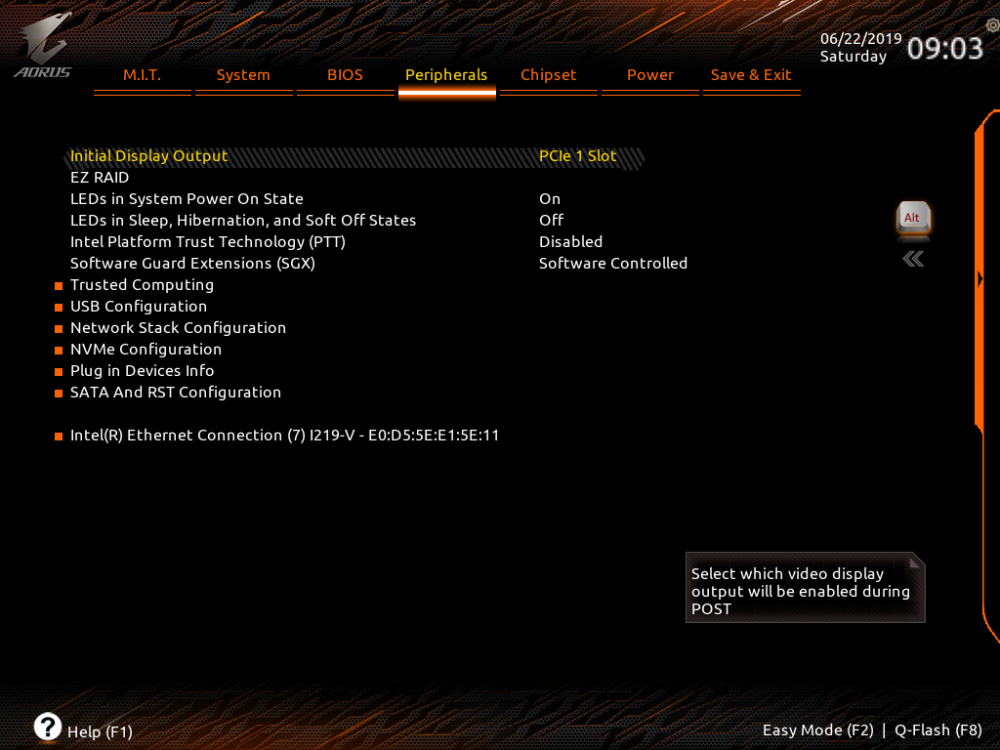
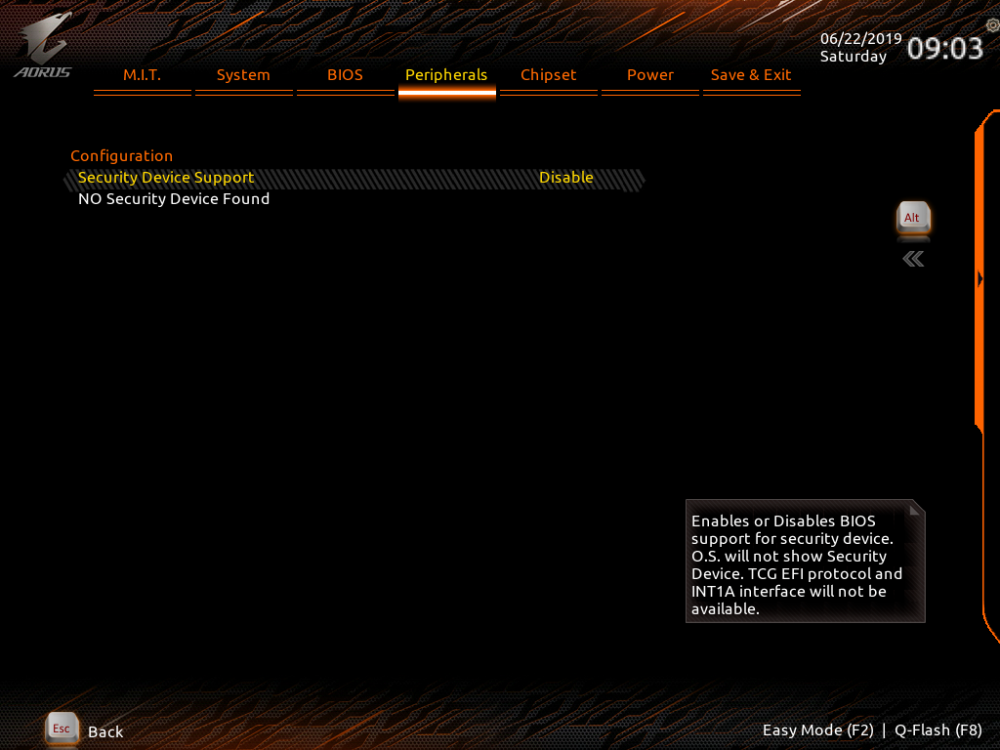
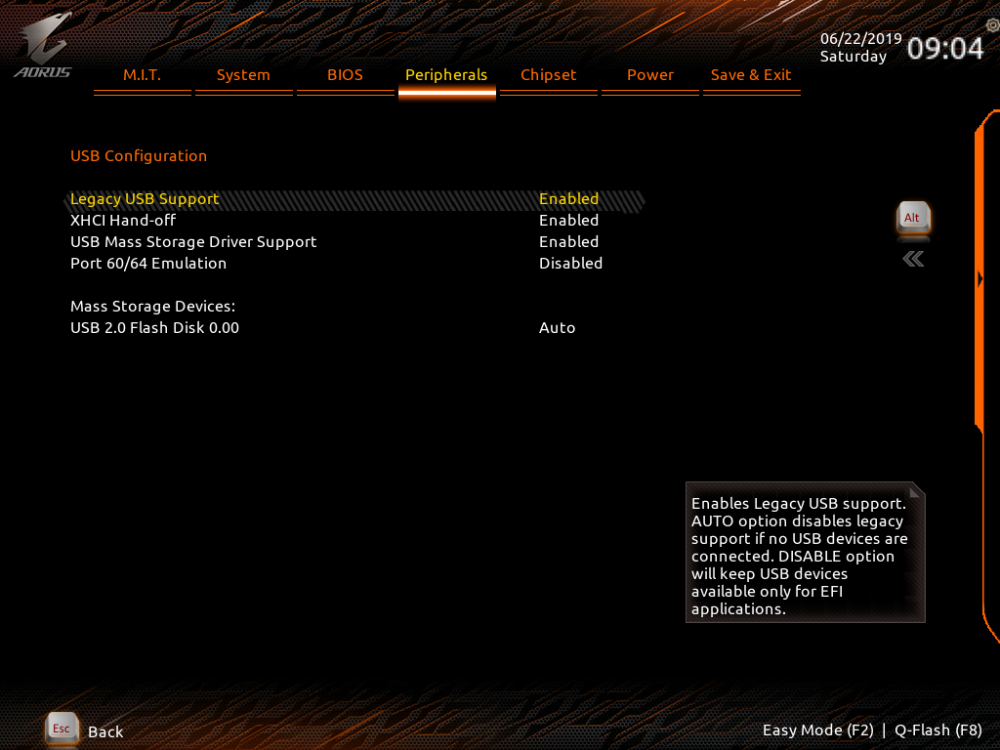
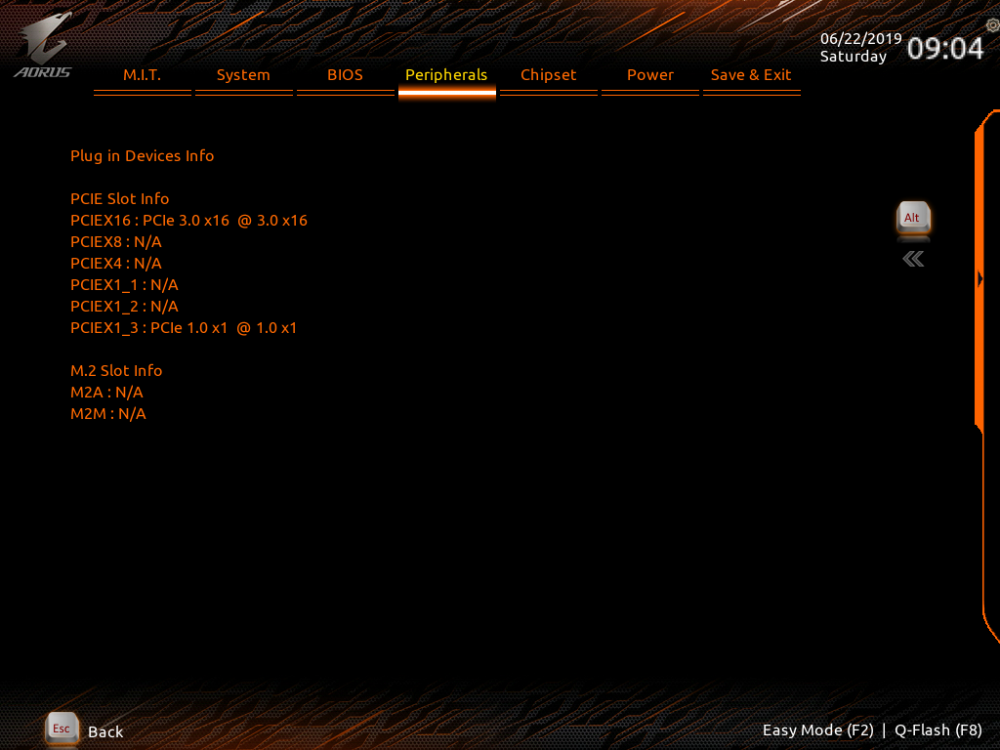
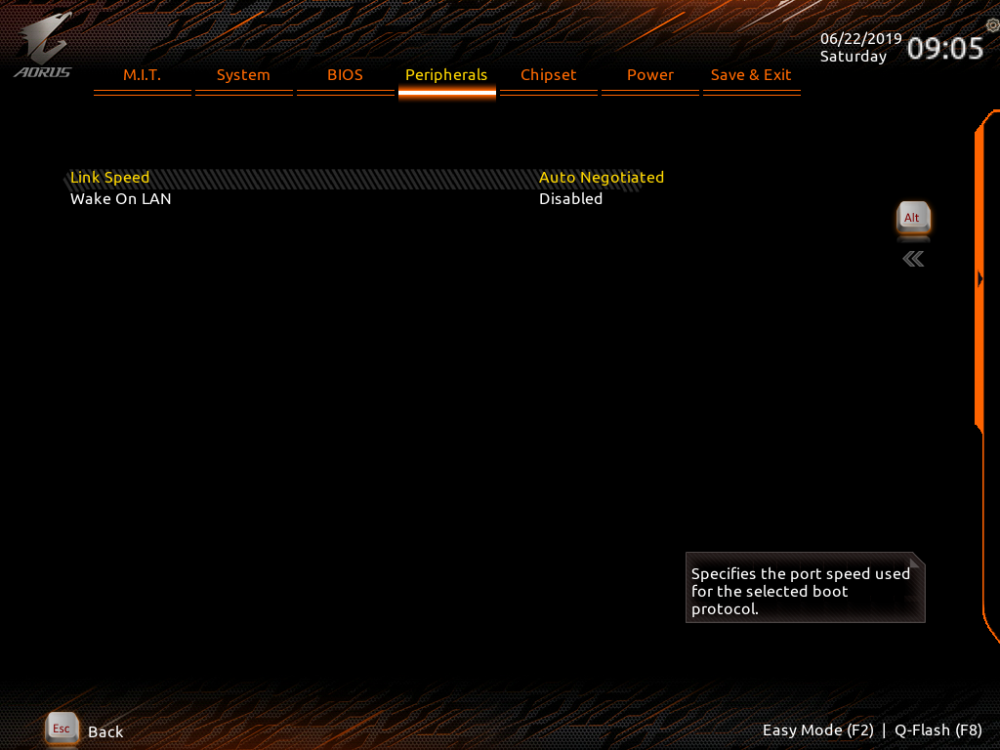
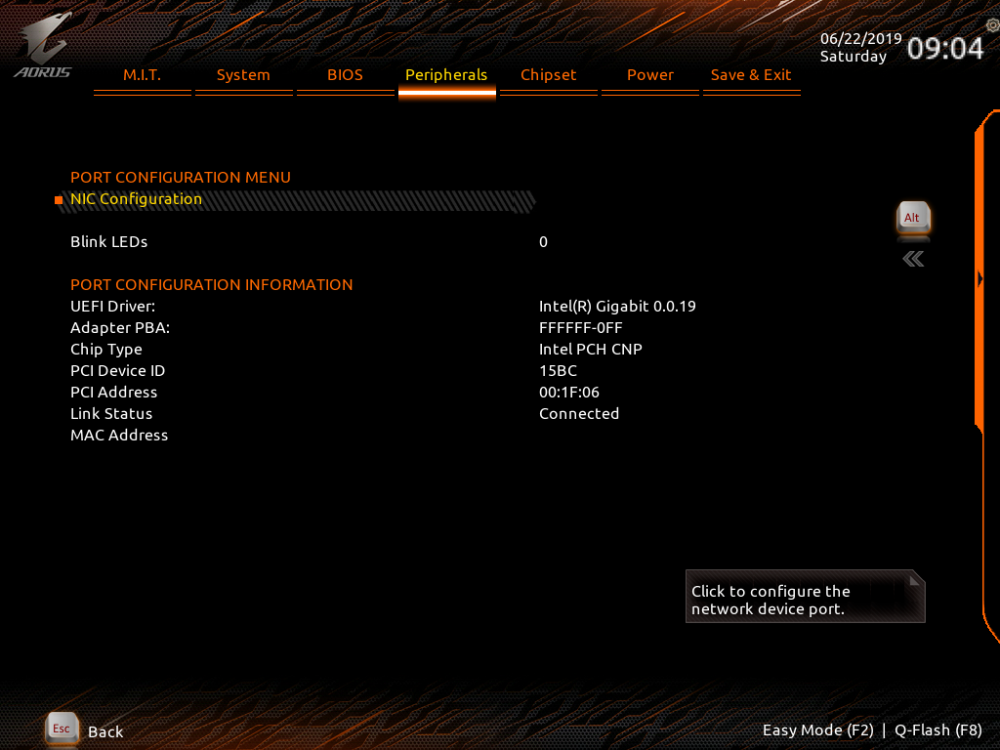
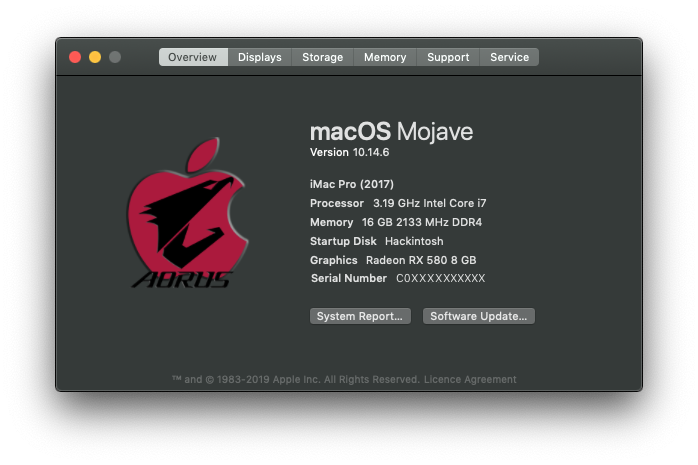
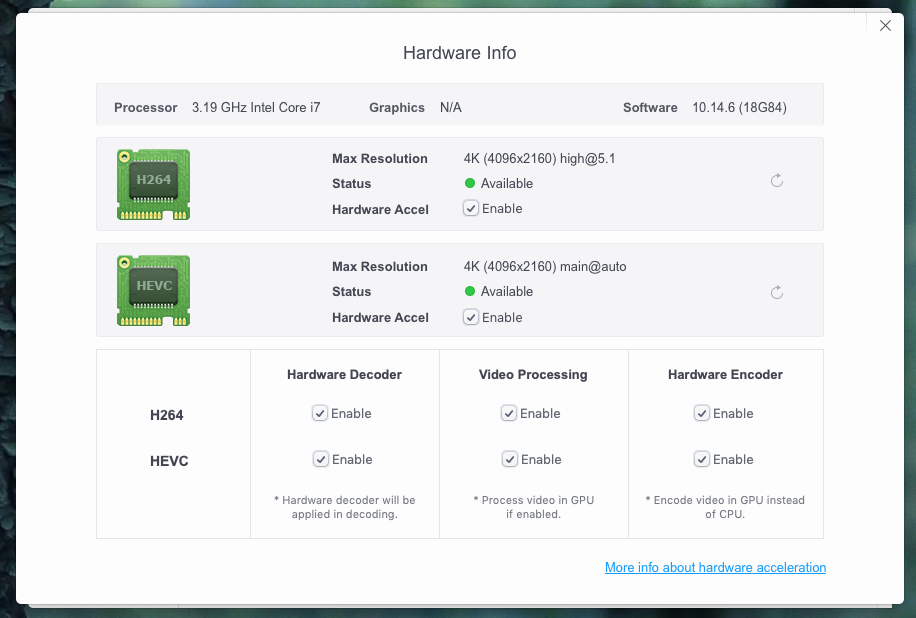
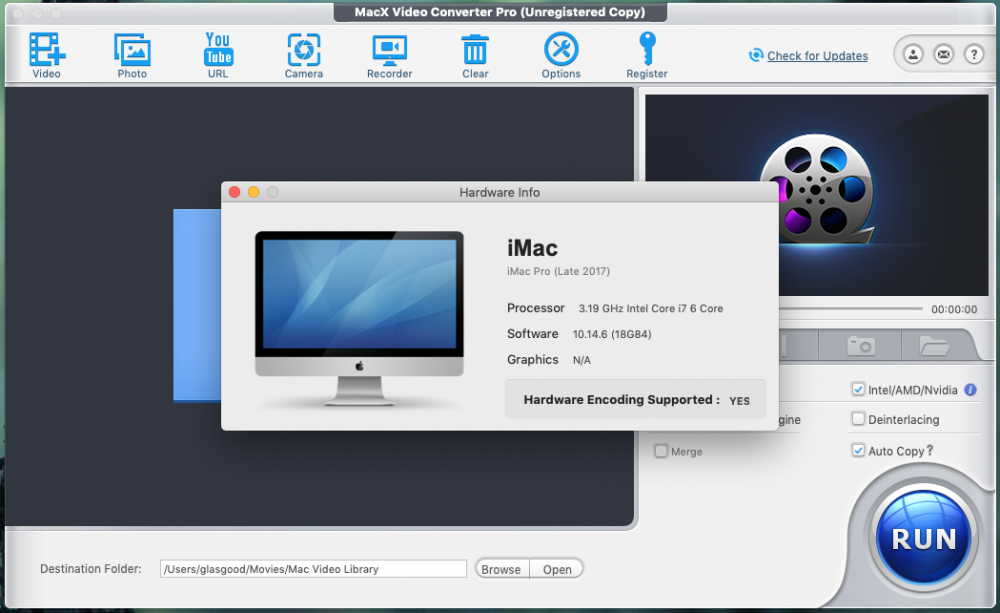
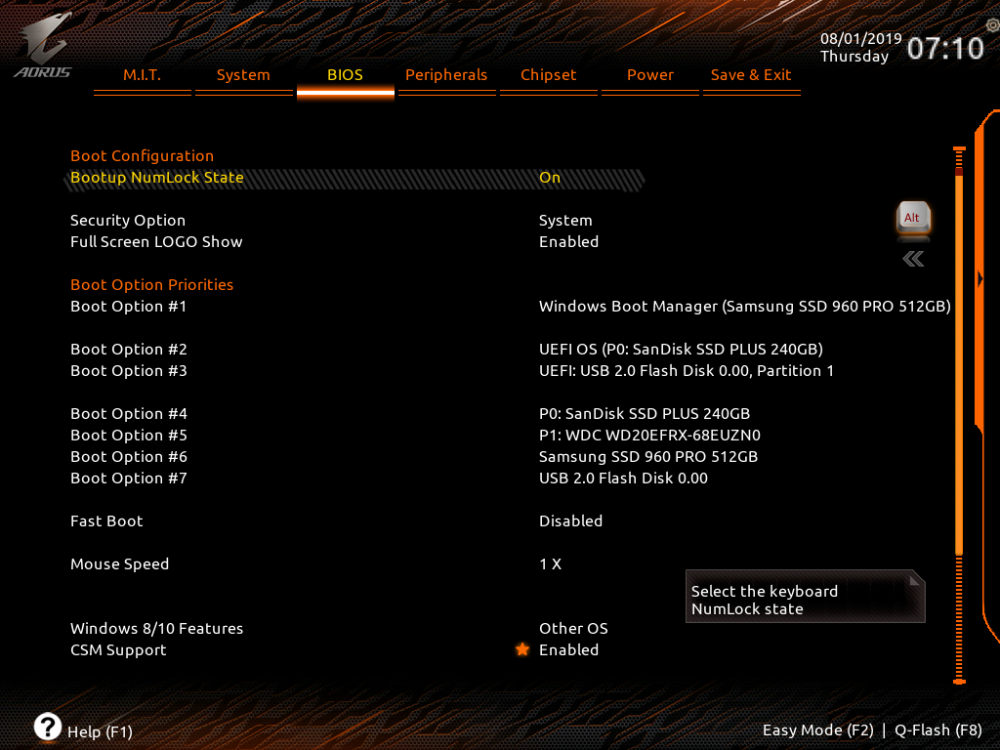
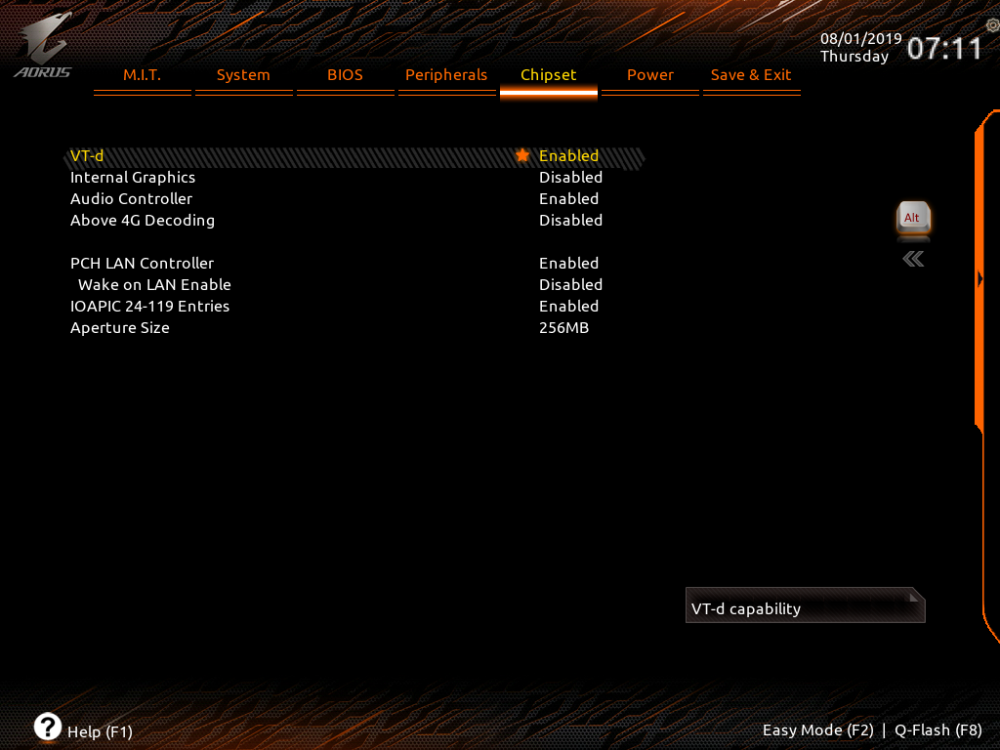
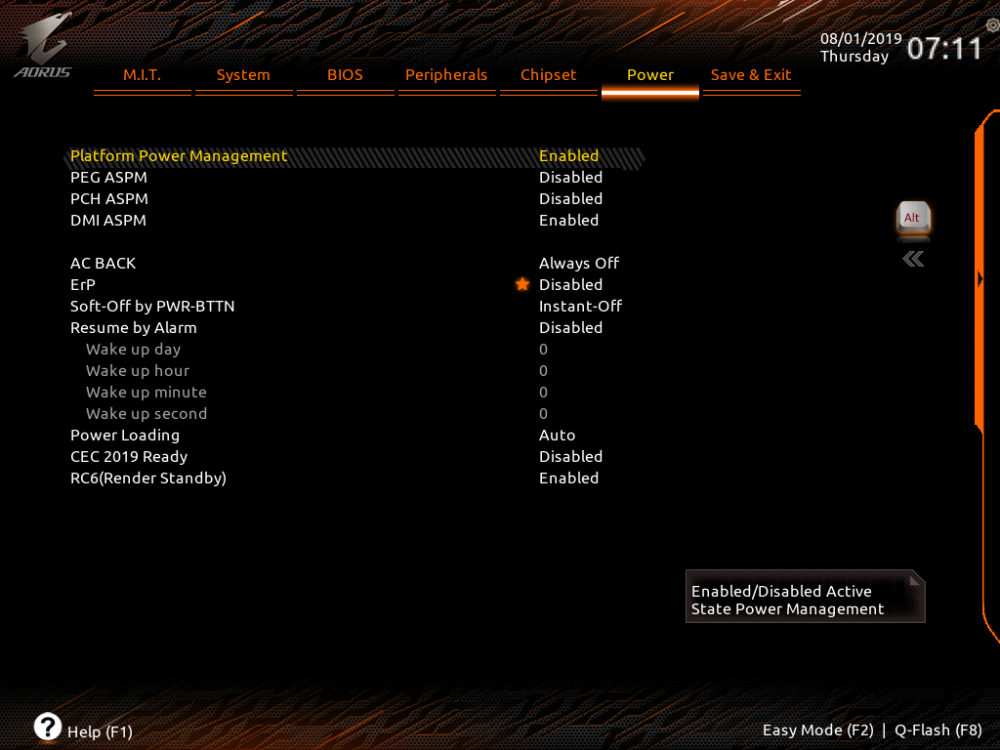
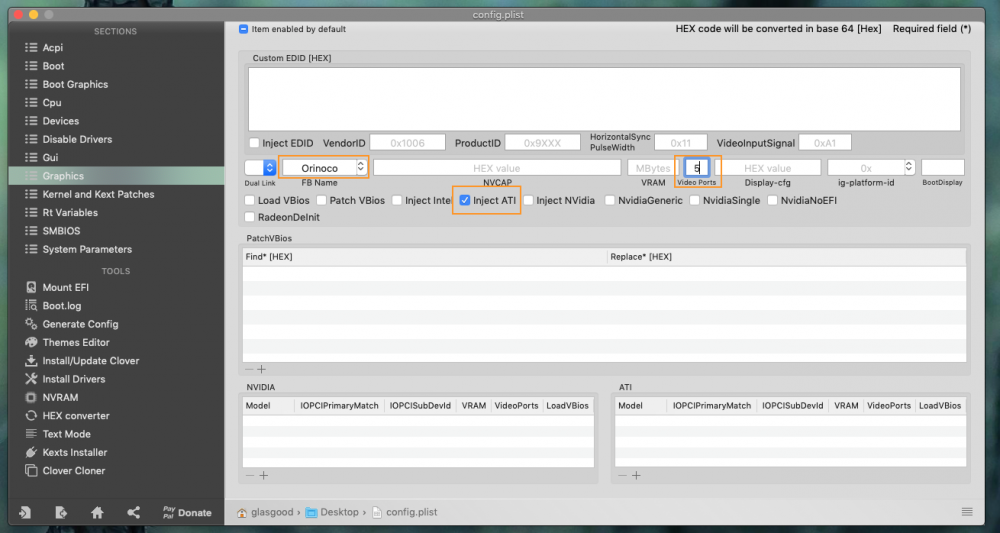
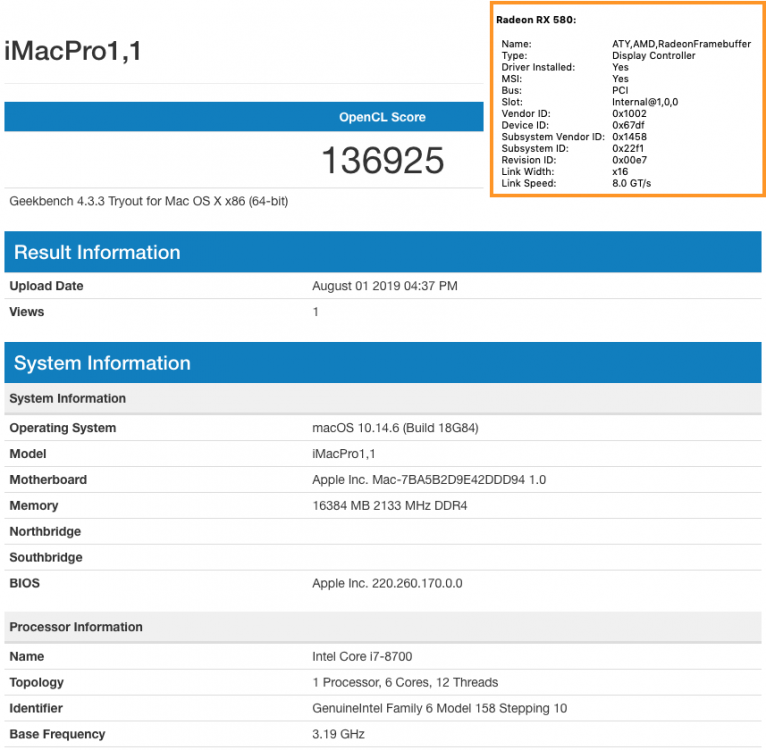
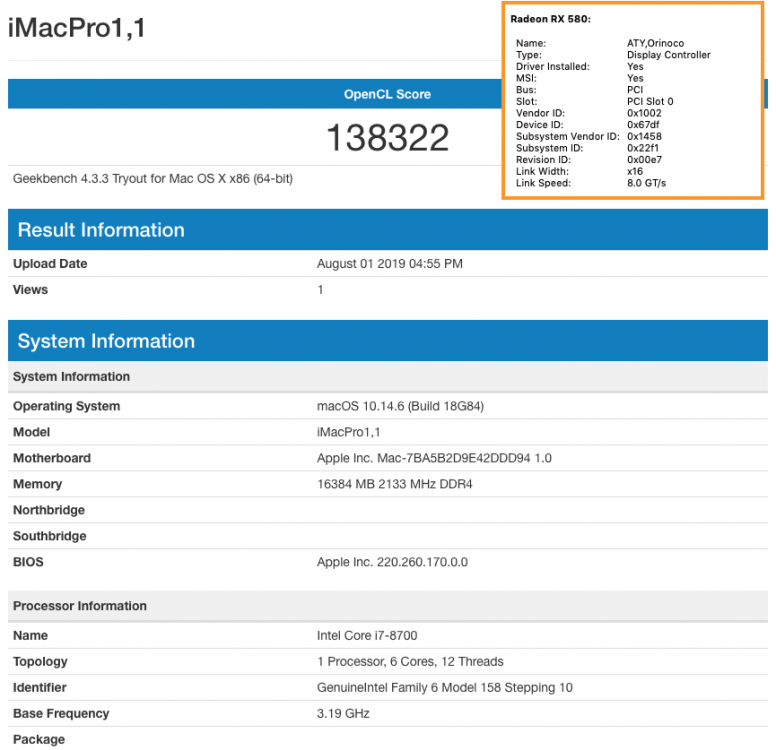
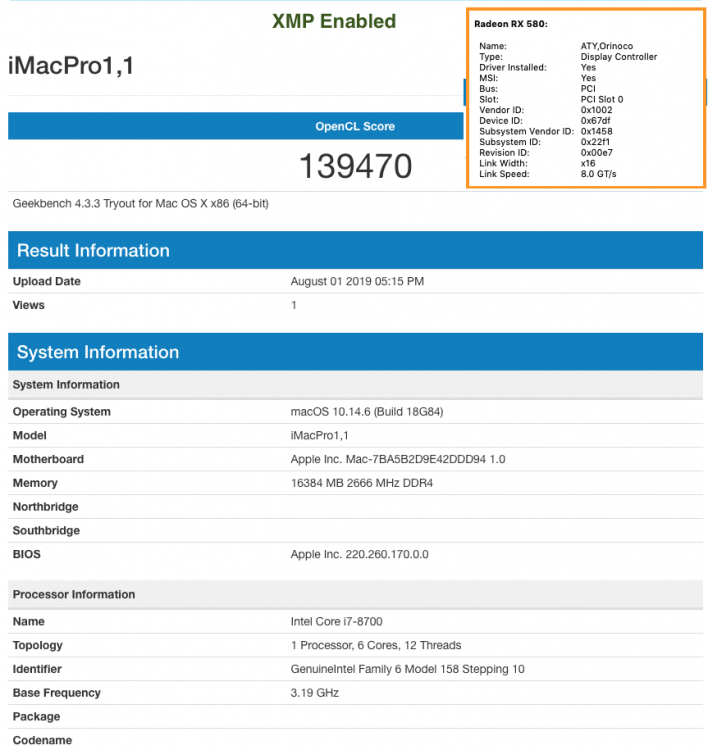
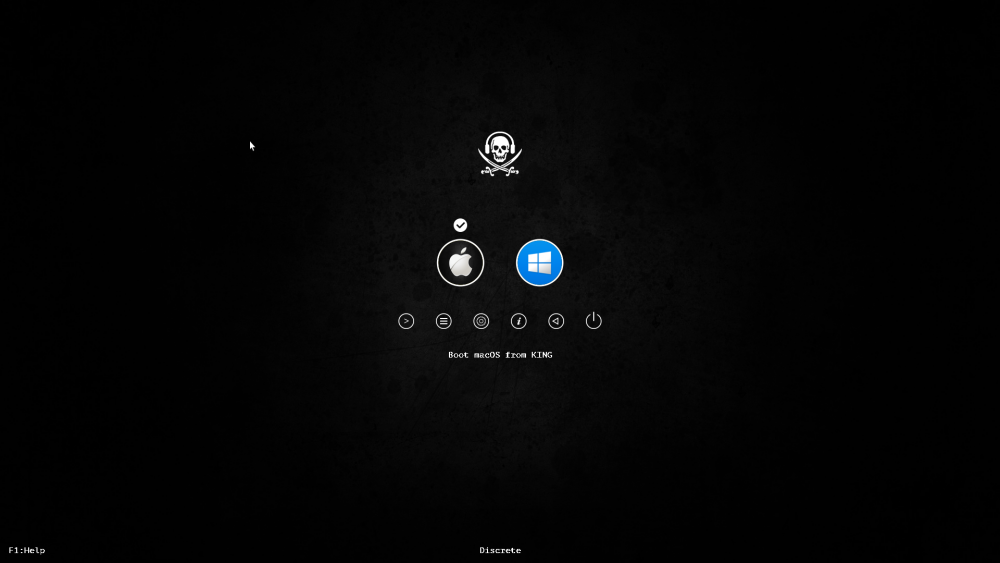
GLASGOOD'S MOJAVE HACKINTOSH GUIDE For latest EFI for macOS Catalina and discussions, visit @AudioGod's ==> Aorus Pro Z390 Patched DSDT mini guide GIGABYTE AORUS PRO Z390 CREDITS & THANKS @MaLd0n His help with EFI configuration and DSDT CLOVER TEAM Slice, Kabyl, usr-sse2, jadran, Blackosx, dmazar, STLVNUB, pcj, apianti, JrCs, pene, FrodoKenny, skoczy, ycr.ru, Oscar09, xsmile, SoThOr, rehabman, Download-Fritz, Zenit432, cecekpawon Et al APPLEALC Acidanthera, vit9696 VOODOOHDA autumnrain, slice2009, zenith432 ESP PRO MOUNTER @Micky1979 HACKINTOOL @headkaze CLOVER CONFIGURATOR Mackie100 THEME ENGINE Alex Zielenski INSANELYMAC OLARILA Hackintool Tutorial daliansky Hackintosh Vanilla Desktop Guide /r/Hackintosh - corpnewt MONITORCONTROL JoniVR & theOneyouseek ------------------------------------------------------------------------------------------------------------------------------------------------------------ UPDATES ------------------------------------------------------------------------------------------------------------------------------------------------------------ PART LIST • Intel I7 8700 • Gigabyte Z390 AORUS PRO • Gigabyte AORUS RADEON RX 580 8GB ( connected to monitor with DisplayPort ) • Corsair Vengeance LPX 16GB ( 2 x 8GB ) 2666MHz – CMK16GX4M2A2666C16 In this build, both memory modules are installed in memory slots DDR4_A1 and DDR4_B1 • Corsair RM650x 80 Plus Gold Power Supply Unit • Corsair H100i V2 AIO Hydro/Water RGB LED CPU Cooler • Samsung EVO 500GB SSD (2.5) macOS Mojave • Samsung EVO 250 GB SSD (2.5) Windows 10 Pro • NZXT H500 Mid Tower ATX Case • 1st RECOMMENDED WIFI CARD → ABWB BCM943602CS 802.11AC WI-FI With Bluetooth 4.0 PCI-Express (PCI-E) OR • 2nd RECOMMENDED WIFI CARD → WIFI and Bluetooth with BCM94331CD with PCI-e adapter (but will require AirportBrcmFixup.kext for AirDrop.. ) WORKING • Sound • Ethernet Port • WiFi • SSD Trim • USB 3.0 & 2.0 • AirDrop • iCloud • Hardware Acceleration AMD RX 580 / AMD Vega • iMessages • Facetime • Handoff • Netflix on Safari browser • Continuity PREAMBLE - BEFORE YOU START Here detailed, is all the steps towards building a successful and stable Aorus Pro Z390 Hackintosh, if you are a first time Hackintosher, this guide will have you quickly up and running with the Aorus Pro Z390 Hackintosh. To rule out potential problems from the go, only have the disc that you plan to install macOS Mojave connected to the Aorus Pro, disconnect any other Windows / Linux or data drives, external drives from your Aorus Pro. Windows / Linux and data drives can be connected after successful installation of macOS Mojave If you have more than 16 GB of memory, then install macOS Mojave with just 16GB or RAM installed, you can later add any additional memory. Install memory modules in slots DDR4_A1 and DDR4_B1. This build has a recommended Wi-Fi combo PCI-e card installed in slot PCIEX1_3 with its 9 pin USB cable attached to motherboard header F_USB2. ( ensure WiFi card is seated properly in PCIe slot and cable is firmly attached to WiFi card and motherboard header F_USB2 ) If using the Corsair H100i v2 AIO cooler with USB cable connected to motherboard header F_USB1, you will need to enable hot-patch ( explained in guide ) in config.plist for working sleep, wake from sleep will only work by pressing Power Button. Install macOS Mojave on its own physical drive, so do not try and install macOS Mojave onto a free partition on a disc that contains Windows. Remove any Thunderbolt cards, Thunderbolt card can be reinserted after installation. Double check your BIOS settings are the same as this guide. Following are unsupported / problematic • Intel Optane ( if you have this, remove it before installation of macOS Mojave ) • Samsung EVO Plus drives ( ensure you update Plus drive to latest firmware to avoid problems ) • XFX Radeon RX 580 • NVIDIA GTX / RTX not supported in macOS Mojave Q - WILL THIS GUIDE WORK WITH MY NON AORUS Z390 PRO MOTHERBOARD ? A - Possibly, though you may have to create your own USBPorts fix. Q - I notice you have the Aorus Pro Z390 version, will this guide work with Aorus Pro Z390 WiFi version ? A - Possibly, but onboard Intel / Intel CNVi WIFII /Bluetooth will not work with macOS and you will have to disable HS14 for Bluetooth to function properly. Q - Can I use my AMD Vega Card ? A - Yes, AMD Vega card's will work with this guide, but If you plan to use a Sapphire Pulse Vega 56 then please read @AudioGod ==>post regarding the Sapphire Pulse 56. PART 1 - DOWNLOAD • Update BIOS to version F10 • CLOVER • Aorus Pro Z390 EFI.zip • Aorus PRo Z390 EFI - THE OC VERSION.zip <== OC VERSION • ESP MOUNTER PRO v1.9 • macOS MOJAVE • CLOVER CONFIGURATOR • Hackintool OPTIONAL DOWNLOADS • Native Display Brightness with MonitorControl • ThemeEngine • Assets.car // Not really needed but IF no sound on Wake from Sleep then use SSDT-ALC1220 and CodecCommander • ( Resolves Audio Sound on Wake, place in Clover / ACPI / Patched ) • ( Resolves Audio Sound on Wake, place in Clover / Kexts / Other ) PART 2 - BIOS SETTINGS (Version F10 ) Here is a list of the BIOS settings that I use ( Screenshots in spoiler below ) • Enter BIOS → Press F12 → Enter Setup • Save & Exit → Load Optimized Defaults • BIOS → Windows 8/10 Features → Other OS • BIOS → CSM Support → Enabled ( Optionally, can be enabled after macOS is installed, your choice ) • Peripherals → Initial Display Output → PCIe 1 Slot • Peripherals → Trusted Computing → Security Device Support → Disable • Peripherals → Intel(R)Bios Guard → Intel BIOS Guard Support → Disable • Peripherals → USB Configuration → Legacy USB Support → Enabled • Peripherals → USB Configuration → XHCI Hand-off → Enabled • Peripherals → Network Stack Configuration → Network Stack → Disabled • Peripherals → SATA And RST Configuration → SATA Mode Selection → AHCI • Chipset → Vt-d → Enabled ( can be enabled or disabled, your choice!) • Chipset → Internal Graphics → Disabled • Chipset → Audio Controller → Enabled • Chipset → Above 4G Decoding → Disabled • Power → Platform Power Management → Disabled ( Optionally, can be enabled after macOS is installed ) • Power → CEC 2019 Ready → Disabled • Power → ErP → Disabled (can be enabled or disabled, your choice !) • Power → RC6 (Render Standby) → Disabled • MIT → Advanced Memory Settings → Extreme Memory Profile (X.M.P) → Disabled ( Optionally, can be enabled after macOS is installed, your choice ) // IF USING CORSAIR H100i V2 AIO CPU WATER COOLER • MIT → Smart Fan 5 Settings → CPU Fan Control mode → PWM • Save & Exit → Save & Exit Setup SCREEN DUMP SPOILERS PART 3 – CREATE A MOJAVE USB FLASH INSTALLER Prepare USB Installer for Mojave ( Video below ) • Insert USB drive • Launch /Applications/Utilities/Disk Utility • Disk Utility → View → Show All Devices • On Left-hand panel → External →(Identify your USB device in left hand panel) • Click and highlight your USB device in the left-hand panel. • Click erase button. • Name: USB • Format: Mac OS Extended (Journaled ) • Scheme: GUID Partition Map • Click Erase button. • Place the downloaded MacOS Mojave app into Applications folder. • Open Terminal copy and paste: sudo /Applications/Install\ macOS\ Mojave.app/Contents/Resources/createinstallmedia --volume /Volumes/USB --nointeraction && say Mojave Drive Created • Enter PART 4 – INSTALL CLOVER ON THE MOJAVE USB INSTALLER Make Mojave USB flash drive installer bootable.( Video below ) • Launch Clover application, double click. • Click Continue → Continue → Continue • Click Change Install Location button. • Click Install macOSMojave USB installer → Continue • Click Customise button • Choose: Clover for UEFI booting only Install Clover in the ESP Themes UEFI Drivers • Click Install button • Installation Complete! Video: PART 5 – CUSTOMIZE MOJAVE USB INSTALLER FOR AORUS Z390 PRO Replace Clover EFI folder with PRE-INSTALL Aorus Pro Z390 EFI - RX580.zip Aorus Pro Z390 EFI.zip ( Video below ) • Install ESP Mounter Pro v1.9 • Using ESP Mounter Pro, Mount ESP on disk2s1 ( Your disk name may be different ) • Open mounted EFI partition found on desktop • Copy all the contents from Aorus 390 Pro EFI folder • Replace USB EFI folder with all the contents inside the Aorus 390 Pro EFI folder. PART 6 – INSTALL MAC OS MOJAVE ON INTERNAL DRIVE INSTALL NOTE ENSURE BIOS: Above 4G Decoding is set to Disabled if Above 4G decoding is set to enabled then macOS Mojave install will freeze at 2 mins remaining and will not shut down properly!!!! Please be patient during install, so when install gets to 2 or 3 mins remaining then it may take extra time. Be ready to boot from UEFI USB installer by pressing F12 when install initiates restarts. • INSERT USB INSTALLER INTO THE USB 2.0 PORT Here is a walkthrough of the full process using the macOS Mojave USB Installer on the Aorus Z390 Pro. • Power on PC and press F12• Choose bootable USB drive from boot menu. • Install macOS Mojave to internal solid state or hard drive. When system returns to the Clover boot menu choose: • Boot macOS Install from Macintosh At next restart, press F12 and boot from external UEFI USB device and choose: • Boot macOS Install from Macintosh Proceed with macOS Mojave install macOS Mojave is now installed, but it can only boot at this moment thanks to FakeSMC and Clover on the Mojave USB flash drive installer. PART 7 – MAKE AORUS Z390 PRO INTERNAL DRIVE BOOTABLE Make internal drive bootable ( Video below ) So far, the Aorus Pro can only boot the internal system drive with the aid of the Mojave USB Installer. To boot from the internal system drive without the installer: Download and install Clover with RC Scripts on target volume. Copy the EFI folder from inside Aorus Pro Z390 EFI.zip folder and paste it inside the the System Drive EFI partition. • Remove USB Mojave installer and shut down and restart. Aorus Hackintosh should now be able to boot to macOS Mojave, Done, well almost ! PART 8 – ENABLE IMESSAGES & FACETIME // UPDATE 21st MAY 2019 Possibly Clover Configurator now automatically populates correct values for working iMessages when you select an SMBIOS. After selecting SMBIOS, example iMac19,1 for Aorus Pro with RX580 ( image above ) then go to Apple and ensure you have the "serial number is not valid " message. Done! If you still have problems connecting to iMessage, test and ensure that AirDrop is working, then follow instructions inside spoiler. PART 9 – ENABLE TRIM for Solid State Flash Drives Open Terminal and enter the following command: sudo trimforce enable PART 10 – FRAMEBUFFERS FOR RADEON AMD RX580, VEGA CARD's DEFAULT USB FIX – USB PORTS CONFIGURATION If you have USBC on Computer Chassis / Case, then SS01 and SS02 is mapped to that USB C port ------------ GUIDE FINISHED YOU SHOULD NOW HAVE WORKING AORUS Z390 PRO HACKINTOSH WITH SSDT USB FIX ------------ OPTIONAL: Set Wi-Fi Country Code OPTIONAL: System Information - PCI External USB Storage: Fix "disk did not eject properly" message upon wake from sleep OPTIONAL: Native Display Brightness - with MonitorControl OPTIONAL: Dual Boot macOS Mojave & Windows 10 OPTIONAL: Replace the default "About This Mac" Apple Logo with RED AORUS APPLE OPTIONAL USB PORTS FIX – Create your own SSDT or USBPorts.kext FRAMEBUFFER PATCHING – For working Intel UHD 630 Graphics, working HDMI Port, working HDMI Audio on Aorus Z390 Pro NOT REQUIRED AS GUIDE IS USING SMBIOS FOR IMAC PRO 1,1 FINAL CUT PRO – Configuration for AMD RX5xx NOT REQUIRED AS GUIDE IS USING SMBIOS FOR IMAC PRO 1,1 AORUS PRO Z390 WIFI version with Intel CNVi – Disable Bluetooth on HS14 Resolve bluetooth issue reported by @eSaF CLOVER – Updating / Upgrade Clover boot loader (If hack is stable, don't update unless you have problems) SLEEP – Sleep and Automatic Sleep SLEEP – Resolving Instant Wake ( Corsair H100i v2 AIO ) WIFI – Clover Hotpatch PXSX to ARPT RECOMMENDED READING – Excellent Hackintosh Vanilla guide created by CorpNewt with in depth tutorial on Clover. https://hackintosh.gitbook.io/-r-hackintosh-vanilla-desktop-guide/config.plist-per-hardware/coffee-lake EFI NON DSDT SMBIOS iMac Pro 1,1 Clover v2.5k r5018 Aorus Pro Z390 EFI - RX580.zip OR Aorus Pro Z390 EFI - Vega-56.zip EFI FOR SMBIOS iMac 19,1 for use with GPU & IGPU enabled in BIOS PRE-INSTALL Aorus Pro Z390 EFI - RX580.zip POST-INSTALL Aorus Pro Z390 EFI - RX580.zip ( Has OsxAptioFix2Drv-free2000.efi ==> recommended reading before use ) EFI FOR INTEL UHD 630 SMBIOS iMAC 18,1 Aorus Pro Z390 EFI - Intel UHD630.zip( Has OsxAptioFix2Drv-free2000.efi ==> recommended reading before use )


 3 points
 -
As I don’t frequent here very often it makes more sense to just link to the project instead https://github.com/Gcenx/WineskinServer Check README.md for current project requirements etc.1 point
-
Hello dear community What do you think about this?? You can use Clover WITH Secure Boot Maybe you can implement it in the next version, it would be wonderful if Clover works with Secure Boot !! https://github.com/ValdikSS/Super-UEFIinSecureBoot-Disk1 point
-
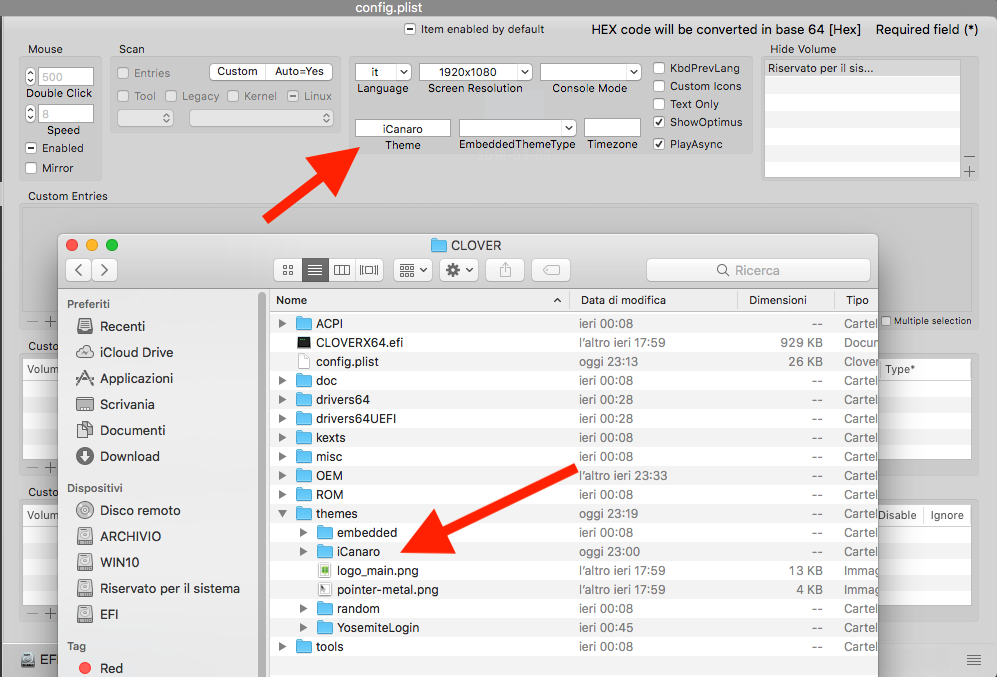
Sei un grande.... Guarda il risultato: Per il resto lasciamo tutto invariato visto che funziona tutto bene. Grazie mito
 1 point
 -
Amazing! That's a real guide1 point
-
All setup, Xcode 8.2.1 works no problem Bug can stay there, Fixed by using Mojave config and kexts. SMBios iMac18,31 point
-
schermate pre clover: come linea generale, compaiono quando si installano beta e scompaiono quando si installano release finale di clover... non sempre ma più o meno è così far scomparire i dischi di ripristino di windows: nello screenshot dove hai evidenziato, se vedi, non ha nome... io ho risolto elegantemente così; live di GParted, ed ho assegnato il nome OEM a tutte le partizioni di ripristino di windows e poi inserendo OEM in hide nel cofig, avviene la magia Le 4 righe di scritte quelle dipendono dal gestore memoria, AptioMemoryFix o quelli meno recenti, stà eseguendo il suo lavoro a cui è preposto1 point
-
Oh you mean to force clover to show the boot menu on startup? I activated the boot menu, but it only shows my backup drive, my main drive and Recovery HD. Edit: my bad! I deactivated "Install" in Clover's "Gui" section, a long time ago before I knew that you could choose to just skip the Clover boot menu alltogether But without your hint to "un-skip" the Clover boot menu (uncheck "Boot" → "Fast") I wouldn't have been able to complete the installation! The update went smoothly, thanks again!
 1 point
 -
Delete macos install data only. Force clover to prompt for menu so you can select macos install1 point
-
Check if its hidden (im not sure)? But you need to delete that1 point
-
@unixb0y You need to select macos install in clover, not your current macos. But first, delete macos install folder n the root of your drive and upgrade agaiin.1 point
-
Questo te lo dedico, io non lo sostituirò, a me piace iCanaro.zip
 1 point
 -
https://github.com/Shaneee92/Mojave_AMD_XNU/releases Only 10.14.1 is recommended. Wait for kernel source updates to update the system, https://opensource.apple.com/1 point
-
Hey! That's nice
 1 point
 -
Key thing to remember about this thread is it does not apply to you since you are using a C612 chipset not a X99 chipset. The thread is specific to X99 chipset builds.1 point
-
Hello Angelus882006, I am also trying to install High Sierra on my Thinkpad T470. Can you please send your EFI Folder please ? Thanks1 point
-
In order to use the device with the Apple driver, it's firmware must be updated with macOS 10.13.3 but as the AQC111's device id 0x11b1 isn't supported natively by Apple's driver, I doubt that it will update the firmware and even in case it does, there is no guarantee that Apple's firmware will work on this chip, it might as well render the chip unusable. Mieze1 point
-
https://nofile.io/f/nFap16zVrz6 Real iMac Pro IOReg1 point
-
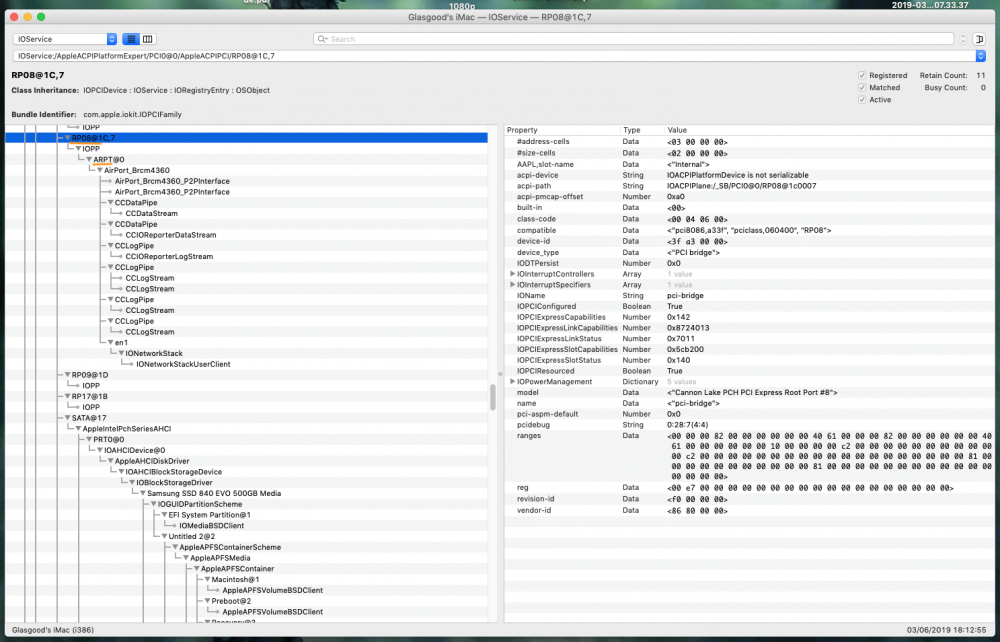
https://nofile.io/f/1M5XHjefftR Real iMac 18,3 IORegExplorer 3.0.21 point