Leaderboard


Popular Content
Showing content with the highest reputation on 04/22/2018 in all areas
-
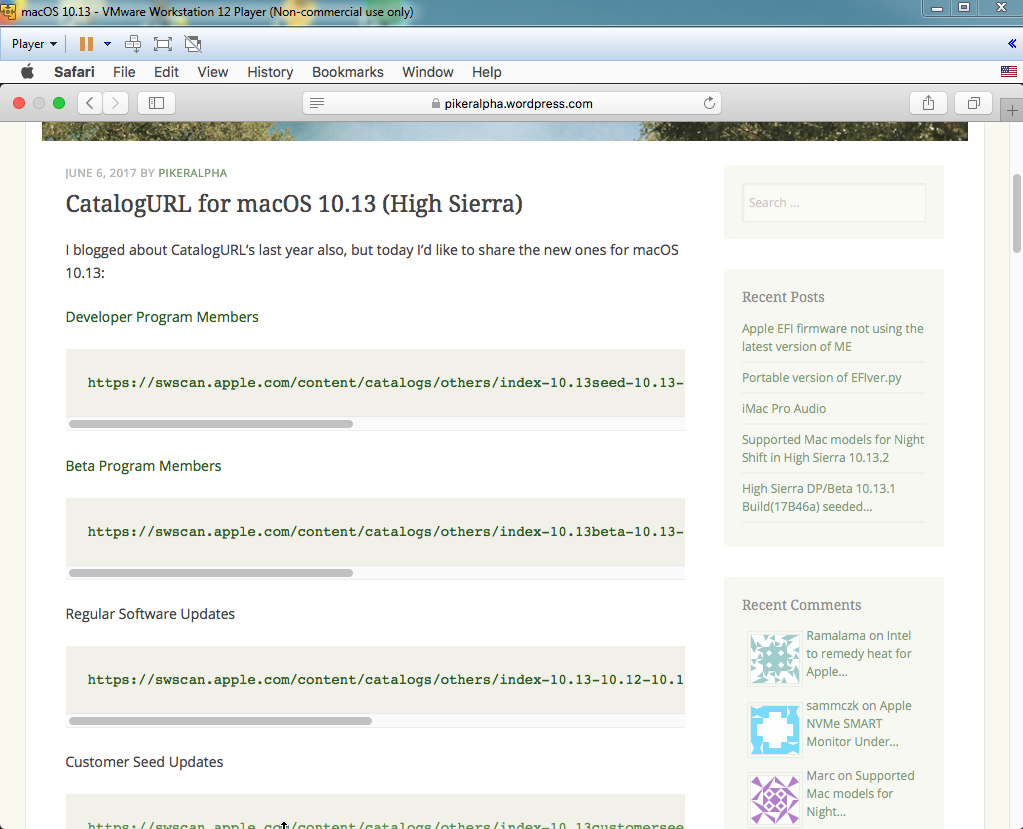
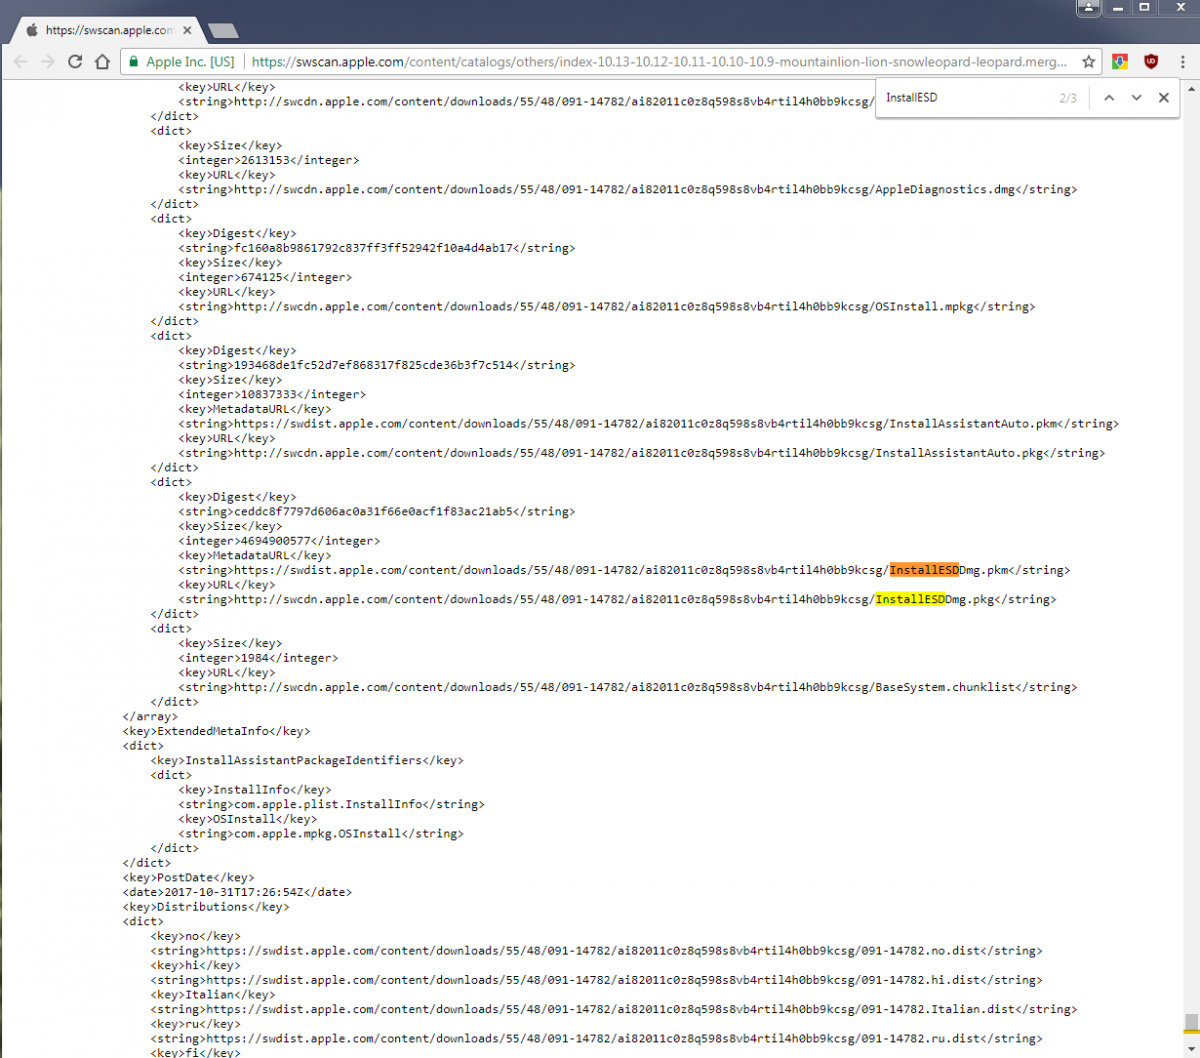
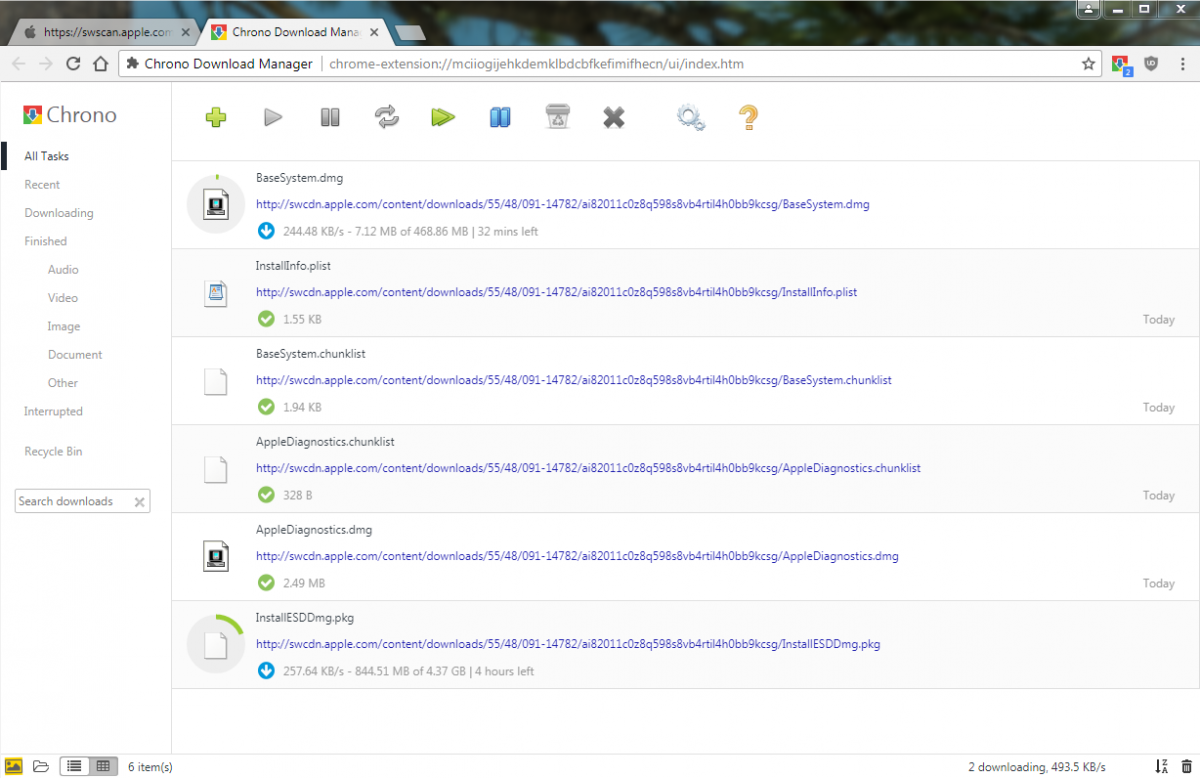
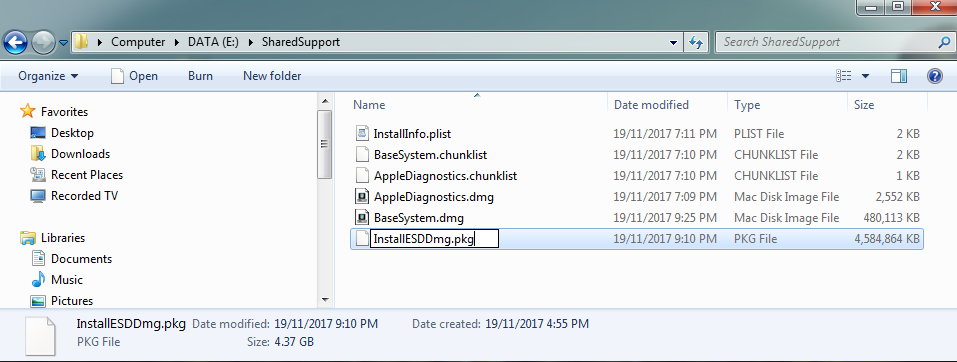
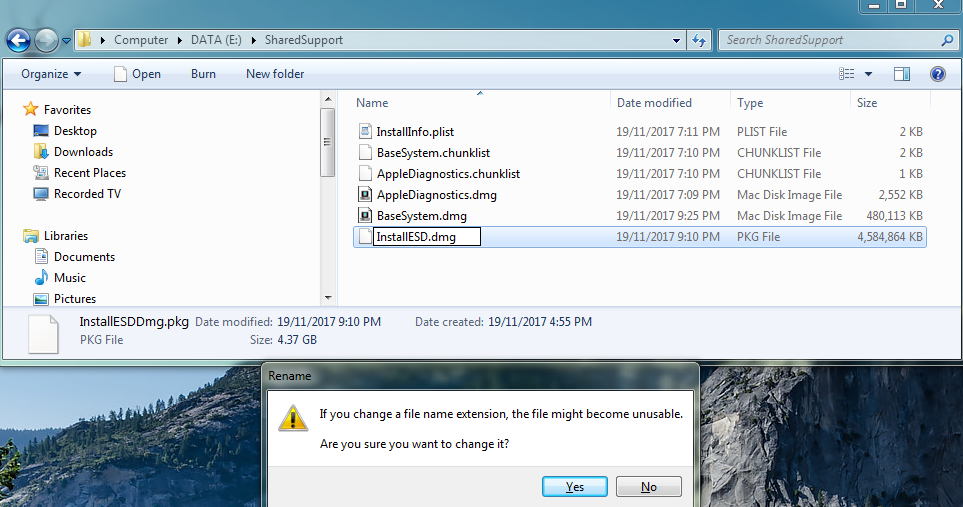
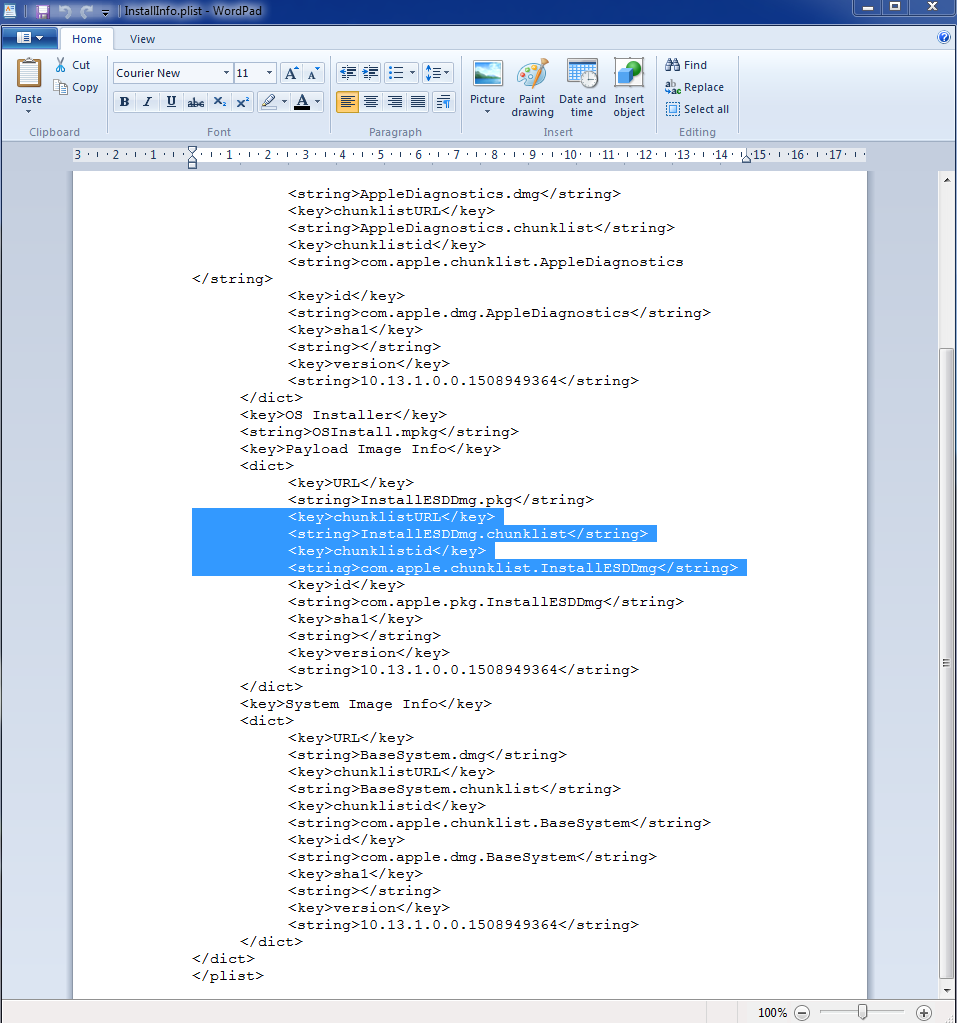
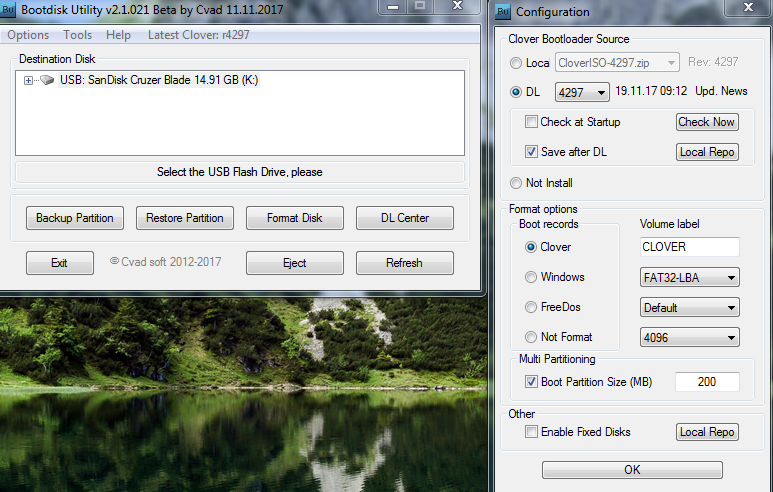
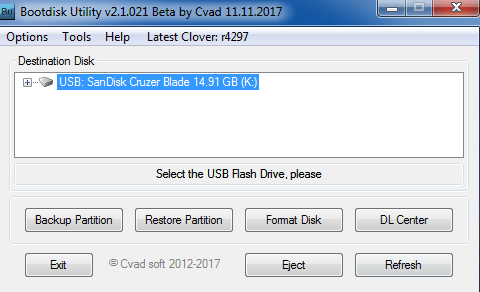
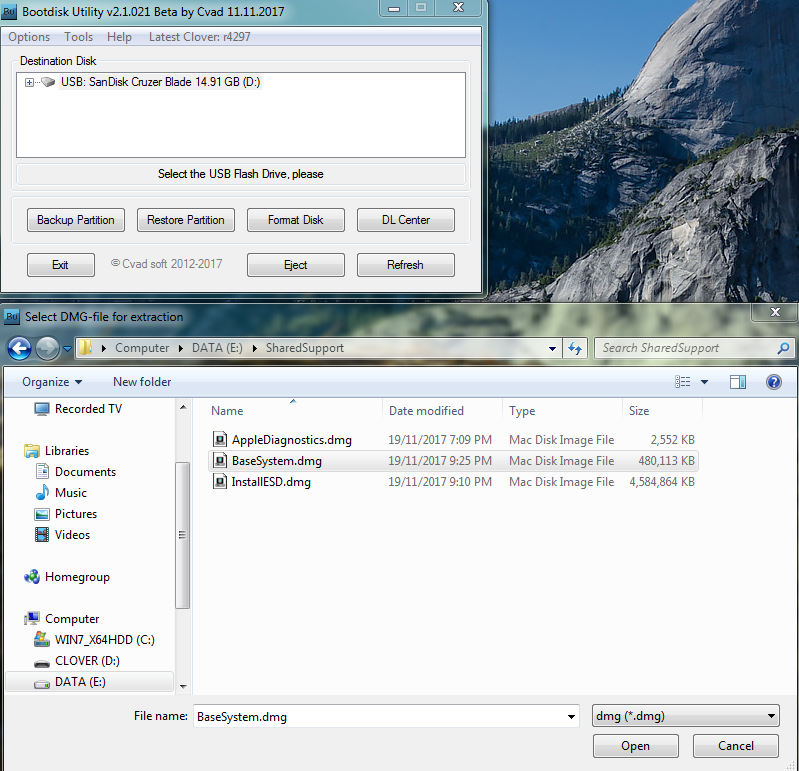
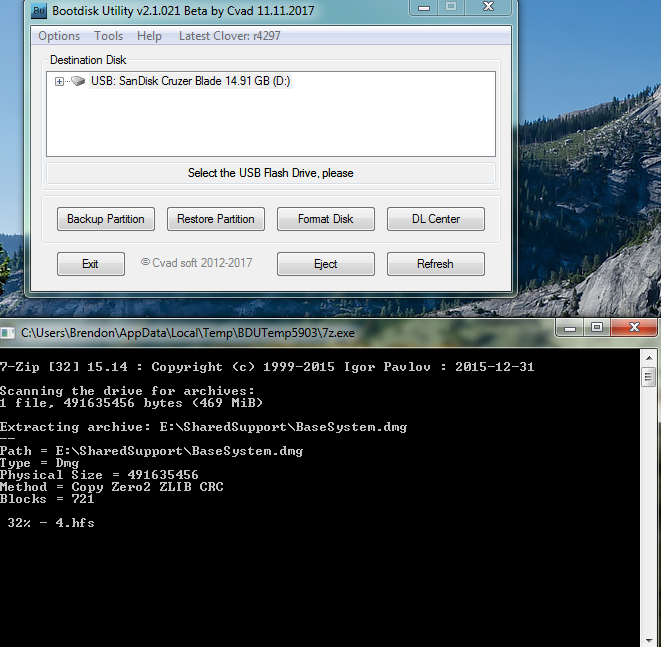
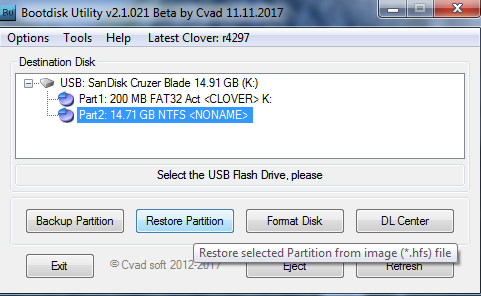
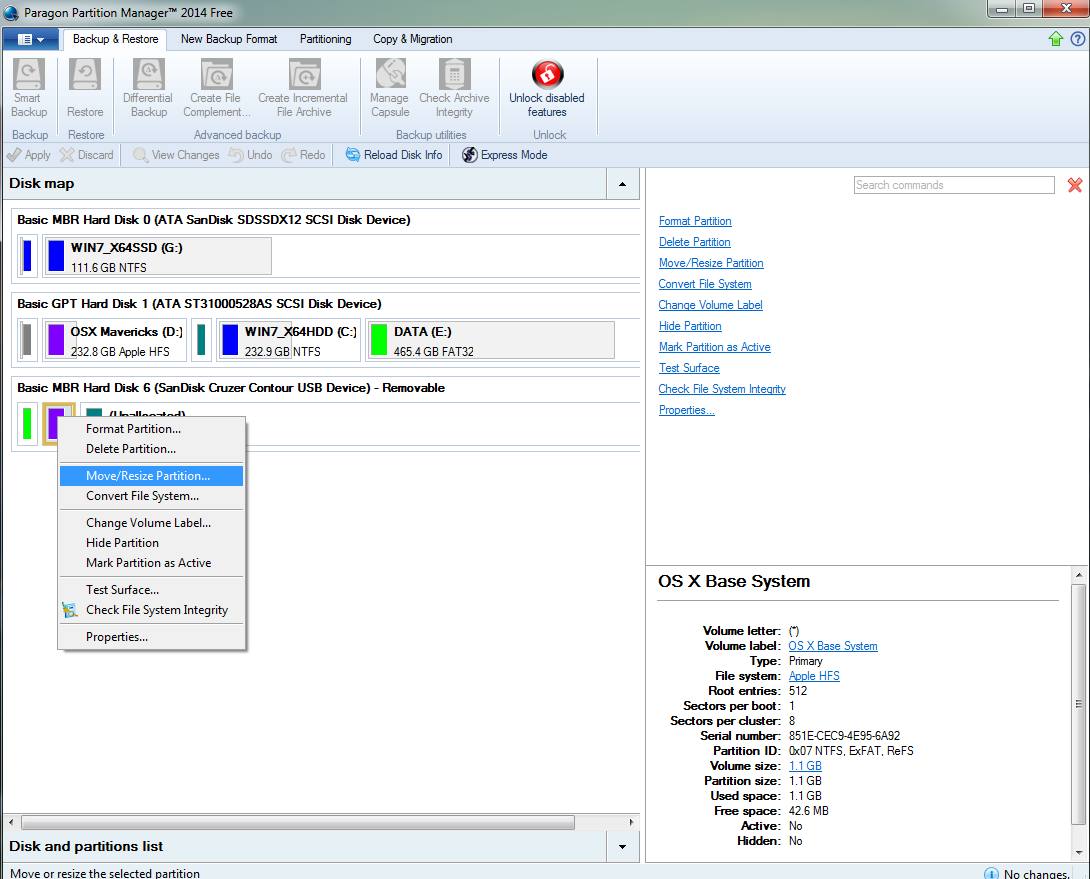
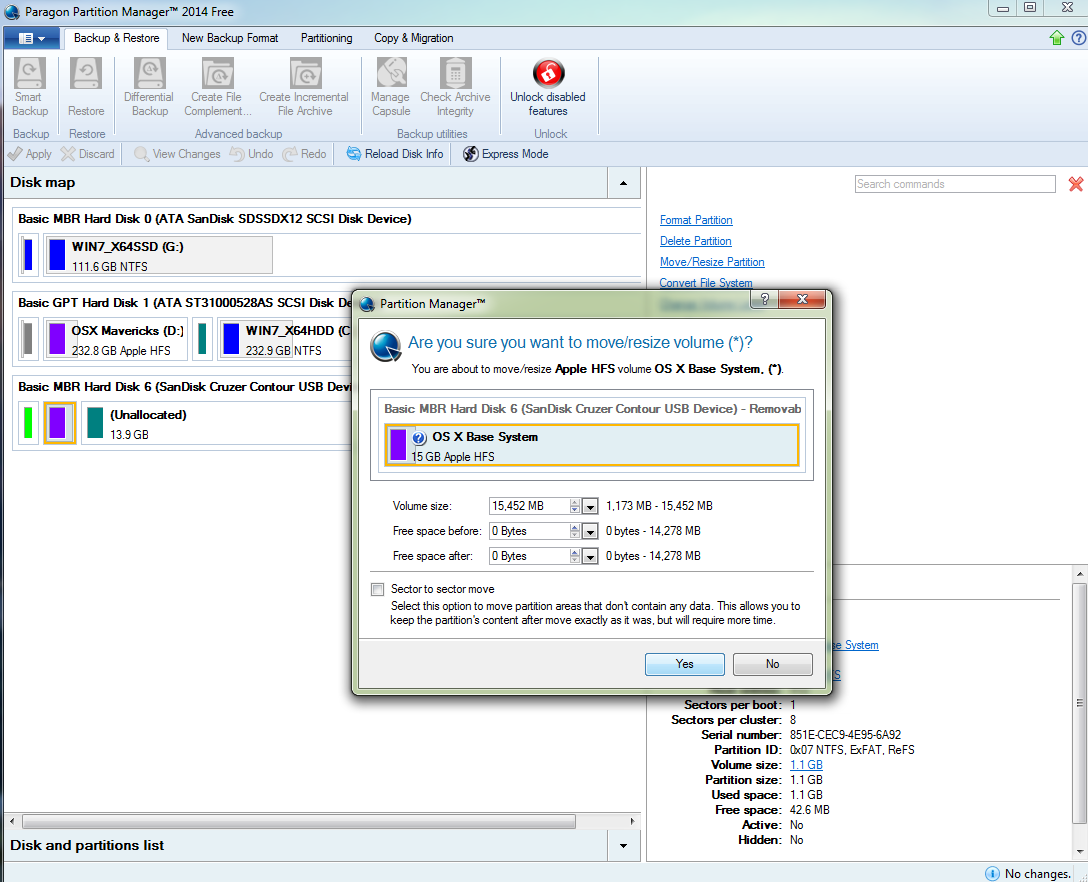
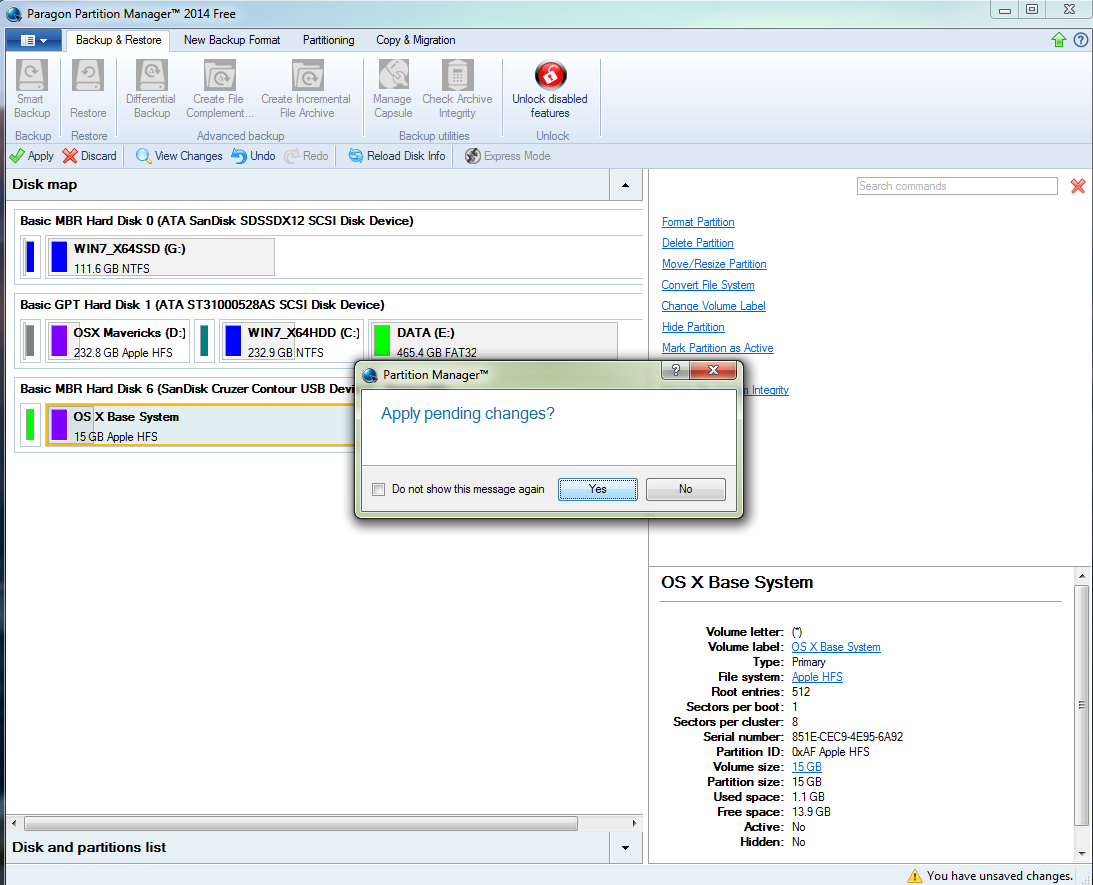
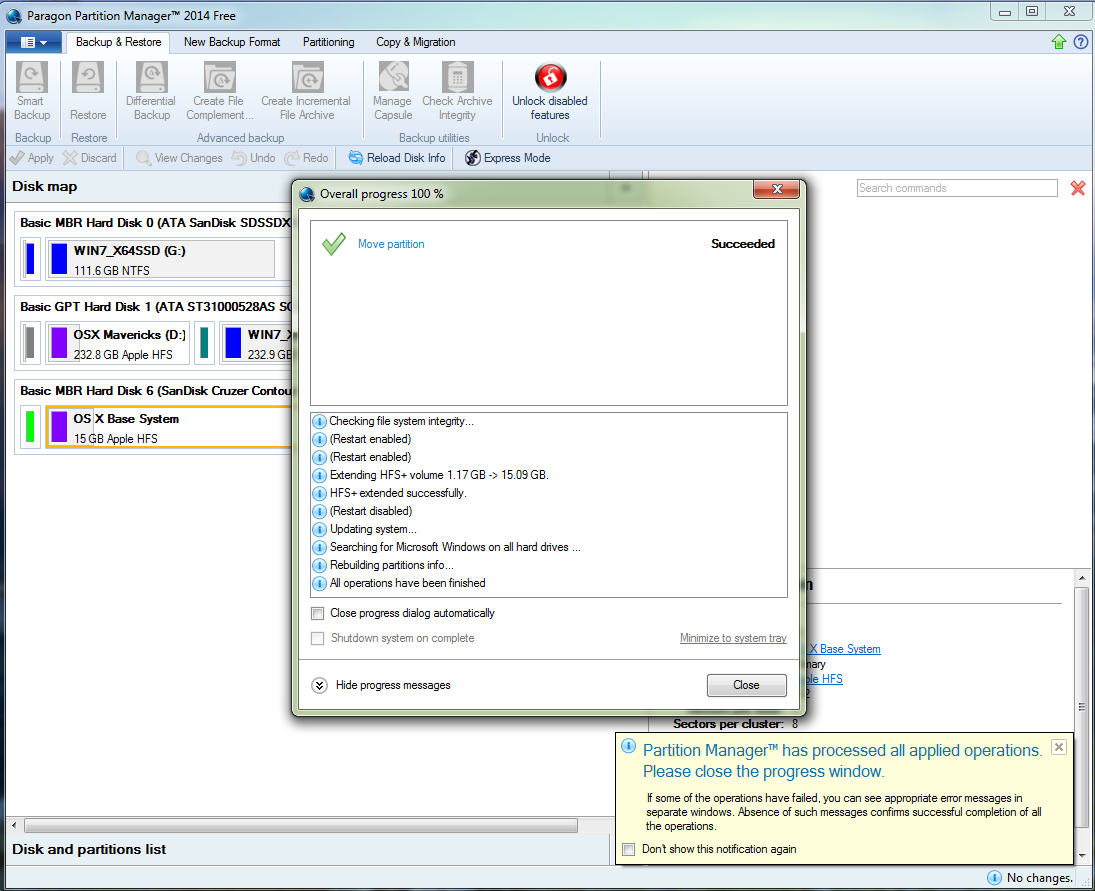
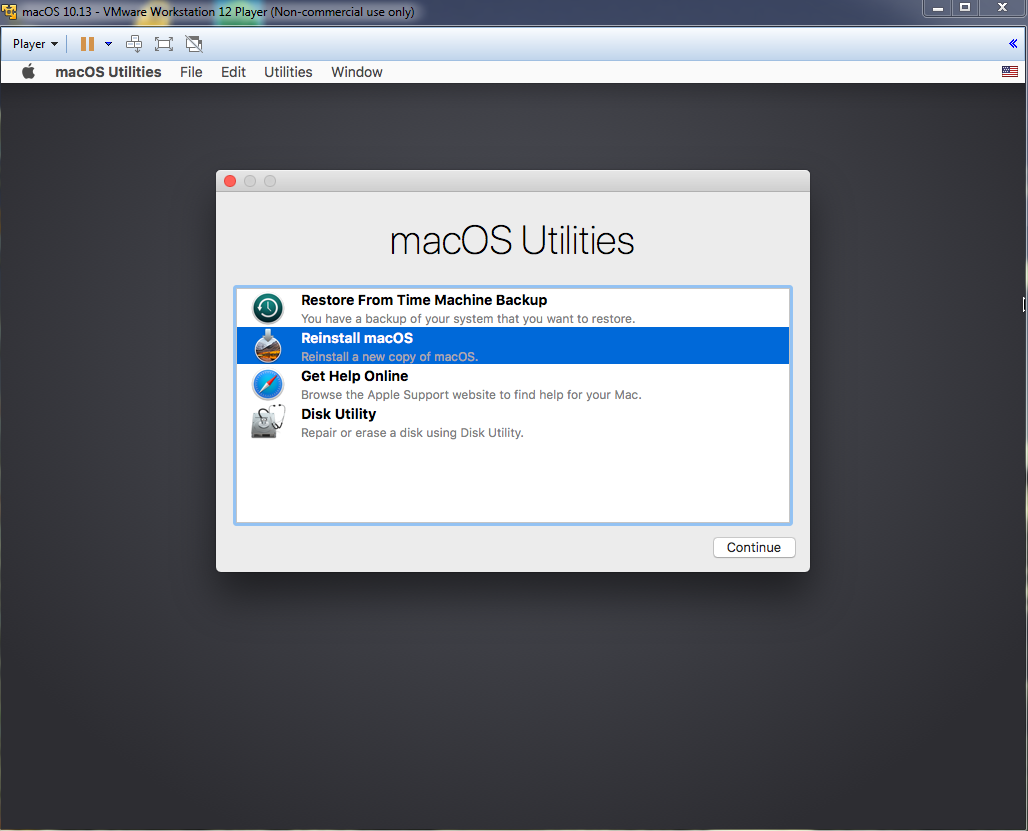
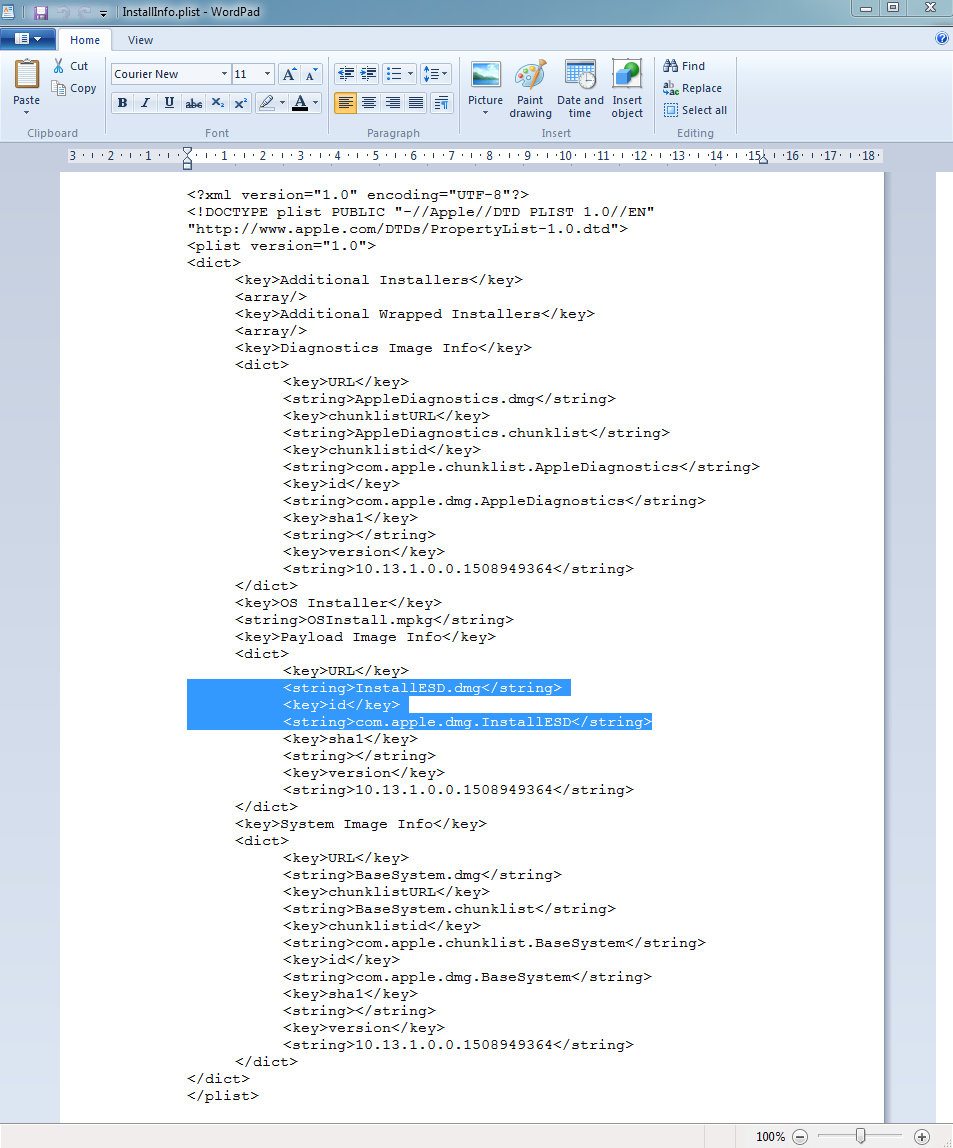
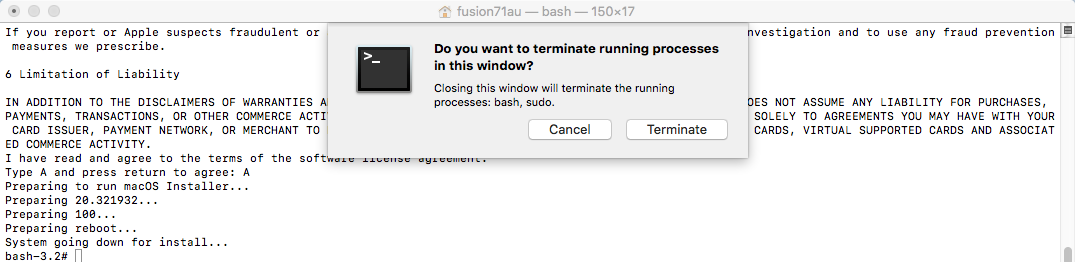
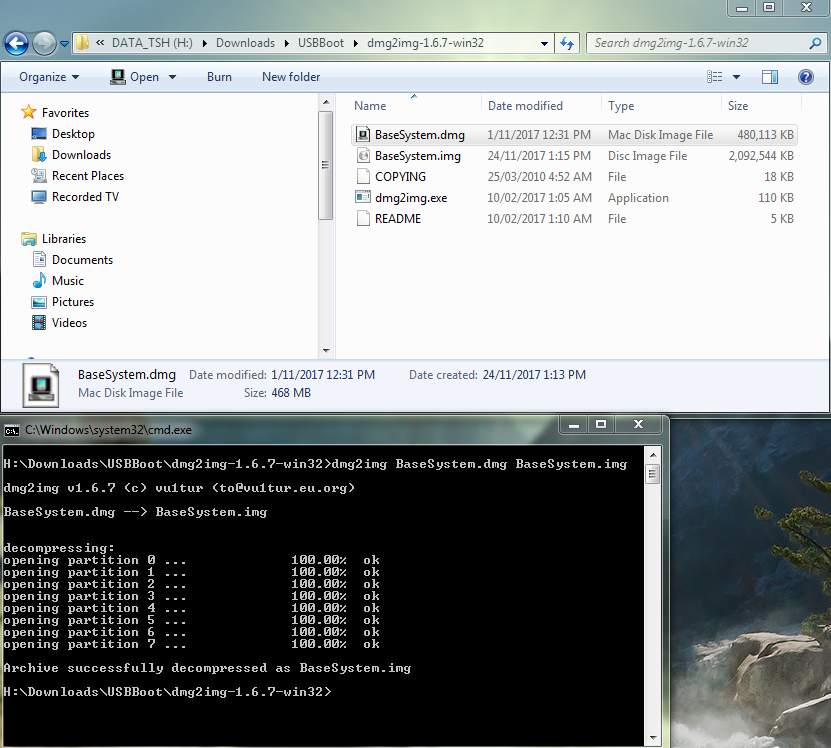
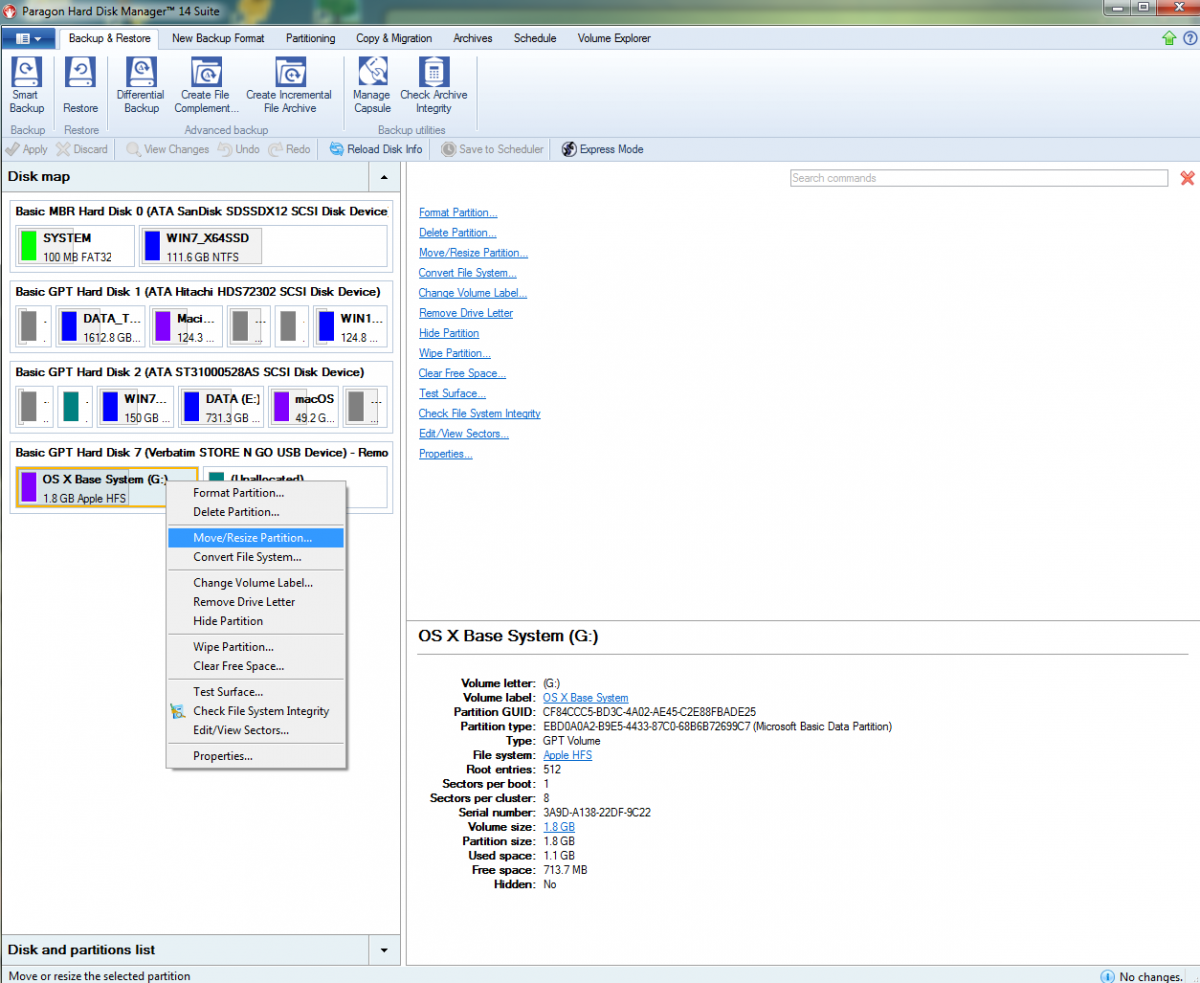
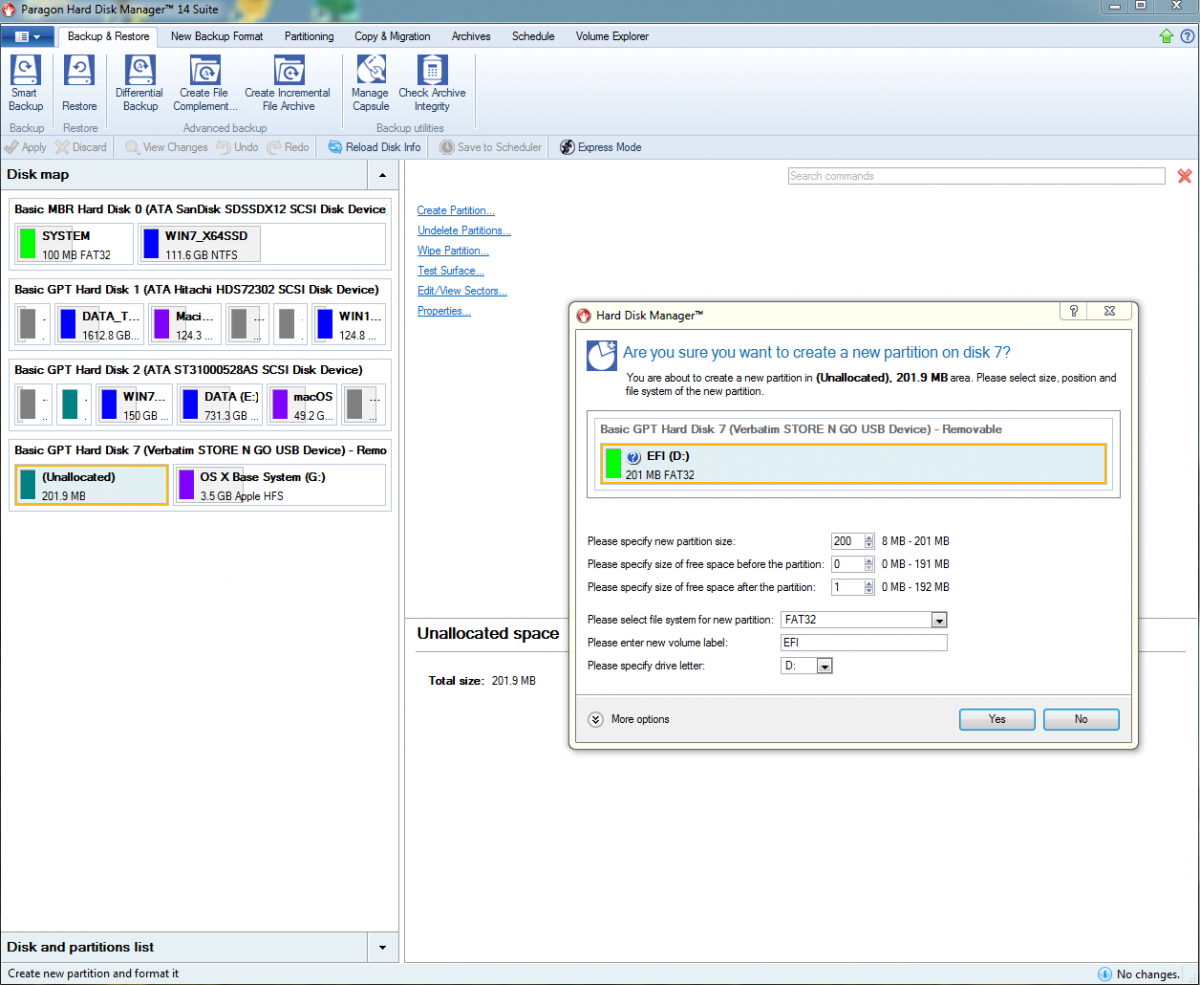
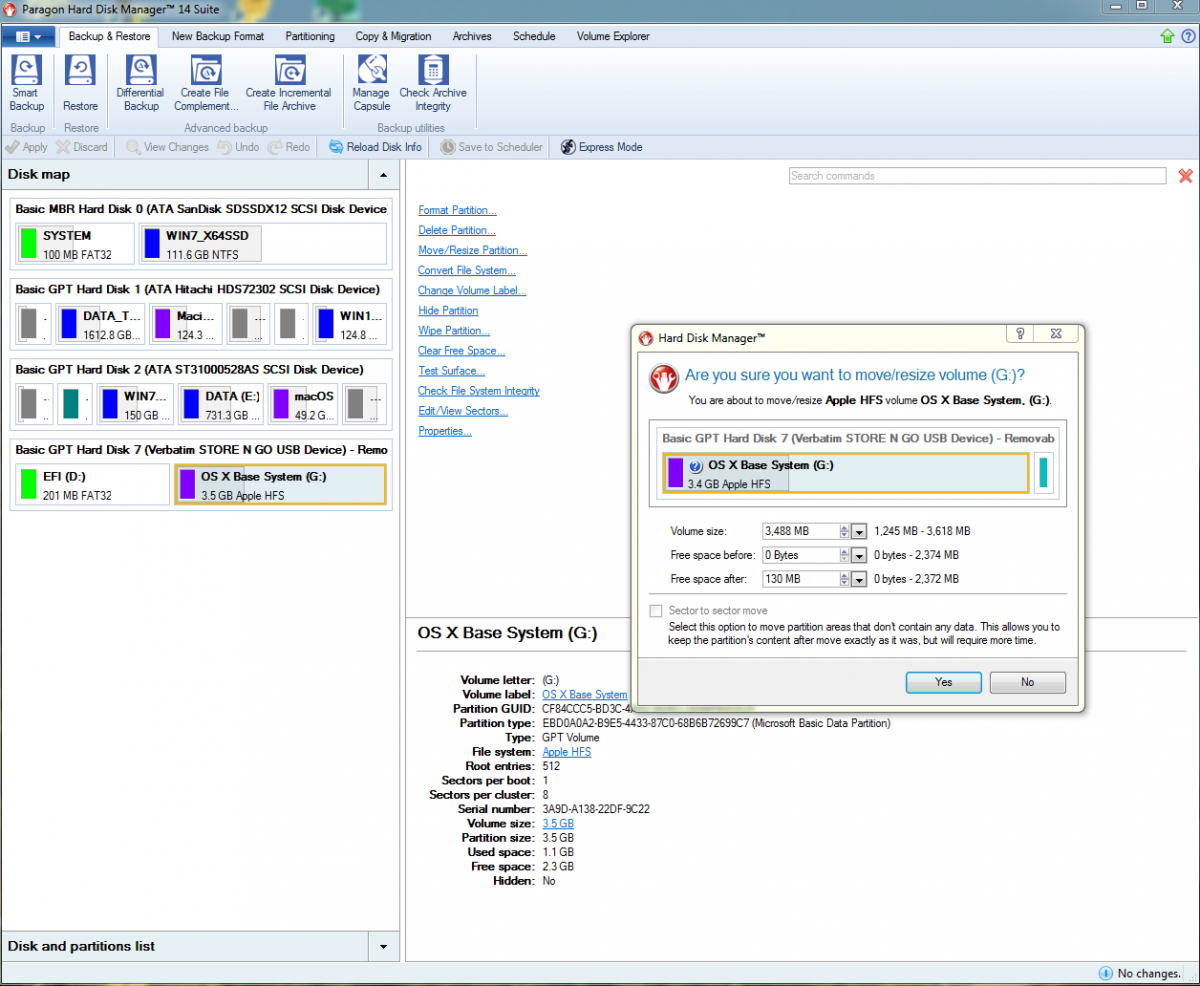
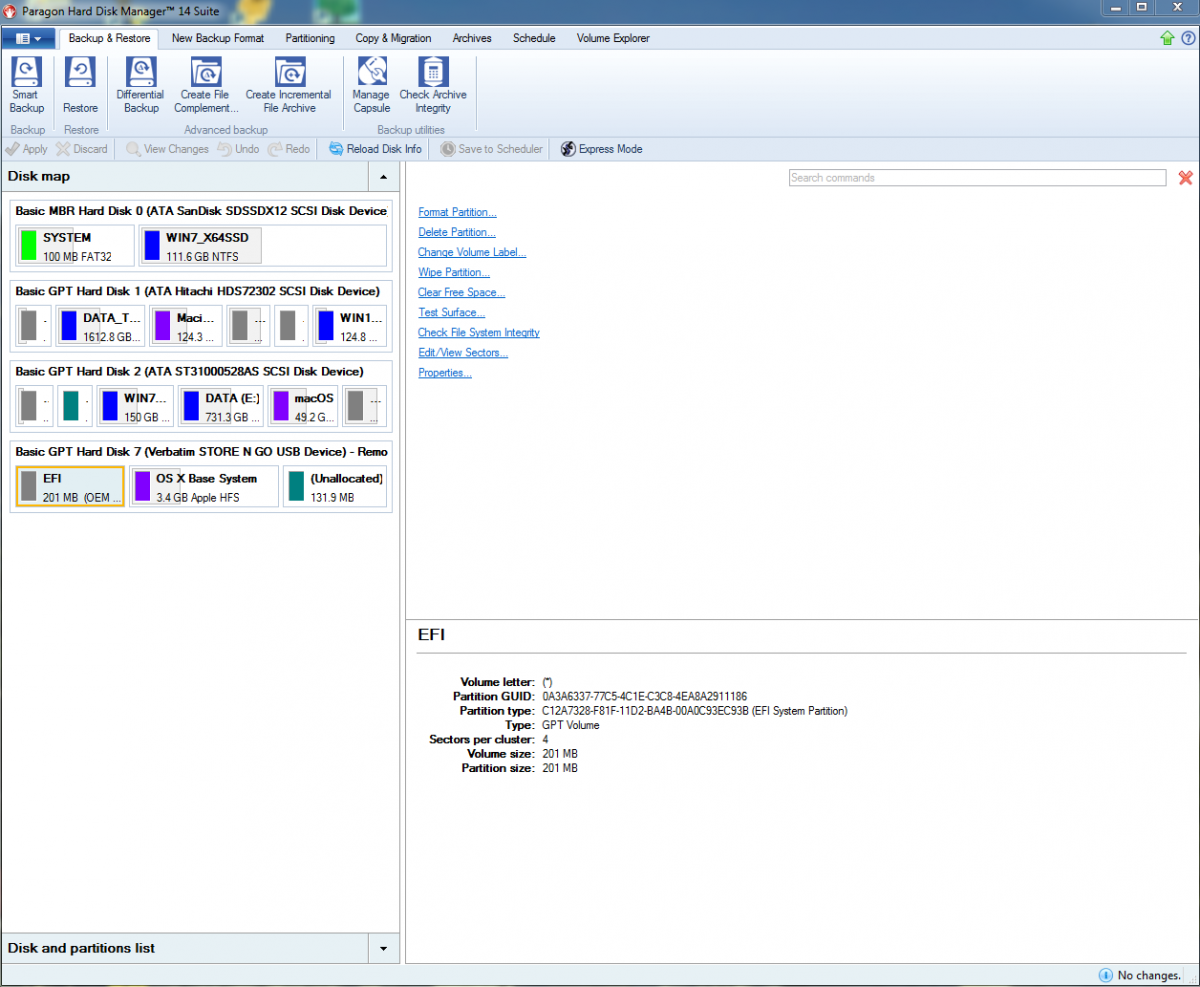
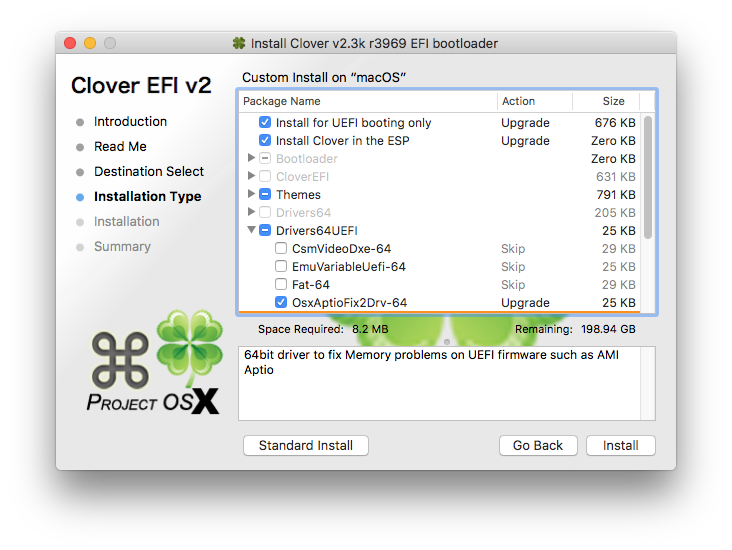
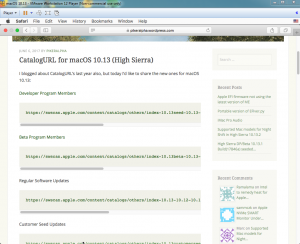
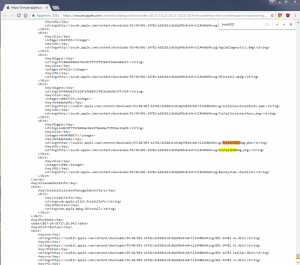
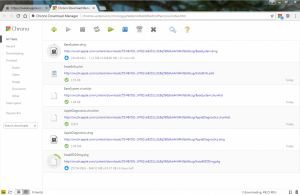
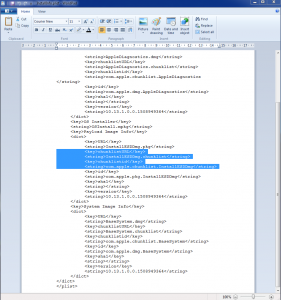
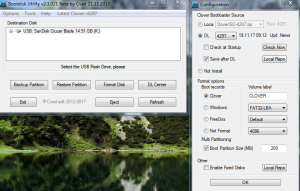
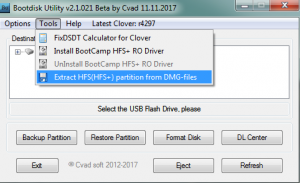
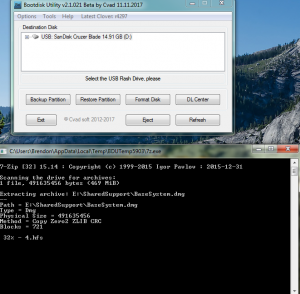
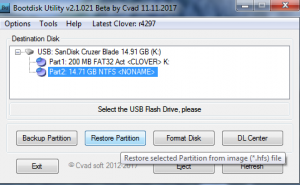
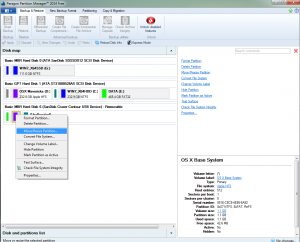
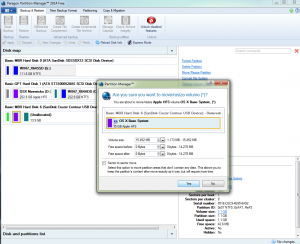
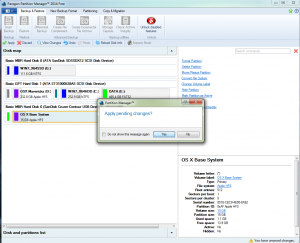
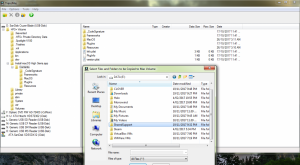
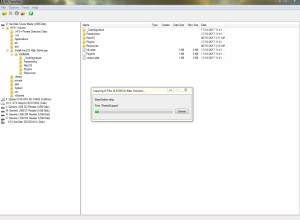
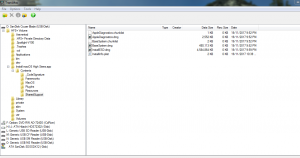
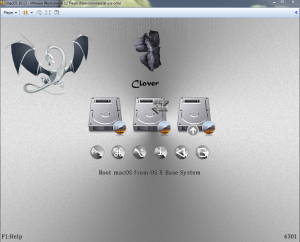
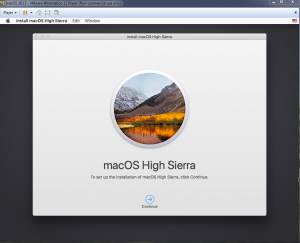
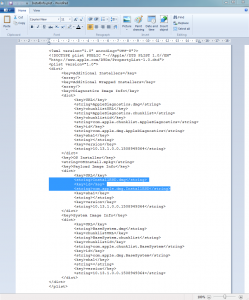
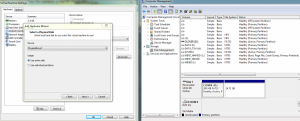
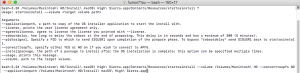
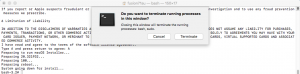
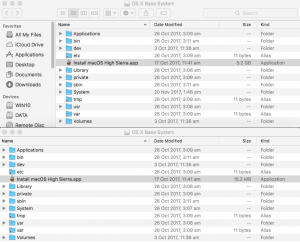
Making a High Sierra USB Installer Entirely From Scratch in Windows This is a proof of concept tutorial, to show it's possible to create a vanilla High Sierra installer, entirely from scratch, in Windows (even without App Store downloaded "Install macOS High Sierra.app" from a real Mac ). @PikeRAlpha's link to Apple's Software Catalog provides us with all the URLs necessary to download the needed files directly from Apple instead of some dubious source from the internet... Pre-Requisites 8GB or larger USB drive. Edit: Recommend 16GB or larger for macOS Catalina 10.16 Boot Disk Utility v2.1.2017rev021b from @CVAD TransMac (free 15 day trial) Paragon Hard Disk Manager Free Download Installer Files Directly from Apple 1) Browse Apple's Regular Software Catalog and find the URLs to download the following 6 installer files... BaseSystem.dmg BaseSystem.chunklist InstallInfo.plist InstallESDDmg.pkg AppleDiagnostics.dmg AppleDiagnostics.chunklist (Hint - search page for "InstallESD" to find its URL and others nearby) to a folder named "SharedSupport" on your Windows NTFS drive. A browser download manager (eg Chrono for Chrome, dTA for FireFox) is handy since InstallESD is >4GB ---> allows you to pause/resume interrupted download... 2) Rename InstallESDDmg.pkg to InstallESD.dmg 3) Edit InstallInfo.plist with WordPad/text editor to remove the chunklistURL and chunklistid keys for InstallESD, and renaming it from InstallESDDmg.pkg to InstallESD.dmg (example of edited file attached to this post)... Note: You can verify the SHA1 checksum of your InstallESD.dmg and BaseSystem.dmg with the correct ones at this website. Boot Disk Utility to format the Installer USB and Restore OS X Base System HFS partition 1. Format USB with BDU & latest Clover ---> creates boot files in CLOVER partition + second FAT partition 2. Extract 4.hfs from \SharedSupport\BaseSystem.dmg with BDU --> save to it's local folder 3. Restore 4.hfs to USB second partition with BDU ---> 2nd partition becomes bootable "OS X Base System" Paragon Hard Disk Manager to extend HFS Partition to its Full Extent Open Paragon Partition Manager Free and resize the second partition of the USB drive to the full size allowed. Don't forget to apply the changes at the end... Transmac to Copy "SharedSupport" folder to OS X Base System 1. Open the TransMac program and navigate to the HFS+ Volume/Install macOS High Sierra.app/Contents folder. Right click anywhere in the empty space on the RHS pane and select "Copy Here"... 2. In the next stage, select the "SharedSupport" folder we created above as the "Files and Folders to be copied to the Mac Volume"... Clover Settings Clover configuration is required now. The default config.plist (in the Clover FAT32 partition of the USB) maybe sufficient to boot your machine if you’re lucky. If not, the hackintosh-vanilla-desktop-guide has some good explanations on the various settings available and also offers sample configuration files based on CPU type. Also, look at the Clover Wiki, Clover Instructions and Clover Configuration Thread for pointers and edit /EFI/Clover/config.plist accordingly with Wordpad or Notepad. The location of the important configuration files for Clover are summarized below config.plist--->EFI/CLOVER folder DSDT.aml with or without SSDT.aml--->EFI/CLOVER/ACPI/patched (don't need one if your DSDT is auto patched by Clover in config.plist) Kexts eg FakeSMC, NullCPUPowerManagement --->EFI/CLOVER/kexts/<osx version> or /Other. NB BootDiskUtility by default already has FakeSMC.kext installed here. You may need to add VoodooPS2Controller for your laptop keyboard/trackpad to work. If UEFI booting, you will most likely need one of the OsxAptioFixDrv-64 drivers copied from /EFI/CLOVER/drivers-off/drivers64UEFI to /EFI/CLOVER/drivers64UEFI. If you want to use the installer to run High Sierra in Windows on VMware, you can follow my guide to set up the Virtual Machine and replace Clover's default config with EFI_Clover for VMware (which is compatible to run in VMware). In the screenshots below, I have attached the USB Installer (in this case PhysicalDrive7) to my macOS Virtual Machine. Reboot the system to the USB installer to install High Sierra ... What happens if we don't have access to TransMac or Paragon Hard Disk Manager? Not a problem, as long as we get "OS X Base System" bootable, we can launch terminal from the Utilities Menu to copy the SharedSupport folder over to the Installer app. In essence, we will build the full installer app = 5GB+ on the target HD eg "Macintosh HD", by copying both the "small" installer app = 15MB (on "OS X Base System") and the SharedSupport folder from the NTFS volume (mounted in this example on /Volumes/DATA)... -bash-3.2# cd / -bash-3.2# cp -R Install\ macOS\ High\ Sierra.app /Volumes/Macintosh\ HD/ -bash-3.2# cp -R /Volumes/DATA/SharedSupport /Volumes/Macintosh\ HD/Install\ macOS\ High\ Sierra.app/Contents/ ...then start installation with the startosinstall utility... -bash-3.2# /Volumes/Macintosh\ HD/Install\ macOS\ High\ Sierra.app/Contents/Resources/startosinstall --volume /Volumes/Macintosh\ HD --converttoapfs NO --applicationpath /Volumes/Macintosh\ HD/Install\ macOS\ High\ Sierra.app The above steps can be automated with the attached "startosinstall.command" script, which will assemble "Install macOS High Sierra.app" on "Macintosh HD" and launch the startosinstall utility targeting the "Macintosh HD" volume. Copy/download to "Macintosh HD", then run in terminal (after attaching DATA USB with /Shared Support folder)... cd "/Volumes/Macintosh HD" chmod +x startosinstall.command ./startosinstall.command Updated Download Links for macOS Mojave 10.14.6_18G103 Browse Apple's Regular Software Catalog and find the URLs to download the following 6 installer files... BaseSystem.dmg BaseSystem.chunklist InstallInfo.plist InstallESDDmg.pkg AppleDiagnostics.dmg AppleDiagnostics.chunklist Note: In Mojave, Apple has removed the --converttoapfs NO and --applicationpath arguments from the startosinstall utility.... eg to use startosinstall for the above section "What happens if we don't have access to TransMac or Paragon Hard Disk Manager?", the syntax is now -bash-3.2# /Volumes/Macintosh\ HD/Install\ macOS\ Mojave.app/Contents/Resources/startosinstall --volume /Volumes/Macintosh\ HD This basically means that for Mojave, the default installation will always convert the target volume to the apfs file system. Updated Download Links for macOS Catalina 10.15.6_19G73 Browse Apple's Regular Software Catalog and find the URLs to download the following 6 installer files... BaseSystem.dmg BaseSystem.chunklist InstallInfo.plist InstallESDDmg.pkg AppleDiagnostics.dmg AppleDiagnostics.chunklist startosinstall.command.zip InstallInfo.plist_edited_10.13.6.zip InstallInfo.plist_edited_10.14.6.zip InstallInfo.plist_edited_10.15.6.zip


 2 points
 -
I extracted from a retail store, sorry. people here may help you: https://applelife.ru/threads/darwindumper-dampy-nastojaschix-macov.39174/2 points
-
https://nofile.io/f/1M5XHjefftR Real iMac 18,3 IORegExplorer 3.0.22 points
-
👉 Rules Our goal is ensure that the forum remains a helpful & friendly place to learn about how to run Mac OS X on non-Apple hardware, and of course other general banter. We want you to be able to discuss anything and everything here, and to do so we ask that you check out these guidelines for forum use. Do not upload anywhere else files when developers specifically ask not to. We take this matter very seriously, as developers are the very heart of our community. No Flaming. This includes racism, threatening, personal attacks, victimization or hateful content. Retaliation will not be tolerated either; if a member has broken a rule, please use the report feature on the forum and the staff will deal with the situation appropriately. No posting of direct or indirect links to warez or pirated pieces of software, this includes cracks, serials and torrents. Do not publicly argue the decision of a moderator. If you disagree with a moderator take it up with them in private via PM. Only one (1) login is allowed per member. Duplicate accounts will be banned or deleted. Bumping of posts is not permitted. Other than being less annoying it also keeps the posts more informative. Meaningless and useless posts may be removed at Moderator's discretion. Only post your post once (1). This keeps the forum cleaner and makes it easier to find what you are looking for. No advertising or business offers of any kind. No posting of copyrighted material. This includes copying and pasting news articles from news websites. Attached materials must come with clear descriptions of what they are and what they do, linking to this information elsewhere is not sufficient. Materials derived from Open Source must include source code, as well as an explanation of what has been done to it. Discussion of P2P, torrent sites, or similar download sites of any kind will not be tolerated. We do not want to know your illegal downloading habits. Do not post spyware or any other malware. This includes linking to other sites which may contain it. Posting just to promote another site, product, or service (spamming) is not allowed. This site is not here for you to promote your own or anyone else's material. Discussion of commercial spin-offs of the OSx86 scene is allowed if it’s to understand their existence, but no discussion of how to use them, nor any support for these commercial spin-offs are allowed as they are not in the spirit of the OSx86 scene. Example of commercial spin-off: tonymacx86. Why InsanelyMac does not support tonymacx86 VERY IMPORTANT: PLEASE READ! (ABOUT TONYMACX86 AND iATKOS M / Y / EC / SR) 👉 Posting Guidelines If you have a question please do your best to use the search feature and search the forum before creating a new topic. Post in the correct forum and read the forum description. This will make sure that your post will not be removed. Pick an appropriate title and tags (if any) for your post. A good title makes it easier to find what you are looking for. Using informative tags allows for improved searching of related topics. All posts must be clearly written and easy to read. For example, if you have long blocks of text, use the Code option, etc. Limit "empty lines" as much as possible, use punctuation where you can and be concise. Posts may be edited for this reasons by InsanelyMac staff at their discretion. Please remember that you are in a public forum, a bit of courtesy is always welcome. It's always nice to start by saying "Hi" or "Hello" before asking a question or seeking help. Also a "thank you" would be appreciated, especially if the help you get is effective. Your topic does not deserve any more attention than others seeking help hence topic titles must reflect their content, and topic titles containing things like: 'please help' 'look here' 'cash reward' 'urgent' or other inaccurate descriptions will be removed. This includes all-caps titles. Give your hardware specs when necessary (asking for support) and any other time where it may be beneficial to have them listed. Watch this video to guide you how to do that: [Video] How to add a signature. 👉 Signatures, Avatars and Nicks Keep your signature/avatar clean and tidy - should you receive a PM from the staff regarding your signature/avatar, please make the requested alterations or it may be removed/shortened appropriately. To keep pages loading fast for everyone, we request that your signatures and avatars contain no animations or high-definition graphics of any kind. Signatures should be no more than 6 lines of text using a regular font. If you can't fit all of your system specs in that you'd like, why not create a small graphic to contain the information? They should also contain no referral or affiliate program graphics. Avatars should be in "good taste," a qualification that is broad enough to let us determine what is and isn't. Goth-devil-child-wild-eyed-in-the-violent-blackness probably qualifies as being in bad taste. Nothing offensive, pornographic, or vulgar. Nicknames must be readable by the system (without question marks). This will ensure that your nickname can be searched, and that other users can contact you. They should also not contain staff member groups (administrator, moderator, developer, etc.) to prevent confusion. Nicknames should also show respect to the community, thus nothing containing offensive language. Email addresses must be real. Accounts not in line with the last two rules will be edited or deleted without warning. 👉 Policing Do not publicly discuss the decision of a moderator. If there is any issue with a decision of a staff member PM them or contact an admin. Moderators have the ability to suspend or impose posting restrictions upon accounts based on the user's history. Records are kept to keep track of user's behavior and point out repeat offenders. Attempts to circumvent posting restrictions will lead to your account being banned, and any other accounts affiliated with your account being banned also. These rules cover a broad spectrum and are set up to preserve a free and open (and fun) place for discussion. They, in conjunction with common sense and good judgment, should steer you in the right direction. We're all human and we know that people make mistakes... but that's also not an excuse. More rules are subject to appear on this board as we see fit, so please check back from time to time for your own benefit. Thanks for joining our community and helping make it the best it can be. In case the rules localizations should differ, the English rules are the standard.
 2 points
 -

Version 2.3.3
21,808 downloads
This version of the driver is not compatible with AppleVTD. Key Features of the Driver Supports Qualcomm Atheros AR816x, AR817x, Killer E220x, Killer E2400 and Killer E2500. Support for multisegment packets relieving the network stack of unnecessary copy operations when assembling packets for transmission. No-copy receive and transmit. Only small packets are copied on reception because creating a copy is more efficient than allocating a new buffer. TCP, UDP and IPv4 checksum offload (receive and transmit). Support for TCP/IPv6 and UDP/IPv6 checksum offload. Makes use of the chip's TCP Segmentation Offload (TSO) feature with IPv4 and IPv6 in order to reduce CPU load while sending large amounts of data. Fully optimized for Mountain Lion, Mavericks and Yosemite (64bit architecture) but should work with Lion (only 64bit) too, provided you build from source with the 10.7 SDK. Wake on LAN support. VLAN support used to be broken in older versions but is working since version 2.3.2. The driver is published under GPLv2.1 point -
Version 2.0.1
28,883 downloads
Driver for Realtek's RTL810X Fast Ethernet family of NICs which supports these chips: RTL8101E RTL8102E RTL8103E RTL8401E RTL8105E RTL8402 RTL8106E RTL8106EUS RTL8107E Features: Version 2.0.0 requires Sierra (may work on El Capitan too but this is untested). Previous versions of OS X are supported by version 1.0.0. 64 bit architecture only. Support for multisegment packets relieving the network stack of unnecessary copy operations when assembling packets for transmission. No-copy receive and transmit. Only small packets are copied on reception because creating a copy is more efficient than allocating a new buffer. TCP, UDP and IPv4 checksum offload (receive and transmit). TCP segmentation offload under IPv4. Support for TCP/IPv6 and UDP/IPv6 checksum offload. Supports Wake on LAN. Support for Energy Efficient Ethernet (EEE) which can be disabled by setting enableEEE to NO in the drivers Info.plist without rebuild. The default is YES. The driver is published under GPLv2.1 point -
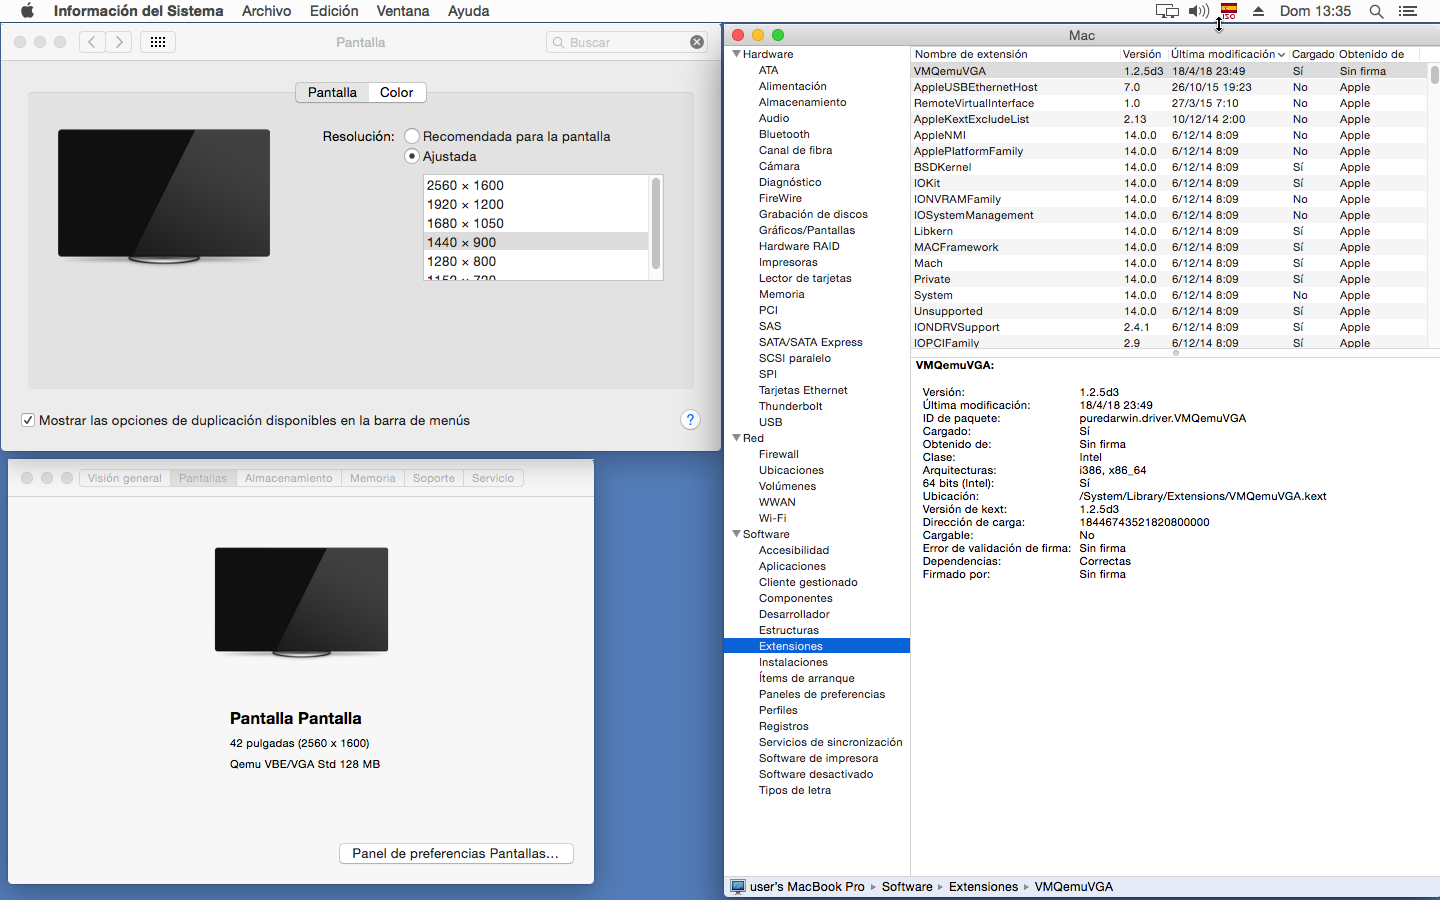
VMQemuVGA display adapter driver for OSx86 running as a VirtualBox guest. The binary should work on all OSs from Snow Leopard up to Yosemite 10.10. It allows to set different screen resolutions in VirtualBox from System Preferences. The changes I've made to the fork have been minimal. GitHub project page Binary and source releases Special thanks: PureDarwin probonopd rafirafi Zenith432 VMware, Inc

 1 point
 -
Check this one: hwmonitor2.zip, there is much more information about the CPU MACHINE STATUS: CPU: Name: Intel(R) Core(TM) i5-3210M CPU @ 2.50GHz Vendor: GenuineIntel Physical cores: 2 Logical cores: 4 Family: 6 Model: 58 Ext Model: 3 Ext Family: 0 Stepping: 9 Signature: 198313 Brand: 0 Features: FPU VME DE PSE TSC MSR PAE MCE CX8 APIC SEP MTRR PGE MCA CMOV PAT PSE36 CLFSH DS ACPI MMX FXSR SSE SSE2 SS HTT TM PBE SSE3 PCLMULQDQ DTES64 MON DSCPL VMX EST TM2 SSSE3 CX16 TPR PDCM SSE4.1 SSE4.2 x2APIC POPCNT AES PCID XSAVE OSXSAVE TSCTMR AVX1.0 RDRAND F16C Ext Features: SYSCALL XD EM64T LAHF RDTSCP TSCI Microcode version: 31 Thermal sensors: 1 Thermal invariant APIC timer: 1 System: 1% User: 3% Idle: 95% Nice: 0% MEMORY: Physical size: 8.0GB Free: 48MB Wired: 1.99GB Active: 2.39GB Inactive: 2.36GB Compressed: 1.22GB SYSTEM: Model: MacBookPro10,1 Sys name: Darwin Node name: FrancescoRs-MBP.station Release: 17.6.0 Version: Darwin Kernel Version 17.6.0: Fri Apr 13 19:57:44 PDT 2018; root:xnu-4570.60.17.0.1~3/RELEASE_X86_64 Machine: x86_64 Uptime: 2d 8h 40m 15s Processes: 350 Threads: 1264 Load Average: [1.74, 1.49, 1.44] Mach Factor: [2.8799999999999999, 2.4100000000000001, 2.2010000000000001] POWER: CPU Speed limit: 100.0% CPUs available: 8 Scheduler limit: 100.0% Thermal level: Not Published BATTERY: AC Powered: false Charged: false Charging: false Charge: 37.0% Capacity: 3248 mAh Max capacity: 8719 mAh Design capacity: 8719 mAh Cycles: 487 Max cycles: 1000 Temperature: 22.0°C Time remaining: 1:561 point
-
AAAAH, funcionando agora, muito obrigado <3. Agora só falta o Caps Lock e tudo 100% funcionando1 point
-
Testa ai: DSDT.aml.zip O que eu fiz foi seguir essa dica do RehabMan: How to fix this error “Invalid type (Target is [Package], Source must be a package also)”1 point
-
Pra conseguir salvar você tem que resolver esses 3 erros, se não esquece. Salva o arquivo em .dsl, e posta aqui. Provavelmente o @MaLd0n, conseguirá te ajudar com isso. Pra ter uma visão mais aberta sobre seu sistema, rode esse app, e poste o resultado aqui: RunMe1 point
-
I suppose suggesting to use bless data instead of endless lines of static paths and detection logic will not work now either?1 point
-
See my changes to the project to compile without warnings and the application works fine. myDiff.txt1 point
-
Thank you very much. I couldn't create any new topic and your comment has solved the problem.1 point
-
Non riesco aprire Darwin Dumper1 point
-
Good! This Monitor is no more crashed. I tested right click on all lines and got popup window or blow sound. Very fine!1 point
-
Some searching seems to suggest that recent QCA 802.11ac chipsets use a different HAL. I'm not sure if patching AirPortAtheros40 (based off the older HAL for Atheros 802.11g/n cards) driver would be feasible in this case.1 point
-
The signature box in my account settings stopped working recently. It just doesn't appear. I was using the "InsanelyMac (Default)" theme. Changing to "Default" or "InsanelyMac Theme" brings the box back. Picking "InsanelyMac (Default)" in the account settings screen also breaks the theme dropdown.1 point
-
Ciao ragazzi, vi ringrazio per tutti gli aiuti che mi avete dato, per concludere o installato di nuovo Windows sull’altro SSD in UEFI e adesso è tutto perfetto e in UEFI appunto Funziona tutto a meraviglia! Inviato dal mio iPhone utilizzando Tapatalk Pro1 point
-
@Slice this is the last build: HWSensors-3_r123.pkg.zip1 point
-
Aus deinen Namen schliesse ich, das du Deutsch kannst. Mein Englisch ist nicht so gut. Ich nutze einen ähnlichen Adapter (M.2 zu Mini PCI-E -> https://www.reichelt.de/DELOCK-62848/3/index.html?ACTION=3&LA=55&ARTICLE=199211 ) mit einer Atheros AR5B95. Funktioniert problemlos und ohne BIOS Modifikation auf meinen T460s. Konnte ihn, dank des Flachbandkabels unter dem rechten Lautsprecher platzieren. Gruß Willy.1 point
-
TODO. 1. We have a patch FixRegions but it works only in DSDT. In some cases Regions present in SSDTs and we should take them into account like GetBiosRegions(SSDT) 2. ArbitraryProperties should be rewritten to accept xml like gfxutil (DarwinDumper) <key>PciRoot(0x0)/Pci(0x1b,0x0)</key> <dict> <key>PinConfigurations</key> <data> AA== </data> <key>layout-id</key> <data> DAAAAA== </data> </dict> <key>PciRoot(0x0)/Pci(0x1c,0x4)/Pci(0x0,0x0)</key> <dict> <key>built-in</key> <data> AQ== </data> <key>device_type</key> <string>ethernet</string> </dict> 3. FixAirport causes crash. 4. FixUSB is not good for PCIe XCHI controllers. 5. I propose to make special kind of DSDT binary patches like Rename. Such patch should search all occurrence of device _SB.PCI0.RP01.PXCS but not _SB.PCI0.RP02.PXCS assuming check for partial defines Scope (_SB.PCI0) { Device (RP01) { ... 6. DropOEM_DSM can be excluded. Any help from programmers will be appreciated.1 point
-
10.13.4 (17E199) with iMac 17,1 SMBIOS. 106 or 105 patched to run worked fine. .30.103 drivers cause graphics crash loop when initializing the displays. the Fix Kext [LILU and Graphics Fixup], manual editing of graphics display kext [to clear out custom display configs], clearing of nvram all don't fix. Have to roll back to the 105 or 106 release for 10.13.2 to get it working. Still can't get the native Skylake SMBIOS and Nvidia Web drivers to work together with my GTX 1080.1 point
-
this kext is for it, for edit for a good usb solution1 point
-
Ok, I made something that is working ! @MaLd0n Tell me if it's ok. (seems like it by my testing) - Opened IOreg, searched for USB port attached to my commander. (HS14) - Opened UsbInjectAll.kext > Info.plist - Searched for HS14 and changed the "3" value to "255". Sleep seems to work now. Isn't there an more elegant solution to this? I feel like changing kext values is kind of {censored} no?1 point
-
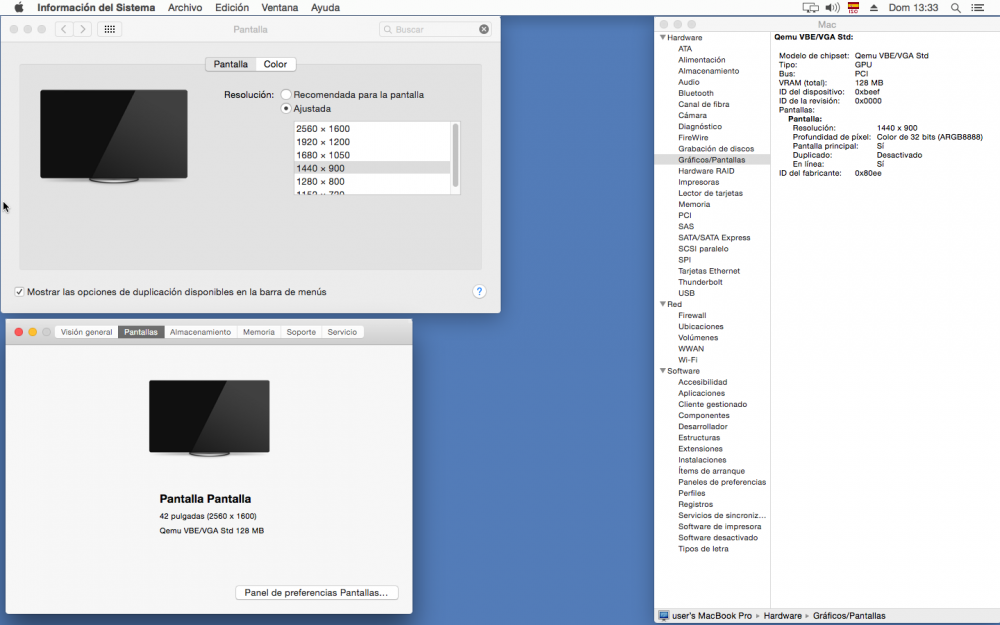
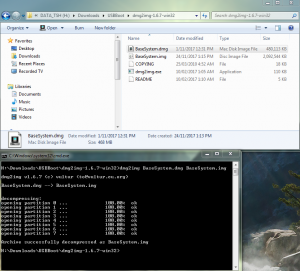
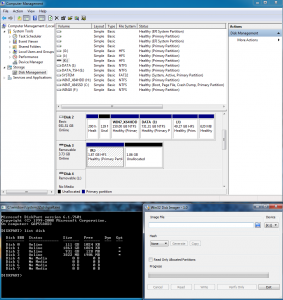
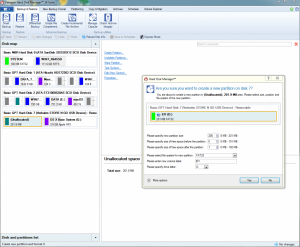
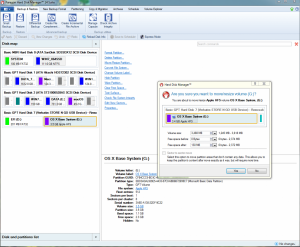
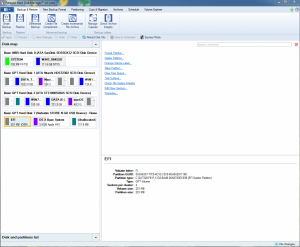
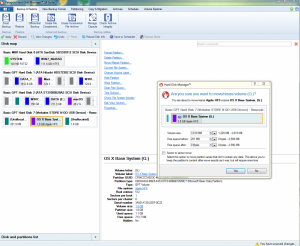
@ice_pdb, Yes, its possible to create a GPT formatted installer disk with dmg2img for Windows, Win32 Disk Imager, Paragon Partition Manager and gdisk instead of MBR using @CVAD's Boot Disk Utility. Procedure 1) Convert BaseSystem.dmg to BaseSystem.img with dmg2img.exe: In command prompt, type dmg2img BaseSystem.dmg BaseSystem.img 2) Open BaseSystem.img in Win32 Disk Imager ---> write to USB drive 3) Launch Paragon PM and move HFS+ OS X Base System volume to the right so 200MB free space created at the start of the drive create new 200MB FAT32 partition at the start of the drive, labelled EFI extend HFS+ OS X Base System volume to right (but leave approx 130MB free space at end) 4) Set correct name, type and partition attribute for EFI System Partition with gdisk in command prompt window. Final result ... 5) Open TransMac to copy downloaded files in /SharedSupport folder from NTFS Windows drive to /Install macOS High Sierra.app/Contents on "OS X Base System" HFS volume 6) Install Clover in Windows - see guide here . Post#1 is for UEFI systems ---> only need to copy CLOVER folder into /EFI on the EFI System Partition + replace /EFI/BOOT/BOOTX64.efi with Clover's BOOTX64.efi. Post#3 for legacy BIOS systems ---> need to also install boot sectors (boot0af, boot1f32 in MBR/PBR with Bootice Program) and boot6 or boot7 in the root / of the EFI partition. Note: the MBR installer made with @CVAD's Boot Disk Utility already has legacy boot sectors for Clover installed ---> should work with BOTH legacy and UEFI systems.

 1 point
 -
You don't need a Disabler binary to create a disabler kext. It can be done as a codeless kext. Take a look at my version of the same. It is just an Info.plist. Attached. EFICheckDisabler.kext.zip1 point
-
Lenovo T420 Clover Guide Release on GitHub Updated to Clover r5142 OpenCore (0.7.6) as an alternative boot manager Recent highlights: Added older versions of IntelMausiEthernet for 10.12, 10.13, 10.14, 10.15 Force DualLink for the 1600x900 configs Update Theme (icons and boot chime option) Use WhateverGreen.kext for GFX patching and properties by default VoodooPS2Controller.kext - with new SSDT option for custom key map AppleALC.kext - merged properties for T420 (changed Layout 12 to 14) Update T420s with SSDT for PS2K device config.plist changes: Revised to common config.plist for simplicity Changed config.plist file to use audio layout id 14 (or 13 for dock) Update config.plist files to set slide=0 by default Removed ACPI patching by Clover (except Fix_Regions) since patching is already in provided in the DSDT Provide alternate config.plist files and DSDT files for testing glitchy 1600x900 LCD 3 alternate configs: EDID-2e2, EDID-2e3, EDID-366 - 60 and 50 Hz modes T420 Clover Guide and Steps Overview The zip file is a complete ESP/kext pack for the Lenovo T420 using Clover on macOS. This file set and method works for Sierra and High Sierra. Full Clover ESP file set - config.plist + required custom kexts + custom ACPI files (DSDT/SSDT) The actual zip bundle releases are posted on GitHub.com * For Mojave (10.14.x) and Catalina (10.15.x) - use dosdude1 installer method + this ESP bundle Apple removed support of HD 3000 Graphics see the "dosdude1" method to create an installer for unsupported Macs: http://dosdude1.com/software.html combine the methods outlined here with dosdude1 method (add Clover to EFI) tested on: 10.12.6, 10.13.5, 10.14.x and 10.15.x Non-maintained Mountain Lion Kext Bundles for 10.8.4 are in post #241 and 10.8.5 in post #397 Also for L420 Guide, see the one by kosakgroove Why Clover vs Chameleon? Native UEFI boot support for macOS (and Windows) on GPT disks. Native Apple macOS Installers and App Store Updates. Supports Recovery HD for system recovery, iMessage, Find My Mac, etc. Dynamic DSDT and Kext patching. Caveat: My system is a T420 with 1600x900 LCD and dedicated Intel HD 3000 Graphics Only. This zip contains what is working for me on this specific model. The related models - such as T420s, T420i, T520 and W520 family - may work as is or need some changes to config.plist and/or the DSDT. In the DSDT source (.dsl) file, the changes are indicated by notes and comments. If your HW is the same as mine, the included DSDT and configuration files may need to be retrofitted to work for your system. The guide has 2 parts or phases: How to create a USB installer to install macOS, and How to complete the OS installation to run macOS BIOS settings Recommended is BIOS v1.46 (and stay on 1.46 if you want use a modded bios - but there are later mods now) Recommended: reset to defaults. Most defaults settings will work - but check these settings: Set Config / Serial ATA (SATA) / SATA = AHCI Set Security / Memory Protection / Execution Prevention = Enabled Disable Discrete Nvidia/Optimus (use integrated HD 3000 only - unless you really know what you are doing!) Note: The custom DSDT is based off BIOS v1.46 (flashed with whitelist mod or original) Terms: GPT = GUID Partition Table MBR = Master Boot Record ESP = ESP = EFI System Partition, the ESP is created automatically as the first (hidden) partition by the Disk Utility when the GPT option is selected for partitioning a disk. Part 1 - OS Installation These steps and procedure is for a complete new fresh installation using an USB Installer. If you are upgrading to High Sierra from an older working version of macOS (say El Capitan or Sierra is on your HD downloaded from the App Store), skip down to Part 2, Step 3 to update your ESP. You must replace or merge in the changes from the EFI/CLOVER files to your HD ESP before you perform the upgrade. 1.1 Overview and Downloads Download and expand (extract) the zip file contents from here: GitHub Lenovo T420 Clover Latest Release. This same file set will be installed on the USB and the HD for UEFI boot. Download macOS from the App Store - they are freely available. One can build a macOS USB installer with the standard macOS installer app downloaded from the "App Store". Install macOS to a GPT formatted disk using the standard Install macOS.app downloaded from the Apple Store. 1.2 Create a standard macOS USB installer Partition an 8GB (or larger) USB formatted with GUID Partition Table (GPT) use the Partition Options... menu to change from MBR to GPT Name the partition - USB - the install process will rename it, but it matches the script below. Use format: Mac OS Extended (Journaled) (formerly OS X Extended) Note: if you have a larger USB (say 16GB) you can split into 2 8GB partitions, so you can have 10.13 and 10.12 installers on the same USB key Run this command to copy the bits to the USB key: sudo /Applications/Install\ macOS\ High\ Sierra.app/Contents/Resources/createinstallmedia --volume /Volumes/USB --applicationpath /Applications/Install\ macOS\ High\ Sierra.app –nointeraction Note: if using an older version of macOS, replace with the corresponding app name. 1.3 Put Clover installation on USB Install Clover on the USB sudo mkdir /Volumes/ESP-USB sudo mount -t msdos /dev/disk1s1 /Volumes/ESP-USB cp -a ~/Downloads/Lenovo-T420-CloverYYYY.MM.DD/EFI/ /Volumes/ESP-USB/EFI Manually mount the ESP of the USB (there is script - espmount.bash - that you can use later in the Utilities folder as an option) If not done already, expand the downloaded Zip to ~/Downloads/LenovoT420-Clover-YYYY.MM.DD (this file set is the Zip) Copy the EFI directory to the ESP directory of the USB For example, assuming the USB is disk1: Note: run "diskutil list" on the command line to find your USB and HD disk devices 1.4 Boot Clover from USB Installer and select Install macOS Install the OS on your GPT disk on the macOS partition. Make sure the drive is formatted using: Scheme: GUID Partition Map (GPT) Partition Name: macOS Format: APFS - use macOS Extended (Journaled) for Sierra Dual BOOT tip: If you plan to dual boot Windows from the same HD - DO NOT make the 2nd partition NTFS or ExFAT with the Disk Utility app. For now make the all partitions "APFS" or "Mac OS Extended (Journaled)" Size the 2 partitions appropriately - later you will delete and reformat the 2nd unused partition space for Windows 1.5 GUI Install of macOS Click through the install menus and wait for the installation to fully complete - on a spinning disk takes about 30-45 minutes. Follow these Notes and Tips: When the installer screens shows: "To pair a Bluetooth keyboard, turn it on and wait for your computer to connect to it.” Hit the Space Bar to get past this step. When installer seems to hang at: "About a second remaining” Don’t Panic, this "second" may take about 10 minutes or more to finish. Just wait for the installer to reboot the computer and continue the installation. The whole install process takes about 1 hour to complete. On the first boot from the HD when asked: "How Do You Connect?” Select: “My computer does not connect to the Internet” You can set up the network later after installation of the NIC driver kext - but it may already be working. The stock Intel WiFi will not work. Period. Part 2 - Post OS Installation and Setup on HD/SSD 2.1 Boot Clover from USB On startup, hit F12 and select USB boot - but now in Clover select the newly installed disk/partition to start macOS. Note: You may see 3 Volumes instead of the expected 2 on the HD - macOS + Recovery HD - make sure you pick the volume that is NOT labelled Recovery HD. See step 3 below to remove the logical volume eliminates the confusion. 2.2 Complete the installation steps - boot up and login Boot up macOS with Clover injecting the custom kexts from the USB. Login and start a terminal session. 2.3 Install Clover on the Boot Drive ESP Download (or transfer) the same Zip files to the HD. (See below for details) In general, the provided kexts do not require any modification. Backlight should work if using WhaterEvergreen kext. Details for Installing Clover Bundle on the Boot Drive ESP Now make the ESP contents on the boot drive exactly like the ESP used to setup the USB installer above. Manually mount the ESP of your HD on /Volumes/ESP. (See first 2 commands below.) Replace the ESP installed by Clover in the previous step -- means you copy/replace these 2 directories /Volume/ESP/EFI/CLOVER and BOOT with the ones from the Zip file. Just as you did for the USB, the config.plist is renamed from the one that matched your LCD. Mount and install the ESP bits to your HD/SSD (disk0) by following the same procedure as for the USB. Note: If you previously installed Windows, be careful to not lose the EFI/Microsoft contents. Note: The Clover config.plist default volume name (the volume to boot automatically) is set to "macOS" - meaning your new volume is assumed to be named "macOS". If you use a different name - like "Macintosh HD" change the volume name or edit the name in config.plist to match. sudo mkdir /Volumes/ESP sudo mount -t msdos /dev/disk0s1 /Volumes/ESP cp -a ~/Downloads/Lenovo-T420-Clover-YYYY.MM.DD/EFI/ /Volumes/ESP/EFI 2.4 For 1600x900 LCD - Recommended Option: Install (copy) the DisplayVendorID-* directories Many have GFX problems (glitches/lines) with 1600x900, so there are 3 configurations that inject an alternate EDID and set DualLink=1. Gfx freezes and glitches can be minimized by these alternate configs. If the default doesnt help - try the other EDID-* configs ( 2e2 or 2e3) which is the same as config.plist) first - copy one to replace the default config.plist. Then, these matching display options can help remove glitches with display speed/size options. The override files also provide a more natural color correction and gamma curves as well as more screen sizes for select Lenovo LCD models. These files are included in the Zip file and should be copied (via sudo) to /System/Library/Displays/Contents/Resources/Overrides. NOTE: For Catalina you may need to mount / (root) as read/write. SIP should already be disabled so you can write to the destination. Note: For Yosemite or earlier versions, these files go in /System/Library/Displays/Overrides sudo cp -a ~/Downloads/Lenovo-T420-Clover-YYYY.MM.DD/\:System\:Library\:Displays\:Contents\:Resources\:Overrides/DisplayVendorID-* /System/Library/Displays/Contents/Resources/Overrides/ Note: for Catalina you need to make / (root) read/write - to do this step, issue this command before the above command: sudo mount -uw / 2.5 Remove the USB and Reboot to load Clover from the HD Notes: For this first boot, hit the spacebar on your boot selection (macOS) and use verbose mode. See below for other tools and scripts for to help with sleep/wake issues. Enjoy your Hackintosh! Optional Steps (no longer required) 1) Install the all custom kexts to your OS /Library/Extensions folder Note: These days, Clover can "Inject" all the custom kexts from the ESP - so you no longer have to copy/install them into your system OS. However, if desired install the custom kexts from the Zip kexts directory to the /Library/Extensions directory by running: cd ~/Downloads/Lenovo-T420-Clover-YYYY.MM.DD/EFI/CLOVER/kexts/ sudo ./_kext-install.command 2) Ethernet Device Installation If you do not already have an ethernet device created as en0 - you can check the System Preferences/Network tool - this step loads the ethernet kext and resets network device order to have ethernet as en0. Seems to help with AppStore and iMessage etc. Note: macOS may already have configured the ethernet, so this step may be unnecessary but it will not hurt anything either for a fresh installation. Run this set of commands: sudo kextload /Library/Extensions/IntelMausiEthernet.kext sleep 10 sudo rm /Library/Preferences/SystemConfiguration/NetworkInterfaces.plist 3) Optional: Create a customer injector.The included/pre-made AppleBackLightInjector kext may work "as is" if you have a common Lenovo LCD. This kext gives full uniform brightness range for the LCD. You can create a custom Backlight Injector kext for your LCD Panel if needed. This script will update the kext in the ../../EFI/CLOVER/kexts/Other directory - which is the unzipped package location. This AppleBacklightInjector kext replaces the (obsolete) IntelBacklight.kext and the kext install script will remove the old one if on 10.12.4 or later. You may manually remove that kext if present. To create this custom kext, run this procedure script: cd ~/Downloads/Lenovo-T420-CloverYYYY.MM.DD/Utilities/Create_AppleBacklightInjector_kext/ sudo ./createAppleBacklightInjector.command Post Installation - Known Issues and Random Tips: GFX distortion/stretching: See Step 2.4 - sometimes DualLink is not set right for 1600x900 LCD. WIFI: The stock Intel WiFi will not work. The common approach is use a modded BIOS 1.46 (or later) and replace the WiFi with a Broadcom or Atheros chip. Bluetooth: Enable (turn on and leave on) Bluetooth so the green light is showing on the LCD bezel (do from Windows or Ubuntu). Also make sure the side switch is set to green too! "Black" Screen - hit "Pause" (or FN Home) key to increase LCD brightness sometimes the saved value in the nvram is out of sync or zero so LCD seems to be off. Audio: When using external headphones or speakers, may need to plug and unplug 1 or 2 times for recognition. Suggested settings if you don't want or use hibernation: sudo pmset -a hibernatemode 0 rm /var/vm/sleepimage Hibernation - Use OsxAptioFix2Drv-64.efi instead of OsxAptioFixDrv-64.efi UEFI driver for restart from hibernation. (Have not tested this in a long time). For hibernation, then set hibernate mode to 7 (mode 7 is like mode 3 but without encryption) - may need to manually edit this value into the plist file now. Note: Booting up from the hibernated image may have jumbled or blank LCD until you do a sleep/wake cycle to reset the LCD. sudo pmset -a hibernatemode 7 If you still have HFS+ formatted part vs APFS, Clover may present 2 options for main OS partition if using Logical Volume vs Standard Volume. You can revert the logical volume, so Clover will not get confused and present duplicate options. Just "revert" using: sudo diskutil corestorage revert / Note: Bluetooth seems to have some issues in High Sierra (early version) the workaround seems to be turning off BT before sleep. This process can be automated by installing the Sleepwatcher tools - which handles the sleep/wake scenario. Optionally one can install "Clover" scripts which turn on/off all networks during shutdown via LoginHook and LogoutHook. The are scripts to re-enable all networks up login or during boot up. Go the Utility Folder in the zip and run these command: ./install_tools.command ./install_sleepwatcher.command ./install_clover_scripts.command Fixed: iMessage/Messages/FaceTime may not register without overriding the Clover generated values for ROM and MLB values. Search thread for ROM to get more info. Otherwise define and inject using RtVariables -- see wiki for details - there are placeholders in the config.plistFixed: TrackPoint may not be responsive on startup (very random occurrence anymore) - a sleep/wake cycle should revive it. Fixed: With WhateverGreen or ACPIBacklight.kext installed, boot with lid open or LCD will be black when you open it. Fixed: Not needed anymore: Add boot option darkwake=0 if you would like to disable power nap - and have the lid wake the gfx instead of hitting extra key. OBSOLETE: After installing the kexts to /L/E, sometimes the symbolic link to the actual binary file referenced in AppleHDA_20672.kext is not right. Fix this link by running this script: cd /Library/Extensions/AppleHDA_20672.kext/Contents/ MacOS sudo rm AppleHDAsudo ln -s /System/Library/ Extensions/AppleHDA.kext/Contents/MacOS/AppleHDA sudo touch /System/Library/Extensions Notes on Custom Kexts FakeSMC.kext - Core hack mechanism. Using Kozlek's version + plugins + custom FakeSMC Info.plist - 2 Custom SMC keys are added to Kozlec's standard FakeSMC - FNum (to find the Fan) and ACID (for AC power and eliminate powerd syslog messages every 30 seconds). - A Custom package is included in the Utilities folder so you can install HWMonitor.app - it just selects these 2 Plugins Sensors: ACPI and CPU. Lilu.kext - by acidanthera - for use with certain kexts such as AppleALC, NightShift, WhateverGreen AppleALC.kext - by acidanthera - Keep original/unmodified AppleHDA.kext in /S/L/E and use this kext to add full audio support for CX20672/CX20590. There are 2 layout-id profiles: (1) ID 14 for normal laptop ports and (2) ID 13 which adds the audio ports on the Docking Station. Thanks to Manwe150's fix/additions for dock ports. The "dock" version adds the second channel output called "Headphones" and a second Input which shows up as either "Line In or Built-in Microphone" - these ports are physically on the Docking Station itself. IF you have a dock and want to use the extra ports, then set/inject Audio ID 13 in the Clover config.plist - IF you DO NOT have a dock, then use everything as is (and not be confused by the extra Input/Output options!!!) WhateverGreen.kext - by acidanthera - for Graphics and Backlight patching ACPIBatteryManager.kext - by RehabMan - show/track battery info on menu bar - Note: most Info.plist items are set to False instead of True Bluetooth_Injector_T420.kext - adds ProductID 8575 to make BT work better (provides on/off capability). IntelMausiEthernet.kext - Mieze's Intel LAN kext that supports TSO, EEE and other features. Put this kext in /Library/ Extensions and remove or disable AppleIntelE1000e.kext IOAHCIBlockStorageInjector.kext - configured to make just the DVD device appear internal so iDVD player works. USBInjectAll.kext - helps with USB properties VoodooPS2Controller.kext (v1.9.2) - RehabMans's PS2 Keyboard/TouchPad/TrackPoint SSDT are used to modify options instead - and can be used to setup alternate FN/key maps. keyboard mappings have 3 or 4 finger swipe left/right to back/forward configured for Safari browser vs space swipe • Obsolete: AppleBackLightInjector.kext - RehabMan's Injector method - modified for Lenovo T420 to incrementally scale brightness in 17 levels from 0 to 4882 (0x1312). Note: The template file has 2 models: T420 and T460. To create a customer Injector, run the Utilities createAppleBacklightInjector script to create a custom Panel definition specific to your LCD. It will put the new injector in the kexts/Other folder. Install it along other kexts with _kext_install.bash script. cd ~/Downloads/Lenovo-T420-Clover-YYYY.MM.DD/ Utilities/Create_AppleBacklightInjector_kext/sudo ./ createAppleBacklightInjector.command AppleIntelE1000e.kext (v2.4.14) - Ethernet (gigE) - can go in /System/ Library/Extensions vs Plugins so OSX re-installations or patch updates will not delete it. IntelBacklight.kext (v1.0.10) - RehabMan's kext for smoother/enhanced LCD backlight (dimming) control. In 10.12.4 (or later) this kext does communicate with Brightness keys or System Preferences Display Slider. So remove this kext unless on a version older (less) than 10.12.4 AppleHDA_20672.kext (v999.99) Keep original/unmodified AppleHDA.kext and add this kext to /L/E for full audio support for CX20672 (same as CX20590). Note: requires matching DSDT sections for Conexant Codec and layoutID 12. and Kext Patch via Clover. Also has Manwe150's fix/additions for dock ports. Credit and thanks to vladichimescu. There are 2 files in AppleHDA_20672.kext/Contents/Resources Platforms.xml.zlib.dock and Platforms.xml.zlib.nodock The "dock" version adds the second audio output called "Headphones" and a second Input "Line In" - both of which are on the Docking Station itself. • - IF you have a dock and want to use these ports - then just replace the Platforms.xml.zlib file with Platforms.xml.zlib.dock • - IF you DO NOT have a dock, then use the new kext as is! (and not be confused by the extra Input/Output options!!!) General Notes, Fixes, and Features Installing Clover from the .pkg file: If you would like to run the included installer package, Clover_v2.5k_rxxxx.pkg, to install the related tools and latest bits into the OS and ESP of this HD, there is an installer package in the Utilities directory. Select (check box) at least first 2 items! This picture shows a good set of overall options: After you close the pkg installer, then follow these step to replace the ESP with the zip contents (step 4 above) There are extra Clover configuration files (config.plist) that use the custom DSDT and WITH extra Clover patching for EDID Certain config files inject an alternate EDID - rather than the default/built-in EDID for your LCD. These EDID were extracted and corrected (set to RGB only mode etc) from other LCD vendors such as LGD that seem to work better than the common/inferior standard from AUO. Historically, these fix problems such as white screen, glitches, and ring buffer hangs. config.EDID-2e2.plist config.EDID-2e3.plist config.EDID-366.plist One should start with config.plist if there are freezes or glitches, then try config.EDID-2e2 or EDID-2e3 Note: The Model should be set to MacBookPro8,1 to get proper Graphics patching - DP/HDMI/DVI/VGA FrameBuffers config.patchDSDT.plist - does some patching. config.plist (default) - only fixes regions Some folks were seeing problems when Clover was asked to patch the DSDT - most of the patching was redundant with the provided DSDT. So there are 2 generic versions - (1) does a number of patches to patch the built-in DSDT (i.e. when you don't provide one) and (2) a config.plist that does almost nothing to patch the DSDT. Over the years - way before the current SSDT/hot-patch approach was devised - manual edits were made to the DSDT. Clover does dynamic patching Patch for AppleIntelSNBGraphicsFB.kext - The included patch replaces the 4th port/buffer (DVI on dock) with VGA on left side. The 4 ports after patch are: LCD, DisplayPort on side, DisplayPort on dock, VGA on side. If you need DVI on the dock - then disable this patch! Or modify the edit scheme to change the 2nd or 3rd port (DP) to be the DVI if still want the VGA port. Patch for IOAHCIBlockStorage.kext - adds SSD TRIM function for a 3rd Party SSD - one can use the "trimforce" command now Patch for SATA ultra bay Note: Lilu+AppleALC will patch AppleHDA.kext for audio codec Conexant 20590/20672 chipset The Zip includes Clover files and custom kexts with kext install script: _kextinstall.command (but this is not really needed anymore) Gfx parameter files in Displays/Overrides offer more natural color gamma curves and screen options Newer Thinkpad theme - adds macOS Icons that may not be in the standard clover installer. Special keys on laptop (not USB or Bluetooth keyboard) without keymap remap SSDT : FN keys LCD Brightness are controlled by these 2 button pairs to change brightness up/down: Fn+Home/End or ScrLck/Pause Audio Levels: The 3 buttons above F1-F3 control volume (except mic mute) Insert key is the CD/DVD eject. Blue ThinkVantage button - toggles fan to highest speed. The Alt key is the Mac Command key and Microsoft flag key is the Mac Option key. Fn+PgUp - turns on the light! DSDT Notes Some of the DSDT tweaks (beyond manwe150's original version) are listed here. DSDT includes source and binary The "EDID" versions of DSDT.aml be use override removes infamous HD 3000 glitches and buffer hangs or so-called artifacts for 1600x.900 LCD. Added MaxBeepBootVolume to DSDT to rid AppleHDA assertion on startup Shutdown fixes in DSDT _PTS and _WAK (thanks to TimeWalker75, RehabMan and Manwe150) Change/fixes to reset LEDs for proper sleep/wake status Battery fixes to use native/current ACPIPlatform.kext with Rehabman's ACPIBatteryManager.kext - no need to rollback or patch AppleACPIPlatform.kext anymore. PNLF additions from RehabMan provide smoother/wider LCD backlight control with IntelBacklight.kext DSDT mods to KBD device - renamed to PS2K and added LENOVO OEM-ids for VoodooPS2Controller to use. The PS2 Keyboard is identified as id LENOVO table-id T420 which will pickup the custom VoodooPS2Controller settings. For El Capitan+, removed the _PRW method from some of the devices in the DSDT DSDT for "heat-step" (DSDT.heat-step.aml) has a modified method to incrementally control the fan speed vs automatically by BIOS. Follow the installation recipe to use this approach: copy/replace the default DSDT.aml file with the DSDT.heat-step.aml file in the ESP (cp DSDT.heat-step.aml patched/DSDT.aml) make sure the ACPIPoller.kext is in use (move from Misc to Other folder) to active the method - changes fan speed vs CPU temperature. reboot For Example: mkdir /Volumes/ESP sudo mount -t msdos /dev/disk0s1 /Volumes/ESP cp -a /Volumes/ESP/EFI/CLOVER/ACPI/DSDT.heatstep.aml /Volumes/ESP/EFI/CLOVER/ACPI/patched/DSDT.aml cp -a /Volumes/ESP/EFI/CLOVER/ACPI/kexts/Misc/ACPIPoller.kext /Volumes/ESP/EFI/CLOVER/kexts/Other/ Scripts and tools will be put in /usr/local/bin. A directory ~/Library/ssdtPRGen will be created with other related data Script creates P and C states to match system CPU. One can hand-edit to modify values for lower power consumption. Copy ssdt.aml to your ESP ACPI/patched folder: /Volumes/ESP/EFI/CLOVER/ACPI/patched
 1 point