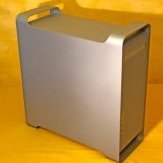
wise_rice Posted June 22, 2018 Share Posted June 22, 2018 (edited) So, I am officially crazy... I bought 26 Powermacs (G5) And I modded them ALL They are now ready for ATX and mATX Mainboards… But why 26? Did I mention I was crazy?! (And they were only sold together…) I modded G5 Cases before – They kind of became my passion. This time I wanted everything to be perfect: - Keep as much of the original design as possible - Cut as less as possible - Since it is impossible to find a G5 Case without dents and scratches, I wanted to paint them, freshly. I am done now and it is time to share my experiences: It was a rough 6 months from start to finish. The project kept me busy during all of the winter. I worked every weekend on it, till late. I need to apologize… …to my family for occupying their workshop, guest rooms and garages …to my friends for neglecting them during the last months …to the dogs and the cat for waking them up from their afternoon nap every now and then (because of the metalwork-noise). I hope to be able and show everybody that it was worth it - And that someone out there is appreciating the work, as well. Back me up, guys - Spread the love :-) I believe in Apples high quality and the unique design of Sir Jony Ive My mods include a preinstalled power supply (and even watercooling on some) Countless hours of work and high-quality components & tools were used Of course, you can come and have a look if you are near the South of Germany (or the North of Switzerland). Finished Builds: I do not have the money to equip all cases with CPU, RAM and SSDs right now. But it would be so much fun to do it, now that all the hard work is done. I will definitively equip machines later and build completely custom machines I already equipped two of the shown modded cases with complete hardware. One was for a music-studio. One for my brother. Threads for the finished build projects will be linked here later: Workstation & Gaming-Beast for my brother: - ATX- X99-Mainbaord - 8-Core Intel XEON E5-1660 v3 (Overclocked to 4 GHz - all-core) - 64GB ECC-RAM (Registered DIMMs) with dual Copper heatsinks & Heatpipes - 3x1TB SSD RAID5 - Two 1080Ti in SLI (two flexible SLI Bridges were later installed) Ryzentosh (For music production studio): o mATX Mainboard o Ryzen 1700X o biggest cooler on the market (BeQuiet! Dark Rock Pro) o 32GB RAM (ECC Unregistered DIMMs) with Aluminium heatsinks o 3x1TB SSD RAID5 A finished (painted) case from the outside. The Apple logo is gone after painting… For the better, I think! The rear of a finished build Preliminaries: All the planning that goes into modding one case actually affected 26 cases. It had to be perfect. That’s why I planned every step and every purchase of parts, meticulously. Then I applied every individual operation to all cases, one after another. This raised the quality of all cases. The metalwork (Filing, sanding, equalizing, gluing and painting) took a very long time. I don’t even know how many hours it took per case because I always did one individual operation to all cases (e.g. filing or cutting) and then started the next task. It probably took a couple of days per G5. Then I broke my shoulder in May 2017 (doing something stupid on an Austrian glacier). That made it harder to do the sanding for a couple of weeks. But even though it was painful, I couldn’t stop... The different case-types: The painting turned out very well. I chose the best 14 cases after painting and decided to finish modding them, completely. I will call these “Barebones” in the following. In the pyramid-pictures they are always on top, because they were finished last and taken to the workshop more often. The 14 best cases got equipped with a 600W PSU, front-panel, water-cooling (for the mATX Barebones), apple power-cables, etc… They are now proper Barebones. No more hard work needed to finish the build. Just missing a motherboard (and maybe hard drives) - and done. 12 other cases did not end up perfectly painted, but still good. Some orange peel here and there. Only 4 of them have stronger orange peel. I will call these 12 cases “Empty Ones” in the following. An “empty case” What to do with the “Empty Ones”? They are also clean and modded. Ready for ATX or mATX boards, empty PSU-Enclosure… One could make furniture or art out of them… One could finish the mod with a new front panel. Or one could paint them again in a different colour… I don’t know… Let’s start from the beginning: Delivery: first we sorted the cases from “good condition” to “scratched and scuffed” This sorting turned out to be useless, later as I ended up sanding, filling and painting all of them. I chose the best ones in the end. We disassembled everything and sorted the parts – plastics, aluminium, batteries, electronics, etc… then gave everything to recycling. I am an environmental engineer, so this was important to me. I gave away all parts that could possibly be reused - Like fans, RAM and graphics cards. There are no pictures of the disassembly, because it has been done by many people already and we were also too busy (it took a couple of days). We ended up making our own tools and screwdrivers for removing the processors and mainboards, because many screws are hard to reach. All parts that I wanted to keep were cleaned and kept separately. E.g. the fan grilles on the back, the rubber screws for the HDD Caddy or the DVD-drive stand-offs Planning & Conversion Then I made a plan for the easiest ATX conversion with the least cutting. Best thing to do: Cut an opening to the back - big enough for ATX boards I/O and reuse the original PCIe slots for graphics cards. This turned out to be just perfect. I tested different boards. E.g.: ASUS TUF X99 (ATX) and ASrock AB350M (mATX) Night shift – working with the Dremel First cut for the ATX Mainboard I/O. All the Internals are removed. Also, the fan grille with its many mini-screws. So that the plastic is not melting. Cut-out (before filing and sanding). Sharp edges. Straight cut of the long sides thanks to the big angle grinder. Shorter sides were done with the Dremel for precision towards the edges. Then the filing and sanding removed all sharp edges. I removed all the Motherboard standoffs from the inside, cleaned the surface with Isopropyl alcohol and glued the standoffs in the new places for ATX Boards using the 2K Aluminium Epoxy. This took a lot of measure to fit a mainboard in the right position for the PCIe-Slots. I bought test-boards that were placed in the empty case with a graphics card plugged in and then the screwholes werde marked on the stencils. I made two different stencils. One for ATX Boards and one for mATX Boards: Putting the standoff through the stencil and securing it with a screw Cleaning the surface before gluing. Both stencils with standoffs and fresh glue – right before placing it in the cases ATX stencil in the case – gluing down the standoffs. mATX stencil while gluing. It had to sit like this over night to make sure the glue is hard. Then, the stencil was taken out. There is no tray necessary under the mainboard. All stand-offs / threads are in the right position for standart mainboards, now. Now that all the disassembly, cutting and gluing was done it was time for some fresh paint. The painting: Before painting it was necessary to fill dents, file edges (there were chips, especially on the feet) and sand EVERYTHING to smoothen the surface and remove unwanted oils. Fill, file, sand, repeat… I used 2K Aluminium epoxy to fill dents The Epoxy is like a cold weld. Hard and sturdy. Dents before filling Dents after filling - before sanding More filling Filled and sanded case. At first I did not want to paint them myself. So I bought the right 2K-Aluminium-paint (had to try different ones to find the perfect colour and shade) and handed four cases with the paint over to a professional paint shop (arm-industry - specialized on parts for tanks). They were happy to try this because they wanted to train their varnisher-apprentices on something that is more difficult than the usual tank-parts. The results were good, but It turned out that these cases are really hard to paint… I was not 100% happy with the result. They returned from the paint-shop with some varnish-runs on the bottom of the cases. They also missed some spots that were hard to reach. So, I changed my mind and decided to paint all the cases, myself (again...) What a fool I was. This took a week. First of all, I needed a cleanroom. So, I converted a shed in my parents’ garden. Shed / Cleanroom – Winter-time Thanks to my brothers’ help, the setup turned out really clean and airtight. Crucial for keeping it warm. To keep the shed warm, I used a big oven and additional electric heaters. My father even set up a big chimney, so that the smoke was led further away from the shed (as smoke=small particles that would leave marks on the fresh paint). I had a compressor on hand (with 30m hose) and used a spray-gun for coating the cases with Aluminium-paint. We used the spray-gun for car parts before. Paint-Shed from the inside Hanging case before spray-painting Usually two or three cases were sprayed at a time. All cases were sprayed at least two times with thin coats. After spray-painting it was time for drying The freshly sprayed cases were put in a sauna at roughly 80 degrees Celsius. That sped up the hardening and caked the varnish in. The fully varnished cases after drying. This is the result: The cases with the white bar on the back have the original Apple 2x2 Wifi / Bluetooth antennas in them (with two plugs) I installed a second 2x2 Antenna. Now they are 4x4. The (IPEX? MHF?) connectors are bigger than those I have seen before. They don’t fit the tiny connectors on laptop-wifi-cards. Maybe someone used the Apple Antennas with a PCIe Wifi-card before and can give me a tip or even post a link? The “Empty Ones”: This is what the 12 empty cases look like, that have some orange-peel skin: Basicaly the underside of ALL cases looks like this - because they were placed on their feet for drying or Spraying. You will never see this when the case is standing on its feet. An “empty-one” - ready for ATX boards. Empty PSU-Enclosure is installed. Fan-bracket is in place. Sometimes still with apple fans. A finished ”empty” mATX case You can see some orange-peel skin or varnish-runs on the “Empty Ones” I modded the 12 best-painted cases to create fully-modded Barebones: Time for re-assembly: Fan-Bracket: The Apple-fans were removed from the fan bracket. They were loud and needed re-wiring anyways. It is recommended to put more modern fans in there. I renewed the rubber-fixings where necessary. You do not need screws to put fans in. They are held in and decoupled by the rubber. Vibration is not passed on to the case. I put the PCIe slot brackets back in (they were also painted, of course) using the rubber-headed HDD screws from other cases. In case you want to add more HDDs you have the right screws at hand. The fan-bracket fits in its original position. That works fine for most Mainboards. If you have a Mainboard with very high VRM heatsinks or high I/O (e.g. with 6 stacked USB-Ports) you can either remove the fan bracket completely (I did that for my brothers build and just clamped some BeQuiet! Silent-Wings 2 - 92mm in) or move the bracket up a bit - by not inserting the hooks under the lip, but rather clamping the bracket above the lip (I did that for the Ryzentosh, it is also very stable). The bracket holds two 92mm x 25mm Fans My favourite: Noctua NF-B9 redux-1600 PWM - 92mm They look like the original ones and are very quiet. (I used them in two projects) Cheaper Arctic PWM Fans for testing Front-Panel: The Power-Buttons needed to be painted, as well. Over time they lost some of their thin chrome coating due to touching. The 2-K varnish is thicker and will be much more durable. Secured the power-buttons down using double-sided tape during varnishing To make them fit perfectly again, I needed to scrape of excess paint from the sides. The buttons would easily get stuck otherwise. The case without any front-panel board or power-button. Half of the G5s I bought were “late 2005” models. The front-panel-boards of all G5s have the same size and fit in all the cases. Only models before “late 2005” have a front panel connector-socket. So, I had 14 front-panels that could be used with BlackCH-Mods-cables, and 14 perfectly painted cases. That’s a match. Re-installing the power-button board with its securing ring. This took a long time because every button had to be re-adjusted to work nicely again. Also notice the rubber piece on the right-hand side. This is needed to support the front-panel board when plugging in the cable to the connector: Installation of the front-panel board. The housing of the front-panel board has also been painted. The custom-made front-panel cable by BlackCH Mods. They were not cheap but they work. I marked all the connectors on one of the cables to make them easier to identify. Audio works perfectly even though there is a proprietary sensing pin on apples board. I recommend to set the front-panel type to “AC’97” in the BIOS / UEFI instead of the default “HD Audio”. That way the front panel audio is basically ON all the time and you can choose other outputs from the task-bar. I used Realtek drivers for Windows in my last two builds. For a Hackintosh you would need to follow BlackCH Mods manual or ask the community about the best settings. Plugging in the mod-cable to the front-panel connector. Securing the plug with the black cap. It is pushed down even further than shown in the picture – so it clipped on to the board itself to give the connector more pressure and therefore stability. DVD / Blu-Ray drive: Eject the disc tray with a paper clip. Unclip the front-plate, so it does not get stuck in the auto-opening Apple-aperture Screw in the stand-off screws (I saved those) Standoffs installed Finally, slide the drive into the mounting-bracket and close the two little retention arms. Done. PSU (Power Supply Unit): I thought a long time about the perfect PSU. I really wanted to re-use the original PSU-housing, because of the clever placement in the case. It sits flush with the mainboard at the bottom and the original power- socket is a MUST to reuse for aesthetics and stability. The original Apple power-plug with Apple power-cable. How do you get a new PSU into the original Apple PSU? I did not want to crack open a standart ATX PSU and jerry-rig its sensible (and dangerous) electronics into the original PSU-housing. So, I looked for a server-PSU that would fit inside the original housing completely with own housing and fan. Safe and sound. Not an easy task setting those up, because server PSUs often have proprietary connectors. Also, I wanted 600 Watts of output power to drive any overclocked CPU with a powerful graphics card like the GTX 1080Ti. Soldering on the new -internal- power-cable to the original power-socket in the Apple PSU housing. Shrink-tube protects the soldered joints. The cable will be connected to the new PSU inside. As an extension. The input-filter is still connected to the socket. The Apple power-cord. I found the perfect PSU. A 600W PSU by Supermicro. Supermicro is a very known brand in the professional server market. So, I can trust those PSUs to constantly deliver real 600Watts. They are designed to run under full load for years. Hence, they can be really expensive. Many cheap PSUs just claim to be 600W but struggle to hold that power up for longer periods of time (or they degrade). This will not happen with a Supermicro PSU. The 600W PSU comes with a 80+ Platinum rating. That is one of the highest Energy efficiency ratings available. Higher than 80+ Gold, Silver or Bronze (which is kind of the standard right now) 80+ Platinum means 92-94% of the Input-power is delivered as output. Only 6-8% is transformed into heat. That was important to me in order to keep the PSU quiet. All PSUs before they were put in It has the 1U form factor. So, you could actually fit two of them in the housing. The 600W PSU plugged into the extension cord. Securing the PSU in place The 2005 Powermac Models have a bigger server power-plug (C19) suitable for higher power delivery of over 1000 Watts. Almost half of the cases have this kind of plug. They also have a bigger input filter. Soldering the extension on. Finished housing with server power jack (C19) on the outside and standart plug (C13) on the inside PSU inside the original Apple-Housing All the cables come out near the back of the case. I created bigger openings for the cables to feed through. All PSUs are prepared The PSUs and their connectors have been tested with a PSU-tester. These Server PSUs still have some proprietary connectors (and some cables, that are a bit shorter than usual), So, I bought different adapter-cables and extensions for the PSUs to make everything universal. PSU-Cables: - PCIe 8-Pin (2x) for graphics cards (over CPU 8-Pin adapter) - CPU (1x 8-Pin, 1x 4-Pin) – actually there is one more 8-Pin, but it is occupied by the PCIe-adapter. So, it is possible to do a dual-CPU setup with a small graphics-card, that does not need a dedicated power plug, as well. - Molex (2x) (6x over SATA-Adapter) - SATA (5x) (over Molex adapter), black sleeved - 24-Pin ATX (20 Pin is possible) + Extension (black) + Dual PSU connector - 12V Fan (4x over Molex Adapter), black sleeved Different types of cables and adapters (in an mATX Case) You can hide most cables behind the PSU-housing and under the mainboard, as the standoffs that hold the mainboard are quite high. That is the biggest benefit over using one of those tray-adapter-plates that would use up the space behind the mainboard. The cables in an ATX Case (not hidden / cable-managed) HDD-Caddy: The original Apple 2-Bay HDD-caddy was glued into its new place to be out of the way. Only necessary in the ATX-Cases to fit the bigger ATX Boards in. Using high-temperature silicone. Molex Power provided by adapter (if needed for 3,5” drives, most new 5400 rpm HDDs don’t even need Molex anymore) ATX Case with a bit of cable management and the HDD-caddy in place Finished ATX Barebones: Finished ATX case with all equipment and the server power-cord Finished ATX case with the Acrylic cover Different finished ATX Case with cover and cable management Watercooling (mATX Barebones): Now that the “Empty Ones” and the ATX Barebones were finished It was time to mod the mATX Cases. I added watercooling to the mATX-Barebones: Best place for the radiator is the front. Here it will blow the hot air directly out of the case. This is the 240mm radiator for the watercooling of all mATX cases To decouple the vibration of the loop from the case I used a foam seal on the front of the radiator and a thick silicone-seal on the sides and the top Gluing the radiator in with special high-temperature silicone. (This Silicone is usually used to attach the IHS to a CPU or to seal an exhaust pipe) – good for temperatures up to 329°C Radiator in Place. Thick silicone seal is decoupling the vibration of the water-pump that travels through the loop. The 240mm radiator fits right in between the PSU and the top-compartment. The mounting kits for this Cooler Master AiO support all modern processors and sockets (775, 1150, 1151, 1155, 1156, 1366, 2011, 2011-3, 2066, AM2, AM2+, AM3, AM3+, AM4, FM1, FM2, FM2+) Two 120mm high static pressure fans come with the watercooling loop. They blow out. You could of course turn the fans around to suck air in (positive pressure). Equipment: I saved the important bits and bought cables for all Barebones Every fully modded Barebone has its own new power-cable (half of them white apple cables, half of them black OEM server cables) All fully modded Barebones have the acrylic cover I kept HDD rubber-head screws, DVD-drive standoffs, Pump Mounting Kits in a little bag. Finished mATX Barebones with watercooling: Here are some pictures of the internal layout: Pictures of the outside can be seen in previous posts. Finished mATX Barebone Finished mATX Barebone with all equipment Finished mATX Barebone with all equipment Types of cases & Barebones: What I have right now: 12 fully modded Barebones: 6 - mATX - with watercooling 6 - ATX - (eATX boards should also fit) 12 “Empty Ones” - 8 prepared for ATX (3 of which have heavier orange-peel) - 3 prepared for mATX (1 of which has heavier orange-peel) The End: Thats it for now… What do you think? Was it worth it? What hardware would you put in? Please let me know… ;-) Yours, sincerely wise_rice Edited June 26, 2018 by wise_rice 2 Link to comment https://www.insanelymac.com/forum/topic/334629-26-powermac-g5-case-modding-project-matx-atx-conversion-barebones-mac-pro-alternative/ Share on other sites More sharing options...
wise_rice Posted June 22, 2018 Author Share Posted June 22, 2018 What can I do, to show the pictures directly? Link to comment https://www.insanelymac.com/forum/topic/334629-26-powermac-g5-case-modding-project-matx-atx-conversion-barebones-mac-pro-alternative/#findComment-2621665 Share on other sites More sharing options...
Cyberdevs Posted June 22, 2018 Share Posted June 22, 2018 9 hours ago, wise_rice said: What can I do, to show the pictures directly? The file upload feature is not working at the moment and once it's fixed you can upload your pictures directly to your post. Link to comment https://www.insanelymac.com/forum/topic/334629-26-powermac-g5-case-modding-project-matx-atx-conversion-barebones-mac-pro-alternative/#findComment-2621779 Share on other sites More sharing options...
MorenoAv Posted June 22, 2018 Share Posted June 22, 2018 Hi wise_rice, What is your idea for the cases, you want to sell them or what? You have any idea of the price you want for them? Link to comment https://www.insanelymac.com/forum/topic/334629-26-powermac-g5-case-modding-project-matx-atx-conversion-barebones-mac-pro-alternative/#findComment-2621804 Share on other sites More sharing options...
wise_rice Posted June 23, 2018 Author Share Posted June 23, 2018 18 hours ago, MorenoAv said: Hi wise_rice, What is your idea for the cases, you want to sell them or what? You have any idea of the price you want for them? Indeed, I will not keep them all for myself. But most forums don't allow you to advertise anything. So, I will be careful what I say on public posts.... I can estimate how much I paid for the material & tools and how much work I put into the cases... It was a couple of thousand Euros for everything and a lot of work on top... I wont post any concrete numbers here. If you need more detail, send me a private message (PM) or find me on twitter, Skype (name is in my profile), etc... Link to comment https://www.insanelymac.com/forum/topic/334629-26-powermac-g5-case-modding-project-matx-atx-conversion-barebones-mac-pro-alternative/#findComment-2621917 Share on other sites More sharing options...
MorenoAv Posted June 23, 2018 Share Posted June 23, 2018 Thanks man... I'll do it... 1 Link to comment https://www.insanelymac.com/forum/topic/334629-26-powermac-g5-case-modding-project-matx-atx-conversion-barebones-mac-pro-alternative/#findComment-2621964 Share on other sites More sharing options...
Cyberdevs Posted June 29, 2018 Share Posted June 29, 2018 On 6/23/2018 at 6:57 PM, wise_rice said: Indeed, I will not keep them all for myself. But most forums don't allow you to advertise anything. So, I will be careful what I say on public posts.... I can estimate how much I paid for the material & tools and how much work I put into the cases... It was a couple of thousand Euros for everything and a lot of work on top... I wont post any concrete numbers here. If you need more detail, send me a private message (PM) or find me on twitter, Skype (name is in my profile), etc... We have the Market Place for these kinds of posts. I guess you can use it to sell or buy things but please read these rules before posting anything in that section: 1. New rule, please read. 2. Important! How to use The Marketplace! Besides the upload feature is fixed now and you can post your picture in the first post if you like to update them. 2 Link to comment https://www.insanelymac.com/forum/topic/334629-26-powermac-g5-case-modding-project-matx-atx-conversion-barebones-mac-pro-alternative/#findComment-2623136 Share on other sites More sharing options...
wise_rice Posted July 3, 2018 Author Share Posted July 3, 2018 On 6/29/2018 at 8:18 PM, Cyberdevs said: Besides the upload feature is fixed now and you can post your picture in the first post if you like to update them. Thank you! On 6/22/2018 at 7:26 PM, Cyberdevs said: The file upload feature is not working at the moment and once it's fixed you can upload your pictures directly to your post. All the pictures now show, as they should. Therefore, the Log is complete and pretty now Enjoy reading! 1 Link to comment https://www.insanelymac.com/forum/topic/334629-26-powermac-g5-case-modding-project-matx-atx-conversion-barebones-mac-pro-alternative/#findComment-2623954 Share on other sites More sharing options...
wise_rice Posted July 8, 2018 Author Share Posted July 8, 2018 On 7/6/2018 at 10:11 PM, millusions said: nice! btw. you crazy man Haha, that sums it up pretty good Link to comment https://www.insanelymac.com/forum/topic/334629-26-powermac-g5-case-modding-project-matx-atx-conversion-barebones-mac-pro-alternative/#findComment-2624825 Share on other sites More sharing options...
wise_rice Posted July 16, 2018 Author Share Posted July 16, 2018 8-Core Workstation for Audio Production: Before starting on the “26 PowerMac G5 Case Modding Project“ I did a couple of prototypes to figure out the best varnish, cooling and PSU design. I wanted to build a machine for a music production studio of a friend, because his machine was older and had only 4 cores. An 8-Core with 32GB of RAM will be the successor. I am a big fan of ECC RAM for productive systems. There is no ECC RAM with heatsinks on the market. So I put my own heatsinks / Aluminium coolers on the RAM to keep it cool even in a very silent, low-airflow environment. First Iteration (oldest): mATX Board in an ATX Modded case. Not all mainboard-holes on the top have a screw, because the case was modded for full ATX sized boards. But that does not really matter. It is held in - safe and secure with around 6 screws. spray can varnish (1K): It worked. But it turned out to be NOT the best solution. The uniformity of the varnish using a can-spray-head is not as good as using a professional spray-gun & compressor. So, I switched to using a compressor, later. Also, the 1K-Spray-can-paint is not as sturdy as 2K varnish. So, I changed that later, as well Watercooling (CoolerMaster AiO) – a bit overkill for this 95W TDP processor, that will never be overclocked. The music-studio requested an air-cooler, anyway. So, I changed that later for a big air-cooler and saved the water-cooling for another case. It was good that I installed the water-cooler on this test-case. You could see the radiator through the front on the first test-build because I used a grey silicone on the front, covering some holes and the radiator was placed very close to the front. I changed that on the later builds. There I will use a black foam-seal to get some distance to the front. Also, no silicone on the front. Only at the top and sides. This is then invisible. Glad I tested this before modding all 6 mATX barebones. Second Iteration: Modded mATX Barebone Case for the second iteration. Everything is the same as in my final mATX barebones, except for the PSU. I was still working on the final PSU design at the time. This one has a BeQuiet 600W PSU. The finished first Iteration of the build. I did not like the PSU very much. It had to be glued in (silicone) and was non-removable. Then, the worst-case scenario happened. The fan suddenly made rattling noises and I had to remove this PSU again to return it. That was the moment I decided to re-use the original PSU-housing on the bottom - and no more glue. Link to comment https://www.insanelymac.com/forum/topic/334629-26-powermac-g5-case-modding-project-matx-atx-conversion-barebones-mac-pro-alternative/#findComment-2626077 Share on other sites More sharing options...
wise_rice Posted July 16, 2018 Author Share Posted July 16, 2018 Third Iteration (Final Build): Varnished with the spray gun and compressed air. Even on the inside. DVD-Drive installed. 2,5” to 3,5” adapter to put an SSD into the Apple HDD Caddy. Later even three SSDs in RAID5. BeQuiet Dark Rock Pro 3. One of the biggest and most powerful Air-coolers on the market. These PowerMac cases can virtually fit any cooler - no matter how big. It also works out with the Aluminium coolers on the ram. Very lucky. Also: Always be grounded when handling electronic components. Still plenty of space left between door and cooler. The fan bracket is fitted with two NoiseBlocker 92mm fans. The empty Apple-PSU housing before modding. See the previous posts for details of the PSU-modding New NoiseBlocker Fans (BlackSilent Fan XR-1 - 60mm) Finished second iteration Build with new supermicro PSU in the original housing. GTX 1050Ti DVD drive 3x1TB SSD RAID5 Most cable-management can be done under the mainboard. Super-silent Air-cooling. 8 fans in total. All run near minimum speed. The back of the modded Case. This one has antennas build in and a C19 power-plug. The mainboard I/O is slightly set back from the case. Everything is accessible. Only the Ethernet-cable can be a bit tricky to remove on this particular build. Ethernet cables have this little barb on it. You need to press it down before you can get the cable out. The barb is hard to press because everything is recessed a bit. For a desktop computer this is totally fine. Other mainboards have the Ethernet port in a different position (not on the very top), so they will not have this “problem”. The barb is easily accessible when opening the door of the case and removing the back-fan bracket (that is clamped in). The LAN-cable will only be plugged in once, so it is fine. The machine will not be moved to a different room very often. No more dents or stains on the case. Freshly varnished. No more Apple-Logo on the side after painting. Just a clean silver look. That’s it for this build. I learned a lot and could improve the quality of all other barebones. Especially PSU-wise, as you can read in the first posts (page 1 & 2). Link to comment https://www.insanelymac.com/forum/topic/334629-26-powermac-g5-case-modding-project-matx-atx-conversion-barebones-mac-pro-alternative/#findComment-2626079 Share on other sites More sharing options...
Kaitain Posted December 26, 2018 Share Posted December 26, 2018 (edited) I probably should have just bought a modded case from you, but I'm (sort of) enjoying the insanity of doing it all myself. One question for you: do you know the best way to get the non-slip feet off the base of the outer shell? I'm wanting to get that section powder-coated and that's the one remaining non-metal part on it. I'm slightly fearful of hacking at the things with a makeshift chisel. btw loved your use of a sauna in this process. Edited December 26, 2018 by Kaitain Link to comment https://www.insanelymac.com/forum/topic/334629-26-powermac-g5-case-modding-project-matx-atx-conversion-barebones-mac-pro-alternative/#findComment-2655778 Share on other sites More sharing options...
Captain Flint Posted September 8, 2019 Share Posted September 8, 2019 Hey, Wise_Rice Very interesting project! What motherboard and cpu you using in your project? I have the G5 case and really love how you fit everything in. I may fallow you in your steps. You probably have finished the project by now, how everything works? Did you hack it into mac? I like to hear from you continue of that wonderful story! Cheers, friend!!! Link to comment https://www.insanelymac.com/forum/topic/334629-26-powermac-g5-case-modding-project-matx-atx-conversion-barebones-mac-pro-alternative/#findComment-2689217 Share on other sites More sharing options...
wise_rice Posted March 29, 2020 Author Share Posted March 29, 2020 My last Build of all time: Asus STRIX Z370-g, 9900K, Vega 64, All Water-cooled using Alphacool hardware, 2 pumps within the CPU and GPU-Block, Pumps running on 5-7V (Ultra-Silent), Noctua Redux fans (all throttled with low noise adaptors). Exhaust air to the front. Running latest Mac OS 10.15.4 with OpenCore. Golden build. Everything works. 1 Link to comment https://www.insanelymac.com/forum/topic/334629-26-powermac-g5-case-modding-project-matx-atx-conversion-barebones-mac-pro-alternative/#findComment-2714508 Share on other sites More sharing options...
carlo_67 Posted March 31, 2020 Share Posted March 31, 2020 You are crazy? https://www.macos86.it/topic/1741-mod-hack-by-carlo_67/ Link to comment https://www.insanelymac.com/forum/topic/334629-26-powermac-g5-case-modding-project-matx-atx-conversion-barebones-mac-pro-alternative/#findComment-2714863 Share on other sites More sharing options...
jayden429 Posted April 5, 2020 Share Posted April 5, 2020 awesome, really love your work. do you plan to sell 1 or 2 of this ? interested Link to comment https://www.insanelymac.com/forum/topic/334629-26-powermac-g5-case-modding-project-matx-atx-conversion-barebones-mac-pro-alternative/#findComment-2715522 Share on other sites More sharing options...
dark4181 Posted May 21, 2021 Share Posted May 21, 2021 So, you still make these? I have two G5 cases and a PSU in good shape. Trade for a converted model with an extra hard drive cage up top? Link to comment https://www.insanelymac.com/forum/topic/334629-26-powermac-g5-case-modding-project-matx-atx-conversion-barebones-mac-pro-alternative/#findComment-2758869 Share on other sites More sharing options...
Recommended Posts