Leaderboard


Popular Content
Showing content with the highest reputation on 10/27/2020 in all areas
-
@PG7 Do not test too much now Keep your energy for when we'll want to test a RC !3 points
-
@PG7 https://github.com/CloverHackyColor/CloverBootloader/commit/5a46bf363f8f38ee2709f716404f2f41b6b514bd CLOVERX64--5125--5a46bf363.efi.zip3 points
-
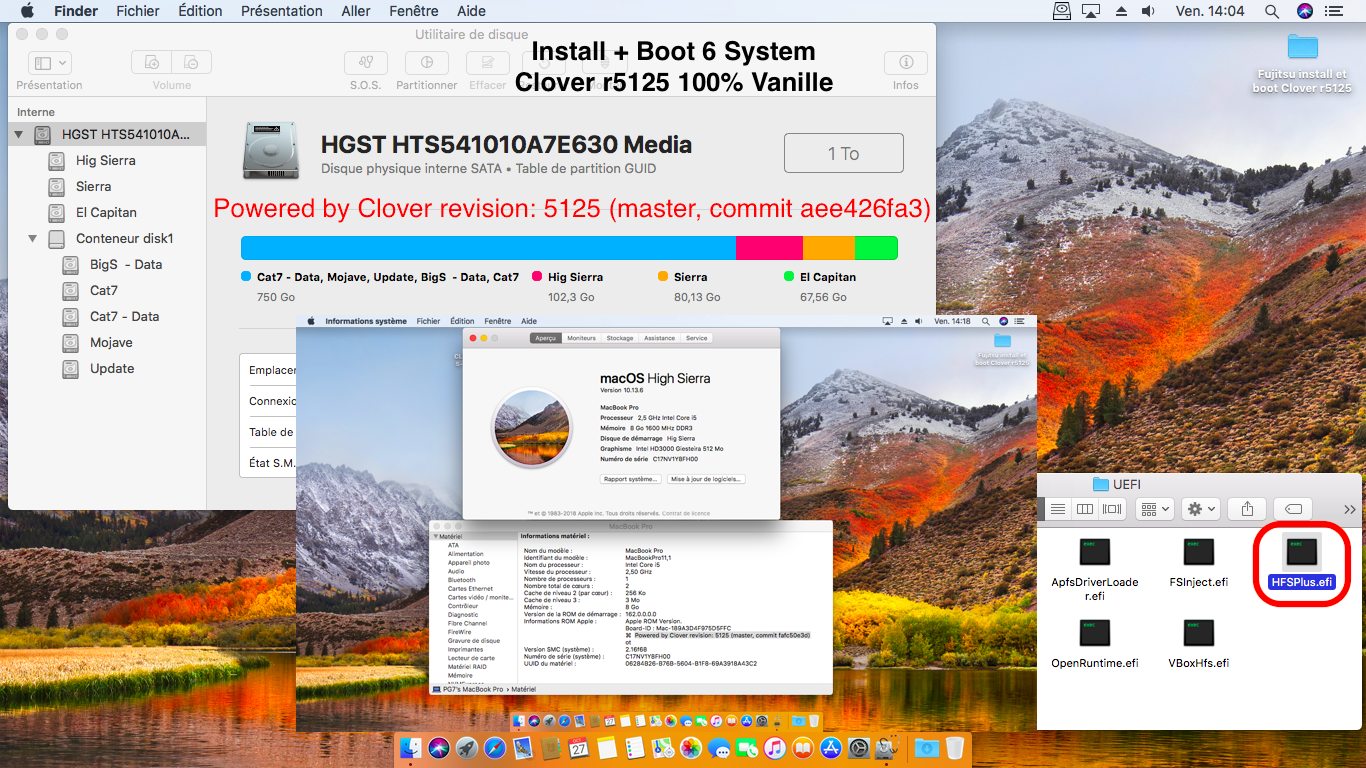
first full test with GitHub's Clover r5125 with PKG test with Fujitsu LIFEBOOK S761 i5-2520M HD3000 Attention are tests where I have not finished installing the kext for the HD3000 in Mojave and Catalina where I know it works well with risks! this HDD will be testing HDD for several machines so I will not install any kext on the system ... I confirm that I installed all the systems from the USB installer with the Clover r5125 available in PKG use the Quircks I got for this series6 chipset I used another commit available yesterday by iCanario to test and confirm its good operation I used the git HFSPlusLegacy.efi driver for this laptop more tests will be done with other machines !!! Thanks Jieff for the work done as well as Slice plus iCanario and all the others that over time are present testing and raporting the bugs good continuations Clover forever ..... Google Translate ! exemple: Config.plist Patch DSDT config.plist
 3 points
 -
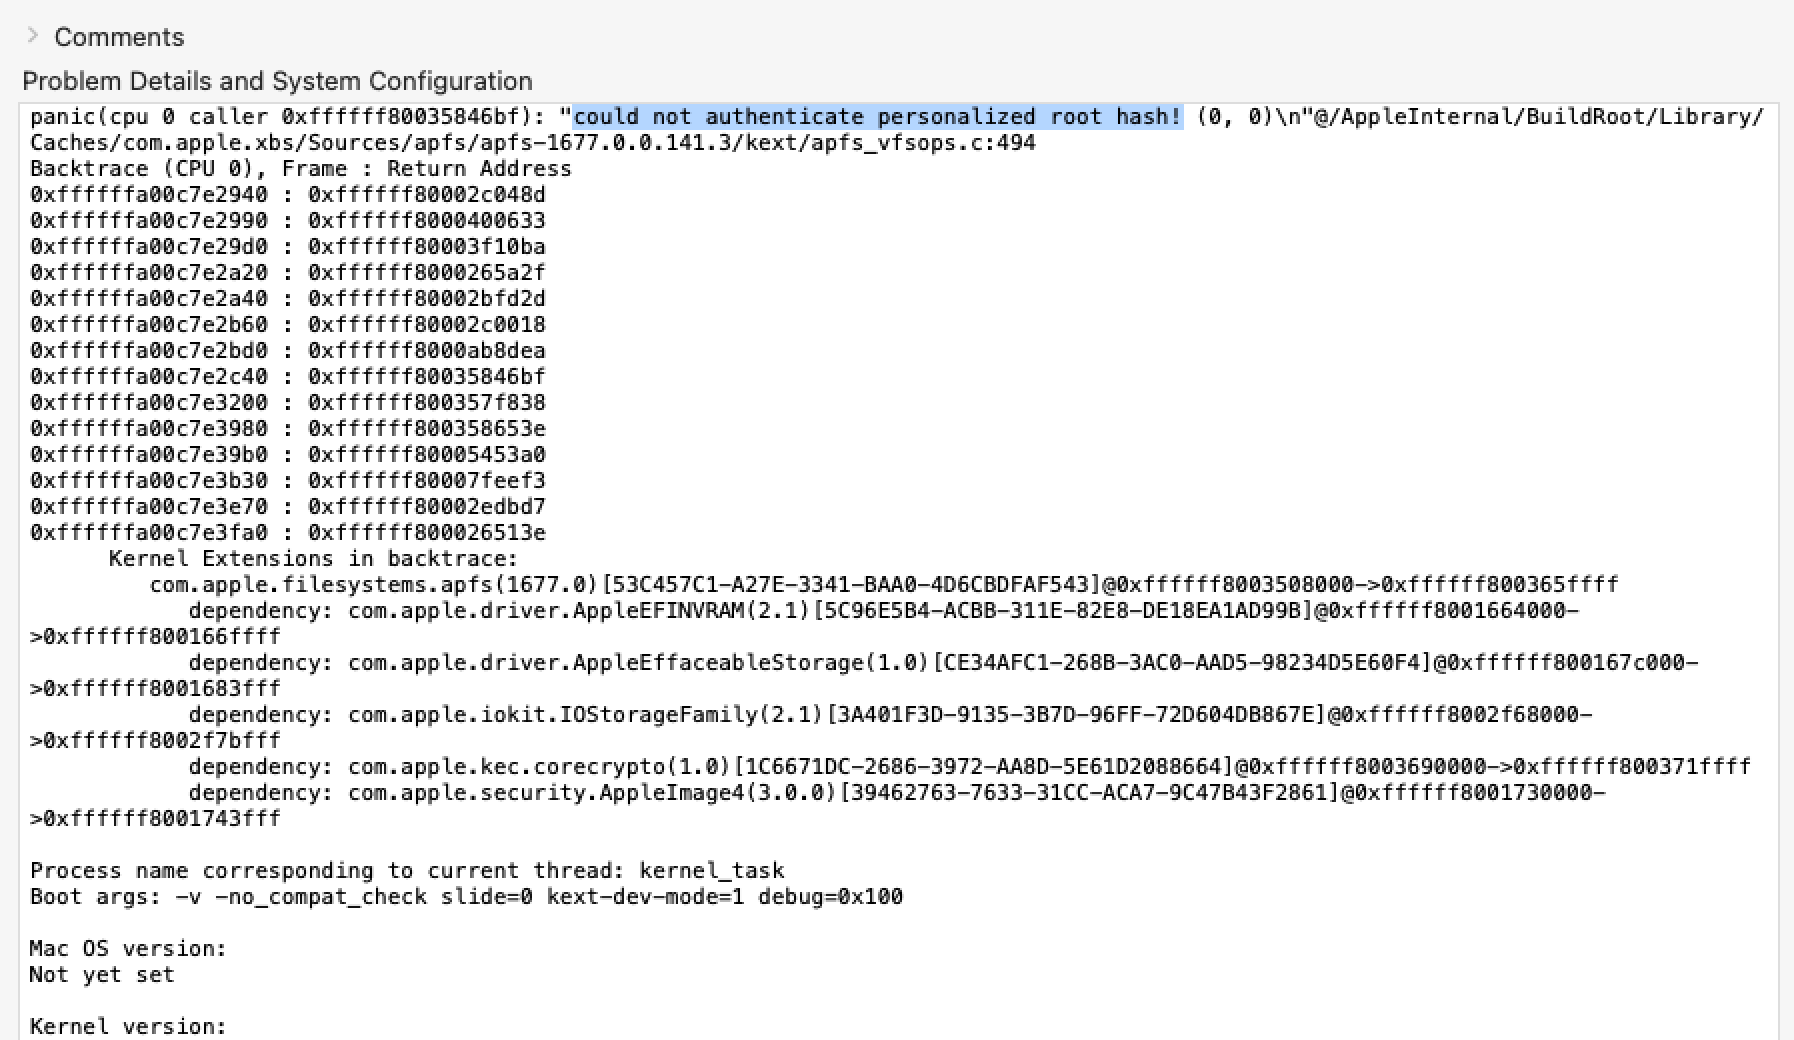
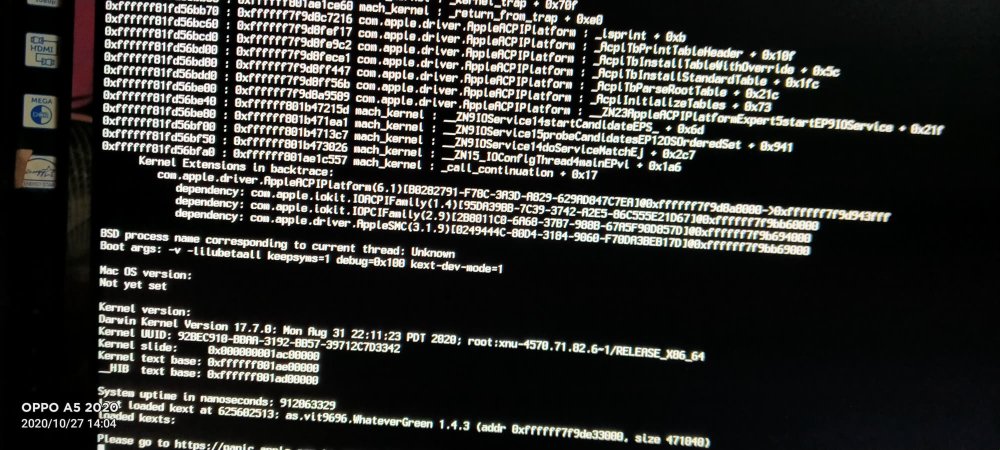
It looks like booting on main partition is still possible and unofficially supported. if we can't boot an main partition, it's because of a feature : authenticate-root. If you type "csrutil authenticate-root status", it's probably enabled. The panic reported : Problem is : we need recovery if we want to disable it. So not today !
 2 points
 -
It possible to hard-code that if the path is 'EFI/Microsoft", we silently switch to "EFI/CLOVER". Because BootloaderChooser make a cleaner configuration (Clover efi stays in it's folder), I personally think we shouldn't. But it's 2 lines of code, it can be done. EDIT : I still admit that it's a change of behaviour I should have said. I didn't know some people had to do that. Sorry. EDIT2 : The intermediary solution is to switch path if it's "EFI/Microsoft", but with a warning?2 points
-
If GUI/Custom/Entries[x]/Ignore that should be deleted, not GUI/Custom/Entries[x]. Yes, it seems we can only boot via preboot. I don't why. I'm currently investigation with someone. Currently, use Preboot.2 points
-
Lo siento mucho, por el, su familia, amigos y compañeros del foro, descanse en paz1 point
-
Ok No problem !1 point
-
@JorgeMax it is a temporary solution. Now you've got no KP and boot Big Sur. That was the goal, now @Jief_Machak will take a closer look at your problem. My Z390 config can boot BS with 0x67.1 point
-
@Matgen84 just remember that with this setting of the csractiveconfig then no updates are reported on BUgSur1 point
-
I understand. But I see only mentioning in this forum. Is it somewhere in git repositories too?1 point
-
I wish it was a bit sooner. At least I have a new hack.
 1 point
 -
Same here. As the error also occurs using OC, I suspect that the ß10 installer is buggy… Again .1 point
-
It is bettes but it is strange to see double values, string and checkbox. I think checkbox only will be enough.
 1 point
 -
As stated, all are correct. Must be selected in the default English language only. Never use any other language. OC is now compatible with mojave Catalina big sur, but can not access it High_Sierra by KP.
 1 point
 -
About grey screen as macrumors forums and others sites said, the issue as many already reported, is due to the Beta 10 installer language, currently to avoid grey screen should be selected English as main installer recovery language. If you don't want grey screen, wait and see golden master or Big Sur release.1 point
-
Yes, fixed in the next commit.1 point
-
Hi my friend, try your own config.plist with a little modifications....(backup your old plist) after you install, remove -igfxvesa on boot args in Nvram plist. If you could, not use Catalina in dual boot for a while, just try install BS above Catalina. Not use Catalina in dual boot until you can verify your boot normally. Don't forget reset (always) Nvram on boot until you have definitive EFI folder. *** Check update your kexts, and try remove was not necessary for install...just essentials....need edit with OpenCore Configurator, and save after every modified... config.plist.zip1 point
-
And remember to clean in the config.plist the prev-lang:kbd field. Oh sorry just read better esaf comment: in my case if language is forced in the config.plist (other than english) grey screen; if left empty all is ok (and choosing english in the language selector).1 point
-
It's a Apple "Bug": all the forums talk about this. Beta 10 comes with US English only for recovery mode, for a clean installation. So you have to choose only this language.1 point
-
The feature is follow: Some bioses don't want to start bootx64.efi. They want to start only EFI/Microsoft/bootmgrw.efi. So the trick is replace this file to Clover and Clover already knows the file name "bootmgfw-orig.efi" to start Windows.1 point
-
Modified the text of the article in the first post to adapt to what is described in the rest of the posts."In Opencore (OC) 0.6.3, still in beta phase, a change has been made to SampleCustom.plist file, a new Memory section has been added within PlatformInfo, it describes a series of RAM memory parameters such as defined in the SMBIOS specification.Note: article useful only for those cases where memory has errors in SMBIOS and it is convenient to define its parameters manually. Most users start from Sample.plist file (instead of SampleCustom.plist file) and Memory section is absent from it, this article is not necessary for them. The difference is the new CustomMemory key which, if set to true, requires filling the Memory section but, if set to false, allows that section to be completely omitted."Sorry for the inconveniences.1 point
-
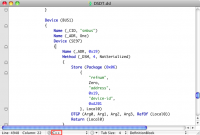
(Basado en el texto publicado por los autores de OpenCore titulado Fixing System Clocks dentro de la sección Getting Started With ACPI del cual en gran parte es una traducción). Real-time clock (RTC) Un reloj en tiempo real (RTC) es un reloj que funciona con pila o batería y que se incluye en un microchip en la placa base de un ordenador. Suele estar separado del microprocesador y se denomina «CMOS» (Complementary Metal Oxide Semiconductor). Su función es mantener una corriente cuando la placa base se apaga y/o es desconectada de la corriente eléctrica y, de esta forma, evitar que la BIOS se desconfigure cada vez que se apaga el ordenador. Una pequeña memoria en este microchip almacena la descripción del sistema o los valores de configuración, incluidos los valores de tiempo almacenados por el RTC. Cuando encendemos el ordenador, la BIOS lee la hora actual desde la memoria en el chip con el RTC. Aunque el término RTC normalmente se refiere a dispositivos en ordenadores y sistemas embebidos, los RTC están presentes en la mayoría de los aparatos electrónicos que necesitan guardar el tiempo exacto. Placas base con chipset Intel series 300 Algunos fabricantes de placas base Intel, sobre todo de la serie 300 (B360, B365, H310, H370, Z370, Z390, B460, Z490, etc.) han implementado un nuevo tipo de reloj del sistema llamado AWAC (ACPI Wake Alarm Counter Clock). El problema es que macOS no sabe manejar AWAC y, en su lugar, espera encontrar el clásico RTC. Esto puede ocasionar problemas como la desconfiguración de la BIOS en cada apagado o errores importantes al arrancar el sistema operativo. La solución pasa por traer de vuelta el RTC para que macOS pueda funcionar correctamente. Esto es lo que se busca con los archivos SSDT-AWAC y SSDT-RTC0. Cada uno de ellos funciona de forma diferente: SSDT-AWAC: deshabilita AWAC y y habilita RTC. En nuestro DSDT generalmente hay una variable llamada STAS que determina qué reloj utilizar, One para RTC y Zero para AWAC SSDT-RTC0: crea un falso dispositivo RTC para macOS cuando el DSDT no tiene la opción de utilizar el RTC clásico. ¿Cómo saber si necesito uno de estos SSDT? Para saber esto has de obtener el DSDT de tu sistema en formato AML y descompilarlo a formato ASL para que puedas leerlo con un editor de texto (ver más abajo). Busca en el archivo DSL el texto Device (AWAC). Si no se encuentra ninguna coincidencia (el reloj AWAC no existe), no es necesario que continúes. No tienes dispositivo AWAC y no necesitas ninguno de estos DSDT. Si el texto Device (AWAC) existe, busca el texto STAS. Si este texto existe, significa que se puede forzar la utilización del RTC clásico mediante SSDT-AWAC.aml que es el archivo que has de emplear en este caso. Si el texto Device (AWAC) existe pero no el texto STAS, has de usar SSDT-RTC0.aml pero es conveniente saber cómo se llama el dispositivo LPC en nuestro DSDT. SSDT-RTC0 por defecto utiliza LPCB pero en el DSDT puede llamarse así o también LBC o incluso LBC0. Puedes averiguarlo buscando el texto Name (_ADR, 0x001F0000) que corresponde al dispositivo LPC (Low Pin Count) y comprobar cómo se llama realmente en tu sistema para corregirlo si es necesario en SSDT-RTC0. Por ejemplo, si en tu DSDT se llama LPCB: Device (LPCB) { Name (_ADR, 0x001F0000) // _ADR: Address Method (SPTS, 1, NotSerialized) { SLPX = One SLPE = One If (PWBT) { PBEN = One } } no tendrías que hacer ninguna corrección en el archivo SSDT. Pero si tuviese otro de los nombres posibles, habría que corregirlo. El archivo SSDT-RTC0 tiene este contenido: DefinitionBlock ("", "SSDT", 2, "ACDT", "RTC0", 0x00000000) { External (_SB_.PCI0.LPCB, DeviceObj) // (from opcode) Scope (_SB.PCI0.LPCB) { Device (RTC0) { Name (_HID, EisaId ("PNP0B00")) // _HID: Hardware ID Name (_CRS, ResourceTemplate () // _CRS: Current Resource Settings { IO (Decode16, 0x0070, // Range Minimum 0x0070, // Range Maximum 0x01, // Alignment 0x08, // Length ) IRQNoFlags () {8} }) Method (_STA, 0, NotSerialized) // _STA: Status { If (_OSI ("Darwin")) { Return (0x0F) } Else { Return (0); } } } } } Las 2 apariciones de LPCB quedarían sin modificar o serían cambiadas a LBC o LBC0, según cada caso. ¿Cómo obtener DSDT.aml del sistema? (ACPI dump) AML (ACPI machine Language) es el código que utiliza ACPI. Es independiente de la plataforma. El código AML es interpretado cuando se leen cada una de las tablas ACPI. ASL (ACPI source language) es el código fuente utilizado por ACPI. Se pude editar con editores de texto. Para convertir AML a ASL y viceversa es necesario emplear un compilador. El más utilizado es iasl (Intel ACPI source language optimizing compiler and dissasembler), utilidad libre incluida en distribuciones Linux y que también tiene versiones para macOS y para Windows. La versión para macOS se puede descargar desde el repositorio de RehabMan entre otros sitios. La versión para Windows se puede obtener incluida en el paquete Windows Binay Tools desde la web acpica.org. Extraer DSDT en macOS con Clover Si usas Clover, esta es una de las formas más sencillas de obtener DSDT.aml. Simplemente hay que pulsar F4 en la pantalla del menú de Clover y el archivo se genera en la partición EFI, en EFI / Clover / acpi / origin, junto a otros archivos que no son interesantes para la tarea que nos ocupa. El archivo DSDT.aml no se puede leer tal cual, es necesario descompilarlo al formato DSL. Para ello, desde Terminal: > iasl DSDT.aml Intel ACPI Component Architecture ASL+ Optimizing Compiler/Disassembler version 20180427(RM) Copyright (c) 2000 - 2018 Intel Corporation File appears to be binary: found 88786 non-ASCII characters, disassembling Binary file appears to be a valid ACPI table, disassembling Input file DSDT.aml, Length 0x408B7 (264375) bytes ACPI: DSDT 0x0000000000000000 0408B7 (v02 ALASKA A M I 01072009 INTL 20180427) Pass 1 parse of [DSDT] Pass 2 parse of [DSDT] Parsing Deferred Opcodes (Methods/Buffers/Packages/Regions) Parsing completed Disassembly completed ASL Output: DSDT.dsl - 1853692 bytes El resultado es un archivo DSDT.dsl en el que podemos hacer las búsquedas relativas al RTC. Extraer DSDT en Windows Del paquete Windows Binary Tools solamente vamos a utilizar iasl.exe y acpidump.exe. Para extraer las tablas al directorio actual: acpidump -b. Se obtienen, como en el caso de macOS, una serie de archivos de los que sólo nos interesa dsdt.dat (en Windows el archivo AML obtenido tiene extensión dat). El proceso para descompilar el archivo DSDT es muy parecido a macOS: > iasl -d dsdt.dat Intel ACPI Component Architecture ASL+ Optimizing Compiler/Disassembler version 20200925 Copyright (c) 2000 - 2020 Intel Corporation File appears to be binary: found 88982 non-ASCII characters, disassembling Binary file appears to be a valid ACPI table, disassembling Input file dsdt.dat, Length 0x40AAB (264875) bytes ACPI: DSDT 0x0000000000000000 040AAB (v02 ALASKA A M I 01072009 INTL 20160527) Pass 1 parse of [DSDT] Pass 2 parse of [DSDT] Parsing Deferred Opcodes (Methods/Buffers/Packages/Regions) Parsing completed Disassembly completed ASL Output: dsdt.dsl - 1980764 bytes El resultado es un archivo dsdt.dsl en el que también podemos hacer las búsquedas relativas al RTC. Nota: los archivos SSDT han de colocarse en la Carpeta EFI/Clover/ACPI/patched (Clover) o EFI/OC/ACPI (OpenCore). En OpenCore también hay que añadirlos en el archivo config.plist.1 point
-
Rev 5123->5125 Since rev5123 we make joined bootloader Clover+OpenCore. It started as Clover using Clover's GUI and ability to change settings and then started OpenCore to inject and patche kexts and start macOS. Starting Windows and other OSes is done by Clover's way. There are new section in config.plist named Quirks that collect setting for OpenCore but some setting is just delegated from Clover because it can change it on the fly. There is a correspondence of OpenCore and traditional Clover settings to easy migrate from OpenCore to new Clover. OpenCore Clover AppleCpuPmCfgLock AppleIntelCPUPM AppleXcpmCfgLock KernelPm DisableRtcChecksum AppleRTC LapicKernelPanic KernelLapic About kernel and kext patches there is the follow. 1. OC accounts them as same and name "kernel" in the place of name of kext. Clover has different section for Kernel patches, kexts patches and Booter (boot.efi) patches. 2. Clover deal only with 64 bit arch while OC has "Arch" parameter. Other fields are OpenCore Clover Base Procedure Comment Comment Count Count Enabled Disabled Skip Skip Identifier Name Find Find Mask MaskFind Replace Replace ReplaceMask MaskReplace MaxKernel - MinKernel - - MatchOS - InfoPlistPatch - RangeFind 3. Procedure name in OpenCore must be long like __ZN8AppleRTC18setupDateTimeAlarmEPK11RTCDateTime Clover can use short name. In the example it can be setupDateTimeAlarm. 4. OpenCore assumes byte mask while Clover assumes bit masking. In the case of 0xFF00FF it will be the same. More careful see documentation for OpenCore and samples for Clover at this page. 5. RangeFind restrict search in Clover by several bytes. I don't know if OpenCore is able do the same. 6. Patches in OpenCore can be "Enabled" by setting the variable while in Clover they are enabled by default. User can disable it in the config.plist or in Clover GUI. 7. For Kernel patches we had additional "StartPattern" and corresponding "MaskStart" to define a place from what we want to search. OpenCore has no such service. Later we will extend the possibility.1 point
-
I agree working together would be great. I wasn't really involve and following like now when you started OpenCore. I don't know why it started. I also already thought about putting the UI of clover in OpenCore. But in the end, Big Sur is probably the last macOs version that will exist on Intel (not sure, do you know more?). If PC manufacturer don't start to make ARM PC, this 2 projects will be useless soon anyway. Is it worth the effort ?1 point
-
Sorry for the late reply. Actually my experience was that on the first few boots, the trackpad driver wasn't loading, however I think this was my fault. Basically after every Clover/Kext change that I used to make, trackpad used to fail and I had to rebuild the kext cache, reboot and it would be fine. The same thing happened on first boot with OpenCore, so I rebuilt the cache. Then when I rebooted it worked, until I rebooted a 2nd time again. I rebuilt the cache again, which worked on 3rd reboot until I rebooted a 4th time. This kept happening, so I rebooted a few times without doing anything and eventually it seemed to work fine. It doesn't happen anymore, so I think maybe after doing a rebuild just try rebooting a few times till it works. Seems to work fine now for me.1 point
-
FetchMacOS - A tool to download macOS on non-Mac platforms. A few months ago I was playing around with the idea of looking at Apple's new distribution method for the macOS Installer (in the A/B test that delivers either a complete app bundle, or a 7MB stub that downloads the rest separately). Since it seemed to use the existing swdist distribution server, I decided to use some older code to write a client that emulates the 7MB macOS Installer and fetches the installation data from Apple's servers. It works on Linux and Windows, and is probably the closest thing to a clean copy of macOS without involving an actual Mac or the App Store. This thread is just to garner some opinions on the idea, and maybe adding some improvements (such as including createinstallmedia logic to make installation drives from the data) before making a wider release. FetchMacOS 1.2a (for macOS 10.14 Mojave) http://swdist.furcode.co/bin/FetchMacOS-1.2.zip SHA1 = ba19a1d3fdf00aa65ac7797388de27089e91d101 Changelog 1.2 - Support for macOS Mojave (10.14) 1.1 - Support for High Sierra (10.13)1 point
-
Thank you for collecting the information in a single place, it works on my DELL laptop also1 point
-
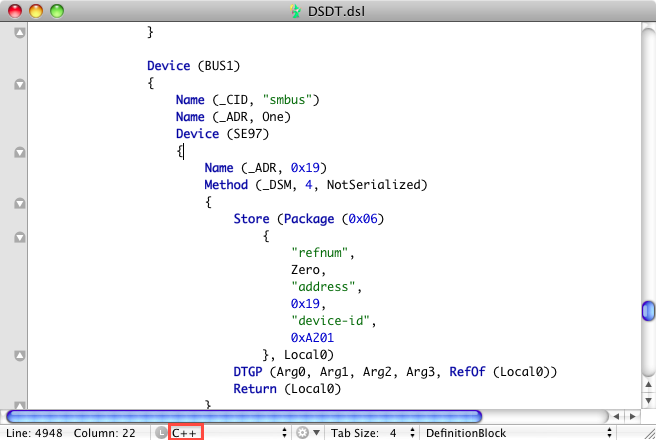
DSDT Background: ACPI (Advanced Configuration and Power Interface) is an open industry specification co-developed by Hewlett-Packard, Intel, Microsoft, Phoenix, and Toshiba that defines hardware and software interfaces that enable OS-directed configuration and Power Management (OSPM) to enumerate and configure motherboard devices, and manage their power. Wikipedia: The tables allow description of system hardware in a platform-independent manner, and are presented as either fixed-formatted data structures or in AML. The main AML table is the DSDT (differentiated system description table) The DSDT is the largest and most important table because this is where the motherboard devices are described. As the DSDT, along with other ACPI tables, is stored in the BIOS only on-board hardware is described. The goal is to bypass this often faulty table because of optimization for Windows by a custom one where the declarations are adjusted to the needs of Mac OS X in order to maximize compatibility. Use for Hackintoshes By loading an edited DSDT via the Chameleon boot loader instead of the factory one, the following things can be achieved: faking device-ids via DSDT can replace legacy/injector kexts updates may disable modified or legacy/injector kexts but cannot disable DSDT patches DSDT edits can enable sleep, native speedstepping extensive edits can boost the boot process Do i really need it? No, to get a functional Hackintosh you don't need a DSDT. But having one can make your system running more stable, lighter (editing this one table replace many extra files). How to extract the DSDT Mac OS X: Be sure no custom/modified DSDT is injected yet. Script by zhell. Run in terminal. The script extracts all ACPI tables to /users/your username/ACPI There are several tools like DSDTSE, Chameleon Wizard. Clover bootloader - Using the GUI In Clover GUI, press F4 button, and then boot your OS X normally. When OS X is already initialized, mount/open the EFI partition, and you can find all your ACPI tables in /EFI/Clover/ACPI/origin/ Linux - via Terminal and Live-CD/DVD: cat /proc/acpi/dsdt > dsdt.aml Windows: AIDA64 or similar tools .dsl / .aml — Compile and Decompile When extracted from the system the DSDT and the other tables are in the ACPI Machine Language (File extension .aml). To make edits, the DSDT needs to be decompiled (File extension .dsl). The program for compiling and decompiling ACPI tables is called iASL. The latest version for Mac OS X can be downloaded here. Compiling Errors: Using newer iASL versions than the original DSDT was compiled with will often cause compiling errors. To fix the errors and adapt the new code guidelines also check this topic. Editing DSDT DSDT.dsl files can be edited with any text editor. We will talk about DSDT patches in a later post in this topic but this can take some time because we want to give detailed explanations and background info to make the patches available for hopefully any hardware. A good method is using Textmate and selecting C++ markup highlighting. There are also utilities that include the iasl compiler like: DSDTEditor DSDTSE MaciASL - Is the most actual DSDT editor. After you applyed the patches, you need save your DSDT as .aml - E.g: DSDT.aml Why DSDT files by others can cause problems Even small hardware differences will result in different tables and can cause problems. To be sure a that a modified DSDT is compatible with your system, compare the two files. Following lines can cause problems: OperationRegion (BIOS, SystemMemory, xx(some hex value)xx OperationRegion (^LPCR, SystemMemory, xx(some hex value)xx If these values are different in your DSDT, replace the hex values on the other modified DSDT with those from your own. Verifying that the custom DSDT is loaded: First be sure your file is named DSDT.aml and placed in /DSDT.aml or /Extra/DSDT.aml. You made / have a custom DSDT and see no changes and your not sure that the DSDT is used and injected by the boot-loader. Here are some ways to check the loading of a DSDT: Use bdmesg. bdmesg ships with the Chameleon boot loader and goes in /usr/bin. bdmesg can be run from Terminal after startup so that you may examine what Chameleon is doing while it boots your Hackintosh. Excerpt from bdmesg output, last line shows DSDT.aml loading: Loading Darwin 10.7 Loading kernel cache /System/Library/Caches/com.apple.kext.caches/Startup/kernelcache Read HFS+ file: [hd(0,2)/System/Library/Caches/com.apple.kext.caches/Startup/kernelcache] 4096 bytes. Read HFS+ file: [hd(0,2)/System/Library/Caches/com.apple.kext.caches/Startup/kernelcache] 18150026 bytes. Read HFS+ file: [hd(0,1)/Extra/DSDT.aml] 22762 bytes. Extract your DSDT on OS X. If you get your modified DSDT, that means it's loaded. Resources for DSDT tweaking ACPI Specification Our DSDT forum Original Apple System Dumps for reference ........................................................................................................ 1.0 first draft by iLeopod 28.03.2012 2.0 edited version with contributions by Gringo Vermelho 3.0 editing completely broke formatting, all code stripped from post. Minor fixes to spelling and grammar
 1 point
 -
I tested it with OpenCore 0.6.3 dev that I created again and the result for me on the HP Envy Recline K-300BR is the same as with Clover!0 points
-
Same with ß6 20A5364e . Install log:0 points