Jump to content

Mojave MBR HFS Firmware Check Patch 10.14.x


1 Screenshot

About This File

Patched OSInstaller.framework to allow macOS 10.14 installation on MBR HFS+ partition.


To use those patched files you must follow HowTo to create an USB installer. You can't just run the app downloaded from Mac App Store.

The patch is made base on 落下爱@pcbeta 10.10.x MBR patch method, and more patch for 10.14 HFS Firmware check by crazybirdy.


What is this patched OSInstaller doing?
1. Patch the MBR check, allow macOS 10.14 installation on MBR partition.
2. Patch the Firmware check, bypass the error of "
An error occurred while verifying firmware".
3. Patch to stop auto-convert to APFS , "
ConvertToAPFS=false" is no longer worked with 10.14.
4. This patched MBR OSInstaller will never convert to APFS, and will always install as HFS+ partition.
5. This patched MBR OSInstaller method
works with both MBR HFS+ and GPT HFS+ partition (GPT+recovery).

No longer need to set new SMbiosversion, FirmwareFeatures, and FirmwareFeaturesMask with this MBR-patch.


What's the difference between createinstallmedia method, MBR-Manual-Method, and MBR-Automatic-Method?
As the following....
1. createinstallmedia method,

    needs stage 1, stage 2 installation process, which is worked with GUID partition only, always convert to APFS format.
2. MBR-Manual-Method (same as 10.12),

    install via stage 2 manually, which is worked with both MBR and GUID, HFS+ and APFS, will never convert the partition format.

    We can manually format as MBR or GPT, HFS+ or APFS on installation screen like as 10.12.

    We can manually select MBR HFS+ partition to install 10.13 and 10.14 on installation screen now.

    Needn't to update the MBR-Manual-Method files, it will still work on 10.13, and 10.14 future versions, I think so.

    It can be installed as Fresh installation on formated blank partition only, but can't be installed as update from previous version.

3. MBR-Automatic-Method (new for 10.13+),

    install via stage 2 automatically, which is worked with both MBR and GUID, HFS+ and APFS, will never convert the partition format.

    It can be installed as Fresh installation on formated blank partition, and can be installed as update from previous version.


How to make 10.14 installer for MBR (MBR-Manual-Method)?

Just use EasyMBR-InstallerMaker to make installer, it works with both MBR and GPT.

Read HowTo inside the dmg first, same as 10.12.

Read HowTo Q/A Q5. How to patch to work with CPU SSE4.1 only for Mojave?
Read HowTo Q/A Q6. How to download the full installer app via swscan.apple.com, instead of App Store?
Read HowTo Q/A Q7. How to update 10.14.x combo-update to MBR and GPT with installScript directly?


How to make 10.14 installer for MBR (MBR-Automatic-Method)?

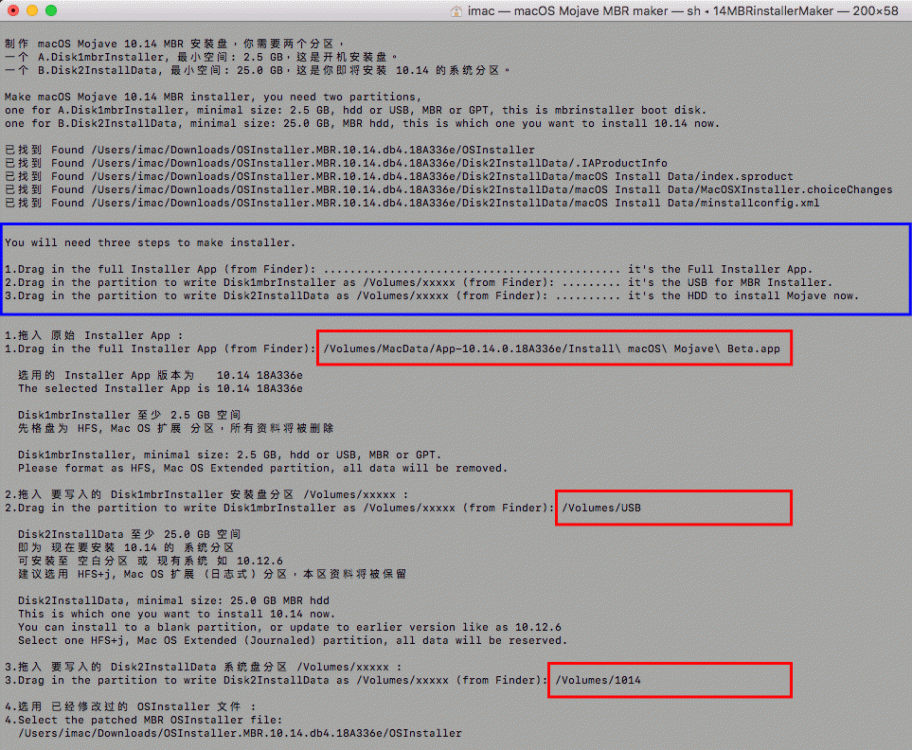
Just use 14MBRinstallerMaker to make installer, it works with both MBR and GPT.

Read HowTo inside the dmg first, same as 10.13.

Read HowTo Q/A Q5. How to patch to work with CPU SSE4.1 only for Mojave?
Read HowTo Q/A Q6. How to download the full installer app via swscan.apple.com, instead of App Store?
Read HowTo Q/A Q7. How to update 10.14.x combo-update to MBR and GPT with installScript directly?


And, need a SMBIOS supported with /System/Library/CoreServices/PlatformSupport.plist.
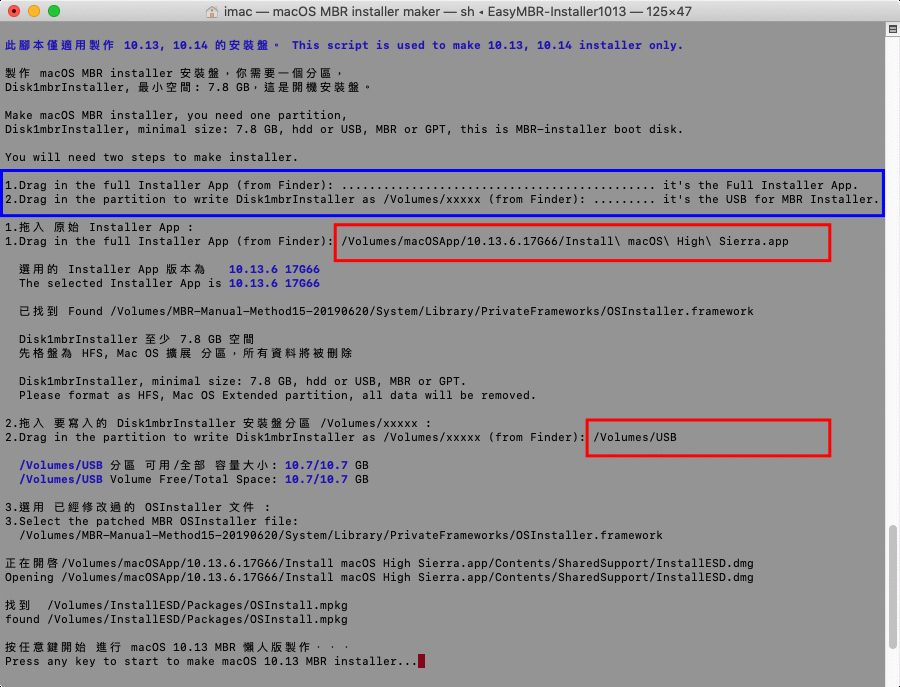
 

EasyMBR-Installer1013.gif.cb360f3033945b1b3cd19711482e36c0.gif

14MBRinstallerMaker.thumb.gif.504e7741aa883bf4158f0526988776b5.gif


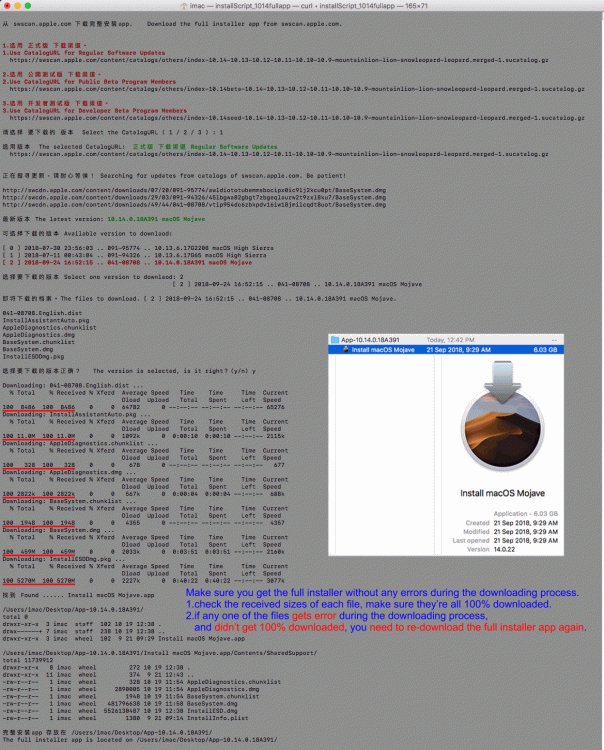
Q6. How to download the full installer app via swscan.apple.com, instead of App Store?
A6. Some people download installer app from App Store, and get only 18 MB size, not the complete installer app (5.68 GB). You should boot to 10.12, or 10.13 to download it again from App Store, or use script Q6-DownloadFullApp/installScript_1014fullapp to download the full installer app via swscan.apple.com.


installScript_fullapp.thumb.gif.963b53da652e145e4ef5a4d461859f0a.gif


What's New in Version 10.14.x

Released

2020.07.13    Update Old-macOS-10+11+12/installScript_1012fullapp.

2020.05.30    Update Readme.

2020.02.25    Update Q7-Update-installScript.

2020.01.30    Update Q7-Update-installScript.

2019.12.06    Update Q6-DownloadFullApp

2019.11.02    Add Old-macOS-10+11+12/installScript_1012fullapp.

2019.11.01    Update Q7-Update-installScript.

2019.10.10    Update Q7-Update-installScript, Q8-MBR-Update1014

2019.09.28    Update to 10.14.6.18G103 (MBR-Auto-Method14)

2019.09.11    Update Q6-DownloadFullApp.

2019.08.26    Update to 10.14.6.18G95 (MBR-Auto-Method14)

2019.08.02    Update to 10.14.6.18G87 (MBR-Auto-Method14)

2019.07.23    Update to 10.14.6.18G84 (MBR-Auto-Method14)

2019.06.20    MBR HFS+ is back for 10.15 now via MBR-Manual-Method.

2019.06.04    End of MBR and HFS+, there is no more MBR HFS+ patch available for 10.15 OSInstaller.

2019.05.14    Update to 10.14.5. (MBR-Auto-Method14)

2019.03.26    Add support to 10.14.4 BaseSystem.dmg. (MBR-EasyInstallerMaker)

2019.02.13    Update script to make update-installer-dmg on Desktop. (Q7-Update-installScript/installScript_101X)

  • Like 23
  • Thanks 15

User Feedback

Recommended Comments


40 minutes ago, themacmeister said:

I created the installer USB using Manual Method, and did an in-place upgrade (not a fresh install).


Sadly, the SSD was converted to APFS during the install. I have reverted back to High Sierra JHFS+ from Time Machine backup.


assume that I can do a fresh Mojave install to JHFS and then restore apps and documents from High Sierra Time Machine backup...?!?!


Please use MBR-Automatic-Method, it will work fine for upgrade from High Sierra to Mojave without convert to APFS.

Link to comment
Share on other sites

trying to install on second drive from usb, can get to installer but when arrive it states

"Mac OS could not be installed on your computer The installer resources have expired"

Edited by lesel
Link to comment
Share on other sites

3 hours ago, lesel said:

trying to install on second drive from usb, can get to installer but when arrive it states

"Mac OS could not be installed on your computer The installer resources have expired"

If you use MBR-Manual-Method, it should work fine.

Link to comment
Share on other sites

Hi, I have a problem 

I make USB installer with 14MBRinstallerMaker but can't install macOS 10.14 in My Acer 4741G 

my error ... 


IMG_20181018_085227.jpg


download macOS 10.14 installer with Q6-DownloadFullApp and add SMBIOS supported with /System/Library/CoreServices/PlatformSupport.plist 


this my install log

Installer Log 10-17-18.txt

Edited by HandaTakuya
Link to comment
Share on other sites

16 hours ago, HandaTakuya said:

Hi, I have a problem 
I make USB installer with 14MBRinstallerMaker but can't install macOS 10.14 in My Acer 4741G 
my error ...
download macOS 10.14 installer with Q6-DownloadFullApp and add SMBIOS supported with /System/Library/CoreServices/PlatformSupport.plist 

this my install log

Installer Log 10-17-18.txt


It looks like, you have the error of "the Installer Source is damage" issue, you should check the md5 first.

It could be the network issue when you download the full installer with "Q6-DownloadFullApp/installScript_1014fullapp",
and didn’t get the complete installer app, especially the big size one "InstallESD.dmg".


Check md5 with Terminal command:
md5 "Install macOS Mojave.app/Contents/SharedSupport/InstallESD.dmg"


mac OS 10.14.0.18A391

-rw-r--r--  1 501     2890005  9 25 07:21 /10.14.0.18A391/Install macOS Mojave.app/Contents/SharedSupport/AppleDiagnostics.dmg
-rw-r--r--  1 501   481796638  9 21 20:25 /10.14.0.18A391/Install macOS Mojave.app/Contents/SharedSupport/BaseSystem.dmg
-rw-r--r--  1 501  5526130487  9 21 20:30 /10.14.0.18A391/Install macOS Mojave.app/Contents/SharedSupport/InstallESD.dmg


MD5 (/10.14.0.18A391/Install macOS Mojave.app/Contents/SharedSupport/AppleDiagnostics.dmg) = dd937905f9148bb4c46672dda021d158
MD5 (/10.14.0.18A391/Install macOS Mojave.app/Contents/SharedSupport/BaseSystem.dmg) = 871f5701af49f91de69edd2ac164c481
MD5 (/10.14.0.18A391/Install macOS Mojave.app/Contents/SharedSupport/InstallESD.dmg) = e603e94dd99241bab4938a7f0334ba1b

  • Like 1
Link to comment
Share on other sites

13 hours ago, crazybirdy said:


It looks like, you have the error of "the Installer Source is damage" issue, you should check the md5 first.

It could be the network issue when you download the full installer with "Q6-DownloadFullApp/installScript_1014fullapp",
and didn’t get the complete installer app, especially the big size one "InstallESD.dmg".


Check md5 with Terminal command:
md5 "Install macOS Mojave.app/Contents/SharedSupport/InstallESD.dmg"


mac OS 10.14.0.18A391

-rw-r--r--  1 501     2890005  9 25 07:21 /10.14.0.18A391/Install macOS Mojave.app/Contents/SharedSupport/AppleDiagnostics.dmg
-rw-r--r--  1 501   481796638  9 21 20:25 /10.14.0.18A391/Install macOS Mojave.app/Contents/SharedSupport/BaseSystem.dmg
-rw-r--r--  1 501  5526130487  9 21 20:30 /10.14.0.18A391/Install macOS Mojave.app/Contents/SharedSupport/InstallESD.dmg


MD5 (/10.14.0.18A391/Install macOS Mojave.app/Contents/SharedSupport/AppleDiagnostics.dmg) = dd937905f9148bb4c46672dda021d158
MD5 (/10.14.0.18A391/Install macOS Mojave.app/Contents/SharedSupport/BaseSystem.dmg) = 871f5701af49f91de69edd2ac164c481
MD5 (/10.14.0.18A391/Install macOS Mojave.app/Contents/SharedSupport/InstallESD.dmg) = e603e94dd99241bab4938a7f0334ba1b


/Users/Desktop/App-10.14.0.18A391/Install macOS Mojave.app/Contents/SharedSupport/

total 11739912

drwxr-xr-x   8 User wheel               272 Oct 19 23:40 .

drwxr-xr-x  11 User  wheel             374 Sep 21 11:43 ..

-rw-r--r--   1 User  wheel               328 Oct 19 22:05 AppleDiagnostics.chunklist

-rw-r--r--   1 User  wheel        2890005 Oct 19 22:05 AppleDiagnostics.dmg

-rw-r--r--   1 User  wheel             1948 Oct 19 22:05 BaseSystem.chunklist

-rw-r--r--   1 User  wheel    481796638 Oct 19 22:16 BaseSystem.dmg

-rw-r--r--   1 User  wheel  5526130487 Oct 19 23:40 InstallESD.dmg

-rw-r--r--   1 User  wheel             1380 Sep 21 08:14 InstallInfo.plist


完整安装app 存放在 /Users/Desktop/App-10.14.0.18A391/

The full installer app is located on /Users/Desktop/App-10.14.0.18A391/

Link to comment
Share on other sites

8 hours ago, HandaTakuya said:

/Users/Desktop/App-10.14.0.18A391/Install macOS Mojave.app/Contents/SharedSupport/

total 11739912

drwxr-xr-x   8 User wheel               272 Oct 19 23:40 .

drwxr-xr-x  11 User  wheel             374 Sep 21 11:43 ..

-rw-r--r--   1 User  wheel               328 Oct 19 22:05 AppleDiagnostics.chunklist

-rw-r--r--   1 User  wheel        2890005 Oct 19 22:05 AppleDiagnostics.dmg

-rw-r--r--   1 User  wheel             1948 Oct 19 22:05 BaseSystem.chunklist

-rw-r--r--   1 User  wheel    481796638 Oct 19 22:16 BaseSystem.dmg

-rw-r--r--   1 User  wheel  5526130487 Oct 19 23:40 InstallESD.dmg

-rw-r--r--   1 User  wheel             1380 Sep 21 08:14 InstallInfo.plist


完整安装app 存放在 /Users/Desktop/App-10.14.0.18A391/

The full installer app is located on /Users/Desktop/App-10.14.0.18A391/


Use the new app 10/19 to  make installer, and save the all log file again (not error only log file).

Or try the MBR-Manual-Method if install to the blank partition, it should work fine.

Edited by crazybirdy
Link to comment
Share on other sites

Do either the manual or automatic methods create the recovery partition? I created Mojave manual installer (worked fine) but after installation of OS it appears I do not have a recovery partition.

Link to comment
Share on other sites

40 minutes ago, just plain dave said:

Do either the manual or automatic methods create the recovery partition? I created Mojave manual installer (worked fine) but after installation of OS it appears I do not have a recovery partition.

No for MBR,  yes for GPT.

Link to comment
Share on other sites

Thank you. I have successfully used the script to install Mohave (HFS+). Is it possible to convert to APFS (without re-installing)? Right clicking on the SSD drives from within DiskUtility presents a greyed-out 'Convert to APFS' option (when booted to Mojave).

Link to comment
Share on other sites

5 hours ago, just plain dave said:

Thank you. I have successfully used the script to install Mohave (HFS+). Is it possible to convert to APFS (without re-installing)? Right clicking on the SSD drives from within DiskUtility presents a greyed-out 'Convert to APFS' option (when booted to Mojave).

I don't know, never use it.


Edited by crazybirdy
  • Like 1
Link to comment
Share on other sites

Mojave 10.14.1 update is out today. I've read the included 'How to text file' and if I understand correctly I need to:

"A9. Use script Q9-Update-installScript/installScript_1014 to install update directly.
    Update macOS Mojave 10.14.x, works fine with both GPT and MBR, and MBR will not update Recovery HD partition.

    http://www.insanelymac.com/forum/topic/330364-macos-high-sierra-10132-update-released/?p=2546218
    After updating finished and reboot, Safari and App Store will stop connecting to the internet.
    To fix this, need to run the following code in Terminal, and reboot after finished:

    sudo update_dyld_shared_cache -force"

I'm still a bit uncertain how to proceed. Do I just run the 'Q9 installscript' (followed by terminal code) or do I first need to download the combo updater from Apple? Thanks and sorry for my confusion.


Link to comment
Share on other sites

1 hour ago, just plain dave said:

Mojave 10.14.1 update is out today. I've read the included 'How to text file' and if I understand correctly I need to:

"A9. Use script Q9-Update-installScript/installScript_1014 to install update directly.
    Update macOS Mojave 10.14.x, works fine with both GPT and MBR, and MBR will not update Recovery HD partition.

    http://www.insanelymac.com/forum/topic/330364-macos-high-sierra-10132-update-released/?p=2546218
    After updating finished and reboot, Safari and App Store will stop connecting to the internet.
    To fix this, need to run the following code in Terminal, and reboot after finished:

    sudo update_dyld_shared_cache -force"

I'm still a bit uncertain how to proceed. Do I just run the 'Q9 installscript' (followed by terminal code) or do I first need to download the combo updater from Apple? Thanks and sorry for my confusion.


just run the 'Q9 installscript'

Link to comment
Share on other sites

44 minutes ago, phillip521125 said:

请问Q6中提到的DownloadFullApp/installScript_1014fullapp有没有下载链接呢,可否提供一下,非常感谢

已经提供了!如果你有下载dmg话,自然会看到!

Link to comment
Share on other sites

15 minutes ago, crazybirdy said:

已经提供了!如果你有下载dmg话,自然会看到!

非常感谢,已经看到了

Link to comment
Share on other sites

I installed Mojave using the manual script and all went fine. I'm now trying to update to 10.14.1 and I get the following error.

I've tried using the script to update in Q9 and that ends with an error too.

any ideas?

Screenshot 2018-10-31 at 09.59.11.png

Link to comment
Share on other sites

1 hour ago, Crabhunter said:

I installed Mojave using the manual script and all went fine. I'm now trying to update to 10.14.1 and I get the following error.

I've tried using the script to update in Q9 and that ends with an error too.

any ideas?


It could be the SIP issue, set Clover SIP as HowTo

        add to /EFI/CLOVER/config.plist as below.

        <key>RtVariables</key>
        <dict>
            <key>BooterConfig</key>
            <string>0x28</string>
            <key>CsrActiveConfig</key>
            <string>0x67</string>
        </dict>


Q9-Update-installScript/installScript_1014 works fine here on MBR HFS 10.14.0.18A391.

01.thumb.gif.332da00a9387f455f2e03324a3b56659.gif

Link to comment
Share on other sites

15 hours ago, crazybirdy said:

just run the 'Q9 installscript'

I ran the installer script. The update completed & logged me out of Mojave. I logged back in and verified it was in fact 10.14.1. I then ran the terminal code "sudo update_dyld_shared_cache -force"  as suggested. After reboot I can NOT get past the stretched apple logo to the appropriately sized logo and the login screen. The white progress bar under the stretched logo makes it all the way to the right but nothing else happens. Before this the stretched logo was always followed quickly by an appropriately smaller sized apple logo and the login screen. Thank you.

Link to comment
Share on other sites

4 hours ago, just plain dave said:

I ran the installer script. The update completed & logged me out of Mojave. I logged back in and verified it was in fact 10.14.1. I then ran the terminal code "sudo update_dyld_shared_cache -force"  as suggested. After reboot I can NOT get past the stretched apple logo to the appropriately sized logo and the login screen. The white progress bar under the stretched logo makes it all the way to the right but nothing else happens. Before this the stretched logo was always followed quickly by an appropriately smaller sized apple logo and the login screen. Thank you.

You should update, reboot, then sudo command, reboot.

Now. I don't know how to fix it.


Boot -v

Or

You can try to boot -s into singleuser mode, and sudo command again.

update_dyld_shared_cache -force

Edited by crazybirdy
Link to comment
Share on other sites

19 hours ago, crazybirdy said:


It could be the SIP issue, set Clover SIP as HowTo

        add to /EFI/CLOVER/config.plist as below.

        <key>RtVariables</key>
        <dict>
            <key>BooterConfig</key>
            <string>0x28</string>
            <key>CsrActiveConfig</key>
            <string>0x67</string>
        </dict>


Q9-Update-installScript/installScript_1014 works fine here on MBR HFS 10.14.0.18A391.

01.thumb.gif.332da00a9387f455f2e03324a3b56659.gif

OK that worked as far as I got the update was successful but now when I boot it hangs at this point. I've tried booting it from my USB installer with my original .config but it still hangs at this point.

20181101_055828.jpg

Link to comment
Share on other sites

2 hours ago, Crabhunter said:

OK that worked as far as I got the update was successful but now when I boot it hangs at this point. I've tried booting it from my USB installer with my original .config but it still hangs at this point.

20181101_055828.jpg

Didn't know why?

It could be 10.14.1 issue.

Link to comment
Share on other sites


×
×
  • Create New...