Jump to content

High Sierra MBR and Firmware Check Patch 10.13.x


1 Screenshot

About This File

Patched OSInstaller.framework to allow macOS 10.13 installation on MBR partition.


To use those patched files you must follow HowTo to create an USB installer. You can't just run the app downloaded from Mac App Store.

The patch is made base on 落下爱@pcbeta 10.10.x MBR patch method, and more patch for 10.13 Firmware check by crazybirdy.


What is this patched OSInstaller doing?
1. Patch the MBR check, allow macOS 10.13 installation on MBR partition.
2. Patch the Firmware check, bypass the error of "
An error occurred while verifying firmware".
3.
This patched MBR OSInstaller method works with both MBR and GPT partition (GPT+recovery).

No longer need to set new SMbiosversion, FirmwareFeatures, and FirmwareFeaturesMask with this MBR-patch.


What's the difference between createinstallmedia method, MBR-Manual-Method, and MBR-Automatic-Method?
As the following....
1. createinstallmedia method,

    needs stage 1, stage 2 installation process, which is worked with GUID partition only.
2. MBR-Manual-Method (same as 10.12),

    install via stage 2 manually, which is worked with both MBR and GUID, HFS+ and APFS.

    We can manually format as MBR or GPT, HFS+ or APFS on installation screen like as 10.12.

    We can manually select MBR HFS+ partition to install 10.13 and 10.14 on installation screen now.

    Needn't to update the MBR-Manual-Method files, it will still work on 10.13, and 10.14 future versions, I think so.

    It can be installed as Fresh installation on formated blank partition only, but can't be installed as update from previous version.

3. MBR-Automatic-Method (new for 10.13+),

    install via stage 2 automatically, which is worked with both MBR and GUID, HFS+ and APFS.

    It can be installed as Fresh installation on formated blank partition, and can be installed as update from previous version.


How to make 10.13 installer for MBR (MBR-Manual-Method)?

Just use EasyMBR-InstallerMaker to make installer, it works with both MBR and GPT.

Read HowTo inside the dmg first, same as 10.12.
Read HowTo Q/A Q6. How to download the full installer app via swscan.apple.com, instead of App Store?
Read HowTo Q/A Q7. How to update 10.13.x combo-update to MBR and GPT with installScript directly?


How to make 10.13 installer for MBR (MBR-Automatic-Method)?

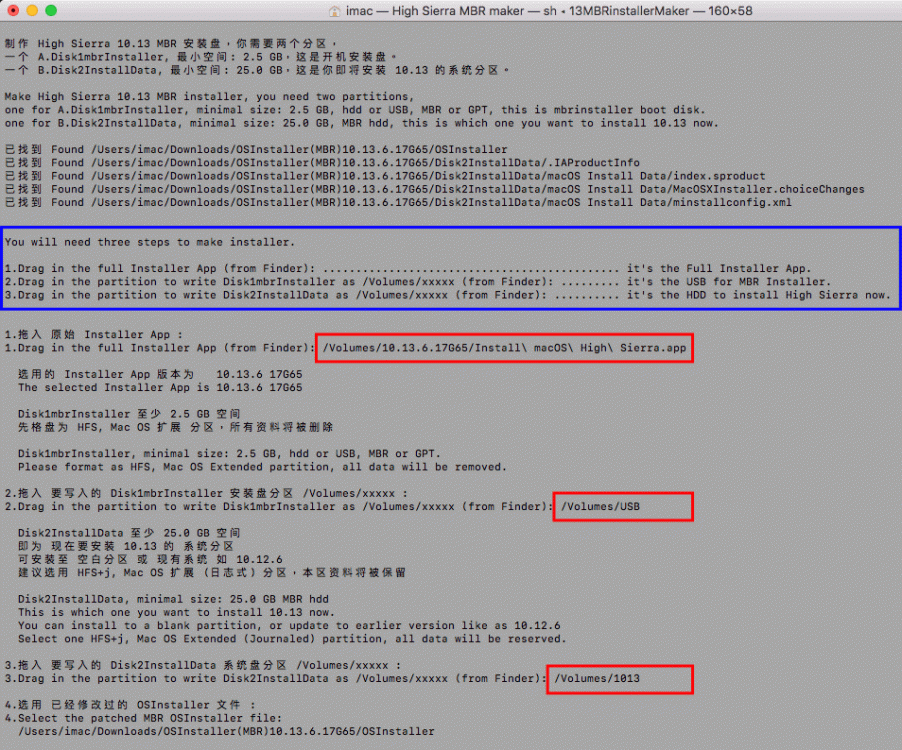
Just use 13MBRinstallerMaker to make installer, it works with both MBR and GPT.

Read HowTo inside the dmg first, new for 10.13+.
Read HowTo Q/A Q6. How to download the full installer app via swscan.apple.com, instead of App Store?
Read HowTo Q/A Q7. How to update 10.13.x combo-update to MBR and GPT with installScript directly?


And, need a SMBIOS supported with /System/Library/CoreServices/PlatformSupport.plist.
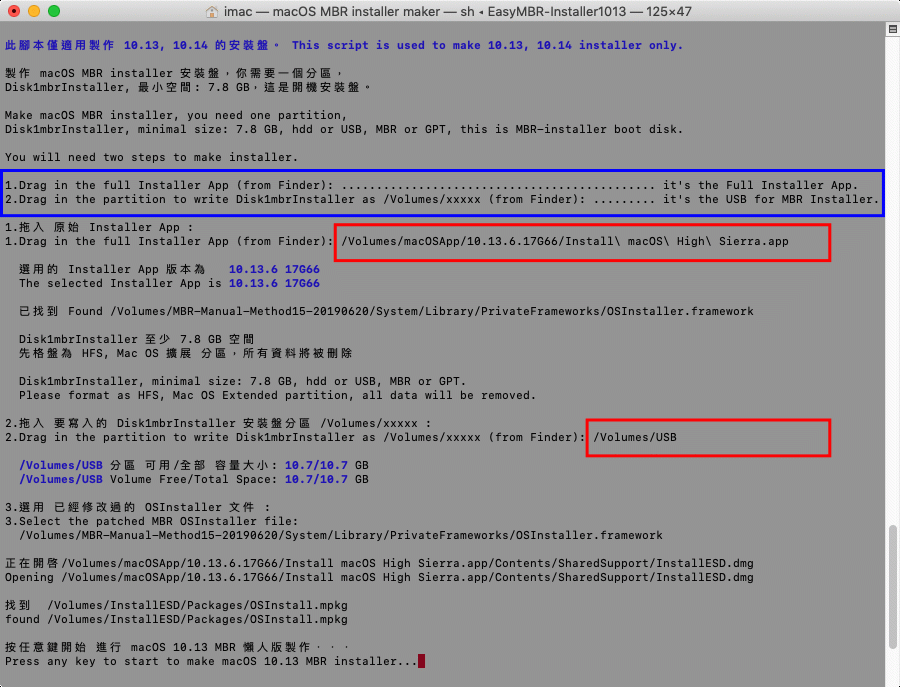


EasyMBR-Installer1013.gif.2042611dbe78ce7f7a88c6d059cf6d85.gif

13MBRinstallerMaker.thumb.gif.82857e8d6f2593a5df832a54a788c9fb.gif


What's New in Version 10.13.x   See changelog

Released

2020.07.13    Update Old-macOS-10+11+12/installScript_1012fullapp.

2020.05.30    Update Readme.

2020.02.25    Update Q7-Update-installScript.

2020.01.30    Update Q7-Update-installScript.

2019.12.06    Update Q6-DownloadFullApp

2019.11.02    Add Old-macOS-10+11+12/installScript_1012fullapp.

2019.11.01    Update Q7-Update-installScript.

2019.10.10    Update Q7-Update-installScript, Q8-MBR-Update1013.

2019.09.11    Update Q6-DownloadFullApp.

2019.02.13    Update script to make update-installer-dmg on Desktop. (Q7-Update-installScript/installScript_101X)

  • Like 5
  • Thanks 4
 Share


User Feedback

Recommended Comments


Do  you boot to Disk1mbrInstaller?


Read HowTo, if you boot to Disk1mbrInstaller, you will never see disk choice screen.

C4. Done for modify the UUID, Target, and TargetName,

    and you can start to boot /Volumes/Disk1mbrInstaller to install to /Volumes/Disk2InstallData now.

script 13MBRinstallerMaker change name Disk1mbrInstaller to MBR, I boot MBR to install to Disk2InstallData 


ps. script 13MBRinstallerMaker dont auto modify the UUID ?

Link to comment
Share on other sites

13MBRinstallerMaker change name Disk1mbrInstaller to 1013xMBR17Xxxx, not only MBR, and will do auto modify the UUID. 

Boot to 1013xMBR17Xxxx will never see the disk choice screen, will auto install the Disk2InstallData. 

You should not see the disk choice screen. your 13MBRinstallerMaker may not work right?

I use 13MBRinstallerMaker no auto install and see the disk choice screen

Link to comment
Share on other sites

You should not see the disk choice screen. your 13MBRinstallerMaker may not work right?


or follow Step A. to check your 1013xMBR17Xxxx boot partition.

report from scrip :


完成恢复 BaseSystem.dmg

Restore BaseSystem.dmg is finished.


/Volumes/InstallESD/Packages/OSInstall.mpkg -> /Volumes/OS X Base System//System/Installation/Packages/OSInstall.mpkg

cp: /Volumes/OS X Base System//System/Library/PrivateFrameworks/OSInstaller.framework/Versions/A/OSInstaller: No such file or directory


Disk /Volumes/InstallESD ejected

Volume OS X Base System on disk3s2 unmounted

Volume OS X Base System on /dev/disk3s2 mounted

Link to comment
Share on other sites

Some error with /Volumes/, upload new zip now.

You can download again, and run the new 13MBRinstallerMaker again, it should work fine with your system now.


thank you ! new scrip is work !! 

  • Like 1
Link to comment
Share on other sites

I have two hard drives with HS on them. I ran script Q9 and updated one drive with HS to 10.13.3 with no problem. Now the other drive has HS 10.13.2. But when I run script Q9 again from either drive I only get these update options.


Available version to update:

[ 0 ] 2018-01-24 18:00:42 .. 091-63423 .. 10.13.4.17E139j Update Beta
[ 1 ] 2017-12-13 18:02:17 .. 091-52056 .. 10.13.2.17C88 Combo Update
[ 2 ] 2018-01-24 18:00:42 .. 091-63425 .. 10.13.4.17E139j Combo Update Beta


So I'm trying to update the second drive with HS from 10.13.2 to 10.13.3 using the Q9 script again. Any ideas?

Thanks for the wonderful scripts in advance.

  • Like 1
Link to comment
Share on other sites

Update new zip, fix it now. Download and try it again.

Amazing, worked perfect. Thank You!!!

  • Like 1
Link to comment
Share on other sites

Updated fine using the Q9... but have issue with browser not loading New York Times website unless Java Script turned OFF.... only with version 11.1...version 11.2 experimental version works perfectly.... happens with both Combo update and 11.3 - 11.4 update...really strange....certain sites don't load... wonder if there is a new setting hidden somewhere... this does not happen on my real MacBook either....anyone else?


Link to comment
Share on other sites

CB, so many versions for 13.4... what did you change in latest? 

Still having weird problem loading https: sites  like the new york times with Java turned on ... loads fine with J off.. and Safari 11.2 loads fine , just some weird issue with 11.1 in 13. 4.... not sure if it is webkit error or what but loading hangs about half way...even on clean install, but no problem on real MacBook...only hack...crazy....


  • Like 1
Link to comment
Share on other sites

Found issue - CONFIGURE IPV6 needs to be set to "Link-local only" and then https:// loads fine. Weird....but now ok...

I will see how next update goes!  Thanks again CB for great tool.


Edited by Dans1975
Link to comment
Share on other sites

I have been reading the help text and don't understand the instructions properly.

Is DIsk 1 a usb flash drive with a partition of at least 2.5GB?

Is Disk 2 a normal hdd connect via .USB and will contain the High Sierra installation files?

Then we boot disk 1 and disk 2 to install it to our internal hdd on a laptop or pc etc?


Or is Disk 2 (a MBR hdd), in which we install the actual MacOS into?

Then we connect Disk2 back to our laptop

Then boot the usb of Disk 1. which allow it to install some files that let us boot the MBR hdd of High Sierra?

Edited by madamax2
Link to comment
Share on other sites

19 minutes ago, crazybirdy said:


Disk 2 (a MBR hdd) is in which we install the actual MacOS into.

Disk1 is just a MBR boot system to boot to install to target Disk2 which you want to install.


So we need an initial hackintosh /Mac OS PC to create the disk 1 which is the High Sierra Installation USB?

Then use that disk 1 usb installer to boot it on our laptop/PC that has the MBR hdd ie Disk 2

then we do the installation to the MBR hdd using that disk 1 USB installer?

Do we need still need another High Sierra installation USB flash drive or is that created on disk 1 as well?

Why is disk 1 only 2.5GB, if it contains all the installation files?
I thought High Sierra installer is at least 5gb+ in size..


OR 

If we already have a hackintosh system, can we just connect our MBR Disk 2 to it
and create the Disk 2 MacOS without needing to create Disk1 within the hackintosh operating system?


When we are creating disk 1 and disk 2
do we need to be in a MacOS system to run the those Disk1mbrInstaller  and Disk2InstallData?


===

Also if I want to dual boot Windows 10 + Linux
Do I install those two OS first then do the MacOS last?
and how many partitions do we need in total?

And how do you suggest going about to this?

Edited by madamax2
Link to comment
Share on other sites

Most of the install files go on the USB

The stuff that goes on the target HDD assists with the install process to that target HDD by the boot USB.

You will wind up with High Sierra installed on the HDD

BUT

In order to boot it you need to install a boot loader....

so before you start this whole process  create a small partition called EFI and install your CLOVER boot loader there ... it will then allow you to boot HS and WIN10.

__________

For dual booting I'd suggest installing WIn 10 on a separate Hard Drive rather than in a partition.

___________


Dans

Link to comment
Share on other sites

26 minutes ago, Dans1975 said:

Most of the install files go on the USB

The stuff that goes on the target HDD assists with the install process to that target HDD by the boot USB.

You will wind up with High Sierra installed on the HDD

BUT

In order to boot it you need to install a boot loader....

so before you start this whole process  create a small partition called EFI and install your CLOVER boot loader there ... it will then allow you to boot HS and WIN10.

__________

For dual booting I'd suggest installing WIn 10 on a separate Hard Drive rather than in a partition.

___________


Dans


To clarify the steps, if I understand it


  1. Boot into a MacOS/Hackintosh system
  2. Insert Disk1 - USB flash drive (GPT or MBR?) with a 1 partition of at least 2.5 GB
  3. Run the script 13MBRinstallerMaker, which then ask you to drag the High Sierra Installation.app ( from the MacOS store download) on the terminal script to create the High Sierra USB installer. 


So with the Disk 2, which should already be MBR hdd with a few partitions,

  1. Connect that Disk 2 within the MacOS, and format 1 partition as Mac Journal.
  2. Copy the files as outlined in the Step B.
  3. Do step C on Disk2 within the MacOS environment
     

Is that how it should done?

Then connect the Disk 2 back into our laptop etc.

insert the USB installer (Disk 1) to boot it and install it on this Disk2.
And do not use disk utility to wipe the Disk 2, else it will delete all the previously copied Disk 2 files that we created.


===


When you say create small EFI partition, 

is that for the MBR hdd?
I think my mbr hdd already have a system reserved partition + recovery partition from Windows 10.


My laptop is BIOS only, will it boot that EFI partition  ie. Clover?


I can't install Windows on another drive because this is a laptop.


Edited by madamax2
Link to comment
Share on other sites

This will mess up your Win 10 so best to use a NEW HDD.

You have an old mbr laptop?

How do you expect to boot High Sierra??

You will need a boot loader like Clover.....


So you need 1 small FAT portion for clover to install to... 

1 partition that will eventually hold High Sierra

and 

1 partition with windows 10 in it... Plus system reserve and recovery for win 10...


You can try it but I think it will destroy your win10 installation.....


dans


Link to comment
Share on other sites

12 minutes ago, Dans1975 said:

This will mess up your Win 10 so best to use a NEW HDD.

You have an old mbr laptop?

How do you expect to boot High Sierra??

You will need a boot loader like Clover.....


So you need 1 small FAT portion for clover to install to... 

1 partition that will eventually hold High Sierra

and 

1 partition with windows 10 in it... Plus system reserve and recovery for win 10...


You can try it but I think it will destroy your win10 installation.....


dans


Okay forget about the Windows 10 dual boot for now..
Just want to get High Sierra working on my laptop as only OS..

Are the steps I wrote above correct or anything wrong?

So Step B and C is done to Disk 2 (MBR hdd) and needs to be done while inside a MacOS environment?
Essentially we are preparing the Disk 2 with these files etc..

Then remove disk 2 from MacOS   and connect disk 2 into my laptop and boot disk 1 on same laptop to do the installation?
Is that correct?


Edited by madamax2
Link to comment
Share on other sites


So you need 1 small FAT portion for clover to install to... 

1 mac formatted HDD partition that will eventually hold High Sierra with the few small files per CB's instruction


1 boot drive....with all the install files per crazybirdys instructions


Then boot off the USB and it will install HS to the HDD .... 


once that finishes, that HDD partition will have a new name and will have HS on it.


THEN you need to install CLOVER on the small FAT partition (label it EFI)... - read up on how to install clover...


Once that's all done you can boot up your HS system that is now on your HDD.


dans


Link to comment
Share on other sites

3 hours ago, crazybirdy said:


It seems you don't have a macOS PC to do this.

I suggest you to install 10.12.6 MBR first, it's more easy for beginner.


If you have a macOS PC already, you only need to run 13MBRinstallerMaker, it will create disk1 and disk2 for you.


No, I do have a MacOS PC, 

I got High Sierra on my hackintosh PC right now.
Have also installed previous versions of MacOS.
 

But this is the first time I am installing it on a BIOS only laptop.
And with BIOS only laptop which means it can only boot MBR hdd, so it is a lot harder to install compare to UEFI motherboards.

Following Dan's further instructions

I created the disk1 and and disk2 using that script 13MBRinstallerMaker.

The problem is when I boot the disk1 USB flash drive on my laptop

it saids:

no operating system found. 


Do I need to install clover bootloader onto Disk1 so that it can boot Disk1?

Does disk 1 need to be GUID or MBR?


Edited by madamax2
Link to comment
Share on other sites

5 hours ago, Dans1975 said:


So you need 1 small FAT portion for clover to install to... 

1 mac formatted HDD partition that will eventually hold High Sierra with the few small files per CB's instruction


1 boot drive....with all the install files per crazybirdys instructions


Then boot off the USB and it will install HS to the HDD .... 


once that finishes, that HDD partition will have a new name and will have HS on it.


THEN you need to install CLOVER on the small FAT partition (label it EFI)... - read up on how to install clover...


Once that's all done you can boot up your HS system that is now on your HDD.


dans


I managed to create Disk 1 and Disk 2 following your explanation


I created the disk1 and and disk2 using that script 13MBRinstallerMaker.

But the problem is when I boot the disk1 USB flash drive on my laptop

it saids:

no operating system found. 


Do I need to install clover bootloader onto Disk1 so that it can boot Disk1?

Do I need to create an EFI partition on Disk 1 and install clover bootloader onto it before it can boot Disk 1?

Does disk 1 need to be GUID or MBR?


Edited by madamax2
Link to comment
Share on other sites

7 hours ago, crazybirdy said:


Yes, you need install clover to disk1.

And BIOS MB can use gpt, you don't need MBR if you want to use GPT.

Clover pkg work fine with BIOS+GPT.


Okay I managed to install the MacOS to my MBR hdd Disk2.
I have succesfully booted it using the Disk 1 clover bootloader.

I also created a clover partition on that MBR hdd Disk2.


So I got this 


CLOVER (FAT32) | OSX (Journal)

Now when I installed clover to that clover partition, what is the recommended settings

so that I can boot the MBR hdd using that clover boot loader on Disk2, so that I no longer need my USB disk 1 to boot it?

====
You should add a note to help file about installing clover on Disk1 first, and what partition map to use MBR or GUID etc. 
It would solve people's problem of not being able to boot their Disk1 and not knowing why.

====


When you say clover can boot BIOS + GPT hdd,

then why do people need to use this patch hack?
I understand it is so they can install it to a MBR hdd, but why not just use the BIOS+GPT method?
 

Edited by madamax2
Link to comment
Share on other sites


×
×
  • Create New...