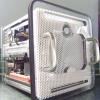
MiniHack Posted November 22, 2013 Share Posted November 22, 2013 Summary This is my latest Cube mod and most challenging. It started out as "I wonder if a Cube can be water cooled?" and grew by stages into what you see here as a final result. Some might say that it has been modded so much that it is no longer a Cube. I stick by it though as to me it has all the essential Cube elements of acrylic outer case, cool touch sensor, re-uses most of the internal structural parts. Gone though is the large passive heatsink (no point in a water cooled set up) and the handle mechanism - there was just no room! The Cube is cut down and lies on the side just because (a) the case came initially from an old mod that I did for my wife to hold her old Mac Mini in and ( the mod has a practical purpose living under my TV, so a cut down arrangement on the side works better. To get around the lack of the handle mechanism, I altered the top plate of the Cube to take some M6 Rivetnuts and then used the original holes in the acrylic plate with some fancy M6 socket head screws to hold everything in place. The water loop in there consists of an old H80 combined pump and block to cool my i7 3770K, a modified XSPC RASA Gpu block to cool the half height Sapphire HD7750, an Alphacool 120 mm radiator, a Noctua PWM cooling fan in "push" mode to throw air out from the case through the rad fins and lots of 6mm ID fittings (to route the pitifully short tubing around the case). As you can see from one of the "in construction" pic.s it uses 6 elbow bends and then probably a total of about 10 to 15cm of flex tubing - definitely a top contender for smallest ever CPU/GPU cooling loop! Total de-ionised water to fill the loop? About 250ml. As you'll see from the benchmarks though this loop is still enough to make this run really cool and is incredibly quiet. To make such a lot fit in such a small space I used three custom cut plates to bridge the cut-down original drive holder brace and the handle bracket and these hold the rad,fan and GPU in one solid unit from which the PCB is then suspended by PCB standoffs. To finish it off I had made a laser cut bottom plate with a honeycomb middle opening to allow as much air as possible to be drawn into the case from top and bottom (back and front now!) and feed the radiator so it can be ejected from the top of the case. The system is running on Mavericks and everything works. Bootloader was installed to the EFI partition and that solves issues that the HD7750 had with not wanting to boot, now it is working great. Final parts list: Zotac Z77 ITX wifi board i7 3770K Noctua 120mm PWM fan Sapphire HD 7750 Low Profile GPU Watercooling elements: Alphacool NexXxoS UT60 Full Copper 120mm XSPC RASA GPU block Combined CPU block and pump from old H80 unit 6mm ID tubing and fittings Extras: 500GB Toshiba SSD; Compatible half height airport card; BT dongle. Some build Pic.s Below is a pic showing the Cube in construction and with the radiator/fan support removed. Here it shows the GPU support and the modified XSPC RASA block. I couldn't find anyone mad enough to be selling water-cooling blocks for the HD7750 (as they don't really need it) but I really did not want a heatsink and fan in my water-cooled creation so I took the frame off the RASA as I found that the four little screws holding the copper block in place had almost exactly the right spacing for the PCB holes. So using the rubber "bumpers" from the heatsink of the 7750 to space the copper block from the GPU PCB I screwed the block down directly to the GPU chip and it works a treat - this GPU water-cooled always stays below 30C! The PCB at the top of this photo is from an auxiliary PSU that I tired to see if I could supplement the 160W from the PicoPSU with another 100W…..that particular experiment failed, so my whole rig is powered completely from a 160W pico PSU. I have a WATT-O-METER that makes sure I keep any turbo boost mild and the GPU is rated at a max of 50W. The picture above shows the support for the fan (before it was riveted to the two aluminium channel parts that hold the GPU plate). The Noctua fan is screwed to this support, and then to the radiator, and then the radiator is in turn screwed to another support plate, shown below: Which in turn is riveted to these two side supports: To give the complete unitary construction for this case (pic below shows an experiment before I decided it was better to have the fan below the radiator): Finished Pictures Benchmarks Video [video=youtube_share;-SMZkWcbrdU] On the second video you can gauge how quiet this machine is - I am using a webcam with an integrated mic and I am giving a whispered explanation of the lighting. The background noise is the sound of the Noctua fan and even more faintly the sound of the Corsair pump. Distance of the mic from the components is around 3cm from the fan intake and about 10 centimetres from the integrated pump/block….. [video=youtube_share;OjME8oJA22E] Hope you like it! All comments welcomed….and of course please vote for this mod if you like it! 6 Link to comment https://www.insanelymac.com/forum/topic/294114-water-cooled-g4-cube-case-mod/ Share on other sites More sharing options...
BALDY_MAN Posted November 22, 2013 Share Posted November 22, 2013 Very well thought out mod. you got my vote 1 Link to comment https://www.insanelymac.com/forum/topic/294114-water-cooled-g4-cube-case-mod/#findComment-1970584 Share on other sites More sharing options...
PunkNugget Posted November 22, 2013 Share Posted November 22, 2013 FANTASTIC BUILD !!! WITH VIDEOS ?!?! IMPRESSIVE !!! YOU GOT MY VOTE !!! 1 Link to comment https://www.insanelymac.com/forum/topic/294114-water-cooled-g4-cube-case-mod/#findComment-1970606 Share on other sites More sharing options...
René_ Posted November 22, 2013 Share Posted November 22, 2013 Very nice described and what a fantastic result. YOU'VE GOT MY VOTE 1 Link to comment https://www.insanelymac.com/forum/topic/294114-water-cooled-g4-cube-case-mod/#findComment-1970665 Share on other sites More sharing options...
Baudouin Posted November 23, 2013 Share Posted November 23, 2013 Crazy great, silent, nice build !!! You got definetely my vote. 1 Link to comment https://www.insanelymac.com/forum/topic/294114-water-cooled-g4-cube-case-mod/#findComment-1970872 Share on other sites More sharing options...
Shaneee Posted November 24, 2013 Share Posted November 24, 2013 Simply outstanding what you did with such little space. You got my vote 1 Link to comment https://www.insanelymac.com/forum/topic/294114-water-cooled-g4-cube-case-mod/#findComment-1971003 Share on other sites More sharing options...
DJenkins Posted November 24, 2013 Share Posted November 24, 2013 Impressive indeed, what a great little machine! You've got my vote 1 Link to comment https://www.insanelymac.com/forum/topic/294114-water-cooled-g4-cube-case-mod/#findComment-1971007 Share on other sites More sharing options...
dcai777 Posted November 24, 2013 Share Posted November 24, 2013 Very nice... You have my vote! 1 Link to comment https://www.insanelymac.com/forum/topic/294114-water-cooled-g4-cube-case-mod/#findComment-1971017 Share on other sites More sharing options...
MiniHack Posted November 26, 2013 Author Share Posted November 26, 2013 Thanks for the great comments everyone. I have just edited the first post again as one of the photos seemed to have got screwed up - so I have put in a replacement. You can now see the rear panel in its full glory…. Link to comment https://www.insanelymac.com/forum/topic/294114-water-cooled-g4-cube-case-mod/#findComment-1971682 Share on other sites More sharing options...
Mr.D. Posted November 26, 2013 Share Posted November 26, 2013 Impressive work, as always! Love to see the old cubes, and to cram all that in there is very, very cool. If I could vote twice, I would!! You have my vote! 1 Link to comment https://www.insanelymac.com/forum/topic/294114-water-cooled-g4-cube-case-mod/#findComment-1971711 Share on other sites More sharing options...
dddirtman Posted December 13, 2013 Share Posted December 13, 2013 you have my vote as well,awesome cone build... 1 Link to comment https://www.insanelymac.com/forum/topic/294114-water-cooled-g4-cube-case-mod/#findComment-1975551 Share on other sites More sharing options...
Guest AllanMax Posted December 15, 2013 Share Posted December 15, 2013 You have my vote! in your video, I noticed that using a very old Apple keyboard. very nice!! Awesome Hackintosh!! Link to comment https://www.insanelymac.com/forum/topic/294114-water-cooled-g4-cube-case-mod/#findComment-1975956 Share on other sites More sharing options...
dcai777 Posted December 16, 2013 Share Posted December 16, 2013 Good job on getting the most votes! Link to comment https://www.insanelymac.com/forum/topic/294114-water-cooled-g4-cube-case-mod/#findComment-1976106 Share on other sites More sharing options...
Wppley2 Posted December 16, 2013 Share Posted December 16, 2013 YOU GOT MY VOTE !!! MOST CREATIVE! MOST LABORIUOS! MOST CHALLENGING! Link to comment https://www.insanelymac.com/forum/topic/294114-water-cooled-g4-cube-case-mod/#findComment-1976329 Share on other sites More sharing options...
3.14r2 Posted December 17, 2013 Share Posted December 17, 2013 YOU GOT MY VOTE !!! Link to comment https://www.insanelymac.com/forum/topic/294114-water-cooled-g4-cube-case-mod/#findComment-1976576 Share on other sites More sharing options...
ytrox Posted December 20, 2013 Share Posted December 20, 2013 WOOOOOOOOOOOOW!! Link to comment https://www.insanelymac.com/forum/topic/294114-water-cooled-g4-cube-case-mod/#findComment-1977402 Share on other sites More sharing options...
ReggieX Posted March 16, 2014 Share Posted March 16, 2014 Wow, nice! Great mod. Link to comment https://www.insanelymac.com/forum/topic/294114-water-cooled-g4-cube-case-mod/#findComment-2004686 Share on other sites More sharing options...
MiniHack Posted July 20, 2014 Author Share Posted July 20, 2014 So just wanted to update on what has happened to this Cube. I did a bios update and it went wrong…..on re-boot all I could get, no matter what I did, was an error code 55 on the POST display and never as far as being able to enter the bios itself. I tried a new bios chip - and same thing. No life. So after a month or so of ignoring the build and not really wanting to tear it apart and troubleshoot (and add to all the other parts I have in the place) I decided something had to be done and put it up on on Facebook for sale for a pitifully small amount - £200. However, as 48 hours later I had no response and as I had nothing to do on a Sunday afternoon I thought: "No, I shall take this apart at least to identify the problem". Obviously there is hassle involved in draining a water loop in such a confined build but actually the Alphacool radiator made it somewhat easier and before long the Cube was a pile of parts on the table. So this evening I took the board, the CPU and a couple of different memory sticks and slapped a standard Intel cooler on and…..I reached the Windows 7 desktop from my mSATA without problem (after a message about bios change and resetting defaults that is!). So now I think it is time to re-think and update the build a little. So everything is bagged up and on the shelf until I decide what to do. But before I put the old mobo in the bag, I couldn't resist attaching a Clover stick to it and my USB installation of Yosemite DP3 just to see what would happen. And what do you know, it booted effortlessly through to the Yosemite desktop with full QE/CI…..and with the grey Apple logo and progress bar just like on my real Mac!!! There is life in the old Cube yet! 2 Link to comment https://www.insanelymac.com/forum/topic/294114-water-cooled-g4-cube-case-mod/#findComment-2042313 Share on other sites More sharing options...
joe75 Posted July 21, 2014 Share Posted July 21, 2014 nice build! glad to hear its not dead.. Link to comment https://www.insanelymac.com/forum/topic/294114-water-cooled-g4-cube-case-mod/#findComment-2042599 Share on other sites More sharing options...
bazpaul Posted August 4, 2014 Share Posted August 4, 2014 Absolutely incredible build - loved reading every minute of it! Link to comment https://www.insanelymac.com/forum/topic/294114-water-cooled-g4-cube-case-mod/#findComment-2048341 Share on other sites More sharing options...
Recommended Posts