Leaderboard


Popular Content
Showing content with the highest reputation on 03/22/2024 in all areas
-
Hi @derpuma I talk with coder that create Kexts from Bluetooth and Airport to auxiliary and just rename free space from kexts and "error" from OCvalidate will fix that God bless you all Kexts names fixed in releases on GitHub https://github.com/hnanoto/Bluetooth-File-Exchange/releases/tag/1.0.1 And https://github.com/hnanoto/AirPort-Utility/releases/tag/1.0.1
 3 points
 -
YOU OLD GIT.😀3 points
-
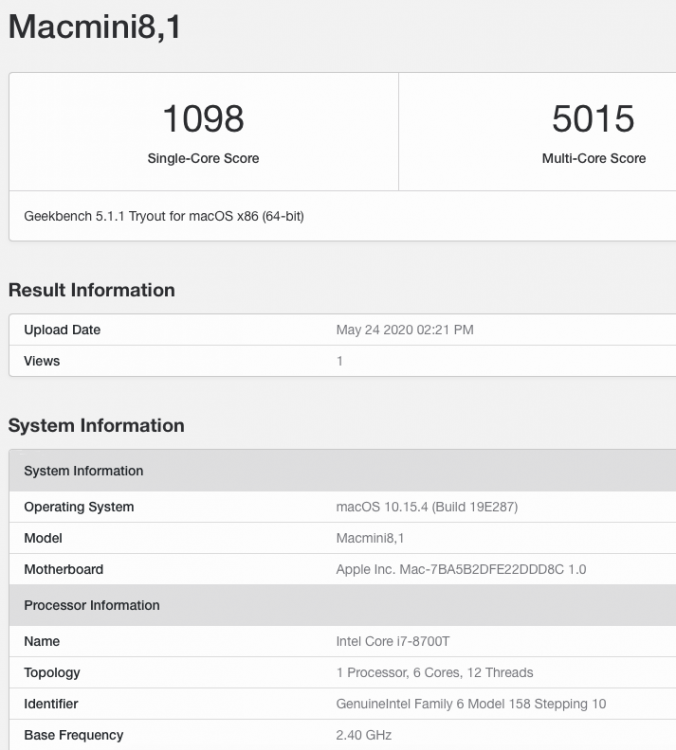
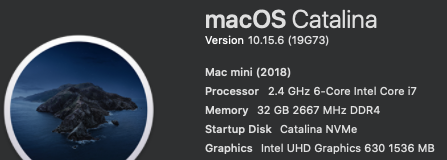
********************************************************************************** In this thread, I have fully documented the installation of macOS on my HP EliteDesk 800 G4 / G5 Mini. It is a PERFECT HackMini8,1 and is running very well for me without any issues. I hope this documentation helps you to install macOS on your hack. Please leave feedback if you think there is anything I can improve and let me know if you have any questions. ********************************************************************************** Background This is my first "modern" hack supporting UEFI and my first hack using Clover "on-the-fly" patches. My previous hacks Laptop: Thinkpad T61 / Nvidia NVS 140m Laptop: Dell Latitude E6410 / Nvidia G3100m Desktop: Gigabyte G31 / GeForce 9600 Desktop: Biostar TH55HD / Sapphire Pulse RX580 (Google "Catalina Biostar TH55HD" and look for user name deeveedee) are all perfectly running Catalina and I patched them all "manually" - all DSDT patches applied with MaciSL with virtually no Clover on-the-fly patching and all booted Legacy Clover. This UEFI hack was MUCH easier and took about 20 hours vs. a combined hundreds of hours for the old hacks. I wanted a hack that was a little more future proof and I think this is it. I hope you enjoy this as much as I am enjoying it. It is a perfect MacMini8,1. My system specs HP EliteDesk 800 G5 Mini (I9-9900 / UHD 630 / Q370 Chipset / 32GB DDR4 RAM) (also own 800 G5 Mini with i7-9700, 800 G4 Mini with i7-8700 and have owned 800 G4 Mini with i7-8700T - all work perfectly) 3 x DP Ports (connected to monitors using DP -> DVI adapters) 6 x USB 3.1 1 x USB Type-C 3.1 2 x NVMe SSD (M.2 PCIe x4 2280/2230 combo ports) 1 x SATA6 SSD 1 x Intel Ethernet RJ-45 Conexant CX20632 Audio Codec I am not using Wi-Fi. See below in "What is not tested" for Wi-Fi solutions. macOS Installation Important: You MUST BE LOGGED-IN to download attachments from this forum See macOS installation steps for OC and CLOVER here See Known Issues here for additional installation steps that may not yet be included in my attached config files See OC and CLOVER EFIs in attached to this post See BIOS configuration in attached BIOS configuration PDF document See how I developed my installation methodology here See references here See instructions here for installing two M.2 2280 NVMe SSDs and one SATA HD / SSD What is not working DRM (no hackintosh solution for DRM with UHD 630 iGPU) Everything else that I have tested is working perfectly What is not tested USB c 3.1 port (I have partially tested the USB 3 functionality of the port and it seems to be working fine with the USBPorts.kext in the attached EFI .zip archives) Wi-Fi / Bluetooth I am not currently using Wi-Fi/Bluetooth in this hack, but starting with Sonoma, Broadcom Wi-Fi is not supported without 3rd-party macOS root patches. I am not in favor of installing Open Core Legacy Patcher (OCLP) root-patches to enable Broadcom Wi-Fi (see my opinion here). If you need basic Wi-Fi/Bluetooth (and don't care about Apple-specific functions like Airdrop), I recommend Open Wireless project to enable Intel Wi-fi/Bluetooth. I don't believe that OCLP Wi-Fi root-patches are safe for secure computing operations (e.g., online banking or even accessing your Facebook page). If you prefer Broadcom Wi-Fi/Bluetooth, replace intel Wi-Fi with Broadcom Wi-Fi here and here. What is working Everything not mentioned above Sleep / Wake Multiple displays with IGPU graphics acceleration, hot pluggable display ports and DP->DVI adapters USB 3.1 ports Audio (internal speaker and headphone jack) Ethernet Microphone / front-right audio port (tested with CTIA-style 4-connector headset) Known Issues and their solutions - see here BIOS Version / Configuration Tested BIOS Versions for G4 Mini: 02.11.01 Rev.A or 02.12.00 Rev.A or 02.14.01 Rev.A, 02.15.00 Rev.A, 02.16.00 Rev.A, 02.17.00 Rev.A, 02.19.00 Rev.A, 02.20.01 Rev A, 02.21.00 Rev.A Tested BIOS Versions for G5 Mini: 02.07.01 Rev.A, 02.08.00 Rev.A, 02.09.00 Rev.A, 02.10.01 Rev.A, 02.11.00 Rev.A, 02.12.00 Rev.A, 02.12.10 Rev.A, 02.13.00 Rev.A, 02.14.01 Rev.A, 02.15.00 Rev.A See attached BIOS configuration in PDF document "HP EliteDesk 800 G4 Mini BIOS Configuration.pdf" Intel ME must be enabled for proper sleep / wake of UHD 630 UHD 630 Framebuffer Patching See here and here to understand my graphics properties for use with WhateverGreen.kext Read this to see my attempt at graphics patching without WhateverGreen.kext (WEG) to get a better understanding of what WEG is doing Current Versions Ventura 13.6.3 OpenCore 0.9.6 Lilu.kext 1.6.7 WhateverGreen.kext 1.6.6 AppleALC.kext 1.8.7 IntelMausi.kext 1.0.7 RestrictEvents.kext 1.1.3 VirtualSMC 1.3.2 NVMeFix.kext 1.1.1 Elements of this implementation that you may not see in other hacks HPET is disabled for the reason stated here RTC memory size is patched (like CLOVER's "Fix RTC") instead of using RtcMemoryFixup.kext for reasons here ScreenShots OC0.9.6-EFI-R001.zip HP EliteDesk 800 G4 Mini BIOS Configuration.pdf CLOVER-r5122-v6.zip


 1 point
 -
I will look again when I return home1 point
-
try this, replace yours...maybe some ports in ur case's won't work USBMap.kext.zip1 point
-
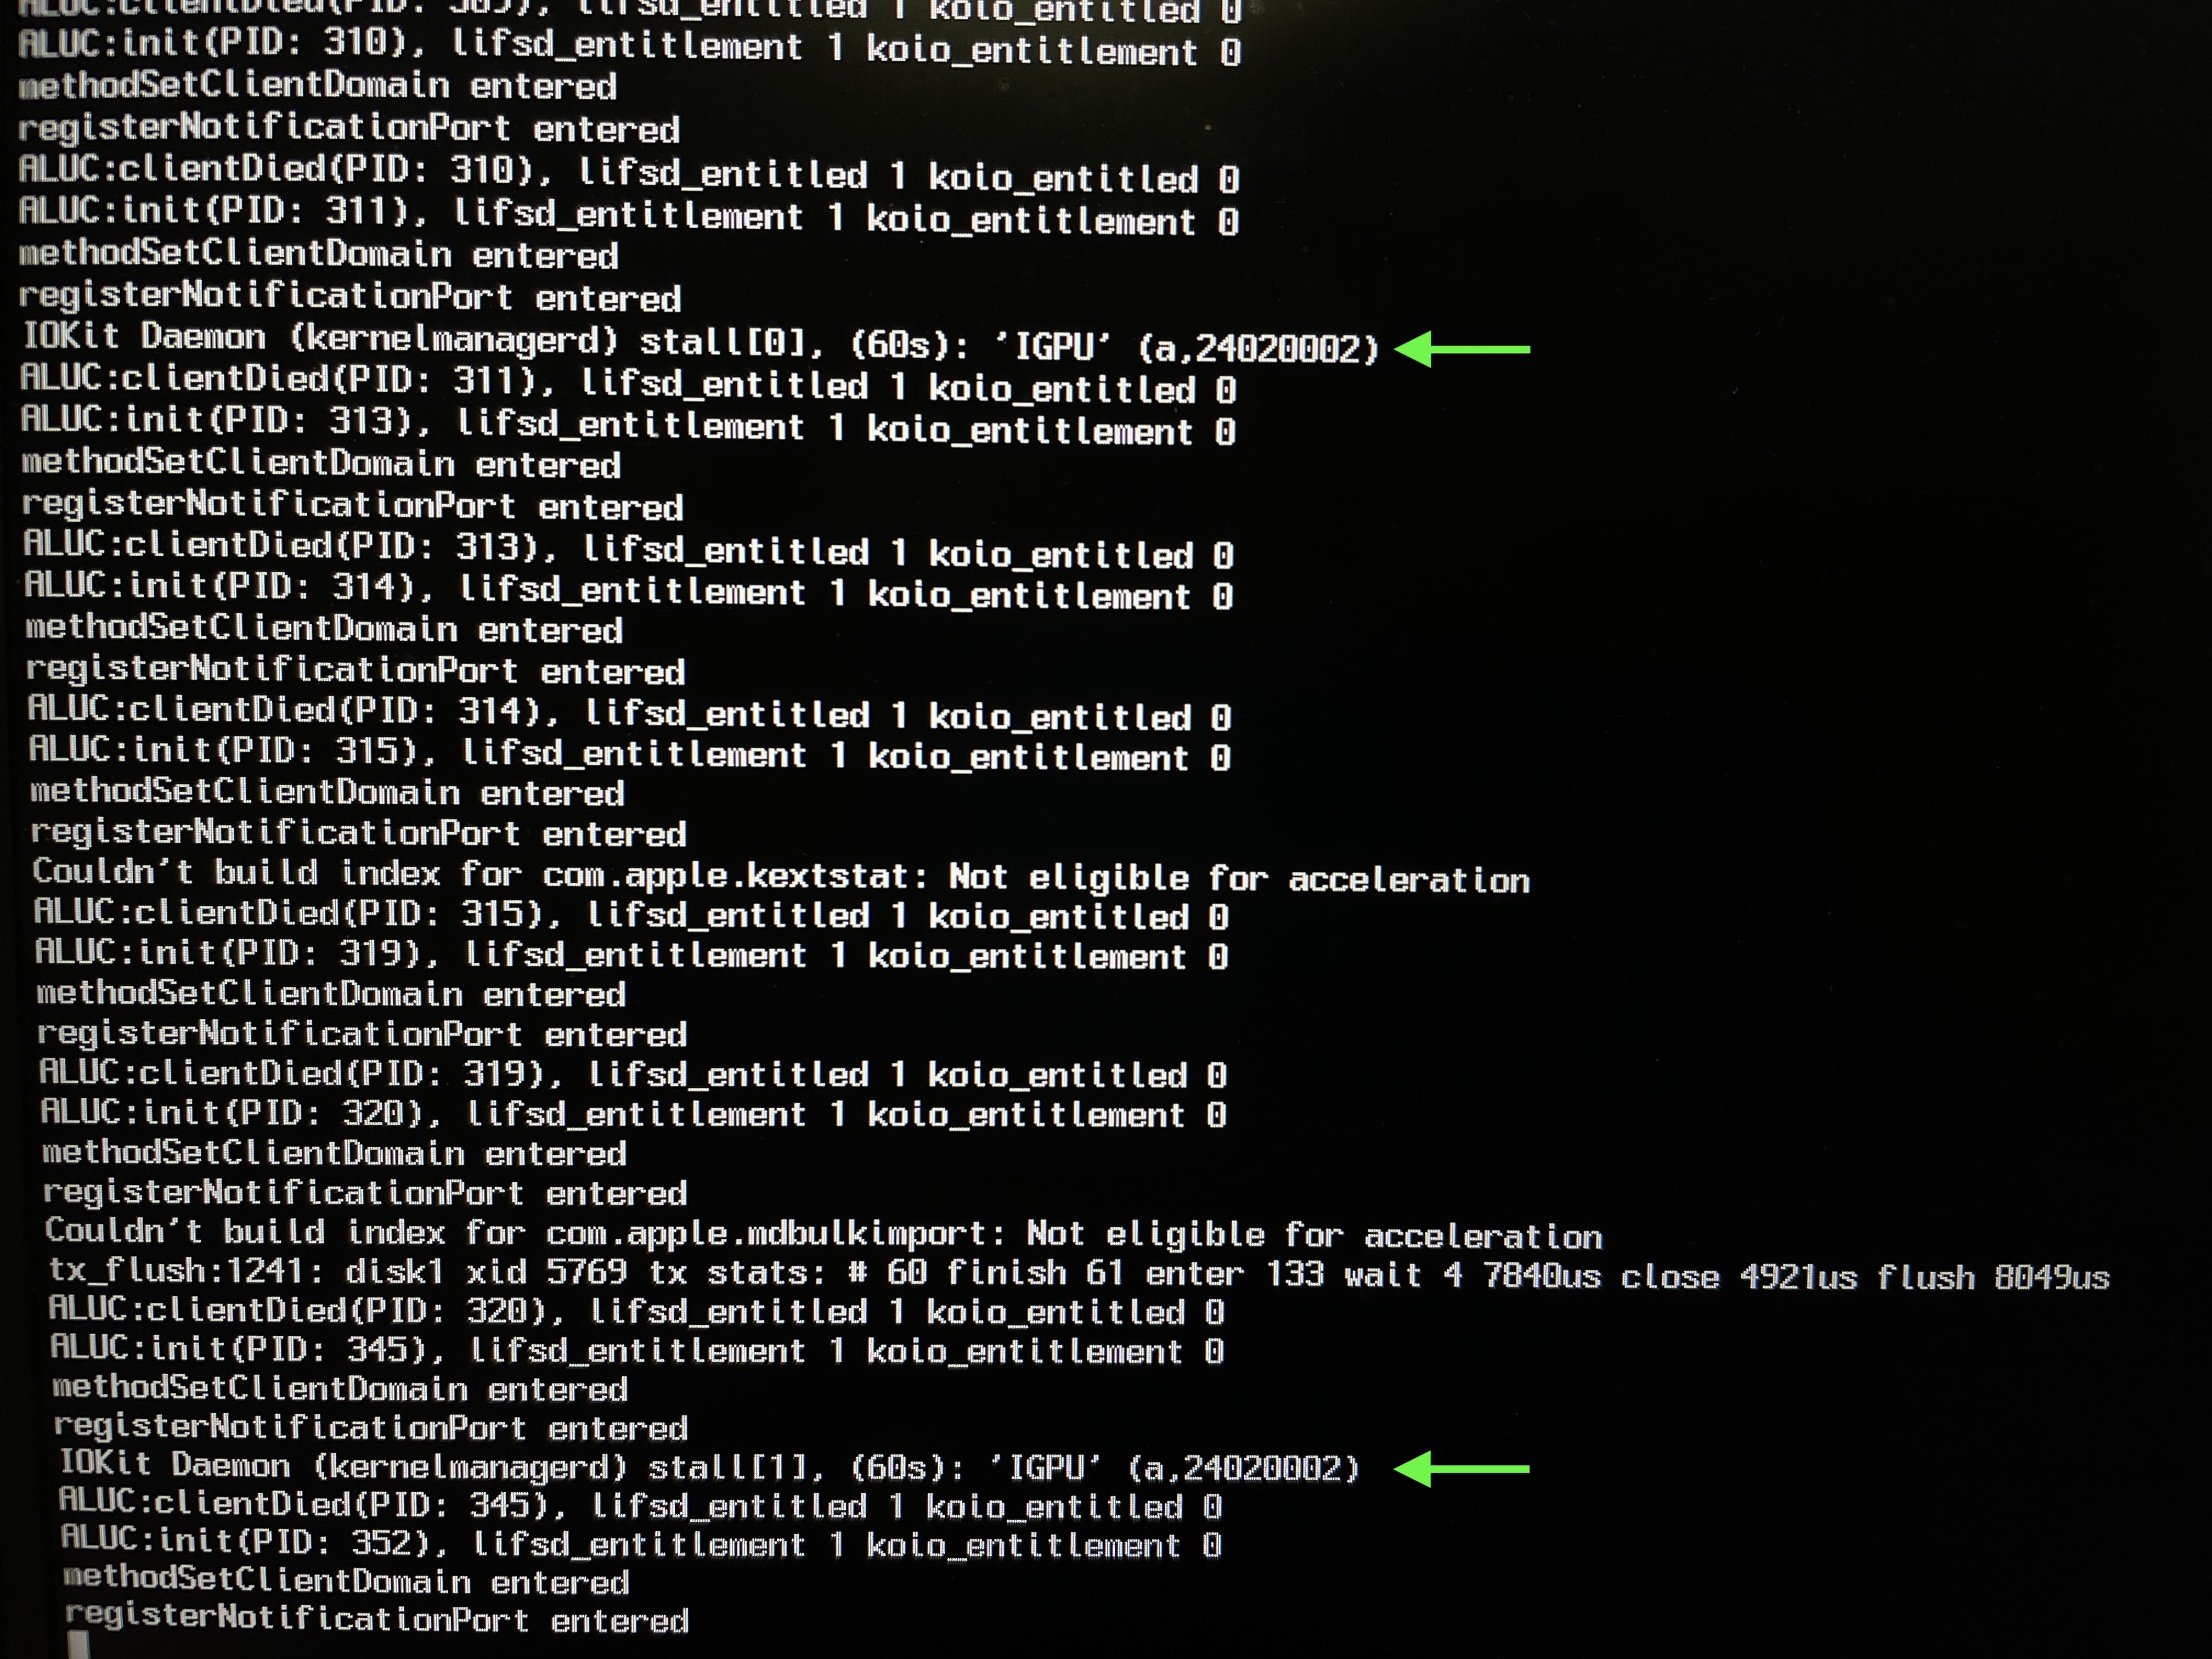
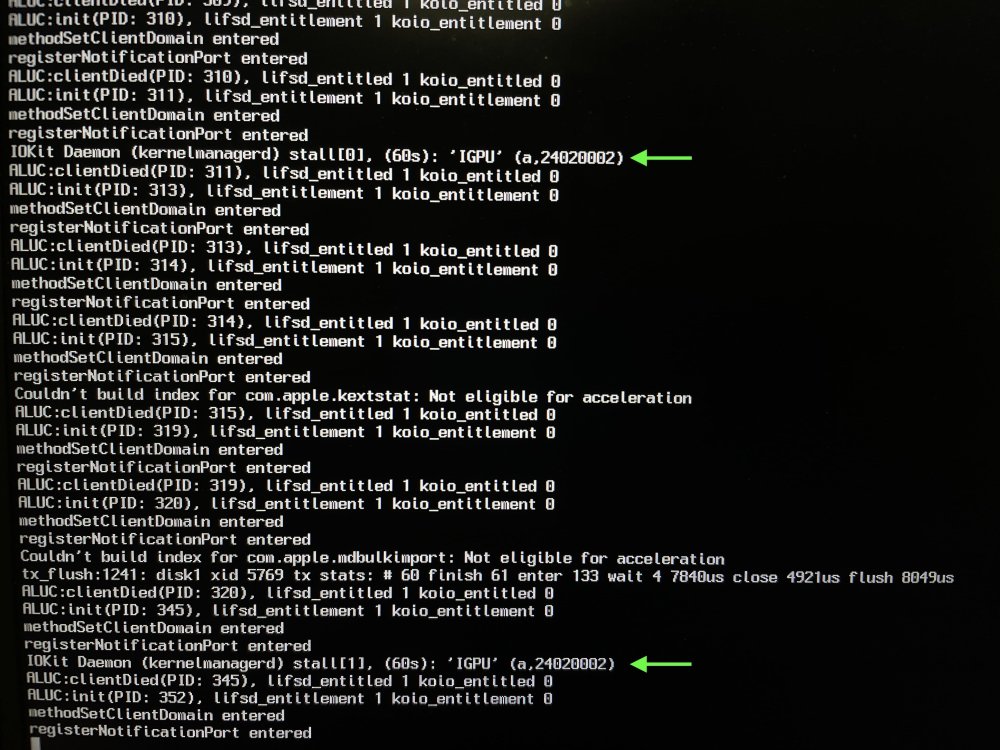
I replaced it with your recently modified NootedBlue and did some testing again. The result is as follows, with some changes : 1. -v keepsyms=1 debug=0x100 -igfxcdc -allow3d 1-1. GraphicsSchedulerSelect = 0 (Default, not modified NBlue Info.plist) IOKit Daemon (kernelmanagerd) stall[0], (60s): 'IGPU' (a,24020002) log infinite output. 1-2. GraphicsSchedulerSelect = 2 IOKit Daemon (kernelmanagerd) stall[0], (60s): 'IGPU' (a,24020002) log infinite output. 2. -v keepsyms=1 debug=0x100 -igfxcdc -allow3d igfxfw=2 2-1. GraphicsSchedulerSelect = 0 (Default, unmodified NBlue's Info.plist) It boots, but logs show firmware load failure and graphics acceleration does not work. Same as IGPU log in Test6 result above. 2-2. GraphicSchedulerSelect = 2 During booting, AuxKC loading is completed and IGPU log output stops. I think it caused an "Unsupported GraphicsSchedulerSelect=2 kernel panic". Forced restart shortcut (Ctrl + Command + Power Button) does not work. 2-3. GraphicSchedulerSelect = 5 IOKit Daemon (kernelmanagerd) stall[0], (60s): 'IGPU' (a,24020002) log infinite output. Unexpected context status buffer entry kernel panic does not occur, and instead the log below continues to be output infinitely. IOKit Daemon (kernelmanagerd) stall[0], (60s): 'IGPU' (a,24020002)
 1 point
 -
Thank you guys, we not forget donate to the Ukraine cause, thanks a lot for this brilliant and excellent program. In fact its so amazing, because the traditional way to install Windows has many trouble with disks, especially Nvme, and take off, put again, disconnect GPU, etc... This program is affordable and exclusive to make this task easy and softly Amazing Job ! Really !!1 point
-
AudioDxe I was testing a week ago. It worked in my config.1 point
-
eSaF I replied to you Here as anticipated Max just needs to go to Microsoft to get it ... everything paid 😆 Max for donations I believe here https://sourceforge.net/projects/windows-install/ Yes, that would be nice , We hope ... Get in line I have already requested for Win 😆1 point
-
try this EFI put your SMBIOS detail (SN/SMUUID/ROM/MLB) reboot, reset nvram, start maybe use a pendrive...risk-free EFI.zip1 point
-
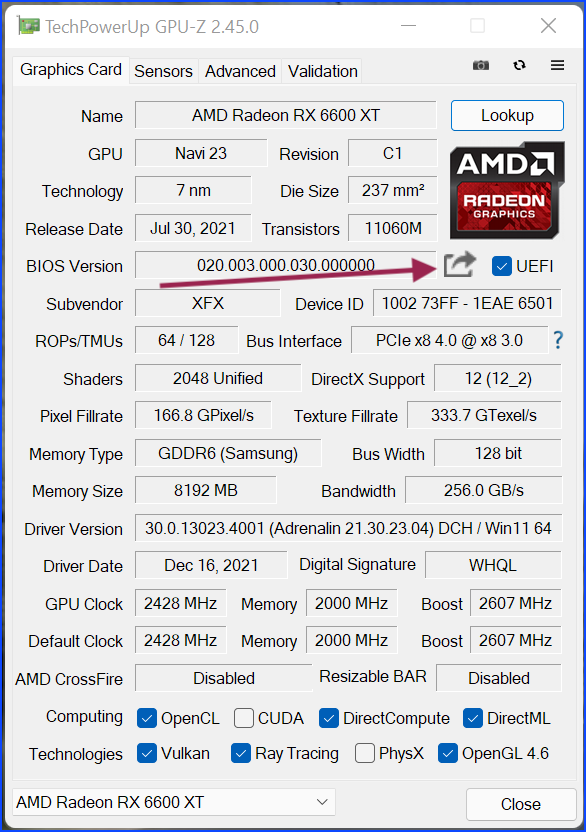
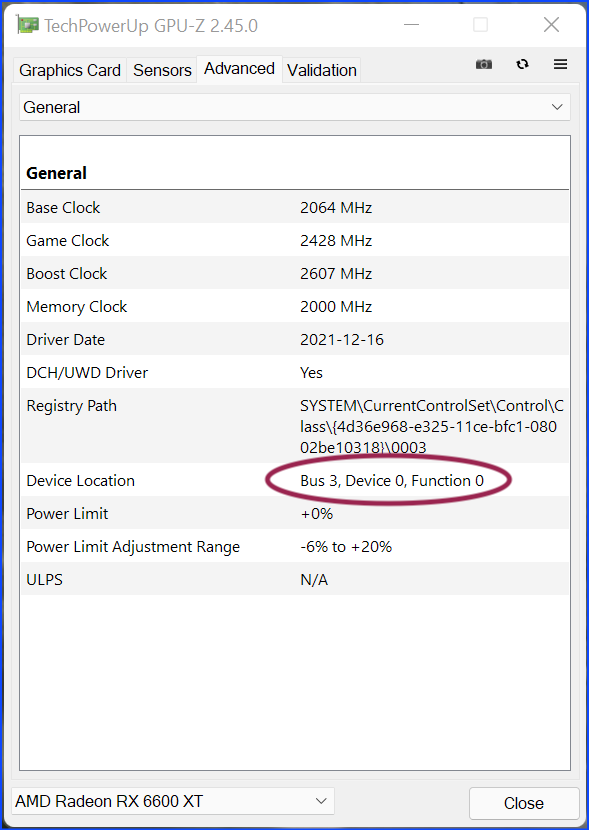
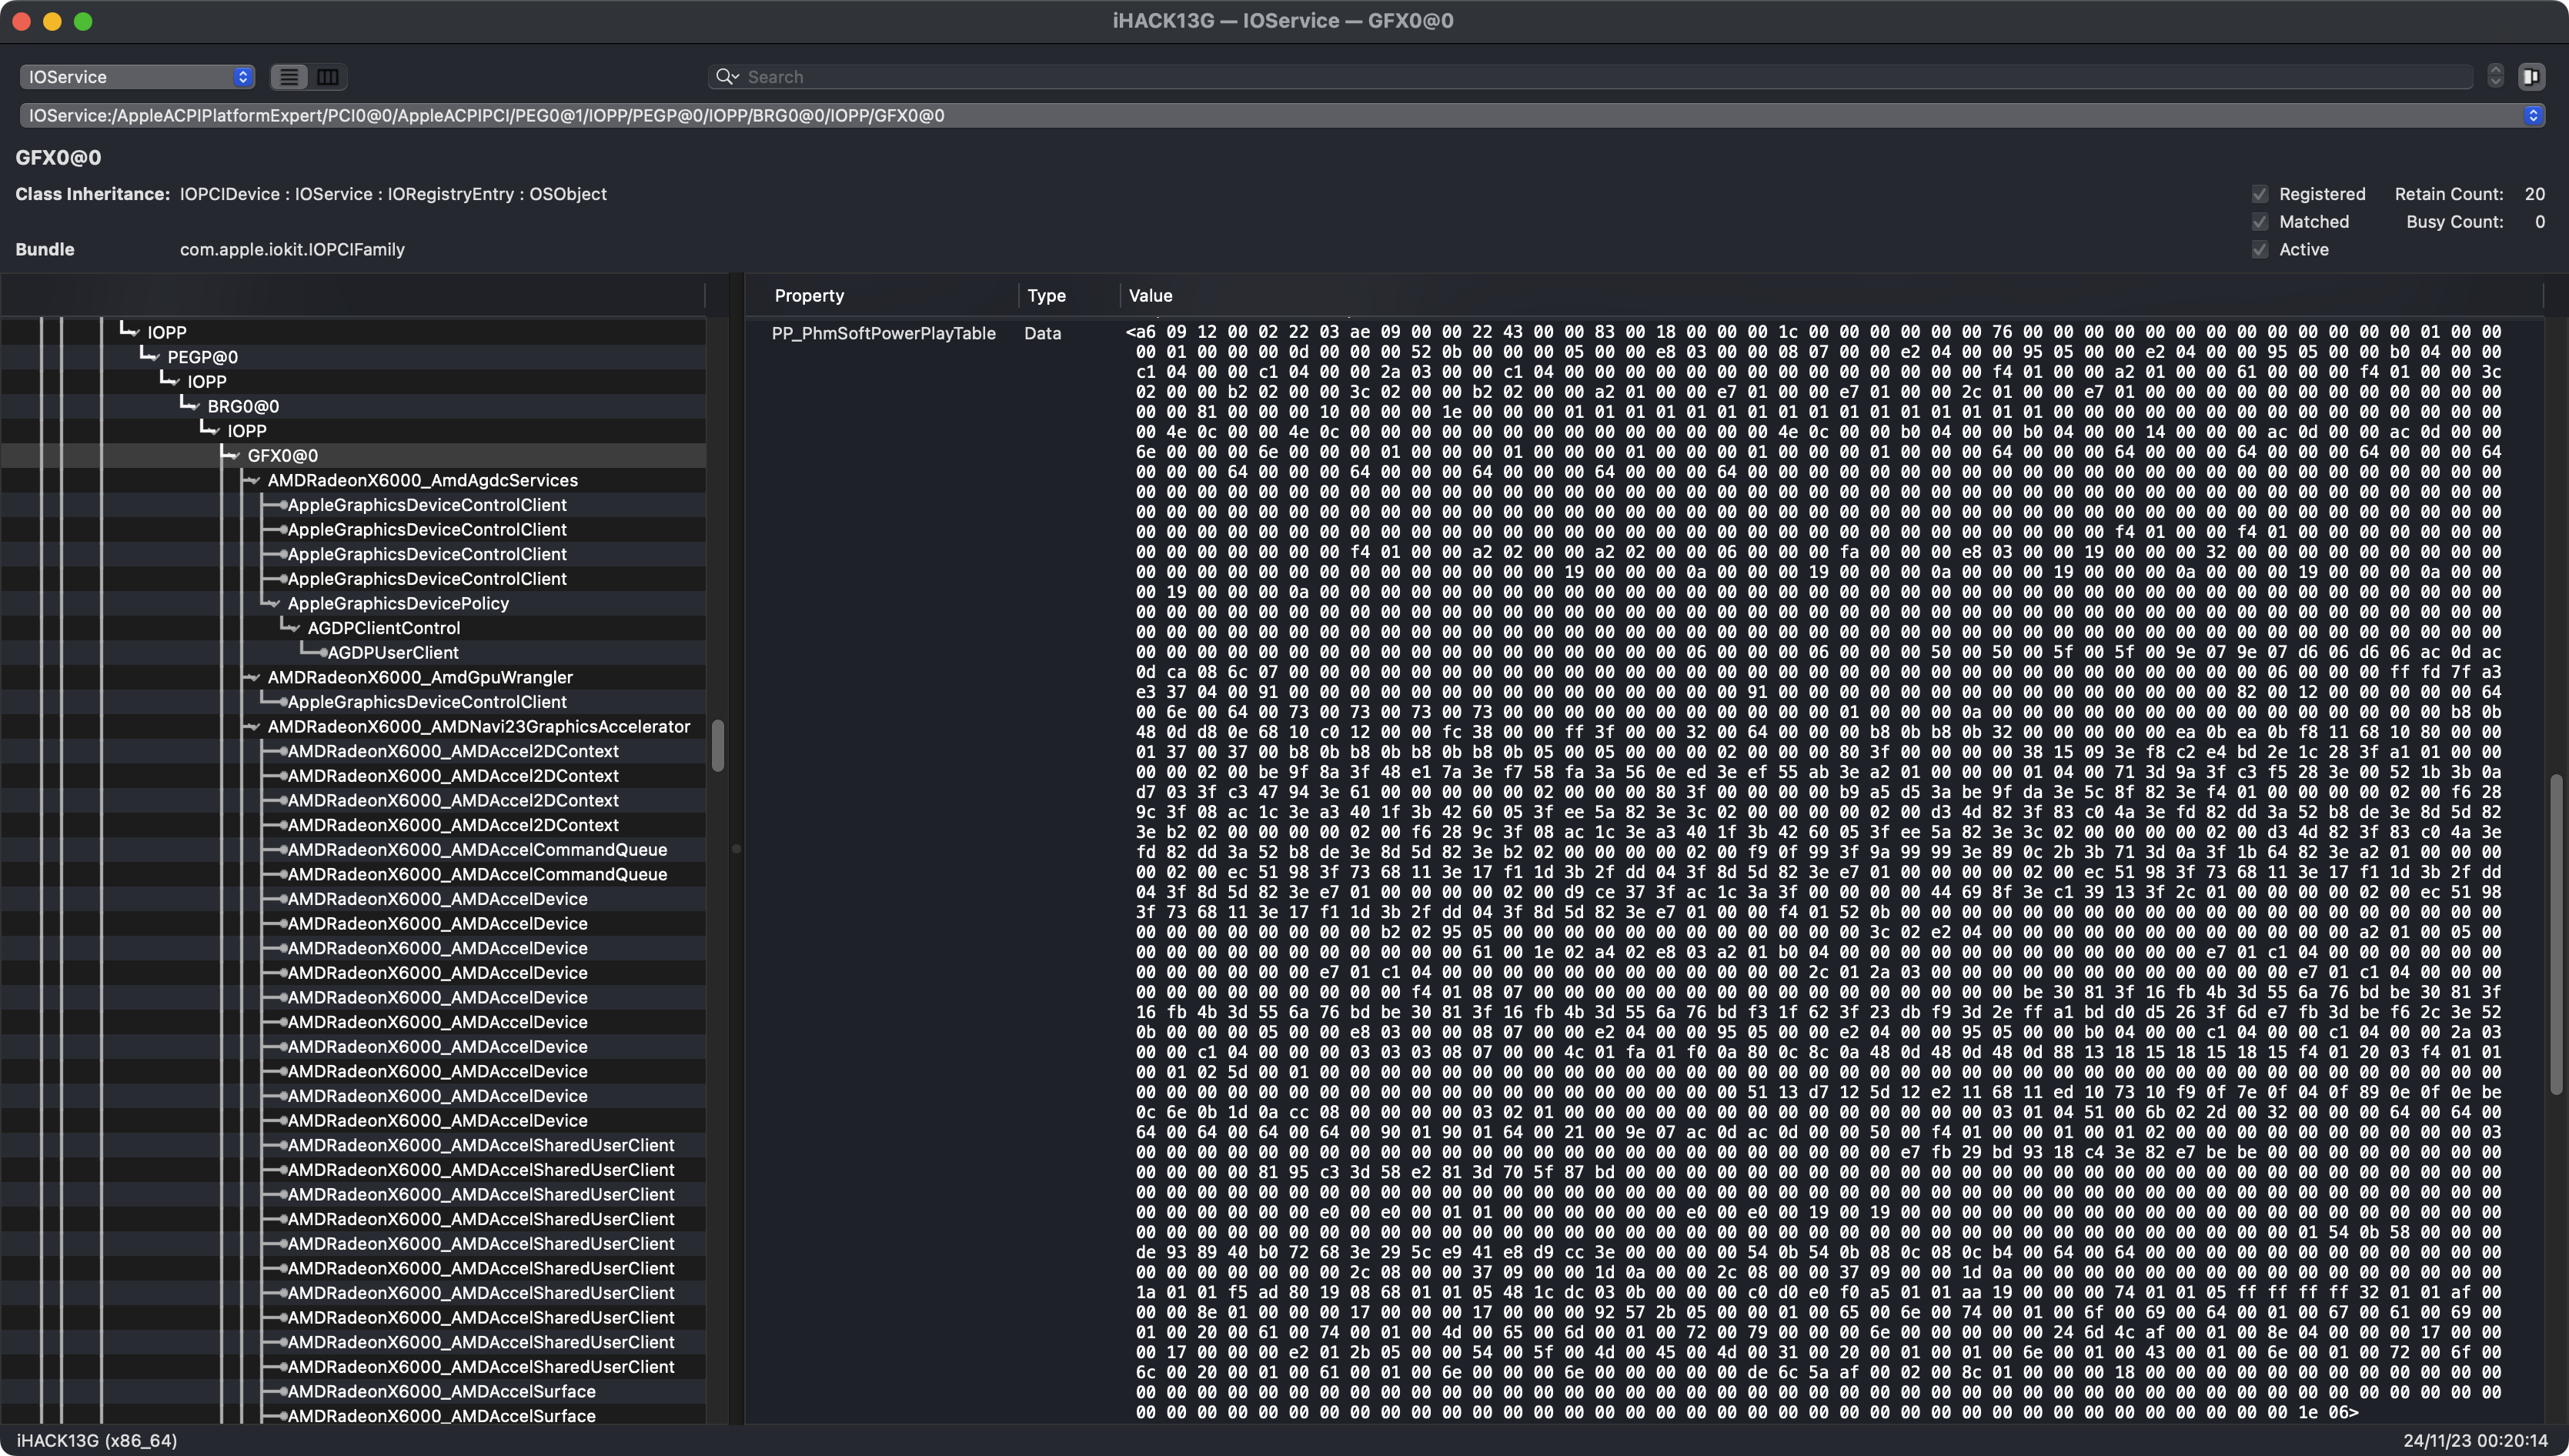
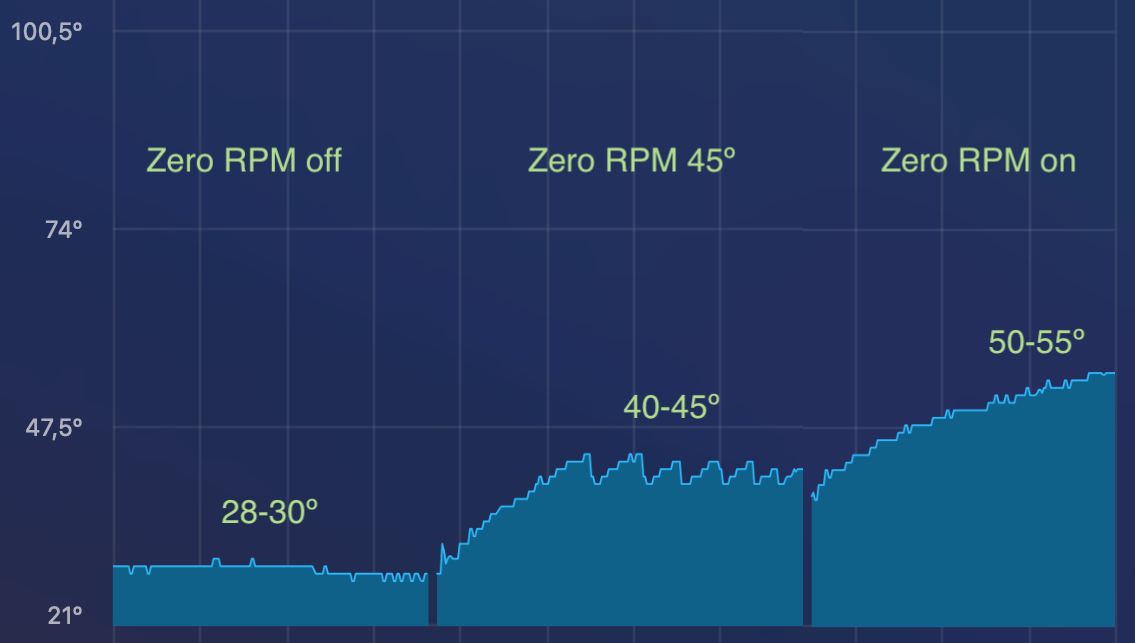
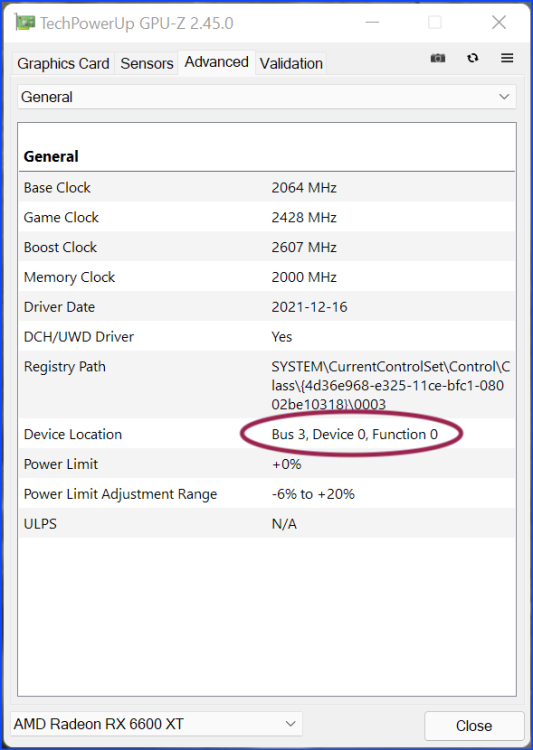
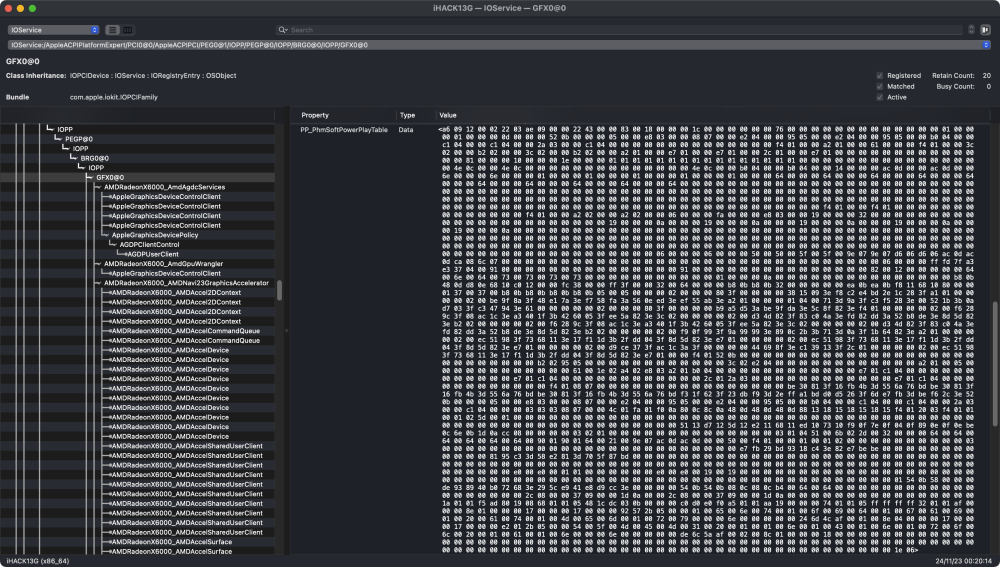
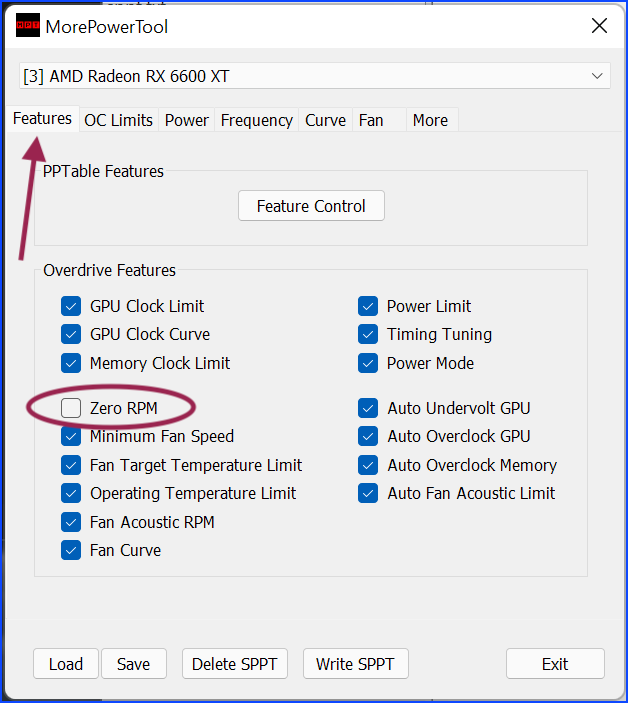
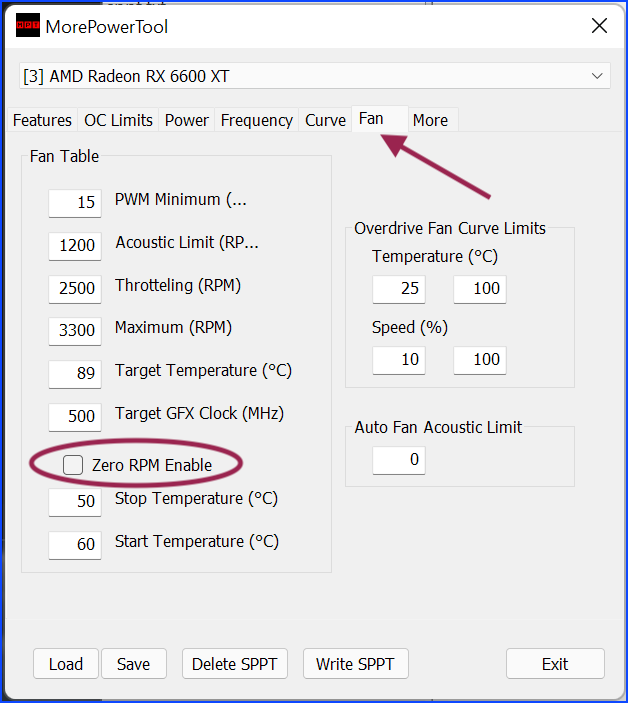
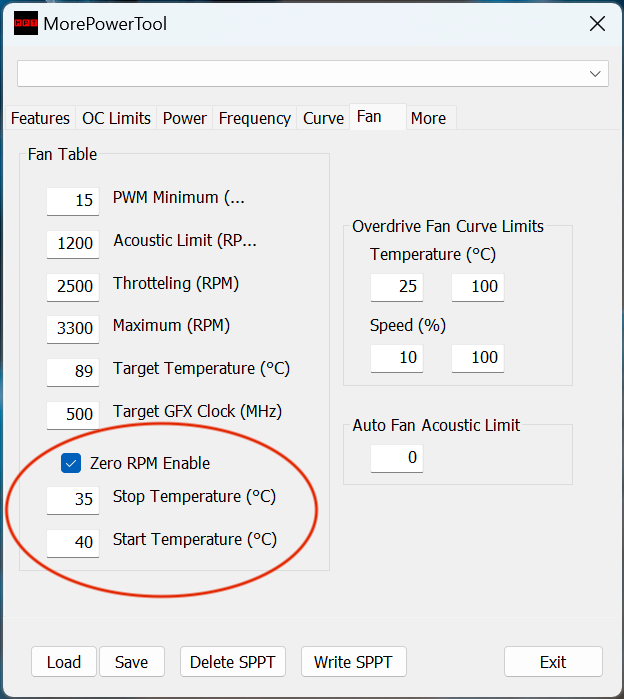
AMD PowerPlay technology allows graphics card to vary performance based on demand, switching between performance and power saving. It has automatic operating modes based on predefined parameters It also allows user settings. Windows 10 and 11 can make a copy of these energy profiles in the PP_PhmSoftPowerPlayTable registry key whose value is so called SoftPowerPlayTable (SPPT), long hexadecimal string. It is a way to have a quick reference by the operating system. This SPPT key can be read and modified by some utilities. Thanks to this, it is possible to modify parameters of the operation of the graphics card, changing their behavior and/or energy management and port these settings to macOS. Zero RPM AMD Radeon 5000 and 6000 series cards come from factory with Zero RPM function activated so that fans are stopped below a temperature (60º), this makes them completely silent except when graphics processor is demanded (tests, games, etc.). On my PC, for example, the base temperature in Windows is 35-40º and in macOS it is 50-55º. Although these are safe temperatures for daily use, some users would prefer to have values similar to those of Windows. The quickest and most effective way to achieve this is by disabling Zero RPM so that fans are spinning all the time and not just above a predefined temperature. However, this is very easy to do on Windows with the Radeon software but on macOS this option does not exist. SoftPowerPlayTable One way to disable Zero RPM on macOS without changing any other parameters is by using the SPPT table created in Windows. To obtain the SPPT table you have to go to Windows, where it is generated as a registry key and exported to a file that we take to macOS where the file is modified and added to an SSDT file or to the OpenCore config.plist file. PHASE 1 ON WINDOWS We need 2 apps: GPU-Z (from TechPowerUp): Loads the firmware (vBIOS) of the graphics card and exports it to a ROM file that can be read by MorePowerTool. MorePowerTool (MPT) (from Igor'sLAB): Reads the ROM file with the firmware and manages the PP_PhmSoftPowerPlayTable registry key (delete or create new). GPU-Z loads the GPU specifications and allows you to export everything to a file with ROM extension. To export (Graphics Card tab) use the arrow icon that comes out of a rectangle below the AMD Radeon logo, to the right of the text box with the BIOS version In the Advanced tab you have to write down the Bus number in the DeviceLocation key, this number (on my system it is 3) is important later, when looking for the SPPT key in the Windows registry. MPT is where the task of generating the SPPT key with Zero RPM disabled is performed. At the top, choose the GPU model you have installed; it usually shows the bus number (noted above) at the beginning of the name (3 in this case). It is advisable to delete the table that may already exist in the registry from the Delete SPPT button. Load the ROM file generated with GPU-Z (Load button). Modify the Zero RPM option by unchecking the checkbox in 2 tabs: Features and Fan. There are 2 ways to export the configuration, both ways end up in a text file with the SPPT table. Method 1: A more complex method is to write the new SPPT table in the registry from the Write SPPT button, this key is located in HKEY_LOCAL_MACHINE\SYSTEM\CurrentControlSet\Control\Class\{4d36e968-e325-11ce-bfc1-08002be10318}\ There are some numbered keys here, choose the one that matches the bus number you have written down before: 0003\PP_PhmSoftPowerPlayTable in my system. With key 0003 selected, export it as registry file (REG) or text file (TXT). File structure is different in each case. Both are valid but REG file has a more readable structure. Regedit exports the entire 003 key, not just the PP_PhmSoftPowerPlayTable key. Save the files somewhere accessible from macOS. Method 2: The simplest method is, from MorePowerTool, click on the Save button: In the Save file dialog choose Save As REG (registry file). A text file with REG extension is generated that contains only the PP_PhmSoftPowerPlayTable key. Save the file somewhere accessible from macOS. PHASE 2 ON MACOS: softPowerPlayTable in SSDT Convert the text of the Windows files into a formatted hexadecimal string so that it can be included in SSDT (softPowerPlayTable in SSDT) or in config.plist (softPowerPlayTable in DeviceProperties) and loaded by OpenCore. This task is possible thanks to Anton Sychev (klich3) and the scripts he has developed to make it very simple. softPowerPlayTable table from GPU ROM Extract SPPT table from ROM: Download upp and run it next to the ROM file. git clone https://github.com/sibradzic/upp.git && cd upp python3 setup.py build sudo python3 setup.py install sudo python3 -m pip install click upp --pp-file=extracted.pp_table extract -r <rom_file>.rom After running upp, a file called extracted.pp_table is created. In the Scripts folder, simply double click on PPT_script.command. The program will prompt you to drag and drop the file into the Terminal window. Drag and drop the default extracted.pp_table file generated by upp to transform it into a hexadecimal string valid for SSDT. The final text will appear in the Scripts/Result folder. It will have two versions, one in plain text (Results.txt) and the other as DSL (Results.dsl). Copy the content of the selected file and paste into your SSDT. Note: With this method we have the factory default table. Zero RPM feature has not been changed in any way. softPowerPlayTable table from Windows registry This method allows you to bring a modified SPPT table to macOS to disable or modify the Zero RPM feature, customizing the behavior of the graphics card. In the Windows phase we have saved the SPPT table as PP_PhmSoftPowerPlayTable key in the Windows registry and we have taken it to 3 different files: MorePoweTool -> Save -> Save As REG: contains only the PP_PhmSoftPowerPlayTable key MorePowerTool -> Write SPPT -> open Registry Editor -> look for the key in the registry according to the instructions above -> export the entire graphics card section, including but not only PP_PhmSoftPowerPlayTable: Export as REG: Registry 5 file format (preferred) Export as TXT: hierarchical text format. Either of the 3 files must be transformed into a valid hexadecimal string valid for SSDT. This transformation can be done by PPT_script.command in a very simple way. In the Scripts folder, simply double click on PPT_script.command. The program will prompt you to drag and drop the file into the Terminal window. You can select REG or TXT file to transform it into a hexadecimal string valid for SSDT. Final text will appear in the Scripts/Result folder. It will have two versions, one in plain text (Results.txt) and the other as DSL (Results.dsl). Copy the content of the selected file and paste it into your SSDT. Note: With this method we have a custom table. Zero RPM feature has been disabled or set up in a value other than default. Include the hexadecimal string in the SSDT file This is the code of a fairly common SSDT used with AMD graphics cards (SAMPLE-NAVI.dsl into SSDT folder). You can use it as reference. DefinitionBlock("", "SSDT", 2, "DRTNIA", "AMDGPU", 0x00001000) { External (_SB_.PCI0, DeviceObj) External (_SB_.PCI0.PEG0.PEGP, DeviceObj) Scope (\_SB.PCI0.PEG0.PEGP) { If (_OSI ("Darwin")) { Method (_DSM, 4, NotSerialized) // _DSM: Device-Specific Method { Local0 = Package (0x02) { // Insert your code here // End mark } DTGP (Arg0, Arg1, Arg2, Arg3, RefOf (Local0)) Return (Local0) } } } Scope (\_SB.PCI0) { Method (DTGP, 5, NotSerialized) { If ((Arg0 == ToUUID ("a0b5b7c6-1318-441c-b0c9-fe695eaf949b") /* Unknown UUID */)) { If ((Arg1 == One)) { If ((Arg2 == Zero)) { Arg4 = Buffer(One) { 0x03 // . } Return (One) } If ((Arg2 == One)) { Return (One) } } } Arg4 = Buffer(One) { 0x00 // . } Return (Zero) } } } SPPT table must go right between these comment lines: // Insert your code here // End mark Remember to modify the IOReg path of your graphics card based on your system, it may be different. To know the IOReg path to the graphics card, it can be done with: gfxutil tool. Hackintool: PCIe tab -> Name of your device (e.g. Navi 23 [Radeon RX 6600/6600 XT/6600M]) -> Device Path column -> Context menu -> Copy IOReg path. In my system is: PCI0.PEG0.PEGP.BRG0.GFX0. For better identification of the SSDT, rename it to SSDT-SPPT.aml and don't forget to compile it to AML format. When you compile the DSL file to AML, the compiler formats text, fills buffer sizes and adds header with comments. Place SSDT-SPPT.aml in the APCI folder and in config.plist, restart and reload OpenCore. Check that the SSDT loads correctly To see if everything is right, run IORegistryExplorer and compare what you see with this image (PP_PhmSoftPowerPlayTable is one of the properties of GFX0 or whatever the graphics device is called on your system): If you have added SPPT string with modified Zero RPM, you must see the changes in GPU temperatures and fans spin. In the image there is 3 conditions, graphics made when there is not high demand: Zero RPM off: Zero RPM disabled, temperature does not rise above 35º Zero RPM 45º: fans start at 45º and stop at 40º Zero RPM on: default setting, fans stop below 60º, temps around 50-55º. PHASE 2 ON MACOS: softPowerPlayTable in DeviceProperties It's another way to get the SPPT table into macOS as a hexadecimal string to the DeviceProperties section of config.plist, with the PCI path that corresponds to your graphics card. My personal experience is that the SSDT method works as is if the SSDT file is well formed but this method usually needs to add the SSDT-BRG0.aml file to work (you have it in the SSDT folder). Easy method using script Get one of the REG or TXT files generated in Windows. In the Scripts folder is PPT_config-plist.sh Open Terminal and write: sh ./PPT_config-plist.sh <REG-file/TXT> The output of this command is a long hexadecimal string that must be saved to be used in the config.plist file. Manual method Get one of the REG or TXT files generated in Windows. Select the block that begins with “PP_PhmSoftPowerPlayTable”= deleting the rest of the text. Also delete «PP_PhmSoftPowerPlayTable»=hex: leaving only the hexadecimal string made up of several lines. Search and replace: remove the commas remove spaces at the beginning of the lines remove backslashes () at the end of the lines remove line breaks to get a single line string, use Grep in Find and Replace. Text before the transformation looks like this (the entire string is not shown, just a part): "PP_PhmSoftPowerPlayTable"=hex:a6,09,12,00,02,22,03,ae,09,00,00,22,43,00,00,83,\ 00,18,00,00,00,1c,00,00,00,00,00,00,76,00,00,00,00,00,00,00,00,00,00,00,00, \ After the changes it looks like this: a6091200022203ae0900002243000008300180000001c0000000000007600000000000000000000000 ... OpenCore You must know the PCI path to the graphics card, it can be done with gfxutil tool. Hackintool: PCIe tab -> Name of your device (e.g. Navi 23 [Radeon RX 6600/6600 XT/6600M]) -> Device Path column -> Context menu -> Copy PCI path. In my system is: PciRoot(0x0)/Pci(0x1.0x0)/Pci(0x0.0x0)/Pci(0x0.0x0)/Pci(0x0.0x0). Open the config.plist file in DeviceProperties >> Add > PciRoot(0x0)/Pci(0x1,0x0)/Pci(0x0,0x0)/Pci(0x0,0x0)/Pci(0x0,0x0) and adds PP_PhmSoftPowerPlayTable, its value as Data is the long text string. <key>PciRoot(0x0)/Pci(0x1,0x0)/Pci(0x0,0x0)/Pci(0x0,0x0)/Pci(0x0,0x0)</key> <dict> <key>PP_PhmSoftPowerPlayTable</key> <data>Long string, seen as: hexadecimal in PLIST file editors and as Base64 in plain text editors</data> </dict> Important: Don't forget to add (ACPI folder and config.plist) the SSDT-BRG0.aml file in which you must check the IOReg path to the graphics card as explained above. Reboot. If everything goes fine, you will see that fans are spinning all the time with a very low sound, base temperature rarely exceeds 40º (when there is not high graphics load) and test scores have not changed. Note: slight errors in the hexadecimal string can lead to a black screen when reaching the Desktop, it is highly recommended to have an EFI that works and can boot macOS on a USB device or another disk in case of problems. April 2023 Note: macOS Ventura 13.4 There are users on macOS Ventura 13.4 who can't disable Zero RPM. Even with it properly loaded from SSDT or from the OpenCore config.plist file (verifiable using IORegistryExplorer), GPU fans are stopped most of the time and temperature ranges between 50 and 55º (approximately 10º more than in Windows), the same as without SPPT string. There is a way to recover the lost feature. When modifying the vBIOS ROM file in Windows with MorePowerTool, instead of disabling Zero RPM (unchecking option box), it is left checked but the temperatures at which fans start and stop are modified. By default they are configured like this: Stop Temperature 50º and Start Temperature 60º. I have tried these settings: Start Temperature 40º and Stop temperature 35. With this change, fans spin and stop with the GPU temperature oscillating between 35 and 40º. GeekBench performance is as expected. Thanks Igor'sLAB where I have got a lot of information. TechPowerUp, GPU-Z developers. Anton Sychev (klich3), SSDT method, PPT_script.command and PPT_config-plist.sh scripts developer. PPT_script.command has its own site as PPT-table-tool. Scripts.zip SSDT.zip


 1 point
 -

Version 1.0.3
34 downloads
IntelLucy.kext is an open source driver for the Intel X500 family of 10GBit network adapters.1 point -
" What is beautiful is not beautiful but what pleases is beautiful " 🙂 ... I much prefer Rescuezilla with a more pleasant and intuitive interface But here we are not talking about our tastes, but about WindowsInstall.app ...let's stay on topic 🤦1 point
-
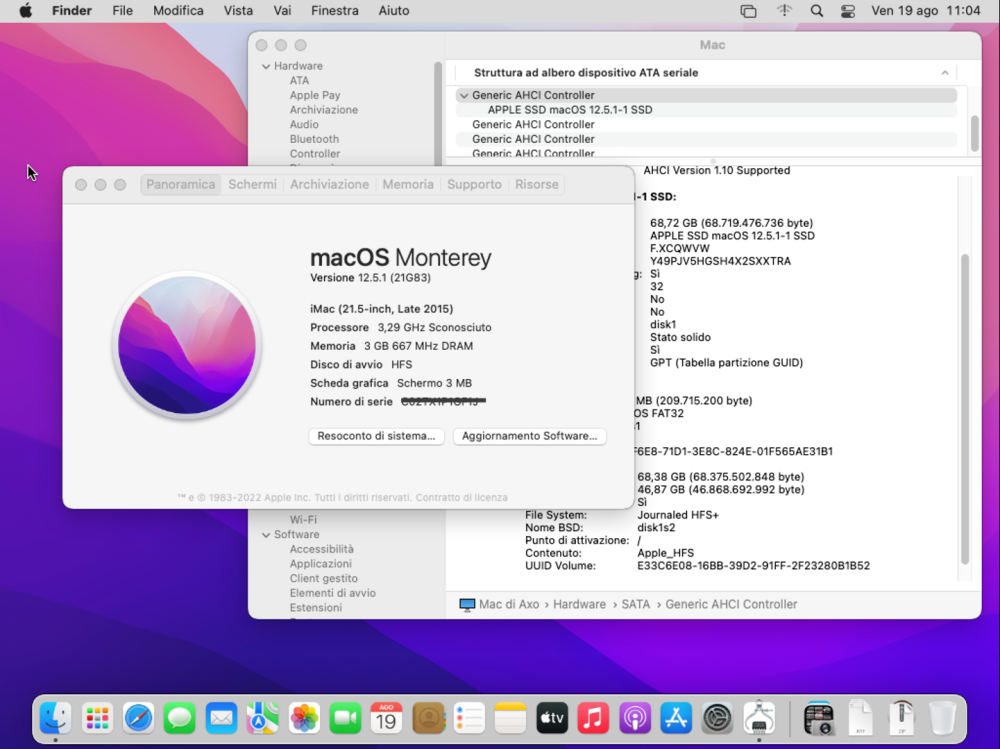
Hi, booring moring, so why don't experiment something wierd ?? MacOS 12.1 on HFS Can macOS Monterey boots from HFS drive ? YES it's smooth on my old RIG ?? YES ... My old RIG - CPU: Intel Core i5-2500k 3,3Ghz - MB: GA-H67N-USB3-B3 RAM: 8Gb DDR3 Skill Sniper 1.333Mhz - Ethernet: RTL8111 - Audio: Realtek ALC889 - Video: Intel HD 3000 512Mb QE/CI ok - HDD: 1.024 Gb SATA3 - BluRay DVD-RW: SONY BD-5300S So how to accomplish this exercise : 1) Install it on usual manner : Clover or OpenCore on APFS ... 2) Clone APFS Drive to HFS Drive I used ditto command ... - Boot on recovery ditto /Volumes/APFS/ /Volumes/HFS/ ditto /Volumes/APFS\ -\ Data/ /Volumes/HFS/ hint : I can use also SuperDuper! vers 3.17 which doesn't try to convert HFS to APFS during cloning. 3) Boot from HFS drive It works, some how ... ( I have to Fix QE/Ci on intel HD3000 .. yet) my Wifi USB 600Mbps works .... so Why ?? a) Because I don't like APFS ( too complicated ) and I like HFS ( very easy to create/delete/modify partitions) b) Because I want try to run new macOS on my old RIG c) Because I want to backup and restore in minutes (and I want a bootable copy of my OSes) d) Just for fun ... NOTE: I have updated also to macOs12.5.1 , but it will give me strange errors so I have downgraded to Mac OS 12.1 which runs fine for me ...
 1 point
 -
8K resolution refers to an image or display resolution with a width of approximately 8,000 pixels. 8K UHD(7680 × 4320) so I don't think the new AMD card supports 8K In the real world. don't believe marketing
 1 point
 -
https://cryptonews.com/news/security-vulnerability-in-apples-m-series-chips-puts-mac-users-crypto-private-keys-at-risk.htm Fundamental Weakness in Apple’s M-Series Chips Security Poses Threat to Crypto Holders Unlike typical vulnerabilities that can be addressed through software patches, this particular flaw resides in the microarchitectural design of the chips themselves, rendering it “unpatchable.” To mitigate the issue, third-party cryptographic software would need to be employed, but this could severely impact the performance of earlier M-series chips, including the M1 and M2.0 points