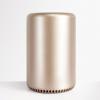
dune_case Posted January 31, 2016 Share Posted January 31, 2016 (edited) Nearly a year ago, we started to build a case that was cylindrical in design that could be used with standard PC parts. It was a challenge to get all the parts inside the cylindrical case as it is not a box. We considered thermals, cable management, positioning of mobo / gpu / psu, and the ease of accessibility of parts. We used all the industry standards for PC parts and built around that. Today, I finally have come up with a design and I hope it will help others to that are looking for a similar solution that is well thought and complete. Here are some of the picture of the final product: Stage 1: Prototype 1 (Standard PC Parts) - January 2015 Parts: Silverstone 450W SFX PSU Gold MSI 780 GTX Gaming MSI ITX motherboard 16 GB Ram 500 GB 2.5 inch Segate HDD intel i7 4770k CPU We started to look at all these parts and measured them piece by piece. I had a friend who is a CAD designer and he helped me with drawing all this up in CAD ... Thanks buddy ... After drawing the CAD it was time to have these parts CNC out of aluminum ... it took forever to mill out the metal.. and very costly .. but in the end it was worth it. The most challenging part was to have a case that didn't have lines on the top of the case that was visible. We managed to do that with a combination of different methods. At the end of the process of cutting the metal, we put all the parts in. It looked great, but after looking at it for 5 minutes something didn't feel right.. The parts felt unorganized and cables were coming from everywhere. There was no cable management. Parts where not easy to put in and out. We stress test it with the case closed using Prime95, and decided that we need a fan to help aid the airflow. Stage 2: Prototype 2 (Fine Tune) - April 2015 Parts: Same as Prototype 1 plus a new 140mm Thermalright fan Three months later we used the existing outer case and redesign the inside. We 3D printed the front panel and gave it a paint job in bling bling gold. Also we included a 140mm fan on top of the case. Temps dropped and was quite cool inside the case. The fan on top pulling the air our of the case made a difference. Hot air naturally rises so the rate of hot air coming out was quicker. Putting it all together and analyzing it, I was still not satisfied and decided as much as I wanted a full size GPU in the case, more powerful cards were coming out in mini-ITX like the 970 GTX. I felt the case was too tall and it didn't look right. Stage 3: Prototype 3 (Making it shorter) - June 2015 Parts: Same as Prototype 2 but removed 780 GTX and replaced it with mini ITX 970 GTX I called my buddy the CAD guru to come over and asked him to recalculate every part and try to make this case smaller. During this process I came up with an idea that made the cables easier to manage. It was to mount the GPU on to a door and when you open the door you have access to HDD and cables for power and SATA. It changed everything !!!! It made inside the case look more appealing instead of seeing cables everywhere. Actually I have never seen this in any other case. We had another go at it and once we finished doing a quick prototype I was finally satisfied. Stage 4: Final Version - September 2015 Parts: Same as Prototype 3 We did a quick 3D print of most of the parts and CNC a new case and bottom. In the process I asked my buddy to make the door follow the contour of the round top. We sand down all the parts and put it all together. The result was amazing. We final made a version that was pleasing to the eye inside out, fix the problems with the thermal and cable management. Also we created a special container for the power supple which helps direct the air from the bottom into the right area leaving no place for hot spots. Now it was time to create a polished version painted, assembled, and tested. Stage 5: Final Version Part 2 - October 2015 Now we had a workable version we all liked, the next step was to recreate it with precision. The result was amazing. After a year on working on this case it has finally become a reality. I love the design and the fact I can put my own parts in it. I like the fact that I can keep upgrading it and most of all we used very high quality materials to build it using high grade aluminum and electronically painted it titanium grey and gold. I put a lot of hard work into this and thank everyone that helped me. Thanks for reading. If your interested in more details, I am happy to share my experience. Alexander Gomez Edited February 1, 2016 by JahStories Commercial link removed 16 Link to comment https://www.insanelymac.com/forum/topic/310694-mac-pro-2013-case-with-mini-itx-parts/ Share on other sites More sharing options...
JahStories Posted February 1, 2016 Share Posted February 1, 2016 Awesome! But how do you connect the various ports from the mobo and gpu to the panel? And what about the lack of display port, why? The other thing I really miss is optical audio output and the possibility to add a small cpu watercooler... 3 Link to comment https://www.insanelymac.com/forum/topic/310694-mac-pro-2013-case-with-mini-itx-parts/#findComment-2212438 Share on other sites More sharing options...
dune_case Posted February 2, 2016 Author Share Posted February 2, 2016 hi JahStories .. I have custom design the front panels to have connectors to the motherboard. I really like display port as well as I have a dell 4k monitor. a dual display port version is 100% going to be done.. optical i love and water cool too. I guess i was trying to build something that was more common .. but yes great suggestions and definitely the display port is the next version 1 Link to comment https://www.insanelymac.com/forum/topic/310694-mac-pro-2013-case-with-mini-itx-parts/#findComment-2212511 Share on other sites More sharing options...
luki1979 Posted February 2, 2016 Share Posted February 2, 2016 yases that looks cool 2 Link to comment https://www.insanelymac.com/forum/topic/310694-mac-pro-2013-case-with-mini-itx-parts/#findComment-2212686 Share on other sites More sharing options...
Frank Nitty Posted February 5, 2016 Share Posted February 5, 2016 This is freaking amazing. Kudos 2 Link to comment https://www.insanelymac.com/forum/topic/310694-mac-pro-2013-case-with-mini-itx-parts/#findComment-2213394 Share on other sites More sharing options...
dune_case Posted February 6, 2016 Author Share Posted February 6, 2016 thanks frank and luki 1 Link to comment https://www.insanelymac.com/forum/topic/310694-mac-pro-2013-case-with-mini-itx-parts/#findComment-2213709 Share on other sites More sharing options...
arstherapia Posted February 6, 2016 Share Posted February 6, 2016 Awesome work! 2 Link to comment https://www.insanelymac.com/forum/topic/310694-mac-pro-2013-case-with-mini-itx-parts/#findComment-2213768 Share on other sites More sharing options...
BALDY_MAN Posted February 7, 2016 Share Posted February 7, 2016 Great work well done 1 Link to comment https://www.insanelymac.com/forum/topic/310694-mac-pro-2013-case-with-mini-itx-parts/#findComment-2213901 Share on other sites More sharing options...
onmybikedrunk Posted February 15, 2016 Share Posted February 15, 2016 Craftsmanship is spot on. On top of PC customization, I'm an industrial designer that builds custom 50-80cc racing bikes as a hobby and I can spot well thought-out design when I see it. This is an awesome project. Well done indeed! Link to comment https://www.insanelymac.com/forum/topic/310694-mac-pro-2013-case-with-mini-itx-parts/#findComment-2215961 Share on other sites More sharing options...
dune_case Posted February 17, 2016 Author Share Posted February 17, 2016 Craftsmanship is spot on. On top of PC customization, I'm an industrial designer that builds custom 50-80cc racing bikes as a hobby and I can spot well thought-out design when I see it. This is an awesome project. Well done indeed! Thanks guys for the comments ... we really worked hard on this project. There were so many different wants to put parts inside this case but the most difficult part was how to do it with ease. I really love PC cases and why not do something in that space that is high quality instead of sheet metal as we see today ... 1 Link to comment https://www.insanelymac.com/forum/topic/310694-mac-pro-2013-case-with-mini-itx-parts/#findComment-2216196 Share on other sites More sharing options...
Mr. Xtreme Posted February 28, 2016 Share Posted February 28, 2016 Great looking job dune_case. Hope it goes well 1 Link to comment https://www.insanelymac.com/forum/topic/310694-mac-pro-2013-case-with-mini-itx-parts/#findComment-2219345 Share on other sites More sharing options...
JahStories Posted March 1, 2016 Share Posted March 1, 2016 Now featured on news. Click here to read the article. 3 Link to comment https://www.insanelymac.com/forum/topic/310694-mac-pro-2013-case-with-mini-itx-parts/#findComment-2219752 Share on other sites More sharing options...
Recommended Posts