
About This File
![]()
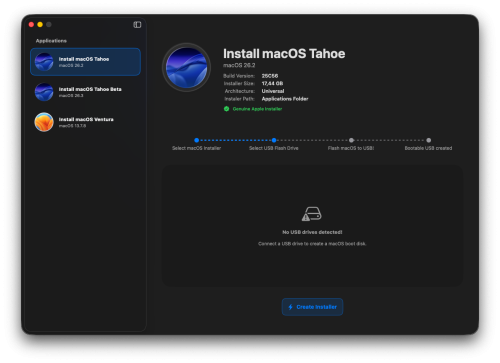
FlashWizard is another one of my personal-use apps that I decided to share with everyone. It's simple, straightforward, with no unnecessary steps or gimmicks. While there are plenty of apps out there that do the same thing create a bootable macOS drive FlashWizard can be another excellent option. With just a few clicks, you can turn your USB drive into a bootable installer, ready to install or restore macOS.
Why use FlashWizard?
• Simple, Intuitive, and Straightforward: No nonsense, no unnecessary steps.
• Fast: The flashing process is optimized to be as quick as possible.
• Supports multiple macOS versions: From macOS Mojave up to macOS Tahoe, it gets the job done.
• Secure: Uses macOS's built-in Authorization Services to ensure only user-approved commands are executed.
• Logs: You can find output and error logs in /tmp (note: the files are hidden).
There are still a few features to be implemented in the future. For now, if you can test it and give me feedback, I promise to reply as soon as possible. Suggestions are welcome as long as they're useful for everyone and not just personal preferences.
How to Use:
• Step 1: Select the macOS installer (by clicking the icon this applies to all steps).
• Step 2: Select your USB drive. A 16GB drive is enough to create a bootable macOS installer from version 10.9 (Mavericks) up to 13.7 (Ventura). For later versions, I recommend a 32GB drive. If you choose to format the USB, it will be formatted as JHFS+ with a GUID Partition Map.
• Step 3: Click Flash macOS to USB and wait. Don’t worry if an error occurs a message should appear (at least I hope so, LOL).
Edited by Mirone
What's New in Version 2.0.0 See changelog
Released
Main changes:
- Complete redesign of the graphical user interface (GUI)
- Application rewritten in SwiftUI
- General performance and stability improvements
- Internal refactoring and various optimizations
- New Icon


Recommended Comments