MiniHack Posted March 27, 2013 Share Posted March 27, 2013 So it's been a while since I posted any mod.s here on Insanely, but I figured it's about time as I have got the bug again to do some stuff for myself. The catalyst for this build It started when I was going to buy some kit online and saw there was a special offer on the Kraken x60 water cooling set up and thought "yep, okay I'll just tick the box that says "buy". The Kraken hasn't been around for long and it is an integrated water cooler based around 2 x 140mm fans and a 280mm radiator. It has had some reasonable reviews, but I've seen no reports yet of one in a hack. Fitment in a G5 is not a logical one as though you might be able to front mount it I don't like the idea of exhausting hot air into the case. It certainly won't rear mount, so that leaves top or bottom. The donor case In my day to day stuff with the laser hive I end up messing around with a lot of cases, usually doing half a build to see if something fits and then ending up with lots of hacked around cases littering house and workshop. The case I have decided to do this mod "for me" with is a broken case. It started as one that someone sent to me for me to do a conversion on, but it arrived with the familiar bent leg (thank you white van man). I tried to bend it back and made a reasonable job of it, but really didn't want to be modding a damaged case for someone else, so I swapped the case out for one I had here and did the customer mod based on a good case - and then kept the damaged one here as one of my guinea pig cases. The guinea pig case I ripped apart and converted it to do a test fit on one of my ATX kits, and then ripped it apart again. So now it was not just broken, but had a large hole in the back already. What kind of build? The impulse buy of the X60 though got me thinking about sticking the radiator on the roof of a G5, so I thought now was the time to try that out on the guinea pig case. But there was no point in just having a roof mount for a radiator if it wasn't part of a full build was there? A 280 radiator on the roof seems pointless without the case being able to take a full ATX tray. So it had to be ATX (if only to fill the large hole already in the case back). I wanted plenty of disk storage, and also needed to do a little development work on my 7 disk hot swap enclosure so using that on this build seemed logical. My only option with a radiator on the roof and my using the hot swapper is to put the PSU in the G5 PSU case. I also wanted to keep a DVD drive. The 280 radiator though, wherever I put it, would not give room for a full size DVD, so I decided I'd need a slot loader. Unfortunately the depth of the radiator and the fans and the whole length of it - even if I put it to the back of the case - would not give room for a slot loader to spit disks from the original DVD area so I needed a re-think on that too. The final configuration then and now decided on is to put the slot loading DVD at around the top shelf level and, to use the space above it to fit a fan controller. Not just any fan controller though - the Lamptron FC10 with Nixie tube display that Graeme at Kustom PCs had just told me had come into stock after having been a virtual product for months and months. This controller set me back a fair amount, but it just looks so awesome that it almost deserves to have the mod themed around it. I can hopefully work on having a ATX board, graphics card and processor somewhere along the line (!) - as this build deserves to live. More than that, this case really should have some serious hardware to justify the Kraken cooler. Next post will be the first case cuts. Things to decide though (and I really haven't decided yet!) is whether to go black and white, black and silver or conventional. And, as I am prototyping almost everything I do in acrylic, whether to stick with some or all of my acrylic parts or translate everything into aluminium..... 1 Link to comment https://www.insanelymac.com/forum/topic/287441-minihack-a-slightly-different-g5-case-mod/ Share on other sites More sharing options...
MiniHack Posted March 28, 2013 Author Share Posted March 28, 2013 So, some cuts to the inner case today. I did some measurements around the radiator and made a cutting template which I then fixed as far back as possible on the roof of the G5. and then dremeled around the line to make the mounting frame. I designed my own grill for the radiator as I couldn't find one that I liked that had 15mm fan hole spacing - so here is a laser hive special. What do you think? I wanted it to look 3D and to look as if it had separate grills that could turn. In reality though this is a sandwich of two pieces together. I could maybe give it a better look by using acrylic of different colours. For my proposed 5.25" bay for the fan controller and slot loader I made some files in Corel Draw. I counted up the holes in the front mesh vertically and horizontally (vertical hole spacing is 5.8mm and horizontal hole spacing is 6.25mm) that would give me enough room for a plate to make a bay opening and have a slot loader underneath it and then cut a piece of acrylic to hold against the G5 and see if it looked okay. The acrylic was held there temporarily by poking M3 screws through the attachment holes I had made and I then adjusted it to be as high as it would sit on the front without going on t the curved part of the case. The G5 front was masked with tape and I then drew on to the tape the shape I thought I needed to cut. After cutting the front here is the loose assembly of the fan controller and plate at the top of the case. So, that's more or less where I am at with this case now. Next jobs are working on the outer case and the back of the case. Outer case is going to be new and will feature being able to hot swap drives without having to remove the whole side door. Link to comment https://www.insanelymac.com/forum/topic/287441-minihack-a-slightly-different-g5-case-mod/#findComment-1901691 Share on other sites More sharing options...
nickjf20 Posted March 28, 2013 Share Posted March 28, 2013 Wow, looking great -- love the Lamptron! Link to comment https://www.insanelymac.com/forum/topic/287441-minihack-a-slightly-different-g5-case-mod/#findComment-1901719 Share on other sites More sharing options...
MiniHack Posted March 28, 2013 Author Share Posted March 28, 2013 Wow, looking great -- love the Lamptron! Thanks Nick. Still changing my mind daily on where to eventually go on this in terms of material and finish. I need black involved because of the Lamptron (!) and want the whole thing to be sort of "industrial" (or is it post industrial??) so I'm not sure if I should keep acrylic in it or just use the acrylic for the prototyping and source 3mm ali for parts - and then which bits to powder coat (and what colours) or whether to try anodising or to polish some bits.....it is keeping me awake at nights. Link to comment https://www.insanelymac.com/forum/topic/287441-minihack-a-slightly-different-g5-case-mod/#findComment-1901721 Share on other sites More sharing options...
v3nom Posted March 28, 2013 Share Posted March 28, 2013 Great! It's nice that you can turn your ideas into real projects. Looking forward, how the grill will look like with the radiator installed Link to comment https://www.insanelymac.com/forum/topic/287441-minihack-a-slightly-different-g5-case-mod/#findComment-1901801 Share on other sites More sharing options...
MiniHack Posted March 28, 2013 Author Share Posted March 28, 2013 Great! It's nice that you can turn your ideas into real projects. Looking forward, how the grill will look like with the radiator installed That'll be tomorrow..... Link to comment https://www.insanelymac.com/forum/topic/287441-minihack-a-slightly-different-g5-case-mod/#findComment-1901804 Share on other sites More sharing options...
nickjf20 Posted March 28, 2013 Share Posted March 28, 2013 The lamptron looks very steampunk Maybe something like this? http://www.bit-tech....he-year-2012/17 EDIT And what do you know - that build I linked uses the Lamptron 1 Link to comment https://www.insanelymac.com/forum/topic/287441-minihack-a-slightly-different-g5-case-mod/#findComment-1901808 Share on other sites More sharing options...
maximus Posted March 28, 2013 Share Posted March 28, 2013 That Lamptron is pleasing to my eyes and makes me feel all warm and fuzzy inside. 1 Link to comment https://www.insanelymac.com/forum/topic/287441-minihack-a-slightly-different-g5-case-mod/#findComment-1901809 Share on other sites More sharing options...
MiniHack Posted March 28, 2013 Author Share Posted March 28, 2013 The lamptron looks very steampunk Maybe something like this? http://www.bit-tech....he-year-2012/17 EDIT And what do you know - that build I linked uses the Lamptron Love it. A bit too extreme for me though...... Link to comment https://www.insanelymac.com/forum/topic/287441-minihack-a-slightly-different-g5-case-mod/#findComment-1901815 Share on other sites More sharing options...
Mr.D. Posted March 29, 2013 Share Posted March 29, 2013 The final configuration then and now decided on is to put the slot loading DVD at around the top shelf level and, to use the space above it to fit a fan controller. Not just any fan controller though - the Lamptron FC10 with Nixie tube display that Graeme at Kustom PCs had just told me had come into stock after having been a virtual product for months and months. This controller set me back a fair amount, but it just looks so awesome that it almost deserves to have the mod themed around it. ME WANT Seriously... how much and where can I willingly fork over my CC number to procure such a wonderful device?? I have a VU meter from an old 5 1/4 bay gizmo that I've been wanting to hack into my machine and this would go well with that... hell, even if I don't use it on my G5, I could use it with an old motherboard in this case. Yes - I actually have both. Link to comment https://www.insanelymac.com/forum/topic/287441-minihack-a-slightly-different-g5-case-mod/#findComment-1901840 Share on other sites More sharing options...
MiniHack Posted March 29, 2013 Author Share Posted March 29, 2013 ME WANT Seriously... how much and where can I willingly fork over my CC number to procure such a wonderful device?? I have a VU meter from an old 5 1/4 bay gizmo that I've been wanting to hack into my machine and this would go well with that... hell, even if I don't use it on my G5, I could use it with an old motherboard in this case. Yes - I actually have both. I had been hunting this since Christmas. It was going to be Christmas present to me from wife (sad?). It had been reviewed but was available nowhere - I checked globally! It seems the quality or reliability on the first examples was not good and they became a virtual product. I got talking to Graeme the owner of Kustom PCs in the UK and he promised to email me when they became available properly - that was last week! I bought one within an hour of him emailing me. He had 5 I have no idea on remaining stock: https://www.kustompc...info_28040.html Hopefully they are becoming available globally now though.... PS That motherboard looks amazing. A vacuum tube PC??? Who cares it if works well or not that looks seriously cool. 1 Link to comment https://www.insanelymac.com/forum/topic/287441-minihack-a-slightly-different-g5-case-mod/#findComment-1901863 Share on other sites More sharing options...
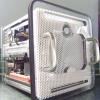
MiniHack Posted March 29, 2013 Author Share Posted March 29, 2013 Latest pic.s A test fit of the radiator and fans and the rear backplate etc. to double check all will go in! The backplate aim here was to place the motherboard absolutely as low as it could possibly go while keeping the original PSU case and being full ATX. The reason for the " G5 LZR" little extension at the top is that the hole in the back of this case was bigger than I needed for this conversion as originally I had used it to test out one of my "high" ATX kits - so the backplate on there now is sort of a "middle" one. The position of the board, PSU and radiator/fans JUST allows the all of the PCI-e slots of a full ATX board to be fully clear and totally useable. At the front, the hot swapper forces the pipes from the radiator to do a tight turn, but I am relieved to see that these Kraken pipes do not kink and make the turn nicely. Looks like the CPU plate should just fit nicely with where the processor will be eventually. No more now until after the Easter break.... Link to comment https://www.insanelymac.com/forum/topic/287441-minihack-a-slightly-different-g5-case-mod/#findComment-1901911 Share on other sites More sharing options...
WhatTheTech Posted March 29, 2013 Share Posted March 29, 2013 Ok seriously, everyone needs to stop what they're doing and watch the master at work Seriously, I'm definitely looking forward to seeing what you come up with. PS, that G5 LZR cutout is KILLER. Is that standard now? Link to comment https://www.insanelymac.com/forum/topic/287441-minihack-a-slightly-different-g5-case-mod/#findComment-1901943 Share on other sites More sharing options...
Mr.D. Posted March 29, 2013 Share Posted March 29, 2013 ouch - it'll cost me $122. damn me being cheap... now I have to think on it. Link to comment https://www.insanelymac.com/forum/topic/287441-minihack-a-slightly-different-g5-case-mod/#findComment-1901997 Share on other sites More sharing options...
WhatTheTech Posted March 29, 2013 Share Posted March 29, 2013 ouch - it'll cost me $122. damn me being cheap... now I have to think on it. The kraken was a Newegg Shell Shocker deal last night for $100 shipped...probably should have mentioned something ey? Never mind, decided to read your previous post AFTER the last one...always smart... Link to comment https://www.insanelymac.com/forum/topic/287441-minihack-a-slightly-different-g5-case-mod/#findComment-1902010 Share on other sites More sharing options...
Mr.D. Posted March 29, 2013 Share Posted March 29, 2013 yeah, well - my desire to have something cool overcame my desire to be cheap this time so I pulled the trigger on getting it. Who's the smart one now? ... But damn that'll be cool. 1 Link to comment https://www.insanelymac.com/forum/topic/287441-minihack-a-slightly-different-g5-case-mod/#findComment-1902025 Share on other sites More sharing options...
nickjf20 Posted March 29, 2013 Share Posted March 29, 2013 No updates until after easter ?!? Link to comment https://www.insanelymac.com/forum/topic/287441-minihack-a-slightly-different-g5-case-mod/#findComment-1902100 Share on other sites More sharing options...
Mr.D. Posted March 29, 2013 Share Posted March 29, 2013 And don't forget those limeys have an extra holiday with 'Easter Monday' What was it that happened in the bible on Easter Monday anyways - "You are neeeever gonna believe what I saw yesterday," said Thomas. Link to comment https://www.insanelymac.com/forum/topic/287441-minihack-a-slightly-different-g5-case-mod/#findComment-1902102 Share on other sites More sharing options...
nickjf20 Posted March 30, 2013 Share Posted March 30, 2013 Ahah, nothing wrong with another day off for us "limeys" Link to comment https://www.insanelymac.com/forum/topic/287441-minihack-a-slightly-different-g5-case-mod/#findComment-1902108 Share on other sites More sharing options...
Mr.D. Posted March 30, 2013 Share Posted March 30, 2013 holy {censored}! surrounded by them!! run away! ! 1 Link to comment https://www.insanelymac.com/forum/topic/287441-minihack-a-slightly-different-g5-case-mod/#findComment-1902109 Share on other sites More sharing options...
MiniHack Posted April 1, 2013 Author Share Posted April 1, 2013 So I'm back from the inlaws where they have no internet access! I have been thinking about the colour scheme and also the style of the side panels for this. Just thought I'd share my current thinking to see what you think of it. I am replacing the outer case totally on this mod. So whatever it'll be a departure. I have made a prototype new door which will keep the original door mechanism and also has an integral sliding panel for the hotswap access (in case I am too lazy to open the whole door!) and I'll share that photo on here later today. I am though still thinking about the final look. The latest idea is this: This is shown without the side window of course. The bottom and sides on this design follow the inner case outline, while the top extends up above the case and forms handles for hauling the case around. I am thinking 3mm polished aluminium as the material. I sort of was thinking of those Airstream caravans and wanted a streamlined front section with a more square back. The vent area would be to provide some extra ventilation for the radiator fans at the top to directly draw cold air from and expel through the roof outlet. Inner case I am still torn on with design detail - I am debating between going matt black with polished alloy detail (rad grill, backplate, front bay adapter and fan controller panel); white with black detail; white with polished alloy detail; G5 original colour with black or polished alloy detail...... 1 Link to comment https://www.insanelymac.com/forum/topic/287441-minihack-a-slightly-different-g5-case-mod/#findComment-1902681 Share on other sites More sharing options...
MiniHack Posted April 1, 2013 Author Share Posted April 1, 2013 So here are a few of the pictures of me rigging up a door mechanism. What I wanted was to make a door with a sliding compartment. I reckoned there was the possibility to do this because all the G5s have the inner plastic door which is 3mm thick and then the inner frame also has a 3mm thick recess in it and finally the outer door itself is of 3mm thick aluminium. So I thought that if I measured right I should be able to make a 3mm inner part, and a 3mm outer part and then sandwich a moving shutter in between the inner and outer. The prototype phase is tedious. I started by taking the frame off of the original door and by measuring up the dimensions of the plastic airdeflector. I then measured up where the holes were on the frame and did some first cuts in card, then offered that up to the mechanism, saw where some mistakes were and did a next prototype in clear acrylic. I went from that to a bit of 3mm ply I had in the workshop and then finally to the prototype you see below. The pic above shows: A clear inner piece with the three tabs sticking out the bottom (which go in the same slots as the original air deflector piece used) and this is connected at the moment by M3 screws that go through the metal frame and then connect with nuts on the outside of the door which at the moment is grey plastic. Trapped between the clear plastic and the grey plastic is a smaller piece of black plastic which can slide front to back in the 3mm depth of the door frame. This pic shows (from the outside) the grey plastic piece which has a hole in it for accessing the hotswapper. Here, the black sliding perspex is slid back and contained in the right hand side out of sight. Pic above shows black shutter now closing off the access to the hotswapper. This one shows shutter open and the black of the perspex fills the Apple logo. ....and half open. ...and another look at the inside of the assembled door. Naturally this needs a bit of refinement but you get the idea. 2 Link to comment https://www.insanelymac.com/forum/topic/287441-minihack-a-slightly-different-g5-case-mod/#findComment-1902722 Share on other sites More sharing options...
shiftysamurai Posted April 1, 2013 Share Posted April 1, 2013 OOooooh. I dig it. So the rounded area will match up on the top, or am I just not imagining the final design correctly? 1 Link to comment https://www.insanelymac.com/forum/topic/287441-minihack-a-slightly-different-g5-case-mod/#findComment-1902726 Share on other sites More sharing options...
MiniHack Posted April 1, 2013 Author Share Posted April 1, 2013 OOooooh. I dig it. So the rounded area will match up on the top, or am I just not imagining the final design correctly? Thanks. On the drawing the idea is the rounded part (i mean the very top of the drawing) comes above where the inner case top finishes and those 3 slotted bits - the ones in the single horizontal line at the top) will sort of be a design detail. However as they'll stick up, they will also be handles for moving this case around. That's only though if I go with getting them cut from 3mm aluminium....so it'll kind of sweep back from each side from the front to a slightly squared off back angle. On the drawing the sets of horizontal slots will take the place of where I have the honeycomb pattern right now on my plastic prototype. Reason for the change is that I won't be able to get a honeycomb pattern cut from aluminium as the material would over heat but the slots should be okay. Looking at how well the door latches hold things I reckon that on the door side it'll be a two piece outer. I mean that the door panel will actually have the handle detail at the top of it, and there will then be a fixed part that joins to the bottom of the inner case. On the non-opening side it'll just be one big panel. Hard to explain in words, but I'll put up some design drawings once I make them. I'm also looking at what fixings to use as they'll have to be really nice to blend with all this stuff. Trouble is really good looking nuts and bolts seem to be really ridiculously expensive too...some of the stuff I like is about £8 a bolt! So I won't be using those...... Link to comment https://www.insanelymac.com/forum/topic/287441-minihack-a-slightly-different-g5-case-mod/#findComment-1902731 Share on other sites More sharing options...
shiftysamurai Posted April 1, 2013 Share Posted April 1, 2013 It's definitely got a more industrial feel to it, while retaining (I think) the Apple styling and charm. REALLY like it. Consider me subscribed. Link to comment https://www.insanelymac.com/forum/topic/287441-minihack-a-slightly-different-g5-case-mod/#findComment-1902744 Share on other sites More sharing options...
Recommended Posts