In an ideal world you'd just pop a DVD into your Mac, press a button in iTunes like you can with a CD to copy it to your hard disk, and then simply play your DVD video file from within Front Row and enjoy the movie in glorious Dolby Digital surround sound and be done with it.
Nope, not that simple I'm afraid.
Firstly, there's two ways to copy a DVD: either the whole DVD disc, lock stock with special features, DVD menus, and the annoying anti-piracy ads even though you actually bought your DVD - or - copying only the actual movie "track" itself, discarding all other content like the special features. There are pros and cons on each side so it's really down to personal preference:
DVD disc copy
Pros:
- Includes all content from the DVD including special features & bonus content
Cons:
- Still got to put up with annoying ads/trailers, if any
- Files are huge, about 7GB for a DVD
- Files are too big to be streamed over Wi-Fi from a remote location
- Have to use Finder to access files, not a cool interface like Front Row or iTunes
Video track extraction
Pros:
- Compressed file, approx. 1GB for a film, with virtually no appreciable difference to quality
- Can be streamed over Wi-Fi from a remote location
- Plays from within Front Row & iTunes
- Easy to export to iPod/iPhone
- Omits adverts, piracy warning, trailers
Cons:
- Omits special features & bonus content
- Surround sound can be a bit fiddly to set up and use
Let me elaborate on a few of those pros and cons above. The video track extraction technique employs an encoding compression standard called H.264. In my opinion, H.264 is to video what MP3 was to music: an efficient way of compressing the size of a raw file from the original disc into a much smaller file size with virtually no impact on quality. Hence how we can get a whole movie down to 1GB.
This reduction in file size not only means we're playing with much smaller files for ripping and copying, but it also enables the neat trick of being able to play these files over a Wi-Fi network. This means you could have all your movie files stored on one computer, in my case that's my Mac Pro which is in my study, and then have other computers in the household simply act as hosts which stream the films over Wi-Fi and display them on the monitor they're attached to, so in my case my Mac mini in the living room which is hooked up to my plasma. The Mac mini thus does not store any film files, so there's no need for me to have multiple copies of the same movie across my computers, they all just sit in the one central location: the Mac Pro in the study.
Other key benefits for the video track extraction route is that you can use iTunes to manage and search your music library, and even apply pretty artwork covers to each movie file if you want to get particularly OCD about it (which I do, of course). You also have the benefit of using Front Row as the interface on your TV to access your movies, although it's a shame that Apple has a bug since 2007 which doesn't show the film artwork if you're using a remote source to serve up your film files.
That aside, the DVD copy route is definitely a lot easier from a sound setup perspective. Copied DVD files are simply launched from Apple's built-in DVD player which will auto-detect whether to play the surround sound track or the stereo track depending on your amp & speaker setup. I would assume that anyone bothering to read this and is interested in using their Mac as a home cinema setup will probably have a surround sound setup with a Dolby Digital capable receiver/amplifier, so at this point you should know that surround sound on the Mac via the video track extraction route is fiddly. I'll get into this in a bit.
DVD disc copy how-to
Copying whole DVD discs is really simple thanks to a great piece of software called Mac DVDRipper Pro from DVDSuki Software. It costs $9.95 and you simply launch it, point it at your DVD that you've inserted into your Mac, and let it rip the whole DVD into a neat little file which you can then simply double-click to launch it in Apple's DVD Player. Simple as that.
Video track extraction how-to
If you decide to simply extract just the actual film track from your DVDs, and you intend to use surround sound, in order to get AC-3 working for your extracted files, you'll need to follow these excellent instructions from programmer Graham Booker's blog to get AC-3 passthrough working on your Mac. It's fiddly, but worth it.
A quick education on surround sound standards: Dolby Pro Logic II is not true surround sound; it simply fakes surround sound by breaking up the stereo source and spitting it out through your rear and centre speakers. True surround sound is Dolby Digital, which is also known as AC-3. It requires output from a digital connection on your Mac to a digital input on your receiver, which will need to have a Dolby Digital decoder.
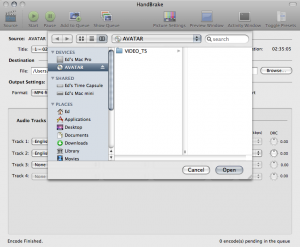
Once you've got AC-3 passthrough enabled, you're now ready to extract the film tracks from your DVDs. The tool of choice will be the popular open-source Handbrake utility. Once you've inserted your DVD, click the 'Source' icon and select your DVD:
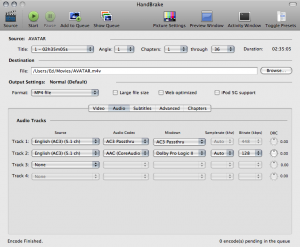
You'll then want to browse to the 'Audio' tab and set your audio tracks as per the screenshot below, which will encode both 'Stereo' tracks and 'Surround' tracks. This means that you'll be able to play your movie track on normal stereo devices (such as your iPhone or normal desktop PC with standard stereo speakers) as well as on Dolby Digital aware equipment such as a proper home cinema setup with Dolby Digital receiver:
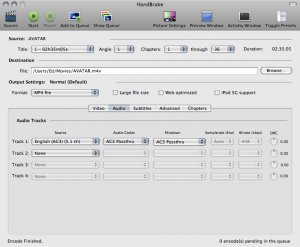
You should note that if you intend to watch all your movies through Front Row, there is a great bug which means that if there's more than one audio track encoded in the movie, Front Row will always default to the non-surround track - great! To get around this, the only way I've found around this is to encode only the surround sound track, so in that case your audio track settings in HandBrake should look like this:
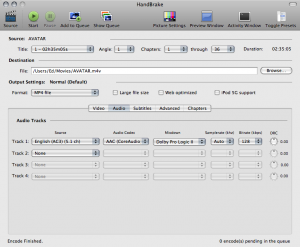
If you have no intention to ever play your films in proper surround sound (Dolby Digital) then you should put your settings like this:
You're now ready to click the 'Start' button and extract and compress the film track from your DVD. Bingo! Follow this process for all your DVDs that you wish to copy.





Recommended Comments