teknojunkie Posted December 23, 2008 Share Posted December 23, 2008 Very Nice B. It is coming out nicely. Link to comment https://www.insanelymac.com/forum/topic/93600-my-nearly-finished-hack-the-tosh/page/4/#findComment-1010601 Share on other sites More sharing options...
Baudouin Posted December 23, 2008 Author Share Posted December 23, 2008 Very Nice B. It is coming out nicely. Thanks amantheboy. Have you seen the pix of the fans mobo plug ? Was difficult to photograph. Link to comment https://www.insanelymac.com/forum/topic/93600-my-nearly-finished-hack-the-tosh/page/4/#findComment-1010682 Share on other sites More sharing options...
MacMeGosh Posted December 31, 2008 Share Posted December 31, 2008 Looks damn good... do your thing man!! Link to comment https://www.insanelymac.com/forum/topic/93600-my-nearly-finished-hack-the-tosh/page/4/#findComment-1021293 Share on other sites More sharing options...
Baudouin Posted January 1, 2009 Author Share Posted January 1, 2009 Looks damn good... do your thing man!! Thanks man. Kind of break now. Too much work for the end of year. But the half right of the door is completely cut now all the way through. Still the left side to go. Will then show some pix with the opening in the door. Forgot to say that I got my Chrissy gift : the tools to bend and cut copper tubes which will replace the plastic ones from my LCS . Link to comment https://www.insanelymac.com/forum/topic/93600-my-nearly-finished-hack-the-tosh/page/4/#findComment-1021817 Share on other sites More sharing options...
0z619 Posted January 4, 2009 Share Posted January 4, 2009 I Really like this. You spent alot of time on it! Link to comment https://www.insanelymac.com/forum/topic/93600-my-nearly-finished-hack-the-tosh/page/4/#findComment-1026420 Share on other sites More sharing options...
Baudouin Posted January 5, 2009 Author Share Posted January 5, 2009 I Really like this. You spent alot of time on it! Yes sir, a lot of time indeed. But you know I got to do what's needed to get the job done. Link to comment https://www.insanelymac.com/forum/topic/93600-my-nearly-finished-hack-the-tosh/page/4/#findComment-1027421 Share on other sites More sharing options...
Baudouin Posted January 7, 2009 Author Share Posted January 7, 2009 After four days of sweating and pain , I got the hole done. I thing I will araldite the apple cut onto the side panel to have a convex logo , painted in black or shinny alu grey. Door cut with cut parts in position: Only the cut parts : Door without cut parts : Cut door in position on the case : Next step, transparant acrylic cut panel to cover the opening. I thing I will paint in black the bottom part of the mobo tray to make the inside of the case darker compared to the acryl panel outside. Link to comment https://www.insanelymac.com/forum/topic/93600-my-nearly-finished-hack-the-tosh/page/4/#findComment-1031201 Share on other sites More sharing options...
teknojunkie Posted January 8, 2009 Share Posted January 8, 2009 Beeeeee-Yoooou-Tiiiii-full. (Beautiful) Can't wait for final Link to comment https://www.insanelymac.com/forum/topic/93600-my-nearly-finished-hack-the-tosh/page/4/#findComment-1031560 Share on other sites More sharing options...
Baudouin Posted January 8, 2009 Author Share Posted January 8, 2009 Thanks amantheboy. I will buy the acryl panel today and not forget to light up the inside apple logo the next time I upload some pix. Link to comment https://www.insanelymac.com/forum/topic/93600-my-nearly-finished-hack-the-tosh/page/4/#findComment-1032055 Share on other sites More sharing options...
nano2nd Posted January 8, 2009 Share Posted January 8, 2009 Looking good dude. You've put some hard work into this for sure. I'm looking forward to see the finished product! Link to comment https://www.insanelymac.com/forum/topic/93600-my-nearly-finished-hack-the-tosh/page/4/#findComment-1032257 Share on other sites More sharing options...
Baudouin Posted January 8, 2009 Author Share Posted January 8, 2009 Looking good dude. You've put some hard work into this for sure. I'm looking forward to see the finished product! Thanks nano2nd. the finished product is coming, slowly but surely. Link to comment https://www.insanelymac.com/forum/topic/93600-my-nearly-finished-hack-the-tosh/page/4/#findComment-1032340 Share on other sites More sharing options...
tazevedo317 Posted January 12, 2009 Share Posted January 12, 2009 looks soo good amazing job man. Link to comment https://www.insanelymac.com/forum/topic/93600-my-nearly-finished-hack-the-tosh/page/4/#findComment-1038519 Share on other sites More sharing options...
Baudouin Posted January 12, 2009 Author Share Posted January 12, 2009 looks soo goodamazing job man. Thanks for your support I do not forget that you and amandtheboy (technojunkie now) initiated this suggestion, so I am trying the best as I can. I just cut the acrylic panel painted in grey used before,to visualise the actual size of the opening and the way to make the panel pops out the hole. Will cut the real panel tomorrow. Link to comment https://www.insanelymac.com/forum/topic/93600-my-nearly-finished-hack-the-tosh/page/4/#findComment-1038773 Share on other sites More sharing options...
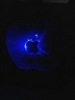
Baudouin Posted February 5, 2009 Author Share Posted February 5, 2009 One step futher. The Apple logo hole cutting is finished . Have tried just for fun to swap the original door from a Dual G5 2 Gig with mine, that's surprising but not bad. Have in the meantime started shopping for the copper tubes and connectors I will use to replace the usual plastic tubes for the LCS inside the MacPro case. Will load some pix with the 3D lighted logo on later when I wake up. These are the connections used for the moment with the usual plastic tubes : Link to comment https://www.insanelymac.com/forum/topic/93600-my-nearly-finished-hack-the-tosh/page/4/#findComment-1069799 Share on other sites More sharing options...
Baudouin Posted February 6, 2009 Author Share Posted February 6, 2009 Here are the tools to be used to bend and cut the copper tubes which will be used to transport the cooling liquid from the G5 case to the Mac Pro case : Here is the G5 door with the final version of the opening Apple logo without the plexi panel and the 3D Apple lighted logo (seven leds inside in total): Here with the remaining piece of plexi panel used in previous tests. You can see the difference because of the reflection on the panel : Just for the fun and by curiosity I attached the G5 opened door onto a G5 case, check the result!! Link to comment https://www.insanelymac.com/forum/topic/93600-my-nearly-finished-hack-the-tosh/page/4/#findComment-1071040 Share on other sites More sharing options...
teknojunkie Posted February 8, 2009 Share Posted February 8, 2009 wow thats awesome, look wonderful, loving the ambient glow. Link to comment https://www.insanelymac.com/forum/topic/93600-my-nearly-finished-hack-the-tosh/page/4/#findComment-1074214 Share on other sites More sharing options...
Baudouin Posted February 10, 2009 Author Share Posted February 10, 2009 wow thats awesome, look wonderful, loving the ambient glow. Thank you teknojunkie for your appreciation. Will try to find some time to finish the inserted Apple acrylic panel this week. Still have to make my mind up about the connectors with the copper tubes. Link to comment https://www.insanelymac.com/forum/topic/93600-my-nearly-finished-hack-the-tosh/page/4/#findComment-1075806 Share on other sites More sharing options...
teknojunkie Posted February 11, 2009 Share Posted February 11, 2009 Thank you teknojunkie for your appreciation.Will try to find some time to finish the inserted Apple acrylic panel this week. Still have to make my mind up about the connectors with the copper tubes. nice and haha its still amantheboy, changed my nickname Link to comment https://www.insanelymac.com/forum/topic/93600-my-nearly-finished-hack-the-tosh/page/4/#findComment-1076748 Share on other sites More sharing options...
Baudouin Posted February 11, 2009 Author Share Posted February 11, 2009 Thanks for your support I do not forget that you and amandtheboy (technojunkie now) initiated this suggestion, so I am trying the best as I can. I just cut the acrylic panel painted in grey used before, to visualise the actual size of the opening and the way to make the panel pops out the hole. Will cut the real panel tomorrow. Come on amandjunkie, I know it I had already edited this post to say it. Link to comment https://www.insanelymac.com/forum/topic/93600-my-nearly-finished-hack-the-tosh/page/4/#findComment-1077360 Share on other sites More sharing options...
teknojunkie Posted February 12, 2009 Share Posted February 12, 2009 haha thanks Link to comment https://www.insanelymac.com/forum/topic/93600-my-nearly-finished-hack-the-tosh/page/4/#findComment-1077890 Share on other sites More sharing options...
Baudouin Posted February 13, 2009 Author Share Posted February 13, 2009 The question is how to connect the tubes onto the different computer parts ? With a piece of plastic covered by the copper tubes ? The difficulty is to secure the two parts together, there is still a leak. Or all copper parts use as connectors ?Because they must be tiny to stay nice and esthetic. I have to visit a founded pro shop where they are selling very small copper parts for airco systems.I hope to get what I am looking for. Link to comment https://www.insanelymac.com/forum/topic/93600-my-nearly-finished-hack-the-tosh/page/4/#findComment-1079614 Share on other sites More sharing options...
Baudouin Posted February 28, 2009 Author Share Posted February 28, 2009 For those who might be interessed, here are the tools I used to cut the apple logo onto the door : 1) copy of the dremel label : 2) the real drumel was cutting like butter : 3) to get the edges smooth I used this : Link to comment https://www.insanelymac.com/forum/topic/93600-my-nearly-finished-hack-the-tosh/page/4/#findComment-1093797 Share on other sites More sharing options...
Baudouin Posted April 5, 2010 Author Share Posted April 5, 2010 Here some pix : I use a piece of G5 case to make a cover for the PCI connectors where I have attached a fan to cool the HDD's inside the Mac Pro case . All the plastic tubes has been replaced by copper tubes. I have finally found the way to connect them to the waterblock without any leak. To fill the big empty space between the rad and the back panel bottom fan, I made a "serpentin", placed between the rad and the pump. The water coming from the main case, G5 with the computer system, will be cooled inside the serpentin and a second time inside the radiator. Still have to connect the rad to the tank and the pump, which will be placed at the top where the DVD drives are, inside the Mac Pro case, to the waterblocks inside the G5 case. Link to comment https://www.insanelymac.com/forum/topic/93600-my-nearly-finished-hack-the-tosh/page/4/#findComment-1442244 Share on other sites More sharing options...
jberg44 Posted April 11, 2010 Share Posted April 11, 2010 Wow!! Very impressed. Nice work. Link to comment https://www.insanelymac.com/forum/topic/93600-my-nearly-finished-hack-the-tosh/page/4/#findComment-1446263 Share on other sites More sharing options...
Baudouin Posted April 12, 2010 Author Share Posted April 12, 2010 Thank you jberg44. Have to buy another meter of copper tube to make the connection between the pump and the in-going water tube to the processor waterblock. This is the tube which connect the out-going water from the radiator to the tank. I am waiting to get the tank to measure and bend and cut the upper side of the tube : I have already separated the Thermaltake pump from the original tank and replace the connectors : The sensor for the water temperature is ready to be connected between the tube coming from the outgoing water from the last Mosfet and the serpentin The digital screen is ready to flash the infos : Link to comment https://www.insanelymac.com/forum/topic/93600-my-nearly-finished-hack-the-tosh/page/4/#findComment-1446764 Share on other sites More sharing options...
Recommended Posts