Not Enough Storage to Update iPhone? Here’s How to Fix It
Were you about to try the newest iOS update only to see “not enough storage to update” on your iPhone? Maybe your free space is actually low, maybe there’s still room. Either way, this issue stops many people and wastes a lot of time. To avoid getting stuck, we’ll show you exactly how to update your iPhone, even in a tight situation like this one.
How Much Free Storage Do You Need to Update Your iPhone
If you can’t update your iPhone because of storage, the first thing you need to know is how much space the update actually needs. In most cases, you should have around 10-20 GB of free space before starting an iOS update.
That said, don’t rely only on this average. The exact storage requirement changes depending on your iPhone model, current iOS version, and the update you’re trying to install.
That’s why you should always check the update size first:
- Open Settings.
- Tap General.
- Go to Software Update.
- Check the update banner to see the size required for the installation.
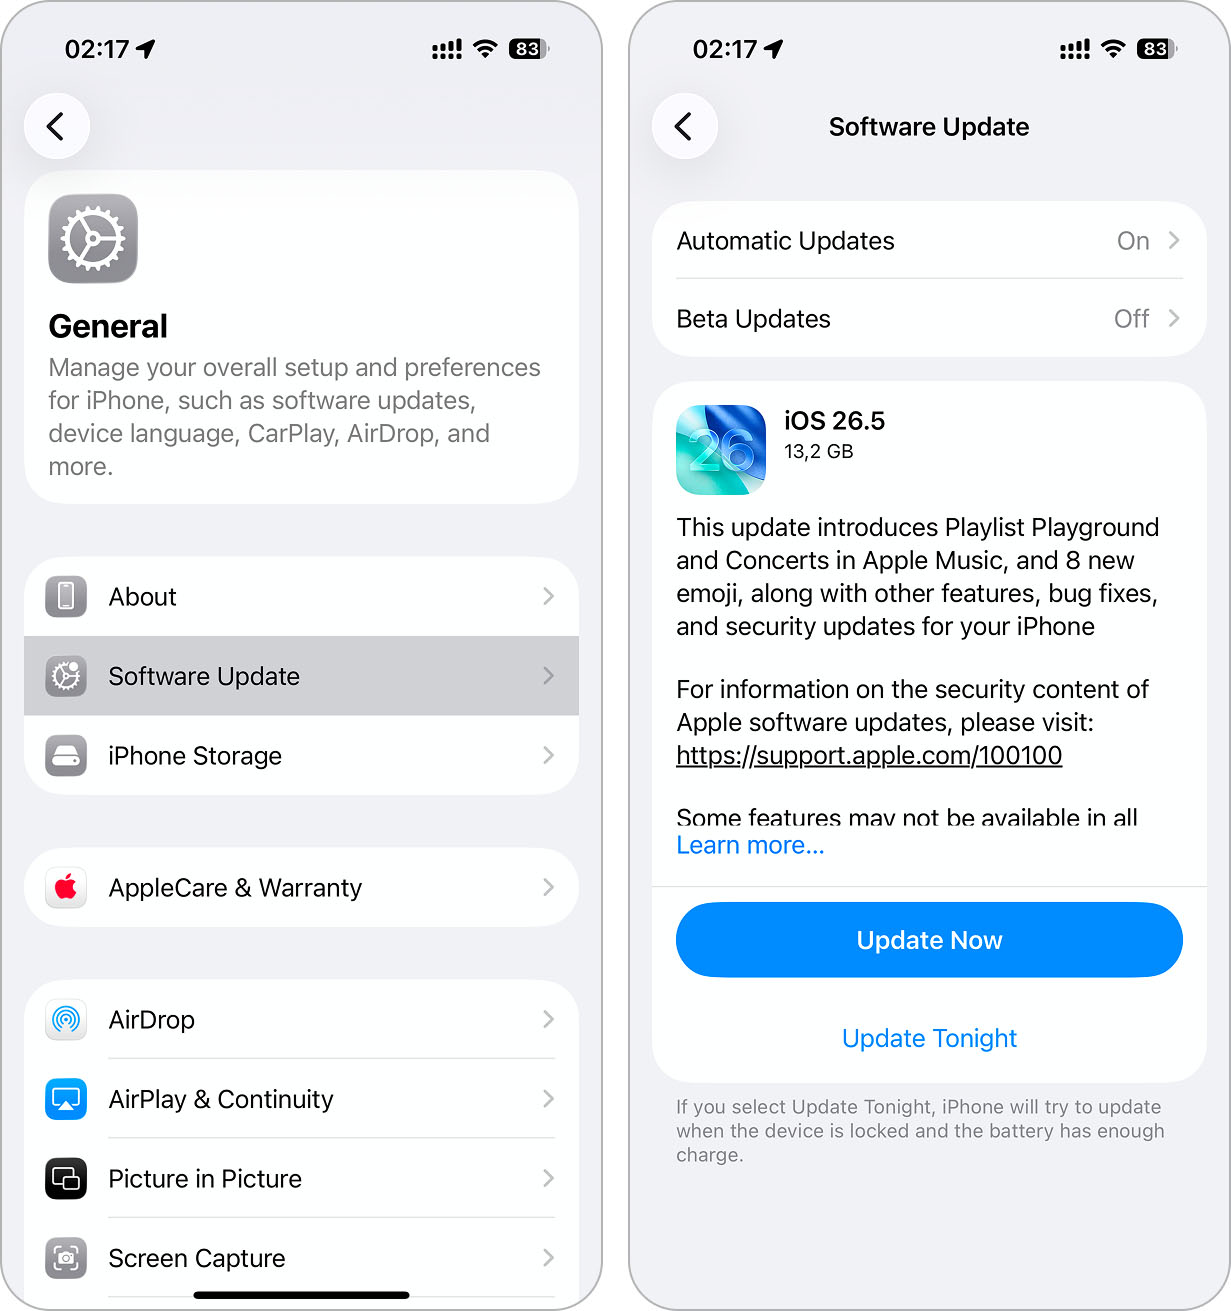
That’s why you shouldn’t rely only on the number you see. Your iPhone needs additional free space on top of that to handle all background processes during the update. So once you see the required size, add a few extra gigabytes as a buffer.
Once you know the size, the next step is to check your available storage:
- Open Settings.
- Tap General.
- Select iPhone Storage and look at the colored storage bar and your available space.
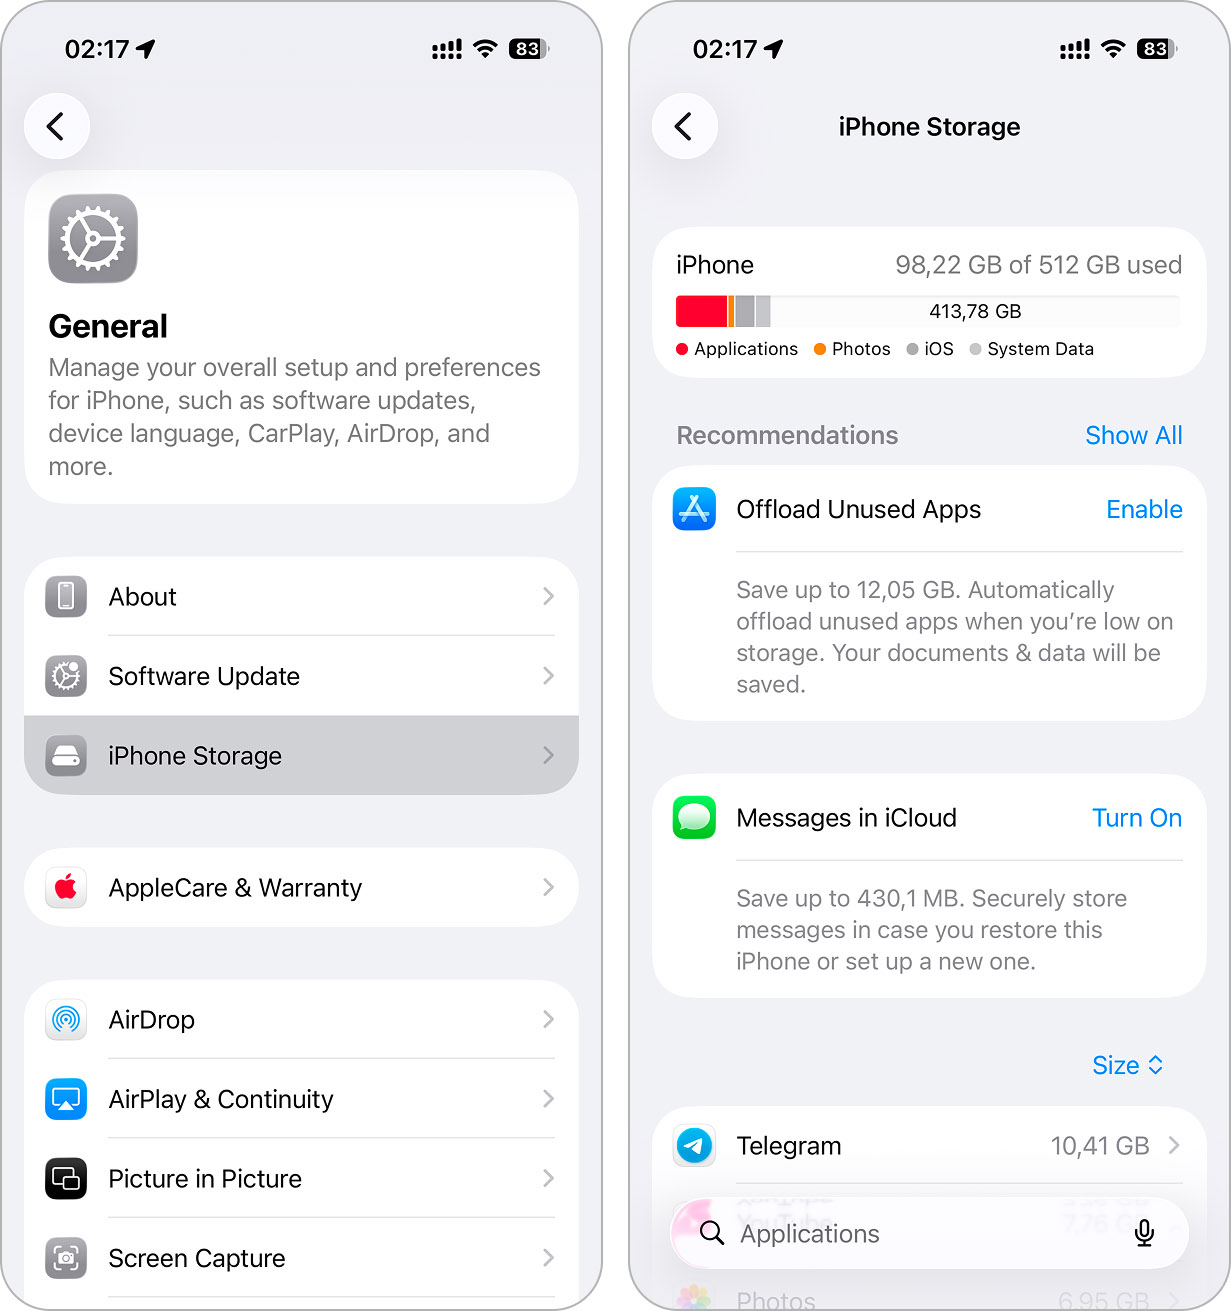
If your available storage is larger than the update size (plus the extra buffer), you’re good to go ahead and install it. If not, you’ll need to take a few extra steps to free up enough space. We’ll walk through those step by step in the next section.
How to Get More Storage to Update iPhone
No idea how to update iPhone with no storage? All of your data seems too important to delete? All you need is to free up a couple of gigabytes that your iPhone requires for the new update by removing unnecessary files. That’s exactly where we’ll start.
1. Clear Storage with Cleaning Apps
When you check your iPhone storage, there’s a good chance that the Photos category is what taking up most of the space. Sure, you can delete unwanted items manually, but that takes a lot of time. There’s a faster solution: cleaning apps. These apps scan your iPhone quickly and spot unnecessary files, usually in under a minute.
Many good cleaning apps exist, and you can find great options in our review of the best iPhone cleaners. Today, though, we’ll use Clever Cleaner: Free iPhone Cleaner as an example. You’ll see it ranked #1 in that review, as it works quickly, effectively, and remains 100% free. Unlike most apps we tested, Clever Cleaner doesn’t require a subscription or any payment. It also never shows ads, and according to the official Clever Cleaner cleanup app’s website, it will stay completely free for all current users. That makes it an easy recommendation. Plus, the app itself takes up only about 113 MB, while it can free up tens of gigabytes on your iPhone.

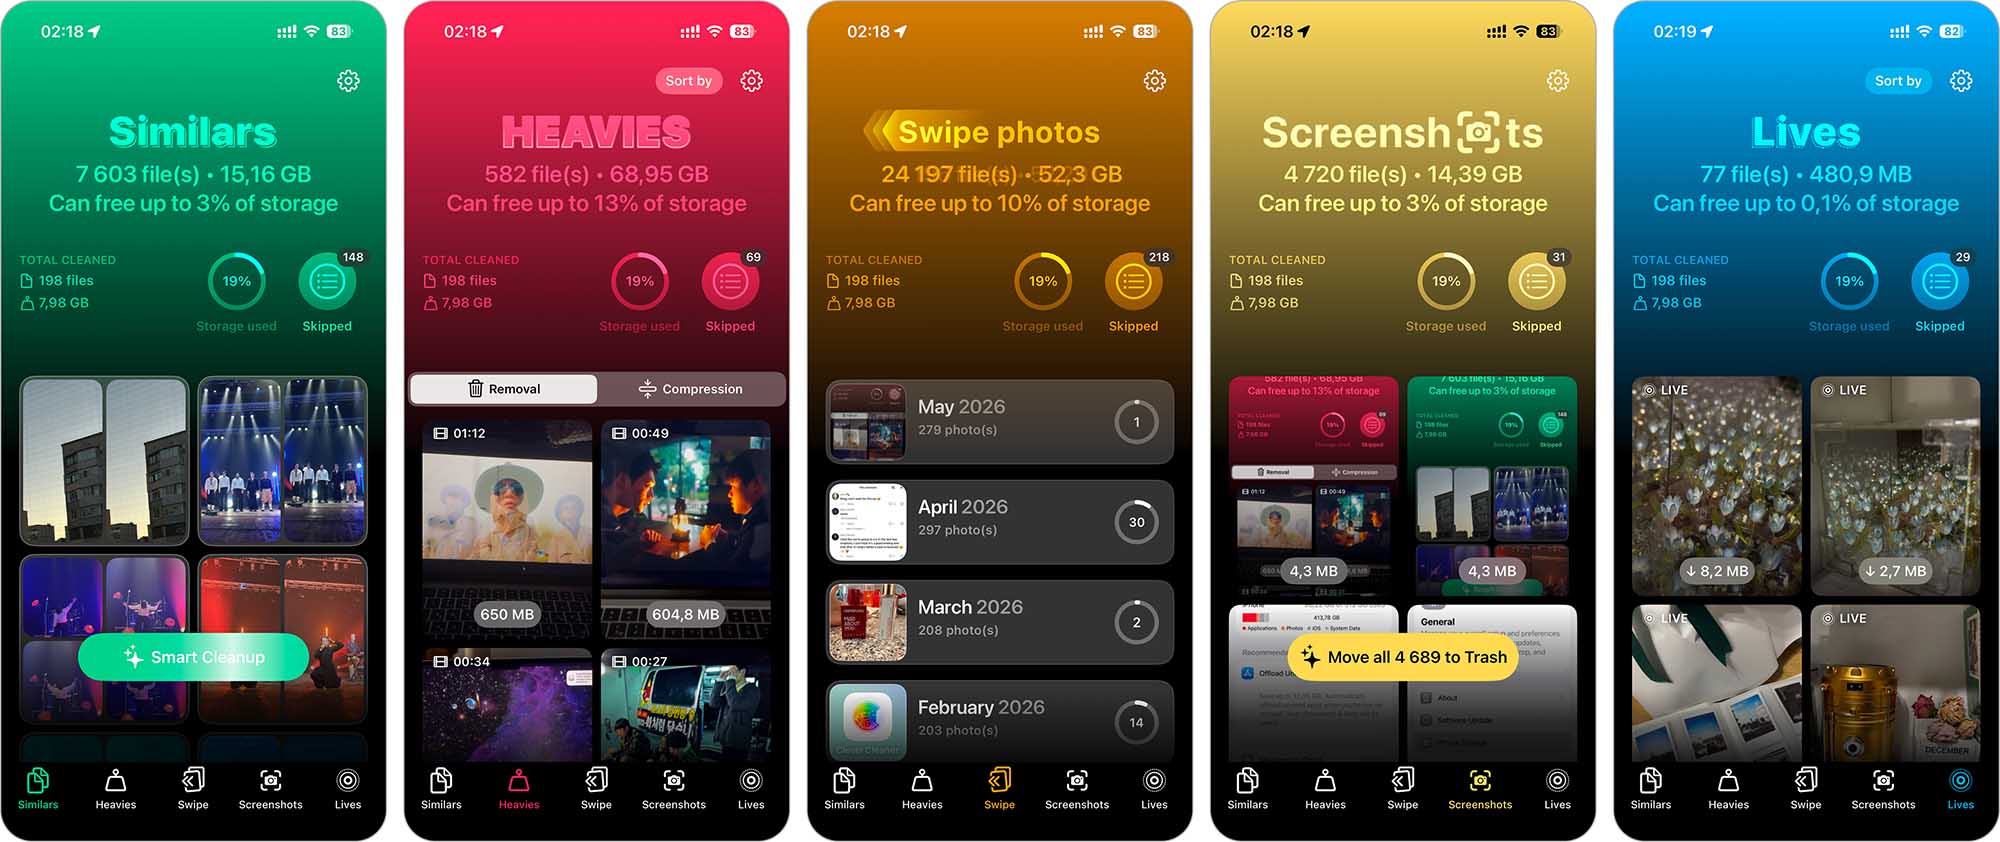
Clever Cleaner has 4 cleaning tools:
- Similars – App’s AI identifies and clears both identical and visually similar images. Although your iPhone has a built-in duplicate detector in the Photos app, it only works for exact matches (not visually similar shots of the same person or object).
- Heavies – Sorts photos and videos in your library from largest to smallest, letting you quickly delete the biggest space-consuming files first (which are usually videos). Inside this feature, there’s also a module that lets you compress videos (useful if you’re not ready to delete them completely).
- Swipe – A feature that shows all photos from your library grouped by the months they were added. From there, everything depends on swipe actions. It’s a good option if you want to get rid of unnecessary photos but don’t want to rely entirely on automation.
- Screenshots – Quickly finds old screenshots and removes them all with a single tap.
- Lives – Converts Live Photos into standard images, removing the short video clips to free up extra space.
All these tools are quite intuitive and, together, can quickly free up several gigabytes, sometimes even dozens, that were taken up by unnecessary files, but are exactly what you need when your iPhone has not enough storage to update. When we first used Clever Cleaner, it surprised us to see just how many unnecessary images and old videos it discovered. Often, deleting just a single large 4K video will free up a couple of gigabytes immediately, maybe enough to complete your update.
Here’s how to quickly clear the largest videos with Clever Cleaner:
- Download Clever Cleaner from the App Store.
- Open the app, grant it full access to your Photos app, and go to Heavies.
- Check the results (the largest videos appear first), clearly labeled with file sizes and durations.
- Tap a video to preview it, swipe left or right to see other videos, or choose Select All to mark everything at once.
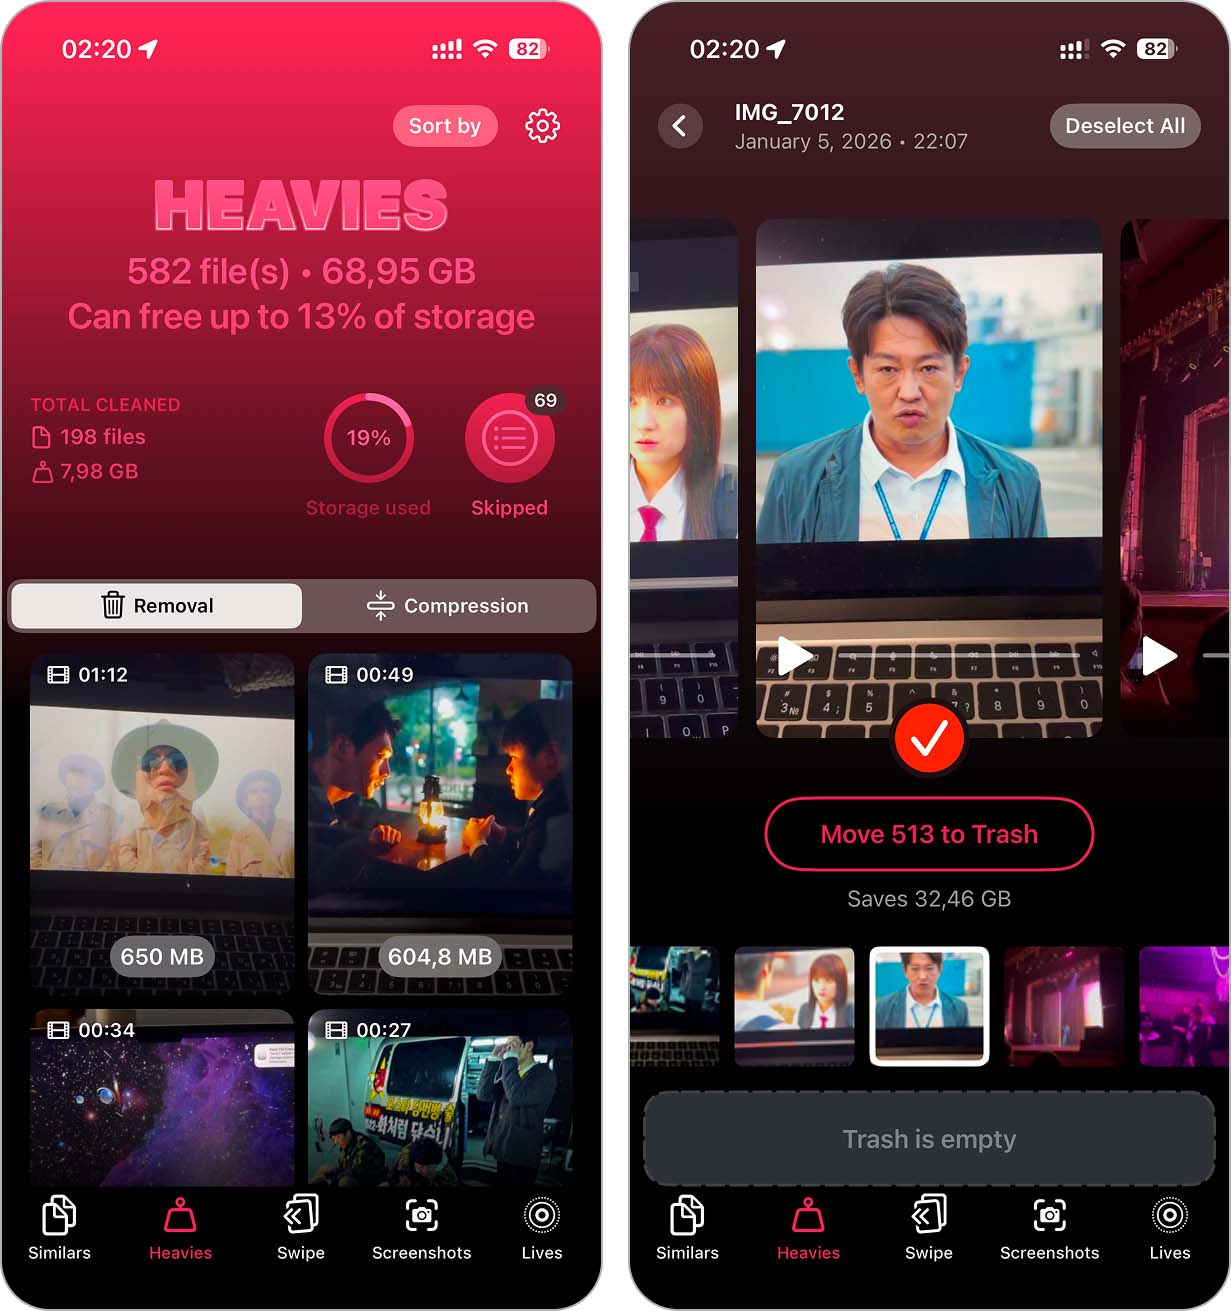
- After selecting videos, tap Move to Trash to delete selected videos.
- Then tap Empty Trash at the bottom, you’ll see the Slide to Delete, use it and confirm deletion.
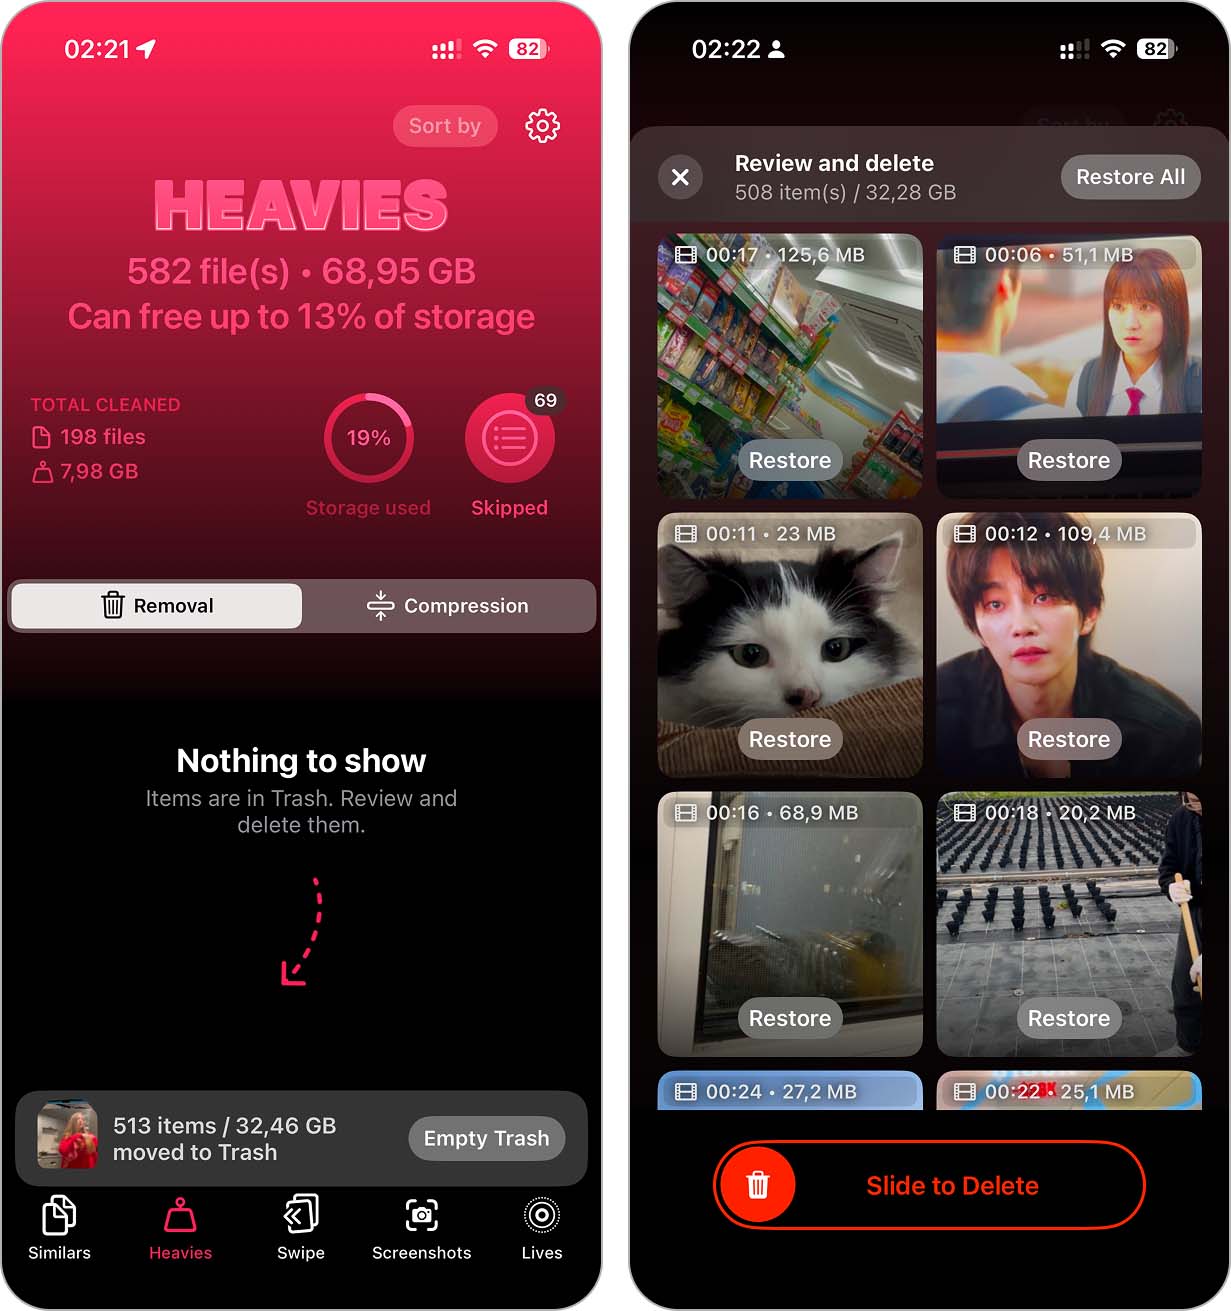
- Finally, the app will remind you to open your Photos app and go to Recently Deleted. You need to delete these videos permanently from this folder. Only then will the storage fully clear.
Once you’ve cleared the biggest videos, feel free to try other tools of Clever Cleaner. Interested in details? Read our analysis here.
After, go ahead and attempt your iPhone update again. Usually, this method gives you enough breathing room on your iPhone, and the “not enough storage to update” message should disappear.
2. Delete or Offload Unused Apps
With applications, unlike with photos, third-party cleaning apps won’t help. Apple doesn’t allow apps to access or remove other apps’ data (if you’ve seen ads claiming otherwise, it’s marketing fluff – iOS blocks that completely). To free storage from apps, you’ll need to handle this manually. Luckily, it’s straightforward.
Here’s how to delete or offload apps that you don’t use often:
- Go to Settings > General > iPhone Storage.
- Scroll through the list of apps and tap on any app you no longer use.
- Tap Delete App and confirm.
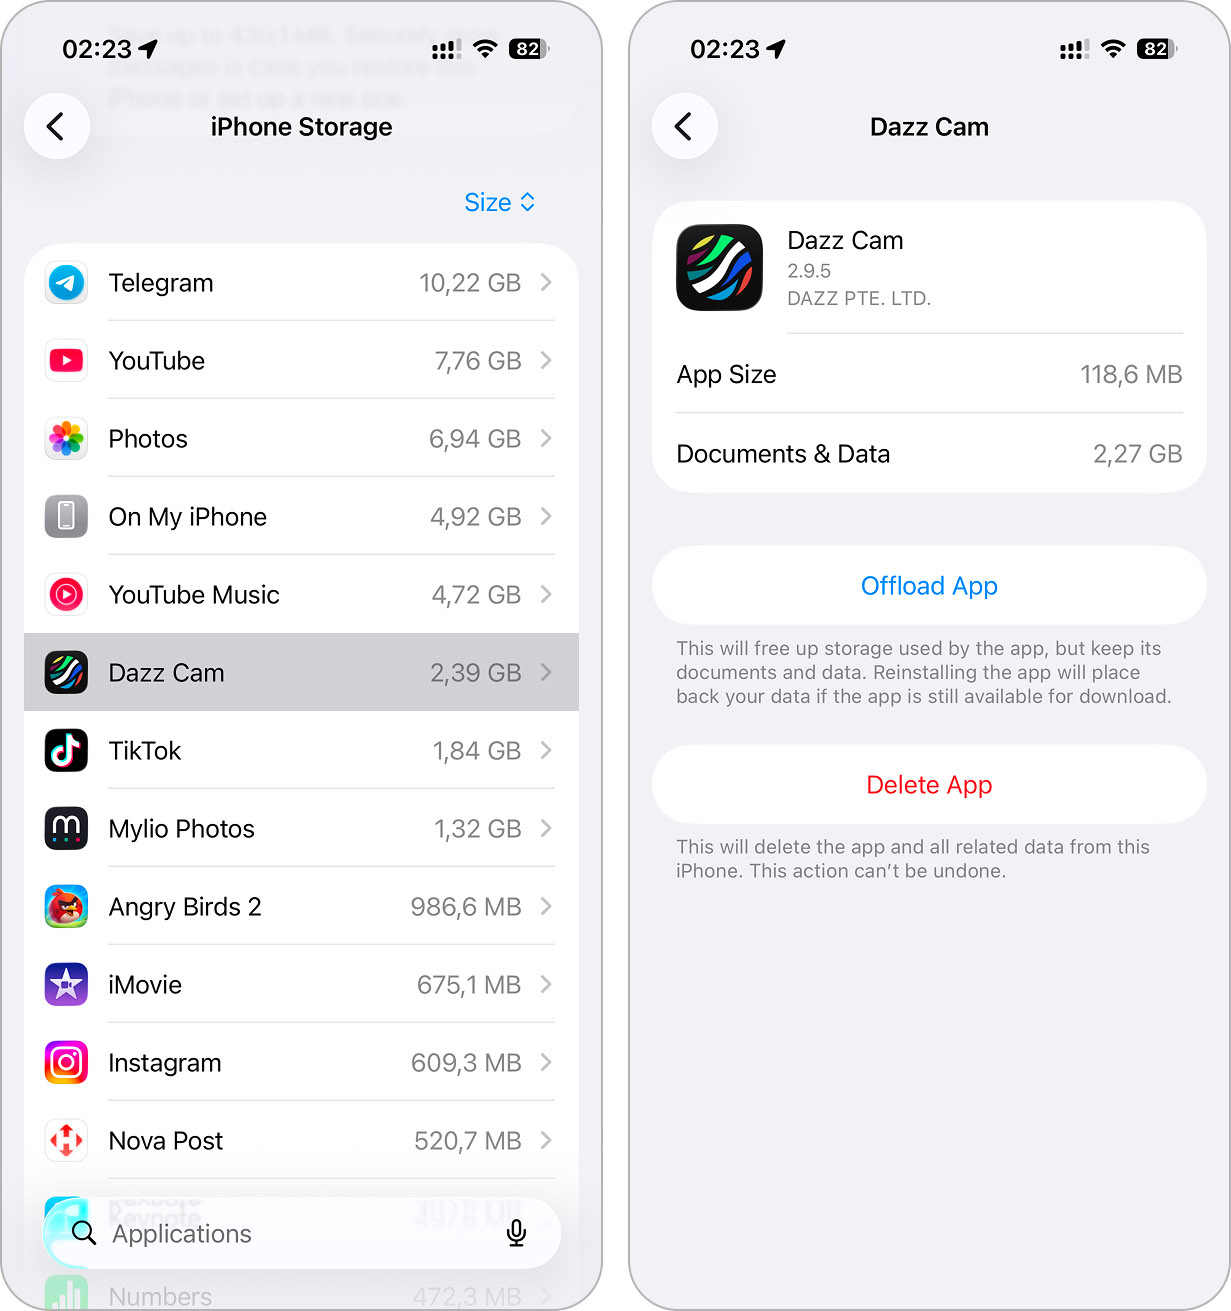
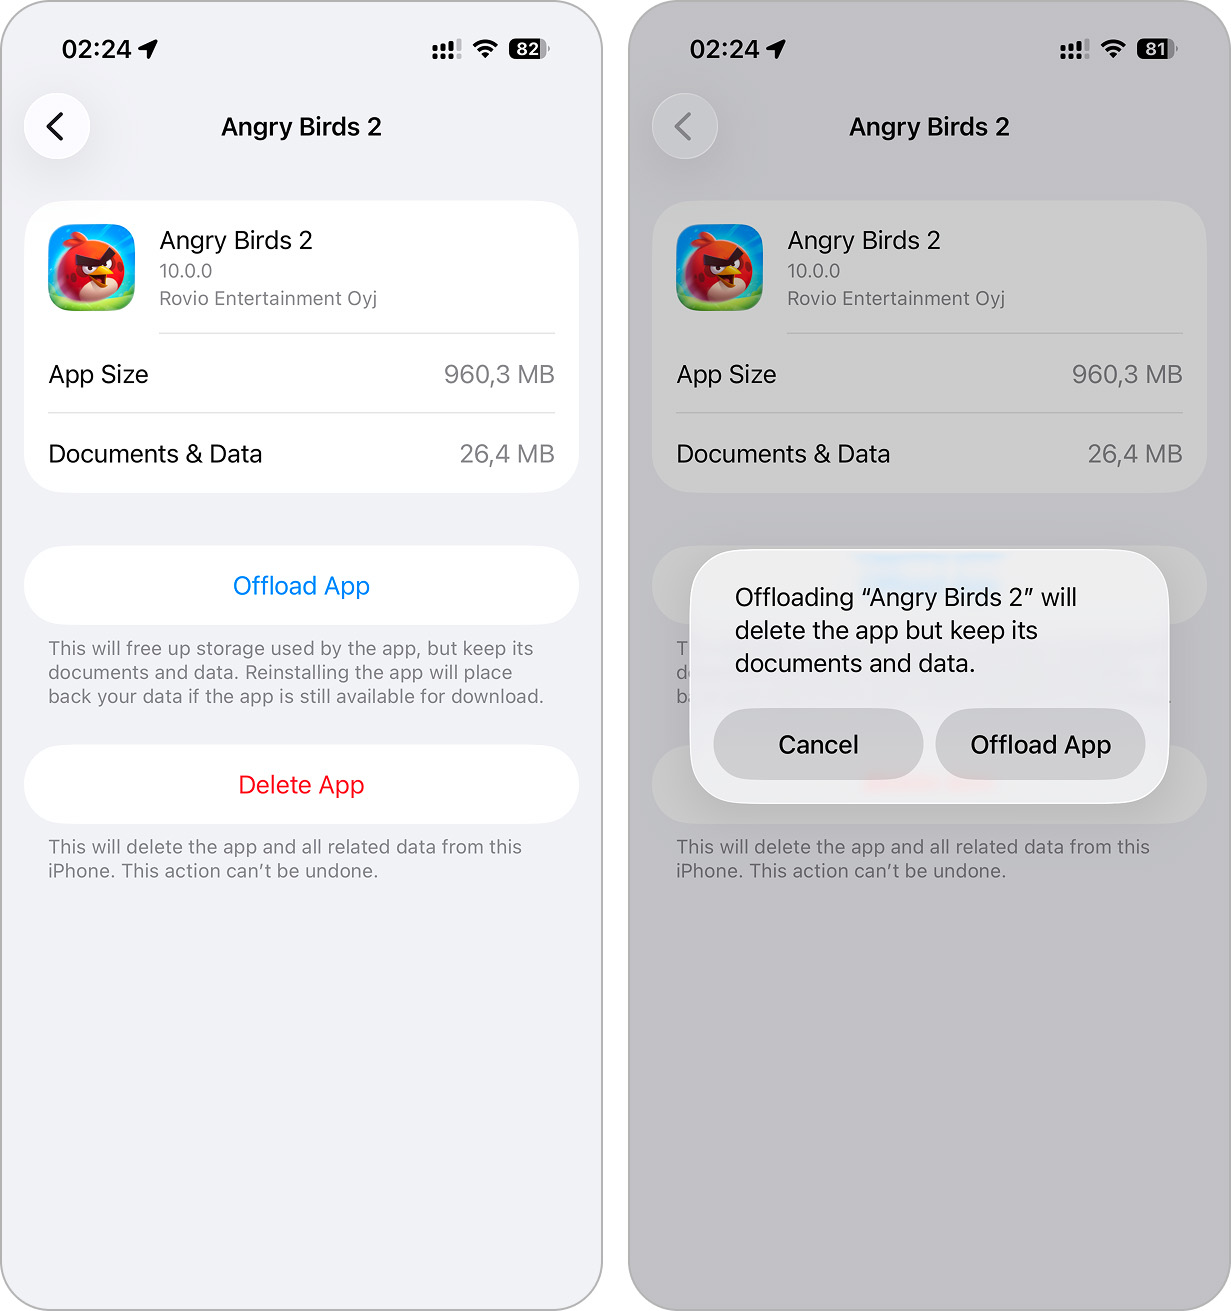
If you want to remove the application but still be able to keep the user data, you can unload the apps:
- Go to Settings > General > iPhone Storage.
- Scroll through the list of apps and tap on any app you no longer use.
- Tap Offload App. This will remove the app but keep its data.
3. Clear App Cache
Many apps, such as Telegram, store cache data to improve performance. Clearing this cache can provide more free space without affecting application data.
Here’s how to do it:
- Open the Telegram app.
- Go to Settings > Data and Storage.
- Tap Storage Usage.
- Select Clear Cache and confirm.
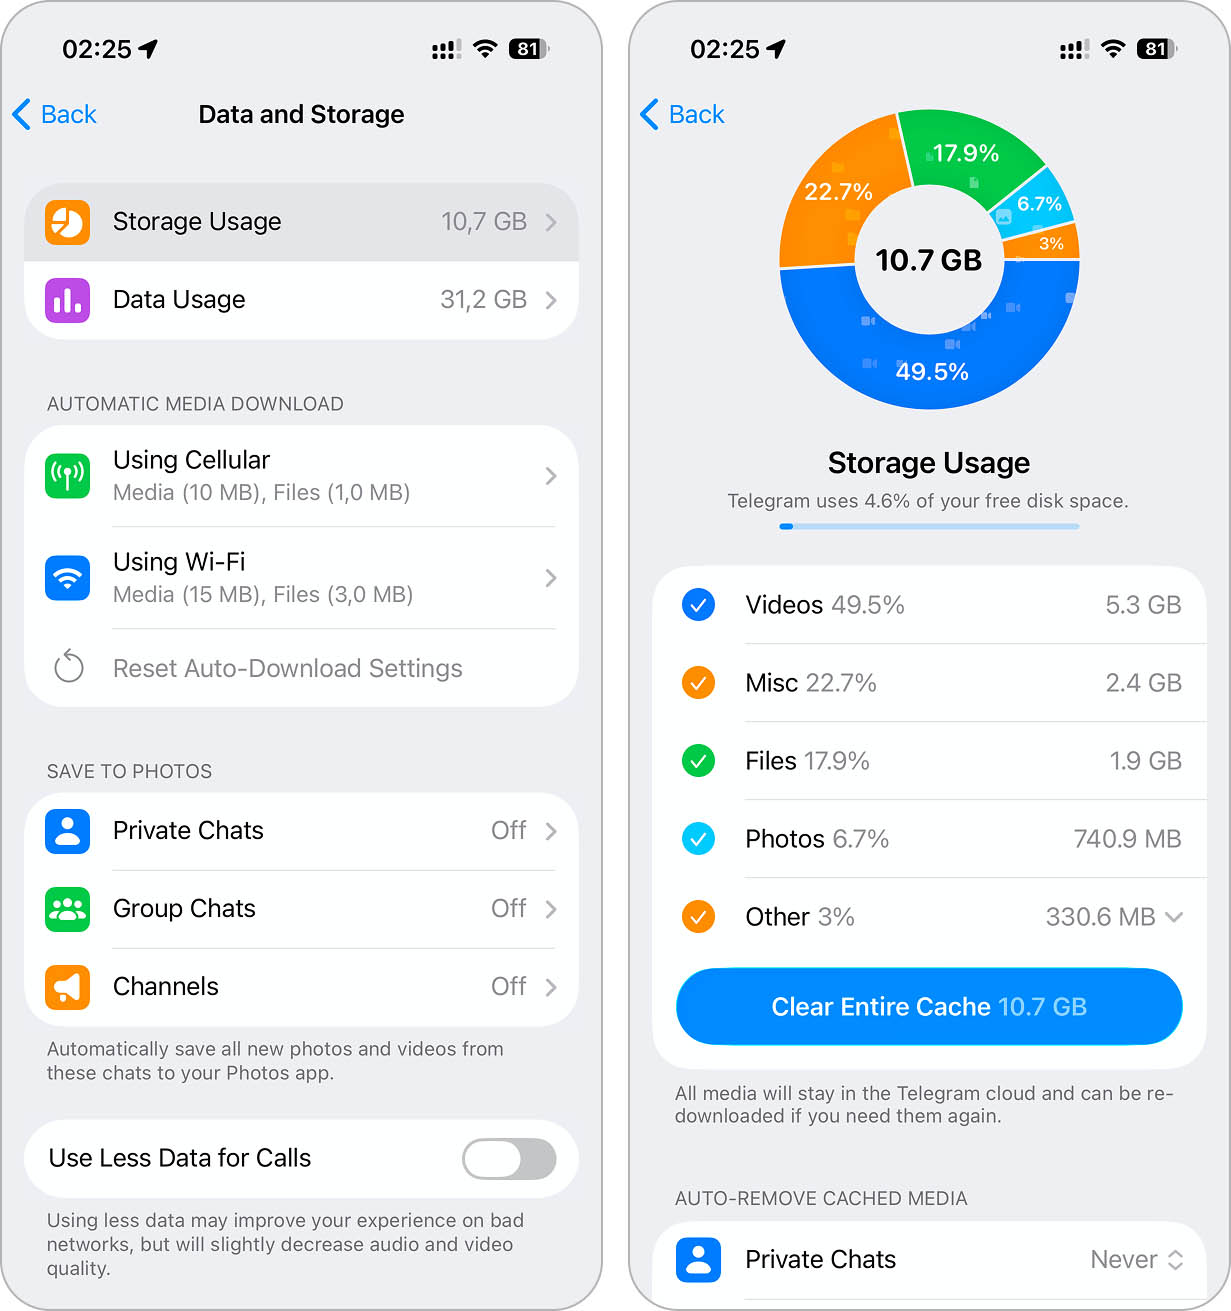
In most applications, you can also set automatic cache deletion or specify the maximum amount of cache the app can use. Check the app’s settings for these options.
4. Remove Unwanted Items from Files App
The Files app is easy to overlook, but it often hides large downloads, old documents, and leftover files that take up space. Unlike Photos and Apps, which have dedicated storage sections, Files doesn’t always make it obvious what’s hogging space (and the iPhone cleaner app we mentioned earlier won’t scan it either), so clearing it out can free up a surprising amount of storage.
Pay special attention to the Downloads folder in On My iPhone. This is where all the files you save from the web end up – PDF documents, archives, and so on. None of it gets cleaned up automatically, so you might have years’ worth of unnecessary large files piling up. It’s one of the easiest ways to free up storage fast.
How to find and delete unwanted large files:
- Open the Files app.
- Tap Browse at the bottom and select On My iPhone.
- Tap the three-dot icon, then sort by Size to see the largest files first.
- Delete anything you don’t need.
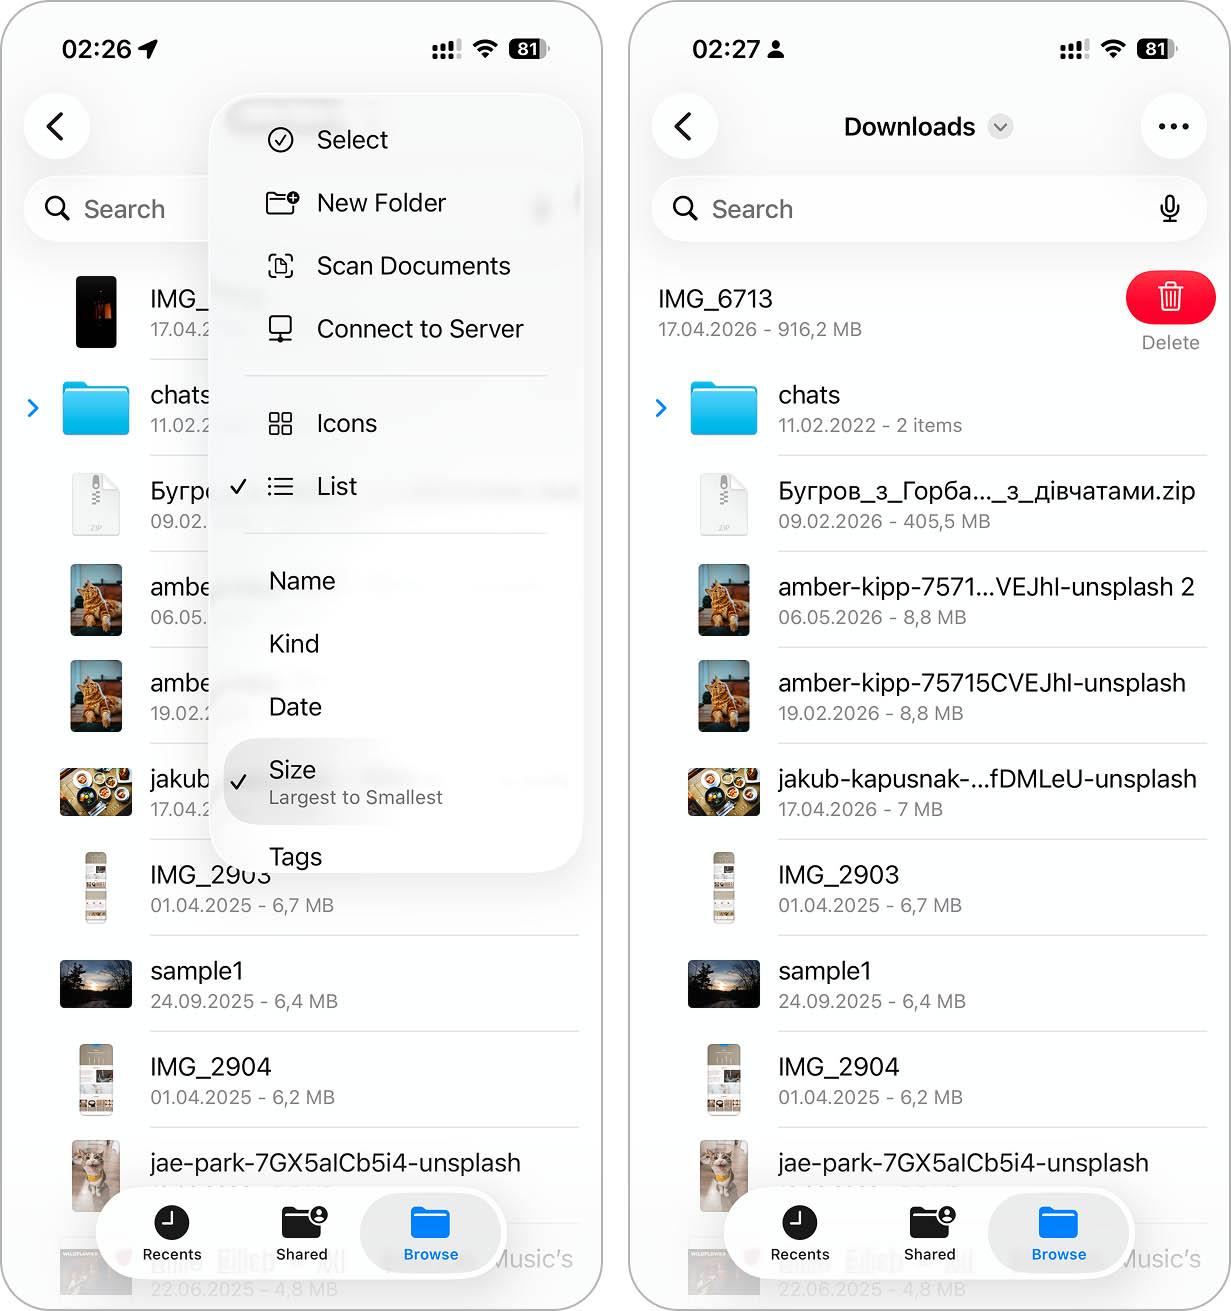
- Don’t forget to empty the Recently Deleted folder (tap Browse > Recently Deleted > Select > Delete All).
5. Manage Message Attachments
Besides obvious storage-heavy files like photos, videos, downloads, and apps, a surprisingly large portion of space can be taken up by attachments in the regular Messages app. Even if you don’t save them manually, they still occupy local storage just by sitting in your conversations, often without any real need to keep them long-term after you’ve viewed them once.
That’s why it’s a good idea to clear them out. There are a few ways to do this, but the most convenient one is the following.
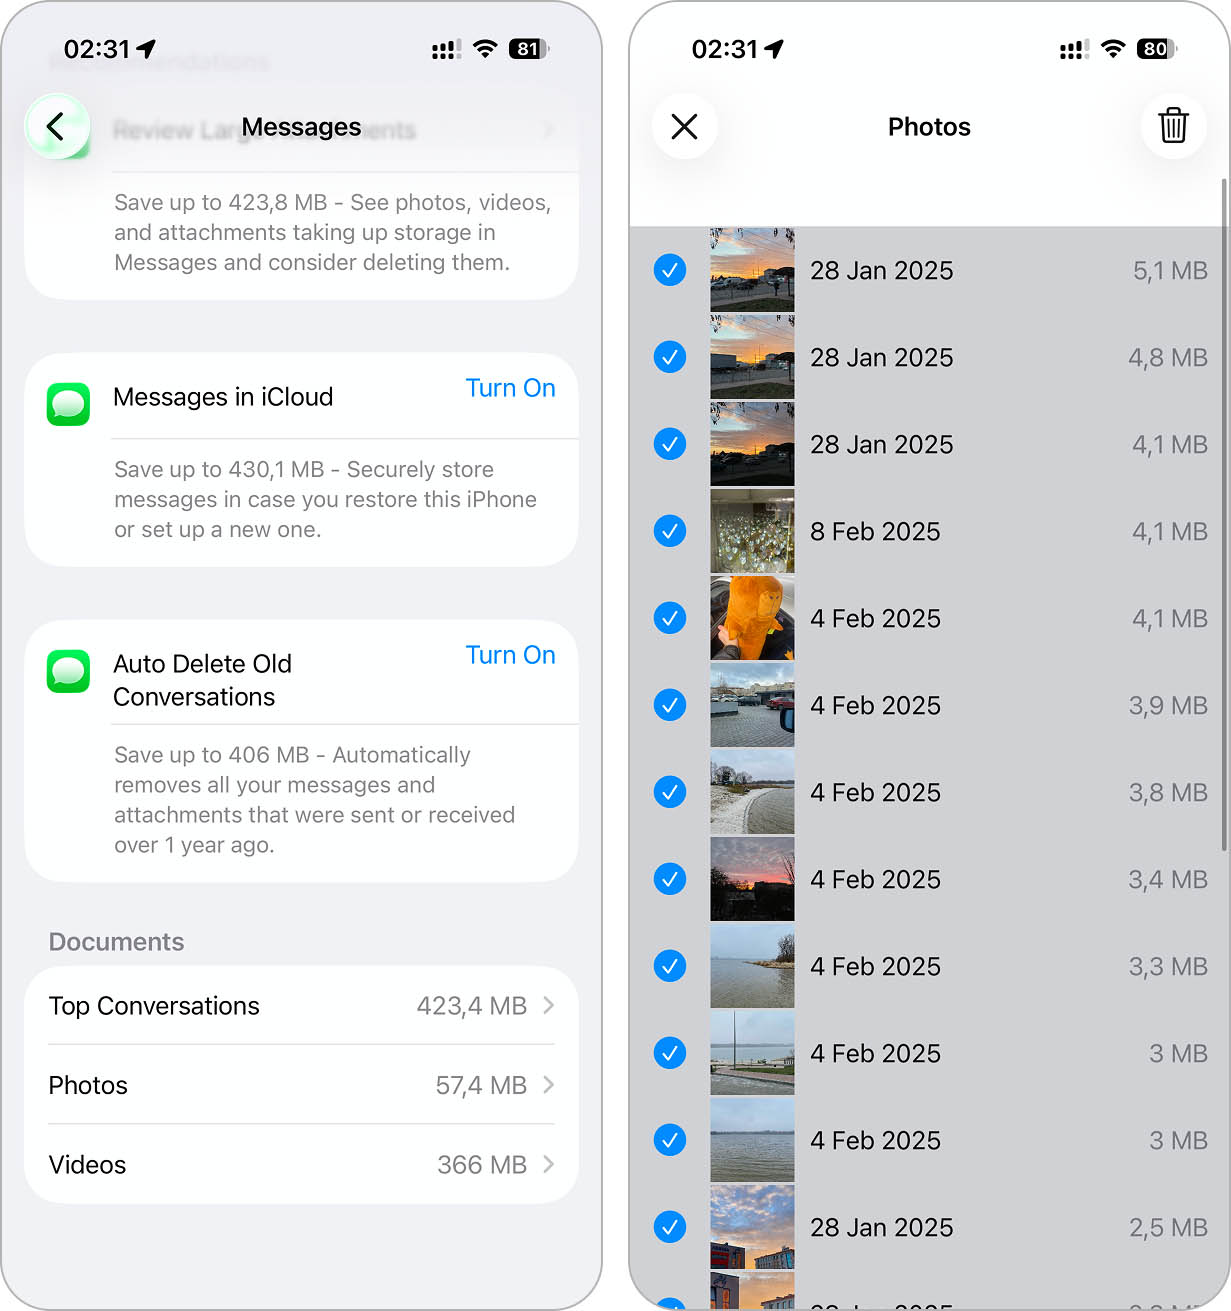
To review and remove message attachments through Settings:
- Go to Settings > General > iPhone Storage.
- Select Messages and scroll to the Documents section.
- You may see attachment categories such as Top Conversations, Photos, Videos, GIFs and Stickers, or Other. Open the category that takes up the most space.
- Delete the attachments you no longer need.
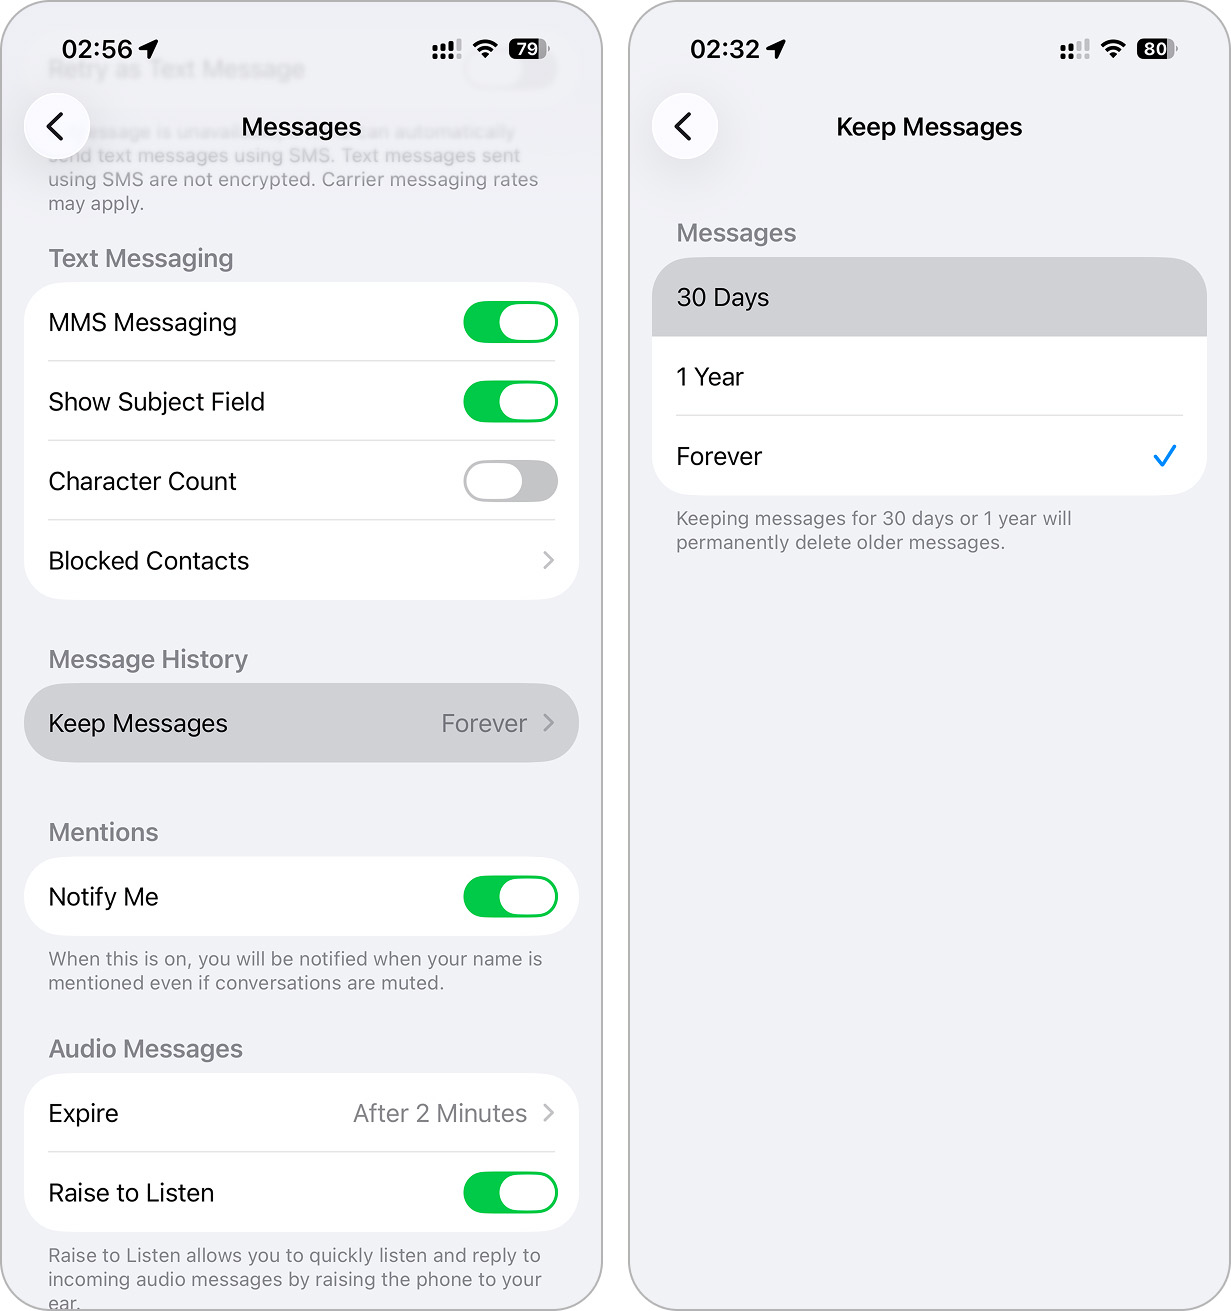
To do this:
- Open Settings, go to the Apps section, and tap Messages.
- Scroll down to Message History and select Keep Messages.
- Choose either 30 Days or 1 Year instead of Forever.
What to Do If iPhone Says Not Enough Storage for Update but There Is
If you’ve followed the steps above but still can’t update your iPhone due to storage, the issue may not be the actual free space. In some cases, it comes down to how the system behaves – bugs, glitches, or temporary freezes can cause your iPhone to misread available storage. As a result, no matter how much space you clear, it may still show it as insufficient and block the update. In this case, there’s a set of methods you can use to work around the problem.
1. Clear Temporary Files
The first thing worth trying here is simply restarting your iPhone. This clears active background processes, removes temporary files, and gives the system a fresh start by reindexing existing data, which can also affect how storage is calculated.
If you haven’t tried restarting your iPhone yet, follow these steps:
- Press and hold the Side button (or Volume Up + Side button on newer models) until the slide to power off option appears.
- Swipe the slider to turn off your iPhone.
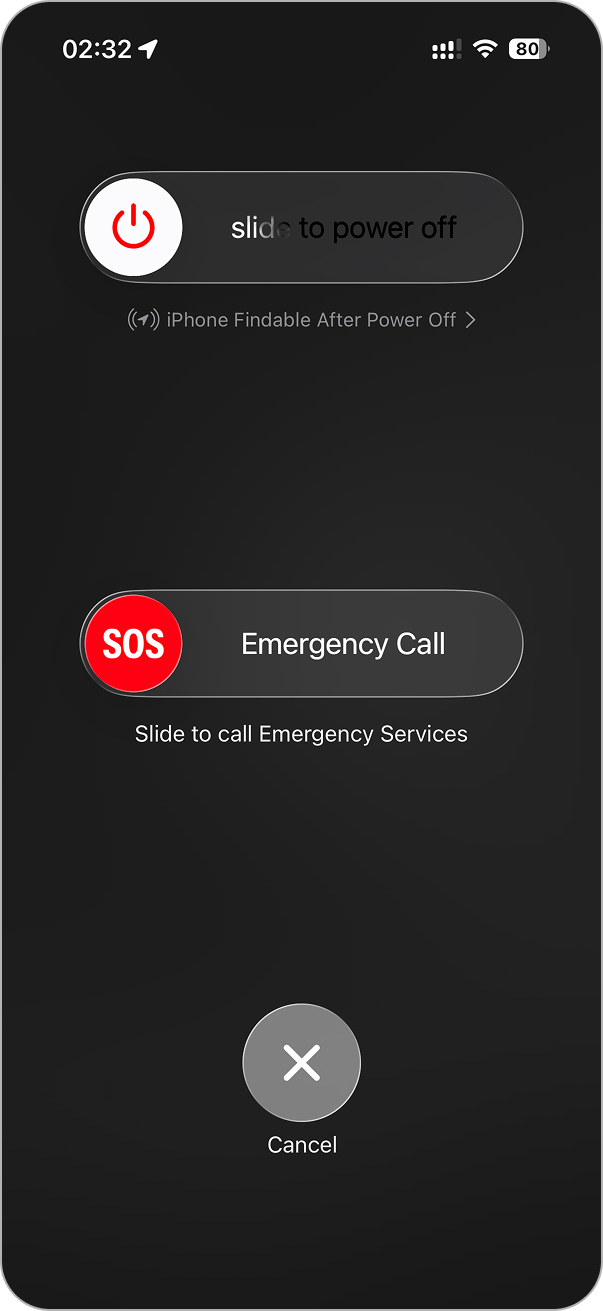
- Wait about 30 seconds, then press and hold the Side button again until the Apple logo appears.
2. Use Your Computer to Update iPhone
If you’re still seeing “not enough storage to update” even after clearing space or you can’t find anything else to delete, you can update your iPhone through a computer instead. This method bypasses storage limitations entirely; it downloads and installs the update using a Mac or PC instead of your iPhone’s internal storage.
To update your iPhone via a computer and bypass storage limits:
- Connect your iPhone to a Mac (using Finder) or PC (using iTunes) with a Lightning or USB-C cable.
- On Mac (macOS Catalina or later): Open Finder and select your iPhone under Locations.
On Windows (or older macOS versions): Open iTunes and click the device icon at the top. - Click Check for Update. If an update is available, click Download and Update.
- Follow the on-screen instructions and wait for the update to complete.
This method works even when your iPhone doesn’t have enough free space because the computer handles most of the update process.
3. Factory Reset Your iPhone
If you’ve tried everything and your iPhone still refuses to update due to storage issues, a factory reset might be the only option left. This wipes everything from your device, including apps, photos, and settings, leaving it like new. While it’s the most drastic solution, it guarantees you’ll have enough space for the update.
According to Apple’s official site:
“A factory restore erases the information and settings on your iPhone, iPad, or iPod and installs the latest version of iOS, iPadOS, or iPod software.”
This means after a reset, your iPhone won’t just have enough storage, it will also automatically install the latest iOS version.
To perform a factory reset and update your iPhone:
- Open Settings and go to General.
- Scroll down and tap Transfer or Reset iPhone.
- Select Erase All Content and Settings.
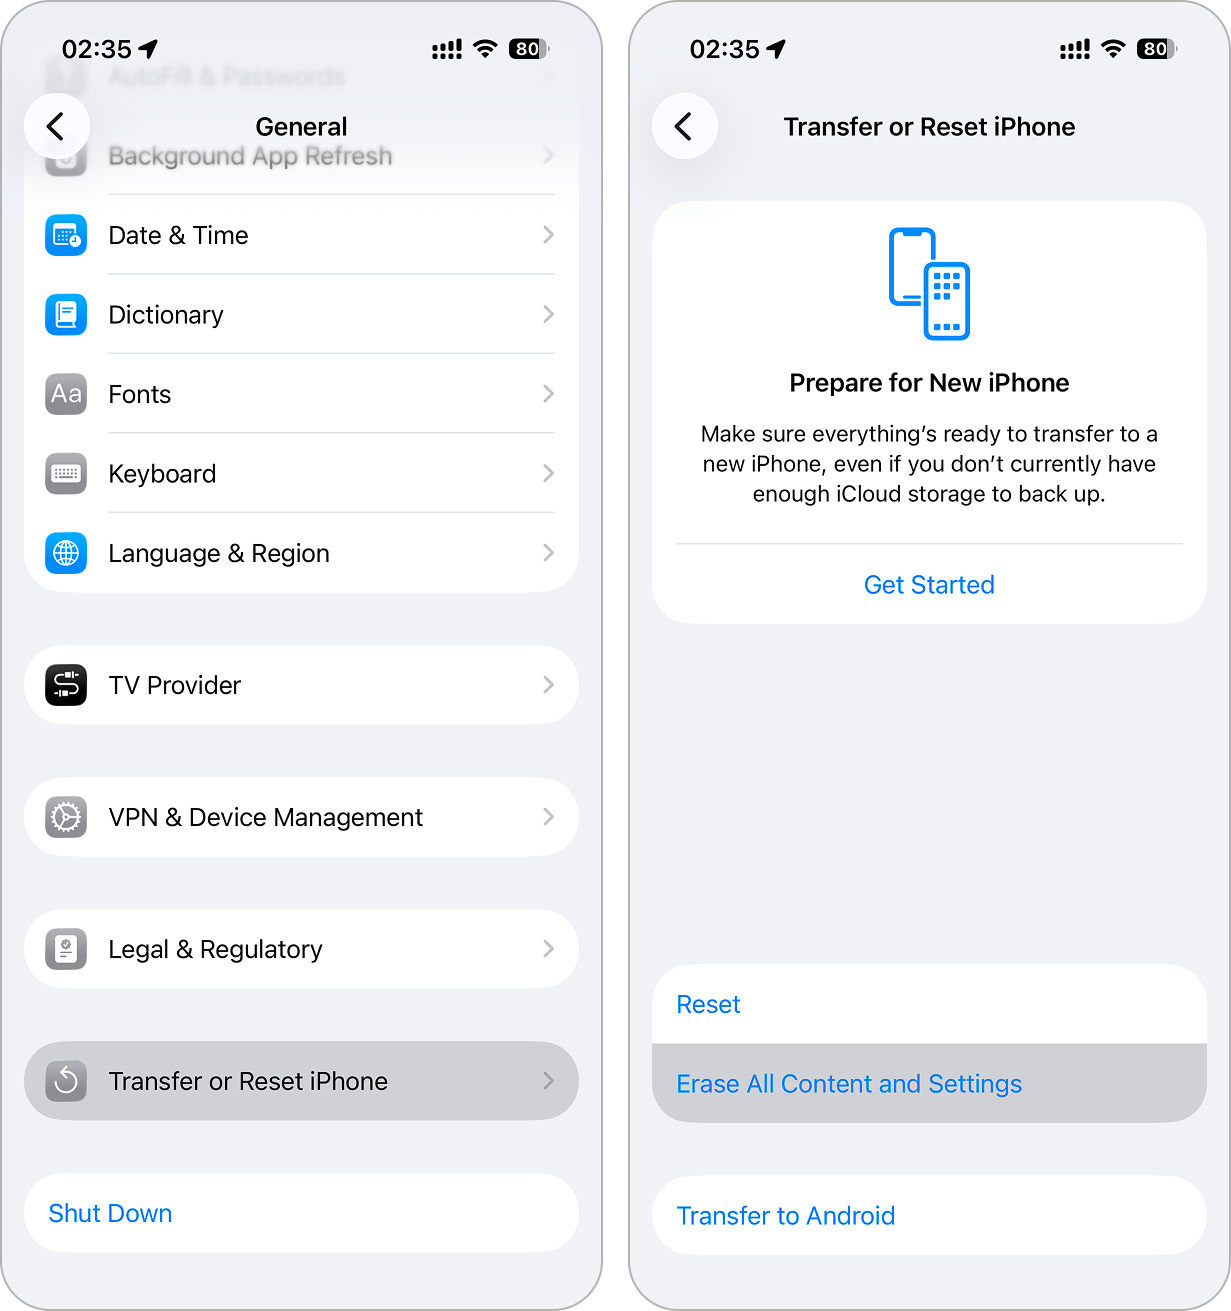
- If prompted, enter your passcode and Apple ID password.
- Confirm the reset and wait for your iPhone to erase everything.
After the reset, your iPhone will restart as if it were brand new. When prompted, you can set it up as a new device or restore your backup from iCloud or a computer.
How to Always Have Enough Storage for iPhone Updates
Updating your iPhone isn’t a one-time thing. Apple releases iOS updates regularly, sometimes every few weeks. Some of them polish the current build, others bring important security patches, and skipping them isn’t a good idea. That’s why it makes sense to keep an eye on your storage from time to time.
If you’re worried about missing the moment when your storage runs out, there are a few things you can set up so your iPhone always has enough space for future updates.
1. Enable iCloud Photos
Using iCloud is one of the simplest ways to make sure your iPhone always has enough free space for updates. If you already use iCloud and stay connected to Wi-Fi or cellular data most of the time, it can handle a lot of storage management for you in the background.
Instead of just syncing your photos, you should enable Optimize iPhone Storage. This feature keeps smaller, space-saving versions of your photos and videos on your device, while the original full-resolution files stay in iCloud. You still see your entire library, but it takes up much less space locally.
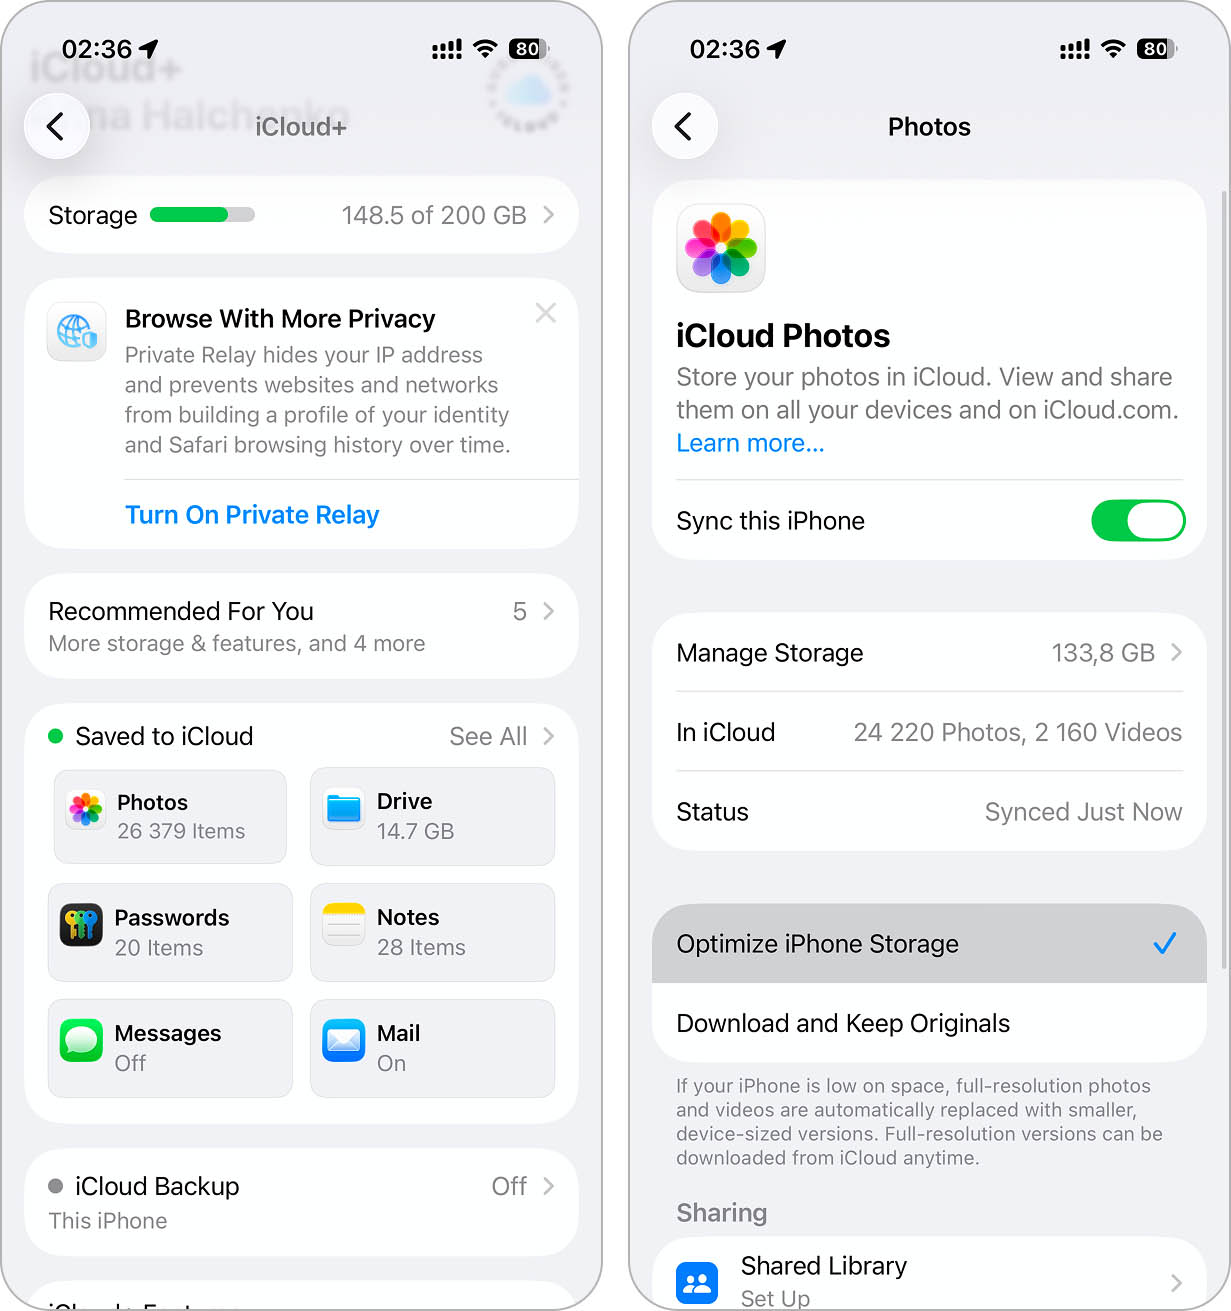
Here’s how to enable Optimize iPhone Storage for photos:
- Go to Settings > Your Name > iCloud.
- Tap Photos.
- Turn on Sync this iPhone. This will upload your entire photo library to iCloud.
- Select Optimize iPhone Storage.
2. Offload App Data to iCloud
Some apps can store their data in iCloud, freeing up local storage without losing any information. This feature backs up app data and allows you to access it from any device where you’re signed in to your iCloud account.
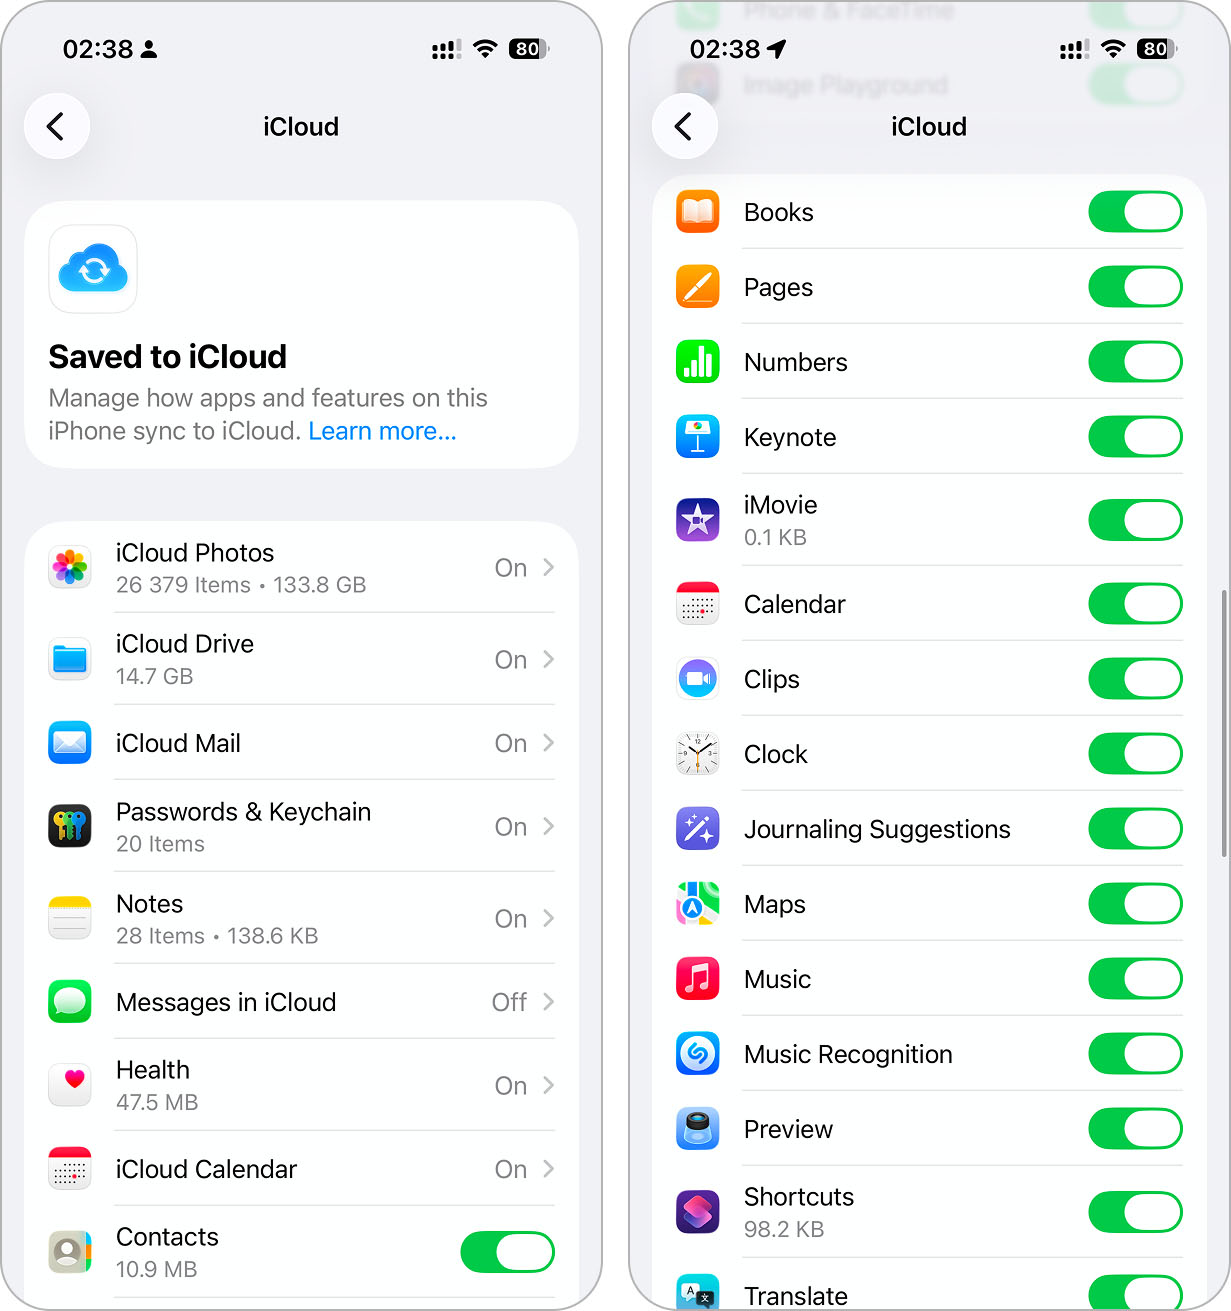
To move app data to iCloud and free up local storage:
- Go to Settings > Your Name > iCloud > See All.
- Scroll down to see a list of apps using iCloud.
- Toggle on the apps you want to store data in iCloud. This will move the app data to iCloud and remove it from your iPhone’s local storage.
With iCloud storage, you can manage your iPhone’s local storage while keeping important data accessible and secure. Just be aware that it comes with some trade-offs, such as the need of regular Wi-Fi or cellular access and occasionally slower loading times for photos stored in iCloud. For more details about managing and optimizing your storage through iCloud, visit Apple’s iCloud guide.
Closing Remarks
Hopefully, one (or more) of the methods above have freed up space for your update, and you’ve successfully installed it. Now that your iPhone is up to date, it’s a good time to think about how to avoid running into the “not enough storage to update” message next time. Apple rolls out new iOS updates regularly, and if your storage is always full, you’ll keep facing the same issue.
To make sure you’re always ready for the next update, it’s a good idea to stay ahead of storage problems. We have plenty of other guides to help you keep your iPhone clean and free up space before it becomes a problem. Whether you’re looking for how to update iPhone without storage issues or just want to keep your device running smoothly, check these out:
- If your iPhone storage keeps filling up on its own, this guide breaks down what’s really taking up space and how to stop it.
- If you want more storage without relying on iCloud, this article covers best options.
- If System Data is eating up too much storage, this fix shows how to clear it out.
- If ‘Media’ is what’s eating away your free space in iPhone Storage, you might be surprised to learn that it’s not the photos and videos you took with your camera. To find out what “Media” really is and how to clear it, check out this text.
FAQ
- iOS needs more space than just the update file – A 3GB update might require 6GB or more to install because iPhones need temporary working space.
- System Data & caches take up hidden storage – Applications, Safari, and iOS itself store temporary files that don’t always appear in iPhone Storage but still take up space.
- Old iOS update files might be blocking space – Failed or incomplete update downloads remain in storage until manually removed.
- iCloud doesn’t expand local storage – Even if you use iCloud for photos and backups, updates require physical space on your iPhone’s internal storage.