How to Delete Duplicate Photos on iPhone
Noticed many duplicate photos in your library? Want to quickly get rid of them? That’s exactly what you’ll find here. We will demonstrate three ways to delete duplicate photos on an iPhone using the latest iOS 18. If you’re still on iOS 17 or even iOS 16, that’s OK—these methods will work too. Let’s get to it.
How to Find Duplicate Photos on iPhone
Apple introduced the built-in Duplicates feature in iOS 16, which made it easier to identify and remove identical photos. It automatically scans the library and groups exact matches (yes, only exact—we’ll get to this later). This feature remains in iOS 18, and you can find it in the Photos app under Utilities.
How to find duplicates in iPhone Photos:
- Open the Photos app.
- Tap Albums at the bottom of the screen.
- Scroll down to Utilities and select Duplicates.

This feature is straightforward, but it does have limitations. The biggest one, as we’ve already mentioned, is that it only detects exact duplicates, not similar photos. If an image has even a small difference, like a crop, filter, or different angle, iOS won’t flag it as a duplicate.
How does iOS identify duplicates?
- Metadata matching – iOS compares file details like creation date, resolution, and format to detect identical files.
- Visual analysis – It scans pixel data to check if two images are truly the same.
- File integrity – If an image was slightly edited or compressed, iOS may not recognize it as a duplicate.
Another possible roadblock? You may not see the Duplicates album at all, even if you know for sure you have exact copies. A Reddit user recently complained about this exact issue—duplicates everywhere, but no Duplicates album in Photos. Why does this happen?
Well, iOS doesn’t detect duplicates instantly. Apple has not provided an official statement on exactly how or when the Duplicates feature scans for duplicate photos. But from what we’ve seen, it often happens when the iPhone is plugged in or the screen is off. It also runs other indexing tasks during this time, and we’re pretty sure duplicate detection isn’t high on the list. If the system is busy with other background tasks, it may take longer for the Duplicates album to appear.
How to Remove Duplicate Photos on iPhone
But let’s get to business. We will now cover three options to clear duplicate photos on an iPhone. We’ll start with the best one, in our opinion, and move from there. At the beginning of each option, we’ll note what it does and when it works best, so you can pick the method that fits your needs.
Method 1: Use a Free App to Delete Duplicate Photos on iPhone
All the limitations of the Duplicates feature we touched on before have contributed to the popularity of third-party duplicate cleaner apps. These apps, many of which now use AI, can effectively find and clean not only exact duplicates but also visually similar images. They also automate the process to basically one tap.
If you don’t want to scour the App Store looking for a good app, you can check our list of best AI-powered cleaners that help with this issue. Or, you can just try the number one app from that ranking—Clever Cleaner: Free Duplicate Cleaner App.

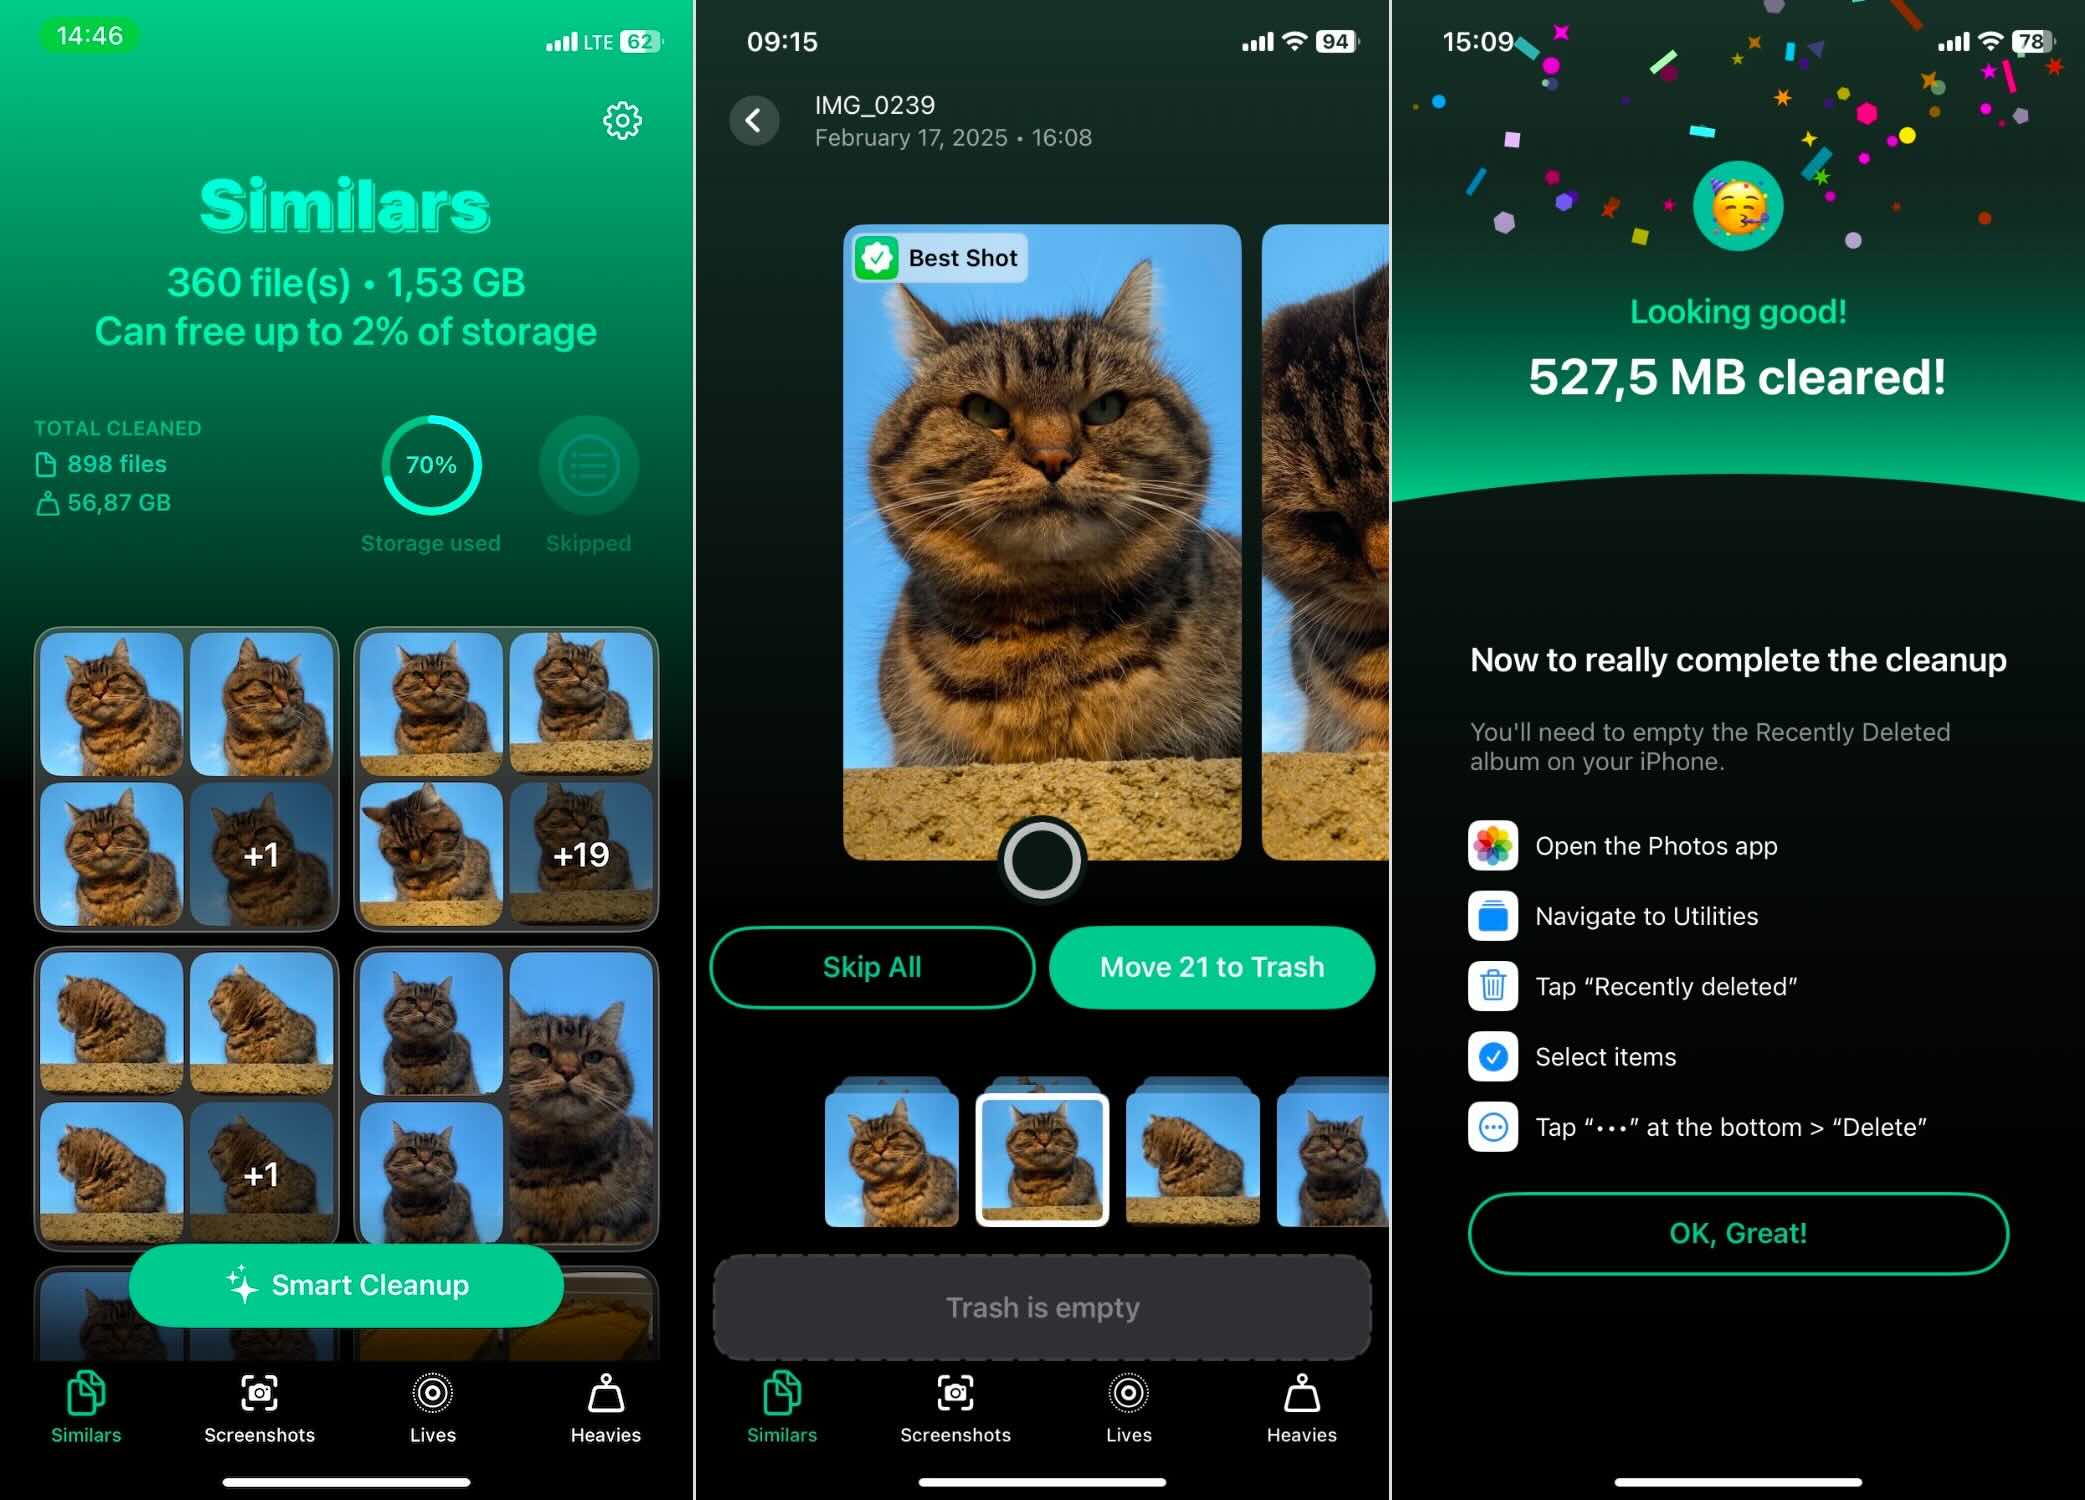
Despite being 100% free, AI-powered scan of Clever Cleaner competes with paid apps. It detects duplicates and near-duplicates, groups them smartly, and makes deletion super quick. Here’s how you can remove duplicate pictures from your iPhone using this app:
- Search for “Clever Cleaner” in the App Store or download it using this link.
- Open the app and grant permission to access your photo library.
- Tap on Smart Cleanup to let the app automatically clear your library for exact duplicates and visually similar photos.
- If you want to get more involved, you can tap on the group for a review. The app pre-selects the best-quality version as “Best Shot”, but you can adjust the selection if needed.
- Tap Move to Trash to delete the selected photos. The app will instantly move to the next batch for review.
- When you’re done, tap Empty Trash, and use Slide to Delete to remove all duplicates and similar photos in one action.
- Clever Cleaner will ask for permission to delete the photos from iCloud Photos across all synced devices.
- If you change your mind, you can restore deleted photos from Recently Deleted within the next 30 days—or just manually empty this folder to free up storage immediately.
This method is fast, automatic, and thorough. We have found the app’s AI quite reliable, so you can let it handle everything with Smart Cleanup without worrying about losing important photos. You can read about its AI performance in more detail in our Clever Cleaner review here.
Duplicate remover isn’t the only feature this app offers—and all the other ones are completely unrestricted and ad-free as well. As stated on the official Clever Cleaner storage cleaner page:
“Once downloaded, you’ll have access to all its powerful tools for free, forever.”
That’s good to know, especially since the other three tools are just as useful. Here’s what they can do:
- Identify and remove screenshots – The app detects all the screenshots in your library and shows how much space they’re using. With one tap, you can delete them all or review them individually if you want to keep some.
- Optimize Live Photos – Live Photos take up extra space due to their short video component. Clever Cleaner lets you convert them into standard still photos without losing quality.
- Find “Heavies” – Clever Cleaner sorts your files from largest to smallest, which makes it easy to find what’s taking up the most space. You’ll usually find videos here since they take up much more storage than images. If you’ve ever tried to sort videos by size in the Photos app, you know it doesn’t have this feature—so this app picks up the slack and lets you quickly clean up unwanted large files.
Method 2: Remove Duplicate Photos Using the iPhone’s Built-in Feature
So, we’ve already covered everything about this option—the downsides, the limitations, and when it’s useful. Now, let’s actually see how to delete duplicates on iPhone using the default method:
- Open the Photos app.
- Scroll down to Utilities and select Duplicates. If you don’t see it, iOS may still be scanning, or it hasn’t detected any exact duplicates yet.
- Review the detected duplicates—iOS groups them together automatically.
- Tap Merge next to each duplicate group. This keeps the best-quality version and moves the rest to Recently Deleted.
- Repeat for all duplicate groups until your library is cleaned up.

That’s it! If you want to free up storage immediately, go to Recently Deleted and empty it.
If this option missed the mark and didn’t find all the duplicates you expected, you’re not alone. If that’s the case, go to Option A (a third-party app might work better for you).
Method 3: Delete Duplicate Photos on Mac (Syncing with iPhone)
How to delete duplicate photos on Mac (syncing with iPhone):
- Open the Photos app on your Mac.
- Click on Library in the sidebar, then scroll down and select Duplicates.

- Review the grouped duplicates—just like on iPhone, macOS automatically detects exact copies.
- Click Merge next to a duplicate group. macOS will keep the highest-quality version and move the others to Recently Deleted.

- Repeat the process until you’ve removed all unwanted duplicates.
If your iPhone and Mac sync through iCloud Photos, any changes made on the Mac will automatically reflect on your iPhone (it just needs to be connected to the internet and given some time to sync).
This method is ideal if you prefer to go through photos on a larger screen or if you find merging duplicates easier with a mouse and keyboard. But just like the iPhone’s built-in tool, this method won’t catch near-duplicates.
How to Clear Duplicate Burst Photos on iPhone (Bonus Round)
Our guide wouldn’t be complete if we didn’t mention Burst photos. These won’t get flagged as duplicates in the Photos app’s Duplicates feature because they appear as one item in your library (with a stacked icon on them). But in reality, a Burst contains multiple nearly identical shots, all taking up iPhone storage.
So, can they be called duplicates? Our answer is yes. If you don’t need all those extra shots, you can leave only one and free up storage. Here’s how to delete duplicate burst images:
- Open the Photos app.
- Scroll down to the Bursts album under Media Types.
- Tap on a Burst photo to open it.
- Tap Burst(n) at the top of the screen.
- Swipe through the shots and pick the best one(s) to keep. iOS may suggest the sharpest images, but you can manually select your favorite.
- Tap Done and choose Keep Only Favorites. This deletes the extra shots while keeping the one(s) you selected.

What to Do When You Can’t Delete Duplicates
In most cases, deleting duplicate photos on an iPhone is simple—until it’s not. Some people run into an issue where certain duplicates won’t delete, no matter what they try. If you’re stuck with duplicate photos that won’t go away, here are a few possible reasons and how to fix them.
If you’ve synced your iPhone with a computer, and the “Delete after import” option wasn’t enabled, you may now have both the original and a synced copy of every photo. These synced duplicates won’t have a delete option on your iPhone.
What you can try:
- Delete the originals – Enable “Delete after import” when syncing next time to remove the extra copies.
- Resync with no photos selected – Connect your iPhone to the computer and sync again, but this time, don’t select any photos to sync back onto your iPhone. This should remove the duplicates while keeping the originals on your Mac or PC.
- Switch to iCloud Photos – If you use iCloud Photos, edits and deletions sync automatically across all devices, preventing duplicate issues caused by manual syncing.
In a Nutshell
Here’s the short version and gist of it all. You have a couple of ways to remove duplicate photos on an iPhone:
- Easiest & fastest method – Use a free storage cleaner app like Clever Cleaner to automatically find and delete exact and similar duplicates for free in one tap.
- Built-in iPhone method – Open Photos > Albums > Duplicates, then tap Merge to remove exact duplicates. This method won’t detect near-duplicates, and photos might take a while to appear here.
- Mac cleanup option – If you sync with iCloud, use Photos on a Mac to remove duplicates the same way as on iPhone but with a bigger screen for easier management.
- Burst photos – Photos made in Burst mode can be considered duplicates too. To clear them: Open Photos > Albums > Bursts, tap a burst, then tap Burst(n). Swipe through the shots, pick the best one(s) to keep, and tap Done > Keep Only Favorites to delete the rest.
FAQ
- User error – People often save or import the same photo multiple times without realizing it.
- Third-party apps – Photo editors, messaging apps, and cloud storage services can save copies of the same image.
- Restoring from backups – When setting up a new iPhone or restoring from an old backup, duplicates sometimes appear if photos were backed up from different sources.
- Near-duplicates from long photo sessions – If you take dozens of shots of the same scene.
- Auto HDR on older iPhones – Some older iPhone models (like iPhone XS or iPhone XR) can save both the regular photo and the HDR version, which will create a duplicate.
A few tweaks to iPhone settings help too. On older iPhones, turning off Auto HDR stops your phone from saving both HDR and non-HDR versions of the same shot. Also, make sure to avoid Burst mode.
You can read more about it in our full guide on how to stop duplicate photos on iPhone.