
How to Delete Downloads on iPhone
Looking for a way to delete downloads on your iPhone? Apple doesn’t automatically clean them up, so every document, photo, video, or song you download stays in your storage until you remove it yourself. Unfortunately, iOS doesn’t offer one “delete all” button to erase every single download at once, but that doesn’t mean clearing downloads has to be a hassle.
Below, we’ve compiled personally tested instructions on how to thoroughly delete downloads on your iPhone, no matter where they’re stored or how you downloaded them! Let’s get started.
How to Delete Downloaded Files on iPhone
There are 5 methods to delete downloaded files on your iPhone. To create this guide, we simulated every type of download possible on an iPhone and diligently investigated where they went. We noticed that some downloads have “overlap”; for example, SOME – not all – browser downloads are also accessible from the Files app.
However, this article only focuses on the most convenient and efficient ways to find and delete them. Specifically, we cover the deletion of documents, archives, photos, videos, web browser downloads, iCloud downloads, and app-specific downloads.
1. Remove Archives, Documents & Text Files
The Files app on your iPhone is a useful directory where you can access the files from your device’s local storage and various cloud storage apps (such as iCloud, Google Drive, etc.).
Downloaded non-media files, such as documents, are almost always stored in the Files app on your iPhone. Here’s how to delete them:
- Open the Files app (it’s an icon of a blue folder on top of a white background).
- Tap Browse in the bottom-right corner of the screen. Then, tap On My iPhone.

- Tap Downloads. Depending on which browser you use, your downloads might not show up in the main Downloads folder. Some browsers—like Chrome or Firefox—create their own folders inside On My iPhone. As you can see in our screenshot, both apps have separate folders with their own downloads. Be sure to check those too.

- Tap the ellipses button in the top-right corner of the screen. Then, tap Select.

- Mark the files you want to delete by tapping on them. Then, tap the trash icon at the bottom of the screen.

2. Get Rid of Downloads in Photos App
Photos and videos, on the other hand, are usually (but not always) stored in the Photos app. We found this to be true whether the media was saved as an attachment or downloaded from a browser (e.g. an image from a website).
Where exactly those photos and videos are located depends on where they were downloaded from. For example, media downloads from a browser are usually found in the Recents album. We also noticed that some apps create their own albums in the Photos app as well, so make sure to check all your albums:
- Open Photos app.
- Go to Recents or the app-specific album.
- Tap Select, choose the files, and tap the trash can icon.

- Confirm with Delete Photos (or Delete Videos).
And don’t forget to check for duplicate copies! It’s very easy to download the same file twice or even three times—all it takes is an accidental extra tap. Unfortunately, your iPhone won’t warn you if the file already exists in your Photos library.
To clean up duplicates, go to Photos > Albums > Duplicates (under Utilities) and merge them.
However, many people report that some duplicates don’t show up here. This could be because the iPhone hasn’t indexed them yet, or the files aren’t exact matches.
If duplicates don’t appear in the built-in tool or you’d rather clean up your library automatically, a third-party app is the best solution. There are plenty of iPhone cleaners that handle this better than Apple’s tools. One 100% free option we’ve tested and liked is Clever Cleaner: AI Photo Cleaner, which works especially well for this situation. Why?

- Its AI-powered detection can compete with big, expensive tools, and quickly finds both exact duplicates and similar images, even if iOS misses them.
- It lets you sort your media by size, which makes it easy to find and delete downloaded videos or other large files—something the Photos app doesn’t allow.
- It’s completely free (no subscriptions, no paywalls).
If you regularly download files to your Photos app, a tool like this makes it much easier to clear out duplicates and other waste:
- Find “Clever Cleaner” on the App Store or use this link to download it.
- Open the app and allow it to access your photo library. According to the official Clever Cleaner cleanup app page, the U.S.-based developer (CleverFiles) assures that everything is processed locally on your device, so your photos never go to the cloud—they remain private and secure.
- Tap Smart Cleanup to let the app automatically clean up duplicate and similar photos.

- If you want to be more involved, tap on a group. The app automatically picks the best-quality version as the “Best Shot”, but you can change the selection if needed.

- Tap Move to Trash to delete the selected photos. The app will instantly move to the next batch for review.
- When you’re done, tap Empty Trash, then Slide to Delete to remove all duplicates and similar images in one go.

- Clever Cleaner will ask for permission once more. Confirm this.

- If you change your mind, you can restore deleted photos from Recently Deleted within 30 days—or manually empty that folder to free up storage immediately.
After you’re done with duplicates, check the “Heavies” section. This tool sorts your photos and videos by size. If you’ve ever downloaded videos from Safari or other apps to your library, they should show up here. The biggest files will be listed at the top, so you can quickly identify and delete the ones taking up the most space.
3. Remove Web Downloads
Non-media files downloaded from web browsers can be directly accessed via the web browser itself. In some cases, downloads are stored elsewhere (e.g. the Files app) but you can still access them via the downloads section of the browser.
We prepared instructions for Safari, Google Chrome, and Firefox, but the steps should be similar for any iOS browser.
For example, in Safari, when you remove a file from your download history, it only disappears from the list you see in the browser—but the actual file stays on your device. To fully delete it, you still need to open the Files app and remove it from there.
We’ve included this as a separate method because you might want to clean up just browser-based downloads, without touching other files in your Downloads folder.
How to delete Safari downloads on iPhone:
- Open Safari.
- In the web address bar at the bottom of the screen, tap the Page Settings button on the far left (it may look like two letter A’s or as a rectangle with two horizontal lines).

- Then, tap Downloads.
- Swipe left on the file you want to delete. Then, tap the Delete button.

How to delete Google Chrome downloads on iPhone:
- Open Google Chrome.
- Tap the ellipses button in the bottom-right corner of the screen.

- Swipe the icons at the top of the menu to the left until you find the Downloads button. Tap it to view your files in the Downloads folder of the Files app.

- Tap and hold the file, then tap Delete. If you want to delete multiple files, tap the ellipses button > Select to multi-select files.

How to delete Firefox downloads on iPhone:
- Open Firefox.
- Tap the menu button in the bottom-right corner of the screen. It looks like 3 lines on top of each other. Then, tap the Downloads button.

- Swipe left on the file you want to erase. Then, tap Delete. Downloaded files you delete via Firefox will automatically be deleted from the Downloads folder of the Files app as well. (However, if you’ve changed Firefox’s storage location or are syncing with iCloud, you may need to manually delete from the Files app’s folder too.)

4. Clear iCloud Downloads on iPhone
If you’ve downloaded files directly to iCloud Drive instead of local storage, they still take up space in your iCloud account. Your iCloud folders isn’t just for files you intentionally save—it can also hold downloads from apps that you’ve set to store data in iCloud instead of on your device. For example, if you’ve configured your browser, email app, or any third-party app to save downloads to iCloud Drive, those files might pile up in the cloud’s Downloads folder.
To check and delete iCloud downloads, follow these steps:
- Open the Files app.
- Tap Browse at the bottom-right corner.
- Select iCloud Drive from the list of locations.
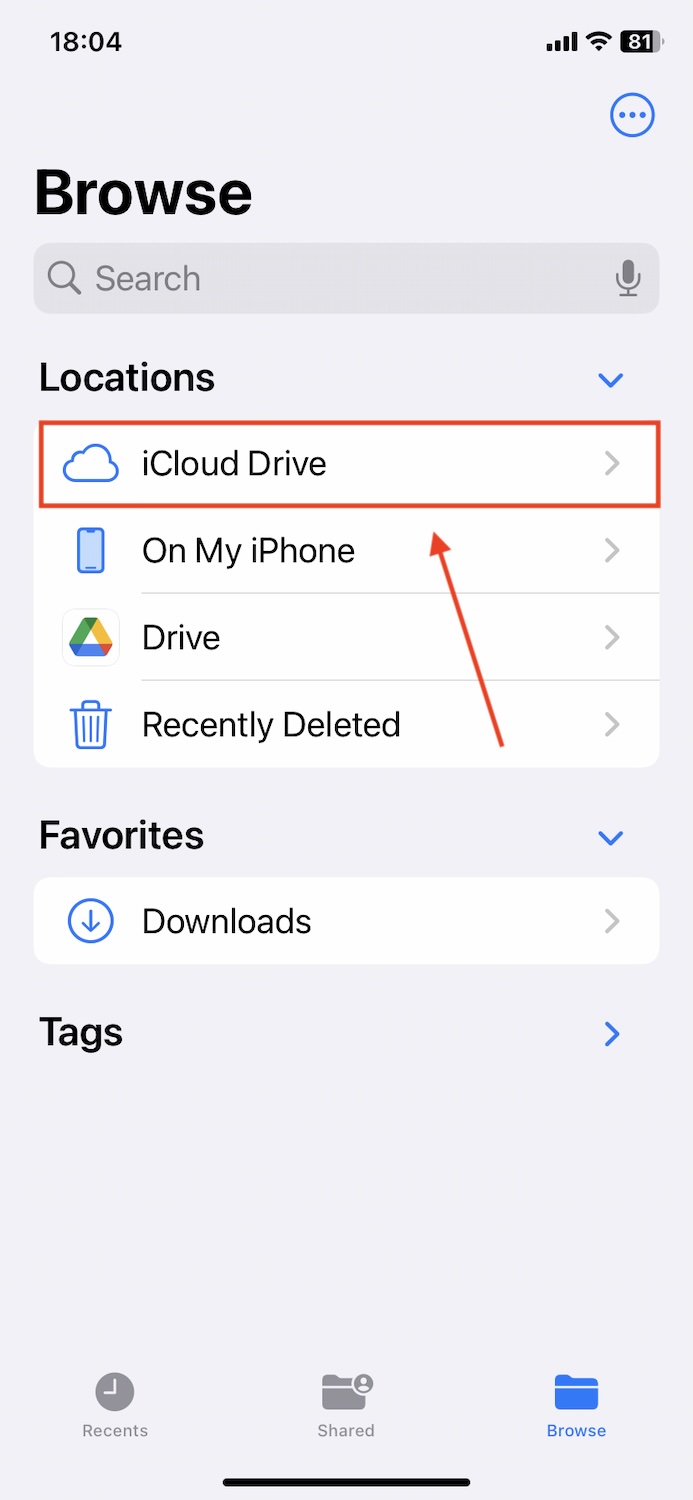
- Open the Downloads folder (or any other folder where files might be stored).

- Tap the ellipsis (⋯) button in the top-right corner, then tap Select.
- Select the files you want to delete and tap the trash icon, exactly like you would for your local Downloads folder.
Just like files you delete locally, iCloud Drive downloads aren’t immediately erased—they first move to the Recently Deleted folder. Go back to Browse, tap Recently Deleted, then select and permanently delete the files.
5. Delete App-Specific Files
App-specific downloads are usually accessed and managed through the app itself. Some popular examples include Netflix, Spotify, and other streaming services.
We’ll demonstrate how to delete downloads from an app using a streaming service called Dropout to show you what this process looks like in lesser-known apps.
- Open the app whose files you want to delete and navigate to the Downloads or Offline section. In our case, we had to open the playlist menu to access offline.

- Depending on the app you use, there should be a delete/erase button beside the file you downloaded. You may also be able to swipe left to delete the file, similar to other native and third-party iOS tools.

- Make sure to confirm the deletion when prompted.

How to Identify Space-Consuming Downloads on Your iPhone
If you’re unsure what types of data make up the majority of your downloads, iOS has a super helpful menu in the Settings app that can point you in the right direction. We’ll show you where it is, then explain how it works.
- Open the Settings app.
- Tap General.

- Tap iPhone Storage.

The colorful bar at the top of the screen is a representation of your iPhone’s total storage space, as well as how much of it is allocated to different types of data.

It should point you toward where your largest downloads are saved. For example, apps take up most of our iPhone’s storage space due to downloaded Dimension 20 episodes using the Dropout app. iOS will even recommend downloads you can delete straight from Settings, depending on how much free storage space your iPhone still has.
Scrolling down, you can actually review the apps on your iPhone and sort them by size to find big downloads faster.
Quick Recap
For those of you who jumped straight here—here’s the quick takeaway on how to delete all downloads from your iPhone:
- Files app first. Most downloads (especially documents, PDFs, spreadsheets, archives, etc.) land here. Head over to Files > Browse > On My iPhone > Downloads, and delete unnecessary items. If you use browsers other than Safari, like Chrome or Firefox, they usually create their own folders alongside the main Downloads folder. Be sure to check those as well.
- Photos app next. Usually (but not always!), your downloaded photos and videos end up here. Check Photos > Recents or app-specific albums, and delete unwanted images and videos. Also, watch out for sneaky duplicates—use Apple’s built-in Duplicates tool under Albums > Utilities, or consider third-party apps like Clever Cleaner, which we covered above.
- You can also delete downloads directly from your browser. Open your browser—Chrome, or Firefox—and go to the Downloads section to clear out saved files. But keep in mind: With Safari, deleting from the Downloads list only removes the entry from your history—the actual file stays on your iPhone. To fully delete it, you’ll need to use the Files app method we covered earlier.
- Don’t forget iCloud. If your apps save downloads directly to iCloud Drive, they still use storage. Navigate to Files app > iCloud Drive > Downloads, and remove unwanted files. Remember to empty the Recently Deleted folder afterward.
- And finally, check app-specific files. Apps like Netflix, Spotify, YouTube, and Podcasts store their downloads internally. For native Apple apps (like Podcasts), you can delete downloads straight from your iPhone settings. Just go to Settings, > General, > iPhone Storage, find the app, and delete the downloaded files directly. For third-party apps, you’ll typically need to open the app itself and find its own download management options in the settings.
FAQ
Yes, there are some cases where you can set your iPhone to automatically delete downloads:
- Messages/message attachments – Open the Settings app > Messages. Underneath Message History, tap Keep Messages and select the duration after which messages will be deleted.
- Podcasts – Open the Settings app > Podcasts. Then, tap Automatically Download and tap Off.
- Third-party apps – Some third-party apps like WhatsApp and Netflix (Smart Downloads) have features that let you set up automatic deletion of downloads.
However, the majority of downloads on your iPhone have to be deleted manually.
The answer depends on where those files were downloaded.
- If the files are in your Photos app, then yes—third-party apps can remove duplicate photos, large photos and videos, and other unnecessary media.
- If the files are stored elsewhere (like app’s download folder), you’ll likely have to remove them manually. Due to iOS restrictions, third-party apps can’t directly delete these files since Apple sandboxes app data for security reasons.