How to Free Up Space on iPhone
Has your iPhone dropped hints that it needs a thorough clean? Maybe apps crash, photos refuse to save, or that “Storage Almost Full” message won’t go away. If so, below, you’ll find nine steps on how to clear your iPhone storage, plus a few extra tricks.
By the end, you won’t just have more space—you’ll know exactly how to keep it that way.
Why Is My iPhone Storage Full?
Most iPhones have at least 64 GB of storage space installed. It sounds like a lot but it runs out quickly – there are a lot of potential data hogs on your device.
We’ll quickly review each data type so you know exactly where your precious space is going (and what data to nuke first).
- 👤 Personal data – Photos, videos, documents, and other files the user saved to the device.
- ✉️ Messages/attachments – Conversations, photos, videos, and other files received via email or messaging apps like Messages or WhatsApp.
- 📄 Caches – Cache files and temporary data used by iOS and apps.
- ⬇️ Downloaded files – Files downloaded from the internet (like a website or cloud storage service like Google Drive).
- 🧰 Apps – Apps downloaded and installed from the App Store
- ⚙️ System data – Files used by iOS for its operation.
To check your iPhone’s storage allocation:
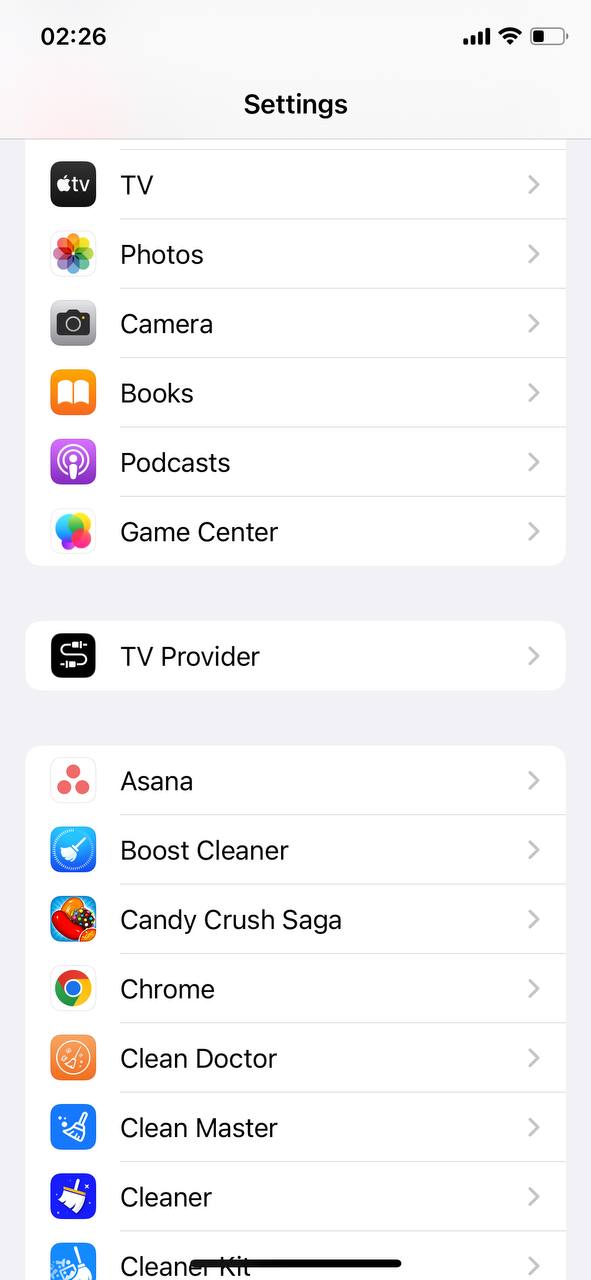
Open the Settings app and tap General, then iPhone Storage. At the very top of the screen, review what data is taking up your device’s storage space (Apps, iOS, Mail, Photos, and System Data). Beneath that, you’ll find all the apps installed on your iPhone and how much space they are using up.
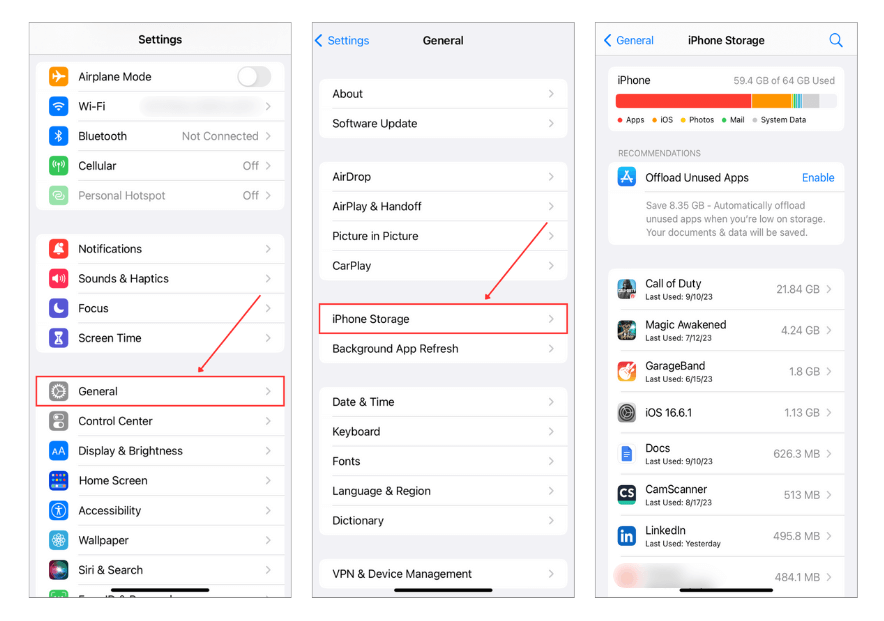
Use these indicators to decide what to clean up first. Not sure where to start? Below, we’ve compiled an easy-to-follow list of steps you can take to free up storage on your iPhone.
9 Tips to Deep Clean Your iPhone Storage
As we mentioned at the beginning of this article, we’ll show you how to free up storage on your iPhone in 9 simple steps.
Data is scattered around the device and there’s no way to delete everything at once without resetting your iPhone. Instead, we’ll show you how to clear your iPhone storage by cleaning up each data type one by one.
Step 1: Clean Up Your Photo Library
For many—if not most—people, the biggest category eating up storage is Photos. Every picture and video you take, save, or import adds up fast. There’s a lot of wasted space hiding in there—duplicates, large videos and screenshots you’ll never look at again. Cleaning this up can free gigabytes.
We’ll break this step into two options: one using built-in tools that come with your iPhone and another using specialized apps that automate the process. We’re starting with apps because, due to the hard limitations of native solutions and based on our experience, they are a much better option.
Option A: Use Third-Party Apps
If you’ve never used a photo cleaning app before, we’ve tested and ranked the best iPhone cleaners available. But if you don’t have time to read the full comparison, the one we recommend most is Clever Cleaner: Free Photo Cleaner App.

This app has gained serious traction since its release, and we think it comes down to two things:
- It works really well (thanks to its capable AI).
- It’s one of the few truly 100% free photo cleaners—no subscriptions, no paywalls, and no ads (something more apps should offer!). According to the official Clever Cleaner storage cleanup app’s page, it will stay free for current users, so even if new features are added in the future, you won’t have to pay for them.
Clever Cleaner helps clear out:
- Duplicates and near-duplicates. The app’s AI sorts out identical, nearly identical, and very similar photos, allowing you to automatically delete the extras.
- Unnecessary screenshots. It detects and removes screenshots in your library in one go.
- Large, outdated videos and photos. It finds files taking up the most space and helps you decide what to keep. You’d think this would be easy to do in the Photos app, but Apple still doesn’t let you sort by file size—even in iOS 18.
- Live Photo conversions. If you don’t need the short clips attached to Live Photos, you can convert them to standard images and save storage without deleting them.
The app is straightforward and intuitive, but let’s walk through how you can remove all duplicate and similar photos in literally one tap:
- Download Clever Cleaner from the App Store.
- Tap the “Similars” section. It finds images that look alike. The app suggests keeping the Best Shot and selecting the rest for removal.

- Review the selections (optional). If you trust the AI’s choices, you can skip this step. Otherwise, you can fine-tune the selection on your own—pick a different Best Shot or skip the group entirely. The app will then automatically move to the next group.

- If the selection looks good, tap “Smart Cleanup” to remove everything at once. After that, tap “Empty Trash” at the bottom and confirm the deletion one more time. That’s it—one scan, a couple of taps, and your library is cleaner.

You can use the other three tools in a similar way—Screenshots, Lives, and Heavies. Nothing complicated about it. Once the cleanup is done, the app will show you how much storage you’ve freed up. It also reminds you of one last step. Since deleted photos go to the Recently Deleted folder in the Photos app, you need to delete them from there as well.
If you want to learn more about these features or the app in general, don’t miss our full Clever Cleaner review, where we go super in-depth on our experience with it.
Option B: Use Photos App
Another option, of course, is manual cleanup in the Photos app. It may be tedious, but the big advantage is that it’s already built into your iPhone—no downloads required. You might already know most of these steps, but let’s go over them anyway to make sure you’re covering everything.
Here’s a step-by-step guide on how to clean up your photo library manually:
- Launch the Photos app on your iPhone. This is where everything is stored, from your latest holiday snaps to those random screenshots you’ve forgotten about.
- Scroll down to the ‘Media Types’ section. Here, your content is sorted by type, such as videos, selfies, and panoramas. Videos often take up the most space, so they’re a good place to start.

- Tap on ‘Videos’ or any other category where you think you can free up some space. Maybe it’s time to let go of those slow-motion videos from two years ago?
- Take a moment to look through your videos or photos. Tap ‘Select’ in the top right corner, then tap on the items you want to remove. Be honest with yourself about what you really need to keep.

- Once you’ve selected the items to delete, tap the trash can icon and confirm. This will move them to the ‘Recently Deleted’ album.
And we should also mention the Duplicates feature. It’s not as capable as third-party apps since it only flags identical duplicates. So, if you snapped 10 nearly identical photos of your pet, they won’t show up here. But still, it’s built into your iPhone, and it’s a quick way to clean up exact copies and merge duplicates into one picture. Open the Photos app and tap Albums at the bottom of the screen. Then, scroll down to the Utilities section and tap Duplicates. Next, tap Merge beside the set of duplicates you want to clear. Finally, tap Merge Exact Copies to confirm the action.
Note. No matter which option you choose, you always need to check the Recently Deleted folder in Photos. Whether you cleaned your library with an app or manually, those files will stay there for up to 30 days, still taking up space.
To permanently remove them and free up storage:
Go to the ‘Recently Deleted’ album, tap ‘Select’, and then ‘Delete All’.
Step 2: Clear Your Browser Cache
Another lucrative place to clean is your iPhone’s web browser cache. Over time, it can take up loads of space (we’re talking gigabytes) due to storing high-resolution images and similar assets in order to cut loading time on certain pages.
This can be annoying because the cache may store such assets from pages that you will never visit again. Fortunately, cleaning it is easy and you don’t really need to worry about losing personal data.
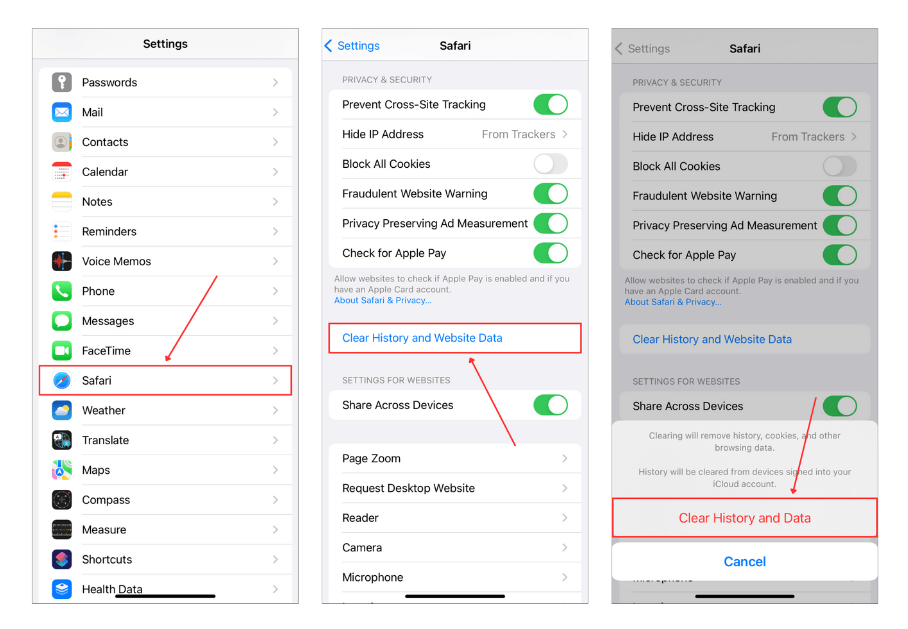
To clear your Safari browser history:
Open the Settings app. Then, scroll down a bit and find Safari. Scroll down to the PRIVACY & SECURITY section and tap Clear History and Website Data. Choose a timeframe:
- Last hour
- Today
- Today and yesterday
- All history (Recommended for a full cleanup)
And finally, make sure to tap Clear History to confirm the action!
Step 3: Delete Your Apps’ Cache
Just like browsers, other apps hoard storage with cached files. Social media and messenger app caches are especially notorious for taking up a lot of space; they usually involve lots of media files like photos and videos being downloaded or saved by users.
When it comes to clearing out those cluttered app caches on your iPhone, you’ve got two handy methods up your sleeve:
- First, some apps come with a built-in cache-clearing tool (although not all of them do).
- Second, you can opt for the classic delete-and-reinstall approach.
In our guide below, we’ll walk you through both methods for three popular apps: TikTok, WhatsApp, and Facebook. For more insights on how to clear caches in other apps, check out this tutorial: Clear Cache on iPhone.
Option A: Use In-App Settings
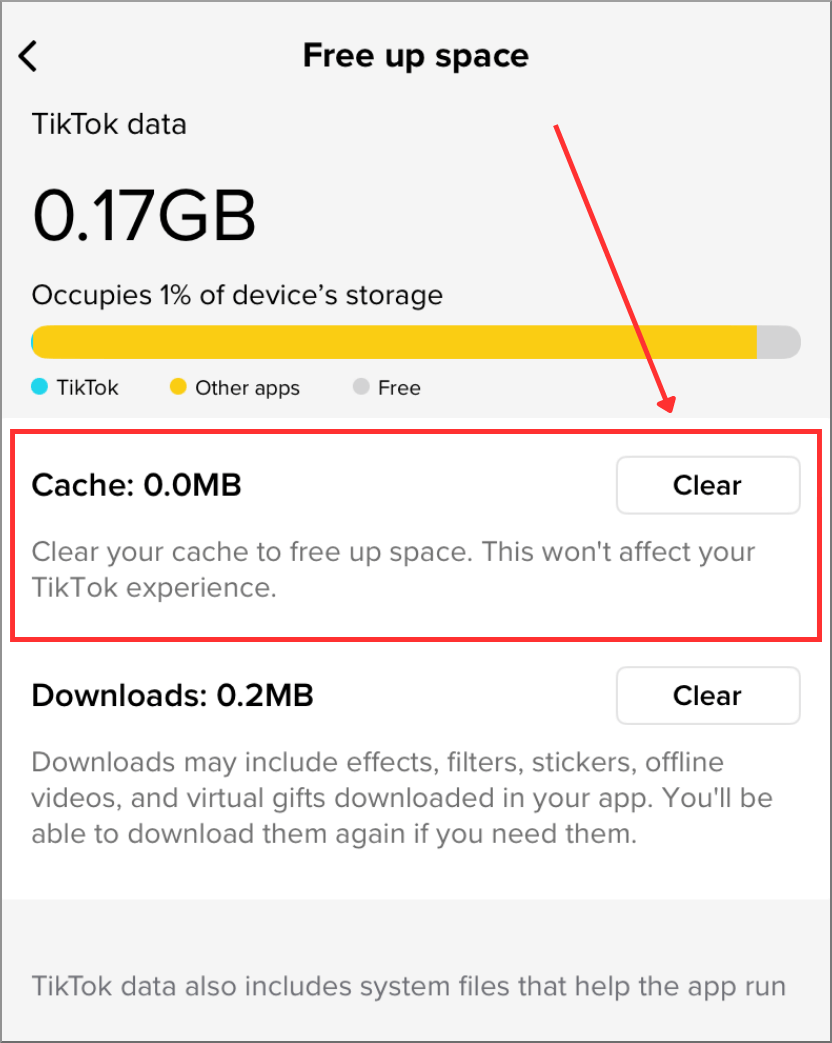
➡️ Deleting TikTok app cache:
Open the TikTok app and tap Profile in the bottom-right corner of the screen. Then, tap the menu icon (3 lines) in the top-right corner of the screen and tap Settings and privacy. Select Free up space.
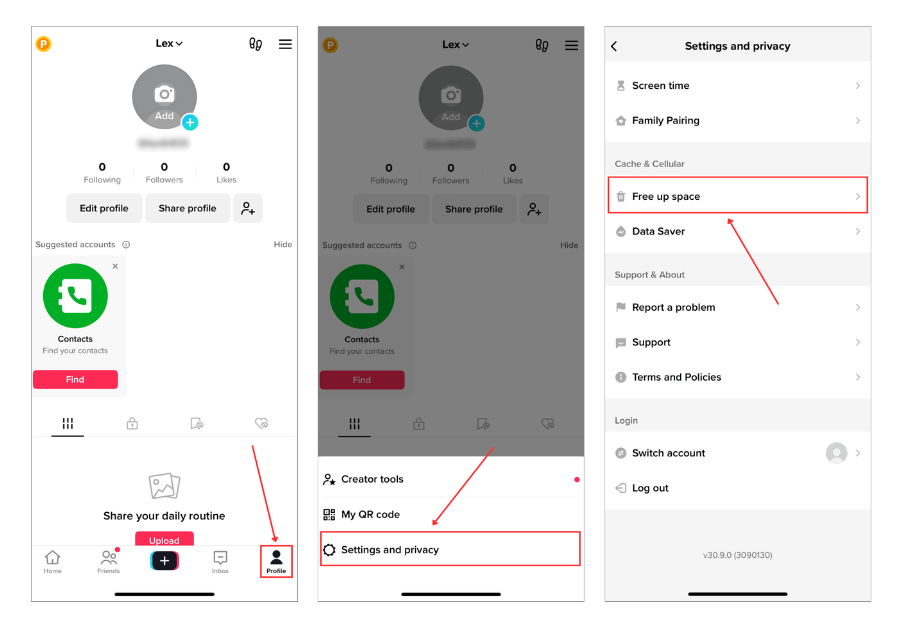
Finally, tap the Clear cache button and close the app.
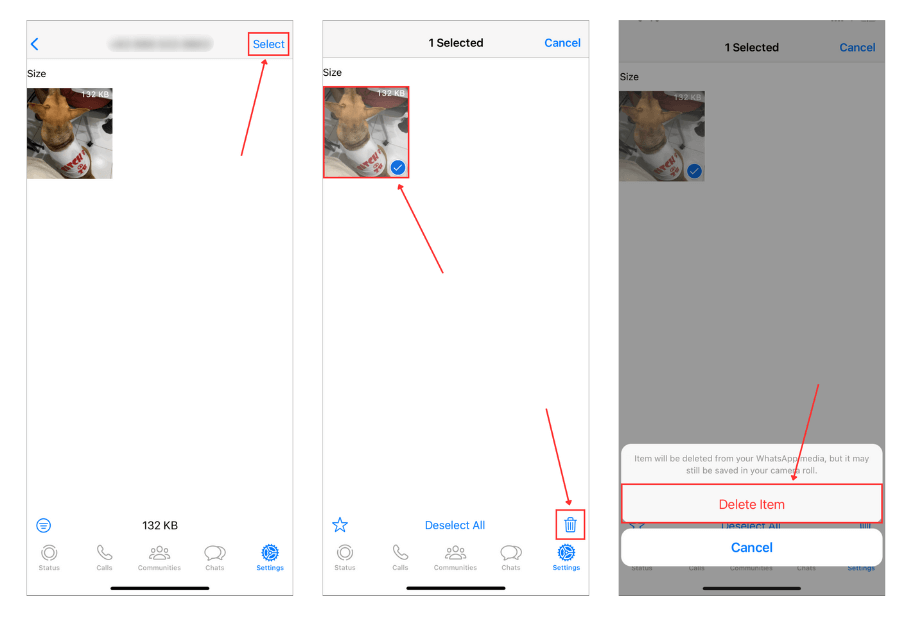
➡️ Deleting WhatsApp app cache:
Open the WhatsApp app and tap the Settings button in the bottom-right corner of the screen. Then, tap Storage and Data. Under the STORAGE section, tap Manage Storage. Under the CHATS section, tap on any conversation whose media files you want to delete.
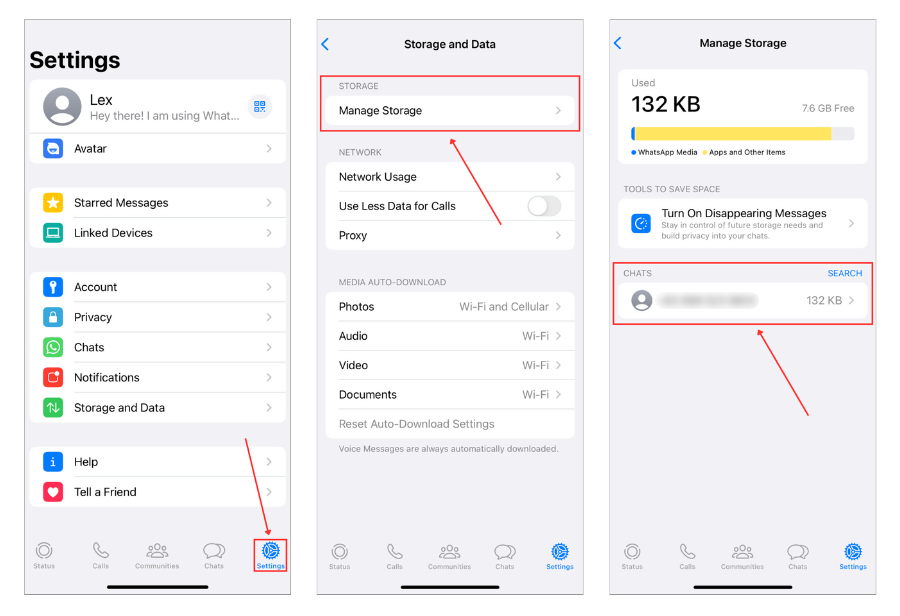
Next, tap Select in the top-right corner of the screen. Then, tap the photos and videos you want to clear and tap the Trash icon in the bottom-right corner of the screen.
Tap Delete Item to delete the file.
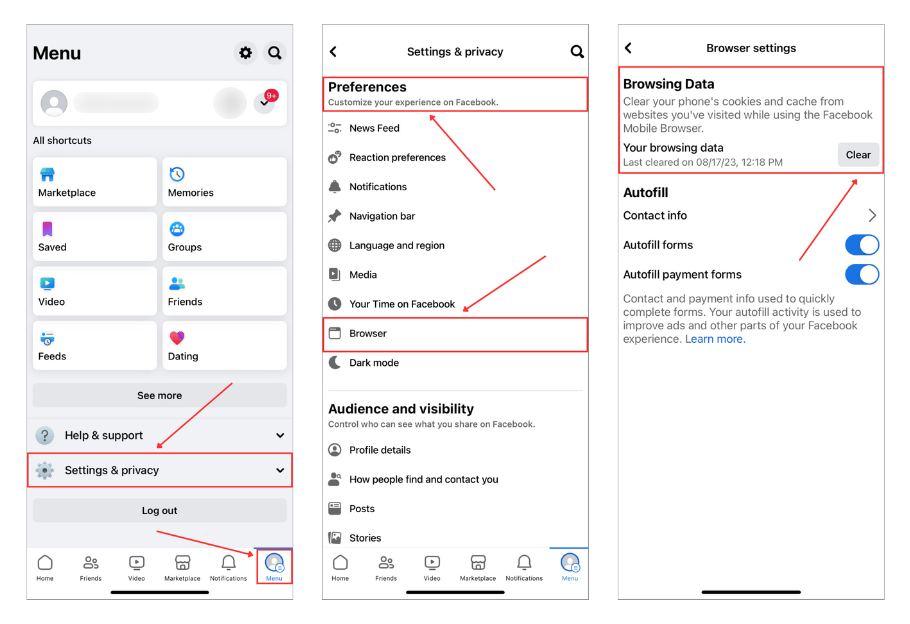
➡️ Deleting Facebook app cache:
- Open the Facebook app and tap on the Menu button in the bottom-right corner of the screen.
- Then, tap the dropdown arrow beside Settings & privacy.
- Under the Preferences section, tap Browser.
- Under the Browsing Data beside Your browsing data, tap Clear.
Option B: Delete and Reinstall the App
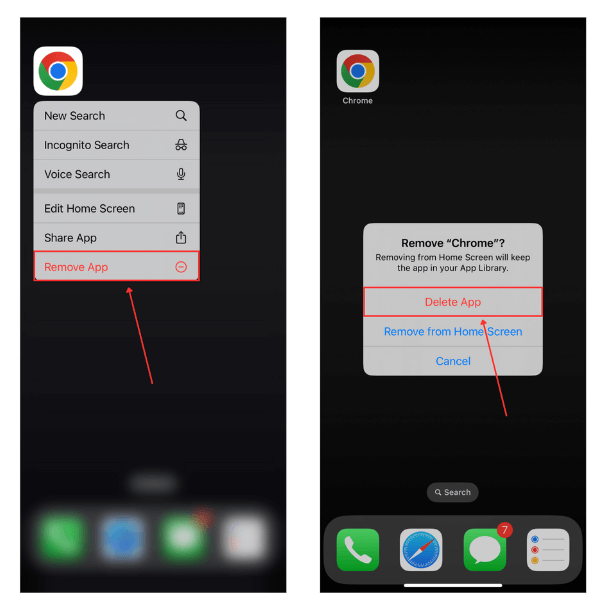
To delete an app on your iPhone:
On your iPhone’s home screen, tap and hold on the app you want to delete and tap Remove App. Then, tap Delete App to confirm the action.
Step 4: Offload the Apps
If you have apps that you don’t use often or won’t need in the near future, consider offloading them. Offloading an app deletes the app itself but keeps the app data, which usually includes user preferences, login credentials, user-generated content, and other you-specific data.
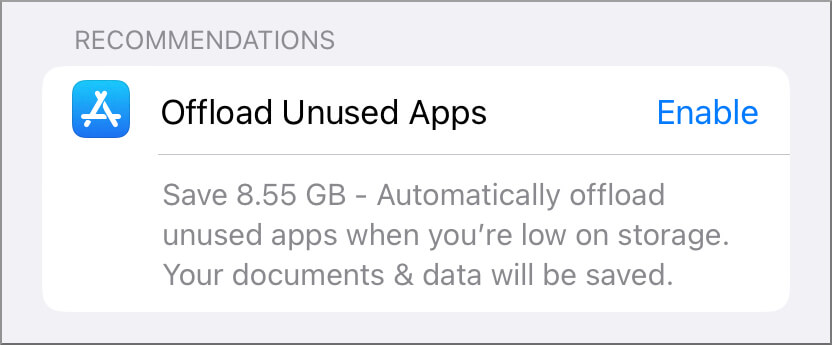
Offloading apps is a good option if you need to reclaim a lot of storage space quickly but still intend to use those apps in the future. In some cases, you may get a recommendation from iOS to offload your unused apps in the iPhone Storage menu (Settings > General > iPhone Storage). This is what it looks like:
But if the above prompt doesn’t appear for you, you can also offload unused apps manually:
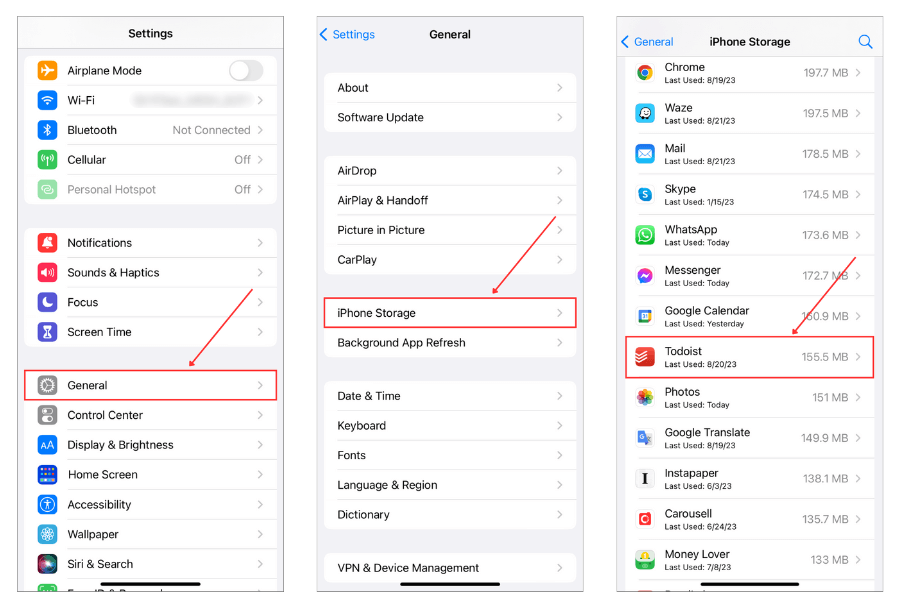
Open the Settings app and tap General. Then, tap iPhone Storage. Tap on any app you want to offload.
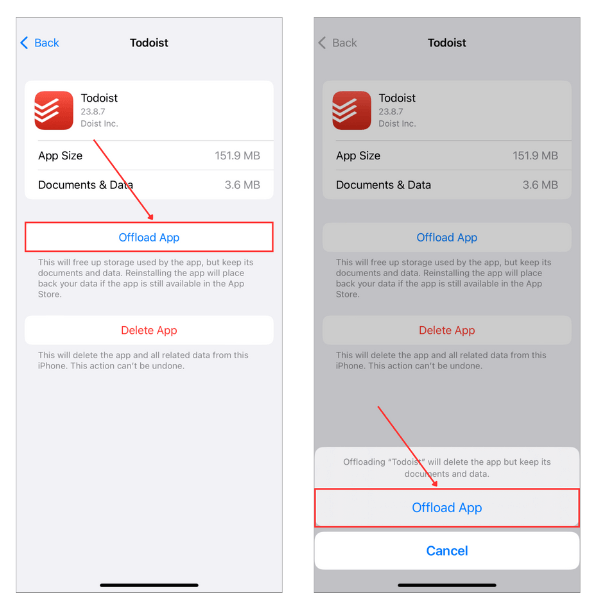
Next, tap Offload App. Finally, tap Offload App again when prompted to confirm the action.
Step 5: Remove Unused Apps
If you have apps you don’t plan on using anymore, just delete them. Apps take up a lot of space and can even grow in size when they get updated. You may opt to offload them, but that method still leaves the shortcut on your home screen and stores app data and cache files.
Step 6: Delete Message Attachments
If you receive photos, videos, documents, and other files via iMessage, they may still be stored as attachments in your Messages app – you can reclaim a lot of storage space by deleting them.
Fortunately, you can find and delete attachments through the Settings app. We’ll demonstrate its usage below.
To delete message attachments on your iPhone:
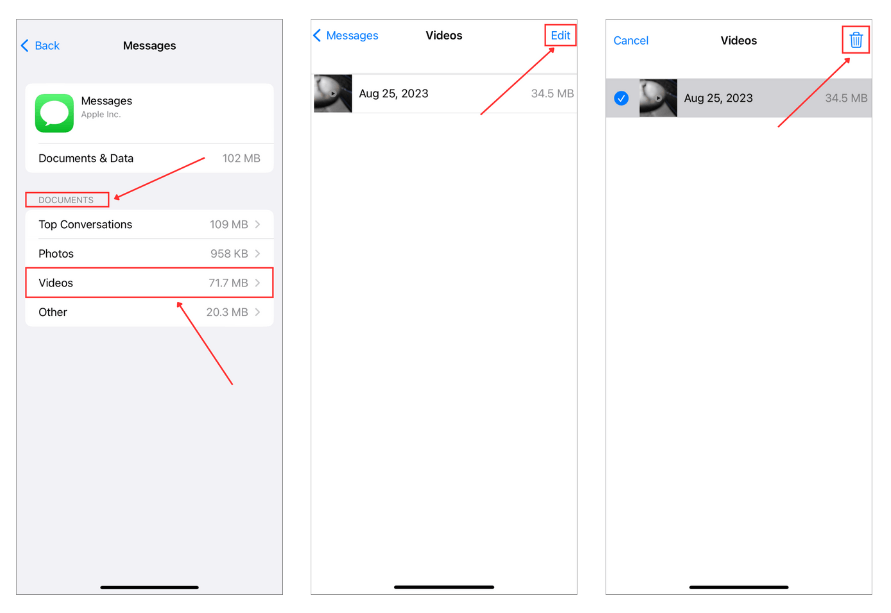
Open the Settings app and tap General. Tap iPhone Storage. Then, scroll down your list of apps and tap Messages.
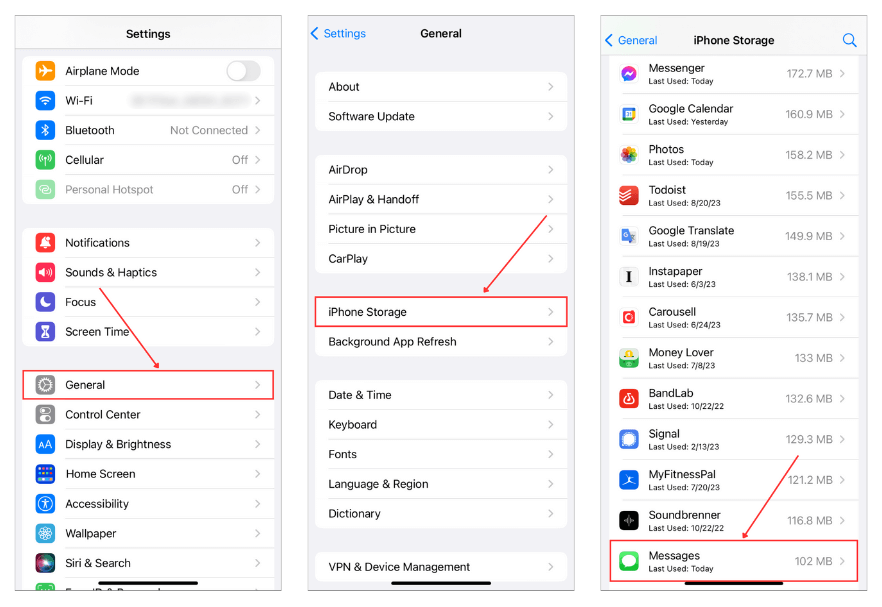
Under the DOCUMENTS section, tap on the file type you want to purge first. For example, Videos. Tap Edit in the top-right corner of the screen. Select the files you want to erase and tap on the Trash icon.
Step 7: Clear Downloaded Files in the Files App
And don’t forget about all the files stored locally in the Files app. If you download a lot of documents, videos, or other media from the web, they might be saved here instead of the Photos app. Many people overlook this, but over the years, these files can pile up and take up a lot of space.
To delete downloaded files in the Files app:
Open the Files app on your iPhone. Then, tap Browse at the bottom and select On My iPhone to see locally stored files.
Tap Downloads (this is where most large files are stored). Then select Size (to find the biggest files first) in the three-dot menu in the top-right corner. Select files you don’t need and tap on the trash bin to delete them.

And don’t forget about Recently Deleted (delete everything from there to free up the space immediately).
Do not skip this step, even if you think you haven’t downloaded anything. Some apps save files directly in the Files app without making it obvious. If you use a document scanner, file manager, or media downloader, it’s definitely worth checking.
Step 8: Utilize iCloud to Free Up Space on Your iPhone
Another step you can take is using iCloud to “offload” data from your iPhone’s storage to the cloud. Let Apple’s servers store your files and keep a lightweight version on your device. This way, you free up storage without losing access to your data. There are different ways to use iCloud:
- Photos – Enable iCloud for Photos to upload all media files to iCloud. This is good for your storage for 2 reasons. (1) You can access them from multiple devices without downloading them. (2) You can enable the Optimize iPhone Storage setting, which only keeps lower-resolution versions of your media on your device and stores the originals in iCloud (we’ll cover this one in detail below).
- iCloud Drive – Many apps allow you to save data to your iCloud drive. The files won’t take up local storage space and are accessible from any device without having to download them.
- iCloud Mail – Unlike some mail apps that store data locally, iCloud Mail stores all of its data (including attachments) on its servers.
- Notes – While notes created with the Notes app don’t take up much space, you can also opt to store them in iCloud and save a few MB of local storage.
- Messages – The Messages app can take up a lot of space due to attachments like photos and videos. Enabled iCloud for Messages to store them on iCloud’s servers instead of on your device.
Step 9: Delete Duplicate Contacts
Duplicate contacts are tiny files but they are still a waste of space. They can also be annoying when you need to quickly make a call and you have to check 5 entries with the same name. Fortunately, cleaning up duplicate contacts takes little effort.
To delete duplicate contacts on your iPhone:
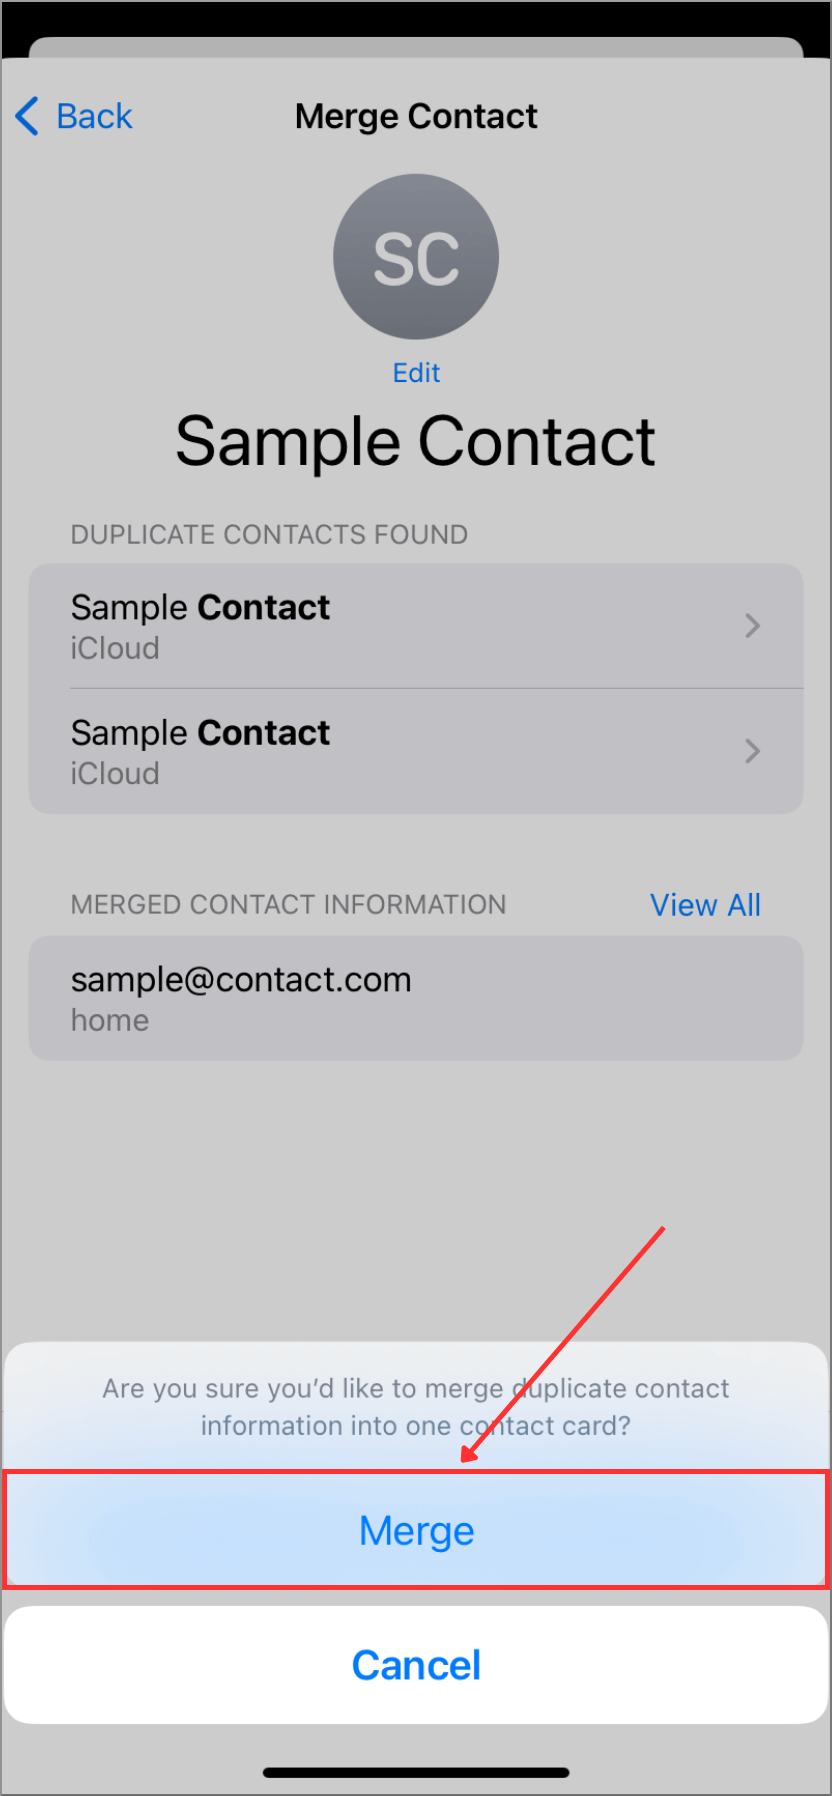
Open the Phone app and tap Contacts at the bottom of the screen. iOS will notify you if it detects any duplicate contacts. If you see Duplicates Found on-screen, tap View Duplicates.
Next, tap on the duplicates you want to delete. Alternatively, you can tap Merge All to merge all duplicates iOS found before deleting them.
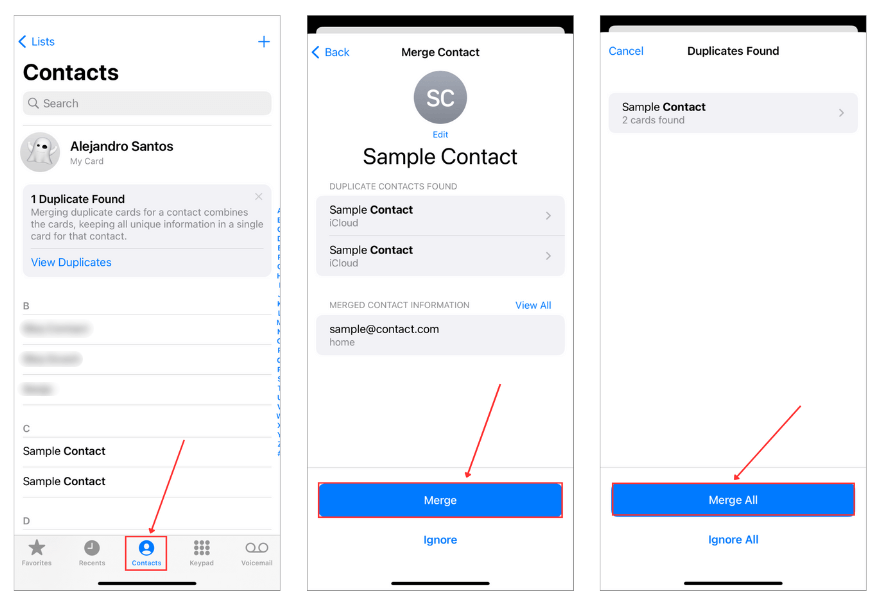
Finally, tap Merge again to confirm the action.
Bonus Ways to Clear Storage on iPhone
We skipped these tips in the main part because, let’s be honest, these are either some of the first things anyone tries when their iPhone starts running out of space or more specialized tricks that not everyone will need. But just in case, here’s a quick rundown:
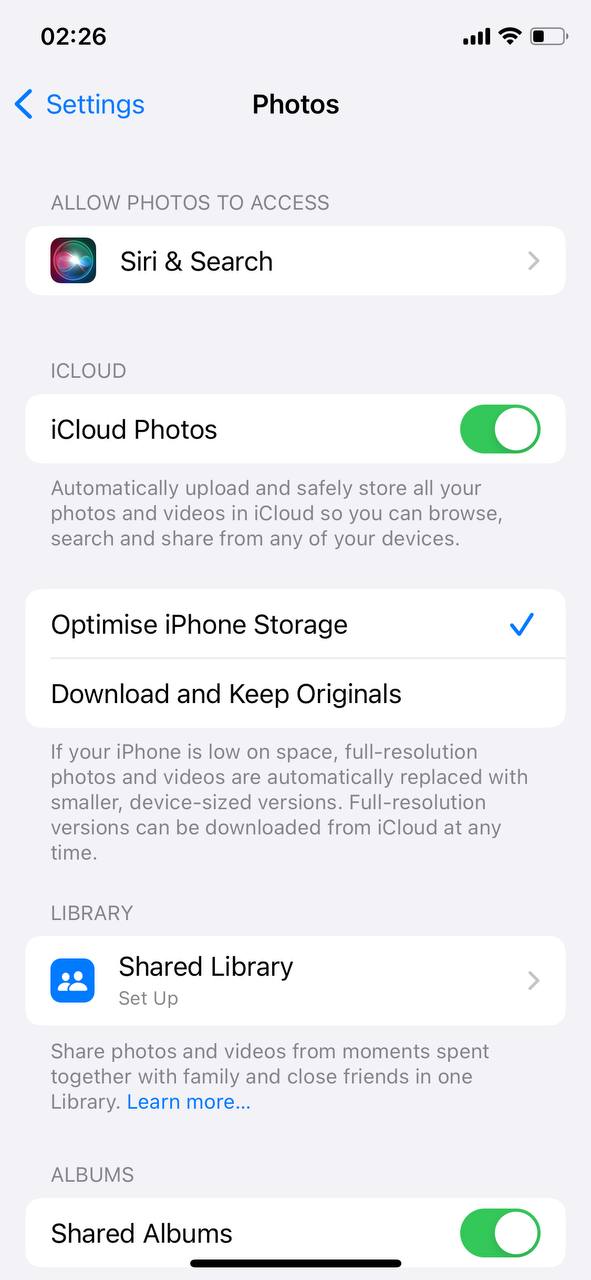
Method 1: Enable ‘Optimize iPhone Storage’ Feature
We already touched on iCloud Photos, but let’s go into more detail. If you’re always connected to Wi-Fi or cellular, then the ‘Optimize iPhone Storage‘ feature is your best friend. It stores the full-resolution versions in iCloud and keeps smaller, space-saving versions on your device. Here’s how to enable it:
- Tap into Settings: Start by opening your iPhone’s Settings app.
- Hit ‘Photos’: Scroll through the list until you find ‘Photos’.
- Select ‘Optimize iPhone Storage’: You’ll see two choices here. Pick ‘Optimize iPhone Storage’. What this does is keep smaller, space-friendly versions of your photos and videos on your iPhone, while the originals are stored in iCloud. If you need the full-res version of a photo or video, it’ll download from iCloud next time you’re connected to Wi-Fi.
Note. Every iPhone user gets a free iCloud plan, but it only includes 5GB of storage—which, for most people, is barely enough for backups, let alone photos and videos. If you need more space, Apple offers paid plans with options going as high as 12TB.
Method 2: Review Downloaded Music and Podcasts
Music and podcasts are great companions for our daily routines, but downloaded episodes and songs can quietly eat up a lot of space. Here’s how to spring clean your downloads:
- Open the Music or Podcasts app: Depending on what you want to clean up, start by launching either the Music app for your tunes or the Podcasts app for your episodes.
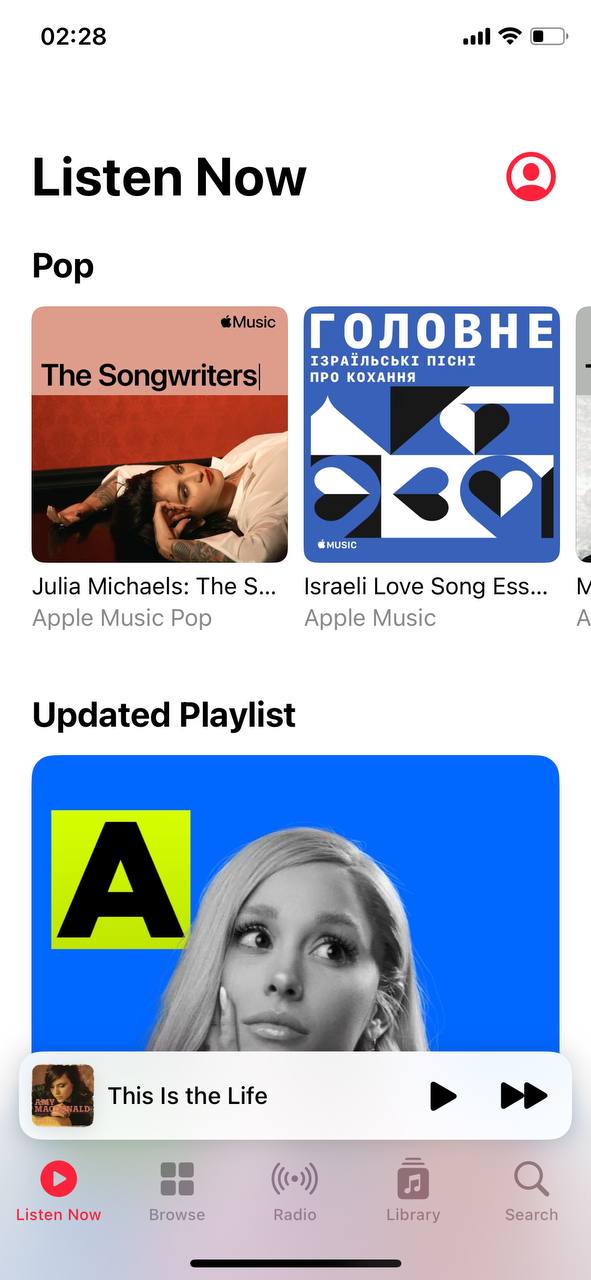
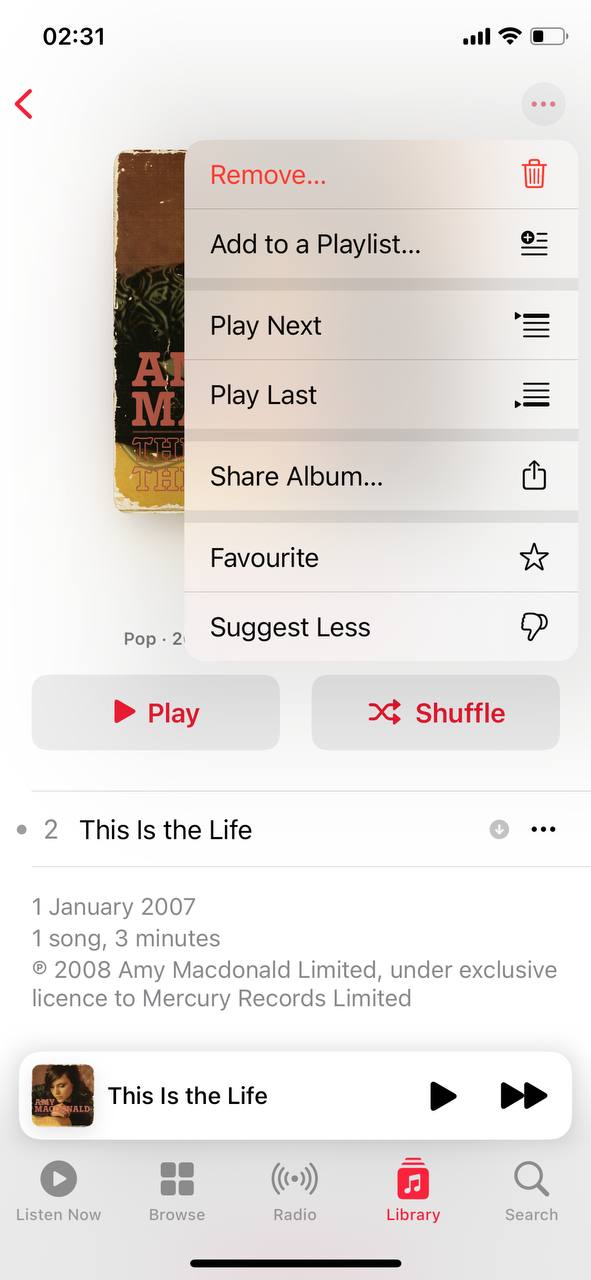
- For Music: If you’re in the Music app, go to your ‘Library’ and tap on ‘Downloaded Music’. Here, you’ll see everything you’ve downloaded, organized by artists, albums, and songs.

- For Podcasts: In the Podcasts app, head over to your ‘Library’, then tap ‘Downloaded Episodes’. You’ll find all the podcast episodes you’ve saved for offline listening.

- For Music: If you’re in the Music app, go to your ‘Library’ and tap on ‘Downloaded Music’. Here, you’ll see everything you’ve downloaded, organized by artists, albums, and songs.
- Select the content to remove: Browse through your downloaded music or podcasts. Think about what you’ve already listened to or what no longer suits your taste.
- Delete individual items: Swipe left on any song or episode you want to remove and tap ‘Delete’. Then choose ‘Only Remove Download’ This will remove the file from your device but keep it in your library for streaming.
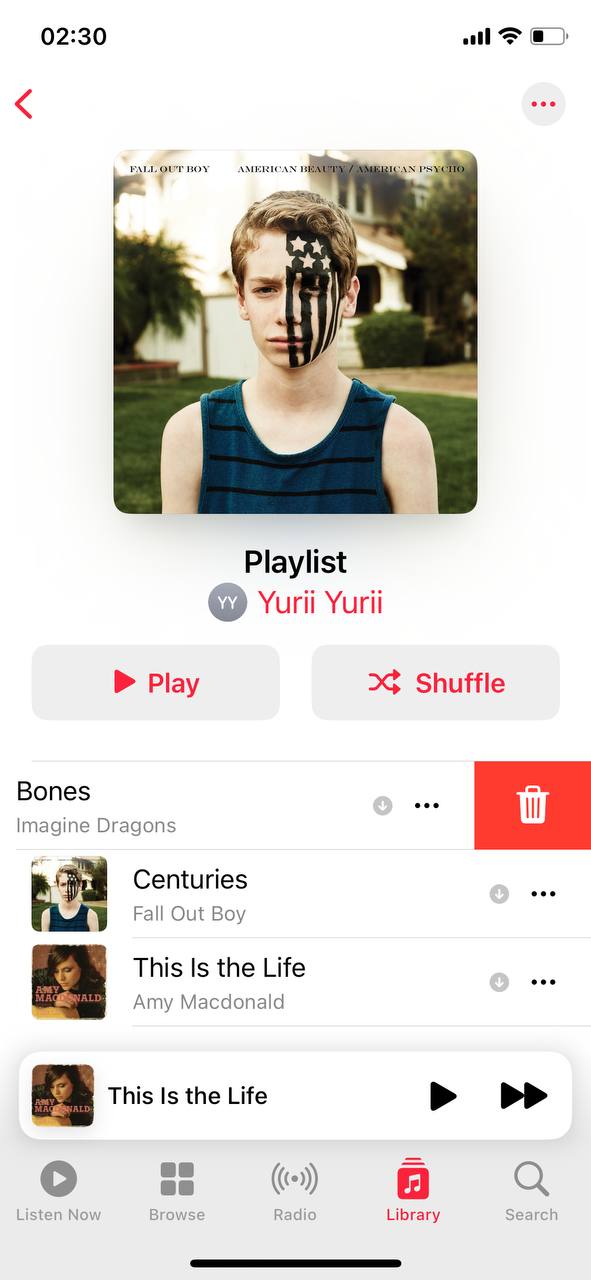
- Delete entire albums or podcasts: For a quicker clean-up, you can also delete entire albums or shows. For music, tap on the album and then on the three dots in the upper right corner to find the delete option. For podcasts, go to the show’s page, and you’ll see ‘Delete from Library’ to remove all downloaded episodes.
Note. If you use Spotify, YouTube Music, or another app, they also can save offline downloads. Check their settings for a “Manage Storage” or “Downloads” option to clear out old songs and playlists.
Method 3: Delete Old Voice Memos You No Longer Need
If you use Voice Memos, you might be sitting on hours of old recordings you don’t need anymore. Whether it’s meeting notes or random audio clips, all these combined can take up more space than you think. Although not as heavy as videos, longer recordings can be surprisingly hefty. Here’s how to delete old voice memos:
- Open the Voice Memos app: Launch the Voice Memos app from your home screen.
- Find large or unused recordings: Scroll through your recordings and look for older ones you no longer need. Longer recordings take up significantly more space, so focus on those first.
- Delete individual files: Swipe left on a recording and tap Delete. If you prefer, tap the memo, then tap the trash icon at the bottom.
- Delete multiple recordings: Tap Edit in the top-right corner. Select multiple recordings, then tap Delete to remove them all at once.
Just like with Photos, you’ll need to go to Recently Deleted in the Voice Memos app to remove recordings permanently and clear up storage for good. Otherwise, deleted memos will continue taking up space for 30 days.
Method 4: Use Alternative Cloud Storage Services
Hit the limits of iCloud? Don’t want to pay Apple for more storage? You can use other cloud services instead—either as a replacement or a complimentary storage option.
- Google Drive: Handy for anyone who’s big on Google stuff. You start with 15 GB for free, which is really generous, and it works great with all the Google apps. You can grab it from the App Store and get your stuff uploaded pretty easily.
- Dropbox: It’s super easy to use and gives you 2 GB to start with. If you need more, they’ve got plans you can check out. Good for sharing files with friends or between your own devices. Find it in the App Store and see how it fits your needs.
- OneDrive: If you’re all about Microsoft and Office stuff, OneDrive could be your best bet. Starts you off with 5 GB for free. It’s all pretty seamless if you’re using Office apps a lot. Just download it from the App Store and start moving your files over.
- Box: This one’s great if you’re into security and working with a team. You get 10 GB free to start, which is pretty sweet. The app’s easy to use and you can get it from the App Store whenever you’re ready.
These apps are pretty cool for extra storage and they’ve all got their own thing going on. Just pick one that sounds like it’ll work for you and give your iPhone a bit of breathing room.
These might be the basics, but a little reminder never hurts. Keeping on top of these can help keep your iPhone’s storage in check without too much hassle.
Summing It Up
OK, we ended up with quite a list. But don’t feel like you have to go through every single step. We wanted to be thorough because different people use their iPhones in different ways. What works best for one person might not be as effective for another.
If we had to pick the top three must-do steps, we’d recommend:
- Clean Up Your Photo Library – Especially with a third-party cleaner app. It’s a no-brainer since apps usually can instantly free up gigabytes of space in just a few taps.
- Clear App Caches – Social media, messaging, and streaming apps hoard a ridiculous amount of storage over time.
- Clear Downloaded Files in the Files App – This one depends on your habits. Some people will barely get anything out of it, but others will find years’ worth of forgotten downloads that waste space.
That said, every other method can still make a big difference—it all depends on how you use your iPhone. Different people recommend different methods based on their own experiences. For example, one Redditor had a bad experience with automatic app offloading, so that might not be the best option for every person.
Also, some steps—like using iCloud to store photos and files—might not be the right fit for those who often offline or need instant access to original files, it could be inconvenient.
As you can see, there’s no single “right way” to free up iPhone storage, but we’re confident that some of these steps will be right for you. Pick the ones that match how you use your iPhone, and you’ll end up with a lot more free space.
FAQ
- Use an iPhone cleaner app
- Delete or offload unused apps
- Enable iCloud for Photos and activate the Optimize Storage setting
- Clear cache for often-used apps
- Delete attachments from your messenger apps (including Messages)
- Use a free iPhone cleaner app
- Clear your browser cache
- Delete app caches
- Delete or merge duplicate photos and videos
- Offload apps
- Remove unused apps
- Delete attachments from messenger apps (including the native Messages app)
- Use iCloud for apps like Photos, Messages, iCloud Mail, etc.
That said, newer models may handle storage tasks faster due to better hardware. Some cleaning apps might also run more efficiently on newer devices with more RAM and processing power. But overall, the cleanup process doesn’t change much between models.
If “System Data” is taking up a lot of space, restarting your iPhone or updating iOS can sometimes shrink it. In more extreme cases, doing a full backup and restore can help clear out bloated system storage. But there’s no official way to manually remove system files yourself.