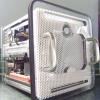
MiniHack Posted June 15, 2013 Author Share Posted June 15, 2013 Sorry not been updated for a while. Here are a few shots from just now. This one shows the latest version of the back which I have laser cut in house from matt black acrylic. I am bonding the acrylic to the original base, which I have given a quick spray of satin black to see if I like the colour. The extra holes in the back panel are for a power inlet and outlet at 12v, the adjustment knob of the small fan controller and for an extra USB port. The 12v outlet is intended for my small "retina" display that I am making up, and the USB port can of course be used for a number of things, but internally it is connected to two of the 5v sources on a USB header so that it can provide higher power - such as for DVD recorder and also to give more possibility to use an original set of Cube speakers. I'm using JB weld to bond the parts together and when it is set I'll add more to smooth the join and then sand back, mask off the acrylic panel and spray the sides again. I have a compressible adhesive strip coming which if it looks okay I'll use to replace the original type of spongy trim strips the Cube had. I am hoping that that strip will provide a nice seal between the Cube base and the inner can (and also conceal any messiness where the panels join!). So the current plan is for the Cube inner to be satin black.... 2 Link to comment https://www.insanelymac.com/forum/topic/288395-water-cooled-g4-cube/page/2/#findComment-1924319 Share on other sites More sharing options...
Mr.D. Posted June 15, 2013 Share Posted June 15, 2013 Hard to believe you can get all of that crammed into the cube! I'm looking forward to seeing what it looks like with the compressible adhesive strip - should clean up nicely! 1 Link to comment https://www.insanelymac.com/forum/topic/288395-water-cooled-g4-cube/page/2/#findComment-1924473 Share on other sites More sharing options...
Baudouin Posted June 15, 2013 Share Posted June 15, 2013 This no more a "Great job in this tiny Cube space" This is an incredible work. It's like Gulliver work inside Lilliput world. 2 Link to comment https://www.insanelymac.com/forum/topic/288395-water-cooled-g4-cube/page/2/#findComment-1924511 Share on other sites More sharing options...
MiniHack Posted June 15, 2013 Author Share Posted June 15, 2013 @Mr D and Baudouin. Thank you guys for the very nice comments. I just hope that when it is all fired up it works the way I want it to.....in my head I am already planning the next one. Still got to get back to my G5 build too. That one is waiting on me being certain of a few vital measurements before I get some big panels cut for the sides. I literally cannot afford to get my size wrong on any of the hole placements. 3mm polished ali panels are not cheap. I just wish Apple would publish detailed CAD files for their cases as it'd make things a lot simpler... Every time I measure the million holes in the case something seems to have moved. Maybe next month... 1 Link to comment https://www.insanelymac.com/forum/topic/288395-water-cooled-g4-cube/page/2/#findComment-1924517 Share on other sites More sharing options...
MiniHack Posted June 17, 2013 Author Share Posted June 17, 2013 I know you shouldn't take photos at night, with a flash, a bad camera etc. (so apologies) but thought I'd do a micro update. This one is showing the back part after bonding and with the compression seal applied. Also I made a small retaining piece from thin ABS sheet that holds my 500GB SSD in place against the side of the rad bracket (i.e. what used to be the drive holder before I butchered it - drive sits where the airport card would have sat). This thin ABS sheet is enough to hold the 2.5" drive in place and also to act as a trim piece to tidy cables out of sight. Next post won't be for a few days. I am now though getting seriously close to being able to add the last bits and pieces and do a switch on. 1 Link to comment https://www.insanelymac.com/forum/topic/288395-water-cooled-g4-cube/page/2/#findComment-1925245 Share on other sites More sharing options...
MiniHack Posted June 18, 2013 Author Share Posted June 18, 2013 Okay.....I lied. Had to spend a little time today and so I cut a new top sheet for the Cube from 0.25mm plasticard. Essentially this is the same as the original top sheet, but where there would have been a space for the plastic grill insert I have instead filled the space with a honeycomb pattern to give a false top grill. I could only find this plasticard in white, but as it is a material used a lot by modellers I gather it should be easy to spray paint. 1 Link to comment https://www.insanelymac.com/forum/topic/288395-water-cooled-g4-cube/page/2/#findComment-1925486 Share on other sites More sharing options...
Baudouin Posted June 18, 2013 Share Posted June 18, 2013 Nice job. That looks so great ! 1 Link to comment https://www.insanelymac.com/forum/topic/288395-water-cooled-g4-cube/page/2/#findComment-1925544 Share on other sites More sharing options...
MiniHack Posted July 16, 2013 Author Share Posted July 16, 2013 So, I have taken a few steps back to move a few more forward. I've actually been using the Cube in the form you saw above for a couple of weeks or so and quite happy with it, but still knowing I need to finish it off. In the meantime though I was thinking that perhaps there was a little more room in there to do something with. And that maybe I should look at the graphics side to match that a little more evenly to the power of the CPU. Inspired by Fleisch on TMx86 who put a Sapphire 7750 low profile into his Cube I thought that it would be nice to do the same thing in my build, but in keeping with the cooling scheme to watercool it. Watercooling is perhaps OTT for this card (as it is rated normally at 50w) but I considered that it would be worth trying to include it in the loop and see how that affects temp.s As a contingency I can still if needed switch to a small external res (or even include small pump/res. combo on the Cube back and use a conventional CPU block) but as the load temp.s I have been getting with the CPU have been so good I am interested to try this out first. Anyway, here is the virgin card: and here it is being transformed: I couldn't find a universal block that was low enough and had side outputs and was specifically for the 7750 so I took a gamble and modified an XSPC universal RASA block. I basically ditched the mount bracket and removed the screws holding the heat transfer plate to the block and then used studding and nuts to secure the plate back together again. This studding is on a 43mm x 43mm square matrix which fits through the GPU holes. The original rubber blocks from the aluminium air cooled heatsink are re-used to provide a cushioned contact for the GPU die and nuts are used on the reverse of the card to attach it. I am hopeful that the rubber blocks will let me get a good pressure on the GPU die without me over crushing it (!). To mount this card I made a new support piece that provides a route for a rigid PCI-e x 16 extender to come up through it and also to take a supplementary DC-DC converter board (photos to follow) and fix this all to the side supports of the Cube. The DC-DC converter board takes an unregulated supply of between 6 and 34v and provides a regulated 12v output of up to 120W. Before deciding to go ahead with this extra step I tried rigging the supplementary supply to a 24v input and using the output to supply the dedicated CPU molex connector while having the rest of the board/components supplied by the regular picopsu and tested it out under various operating conditions and all seemed to function well - so the Cube now has a potential 280W of power......not that I plan on using all of that. However, I am keen to try this as an experiment to see how well it might work. Plan is to get a high power (240W) external 12v supply and use that for everything in the Cube, but I do have to also look at getting the cabling solutions right from such a supply brick as potentially 20A needs to be factored in as an input current so a 4 pin connection system (e.g. like the original Cube used) is called for. In theory I think that by using a single high power 12v brick the Cube power regulators will not have to work hard and so heat from the PSU will not be a factor. ANyway, back to the case mod.s: I lowered the motherboard another 7mm over where it was before - to give more space - and here is a trial fit using an old 775 ITX board: Finally here is a first trial fit in the Cube base with single 120mm Noctua fan on the Alphacool radiator. Obviously next things to do are now a bit more complicated....new panel, more water fittings, making a circuit to ensure that the DC-DC board and picopsu can start at the same time from the on switch. So lots more things to figure out. Still, I am pretty sure one way or another it is all going to fit in there. 1 Link to comment https://www.insanelymac.com/forum/topic/288395-water-cooled-g4-cube/page/2/#findComment-1932576 Share on other sites More sharing options...
Tomppaq Posted July 16, 2013 Share Posted July 16, 2013 Nice tight mini build! I'm just wondering how much that cpu pump block moves water? 1 Link to comment https://www.insanelymac.com/forum/topic/288395-water-cooled-g4-cube/page/2/#findComment-1932639 Share on other sites More sharing options...
MiniHack Posted July 16, 2013 Author Share Posted July 16, 2013 Nice tight mini build! I'm just wondering how much that cpu pump block moves water? Well, the answer to that is pretty slowly, but then again it is a small loop and the tube is only 6mm diameter internal. To be honest I was sceptical it would work but I have been getting really good temperatures just cooling the CPU (doing GB stress tests with it running turbo to 4.3GHz gave CPU temp.s of less than 60C and idle was less than 30c even in this british heatwave). But yeah, the flow rate is not exactly huge. I do like to play with things though to see what will happen so the next phase will really show whether the H80 pump/block and the small loop can handle it. If not then there's always a plan "B". Link to comment https://www.insanelymac.com/forum/topic/288395-water-cooled-g4-cube/page/2/#findComment-1932655 Share on other sites More sharing options...
nickjf20 Posted July 17, 2013 Share Posted July 17, 2013 Excellent as always! Link to comment https://www.insanelymac.com/forum/topic/288395-water-cooled-g4-cube/page/2/#findComment-1932918 Share on other sites More sharing options...
MiniHack Posted November 22, 2013 Author Share Posted November 22, 2013 Mod finally finished off and now posted last pictures and video into the "Mac Mod" competition - http://www.insanelymac.com/forum/topic/294114-water-cooled-g4-cube-case-mod/ Give me a vote if you like it enough please! 1 Link to comment https://www.insanelymac.com/forum/topic/288395-water-cooled-g4-cube/page/2/#findComment-1970579 Share on other sites More sharing options...
MiniHack Posted November 30, 2013 Author Share Posted November 30, 2013 So I guess I lied, these mods are never really complete are they? I added an extra hard drive. So there are now 2 500GB drives (one on each side of the case) ann a 64GB mSATA (with Win 7 on it). Also I have been playing with the outer case. At the moment it is looking like this. But I'm currently now modding a case that I can use with the Cube standing up (in the conventional way). This case though has a new top - which is more open than the original top and of course has a hole at the back to exhaust the air from the radiator. I think I'm going to go with a black and white scheme so the main case will be white, with a black mesh at the top and the grill being black at the back. Doing lots of rubbing down now getting ready to do the paint work. 1 Link to comment https://www.insanelymac.com/forum/topic/288395-water-cooled-g4-cube/page/2/#findComment-1972649 Share on other sites More sharing options...
Recommended Posts