
How to Fix the iPhone Memory Full Message on Your iPhone (iOS 18)
iPhone says its memory is full again? Just when you need to take a photo or download an app, right? The internet is filled with posts about this exact problem, but our guide aims to give you all the answers. Here we gathered simple and proven solutions as well as more hardcore fixes for when nothing else works. Just keep reading.
Common Reasons for the iPhone Memory Full Message
You can see the ‘iPhone storage full’ alert even when it seems like your device shouldn’t be at full capacity. This message often pops up due to several not-so-obvious reasons, which can cause inconvenience.
Here are some typical culprits behind this notification:
- Cached Data and Temporary Files: Apps frequently store cache and temporary files to improve performance. Over time, these files can accumulate and consume significant space, leading to an iPhone storage full message.
- Media Files: Photos, videos, and music are common space hogs. Sometimes, the storage consumed by these files isn’t immediately apparent, contributing to the illusion that your iPhone’s memory is full.
- Old Messages and Attachments: Text messages, especially those with attachments like photos and videos, can occupy more space than you might expect. Cleaning these up can free up a considerable amount of space.
- Apps and Games: Some apps and games can take up more space than initially installed due to data storage and updates. Regularly reviewing and removing unused apps can help manage storage effectively.
When facing an iPhone storage full message, start by checking the iPhone Storage under Settings > General to see a breakdown of what’s consuming your space. From there, you can take steps to manage and free up storage.

4 Immediate Steps You Can Take to Fix the iPhone Memory Full Error
iPhone’s storage cleanup doesn’t have to be complex. We’ll show you 4 simple steps to start with, from quick fixes to slightly more involved things. Here’s how to deal with this task:
Step 1: Manage Photos and Videos
We will begin with media files—they usually take up the most space, so it’s worth starting there. You can free up media storage in a few ways. If you use iCloud to sync your Photos, “Optimize iPhone Storage” feature can free up a lot of space without deleting anything. Here’s what to do:
- Go to ‘Settings’ and tap on your name at the top, then select “iCloud” > “Photos.”
- Enable “Optimize iPhone Storage” to keep smaller, device-sized versions of photos on your iPhone while the originals are stored in iCloud.

This replaces full-resolution photos with smaller versions while keeping the originals in cloud. If your iPhone is low on space, this might instantly free up gigabytes without much effort.
We recently came across a new free app that automates all of this—Clever Cleaner: AI iPhone Storage Cleaner. It’s a 100% free app from CleverFiles that uses Smart Cleanup mode to automatically clear media clutter in seconds, but if you prefer more control, it also offers a more targeted semi-automatic cleaning.
Although it’s a brand-new app, it runs surprisingly smoothly—we didn’t notice any bugs or crashes during testing. The AI algorithms for photo cleanup are quite accurate, even compared to paid options that have been on the market for years, so it feels safe to automate the process and let it decide what to delete. But don’t worry—it won’t remove anything without your approval. You always have full control over what stays and what goes.
The app is straightforward and intuitive. But just to demonstrate, we’ll show you how to convert your Live Photos to save a lot of space—all while your photos stay exactly where they were. The only thing that gets removed is the short clip that plays when you open them:
- Use this link to download Clever Cleaner from the App Store.
- Open the app and allow access to your media library.
- Tap Lives.

- Then select the photos you want to convert (or just tap Select All to convert your whole Live library).
- Tap on Compress. Below the button, the app displays how much storage space this action will free up.

- Wait for the app to finish. The app will save a new still photo and then ask what to do with the original Live Photo.

- You can either keep the Live Photo in the Trash for a temporary backup or permanently delete it to free up space.
If you choose to keep it in the trash, you can restore it directly from the app if you change your mind after the fact. Now, check the other 3 tabs in Clever Cleaner to free up even more space:
- ✅ Screenshots – old screenshots that pile up over time.

- ✅ Heavies – Identify and delete huge video files that you no longer need.

- ✅ Similars – Let the AI suggest images that look alike so you can remove the worst ones.

It all adds up. Most people should be able to clear gigabytes of no-longer-needed media files with just a few taps.
Step 2: Delete Unused Apps
Next, check which apps you no longer need—because, let’s be honest, most iPhones have at least a few apps that haven’t been opened in months. These apps not only take up storage but also accumulate cached data over time, so your iPhone will run out of space faster.
- Touch and hold the app icon on your Home screen.
- Select “Remove App” from the options.
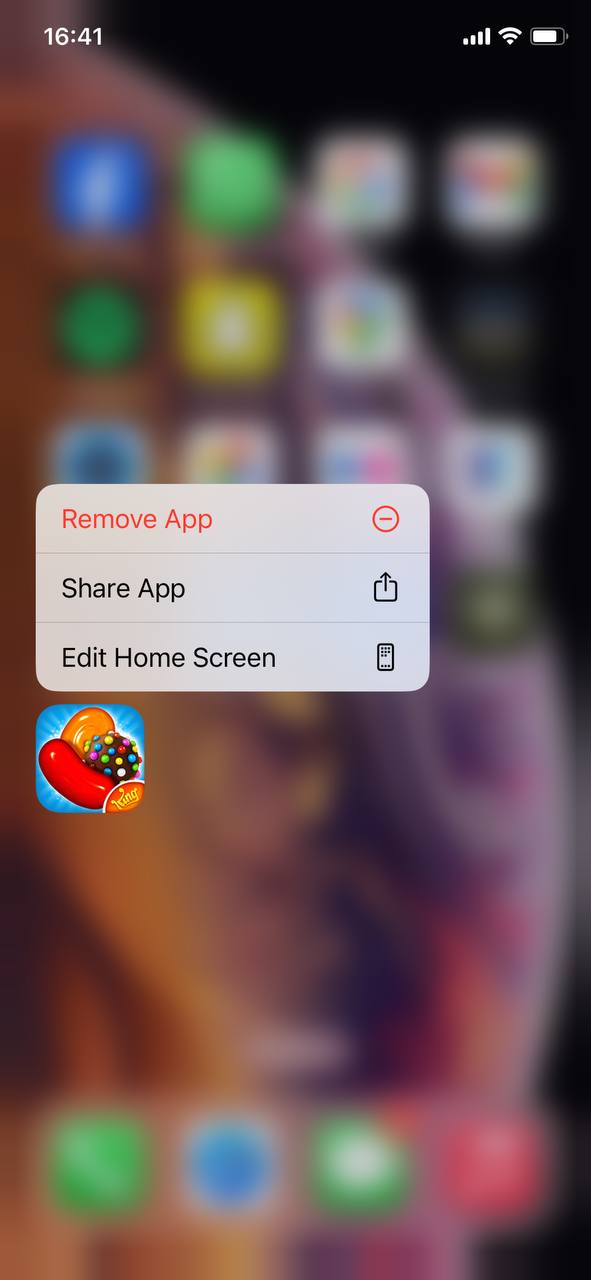
- Tap “Delete App” to confirm and uninstall the app, freeing up space.

Step 3: Clear Safari Cache
Another quick way to free up space is clearing Safari’s cache and website data. Over time, Safari stores temporary files, cookies, and browsing history, which can take up hundreds of megabytes or more. While this data helps websites load faster, it isn’t that important and can be cleared safely.
- Open the Settings app on your iPhone.
- Find Safari in the list of apps and tap on it to open Safari settings.
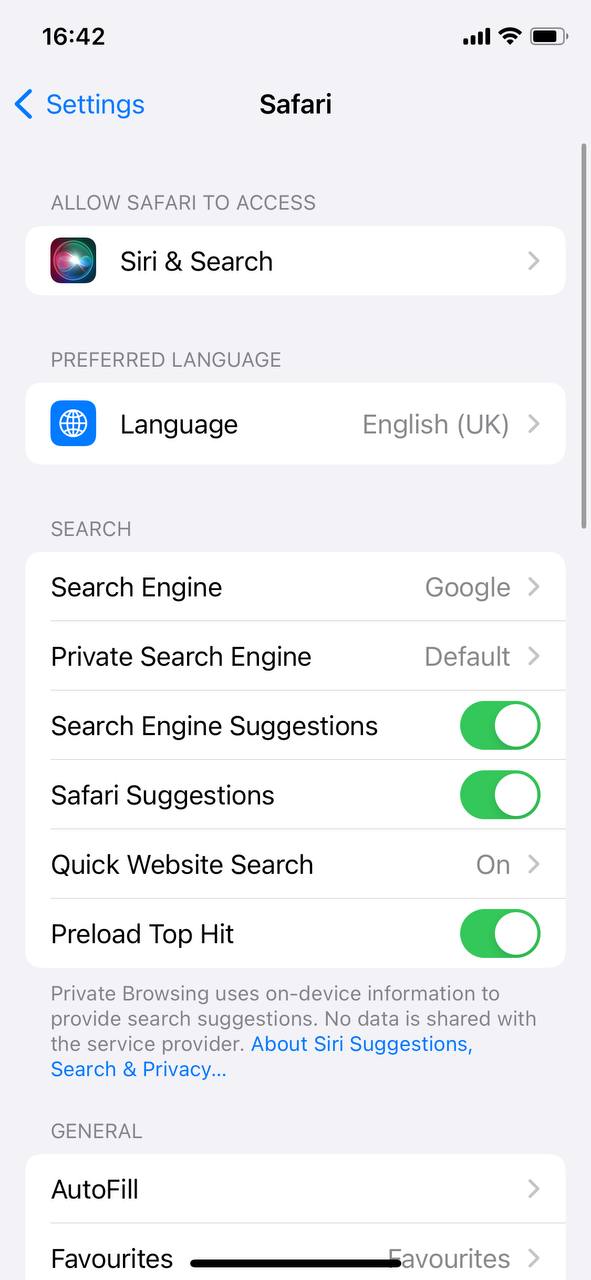
- Scroll to the bottom and select “Clear History and Website Data.”
- Confirm by tapping “Clear History and Data.”
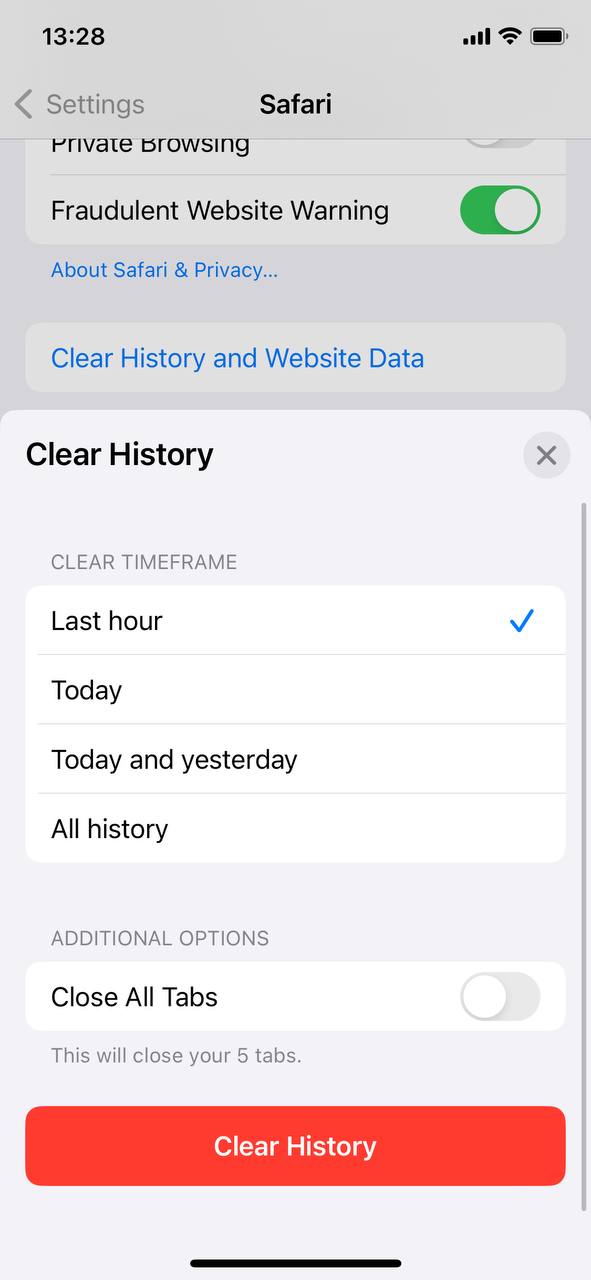
Clearing cache won’t just free up space it also may solve browsing issues and protect your privacy.
Step 4: Review and Delete Large Messages and Attachments
Messages, especially those with photos, videos, and other attachments, can quietly take up gigabytes of space over time. If you’ve been using Message for years, there’s a good chance that old conversations and large media files are still sitting on your device, even if you don’t need them anymore.
- Open the Messages then go to the conversation list and open any conversation with attachments you wish to remove.
- Tap and hold any messages or, when menu appear select ‘More…‘ now you can select all attachments from conversation you wish to delete.
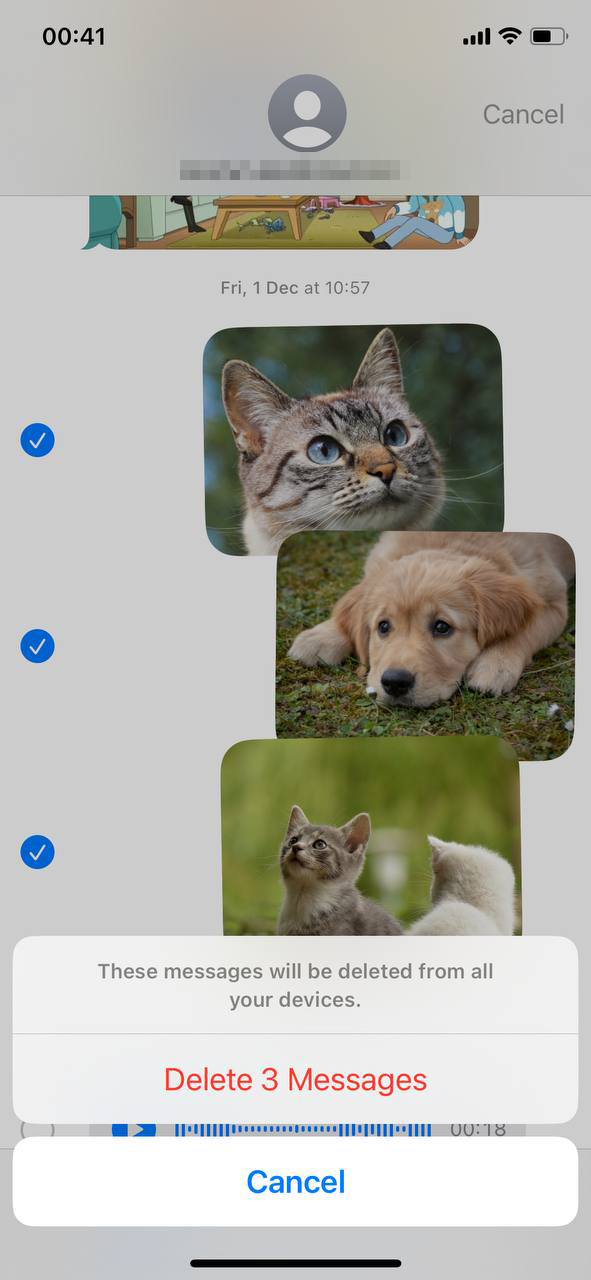
Regularly reviewing message attachments can prevent unexpected storage issues, especially with media-rich conversations.
Solutions for Persistent Memory Full Issues
If those steps weren’t enough—we’ve got a few more solutions. We’ll start with a couple of easy ones that can help in most cases, then move on to more drastic measures that might be necessary for particularly stubborn storage problems.
Option A: Auto-Delete Old Conversations to Free Up Space
Instead of manually deleting old conversations, you can set your iPhone to automatically remove old conversations after a set period. This way, your iPhone will constantly “self-clean”.
- Open Settings and go to Messages.

- Scroll down to Message History and tap Keep Messages.
- Select either 30 Days or 1 Year instead of “Forever.”

- Confirm the change.
Option B: Set a Cache Limit for Apps That Allow It
Some apps, like Telegram for example, give users control over cache storage—letting you set a size limit so it automatically clears out files before they pile up.
- Open Telegram and go to Settings.
- Tap Data and Storage > Storage Usage.
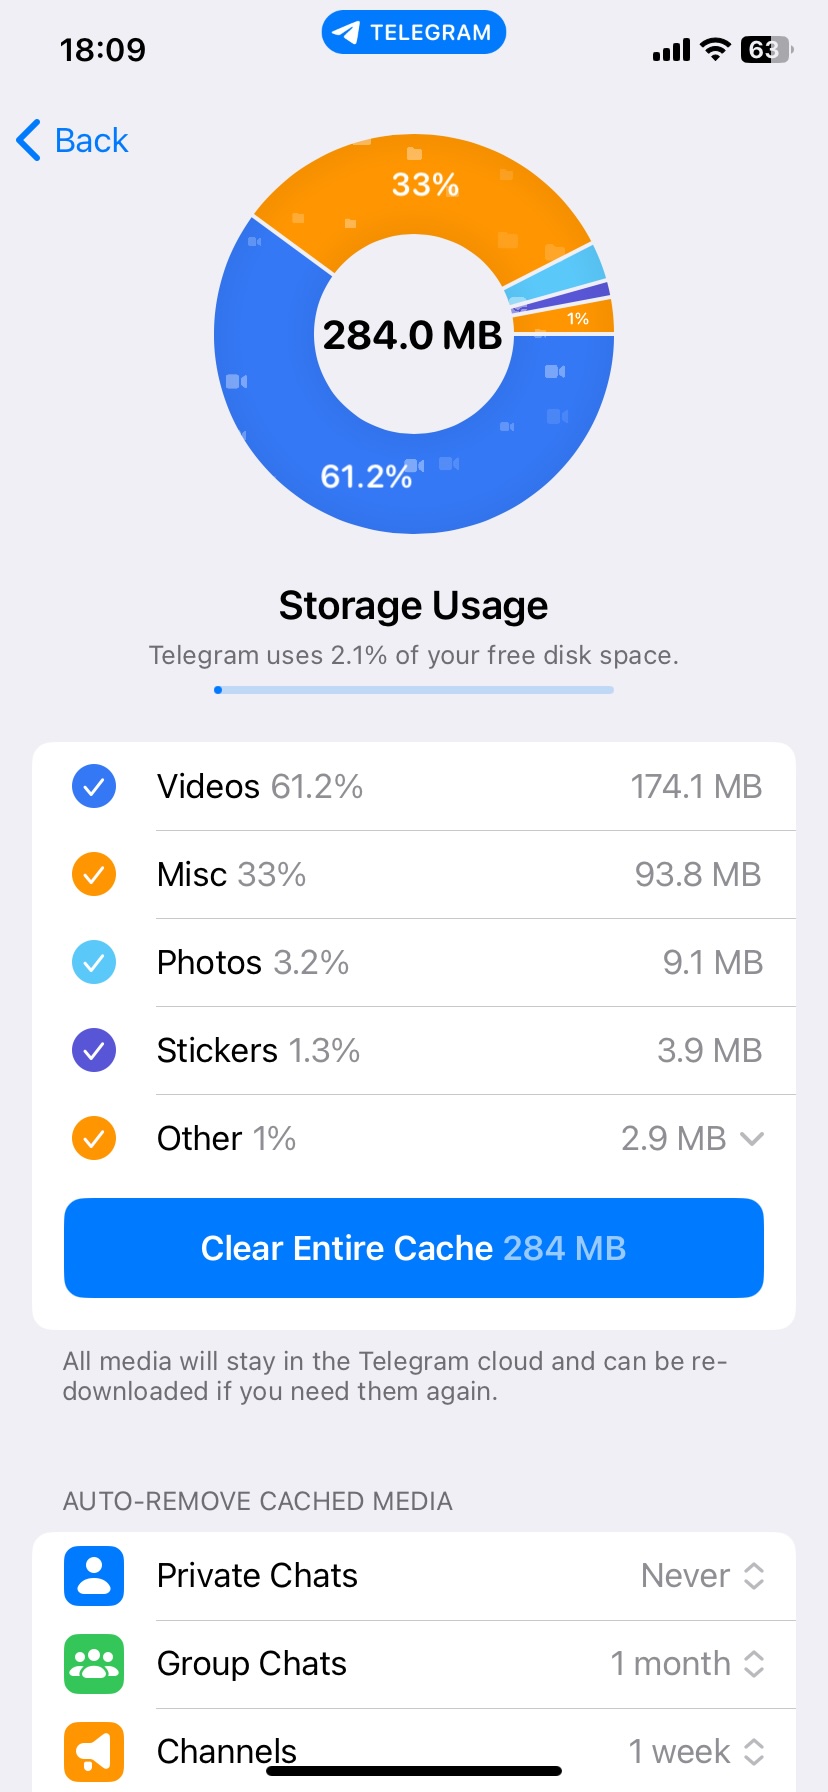
- Under Maximum Cache Size, set a limit.

- Tap Clear Entire Cache to instantly free up space.

While most iOS apps don’t let you directly set cache limits, some provide built-in storage management features:
- WhatsApp – Lets you review and delete large files and forwarded media from chats.
- Spotify – Lets you delete downloaded music.
- Netflix/YouTube – Allows clearing cached videos to free up streaming storage.
Option C: Reset iPhone Settings
Resetting your iPhone’s settings can often fix persistent storage problems without erasing your data.
- Go to Settings > General > Transfer or Reset iPhone.
- Select “Reset All Settings.”
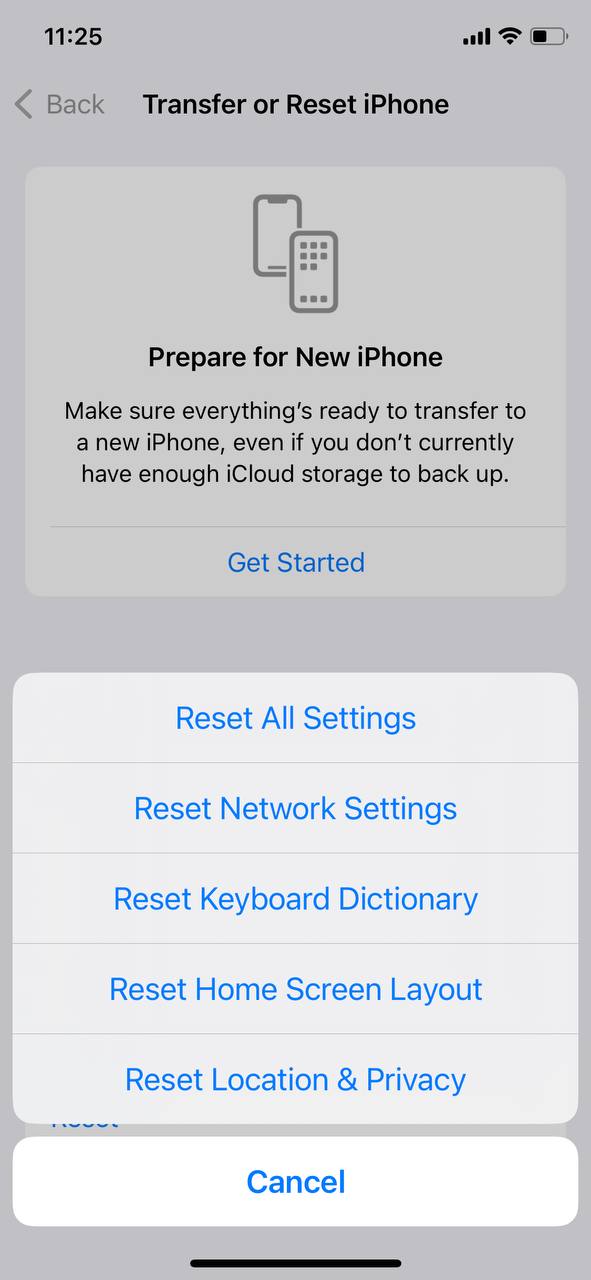
- Enter your passcode and confirm the reset.
Option D: Backup and Restore iPhone
A fresh start can sometimes be the best solution. Backup your iPhone, then restore it through settings or using iTunes or Finder on a Mac with macOS Catalina or later.
- Backup your iPhone via iCloud or your computer.
- Go to the Transfer or Reset iPhone menu previously mentioned.
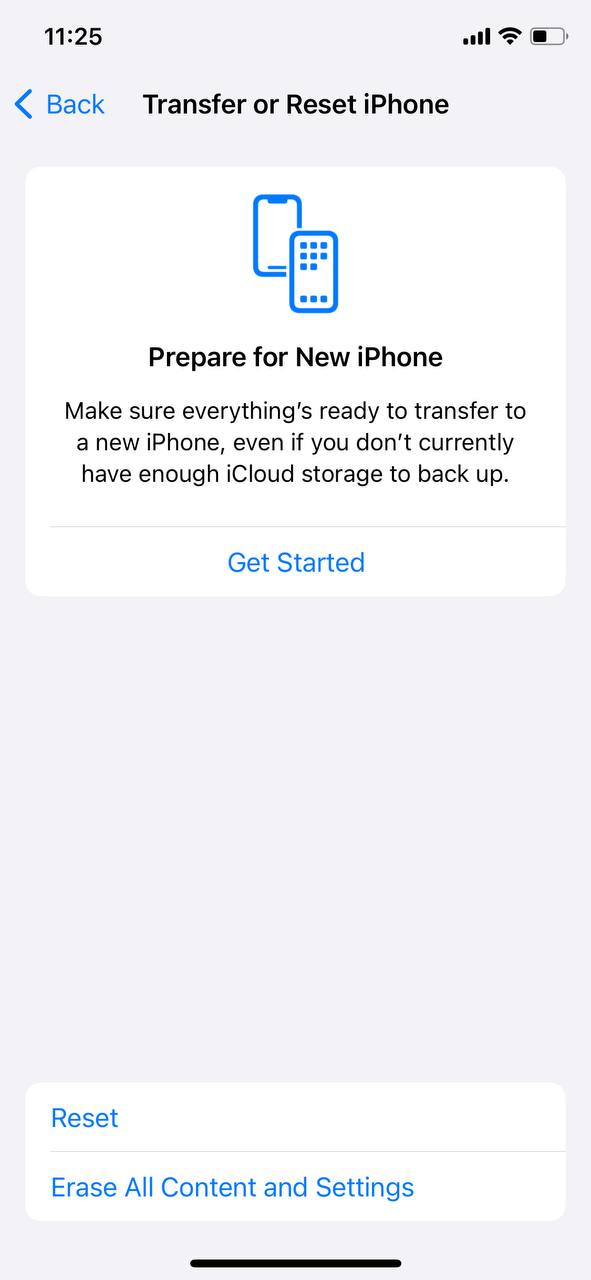
- Tap on Erase All Content and Settings, then follow the instructions on your screen.
Option E: Contact Apple Support for Guidance
If the above steps don’t help, reaching out to Apple Support can provide personalized assistance.
- Visit the Apple Support website for online resources or to schedule a call.
- Visit an Apple Store or authorized service provider for in-person help.
Final Words
Official Apple Support may not be the most convenient option for everyone. Maybe you don’t want to wait for a response, or there’s no official Apple Store or service provider nearby. Fortunately, there are plenty of other places where you can find help and troubleshooting guidance. Online communities like official Apple Discussions, r/iphone, and r/ios are filled with experienced users who can offer solutions based on their own experiences.
You can also join our own iPhone forum for help from fellow users and experts. Just be sure to provide as many details as possible when posting your issue. Mention your iPhone model, iOS version, what you’ve already tried, and the exact messages or alerts you’re seeing—the more details, the better!
FAQ
- Regularly review and delete unnecessary photos, videos, and apps to optimize iPhone storage. Alternatively, use a cleaning app to automate this process.
- Utilize iCloud or other cloud storage services to offload files and optimize photos on iPhone, ensuring they don’t consume your device’s physical storage.
- Enable the “Offload Unused Apps” feature in Settings > iTunes & App Store to automatically remove apps you don’t use often while keeping their data.
- Manage message attachments by regularly deleting unnecessary photos, videos, and gifs from conversations.
- Limit the storage used by streaming apps like Music, Podcasts, and Video by downloading content selectively.
- When you delete photos, videos, or files, they move to the Recently Deleted folder and remain there for up to 30 days unless manually removed. Empty this folder in Photos and Files to free up space immediately.
- Apps and iOS itself store temporary files, logs, and other cached data that may not be automatically cleared. Try to restart your iPhone.
- Over time, iOS accumulates system files, logs, and caches that can take up a significant amount of storage. This category isn’t always easy to clear manually, but restoring your iPhone from a backup or resetting settings can sometimes help.