How to Compress Photos on iPhone with iOS 26
If you want to reduce the size of a specific photo or even your entire library on your iPhone, this guide has you covered. Our team rolled up our sleeves, tested iOS 26 features, played around with apps, and found the best ways to compress photos on your iPhone. Whether you’re trying to free up space, share pictures without a wait, or just get your gallery under control, we’ve got the lowdown on how to make it happen.
5 Ways to Compress Photos on iPhone
So, here are 5 ways to compress photos on your iPhone that we trust. We’ve got third-party apps, online services, and tricks using built-in iPhone features—all tested by us and proven to actually work. Each option has its own perks, so you can pick what works best for you. Let’s get into it!
Method 1: Use the Built-In iPhone Compression Tool in the Files App
At first glance, it may seem like iOS doesn’t offer any built-in way to compress images on an iPhone. The Photos app really doesn’t give you such an option, however the Files app quietly includes a tool that can handle this task.
This feature often looks like it exists only to convert images from one format to another. In reality, when you choose the output file type, you can also keep the same format and simply apply compression. Even better, you can select the compression level, and the visual quality of the image stays unchanged.
The main downside is that most photos live in the Photos app, not in Files. Because of that, you first need to move or copy images into the Files app before you can compress them.
Here’s how to compress an image using the Files app:
- Open the Photos app and select the photo you want to compress.
- Tap the Share button and choose Save to Files.
- Pick a location in the Files app (for example, On My iPhone), then tap Save.
- Open the Files app and navigate to the folder where you saved the image.
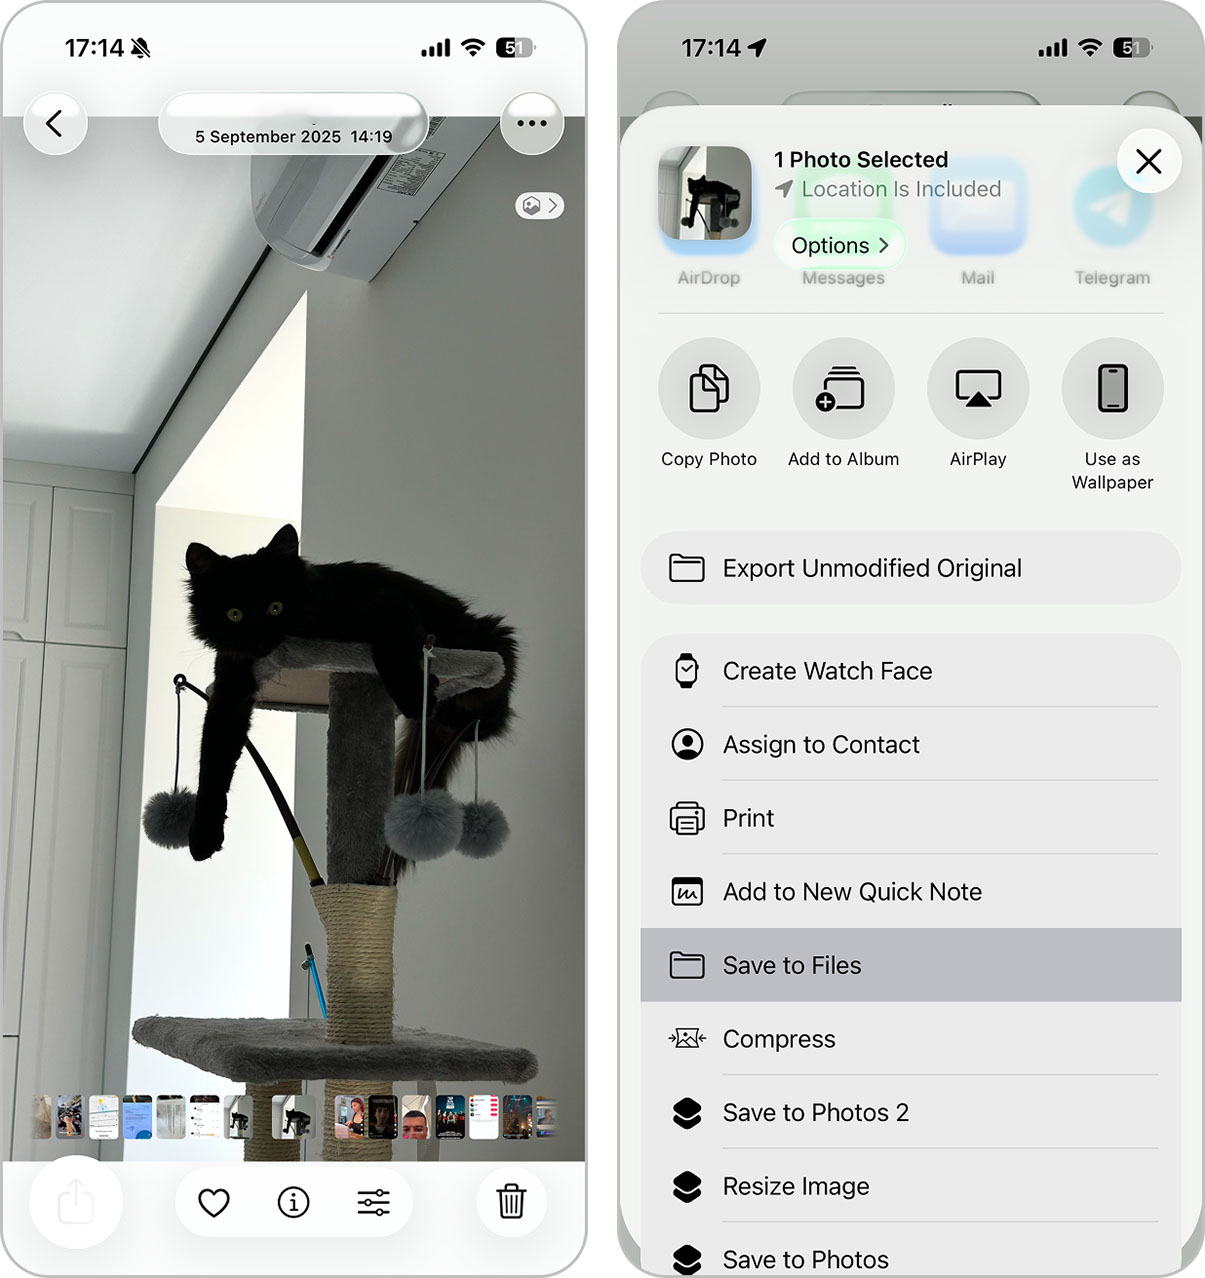
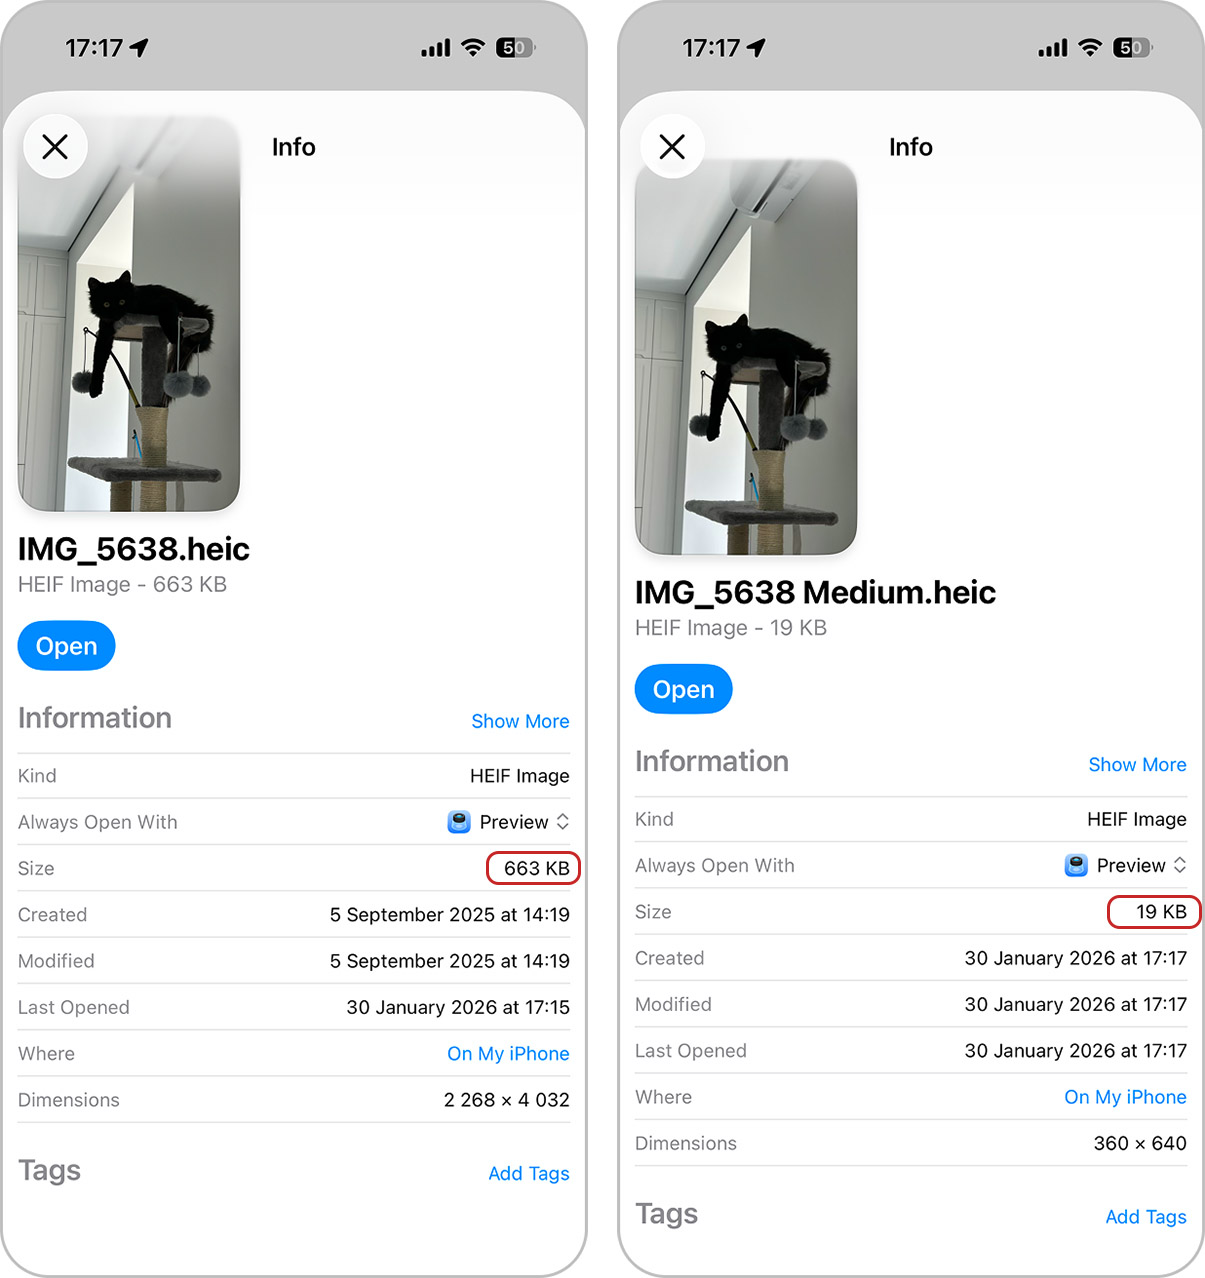
- Tap and hold the photo, then select Quick Actions and Convert Image.

- Choose the file format. You can select the same format as the original image if you only want compression.
- Select the desired file size when prompted.
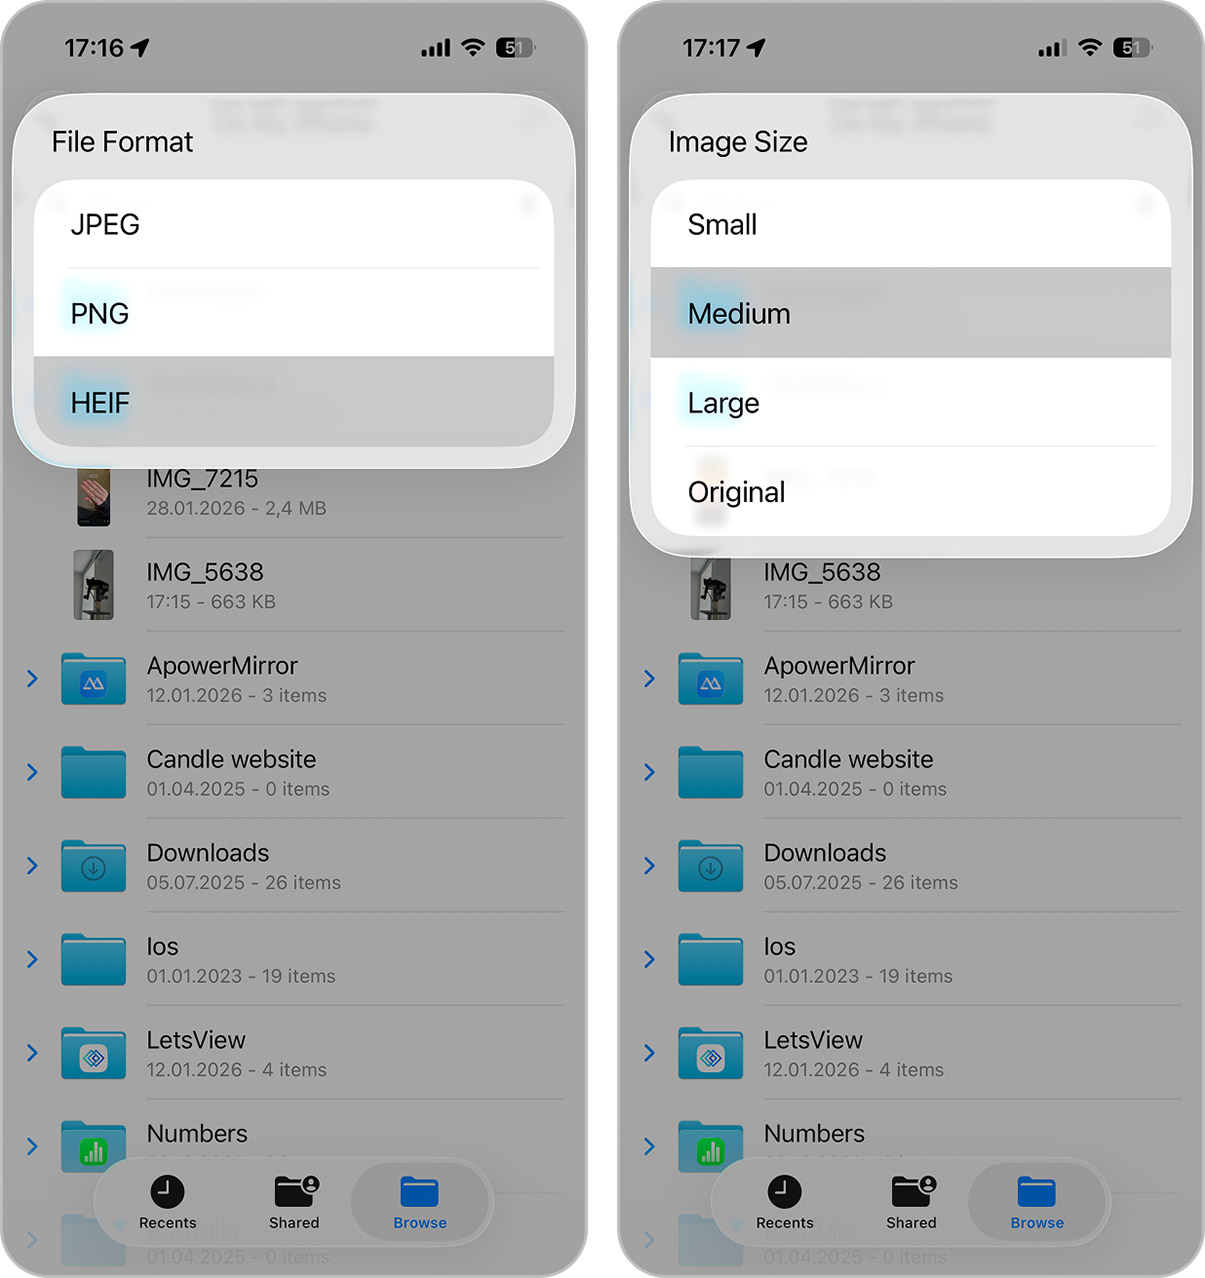
- The Files app will create a new, compressed version of the image in the same folder.
Method 2: Compress Image Size on iPhone by Removing Live Photo Data
When it comes to compressing iPhone photos, Live Photos deserve special attention. They’re a cool iPhone feature that captures a short video alongside your photo. While they’re fun to look at, they take up significantly more space than a standard photo. Thankfully, you can quickly turn them into normal still images with no animation, all while keeping the same great quality.
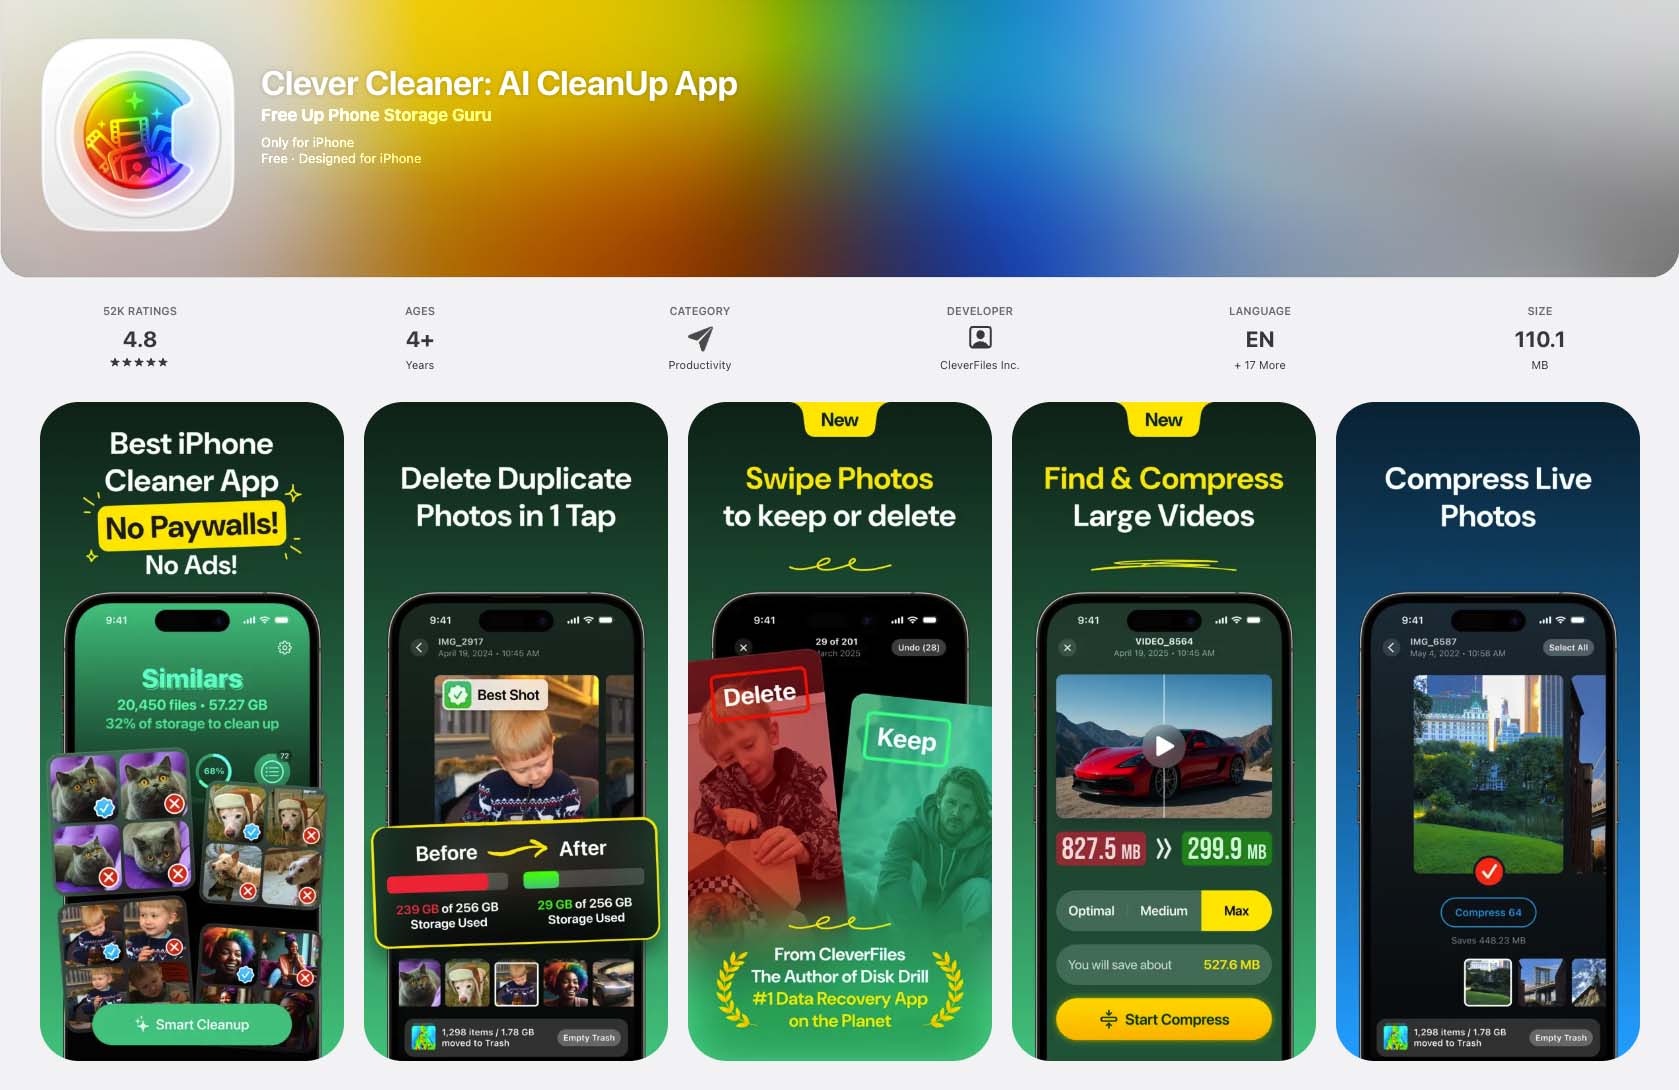
We’ve recently found a free Clever Cleaner cleanup app for iPhone that makes this kind of compression super simple. It’s a free iPhone cleanup app that focuses mainly on managing and organizing your photo library, but it includes a feature that lets you remove the Live Photo component and keep only the still image. This alone can significantly reduce photo file size on an iPhone.
Follow these steps to convert images with Clever Cleaner:
- Find and download Clever Cleaner from the App Store, or use the QR code on the official Clever Cleaner website.
- Launch the app and grant full access to your photo library.
- By default, the app opens the Similars feature, so on the bottom toolbar, switch to the Lives section.
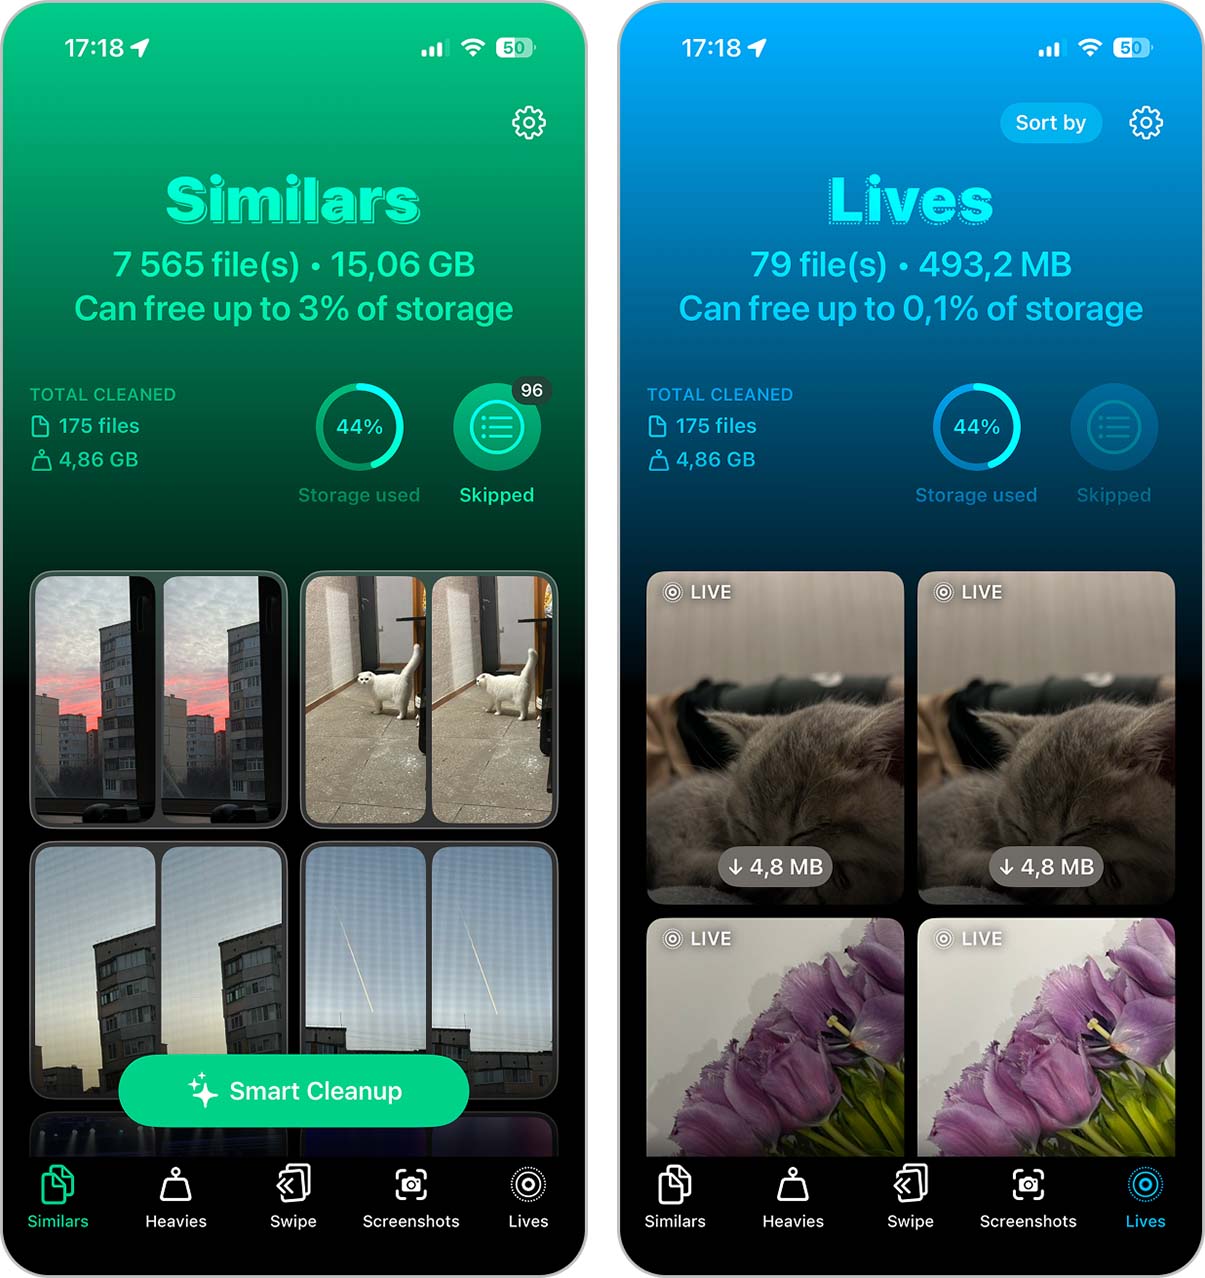
- You’ll see all your Live Photos in one place. Select the ones you want to convert into regular images.
- In the middle of the screen, tap Compress. Below the button, the app shows how much storage you’ll save.
- After compression, Clever Cleaner asks whether you want to delete the original Live Photos or move them to the trash. If you choose the trash option, you can restore them later if needed.
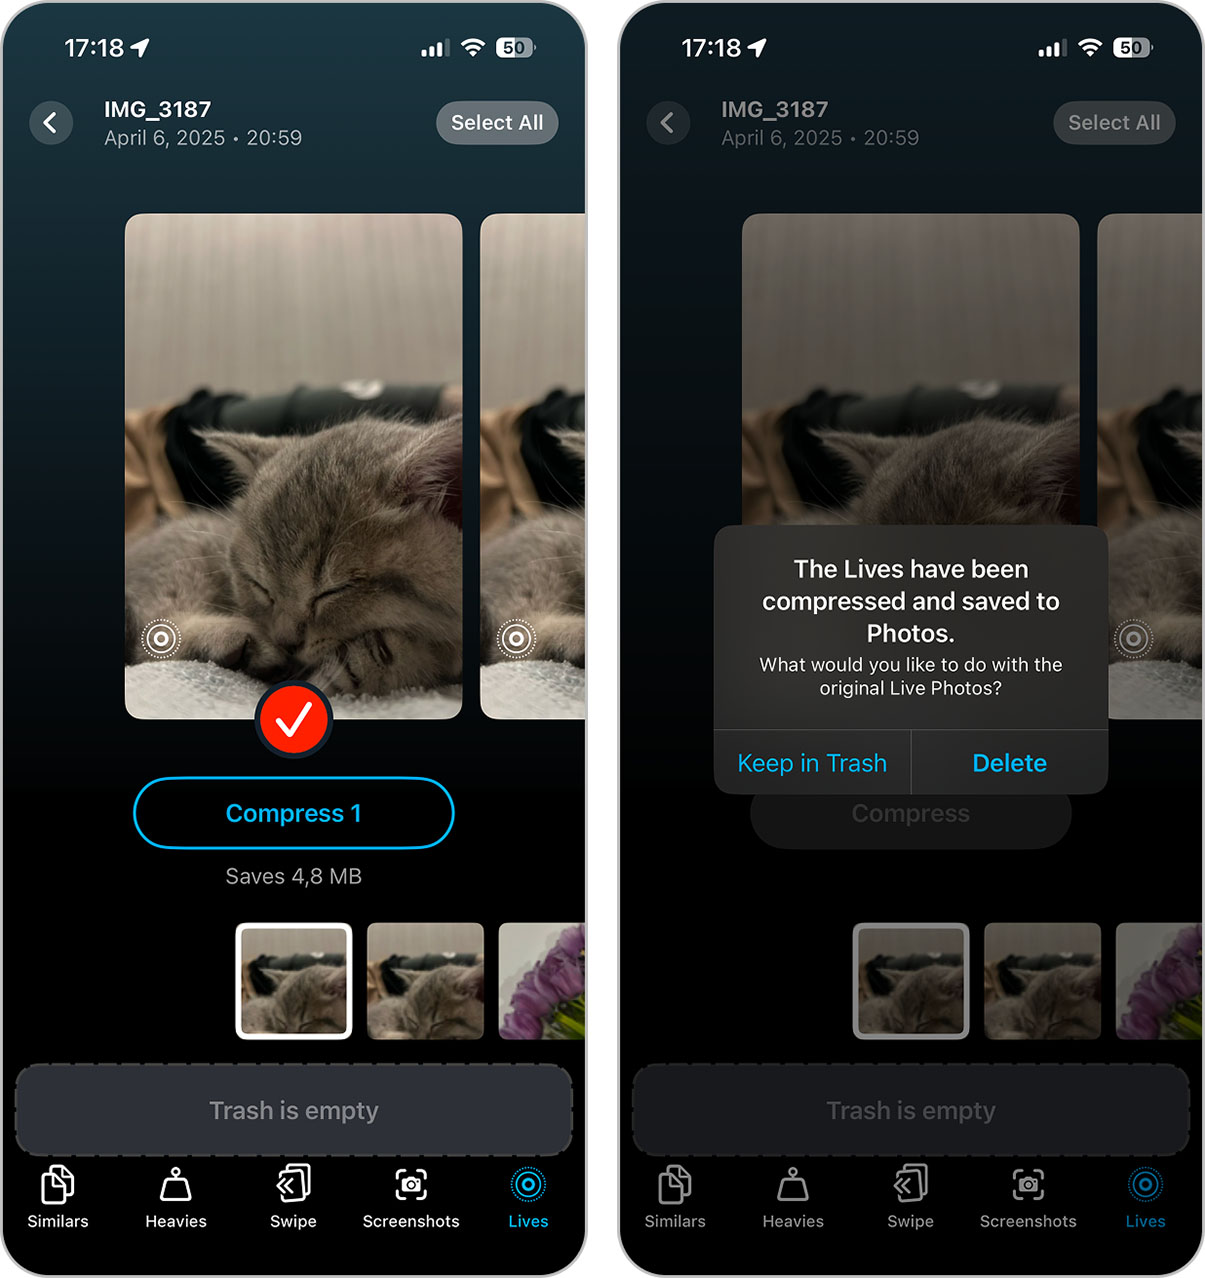
- After the process finishes, you’ll find the converted image in your Photos app.
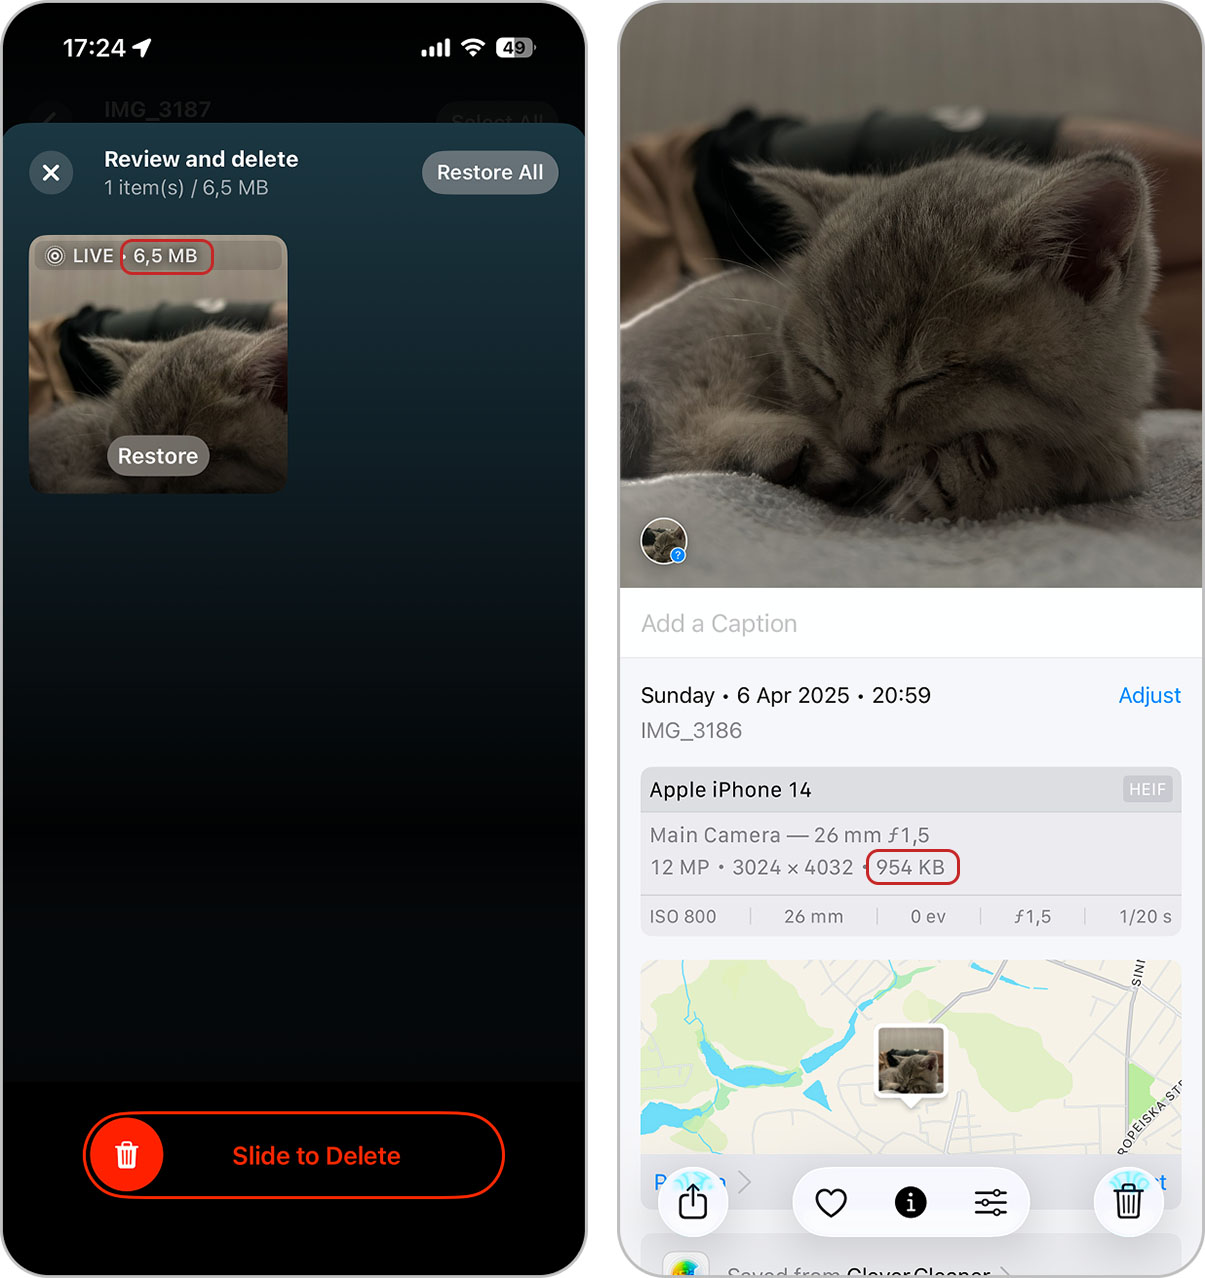
What’s interesting is that the iPhone doesn’t show the full size of Live Photos by default. In the Photos app, you only see the size of the still image, while the video part isn’t counted there. Because of that, the actual storage impact of Live Photos is often hidden. To see the real size, you need to use a third-party app like Clever Cleaner or import Live Photos to a Mac, where both parts are taken into account.
Beyond Live Photos, Clever Cleaner offers several tools that help clean up and optimize your photo library:
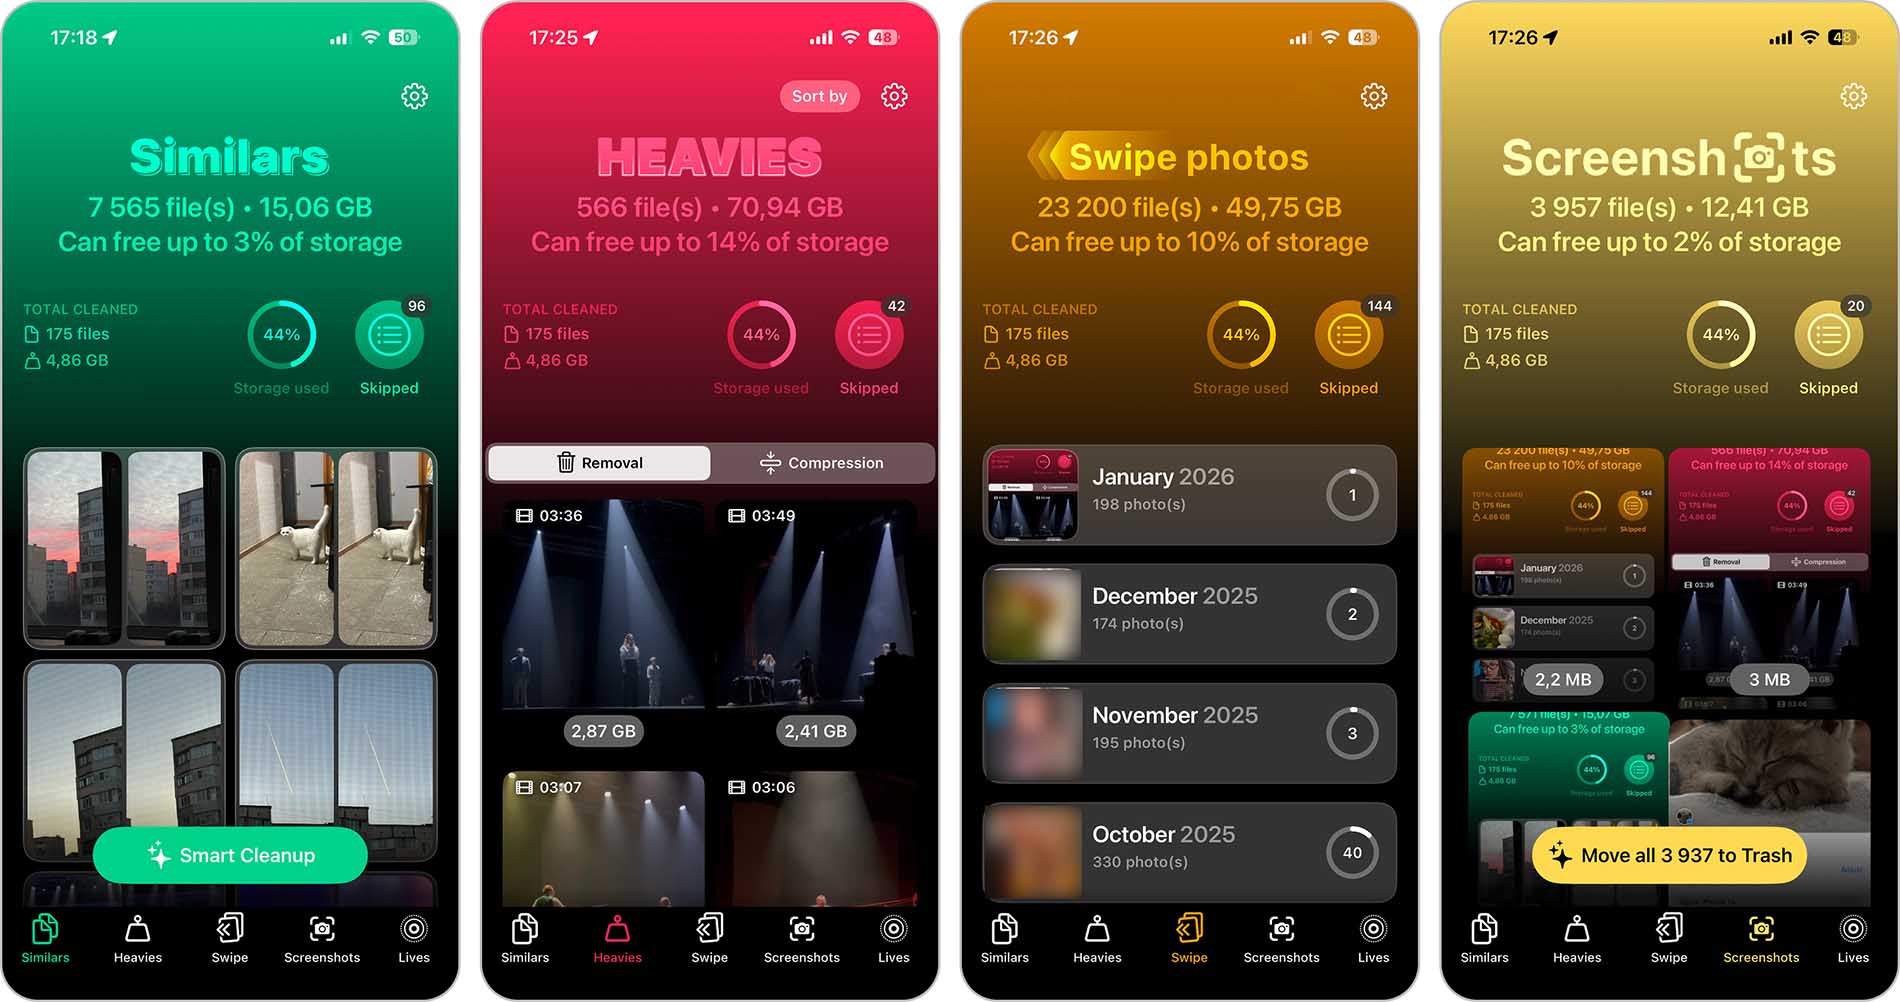
- The Similars feature uses AI to identify similar images, unlike the native Photos app, which only detects exact duplicates. This makes it much easier to clean up your library by removing photos that are almost identical (but slightly different).
- Heavies is especially useful for large video files, as it sorts them by size, with the biggest ones shown first—something the native Photos app doesn’t do. Inside this section, you can also compress videos, which comes in handy if you don’t want to delete them but still need to reduce their file size.
- Swipe-based photo view displays your photos grouped by the month they were added to the Photos app, and you can swipe left or right to quickly delete unwanted images and keep the ones you need.
- The Screenshots section mirrors your Screenshots album but adds extra context. It shows the file size of each screenshot and lets you remove all of them in a single tap.
Method 3: Utilize Third-Party Apps for Photo Compression
When native iPhone features are not enough, and full-scale cleaning apps feel like overkill, the App Store offers a simpler alternative—iPhone image compressor apps. These tools focus on compressing photos without unnecessary extras.
Most of these apps work in a very similar way. You select photos from your photo library (sometimes one by one, sometimes in batches if the app allows it), choose a compression level, and let the app handle the rest. In some cases, compression levels come as presets like low, medium, or high. In others, you can fine-tune the result using sliders that control quality or resolution. Once everything is set, the app processes the images automatically and saves the compressed versions back to your library.
To show how this works in practice, let’s take Compress Photos & Pictures as an example:
- Download Compress Photos & Pictures from the App Store and launch the app.
- Grant access to your photo library when prompted.
- Tap Select Photos to Compress, then pick the photo you want to compress.
- Use preset options to adjust the quality and photo dimensions manually.
- Tap Compress to start the compression, then wait a few seconds while the app processes the image.

- Once finished, the compressed photo is saved, and you can review the result or remove the original if you’re satisfied.

Method 4: Employ Online Services to Reduce Photo File Size on iPhone
If you don’t want to use any of the methods above, another alternative is an online iPhone photo compressor. These services work directly in your browser and don’t require installing apps on your device.
When choosing an online compressor, pay close attention to supported file types. Most services handle only JPEG and PNG images. If your photos are taken in HEIC format, you’ll need to find a tool that supports it or fall back to other ways to compress photos on iOS that we covered earlier.
The workflow across online compressors is nearly identical, so we’ll use Compress JPEG as an example to show how it works:
- Open Safari or any browser on your iPhone and go to the Compress JPEG website.
- Tap Select Files and upload photos from your photo library.
- Wait while the service uploads and processes your images.
- Set the photo compression level, then click Compress.

- Once compression finishes, download the compressed photos back to your iPhone.
- Save the files to the Photos app or the Files app, depending on your browser settings.

Online tools work in a similar way and are useful for quick, one-off tasks. Just keep in mind that these are web-based services, so always use a secure internet connection when uploading personal photos, especially if they contain sensitive content.
Method 5: Convert Images to Another Format
The last option for compressing pictures on an iPhone is to convert them to a different image format. In many cases, this reduces file size simply because some formats store image data more efficiently than others.
Format conversion is a broad topic, so below is a quick overview of the practical ways to use it on iOS without details:
- You can convert images directly in the Files app, which includes a built-in conversion tool. You just move a photo from the Photos app into Files, use the Convert Image action, select the target format, and save the new file. This works well for occasional conversions and doesn’t require installing extra apps. We walked through this feature in more detail, with visuals, in Method 1 above.
- Another option is using a photo converter app from the App Store (for example, The Image Converter by Float Tech or Image Converter – JPG PNG HEIC by WEBDIA INC). These apps follow a similar workflow when you select photos from your library, choose an output format, optionally adjust compression settings, and let the app handle the conversion. They’re more convenient for batch processing and larger photo libraries, though free versions often come with limits.
- Online image converters, such as FreeConvert.com and HEIC to JPEG Online Converter, are also an option if you prefer not to install anything. You upload photos through a browser, select the desired format, and download the converted files back to your iPhone.
Alternatives to Compression
Aside from traditional compression, there are other ways to manage and reduce photo file sizes on your iPhone. These aren’t full compression methods but rather quick hacks for moments when you need a smaller image immediately and don’t want to deal with exports, apps, or online tools.
Method 1: Take Screenshots of Photos (Quick Hack)
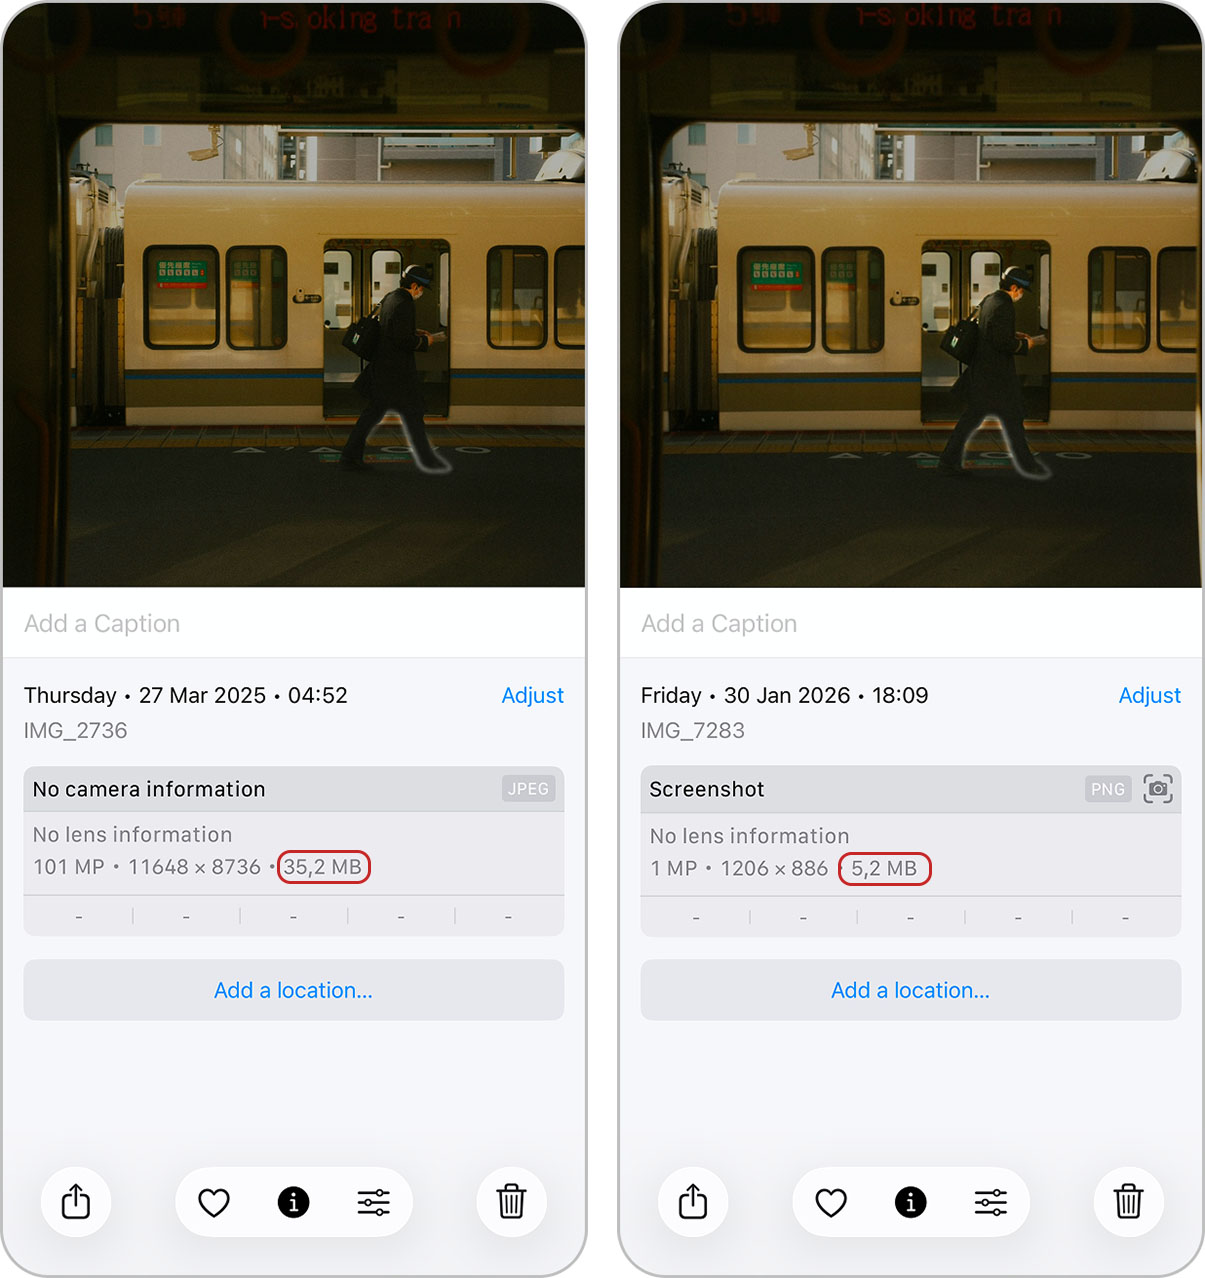
The last method is more of a quick hack—great if you’re in a rush and don’t have time for apps or settings. Taking a screenshot of a photo instantly reduces its file size since screenshots are saved at a lower resolution. It’s not the best option for preserving quality, but it works if you need smaller files fast for sharing or saving space.
Here’s how to compress photos with this method:
- Open the photo in full-screen mode in the Photos app.
- Take a screenshot by pressing the Power and Volume Up buttons at the same time.
- Your screenshot opens in the full-screen editing view automatically. Use the Crop tool to remove everything except the photo itself, including any borders or UI elements.
- Tap the check mark in the upper-right corner to save the screenshot to your photo library.
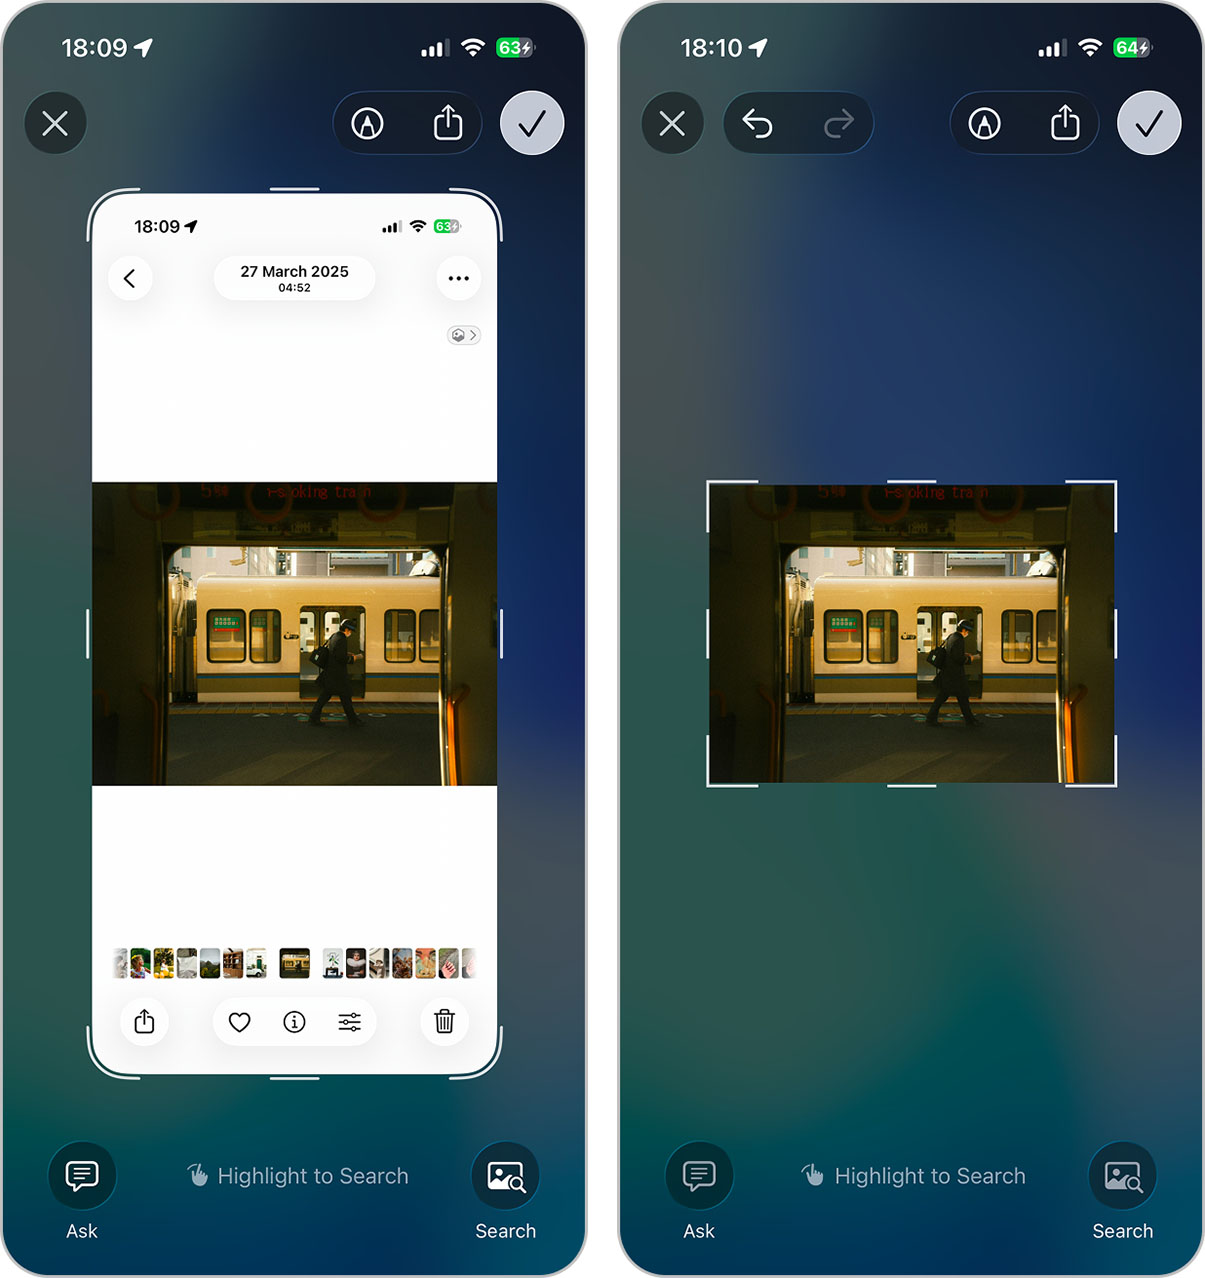
- If you’re happy with the result, you can delete the original photo to free up space.
Method 2: Compress iPhone Photos by Sending Them Through a Messenger
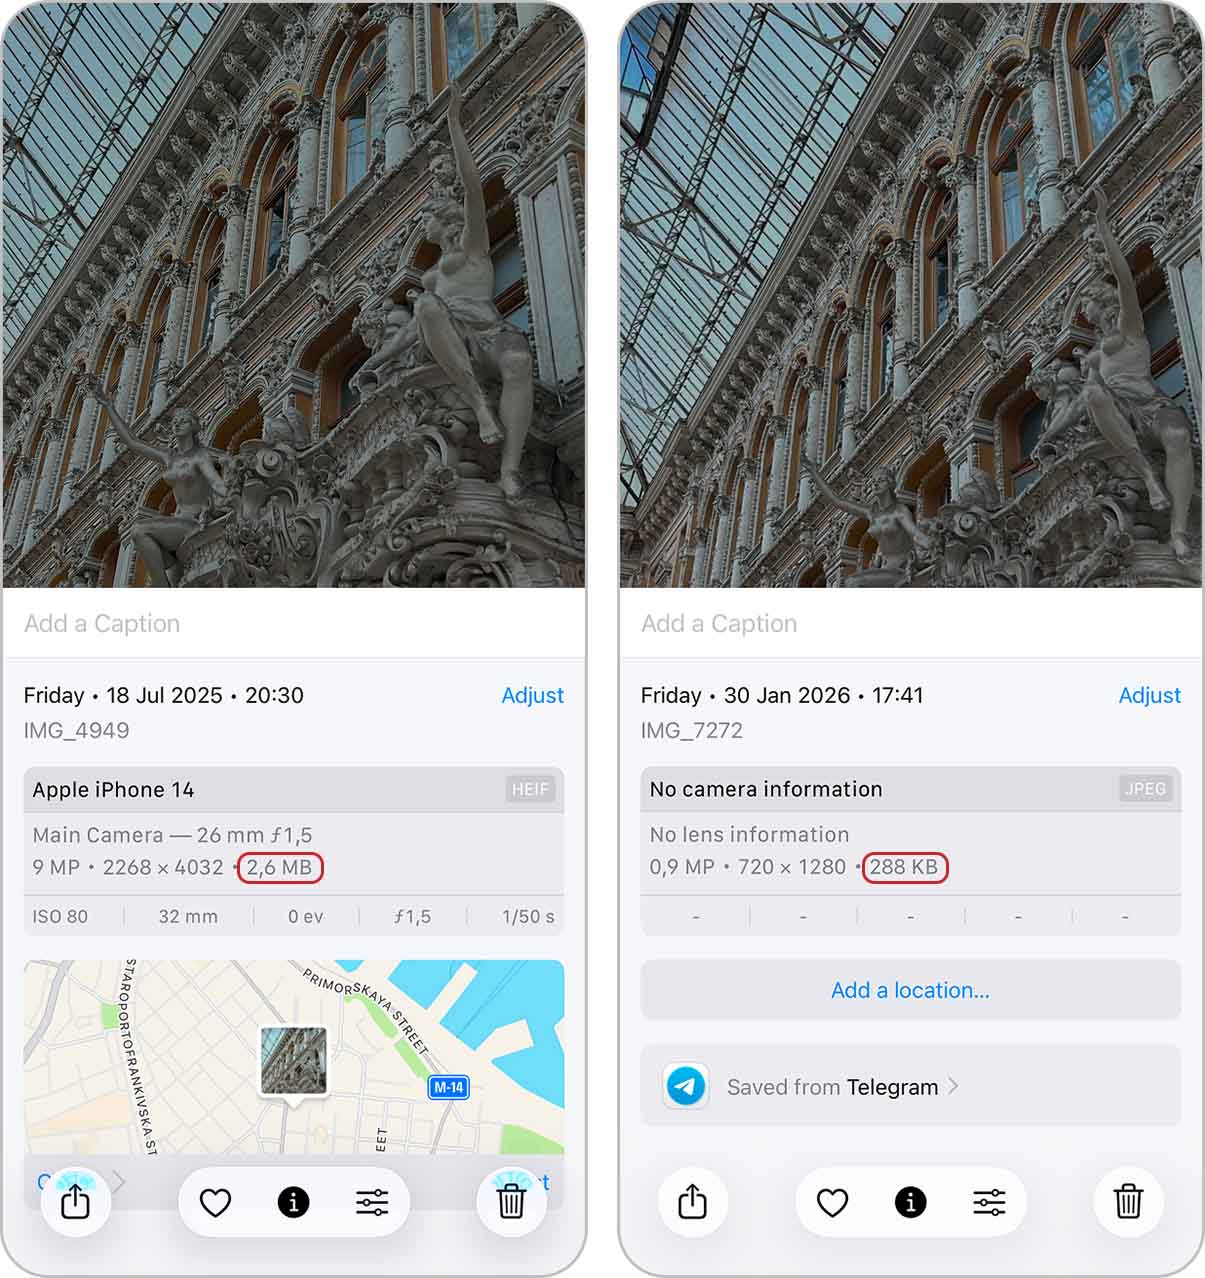
Sending photos through a messenger and downloading them back is a quick way to reduce photo file size on an iPhone. Apps like Viber, WhatsApp, and Telegram often compress images automatically to save traffic and speed up delivery. The downside is quality—the photo may lose detail, so this method works best when you need a smaller file fast and don’t need the original quality.
Here’s how to compress a photo using a messenger:
- Open your messenger and start a chat with yourself, a trusted contact, or a private group.
- Attach the photo as a regular image (not as a file/document).
- If the app asks about quality, choose the standard option, not original or without compression.
- Send the photo. The messenger will compress it automatically.
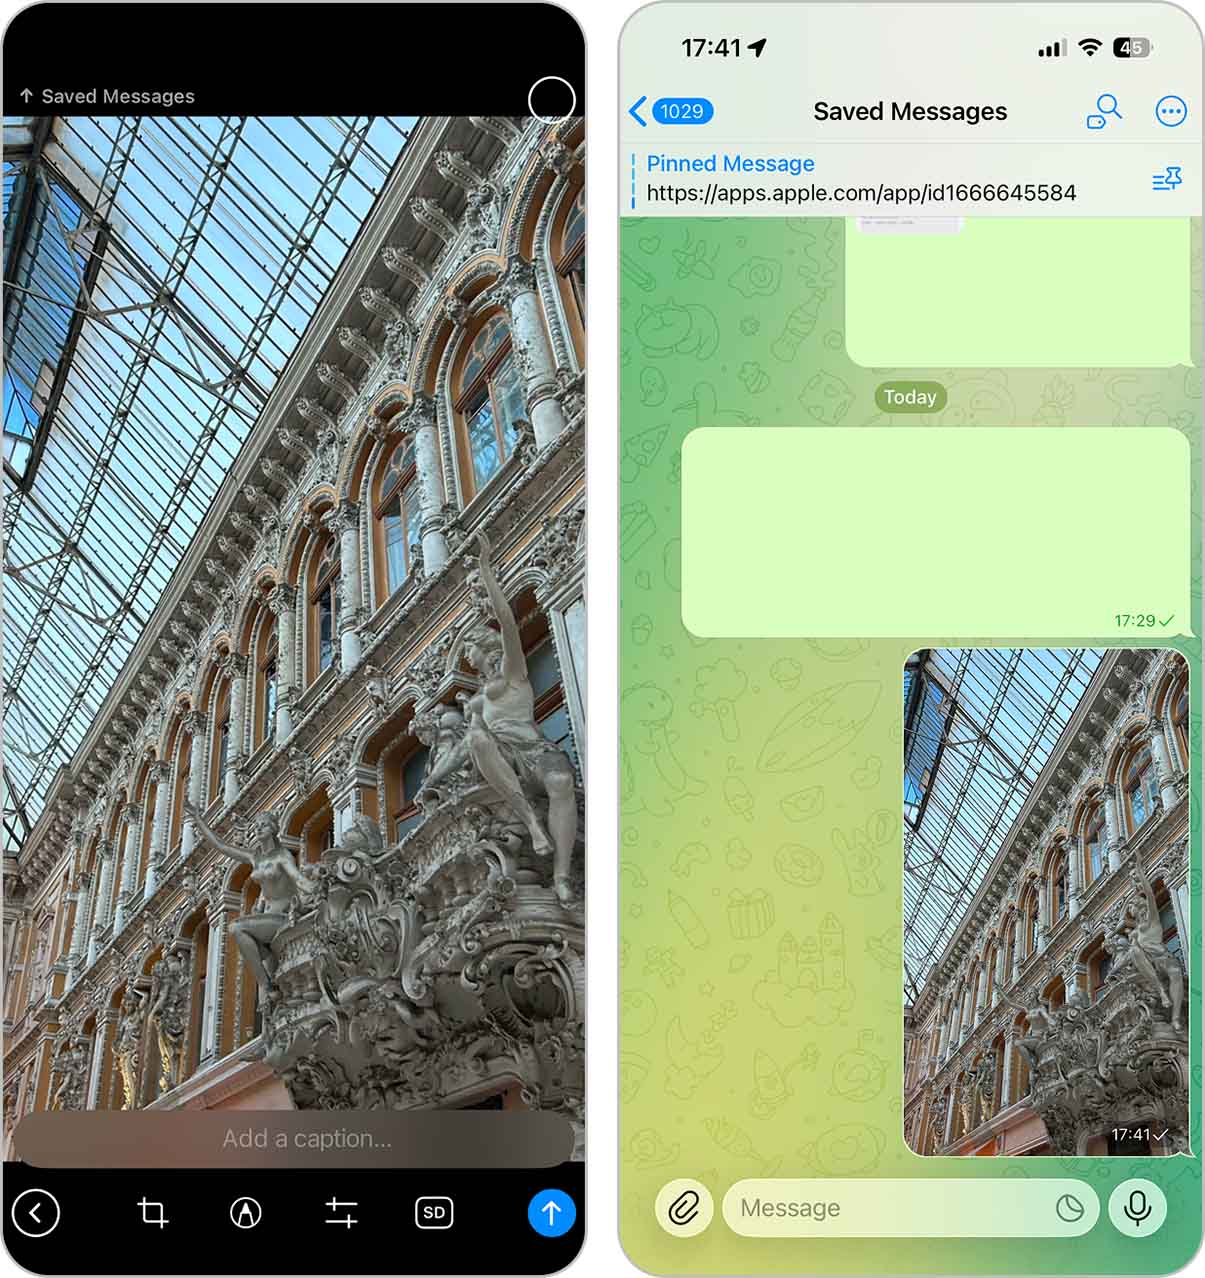
- Open the sent image and save it back to your iPhone (usually via Save Image or Save to Photos).
- Check the new file in the Photos app. If the quality and size look good, you can keep it and remove the original.
How to Make Photos Take Up Less Space on iPhone Without Compression
If you don’t want to compress pictures on your iPhone at all, even when batch options are available, and instead want your entire photo library to take up less storage on the device, there are a few ways to do that. These methods don’t change the actual image files, instead they focus on managing how photos are stored, synced, and kept on your iPhone, which can free up a noticeable amount of space.
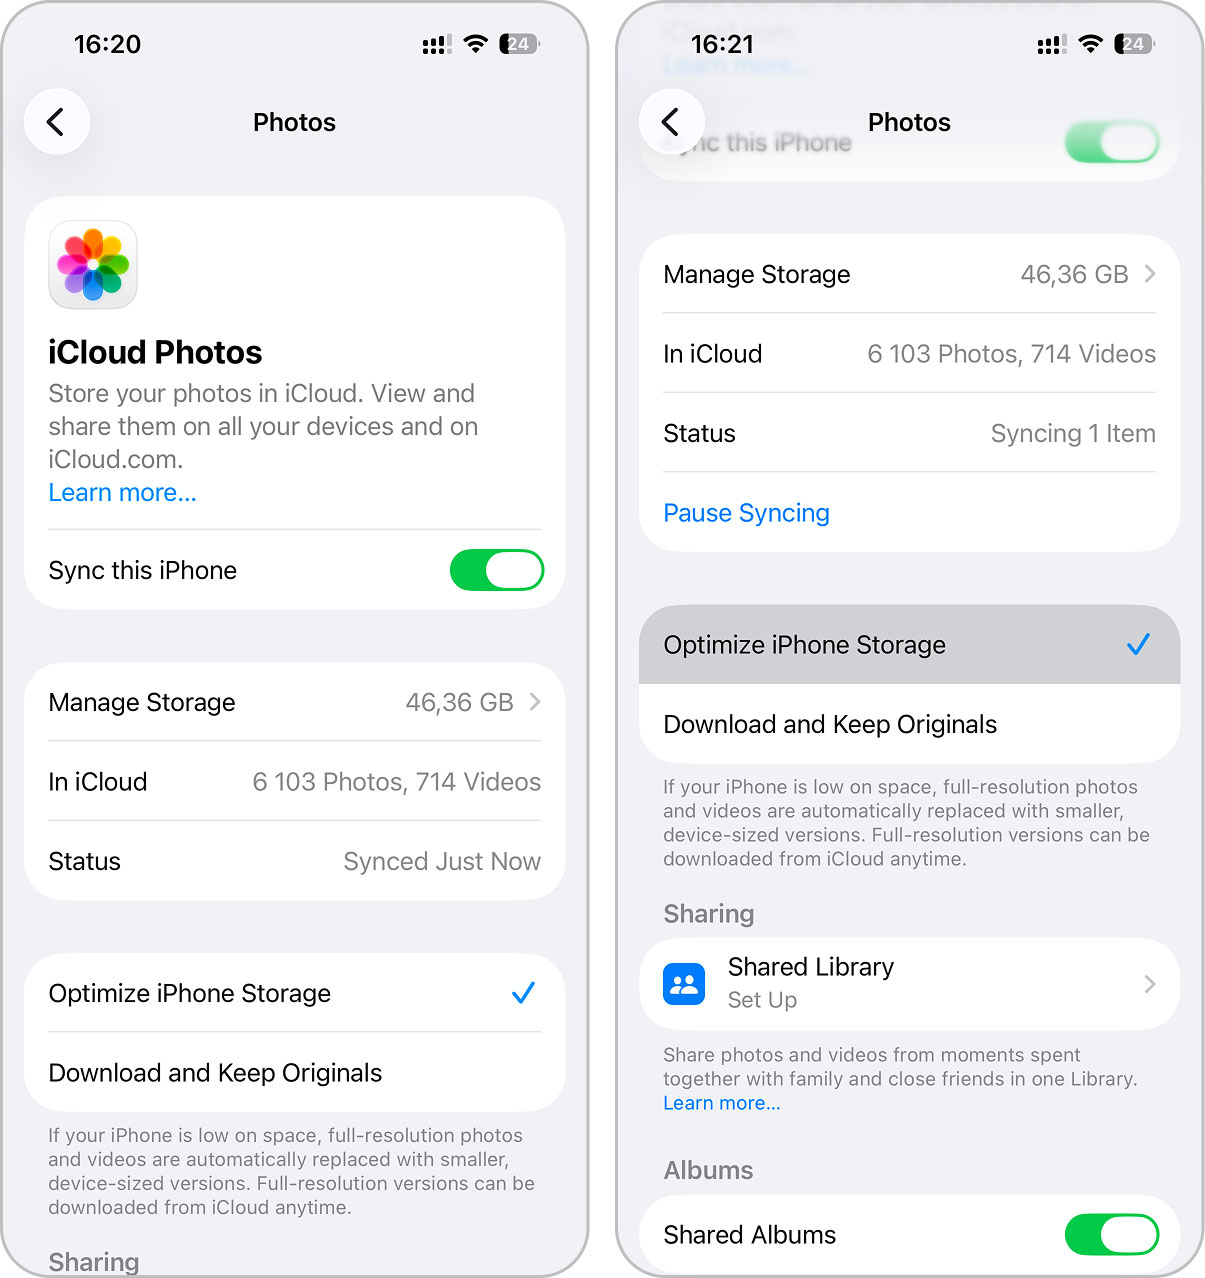
Method 1: Optimize Storage with iCloud
Instead of compressing photos directly, you can reduce how much space they take up on your iPhone by letting iCloud manage them for you. The Optimize iPhone Storage option keeps full-resolution photos and videos in iCloud, while smaller, device-optimized versions remain on your iPhone. This way, your photo library stays fully accessible, but local storage usage drops significantly.
Follow these steps to set up iCloud photo optimization:
- Open Settings on your iPhone, tap your Apple ID name at the top, then tap iCloud.
- Tap Photos under Saved to iCloud.
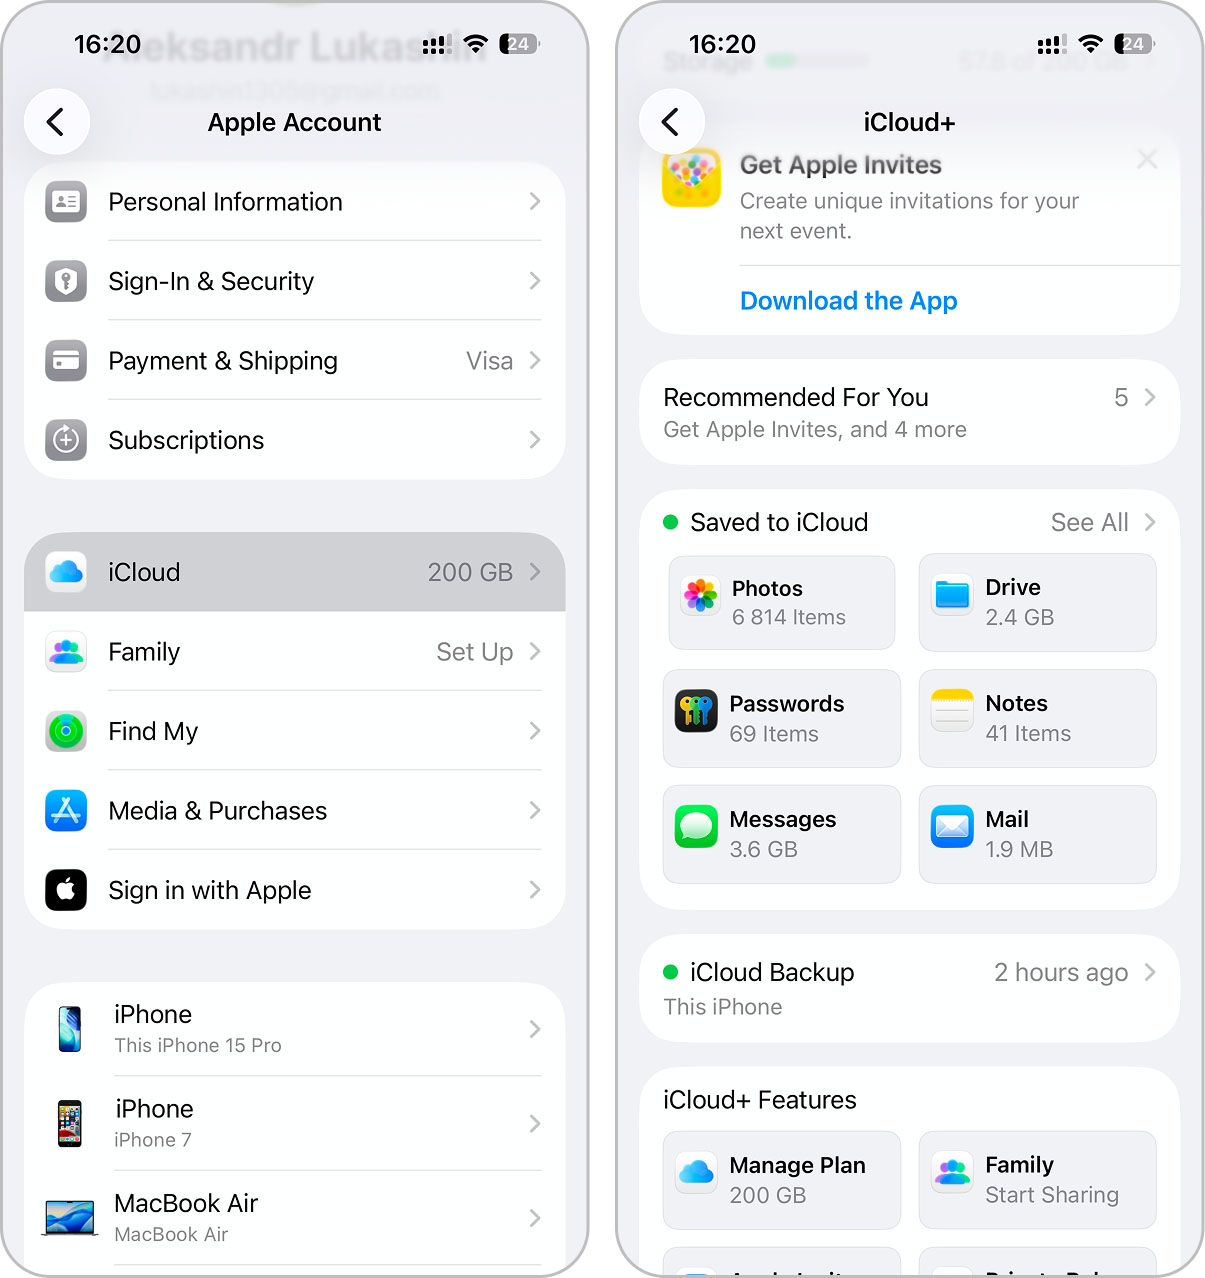
- Turn on Sync this iPhone (or iCloud Photos) if it’s off.
- Select Optimize iPhone Storage. Once enabled, the process runs automatically in the background.
Method 2: Regularly Clean Up Your Gallery
Independent of iCloud, maintaining a tidy photo library can significantly reduce storage needs:
- Delete Duplicates: Manually or with the aid of third-party apps, to declutter your gallery and reclaim space.
- Review and Remove Unwanted Photos: Periodically scroll through your photo library to remove unnecessary images, such as accidental shots or poor-quality photos, to free up storage efficiently.
Regularly cleaning your gallery not only keeps your storage in check but also helps your iPhone run smoothly. If doing this manually feels like a hassle, you can automate it with an iPhone storage cleaner app like Clever Cleaner, which we covered in Method 2 of the previous section.
Method 3: Adjust Camera Settings
If you want every new photo you take on your iPhone to use the most efficient format without needing extra compression later, you can do that by adjusting the camera settings. This action doesn’t change existing photos, but it ensures that all future images already take up less space right from the start.
To set your iPhone camera to capture smaller photos by default:
- Open Settings on your iPhone, scroll down, and tap Camera.
- Tap Formats and select High Efficiency.

When this option is enabled, your iPhone saves photos in HEIF format and videos in HEVC. These formats store the same visual quality as JPEG and H.264 but use much less space—often up to 50% less. For most users, this is the best long-term way to reduce photo file size on an iPhone without touching compression tools at all.
In the same Camera settings, you can also control resolution-related options, especially on newer iPhone models. For example, high-resolution modes such as 48 MP capture create much larger files. If you don’t need maximum resolution for everyday photos, disabling these options can noticeably reduce file size.
Final Tips
If you constantly find yourself compressing photos because your storage is maxed out, there are easier ways to manage things. Instead of compressing, try tackling the root of the problem.
We’ve got guides on how to organize photos without duplicates and how to clear photo storage that share simple solutions. you’ll find tips for spotting duplicates, using cloud storage smarter, and organizing your photo library so you don’t have to compress photos every other week.
Also, feel free to join the conversation on our forum, especially if you’re looking to share tips or get advice about iPhones. Check out the discussions at InsanelyMac iPhone Forum and connect with others who are tackling the same challenges. It’s a great place to swap ideas and learn new tricks!
FAQ
Ideal settings can vary depending on the app or service you’re using, but a general rule is to aim for a compression that reduces file size without causing noticeable quality loss.
This often involves choosing between lossy and lossless compression. Lossy compression significantly reduces file size by removing some image data, which can result in a slight drop in quality. However, with the right settings, this loss is usually minimal and almost invisible to the naked eye, ideal for casual use or sharing online. Formats like JPEG or HEIC use lossy compression to achieve smaller file sizes while maintaining good visual quality.
Lossless compression, on the other hand, keeps all the original data intact, so no quality is lost. While this method results in a smaller reduction in file size, it’s a better choice for photos that need to retain every detail, such as for professional or archival purposes. Common formats for lossless compression include PNG or RAW.