How to Convert Live Photos to Still on iPhone
Had enough of Live Photos? They look great, but when it comes to sharing or editing, they aren’t always convenient, not to mention they take up more space. If you need a still image instead, iOS 26 makes it easy with built-in options, and there are also apps and automation tricks to speed up the process. Our team has tested many methods (6 to be precise), and since each of them converts Live Photos to still images on iPhone differently, you’ll likely find the one for you.
6 Easy Ways to Convert Live Photos to Still on iPhone
Out of the different ways to extract still images from your Live Photos, some methods will suit your needs better. With this in mind, we have tested several ways to process your Live Photos and categorized the processes into the following sections below.
1. Edit a Single Live Photo
If you’re only editing one or a few live photos, then using your iPhone’s native Edit menu is the most convenient method to convert Live Photos to normal. Despite being manual, this method does not require installing any app. Plus, you can edit a photo with only a few taps.
Here’s how you can get your image from a Live Photos on iPhones running iOS 13 and later, including the latest iPhones with iOS 26:
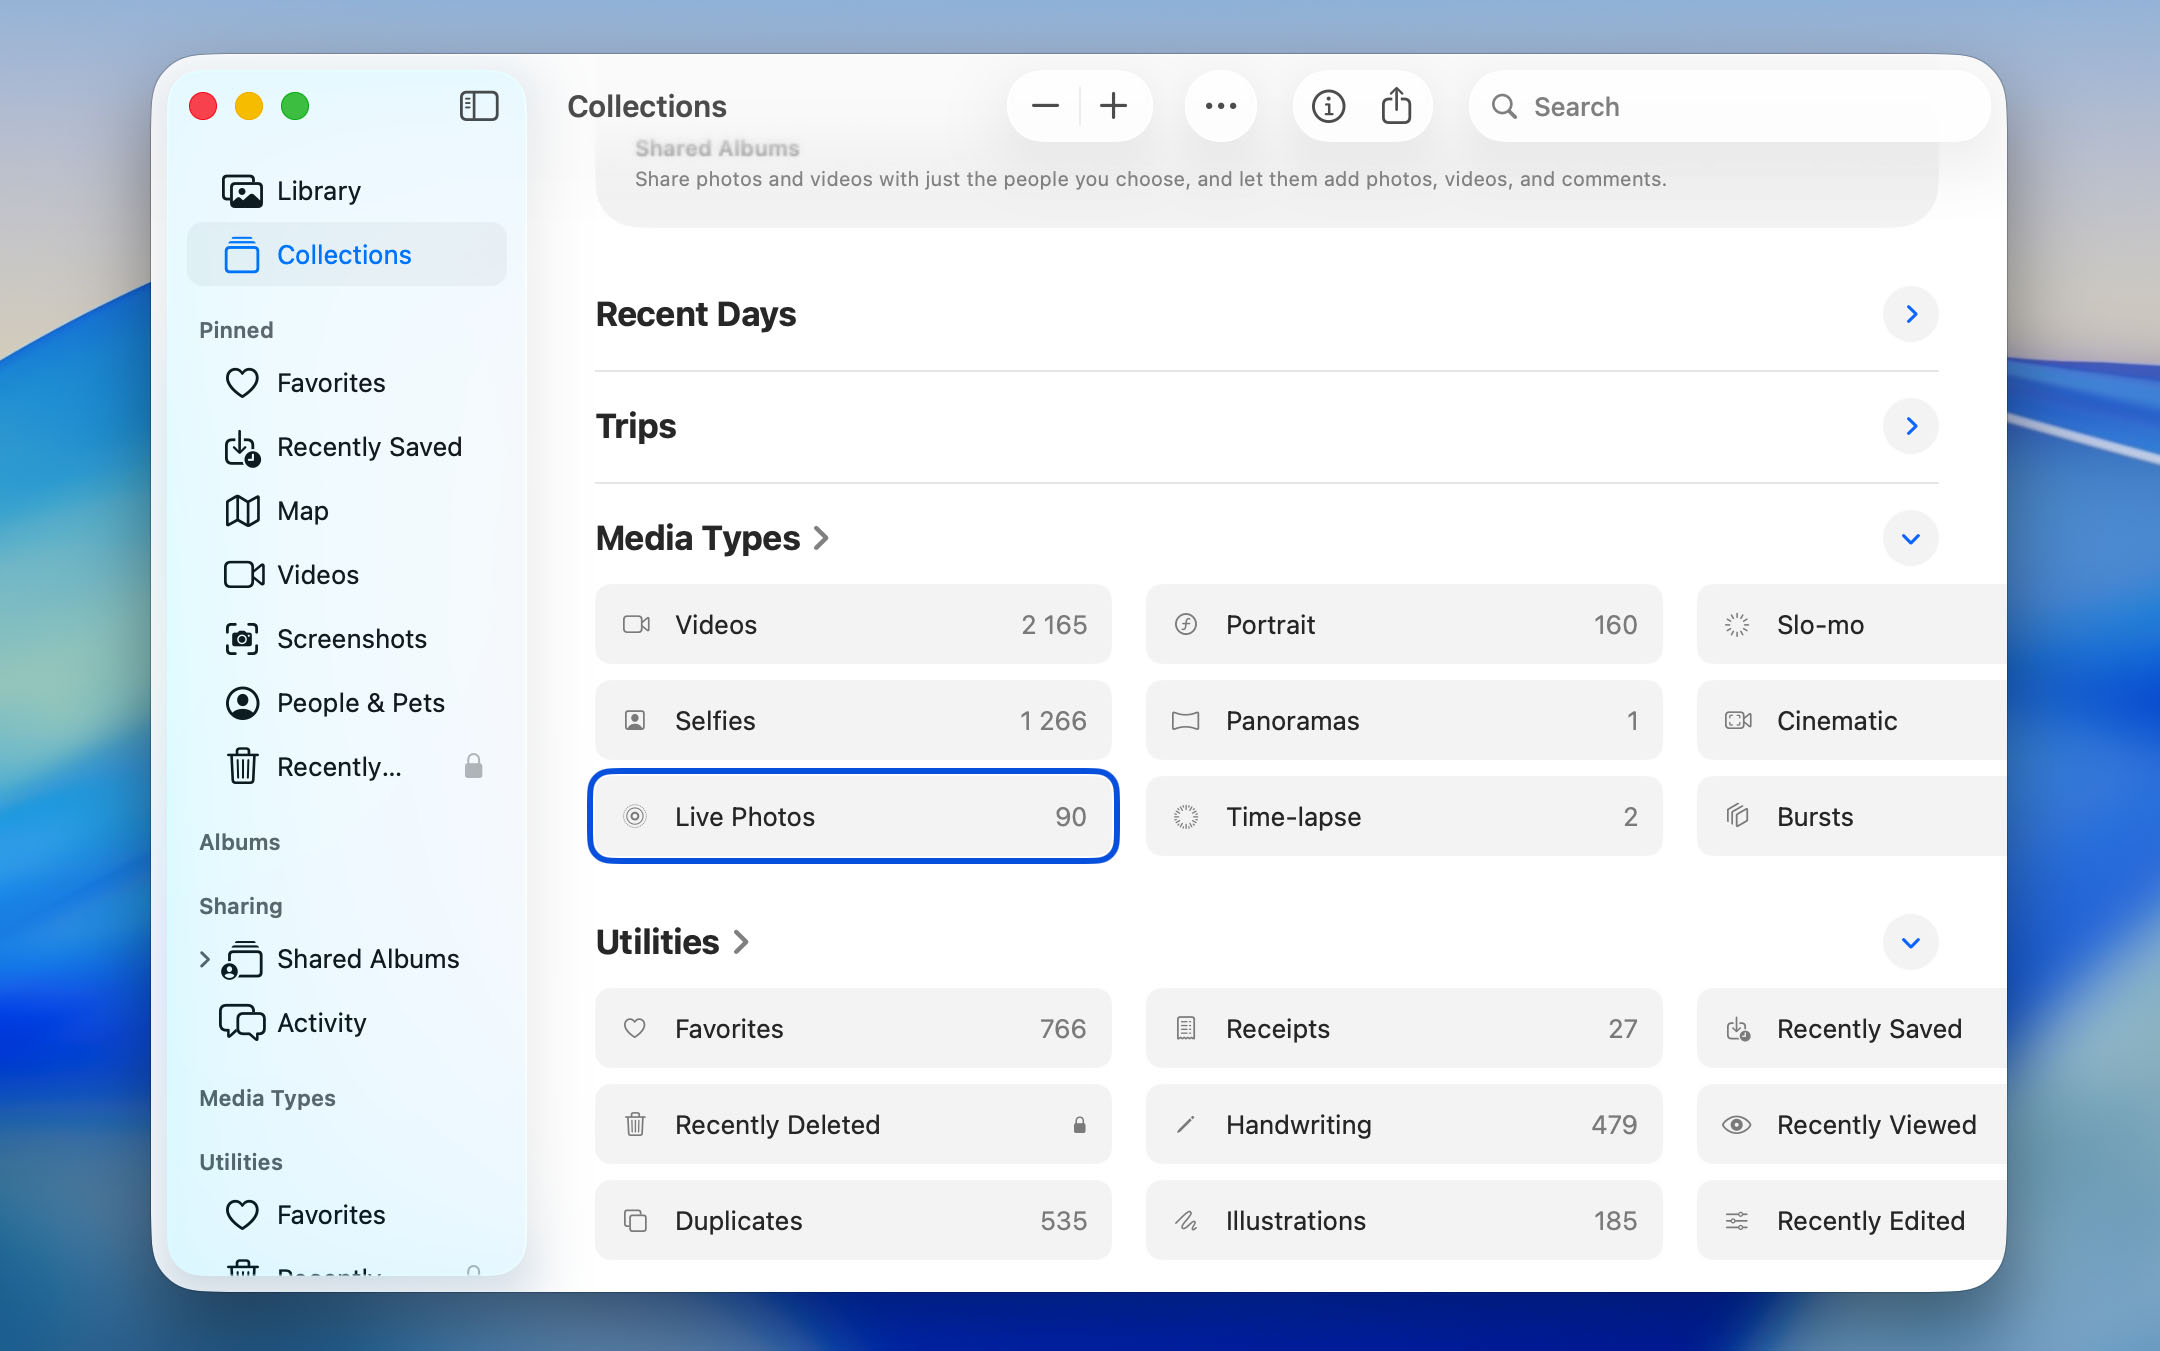
- Open the Photos app.
- If you land on the Library tab, switch to Collections.
- Scroll down to the Media Types section and open the Live Photos category.
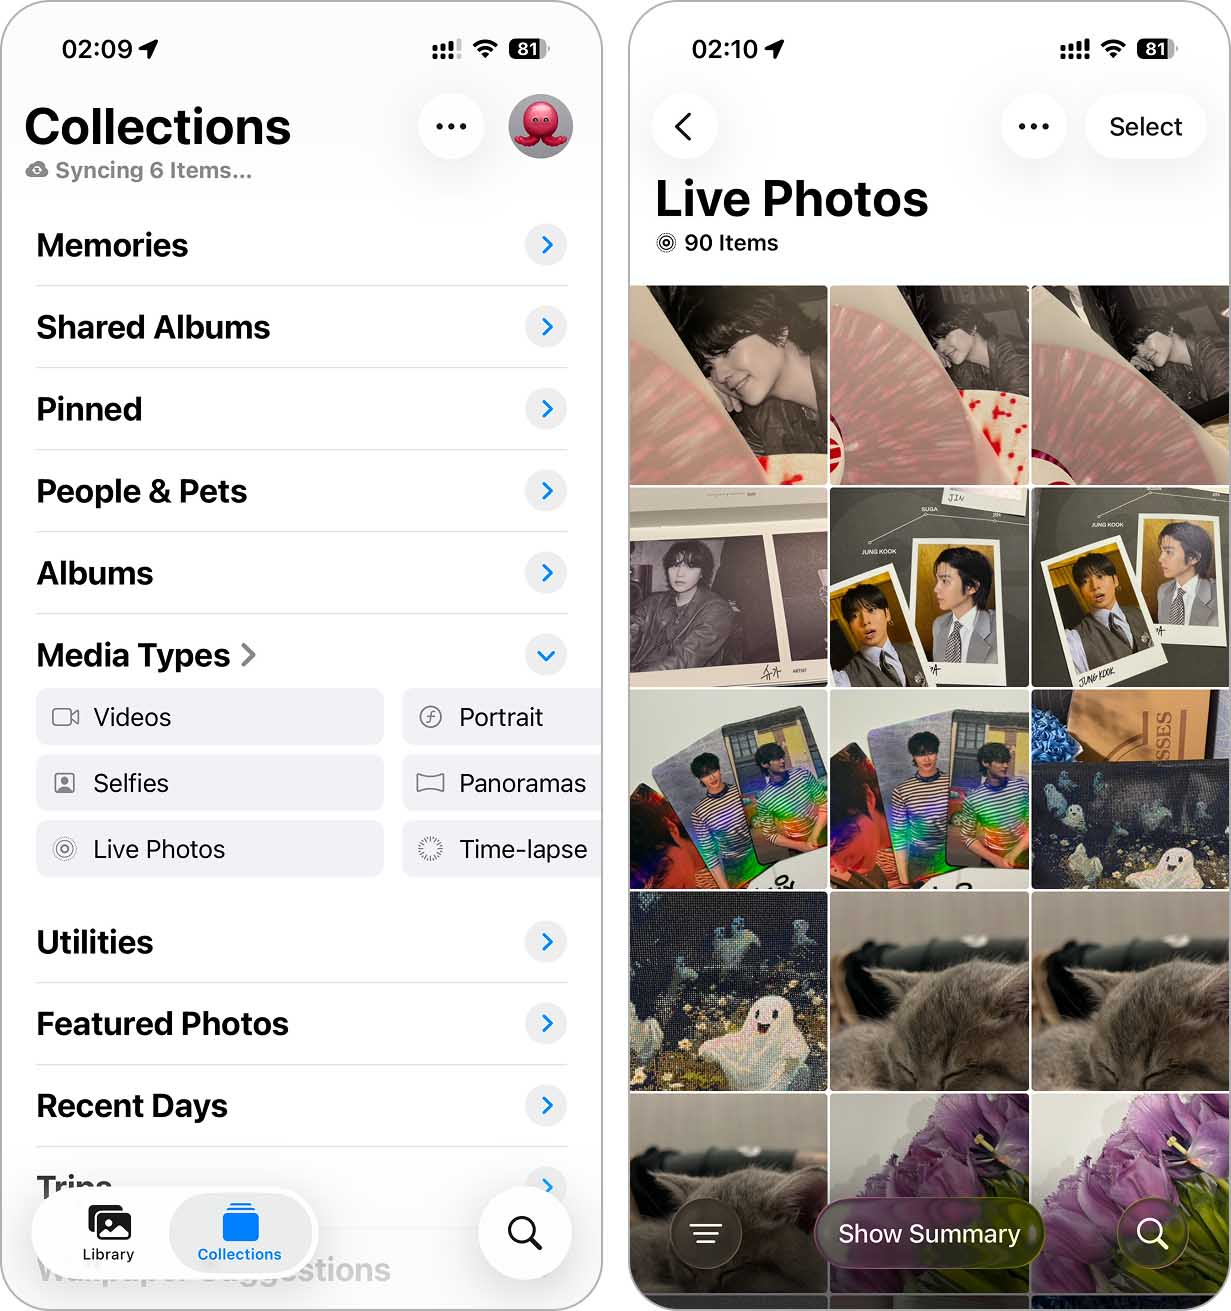
- Find and tap the photo you want to convert.
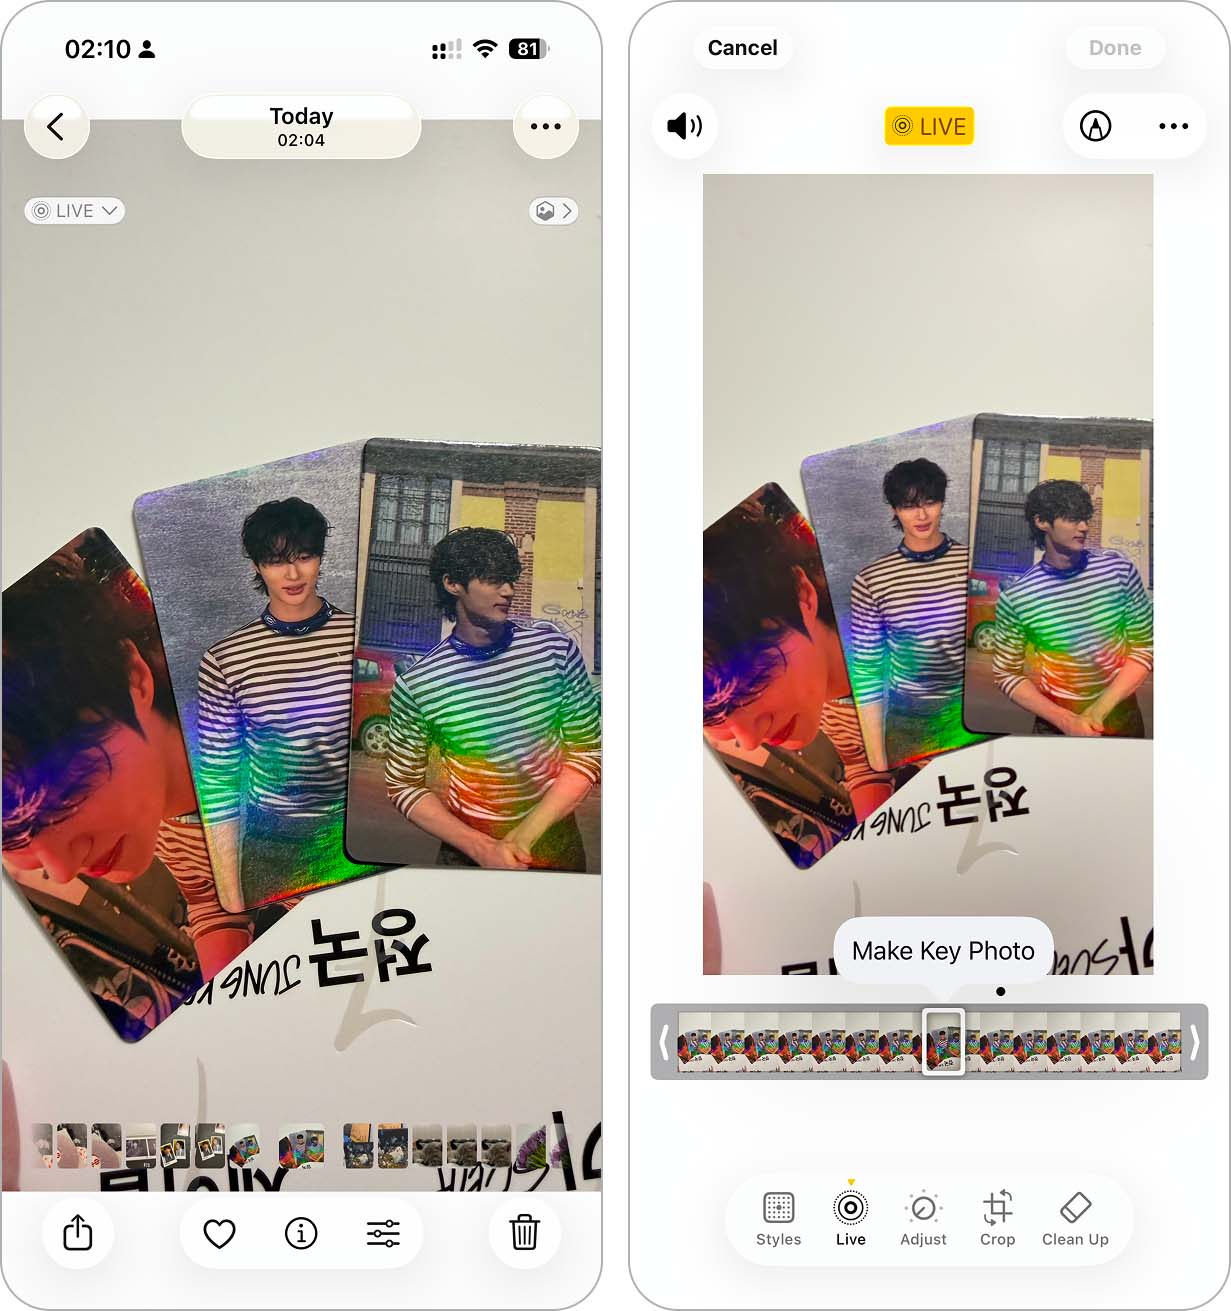
- Tap Edit at the bottom of the screen, next to the share icon.
- Tap the Live Photo icon (three concentric circles).
- To choose a different frame – move the slider to find the best moment.
- Tap Make Key Photo to set your preferred frame.
- Next, tap the LIVE button at the top of the screen to turn off the feature.
- Don’t forget to tap Done at the top right corner after applying your change.
After this, your Live Photos will turn into a still image. You can undo this change by applying the same steps as above. Alternatively, you can simply do the following:
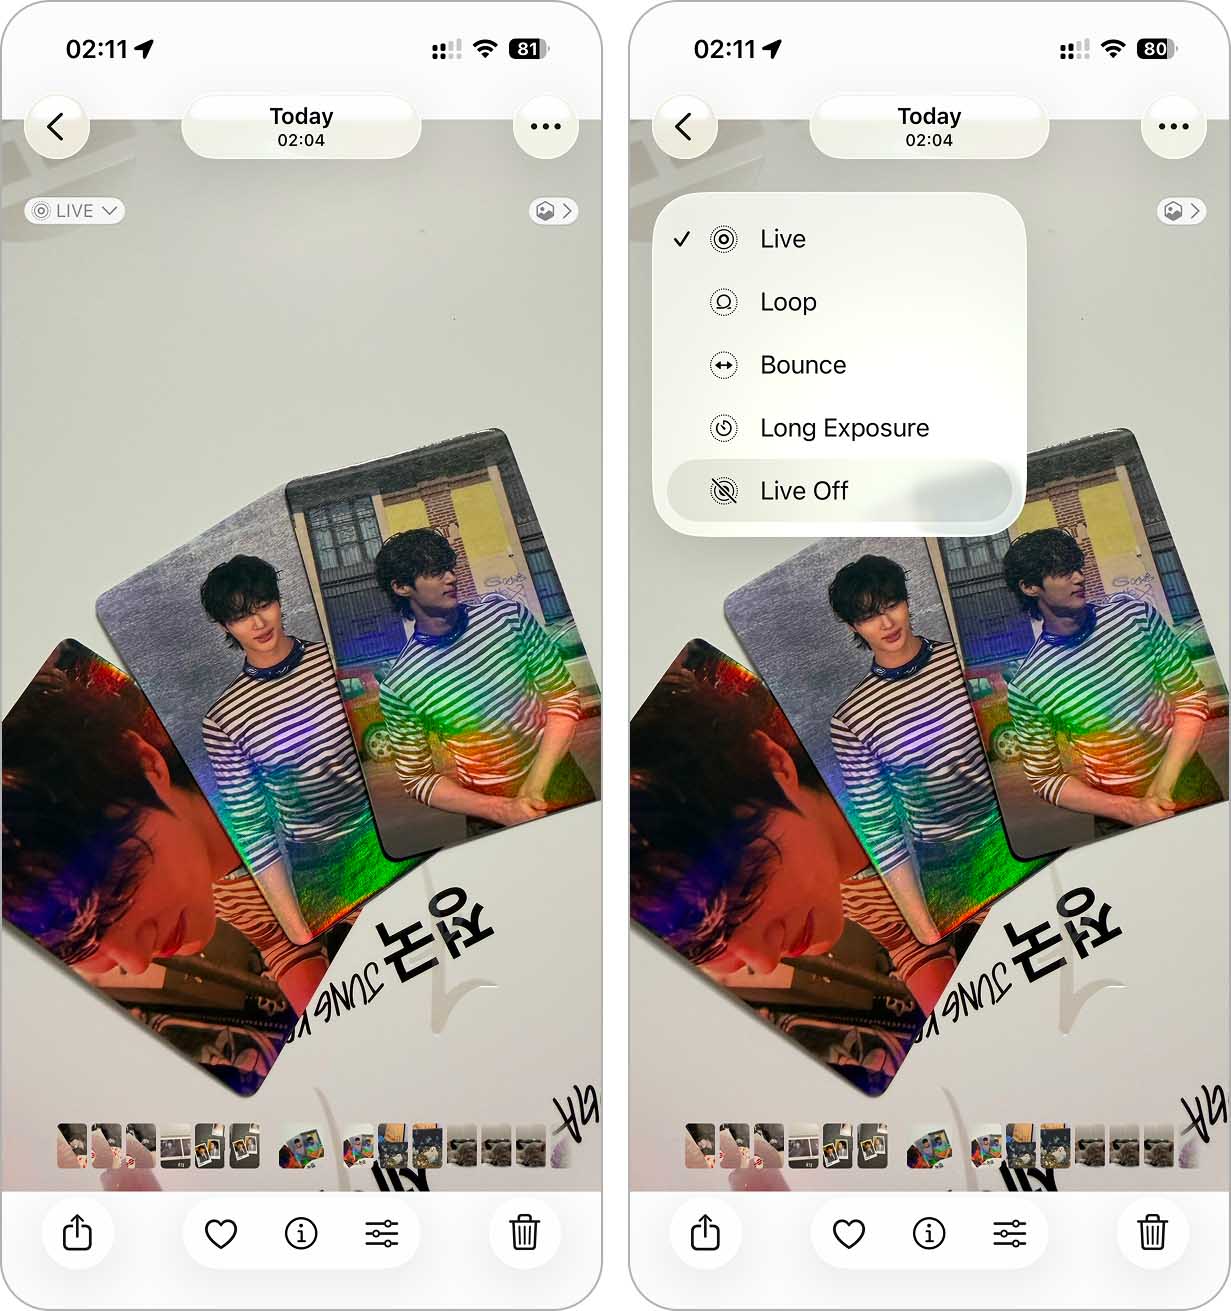
- Tap the Live Photo you want to edit.
- Next, tap the LIVE option on the top left corner of your screen when viewing a Live Photos.
- Apply the Live or Live Off option.
2. Convert Multiple Live Photos to Still
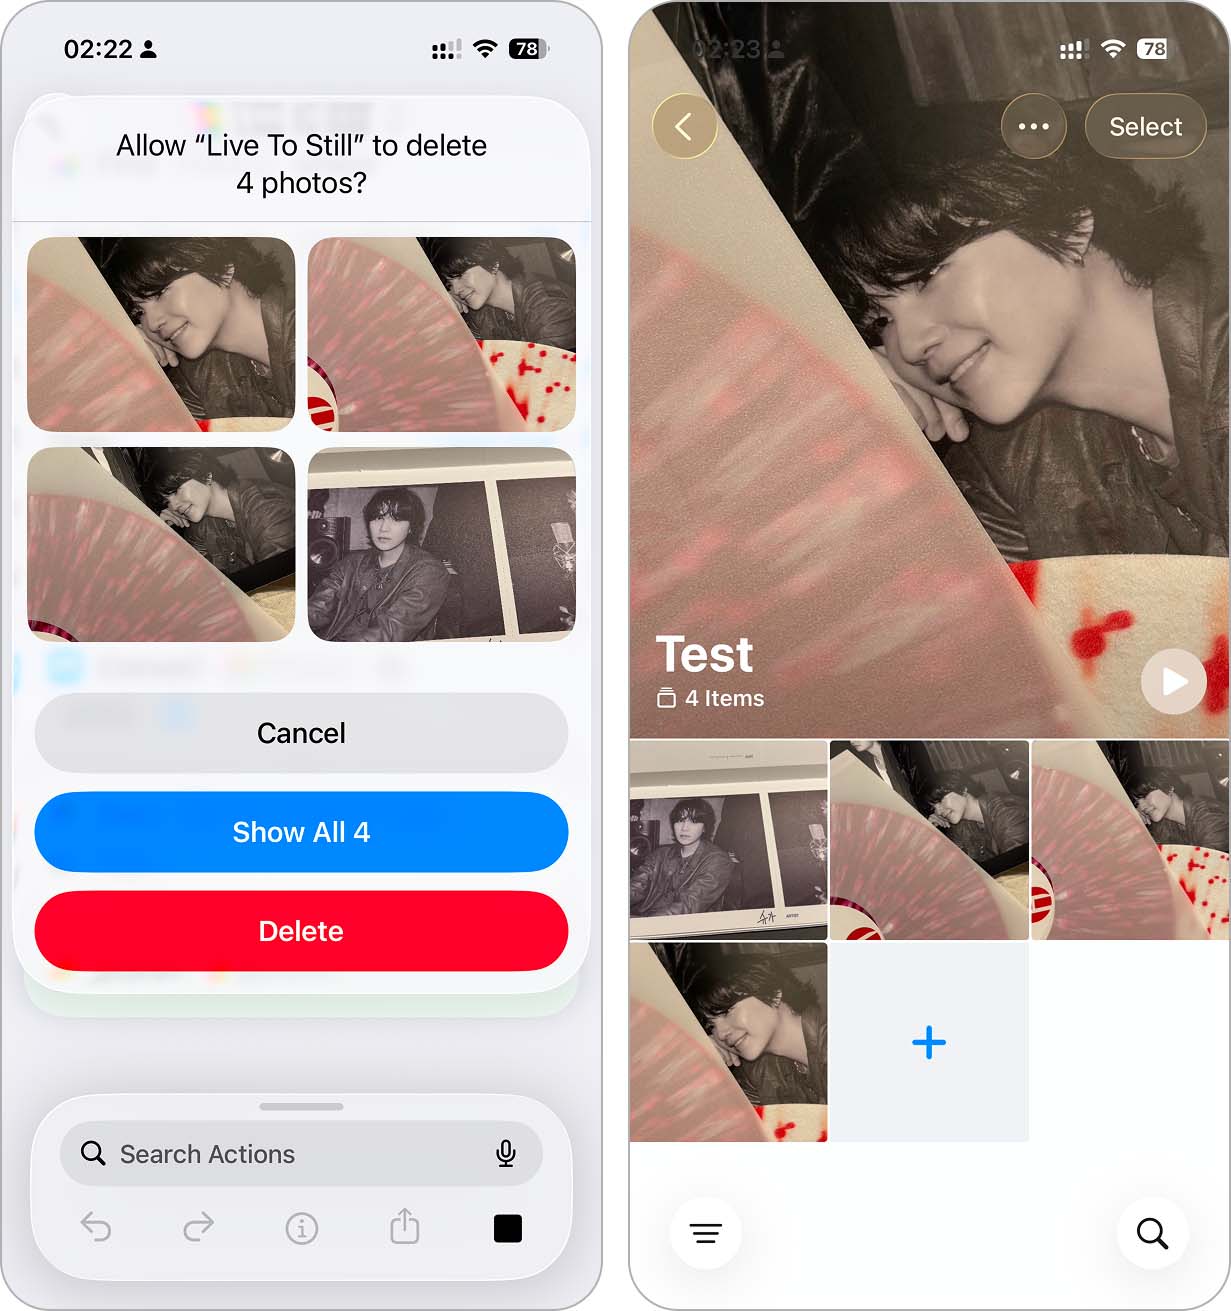
Using the Edit option on your Photos app would be tedious if you have hundreds of photos to extract. To convert multiple Live Photos to still images at once, you can use the Duplicate as Still Photos feature on your iPhone.
Here’s how you can do this:
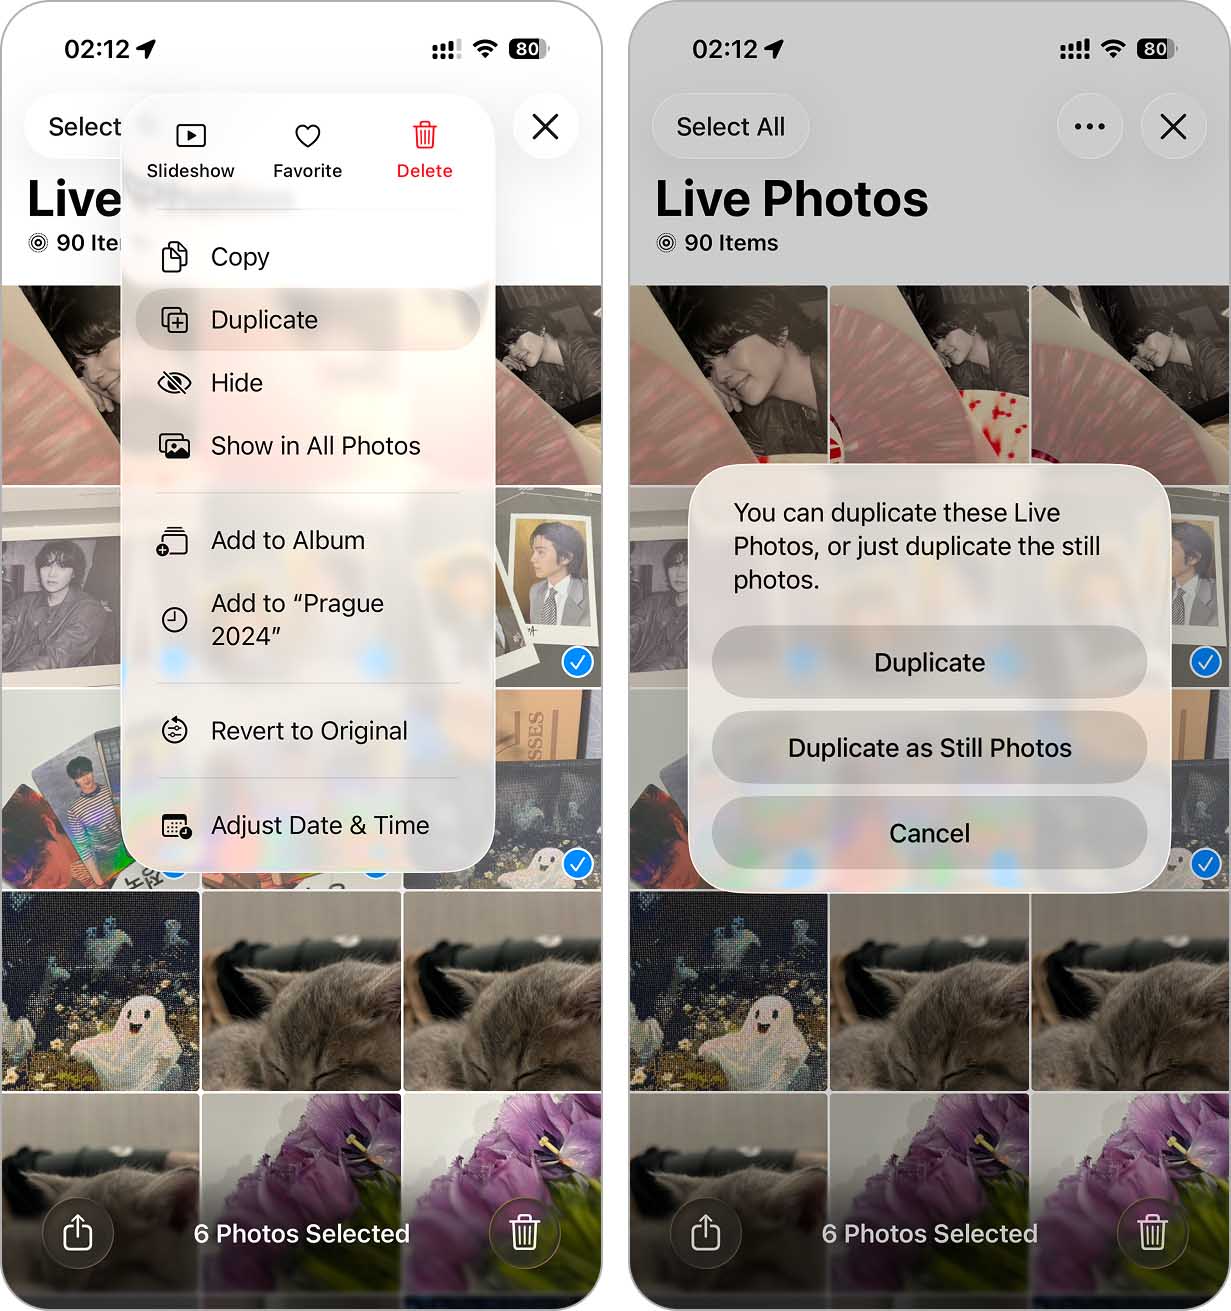
- Open the Photos app and navigate to the Live Photos section so you don’t have to search through your entire library.
- Tap Select in the top right corner of your screen.
- Tap the Live Photos you want to convert.
- Tap the Meatballs menu (three dots menu) and select Duplicate.
- In the pop-up menu, select Duplicate as Still Photos.
This will change Live Photos to still in bulk. However, this method duplicates the selected photos, taking up more space. To delete the Live Photos, go to the Live Photos album on your Photos app and manually select and delete the duplicates, or check out our guide on deleting duplicate photos on iPhone and follow the tips from there.
3. Convert to Still Photos Automatically with an App
If previous methods seem tedious (if you have a large library of Live Photos or simply don’t want to deal with duplicate copies), you can find an app on the App Store to do it for you. We recently tested Clever Cleaner storage cleaning app, and it works great for batch-converting Live Photos to still images.
Live-to-still Photo conversion is only one of four features Clever Cleaner offers. We’ll go over the other features after the guide, but what caught our attention is that not only is this app free, but we didn’t encounter any in-app purchases, locked features, or even a single ad (at least for now).
Here’s how you can use it:
- Download and install Clever Cleaner from the App Store.
- Open the app and allow access to your Photos.
- Tap Lives. You can sort by date or size using the Sort by option at the top.
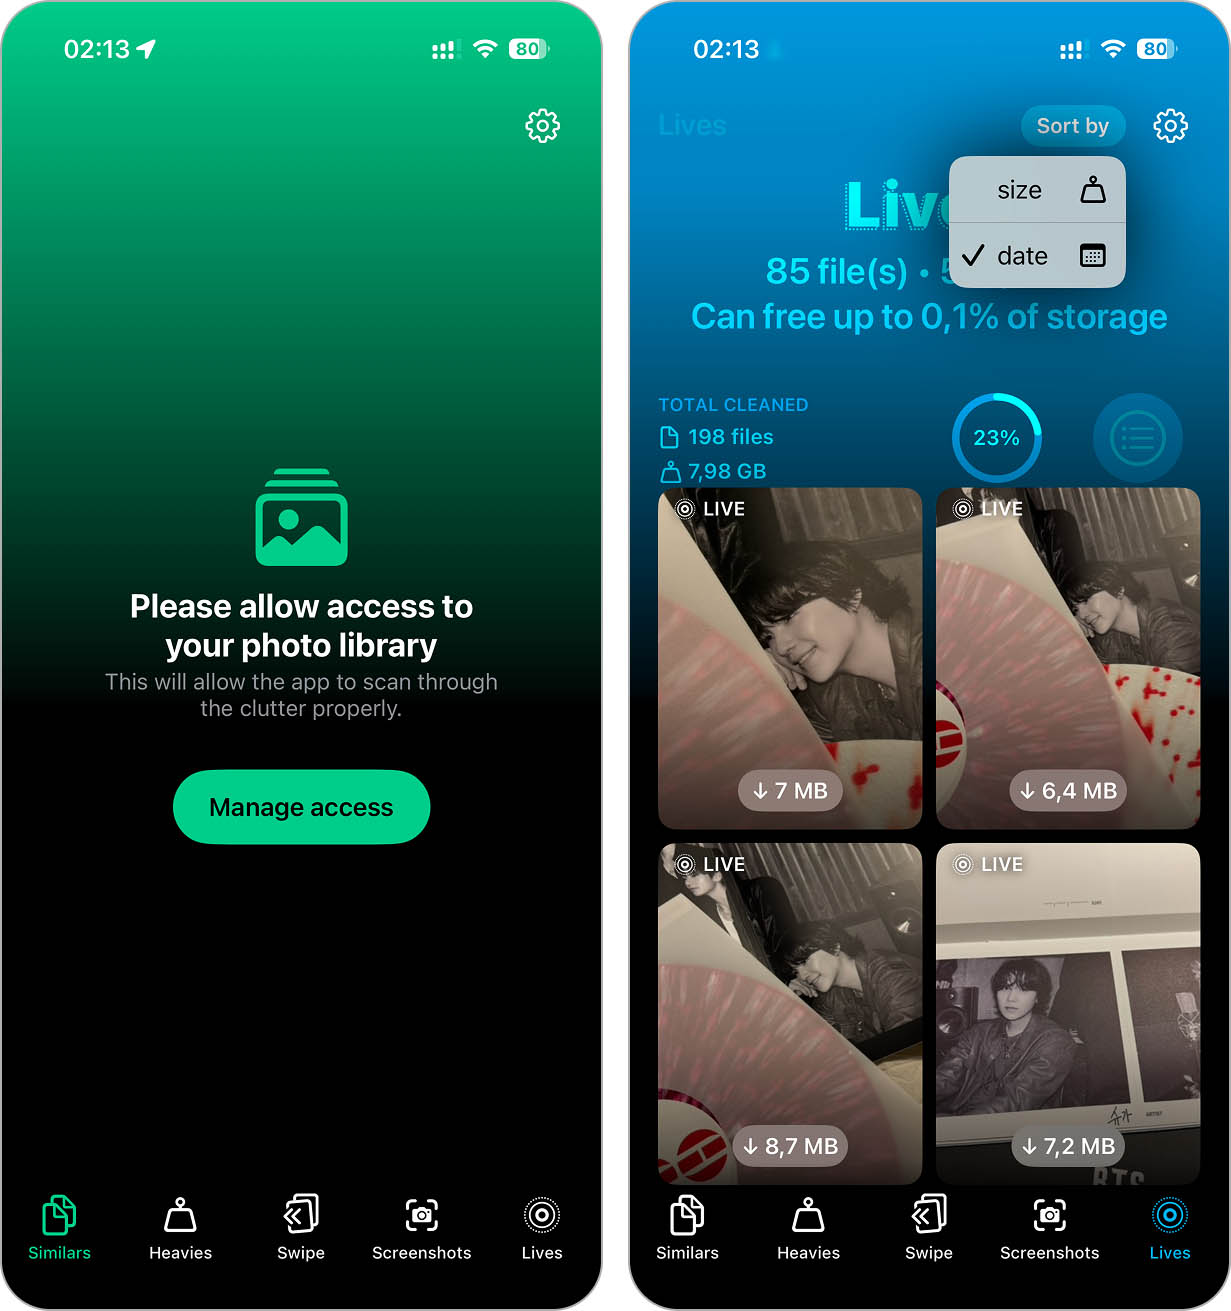
- Then select the ones you want to convert (or tap Select All).
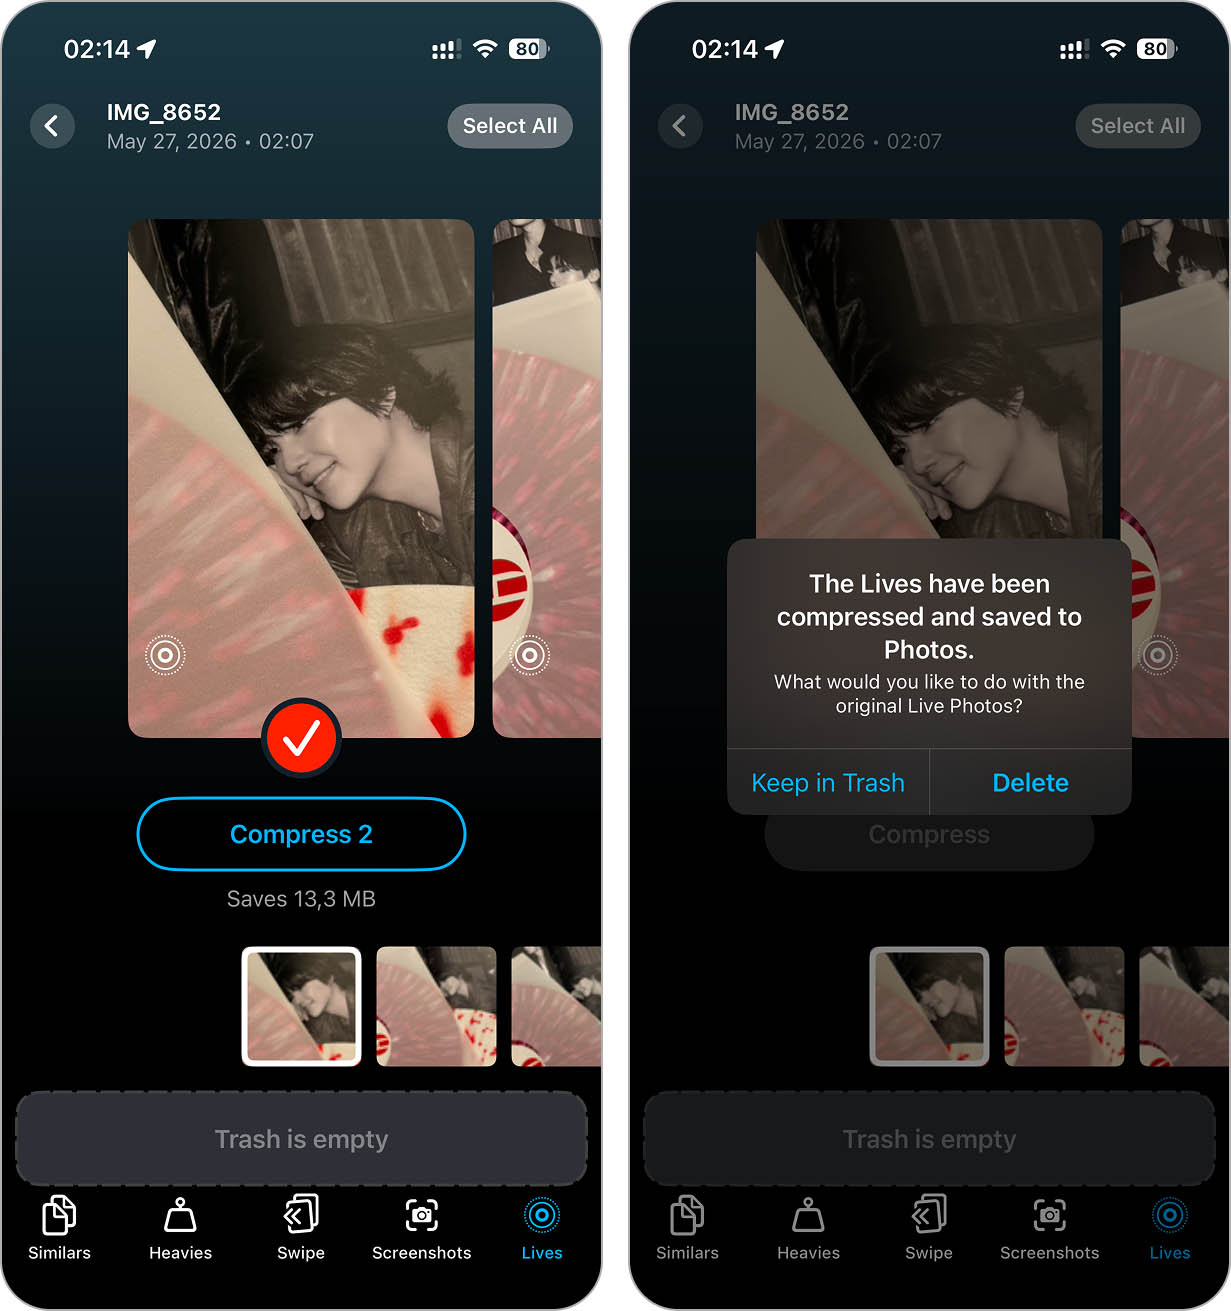
- Tap on Compress (even though it says “compress,” this process will turn them into still images). Below the Compress button, the app even displays how much storage space this action will free up, a pretty nifty addition.
- Wait for the app to finish processing. The app will save a new still photo and then ask what to do with the original Live Photo.
- You can either keep the Live Photo in the app’s Trash or delete it. If you delete it, the photo will move to the Recently Deleted album on your iPhone, where it will stay for 30 days. During that time, you can still restore it before iOS permanently removes it from your device.
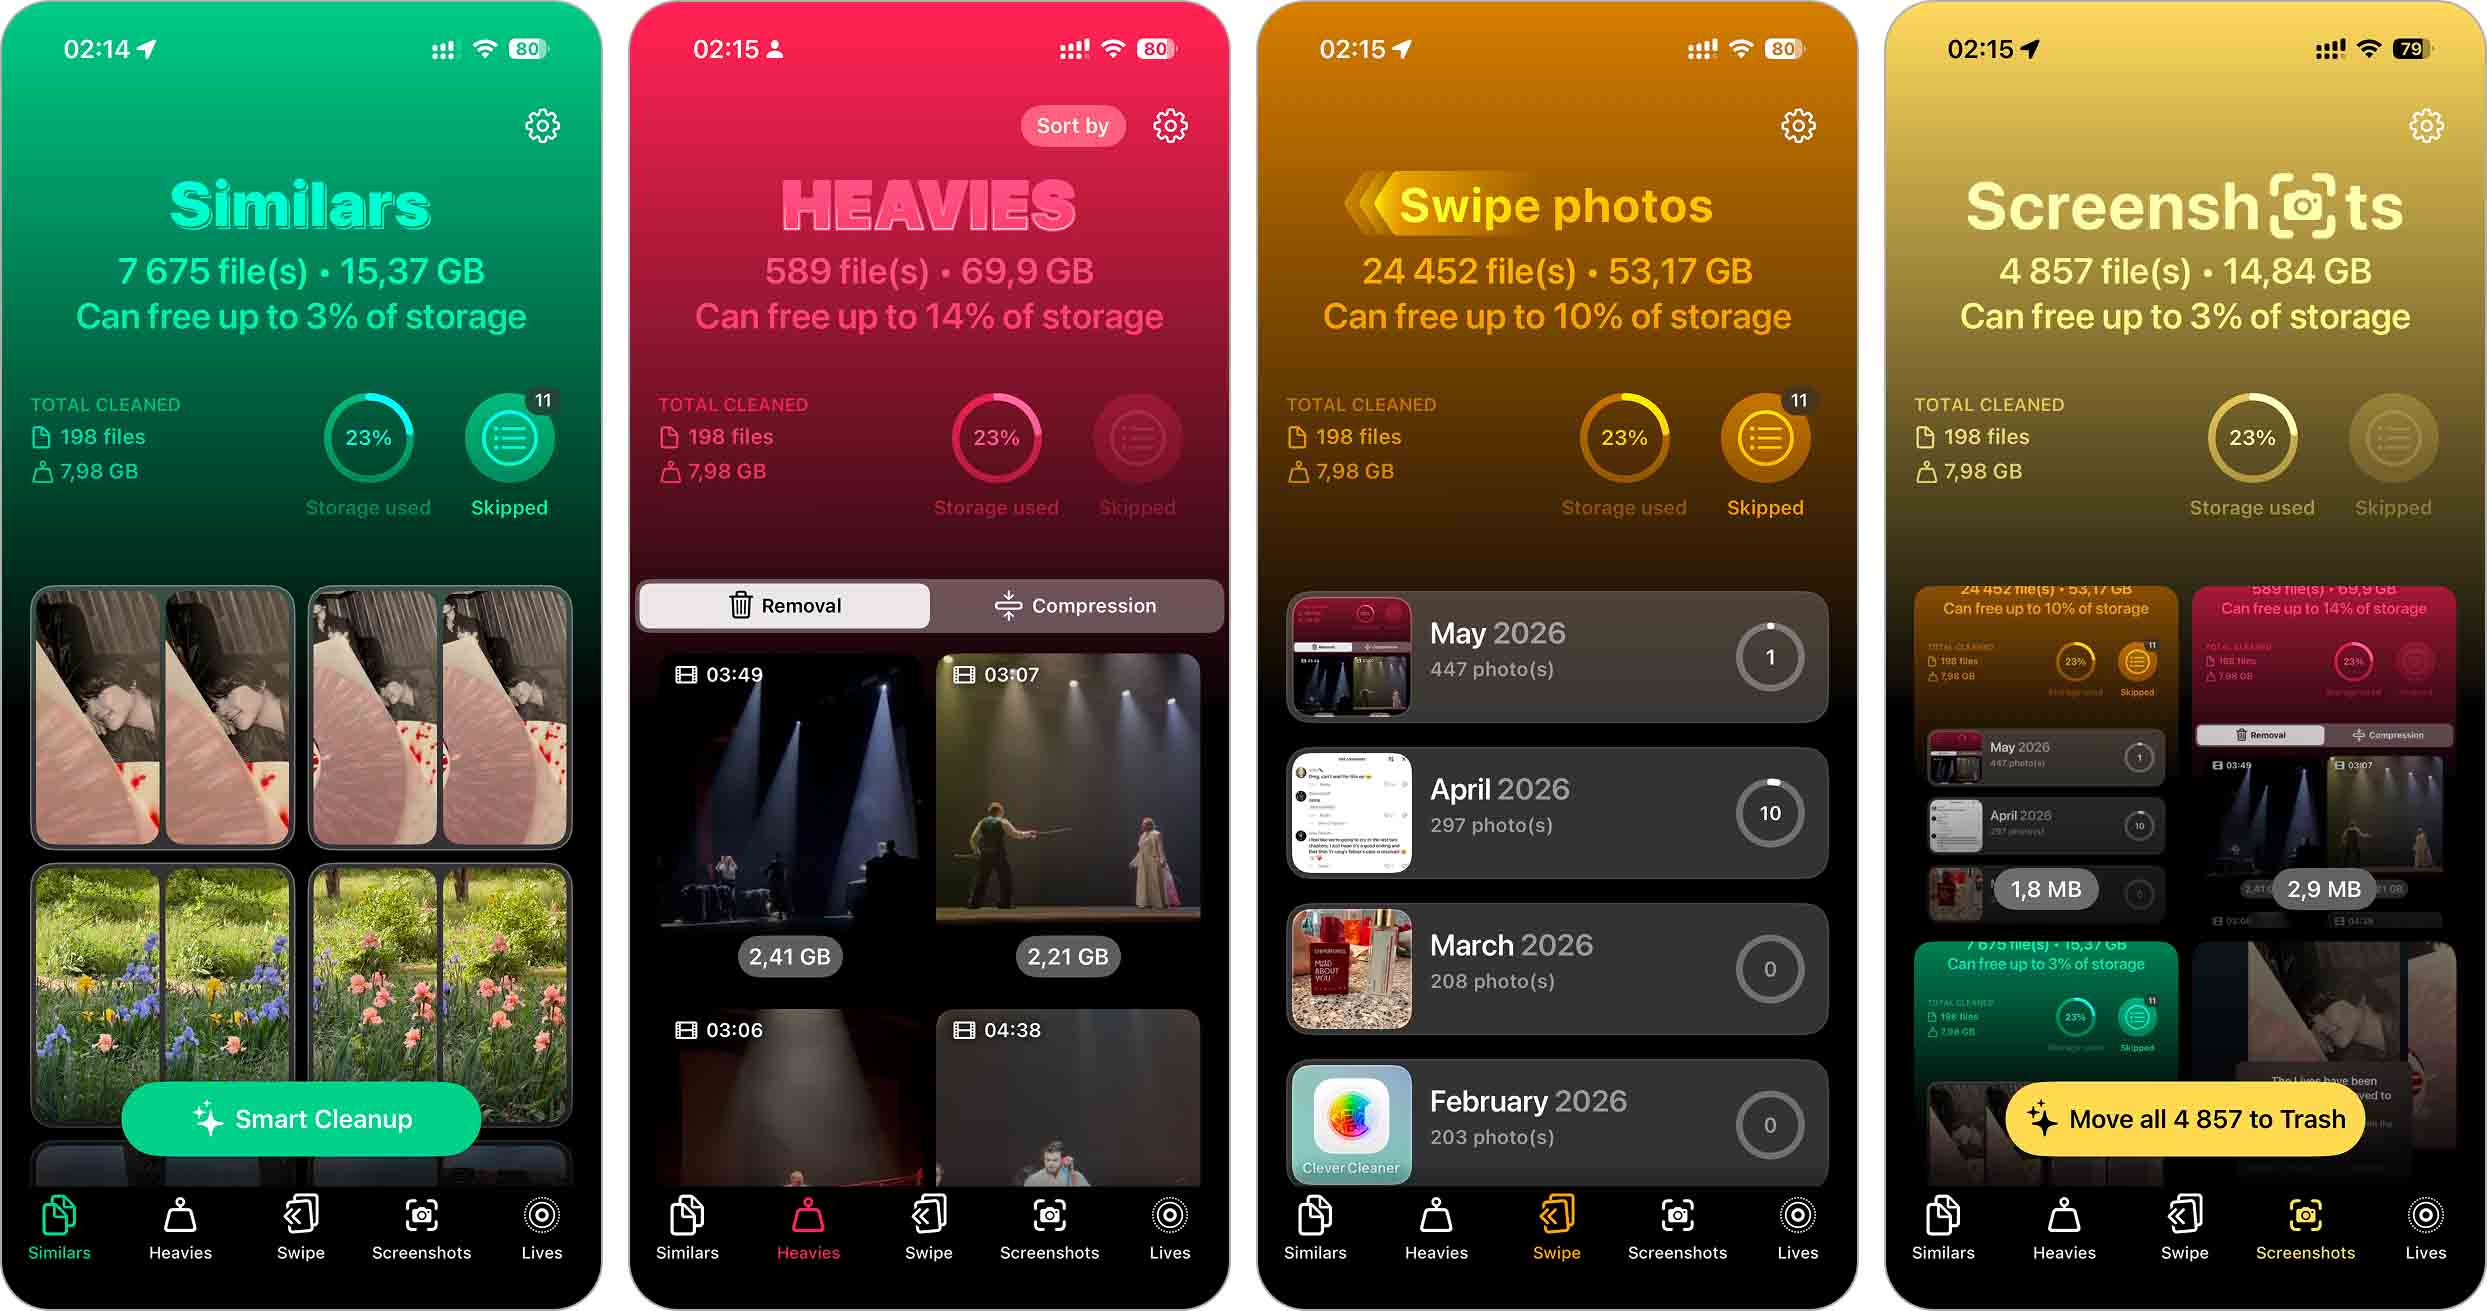
As we mentioned, that’s not all Clever Cleaner can do. At the bottom of the app, you’ll see five sections: Similars,Heavies,Swipe, Screenshots and Lives. We’ve already shown what the Lives feature does, but you can learn more about the others in our full Clever Cleaner review or check out this quick overview:
- Similars detects duplicate and visually similar photos that the native Photos app usually misses.
- Heavies section is split into two parts: one to find and delete large videos, and another to compress them and reduce their file size without removing them completely.
- Swipe is a more manual photo-cleanup mode for people who prefer to stay in control rather than rely fully on automation.
- Screenshots lets you quickly find and delete unnecessary screenshots in bulk.
4. Change Live Photos to Still Through the Files App
Another option is to simply move your Live Photos from the Photos app to the Files app and then back again. Honestly, after a convenient method like Clever Cleaner, suggesting the
5. Convert All Live Photos to Still Using Shortcuts
You can use your iPhone’s Shortcuts menu if you need a more automated option to turn your Live Photos into still images. Once run, this shortcut will convert all Live Photos to still on iPhone.
You can use this method on devices with the Shortcuts app, up to all iOS 26 devices. We’re using an iPhone 13 Pro Max device to test this method.
Here’s how you can create this shortcut:
- Launch the Shortcuts app on your iPhone.
- Tap the + button in the top right corner to create a new shortcut.
- Tap Search Actions and search for Find Photos.
- In the Find Photos action, tap Add Filter and change it from Album to Photo Type, then set it to Live Photo.
- (Optional) Enable the Limit option if you want to process only a specific number of Live Photos at once. Otherwise, leave it disabled to convert all of them.
- Next, tap Search Actions again and add the Convert Image action.
- In the Convert Image block, tap JPEG (or something else).
- Tap Search Actions again, then add the Save to Photo Album action.
- Choose the album where you want the converted still images to be saved.
- Finally, add the Delete Photos action and make sure it targets the original Live Photos.
- Tap the shortcut name at the top if you want to rename it, then press Done.
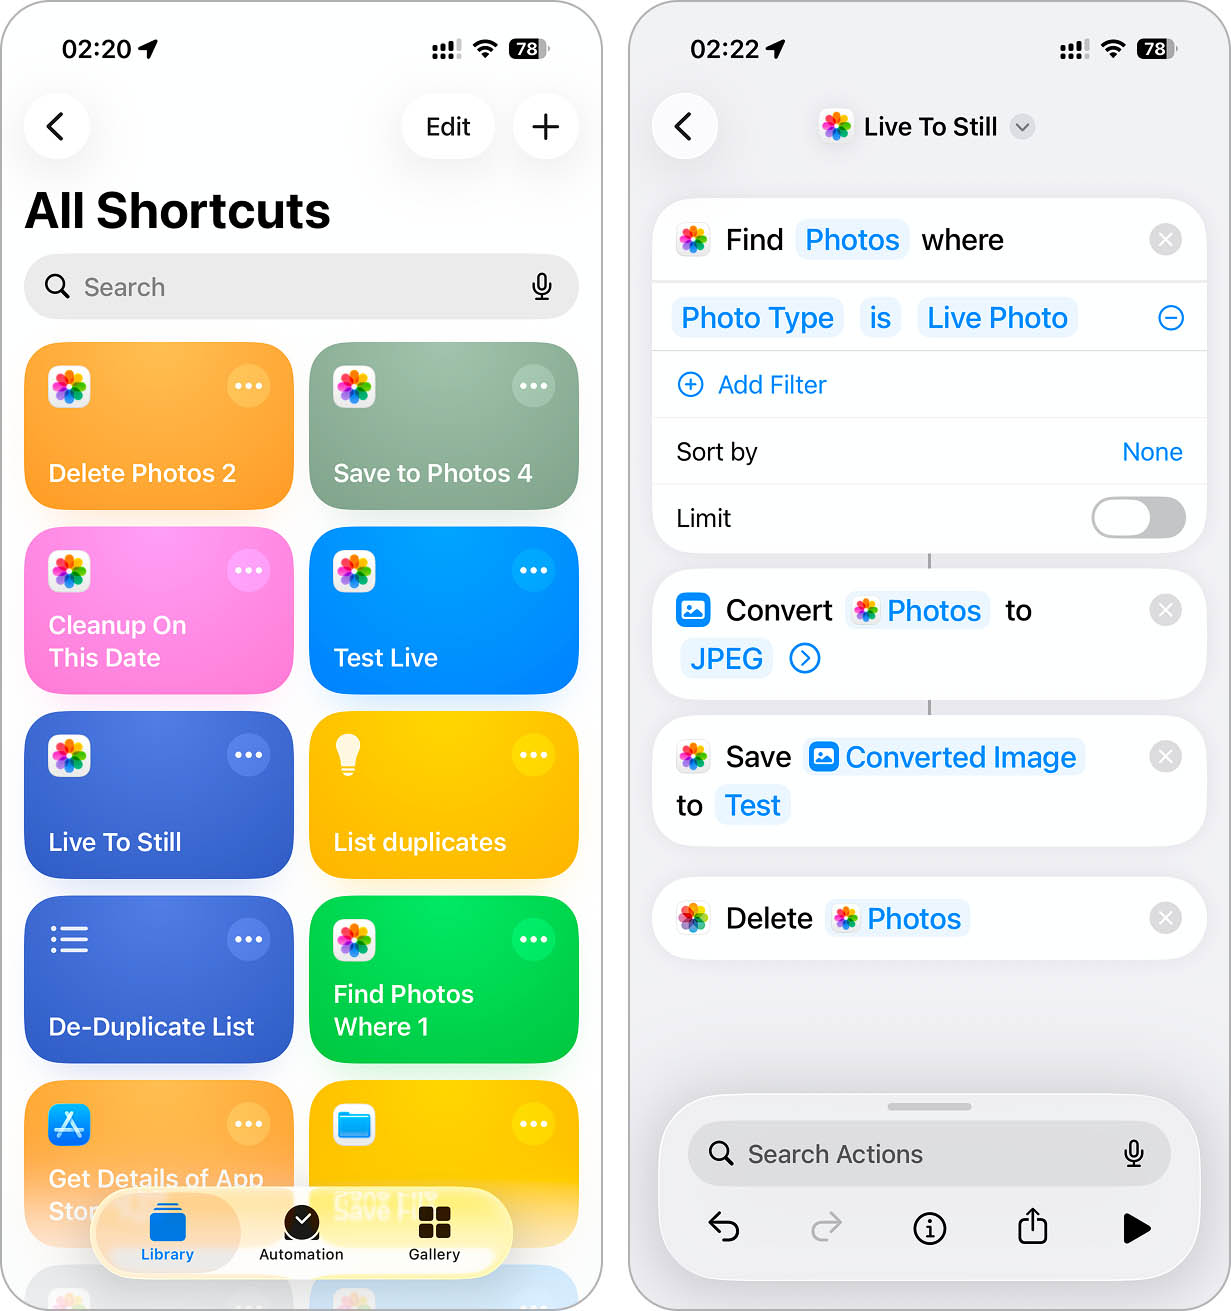
- After that, simply run the shortcut whenever you want to automatically turn off the live photo effect.

6. Manage Live Photos Using Mac
If you have a Mac, you can also manage your Live Photos using its Photos app.
You should have a Mac running at least macOS Sierra to recognize Live Photos. Also, both your Mac and iPhone should sync Photos via iCloud so all Live Photos appear on your Mac.
Here’s how you can turn Live Photos into stills using your Mac:
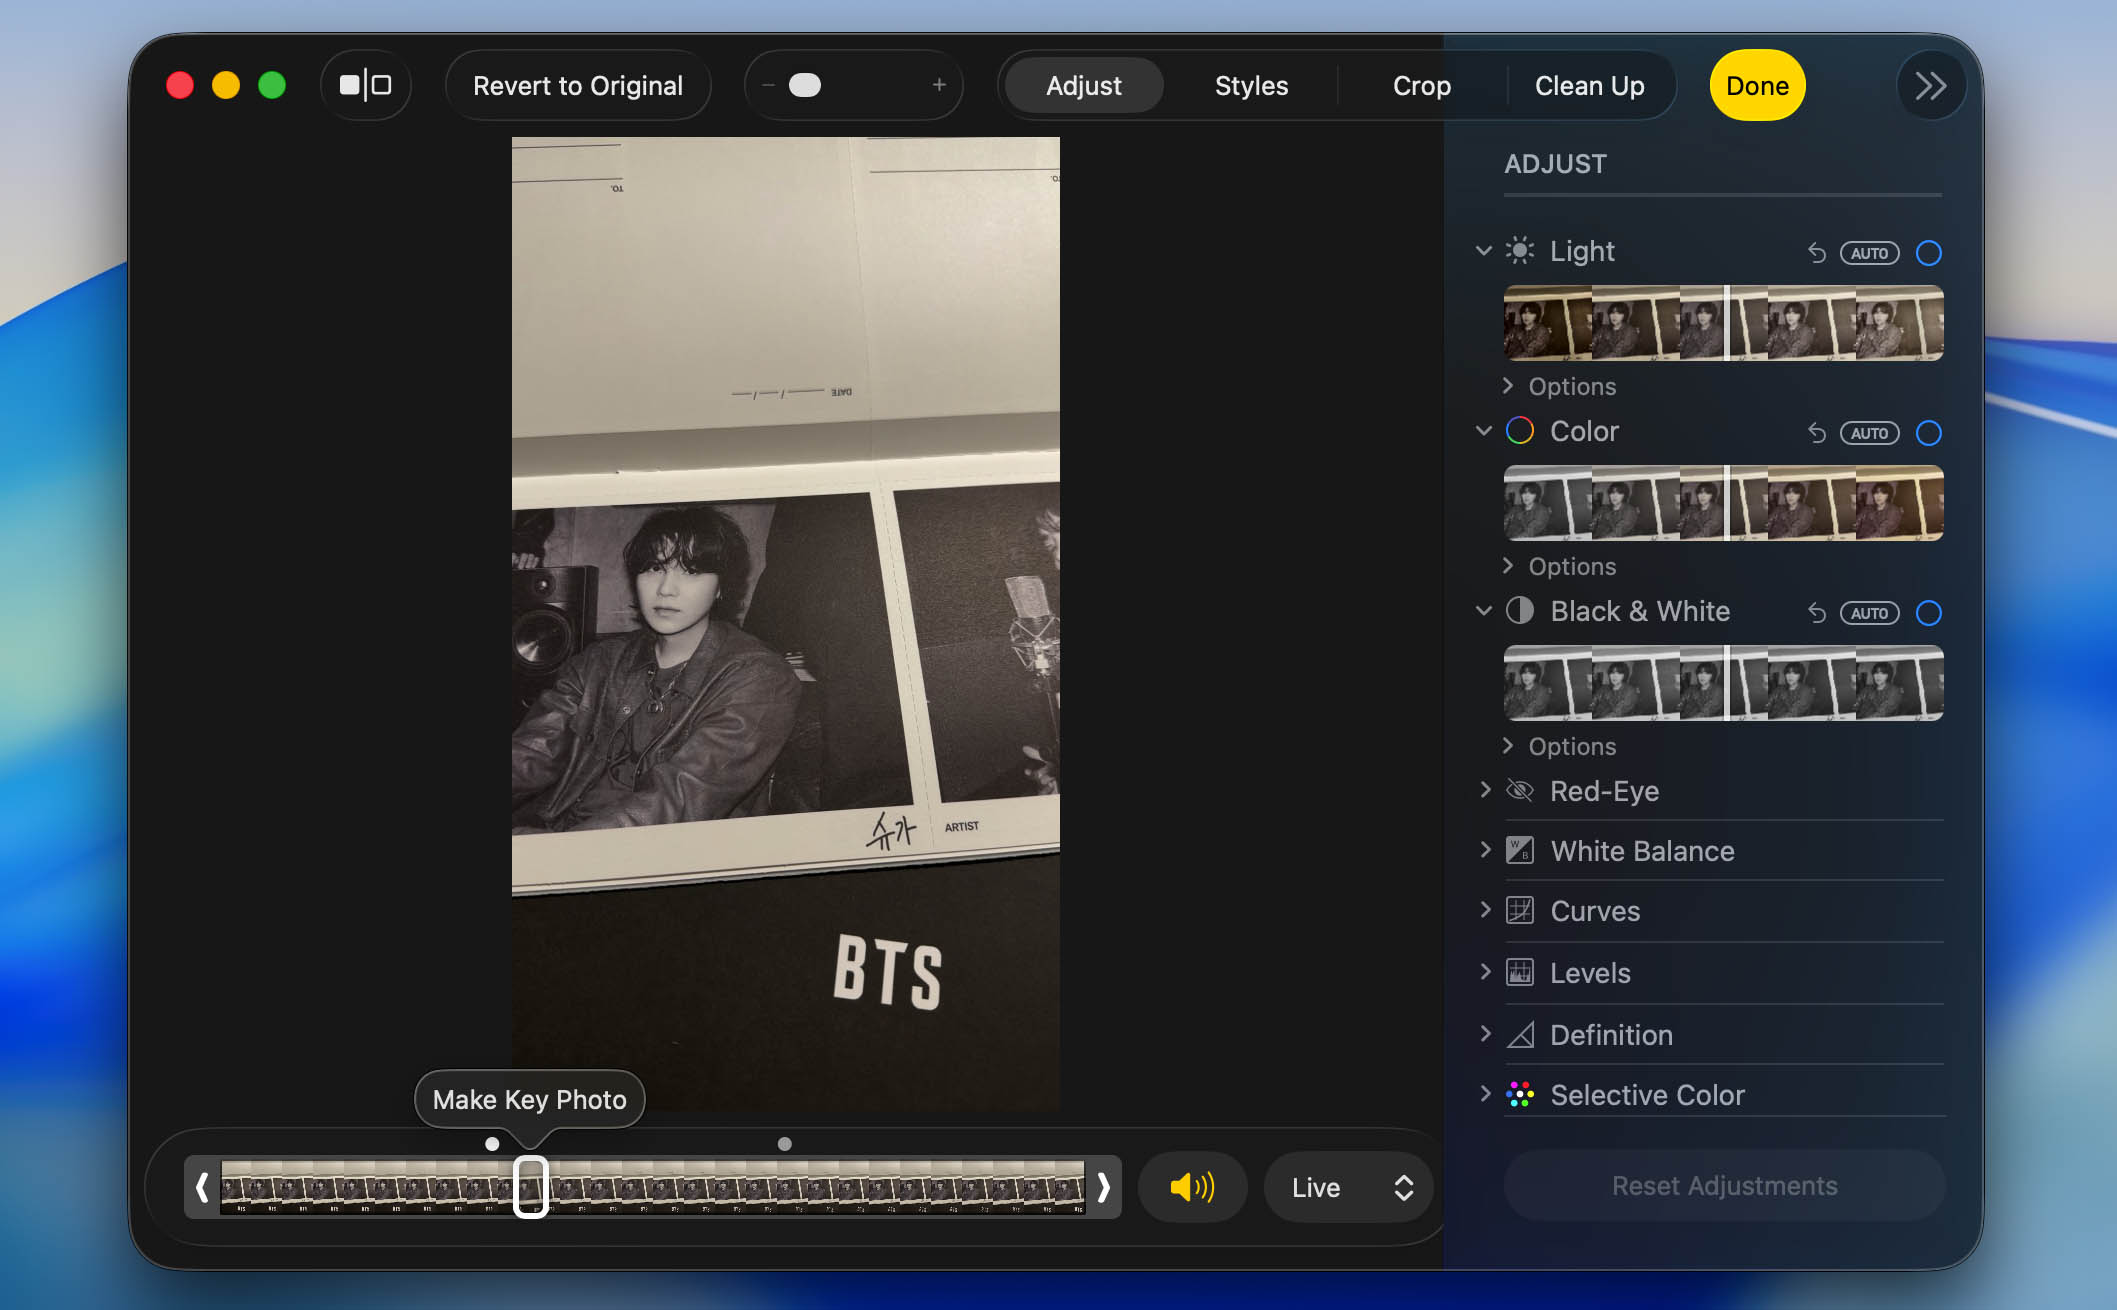
- Open the Photos app on your Mac. In the Collections section, select the Live Photos album from the sidebar.
- Select the Live Photo that you want to convert.
- Click Edit in the top right corner.
- At the bottom of the screen, you’ll see the timeline. Drag the white slider left or right to choose the best frame. Once you’ve selected the perfect frame, click Make Key Photo to set it as the main still image.
- Now, click on the Live Photos button at the bottom of the window and select Off from the dropdown menu.
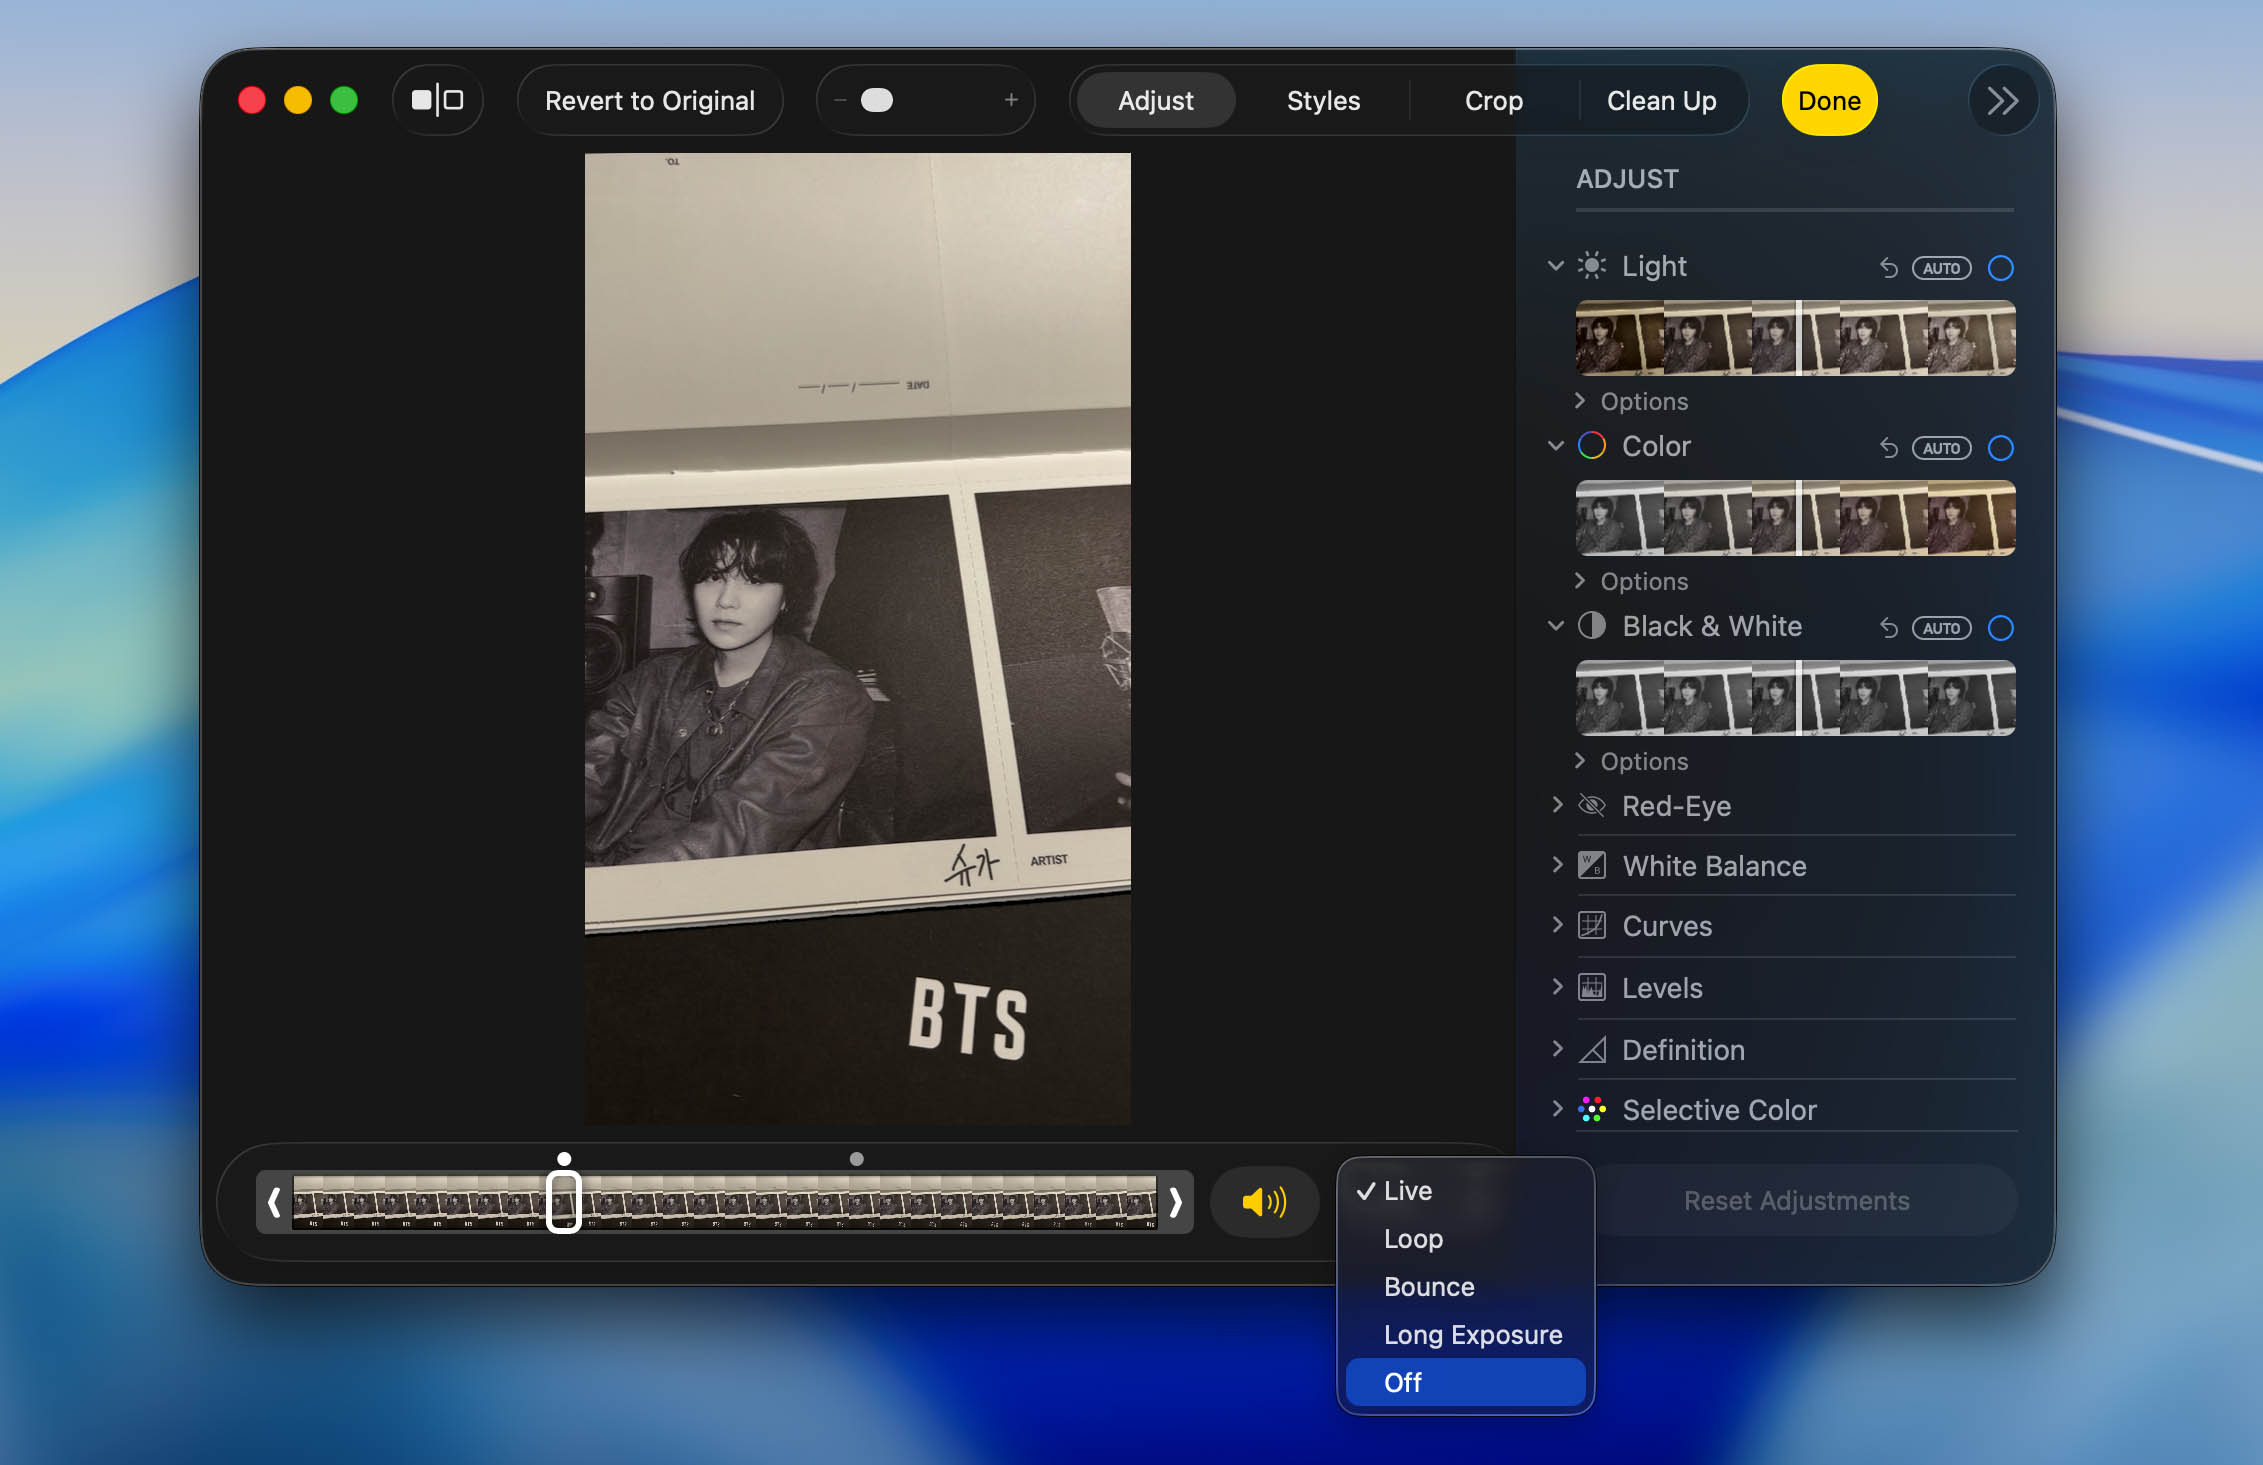
- Finally, click Done.
Final Tips
If you want to get rid of Live Photos for good (maybe because they’re draining your iPhone’s storage), we have a detailed guide with step-by-step instructions. It walks you through how to clean up all Live Photos while keeping the still versions, so you don’t lose your favorite shots.
If you’ve already tried that but your storage still seems full, it might be because deleted photos are still in the Recently Deleted album, or your iPhone’s system storage isn’t clearing up properly. In that case, check out our guide on what to do if your iPhone storage is still full after deleting photos. It breaks down common issues and how to free up hidden space that Apple’s built-in tools don’t always handle well.
If you encountered any roadblocks or have additional questions that weren’t covered in the FAQ, feel free to join our forum. You can start a new topic, ask for advice, and get help from both our team and other experienced users. Whether it’s a tricky issue with Live Photos or anything else related to your iPhone or other Apple devices, our forum is a good place to find solutions.
FAQ
With heavier data, you’d expect the Live Photos to take up more space. Depending on the duration of the video on your Live Photos (up to three seconds, which varies depending on the video details and how you shot your photo), it can be twice or even three times the size of its still image counterpart.
Aside from converting your Live Photos to still images, you can also turn on iCloud’s Optimize iPhone Storage to save your storage. This option keeps a smaller copy of your photos on your device and stores the full resolution of the photo on iCloud.
Not by itself. In most cases, converting a Live Photo to a still image creates an additional still version while the original Live Photo remains in your library. This means you temporarily end up with both files (the regular photo and the original Live Photo that still contains the short video responsible for the Live effect). To actually save storage space, you need to delete the original Live Photo after confirming that the still version was saved correctly.
Yes. You can convert Live Photos on your PC/Mac. On your Mac (at least macOS Sierra):
- Access your photos via the Photos app.
- Then, select the photo/s you want to convert and click Edit.
- You should see the Live Photo icon. Simply click on it to disable the Live Photo feature.
On Windows, you can use third-party conversion applications to change multiple photos in bulk. You can also try to transfer your photos to your Windows by connecting to it. Windows automatically extracts the JPEG of the photo, along with its .AAE (edit information).
This depends on what method you choose to convert your Live Photo. If you choose to duplicate your Live Photos, the original Live Photo should still have the video clip. Some methods will overwrite the Live Photo with the still image. Be careful in converting your Live Photo to a still image to prevent accidentally losing your data.
To choose which frame from the Live Photo becomes the still image, you need to edit the Key Photo on your Live Photo. To do this, follow these steps on your iPhone:
- Open the Photos app and select your Live Photo.
- Tap Edit in the top right corner.
- Select the Live Photo icon at the bottom of the screen.
- Hover over the Live Photo timeline to choose your key photo. Then, tap Make Key Photo.
- Select Done to save your changes.