How to Delete Photos From iPhone but Not iCloud
Want to delete some photos from your iPhone but not iCloud? Or maybe you’re ready to nuke your entire media library on the iPhone but keep everything safe in the cloud? Whatever brought you here, we’ll break down exactly how this Apple sync feature works and the real options you have.
As iPhone users with years of hands-on experience, we’ve tried and tested every method ourselves, so we know what works, what doesn’t, and what you should watch out for. So, let’s get to it.
Is It Possible to Delete iPhone Photos Without Losing Them in iCloud?
We want to start with this right out of the gate.
If you’re trying to delete just a few photos from your iPhone without messing with the ones in iCloud and still keep iCloud Photo sync on, it is NOT possible.
Yes, Apple doesn’t let you selectively delete photos from your iPhone while sync is turned on. But, if you turn off iCloud Photos, you can remove photos on your iPhone without affecting your iCloud library.
Now, if you’re thinking, great, I’ll just remove some photos, then turn iCloud Photos back on, nope, it won’t work like that. Once you re-enable it, Apple will try to resync your device with iCloud, and depending on the situation, those photos you deleted might also disappear from iCloud, or you’ll end up where you started.
So, you’ve got a couple of ways to proceed. It all depends on your situation. Here’s a quick decision helper:
- 1️⃣ I want to wipe ALL photos from my device but keep iCloud untouched (Optimize iPhone Storage was enabled): jump to Radical Method.
- 2️⃣ I want to delete photos without affecting iCloud (and I don’t plan to use iCloud Photo sync anymore): check out Method 1.
- 3️⃣ I want to free up some photo storage but keep using iCloud Photo sync: you’ll want to check both Method 2 and Why Deleting Photos from iPhone but Not iCloud Isn’t Always the Best Move section.
Radical Method (Remove All Photos from iPhone but Not iCloud)
This is the fastest method to remove photos from your iPhone. If you’ve used iCloud with Optimize iPhone Storage enabled, this will clear all your photos (and videos) that were offloaded to the cloud. The local copies will be deleted in one shot (the full-resolution versions will stay safely stored in iCloud and won’t be affected.)
We call it radical because it wipes your entire iPhone photo library at once. No cherry-picking here.
It makes the most sense if you’ve been using Optimize iPhone Storage and just want everything gone from your device. But if that’s not your setup, skip ahead to the next methods.
So after you follow the steps, it’s a good idea to double-check your Photos app to make sure everything you wanted gone is actually gone.
Here’s how to delete all photos from iPhone but not iCloud:
- Open Settings.
- Tap your name at the top.
- Go to iCloud > Photos.
- Look for iCloud Photos (or Sync this iPhone) and turn it off.
- When asked, select Remove from iPhone.
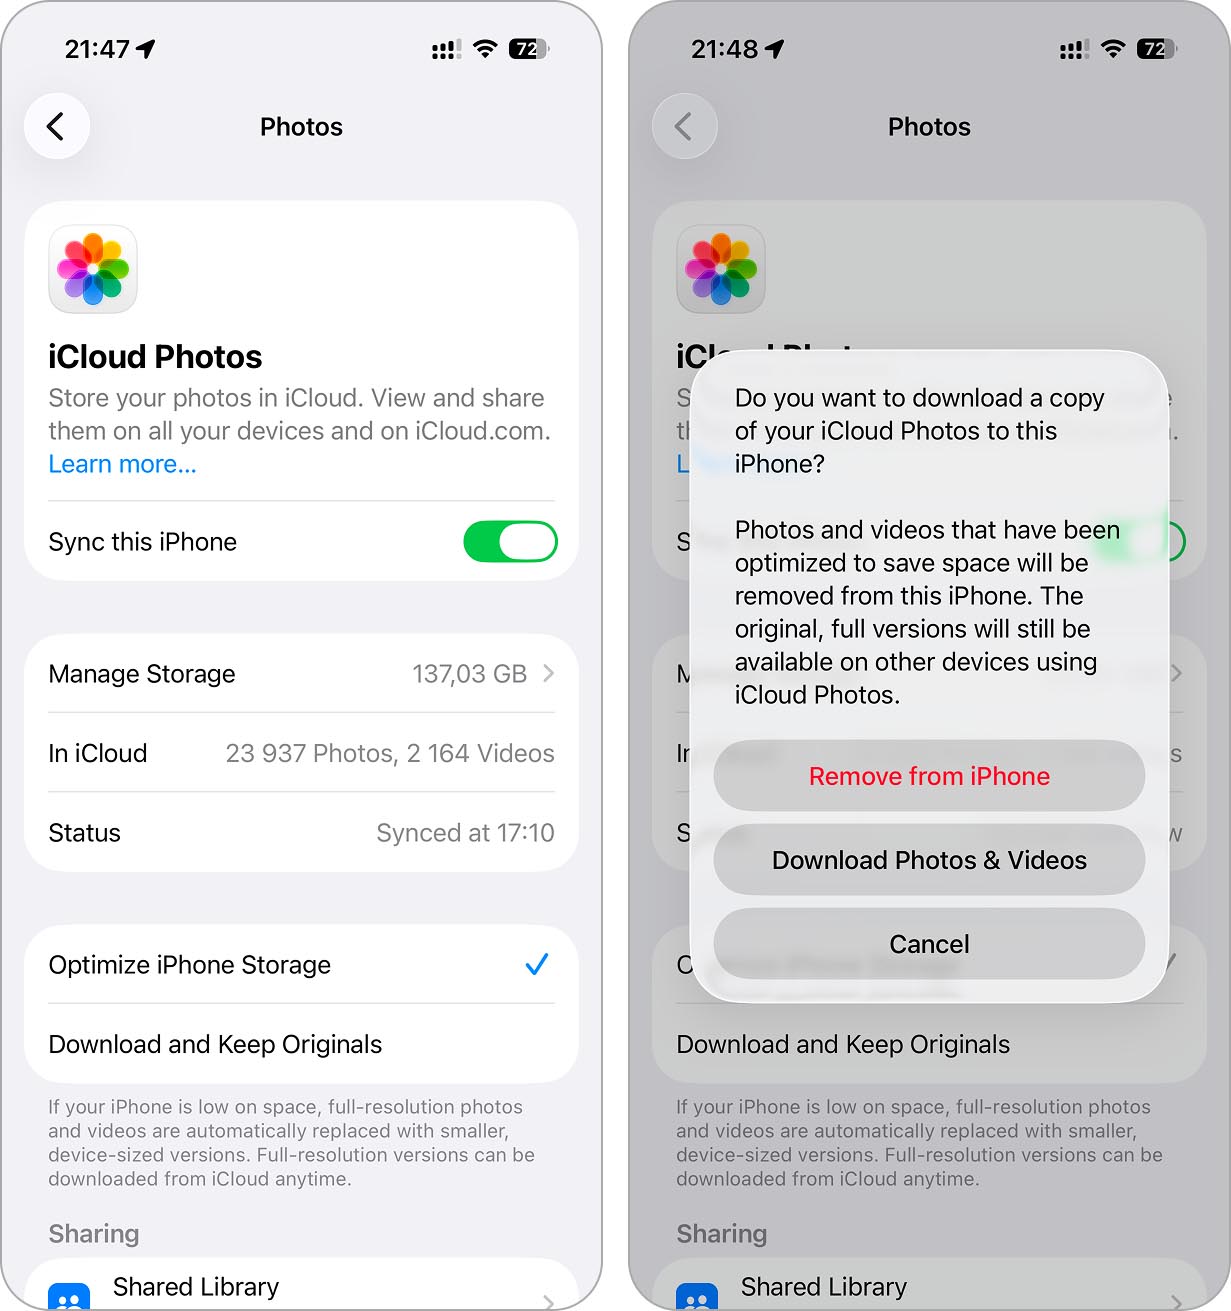
Done. Your iPhone will now remove all optimized photos and videos stored locally, but nothing gets deleted from iCloud. You can still view and download them anytime from iCloud.com or any other device that still has iCloud Photos turned on.
If you later turn iCloud Photos back on, your iPhone will try to download the entire library again. You don’t permanently delete photos, you just unlink your phone from iCloud. Re-enabling it brings the full library right back onto your iPhone.
Soft Methods to Delete Photos on iPhone but Not iCloud
If the radical method feels like too much, and for most people it will be, here are a couple of less “burn all bridges” options.
The first one still requires you to quit iCloud Photos sync, but lets you decide exactly which photos to remove. The second one doesn’t require turning off iCloud Photos at all, but it’s not really about deleting photos. It’s more about freeing up your local storage without actually deleting anything from your library.
Method 1: Disable iCloud Photos and Then Manually Remove Photos
This method is for those who want to remove some photos from an iPhone, not the whole library. Just like with the radical method, the key here is that you’ll need to stop iCloud Photo sync altogether. Once you do, you get full control to delete only what you want from your iPhone without ever touching your photos in iCloud.
Here’s how it works:
- Open Settings.
- Tap your name > iCloud > Photos.
- Turn off iCloud Photos (or Sync this iPhone).
Now your iPhone will ask you to make a choice:
- Remove from iPhone
- Download Photos & Videos
You need to go for the second option: Download Photos & Videos. This will make sure that all your photos are fully downloaded to your device before iCloud sync is turned off. Just make sure your iPhone has enough free space to store everything from iCloud. Before you do this, it’s worth checking in Settings > General > iPhone Storage. If the available space is smaller than your iCloud photo library, you’ll need to free up storage first or go with a different method.
Once it’s done, all your photos will be stored locally on your iPhone. Now you get to decide what goes and what stays. The link between iCloud and your iPhone is severed, so no changes you make from here will affect your photos in iCloud. Delete as many photos as you want from the iPhone, and they’ll still be safely sitting in the cloud.
You probably know how to delete photos from the Photos app, but just to be thorough, let’s go through it real quick:
- Open the Photos app.
- Find the photos you want to delete, in the main library, Albums, or Search.
- Select the photos.
- Tap the trash can and confirm.
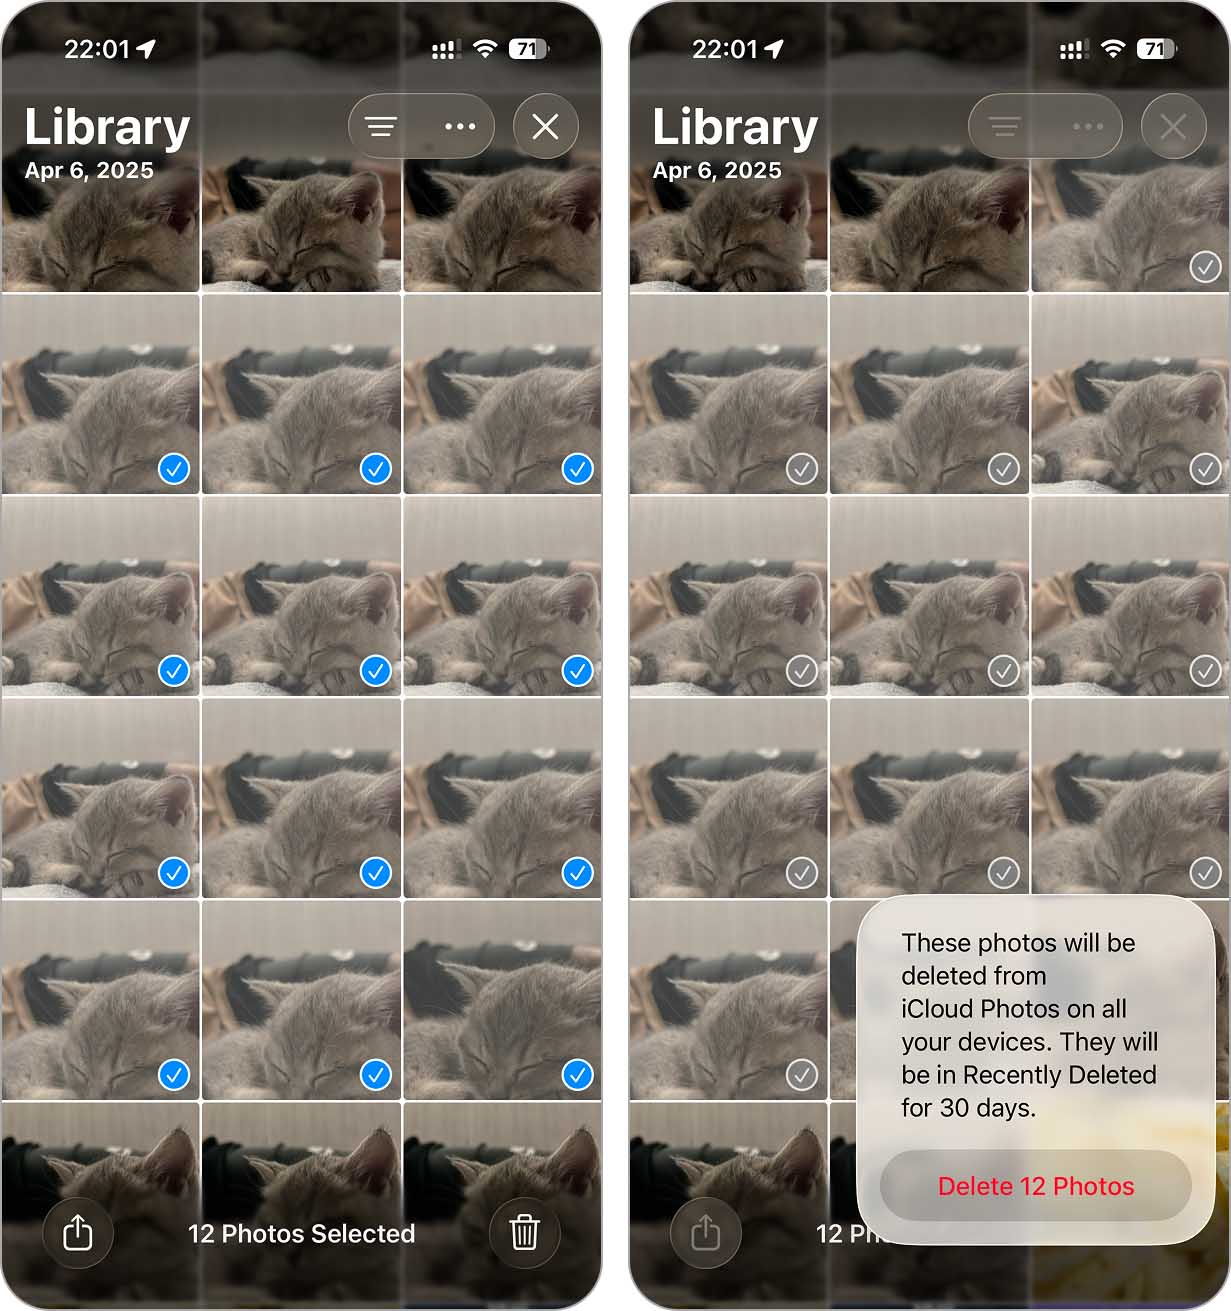
Remember, they’re not fully gone yet. Deleted photos move to the Recently Deleted album and stay there for 30 days. If you want to free up space right now, go to Recently Deleted and clear it out manually.
As with the previous method, if you turn Sync this iPhone back on, your photo library will sync with iCloud again. Any photos you deleted will come right back to your iPhone as the full library is restored.
Method 2: Use Optimize iPhone Storage
If you don’t want to disable iCloud Photos sync and, just like many people, want to free up space without losing the pictures and videos on the cloud, here’s the alternative. You can enable Optimize iPhone Storage.
This will replace full-resolution photos and videos on your iPhone with smaller, space-saving versions while keeping the originals safely in iCloud. You’ll still see all your photos on your iPhone, but they won’t take up nearly as much storage.
How to enable Optimize iPhone Storage:
- Open Settings.
- Tap your name > iCloud > Photos.
- Make sure iCloud Photos (or Sync this iPhone) is turned on.
- Select Optimize iPhone Storage.
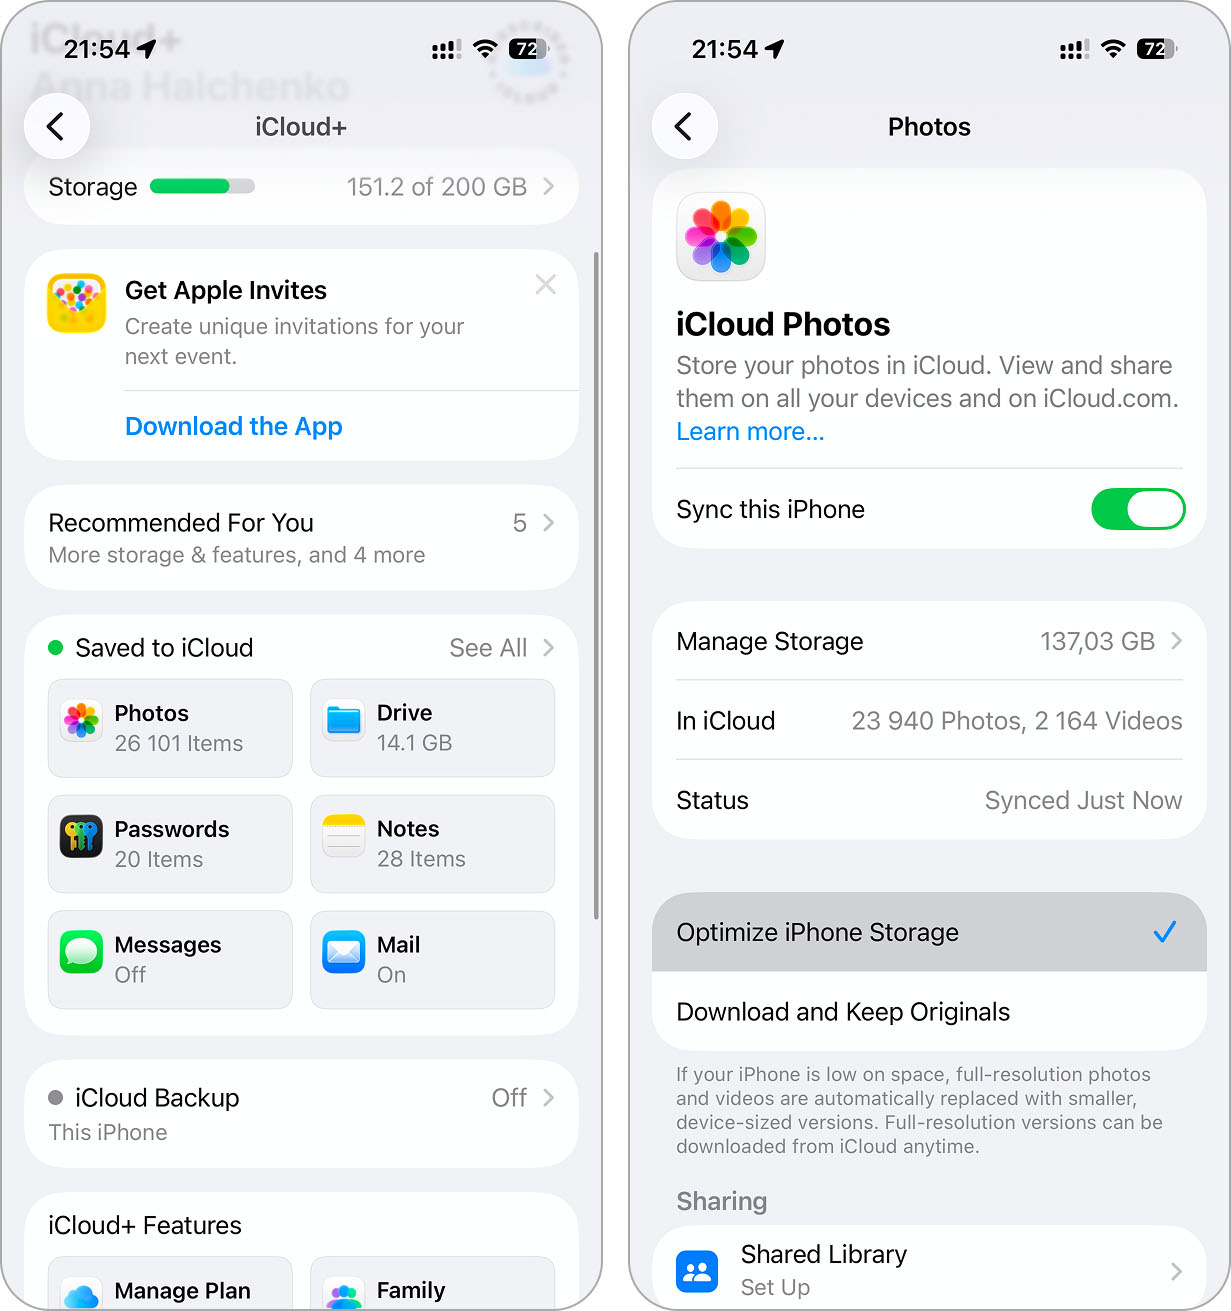
That’s it. iOS will automatically manage your photo storage. You’ll still be able to view, share, and edit them like normal, but your storage usage will be way lower.
If the reason you wanted to delete pictures from an iPhone but not iCloud was just to clear local iPhone storage, you can simply use this option. This way, you don’t have to delete anything. Your photos stay untouched on iCloud, and your iPhone holds only lightweight versions.
But, of course, there are a few drawbacks:
- You’ll need enough space in your iCloud account for all your current and future photos. The free version only gives you 5 GB.
- You’ll need a stable internet connection, especially when viewing or editing older photos. Since full-resolution versions will now live in the cloud, your iPhone may need to download them when you open them.
- If you lose internet, you may only have access to the lower-quality versions until you’re back online.
Why Deleting Photos from iPhone but Not iCloud Isn’t Always the Best Move
All the methods we covered above work fine and will be suitable for many people. But before you go all-in on it, it’s worth asking: do you actually need all of these photos in the first place? And are you willing to accept the downsides that come with the previous methods?
- If you go with Method 1, you’ll have to disable iCloud Photo sync for good.
- If you go with Method 2, you’ll still need enough available space in iCloud and you’ll rely on constant internet access to load full-resolution photos on demand.
So, maybe the real move here is to clean up both your iPhone and iCloud. Most iPhone users (including us) have tons of junk hiding in their libraries:
- Duplicate photos and videos
- Multiple near-identical shots
- Old screenshots
- Large videos you don’t even remember taking
If you tidy up your entire library while keeping iCloud Photos sync turned on, you’ll free up space everywhere, both local storage and cloud storage, without breaking the sync or losing anything important.
Plus, you’ll make your Photos app way easier to browse.
While you can clean up your photo library manually, let’s be honest, that’s a lot of work. Instead, we want to show you how to free up a ton of space (if that’s your main goal) without breaking iCloud sync and without losing anything valuable, automatically, with an app.
This app has four cleaning tools that can give both your iPhone and iCloud library some much-needed breathing room. In our tests, it helped us free up more than 17 GB of storage. You can read all about it in our full review, and that’s without deleting anything truly important.
Let’s take a quick look at what it can clean:
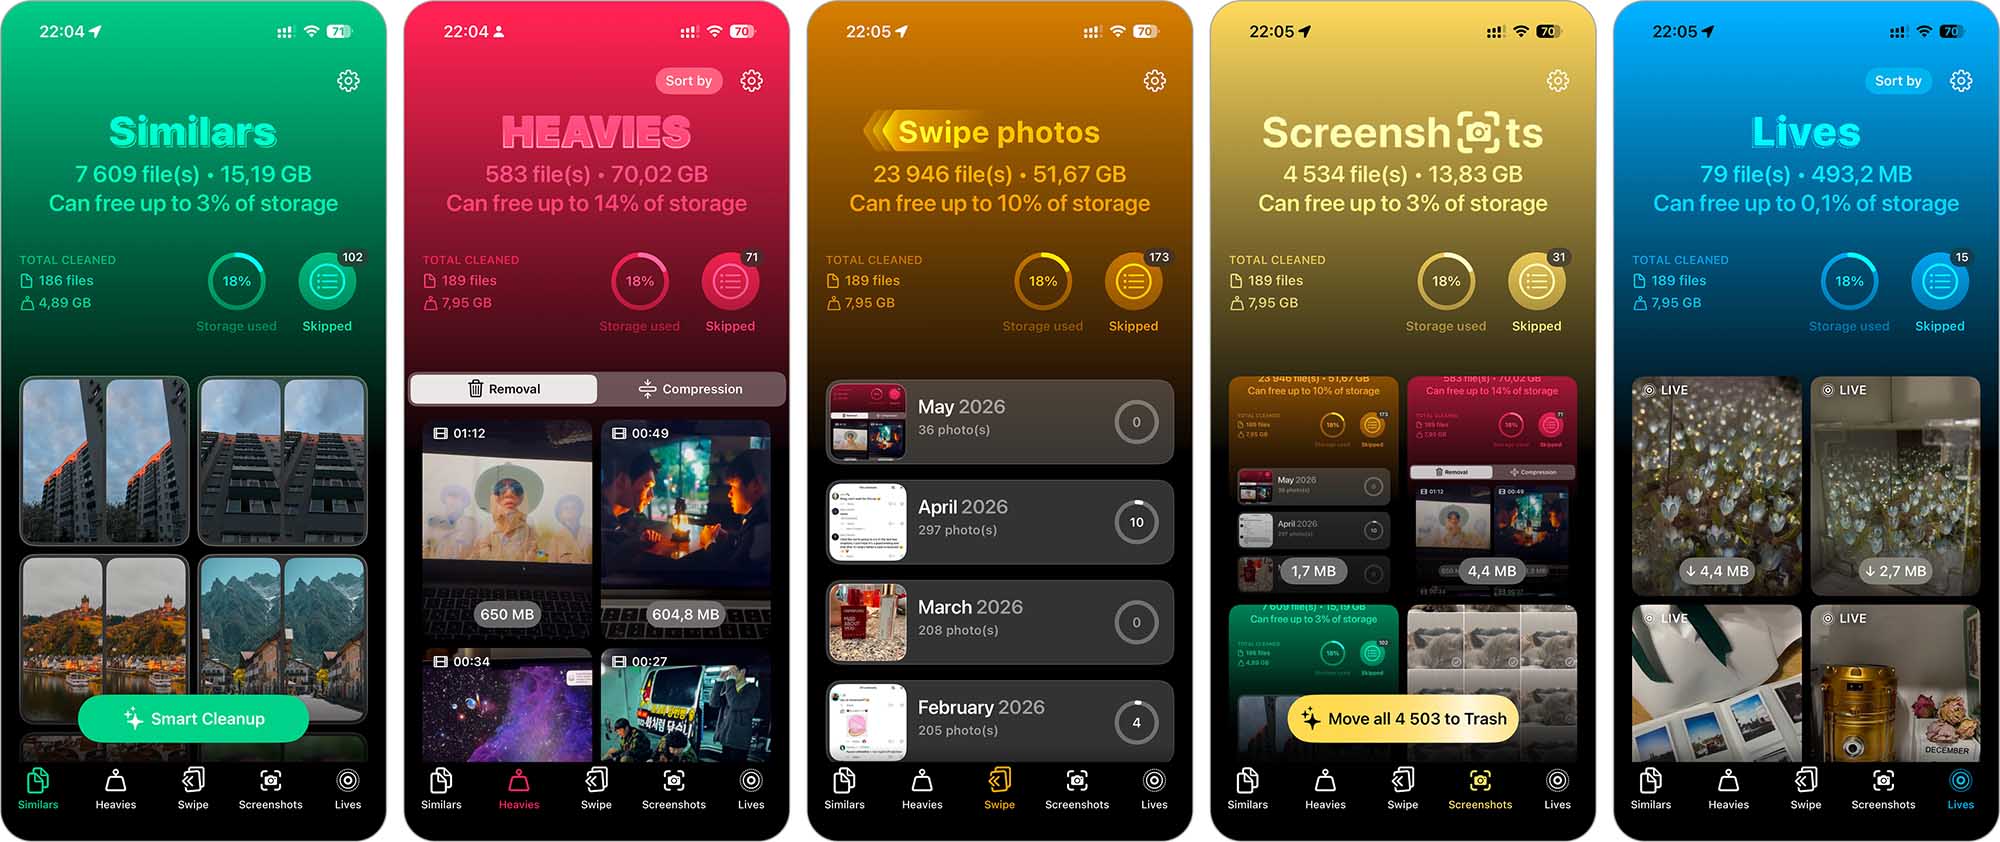
- Duplicates and visually similar images: Its AI-powered system finds not only exact duplicates but also similar-looking photos. This is a lot more than what the Photos app does, which only flags exact matches. Clever Cleaner lets you remove all the extras automatically.
- Large files: Sorts your videos from largest to smallest so you can easily spot and remove the ones eating up the most space. If you’ve ever tried to do this in the Photos app, you already know, there’s no option to sort by file size. There’s also the option to compress the videos if you’re not ready to delete them just yet.
- Library by months: Groups all your photos based on when they were added, so you can go through your library in smaller, more manageable chunks. You can swipe to keep or delete, which makes the process feel quick. It’s a great option for day-to-day cleanup if you’re not a fan of fully automated tools.
- Screenshots: Quickly finds and removes screenshots you probably don’t need anymore. Clean them all up in a single tap.
- Live photos: Offers a smart way to convert Live Photos into regular still images, removing the short video portion. It’s a creative trick to save space without changing the look of your gallery.
Here’s a real example of how you can automatically delete all duplicates and near-duplicates from your library using this app:
- Type “Clever Cleaner” into the App Store search bar or go directly to its page.
- Open the app and head to the Similars tab.
- From here, you can either manually review similar photos or let the app handle it with Smart Cleanup.
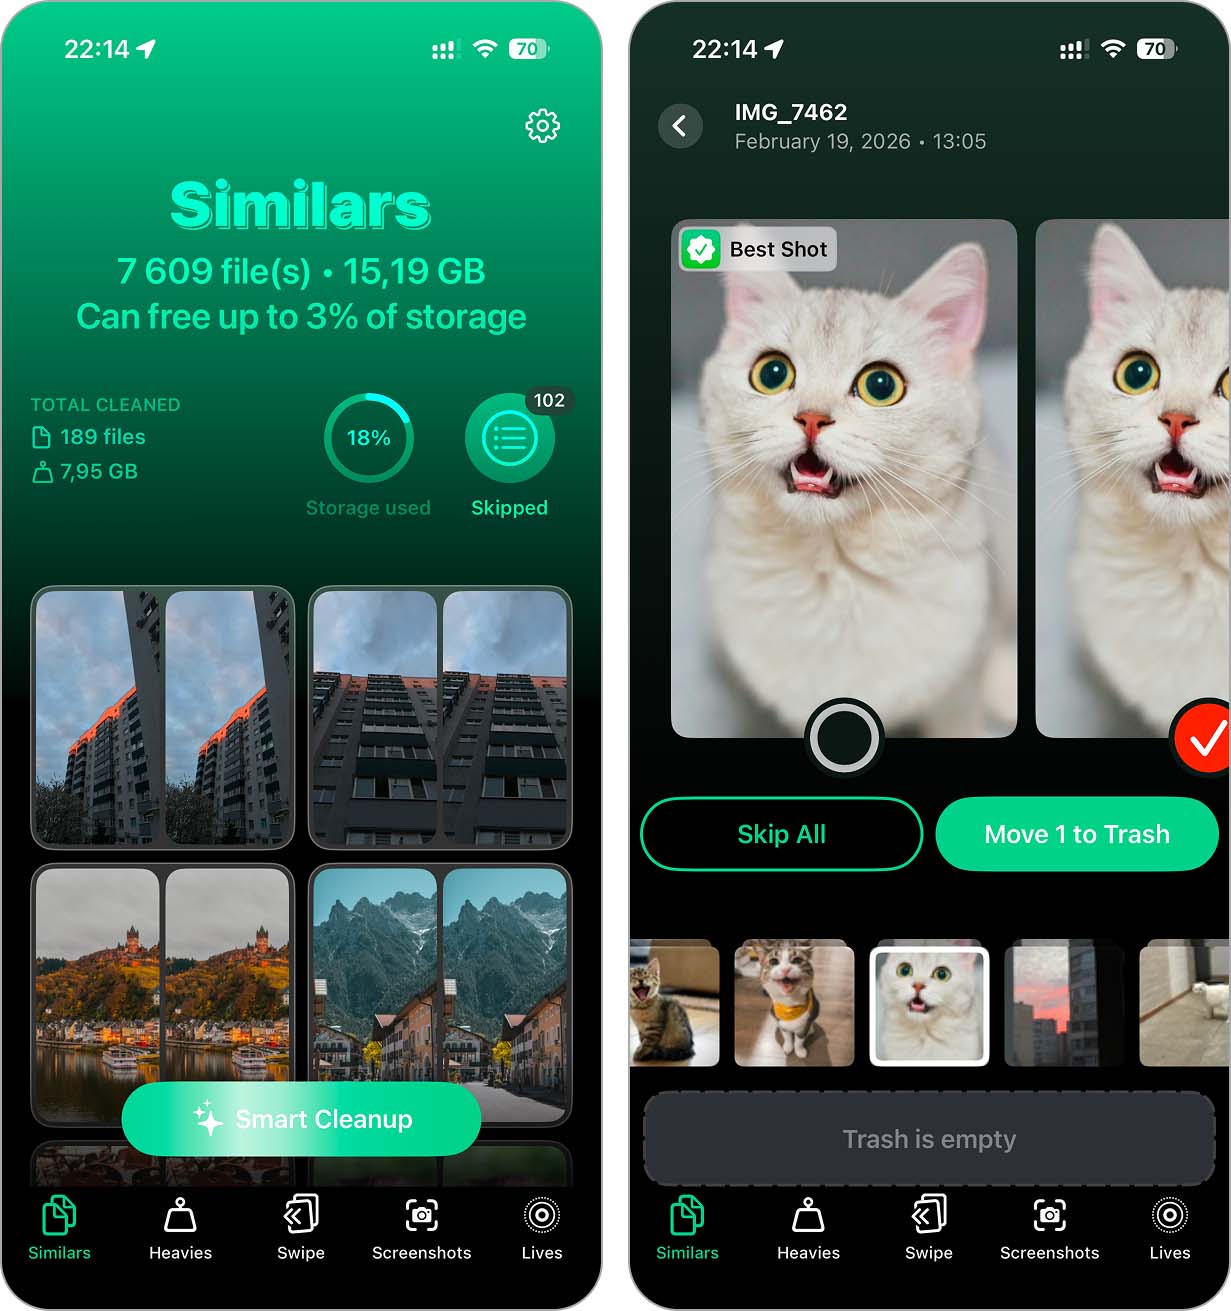 If you prefer to review them yourself, tap on a group of similar photos, and select which ones you want to delete.
The app automatically pre-selects duplicates and marks the best-quality photo as Best Shot, so you don’t have to figure it out. You can, of course, change this if you want. - Tap Move to Trash and the app will immediately show you the next group.
When you’re ready, tap Empty Trash and confirm to delete the selected photos. - If you go with Smart Cleanup, the app will show you everything it suggests for deletion upfront, and you can simply Slide to delete them all in one go.
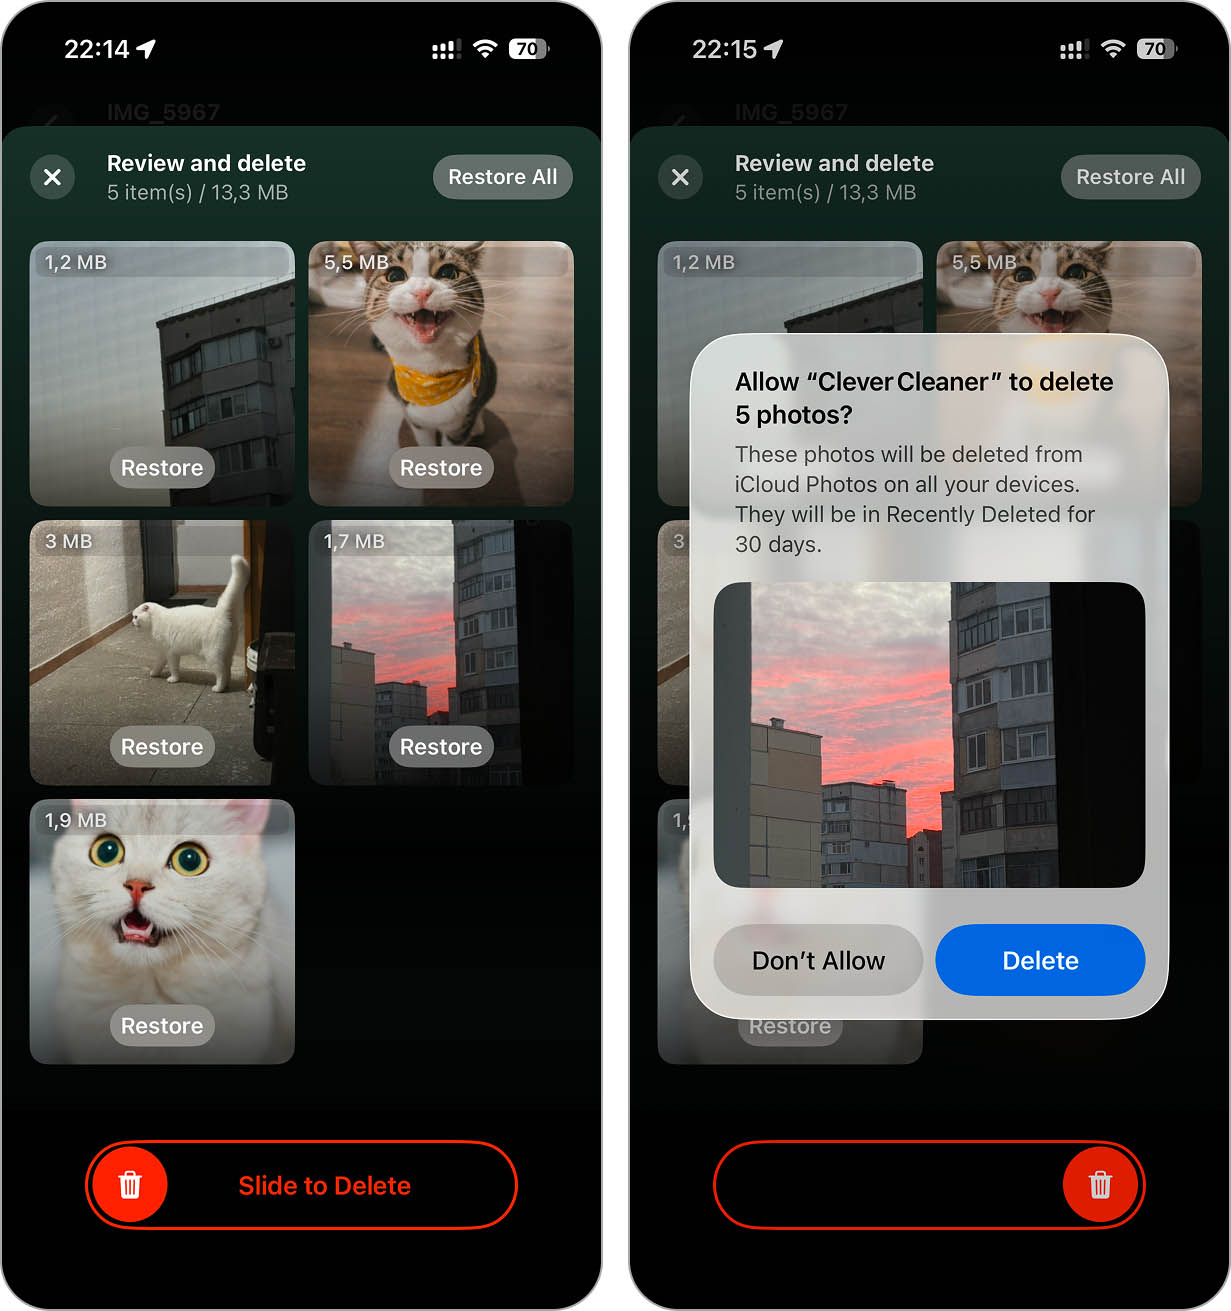
The app will ask for permission to remove the photos from iCloud Photos across all synced devices, so these useless photos will be gone from both your device and iCloud. It’s a great way to free up space locally and in the cloud without losing iCloud sync.
Be sure to try all the other features too. There’s a lot of potential here. And as the developers at CleverFiles state on the official Clever Cleaner cleanup app page:
“Early users will never be asked to pay for upgrades or new features.”
So if you grab it now, you should be able to use it for free forever, and who knows, maybe even more useful features will be added down the line.
Quick Recap
Before we bow out, let’s go through everything one more time, real quick.
Here are the key takeaways:
- You can’t selectively sync your photos to iCloud. It’s all or nothing. Either the entire library syncs or nothing does.
- If you’re okay with disabling iCloud Photos sync, you can: Nuke all photos from your iPhone while keeping them in iCloud. If you were using Optimize iPhone Storage, this lets you clear out all the low-res, optimized versions that were stored locally. Go to Settings > Your Name > iCloud > Photos, turn off Sync this iPhone, and choose Remove from iPhone /OR/ Remove photos selectively from your iPhone without touching iCloud. Same steps, but after turning sync off, choose Download Photos & Videos and manually delete only the photos you want from the Photos app.
- If you want to keep using iCloud sync and just need more local storage: Use the Optimize iPhone Storage feature to offload full-res versions and keep lightweight previews on your device. Go to Settings > Your Name > iCloud > Photos and turn on Optimize iPhone Storage /OR/ You can actually clean up your photo library and get rid of stuff no one will miss, duplicates, junk, screenshots, huge files, and free up space on both your iPhone and iCloud without breaking sync.
Since we know a lot of you mainly have a goal to make iCloud a sort of storage space for photos because they no longer fit on your iPhone, we’d suggest stepping back before turning off sync completely. That move can cause more hassle than it’s worth. In most cases, it’s better to ask if you really need to go that far, or if a good cleanup would solve the issue.
Start with the section Why Deleting Photos from iPhone but Not iCloud Isn’t Always the Best Move, where we explain a quick way to do exactly that. Then check if your iPhone has enough space to function properly. You might not need to disable anything at all. It’s quick, painless, and absolutely free, so it’s a solid first step before any big changes.
If after all this you still want your iPhone and cloud storage to stay independent, so deleting a photo in one place doesn’t remove it from the other, you’ll need to look at alternative cloud services like Google Drive or Dropbox. These let you upload photos manually instead of syncing your entire library, which gives you full control over what stays on your device and what lives in the cloud.
If you have additional questions, check out our FAQ below or drop by our iPhone forum, plenty of useful discussions happening there.
Also, remember that we have a contact form here, where you can reach out to us directly if you get stuck, run into issues, or just want to share your experience. We’re always happy to help fellow iPhone users figure things out.
FAQ
If you just need to free up space, consider other methods (like Optimize iPhone Storage) before you go through the hassle of switching accounts entirely.
- Google Photos: offers free (15GB) storage, automatic sync, and cross-platform access.
- Dropbox: known for reliable syncing and easy folder organization; often used as a universal backup solution for multiple file types.
- Amazon Photos: especially good for Prime members, with unlimited full-resolution photo storage.