Mr.D. Posted April 1, 2013 Share Posted April 1, 2013 a door within the door... very cool idea. as a side note - watcha doin with the apple and leaf you cut out? 1 Link to comment https://www.insanelymac.com/forum/topic/287441-minihack-a-slightly-different-g5-case-mod/page/2/#findComment-1902749 Share on other sites More sharing options...
MiniHack Posted April 1, 2013 Author Share Posted April 1, 2013 a door within the door... very cool idea. as a side note - watcha doin with the apple and leaf you cut out? Don't know - do you have an idea???? Link to comment https://www.insanelymac.com/forum/topic/287441-minihack-a-slightly-different-g5-case-mod/page/2/#findComment-1902768 Share on other sites More sharing options...
v3nom Posted April 1, 2013 Share Posted April 1, 2013 Haha, love it! Please combine it with an old DVD drive engine and use the eject button to open the door! Or will you just slide it manually? Link to comment https://www.insanelymac.com/forum/topic/287441-minihack-a-slightly-different-g5-case-mod/page/2/#findComment-1902859 Share on other sites More sharing options...
Mr.D. Posted April 1, 2013 Share Posted April 1, 2013 yeah.. I gots an idear aight... send it to me! actually, I need to talk with you about something along those lines... I'll pm you. Link to comment https://www.insanelymac.com/forum/topic/287441-minihack-a-slightly-different-g5-case-mod/page/2/#findComment-1902865 Share on other sites More sharing options...
Baudouin Posted April 2, 2013 Share Posted April 2, 2013 Don't know - do you have an idea???? You could light on an acrylic Apple logo, the same way the Macbook (Pro) does on the back of the cover. Connecting the wires to the Power Led and get both lights on when starting the Computer. 1 Link to comment https://www.insanelymac.com/forum/topic/287441-minihack-a-slightly-different-g5-case-mod/page/2/#findComment-1902972 Share on other sites More sharing options...
MiniHack Posted April 2, 2013 Author Share Posted April 2, 2013 Case Fixings One of the challenges in this mod is attaching panels internally and externally to the inner case of the G5. One of my latest favourite tools though is going to make this easier. This is a tool for attaching Rivet Nuts or Rivnuts Here are the rivet nuts - I bought 1000 of them. Basically these ones are M3 internally threaded and open at each end. This is the outer part of the Rivet Nut after attachment - it sits flush on the surface. And here it is from the other side: To use them you screw the rivnut onto the tool, put the head into your proper sized hole, squeeze the handles of the tool. Then unscrew the tool leaving the rivnut in place. The rivetnut works by compressing on the "blind" side of the hole and grips the material around the perimeter of the hole. It leaves a "standoff" type shape. There are a few good things about this as a fixing: 1 - you only need access to one side of the panel; 2. As it is threaded all the way through you can attach something by a screw to either OR both sides of the rivet nut; 3. It is made from aluminium (same material essentially as the G5 and is potentially I guess also capable of anodising); 4. They give a good solid no glue attachment; 5. The size I use fit perfectly in a 4.8 or 4.7mm hole and.....the inner case has those size holes; 6. As they are a screw fixing the parts can be separated (unlike using a normal rivet); 7. Any fool can use them. If for instance you have that bent foot problem on your case and the lower captive nuts have popped on your G5 you could use these to provide a new captive thread on your inner case. And then you could drill and countersink holes in the outer case to use screws to help pull it back into line. Yes, it would be a visible repair, but with the right countersinking and screws would also look good.... For me I will use them to attach my door panels as well as to attach a motherboard tray in my custom G5 mod. I also use them in G5 power supply case mods. to space the PCB from the case and to provide attachment points for PCI-e cards in IO brackets. They can also be used as secure standoffs for you to make home made motherboard trays from aluminium sheet. 2 Link to comment https://www.insanelymac.com/forum/topic/287441-minihack-a-slightly-different-g5-case-mod/page/2/#findComment-1903049 Share on other sites More sharing options...
Baudouin Posted April 2, 2013 Share Posted April 2, 2013 ... This is a tool for attaching Rivet Nuts or Rivnuts Here are the rivet nuts - I bought 1000 of them. Basically these ones are M3 internally threaded and open at each end. This is the outer part of the Rivet Nut after attachment - it sits flush on the surface. And here it is from the other side: To use them you screw the rivnut onto the tool, put the head into your proper sized hole, squeeze the handles of the tool. Then unscrew the tool leaving the rivnut in place. The rivetnut works by compressing on the "blind" side of the hole and grips the material around the perimeter of the hole. It leaves a "standoff" type shape. ... I also use them in G5 power supply case mods. to space the PCB from the case and to provide attachment points for PCI-e cards in IO brackets. They can also be used as secure standoffs for you to make home made motherboard trays from aluminium sheet. Very very interesting !!! Better than the standard rivets tool. Thanks a lot for sharing this experience . Link to comment https://www.insanelymac.com/forum/topic/287441-minihack-a-slightly-different-g5-case-mod/page/2/#findComment-1903076 Share on other sites More sharing options...
Mr.D. Posted April 2, 2013 Share Posted April 2, 2013 stop showing my cool stuff that I now must have. that would've been handy for my PSU mod for sure. Link to comment https://www.insanelymac.com/forum/topic/287441-minihack-a-slightly-different-g5-case-mod/page/2/#findComment-1903206 Share on other sites More sharing options...
MiniHack Posted April 3, 2013 Author Share Posted April 3, 2013 stop showing my cool stuff that I now must have. that would've been handy for my PSU mod for sure. Go on, buy one.... It's cheaper than the fan controller. and you'll find all sorts of stuff you can use it for... 1 Link to comment https://www.insanelymac.com/forum/topic/287441-minihack-a-slightly-different-g5-case-mod/page/2/#findComment-1903310 Share on other sites More sharing options...
MiniHack Posted April 4, 2013 Author Share Posted April 4, 2013 I was complaining recently about the cost of just buying screws and bolts. Just wanted to share for people in the UK a place that actually seems to sell this kind of thing at a sensible price: http://www.fixingsandfastenings.co.uk/ - and no I am not being paid to say this, but it is my new place for buying stuff from - is remarkably cheap for buying stuff from if you don't mind buying 100 or more at a time. I even bought a replacement multimeter from there for £5.23 (I don't need one but at that price I couldn't help myself). I wasn't sure whether to buy button headed, allen key headed or recessed socket headed screws and whether black or zinc plated for my build. So I just bought all of them as I know I'll use them sometime. Hope this link helps someone else. 1 Link to comment https://www.insanelymac.com/forum/topic/287441-minihack-a-slightly-different-g5-case-mod/page/2/#findComment-1903802 Share on other sites More sharing options...
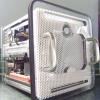
MiniHack Posted April 10, 2013 Author Share Posted April 10, 2013 Little update today. Had some spare time so tackled the G5 power supply housing. Opening up the original case shows just how filthy these things get inside and how dust kills computers (note to self - get some filters). I am going to re-use the front connector - to re-use the original Mac front cable that runs from bottom to top. I want to do this because the original cable conveniently has two SATA power connectors (which will power all the drives in the hotswapper) and one Molex (for the fan controller). So I will be removing original long Molex connector from my ATX supply and grafting on the original G5 plug which is conveniently colour coded. I'll also be re-using the original plug and housing for it so it is easiest to just clip that short now. PCB for the G5 is then removed. Washed out the interior - and found a load of old washers and stuff in there too - glad I didn't try and power on this supply. Then I marked out the interior for where I will place the PCB from the ATX supply I am using. Goal here was to get the PCB placed in the box as close to the door side of the G5 as I could and also positioned so it would be in an area where my hotswapper will NOT be standing as I am thinking of cutting the top of the G5 box for ventilation so I want to leave that option open. Keeping it as close to the door side as I can also lets me see later if there will be room for a top fan that will not interfere with the ATX mobo when in place. All those decisions to come later when I see how things pan out..... In deciding how to mount it I put it so that one of the existing standoffs for the PCB could be used and so I would just have to drill three holes for the remaining supports. Another thing is to mount the heatsinks in line with the way air will flow, so that they will get air through them and will not block the flow. Holes drilled and out came my trusty rivet nut tool which makes light work of putting in new fixings. Note yet done with the PSU - TBC 1 Link to comment https://www.insanelymac.com/forum/topic/287441-minihack-a-slightly-different-g5-case-mod/page/2/#findComment-1905404 Share on other sites More sharing options...
Baudouin Posted April 10, 2013 Share Posted April 10, 2013 I am going to re-use the front connector - to re-use the original Mac front cable that runs from bottom to top. I want to do this because the original cable conveniently has two SATA power connectors (which will power all the drives in the hotswapper) and one Molex (for the fan controller). So I will be removing original long Molex connector from my ATX supply and grafting on the original G5 plug which is conveniently colour coded. Yes man, I did reuse the original Mac front cable that runs from bottom to top to use the two SATA power connectors for my two HDD's and the one Molex for the DVD driver with an adapter molex-sata . Holes drilled and out came my trusty rivet nut tool which makes light work of putting in new fixings. I love this tool and really will buy one. Link to comment https://www.insanelymac.com/forum/topic/287441-minihack-a-slightly-different-g5-case-mod/page/2/#findComment-1905420 Share on other sites More sharing options...
MiniHack Posted April 10, 2013 Author Share Posted April 10, 2013 I love this tool and really will buy one. Yes, it is a seriously good thing to have - just drill a hole and make an almost instant standoff or captive nut! And you can buy tools off eBay like this without spending a lot. 1 Link to comment https://www.insanelymac.com/forum/topic/287441-minihack-a-slightly-different-g5-case-mod/page/2/#findComment-1905428 Share on other sites More sharing options...
Mr.D. Posted April 10, 2013 Share Posted April 10, 2013 Looks llike you are doing the exact same thing I did with my PSU. I also reused the original G5 black sata power cables and Molex because it fit, it was original and did exactly what I wanted it to do. Again, I wish ida had that rivet nut tool then, or at least within driving distance to your place to borrow all your cool tools. Link to comment https://www.insanelymac.com/forum/topic/287441-minihack-a-slightly-different-g5-case-mod/page/2/#findComment-1905647 Share on other sites More sharing options...
Baudouin Posted April 10, 2013 Share Posted April 10, 2013 Yes, it is a seriously good thing to have - just drill a hole and make an almost instant standoff or captive nut! And you can buy tools off eBay like this without spending a lot. I am following two of them on eBay, but I want first to compare the price with the shop next door. I will then buy one . Is it not strange that the cheaper one seems bigger and solid ? http://www.befr.ebay...984.m1438.l2649 http://www.befr.ebay...84.m1438.l2649 1 Link to comment https://www.insanelymac.com/forum/topic/287441-minihack-a-slightly-different-g5-case-mod/page/2/#findComment-1905664 Share on other sites More sharing options...
MiniHack Posted April 11, 2013 Author Share Posted April 11, 2013 Looks llike you are doing the exact same thing I did with my PSU. I also reused the original G5 black sata power cables and Molex because it fit, it was original and did exactly what I wanted it to do. Again, I wish ida had that rivet nut tool then, or at least within driving distance to your place to borrow all your cool tools. Long drive from Wyoming to Yorkshire.....that's something I'd like to see. I am following two of them on eBay, but I want first to compare the price with the shop next door. I will then buy one . Is it not strange that the cheaper one seems bigger and solid ? http://www.befr.ebay...984.m1438.l2649 http://www.befr.ebay...84.m1438.l2649 Looks like the cheaper one includes some of the nuts too..... 1 Link to comment https://www.insanelymac.com/forum/topic/287441-minihack-a-slightly-different-g5-case-mod/page/2/#findComment-1905752 Share on other sites More sharing options...
Baudouin Posted April 11, 2013 Share Posted April 11, 2013 Looks like the cheaper one includes some of the nuts too..... Indeed, I have noticed this too. That's the one I will afford. 1 Link to comment https://www.insanelymac.com/forum/topic/287441-minihack-a-slightly-different-g5-case-mod/page/2/#findComment-1905803 Share on other sites More sharing options...
MiniHack Posted April 11, 2013 Author Share Posted April 11, 2013 Indeed, I have noticed this too. That's the one I will afford. When buying the nuts separately it pays to read carefully about the different types. You can buy short, long, open and closed types. They come in different materials and with different "grip ranges" (thickness of material they fit into) as well as having different base diameters. I needed ones that were as slim as possible so I could use them as inserts in my ATX shields. The ones I bought were like the M3 type shown in the attachment. I bought 1,000 of them for about £40. ( Might be more than you need......) RTOS DATA SHEET.pdf 1 Link to comment https://www.insanelymac.com/forum/topic/287441-minihack-a-slightly-different-g5-case-mod/page/2/#findComment-1905854 Share on other sites More sharing options...
Baudouin Posted April 11, 2013 Share Posted April 11, 2013 Thank you again for the pro infos. I might buy you back some nuts, coze I will never use a thousand of them, if you can miss some ... Link to comment https://www.insanelymac.com/forum/topic/287441-minihack-a-slightly-different-g5-case-mod/page/2/#findComment-1905870 Share on other sites More sharing options...
MiniHack Posted April 11, 2013 Author Share Posted April 11, 2013 Thank you again for the pro infos. I might buy you back some nuts, coze I will never use a thousand of them, if you can miss some ... I'll certainly use them all up over time as I had 100 ATX shields made up (so most will be gone on those already!). But if you want some then I'm happy to do you a good deal. Just send me a PM when you have the tool and if you want any as I'm sure I can do better than eBay prices. 1 Link to comment https://www.insanelymac.com/forum/topic/287441-minihack-a-slightly-different-g5-case-mod/page/2/#findComment-1905891 Share on other sites More sharing options...
shiftysamurai Posted April 11, 2013 Share Posted April 11, 2013 I'm gonna have to send you a PM regarding some prototypes. Your pieces always turn out so nice, and that side panel has me REALLY thinking about some changes I would like to make to my box. As well as some different/custom inner pieces/drive bays. On Topic: I really like the direction this is heading. Link to comment https://www.insanelymac.com/forum/topic/287441-minihack-a-slightly-different-g5-case-mod/page/2/#findComment-1905975 Share on other sites More sharing options...
MiniHack Posted April 22, 2013 Author Share Posted April 22, 2013 So, just a small update on this slow thread. I'm constantly re-thinking what to do with this mod and which direction to take it in. I think I may be changing the back of this case (and will cut an acrylic sheet or at least a cardboard sheet tomorrow to show what I mean) to move the IO shield further across the back towards the door side. I am thinking of making that move maybe as much as 2cm across. If I do make that move then I will abandon the rear single 120 fan and instead go for a single 92mm fan. I know this sounds a little backwards at first, but there is some method in my madness. I will be mostly getting air into the case from the front and, expelling it through the roof mounted radiator, so what is the point in having a large rear exhaust fan when the CPU is going to be water cooled? The main reason though is cable management and also making this into a case variant where it could be used for an awesome,dedicated "proper" water cooled case. If I do that, then what is the point in leaving room for a large air cooler when one will never be fitted? And what is the point in a large fan at the back if I want the air to go out of the roof? No point at all.... So by moving the IO closer to the door, I can make a full width/almost full height motherboard tray that is a false back. Then there will be a space of around 2cm behind this false back and the case outer wall. And because the case outer wall is actually removeable too I can not only route any wires I want to behind there, but also with a full water loop conversion I could have full sized water cooling pipes behind there too. Potentially the new design could even have pipes that exit the case at the back, underneath the PCI-e slots and go to a rear mounted reservoir. I can also have pipes that appear from/disappear into modified G5 PSU casing to go the shortest visible distances to the CPU block. Another idea I am playing with is making the non-door side of the case be a G5 door too. I have a scrap case that I have taken the door frame out of and having done a little checking it would not be too hard to mount it to have a double door G5 with a discrete little front mounted latch lever underneath my fan controller bay so that the second door can be readily opened for cable and pipe work maintenance. The more I think about it the more it seems to me that without too much extra effort I could make this project take an interesting extra direction. Maybe I should just stop thinking about this and get on with it so you can see what I mean..... 1 Link to comment https://www.insanelymac.com/forum/topic/287441-minihack-a-slightly-different-g5-case-mod/page/2/#findComment-1909728 Share on other sites More sharing options...
Baudouin Posted April 22, 2013 Share Posted April 22, 2013 Interesting, your thoughts . And as you say, it's time to go into action. I know what you mean, sometime you have to move first and think again later on. I'd like to see your performance with the G5 case double deck-doors and the pipes coming out and in. That makes me think to finally couple my two cases together with the double watercooling wires. Link to comment https://www.insanelymac.com/forum/topic/287441-minihack-a-slightly-different-g5-case-mod/page/2/#findComment-1909737 Share on other sites More sharing options...
MiniHack Posted April 23, 2013 Author Share Posted April 23, 2013 So here are the pic.s of a (another) prototype G5 back which moves everything more towards the door side to leave room underneath the IO area. Fan replaced by a single 92mm one from the original G5 with original grill. The large holes under the mobo area are big enough for large water pipes to be routed through or for panel connectors (maybe quick release?) to be attached for that. The small holes in line with them are 4mm holes which allow a variety of choices for mounting brackets for cylindrical reservoirs of any desired height. I've also included mount holes above and below the grill so that a shorter tube reservoir like a 150mm tube could be positioned there if wanted. Edit: Just realised I should have put a couple of tube holes underneath the grill too in case pump to be mounted on the PSU cover.....oh well, next prototype. 1 Link to comment https://www.insanelymac.com/forum/topic/287441-minihack-a-slightly-different-g5-case-mod/page/2/#findComment-1909880 Share on other sites More sharing options...
nickjf20 Posted April 23, 2013 Share Posted April 23, 2013 Very nice! Although I've always thought the idea of having the reservoir, pipes or radiator external to the case was ungainly I NEED a laser cutter now. 1 Link to comment https://www.insanelymac.com/forum/topic/287441-minihack-a-slightly-different-g5-case-mod/page/2/#findComment-1909910 Share on other sites More sharing options...
Recommended Posts