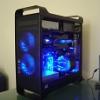
Zoran Bogunovic Posted April 20, 2010 Share Posted April 20, 2010 Hello my fellow modders, For a long time I've been researching G5 mods. I would read everyone posts, view their pics while hunting for a case of my own so could perform my own mods. I've since found a case and have performed a series of ongoing mods, its a constant work in progress. One thing I've noticed with my mods and processes is that in doing so, despite learning from all of you through your efforts and troubleshooting I have still yet to give back to the G5 case mod community. Hope you guys like my work - enjoy Specs at time of posting: CPU: Intel i7 920 (stock settings) with TT SpinQ cooler. Mem: 6GB Kingston Mobo: Asus P6T Deluxe V2 GPU: 2 x Gigabyte Nvidia GTX260+OC in SLI (further OC via software) PSU: Antec TruePower 750W Storage: 32GB Corsair M32 SSD (boot drive only) RAID: 8 x 2.5" 320GB 7200RPM Seagate Momentus enclosed in two "Q14 5.25" quadra packs" connect in RAID 5 via Highpoint RocketRaid 2320 HBA (2.24TB) Speeds 450MB/s write and 550MB/s read The story begins! ------------------------------------ I found this case on eBay being sold by a fellow modder who had performed a very basic Pentium 4 PC mod. After removing the previous owners efforts i was left with the following. Now please excuse the missing photos, I find hard to stop when I'm working to take photos. Once I get into a rythm I'm like a locomotive slamming on the brakes. This here is the end of the first stage of modding here I used a Lian Li Mobo tray to hold all the components and after cutting away the ugly hole left by the previous modder I patched it up by mounting the the tray onto the chassis this you will see in my second stage mods. Notice the PSU point on the case it now on the top much like the Mac Pro case design this is a small power patch lead I made about 8 inches in length connecting the PSU the the chassis. The silver box in the bottom left corner the case are the two Q14 quadra packs used to house my 8 x 2.5" drives, this is where all my content lives for games etc. I love blue LED fans, in this stage I've used small threaded screws to mount two 120mm intake fans on the front and replaced the stock 80mm Lian Li fan with another LED fan. Now I had kept my mod like this for a couple of months specs where from my old LAN PC at the time: Intel Core 2 Duo E7200 2.53MHz single GTX260+OC (stock) 2GB RAM and some random Gigabyte Mobo and my Highpoint RAID HBA. It was at this stage I was getting sick of the aluminium look decided it was time to paint the case. Out came all the components and a tonne of nuts and bolts not to mention a few rivets that had to be drilled out - These were not meant to be pulled apart but I wanted to make sure I did it right. I turned my garage into a make shift spray booth and decided the I'd go matte black for colour and that I'd be using spray cans. The required steps before priming the panels where achieved by used some wet and dry sandpaper (800 grit) to remove the painted Apple logo and any other imperfections/marks the case had sustained. You'll see the hole I cut out on the rear panel that's covered by the mobo tray. Putting the case back to together was interesting, even more so due to the fact that scratching the the new paint job would mean doing everything again but I got there in the end. Now with the freshly painted case in one piece again it was time to reconstruct the PC, this time I stopped to take pics as I went along. You'll see how the mobo tray fits nicely on the back, I've left the side panel lever the original colour for contrast. In the second pic you'll see how I've cut a breather hole for the PSU to extract any heat generated by other components. The PSU is only held in place by two thumb screws the case dimensions take over when it comes to holding it in place. A look inside shows the board position and the mess of my cables. Air deflector is probably the most awesome aspect as it ensures correct air flow which I've proven helps keep temps slightly lower. Wanted to keep the Apple logo on the sides so I made up two identical sized logo and had them cut from a gloss black vinyl thus the name "StealthMac" After this point I went out and upgraded mobo, cpu, ram, and cpu cooler to what I have currently with exception to my second GPU, that comes later. The ThermalTake SpinQ is by far the best looking component in my case and even has about a 3mm gap between it and the air deflector... was very lucky there ass I love being able to see inside while maintaining correct air flow. Naturally the fan LEDs are blue A nice shot of the all the computers components fired up, note my front panel is fully functional. It's at this point I considered this a serious gaming rig and that I needed more graphics grunt. With this mod any work that requires access to the PSU or DVD drive means a full pull apart, once again I'm wise enough to take a few snaps. The mobo and cooler The case striped of all its parts. PSU and DVD drive plate, here you will two "L" brackets which have been riveted to the plate and is held in place by thumb screws found on standard PC cases. This is all that holds the PSU until its mount back into the case. A snug fit. For this exercise I had to connect additional leads to power up the second GPU. Mobo tray, mobo and GPUs in place. Notice under the DVD drive my SSD (boot drive) is mounted using heavy duty velcro tape. The ribbon to rule them all, "go go gadget SLI" RAID HBA and disks put back into position. Isn't that just beautiful? StealthMac will destroy all you know and love Additional Mod: -------------------- My RAID HBA manages 8 disks and by standard and doesn't come with any status lights to show disk activity the following is a small project I completed to complement my rig. Using and etching pen i drew a basic circuit and dipped the board which measures 15mm x 25mm, cable is from a DB9 serial lead. Pin1 (the red wire) is common earth Used 8 x 3mm blue LEDs which produce 1500 MCD for those playing at home. This shot is a bit fuzzy but you should make out a heat shrink surround Test burn the LEDs just in case I've screwed something up This is a conceptual attempt to mount LEDs on my RAID card which i really didn't like. The complete harness which would be mounted to the card. Fits perfectly The finished product. Next mods/upgrades I'm looking at are: 1. Bigger PSU (at least 1200 to 1500W in prep for GTX480 SLI or greater) 2. SLI GTX480 or greater 3. i7 X980 CPU or greater 4. Increase RAID drives to 500GB from the current 320GB 5. BluRay optical drive 6. Paint case GunMetal gray 7. Possible switch to water cooling Once again I would like to thank all the G5 case modders before me from whom I've drawn my inspiration. Any questions and or criticisms are most welcome. Please excuse any spelling mistakes and grammatical errors this was posted around 5am my time during an all nighter Link to comment https://www.insanelymac.com/forum/topic/216055-stealthmac-g5-case-mod/ Share on other sites More sharing options...
BlackCH Posted April 20, 2010 Share Posted April 20, 2010 I like the paint job you did. Can you tell how you did it? Did you use some kind of coating to prevent the paint to peel-off or get easily scratched? Link to comment https://www.insanelymac.com/forum/topic/216055-stealthmac-g5-case-mod/#findComment-1452468 Share on other sites More sharing options...
Zoran Bogunovic Posted April 20, 2010 Author Share Posted April 20, 2010 I did it using spray cans applying light even coats... when painting anything to prevent peeling you to need to clean the surface with at least 800 grit and apply an etching-primer even when dealing with plastics (or undercoat). That acts as the bond between the paint and the surface. So in the end, no special coating, just method is key. Link to comment https://www.insanelymac.com/forum/topic/216055-stealthmac-g5-case-mod/#findComment-1452472 Share on other sites More sharing options...
m4778 Posted April 21, 2010 Share Posted April 21, 2010 this is officially the most bad ass computer set-up i have ever seen in my life. congrats that thing looks amazing Link to comment https://www.insanelymac.com/forum/topic/216055-stealthmac-g5-case-mod/#findComment-1452616 Share on other sites More sharing options...
geekdad Posted April 21, 2010 Share Posted April 21, 2010 Dude that is awesome! You have a bright future in selling PC Mods! You Rock! :-) this is officially the most bad ass computer set-up i have ever seen in my life. congrats that thing looks amazing Link to comment https://www.insanelymac.com/forum/topic/216055-stealthmac-g5-case-mod/#findComment-1452795 Share on other sites More sharing options...
pirloui Posted April 21, 2010 Share Posted April 21, 2010 Very nice with the dark color. I wouldn't dare for the scratches, but it looks very good. Link to comment https://www.insanelymac.com/forum/topic/216055-stealthmac-g5-case-mod/#findComment-1452944 Share on other sites More sharing options...
Zoran Bogunovic Posted April 22, 2010 Author Share Posted April 22, 2010 Very nice with the dark color. I wouldn't dare for the scratches, but it looks very good. actually the paint job is quite strong. I think the layering method really helped, I would do one light cover then let dry three quarters then add another dust coat and repeat... Time will tell but I'm sure I'll repaint it but next time i'll use a spray booth and then bake the panels with a hardener. Link to comment https://www.insanelymac.com/forum/topic/216055-stealthmac-g5-case-mod/#findComment-1453403 Share on other sites More sharing options...
Baudouin Posted April 22, 2010 Share Posted April 22, 2010 Very nice black paint monster Gigs!! Link to comment https://www.insanelymac.com/forum/topic/216055-stealthmac-g5-case-mod/#findComment-1453599 Share on other sites More sharing options...
pirloui Posted April 22, 2010 Share Posted April 22, 2010 Maybe powder coating could be interesting to consider if it had to be done again. The ultimate would be if it was possible to anodise it to a different color; but I think it allready is clear annodised, and it is maybe not possible. Anyhow, good work, congratulations. Link to comment https://www.insanelymac.com/forum/topic/216055-stealthmac-g5-case-mod/#findComment-1453721 Share on other sites More sharing options...
spackley Posted April 23, 2010 Share Posted April 23, 2010 Very cool!!! Link to comment https://www.insanelymac.com/forum/topic/216055-stealthmac-g5-case-mod/#findComment-1454038 Share on other sites More sharing options...
Timdphotos Posted April 23, 2010 Share Posted April 23, 2010 awesome, and not in the way that the word is ususally used these days, truly incredible Link to comment https://www.insanelymac.com/forum/topic/216055-stealthmac-g5-case-mod/#findComment-1454437 Share on other sites More sharing options...
Rantamplan Posted April 24, 2010 Share Posted April 24, 2010 Just amazing.You cut the apple logo just i wont to tinking do, but I will iliminated in blue.Tha's {censored} perfect made Link to comment https://www.insanelymac.com/forum/topic/216055-stealthmac-g5-case-mod/#findComment-1454969 Share on other sites More sharing options...
habblet Posted April 25, 2010 Share Posted April 25, 2010 cool! Link to comment https://www.insanelymac.com/forum/topic/216055-stealthmac-g5-case-mod/#findComment-1455258 Share on other sites More sharing options...
bofors Posted June 1, 2010 Share Posted June 1, 2010 Interesting... I have been thinking about a black (but anodized) G5/Mac Pro case for a long time... but never seen it attempted before. Link to comment https://www.insanelymac.com/forum/topic/216055-stealthmac-g5-case-mod/#findComment-1479562 Share on other sites More sharing options...
Zoran Bogunovic Posted June 2, 2010 Author Share Posted June 2, 2010 Yeah i wanted to anadize also, but couldn't find a place that was willing to do my panels (bastards)... maybe when its time for a respray i'll get it dipped.. not before sand/bead blasting it first tho Interesting... I have been thinking about a black (but anodized) G5/Mac Pro case for a long time... but never seen it attempted before. Link to comment https://www.insanelymac.com/forum/topic/216055-stealthmac-g5-case-mod/#findComment-1480263 Share on other sites More sharing options...
Alex//3oo1 Posted June 8, 2010 Share Posted June 8, 2010 Best Mod Ever Link to comment https://www.insanelymac.com/forum/topic/216055-stealthmac-g5-case-mod/#findComment-1484808 Share on other sites More sharing options...
splodgecat Posted June 11, 2010 Share Posted June 11, 2010 Great mod. I've also cut vents in my media shelf beneath the powersupply. I'm gonna add a plastic baffle to funnel the air out the back of the case, not over my motherboard. Good luck Link to comment https://www.insanelymac.com/forum/topic/216055-stealthmac-g5-case-mod/#findComment-1486762 Share on other sites More sharing options...
Hueythefreeman Posted June 12, 2010 Share Posted June 12, 2010 Oh man I'm really digging the PC here. The Thermaltake SpinQ really gives it that badass PC look. Good job on getting that in a fairly compact space, too. Link to comment https://www.insanelymac.com/forum/topic/216055-stealthmac-g5-case-mod/#findComment-1487182 Share on other sites More sharing options...
chukieboy Posted June 12, 2010 Share Posted June 12, 2010 awesome! great job! Link to comment https://www.insanelymac.com/forum/topic/216055-stealthmac-g5-case-mod/#findComment-1487461 Share on other sites More sharing options...
Zoran Bogunovic Posted September 2, 2010 Author Share Posted September 2, 2010 Maybe you guys could help me with something... I need to source a PSU thats say around 1000W (looking to power 2 x GTX480s) however I need to maintain the external form factor due space constraints. The current PSU measures 150mm x 150mm x 86mm Oh and because its about asthetics, a blue LED fan.. I'm starting a series of additional mods which I'll post pics of once my parts arrive Link to comment https://www.insanelymac.com/forum/topic/216055-stealthmac-g5-case-mod/#findComment-1541598 Share on other sites More sharing options...
bonestonne Posted September 5, 2010 Share Posted September 5, 2010 I know this isn't an AUS store, but look for this power supply: http://www.newegg.com/Product/Product.aspx...N82E16817139009 I know it's not 1kW, but 850 should be more than enough even for a pair of GTX480's. 80+ certified, and about the same size as what you have to boot. Double check the size though, I didn't see specifics mentioned, but I'm certain this will do the job for you if it fits in your case. Link to comment https://www.insanelymac.com/forum/topic/216055-stealthmac-g5-case-mod/#findComment-1542990 Share on other sites More sharing options...
craterloads Posted September 5, 2010 Share Posted September 5, 2010 awesome build mate - hope you can offer some help when i get project going!! Link to comment https://www.insanelymac.com/forum/topic/216055-stealthmac-g5-case-mod/#findComment-1543088 Share on other sites More sharing options...
Zoran Bogunovic Posted September 5, 2010 Author Share Posted September 5, 2010 Thanks for the suggestion Bluestone. There appears to be quite a few contenders however this bad bad seems to really fit the bill Kingwin ABT-1000MAIS. Can't say this is a common brand down under - what's their rep stateside? Modular connections, blue LEDs all over the shop biggest thing for me also is the the fact the IEC point is flipped 180 degrees which would be the correct position for my IEC elbow connector. To fit this sucker which is 30mm longer I'd need to re-drill my rivet positions for the screw mounts so it sits closer to rear of the case... any excuse to rip out the Dremel Craterloads, feel free to hit me up buddy Link to comment https://www.insanelymac.com/forum/topic/216055-stealthmac-g5-case-mod/#findComment-1543207 Share on other sites More sharing options...
Cengiz sevinir Posted September 6, 2010 Share Posted September 6, 2010 awesome this is great ireplaced a hack pro Link to comment https://www.insanelymac.com/forum/topic/216055-stealthmac-g5-case-mod/#findComment-1543894 Share on other sites More sharing options...
Zoran Bogunovic Posted September 16, 2010 Author Share Posted September 16, 2010 Just picked up another G5 from ebay. Thinking this will be "Stealth Mac: Mach 2" After putting the new arrival next to the currently modded it really hit home how many bloody hours I've put into this thing . Thoughts for Mach 2 are: 1. Professional Matte Black spary job with maybe some airbrushing. 2. new concept rear I/O (still trying to figure out the best approach over my current method) 3 HDD caddy for boot drives 4. New design RAID configuration for the 8 x 2.5" drives 5. Improved Front panel intergration (currently works fine, but want it better think sleeved cables) Welcome any suggestions.... Let's make this the peoples Stealth Mac ;D Of course once I start pulling this one apart I'll start a new Work Log, until then i'll collect the needed parts and use them for the current rig. (unless we're all happy for me to make this topic HUGE) Link to comment https://www.insanelymac.com/forum/topic/216055-stealthmac-g5-case-mod/#findComment-1549644 Share on other sites More sharing options...
Recommended Posts