How to Recover Data from an External Hard Drive on a Mac
External hard drives are very popular devices used to extend the storage capacity of a Mac or MacBook. If you back up your machine locally with a tool like Time Machine, you need an external drive to store the backup files. External drives are also very useful for sharing data with other users or transferring information between machines.
In this article, we are going to show you how to recover data from external hard drives. We will concentrate on data recovery software solutions and also talk a little about other recovery methods.
Why Would I Need to Perform External Hard Drive Recovery?
The possibility of unexpected data loss affects all types of digital storage devices including external hard drives. Data loss can occur for multiple reasons, some of which you can influence and some that are beyond your control.
In this article, we will primarily discuss DIY methods for external disk recovery and repair, focusing on logical issues and human errors, along with the likelihood of successful data recovery in each scenario. These often include, but are not limited to:
- Accidental Deletion: This occurs when users unintentionally delete files or directories from an external drive. Modern operating systems may temporarily store these deleted items in a “Recycle Bin” or “Trash,” providing a buffer for recovery. However, permanent deletion or emptying the Recycle Bin/Trash removes the file entries from the file system’s directory, making recovery more complex. The data often remains on the storage medium until it’s overwritten by new data. If the external drive hasn’t been extensively written since the deletion, recovery software can restore these files with high probability. The sooner the attempt is made, the higher the chance of success.
- Formatting an External Drive: Formatting involves preparing a storage device for use by an operating system, which includes setting up a file system. When the external drive is formatted, the existing files and file system structure are erased, and a new file system is initialized. This process removes all previous data, making it challenging to retrieve unless backup copies exist. Recovery can be quite successful if no new data has been written to the drive post-formatting. The depth of the format (quick vs. full) also affects recovery chances, with quick formats being more conducive to DIY recovery.
- File System Corruption: The file system organizes and manages how data is stored and retrieved on an external drive. Corruption can occur due to software errors, system crashes, improper shutdowns, or hardware failures, leading to loss of access to the files. Corrupted file systems might misplace data, lose file information, or render entire volumes inaccessible. Recovery depends on the corruption’s extent and nature. Some file system errors can be repaired with built-in OS tools, allowing data access. In more severe cases, specialized software might be needed, with varying success rates.
- Incompatible File System: Operating systems may not support all types of file systems. If a storage device is formatted with an incompatible file system, the device may not be accessible or readable on certain systems, leading to apparent data loss. This situation often requires reformatting the drive with a compatible file system, which can erase existing data if not done carefully. This often requires simply using a compatible device or software to access the data. No data is “lost” in a traditional sense so “recovery” is guaranteed in this case.
- Bad Sectors: A sector is the smallest storage unit on a hard drive. Bad sectors can result from physical damage (hard bad sectors) or logical errors (soft bad sectors). When sectors become unreadable or unwriteable, data stored in those sectors is at risk. Physical damage can be due to wear and tear, while logical errors might be fixed with disk repair tools. Data recovery from bad sectors is more challenging, especially if physical damage is involved. The software can sometimes bypass or repair logical bad sectors and recover some data, but success rates vary widely.
- Improper Ejection: Removing the external drive from a computer when the drive is used by the system can lead to data loss. Improper ejection might interrupt ongoing read/write processes, leading to file corruption or loss. If data corruption is limited, recovery tools can often restore files. However, if system files or file tables were being written at the time of ejection, the recovery might be more complicated.
- File Transfer Errors: Errors during the file transfer process (e.g., due to connection issues, system crashes, or power outages) can result in incomplete files or corruption. Such interruptions can corrupt not only the files being transferred but also the file system structure, complicating recovery efforts. Similar to improper ejection, the success of recovery depends on the extent of corruption. If the error affected only specific files in the transfer, recovery chances are better. If the error causes broader file system damage, recovery becomes more complex.
While logical damage and human errors account for a significant portion of data loss scenarios, physical factors and external threats can also lead to the loss of valuable data. These scenarios often involve different paths to recovery and carry varying probabilities of successful data retrieval:
- Malware or virus infection. Malware and viruses can be extremely damaging and result in unexpected data loss. Running anti-virus software on your Mac will help protect an external hard drive. Problems with malware may arise when an external drive is connected to multiple computers. Recovery probability depends on the malware’s nature and the encryption’s complexity. While some data recovery software might succeed, severe cases may require professional assistance, particularly for ransomware
- System crash. If your Mac crashes while connected to an external hard drive, it may lead to data loss. There’s not much you can do to prevent this problem except to keep your Mac’s operating system and applications updated. Recovery success depends on the data corruption extent and whether the drive was directly impacted. Some corrupted files might be recoverable with software, but there’s no guarantee for all data.
- Physical damage. Physical damage caused by dropping an external drive or subjecting it to extreme environmental conditions will often result in data loss. Too much moisture or heat can damage the device. Over time, mechanical parts may wear out and make it hard to access data on an external drive. Keeping the device in a cool, dry place will go a long way toward protecting its data. Never leave any digital storage device in direct sunlight. Chances for getting your files back are heavily influenced by the damage severity. Professional data recovery services may retrieve some data, but outcomes can vary, and costs may be high.
- Theft. An additional risk associated with external hard drives is theft. Modern external hard drives are very compact and can easily fit into a pocket or purse. We don’t have any magical techniques capable of recovering the data from a stolen external drive. Keep your external devices secure or risk losing everything on them.
Mac External Hard Drive Recovery Dos and Don’ts
When facing data loss on a Mac external hard drive, your actions immediately following the incident can significantly impact chances for successful recovery. It’s important to take a few steps to preserve your data and avoid those that might jeopardize your chances of retrieval. Here’s what you should do:
- Avoid further use of the disc. Continuing to use an external hard drive after experiencing data loss can overwrite the very data you’re trying to recover. Cease all write operations to increase your chances of successful data recovery.
- Avoid formatting the device. While formatting might seem like a quick fix to some errors, it can lead to permanent data loss. Recovery software can often retrieve data without the need to format, accessing lost or deleted files directly from the external drive’s existing file system.
- In case of visible damage, do not try to repair anything yourself. Physical damage requires professional attention. Attempting DIY repairs on a physically damaged external hard drive can exacerbate the problem, making professional data recovery even more difficult or impossible.
- Choose good software. The quality and capabilities of recovery software can vary greatly. Selecting reputable, reliable recovery software is important for maximizing your chances of successful data recovery. In the following sections of this article, we will guide you in choosing the best software solution for your specific situation.
Following these 4 simple rules can make a significant difference in the outcome of your data recovery efforts.
How to Recover Data from an External Hard Drive on a Mac Using DIY Software
If you’ve permanently deleted files, formatted your drive, or are dealing with file system errors, you’ll likely need some software help to get your data back. But not just any software will do. Here’s what to keep in mind when choosing:
- macOS Compatibility: Make sure the software works smoothly with your Mac’s operating system.
- File System Support: It should support the file systems that are commonly used on external hard drives by Mac users, whether it’s HFS+, APFS, exFAT, or even NTFS.
- Ability to Scan Corrupted Drives: The software needs to be able to scan drives that are logically damaged or in a RAW state, which often happens when there’s serious corruption.
- File Signature Recognition: If the file system is too damaged, the software should still be able to find your files based on their unique signatures.
- Optional – Disk Backup: It’s a bonus in most cases if the software can also backup your disk, as creating a byte-to-byte disk image which is then scanned by software causes less stress on the drive than direct scan.
And yes, there’s software that ticks all these boxes – Disk Drill is a great example. But don’t worry, we’ll talk about more options later in the article, so you can find the best fit for your needs. Now that you know what to look for in recovery software, let’s walk through how to use it. Here’s a step-by-step guide to recovering your data from an external hard drive using Disk Drill for Mac:
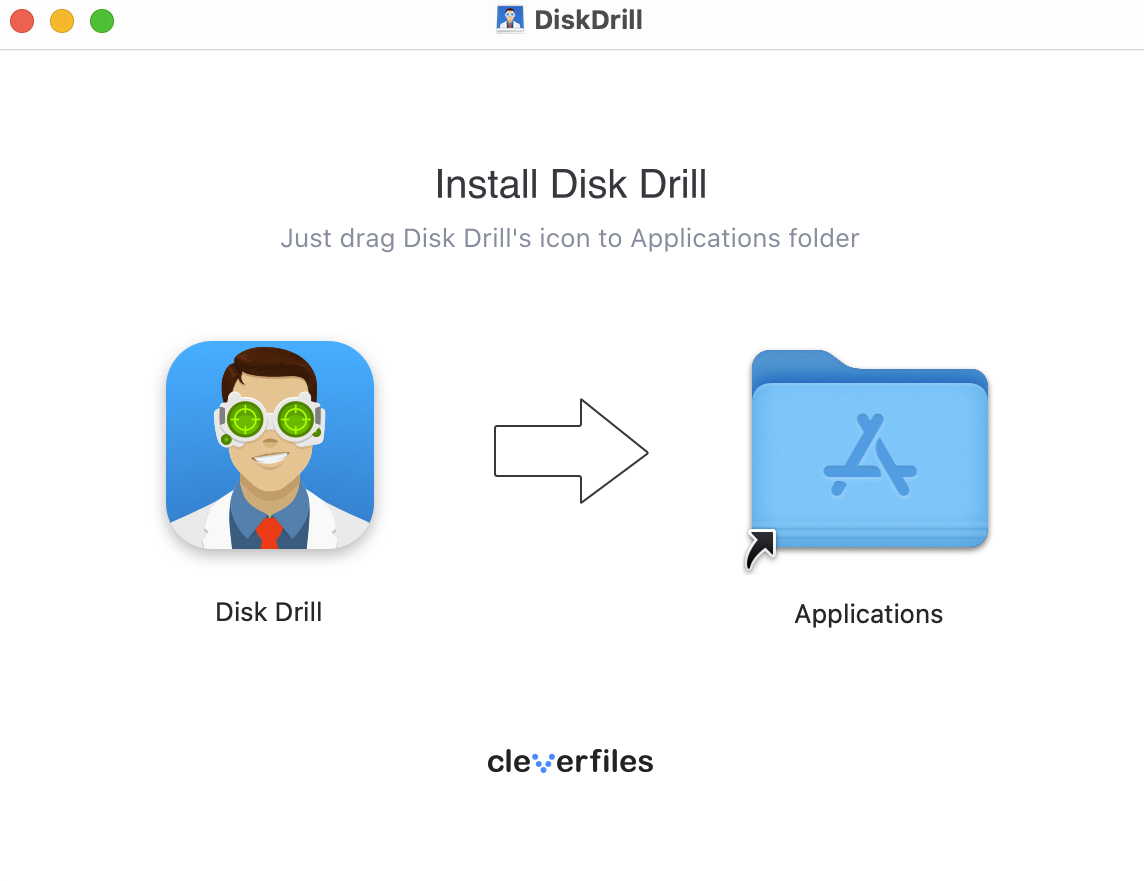
- Download and install the recovery software on your Mac.
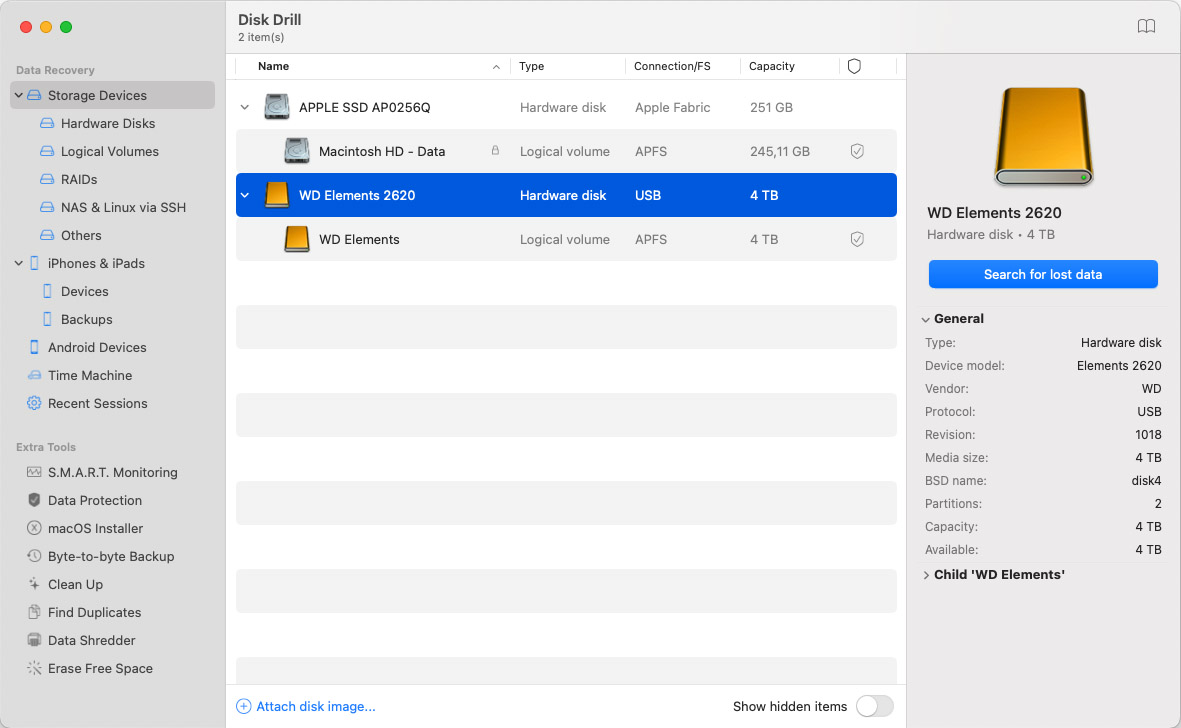
- Connect the external hard drive that experienced data loss to your computer.
- Launch the program and choose the external drive from the list of available disks. Then click on Search for lost data.
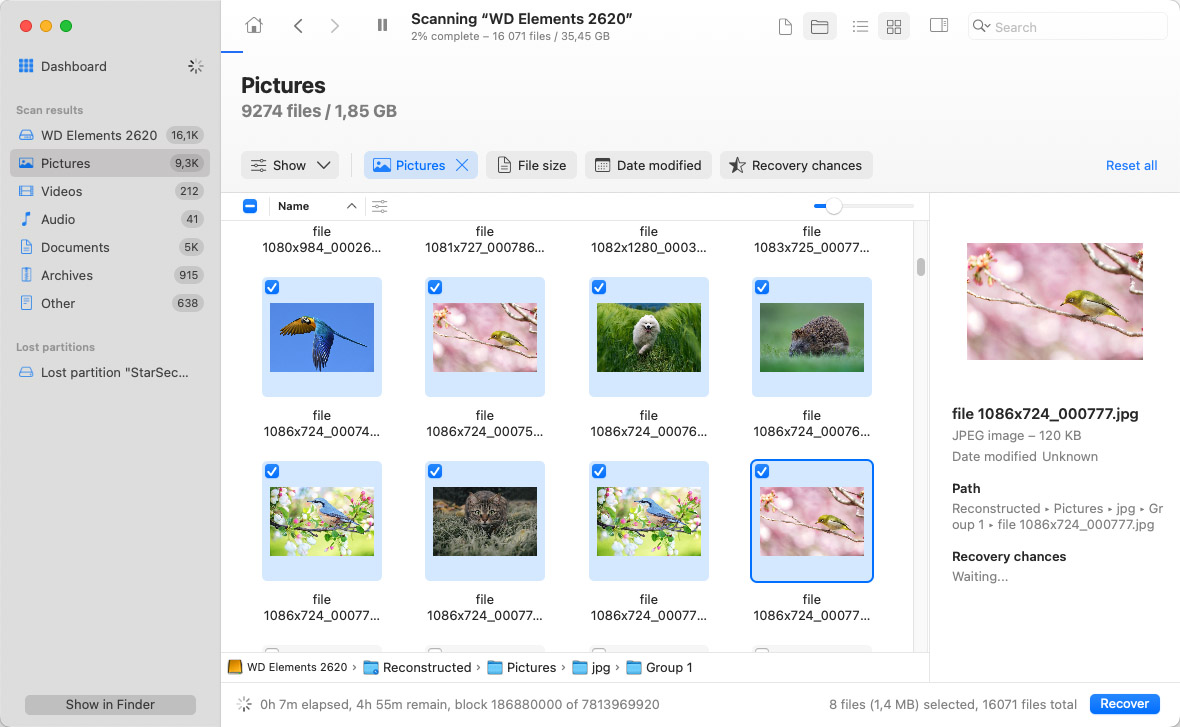
- Wait for the scan to finish, then click on Review found items, or if you have a certain file type in mind you can choose it by clicking on thematic tile
- Preview the found files and select the ones you want to recover.
- Select a safe location in which to store the recovered data. Don’t save it to the external disk to avoid overwriting or corrupting files during the recovery.
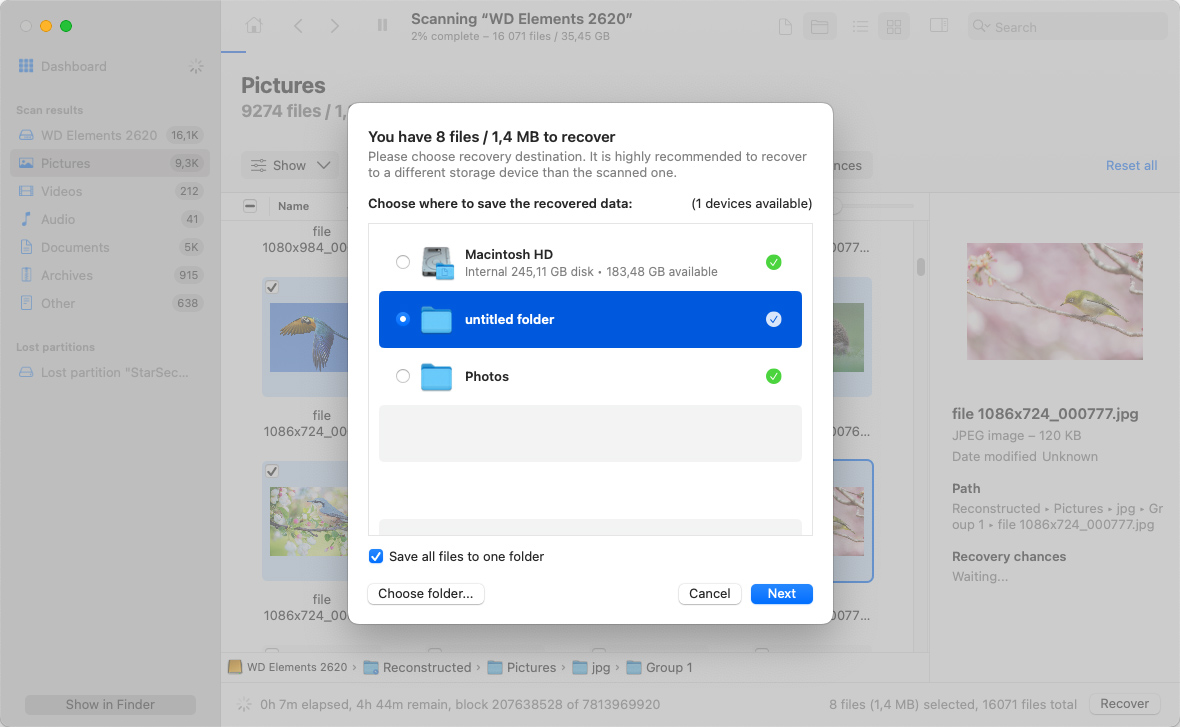
- Complete the recovery process using the tool’s interface.
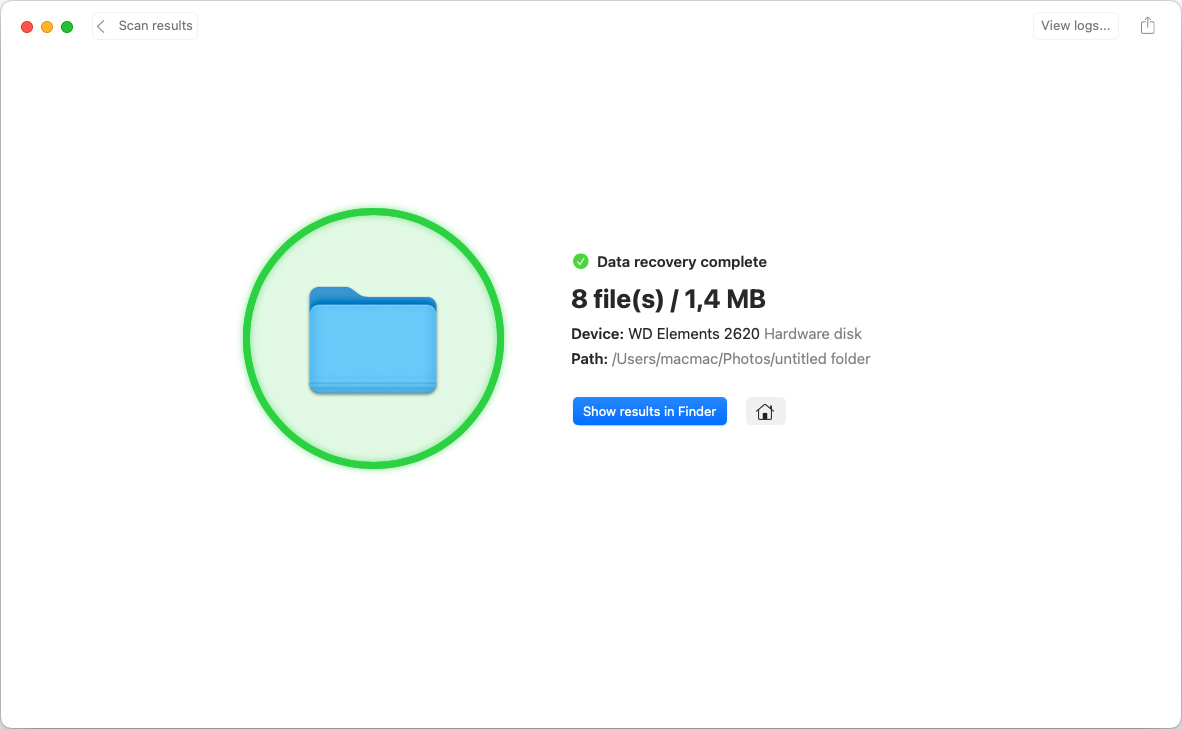
Following these steps closely will give you the best chance of getting your data back. Remember, the key is to act quickly and avoid using the affected drive for the best recovery outcomes.
Alternative Methods to Recover External Hard Drive Data on a Mac
Multiple techniques can be used to recover files from external hard drives. We are going to look at all of the methods of performing data recovery on an external hard drive with the hope that one works for your situation.
Method 1: Recover Files from the External Drive Trash
The Trash is a special folder that macOS uses to temporarily store deleted files and folders. If you delete an item from a connected external hard drive, the file will be visible in the Trash until it has been manually emptied or rolled off due to how you have it configured.
Your Mac’s main Trash folder displays the contents of the hidden Trash folder that resides on the external drive when it’s connected to your computer. When you eject the device, you cannot see the files in the Trash. Reconnecting the drive makes them easily recoverable using the following procedure.
- Connect the external hard drive to your Mac.
- Open the Trash by clicking on its icon.

- Locate the item you want to recover.
- Right-click on the item and select Put Back.
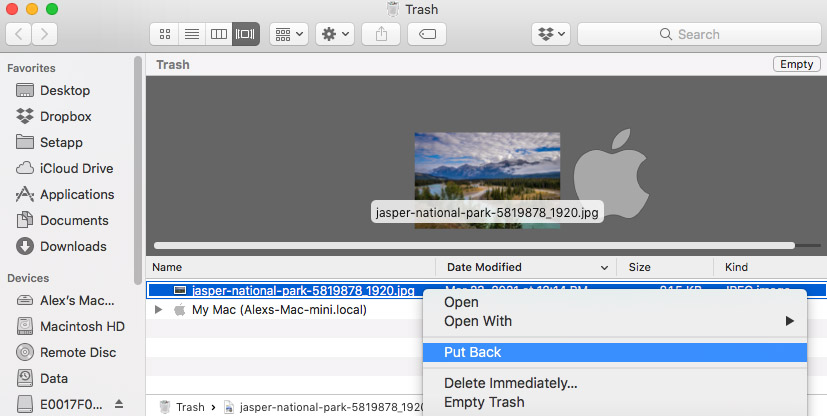
- The file will be recovered to the external drive.
To find the trash folder on an external drive on Mac:
- Connect the external drive to your Mac.
- Open Finder by clicking on the Finder icon on the Dock or by clicking on the Finder icon in the Applications folder.
- Click on “File” in the menu bar at the top of the screen and select “New Finder Window” to open a new Finder window.
- In the new Finder window, click on “Go” in the menu bar at the top of the screen and select “Go to Folder.”
- In the “Go to Folder” dialog box, type in “/Volumes” and click “Go.”
- Locate the external drive in the Volumes folder and double-click on it to open it.
- Look for a folder named “.Trashes” in the root directory of the external drive. This is where deleted files from the external drive are usually sent.
- Double-click on the “.Trashes” folder to open it and locate the folder with the same name as your user account. This is where the deleted files from the external drive for that user account are usually located. Once you’ve found the deleted files, you can drag them to another folder on the external drive or to your desktop to recover them.
Method 2: External Hard Drive Recovery from a Time Machine Backup
If you are in the habit of backing up your external drive using Time Machine, the following procedure will enable you to recover data from backup media. This method will only work if the specific files you want to recover have previously been backed up.
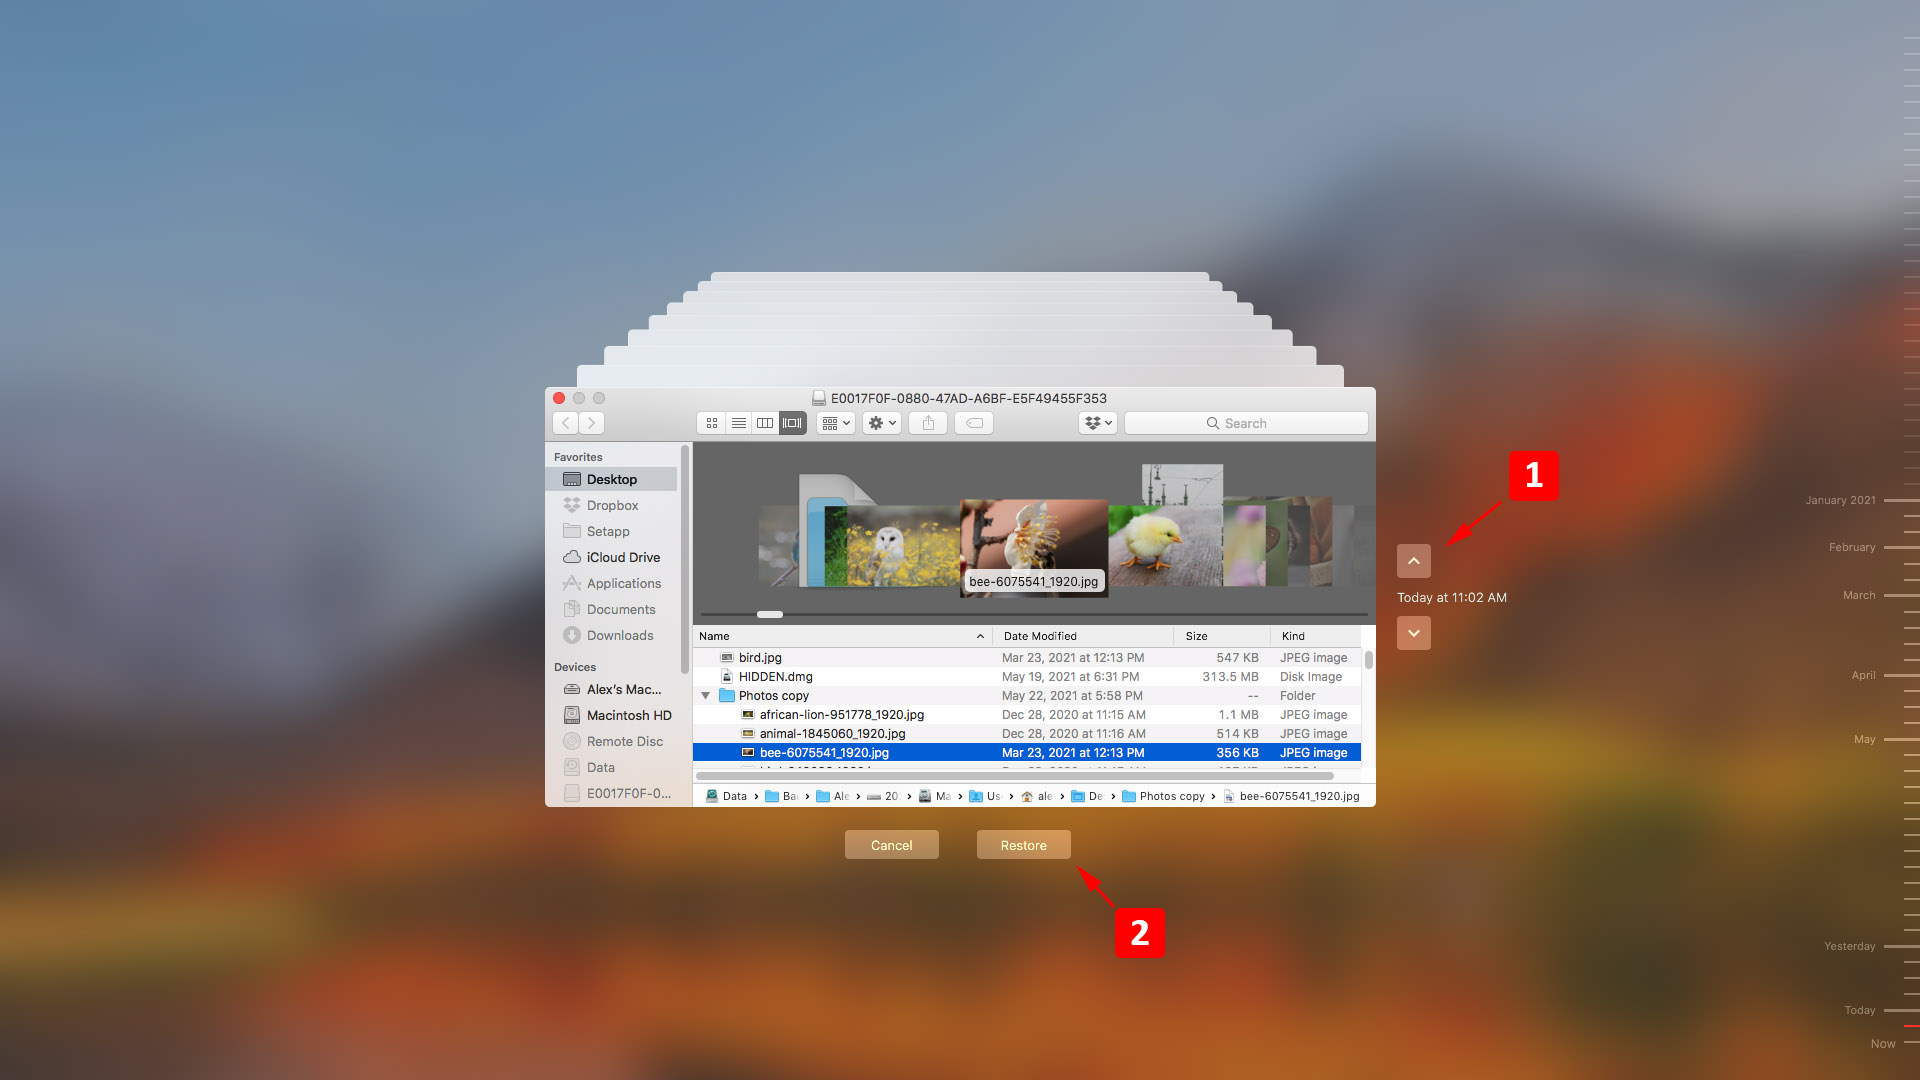
- Connect the storage device that contains the Time Machine backup files to your computer.
- Attach the external hard drive that contained the files you want to recover.
- Open a Finder window in the folder on the external drive that previously stored the data you want to recover.
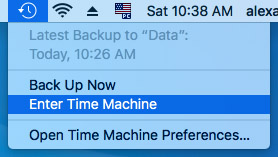
- Click the Time Machine icon on the menu bar to start Time Machine.
- Search through the available backed up files using the timeline and arrows to locate the items you want to restore.
- Make your selections and click the Restore button to recover the items to their original location on the external drive.
Solution 3: Recover Files from an iCloud
If you have previously saved the deleted files to iCloud Drive, you can recover them from iCloud.
These are the steps to use when recovering data from cloud backup:
- Connect the external drive to your Mac.
- go to www.icloud.com/iclouddrive
- Find the files you want to recover.
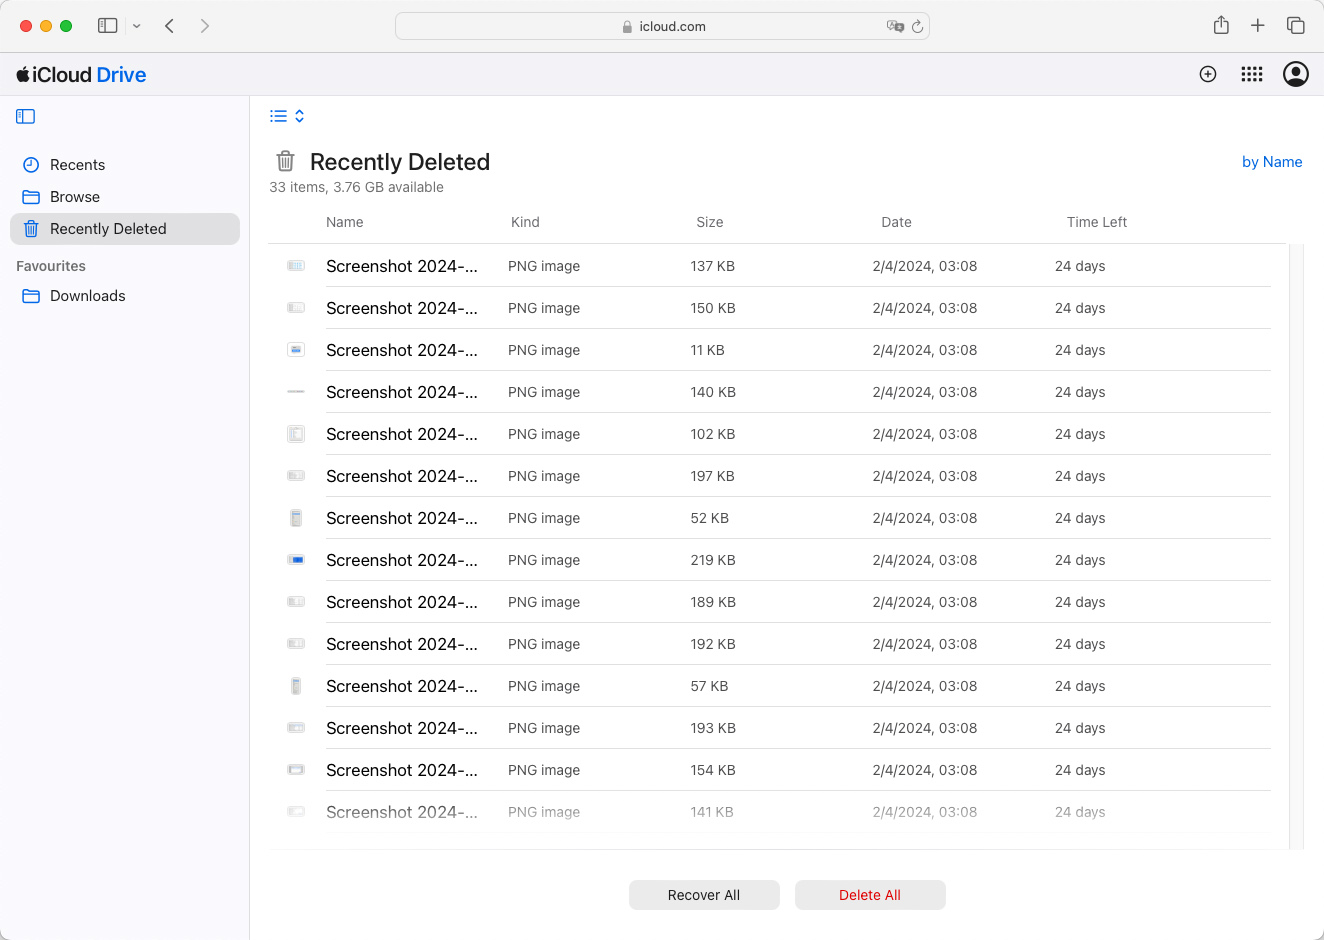
- Download them and transfer them to your external hard drive.
Solution 4: Fix External Hard Drive Issues with Disk Utility
Mac’s Disk Utility is a built-in tool that can help resolve some disk-related issues, potentially restoring access to your data. Here’s how to use it:
- Connect your external hard drive to your Mac.
- Open Disk Utility by going to Applications > Utilities or searching for it using Spotlight.
- In Disk Utility, select your external hard drive from the sidebar.

- Click on the First Aid button and then Run to start the repair process. Disk Utility will check the disk for errors and attempt to repair any it finds.
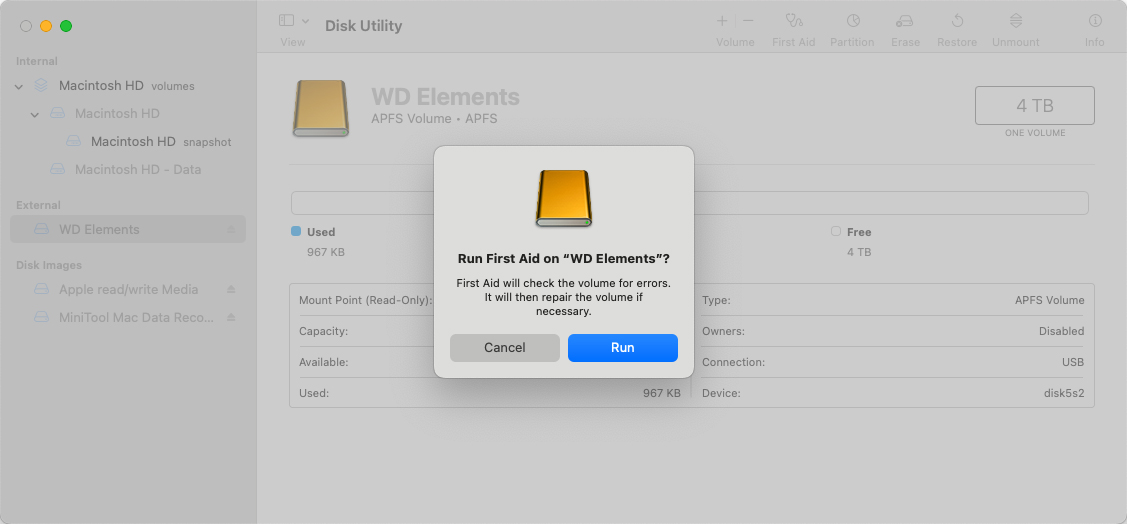
- Once the process is complete, close Disk Utility and check if your data is accessible.
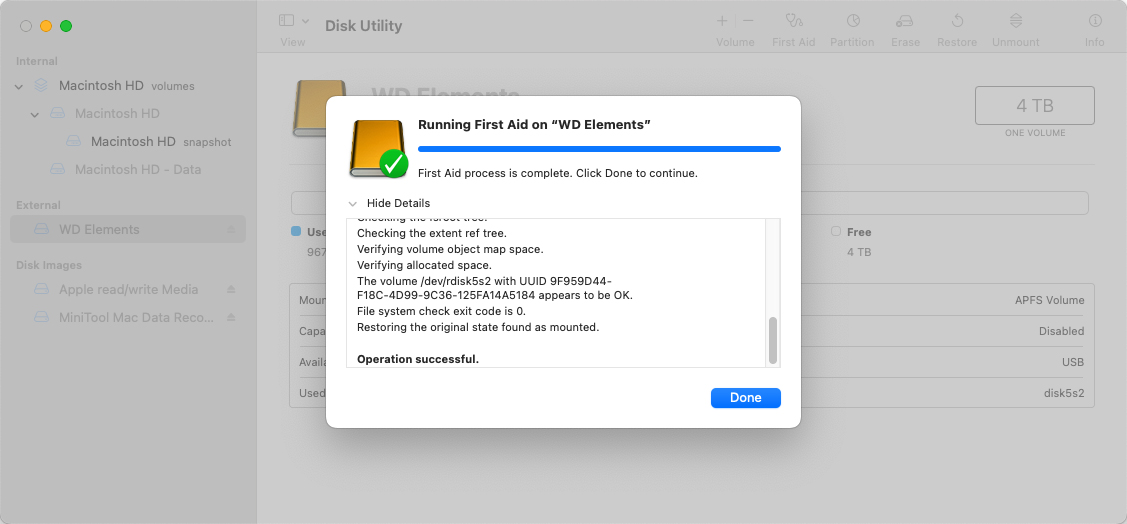
Note: If Disk Utility reports that the disk is about to fail, back up your data immediately and replace the drive.
Solution 5: Repair External Hard Drive Partitions Using TestDisk
TestDisk is a powerful, open-source data recovery software that can fix partition tables, recover deleted partitions, and more. Here’s a basic guide on how to use it:
- Download TestDisk from its official website and install it on your Mac.
- Connect your external hard drive to the Mac.
- Open TestDisk by launching the terminal and entering sudo and then the path to the app.
- Follow the on-screen instructions to create a new log file or append to an existing one.
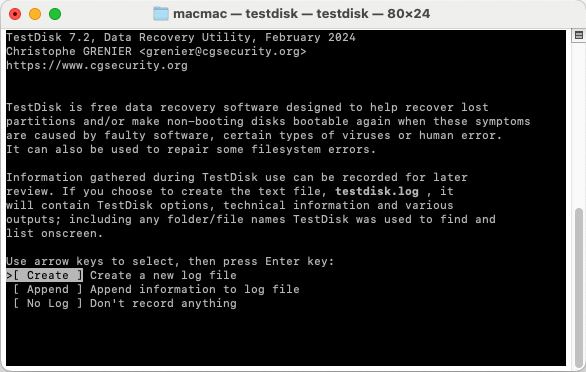
- Select your external hard drive from the list of drives and proceed with the analysis.
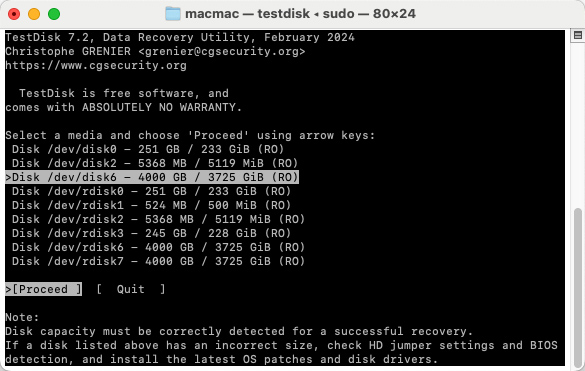
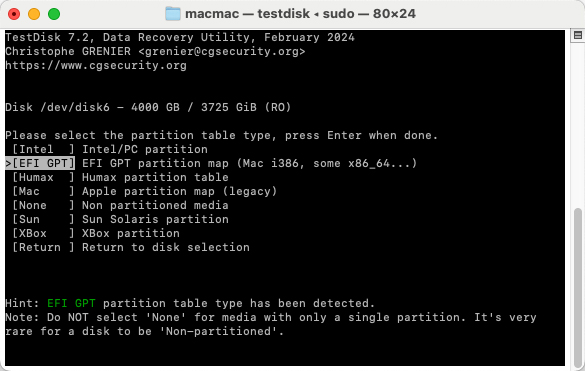
- Choose the partition table type (TestDisk will try to detect it automatically). If unsure, select [Proceed] with the suggested type.
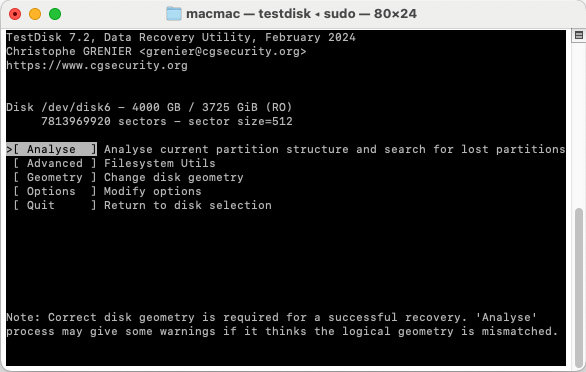
- Select [Analyse] to search for lost partitions. Follow the on-screen prompts to check and repair the partition table.
- After the analysis, follow the instructions to repair the partition table or recover deleted partitions.
- Once completed, exit TestDisk and check if your data is accessible.
Note: TestDisk can be complex, so it’s recommended for more advanced users or those willing to carefully follow detailed instructions. Always back up your data before using such tools, if possible.
Solution 6: Contact a Data Recovery Service Center
In cases of physical damage to your external drive, a reliable data recovery service may be your only chance of getting your data back. Technicians at a recovery center have advanced software and hardware techniques available with which to attempt to save your data.
Here’s how to engage a data recovery service.
- Contact the data recovery service to get an initial consultation and find out how to ship your device.
- Ship the storage device to the recovery center. The technical team at the center can then evaluate the device and provide an estimate of the cost for its recovery.
- Technicians will open the drive and try to recover its data.
- The recovered data will be shipped to you on new media, and the original external drive will be destroyed.
More External Hard Drive Recovery Software for Mac Options
Following are seven software solutions that can be used to recover files from an external hard drive. We run you through their features and let you know how much they cost. Hopefully, you’ll find one that works for your data loss situation.
1. Disk Drill Hard Drive Recovery for Mac
Disk Drill is a comprehensive data recovery and protection tool that can handle a wide variety of data loss situations. It features a user-friendly interface that allows users of all levels of experience to easily recover their deleted data from an external hard drive with just a few clicks.
Disk Drill supports recovering image, video, document, audio, and archive files in over 400 formats. It allows users to recover data from any disk-based storage device such as external hard drives, SD cards, thumb drives, and internal hard drives.
Quick and deep scanning modes interrogate your hard drive on the sector level to identify and recover long-lost files. Free data protection tools are provided that enable users to create byte-level backups and configure one-click recovery for important files and folders.
- Supports a wide variety of file formats
and storage devices - Reliable recovery results
- Scan results can be mounted as a volume
- Intuitive and user-friendly interface
- Includes free data protection tools
- The free version only identifies recoverable files
- No phone support
- General users looking for a versatile data recovery tool.
- Free trial to preview files
- Pro upgrade for $89
- Enterprise version $499
2. TestDisk

TestDisk is a freeware solution that is designed primarily to recover deleted partitions and repair corrupted ones. Its features include the ability to fix partition tables, rebuild boot sectors, fix FAT tables, and recover a boot sector from its backup.
TestDisk runs under multiple operating systems including DOS, Windows, Linux, Mac OS X, and FreeBSD. The tool supports all of the filesystems found on partitions running under these operating systems. This recovery solution is most suited to users with technical experience who are comfortable operating with a command-line interface.
- Freeware
- Recovers lost and deleted partitions
- Extensive operating system and filesystem support
- The latest update was in July 2019
- Cannot recover individual files
- Uses a command-line interface
- Recovering complete partitions by experienced users.
- TestDisk is freeware with no cost to the user
3. PhotoRec
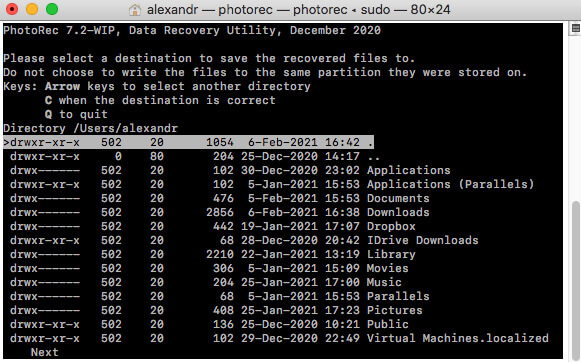
PhotoRec is a freeware tool that is a companion product to TestDisk. It’s an HDD recovery tool designed to recover individual files rather than complete partitions. The tool supports all major operating systems, device types, and file formats.
The main drawback of this tool is its command-line interface which requires multiple commands to be executed when recovering files. A degree of knowledge about disk internals is necessary to run the tool successfully. Results are returned with generic filenames, making it difficult and time-consuming to find recovered data.
- Freeware
- Recovers lost and deleted files
- Extensive operating system and file system support
- Requires users to navigate a command-line interface
- Complicated recovery procedure not suitable for inexperienced users
- Latest update was July 2019
- Experienced users who are looking for a free file recovery tool.
- PhotoRec is freeware with no cost to the user
4. EaseUS Data Recovery for Mac
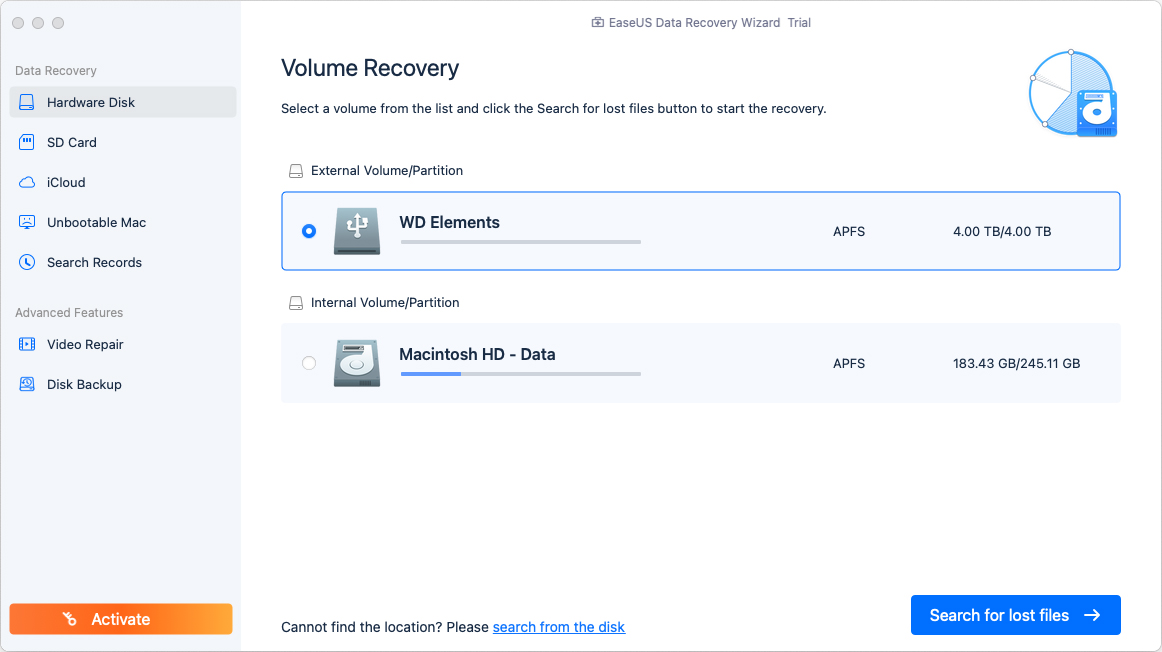
EaseUS Data Recovery Wizard is a simple data recovery software tool that can be used to recover files from external hard drives and other disk-based storage devices. The software is an all-inclusive recovery solution that presents users with a streamlined method of retrieving lost data from all types of storage devices.
The tool is substantially more expensive than its competitors but has a long history of successful recoveries and has been on the market for close to 20 years. Its user-friendly interface and the ability to preview files before recovery are features that appeal to its user base.
- 30-day money-back guarantee
- Preview before recovery
- One-on-one remote recovery assistance
- User-friendly interface
- More expensive than other paid solutions
- General users looking for a comprehensive data recovery solution.
- Monthly – $89.95
- Yearly – $119.95
- Lifetime – $169.95
5. DMDE – Disk Editor
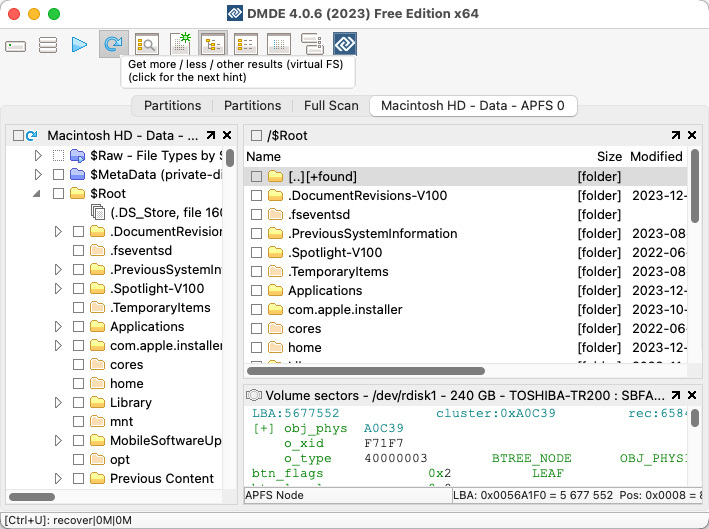
DMDE is a versatile tool offering data recovery and disk editing capabilities. It is available in several editions, catering to different needs and expertise levels. DMDE supports a wide array of file systems and can recover data lost due to deletion, formatting, or disk partition issues, both from external drives and various other storage media.
The software stands out with its disk editor feature, allowing users to dig deep into disk structures. DMDE also provides functionality for RAID reconstruction, making it a handy tool for complex recovery tasks. Its user interface is more technical, and appealing to users with advanced knowledge in data recovery.
- Supports a wide range of file systems and storage devices
- Features a powerful disk editor for in-depth analysis
- RAID reconstruction capabilities
- Partition recovery and file undelete
- Steep learning curve due to technical interface
- Free version has limited functionality
- Lacks customer support options available in paid versions
- Users with technical expertise in disk structures and data recovery.
- $20 for the Express edition
- $48 for the Standard edition
- $98 for the Professional edition
A free version is available with restricted capabilities, ideal for basic recovery tasks.
6. Recoverit
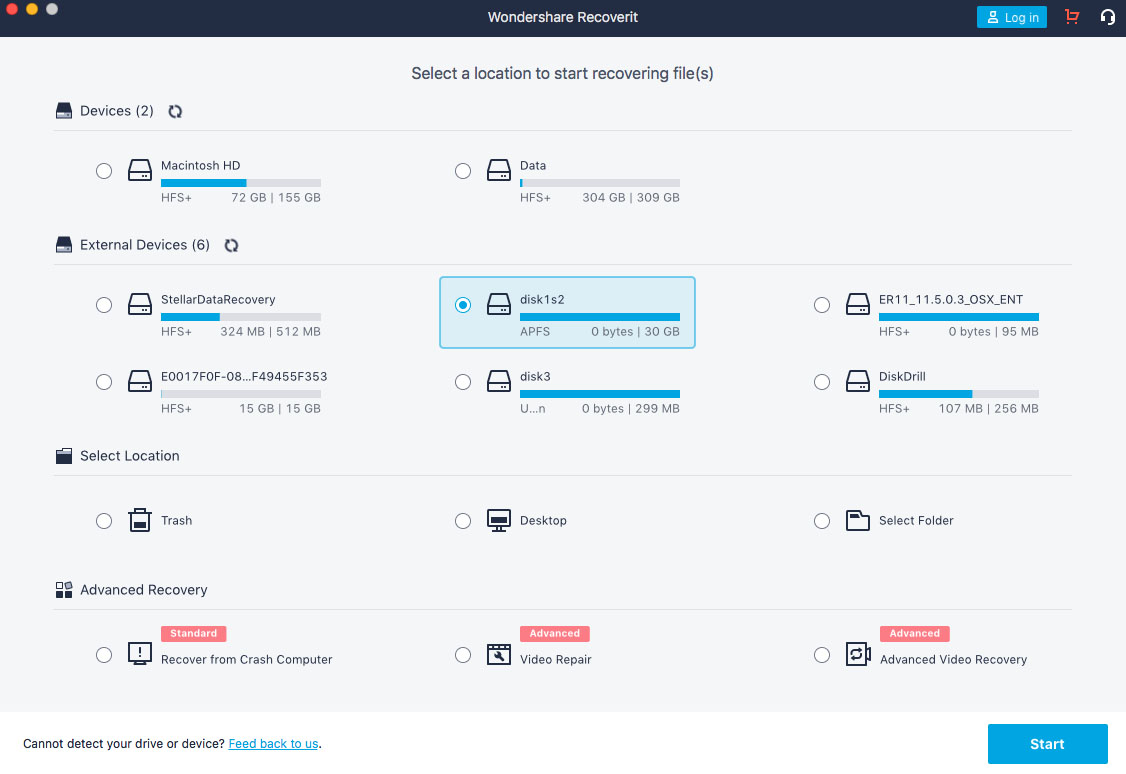
Recoverit Data Recovery for Mac lets you perform external hard drive recovery as well as recover data from many other types of storage media. Its intuitive interface makes it easy for any user to recover lost files without seeking professional help. It uses a three-step process to select the recovery target, scan for recoverable files, and recover them to a safe storage location.
The tool can recover deleted data in all major file formats and can also be used to repair some damaged videos. The company has been in business since 2003 and claims to have helped over five million users.
- An easy recovery process that just takes a few clicks
- 7-day money-back guarantee
- Supports recovery of over 1000 file types
- Recovers data from any disk-based storage device
- Can repair some damaged videos
- Lack of data protection tools
- General users looking for a reliable recovery tool.
- Monthly prices range from $75.95 to $105.95
- Yearly $79.95 to $119.95
- Lifetime from $119.95 to $159.95
7. Stellar Data Recovery
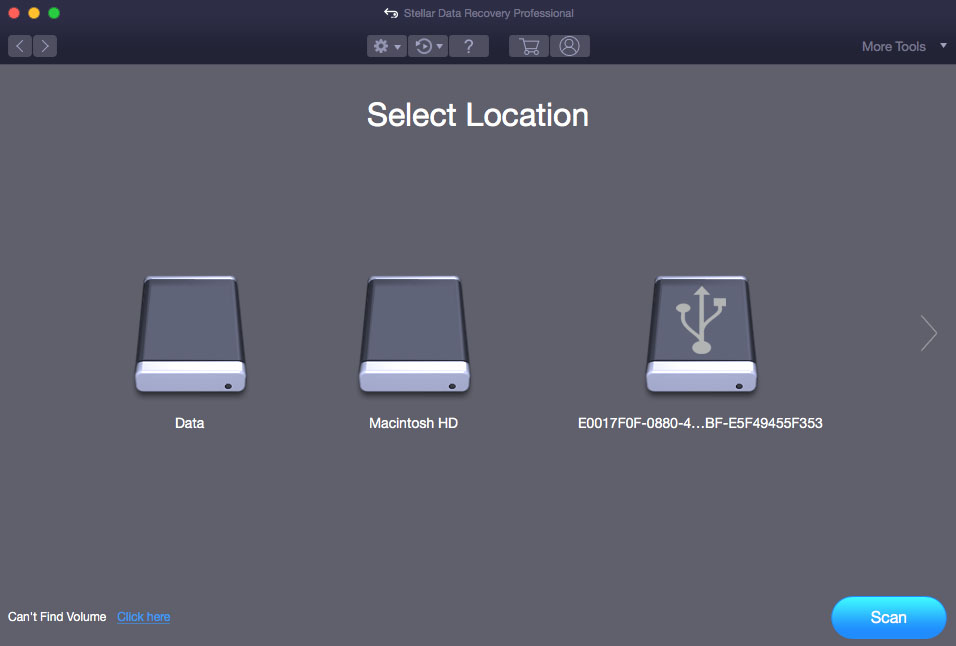
Stellar Data Recovery is a general data recovery tool that can recover deleted data from external hard drives and most other types of disk-based storage devices. It recovers videos, images, documents, and audio files in all major file formats.
The software uses a simple three-step process that asks the user for the file type to be recovered and then locates and recovers files of that type from the storage device. The company partners with Stellar and provides 24×5 technical support.
- Quick and deep scanning modes
- Preview files before recovery
- The free version recovers 1GB of data
- Free technical support
- Lack of data protection tools
- General users looking for a paid recovery tool.
- A free trial is available
- The Professional version costs $79.99
- The Premium version is $99.99
How we Chose
Several factors went into our decision when selecting an external hard drive recovery solution for your Mac or MacBook.
- ⚙️ macOS compatibility. The first criterion that has to be addressed is operating system compatibility. Not all data recovery solutions are compatible with the version of macOS you are currently running. Make sure the solution you select supports your macOS version.
- 🔍 Recovery capability. The tool you select needs to be able to recover the types of files you have lost from the kind of storage device on which they were stored. Choose a tool that supports all the file formats and device types you use. You also want a solution that gives you the most information possible about recovered data. Some tools may recover files with generic names, making them harder to use.
Some tools are restricted to recovering complete partitions and are not suitable for getting individual files back. Make sure the solution you choose can handle the data loss situation you need to resolve. - 🤗 Ease of use. It can be very stressful for the average user to deal with a data loss scenario. Using an HDD recovery tool with a complicated, command-line interface is not recommended in these situations. Look for a tool with a nice user interface that makes it easy to recover your data.
- 💲 Pricing. Solutions are available at different price points from freeware to expensive commercial products. Freeware recovery products don’t usually provide the functionality and user experience of a paid recovery tool.
- 💬 User reviews. User reviews can sometimes provide reliable information about a software tool. While not all online reviews are believable, you may get a sense of a product’s friendliness and usefulness by reading reviews on different sites.
Conclusion
One of the data recovery software solutions or file recovery methods listed above should be able to get your lost data back. It’s important that you act quickly and don’t use the external device until you have completed the recovery to protect the recoverable data from being corrupted or overwritten.
While free tools may look appealing, they don’t offer the same functionality and user-friendly interface as commercial data recovery tools. Choose wisely, as you may only get one chance to recover your valuable data and you want to use the best tool possible. Good luck with your data recovery!