How to Take a Screenshot on a Mac
The ability to take screenshots on your Mac can be valuable for several reasons. Screenshots capture a unique instant of time that can never be completely replicated. A screenshot can be instrumental in providing information to tech support if you experience an issue with your Mac or MacBook Pro. Some users like to take screenshots of interesting images they find while surfing the web. In this article, we are going to show you how to take a screenshot on a Mac and manipulate the images after they are taken.
How to take a screenshot on your Mac
| Type of screenshot | Command to use |
| Full screen: | Shift-Command-3 |
| Portion of the screen: | Shift-Command-4 and then select the area to be copied. |
| Open the Screenshot app: | Shift-Command-5 |
| Take a screenshot of a MacBook’s touch bar: | Shift-Command-6 |
| Take a screenshot without the keyboard: | Use the Screenshot app or the touch bar |
Let’s talk about how to screenshot on a Mac. It’s a relatively simple procedure, but there are some subtleties built into the process.
The full spectrum of screenshot functionality on an Apple computer is accessed with the Shift-Command-5 keystroke combination. This opens the Screenshot application, which can also be opened the same way as any other app from the Utilities folder.
Method 1. Using the Screenshot app
The following procedure details how to use the Screenshot app to take various types of screenshots.
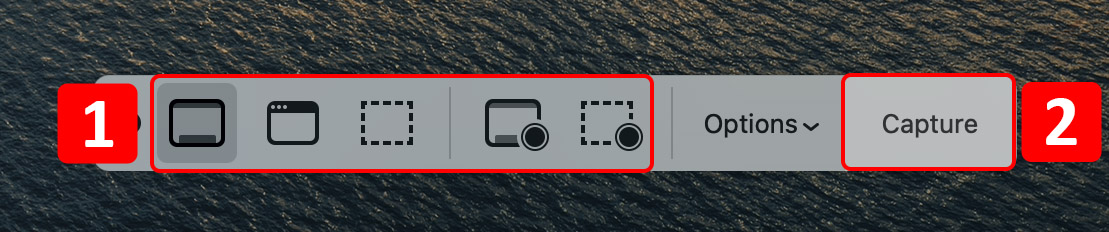
- Open the Screenshot app with the Shift-Command-5 keystroke combination.
- Click a tool to select the type of screenshot you want to take. Your options are:
- Capture the entire screen;
- Capture a window;
- Capture a portion of the screen;
- Record the entire screen;
- Record a portion of the screen.
- Click the Capture or Record button to take the screenshot or start recording.
Method 2. Using the keyboard shortcuts
- Shift-Command-3 – Takes a screenshot of the entire screen.
- Shift-Command-4 – Takes a screenshot of a portion of the screen. Drag the rectangular section to capture the part of the screen you want to save.
- Shift-Command-6 – Takes a screenshot of your MacBook’s touch bar.
Method 3. Using the touch bar
New Apple MacBooks have a touch bar that can be customized to make specific commands easy to access. The following steps will enable you to take a screenshot directly from the touch bar.
- Open System Settings > Keyboard.
- Click on Customize Control Strip in the bottom right.
- Drag the Screenshot icon down to put it on the touch bar.
- Now you can open the Screenshot app from the touch bar by tapping the Screenshot icon. Then proceed to take the type of screenshot you want.

Method 4. How to take a timed screenshot
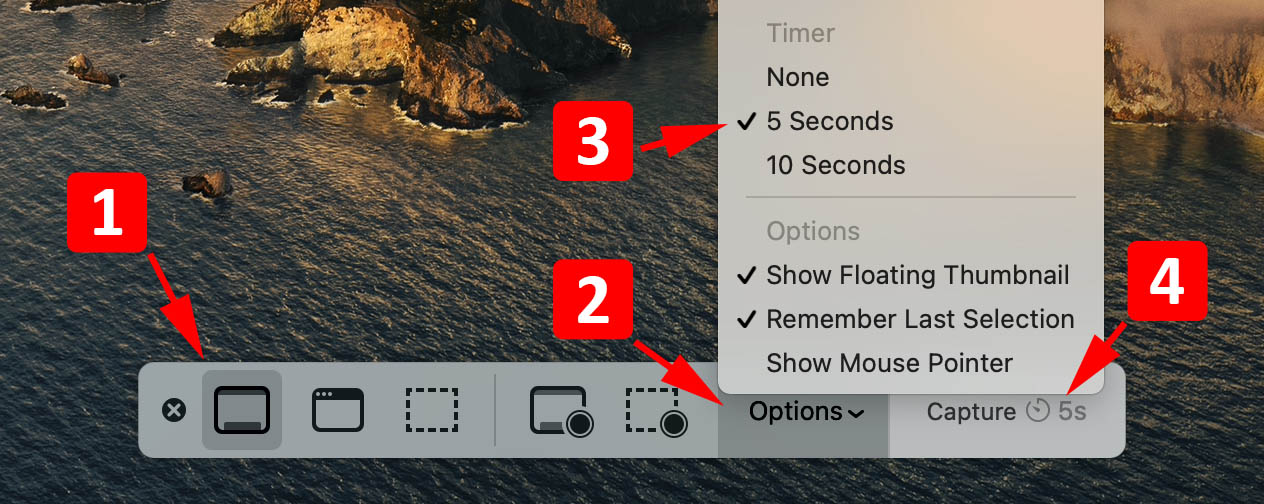
- Open the Screenshot app with the Shift-Command-5 keystroke combination.
- Click Options and in the Timer section choose either a 5 or 10-second delay.
- Click Capture to begin the countdown. When the selected number of seconds have elapsed, a screenshot will be taken automatically.
Method 5. Third-party Mac screenshot apps
Third-party Mac screenshot apps offer additional flexibility and functionality that allows you to capture an image of your screen without using a keyboard. Users that take a lot of screenshots and need more than a simple screen capture should look into a third-party tool.
A third-party screenshot tool requires you to install a small application but pays you back with enhanced features macOS does not provide. Using a third-party screenshot app is a simple proposition that you will become comfortable with very quickly.
Some of the features to look for in a screenshot app are the ability to markup or annotate your screenshots, save them to different file formats, and export images directly to other apps or cloud platforms. If you need to share screenshots with colleagues, a third-party tool is essential for enhanced productivity.
Here’s an overview of how to take screenshots using the following third-party apps.
Lightshot
- Download Lightshot for macOS.
- Open the app by clicking its icon.
- Select the area of the screen to copy.
- Annotate and markup the screenshot.
- Save the screenshot locally or to the cloud where you can share it with others.
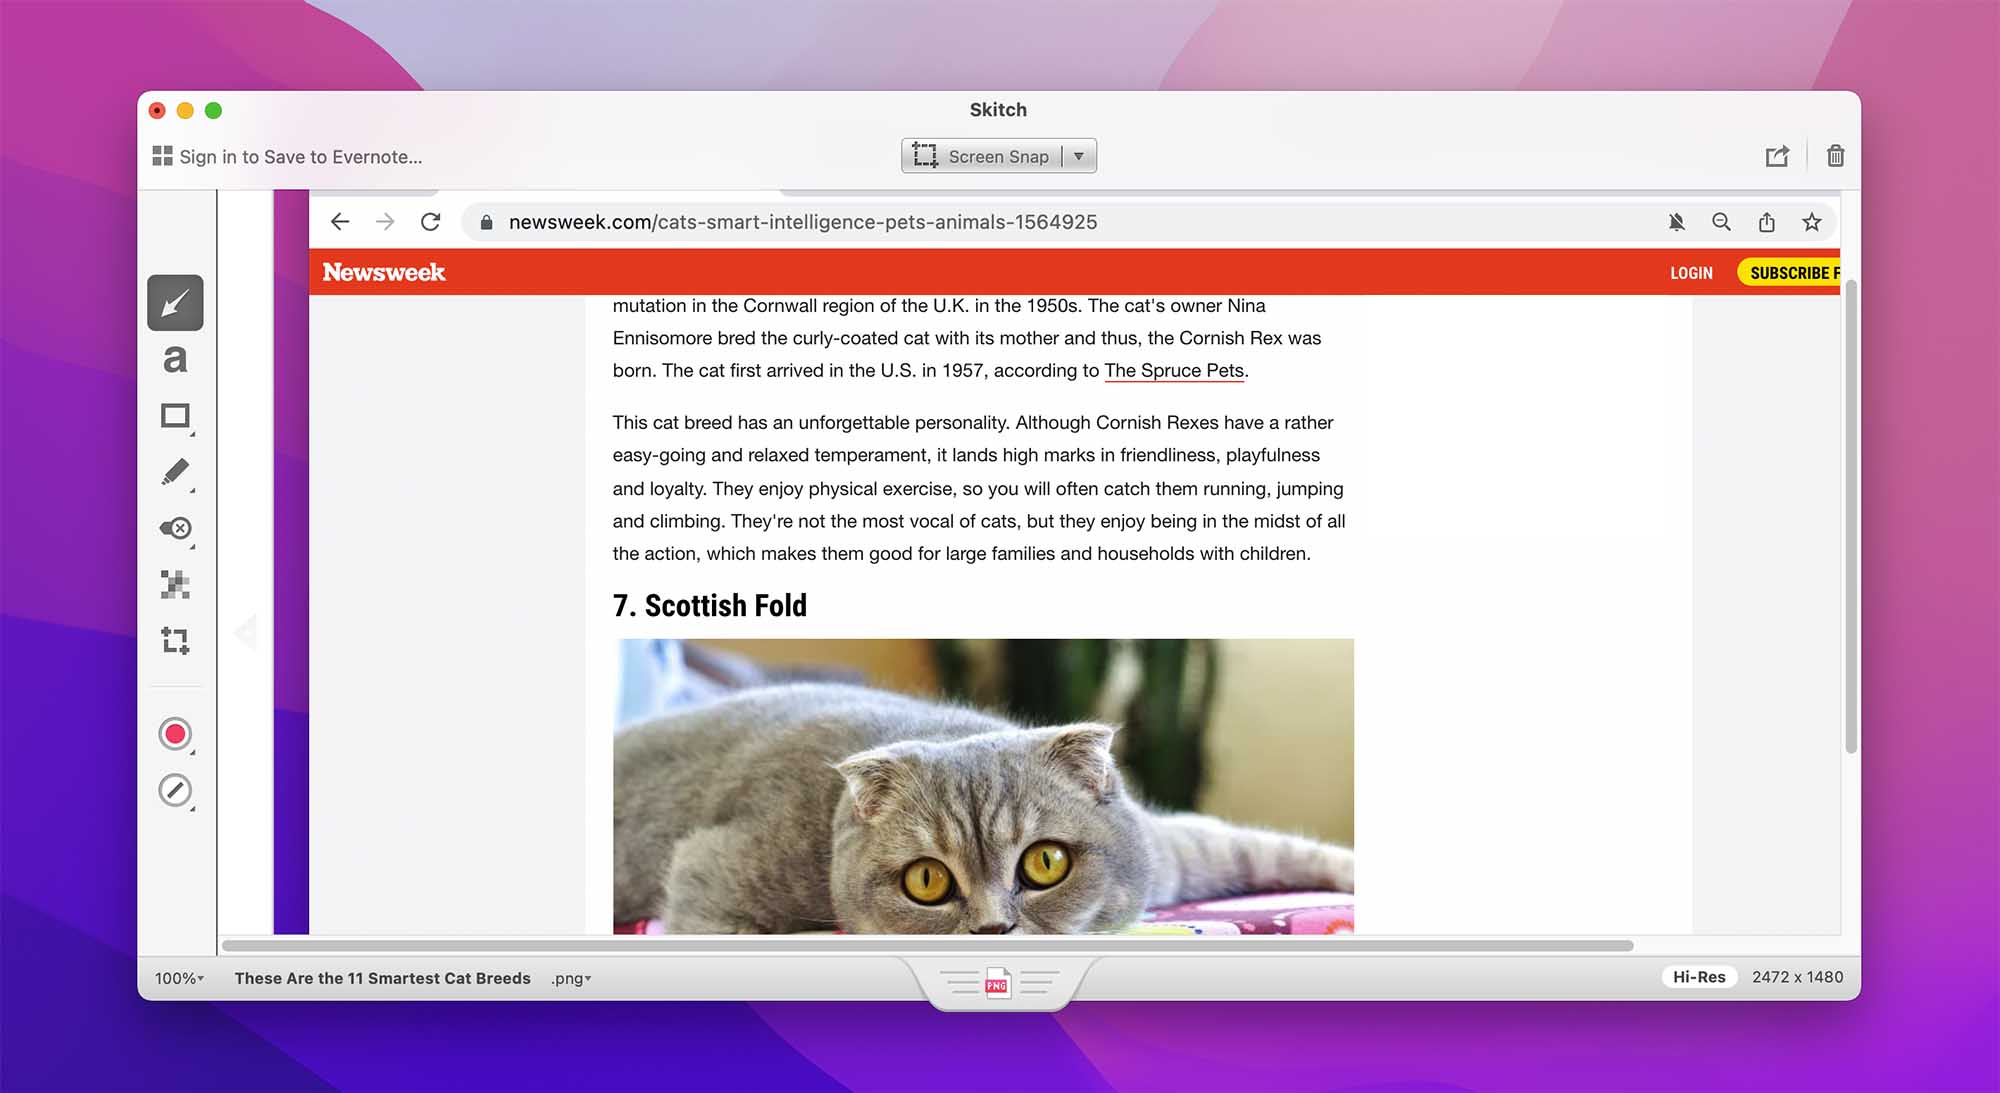
Skitch
- Install and launch the Skitch app.
- Click and hold the Skitch icon in the application dock.
- A snapshot menu appears from which you can choose to take various types of screenshots including fullscreen, crosshair, menu, and specific windows. There are also keyboard shortcuts such as Shift + Command + 5 for a crosshair snapshot or Shift + Command + 6 for an image of the full screen.
- Capture the image and it will be opened in Skitch. Now you can annotate and share the screenshot with colleagues from within the app.
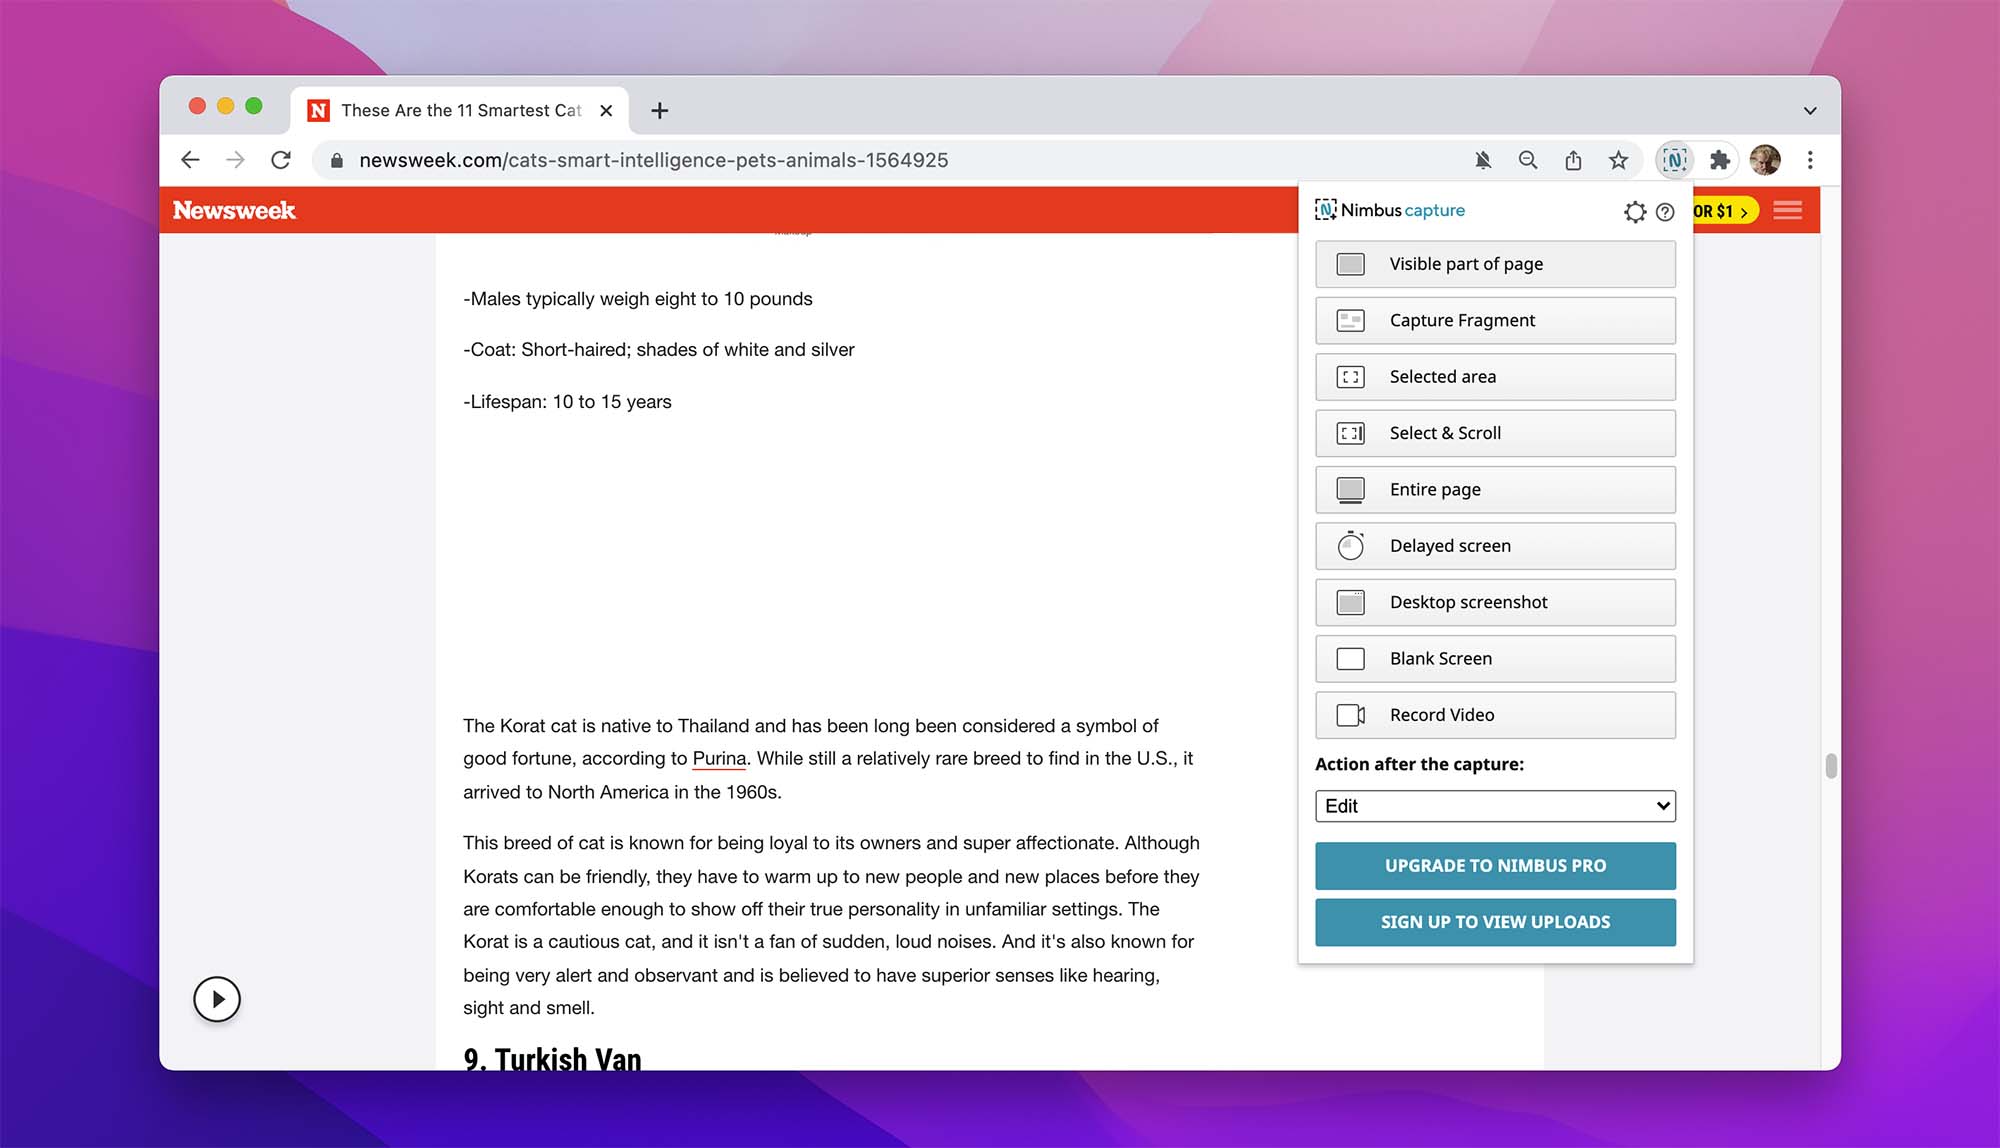
Nimbus – a Google Chrome extension
- Install the Nimbus Google Chrome extension.
- Click on the app’s icon to open it.
- Choose the type of screenshot you wish to take from the menu.
- Click the Checkmark to save the image.
- Click the pencil icon to annotate the screenshot.
- Click Done to save the screenshot to your desired location.
Where are Mac Screenshots saved?
By default, any screenshot you take on your Mac is saved to the macOS Desktop. If you are in the habit of taking a lot of screenshots, this default will quickly lead to a very cluttered desktop. If you’re not satisfied with this outcome for a screenshot on Mac, the next section of this article should interest you.
Change Where Your Mac Screenshots Are Saved
You can change where your Mac screenshots are saved with the following simple procedure.
- Open the Screenshots application with the Shift-Command-5 keystroke combination or by opening the app from the Utilities folder.
- Click on Options at the bottom of the App’s screen.
- Select the location in the Save to portion of the menu. You can choose to save to the Clipboard, Documents, or other predefined locations. You can also select Other Location and choose the folder in which you want your screenshots to be saved.

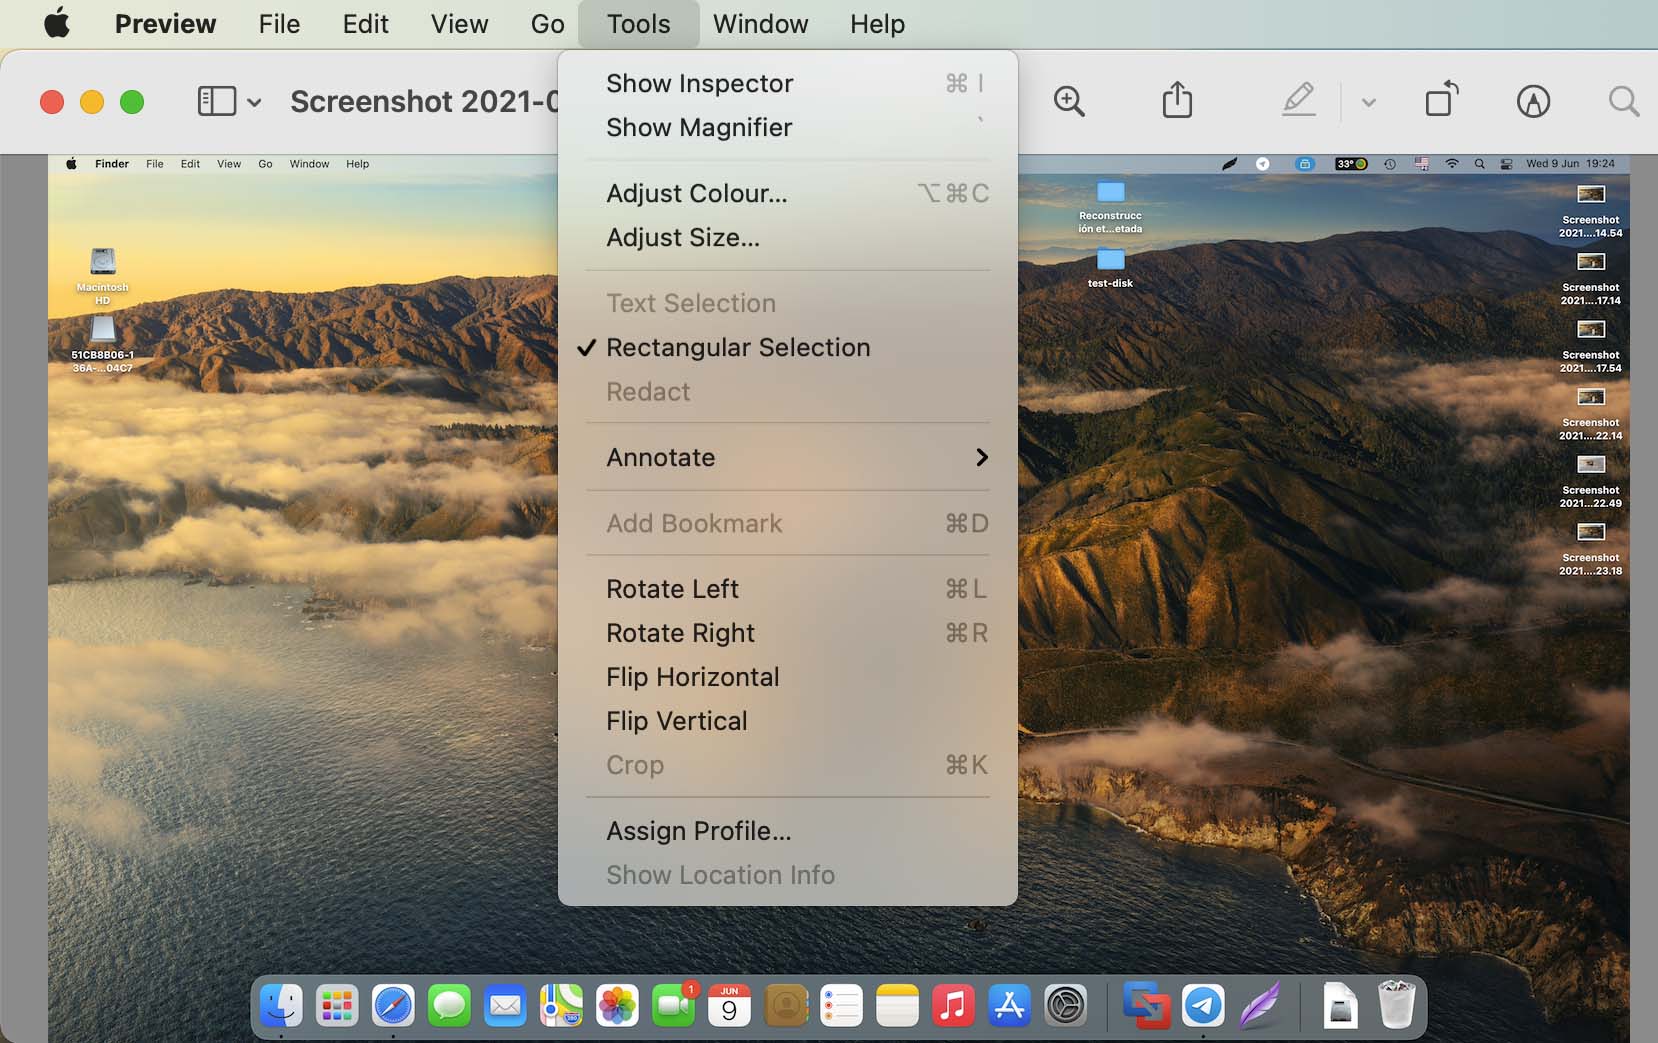
How to Edit a Screenshot on Mac
Depending on how you plan to use a screenshot, you may need to edit it for a variety of reasons. Mac screenshots are saved as a .PNG file and you might want to change the format. We’ll show you how to do that as well as how to crop the image or change its dimensions using the macOS Preview application.
Preview is the default app for opening images, so you can also just click on the image if you haven’t changed the default. If you have, open it by right-clicking on it and selecting Preview.
- Open the screenshot in Preview.
- Open the Tools Menu.
- Click on Adjust Size to change the dimension and resolution of the screenshot.
- Click on Annotate to make annotations to the screenshot.
- Click on Rectangular Section to select a portion of the screenshot and then select Tools > Crop to crop the image. After making your changes, click Edit and save the modifications.
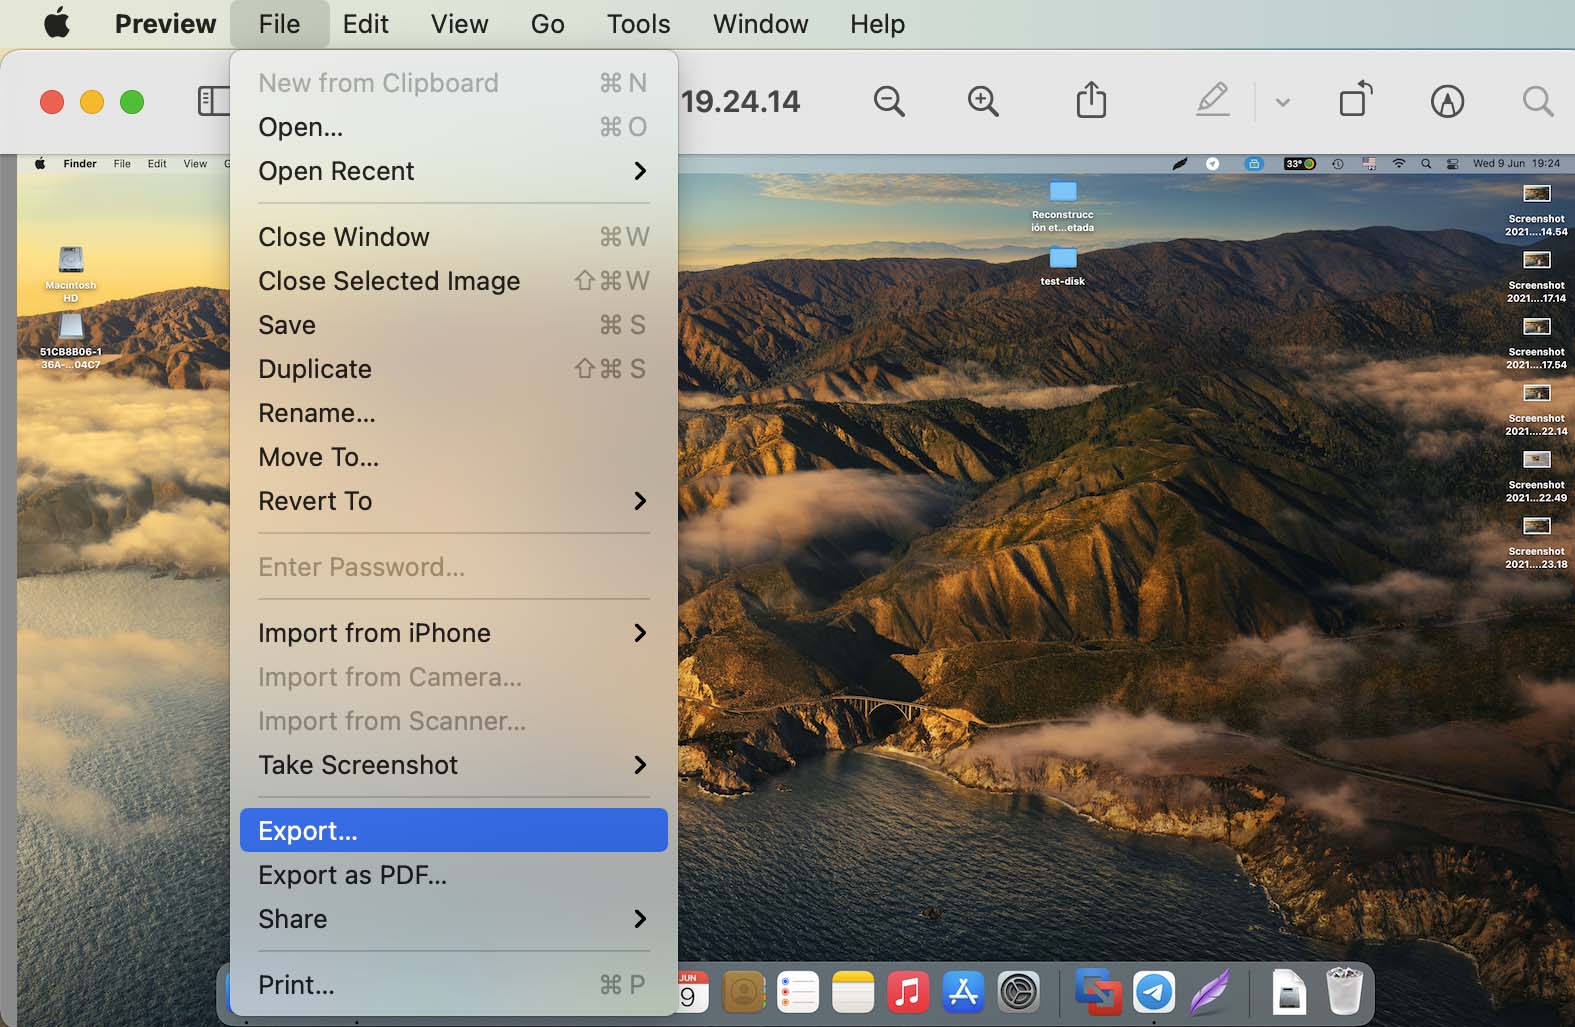
If you want to save the screenshot in a different format, use these steps while in Preview:
- Select File > Export.
- Choose the format, filename, location, and filter you want to use for the new image.
What to Do if I’m Having Problems with Screen Capture on Mac
It can be frustrating to attempt to take a screenshot on your Mac and find out it’s not working for some reason. Fortunately, there are multiple actions you can take to resolve this issue.
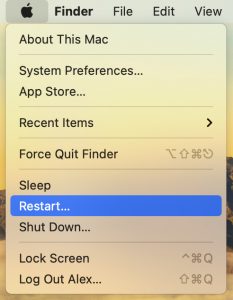
Solution 1. Try restarting your Mac
Your Mac can start performing inefficiently if it hasn’t been restarted in a while. This can affect the performance of your apps and may impact your ability to perform a print screen on your Mac. A simple restart may resolve this problem.
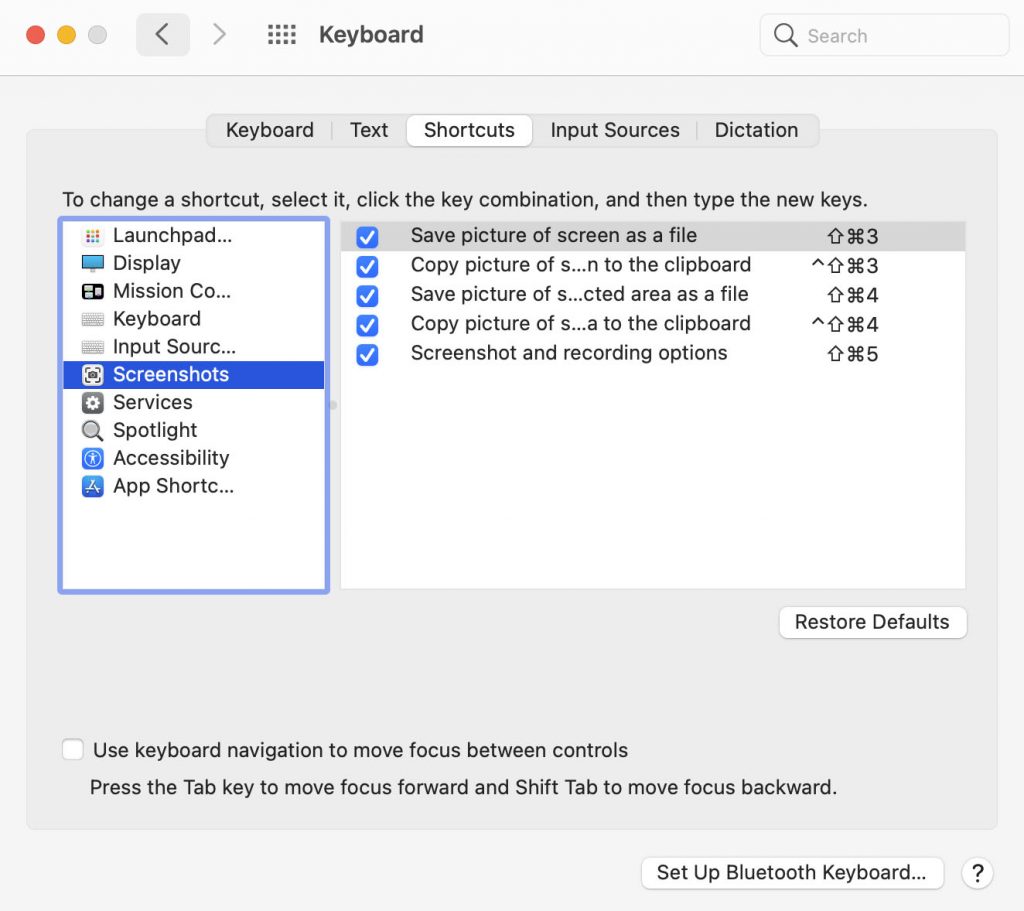
Solution 2. Check the keyboard shortcuts
Make sure the keyboard shortcuts for the Screenshot app are turned on with the following procedure.
- Go to System Preferences > Keyboard > Shortcuts.
- Select Screenshots from the menu in the left panel.
- Make sure that the shortcuts are active or click the checkbox next to them to activate the screenshot shortcuts that have been turned off.
Solution 3. Verify where your screenshots are being saved
It’s possible that you have simply forgotten where you are saving your screenshots. To find out where you are saving your screenshots use this procedure:
- Open the Screenshot application with the Shift-Command-5 keystroke combination or by opening the app from the Utilities folder.
- Click on Options at the bottom of the App’s screen.
- View the location screenshots are saved to in the Save to portion of the menu.
How to Increase Efficiency When Taking Screenshots on a Mac
You can increase your efficiency when taking a screenshot on your Mac in three ways.
- Use the Screenshot shortcuts. They are called shortcuts for a reason. Using them will save time that would be spent opening the Screenshot app.
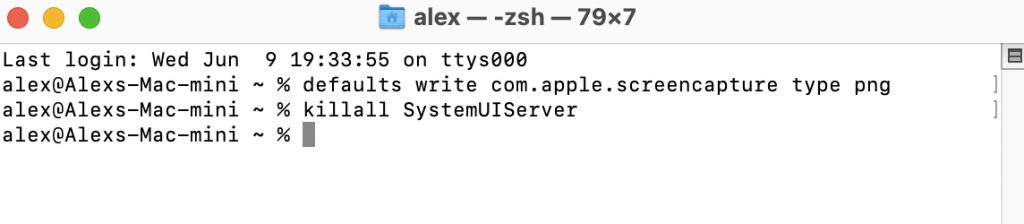
- Save the screenshots to a custom location so you don’t need to move them after they are taken.
- Change the screenshot file format to avoid having to update the item after the fact. To do so, you need to use the Terminal app and enter the following command, changing file format to the image format of your choice: defaults write com.apple.screencapture type <file format>; killall SystemUIServer
Conclusion
Whatever reason you have for wanting to take and edit screenshots on your Mac, we hope that you have found this article informative. There is a lot of powerful native functionality available in macOS Big Sur and its predecessors. Using the Screenshot app, you can easily capture all or part of your screen. Then use Preview to edit the image and save it to a different format if you like. You can even perform some simple annotation on the images with Preview. Have fun taking your screenshots!
FAQ
- Open the Screenshot app with the Shift-Command-5 keystroke combination.
- Select the type of screenshot you wish to take.
- Click the Capture button.
Shift-Command-3
The screenshot will be saved to the default location which can be changed by the user.
- Snagit
- Monostrap
- Skitch
- Recordit
- Lightshot
- SnapNDrag
- Open Finder and then Applications.
- Open the Utilities folder.
- Open the Screenshot app.
- Use the app’s toolbar to select the type of screenshot you want to take.
- Click the Capture button to take the screenshot.
- Launch the Screenshot tool with the Shift + Command + 5 keystroke combination.
- Choose the option to record the entire screen or just a portion of it.
- Click the Record button to begin recording your screen movements.
- Click the Stop button in the menu bar when you are finished recording.
- The scrolling screenshot will be saved in the .MOV file format.