How to Clean Junk Files on iPhone
Want to delete junk files on your iPhone before they start causing problems? Or maybe your apps already take longer to open, and storage warnings keep popping up? Either way, the issue often comes down to accumulated junk files.
Below, we’ll show you 10 reliable, battle-tested methods to clean junk files from your iPhone and most in under 10 minutes. Let’s get started!
What Exactly Qualifies as Junk Files on iPhone?
What is junk? Simply put, it’s clutter (stuff you don’t need but that sticks around anyway). Junk files are unnecessary data that pile up over time, wasting space and slowing down your iPhone.
Here’s what we would put into the junk category:
- App caches and data – temporary files apps create but never clean up.
- Old messages and attachments – forgotten texts, photos, and videos hogging storage
- Unused apps – apps you don’t use but still take up space.
- Browser cache – website data from Safari and other browsers that becomes outdated.
- Downloaded files – PDFs, videos, music, and documents you no longer need.
- Duplicate and near-duplicate photos – multiple shots of the same scene or near-identical images cluttering your library.
- Screenshots and screen recordings – quick captures that often get forgotten.
- Large, unused video files – old clips taking up gigabytes of storage.
- Voice memos – recordings you no longer need but still linger.
- System data – hidden logs, update leftovers, temporary files, and other background data iOS keeps on your device.
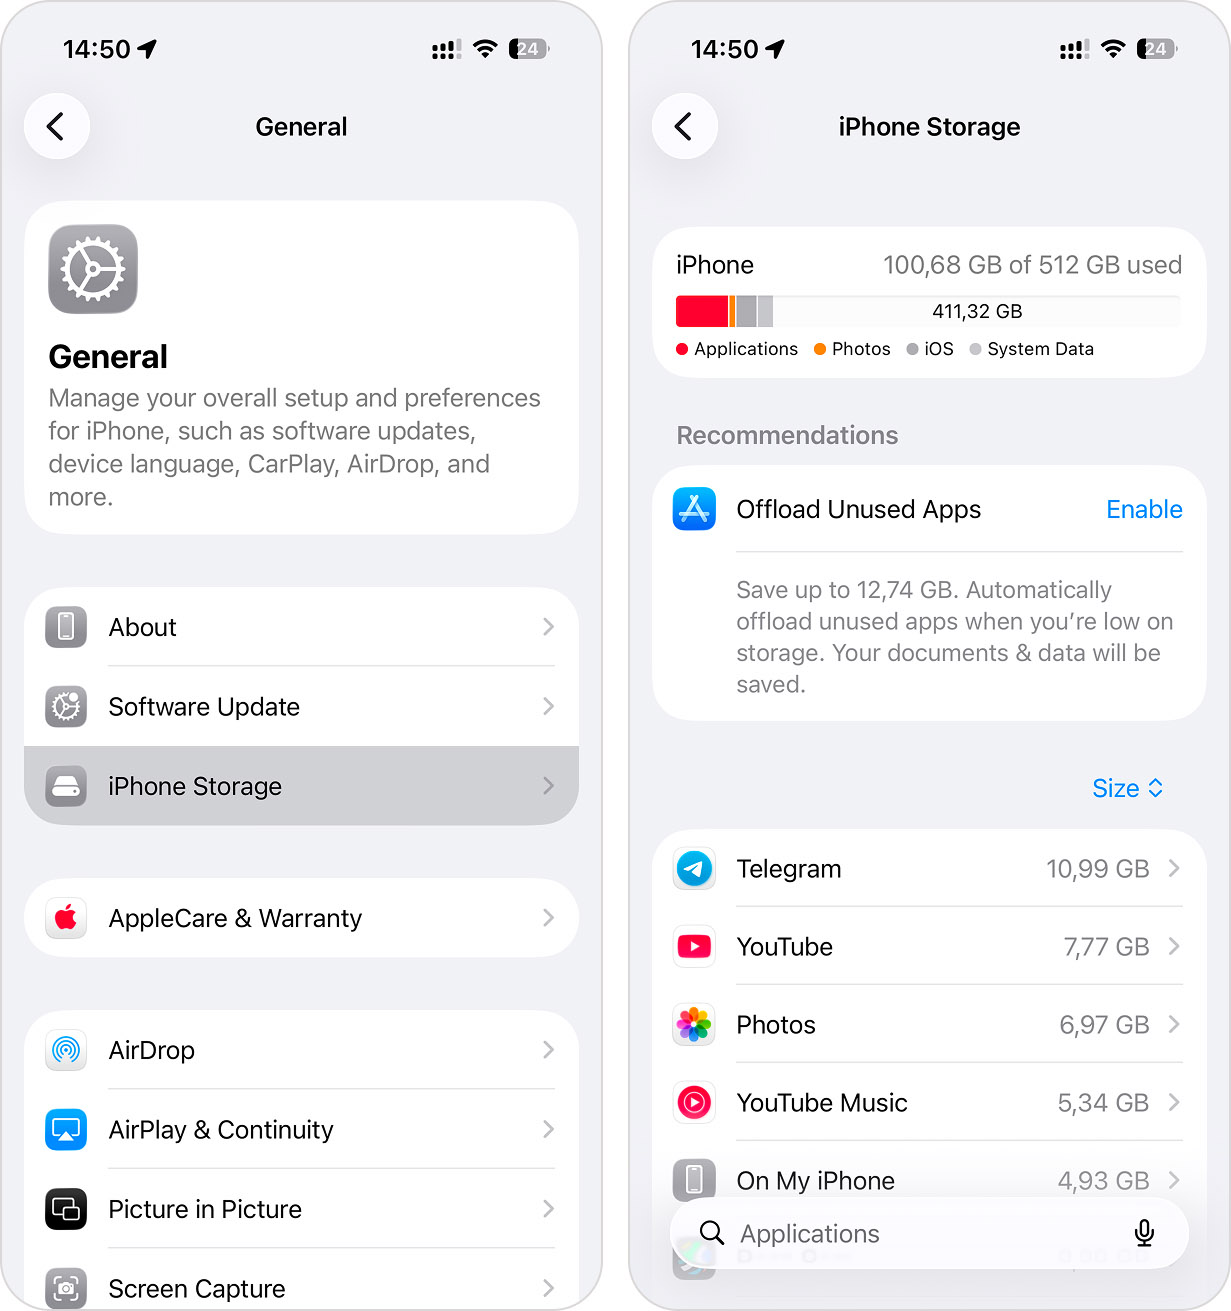
So, go to Settings > General > iPhone Storage and check the detailed breakdown. It may give you a good place to start.
Junk problems on iPhones are super common. For example, just recently, we got this message through our contact form:
“Hey, I was trying to take a picture yesterday, and right when I tapped the shutter button, my iPhone gave me a ‘Storage Almost Full’ message. I couldn’t even take the photo. I have no idea whats clogging up my storage. I don’t download that much stuff. Is there any easy way to clean up whatever junk is filling my phone?”
If this sounds familiar and you want a solution, below you’ll find the methods we suggested to our reader.
Top 10 Methods to Clean Junk Files on iPhone
Now, let’s get to the main part – how to clean junk files on iPhone. If your main goal is to free up storage, one method may be enough. Start with the category that took up the most space when you checked iPhone Storage. But if you want better results, or if your goal is to remove as much unnecessary clutter as possible, work through the methods step by step. Every iPhone is different, so the junk that clutters them varies too.
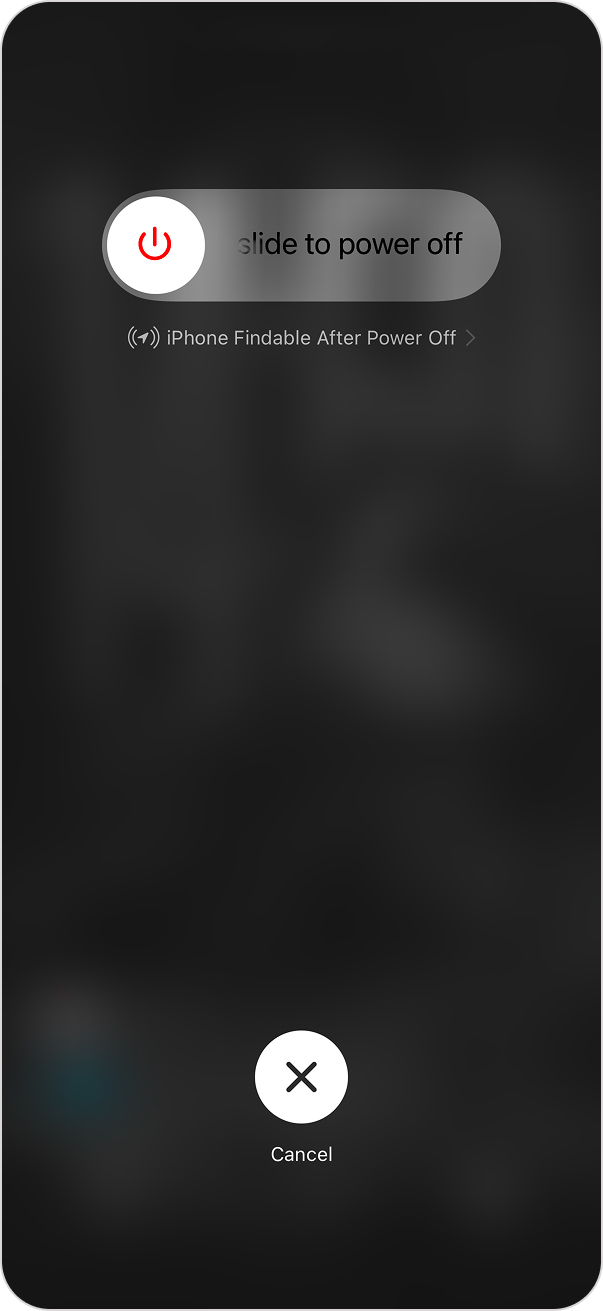
Method 1: Force Restart Your iPhone
The first thing we recommend is a force restart. At first glance, it may seem too simple to make any difference, but it can clear temporary system data, stop stuck background processes, and help iOS get rid of files it no longer needs.
Think of it as a mini version of a full iPhone reset. It won’t clean up files on your iPhone (like photos, apps, messages, or other personal data), but it can help remove some temporary clutter before you move on to the more targeted cleanup methods below.
To force restart most modern iPhones (iPhone 8, iPhone X, and newer):
- Quickly press and release the Volume Up button.
- Quickly press and release the Volume Down button.
- Press and hold the Side button.
- Keep holding it until the Apple logo appears, then release it.
Method 2: Use Third-Party iPhone Cleanup Apps
Now move on to more targeted ways to remove junk from your iPhone and start with what’s sitting inside the Photos app (copies of the same or similar photos, old screenshots, and outdated videos can all be considered junk because they are no longer relevant).
If you prefer, you can delete all of this manually. However, we’d like to offer an alternative in the form of iPhone cleaner apps. They scan your iPhone for unnecessary files and automate cleanup, turning what might take hours into minutes or even seconds.
- It actually cleans up storage efficiently and finds media junk quickly.
- It’s one of the iPhone cleaner apps that you can use for free.
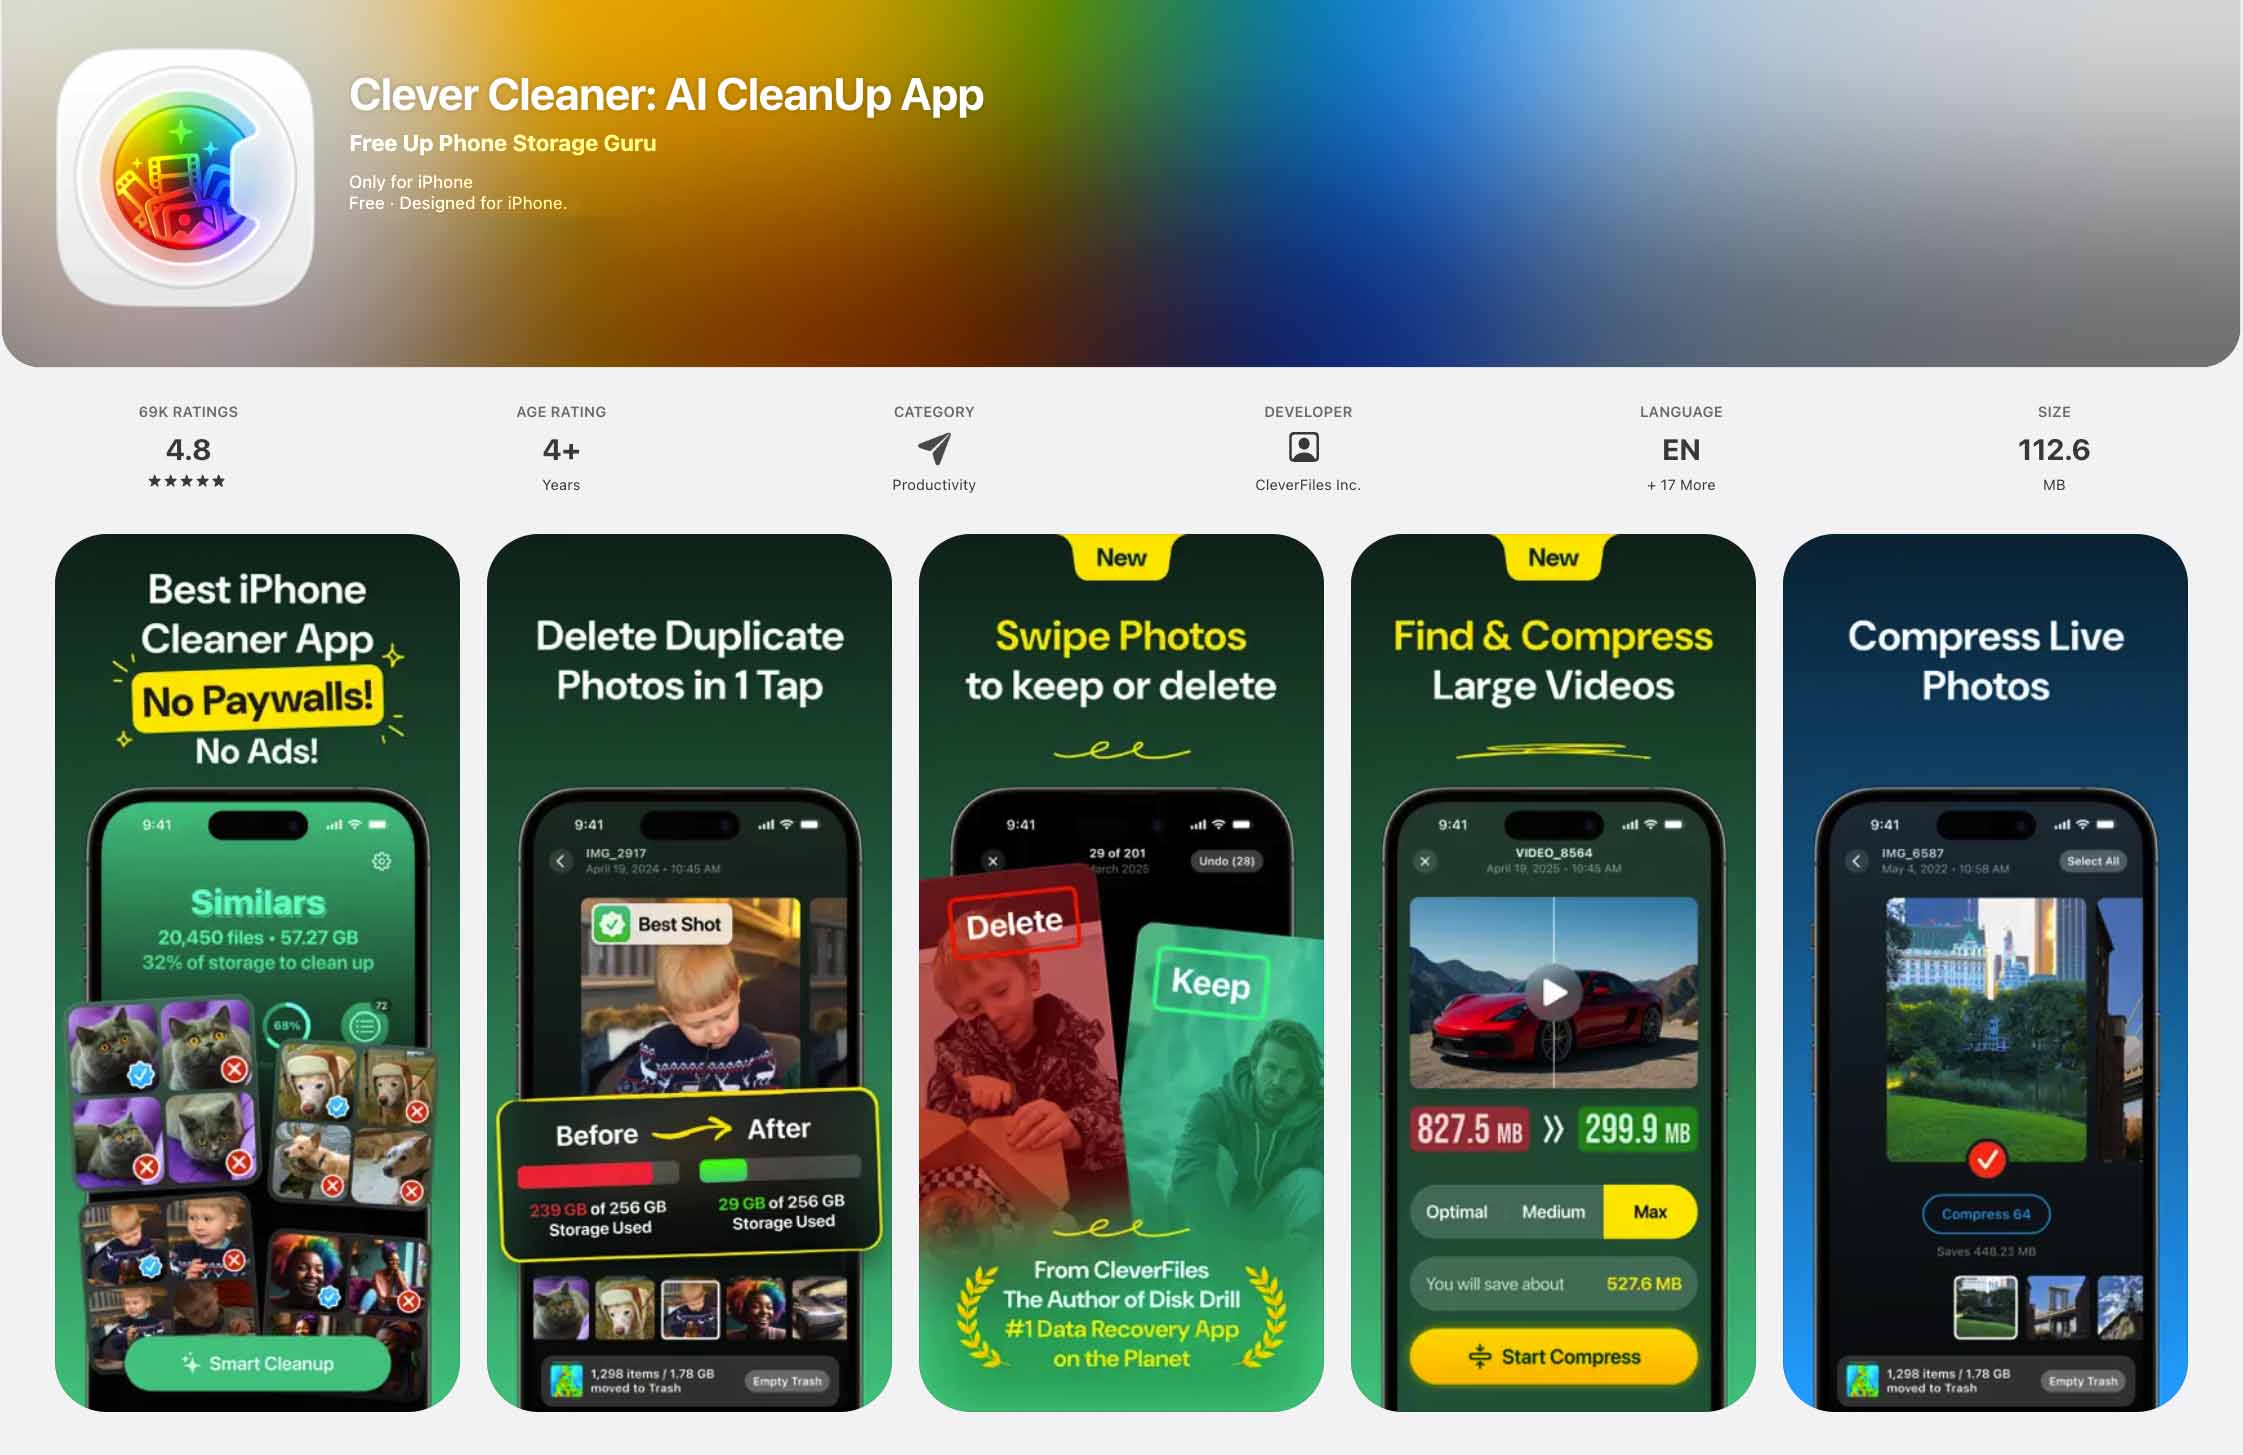
We’ll show how to use Clever Cleaner to remove unnecessary images and cover its other features later in the article. Here’s how to use it:
- Search for “Clever Cleaner” in the App Store or use the official link to download it.
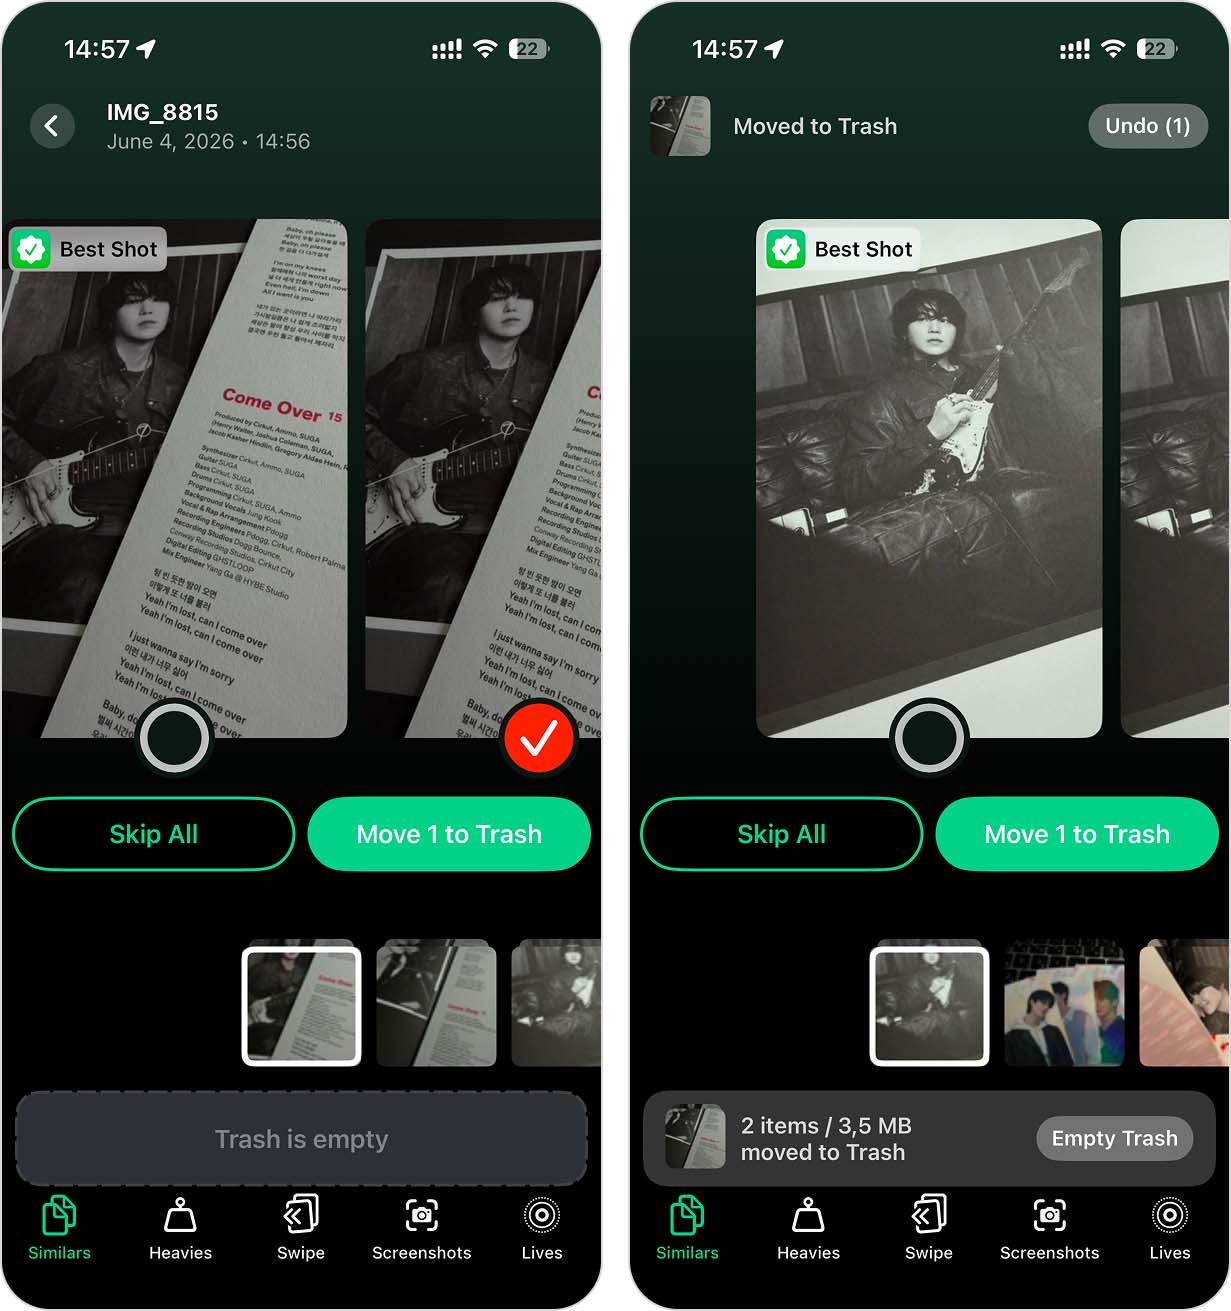
- Open the app and navigate to the Similars tab.
- Tap Smart Cleanup, and the app will scan your photo library in seconds.
- Review the suggested deletions. If you want to keep a specific one, tap Restore.
- If you agree with the selection, Slide to delete, then confirm.
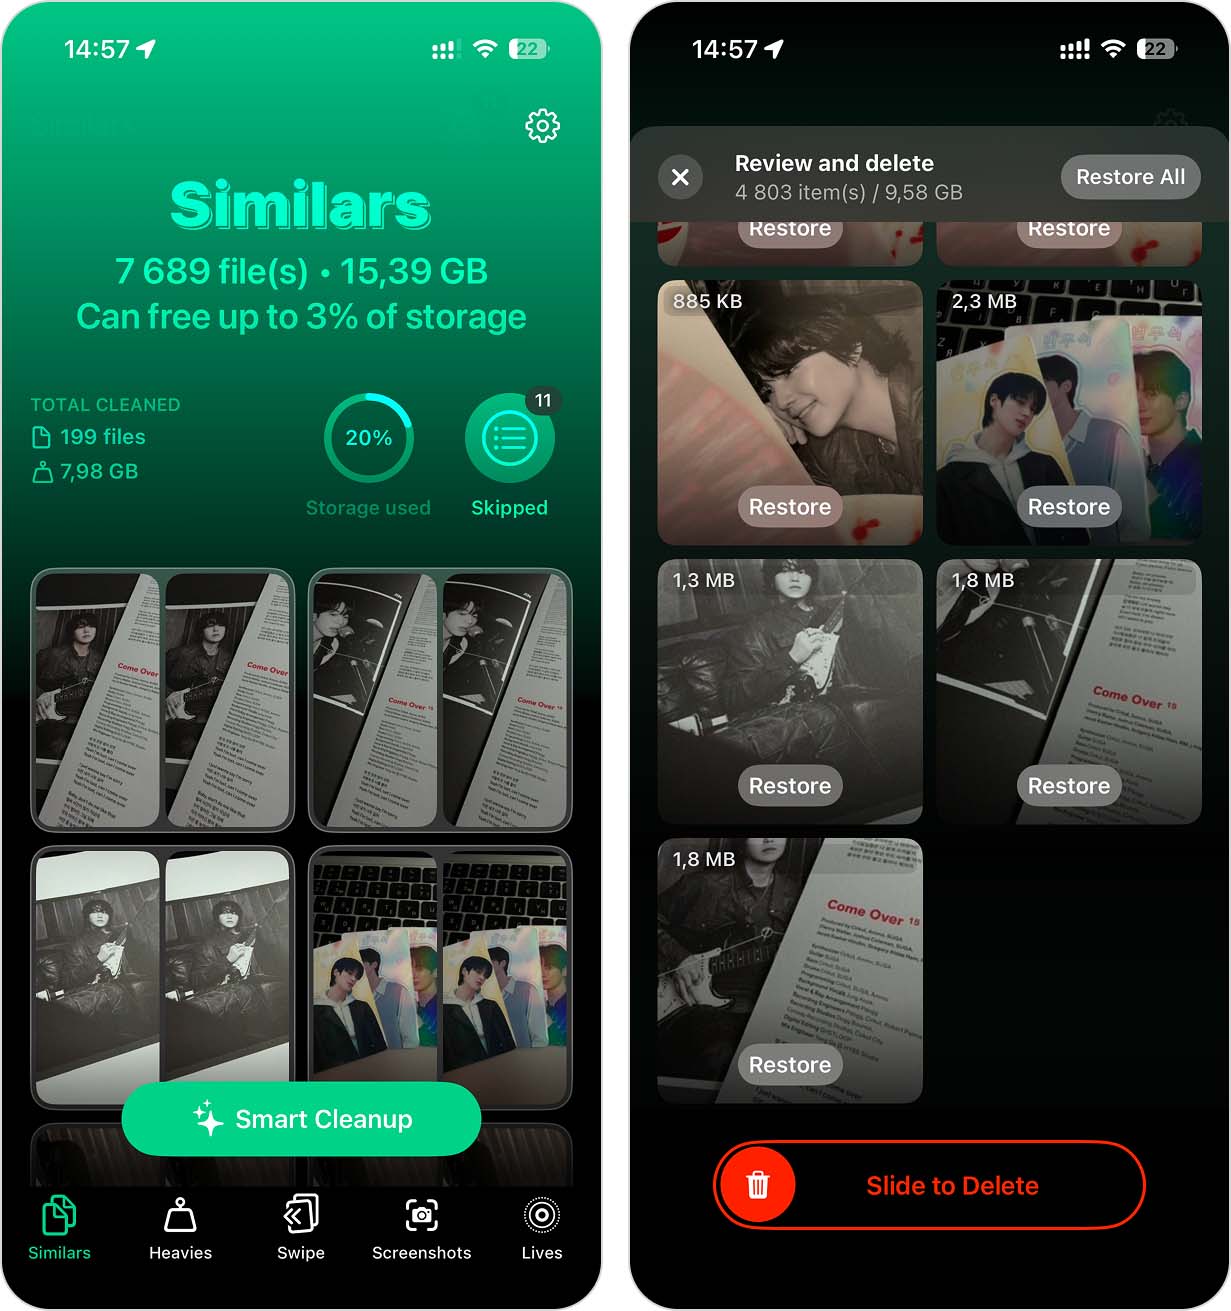
- For a more hands-on approach, tap a group to manually select which photos to keep or remove.
- The app’s AI automatically picks the Best shot in each group, but you can change this if needed.
- Once you’re satisfied, tap Move to Trash to delete the selected images or Skip All to move to the next group.
- When finished, tap Empty Trash and confirm the deletion.
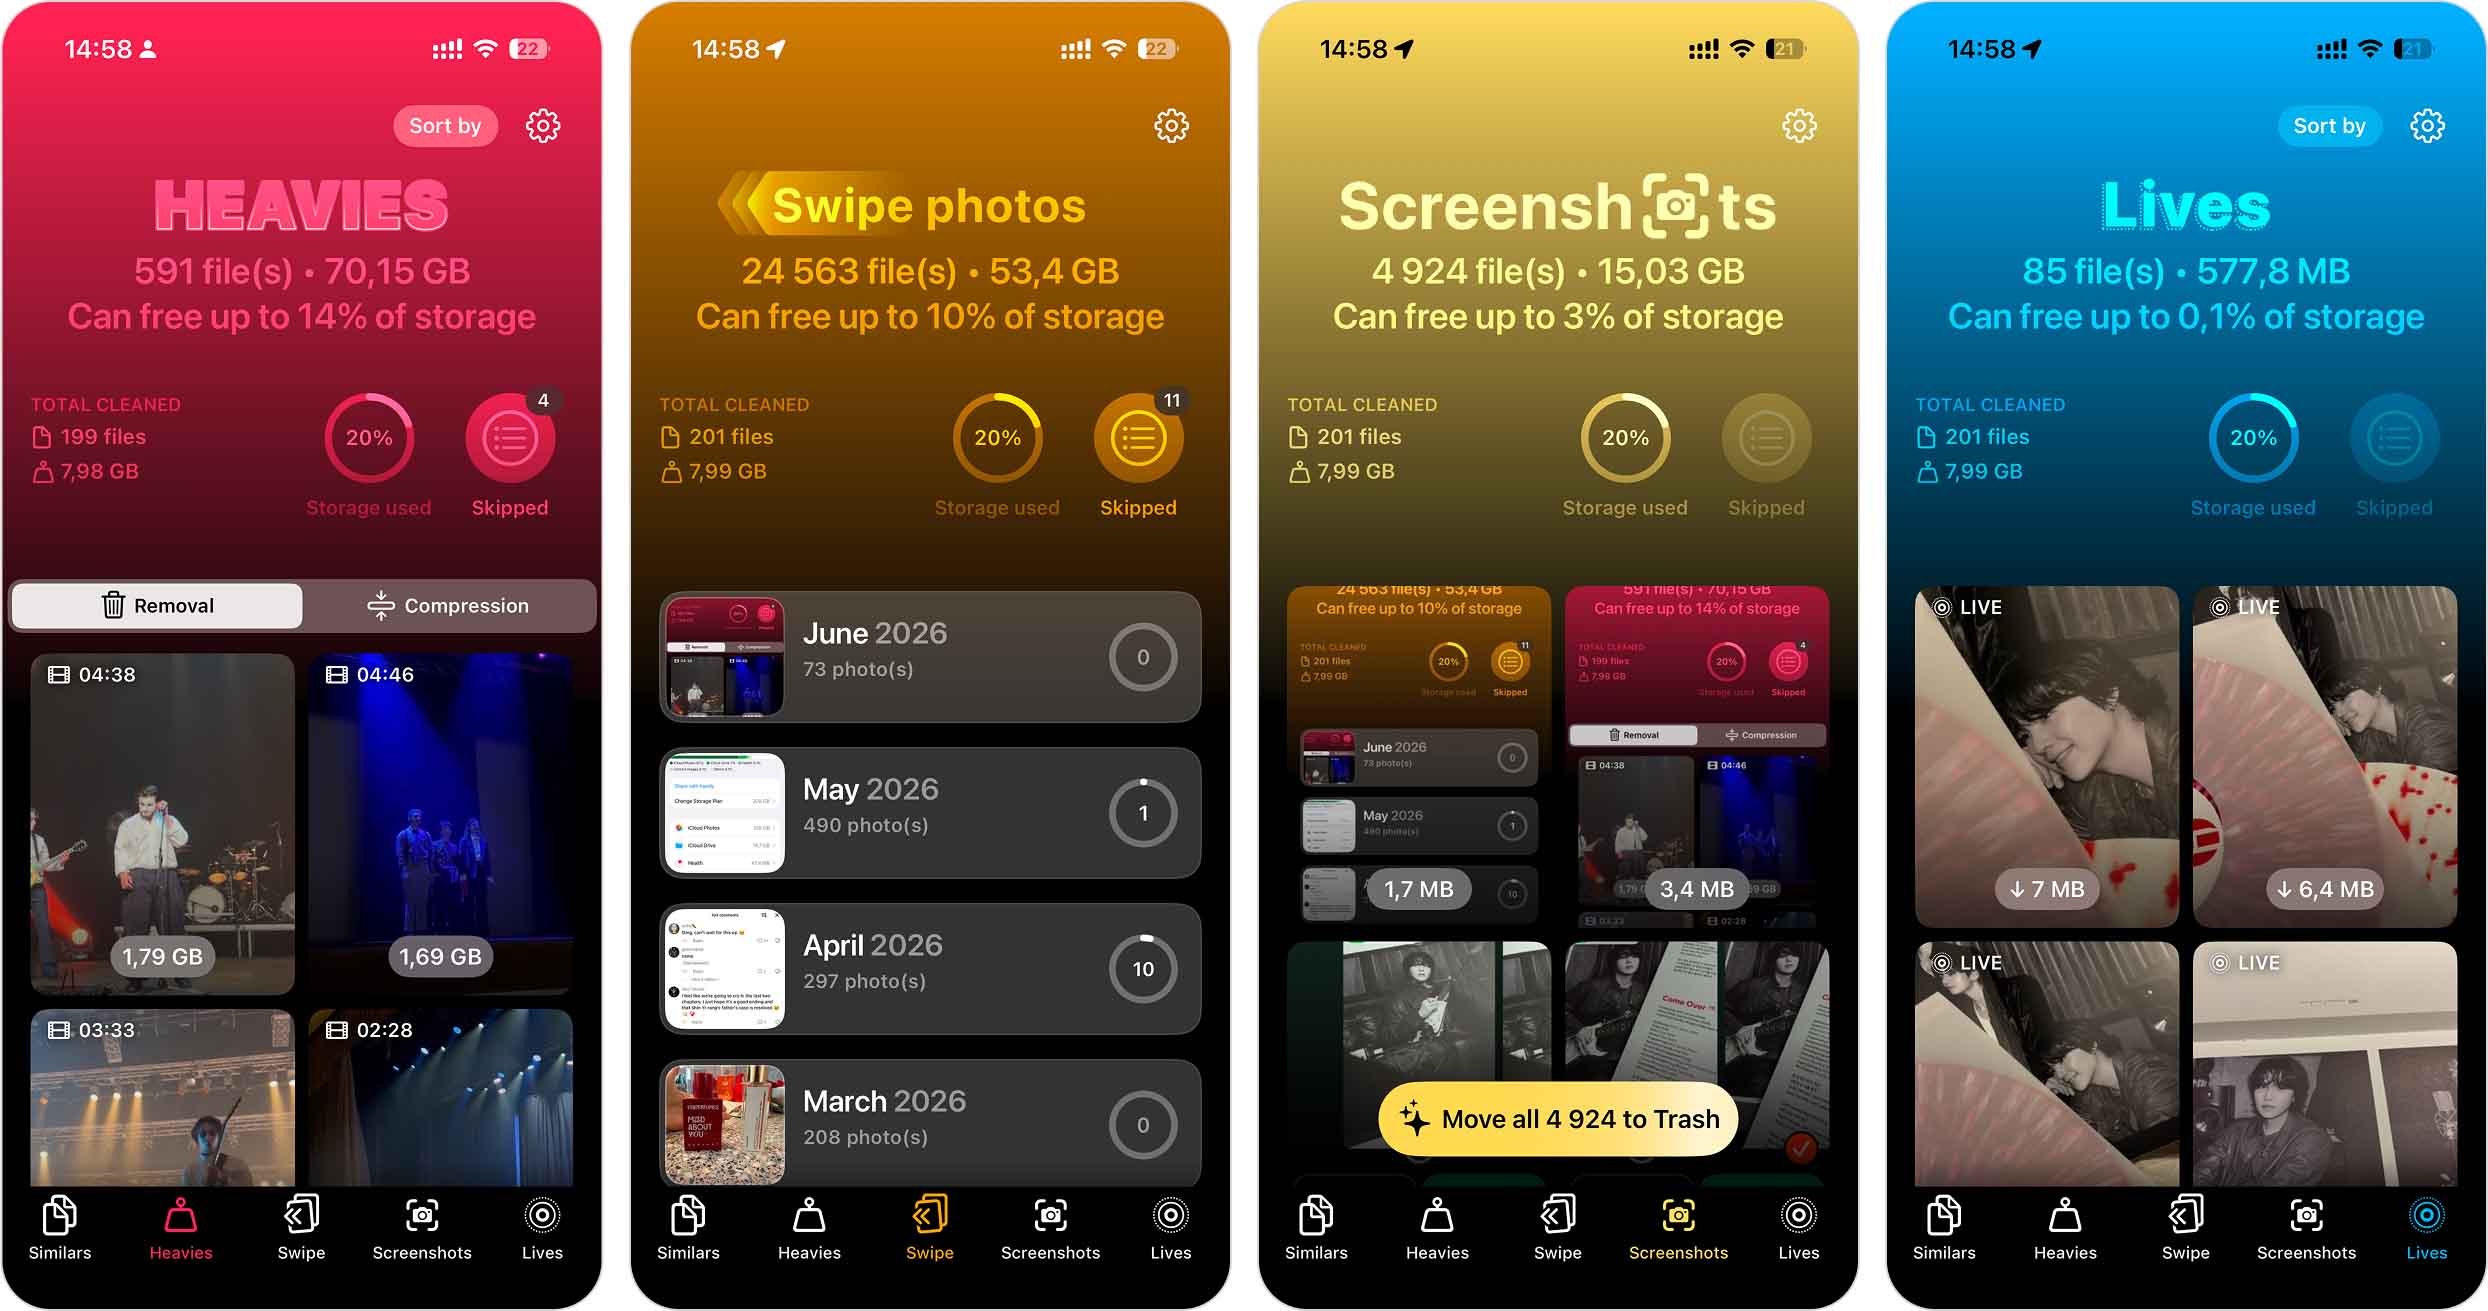
Beyond similar photos, Clever Cleaner has three other useful tabs:
- Heavies tab – Displays videos/photos sorted by size, which allows you to instantly identify and remove the biggest space-wasters. This is something iOS doesn’t natively offer. If you’re not ready to delete a large video, the Compression tab lets you reduce its size and reclaim storage while keeping the video itself.
- Swipe tab – Groups photos by the month they were added to your library and lets you review them with simple swipe gestures. This is a convenient option for regular cleanup sessions or if you prefer to stay in control instead of relying on automated suggestions.
- Screenshots tab – Mirrors the Screenshots album from the Photos app, making it easy to review and delete screenshots in bulk. Since everything happens inside the app, there’s no need to switch between it and the native Photos app.
- Lives tab – Converts Live Photos to regular images to save space. Live Photos take up a lot more storage than standard photos due to their short animation. If you don’t need the motion effect, this feature helps free up significant storage.
As you can see, Clever Cleaner focuses on media cleanup, and that’s true for most iPhone cleaner apps. While some offer extra features like contact cleanup or calendar cleanup, they can’t clean everything – only the areas that Apple allows third-party apps to access. In other words, no single app can remove all junk from your iPhone. That’s why the remaining methods in this guide focus on other types of clutter that require manual cleanup.
“Early users will never be asked to pay for upgrades or new features.”
That means if you download it now, you should have lifetime access to all current and future features for free. It might come in handy.
Method 3: Uninstall Rarely Used Apps
Next to Photos, the Apps category is often one of the biggest storage hogs on an iPhone. Unused apps don’t just take up space – they may also run background processes, slowing things down. Unlike with Photos, there are no third-party apps that can simplify cleanup for you. You’ll need to do it manually.
To delete an unused app:
- Touch and hold the app icon on your home screen.
- Tap on ‘Remove App‘ or ‘Delete App‘ from the options menu.
- Confirm deletion by selecting ‘Delete App‘ again in the prompt.
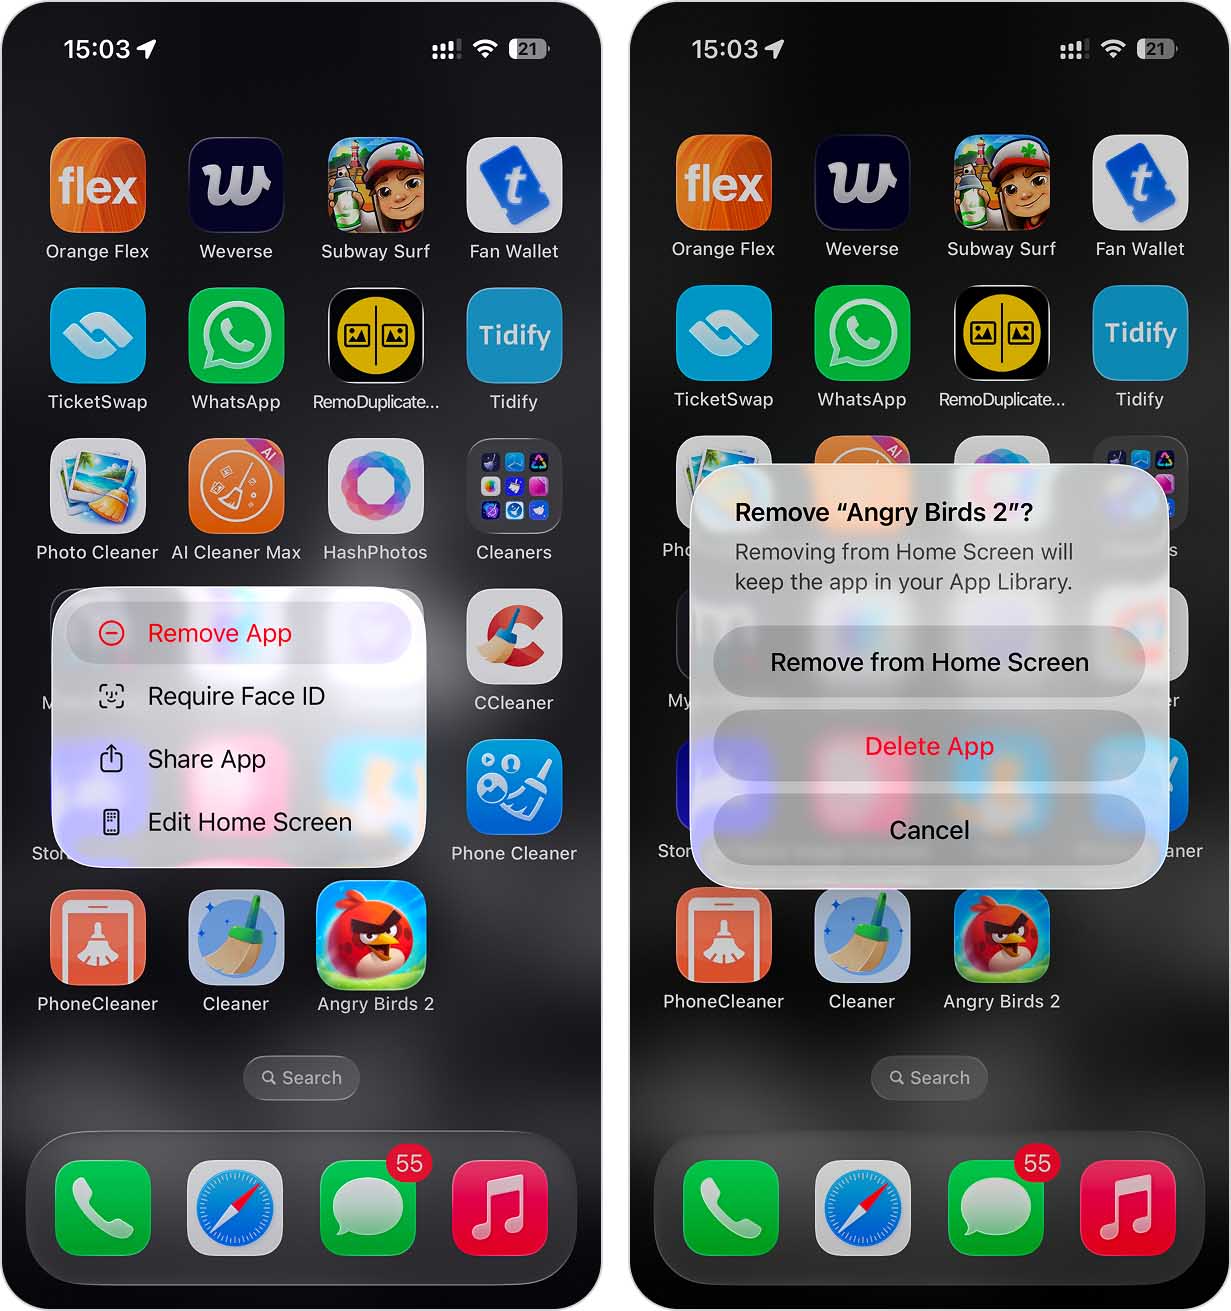
This action removes the app and associated data, freeing up space. Be cautious to only delete apps you no longer need, as this action cannot be undone without re-downloading the app.
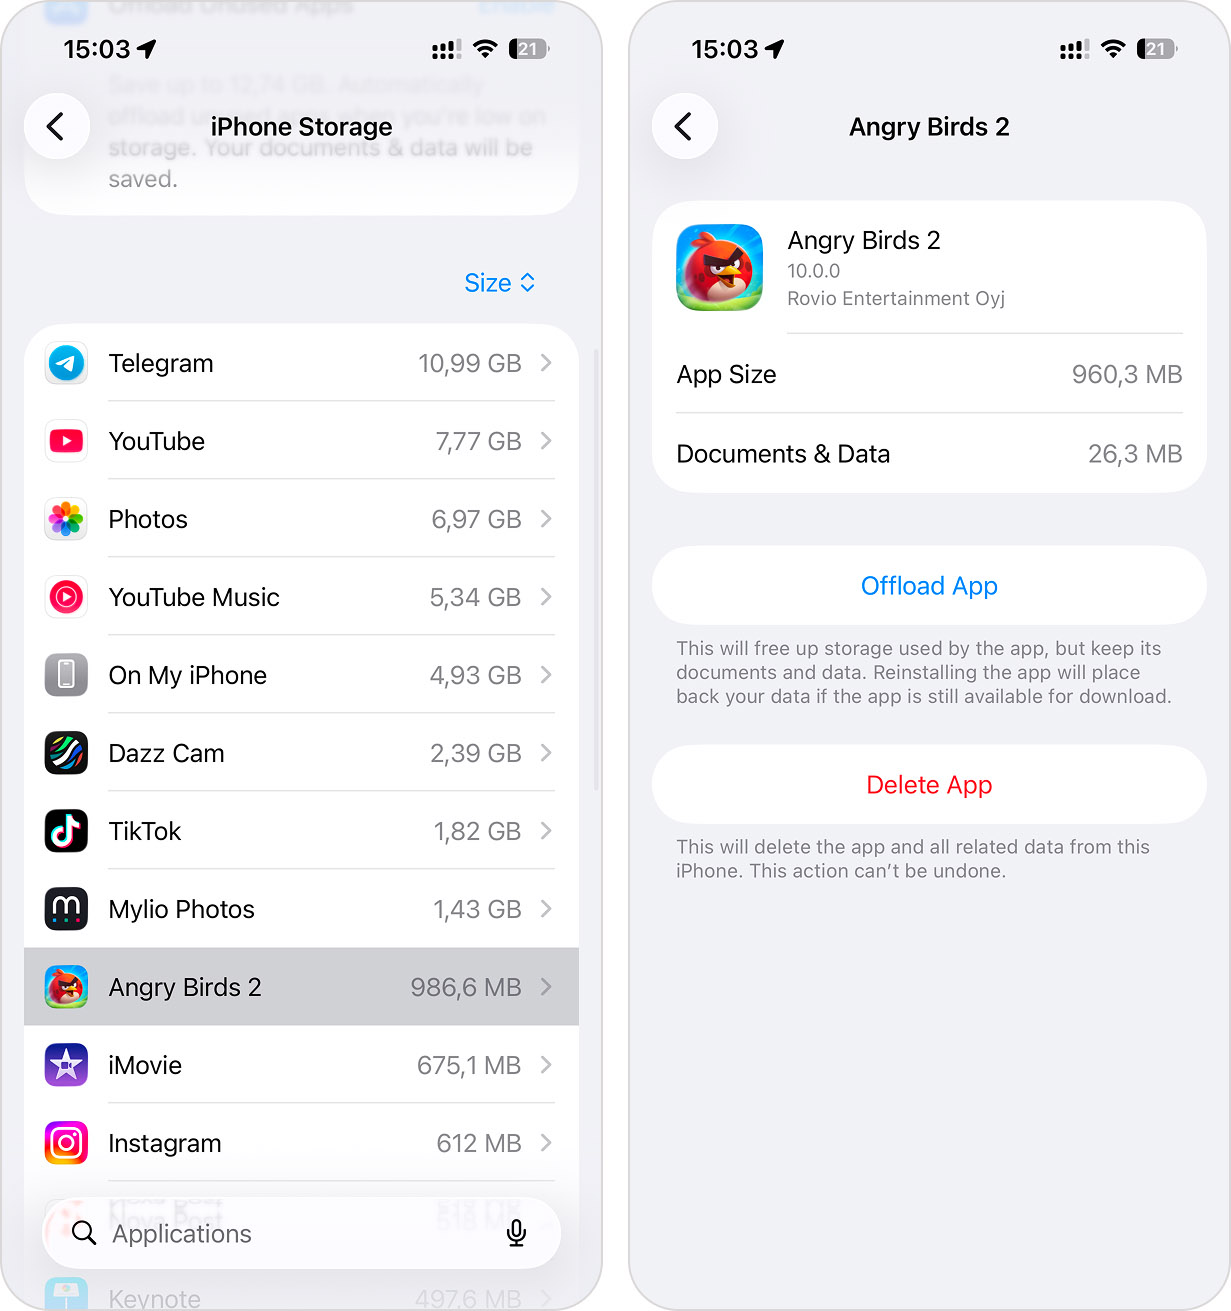
- In Settings > General > iPhone Storage, tap an app.
- Select Offload the app to remove it while keeping its settings and documents.
- Reinstall it anytime from the App Store, and your data will still be there.
Method 4: Clear App Cache
Even after you remove the apps you no longer need, you’ll still have the ones you use every day. Social media apps, streaming services, games, and other apps related to your interests continue to accumulate data over time. This data can include cache files, temporary files, saved settings, game progress, and other information that helps apps load faster and remember your preferences. While some of it is useful, it can also take up a surprising amount of storage, so this is another area worth keeping an eye on.
For different apps, the steps to clear the cache will vary, but it’s usually found in the app’s settings under something like Storage, Data Management, or Cache.
Here’s the general approach to clearing app cache:
- Select an app to view its storage usage details.
- Look for an option to clear cache or data.
- If available, tap Clear Cache or a similar option.
Clearing cached data often removes temporary files without affecting your important information, but this depends on the app. For example, clearing game data may reset your progress, achievements, and other saved information. Review the options carefully before deleting anything.
Method 5: Remove Offline Content from Apps
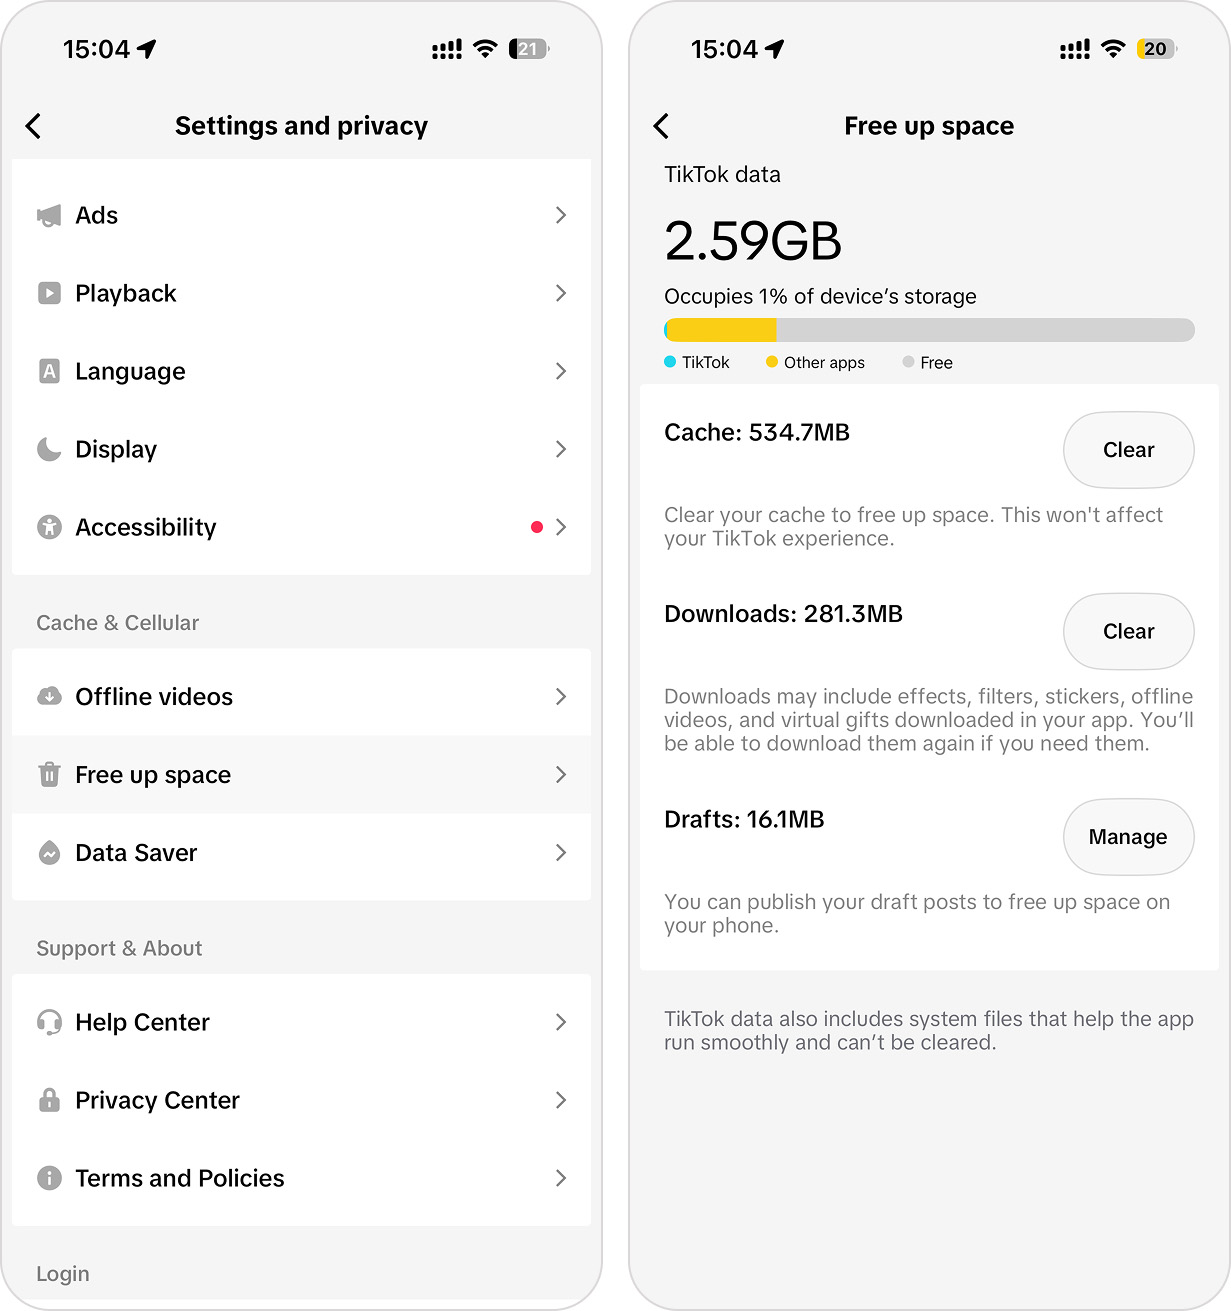
Continuing the topic of how to remove junk from iPhone apps, don’t forget about offline content. This includes downloaded videos, music, podcasts, books, and other media stored for offline access in apps like YouTube, YouTube Music, Spotify, Apple Music, Podcasts, Kindle, and similar services.
Offline content is convenient because you can access it without an internet connection while traveling, commuting, or in areas with poor reception. However, it still takes up part of your iPhone’s local storage. And just like any other category, some of this content eventually becomes junk. Videos you’ve already watched, books you’ve finished, podcast episodes you’ve listened to, or music from artists you no longer follow all continue to occupy storage long after they’ve served their purpose.
To free up storage by deleting downloaded media:
- Open YouTube Music and tap your profile picture.
- Open Downloads.
- Review the downloaded albums, playlists, songs, or podcasts stored on your device.
- Tap the three-dot menu next to the item you no longer need and select Remove Download.
- Repeat the process for any other offline content you no longer want to keep.
Method 6: Clear Safari Cache
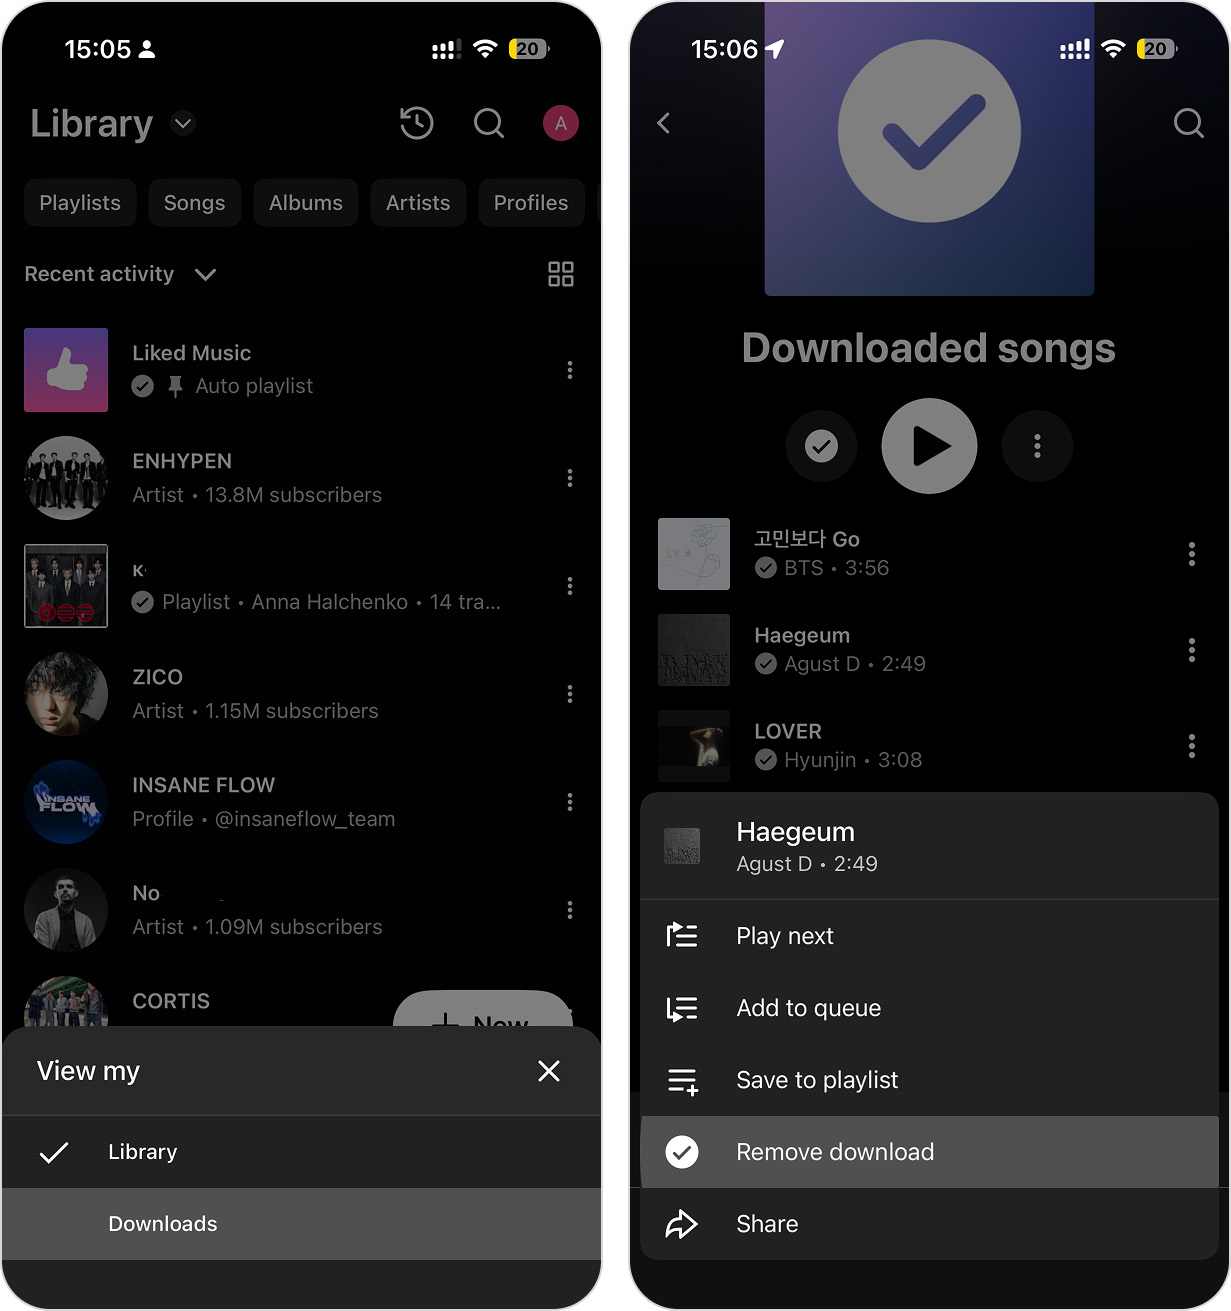
Although we’ve already covered app caches, browser cache is another type of junk you can clean up on your iPhone. Safari stores browsing data, history, and website caches to speed up page loading. Over time, these files pile up, taking up storage and sometimes even slowing down Safari itself.
- Open the Settings app on your iPhone.
- Scroll down to the Apps tab, find and select Safari.
- Tap on Clear History and Website Data.
- Confirm your action by tapping Clear History in the pop-up.
This action will not only free up space but also potentially improve browser performance. Remember, this will log you out of websites and remove your browsing history.
Method 7: Review iMessage Attachments
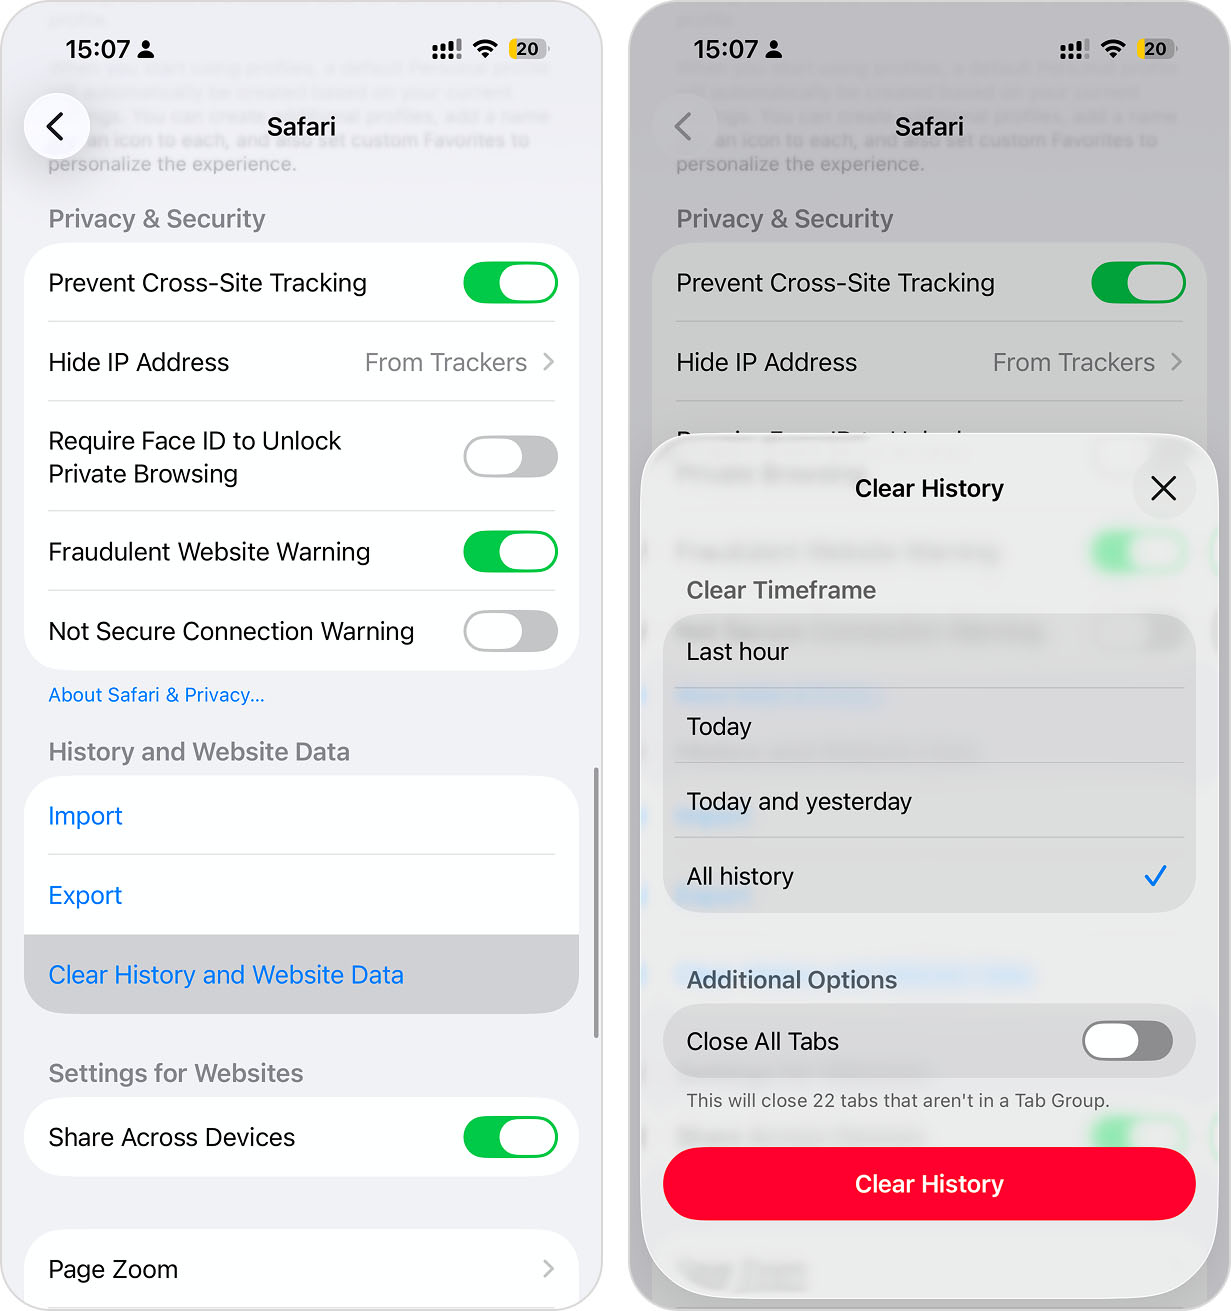
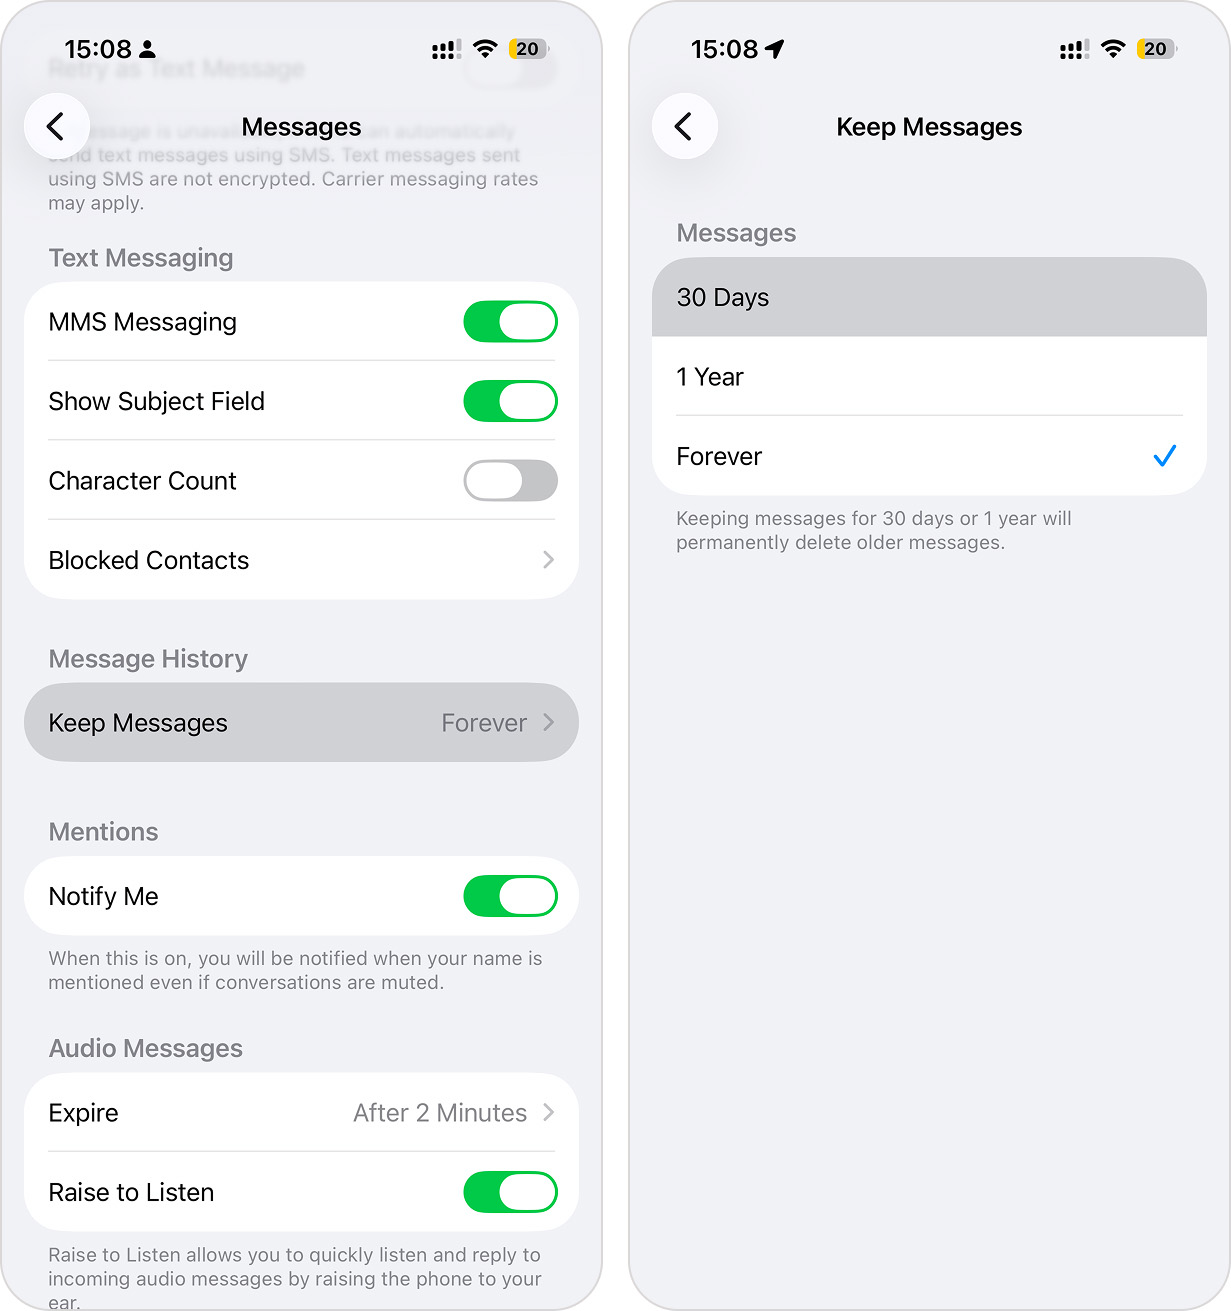
Old messages, especially those with attachments, can occupy significant storage. You can enable ‘Message History’ to automatically delete messages after a certain period. Additionally, manually review message threads and remove large attachments or unneeded conversations to keep your message storage clean.
Here’s how to manage message storage on your iPhone:
- Go to Settings, open the Apps tab, and select Messages.
- Scroll to the Message History section.
- Tap Keep Messages and choose the desired duration (e.g., 30 days).
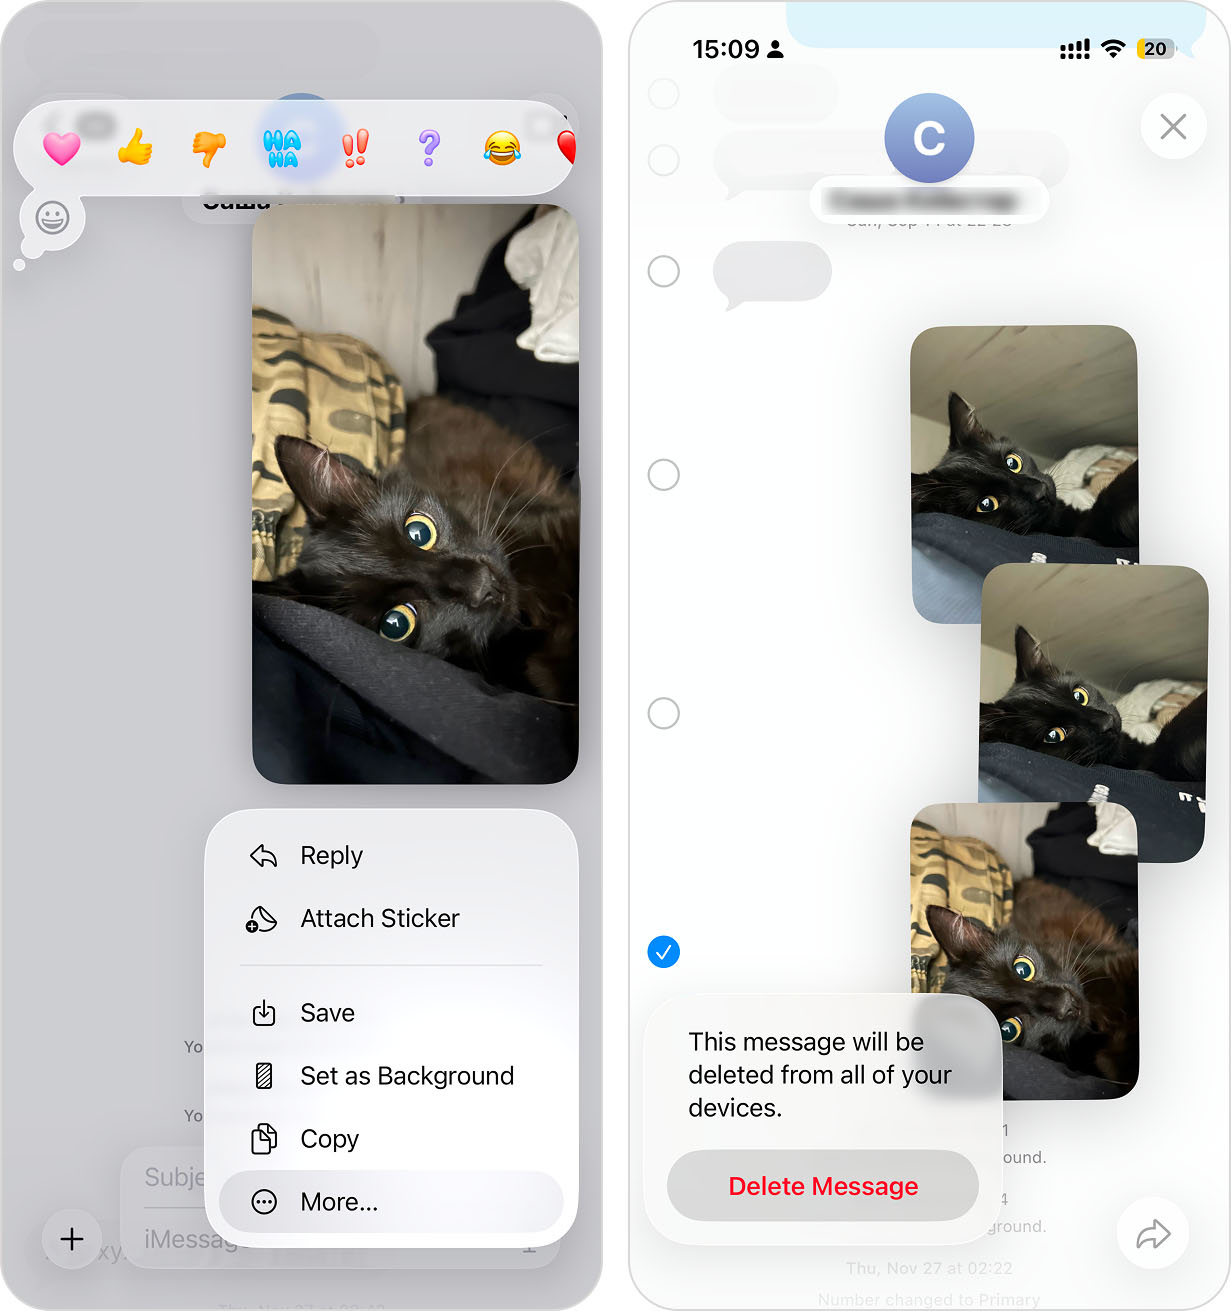
- To delete individual messages, open a conversation, touch and hold a message, and choose More to select messages for deletion.
This is only one option for cleaning up junk from the Messages app. There are several other ways to do it, and some of them may be more convenient for your particular situation. For a broader look at the available options, check out our guide to deleting large attachments on iPhone. But exercise caution while deleting files. Avoid removing necessary data and back up important information beforehand to avoid data loss
Method 8: Delete Downloaded Files
Downloaded files can accumulate and take up valuable space. Review your Downloads folder and remove files you no longer need.
Follow these steps to locate and delete them:
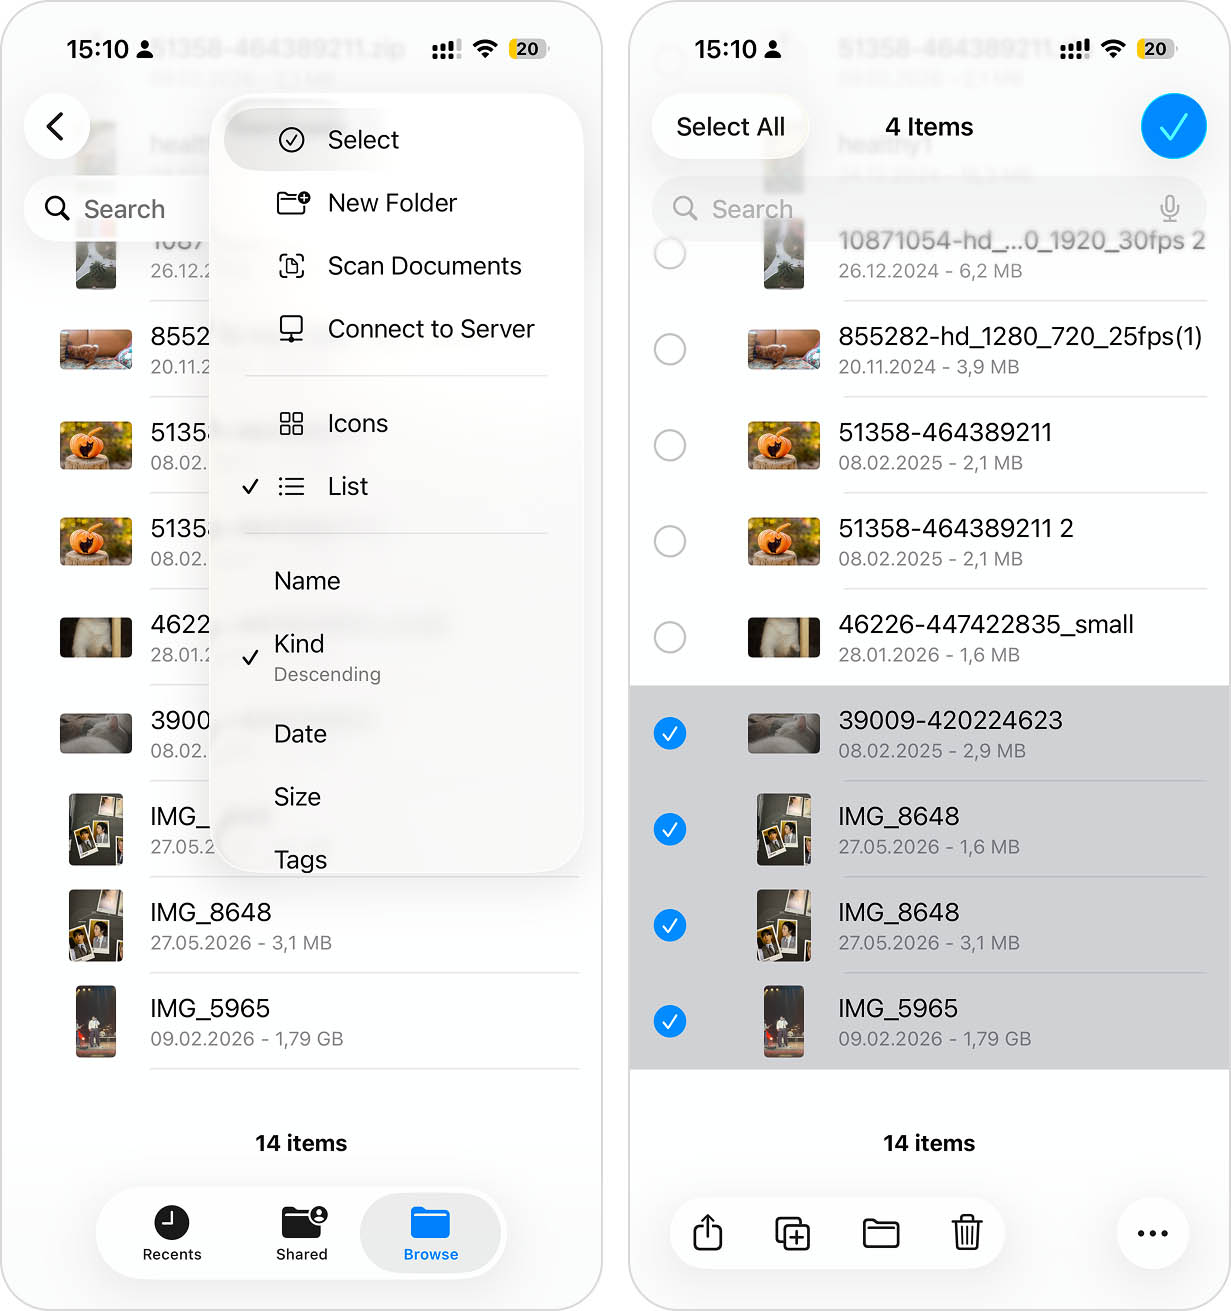
- Open the Files app on your iPhone and go to the Downloads folder.
- Tap “…”in the top right corner, then Select and choose the files you want to delete.
- Tap the trash icon to delete the selected files.
Method 9: Remove Unused Voice Memos
If your Voice Memos app is cluttered with unused recordings, you can tidy it up.
Here’s how to delete unused voice memos:
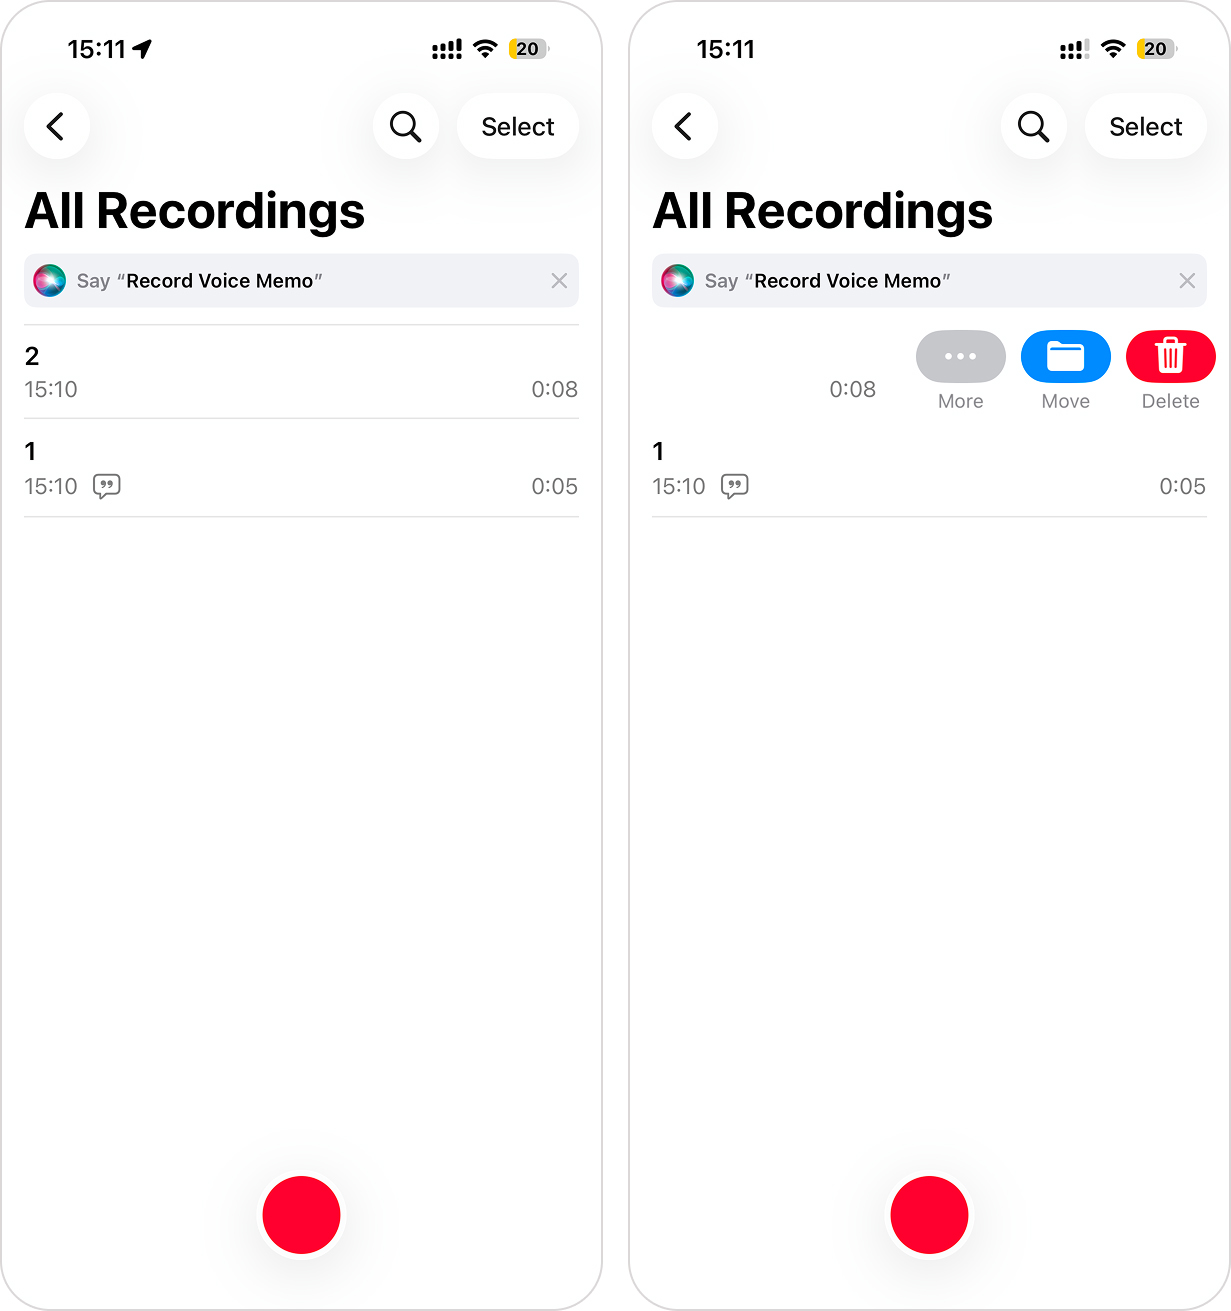
- Open the Voice Memos app on your iPhone.
- Browse through your recordings and identify the ones you no longer need.
- Swipe left on a memo to reveal the delete option, then tap Delete.
- Confirm the deletion if prompted.
Method 10: Back Up Your iPhone and Perform a Factory Reset
The most drastic measure is to back up your iPhone, reset it to factory settings, and then restore from the backup. This can clear hidden junk files that regular cleanup methods won’t touch.
In our opinion, this method works best after you’ve already removed as much junk as possible from categories like Photos, apps, offline content, messages, and downloads. This way, the backup contains mostly the files you actually want to keep, while the factory reset can clean areas of iOS that aren’t accessible to users. Without at least some manual cleanup beforehand, the benefits of this method are much more limited, since much of the same junk may simply return when you restore the backup.
Follow these steps to factory reset and restore your iPhone:
- Create a full backup of your iPhone to make sure all data, settings, and media are saved. Use Finder/iTunes, iCloud, or one of third third-party apps.
- Once the backup is complete, go to Settings > >General > Transfer or Reset iPhone on your iPhone.
- Choose Erase All Content and Settings to wipe your device clean.
- After the reset, follow the prompts to restore your iPhone from the backup you created earlier.

This process can eliminate hidden junk files and restore your iPhone to a healthier state.
How to Keep Junk Files from Eating Up Your iPhone’s Local Storage
While there’s no way to completely stop junk files from appearing on your iPhone, there is a way to prevent them from consuming as much local storage. The answer is iCloud.
Of course, this doesn’t mean you can forget about cleanup entirely. Junk is still junk, whether it sits on your iPhone or in iCloud. You’ll still need to review and remove unnecessary photos, videos, downloads, and other files from time to time. The difference is that they won’t put as much pressure on your iPhone’s local storage, which is often the resource that runs out first and can even interfere with basic device functions when it gets too low.
Here are the main iCloud features that can help move some of your data out of local storage and reduce the amount of space junk files occupy on your iPhone:
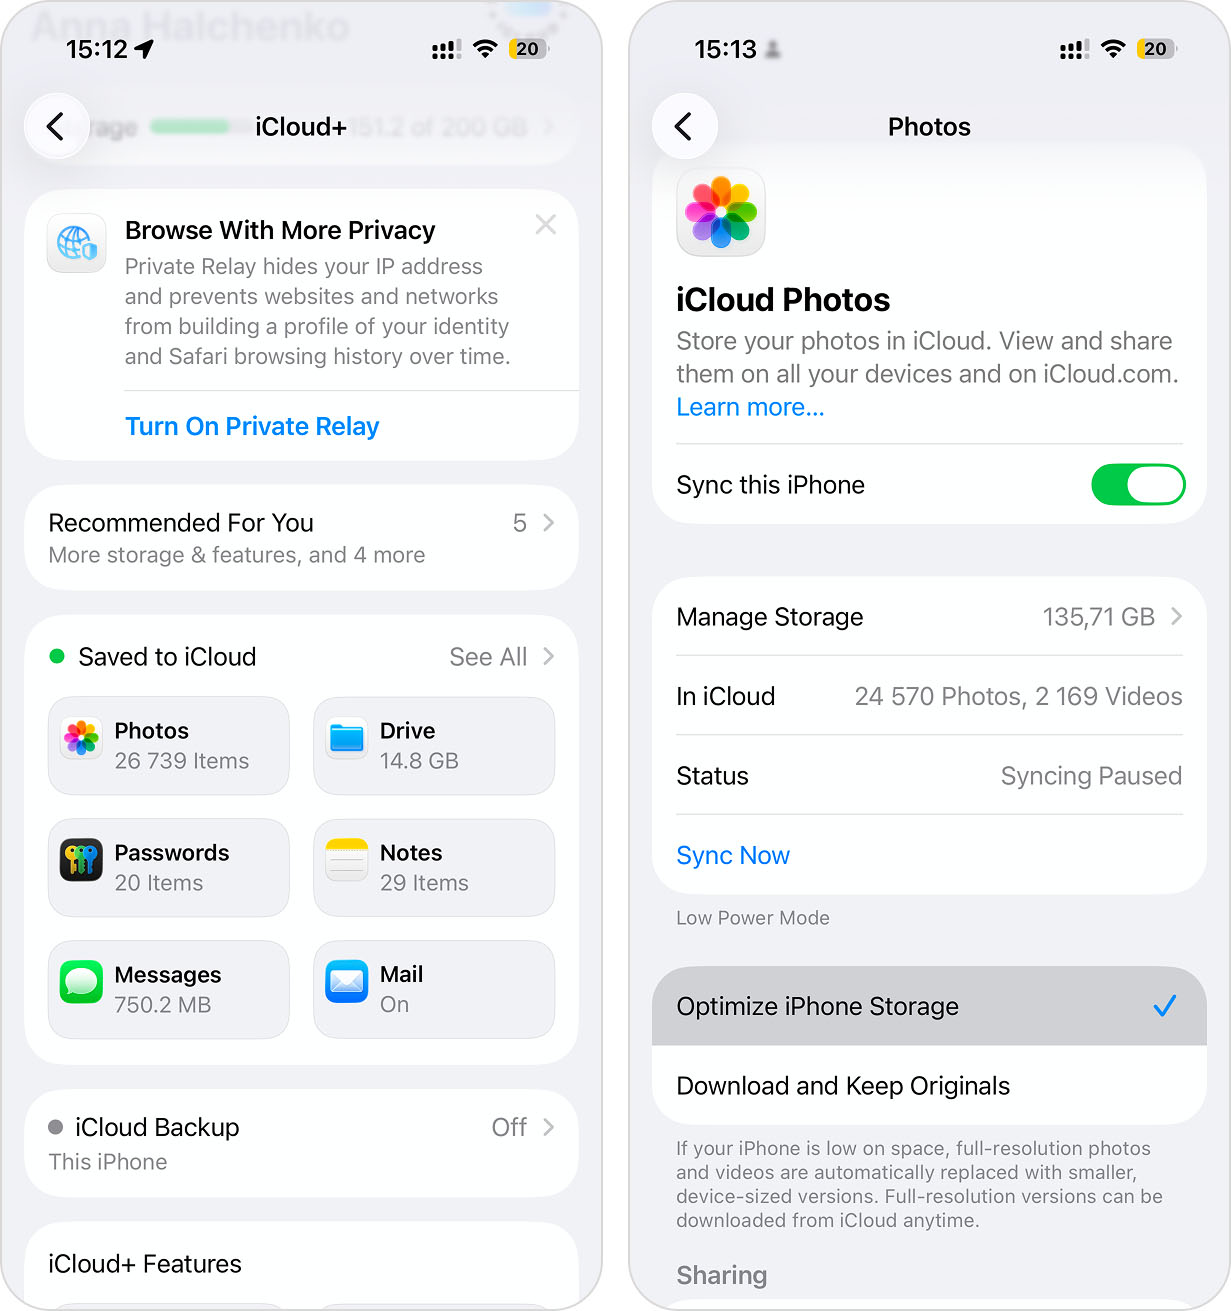
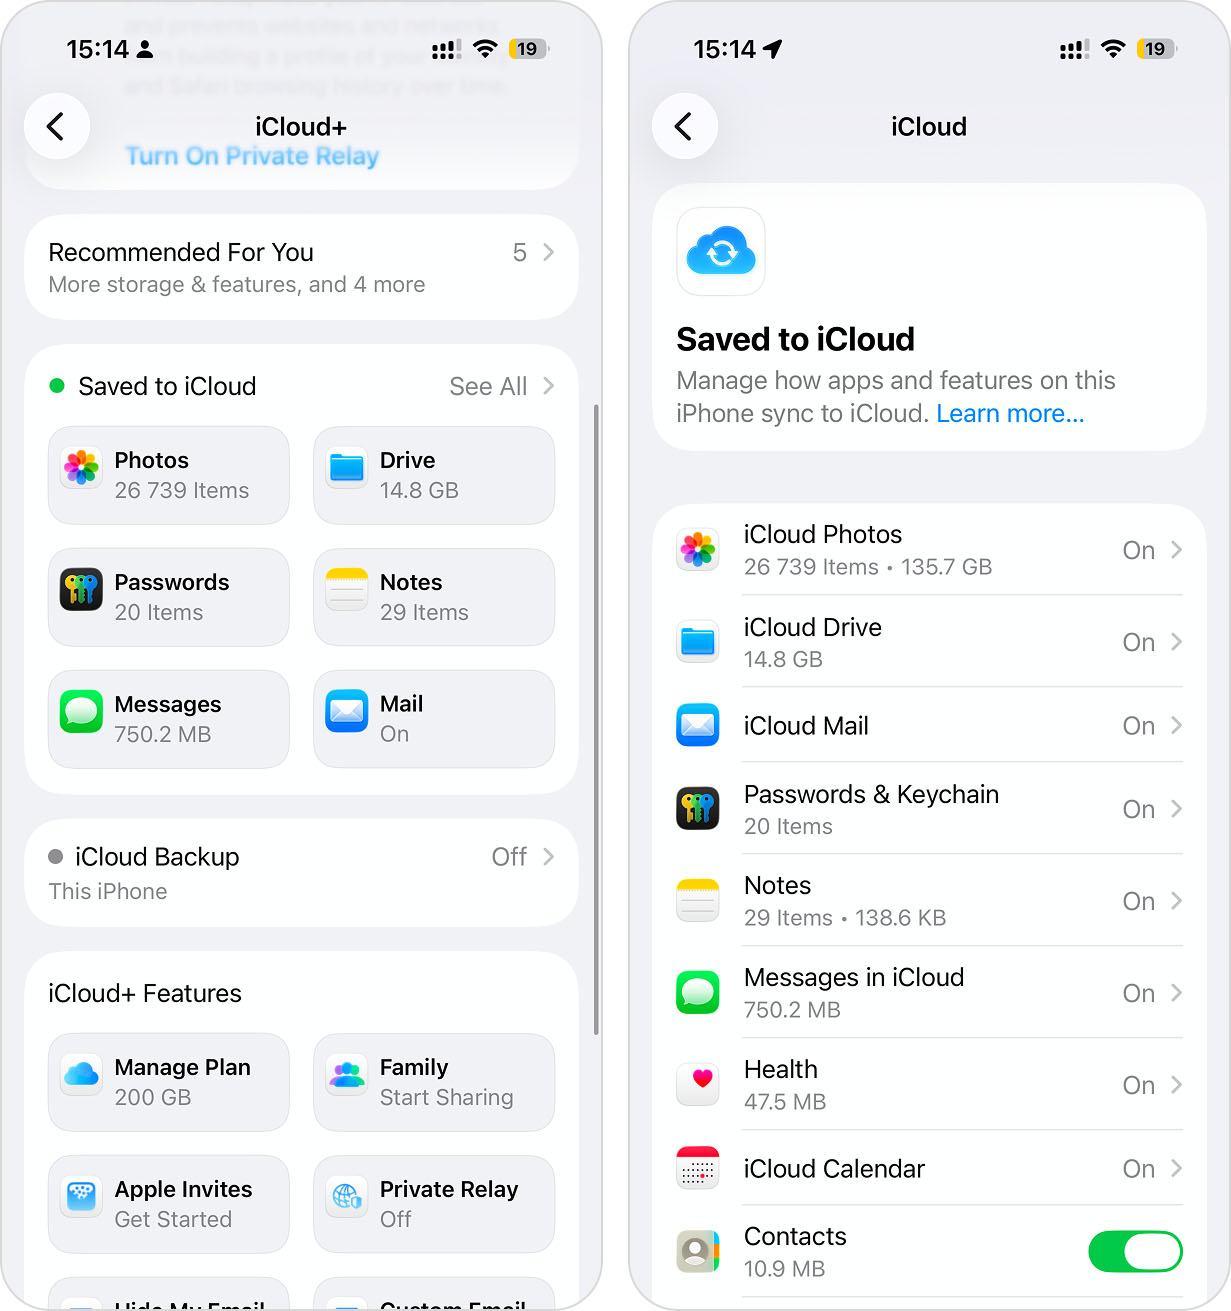
- Optimize iPhone Storage for Photos. This is probably the most effective option for most users because photos and videos are often the largest storage category. > Go to Settings > Your Name > iCloud > Photos and enable Sync this iPhone, then select Optimize iPhone Storage. Your full-resolution photos and videos will remain in iCloud, while your iPhone keeps smaller local versions that take up much less space.
- Store app data in iCloud. Many Apple apps can keep their data in iCloud instead of relying entirely on local storage. This includes Messages, Notes, Mail, Voice Memos, and others. > Go to Settings > Your Name > iCloud and review the Apps Using iCloud section. Enable syncing for the apps you use. Many third-party apps also support iCloud or their own cloud sync systems, usually accessible through the app’s settings.
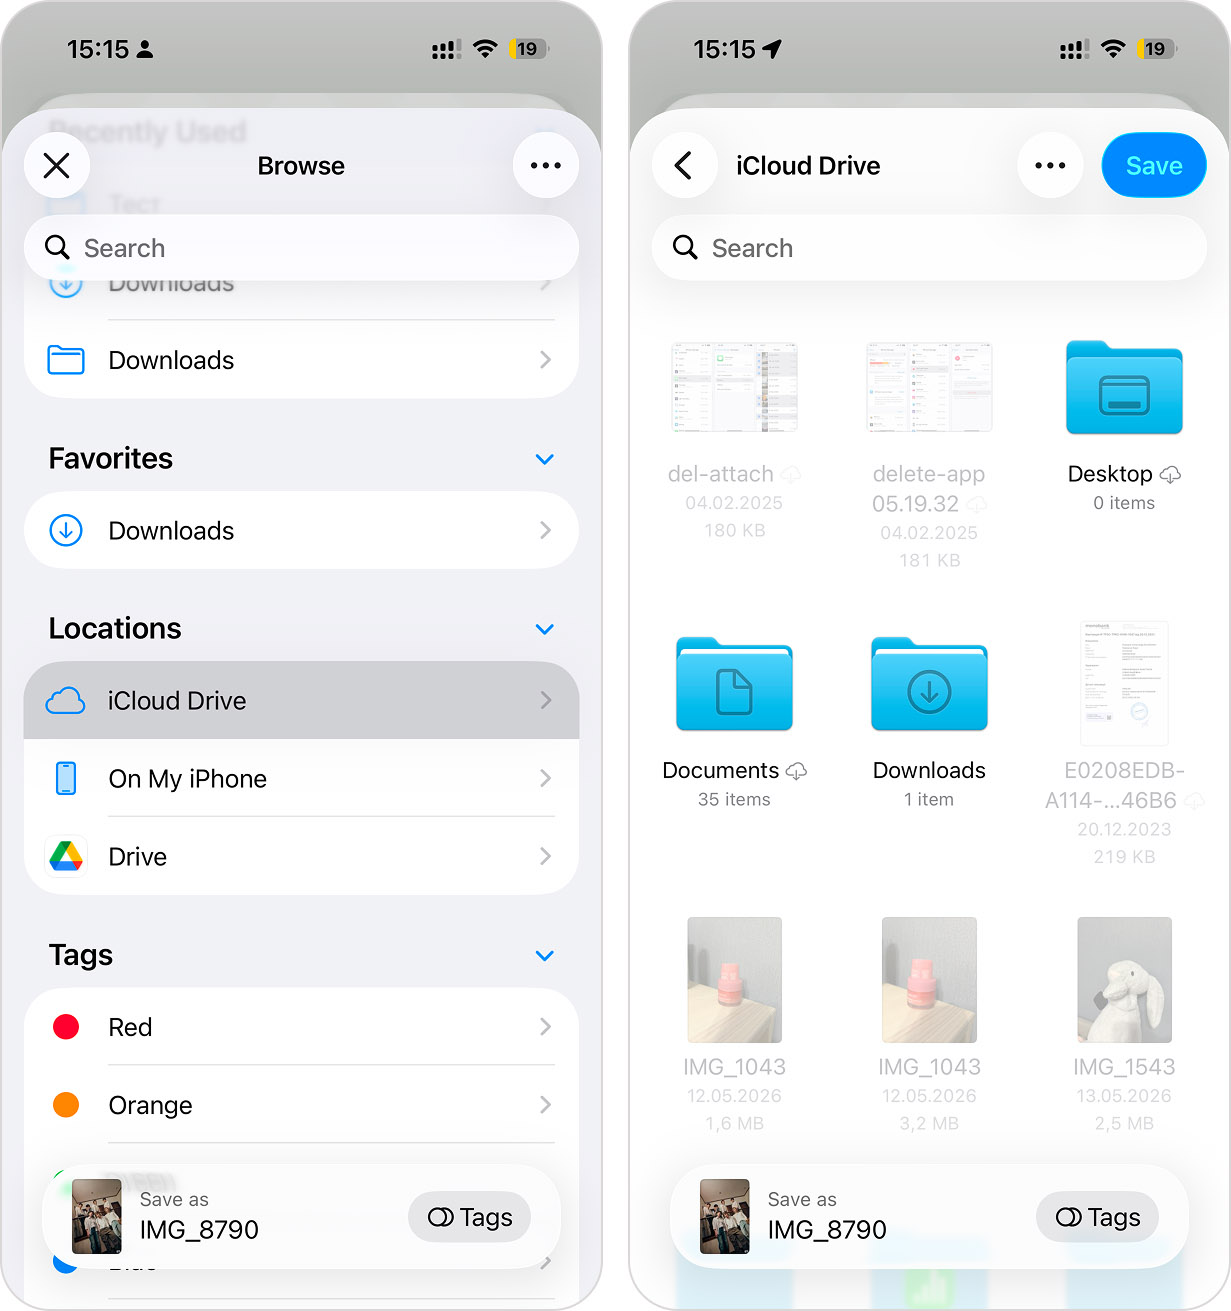
- Save files to iCloud Drive instead of On My iPhone. When you save documents, PDFs, archives, videos, and other files in the Files app, choose iCloud Drive whenever possible. This reduces the amount of local storage those files consume.
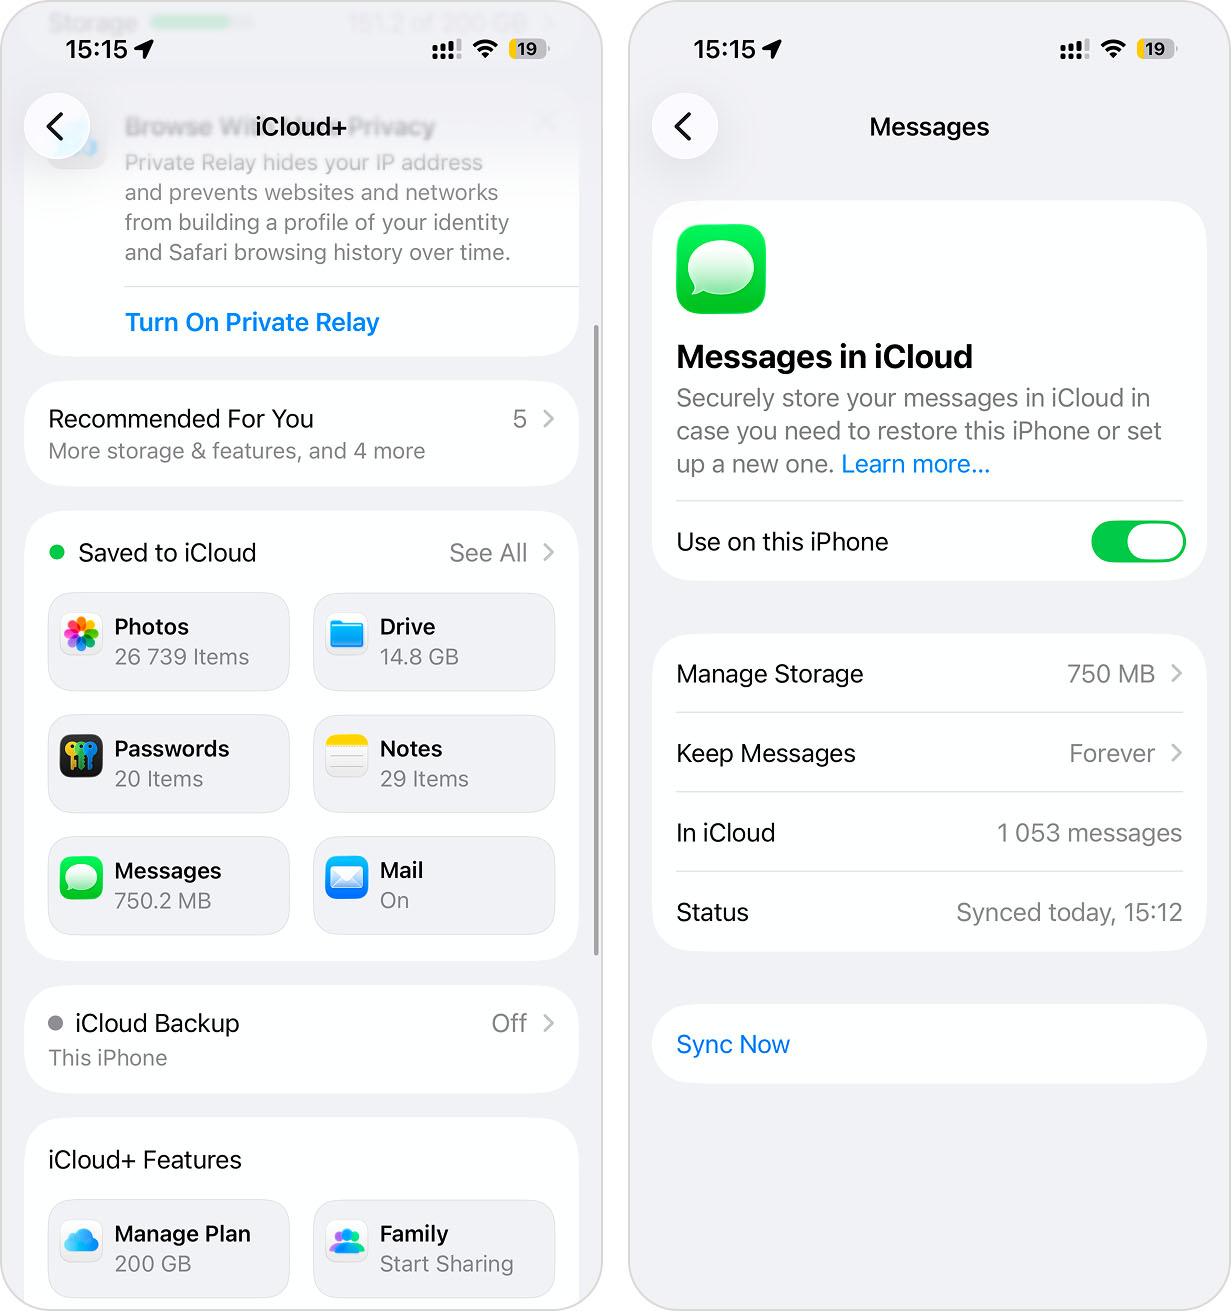
- Use Messages in iCloud. Photos, videos, GIFs, voice messages, and other attachments exchanged through Messages can consume a surprising amount of space. > Go to Settings > Your Name > iCloud > Messages and enable Use on this iPhone to keep your message history synchronized through iCloud.
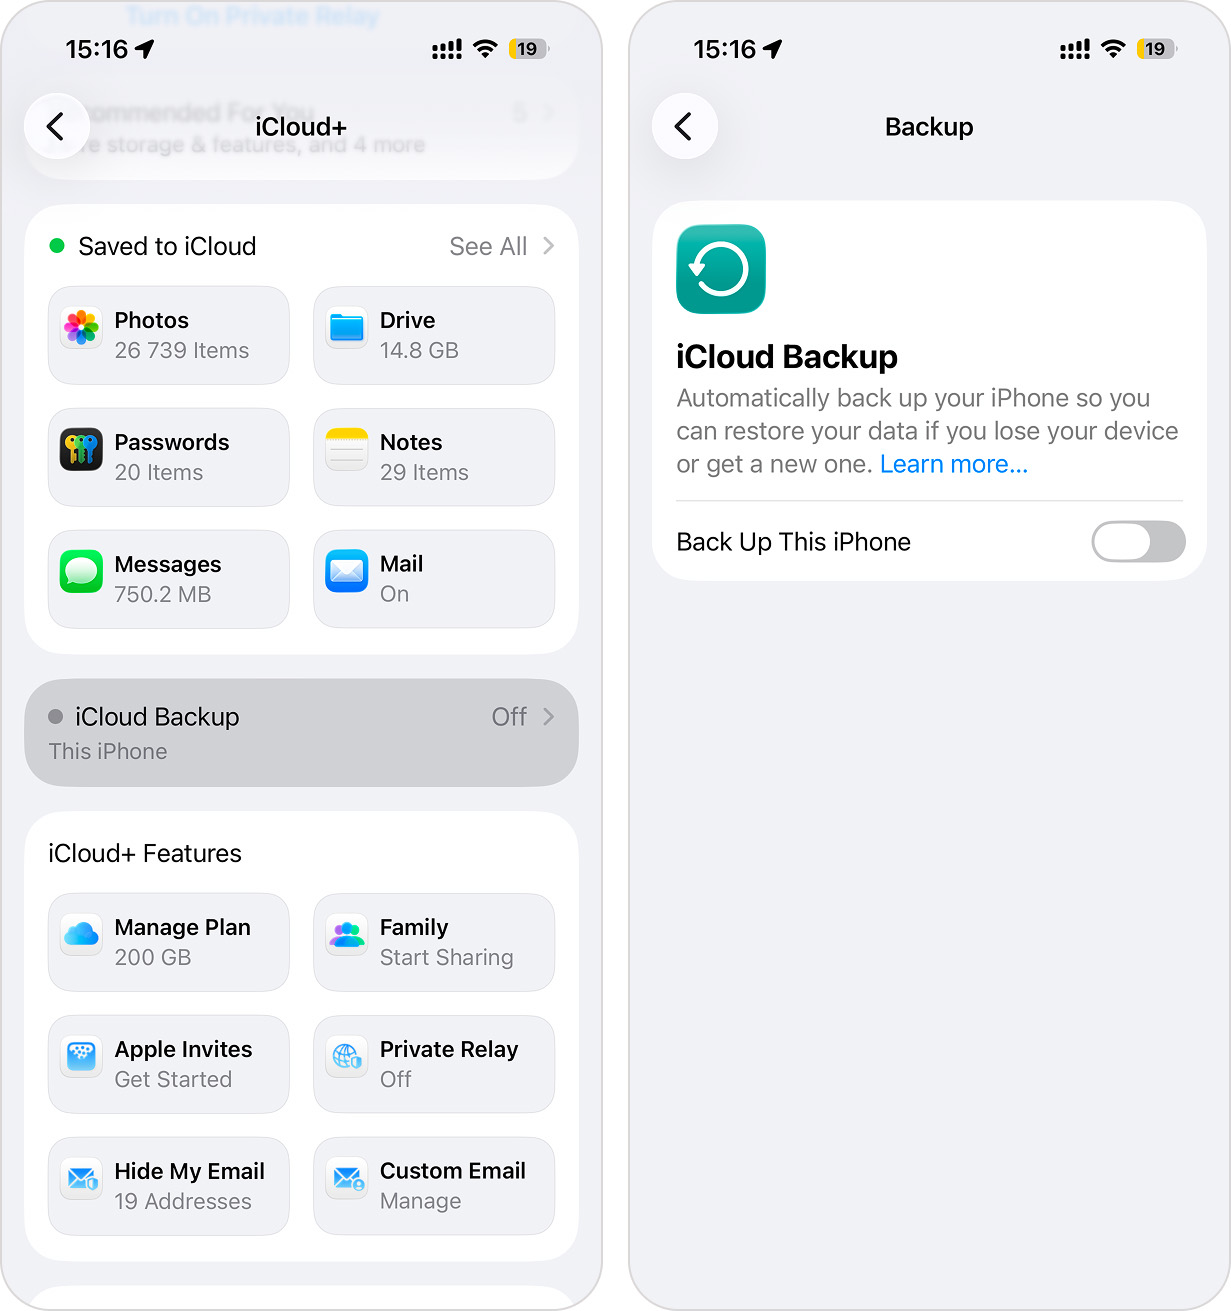
- Move device backups to iCloud. Local backups stored on a Mac or PC don’t affect iPhone storage directly, but keeping your backup strategy centered around iCloud makes it easier to rely less on local copies of files and media. > Go to Settings > Your Name > iCloud > iCloud Backup and enable Back Up This iPhone.
To Sum Up
Cleaning junk files isn’t just about freeing up storage – it also keeps your iPhone running smoothly. While every device accumulates different types of clutter, some methods are musts, while others are only needed in specific cases.
We always recommend starting with the fastest and easiest methods first, like using a third-party cleaner app, reviewing iMessage attachments, clearing app data and browser cache. These steps don’t take much time and usually remove a significant amount of junk from most iPhones.
However, not all cases are the same. In rare cases, even these solutions aren’t enough. Method 10 is a last resort, but as seen in this Reddit discussion, some users found that only a factory reset could clear out ballooned junk in ‘System Data’. If junk files keep returning and your storage seems to disappear without explanation, resetting your iPhone may be the only way to completely wipe out hidden system clutter.
Bottom line – start with the quick fixes and see if that’s enough. For most people, it will be, and you should spend no more than 10 minutes on cleanup. However, if that’s not enough, keep working your way down the list until your iPhone feels fresh again.
FAQ
There is no single junk file on an iPhone. In fact, junk can be almost anywhere because it simply refers to data you no longer need. For one person, junk might be duplicate photos, old screenshots, watched videos, and downloaded music. For another, it could be message attachments, browser cache, app data, offline content, or files sitting in the Downloads folder.
That’s why the best place to start is Settings > General > iPhone Storage. While iOS can’t tell you what is junk and what isn’t, it can show you which categories use the most space, helping you decide where to look first.