How to Check Storage on iPhone (iOS 26)
Is your iPhone running low on space and you’re not sure what’s taking it up? We show how to check storage on iPhone (iOS 26) using a few simple methods that reveal exactly where your space goes. You will see how to read the storage overview, identify what uses the most space, and take quick action. We also share tips to help you keep storage under control in the future without unnecessary steps.
Check Storage Directly on Your iPhone
The fastest and the easiest way to check how much storage you have on your iPhone is directly from your Settings app:
- Open the Settings app on your iPhone.
- Scroll down a little and select General.
- Tap iPhone Storage.
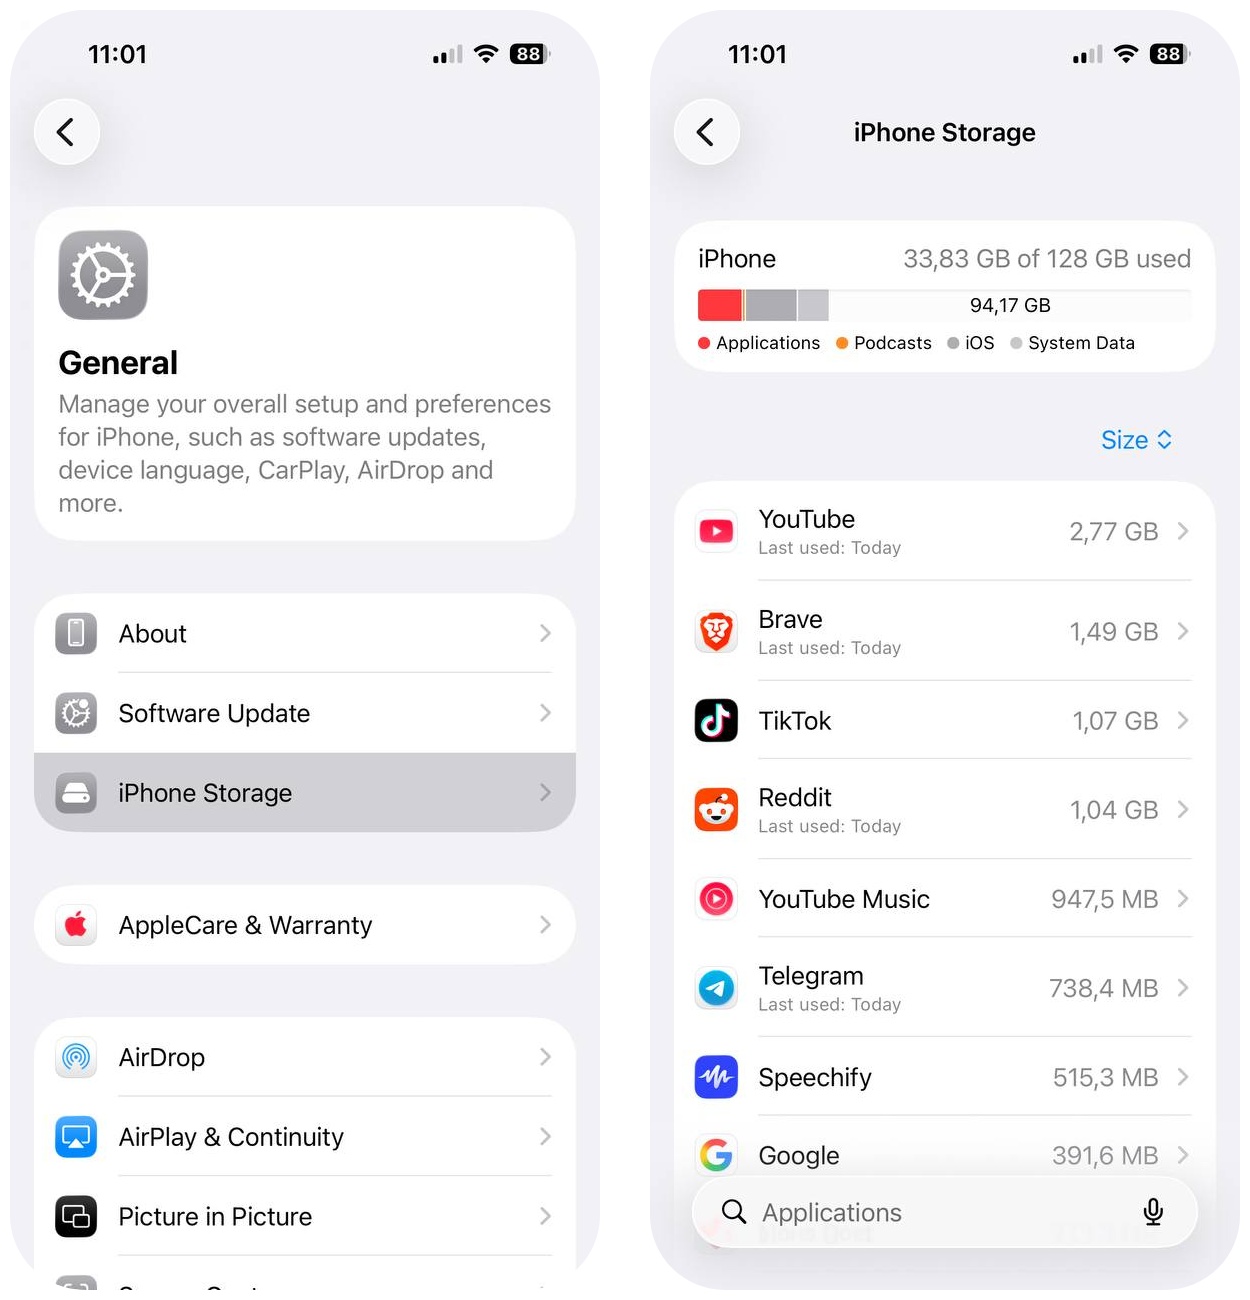
- Wait a moment for your iPhone to calculate the storage breakdown.
- Review the detailed list showing how much storage is used by different categories and apps.
The iPhone gives you a pretty detailed breakdown. At the top, you’ll see a visual bar that shows how your storage is divided between apps, photos, media, system data, and other categories. Below that, iOS lists all apps sorted by the amount of space they use, so it’s easy to spot what takes up the most storage.
Use a Computer to Check iPhone Storage
A computer gives you an alternative view of your iPhone storage and adds a few management options you don’t get on the device itself. It works best when you want to check synced content, create backups, or review storage from a larger screen. It does not replace the iPhone Storage menu in Settings, but it can help in specific cases, especially when you manage files through a computer or need a quick visual overview.
Use Finder on macOS
On modern Macs, Finder is the main way to check iPhone storage.
- Connect your iPhone to your Mac with a USB cable.
- Open Finder and select your iPhone from the sidebar.
- Stay in the General tab.
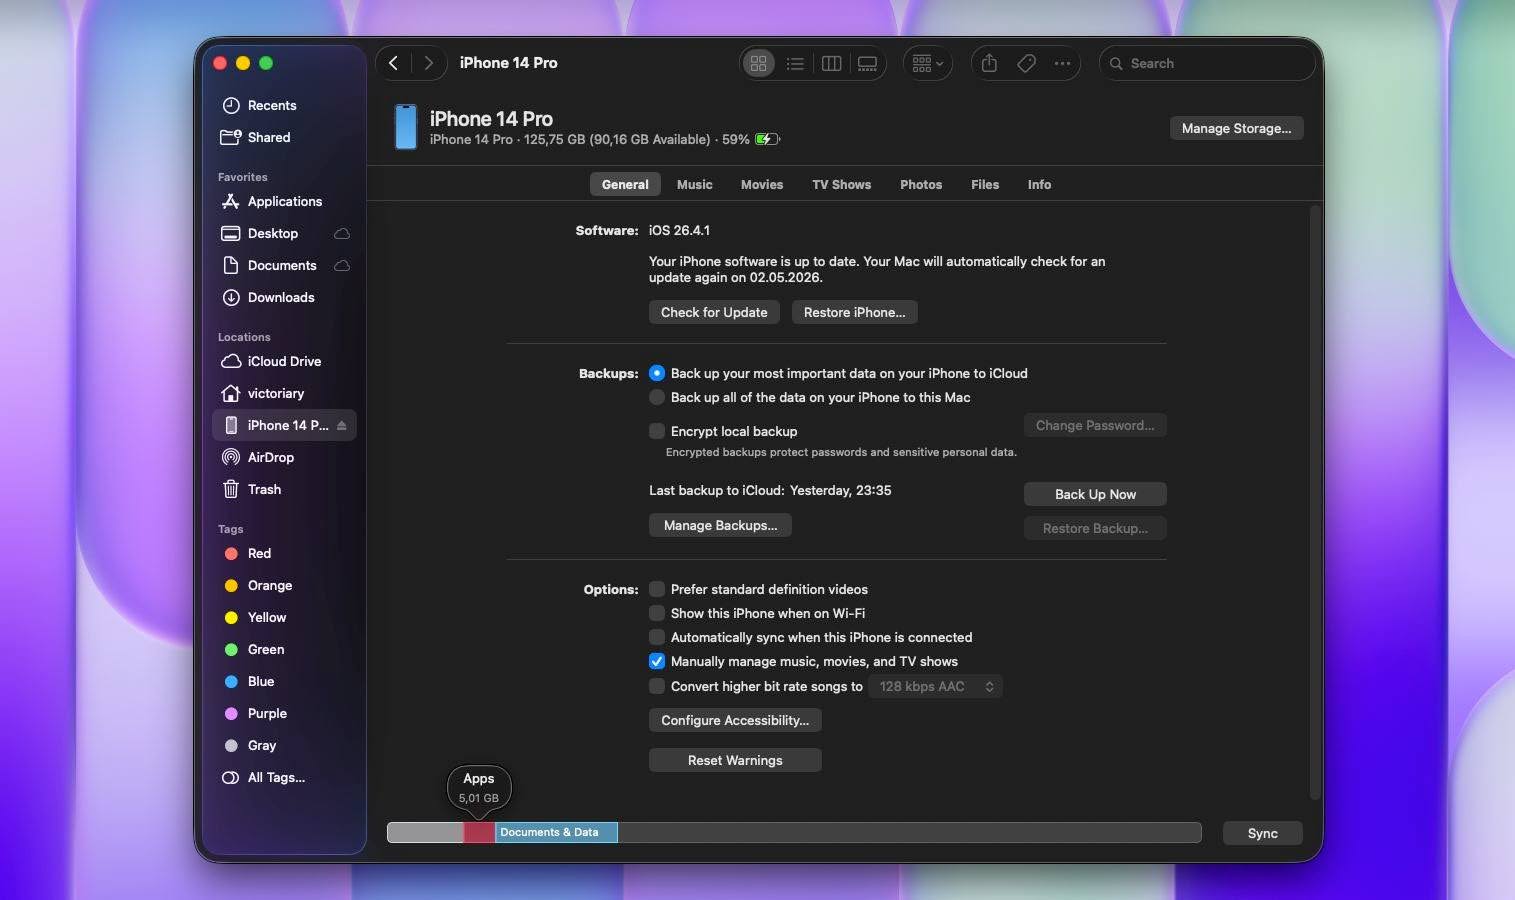
- Look at the storage bar at the bottom of the window.
- Hover over different sections of the bar to see how much space each category uses.
Finder shows a visual breakdown of storage by categories such as apps, photos, media, and system data. It also reflects synced content, which can help you understand how much space comes from files transferred through your computer. This method is useful when you manage music, videos, or backups directly on your Mac.
Use iTunes on Windows or Older macOS
On Windows PCs, or older Macs, iTunes still handles iPhone storage.
- Connect your iPhone to your computer using a USB cable.
- Open iTunes and select your device.
- Go to the Summary section.
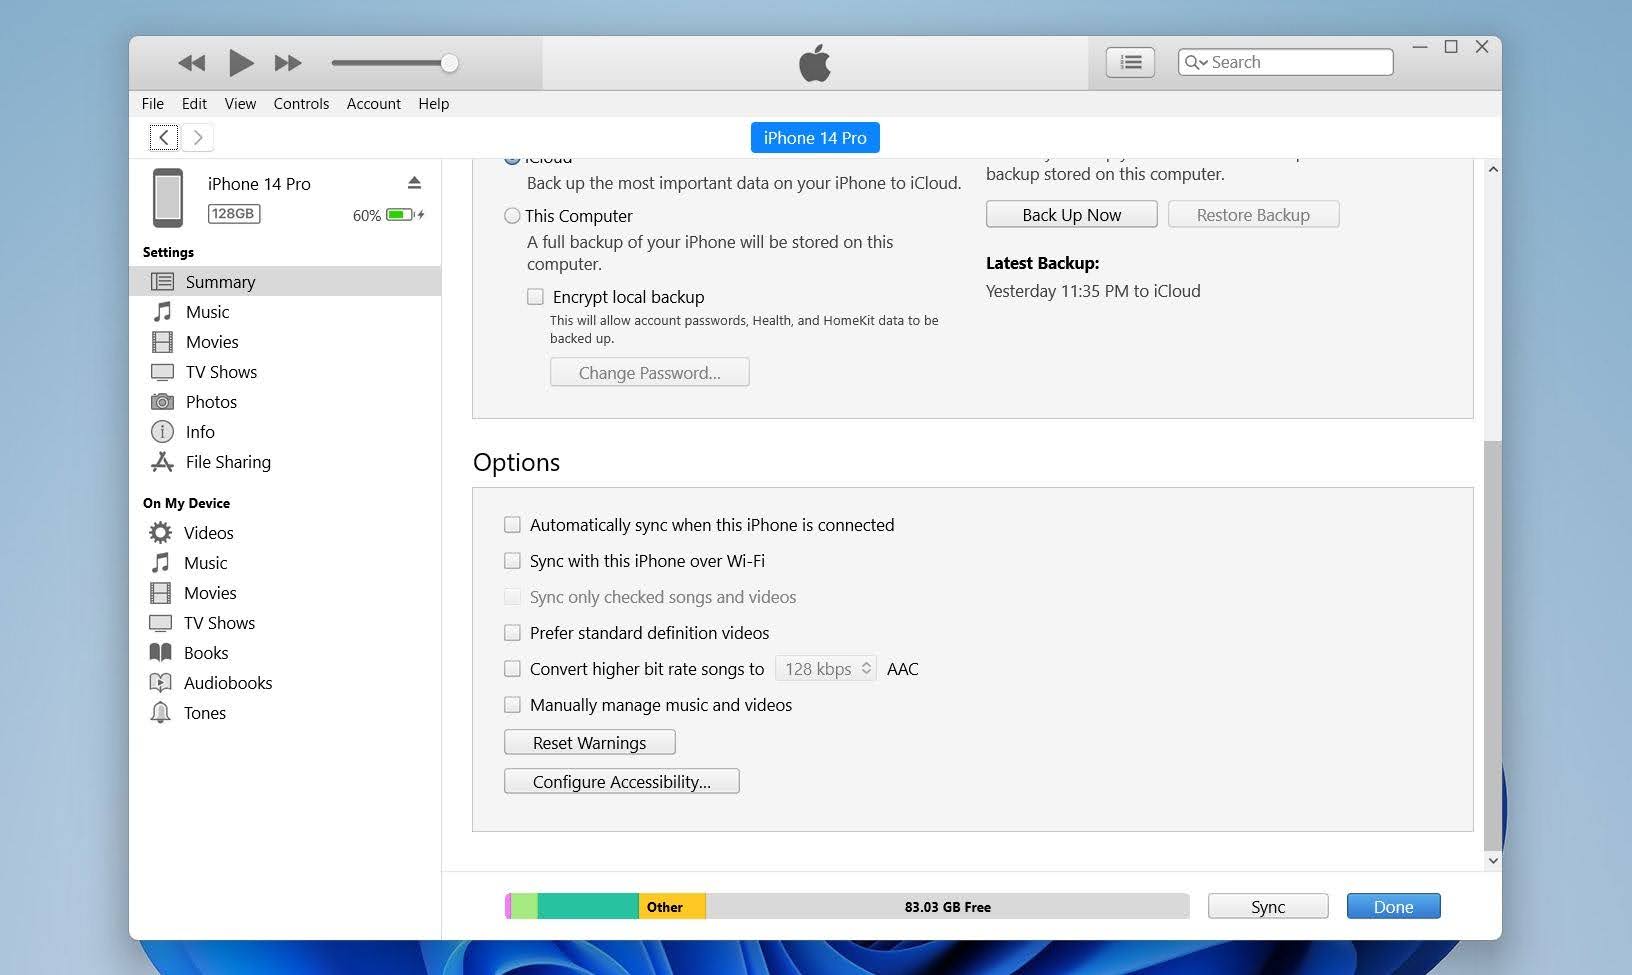
- Review the storage bar at the bottom of the window.
- Move your cursor over the bar to see category details.
iTunes shows a similar visual storage chart and allows you to manage backups and synced data. This method makes sense when you use a Windows PC or still rely on older macOS versions. It also helps when you want to adjust synced content or check how much space it takes.
Check iCloud Storage
iPhone storage is only part of the picture. Even after you clear space on the device, data stored in iCloud still affects backups, photo syncing, and messages. In many cases, users free up local storage but still run into limits because iCloud is full. That leads to failed backups, paused syncing, or media that no longer uploads. A quick check gives a clear view of where your data sits and what still needs attention.
Here is how to check iCloud storage on iPhone:
- Open Settings.
- Tap your name at the top (Apple ID).
- Select iCloud.
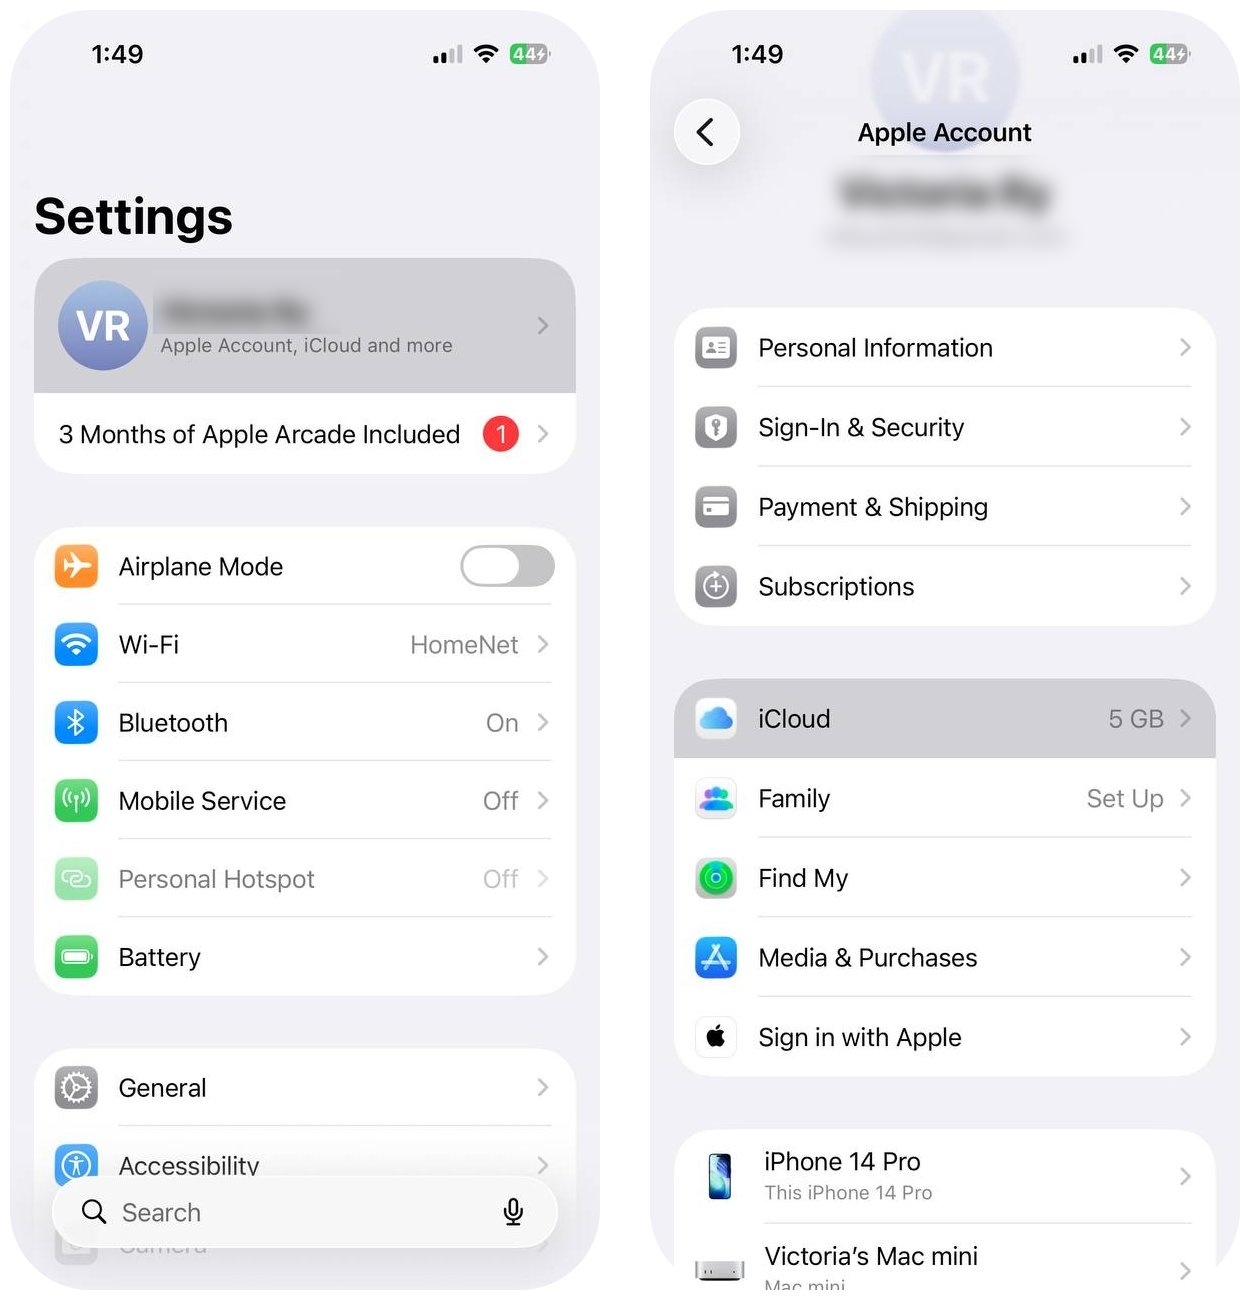
- Tap iCloud Storage.
- Wait for the storage bar to load.
- Review how space is divided between backups, photos, messages, and apps.
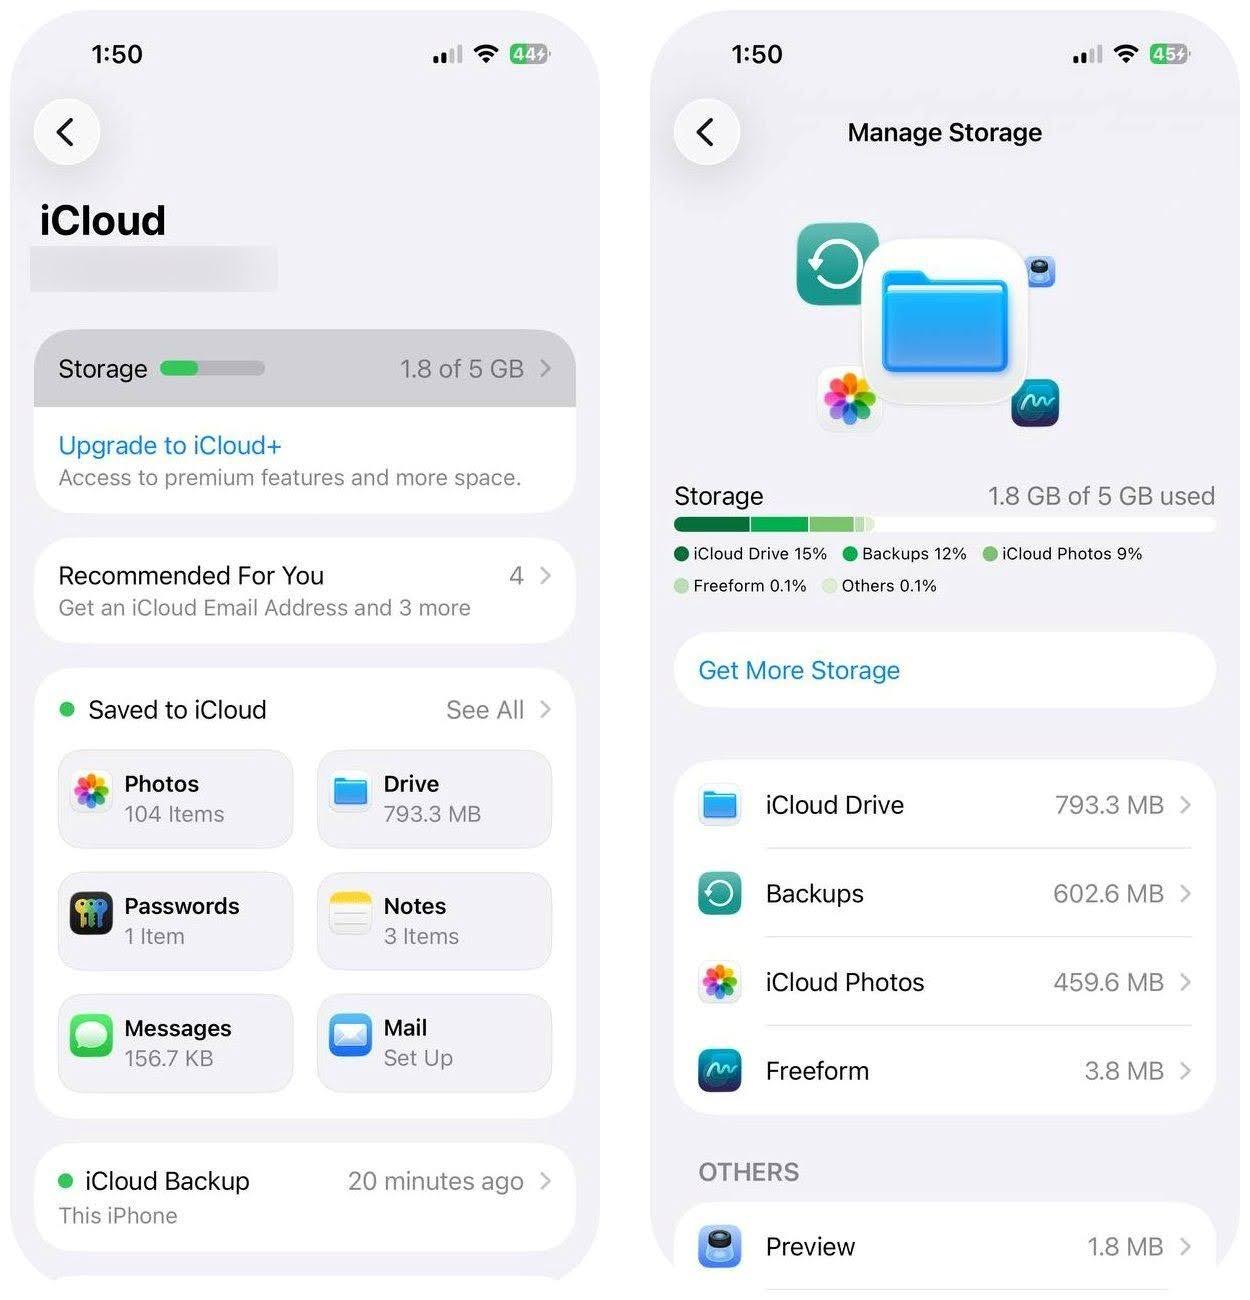
- Tap any category to see more details and decide what can be removed or moved.
You can do the same on Mac:
- Open System Settings (or System Preferences on older macOS versions).
- Click your Apple ID at the top.
- Select iCloud.
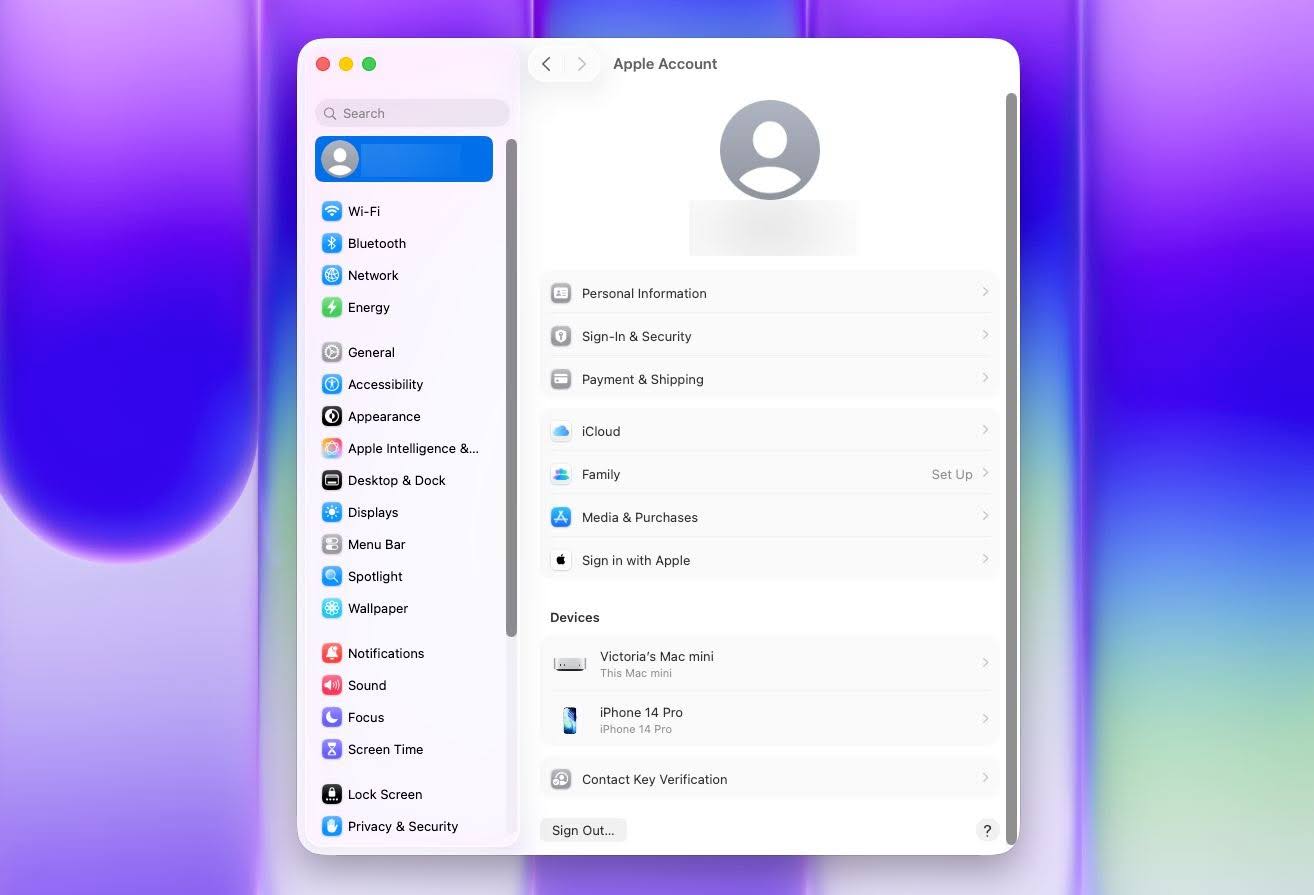
- Click Manage (or Manage Storage).
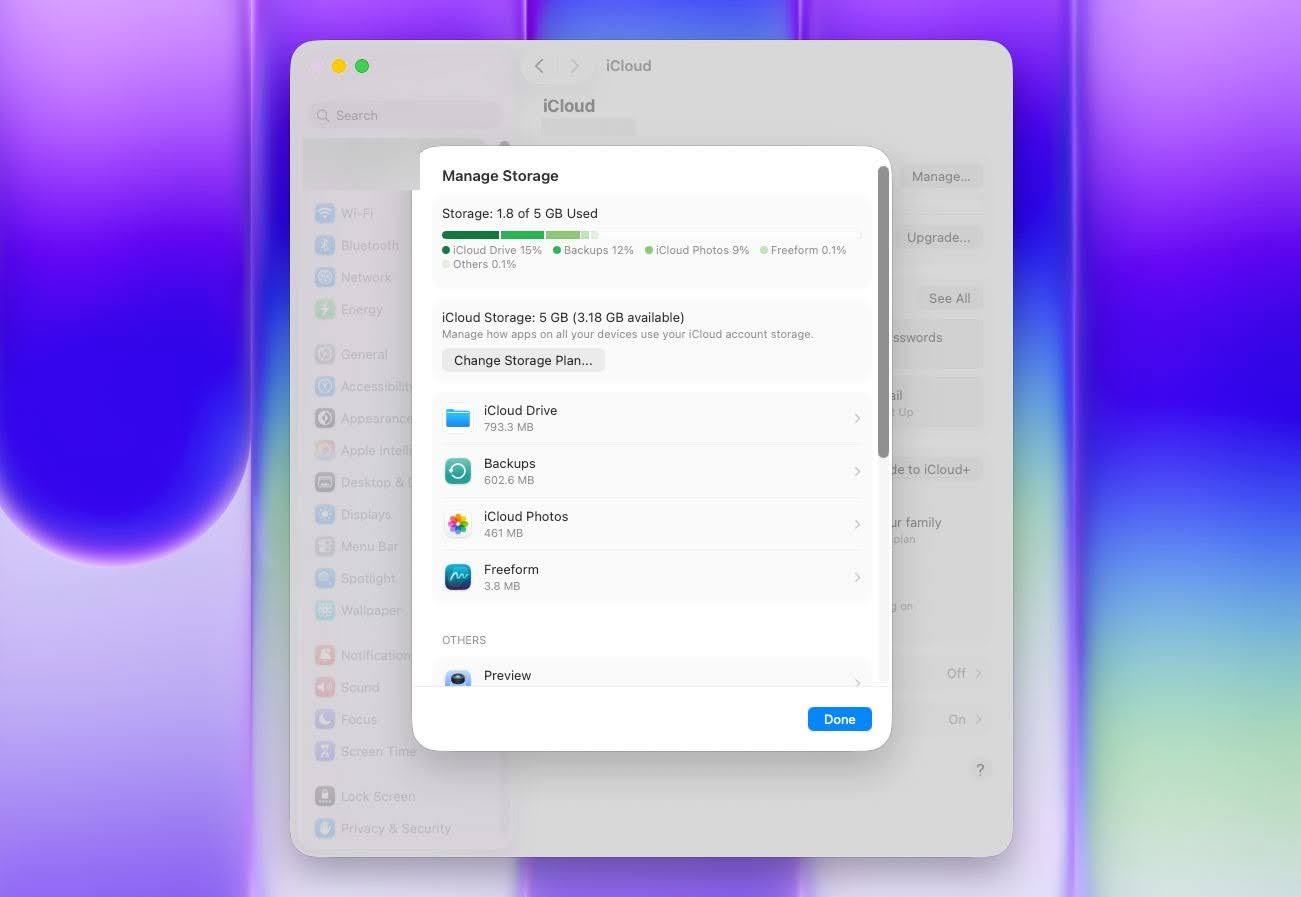
- Check the storage bar and detailed list of apps and services.
- Open specific sections like Backups or Photos to review usage in more detail.
iCloud doesn’t increase your iPhone’s internal storage, but it works as an extension for managing data. Photos, backups, and app data often take the most space, so these categories deserve the most attention. If storage is full, backups may stop and some data won’t sync, even when your iPhone still has free space. Regular checks help avoid that situation and make it easier to decide what to keep locally and what to move or remove.
What to Do If Your iPhone Storage Is Full
When your iPhone runs out of space, the fastest way to free up several gigabytes often starts with photos and videos. For most users, this is the largest category, and cleaning it manually takes time. A cleanup app can speed up this step if your photo library is large.
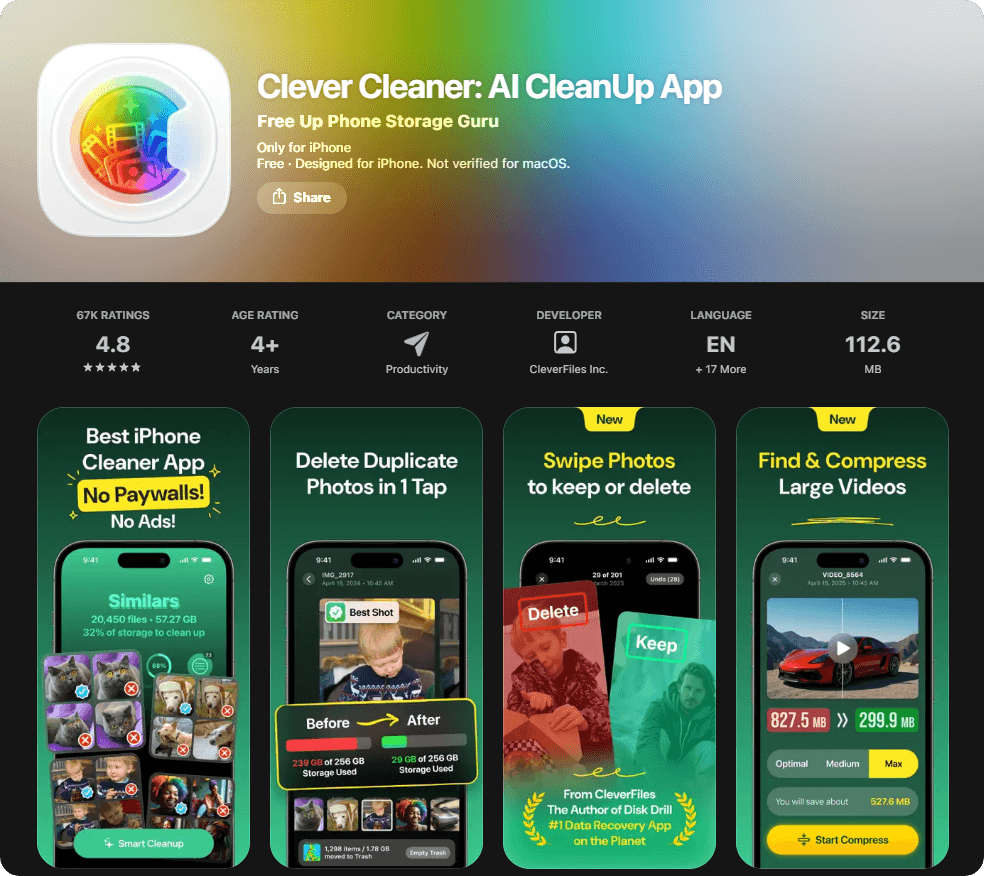
We understand that there are hundreds of different cleaner apps on the App Store, and it’s not easy to immediately figure out which one is actually worth your time. That’s why we want to briefly show how these apps work and how they can help free up iPhone storage using Clever Cleaner, which took the #1 spot in our testing of the best iPhone cleaner apps.
Here’s how to clean up media using Clever Cleaner:
- Download Clever Cleaner: AI Cleanup App from the AppStore.
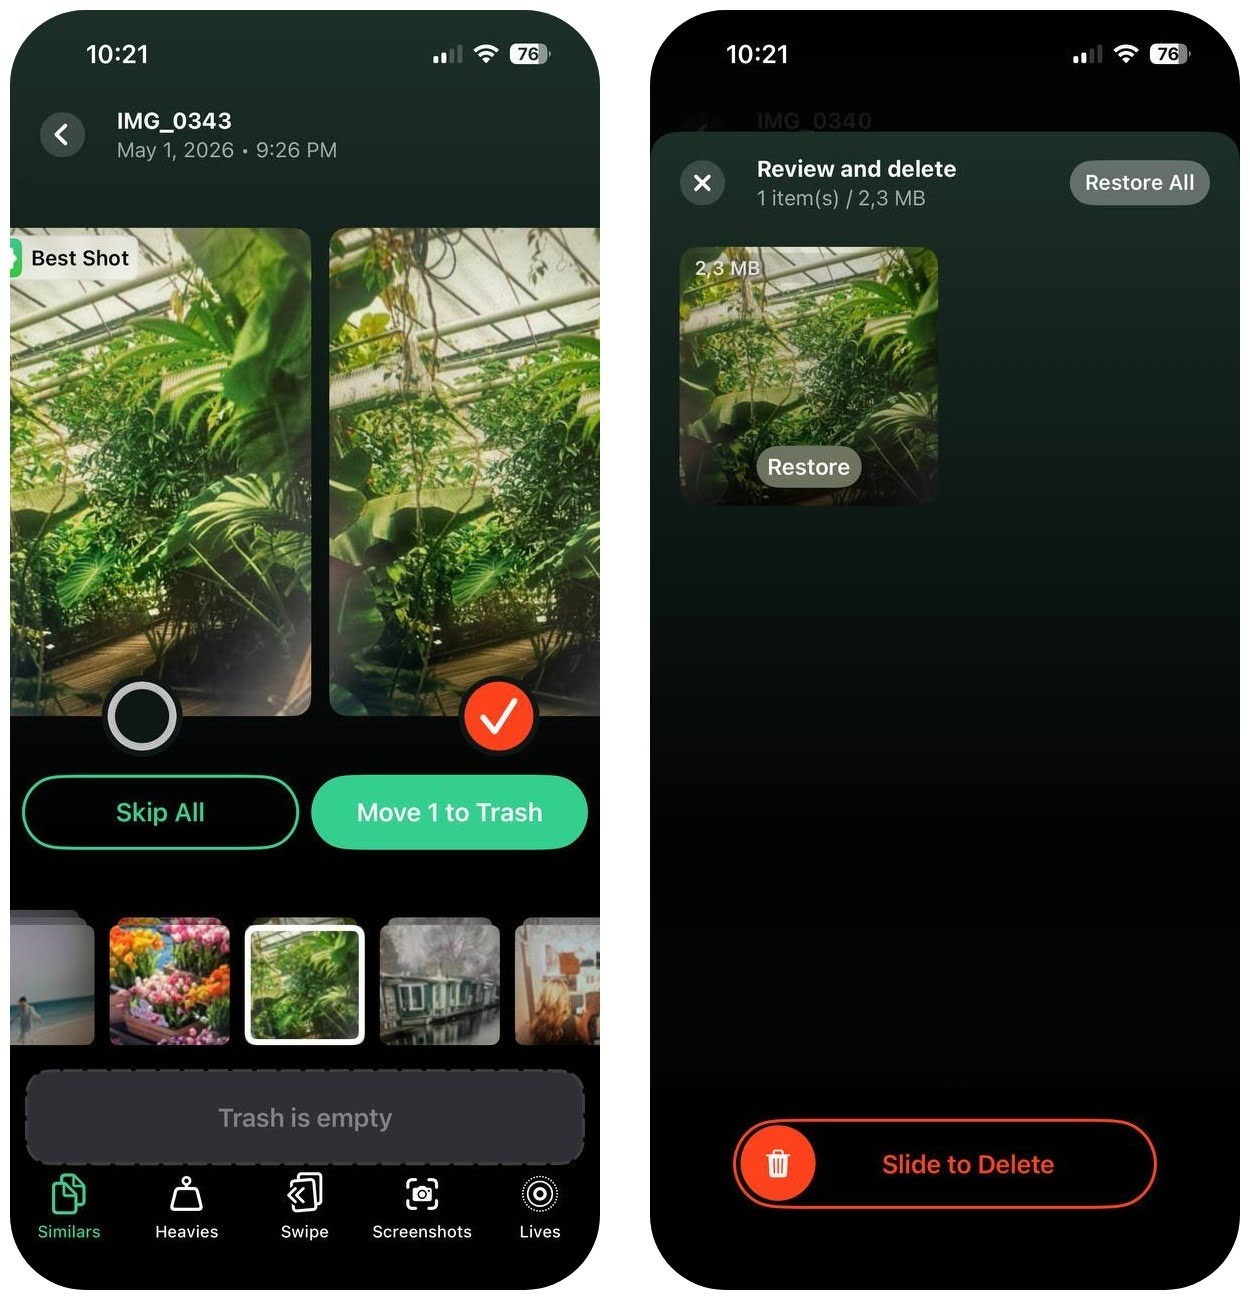
- When you open Clever Cleaner, Similars is the first section you’ll see. It scans your library for exact duplicates and visually similar photos, like burst shots or multiple attempts at the same scene. From here, you can let the app handle everything with Smart Cleanup.
- To run it, just tap Smart Cleanup and the app will scan your library, pre-select the photos to remove, and clear them in one go.

- Go through suggested files, you can confirm removal with a swipe.
- If you’d rather review them yourself, tap any group to open it. The app already pre-selects the duplicates and marks the best-quality photo as Best Shot, but you can change any selection before deleting.
If you have more time or simply want to free up even more iPhone storage, you can also use the app’s other cleanup tools:
- Heavies to delete or compress large videos.
- Screenshots to remove unnecessary captures in bulk.
- Lives to convert Live Photos into standard images.
- Swipe Mode to quickly go through your entire library one photo at a time.
This step clears the biggest category, but it is only part of the cleanup.
To free up more space, continue with system-level actions:
- Open Settings > General > iPhone Storage, review the list of apps sorted by size, and delete or offload the ones you don’t use.
- Go through your photos and videos, remove duplicates, screenshots, and large clips, then clear the Recently Deleted album.
- Check Messages, find conversations with large attachments, and delete videos or images you no longer need.
- Move photos, videos, or documents to iCloud or another cloud service, then remove local copies from your device.
- Remove downloaded media from apps like Spotify, Netflix, or YouTube, as offline files can take several gigabytes.
- Clear Safari data by going to Settings > Safari > Clear History and Website Data to free up cached files.
- Review Files app downloads and delete documents you no longer need, especially large PDFs or videos.
- Restart your iPhone after cleanup to help the system recalculate storage and clear temporary data.
After these steps, check your storage again. In most cases, you will see a noticeable increase in free space without removing anything important.
Closing Words
Check your iPhone storage on a regular basis to stay aware of how your space is used and to avoid sudden “storage full” alerts. A quick look in Settings shows what takes up the most space and helps you decide what to remove or keep.
iCloud can also reduce the load on your iPhone when you use it the right way:
- Turn on Optimize iPhone Storage for Photos so full-resolution files stay in iCloud while smaller versions remain on the device.
- Enable app data sync in iCloud (Photos, Messages, Files) so important data does not stay only in local storage.
- In the Files app, save large files directly to iCloud Drive instead of “On My iPhone” to keep local space free.
- Move older photos, videos, and backups to iCloud, then delete local copies after you confirm everything synced.
At the same time, iCloud has limits and it will not keep your storage organized on its own. You still need to review it from time to time: remove old backups, delete unnecessary files, and keep your folders in order so they do not turn into clutter.
FAQ
At the same time, iPhones can work with external storage through adapters. You can connect a flash drive or SD card and transfer files using the Files app. This doesn’t increase system storage, but it works well as a way to move data off the device and free up space, especially for large photos or videos.
If the storage fills up again immediately after cleanup or the numbers still look wrong, create a backup and reset the iPhone to factory settings.