How to Recover Deleted Files on Your Mac: 8 Working Ways
Your Mac or MacBook is an incredible example of cutting-edge technology wrapped in an intuitive and user-friendly package. Unfortunately, no computer manufacturer, not even Apple, has been able to design a machine that is impervious to the problem of accidentally or inadvertently deleted data. There’s no computer on the market that can guarantee you’ll never lose some important files.
If you’re looking for a quick solution to recover deleted files on Mac, the Trash Bin offers the simplest method. It’s important to act quickly, if your Mac is set to automatically clean out the Trash Bin after 30 days.
Here’s the steps for undeleting files on your Mac:
- Open the Trash Bin icon on your Mac desktop
- Find the lost or deleted files that you wish to restore.
- Right-click on them and select the “put back” option to recover deleted files on Mac from the Trash.
- Congratulations! You have recovered deleted data on your Mac
| Problem | Solution | Probability of Success |
| I have recently deleted a file: | 🗑️ Check your Mac main Trash and secondary Trashes folders for the lost file. (Solution 2 | Solution 2 | Solution 4) | High |
| I have accidentally deleted an important file and it’s not in the Trash: | 💻 Try data recovery software or recovering from a backup. (Solution 6 | Solution 7 | Solution 1) | High |
| I formatted a disk accidentally: | 💻 Use data recovery software. (Solution 1) | High if done promptly after the format. |
| My Mac got a virus and I lost files: | 💾 Use data recovery software or recovering from a backup. (Solution 5 | Solution 6 | Solution 1) | Average |
| My Macbook is dead: | 👨🔧 Contact a data recovery service center. (Solution 7) | Depends on the condition of the drive. |
Is It Possible to Recover Permanently Deleted Files on Mac?
Yes, it is possible to recover permanently deleted files on a Mac, but it depends on several factors.
When files disappear from the Trash or bypass it entirely—often referred to as “permanent deletion”—recovery becomes more complex but not always impossible. The feasibility of retrieving permanently deleted files largely depends on several critical factors:
- Type of storage device: Modern Macs typically utilize solid-state drives (SSDs), which handle deleted data differently from traditional hard disk drives (HDDs). SSDs use a process called TRIM, which helps to manage the data storage and enhances performance by immediately clearing blocks of data that are no longer in use. This functionality, while beneficial for speed and efficiency, makes data recovery extremely challenging because once the TRIM command has been executed, the data is irrecoverable.
- Time since deletion: The interval between file deletion and recovery attempts is crucial. The longer the delay, the greater the probability that the deleted data spaces have been overwritten by new data, especially if the Mac is in active use. This overwriting permanently erases the old data, making recovery highly unlikely.
- Availability of backup: The presence of a recent backup can simplify the recovery process significantly. If you regularly back up your Mac using Time Machine or a cloud storage solution, you can restore lost files from these backups with relative ease and certainty.
- Use of data recovery software: For cases where backups are not available, and the data has not yet been overwritten, reliable data recovery software can be a last resort. These tools scan your drive to recover remnants of deleted files that haven’t been overwritten. The effectiveness of this software can vary, and its success largely depends on the two factors mentioned above: the type of storage device and the time since deletion.
How to Restore Permanently Deleted Files on Mac using Software
Data recovery software can be used to restore deleted files that are not in the Trash or have not been backed up. It can get back files that appeared to be permanently deleted from your Mac, as long as you act quickly before. The data is overwritten.
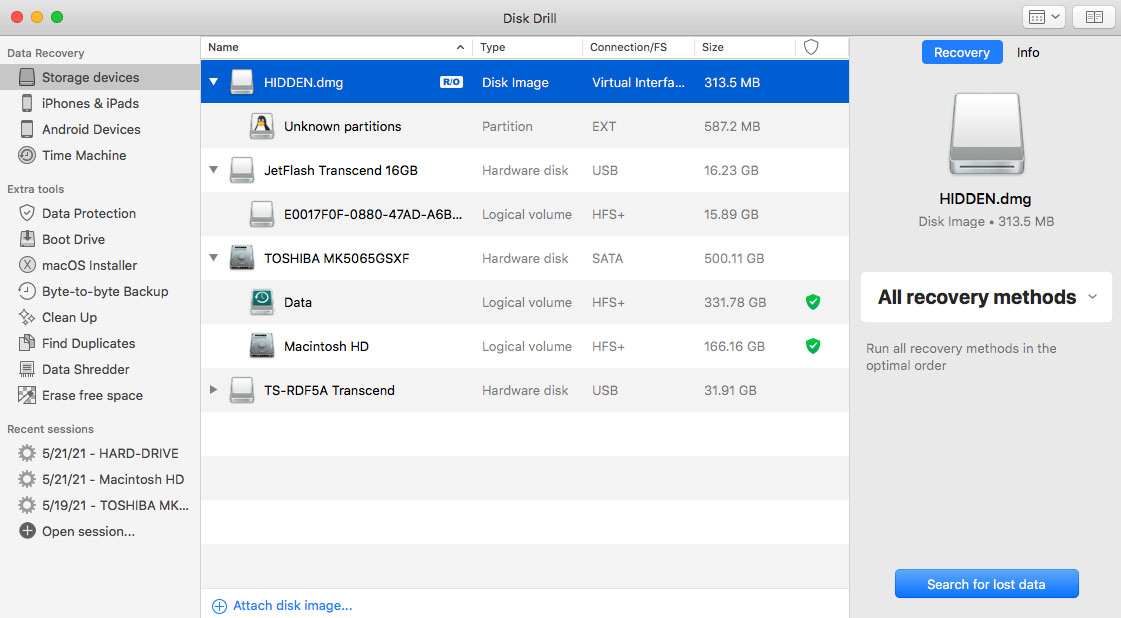
There are many different recovery tools available like Disk Drill, PhotoRec, EaseUS, and R-Studio. We chose Disk Drill for this demonstration and use it for our recovery needs. We like it because of its intuitive interface, advanced scanning algorithms, and compatibility with all major file formats and any type of disk-based storage device.
The following steps demonstrate how to recover deleted files on a Mac with data recovery software:
- Download and install Disk Drill for Mac. Don’t download and install the software on the storage device that contained the files you want to recover. If the data was lost on your main drive, use an external device for the download and install process. This will help prevent the files you want to restore from inadvertently being overwritten.
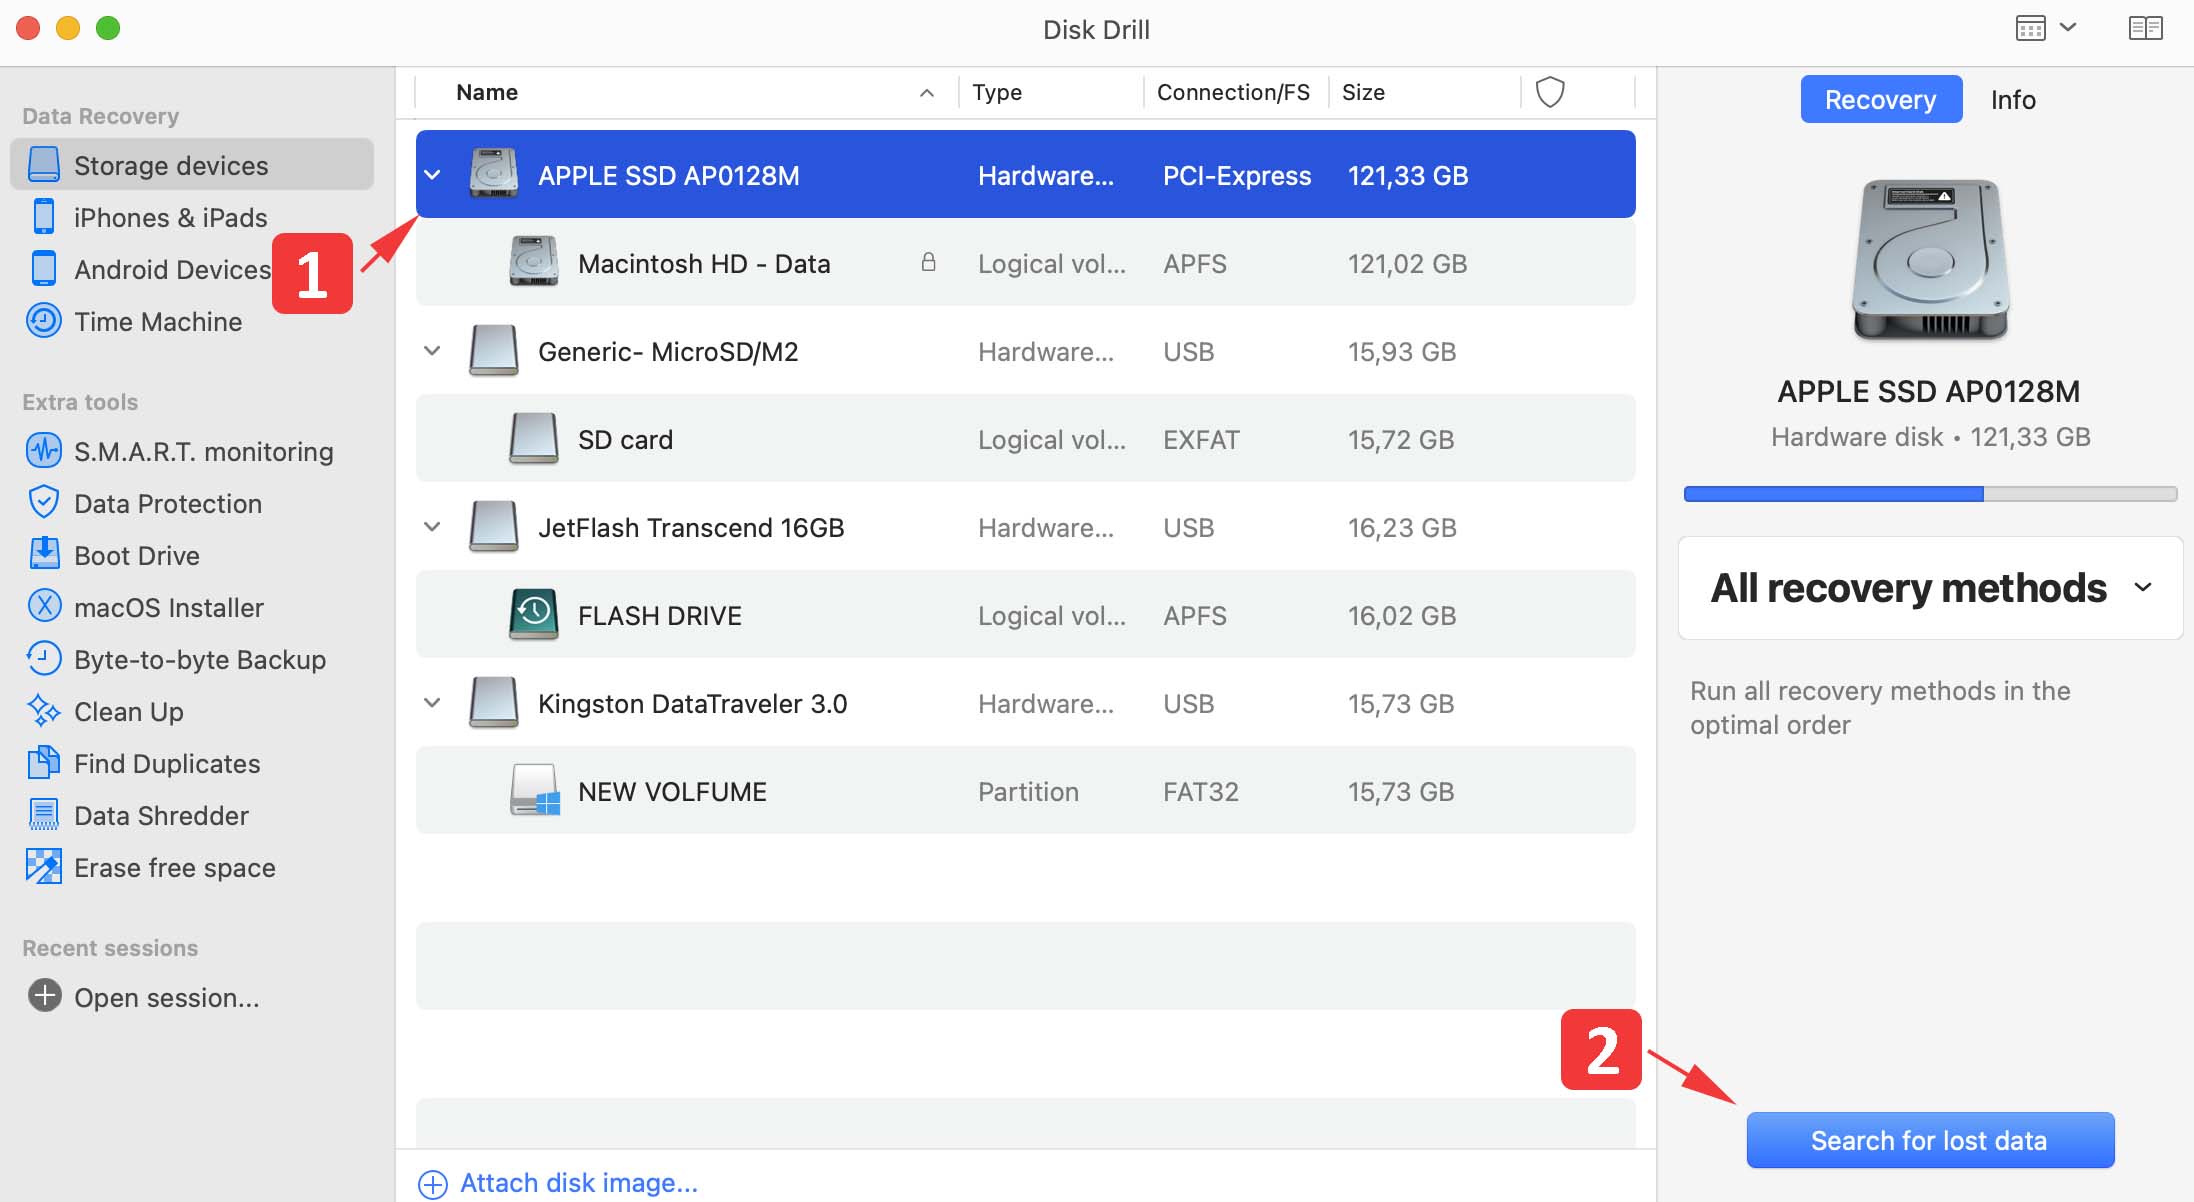
- Start Disk Drill and choose the affected device from the list of available disks.
- Click the Search for lost data button to start scanning the device for recoverable data.
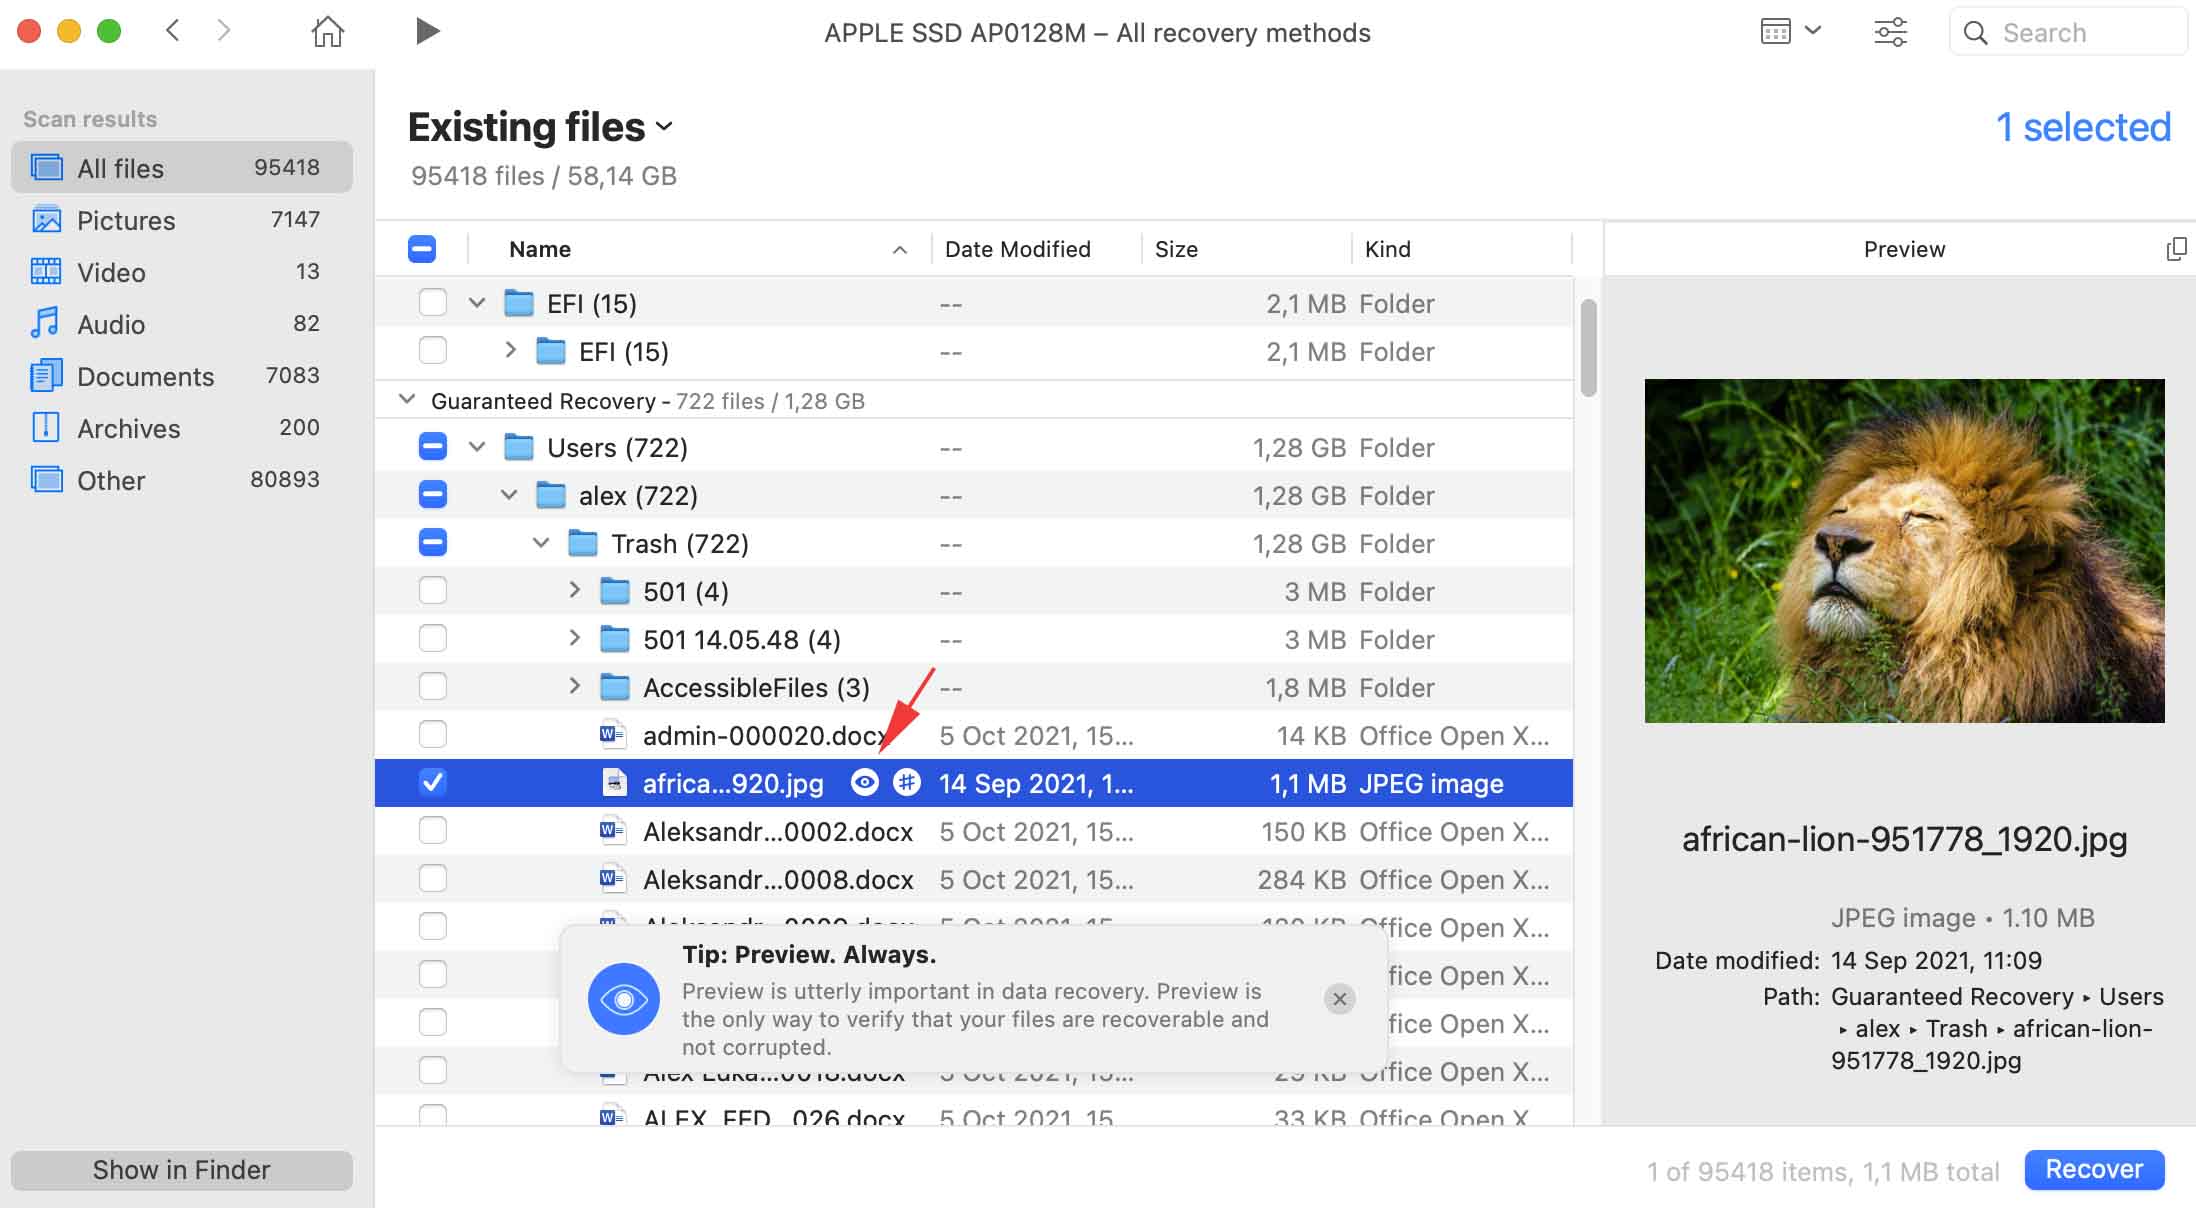
- Preview the files that Disk Drill finds and choose the ones you want to recover.
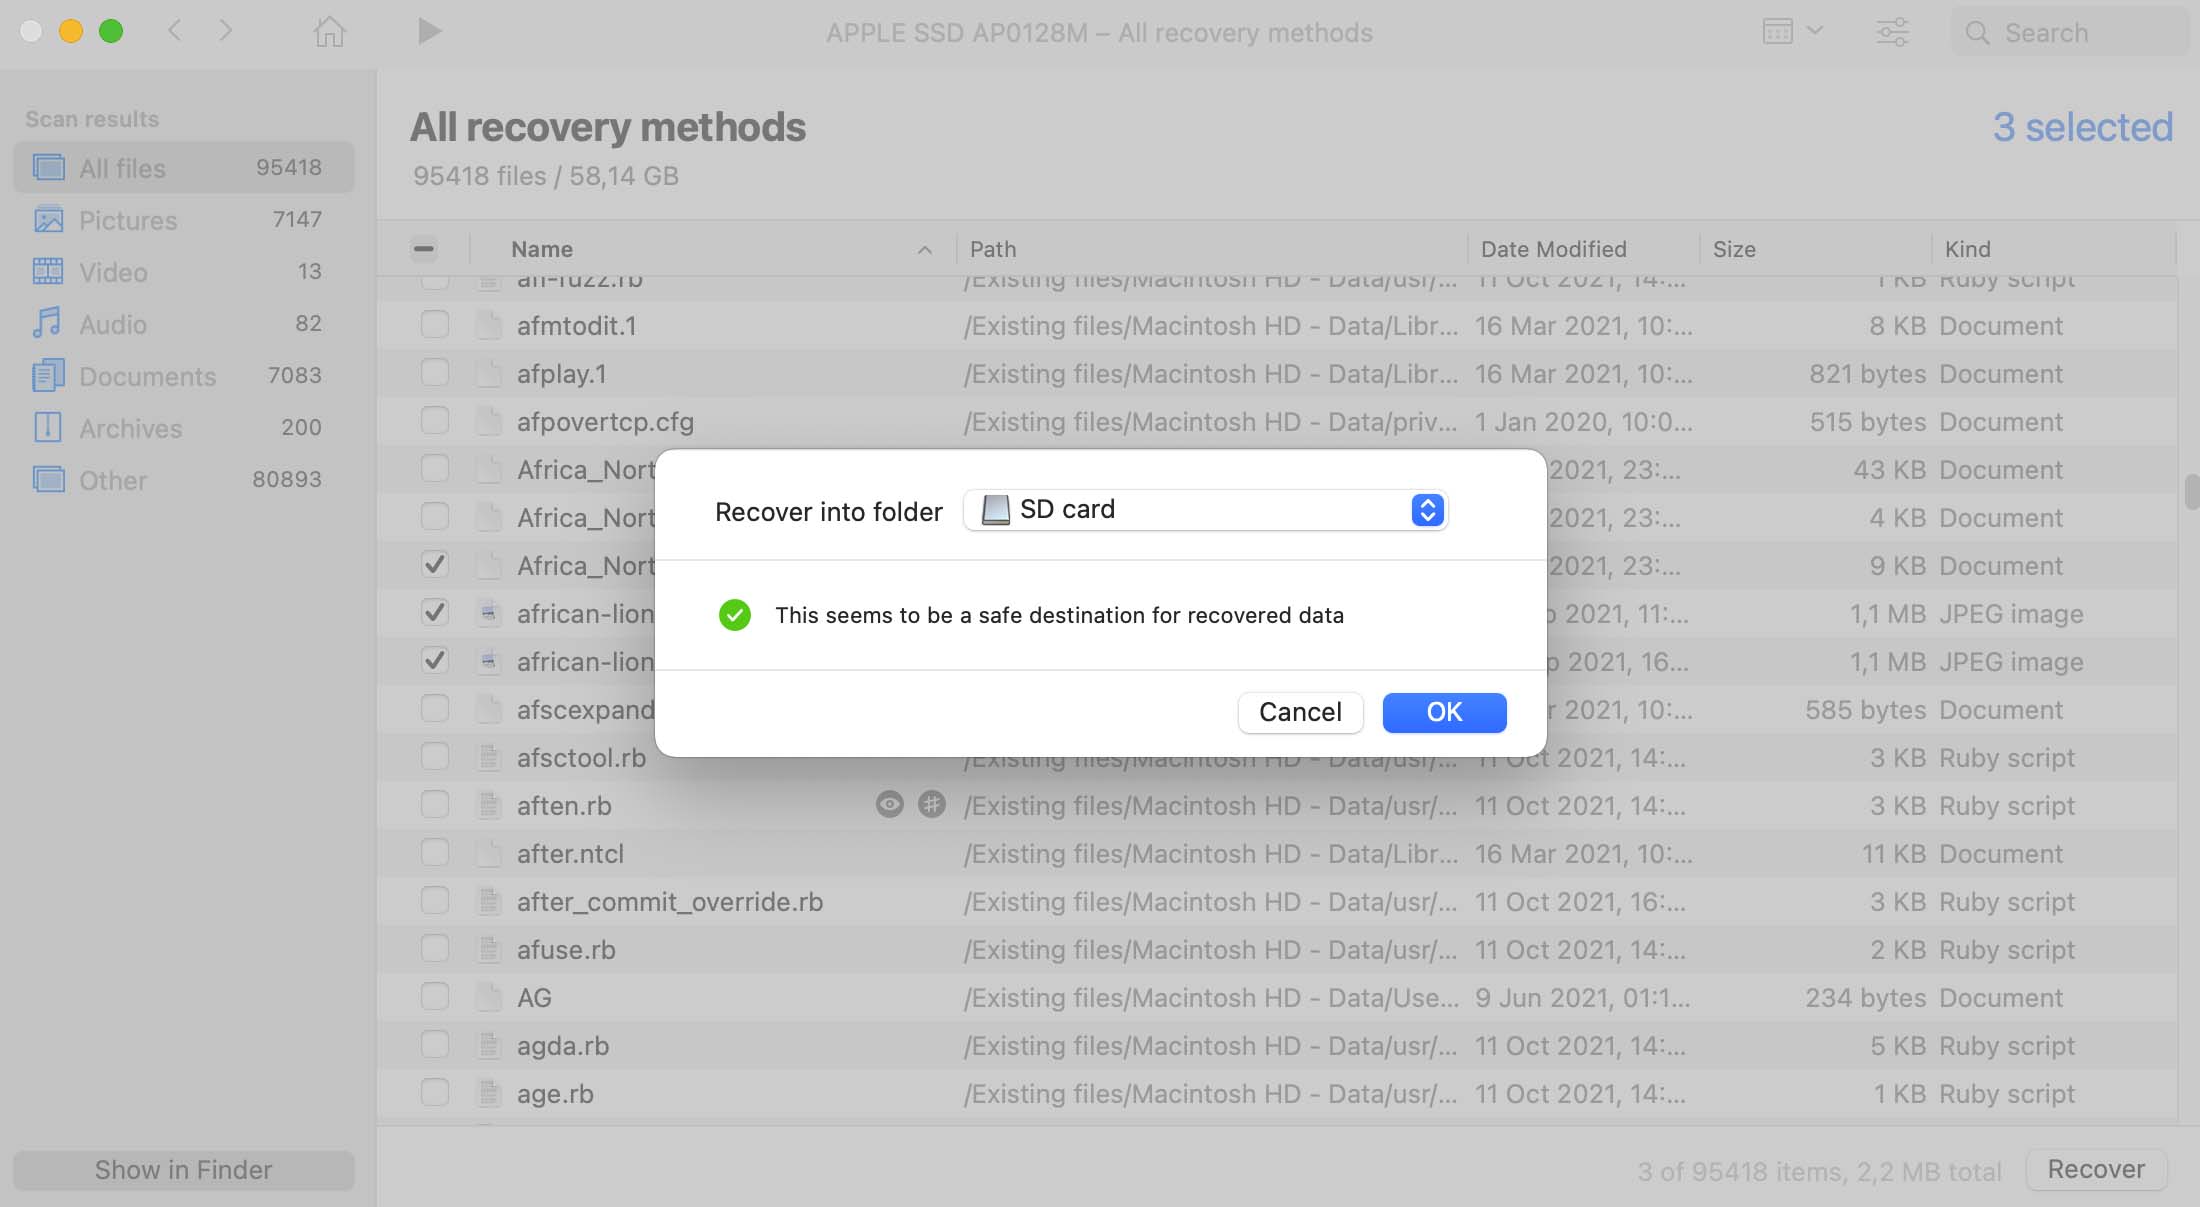
- Click Recover button and select a safe location to store the recovered data that is not on the original disk.

- Click the OK button to complete the recovery.
How to Recover Deleted Files on Mac Without Software
There are many ways to perform Mac file recovery. Some are simpler than others and can be done with a few clicks or keystrokes. Hopefully, one of the following methods will enable you to recover your valuable lost data.
Method 1: Recover Deleted Files from Trash on Mac
👍 Advantages: No need to install third-party software, quick & simple
👎 Disadvantages: Won’t help you recover permanently deleted files
Deleted files on a Mac computer are moved to the Trash for temporary storage. The Trash is just a special folder to hold recently deleted items and make them available for quick recovery.
Depending on how you have your Mac configured, files will remain in the Trash for a set length of time or until the Trash is manually emptied. If you want to know more about how to use the Trash, consult this Apple support page.
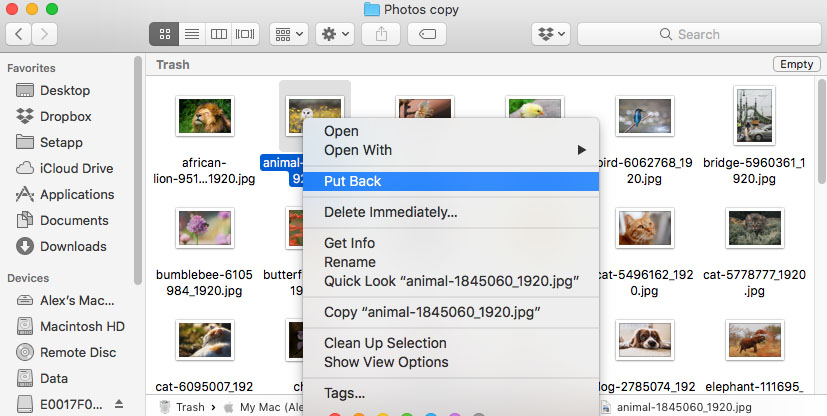
The following steps show you how to recover files from the Trash on your Mac:
- Click the Trash icon to open the folder.

- Search the folder for the item you want to retrieve.
- Right-click on the file and select Put Back to restore the file or folder to its original location.
Method 2: Recover Deleted Files with Undo Options
👍 Advantages: Instant recovery of recently deleted files
👎 Disadvantages: Works only for a limited amount of time
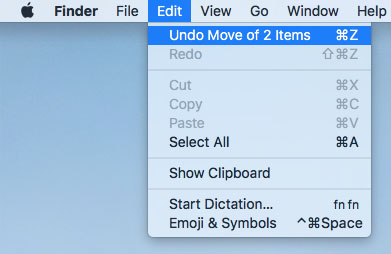
You may be able to recover a deleted file by using the macOS Undo keystroke combination. In many cases, a combination of the Command and Z keys will undo your last action. If that action was deleting a file, performing the Command Z keystroke combination will immediately restore it. You may be able to go back several commands, but there is a limit so you need to try this method promptly after deleting the file.
Method 3: Recover Deleted Files on Mac with the Terminal App
👍 Advantages: Good for users who prefer the command line
👎 Disadvantages: Not beginner-friendly
Following are two ways to recover deleted files on your Mac using the Terminal app.
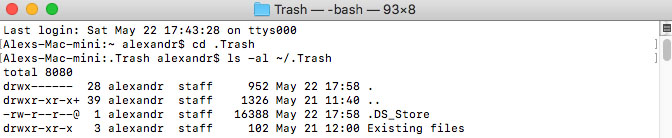
- After opening Terminal through your Utilities on Mac, type the following command: cd .Trash and then hit Return.
- View the contents of the Trash folder with this command: ls -al ~/.Trash.
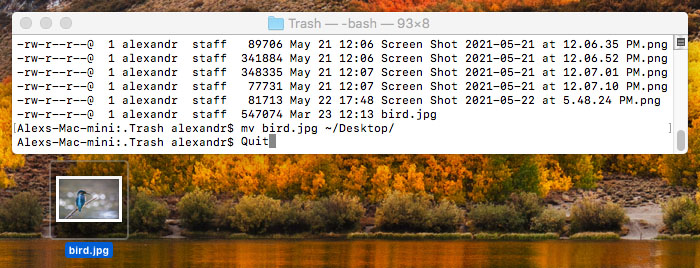
- Move files out of the Trash to the current folder with this command: mv filename ../.
- Enter Quit to exit Terminal.
Method 4: Check .Trashes Folders
👍 Advantages: No need to install third-party software, quick & simple
👎 Disadvantages: Only for external storage devices, won’t help you recover permanently deleted files
Besides the main Trash folder, which can be accessed by clicking the Trash icon on the dock, macOS also creates a hidden .Trashes folder on every external storage device that you connect to your Mac, and it then uses this folder to temporarily store files deleted from the same external storage device.
Since .Trashes folders are hidden by default, most Mac users are not aware of their existence, which is a shame because the deleted files they contain can be easily recovered from them:
- Connect your external storage device to your Mac.
- Open Finder and navigate to the root folder of the external storage device.
- Press Command + Shift + . (dot) to display hidden files and folders.
- Open the .Trashes folder.
- Recover lost files from the folder.
You can then press Command + Shift + . (dot) in Finder again to hide hidden files and folders.
Method 5: How to Retrieve Deleted Files from a Time Machine Backup
👍 Advantages: Time Machine is part of macOS, can recover older versions of existing files
👎 Disadvantages: Requires previous setup, depends on an external backup drive
A Time Machine backup is a great way to recover a lost or deleted file. It is Apple’s free backup and recovery tool and comes preinstalled on your Mac. All you need to do is supply an external drive to store the backups. We strongly recommend that you use it to backup your valuable data.
The only problem with this method is that you need to have backed up the item to use this technique. It won’t work for recently created and deleted files or those that have had substantial changes made to them since the last backup.
Use the following steps to recover files from a Time Machine Backup:
- Connect the storage device that contains the Time Machine backup files to your computer.
- Open a Finder window in the folder that previously stored the file you want to recover. You don’t need a Finder window if the item was deleted from the desktop.
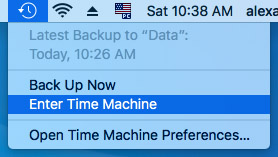
- Launch Time Machine by clicking the Time Machine icon on the menu bar.
- Search through the available backups using the timeline and arrows to find the file that you want to recover.
- Select the file you want to retrieve and click the Restore button. The item will be restored to its original location.

In addition to retrieving deleted files from external backups, Time Machine also offers a useful feature known as local snapshots. Local snapshots are automatically saved copies of your files that are stored directly on your Mac’s internal storage. This feature is particularly useful when your external backup drive is not available.
Local Snapshots vs. External Backups:
- Local snapshots: These are created automatically and frequently, ensuring you have recent backups of your files. They are stored on your Mac’s internal drive and are designed to provide a quick recovery solution for files deleted within the last 24 to 48 hours.
- External backups: Time Machine backups to an external drive are less frequent but provide a longer history. They are ideal for recovering files from further back in time or when a complete system restore is needed.
To recover files from a local snapshot when your external backup drive isn’t connected, simply enter Time Machine through the menu bar, use the timeline to find the snapshot you need, and restore the files from there. This method is convenient and quick, especially for recent file recoveries.
Method 6: Recover via Other Backup Solutions
👍 Advantages: Versatile, cloud backups can be accessed from anywhere
👎 Disadvantages: Require previous setup
Many other backup solutions exist and they can all be used to save the day when files get accidentally deleted. They can be categorized as either creating local or cloud backups and slightly different techniques are necessary when using them to recover files. Here are the general steps when using either type of backup.
Cloud
Use these steps when recovering data from cloud backup options like iCloud or Carbonite:
- Connect your computer to the Internet and access the cloud storage that holds your backups.
- Locate the files you want to restore.
- Transfer them over the network to your machine.

Local
Local backups can be created with a wide variety of tools. Disk Drill offers a free feature that creates byte-level backups that can be used to protect your data and recover it if needed. Recovering from local backups requires following this general process:
- Connect the storage device that holds the backup to your Mac.
- Start the recovery tool or search on the backup media for the desired files.
- Copy the files from the backup media to your computer.
Method 7. Use a data recovery service
👍 Advantages: Can recover data from physically damaged storage devices
👎 Disadvantages: Expensive and potentially time-consuming
When all other options fail, a reputable data recovery service may be able to get your deleted data back. The specialists at a data recovery center use a cleanroom and advanced software and hardware techniques to recover your data. In cases of physical damage to the device, this may be your only choice.
If you have lost important data and cannot get it back using other methods, you should look into engaging a data recovery service. Here’s how it works.
- Contact the data recovery service for an initial consultation and to obtain shipping information.
- Send the storage device to the recovery center. Once it is received, technicians can evaluate the device and give you a recovery estimate.
- Specialists at the recovery center will open the drive and attempt to clone it to recover its data.
- Recovered data will be sent back to you on new media when the process is complete.
How to Avoid Data Loss on Your Mac
Even better than recovering your data successfully is not losing it in the first place. Here are some steps you should take to avoid losing valuable data stored on your Mac.
- 💽 Take backups regularly. If you are not currently backing up your Mac, we suggest you start today. Time Machine is already on your Mac and ready to use with an external drive. Other backup solutions can also work. Any backups are better than none, so get on it!
- 🤔 Take care when deleting files or formatting partitions and disk drives. Double-check your work before hitting that delete or format button. It might save you a lot of time later.
- 👾 Malware infections can result in data loss. Make sure you use an antivirus program on your Mac. Avoid connecting external devices that may contain a virus to your computer.
Conclusion
As you can see, there are many ways to recover a deleted file from your Mac. The simplest method is to recover files from the Trash on your Mac, but backups and data recovery software are also viable techniques. It’s important to act quickly to avoid the chance that your lost file gets overwritten by new data.
Data recovery software is the most reliable way to recover deleted files that are no longer available in the Trash. We recommend you stop using your computer until after the recovery is complete for the best results. Good luck recovering your lost data!
FAQs
The most reliable way of recovering permanently deleted files from a Mac is with data recovery software like Disk Drill, PhotoRec, or R-Studio. The basic procedures are the same for all data recovery solutions and involve the following steps.
- Install the software and connect an external storage device if necessary.
- Scan the affected storage device for recoverable files.
- Preview the identified files and select those to be recovered.
- Choose a safe storage location for the recovered data.
- Complete the recovery.
Without using data recovery software, your best option for recovering permanently deleted files are from a Time Machine or other form of backup. Use this procedure with Time Machine:
- Open a Finder window in the folder that contained the lost item.
- Start Time Machine.
- Search for the file with the arrows in Time Machine.
- Select the file you want and click Recover.
- Trash Bin: As mentioned, deleted files are moved to the Trash and can be restored by right-clicking on the file in the Trash and selecting “Put Back.”
- Undo Option: Immediately after deleting a file, you can press Command + Z to undo the delete action.
- Time Machine: If set up, Time Machine allows you to restore files from external backups as well as local snapshots stored on your Mac.
- Terminal Commands: More advanced users can use Terminal commands to interact with the system and recover files, though this requires a good understanding of macOS file systems.
- Recover from Trash: If the files are still in the Trash Bin, you can easily restore them.
- Third-Party Data Recovery Software: Numerous data recovery programs are available that can scan your Mac’s drive for “permanently” deleted files that haven’t yet been overwritten.
- File History: If you use cloud services like iCloud, Dropbox, or Google Drive, these platforms often keep file histories that might allow you to recover previous versions of a file or files that were deleted.
- Terminal Recovery: Advanced users can sometimes use Terminal commands to recover files, depending on the file system and the state of the data.