How to Delete Synced Photos & Other Media From iPhone
Need to delete synced photos from your iPhone but worried you’ll accidentally wipe them from iCloud too? Or maybe they’re stubbornly stuck after syncing from your computer? This quick tutorial explains clearly how to remove unwanted photos safely, solve those weird sync mysteries, and free up space without causing chaos. Ready to clear your gallery? We’ve tested every single method ourselves—and trust us, it’s simpler than you think!
Which Synced Photo Deletion Problem Are You Trying to Fix?
First things first—let’s not waste your time. Before we follow with the solutions, let’s quickly figure out exactly what you need. We’ll cover different scenarios here, and you can pick the one that fits your situation.
| Scenario | What’s this about? |
| Delete synced photos from an iPhone only | You want photos gone from your iPhone but safely stored in iCloud. |
| Delete photos from iCloud only | You need to clear out iCloud space but keep your photos on your iPhone. |
| Can’t delete photos synced from a Mac/PC | Photos transferred from your computer stubbornly refuse deletion on your iPhone. |
| Clear synced media on iPhone remotely from a computer | You prefer managing your iPhone’s photos right from your Mac or PC without touching your phone. |
| Delete synced photos from iPhone and iCloud | You want photos gone everywhere—your iPhone, iCloud, and every connected device. |
Scenario 1: Delete Synced Photos from iPhone Only
Let’s start simple. You’ve got photos synced to your iPhone and just want them gone—without messing up what’s in iCloud or on other devices. Good news: doing this is easier (and safer) than you might think.
First, quickly check if your iPhone is syncing with iCloud Photos. Head to Settings, tap your Apple ID at the top, then tap iCloud → Photos. Is “Sync this iPhone” enabled?
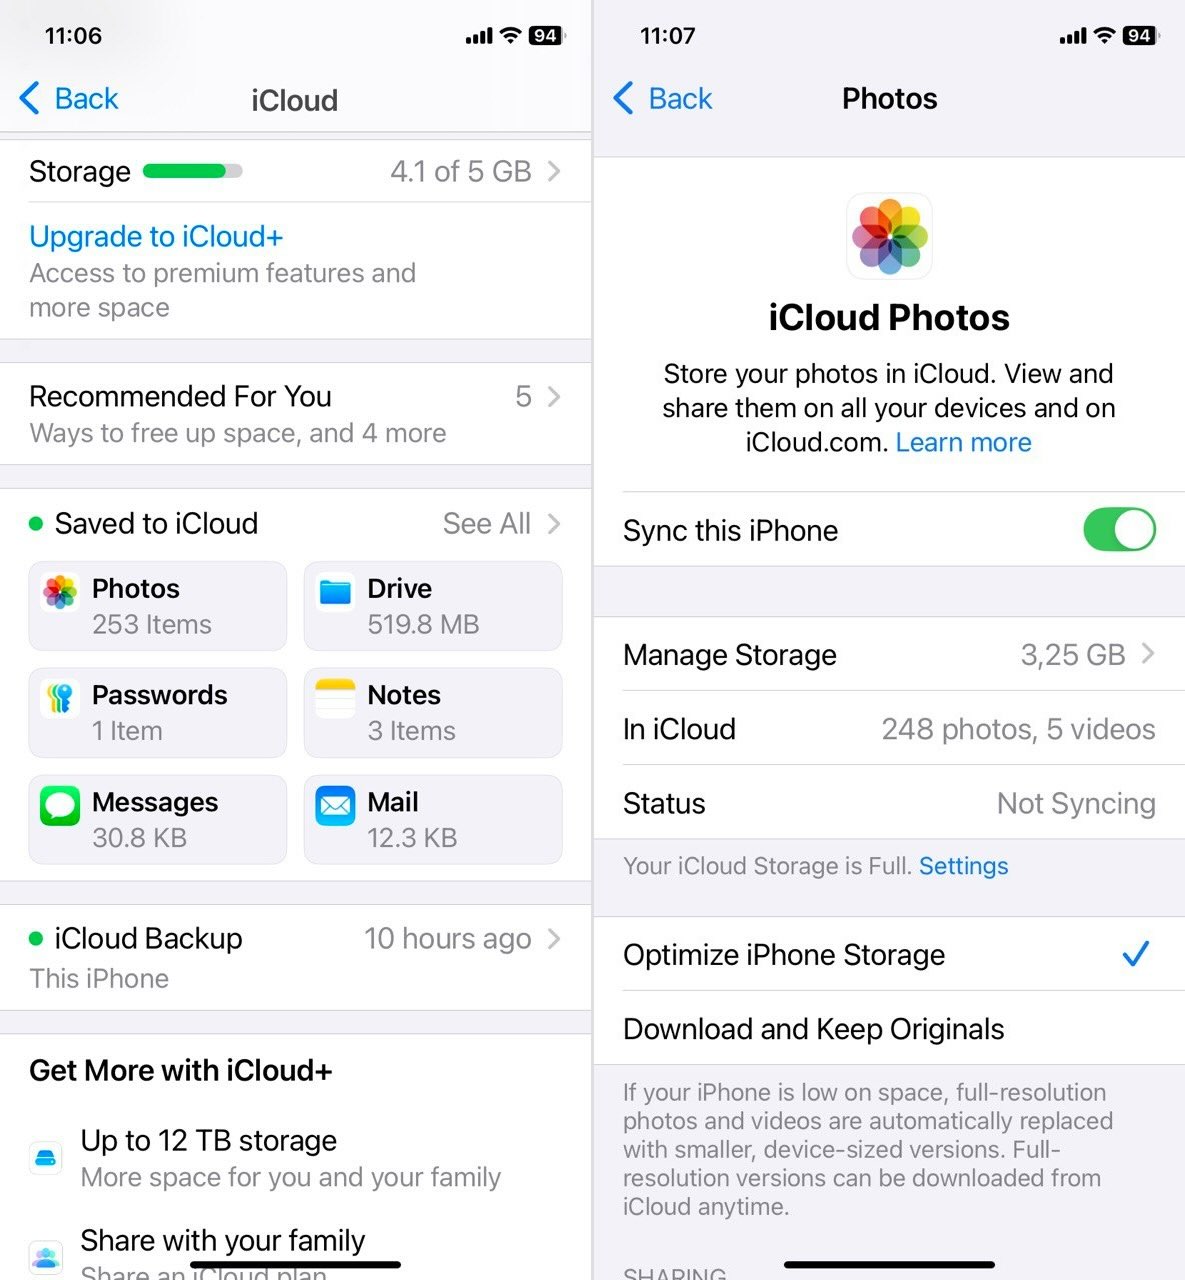
If yes, don’t just start deleting photos yet—that’ll clear them from iCloud too, and we’re guessing you don’t want that. Instead, flip off the toggle labeled iCloud Photos. You’ll be asked whether you want to “Remove from iPhone” or “Download Photos & Videos.”
If your goal is to delete all synced photos from your iPhone to free space immediately, pick “Remove from iPhone.” Don’t worry; your originals stay safely backed up in iCloud.
But if you choose “Download Photos & Videos,” the full-resolution photos will be downloaded first, so you’ll need enough storage space for them. This lets you carefully pick and delete exactly what you don’t need afterward.

How to Remove Synced Media From Your iPhone (the Easy Way)
Okay, so no matter what you chose in the previous step, your photos in iCloud are safe. That’s locked in.
Now, if you don’t want to delete all the synced photos at once—but instead want to go after the stuff you definitely don’t need or that’s just taking up too much space—there are a few solid options for thinning out your media library without overdoing it.
We’re pretty sure you already know how to delete those through the Photos app, but just in case, here’s a quick refresher:
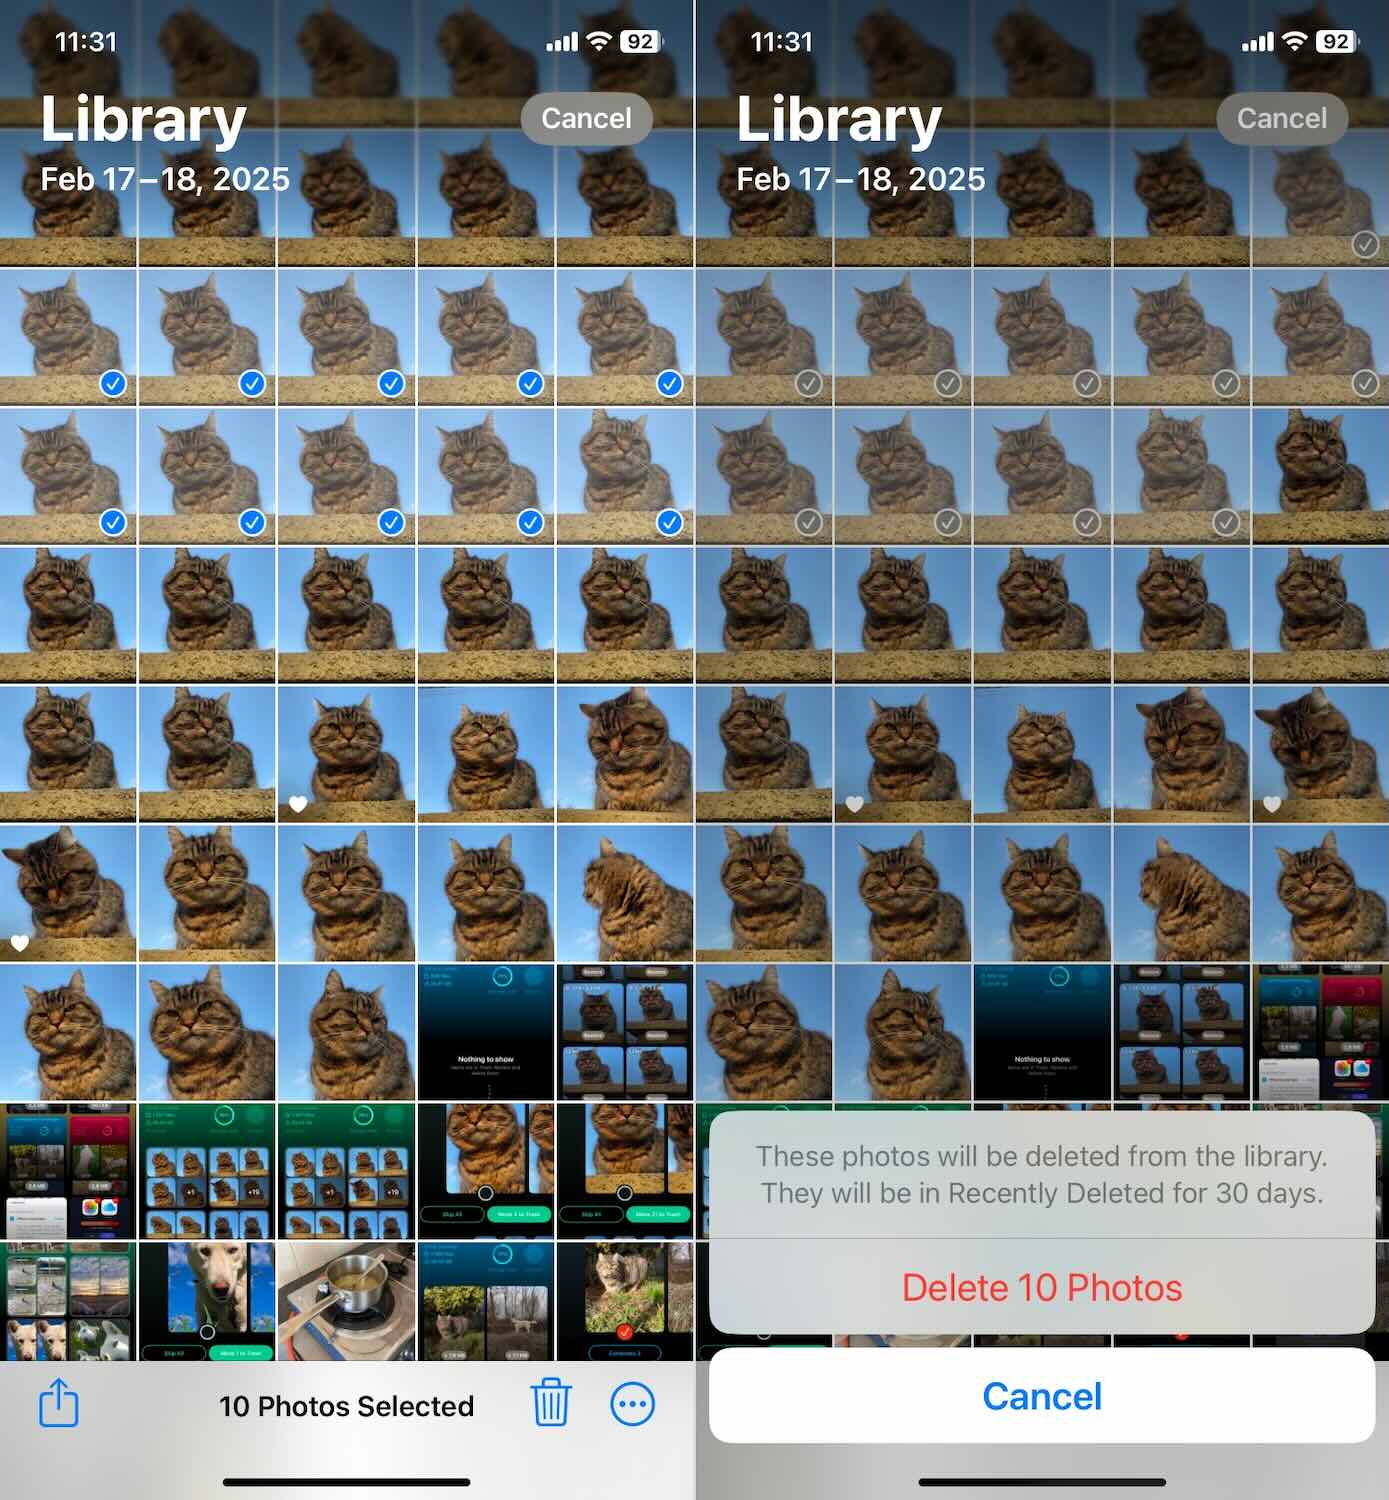
- Head over to your Photos app.
- Tap Select at the top-right corner.
- Then choose everything that’s overstayed its welcome.
- Once you’ve made your picks, tap the trash bin icon and confirm.
Easy enough—but let’s be honest. If you’ve untethered your iPhone photo library from iCloud, you’re probably aiming to keep everything in the cloud and only leave the most relevant and necessary files on your iPhone. Smart move. But doing that manually? Could take all day.
Luckily, there’s a faster, stress-free alternative. iPhone cleaner apps let you automate the entire media cleanup. We’ve tested many cleaning apps ourselves, and trust us—they actually work. The app we’ll use for this tutorial is Clever Cleaner: iPhone Photo Cleaner. Why Clever Cleaner? Because it’s free (like, genuinely free—no hidden fees or sneaky limitations), and it gets results. During our tests (you can read all about it in our Clever Cleaner review), we cleared dozens of gigabytes of media clutter in just a couple of minutes. Honestly, we didn’t expect to free up that much space so quickly—but we did.

- Find duplicates and similar shots – Clever Cleaner uses smart AI to detect exact copies and similar pics—like those fifteen group shots you took “just in case.” Apple’s built-in Photos app has a “Duplicates” feature, while it can merge duplicates, it can’t catch photos that aren’t exact matches.
- Clear out old screenshots – Detects and wipes screenshots you’ve long forgotten about.
- Spot huge files in seconds – It sorts all your photos/videos by size to make it easy to delete the biggest space hogs instantly. Ever tried doing this with the built-in Photos app? Good luck—it just doesn’t let you sort by file size.
- Manage Live Photos – Quickly converts Live Photos into standard images. If you’ve ever tried converting Live Photos manually in Photos, you know it’s a major headache—this app makes it a breeze.
The app itself is super easy to use. To give you an idea, here’s a quick walkthrough of how we cleared our own library of duplicates (and those sneaky “almost” duplicates) in literally seconds:
- First, download Clever Cleaner from the App Store.
- Once installed, open the app and tap the Similars tab.

- You can tap Smart Cleanup, and the app will automatically select the lower-quality duplicates for removal—or tap on a group to review manually. We’re actually more fans of cleaning in groups—it gives you more control. But since all our photos are already safely uploaded to iCloud, you can go ahead and clean them all at once if you’re short on time. Just check a few groups first. If you’re satisfied with the way the app picks the Best Shot (the one that will be kept), go ahead and tap Smart Cleanup. It’ll take care of the rest in seconds.
- If you went for group review, you can select different shots to keep—or skip the group entirely.
- Once you’ve made your choices, tap Move to Trash, and the app will show you the next batch. If you change your mind, there’s an Undo button at the top, so no pressure.
- When you’re ready, tap Empty Trash at the bottom, confirm the deletion, and that’s it—duplicates gone in seconds.

The app will also remind you of something important—deleted photos and videos don’t disappear instantly. Whether you remove them using Clever Cleaner or manually through the Photos app, they all end up in the Recently Deleted folder.
To finish the job, open Photos, scroll down to Recently Deleted, tap Select, then hit Delete All. Once you confirm, those synced photos (and everything else you removed) will be gone for good.

That means not only should the app stay free if you already have it installed, but there’s a good chance new features might roll out in the future—without charges.
Scenario 2: Delete Synced Photos from iCloud But Keep Them on Your iPhone
In case you need the “reverse” of the previous scenario—you want to delete iCloud synced photos, but only from iCloud, not your iPhone—you’ll need to make sure iCloud Photos isn’t actively syncing before you start deleting. Otherwise, anything you remove from iCloud will vanish from your iPhone, too.
So, first, turn off iCloud Photos on your iPhone:
- Open Settings and tap [Your Name] at the top.
- Go to iCloud → Photos.
- Toggle off iCloud Photos.
- When prompted, select Download Photos & Videos, so all your iCloud-stored photos are saved locally on your iPhone.
Now that your iPhone is no longer syncing photos with iCloud, you can safely delete them from iCloud without losing anything on your device.
To do this, access your iCloud Photos from another device—like your other iPhone, iPad, or even a computer browser:
- Open iCloud.com on any web browser and sign in with your Apple ID.
- Go to Photos. Select the pictures you want to remove.
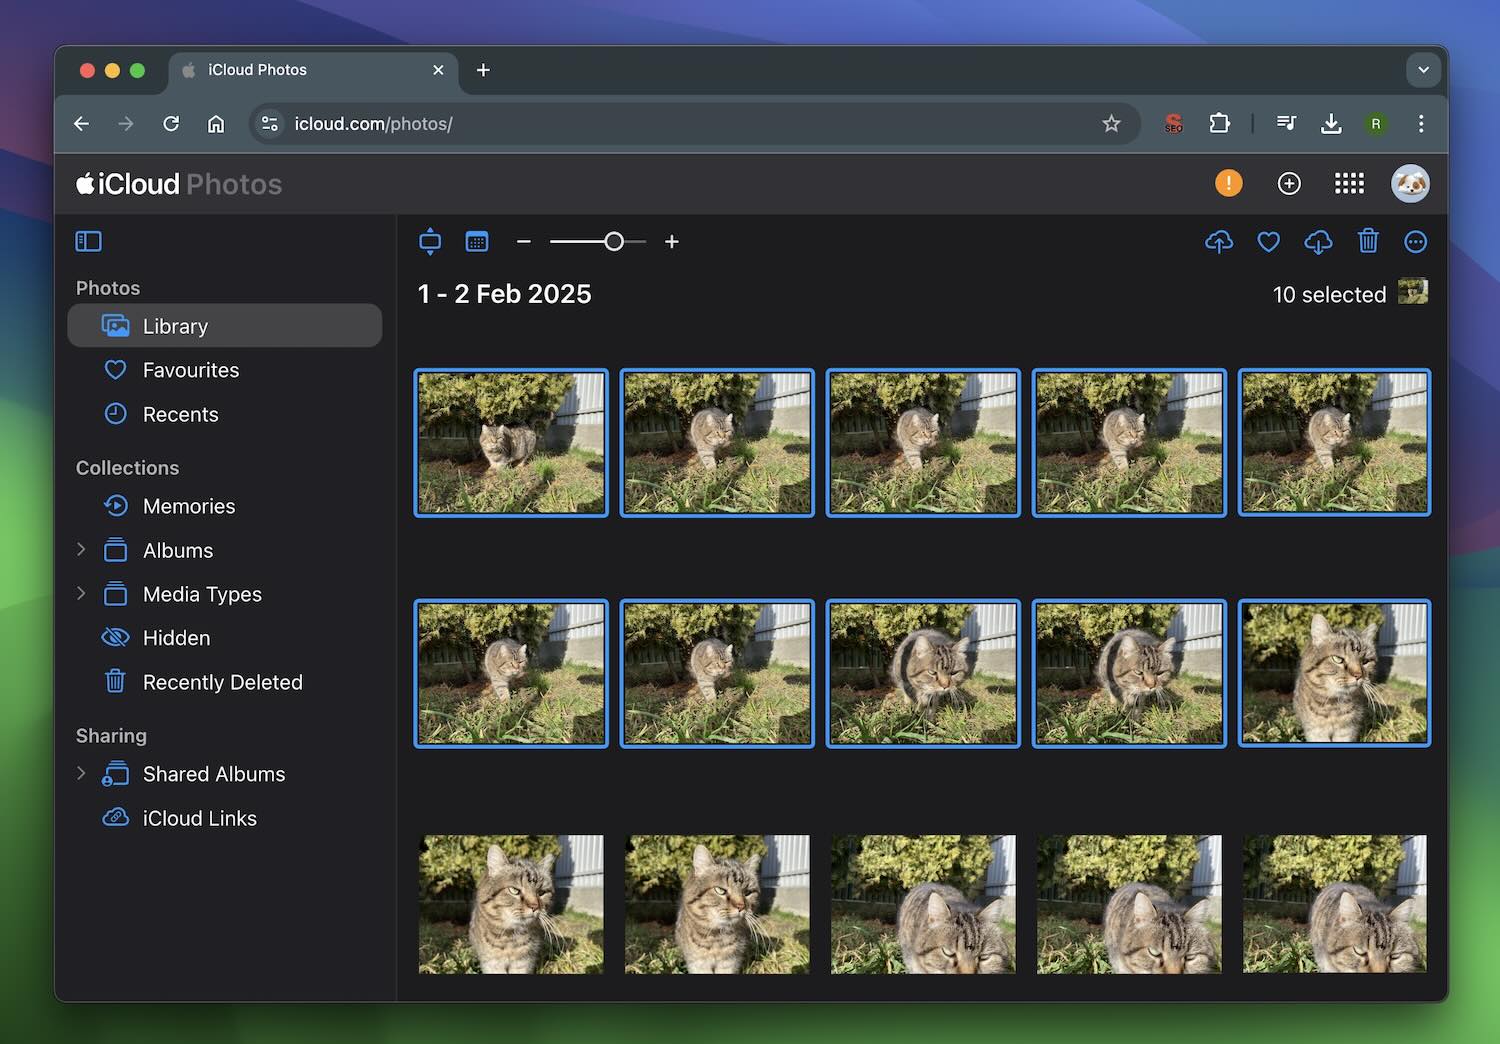
- Click the trash icon, and confirm.

- Just like on your iPhone, iCloud has a Recently Deleted folder where images stay for 30 days. If you want them gone immediately, clear that out, too.
That’s it! Your iPhone still has all its photos, but your iCloud storage is freed up.
Scenario 3: Can’t delete photos synced from a Mac/PC
If you ran into a situation where you can’t delete certain synced photos from your iPhone, and the trash icon is grayed out, you’re not alone. Tons of people run into this issue, especially when transferring photos from a Mac or PC. It’s one of those Apple quirks that makes no sense until you realize what’s going on: your iPhone isn’t in charge of these photos—your computer is.
So what’s the solution? You have to go back to the source (your Mac or PC) to remove them.
Since your iPhone won’t let you remove these photos directly, the trick is to overwrite them with nothing—basically, syncing your iPhone to an empty folder instead. Here’s how:
- First, grab a USB cable and connect your iPhone to your computer.
- If you’re using a Mac, open Finder. If you’re on Windows, open iTunes (yes, iTunes is still hanging around for this).

- Now, create a new empty folder anywhere on your computer—name it something like “Unwanted Photos”.
- Back in Finder (Mac) or iTunes (PC), select your iPhone from the sidebar, then go to the Photos tab.
- Look for the Sync Photos option. When you see it, select the empty folder you just created.
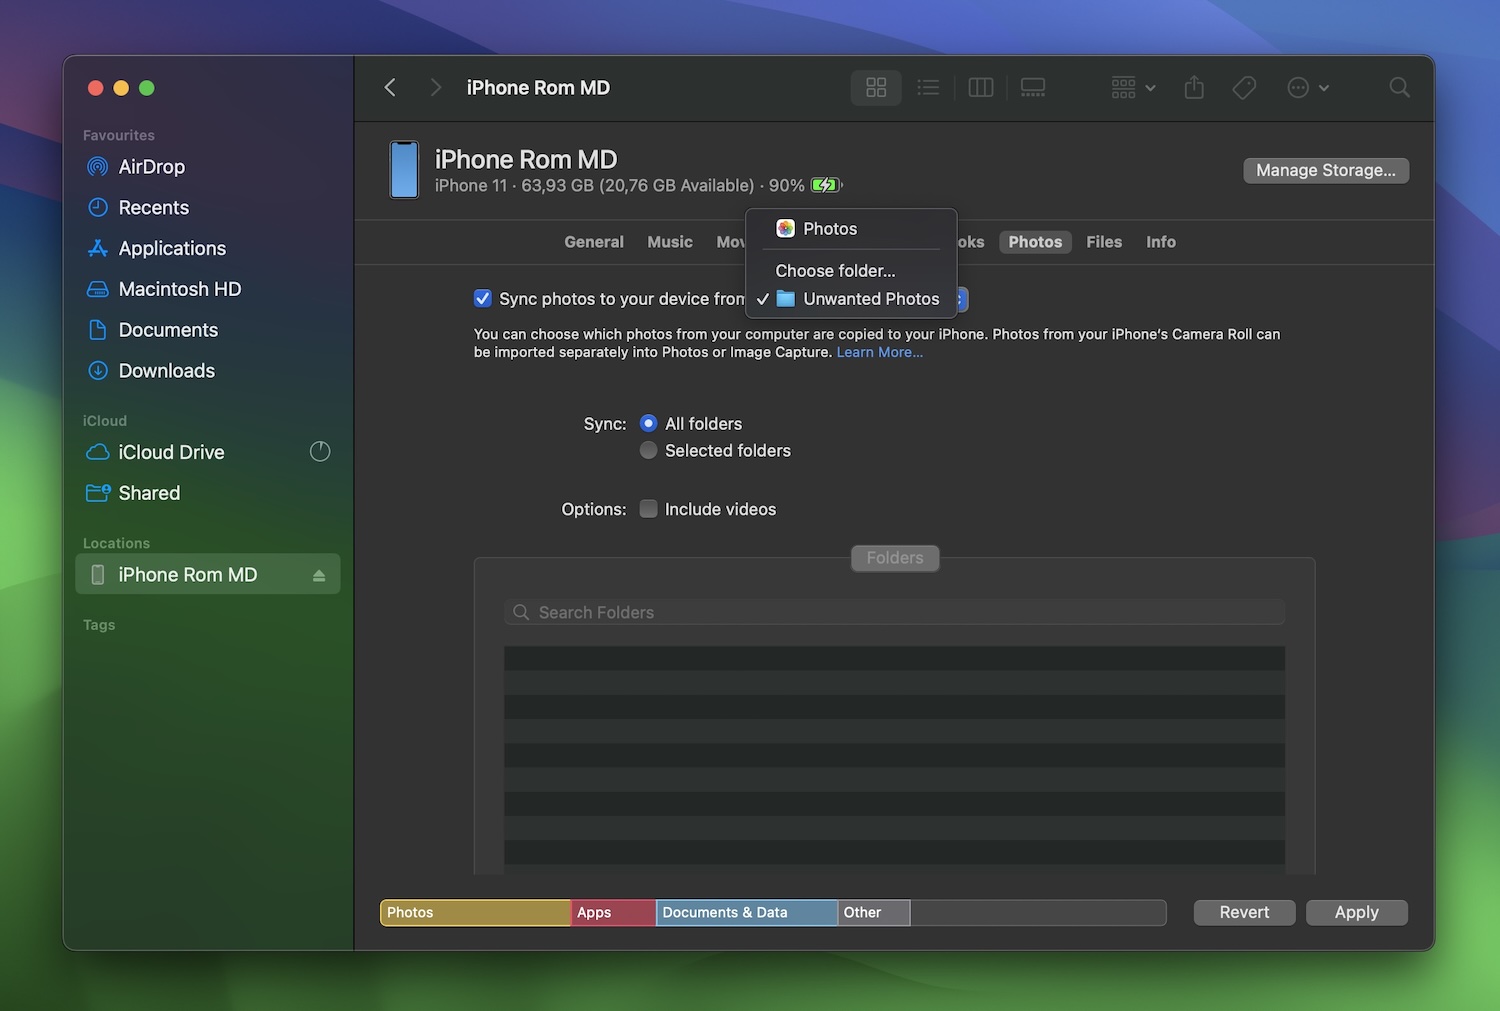
- Click Apply (or Sync, depending on what shows up).
Your iPhone will now replace the previously synced photos with whatever’s in that new folder—which, if you followed along, is absolutely nothing. The unwanted photos? Gone.
And that’s it! Your iPhone is finally free from those stubborn images. No more grayed-out trash bins, no more syncing confusion—just a clean photo library!
Scenario 4: Clear Synced Media on iPhone Remotely from a Computer
If you need to remove synced content from your iPhone but can’t do it directly—maybe you left your phone at home, misplaced it, or just need those photos gone right now—you can still delete them remotely using iCloud.com.
Since iCloud Photos keeps everything in sync across devices, any photo deleted from iCloud will automatically disappear from your iPhone as long as iCloud Photos is enabled. That means you don’t have to wait until you have your phone in hand—you can take care of it from any computer or tablet.
How to delete synced iPhone photos remotely via iCloud.com:
- Open a web browser on your computer and go to iCloud.com.
- Sign in with your Apple ID (same one used on your iPhone).
- Click on Photos to access your entire iCloud-synced photo library.
- Select the photos you want to delete.
- Click the trash icon at the top, then confirm the deletion.
Since iCloud syncs across devices, these photos will also be removed from your iPhone automatically—no need to touch your phone at all. Just don’t forget, by default, deleted photos stay in the Recently Deleted folder for 30 days before they’re permanently erased.
Scenario 5: Delete Synced Photos from iPhone and iCloud
If you want to delete iCloud-synced media from all your devices—your iPhone, iPad, Mac, and iCloud itself—you need to make sure everything is set up properly so the deletions sync across all connected devices. Since iCloud Photos automatically keeps everything in sync, when you delete a photo from one device, it disappears from everywhere.
The steps are the same as the previous scenario, so we won’t repeat those. But before you start, here’s a checklist of things to verify so you don’t run into issues:
- iCloud Photos is enabled on your devices – If it’s off, deletions won’t sync. Go to Settings → [Your Name] → iCloud → Photos and check that iCloud Photos is turned on.
- All your Apple devices are online – If a device is offline, it won’t sync the deletions until it reconnects.
- Low Power Mode is off – Sometimes, iCloud sync pauses when your battery is low. Make sure Low Power Mode isn’t limiting background activity.
- You’re signed into the same Apple ID on all devices – If your devices are using different accounts, deletions won’t sync. Double-check under Settings → [Your Name].
- Your Mac is syncing with iCloud – If you’re using a Mac, open System Settings → Apple ID → iCloud and confirm that Photos is checked.
- You understand that this is permanent – Once you clear the Recently Deleted folder, those photos are gone for good. If you think you might need them later, back them up before deleting.
Once you’ve checked all of the above, you’re ready to delete your synced photos from every device at once without worrying about stragglers sticking around!
Final Tips
To conclude, we want to mention a couple more things. Maybe adjusting your syncing habits could help you avoid headaches in the future. If iCloud feels like it has too much control over your photos, or just isn’t flexible enough for you, there are a couple of solid alternatives worth considering.
- DearMob iPhone Manager is one of them. It lets you transfer, back up, and delete photos without iCloud or iTunes or worrying about sync messing everything up. Got old synced photos that won’t delete? This tool handles that too. Think of it as a way to manage your iPhone’s media on your own terms—without Apple’s usual restrictions.
- Then there’s Shared Albums—perfect if you still like iCloud but don’t want every photo taking up space across all devices. Unlike iCloud Photos, Shared Albums don’t eat into your iCloud storage and let you pick which photos get synced instead of dumping your entire library everywhere. It’s a simple trick, but a useful one.
And if you run into unexpected problems, there are plenty of users who have been through the same thing. Reddit’s r/iPhone, Apple’s support forums, and our own iPhone forum are full of people sharing fixes, advice, and workarounds. If you ever feel stuck, ask—someone definitely has the answer.
FAQ
If iCloud Photos isn’t enabled, you’ll need to connect your iPhone to your Mac with a USB cable and use Finder (or iTunes on older macOS versions). From there, go to the Photos tab, select your iPhone, and manage your synced media.