verdant Posted August 9, 2012 Share Posted August 9, 2012 nForce OS X Mountain Lion (10.8) APP STORE DOWNLOAD INSTALL GUIDE on a Series 6 or 7 nForce chipset / Intel CPU MOBO ************************************************************* GUIDE CONTENTS ************************************************************* Post #1 - How to Prepare for Installing OS X Mountain Lion on a HDD Introduction Download Links Acknowledgements Methods for [1] Enabling the download of OS X Mountain Lion from the Apple App Store and [2] Making a USB Flash Drive Installer for OS X Mountain Lion 10.8: Part A. Enabling Snow Leopard running in 64bit mode or Lion running in default 64bit mode on an nForce MOBO for purchasing and downloading OS X Mountain Lion from the Apple App Store Part B. Making a Bootable GPT Partitioned USB Flash Drive OS X Lion 10.8 Installer Post #2 - How to Install OS X Mountain Lion on a HDD USB and DVD Installer Methods for Installing OS X Mountain Lion on a HDD Volume (GPT or MBR): Part C. Installing a Bootable OS X Mountain Lion (OS X 10.8) system on a GPT Partitioned Hard Drive Volume Using a Bootable GPT USB Flash Drive Installer Part D. Installing a Bootable OS X Mountain Lion (OS X 10.8) system on a MBR or GPT Partitioned Hard Drive Volume Using a Bootable GPT USB Flash Drive Installer Part E. Installing a Bootable OS X Mountain Lion 10.8 system on a MBR or GPT Partitioned Hard Drive Volume Using verdant's OS X Mountain Lion 10.8 Single Layer DVD MBR/GPT Installer Part F. Installing a Bootable OS X Mountain Lion 10.8 system on a MBR or GPT Partitioned Hard Drive Volume Using verdant's OS X Mountain Lion 10.8 Dual Layer DVD MBR/GPT Installer Post #3 - nVidia Graphics Card Operation in OS X Mountain Lion Getting an nVidia graphics card working in Mountain Lion Generating and Modifying an EFI Graphics String for Mountain Lion Indications that Core Image (CI) and Quartz Extreme (QE) are both enabled in Mountain Lion Obtaining the NVCAP data string from your nVidia graphics card BIOS via Windows Inserting nVidia Graphics Card Hardware Matching Device ID into nVidia Graphics Kexts Post #4 - Generating and Modifying the DSDT.aml File for Your Own nForce MOBO Device (RTC) fix for the CMOS Reset issue DTGP Method patch to enable use of other patches in the DSDT.aml file Device (HPET) fix to enable the removal of NullCPUPowerManagement.kext from /Extra/Extensions/ and loading of AppleIntelCPUPowerManagement.kext Device (LPCB) patch insertion into the DSDT.aml file to enable Native Power Management in OS X Device (TMR) and Device (PIC) fixes to prevent audio "stuttering" when Native Power Management in OS X is enabled, i.e. after SpeedStepping with C-states is enabled Post #5 - How to Enable Natural Power Management ("vanilla SpeedStepping") in OS X Mountain Lion (and OS X Lion and OS X Snow Leopard) on an nForce chipset + Intel CPU MOBO Post #6 - OS X Mountain Lion Installation / Boot / Operation Issues Issue 1. [PCI configuration begin] bootup error - proposed solutions Issue 2. Setting up Builtin Ethernet manually / LAN0 / (en0) - proposed solutions Post #7 - Getting Audio Working in OS X Mountain Lion Asus SupremeFX II Audio Card (Analog Devices AD1988B 8-Channel High Definition Audio chipset/CODEC) Realtek ALC885/889a 7.1+2 Channel High Definition Audio Codec via DSDT Modding Will be expanded in time...... Post #8 - Peripheral Devices on nForce chipset + Intel CPU MOBOs Device 1. Asmedia 106x SATA Controller Ver 0.95 AHCI Mode Issue 1. Displayed in System Report as "Unknown AHCI Standard Controller:" and "Vendor: Unknown" Issue 2. Updating the ASM1061 firmware from version 0.89 to version 0.95 and then 0.95.1 Issue 3. Resolvable Issues when the Asmedia SATA Controller is connected to one or more SATA Optical Drives ************************************************************* INTRODUCTION ************************************************************* This guide is: 1. Is focussed on installing and running OS X Lion on a Series 6 or 7 nForce chipset / Intel CPU MOBO with an nVidia graphics card: simply because I have a 650i nForce chipset + Intel Q6600 CPU MOBO + Inno3D GeForce 9800GT 512MB graphics card........and what works for the 650i should and invariably does work for the 650i Ultra, 680i, 750i, 780i, 790i, and 790i Ultra.....hence my topic tags.... However, in my topic tags, I say 630i only possibly. This is because my current understanding is that the following nForce chipsets are not fully AHCI compliant and so can be used with imk's 64bit version of the always mentioned nForceATA.kext: nForce 430/410 (MCP51), nForce 590/570/550/680i/650i/780i/750i/790i (MCP55) and nForce 430/405/400 (MCP61); nForce 560/520 (MCP65) and nForce 630a (MCP67) Furthermore, the MOBOs using one of these nForce chipsets usually have the BIOS option to set the enable nForce SATA Controller and require SATA RAID to be Enabled (implicitly enabling AHCI mode) even when not running a RAID system, for the NForceATA.kext to work. In contrast, the following nForce chipsets are/may be fully-AHCI compliant and so do not/may not work with the AppleNForceATA.kext: nForce 560/520 (MCP65) and nForce 630a (MCP67); nForce 630i/620i/610i (MCP73), nForce 730a/720a/710a (MCP78) and nForce ION (MCP79) nForce chipsets (MCP65 and higher) support the advanced SATA features in the AHCI standard, such as NCQ etc. The MOBOs using one of these nForce chipsets usually have the BIOS option to set the nForce SATA Controllers to "AHCI Mode" instead of "IDE Mode". ************************************************************* As I use an nVidia graphics card, the guide is naturally written from an nVidia perspective; nevertheless, I hope that owners of a Series 6 or 7 nForce chipset / Intel CPU MOBO with an ATI graphics card will use it too because hopefully the method that you have used to get full CI/QE and multi-resolutions in OS X Lion and/or OS X Snow Leopard work the same for OS X Mountain Lion, or work with only convenient minor changes. ************************************************************* For help with: 1. AMD/ATI graphics cards go here 2. Multiple nVidia graphics card(s) and/or displays go here but go here for setting up your DSDT.aml for AMD/ATI graphics cards 3. For help with mixed multiple AMD/ATI and/or nVidia graphics cards and /or multiple displays, Google is your friend......as are aqua-mac, netkas, and others....... I also hope that non-nForce chipset + Intel CPU MOBOs also find it interesting and even helpful too....... I say this because: {a} Each reader's MOBO brand/model typically has to have its own custom setup for DSDT/audio/networking/video etc. {b} It is primarily the need for the AppleNForceATA.imk64bit.kext in /Extra/Extensions/ and nForceLAN.0.64.5.kext in /System/Library/ Extensions/, as well not being able to use a SleepEnabler.kext and having issues with sleep that distinguishes nForce chipset + Intel CPU MOBOs from non-nForce chipset + Intel CPU MOBOs rather than the basic procedures for installing OS X......... 2. Split into sections and sub-sections (from post #1 to post #8) for ease of following and adding to.... 3. A "live guide" that will evolve with both Mountain Lion and time (with some inevitable typo corrections, additions, deletions etc.)....... So, please read the current online "live" guide before attempting to follow it, even if you had previously followed an earlier version successfully..... 4. Starts with the assumption that you already have OS X Snow Leopard (10.6.6 or later) OR OS X Lion (10.7.2 or later) installed and running in 64bit mode on a Mac or Hack using at least the following 64bit capable kexts in /Extra/Extensions: AppleNForceATA.imk64bit.kext EvOreboot.kext or OpenHaltRestart.kext FakeSMC.kext NullCPUPowerManagement.kext or Disabler.kext HOWEVER, if you are currently running OS X Leopard, then see my nForce RETAIL INSTALL GUIDE for Snow Leopard (10.6) on a Series 6 or 7 nForce chipset / Intel CPU MOBO on how to install Snow Leopard....... Or my nForce OS X Lion (10.7) APP STORE DOWNLOAD INSTALL GUIDE on a Series 6 or 7 nForce chipset / Intel CPU MOBO on how to install Lion....... While I realise that some of you may have already obtained the OS X Mountain Lion 10.8.0 Installer as a .dmg /.iso image file, my working assumption is that most of you will need to have Snow Leopard installed in order to purchase and download the OS X Mountain Lion 10.8 Installer from the Apple App Store....... My plea to all readers is: Remember Apple are a company not a charity and they will do all they can to protect their market share and profits, and if they ever begin to see the OSx86/Hackintosh web fora as a 'serious threat', they may decide to fully 'lock down' OS X......! SO PLEASE THANK APPLE FOR THEIR FANTASTIC OS AND FOR NOT FULLY LOCKING IT DOWN TO THEIR OWN HARDWARE BY SUPPORTING FURTHER AND FUTURE APPLE R&D ON OS X IF YOU CAN, BY...... [1] BUYING AND DOWNLOADING OS X MOUNTAIN LION 10.8 FROM THE APPLE APP STORE...... [2] IF AND WHEN YOU CAN AFFORD IT, PURCHASING A MAC AND/OR OTHER APPLE PRODUCTS IF THEY CAN DO WHAT YOU NEED THEM TO DO...... ************************************************************* DOWNLOAD LINKS ************************************************************* Sendspace Download Links Download 1. verdant_Mountain_LIon_Support_Files_v1.0 > verdant_Mountain_LIon_Support_Files_v1.0 >> 64bit Kexts for Sys_Lib_Extensions ACPIMonitor.kext AD1998b.FIX.kext AppleHDA.1062.kext AppleNForceATA.imk64bit.kext AppleRTC.MLion.Patched.kext EvOreboot.kext FakeSMC.kext IntelCPUMonitor.kext IntelThermal.kext nForceLAN.0.64.5.kext NullCPUPowerManagement.kext NVClockX.kext NVEnabler 64.kext SuperIOFamily.kext VoodooHDA.kext >> Applications Chameleon Wizard Kext Wizard SMC Monitor >> Chameleon Bootloader Chameleon-2.1svn-r2042.pkg.zip i386.2.1svn-r2042.zip >> Changelog for verdant_Mountain_LIon_Support_Files_v1.0.rtf >> CUDA 5.0.17 for Mountain Lion cudadriver-5.0.17-macos.dmg - this is the image file for v5.0.17 CUDADriver.pkg >> EFI Graphics String Apps EFIStudio_GTX.zip EFIStudio.1.1.zip OSX86Tools_1.0.150.zip plist_gfxutil.zip >> Lion FakeSMC - FakeSMC (3.1.0) - Revision 493. Made by mojodojo Release 10.6 - only use the HWSensor kexts appropriate for your hardware SMC_Stat_i - this is a SMC monitor menu bar app >> MaLd0n Extra Folder Extra_Folder.zip - this is the .zip file for MaLd0n's Extra Folder.pkg >> Pure 64bit Extra Kexts AHCIPortInjector.kext AppleACPIPS2Nub.kext ApplePS2Controller.kext ApplePS2Keyboard.kext ApplePS2Mouse.kext ApplePS2Trackpad.kext ATAPortInjector.kext AtherosFix.kext FakeSMC.kext JMicron36xATA.kext JMicron36xSATA.kext NullCPUPowerManagement.kext OpenHaltRestart.kext ************************************************************* ACKNOWLEDGEMENTS ************************************************************* PLEASE NOTE that ALL CREDIT goes (in no particular order) the original developers of the included applications/kexts/bootloaders and boot files etc: In /Extra/Extensions/ NullCPUPowerManagement.kext - David Elliott AD1998b.FIX.kext - THe KiNG AppleNForceATA.imk64bit.kext - MeDevil for original kext AND imk for the working 64bit version EvOreboot.kext - EvO Team FakeSMC.kext – netkas, Slice In /System/Library/Extensions/ nForceLAN.0.64.5.kext – eno VoodooHDA patched for AD1988B - oldnalpalm In boot sector, / and in /Extra/ Chameleon v2.1svn r2042 Thanks to everyone involved in the development of Chameleon v2.1svn r2042, making it a compatible bootloader for Mountain Lion......! Chameleon Developers : zef, Turbo, dfe, netkas, mackerintel, mercurysquad, fassl, Kabyl, Crazor, Dense, kaitek, iNDi, munky, JrCs, asereBLN, rekursor, mozodojo, meklort, AnV, valv, AzimutZ, Slice, cosmo1t, cparm, Conti With thanks to : bumby, kalyway, Krazubu, Eddie11c, JaS, fassl, XyZ, SMF, flama, Galaxy, sckevyn, MasterChief, smith@@, blackosx, DHP, nawcom, scorpius, macman, dmazar Chameleon Package : kalyway, AzimutZ, blackosx, ErmaC, scrax, JrCs Thanks also to MaLd0n for the MacPro3,1 SMBIOS.plist Apologies to anyone I have forgotten, or do not know to mention, or have yet to mention in the above credits as the guide is expanded in due course...... ************************************************************* ************************************************************* Part A. Enabling Snow Leopard running in 64bit mode or Lion running in default 64bit mode on an nForce MOBO for purchasing and downloading OS X Mountain Lion from the Apple App Store ************************************************************* According to Apple, to upgrade to OS X Mountain Lion, the following must be done: Step 1: Make sure your Mac can run Lion. To run OS X Mountain Lion, your Mac must have a 64-bit capable Intel Core 2 Duo processor or better processor, as well as being capable of booting the Mountain Lion 64-bit kernel, 64-bit EFI, and 64-bit graphics drivers. Find out if your current Mac has one of these processors by clicking the Apple icon at the top left of your screen, then choosing About This Mac. General Requirements * OS X v10.6.8 or later * 2GB of memory * 8GB of available space * Some features require an Apple ID; terms apply. * Some features require a compatible Internet service provider; fees may apply. Supported Models * iMac (Mid 2007 or newer) * MacBook (Late 2008 Aluminum, or Early 2009 or newer) * MacBook Pro (Mid/Late 2007 or newer) * Xserve (Early 2009) * MacBook Air (Late 2008 or newer) * Mac mini (Early 2009 or newer) * Mac Pro (Early 2008 or newer) For further information read this article and for a list of non-compatible real Macs, read this article. Step 2: Make sure you have the latest version of OS X Snow Leopard or OS X Lion. Get up to date with the latest version of OS X Snow Leopard or OS X Lion to purchase OS X Mountain Lion from the Mac App Store. If you have Snow Leopard, click the Apple icon and choose Software Update to install the latest version, which is 10.6.8. If you have Lion, click the Apple icon and choose Software Update to install the latest version, which is 10.7.4. Step 3: Download OS X Lion from the Mac App Store. Open the Mac App Store from your Dock to buy and download Lion. Then follow the onscreen instructions to install it. In the case of OSx86 / Hackintosh PCs, the equivalent steps are: Step 1: Make sure your OSx86 / Hackintosh PC can run Mountain Lion. Initial Requirements: * A 64-bit capable Intel Core 2 Duo processor or better processor, as well as being capable of booting the Mountain Lion 64-bit kernel, 64-bit EFI, and 64-bit graphics drivers. * OS X v10.6.8 or later * 2GB of memory * 8GB of available space * Some features require an Apple ID; terms apply. * Some features require a compatible Internet service provider; fees may apply. Further Requirements: 1. If your PC has a CPU that System Profiler lists as 'Unknown' even though it is an Intel CPU, it is not just a case of editing: The AppleSystemInfo.strings "UnknownCPUKind" entry from "Unknown" to, for example, "Intel® Core™2 Quad CPU Q6600" (found in OS X 10.6.8 /System/Library/CoreServices/Resources/English.lproj/}. [ii] The AboutThisMac.strings for Processor text fields in the About This Mac window (found in 10.6.8 /System/Library/CoreServices/loginwindow.app/Contents/Resources/), to get, for example, "3.0 MHz Intel® Core™2 Quad CPU Q6600" to display properly in the About This Mac window. because these changes are purely cosmetic......OS X still regards your CPU as Unknown......consequently, some software installers (if not hacked) will fail to install because the CPU is not properly detected, e.g. the Microsoft Silverlight installer. The solution is to use a bootloader with auto-CPU detection (following the work of DigitalDJ; see here). RECOMMENDATION: Try using a current Chameleon bootloader version, such as Chameleon Chameleon v2.1svn r2042 Hence, with a Core2Quad CPU, e.g. Q6600, the Chameleon v2.1svn r2042 bootloader will inject a "Quad-Core Intel Xeon" CPU-type...... 2. It is necessary to use a SMBIOS.plist which gives 'vaild' details as far as OS X Snow Leopard, OS X Lion and OS X Mountain Lion are concerned for the following keys: <key>SMbiosdate</key> <key>SMbiosversion</key> <key>SMboardproduct</key> <key>SMfamily</key> <key>SMmanufacter</key> <key>SMproductname</key> <key>SMserial</key> because in OS X Lion 10.8 /System/Library/CoreServices/PlatformSupport.plist, there is a list of Supported Board IDs: Mac-F2268DC8 Mac-F22C86C8 Mac-F22587C8 Mac-F2218FA9 Mac-F2218EA9 Mac-F42D86A9 Mac-F22C8AC8 Mac-F22586C8 Mac-942B59F58194171B Mac-F226BEC8 Mac-F4218FC8 Mac-942459F5819B171B Mac-7BA5B2794B2CDB12 Mac-F4218EC8 Mac-F2208EC8 Mac-F22C89C8 Mac-F22587A1 Mac-F221DCC8 Mac-F42388C8 Mac-F223BEC8 Mac-F4238CC8 Mac-F222BEC8 Mac-F227BEC8 Mac-F4208AC8 Mac-F22788A9 Mac-F4238BC8 Mac-F221BEC8 Mac-C08A6BB70A942AC2 Mac-8ED6AF5B48C039E1 Mac-F2238AC8 Mac-F4208EAA Mac-F22788C8 Mac-F2268EC8 Mac-F2218EC8 Mac-F22589C8 Mac-F4228EC8 Mac-F22788AA Mac-F42C86C8 Mac-F4208CA9 Mac-942C5DF58193131B Mac-F2238BAE Mac-F42289C8 Mac-F2268CC8 Mac-F4208DC8 Mac-F2218FC8 Mac-742912EFDBEE19B3 Mac-F4208DA9 Mac-F42D89C8 Mac-F4208CAA Mac-F42D89A9 Mac-F2268AC8 Mac-F42C89C8 Mac-942452F5819B1C1B Mac-F42786A9 Mac-F42D88C8 Mac-F42187C8 Mac-94245B3640C91C81 Mac-F42D86C8 Mac-4BC72D62AD45599E Mac-F2268DAE Mac-F42C8CC8 Mac-F42C88C8 Mac-94245A3940C91C80 Mac-F42386C8 Mac-942B5BF58194151B Mac-F42189C8 Recommendation: Use the very useful Extra Folder Installer prepared by MaLd0n: Extra_Lion.pkg.zip and run the Installer with the Extra Folder option UNCHECKED but CHECK the smbios.plist option that is applicable to your CPU: iMac9,1 -> Intel Core 2 Duo ("Penryn") iMac10,1 -> Intel Core 2 Duo ("Wolfdale") iMac11,1 -> Core i5, or Core i7 ("Nehalem") iMac11,2 -> Intel Core i3 or Core i5 ("Clarkdale") iMac11,3 -> Intel Core i3, Core i5, or Core i7 ("Clarkdale, Lynnfield") iMac12,1 -> Intel Core i5 or Core i7 ("Sandy Bridge") iMac12,2 -> Intel Core i5 or Core i7 ("Sandy Bridge") MacBook2,1 -> Intel Core 2 Duo Mobile ("Merom") / Intel Graphics Media Accelerator (GMA) 950 MacBook4,1 -> Intel Core 2 Duo Mobile ("Penryn") / Intel Graphics Media Accelerator (GMA) X3100 MacBookPro4,1 -> Intel Core 2 Duo Mobile ("Penryn") / NVIDIA GeForce MacBookPro6,1 -> Intel Core i5 or Core i7 Mobile ("Arrandale") / NVIDIA GeForce and Intel HD Graphics MacBookPro8,1 -> Intel Core i5 or Core i7 Mobile ("Sandy Bridge") / Intel HD Graphics 3000 MacBookPro8,3 -> Intel Core i7 Mobile ("Sandy Bridge") / AMD Radeon HD and Intel HD 3000 Graphics MacPro3,1 -> Intel Xeon 5400 series ("Harpertown") / Use for Core2Quad MacPro4,1 -> Intel Xeon 3500 or 5500 series ("Bloomfield, Gainestown") / Use for Core i Nehalem/ Quad Core HT / Line 9xx MacPro5,1 -> Intel Xeon W3530, W3565, W3680, E5620, X5650, or X5670 ("Bloomfield, Westmere") / Use for Core i Nehalem/ Quad or Six Core HT / Line 9xx I have found that without the correct SMBIOS.plist details, i.e. all the details recognisable as 'valid' by the Apple App Store, it is not possible to purchase and download the Install Mac OS X Lion app from the App Store, even though other software can be purchased and downloaded via the App Store using a 'validated' Apple ID...... For example, I have found that using SMBIOS.plist details for a MacPro2,1 with my Core2Quad Q6600 CPU, which results in my OSx86 / Hacintosh PC being recognised by Geekbench as a Mac: did not enable the purchase and download of the Install Mac OS X Lion app, whereas using 'valid' SMBIOS.plist details for a MacPro3,1 (thanks to MaLd0n), which results in my OSx86 / Hackintosh PC being recognised by Geekbench as a Hackintosh: did enable the purchase and download of the Install Mac OS X Lion app.....! So, a OSx86 / Hackintosh PC being recognised by Geekbench as a Hackintosh is not necessarily an obstacle to being able to purchase and download the Install Mac OS X Lion app from the Apple App Store........ Step 2: Make sure you have the latest version of Snow Leopard or Lion. While Apple have recommended using the latest version OS X Snow Leopard version, which is 10.6.8 (make sure you run Software Update, so that the recently released Mac OS X 10.6.8 Supplemental Update is installed; alternatively, you can download and run the standalone Mac OS X 10.6.8 Update Combo v1.1.....the same advice to use the standalone Update Combo applies if you are running OS X Lion, i.e. MacOSXUpdCombo10.7.4.dmg. However, some IM members have had problems with 10.6.8 but success with 10.6.7 when attempting to purchase and download the Install Mac OS X Lion app.....so, if 10.6.8 does not work for you, try 10.6.7, or even 10.6.6.....the same advice applies if you are running OS X Lion. Step 3: Download OS X Mountain Lion from the Mac App Store. Before attempting to purchase and download the Install Mac OS X Lion app from the Apple App Store, you should check the following: That you can enter your Apple ID and password and have it accepted....... If you have problem, then follow the procedure recommended by Apple.....the procedure has worked for me on an Ethernet connection..... [ii] That you can start the process of purchasing software from the App Store...... [iii] Read Section 1 of Part B. of this guide (in post #1) If and [ii] are achievable and [iii] has been done, then you should hopefully be able to open the Mac App Store from your Dock to buy and download Install OS X Mountain.app BUT DO NOT click on the “Install OS X Mountain Lion” installer app icon that will show up in the Dock......If you still have problems then try the following: [1] Go to System Preferences, then to Network......select your Network Service i.e. Ethernet or AirPort in the sidebar and click the '-' tab at the sidebar bottom, which will delete the service [2] Modify your org.chameleon.Boot.plist by adding in the following: <key>EthernetBuiltIn</key> <string>Yes</string> If you have a PIC NIC installed it may also be necessary to add an entry in org.chameleon.Boot.plist for PCIRootUID because a MOBO may have pciroot=0 or pciroot=1, shown here for pciroot=1: <key>PCIRootUID</key> <string>1</string> To find your pciroot value, use this command in Terminal: ioreg -l | grep -15 "AppleACPIPCI" | grep "_UID" which should give "_UID" = "1" or "_UID" = "0". [3] Reboot into OS X Lion and again go to System Preferences > Network......but now click the '+' tab at the sidebar bottom, to add a new Network Service named Ethernet (en0) for your LAN service..... I have a PIC NIC that is connected to the internet under the Network Service name 'Ethernet Adaptor (en0)' but is seen as built-in......System Profiler says against Ethernet Cards: This computer does not appear to have any PCI Ethernet cards installed. I wish you the same success I had in purchasing and downloading the Install Mac OS X Lion app from the Apple App Store...... Posted Image If you have problems with using <key>EthernetBuiltIn</key> <string>Yes</string> and/or <key>PCIRootUID</key> <string>1</string> then go to post #4 Issue 2 Setting up Builtin Ethernet / LAN0 / (en0) ************************************************************* ************************************************************* Part B. Making a Bootable GPT Partitioned USB Flash Drive OS X Lion 10.8 Installer ************************************************************* 1. You will need: [1] Access to a working Mac or Hack x86 OS X Snow Leopard 10.6.8 or OS X Lion 10.7.4 (I am assuming that you already have OS X Snow Leopard 10.6.8 or OS X Lion 10.7.4 installed and running) [2] A 8GB USB flash drive (memory stick) [3] To be able to purchase and download OS X Mountain Lion from the Apple App Store. See Part A. [4] To download my "verdant_Mountain Lion_Support_Files_v1.0.zip" folder The “Install OS X Mountain.app” installer app icon will show up in the Dock. If it does, then the installer should also show up in your Applications folder. * DO NOT click on the icon NOR right-click on the icon and select Open * DO NOT double-click on its icon in the Applications folder 2. Extracting Necessary Files from Lion Installer App [1] Boot into Snow Leopard or OS X Lion and go to the Applications folder and find Install OS X Mountain.app WITHOUT clicking on the icon NOR right-click on the icon and selecting Open [2] Unhide all files via a Terminal command: *********************************************************** Terminal commands to show/hide hidden and system files: To show hidden and system files: defaults write com.apple.finder AppleShowAllFiles TRUE killall Finder To hide hidden and system files: defaults write com.apple.finder AppleShowAllFiles FALSE killall Finder *********************************************************** Or, you can download and run TinkerTool......select the Finder options: 'Show hidden and system files' option and then click Relaunch Finder to unhide......and deselect the Finder options: 'Show hidden and system files' option and then click Relaunch Finder to hide...... [3] Right-click on the Install OS X Mountain.app installer icon and select Show Package Contents. Open the Contents folder and the SharedSupport folder within it, and look for InstallESD.dmg [4] Open i.e. mount InstallESD.dmg and look for BaseSystem.dmg……LEAVE the Mac OS X Install ESD window open……. 3. Preparing the USB flash drive as a Mac bootable device volume [1] Plug in the USB flash drive and then using the Snow Leopard or Lion Disk Utility, partition/format it as a single GPT/HFS+ volume named OSX_Lion_USB_Installer (or your chosen name without spaces) as follows: In the Disk Utility sidebar, highlight your USB flash drive device icon In the Disk Utility main window, click on the Partition tab and select to partition as 1 volume, using a name with no spaces and format as Mac OS Extended (Journaled)…… Then click on Options button -> select GUID Partition Table (GPT) -> click Apply Doing this will make the USB flash drive bootable on a Mac. Note that this operation will erase everything on the drive. 4. Installing necessary /Extra/ and /Extra/Extensions/ directory files and the Chameleon v2.1svn r2042 bootloader onto the partitioned/formatted USB flash drive [1] In the Disk Utility main window, click on the Restore tab to load the BaseSystem.dmg onto the OSX_Lion_USB_Installer volume.....doing this puts a base OS X Lion system on the USB flash drive volume…… Choose the BaseSystem.dmg file as the Source by 'drag and dropping' it from the Mac OS X Install ESD window into the Source Window (note that a '+ in green circle' appears momentarily) Choose your USB flash drive volume icon as the Destination by 'drag and dropping' it from the Disk Utility sidebar into the Destination window (note that a '+ in green circle' appears momentarily). Click the Apply button and it will create your bootable USB drive. Note that Erase destination checkbox will be ticked by default. The USB flash drive device name will be automatically changed to Mac OS X Base System in the sidebar…… [2] On the USB flash drive volume, open the System folder and double-click on the Installation folder within it…..this opens an Installation folder window…. Right-click on the Packages alias icon and select Move to Trash Go to the open Mac OS X Install ESD window and 'drag and drop' the Packages folder in the window into the open Installation folder window……the 3.85 GB Packages folder will take about 10 or minutes to copy over…… Also 'drag and drop' the mach_kernel file from the open Mac OS X Install ESD window into the into the USB flash drive volume's / directory…….i.e. into the open Mac OS X Base System Window…… [3] Note that the USB flash drive Mac OS X Base System volume /System/Library/Extensions/ folder does not contain all the graphics kexts that the installed OS X Mountain Lion /System/Library/Extensions/ does. The Mac OS X Base System volume /System/Library/Extensions/ folder is missing the following kexts, bundles and plugins, as well as the BJUSBLoad.kext: AMDRadeonAccelerator.kext AMDRadeonVADriver.bundle AMDRadeonX3000GLDriver.bundle AppleIntelHD3000Graphics.kext AppleIntelHD3000GraphicsGA.plugin AppleIntelHD3000GraphicsGLDriver.bundle AppleIntelHD3000GraphicsVADriver.bundle AppleIntelHD4000Graphics.kext AppleIntelHD4000GraphicsGA.plugin AppleIntelHD4000GraphicsGLDriver.bundle AppleIntelHD4000GraphicsVADriver.bundle AppleIntelHDGraphicsGLDriver.bundle AppleIntelIVBVA.bundle ATIRadeonX2000GA.plugin ATIRadeonX2000GLDriver.bundle ATIRadeonX2000VADriver.bundle GeForce.kext GeForceGA.plugin GeForceGLDriver.bundle GeForceVADriver.bundle Thus, depending on your installed graphics card i.e. nVidia or ATI, you may need to use Pacifist v3.0.8 to extract the relevant kexts, bundles and plugin from /Volumes/Mac\ OS\ X\ Install\ ESD/Packages/Essentials.pkg into the USB flash drive Mac OS X Base System volume /System/Library/Extensions/ folder, in order for your GPU and display to function properly when booting from the Bootable GPT Partitioned USB Flash Drive OS X Lion 10.8 Installer, i.e. not present you with a black display screen at worst, or less worse, an incorrect and fixed display resolution, on reaching the OS X Lion Installer window. Since I have an Inno3D GeForce 9800GT 512MB graphics card, I had to extract the following files into my USB flash drive Mac OS X Base System volume /System/Library/Extensions/ folder so that booting the USB installer did not just present me with a black display screen on reaching the OS X Lion Installer window: GeForce.kext GeForceGA.plugin GeForceGLDriver.bundle GeForceVADriver.bundle Please be note that being able to use GraphicsEnabler=Yes in org.chameleon.Boot.plist for the same graphics card under different OS X versions via different Chameleon bootloader versions/revisions is not a given. For example, with my Inno3D GeForce 9800GT 512MB graphics card, to get full CI/QE and changeable display resolutions, the situation is as follows: OS X Leopard 10.5.8 - GraphicsEnabler=No and NVEnabler.kext OS X Snow Leopard 10.6.8 - GraphicsEnabler=Yes and so no NVinjector kext such as NVEnabler64.kext OS X Lion 10.7.4 - GraphicsEnabler=No and NVEnabler64.kext OS X Mountain Lion 10.8.0 - GraphicsEnabler=No and either a <key>device-properties</key> custom hex entry in org.chameleon.Boot.plist, that I generated using OSX86 Tools, or NVEnabler 64.kext For help with: 1. ATI graphics cards go here 2. nVidia graphics cards go to post #3 in this topic for single nVidia graphics card use 3. Multiple nVidia graphics card(s) and/or displays go here. 4. For help with mixed multiple ATI and/or nVidia graphics cards and /or multiple displays, Google is your friend......as are aqua-mac, netkas, and others....... [4] Run the Chameleon-2.1svn-r2042.pkg installer (in the verdant_Mountain Lion_Support_Files_v1.0 folder) and click on the Continue button in the Chameleon v2.1svn r2042 Bootloader Installer window…….then click Continue and Continue again and Agree…..then in the Standard Install window click Change Install Location and select the USB flash drive Mac OS X Base System volume in the Select a Destination window and click Continue……then click Install…..after a hopefully successful install, click Close.... [5] Go back to the open Mac OS X Base System Window……the Chameleon bootloader installer should have created the /Extra/ and /Extra/Extensions/ directories or folders……BUT you may have to create them manually afterward (as I did)…… [6] Copy across from your running 64bit mode Snow Leopard or Lion system, your MOBO's OS X DSDT.aml file into the open target HDD OS X Lion System Window, i.e. the target HDD volume's / directory……. [7] Copy across from your running 64bit mode Snow Leopard or Lion system, or from the verdant_Mountain Lion_Support_Files_v1.0 folder, into /Extra/ on the USB flash drive Mac OS X Base System volume, the following .plist files: smbios.plist for MacPro3,1 (use the one from MaLd0n's Lion installation via USB stick using Chameleon, DP4, GM and FINAL topic…….), or whatever MacProx,y designation matches your CPU.... org.chameleon.Boot.plist (assuming that you are using a recent/current Chameleon boot loader version later than v2.0 r11xx, or a version 2.1 revision) Also copy across (if you wish) your Chameleon bootloader Themes folder from your running 64bit mode Snow Leopard or Lion system, or from the folder.... [8] Copy the following kexts in /Extra/Extensions/ on your running 64bit mode Snow Leopard or Lion system, or from the verdant_Mountain Lion_Support_Files_v1.0 folder, into /Extra/Extensions/ on the USB flash drive Mac OS X Base System volume... FakeSMC.kext EvOreboot.kext NullCPUPowerManagement.kext AppleRTC.MLion.Patched.kext AppleNForceATA.imk64bit.kext AD1998b.FIX.kext or VoodooHDA.kext (for AD1998b) if this is the audio chipset/codec of your nForce chipset + Intel CPU MOBO You may also have AppleHDA.10.6.2.kext, FakeSMC.kext and nForceLAN.0.64.5.kext in /Extra/Extensions/. Note the later versions/revisions of FakeSMC.kext v3.0 and later by mojodojo can function from /Extra/Extensions/ or from /System/Library/Extensions/ but be aware that earlier versions/revisions of FakeSMC.kext can only function from /System/Library/Extensions/ - hence step [8] below: [9] If you have AppleHDA.10.6.2.kext, FakeSMC.kext and nForceLAN.0.64.5.kext in /System/Library/Extensions/ on your running 64bit mode Snow Leopard or Lion system, then these need to copied from there, or from the verdant_Mountain Lion_Support_Files_v1.0 folder, into /System/Library/Extensions/ on the USB flash drive Mac OS X Base System volume…… [10] Having added AppleHDA.10.6.2.kext, FakeSMC.kext and nForceLAN.0.64.5.kext to /System/Library/Extensions/ on the USB flash drive Mac OS X Base System volume, you need to use Terminal to reset the kexts ownership and permissions and rebuild the kernelcache file etc.....alternatively, you can use janek202's Kext Wizard for a Terminal-free life....... In Terminal type: sudo chown -R root:wheel /Volumes/Mac\ OS\ X\ Base\ System/System/Library/Extensions sudo chmod -R 755 /Volumes/Mac\ OS\ X\ Base\ System/System/Library/Extensions sudo touch /Volumes/Mac\ OS\ X\ Base\ System/System/Library/Extensions followed by sudo chflags nouchg /Volumes/Mac\ OS\ X\ Base\ System/System/Library/CoreServices/boot.efi exit [11] Close all open folders within the Mac OS X Base System folder and in the Terminal type: sudo chown -R 0:0 /Volumes/Mac\ OS\ X\ Base\ System [12] Close Terminal and then go to /System/Library/Caches/com.apple.kext.caches/Startup and delete the files within Startup…. IOKitPersonalities_i386.ioplist.gz IOKitPersonalities_x86_64.ioplist.gz kernelcache KextPropertyValues_OSBundleHelper_i386.plist.gz KextPropertyValues_OSBundleHelper_x86_64.plist.gz [13] Close the Mac OS X Base System Window and boot from the USB flash drive Mac OS X Base System volume by pressing F8 at boot-up to bring up the PC BIOS "Boot Menu", then selecting the USB Mac OS X Base System Flash Drive and pressing Enter. [14] If you experience the [PCI configuration begin] error on booting from the USB Mac OS X Base System Flash Drive installer, then see post #4, which gives four proposed solutions to this error....... ************************************************************* This guide is being typed up in OS X Lion from this point onward......so far I have not experienced any problems e.g. freezes etc. during hours of use...... Here are my system details: 1. Software Info: System Version: OS X 10.8 (12A269) Kernel Version: Darwin 12.0.0 Boot Volume: S1TB_GPT_OSX64_10.8 Boot Mode: Normal Secure Virtual Memory: Enabled Time since boot: 1:02 2. Hardware Info: Model Name: Mac Pro Model Identifier: MacPro3,1 Processor Name: Quad-Core Intel Xeon Processor Speed: 3.00 GHz Number of Processors: 1 Total Number of Cores: 4 L2 Cache: 8 MB Memory: 6 GB Bus Speed: 1.33 GHz Boot ROM Version: MP31.006C.B05 SMC Version (system): 1.30f3 Hardware UUID: 25D0A764-DBE0-54C4-8E7F-7D481F6B1BB9 3. Loaded non-vanilla, i.e. non-Apple Kexts from /System/Library/Extensions via UseKernelCache=Yes ACPIMonitor.kext AppleNForceATA.imk64bit.kext AppleRTC.MLion.Patched.kext AppleRTL8169Ethernet.kext EvOreboot.kext FakeSMC.kext IntelCPUMonitor.kext IntelThermal.kext nForceLAN.0.64.5.kext NVClockX.kext SuperIOFamily.kext VoodooHDA.kext ************************************************************* 2 Link to comment https://www.insanelymac.com/forum/topic/281665-nforce-os-x-mountain-lion-108-app-store-download-install-guide-on-a-series-6-or-7-nforce-chipset-intel-cpu-mobo/ Share on other sites More sharing options...
verdant Posted August 10, 2012 Author Share Posted August 10, 2012 ************************************************************* Part C. Installing a Bootable OS X Mountain Lion (OS X 10.8) system on a GPT Partitioned Hard Drive Volume Using a Bootable GPT USB Flash Drive Installer ************************************************************* 1. Preparing the target Hard Drive volume as a Mac bootable device volume [1] Use the running Snow Leopard or Lion Disk Utility to partition/format your target HDD volume for OS X 10.8 as GPT/HFS+ volume named OSX_10.8_GPT_A (or your chosen name without spaces) **************************************************** VERY IMPORTANT TO CHECK : OS X target HDD ownership **************************************************** Right-click on the target OS X HDD volume icon on your Desktop, and select Get Info. If the checkbox next to "Ignore ownership on this volume" is checked then click on the padlock symbol to authenticate and UNCHECK the checkbox. Then to ensure that the target OS X HDD volume's root directory is owned by the root user, go to Terminal and type: (note that using 0:0 is equivalent to using root:wheel) sudo chown 0:0 /Volumes/"your target OS X HDD volume name" This is to make certain that the permissions are not scrambled after the installation of OS X.....and hence that you are able to boot from the OS X 10.8 hard drive........ [2] Now close all open windows on the Snow Leopard or Lion Desktop and any open applications....... Reboot your PC and press the F8 key (or whichever key you need to) IMMEDIATELY after the message "Press DEL to enter SETUP, Press TAB to display BIOS POST message" or similar appears on-screen, in order to bring up the message "Loading Boot Menu......" When the PC BIOS "Boot Menu" window appears on-screen, select the USB flash drive OS X Mountain Lion installer from the list of bootable drives presented in the "Boot Menu", and press Enter...... OR Choose it from the list of bootable volumes presented by the Chameleon bootloader..... Boot from the USB flash drive Mac OS X Base System volume and follow the onscreen Mac OS X Installer instructions to install OS X Lion onto the target HDD volume..... [3] Re-boot back into OS X Snow Leopard or OS X Lion and run the Chameleon-2.1svn-r2042.pkg installer (in the verdant_Mountain Lion_Support_Files_v1.0 folder) and click on the Continue button in the Chameleon v2.1svn r2042 Bootloader Installer window…….then click Continue and Continue again and Agree…..then in the Standard Install window click Change Install Location and select the target HDD OS X Mountain Lion volume icon in the Select a Destination window and click Continue……then click Install…..after a hopefully successful install, click Close….. [4] Set up your video driver as you have done for running OS X 10.6.8 Snow Leopard in 64bit mode or OS X Lion 10.7.4 in default 64bit mode...... [5] Go back to the open target HDD OS X Mountain Lion System Window……the Chameleon bootloader installer should have created the /Extra/ and /Extra/Extensions/ directories or folders……BUT you may have to create them manually afterward (as I did)…… [6] Copy across from your running 64bit mode Snow Leopard system, or running OS X Lion 10.7.4 system, the DSDT.aml file into the open target HDD OS X Mountain Lion System Window, i.e. the target HDD volume's / directory……. [7] Copy across from your running 64bit mode Snow Leopard system, or running OS X Lion 10.7.4 system, into /Extra on the target HDD volume, the following .plist files: smbios.plist for MacPro3,1 (use the one from MaLd0n's Lion installation via USB stick using Chameleon, DP4, GM and FINAL topic…….), or whatever MacProx,y designation matches your CPU.... org.chameleon.Boot.plist (assuming that you are using a recent/current Chameleon boot loader version later than v2.0 r11xx, or a version 2.1 revision) Also copy across (if you wish) your Chameleon bootloader Themes folder from your running 64bit mode Snow Leopard or Lion system, or from the folder.... [8] Copy the following kexts in /Extra/Extensions/ on your running 64bit mode Snow Leopard, or in /System/Library/Extensions/ on your running Lion system, or from the verdant_Mountain Lion_Support_Files_v1.0 folder, into /System/Library/Extensions/ in the open target HDD OS X Lion System Window…… FakeSMC.kext EvOreboot.kext NullCPUPowerManagement.kext (NullCPUPowerManagement.kext is not present or needed if you have already enabled, or are going to enable, Natural Power Management i.e. "vanilla SpeedStepping") AppleNForceATA.imk64bit.kext AD1998b.FIX.kext or VoodooHDA.kext (AD1998b.FIX.kext or VoodooHDA.kext are only present or needed if AD1988b the audio chipset/codec of your nForce chipset + Intel CPU MOBO; alternatively, you may have or need AppleHDA.10.6.2.kext for audio in /System/Library/Extensions/) Then also copy the AppleRTC.MLion.Patched.kext from the verdant_Mountain Lion_Support_Files_v1.0 folder, into /System/Library/Extensions/ in the open target HDD OS X Mountain Lion System Window… Alternatively, you can directly patch the installed OS X Mountain Lion AppleRTC.kext in /System/Library/Extensions/ in the open target HDD OS X Mountain Lion System Window, by running this perl script in Terminal, which has been posted by rayap, which forces an unconditional jump over the rtcWrites() in updateChecksum() to prevent CMOS Resets: sudo perl -pi -e 's|\x75\x30\x89\xd8|\xeb\x30\x89\xd8|' /System/Library/Extensions/AppleRTC.kext/Contents/MacOS/AppleRTC N.B. If you have added the AppleRTC.MLion.Patched.kext from the verdant_Mountain Lion_Support_Files_v1.0 folder, into /System/Library/Extensions/ in the open target HDD OS X Mountain Lion System Window, then to ensure that this is the RTC kext that is loaded, rename the installed OS X Mountain Lion AppleRTC.kext in /System/Library/Extensions/ in the open target HDD OS X Mountain Lion System Window using the Terminal as follows: sudo mv /Volumes/"your target OS X Mountain Lion HDD volume name"/System/Library/Extensions/AppleRTC.kext /Volumes/"your target OS X Mountain Lion HDD volume name"/System/Library/Extensions/AppleRTC.kext_Original Note the later versions/revisions of FakeSMC.kext v3.0 and later by mojodojo can function from /Extra/Extensions/ or from /System/Library/Extensions/ but be aware that earlier versions/revisions of FakeSMC.kext can only function from /System/Library/Extensions/ - hence step [9] below: [9] If you have AppleHDA.10.6.2.kext, FakeSMC.kext and nForceLAN.0.64.5.kext in /System/Library/Extensions/ on your running 64bit mode Snow Leopard system, or in /System/Library/Extensions/ on your running Lion system, then these kexts need to copied from there, or from the verdant_Mountain Lion_Support_Files_v1.0 folder, into /System/Library/Extensions/ in the open target HDD OS X Mountain Lion System Window…… [10] Having added these non-vanilla, i.e. non- Apple kexts, plus any others specific to your system; for example, I have added: ACPIMonitor.kext AppleNForceATA.imk64bit.kext AppleRTL8169Ethernet.kext AppleRTC.kext_ORIG AppleRTC.MLion.Patched.kext EvOreboot.kext FakeSMC.kext IntelCPUMonitor.kext IntelThermal.kext nForceLAN.0.64.5.kext NVClockX.kext SuperIOFamily.kext VoodooHDA.kext to /System/Library/Extensions/ on the open target HDD OS X Mountain Lion System Window, you need to use Terminal to reset the kexts ownership and permissions and rebuild the kernelcache file……alternatively, you can use janek202's Kext Wizard for a Terminal-free life....... In Terminal type: sudo chown -R root:wheel /System/Library/Extensions sudo chmod -R 755 /System/Library/Extensions sudo touch /System/Library/Extensions exit Close Terminal and then go to /System/Library/Caches/com.apple.kext.caches/Startup and delete the files within Startup…. IOKitPersonalities_i386.ioplist.gz IOKitPersonalities_x86_64.ioplist.gz kernelcache KextPropertyValues_OSBundleHelper_i386.plist.gz KextPropertyValues_OSBundleHelper_x86_64.plist.gz [11] Close the open target HDD OS X Mountain Lion System Window and boot from the target hard drive OS X Lion System volume...... [12] If you find that on shutting down OS X Lion and rebooting, that the CMOS has been "wiped clean" of your custom BIOS settings profile and the BIOS has reverted to using the in-built default BIOS settings, then reload your backed-up custom BIOS settings profile from its source (e.g. USB flash drive) and boot back into OS X Lion...... If this happens, then you have either not copied the AppleRTC.MLion.Patched.kext from the verdant_Mountain Lion_Support_Files_v1.0 folder, into /System/Library/Extensions/ in the open target HDD OS X Mountain Lion System Window, or not directly patched the installed OS X Mountain Lion AppleRTC.kext in /System/Library/Extensions/ in the open target HDD OS X Mountain Lion System Window, by running this perl script in Terminal, which has been posted by rayap, which forces an unconditional jump over the rtcWrites() in updateChecksum() to prevent CMOS Resets: sudo perl -pi -e 's|\x75\x30\x89\xd8|\xeb\x30\x89\xd8|' /System/Library/Extensions/AppleRTC.kext/Contents/MacOS/AppleRTC N.B. If you have added the AppleRTC.MLion.Patched.kext from the verdant_Mountain Lion_Support_Files_v1.0 folder, into /System/Library/Extensions/ in the open target HDD OS X Mountain Lion System Window, then to ensure that this is the RTC kext that is loaded, rename the installed OS X Mountain Lion AppleRTC.kext in /System/Library/Extensions/ in the open target HDD OS X Mountain Lion System Window using the Terminal as follows: sudo mv /Volumes/"your target OS X Mountain Lion HDD volume"/System/Library/Extensions/AppleRTC.kext /Volumes/"your target OS X Mountain Lion HDD volume name"/System/Library/Extensions/AppleRTC.kext_Original Now you need to again use Terminal to reset the kexts' ownership and permissions and rebuild the kernelcache file etc.....alternatively, you can use janek202's Kext Wizard for a Terminal-free life....... In Terminal type: sudo chown -R root:wheel /System/Library/Extensions sudo chmod -R 755 /System/Library/Extensions sudo touch /System/Library/Extensions exit Close Terminal and then go to /System/Library/Caches/com.apple.kext.caches/Startup and delete the files within Startup…. IOKitPersonalities_i386.ioplist.gz IOKitPersonalities_x86_64.ioplist.gz kernelcache KextPropertyValues_OSBundleHelper_i386.plist.gz KextPropertyValues_OSBundleHelper_x86_64.plist.gz [13] Close the open target HDD OS X Mountain Lion System Window and re-boot from the target hard drive OS X Mountain Lion System volume...... [14] Use the OS X Mountain Lion Disk Utility to repair the HDD OS X Mountain Lion system permissions...... N.B. If you experience the [PCI configuration begin] error on booting from the OS X Mountain Lion System installed on your target HDD volume, then see post #6, which gives four proposed solutions to this error....... ************************************************************* ************************************************************* Part D. Installing a Bootable OS X Mountain Lion (OS X 10.8) system on a MBR or GPT Partitioned Hard Drive Volume Using a Bootable GPT USB Flash Drive Installer ************************************************************* There are two possible procedures you can follow, depending on your situation: Procedure 1. (No pre-existing OS X Mountain Lion (OS X 10.8) system installation) This 2-stage procedure assumes that you have already followed "Part B. Making a Bootable GPT Partitioned USB Flash Drive OS X Lion 10.8 Installer" of this guide, and now have a working bootable GPT USB Flash Drive Installer...... In order for you to install OS X Mountain Lion 10.8 onto your target HDD volume partitioned/formatted as MBR/HFS+ you need to use a modified OSInstall.mpkg package and OSInstall Unix executable file in place of the ones that the OS X Mountain Lion Installer on your bootable GPT USB Flash Drive Installer uses...... The versions of OSInstall.mpkg and OSInstall that I have used have been posted by crazybirdy and are based on nawcom's work. The Board-ID and RAM checks have been removed, and some Custom Install Options have been added too. Here is a zipped archive for your convenience: 2815-OSInstall(MBR)+OSInstall.zip Stage 1. Inserting the MBR modified OSInstall.mpkg package and OSInstall Unix executable file in place of the ones that the downloaded OS X Mountain Lion Installer on your bootable GPT USB Flash Drive Installer uses Download and unarchive the 2815-OSInstall(MBR)+OSInstall.zip file…….the unarchived folder contains the modified OSInstall.mpkg package and the OSInstall Unix executable file. The procedure for installing the modified OSInstall.mpkg package and OSInstall Unix executable file on your bootable GPT USB Flash Drive Installer in place of the original OS X Mountain Lion Installer versions is as follows: 1. Unhide the hidden and systems files on your OS X Mountain Lion USB Flash Drive Installer, named Mac OS X Base System, using Terminal commands or Tinker Tool (see Part C. above) 2. Go to Terminal and then: [1] Either type: cd /Volumes/Mac\ OS\ X\ Base\ System/System/Installation/Packages or type cd and press the 'Space Bar', and then having navigated to System, then to Installation, then to Packages, 'drag and drop' the Packages folder into Terminal…… [2] Type the following: sudo mv OSInstall.mpkg OSInstall.mpkg.GPT ls Note that you have now renamed the original file as shown by the 'ls' command….. [3] Either type: cd /Volumes/Mac\ OS\ X\ Base\ System/System/Library/PrivateFrameworks/Install.framework/Frameworks/OSInstall.framework/Versions/A or type cd and press the 'Space Bar', and then having navigated to System, then to Library, then to PrivateFrameworks, then to Install.framework, then to Frameworks, then to OSInstall.framework, then to Versions, and finally to the A folder, 'drag and drop' the A folder into Terminal…… [4] Type the following: sudo mv OSInstall OSInstall.GPT ls exit Note that you have now renamed the original file as shown by the 'ls' command….. **************************************************** As a reminder if ever you wish to revert back to the original GPT installer versions......simply rename the original files by removing the .GPT extensions after having renamed the patched files with the .MBR extension, via Terminal: cd /Volumes/Mac\ OS\ X\ Base\ System/System/Installation/Packages sudo mv OSInstall.mpkg OSInstall.mpkg.MBR sudo mv OSInstall.mpkg.GPT OSInstall.mpkg followed by cd /Volumes/Mac\ OS\ X\ Base\ System/System/Library/PrivateFrameworks/Install.framework/Frameworks/OSInstall.framework/Versions/A sudo mv OSInstall OSInstall.MBR sudo mv OSInstall.GPT OSInstall exit **************************************************** 3. Then either 'drag and drop' the chosen version of OSInstall.mpkg into /Volumes/Mac\ OS\ X\ Base\ System/System/Installation/Packages......(or use cp command via Terminal): sudo cp -p -R /Users/"User Name"/Desktop/2815-OSInstall\(MBR\)+OSInstall/OSInstall.mpkg /Volumes/Mac\ OS\ X\ Base\ System/System/Installation/Packages 4. Then 'drag and drop' OSInstall into /Volumes/Mac\ OS\ X\ Base\ System/System/Library/PrivateFrameworks/Install.framework/Frameworks/OSInstall.framework/Versions/A......(or use cp command via Terminal): sudo cp -p -R /Users/"User Name"/Desktop/2815-OSInstall\(MBR\)+OSInstall/OSInstall /Volumes/Mac\ OS\ X\ Base\ System/System/Library/PrivateFrameworks/Install.framework/Frameworks/OSInstall.framework/Versions/A 5. Close all windows....... 6. Now follow the following procedure in Stage 2. to install OS X Mountain Lion 10.8 onto your target HDD volume partitioned/formatted as MBR/HFS+ : Stage 2. Preparing the target Hard Drive volume as a Mac bootable device volume [1] Use the running Snow Leopard or Lion Disk Utility to partition/format your target HDD volume for OS X 10.8 as GPT/HFS+ volume named OSX_10.8_GPT_A (or your chosen name without spaces) **************************************************** VERY IMPORTANT TO CHECK : OS X target HDD ownership **************************************************** Right-click on the target OS X HDD volume icon on your Desktop, and select Get Info. If the checkbox next to "Ignore ownership on this volume" is checked then click on the padlock symbol to authenticate and UNCHECK the checkbox. Then to ensure that the target OS X HDD volume's root directory is owned by the root user, go to Terminal and type: sudo chown 0:0 /Volumes/"your target OS X HDD volume name" (Note: root:wheel and 0:0 are equivalent; but it is good to know both) This is to make certain that the permissions are not scrambled after the installation of OS X.....and hence that you are able to boot from the OS X 10.8 hard drive........ [2] Now close all open windows on the Snow Leopard or Lion Desktop and any open applications....... Reboot your PC and press the F8 key (or whichever key you need to) IMMEDIATELY after the message "Press DEL to enter SETUP, Press TAB to display BIOS POST message" or similar appears on-screen, in order to bring up the message "Loading Boot Menu......" When the PC BIOS "Boot Menu" window appears on-screen, select the USB flash drive OS X Mountain Lion installer from the list of bootable drives presented in the "Boot Menu", and press Enter...... OR Choose it from the list of bootable volumes presented by the Chameleon bootloader..... Boot from the USB flash drive Mac OS X Base System volume and follow the onscreen Mac OS X Installer instructions to install OS X Lion onto the target HDD volume..... [3] Re-boot back into OS X Snow Leopard or OS X Lion and run the Chameleon-2.1svn-r2042.pkg installer (in the verdant_Mountain Lion_Support_Files_v1.0 folder) and click on the Continue button in the Chameleon v2.1svn r2042 Bootloader Installer window…….then click Continue and Continue again and Agree…..then in the Standard Install window click Change Install Location and select the target HDD OS X Mountain Lion volume icon in the Select a Destination window and click Continue……then click Install…..after a hopefully successful install, click Close….. [4] Set up your video driver as you have done for running OS X 10.6.8 Snow Leopard in 64bit mode or OS X Lion 10.7.4 in default 64bit mode...... [5] Go back to the open target HDD OS X Mountain Lion System Window……the Chameleon bootloader installer should have created the /Extra/ and /Extra/Extensions/ directories or folders……BUT you may have to create them manually afterward (as I did)…… [6] Copy across from your running 64bit mode Snow Leopard system, or running OS X Lion 10.7.4 system, the DSDT.aml file into the open target HDD OS X Mountain Lion System Window, i.e. the target HDD volume's / directory……. [7] Copy across from your running 64bit mode Snow Leopard system, or running OS X Lion 10.7.4 system, into /Extra on the target HDD volume, the following .plist files: smbios.plist for MacPro3,1 (use the one from MaLd0n's Lion installation via USB stick using Chameleon, DP4, GM and FINAL topic…….), or whatever MacProx,y designation matches your CPU.... org.chameleon.Boot.plist (assuming that you are using a recent/current Chameleon boot loader version later than v2.0 r11xx, or a version 2.1 revision) Also copy across (if you wish) your Chameleon bootloader Themes folder from your running 64bit mode Snow Leopard or Lion system, or from the folder.... [8] Copy the following kexts in /Extra/Extensions/ on your running 64bit mode Snow Leopard, or in /System/Library/Extensions/ on your running Lion system, or from the verdant_Mountain Lion_Support_Files_v1.0 folder, into /System/Library/Extensions/ in the open target HDD OS X Lion System Window…… FakeSMC.kext EvOreboot.kext NullCPUPowerManagement.kext (NullCPUPowerManagement.kext is not present or needed if you have already enabled, or are going to enable, Natural Power Management i.e. "vanilla SpeedStepping") AppleNForceATA.imk64bit.kext AD1998b.FIX.kext or VoodooHDA.kext (AD1998b.FIX.kext or VoodooHDA.kext are only present or needed if AD1988b the audio chipset/codec of your nForce chipset + Intel CPU MOBO; alternatively, you may have or need AppleHDA.10.6.2.kext for audio in /System/Library/Extensions/) Then also copy the AppleRTC.MLion.Patched.kext from the verdant_Mountain Lion_Support_Files_v1.0 folder, into /System/Library/Extensions/ in the open target HDD OS X Mountain Lion System Window… Alternatively, you can directly patch the installed OS X Mountain Lion AppleRTC.kext in /System/Library/Extensions/ in the open target HDD OS X Mountain Lion System Window, by running this perl script in Terminal, which has been posted by rayap, which forces an unconditional jump over the rtcWrites() in updateChecksum() to prevent CMOS Resets: sudo perl -pi -e 's|\x75\x30\x89\xd8|\xeb\x30\x89\xd8|' /System/Library/Extensions/AppleRTC.kext/Contents/MacOS/AppleRTC N.B. If you have added the AppleRTC.MLion.Patched.kext from the verdant_Mountain Lion_Support_Files_v1.0 folder, into /System/Library/Extensions/ in the open target HDD OS X Mountain Lion System Window, then to ensure that this is the RTC kext that is loaded, rename the installed OS X Mountain Lion AppleRTC.kext in /System/Library/Extensions/ in the open target HDD OS X Mountain Lion System Window using the Terminal as follows: sudo mv /Volumes/"your target OS X Mountain Lion HDD volume name"/System/Library/Extensions/AppleRTC.kext /Volumes/"your target OS X Mountain Lion HDD volume name"/System/Library/Extensions/AppleRTC.kext_Original Note the later versions/revisions of FakeSMC.kext v3.0 and later by mojodojo can function from /Extra/Extensions/ or from /System/Library/Extensions/ but be aware that earlier versions/revisions of FakeSMC.kext can only function from /System/Library/Extensions/ - hence step [9] below: [9] If you have AppleHDA.10.6.2.kext, FakeSMC.kext and nForceLAN.0.64.5.kext in /System/Library/Extensions/ on your running 64bit mode Snow Leopard system, or in /System/Library/Extensions/ on your running Lion system, then these kexts need to copied from there, or from the verdant_Mountain Lion_Support_Files_v1.0 folder, into /System/Library/Extensions/ in the open target HDD OS X Mountain Lion System Window…… [10] Having added these non-vanilla, i.e. non- Apple kexts, plus any others specific to your system; for example, I have added: ACPIMonitor.kext AppleNForceATA.imk64bit.kext AppleRTL8169Ethernet.kext AppleRTC.kext_ORIG AppleRTC.MLion.Patched.kext EvOreboot.kext FakeSMC.kext IntelCPUMonitor.kext IntelThermal.kext nForceLAN.0.64.5.kext NVClockX.kext SuperIOFamily.kext VoodooHDA.kext to /System/Library/Extensions/ on the open target HDD OS X Mountain Lion System Window, you need to use Terminal to reset the kexts ownership and permissions and rebuild the kernelcache file……alternatively, you can use janek202's Kext Wizard for a Terminal-free life....... In Terminal type: sudo chown -R root:wheel /System/Library/Extensions sudo chmod -R 755 /System/Library/Extensions sudo touch /System/Library/Extensions exit Close Terminal and then go to /System/Library/Caches/com.apple.kext.caches/Startup and delete the files within Startup…. IOKitPersonalities_i386.ioplist.gz IOKitPersonalities_x86_64.ioplist.gz kernelcache KextPropertyValues_OSBundleHelper_i386.plist.gz KextPropertyValues_OSBundleHelper_x86_64.plist.gz [11] Close the open target HDD OS X Mountain Lion System Window and boot from the target hard drive OS X Lion System volume...... [12] If you find that on shutting down OS X Lion and rebooting, that the CMOS has been "wiped clean" of your custom BIOS settings profile and the BIOS has reverted to using the in-built default BIOS settings, then reload your backed-up custom BIOS settings profile from its source (e.g. USB flash drive) and boot back into OS X Lion...... If this happens, then you have either not copied the AppleRTC.MLion.Patched.kext from the verdant_Mountain Lion_Support_Files_v1.0 folder, into /System/Library/Extensions/ in the open target HDD OS X Mountain Lion System Window, or not directly patched the installed OS X Mountain Lion AppleRTC.kext in /System/Library/Extensions/ in the open target HDD OS X Mountain Lion System Window, by running this perl script in Terminal, which has been posted by rayap, which forces an unconditional jump over the rtcWrites() in updateChecksum() to prevent CMOS Resets: sudo perl -pi -e 's|\x75\x30\x89\xd8|\xeb\x30\x89\xd8|' /System/Library/Extensions/AppleRTC.kext/Contents/MacOS/AppleRTC N.B. If you have added the AppleRTC.MLion.Patched.kext from the verdant_Mountain Lion_Support_Files_v1.0 folder, into /System/Library/Extensions/ in the open target HDD OS X Mountain Lion System Window, then to ensure that this is the RTC kext that is loaded, rename the installed OS X Mountain Lion AppleRTC.kext in /System/Library/Extensions/ in the open target HDD OS X Mountain Lion System Window using the Terminal as follows: sudo mv /Volumes/"your target OS X Mountain Lion HDD volume"/System/Library/Extensions/AppleRTC.kext /Volumes/"your target OS X Mountain Lion HDD volume name"/System/Library/Extensions/AppleRTC.kext_Original Now you need to again use Terminal to reset the kexts' ownership and permissions and rebuild the kernelcache file etc.....alternatively, you can use janek202's Kext Wizard for a Terminal-free life....... In Terminal type: sudo chown -R root:wheel /System/Library/Extensions sudo chmod -R 755 /System/Library/Extensions sudo touch /System/Library/Extensions exit Close Terminal and then go to /System/Library/Caches/com.apple.kext.caches/Startup and delete the files within Startup…. IOKitPersonalities_i386.ioplist.gz IOKitPersonalities_x86_64.ioplist.gz kernelcache KextPropertyValues_OSBundleHelper_i386.plist.gz KextPropertyValues_OSBundleHelper_x86_64.plist.gz [13] Close the open target HDD OS X Mountain Lion System Window and re-boot from the target hard drive OS X Mountain Lion System volume...... [14] Use the OS X Mountain Lion Disk Utility to repair the HDD OS X Mountain Lion system permissions...... N.B. If you experience the [PCI configuration begin] error on booting from the OS X Mountain Lion System installed on your target HDD volume, then see post #6, which gives four proposed solutions to this error....... OR Procedure 2. (Pre-existing OS X Mountain Lion system installation) 1. Simply use Disk utility or Carbon Copy Cloner to clone a OX Mountain Lion 10.8 system installed on a GPT/HFS+ HDD (e.g. external USB HDD) to your internal HDD MBR/HFS+ OS X volume........ 2. Install the Chameleon v2.1svn r2042 bootloader to your OS X Lion MBR/HFS+ partition/volume after cloning the OS X Lion system on your GPT/HFS+ HDD to your OS X Lion MBR/HFS+ partition/volume 3. Boot into the OS X Mountain Lion 10.8 system just installed on the MBR/HFS+ partition/volume..... ************************************************************* ************************************************************* Part E. Installing a Bootable OS X Mountain Lion 10.8 system on a MBR or GPT Partitioned Hard Drive Volume Using verdant's OS X Mountain Lion 10.8 Single Layer DVD MBR/GPT Installer ************************************************************* I have prepared the following guide for producing my OS X Mountain Lion 10.8 Single Layer DVD MBR/GPT Installer for nForce MOBO owners who: {a} who do not have ready access to an 8GB minimum size USB flash drive, {b} who are having difficulty booting their PC from a USB flash drive, or {c} who just like the idea of having an archival 'backup' installation method on an optical disk should their USB flash drive ever fail……. 1. Creating a folder for my OS X Mountain Lion 10.8 Single Layer DVD MBR/GPT Installer contents [1] Boot into Snow Leopard or OS X Lion and go to the Applications folder and find Install OS X Mountain.app WITHOUT clicking on the icon NOR right-click on the icon and selecting Open [2] Unhide all files via a Terminal command: *********************************************************** Terminal commands to show/hide hidden and system files: To show hidden and system files: defaults write com.apple.finder AppleShowAllFiles TRUE killall Finder To hide hidden and system files: defaults write com.apple.finder AppleShowAllFiles FALSE killall Finder *********************************************************** Or, you can download and run TinkerTool......select the Finder options: 'Show hidden and system files' option and then click Relaunch Finder to unhide......and deselect the Finder options: 'Show hidden and system files' option and then click Relaunch Finder to hide...... [3] Create a folder on your Desktop called OS_X_10.8_Base_Sys_SLDVD and click to open it and leave it open....... [4] Right-click on the Install OS X Mountain.app installer icon and select Show Package Contents. Open the Contents folder and the SharedSupport folder within it, and look for InstallESD.dmg [5] Open i.e. mount InstallESD.dmg and look for BaseSystem.dmg……LEAVE the Mac OS X Install ESD window open……. [6] Open i.e. mount BaseSystem.dmg……LEAVE the BaseSystem window open……. [7] 'Select All' files in the open BaseSystem window and copy them into the OS_X_10.8_Base_Sys_SLDVD folder that you created on your Desktop [8] Open the copied-over System folder in the open OS_X_10.8_Base_Sys_SLDVD folder and double-click on the Installation folder within it…..this opens an Installation folder window…. [9] Right-click on the Packages alias icon and select Move to Trash [10] Go to the already open Mac OS X Install ESD window and 'drag and drop' the Packages folder in the window into the open Installation folder window……the 3.85 GB Packages folder will take a minute or two to copy over…… [11] Now 'drag and drop' the mach_kernel file from the open Mac OS X Install ESD window into the into the OS_X_10.8_Base_Sys_SLDVD folder……. [12] Note that the copied-over Mac OS X Base System volume /System/Library/Extensions/ folder in the OS_X_10.8_Base_Sys_SLDVD folder does not contain all the graphics kexts that the installed OS X Mountain Lion /System/Library/Extensions/ does. The Mac OS X Base System volume /System/Library/Extensions/ folder is missing the following kexts, bundles and plugins, as well as the BJUSBLoad.kext: AMDRadeonAccelerator.kextAMDRadeonVADriver.bundleAMDRadeonX3000GLDriver.bundleAppleIntelHD3000Graphics.kextAppleIntelHD3000GraphicsGA.pluginAppleIntelHD3000GraphicsGLDriver.bundleAppleIntelHD3000GraphicsVADriver.bundleAppleIntelHD4000Graphics.kextAppleIntelHD4000GraphicsGA.pluginAppleIntelHD4000GraphicsGLDriver.bundleAppleIntelHD4000GraphicsVADriver.bundleAppleIntelHDGraphicsGLDriver.bundleAppleIntelIVBVA.bundleATIRadeonX2000GA.pluginATIRadeonX2000GLDriver.bundleATIRadeonX2000VADriver.bundleGeForce.kextGeForceGA.pluginGeForceGLDriver.bundleGeForceVADriver.bundle Thus, depending on your installed graphics card on your nForce chipset + IntelCPU MOBO, i.e. nVidia or ATI you may need to use Pacifist v3.0.8 to extract the relevant graphics card brand kexts, bundles and plugin from /Volumes/Mac\ OS\ X\ Install\ ESD/Packages/Essentials.pkg into the OS_X_10.8_Base_Sys_SLDVD folder's /System/Library/Extensions/ folder, in order for your GPU and display to function properly when booting from my OS X Mountain Lion Base System Single Layer DVD Installer, i.e. not present you with a black display screen at worst, or less worse, an incorrect and fixed display resolution, on reaching the OS X Lion Installer window. Since I have an Inno3D GeForce 9800GT 512MB graphics card, I extracted the following files into into the OS_X_10.8_Base_Sys_SLDVD folder's /System/Library/Extensions/ folder so that booting the SLDVD installer did not just present me with a black display screen on reaching the OS X Lion Installer window: GeForce.kext GeForceGA.plugin GeForceGLDriver.bundle GeForceVADriver.bundle [13] Unzip the i386.2.1svn-r2042.zip file in the downloaded verdant_Mountain_LIon_Support_Files_v1.0 folder and then from the open i386 folder, copy via Terminal, the cdboot file into /Users/"User Name"/Desktop/OS_X_10.8_Base_Sys_SLDVD/usr/standalone/i386, or, in non-Terminal "speak" go to Desktop >>>> OS_X_10.8_Base_Sys_SLDVD >>>> usr >>>> standalone >>>> i386, and then 'drag and drop' the cdboot file from the open source i386 folder into the target i386 folder. [14] Go to /Users/"User Name"/Desktop/OS_X_10.8_Base_Sys_SLDVD/System/Library/CoreServices/, i.e. in non-Terminal "speak" go to Desktop >>>> Mac OS X Base System >>>> System >>>> Library >>>> CoreServices, and then highlight the 'locked' boot.efi file and right-click to select Get Info…….in the Get Info pop-up window that appears, uncheck the Locked checkbox…… or simply use the power of the Terminal, as shown in part B., by typing sudo chflags nouchg /Users/"User Name"/Desktop/OS_X_10.8_Base_Sys_SLDVD/System/Library/CoreServices/boot.efi exit [15] Now download my nForce Extra folder for my OS X Mountain Lion Base System Single Layer DVD Installer: verdant_Mountain_Lion_DVD_nForce_Extra.zip N.B. This version of my nForce Extra folder uses NVEnabler 64.kext with GraphicsEnabler=No. If anyone has problems with this version, then let me know and I will prepare and upload a version of my nForce Extra folder without NVEnabler 64.kext and GraphicsEnabler=Yes........ Unzip it and then 'drag and drop' the Extra folder into the open OS_X_10.8_Base_Sys_SLDVD folder [16] Since my OS X Mountain Lion 10.8 Single Layer DVD MBR/GPT Installer is designed to be burnt onto a single layer DVD of 4.7 GB capacity, you need to remove the AdditionalSpeechVoices.pkg package from the OS_X_10.8_Base_Sys_SLDVD folder /System/Installation/Packages and put it in a another folder for safe keeping in case you decide to install it later on your OS X Mountain Lion 10.8 HDD system using Pacifist 3.0.8. [17] Furthermore, since the AdditionalSpeechVoices.pkg has been removed from the OS_X_10.8_Base_Sys_SLDVD folder /System/Installation/Packages, the OS X Mountain Lion DVD Installer app will fail unless there is the Customise option to deselect the AdditionalSpeechVoices.pkg for installation..... Have no fear...........this issue is solved by my setting up the OS X Mountain Lion 10.8 Single Layer DVD Installer as a MBR/GPT Installer by using a modified OSInstall.mpkg package and OSInstall Unix executable file (courtesy of crazybirdy via nawcom; see Part D. above), from which the Board-ID and RAM checks have been removed, and more importantly, to which some Custom Install Options have been added; most importantly, the Customise option to deselect AdditionalSpeechVoices.pkg for installation..... So, go to Part D. above to download the 2815-OSInstall(MBR)+OSInstall.zip file to the Desktop and then unarchive it…….the unarchived folder contains the modified OSInstall.mpkg package and the OSInstall Unix executable file. [18] The procedure for installing the modified OSInstall.mpkg package and OSInstall Unix executable file in place of the original OS X Mountain Lion Installer versions is as follows: 1. Go to Terminal and then: [1] Either type: cd /Users/"User Name"/Desktop/OS_X_10.8_Base_Sys_SLDVD/System/Installation/Packages or type cd and press the 'Space Bar', and then having navigated to System, then to Installation, then to Packages, 'drag and drop' the Packages folder into Terminal…… [2] Type the following: sudo mv OSInstall.mpkg OSInstall.mpkg.GPT ls Note that you have now renamed the original file as shown by the 'ls' command….. [3] Either type: cd /Users/"User Name"/Desktop/OS_X_10.8_Base_Sys_SLDVD/System/Library/PrivateFrameworks/Install.framework/Frameworks/OSInstall.framework/Versions/A or type cd and press the 'Space Bar', and then having navigated to System, then to Library, then to PrivateFrameworks, then to Install.framework, then to Frameworks, then to OSInstall.framework, then to Versions, and finally to the A folder, 'drag and drop' the A folder into Terminal…… [4] Type the following: sudo mv OSInstall OSInstall.GPT ls exit Note that you have now renamed the original file as shown by the 'ls' command….. 2. Then either 'drag and drop' the modified version of OSInstall.mpkg into /Users/"User Name"/Desktop/OS_X_10.8_Base_Sys_SLDVD/System/Installation/Packages......(or use cp command via Terminal): sudo cp -p -R /Users/"User Name"/Desktop/2815-OSInstall\(MBR\)+OSInstall/OSInstall.mpkg /Users/"User Name"/Desktop/OS_X_10.8_Base_Sys_SLDVD/System/Installation/Packages 3. Then 'drag and drop' the modified version of OSInstall into /Users/"User Name"/Desktop/OS_X_10.8_Base_Sys_SLDVD/System/Library/PrivateFrameworks/Install.framework/Frameworks/OSInstall.framework/Versions/A/OSInstall......(or use cp command via Terminal): sudo cp -p -R /Users/"User Name"/Desktop/2815-OSInstall\(MBR\)+OSInstall/OSInstall /Users/nforcer/Desktop/OS_X_10.8_Base_Sys_SLDVD/System/Library/PrivateFrameworks/Install.framework/Frameworks/OSInstall.framework/Versions/A/OSInstall [19] Close all open folders within the OS_X_10.8_Base_Sys_SLDVD folder before closing it and then in the Terminal type: sudo chown -R 0:0 /Users/"User Name"/Desktop/OS_X_10.8_Base_Sys_SLDVD (Note: root:wheel and 0:0 are equivalent; but it is good to know both) 2. Creating my OS X Mountain Lion 10.8 Single Layer DVD MBR/GPT Installer.ISO file [20] Then in Terminal type: sudo hdiutil makehybrid -o OSX_10.8_BaseSystemSLDVD.iso /Users/"User Name"/Desktop/OS_X_10.8_Base_Sys_SLDVD -iso -hfs -joliet -eltorito-boot /Users/"User Name"/Desktop/OS_X_10.8_Base_Sys_SLDVD/usr/standalone/i386/cdboot -no-emul-boot -hfs-volume-name "OSX_10.8_BaseSystemSLDVD" -joliet-volume-name "OSX_10.8_BaseSystemSLDVD" If you have entered this line correctly you should see: "Creating hybrid image... …………………………………………………………………… "……………………………………………………………………" is a moving progress bar and after it stops, you should find a OSX_10.8_BaseSystemSLDVD.iso in the /Users/"User Name"/ directory. [21] Burn this .iso image file to a single layer DVD disc at x4 or slower, or at the stated DVD disc burn speed....... BTW I use DVD+RW disks [rather than DVD-RW due to the claimed built-in defect management of DVD+RW] for [1] convenience (can be re-written up to 1000 times), and [2] long-term data-retention because the recording layer in DVD-RW and DVD+RW is not an organic dye [as used for DVD±R disks] but a phase change material, often GeSbTe chalcogenide glass, that can be transformed back and forth between a crystalline phase and an amorphous phase by a temperature change, also changing the reflectivity, depending on the power of the DVDRW laser beam. 3. Installing OS X Mountain Lion 10.8 to a target MBR/GPT HDD volume [22] Use your running Snow Leopard or Lion Disk Utility to partition/format your target HDD volume for OS X 10.8 as a GPT or MBR/HFS+ volume named OSX_10.8_GPT_A or OSX_10.8_MBR_A (or your chosen name without spaces) **************************************************** VERY IMPORTANT TO CHECK : OS X target HDD ownership **************************************************** Right-click on the target OS X HDD volume icon on your Desktop, and select Get Info. If the checkbox next to "Ignore ownership on this volume" is checked then click on the padlock symbol to authenticate and UNCHECK the checkbox. Then to ensure that the target OS X HDD volume's root directory is owned by the root user, go to Terminal and type: sudo chown 0:0 /Volumes/"your target OS X HDD volume name" This is to make certain that the permissions are not scrambled after the installation of OS X.....and hence that you are able to boot from the OS X 10.8 hard drive........ Note that using 0:0 is equivalent to using root:wheel [23] Now close all open windows on the Snow Leopard or Lion Desktop and any open applications....... [24] Insert the OSX_10.8_BaseSystemSLDVD disc into your DVDRW and then reboot your PC and press the F8 key (or whichever key you need to) IMMEDIATELY after the message "Press DEL to enter SETUP, Press TAB to display BIOS POST message" or similar appears on-screen, in order to bring up the message "Loading Boot Menu......" [25] When the PC BIOS "Boot Menu" window appears on-screen, select the DVDRW containing OSX_10.8_BaseSystemSLDVD disc from the list of bootable drives presented in the "Boot Menu", and press Enter...... [26] When the Chameleon bootloader menu appears, choose the OSX_10.8_BaseSystemSLDVD icon from the list of bootable volumes presented by the Chameleon bootloader..... I recommend you choose -v as a boot flag before booting from the Mac OS X Base System, so that you can see what is happening onscreen during booting……. BE PREPARED - booting from the DVD is very slow - from booting the MacOSXBaseSystemDVD to reaching the Mac OS X Installer Desktop takes 10+ minutes........thus the OS X Mountain Lion system installation process takes even longer...... This is because all kexts are loaded directly from /System/Library/Extensions/ and [ii] the OS X Mountain Lion BaseSystem.dmg files are no longer optimised for use with optical disks………….a further clear indication IMHO that Apple now view optical drives/disks as obsolete (just as they did with the floppy disk drive/disks)…….. [27] Follow the onscreen Mac OS X Installer instructions to install OS X Lion onto the target HDD volume..... DO NOT FORGET to click on the Customise button after having selected the target HDD volume in the Select Destination window AND deselect the AdditionalSpeechVoices.pkg for installation BEFORE clicking the Install button! [28] When the OS X Mountain Lion Installer is finished, click on the Restart button.....and boot back into your OS X Snow Leopard or OS X Lion system and run the Chameleon-2.1svn-r2042.pkg installer (in the verdant_Mountain Lion_Support_Files_v1.0 folder) and click on the Continue button in the Chameleon v2.1svn r2042 Bootloader Installer window…….then click Continue and Continue again and Agree…..then in the Standard Install window click Change Install Location and select the target HDD OS X Mountain Lion volume icon in the Select a Destination window and click Continue……then click Install…..after a hopefully successful install, click Close….. [29] Set up your video driver as you have done for running OS X 10.6.8 Snow Leopard in 64bit mode or OS X Lion 10.7.4 in default 64bit mode...... [30] Go back to the open target HDD OS X Mountain Lion System Window……the Chameleon bootloader installer should have created the /Extra/ and /Extra/Extensions/ directories or folders……BUT you may have to create them manually afterward (as I did)…… [31] Copy across from your running 64bit mode Snow Leopard system, or running OS X Lion 10.7.4 system, the DSDT.aml file into the open target HDD OS X Mountain Lion System Window, i.e. the target HDD volume's / directory……. [32] Copy across from your running 64bit mode Snow Leopard system, or running OS X Lion 10.7.4 system, into /Extra on the target HDD volume, the following .plist files: smbios.plist for MacPro3,1 (use the one from MaLd0n's Lion installation via USB stick using Chameleon, DP4, GM and FINAL topic…….), or whatever MacProx,y designation matches your CPU.... org.chameleon.Boot.plist (assuming that you are using a recent/current Chameleon boot loader version later than v2.0 r11xx, or a version 2.1 revision) Also copy across (if you wish) your Chameleon bootloader Themes folder from your running 64bit mode Snow Leopard or Lion system, or from the folder.... [33] Copy the following kexts in /Extra/Extensions/ on your running 64bit mode Snow Leopard, or in /System/Library/Extensions/ on your running Lion system, or from the verdant_Mountain Lion_Support_Files_v1.0 folder, into /System/Library/Extensions/ in the open target HDD OS X Lion System Window…… FakeSMC.kext EvOreboot.kext NullCPUPowerManagement.kext (NullCPUPowerManagement.kext is not present or needed if you have already enabled, or are going to enable, Natural Power Management i.e. "vanilla SpeedStepping") AppleNForceATA.imk64bit.kext AD1998b.FIX.kext or VoodooHDA.kext (AD1998b.FIX.kext or VoodooHDA.kext are only present or needed if AD1988b the audio chipset/codec of your nForce chipset + Intel CPU MOBO; alternatively, you may have or need AppleHDA.10.6.2.kext for audio in /System/Library/Extensions/) Then also copy the AppleRTC.MLion.Patched.kext from the verdant_Mountain Lion_Support_Files_v1.0 folder, into /System/Library/Extensions/ in the open target HDD OS X Mountain Lion System Window… Alternatively, you can directly patch the installed OS X Mountain Lion AppleRTC.kext in /System/Library/Extensions/ in the open target HDD OS X Mountain Lion System Window, by running this perl script in Terminal, which has been posted by rayap, which forces an unconditional jump over the rtcWrites() in updateChecksum() to prevent CMOS Resets: sudo perl -pi -e 's|\x75\x30\x89\xd8|\xeb\x30\x89\xd8|' /System/Library/Extensions/AppleRTC.kext/Contents/MacOS/AppleRTC N.B. If you have added the AppleRTC.MLion.Patched.kext from the verdant_Mountain Lion_Support_Files_v1.0 folder, into /System/Library/Extensions/ in the open target HDD OS X Mountain Lion System Window, then to ensure that this is the RTC kext that is loaded, rename the installed OS X Mountain Lion AppleRTC.kext in /System/Library/Extensions/ in the open target HDD OS X Mountain Lion System Window using the Terminal as follows: sudo mv /Volumes/"your target OS X Mountain Lion HDD volume name"/System/Library/Extensions/AppleRTC.kext /Volumes/"your target OS X Mountain Lion HDD volume name"/System/Library/Extensions/AppleRTC.kext_Original Note the later versions/revisions of FakeSMC.kext v3.0 and later by mojodojo can function from /Extra/Extensions/ or from /System/Library/Extensions/ but be aware that earlier versions/revisions of FakeSMC.kext can only function from /System/Library/Extensions/ - hence step [9] below: [34] If you have AppleHDA.10.6.2.kext, FakeSMC.kext and nForceLAN.0.64.5.kext in /System/Library/Extensions/ on your running 64bit mode Snow Leopard system, or in /System/Library/Extensions/ on your running Lion system, then these kexts need to copied from there, or from the verdant_Mountain Lion_Support_Files_v1.0 folder, into /System/Library/Extensions/ in the open target HDD OS X Mountain Lion System Window…… [35] Having added these non-vanilla, i.e. non- Apple kexts, plus any others specific to your system; for example, I have added: ACPIMonitor.kext AppleNForceATA.imk64bit.kext AppleRTL8169Ethernet.kext AppleRTC.kext_ORIG AppleRTC.MLion.Patched.kext EvOreboot.kext FakeSMC.kext IntelCPUMonitor.kext IntelThermal.kext nForceLAN.0.64.5.kext NVClockX.kext SuperIOFamily.kext VoodooHDA.kext to /System/Library/Extensions/ on the open target HDD OS X Mountain Lion System Window, you need to use Terminal to reset the kexts ownership and permissions and rebuild the kernelcache file……alternatively, you can use janek202's Kext Wizard for a Terminal-free life....... In Terminal type: sudo chown -R root:wheel /System/Library/Extensions sudo chmod -R 755 /System/Library/Extensions sudo touch /System/Library/Extensions exit Close Terminal and then go to /System/Library/Caches/com.apple.kext.caches/Startup and delete the files within Startup…. IOKitPersonalities_i386.ioplist.gz IOKitPersonalities_x86_64.ioplist.gz kernelcache KextPropertyValues_OSBundleHelper_i386.plist.gz KextPropertyValues_OSBundleHelper_x86_64.plist.gz [36] Close the open target HDD OS X Mountain Lion System Window and boot from the target hard drive OS X Lion System volume...... [37] If you find that on shutting down OS X Lion and rebooting, that the CMOS has been "wiped clean" of your custom BIOS settings profile and the BIOS has reverted to using the in-built default BIOS settings, then reload your backed-up custom BIOS settings profile from its source (e.g. USB flash drive) and boot back into OS X Lion...... If this happens, then you have either not copied the AppleRTC.MLion.Patched.kext from the verdant_Mountain Lion_Support_Files_v1.0 folder, into /System/Library/Extensions/ in the open target HDD OS X Mountain Lion System Window, or not directly patched the installed OS X Mountain Lion AppleRTC.kext in /System/Library/Extensions/ in the open target HDD OS X Mountain Lion System Window, by running this perl script in Terminal, which has been posted by rayap, which forces an unconditional jump over the rtcWrites() in updateChecksum() to prevent CMOS Resets: sudo perl -pi -e 's|\x75\x30\x89\xd8|\xeb\x30\x89\xd8|' /System/Library/Extensions/AppleRTC.kext/Contents/MacOS/AppleRTC N.B. If you have added the AppleRTC.MLion.Patched.kext from the verdant_Mountain Lion_Support_Files_v1.0 folder, into /System/Library/Extensions/ in the open target HDD OS X Mountain Lion System Window, then to ensure that this is the RTC kext that is loaded, rename the installed OS X Mountain Lion AppleRTC.kext in /System/Library/Extensions/ in the open target HDD OS X Mountain Lion System Window using the Terminal as follows: sudo mv /Volumes/"your target OS X Mountain Lion HDD volume"/System/Library/Extensions/AppleRTC.kext /Volumes/"your target OS X Mountain Lion HDD volume name"/System/Library/Extensions/AppleRTC.kext_Original Now you need to again use Terminal to reset the kexts' ownership and permissions and rebuild the kernelcache file etc.....alternatively, you can use janek202's Kext Wizard for a Terminal-free life....... In Terminal type: sudo chown -R root:wheel /System/Library/Extensions sudo chmod -R 755 /System/Library/Extensions sudo touch /System/Library/Extensions exit Close Terminal and then go to /System/Library/Caches/com.apple.kext.caches/Startup and delete the files within Startup…. IOKitPersonalities_i386.ioplist.gz IOKitPersonalities_x86_64.ioplist.gz kernelcache KextPropertyValues_OSBundleHelper_i386.plist.gz KextPropertyValues_OSBundleHelper_x86_64.plist.gz [38] Close the open target HDD OS X Mountain Lion System Window and re-boot from the target hard drive OS X Mountain Lion System volume...... [39] Use the OS X Mountain Lion Disk Utility to repair the HDD OS X Mountain Lion system permissions...... N.B. If you experience the [PCI configuration begin] error on booting from the OS X Mountain Lion System installed on your target HDD volume, then see post #6, which gives four proposed solutions to this error....... ************************************************************* ************************************************************* Part F. Installing a Bootable OS X Mountain Lion 10.8 system on a MBR or GPT Partitioned Hard Drive Volume Using verdant's OS X Mountain Lion 10.8 Dual Layer DVD MBR/GPT Installer ************************************************************* I have prepared the following guide for producing my OS X Mountain Lion 10.8 Dual Layer DVD MBR/GPT Installer for nForce MOBO owners who: {a} who do not have ready access to an 8GB minimum size USB flash drive, {b} who are having difficulty booting their PC from a USB flash drive, or {c} who just like the idea of having a complete as-downloaded OS X Mountain Lion Installer (i.e. no excluded installation packages due to DVD capacity limitations) archival 'backup' installation method on an optical disk should their USB flash drive ever fail……. 1. Creating a folder for my OS X Mountain Lion 10.8 Dual Layer DVD MBR/GPT Installer contents To do this: {1} Follow Part E. Steps [1] to [15], substituting OS_X_10.8_Base_Sys_DLDVD in place of OS_X_10.8_Base_Sys_SLDVD....... {2} Ignore Part E. Step [16] {3} Follow Part E. Step [17] to prepare the Dual layer DVD as a MBR/GPT Installer for the greatest installer versatility, by using a modified OSInstall.mpkg package and OSInstall Unix executable file (courtesy of crazybirdy via nawcom; see Part D. above), from which the Board-ID and RAM checks have been removed, and more importantly, to which some Custom Install Options have been added....... Thus, now go to Part D. above to download the 2815-OSInstall(MBR)+OSInstall.zip file to the Desktop and then unarchive it…….the unarchived folder contains the modified OSInstall.mpkg package and the OSInstall Unix executable file. {4} Follow Part E. Steps [18] to [19], substituting OS_X_10.8_Base_Sys_DLDVD in place of OS_X_10.8_Base_Sys_SLDVD....... 2. Creating my OS X Mountain Lion 10.8 Dual Layer DVD MBR/GPT Installer.ISO file {5} Then instead of Part E. Step [20], type in Terminal: sudo hdiutil makehybrid -o OSX_10.8_BaseSystemDLDVD.iso /Users/"User Name"/Desktop/OS_X_10.8_Base_Sys_DLDVD -iso -hfs -joliet -eltorito-boot /Users/"User Name"/Desktop/OS_X_10.8_Base_Sys_DLDVD/usr/standalone/i386/cdboot -no-emul-boot -hfs-volume-name "OSX_10.8_BaseSystemDLDVD" -joliet-volume-name "OSX_10.8_BaseSystemDLDVD" If you have entered this line correctly you should see: "Creating hybrid image... …………………………………………………………………… "……………………………………………………………………" is a moving progress bar and after it stops, you should find a OSX_10.8_BaseSystemDLDVD.iso in the /Users/"User Name"/ directory. {6} Then instead of Part E. Step [21], burn this .iso image file to a dual layer DVD+R or DVD-R disc at x2.4 or slower, or at the stated dual layer DVD disc burn speed....... I use DVD+R DL discs because they have been on the market longer than dual layer DVD-R discs and so have had more development time based on user feedback etc...... Note that dual layer DVDs are not available in re-writable formats of DVD-RW or DVD+RW 3. Installing OS X Mountain Lion 10.8 to a target MBR/GPT HDD volume {7} Follow Part E. Steps [22] to [39], substituting OS_X_10.8_Base_Sys_DLDVD in place of OS_X_10.8_Base_Sys_SLDVD....... N.B. If you experience the [PCI configuration begin] error on booting from the OS X Mountain Lion System installed on your target HDD volume, then see post #6, which gives four proposed solutions to this error....... ************************************************************* 2 Link to comment https://www.insanelymac.com/forum/topic/281665-nforce-os-x-mountain-lion-108-app-store-download-install-guide-on-a-series-6-or-7-nforce-chipset-intel-cpu-mobo/#findComment-1842747 Share on other sites More sharing options...
verdant Posted August 10, 2012 Author Share Posted August 10, 2012 *************************************************************nVidia Graphics Card Operation in OS X Mountain Lion*************************************************************This section deals with getting your nVidia graphics / video card working in OS X Mountain Lion.......I have an nVidia 9800 GT graphics card and so can only be of limited help if you have an AMD/ATI graphics card.........likewise if you want to run more than 1 graphics card in your OSx86 / Hackintosh.........For help with:1. AMD/ATI graphics cards go here 2. Multiple nVidia graphics card(s) and/or displays go here but go here for setting up your DSDT.aml for AMD/ATI graphics cards3. For help with mixed multiple AMD/ATI and/or nVidia graphics cards and /or multiple displays, Google is your friend......as are aqua-mac, netkas, and others....... This guide will hopefully include in time, more reports of successful attempts to get different graphics cards (both nVidia and ATI) working on different nForce chipset + Intel CPU MOBOs.........Thus, I am happy to include clear to follow guides dealing with setting up of specific graphics card chipsets/models on nForce chipset + Intel CPU MOBOs.......*************************************************************Getting an nVidia graphics card working in Mountain Lion*************************************************************The four methods I am currently aware of for getting an nVidia graphics card working in Mountain Lion are as follows (the easiest method is listed first and the most involved method is mentioned last).Method 1. Use the Chameleon 2.svn r1820 (or later revision, e.g. r2042) GraphicsEnabler option via org.chameleon.Boot.plist: <key>GraphicsEnabler</key> <string>Yes</string> Method 2. Use the hexadecimal graphics string option via org.chameleon.Boot.plist:<key>device-properties</key> <string>"for example, 6c0200000100000001000000600200000d00000002010c.."</string> where the graphics string is generated by EFIStudio v1.1 or OSx86Tools v1.0.150.....Method 3. NVEnabler 64.kext, which enables TV-OUT and injects 2nd display operation very well......The NVEnabler.kext (32bit/64bit) is not just another injector kext because it does on-the-fly ROM patching to give a more stable output configuration.......Although I have found that the NVEnabler 64.kext works in OS X Mountain Lion with my Inno3D GeForce 9800GT [G92] 512MB graphics card with DVI-D and VGA ports, without any need to insert the graphics card's Device ID into the Info.plist files of the NVDAResman.kext and NVDANV50Hal.kext, this may not be true for you.For NVEnabler 64.kext to work properly for you in OS X Mountain Lion, you may still need to insert your graphics card(s) Device ID into the Info.plist files of the NVDAResman.kext and NVDAGF100Hal.kext or NVDAGK100Hal.kext......see the section on Inserting Graphics Card Hardware Matching Device ID into nVidia Graphics Kexts below.....Method 4. Finally, if you are familiar with DSDT modding, you can choose to modify your DSDT.aml file with information on your NVCap values obtained via IORegistry Editor, which is the newest method but also the cleanest, most "vanilla" method because it is DSDT-based, rather than involving com.apple.Boot.plist changes, or using a non-vanilla kext.......NOTE: The methods above are mutually exclusive......use only one.The situation is a bit more complicated with the nVidia GeForce GTX and GTS series graphics cards ......if Methods 1. and 2. do not work properly, then it may be necessary to insert the graphics card(s) Device ID directly into the appropriate vanilla kexts, as well as using a compatible enabler.....Method 1. is self-explanatory, so I will deal with Method 2. and 3. below, but I will not deal with Method. 4 in this topic because {1} it requires first-hand knowledge of any given MOBO and graphics card(s) combination to properly set up the DSDT.aml graphics section(s) and {2} this topic is focussed on installing OS X Mountain Lion and not on setting up a DSDT.aml for graphics cards under OS X Mountain Lion.*************************************************************Generating and Modifying an EFI Graphics String for Mountain Lion*************************************************************GUI Approach to generating an EFI graphics string using OSx86Tools v1.0.150First of all to deal with the question of which OS X version is best for generating a EFI graphics string using OSx86Tools v1.0.150, I have generated the .plist files and .hex files for my Inno3D GeForce 9800GT 512MB DVI/VGA graphics card using OS X Leopard 10.5.8, OS X Snow Leopard 10.6.8, OS X Lion 10.7.4 and OS X Mountain Lion 10.8.0.I then used DiffMerge to compare the files generated and found that all the files were identical; here is the .plist file for my Inno3D GeForce 9800GT 512MB DVI/VGA graphics card:<?xml version="1.0" encoding="UTF-8"?> <!DOCTYPE plist PUBLIC "-//Apple//DTD PLIST 1.0//EN" "http://www.apple.com/DTDs/PropertyList-1.0.dtd"> <plist version="1.0"> <dict> <key>PciRoot(0x1)/Pci(0x3,0x0)/Pci(0x0,0x0)</key> <dict> <key>@0,compatible</key> <string>NVDA,NVMac</string> <key>@0,device_type</key> <string>display</string> <key>@0,name</key> <string>NVDA,Display-A</string> <key>@1,compatible</key> <string>NVDA,NVMac</string> <key>@1,device_type</key> <string>display</string> <key>@1,name</key> <string>NVDA,Display-B</string> <key>NVCAP</key> <data> BAAAAAAAAwAEAAAAAAAABwAAAAA= </data> <key>NVPM</key> <data> AQAAAAAAAAAAAAAAAAAAAAAAAAAAAAAAAAAAAA== </data> <key>VRAM,totalsize</key> <string>0x20000000</string> <key>device_type</key> <string>NVDA,Parent</string> <key>model</key> <string>Inno3D GeForce 9800GT</string> <key>name</key> <string>display</string> <key>rom-revision</key> <string>Inno3D GeForce 9800GT OpenGL Engine [EFI]</string> </dict> </dict> </plist> and here is the corresponding .hex string:6a02000001000000010000005e0200000d00000002010c00d041030a010000000101060000030101060000007fff04001e00000072006f006d002d007200650076006900730069006f006e0000002d000000496e6e6f3344204765466f72636520393830304754204f70656e474c20456e67696e65205b4546495d22000000400030002c006400650076006900630065005f00740079007000650000000b000000646973706c6179100000004e00560043004100500000001800000004000000000003000400000000000007000000000e0000006e0061006d00650000000b000000646973706c617914000000400030002c006e0061006d0065000000120000004e5644412c446973706c61792d41100000006d006f00640065006c00000019000000496e6e6f3344204765466f726365203938303047540e0000004e00560050004d000000200000000100000000000000000000000000000000000000000000000000000014000000400031002c006e0061006d0065000000120000004e5644412c446973706c61792d4220000000400031002c0063006f006d00700061007400690062006c00650000000e0000004e5644412c4e564d6163220000005600520041004d002c0074006f00740061006c00730069007a0065000000080000000000002020000000400030002c0063006f006d00700061007400690062006c00650000000e0000004e5644412c4e564d616322000000400031002c006400650076006900630065005f00740079007000650000000b000000646973706c61791c0000006400650076006900630065005f00740079007000650000000f0000004e5644412c506172656e74 Using the GeForce 9800GTX 512MB EFI graphics string as an example, it is interesting to note that EFIStudio writes the VRAM as<key>VRAM,totalsize</key> <data>AAAAIA==</data> whereas OSx86Tools writes the VRAM as<key>VRAM,totalsize</key> <string>0x20000000</string> Now let us deal with how the .plist file and corresponding .hex file are produced using OSx86Tools v1.0.150:1. Double-click on the OSX86Tools.app icon2. In the OSx86 Tools Utility window that opens, click on the "Add EFI Strings/Boot Flags" button3. In the Boot Editor window that opens, click on the "GFX Strings" button4. In the GFX String Creator window that opens, click on the "Choose" button.......select your graphics card if it is named in the list of graphics cards; otherwise, if not, click on the "Custom GeForce hex" button.5. In the "Please enter the name/model of your card....." window that opens, enter the brand/model of your graphics card and click OK6. In the "Please choose your VRAM size:" window, select if listed your enter your graphics card VRAM and click OK; otherwise, select "Custom..." and click OK and then enter a custom VRAM string value in the "Please enter a custom VRAM string...." window that opens, and click OK.Here is a table of VRAM string values:Data Value -------- VRAM (MB) ---------- String Value (Hexadecimal) <00000002>-------------32------------------<0x02000000> <00000004>-------------64------------------<0x04000000> <00000008>------------128------------------<0x08000000> <00000010>------------256------------------<0x10000000> <00000014>------------320------------------<0x14000000> <00000020>------------512------------------<0x20000000> <00000028>------------640------------------<0x28000000> <00000030>------------768------------------<0x30000000> <00000038>------------896------------------<0x38000000> <00000040>-----------1024 (1.0GB)--------<0x40000000> <00000050>-----------1280 (1.28 GB)------<0x50000000> <00000060>-----------1500 (1.5 GB)-------<0x60000000> <00000080>-----------2000 (2.0 GB)-------<0x80000000> <000000c0>-----------3072 (3.0 GB)-------<0xc0000000> 7. In the "Please choose your display output configuration (NVCAP) window", select the combination that matches your graphics card output ports; the first port-type listed is either the physical port-type on the graphics card nearest to the MOBO (i.e. the primary video port) and/or the physical port-type that your display is connected to.If none the listed port-type combinations match your graphics card outputs (generally unlikely that this will be the case, unless you have VGA/VGA , for example), then select Custom... and click OK and then enter a custom NVCAP data string in the "Please enter a custom NVCAP data string:" window that opens, and click OK.8. When you click on OK after entering a pre-listed port-type combinations or a custom NVCAP data string, the empty Property List File (plist) and Hexadecimal EFI String (device-properties) windows in the already open the GFX String Creator will be simultaneously populated.....9. You now have the choice to save {a} the generated custom Property List File (plist) data by clicking on the "Save as XML" button and {b} the generated custom Hexadecimal EFI String (device-properties) data by clicking on the "Save as Hex" button, as well as by clicking on the "Import String to Boot Editor" button, to go back to the Boot Editor window......As you will see, the previously empty box at the bottom of the window is now populated by the generated custom Hexadecimal EFI String (device-properties) data string.You now have the option to insert this string into com.apple.Boot.plist, which is located in /Library/Preferences/SystemConfiguration/, along with any chosen kernel flags, graphics mode, timeout time......However, you will preferably want to insert this string into the device-properties entry into org.chameleon.Boot.plist:<key>device-properties</key> <string></string> to enable your graphics display.Terminal Approach to modifying VRAM,totalsize entry using gfxutil v0.71b1. Create a folder on your Snow Leopard or Lion Desktop called GFXStringMod2. Extract your current hexadecimal EFI graphics string using Lizard v0.62 beta, or generate a pre-listed hexadecimal EFI graphics string using EFIStudio v1.1, or generate a new custom hexadecimal EFI graphics string using OSx86Tools v1.0.150, and save it as GFXString.hex to the GFXStringMod folder.Yes....I know you can save the string as a .hex, or as a .xml (i.e. .plist) file using either EFIStudio v1.1 or OSX86Tools.....but I am using gfxutil v0.71b for a consistent approach.....This is because EFIStudio v1.1, OSx86Tools v1.0.150, and Lizard v0.62 beta use gfxutil v0.71b......3. Use gfxutil v0.71b to convert GFXString.hex to GFXString.plist as follows:Copy downloaded gfxutil to GFXStringModIn Terminal type (leave Terminal window open, as you will use it again)cd /Users/"Username"/Desktop/GFXStringMod ./gfxutil -s -n -i hex -o xml ./GFXString.hex ./GFXString.plist 4. Use 'Property List Editor' (available in XCode > Developer > Applications > Utilities) to modify your settings by changing the number to the appropriate string value for your VRAM:<key>VRAM,totalsize</key> <string>0x40000000</string> 5. Use gfxutil to convert from GFXString.plist to GFXString.hex as follows:In Terminal type./gfxutil -i xml -o hex ./GFXString.plist ./GFXString.hex 6. Copy the string in the new VRAM,totalsize-modified GFXString.hex file to /Library/Preferences/SystemConfiguration/com.apple.Boot.plist under/against <key>device-properties</key>Finally, if you are familiar with DSDT modding, you can choose to modify your DSDT.aml file with information on your NVCap values obtained via IORegistry Editor, which is the newest method but also the cleanest, most "vanilla" method because it is DSDT-based, rather than involving com.apple.Boot.plist or org. chameleon.Boot.plist changes, or even using a non-vanilla graphics injector kextNOTE: The methods above are mutually exclusive......use only one.The situation is a bit more complicated with the nVidia GeForce GTX and GTS series graphics cards ...... it may be necessary to insert the graphics card(s) Device ID directly into the appropriate vanilla kexts, as well as using a compatible enabler, i.e. injector kext......*************************************************************Indications that Core Image (CI) and Quartz Extreme (QE) are both enabled in Mountain Lion*************************************************************If CI and QE are not fully enabled for your graphics card(s), then you will probably experience so-called mouse pointer "tearing", display-screen artifacts such as horizontal dashes, poor display refresh-rates, fixed screen-resolution etc.In Leopard, going to System Profiler and selecting Graphics/Displays would directly indicate this because Core Image would be shown as "Hardware Accelerated" and Quartz Extreme as "Supported" BUT this is no longer the case in Snow Leopard and Lion and Mountain Lion.......However, there are 2 key ways to confirm that the Core Image functioning is hardware accelerated and that Quartz Extreme functioning is supported in Lion:1. The top-menu bar is transluscent i.e. the underlying Desktop image is visible through the menu bar2. First, go to Launchpad or the Dock, and click on System Preferences, then click on Mission Control and uncheck the 'Show Dashboard as a space' checkbox.Then, when you go to Launchpad, click on the Dashboard icon or run the Dashboard app and add a widget, either via the LHS "+" button and clicking on a widget icon in the bottom widgets bar, or by 'dragging and dropping' a widget, you should see a "real-time" water-ripple effect as the new widget is "dropped" into the Dashboard.......*************************************************************Obtaining the NVCAP data string from your nVidia graphics card BIOS via Windows*************************************************************If OSx86Tools does not generate the correct NVCAP data string for your nVidia graphics card, you have two options, both of which involve using the NVCAP Maker 1.4.app (despite it having a reputation of being 'buggy').I cannot and do not guarantee that either procedure will work for you as it does for me; in particular, the Option B. Windows 7 Command Prompt Method is a procedure that you choose to do at your own risk because if you type the incorrect commands (even though I have not given the command for flashing a new BIOS file (*.rom file) to your graphics card), you could 'brick' your nVidia graphics card BIOS!NVCAP Maker 1.4.app.zipOption A - Download a pre-extracted graphics card BIOS file (*.rom file) for your graphics card brand/model if available1. Download your nVidia graphics card BIOS file from here if your graphics card brand/model is listed. Then, if the file does not have a *.rom extension, rename the file with an 8 character name with no spaces and .rom extension, e.g. myvidrom.romHowever, my example downloaded file is named Inno3D.9800GTX.PCIe.512MB.Rev.01.rom- - - --- Inno3D GeForce BIOS ----------------------------------------------. : Name : Inno3D GeForce 9800 GTX PCIe BIOS Version : 62.92.3B.00.06 . : '---------------------------------------------------------------------- - - - '--http://www.mvktech.net---------------------------------------------- - - - 2. When you run NVCAP Maker 1.4.app, two windows open; a NVCAP Maker window and an Open "Choose the source ROM file" window. Navigate to where you have saved the downloaded *.rom file, then select the *.rom file and click the Open button.....this will cause the NVCAP Maker window to be populated by the NVCAP data string from your extracted graphics card *.rom fileRun NVCAP Maker 1.4.app in OS XROM file: /Applications/My Utilities/NVCAP Maker/Inno3D/Inno3D.9800GTX.PCIe.512MB.Rev.01.rom Copyright 2008 Arti Itra version 1.4 If you find this program useful you may consider a PayPal donation to: arti.macelite@gmail.com 04000000000003000c0000000000000700000000 3. Property List Editor.app (found in Developer/Applications/Utilities) can be used to enter and save the NVCAP data string in your EFI graphics string .plist file (e.g. produced vis OSx86Tools), and then you can use OSx86Tools to import this modified .plist file and hence generate the corresponding modified .hex file, which is then inserted into your org.chameleon.Boot.plist file.Option B. - Extract your graphics card BIOS file (*.rom file) when running Windows on your PCWindows 7 GUI Method (i.e. 'safe'):1. Extract TechPowerUp GPU-Z.06.4.exe from this .zip file:GPU-Z.0.6.4.exe.zipand run it as Windows administrator in classic standalone mode.2. In the Graphics Card window that opens by default, click on the icon on the right-hand-side (RHS) of the BIOS version box and select and click on the "Save to file" option to save your graphics card BIOS file (*.rom) to a suitable location accessible by OS X, and hence the NVCAP Maker 1.4.app.3. When you run NVCAP Maker 1.4.app, two windows open; a NVCAP Maker window and an Open "Choose the source ROM file" window. Navigate to where you have saved the extracted *.rom file, then select the *.rom file and click the Open button.....this will cause the NVCAP Maker window to be populated by the NVCAP data string from your extracted graphics card *.rom file; e.g. here is the NVCAP data string for my Inno3D GeForce 9800GT [G92] 512MB graphics card with DVI-D and VGA ports:ROM file: /Applications/My Utilities/NVCAP Maker/nvflash_windows_5.118/gpu.rom Copyright 2008 Arti Itra version 1.4 If you find this program useful you may consider a PayPal donation to: arti.macelite@gmail.com 04000000000003000c0000000000000700000000 Windows 7 Command Prompt Method (i.e. 'scary fun'):1. Extract the nvflash v5.118 files from this .zip file:nvflash_windows_5.118.zipinto a nvflash_windows_5.118 folder in your Downloads folder.2. Click on All Programs and select Accessories and then select Command Prompt, and in the Command Prompt window that opens, at the C:\Users\"username"> prompt, type cd C:\Users\"username"\Downloads\nvflash_windows-5.118 and press Return, then at the C:\Users\"username"\Downloads\nvflash_windows-5.118> prompt, type dir and you should see:nvflash.exenvflsh32.sysnvflsh64.sys3. At the C:\Users\"username"\Downloads\nvflash_windows-5.118> prompt, typenvflash --save gpu.rom and you will see a User Account Contro lpop-up window appear..............click on Yes to authorize nvflash.exe to function......then you will see a NVIDIA Firware Update Utility Command Prompt window appear, which shows that the BIOS file is being extracted and saved in the nvflash_windows_5.118 folder as gpu.rom.4. When you run NVCAP Maker 1.4.app, two windows open; a NVCAP Maker window and an Open "Choose the source ROM file" window. Navigate to where you have saved the extracted gpu.rom file, then select the gpu.rom file and click the Open button.....this will cause the NVCAP Maker window to be populated by the NVCAP data string from your extracted graphics card gpu.rom file; e.g. here is the NVCAP data string for my Inno3D GeForce 9800GT [G92] 512MB graphics card with DVI-D and VGA ports:ROM file: /Applications/My Utilities/NVCAP Maker/nvflash_windows_5.118/gpu.rom Copyright 2008 Arti Itra version 1.4 If you find this program useful you may consider a PayPal donation to: arti.macelite@gmail.com 04000000000003000c0000000000000700000000 Note that both GPU-Z and nvflash extracted BIOS files produce an NVCAP via NVCAP Maker 1.4 of 04000000000003000c0000000000000700000000whereas the OSx86Tools.app "Custom GeForce" option generated a NVCAP data string, shown in the .plist file asBAAAAAAAAwAEAAAAAAAABwAAAAA=which is a Base64 encoded NVCAP value data string. However, you can decode Base64 with the following Terminal command:echo "Base64 encoded NVCAP value data string" | openssl enc -d -base64 | xxd -p Thus, echo "BAAAAAAAAwAEAAAAAAAABwAAAAA=" | openssl enc -d -base64 | xxd -p in Terminal gives:0400000000000300040000000000000700000000 which is exactly 20 bytes long, specified in binary form using ASCII-HEX (0-9,a-f). But note that this OSx86Tools value:0400000000000300040000000000000700000000is different from the NVCAP Maker generated value:04000000000003000c0000000000000700000000which translates into OSx86Tools .plist form asBAAAAAAAAwAMAAAAAAAABwAAAAA=I used Property List Editor.app (found in Developer/Applications/Utilities) to edit and save the NVCAP data string in the OSx86Tools generated .plist file for my Inno3D GeForce 9800GT [G92] 512MB graphics card, changing BAAAAAAAAwAEAAAAAAAABwAAAAA= to BAAAAAAAAwAMAAAAAAAABwAAAAA=.I then used OSx86Tools to import this modified .plist file and hence generate the corresponding modified .hex file, which I inserted into the org.chameleon.Boot.plist file in /Extra in both the OS X Mountain Lion USB Installer and the HDD OS X Mountain Lion system.I found that both EFI graphics string versions worked without any noticeable differences in in both the OS X Mountain Lion USB Installer and the HDD OS X Mountain Lion system, so I am now using the NVCAP Maker generated NVCAP data string in my org.chameleon.Boot.plist.*************************************************************Inserting nVidia Graphics Card Hardware Matching Device ID into nVidia Graphics Kexts*************************************************************A. Archive of nVidia graphics card models and their Device IDsFirstly, it will be helpful to list the current nVidia graphics cards into classes for easy identification:GeForce 600 series: GTX 690, GTX 680, GTX 670, GT 645, GT 640, GT 630, GT 620, GT 610, 605 GeForce 600M series: GTX 675M, GTX 670M, GTX 660M, GT 650M, GT 640M LE, GT 640M, GT 635M, GT 630M, GT 620M, G610M GeForce 500 series: GTX 590, GTX 580, GTX 570, GTX 560 Ti, GTX 560 SE, GTX 560, GTX 555, GTX 550 Ti, GT 545, GT 530, GT 520, 510 GeForce 500M series: GTX 580M, GTX 570M, GTX 560M, GT 555M, GT 550M, GT 540M, GT 525M, GT 520MX, GT 520M GeForce 400 series: GTX 480, GTX 470, GTX 465, GTX 460 v2, GTX 460 SE v2, GTX 460 SE, GTX 460, GTS 450, GT 440, GT 430, GT 420, GT 415, 405 GeForce 400M series: GTX 485M, GTX 480M, GTX 470M, GTX 460M, GT 445M, GT 435M, GT 425M, GT 420M, GT 415M, 410M GeForce 300 series: GT 340, GT 330, GT 320, 315, 310 GeForce 300M series: GTS 360M, GTS 350M, GT 335M, GT 330M, GT 325M, GT 320M, 320M, 315M, 310M, 305M GeForce 200 series: GTX 295, GTX 285, GTX 280, GTX 275, GTX 260, GTS 250, GTS 240, GT 240, GT 230, GT 220, G210, 210, 205 GeForce 200M series: GTX 285M, GTX 280M, GTX 260M, GTS 260M, GTS 250M, GT 240M, GT 230M, GT 220M, G210M GeForce 100 series: GT 140, GT 130, GT 120, G 100 GeForce 100M series: GTS 160M, GTS 150M, GT 130M, GT 120M, G 110M, G 105M, G 103M, G 102M GeForce 9 series: 9800 GX2, 9800 GTX+, 9800 GTX/GTX+, 9800 GT, 9650 S, 9600 GT, 9600 GSO 512, 9600 GSO, 9600 GS, 9500 GT, 9500 GS, 9400 GT, 9400, 9300 SE, 9300 GS, 9300 GE, 9300 / nForce 730i, 9300, 9200, 9100 GeForce 9M series: 9800M GTX, 9800M GTS, 9800M GT, 9800M GS, 9700M GTS, 9700M GT, 9650M GT, 9650M GS, 9600M GT, 9600M GS, 9500M GS, 9500M G, 9400M G, 9400M, 9300M GS, 9300M G, 9200M GS, 9100M G GeForce 8 series: 8800 Ultra, 8800 GTX, 8800 GTS 512, 8800 GTS, 8800 GT, 8800 GS, 8600 GTS, 8600 GS, 8500 GT, 8400 SE, 8400 GS, 8400, 8300 GS, 8300, 8200, 8100 / nForce 720a GeForce 8M series: 8800M GTX, 8800M GTS, 8700M GT, 8600M GT, 8600M GS, 8400M GT, 8400M GS, 8400M G, 8200M G GeForce 7 series: 7950 GX2, 7950 GT, 7900 GTX, 7900 GT/GTO, 7900 GS, 7800 SLI, 7800 GTX, 7800 GT, 7800 GS, 7650 GS, 7600 LE, 7600 GT, 7600 GS, 7500 LE, 7350 LE, 7300 SE / 7200 GS, 7300 LE, 7300 GT, 7300 GS, 7150M /NVIDIA nForce 630M, 7150 / NVIDIA nForce 630i, 7100 GS, 7100 / NVIDIA nForce 630i, 7050 PV / NVIDIA nForce 630a, 7050 / NVIDIA nForce 630i, 7050 / nForce 620i, 7025 / NVIDIA nForce 630a, 7000M /NVIDIA nForce 610M GeForce Go 7 series: Go 7950 GTX, Go 7900 GS, Go 7800 GTX, Go 7800, Go 7700, Go 7600 GT, Go 7600, Go 7400, Go 7300, Go 7200 GeForce 6 series: 6800 XT, 6800 XE, 6800 Ultra, 6800 LE, 6800 GT, 6800 GS, 6800, 6700 XL, 6610 XL, 6600 VE, 6600 LE, 6600 GT, 6600, 6500, 6250, 6200 TurboCache, 6200SE TurboCache, 6200 LE, 6200 A-LE, 6200, 6150SE nForce 430, 6150 LE, 6150, 6100 nForce 420, 6100 nForce 405, 6100 nForce 400, 6100 NVS Series: NVS 310, NVS 300 Quadro series: 7000, 6000, 600, 5000, 410, 4000, 400, 2000D, 2000 Quadro FX series: FX Go1400, FX 5800, FX 580, FX 570, FX 5600, FX 560, FX 5500, FX 550, FX 540, FX 4800, FX 4700 X2, FX 4600, FX 4500 X2, FX 4500, FX 4000, FX 380 LP, FX 3800, FX 380, FX 370 Low Profile, FX 3700, FX 370, FX 3500, FX 350, FX 3450/4000 SDI, FX 3400/4400, FX 1800, FX 1700, FX 1500, FX 1400, CX Quadro Notebook series: 5010M, 5000M, 4000M, 3000M, 2000M, 1000M Quadro FX Notebook series: FX 880M, FX 770M, FX 570M, FX 560M, FX 540M, FX 380M, FX 3800M, FX 370M, FX 3700M, FX 360M, FX 3600M, FX 350M, FX 2800M, FX 2700M, FX 2500M, FX 1800M, FX 1700M, FX 1600M, FX 1500M Quadro NVS series: NVS 450, NVS 440, NVS 420, NVS 295, NVS 290, NVS 285, NVS 210S / 6150LE Quadro NVS Notebook series: NVS 5400M, NVS 510M, NVS 4200M, NVS 320M, NVS 160M, NVS 150M, NVS 140M, NVS 135M, NVS 130M, NVS 120M, NVS 110M Quadro Plex series: Model IV, Model II, D Series, 7000 Quadro G-Sync series: G-Sync II Quadro SDI series: Quadro SDI ION series: ION LE, ION C-Class Processors: Tesla C870, Tesla C2075, Tesla C2070, Tesla C2050, Tesla C1060, T10 Processor M-Class Processors: Tesla M2090, Tesla M2075, Tesla M2070-Q, Tesla M2070, Tesla M2050, Tesla M1060 X-Class Processors: Tesla X2090 Secondly, it is useful to list the current NVIDIA graphics cards device IDs (as of May 2012) in nvidia.c (Fabio (ErmaC):/** NVidia injector** Copyright © 2009 Jasmin Fazlic, iNDi** NVidia injector modified by Fabio (ErmaC) on May 2012,* for allow the cosmetics injection also based on SubVendorID and SubDeviceID. /* ======================================================================================== * Layout is device(VendorId + DeviceId), subdev (SubvendorId + SubdeviceId), display name. * ======================================================================================== *//*Unknown*/ { 0x10DE0000, NV_SUB_IDS, "Unknown" }, /* ------ Specific DeviceID and SubDevID. ------ */// 0000 - 0040// 0040 - 004F{ 0x10DE0040, 0x10438178, "Asus V9999 Ultra V62.11" },{ 0x10DE0040, 0x1043817D, "Asus V9999GT V61.21" },{ 0x10DE0040, 0x10DE0205, "nVidia GeForce 6800 Ultra" },{ 0x10DE0040, 0x7FFFFFFF, "GeForce 6800 Ultra [NV40.0]" },// 0050 - 005F// 0060 - 006F// 0070 - 007F// 0080 - 008F// 0090 - 009F// 00A0 - 00AF// 00B0 - 00BF// 00C0 - 00CF// 00D0 - 00DF// 00E0 - 00EF// 00F0 - 00FF// 0100 - 010F// 0110 - 011F// 0120 - 012F// 0130 - 013F// 0140 - 014F// 0150 - 015F// 0160 - 016F// 0170 - 017F// 0180 - 018F// 0190 - 019F{ 0x10DE0193, 0x10438234, "Asus GeForce 8800 GTS" },{ 0x10DE0193, 0x1043823C, "Asus GeForce 8800 GTS" },{ 0x10DE0193, 0x1043825F, "Asus GeForce 8800 GTS" },{ 0x10DE0193, 0x10DE0420, "Asus GeForce 8800 GTS" },{ 0x10DE0193, 0x10DE0421, "Albatron GeForce 8800 GTS" },{ 0x10DE0193, 0x19F104A6, "BFG GeForce 8800 GTS" },{ 0x10DE019D, 0x107D2A72, "Leadtek Quadro FX 5600" },{ 0x10DE019D, 0x10DE0409, "nVidia Quadro FX 5600" },{ 0x10DE019E, 0x107D2A72, "Leadtek Quadro FX 4600" },{ 0x10DE019E, 0x10DE0408, "nVidia Quadro FX 4600" },// 01A0 - 01AF// 01B0 - 01BF// 01C0 - 01CF// 01D0 - 01DF{ 0x10DE01D7, 0x1025006C, "Acer GeForce Go 7300" },{ 0x10DE01D7, 0x10250090, "Acer GeForce Go 7300" },{ 0x10DE01D7, 0x10250096, "Acer GeForce Go 7300" },{ 0x10DE01D7, 0x10250100, "Acer GeForce Go 7300" },{ 0x10DE01D7, 0x10250107, "Acer GeForce Go 7300" },{ 0x10DE01D7, 0x10250110, "Acer GeForce Go 7300" },{ 0x10DE01D7, 0x10250112, "Acer GeForce Go 7300" },{ 0x10DE01D7, 0x102501C2, "Acer GeForce Go 7300" },{ 0x10DE01D7, 0x102501C8, "Acer GeForce Go 7300" },{ 0x10DE01D7, 0x102801C2, "Dell Quadro NVS 110M" },{ 0x10DE01D7, 0x102801C8, "Dell GeForce Go 7300" },{ 0x10DE01D7, 0x102801CC, "Dell Quadro NVS 110M" },{ 0x10DE01D7, 0x102801D7, "Dell GeForce Go 7300" },{ 0x10DE01D7, 0x102801E2, "Dell GeForce Go 7300" },{ 0x10DE01D7, 0x102801F9, "Dell GeForce Go 7300" },{ 0x10DE01D7, 0x102801FE, "Dell GeForce Go 7300" },{ 0x10DE01D7, 0x10282003, "Dell GeForce Go 7300" },{ 0x10DE01D7, 0x10338848, "NEC GeForce Go 7300" },{ 0x10DE01D7, 0x103C30B2, "HP GeForce Go 7300" },{ 0x10DE01D7, 0x103C30B7, "HP GeForce Go 7300" },{ 0x10DE01D7, 0x10431212, "Asus GeForce Go 7300" },{ 0x10DE01D7, 0x104313A2, "Asus GeForce Go 7300" },{ 0x10DE01D7, 0x10431441, "Asus GeForce Go 7300" },{ 0x10DE01D7, 0x10DE0000, "nVidia GeForce Go 7300" },{ 0x10DE01D7, 0x10DE014B, "nVidia Quadro NVS 110M" },{ 0x10DE01D7, 0x11790001, "Toshiba GeForce Go 7300" },{ 0x10DE01D7, 0x11790002, "Toshiba GeForce Go 7300" },{ 0x10DE01D7, 0x1179FF00, "Toshiba GeForce Go 7300" },{ 0x10DE01D7, 0x1179FF01, "Toshiba GeForce Go 7300" },{ 0x10DE01D7, 0x1179FF02, "Toshiba GeForce Go 7300" },{ 0x10DE01D7, 0x1179FF10, "Toshiba GeForce Go 7300" },{ 0x10DE01D7, 0x1179FF31, "Toshiba GeForce Go 7300" },{ 0x10DE01D7, 0x13DC1172, "Netbost GeForce Go 7300" },{ 0x10DE01D7, 0x144D8063, "Samsung GeForce Go 7300" },{ 0x10DE01D7, 0x144DC024, "Samsung GeForce Go 7300" },{ 0x10DE01D7, 0x144DC026, "Samsung GeForce Go 7300" },{ 0x10DE01D7, 0x144DC513, "Samsung GeForce Go 7300" },{ 0x10DE01D7, 0x14C00012, "Compal GeForce Go 7300" },{ 0x10DE01D7, 0xC0181631, "GeForce Go 7300" },{ 0x10DE01D8, 0x10250090, "Acer GeForce Go 7400" },{ 0x10DE01D8, 0x102801C8, "Dell GeForce Go 7400" },{ 0x10DE01D8, 0x102801CC, "Dell Quadro NVS 120M" },{ 0x10DE01D8, 0x102801D7, "Dell GeForce Go 7400" },{ 0x10DE01D8, 0x102801F3, "Dell GeForce Go 7400" },{ 0x10DE01D8, 0x102801F9, "Dell GeForce Go 7400" },{ 0x10DE01D8, 0x102801FE, "Dell GeForce Go 7400" },{ 0x10DE01D8, 0x10280209, "Dell GeForce Go 7400" },{ 0x10DE01D8, 0x10282003, "Dell Quadro NVS 120M" },{ 0x10DE01D8, 0x103C30A5, "HP GeForce Go 7400" },{ 0x10DE01D8, 0x103C30B6, "HP GeForce Go 7400" },{ 0x10DE01D8, 0x103C30B7, "HP GeForce Go 7400" },{ 0x10DE01D8, 0x103C30BB, "HP GeForce Go 7400" },{ 0x10DE01D8, 0x10431211, "Asus GeForce Go 7400" },{ 0x10DE01D8, 0x10431214, "Asus GeForce Go 7400" },{ 0x10DE01D8, 0x104D81E6, "Sony GeForce Go 7400" },{ 0x10DE01D8, 0x104D81EF, "Sony GeForce Go 7400" },{ 0x10DE01D8, 0x104D81FD, "Sony GeForce Go 7400" },{ 0x10DE01D8, 0x104D8205, "Sony GeForce Go 7400" },{ 0x10DE01D8, 0x104D820F, "Sony GeForce Go 7400" },{ 0x10DE01D8, 0x109F319C, "Trigem GeForce Go 7400" },{ 0x10DE01D8, 0x109F319D, "Trigem GeForce Go 7400" },{ 0x10DE01D8, 0x109F3C01, "Trigem GeForce Go 7400" },{ 0x10DE01D8, 0x11790001, "Toshiba GeForce Go 7400" },{ 0x10DE01D8, 0x1179FF00, "Toshiba GeForce Go 7400" },{ 0x10DE01D8, 0x1179FF10, "Toshiba GeForce Go 7400" },{ 0x10DE01D8, 0x1179FF31, "Toshiba GeForce Go 7400" },{ 0x10DE01D8, 0x144D8062, "Samsung GeForce Go 7400" },{ 0x10DE01D8, 0x144DB03C, "Samsung GeForce Go 7400" },{ 0x10DE01D8, 0x144DC024, "Samsung GeForce Go 7400" },{ 0x10DE01D8, 0x144DC026, "Samsung GeForce Go 7400" },{ 0x10DE01D8, 0x14620511, "MSi GeForce Go 7400" },{ 0x10DE01D8, 0x14623FCC, "MSi GeForce Go 7400" },{ 0x10DE01D8, 0x14623FDF, "MSi GeForce Go 7400" },{ 0x10DE01D8, 0x14624327, "MSi GeForce Go 7400" }, { 0x10DE01D8, 0x15092A30, "GeForce Go 7400" }, // First International Computer Inc{ 0x10DE01D8, 0x152D0753, "Quanta GeForce Go 7400" },{ 0x10DE01D8, 0x152D0763, "Quante GeForce Go 7400" },{ 0x10DE01D8, 0x161F203D, "Arima GeForce Go 7400" },{ 0x10DE01D8, 0x161F2052, "Arima GeForce Go 7400" },{ 0x10DE01D8, 0x161F2054, "Arima GeForce Go 7400" },{ 0x10DE01D8, 0x161F205D, "Arima GeForce Go 7400" }, { 0x10DE01D8, 0x1631C022, "NEC GeForce Go 7400" },{ 0x10DE01D8, 0x173410D3, "Fujitsu GeForce Go 7400" },{ 0x10DE01D8, 0x17AA2075, "Lenovo GeForce Go 7400" },{ 0x10DE01D8, 0x17AA3833, "Lenovo GeForce Go 7400" },{ 0x10DE01D8, 0x17AA39F5, "Lenovo GeForce Go 7400" },{ 0x10DE01D8, 0x17AA6666, "Lenovo GeForce Go 7400" },{ 0x10DE01D8, 0x17C0207F, "Wistron GeForce Go 7400" }, { 0x10DE01D8, 0x17C02083, "Wistron GeForce Go 7400" },{ 0x10DE01D8, 0x17FF500E, "Benq GeForce Go 7400" },{ 0x10DE01D8, 0x18940040, "LG GeForce Go 7400" },{ 0x10DE01D8, 0x18640041, "LG GeForce Go 7400" },{ 0x10DE01D8, 0x18640042, "LG GeForce Go 7400" },{ 0x10DE01D8, 0x18640043, "LG GeForce Go 7400" },{ 0x10DE01D8, 0x18640044, "LG GeForce Go 7400" }, { 0x10DE01D8, 0x18640045, "LG GeForce Go 7400" },{ 0x10DE01D8, 0x18640046, "LG GeForce Go 7400" },{ 0x10DE01D8, 0x18640047, "LG GeForce Go 7400" },{ 0x10DE01D8, 0x1864007A, "LG GeForce Go 7400" },{ 0x10DE01D8, 0x19614605, "ESS GeForce Go 7400" },{ 0x10DE01D8, 0x19615607, "ESS GeForce Go 7400" },{ 0x10DE01D8, 0x19915532, "Topstar GeForce Go 7400" }, { 0x10DE01D8, 0x19DB2174, "GeForce Go 7400" }, // ??{ 0x10DE01D8, 0xC0181631, "GeForce Go 7400" }, // ??{ 0x10DE01DA, 0x1028017D, "Dell Quadro NVS 110M" },{ 0x10DE01DA, 0x10280407, "Dell GeForce 7300 LE" },{ 0x10DE01DA, 0x11790001, "Toshiba Quadro NVS 110M" },{ 0x10DE01DA, 0x11790002, "Toshiba Quadro NVS 110M" },{ 0x10DE01DA, 0x11790010, "Toshiba Quadro NVS 110M" },{ 0x10DE01DA, 0x1179FF00, "Toshiba Quadro NVS 110M" },{ 0x10DE01DA, 0x1179FF10, "Toshiba Quadro NVS 110M" },// 01E0 - 01EF// 01F0 - 01FF// 0200 - 020F// 0210 - 021F// 0220 - 022F// 0230 - 023F// 0240 - 024F// 0250 - 025F{ 0x10DE025B, 0x10480D23, "ELSA Gloria4 700XGL" },{ 0x10DE025B, 0x10DE013B, "nVidia Quadro4 700 XGL" },{ 0x10DE025B, 0x155410F3, "Prolink Quadro4 700 XGL" },// 0260 - 026F// 0270 - 027F// 0280 - 028F// 0290 - 029F// 02A0 - 02AF// 02B0 - 02BF// 02C0 - 02CF// 02D0 - 02DF// 02E0 - 02EF// 02F0 - 02FF// 0300 - 030F// 0310 - 031F// 0320 - 032F// 0330 - 033F// 0340 - 034F{ 0x10DE0349, 0x1179FF00, "Toshiba NV36M Pro" },{ 0x10DE034B, 0x1179FF00, "Toshiba NV36MAP" },// 0350 - 035F// 0360 - 036F// 0370 - 037F// 0380 - 038F// 0390 - 039F{ 0x10DE0391, 0x104381F7, "Asus GeForce 7600 GT" },{ 0x10DE0391, 0x104D820D, "Sony GeForce 7600 GT" },{ 0x10DE0391, 0x104D9004, "Sony GeForce 7600 GT" },{ 0x10DE0391, 0x104D9007, "Sony GeForce 7600 GT" },{ 0x10DE0391, 0x105B0E10, "Foxconn GeForce 7600 GT" },{ 0x10DE0391, 0x10B00401, "Gainward GeForce 7600 GT" },{ 0x10DE0391, 0x10B00803, "Gainward GeForce 7600 GT" },{ 0x10DE0391, 0x10DE033D, "nVidia GeForce 7600 GT" },{ 0x10DE0391, 0x10DE0403, "nVidia GeForce 7600 GT" },{ 0x10DE0391, 0x10DE047A, "Galaxy GeForce 7600 GT" },{ 0x10DE0391, 0x14583417, "Gigabyte GeForce 7600 GT" },{ 0x10DE0391, 0x1179FF00, "Toshiba GeForce 7600 GT" },{ 0x10DE0391, 0x19F1201F, "BFG GeForce 7600 GT" },{ 0x10DE0391, 0x19F120DE, "Galaxy GeForce 7600 GT" },{ 0x10DE0391, 0x3842C615, "EVGA GeForce 7600 GT" },{ 0x10DE0393, 0x00000400, "Apple GeForce 7300GT" },// 03A0 - 03AF// 03B0 - 03BF// 03C0 - 03CF// 03D0 - 03DF// 03E0 - 03EF// 03F0 - 03FF// 0400 - 040F{ 0x10DE0402, 0x1043034D, "Asus GeForce 8600 GT" },{ 0x10DE0402, 0x1043034E, "Asus GeForce 8600 GT" },{ 0x10DE0402, 0x10431618, "Asus GeForce 8600 GT" },{ 0x10DE0402, 0x104381F7, "Asus GeForce 8600 GT" },{ 0x10DE0402, 0x10DE0439, "Galaxy 8600GT" },{ 0x10DE0402, 0x10DE0505, "Galaxy 8600GT" },{ 0x10DE0402, 0x14620890, "MSi GeForce 8600 GT" },{ 0x10DE0402, 0x14620964, "MSi GeForce 8600 GT" },{ 0x10DE0402, 0x174B8030, "PC Partner GeForce 8600 GT" },{ 0x10DE0407, 0x101922D4, "Elitegroup GeForce 8600M GT" },{ 0x10DE0407, 0x1025011D, "Acer GeForce 8600M GT" },{ 0x10DE0407, 0x1025011E, "Acer GeForce 8600M GT" },{ 0x10DE0407, 0x10250121, "Acer GeForce 8600M GT" },{ 0x10DE0407, 0x10250125, "Acer GeForce 8600M GT" },{ 0x10DE0407, 0x10250126, "Acer GeForce 8600M GT" },{ 0x10DE0407, 0x10250127, "Acer GeForce 8600M GT" },{ 0x10DE0407, 0x10250129, "Acer GeForce 8600M GT" },{ 0x10DE0407, 0x1025012B, "Acer GeForce 8600M GT" },{ 0x10DE0407, 0x10250136, "Acer GeForce 8600M GT" },{ 0x10DE0407, 0x1025013D, "Acer GeForce 8600M GT" },{ 0x10DE0407, 0x1025013F, "Acer GeForce 8600M GT" },{ 0x10DE0407, 0x10250142, "Acer GeForce 8600M GT" },{ 0x10DE0407, 0x10250143, "Acer GeForce 8600M GT" },{ 0x10DE0407, 0x10250145, "Acer GeForce 8600M GT" },{ 0x10DE0407, 0x10250146, "Acer GeForce 8600M GT" },{ 0x10DE0407, 0x1025015E, "Acer GeForce 8600M GT" },{ 0x10DE0407, 0x1028019C, "Dell GeForce 8600M GT" },{ 0x10DE0407, 0x102801F1, "Dell GeForce 8600M GT" },{ 0x10DE0407, 0x102801F2, "Dell GeForce 8600M GT" },{ 0x10DE0407, 0x10280228, "Dell GeForce 8600M GT" },{ 0x10DE0407, 0x10280229, "Dell GeForce 8600M GT" },{ 0x10DE0407, 0x1028022E, "Dell GeForce 8600M GT" },{ 0x10DE0407, 0x10431515, "Asus GeForce 8600M GT" },{ 0x10DE0407, 0x10431588, "Asus GeForce 8600M GT" },{ 0x10DE0407, 0x10431618, "Asus GeForce 8600M GT" },{ 0x10DE0407, 0x10431632, "Asus GeForce 8600M GT" },{ 0x10DE0407, 0x104314A2, "Asus GeForce 8600M GT" },{ 0x10DE0407, 0x104381F7, "Asus GeForce 8600M GT" },{ 0x10DE0407, 0x104D9005, "Sony GeForce 8600M GT" },{ 0x10DE0407, 0x104D9016, "Sony GeForce 8600M GT" },{ 0x10DE0407, 0x104D9018, "Sony GeForce 8600M GT" },{ 0x10DE0407, 0x106B00A0, "Apple GeForce 8600M GT" },{ 0x10DE0407, 0x106B00A3, "Apple GeForce 8600M GT" },{ 0x10DE0407, 0x106B00A4, "Apple GeForce 8600M GT" },{ 0x10DE040C, 0x103C30C5, "HP Quadro FX 570M" },{ 0x10DE040C, 0x104381F7, "Asus Quadro FX 570M" },{ 0x10DE040C, 0x10CF1423, "Fujitsu Quadro FX 570M" },{ 0x10DE040C, 0x17AA20D9, "Lenovo Quadro FX 570M" },// 0410 - 041F{ 0x10DE0410, 0x174B3058, "PC Partner GeForce GT 330" },// 0420 - 042F{ 0x10DE0426, 0x10338897, "NEC GeForce 8400M GT" },{ 0x10DE0426, 0x104381F7, "Asus GeForce 8400M GT" },{ 0x10DE0426, 0x104D9005, "Sony GeForce 8400M GT" },{ 0x10DE0426, 0x104D9016, "Sony GeForce 8400M GT" },{ 0x10DE0426, 0x104D9017, "Sony GeForce 8400M GT" },{ 0x10DE0426, 0x104D9018, "Sony GeForce 8400M GT" },{ 0x10DE0426, 0x104D902D, "Sony GeForce 8400M GT" },{ 0x10DE0426, 0x104D9030, "Sony GeForce 8400M GT" },{ 0x10DE0426, 0x19915584, "Topstar GeForce 8400M GT" },// 0430 - 043F// 0440 - 044F// 0450 - 045F// 0460 - 046F// 0470 - 047F// 0480 - 048F// 0490 - 049F// 04A0 - 04AF// 04B0 - 04BF// 04C0 - 04CF// 04D0 - 04DF// 04E0 - 04EF// 04F0 - 04FF// 0500 - 050F// 0510 - 051F// 0520 - 052F// 0530 - 053F// 0540 - 054F// 0550 - 055F// 0560 - 056F// 0570 - 057F// 0580 - 058F// 0590 - 059F// 05A0 - 05AF// 05B0 - 05BF// 05C0 - 05CF// 05D0 - 05DF// 05E0 - 05EF{ 0x10DE05E0, 0x10DE064E, "nVidia GeForce GTX 295" },{ 0x10DE05E0, 0x38421291, "EVGA GeForce GTX 295" },{ 0x10DE05E1, 0x10DE0557, "nVidia GeForce GTX 280" },{ 0x10DE05E2, 0x10438291, "Asus GeForce GTX 260" },{ 0x10DE05E2, 0x10438298, "Asus GeForce GTX 260" },{ 0x10DE05E2, 0x104382C4, "Asus GeForce GTX 260" },{ 0x10DE05E2, 0x104382CF, "Asus GeForce GTX 260" },{ 0x10DE05E2, 0x104382E3, "Asus GeForce GTX 260" },{ 0x10DE05E2, 0x104382EB, "ASUS ENGTX260" },{ 0x10DE05E2, 0x10B00801, "Gainward GeForce GTX 260" },{ 0x10DE05E2, 0x10DE0585, "nVidia GeForce GTX 260" },{ 0x10DE05E2, 0x10DE0617, "nVidia GeForce GTX 260" },{ 0x10DE05E2, 0x16822390, "HFX GeForce GTX 260" },{ 0x10DE05E2, 0x17870000, "HIS GeForce GTX 260" },{ 0x10DE05E2, 0x196E064B, "PNY GeForce GTX 260" },{ 0x10DE05E2, 0x19F10FA9, "BFG GeForce GTX 260" },{ 0x10DE05E2, 0x34421260, "Bihl GeForce GTX 260" },{ 0x10DE05E2, 0x34421262, "Bihl GeForce GTX 260" },{ 0x10DE05E2, 0x73770000, "Colorful GeForce GTX 260" },{ 0x10DE05E3, 0x10438320, "Asus GeForce GTX 285" },{ 0x10DE05E3, 0x106B0000, "Apple GeForce GTX 285" },{ 0x10DE05E3, 0x10DE065B, "nVidia GeForce GTX 285" },{ 0x10DE05E3, 0x38421080, "EVGA GeForce GTX 285" },{ 0x10DE05E3, 0x38421187, "EVGA GeForce GTX 285" },{ 0x10DE05E6, 0x10B00401, "Gainward GeForce GTX 285" },{ 0x10DE05E6, 0x38421171, "EVGA GeForce GTX 275" },{ 0x10DE05E7, 0x10DE0595, "nVidia Tesla T10 Processor" },{ 0x10DE05E7, 0x10DE066A, "nVidia Tesla C1060" },{ 0x10DE05E7, 0x10DE068F, "nVidia Tesla T10 Processor" },{ 0x10DE05E7, 0x10DE0697, "nVidia Tesla M1060" },{ 0x10DE05E7, 0x10DE0714, "nVidia Tesla M1060" },{ 0x10DE05E7, 0x10DE0743, "nVidia Tesla M1060" },{ 0x10DE05EA, 0x10DE0738, "nVidia GeForce GTX 260" },{ 0x10DE05EA, 0x10DE0753, "nVidia GeForce GTX 260" },{ 0x10DE05EA, 0x10DE8086, "nVidia GeForce GTX 260" },{ 0x10DE05EB, 0x10DE0705, "nVidia GeForce GTX 295" },{ 0x10DE05EB, 0x19F110C2, "BFG GeForce GTX 295" },// 05F0 - 05FF// 0600 - 060F{ 0x10DE0600, 0x10438268, "Asus GeForce 8800 GTS" },{ 0x10DE0600, 0x1043826C, "Asus GeForce 8800 GTS" },{ 0x10DE0600, 0x10DE0000, "Abit GeForce 8800 GTS" },{ 0x10DE0600, 0x10DE0502, "nVidia GeForce 8800 GTS" },{ 0x10DE0600, 0x19F10719, "BFG GeForce 8800 GTS" },{ 0x10DE0603, 0x174B1058, "PC Partner GeForce GT 230" },{ 0x10DE0603, 0x1B0A9044, "Pegatron GeForce GT 230" },{ 0x10DE0604, 0x10DE0504, "nVidia GeForce 9800 GX2" },{ 0x10DE0605, 0x10DE0612, "nVidia GeForce 9800 GT" },{ 0x10DE0605, 0x10DE062D, "nVidia GeForce 9800 GT" },{ 0x10DE0605, 0x14621460, "MSi GeForce 9800 GT" },{ 0x10DE0607, 0x10DE0736, "nVidia GeForce GTS 240" },{ 0x10DE0608, 0x1028019C, "Dell GeForce 9800M GTX" },{ 0x10DE0608, 0x102802A1, "Dell GeForce 9800M GTX" },{ 0x10DE0608, 0x10432003, "Asus GeForce 9800M GTX" },{ 0x10DE0608, 0x1179FF01, "Toshiba GeForce 9800M GTX" },{ 0x10DE0608, 0x15580481, "Clevo GeForce 9800M GTX" },{ 0x10DE0608, 0x15880577, "Solidum GeForce 9800M GTX" },{ 0x10DE0608, 0x161F207A, "Arima GeForce 9800M GTX" },{ 0x10DE0609, 0x1028019B, "Dell GeForce 8800M GTS" },{ 0x10DE0609, 0x103C30D4, "HP GeForce 8800M GTS" },{ 0x10DE0609, 0x104381F7, "Asus GeForce 8800M GTS" },{ 0x10DE0609, 0x106B00A7, "Apple GeForce 8800M GS" },{ 0x10DE0609, 0x107B0690, "Gateway GeForce 8800M GTS" },{ 0x10DE0609, 0x11700121, "Inventec GeForce 8800M GTS" },{ 0x10DE0609, 0x152D0770, "Quanta GeForce 8800M GTS" },// 0610 - 061F{ 0x10DE0611, 0x104381F7, "Asus GeForce 8800 GT" },{ 0x10DE0611, 0x10DE053C, "nVidia GeForce 8800 GT" },{ 0x10DE0611, 0x14621171, "MSi GeForce 8800 GT" },{ 0x10DE0611, 0x14621172, "MSi GeForce 8800 GT" },{ 0x10DE0611, 0x174B9210, "PC Partner GeForce 8800 GT" },{ 0x10DE0611, 0x1ACC8582, "Point of View GeForce 8800 GT" },{ 0x10DE0611, 0x3842C802, "EVGA GeForce 8800 GT" },{ 0x10DE0612, 0x104382A6, "Asus GeForce 9800 GTX+" },{ 0x10DE0612, 0x10DE0571, "nVidia GeForce 9800 GTX+" },{ 0x10DE0612, 0x10DE0592, "nVidia GeForce 9800 GTX+" },{ 0x10DE0612, 0x3842C842, "EVGA GeForce 9800 GTX+" },{ 0x10DE0612, 0x3842C875, "EVGA GeForce 9800 GTX+" },{ 0x10DE0615, 0x104382E6, "Asus GeForce GTS 250" },{ 0x10DE0615, 0x104382FB, "Asus GeForce GTS 250" },{ 0x10DE0615, 0x10438303, "Asus GeForce GTS 250" },{ 0x10DE0615, 0x10438305, "Asus GeForce GTS 250" },{ 0x10DE0615, 0x10438312, "Asus GeForce GTS 250" },{ 0x10DE0615, 0x10438338, "Asus GeForce GTS 250" },{ 0x10DE0615, 0x10438339, "Asus GeForce GTS 250" },{ 0x10DE0615, 0x1043833C, "Asus GeForce GTS 250" },{ 0x10DE0615, 0x10438345, "Asus GeForce GTS 250" },{ 0x10DE0615, 0x10480F67, "ELSA GeForce GTS 250" },{ 0x10DE0615, 0x10B00401, "Gainward GeForce GTS 250" },{ 0x10DE0615, 0x10190000, "Elitegroup GeForce GTS 250" },{ 0x10DE0615, 0x107D2723, "Leadteck GeForce GTS 250" },{ 0x10DE0615, 0x10DE0592, "Palit GeForce GTS 250" },{ 0x10DE0615, 0x10DE0593, "Palit GeForce GTS 250" },{ 0x10DE0615, 0x10DE0652, "Palit GeForce GTS 250" },{ 0x10DE0615, 0x10DE0719, "Palit GeForce GTS 250" },{ 0x10DE0615, 0x10DE079E, "Palit GeForce GTS 250" },{ 0x10DE0615, 0x11503842, "TMC GeForce GTS 250" }, // Thinking Machines Corporation{ 0x10DE0615, 0x11513842, "JAE GeForce GTS 250" },{ 0x10DE0615, 0x11553842, "Pine GeForce GTS 250" },{ 0x10DE0615, 0x11563842, "Periscope GeForce GTS 250" },{ 0x10DE0615, 0x145834C7, "Gigabyte GeForce GTS 250" },{ 0x10DE0615, 0x145834CB, "Gigabyte GeForce GTS 250" },{ 0x10DE0615, 0x145834E7, "Gigabyte GeForce GTS 250" },{ 0x10DE0615, 0x145834E9, "Gigabyte GeForce GTS 250" },{ 0x10DE0615, 0x14621542, "MSi GeForce GTS 250" },{ 0x10DE0615, 0x14621543, "MSi GeForce GTS 250" },{ 0x10DE0615, 0x14628090, "MSi GeForce GTS 250" },{ 0x10DE0615, 0x16822600, "XFX GeForce GTS 250" },{ 0x10DE0615, 0x16822601, "XFX GeForce GTS 250" },{ 0x10DE0615, 0x16822605, "XFX GeForce GTS 250" },//{ 0x10DE0615, 0x196E0593, " GeForce GTS 250" },{ 0x10DE0615, 0x19DA2103, "Zotac GeForce GTS 250" },{ 0x10DE0615, 0x19DA3056, "Zotac GeForce GTS 250" },{ 0x10DE0615, 0x19DA5103, "Zotac GeForce GTS 250" },//{ 0x10DE0615, 0x19F1, "BFG GeForce GTS 250" },{ 0x10DE0615, 0x1ACC9252, "Point of View GeForce GTS 250" },{ 0x10DE0615, 0x1ACC9253, "Point of View GeForce GTS 250" },{ 0x10DE0615, 0x1ACC925C, "Point of View GeForce GTS 250" },{ 0x10DE0615, 0x1B0A9038, "Pegatron GeForce GTS 250" },{ 0x10DE0615, 0x38421145, "EVGA GeForce GTS 250" },{ 0x10DE0615, 0x38421158, "EVGA GeForce GTS 250" },//{ 0x10DE0615, 0x7377, "Colorful GeForce GTS 250" },{ 0x10DE0618, 0x1025028E, "Acer GeForce GTX 260M" },{ 0x10DE0618, 0x102802A1, "Dell GeForce GTX 260M" },{ 0x10DE0618, 0x102802A2, "Dell GeForce GTX 260M" },{ 0x10DE0618, 0x10431A52, "Asus GeForce GTX 260M" },{ 0x10DE0618, 0x10432028, "Asus GeForce GTX 170M" },{ 0x10DE0618, 0x1043202B, "Asus GTX 680" },{ 0x10DE0618, 0x10432033, "Asus GeForce GTX 260M" },{ 0x10DE0618, 0x15580481, "Clevo/Kapok GeForce GTX 260M" },{ 0x10DE0618, 0x15580577, "Clevo/Kapok GeForce GTX 260M" },{ 0x10DE0618, 0x15580860, "Clevo/Kapok GeForce GTX 260M" },// 0620 - 062F{ 0x10DE0622, 0x104382AC, "Asus EN9600GT Magic" },{ 0x10DE0622, 0x10DE0545, "nVidia GeForce 9600GT" },{ 0x10DE0622, 0x10621272, "MSi GeForce 9600GT" },{ 0x10DE0622, 0x10621278, "MSi GeForce 9600GT" },{ 0x10DE0622, 0x10621279, "MSi GeForce 9600GT" },{ 0x10DE0622, 0x10621432, "MSi GeForce 9600GT" },// 0630 - 063F// 0640 - 064F{ 0x10DE0640, 0x106B00AD, "Apple GeForge 9500 GT" },{ 0x10DE0640, 0x106B00B3, "Apple GeForge 9500 GT" },{ 0x10DE0640, 0x106B061B, "Apple GeForge 9500 GT" },{ 0x10DE0640, 0x10DE077F, "Inno3D GeForge 9500GT HDMI" },{ 0x10DE0640, 0x14621290, "MSi GeForge 9500 GT" },{ 0x10DE0640, 0x14621291, "MSi GeForge 9500 GT" },{ 0x10DE0640, 0x16423796, "Bitland GeForge 9500 GT" },{ 0x10DE0647, 0x106B00A9, "Apple GeForge 9600M GT" },{ 0x10DE0647, 0x106B00B0, "Apple GeForge 9600M GT" },{ 0x10DE0647, 0x106B00B3, "Apple GeForge 9600M GT" },{ 0x10DE0647, 0x106B00BC, "Apple GeForge 9600M GT" },{ 0x10DE0648, 0x1043900F, "Asus GeForge 9600M GS" },{ 0x10DE0649, 0x10439013, "Asus GeForge 9600M GT" },// 0650 - 065F{ 0x10DE065C, 0x10280250, "Dell Quadro FX 770M" },{ 0x10DE065C, 0x103C30E7, "HP Quadro FX 770M" },{ 0x10DE065C, 0x10DE058B, "nVidia Quadro FX 770M" },{ 0x10DE065C, 0x10DE0734, "nVidia Quadro FX 770M" }, // 512MB{ 0x10DE065C, 0x17341147, "Fujitsu Quadro FX 770M" },// 0660 - 066F// 0670 - 067F// 0680 - 068F// 0690 - 069F// 06A0 - 06AF// 06B0 - 06BF// 06C0 - 06CF{ 0x10DE06C0, 0x10438359, "Asus GeForce GTX 480" },{ 0x10DE06C0, 0x10DE075F, "nVidia GeForce GTX 480" },{ 0x10DE06C0, 0x38421480, "EVGA GTX 480" },{ 0x10DE06C0, 0x38421482, "EVGA GTX 480" },{ 0x10DE06CD, 0x10DE079F, "Point of View GeForce GTX 470" },{ 0x10DE06CD, 0x10DE979F, "nVidia GeForce GTX 470" },{ 0x10DE06CD, 0x145834F5, "GigaByte GeForce GTX 470" },{ 0x10DE06CD, 0x19DA0010, "Zotac GTX 470" },{ 0x10DE06CD, 0x19DA1153, "Zotac GeForce GTX 470" },{ 0x10DE06CD, 0x38421472, "EVGA GeForce GTX 470" },// 06D0 - 06DF{ 0x10DE06D1, 0x10DE0771, "nVidia Tesla C2050" },{ 0x10DE06D1, 0x10DE0772, "nVidia Tesla C2070" },{ 0x10DE06D2, 0x10DE0774, "nVidia Tesla M2070" },{ 0x10DE06D2, 0x10DE0830, "nVidia Tesla M2070" },{ 0x10DE06D2, 0x10DE0842, "nVidia Tesla M2070" },{ 0x10DE06D2, 0x10DE088F, "nVidia Tesla X2070" },{ 0x10DE06D2, 0x10DE0908, "nVidia Tesla M2070" },{ 0x10DE06D8, 0x103C076F, "HP Quadro 6000" },{ 0x10DE06D8, 0x10DE076F, "nVidia Quadro 6000" },{ 0x10DE06D9, 0x103C0770, "HP Quadro 5000" },{ 0x10DE06D9, 0x10DE0770, "nVidia Quadro 5000" },{ 0x10DE06DA, 0x1028081A, "Dell Quadro 5000M" },{ 0x10DE06DA, 0x103C1520, "HP Quadro 5000M" },{ 0x10DE06DD, 0x103C0780, "HP Quadro 4000" },{ 0x10DE06DD, 0x106B0000, "Apple Quadro 4000" },{ 0x10DE06DD, 0x10DE0780, "nVidia Quadro 4000" },{ 0x10DE06DE, 0x10DE0773, "nVidia Tesla S2050" },{ 0x10DE06DE, 0x10DE077A, "nVidia Tesla M2050" },{ 0x10DE06DE, 0x10DE082F, "nVidia Tesla M2050" },{ 0x10DE06DE, 0x10DE0830, "nVidia Tesla M2070" },{ 0x10DE06DE, 0x10DE0831, "nVidia Tesla M2070" },{ 0x10DE06DE, 0x10DE0832, "nVidia Tesla M2070" },{ 0x10DE06DE, 0x10DE0840, "nVidia Tesla X2070" },{ 0x10DE06DE, 0x10DE0842, "nVidia Tesla M2050" },{ 0x10DE06DE, 0x10DE0843, "nVidia Tesla M2050" },{ 0x10DE06DE, 0x10DE0846, "nVidia Tesla M2050" },{ 0x10DE06DE, 0x10DE0866, "nVidia Tesla M2050" },{ 0x10DE06DE, 0x10DE0907, "nVidia Tesla M2050" },{ 0x10DE06DE, 0x10DE091E, "nVidia Tesla M2050" },{ 0x10DE06DF, 0x10DE0842, "nVidia Tesla M2070-Q" },{ 0x10DE06DF, 0x10DE084D, "nVidia Tesla M2070-Q" },{ 0x10DE06DF, 0x10DE087F, "nVidia Tesla M2070-Q" },// 06E0 - 06EF{ 0x10DE06E4, 0x10438322, "Asus EN8400GS" },{ 0x10DE06E4, 0x14583475, "GV-NX84S256HE [GeForce 8400 GS]" },{ 0x10DE06E4, 0x14621160, "MSi GeForce 8400 GS" },{ 0x10DE06E4, 0x14621164, "MSi GeForce 8400 GS" },{ 0x10DE06E4, 0x3842C802, "EVGA GeForce 8400 GS" },{ 0x10DE06E8, 0x10280262, "Dell GeForce 9200M GS" },{ 0x10DE06E8, 0x10280271, "Dell GeForce 9200M GS" },{ 0x10DE06E8, 0x10280272, "Dell GeForce 9200M GS" },{ 0x10DE06E8, 0x103C30F4, "HP GeForce 9200M GS" },{ 0x10DE06E8, 0x103C30F7, "HP GeForce 9200M GS" },{ 0x10DE06E8, 0x103C3603, "HP GeForce 9200M GS" },{ 0x10DE06E8, 0x103C360B, "HP GeForce 9200M GE" },{ 0x10DE06E8, 0x103C3621, "HP GeForce 9200M GE" },{ 0x10DE06E8, 0x103C3629, "HP GeForce 9200M GE" },{ 0x10DE06E8, 0x10432008, "Asus GeForce 9200M GE" },{ 0x10DE06E8, 0x107B0900, "Gateway GeForce 9200M GE" },{ 0x10DE06E8, 0x11790001, "Toshiba GeForce 9200M GE" },{ 0x10DE06E8, 0x144DC041, "Samsung GeForce 9200M GE" },{ 0x10DE06E8, 0x144DC042, "Samsung GeForce 9200M GE" },{ 0x10DE06E8, 0x144DC048, "Samsung GeForce 9200M GE" },{ 0x10DE06E8, 0x144DC04A, "Samsung GeForce 9200M GE" },{ 0x10DE06E8, 0x144DC521, "Samsung GeForce 9200M GE" },{ 0x10DE06E8, 0x144DC524, "Samsung GeForce 9200M GE" },{ 0x10DE06E8, 0x152D0772, "Quanta GeForce 9200M GE" },{ 0x10DE06E8, 0x152D0773, "Quanta GeForce 9200M GE" },{ 0x10DE06E8, 0x152D0774, "Quanta GeForce 9200M GE" },{ 0x10DE06E8, 0x152D0775, "Quanta GeForce 9200M GE" },{ 0x10DE06E8, 0x17341146, "Fujitsu GeForce 9200M GE" },{ 0x10DE06E8, 0x18541772, "LG GeForce 9200M GE" },{ 0x10DE06E8, 0x18541773, "LG GeForce 9200M GE" },{ 0x10DE06E8, 0x18541774, "LG GeForce 9200M GE" },{ 0x10DE06E8, 0x18541775, "LG GeForce 9200M GE" },{ 0x10DE06E8, 0x19614605, "ESS GeForce 9200M GE" },{ 0x10DE06E8, 0x19615584, "ESS GeForce 9200M GE" },{ 0x10DE06E8, 0x1B0A000E, "Pegatron GeForce 9200M GE" },{ 0x10DE06E9, 0x10430510, "Asus GeForce 9300M GS" },// 06F0 - 06FF{ 0x10DE06FF, 0x10DE0711, "nVidia HICx8 + Graphics" },// 0700 - 070F// 0710 - 071F// 0720 - 072F// 0730 - 073F// 0740 - 074F// 0750 - 075F// 0760 - 076F// 0770 - 077F// 0780 - 078F// 0790 - 079F// 07A0 - 07AF// 07B0 - 07BF// 07C0 - 07CF// 07D0 - 07DF// 07E0 - 07EF// 07F0 - 07FF// 0800 - 080F// 0810 - 081F// 0820 - 082F// 0830 - 083F// 0840 - 084F{ 0x10DE084B, 0x10250227, "Acer GeForce 9200" },{ 0x10DE084B, 0x10250228, "Acer GeForce 9200" },{ 0x10DE084B, 0x103C2A6E, "HP GeForce 9200" },{ 0x10DE084B, 0x1631E03B, "NEC GeForce 9200" },// 0850 - 085F// 0860 - 086F{ 0x10DE086A, 0x1458D000, "Gigabyte GeForce 9400" },// 0870 - 087F{ 0x10DE0873, 0x104319B4, "Asus GeForce G102M" },{ 0x10DE0876, 0x103C3651, "HP ION" },{ 0x10DE0876, 0x10438402, "Asus ION" },{ 0x10DE0876, 0x144DC056, "Samsung ION" },{ 0x10DE0876, 0x17AA38F8, "Lenovo ION" },{ 0x10DE0876, 0x18491202, "ASRock ION" },{ 0x10DE0876, 0x18540148, "LG ION" },{ 0x10DE0876, 0x18540149, "LG ION" },{ 0x10DE087D, 0x10250222, "Acer ION" },{ 0x10DE087D, 0x17AA301D, "Lenovo ION" },// 0880 - 088F// 0890 - 089F// 08A0 - 08AF{ 0x10DE08A0, 0x106B00C0, "Apple GeForce 320M" },{ 0x10DE08A0, 0x106B00C2, "Apple GeForce 320M" },{ 0x10DE08A0, 0x106B00C5, "Apple GeForce 320M" },{ 0x10DE08A0, 0x106B00C9, "Apple GeForce 320M" },{ 0x10DE08A0, 0x106B00CE, "Apple GeForce 320M" },{ 0x10DE08A2, 0x106B00D4, "Apple GeForce 320M" },// 08B0 - 08BF// 08C0 - 08CF// 08D0 - 08DF// 08E0 - 08EF// 08F0 - 08FF// 0900 - 090F// 0910 - 091F// 0920 - 092F// 0930 - 093F// 0940 - 094F// 0950 - 095F// 0960 - 096F// 0970 - 097F// 0980 - 098F// 0990 - 099F// 09A0 - 09AF// 09B0 - 09BF// 09C0 - 09CF// 09D0 - 09DF// 09E0 - 09EF// 09F0 - 09FF// 0A00 - 0A0F// 0A10 - 0A1F// 0A20 - 0A2F{ 0x10DE0A20, 0x10438311, "Asus GeForce GT 220" },{ 0x10DE0A20, 0x10DE069A, "nVidia GeForce GT 220" },{ 0x10DE0A20, 0x14621910, "MSi GeForce GT 220" },{ 0x10DE0A20, 0x14621911, "MSi GeForce GT 220" },{ 0x10DE0A20, 0x14621990, "MSi GeForce GT 220" },{ 0x10DE0A20, 0x16423920, "Bitland GeForce GT 220" },{ 0x10DE0A28, 0x10338897, "NEC GeForce GT 230" },{ 0x10DE0A28, 0x103C2AA7, "HP GeForce GT 230" },{ 0x10DE0A28, 0x103C363C, "HP GeForce GT 230" },{ 0x10DE0A28, 0x103C363E, "HP GeForce GT 230" },{ 0x10DE0A28, 0x103C3659, "HP GeForce GT 230" },{ 0x10DE0A28, 0x103C365C, "HP GeForce GT 230" },{ 0x10DE0A28, 0x103C7001, "HP GeForce GT 230" },{ 0x10DE0A28, 0x10432031, "Asus GeForce GT 230" },{ 0x10DE0A28, 0x10719072, "Mitac GeForce GT 230" },{ 0x10DE0A28, 0x1179FF00, "Toshiba GeForce GT 230" },{ 0x10DE0A28, 0x1179FF15, "Toshiba GeForce GT 230" },{ 0x10DE0A28, 0x1179FF16, "Toshiba GeForce GT 230" },{ 0x10DE0A28, 0x1179FF50, "Toshiba GeForce GT 230" },{ 0x10DE0A28, 0x144DC064, "Samsung GeForce GT 230" },{ 0x10DE0A28, 0x152D0815, "Quanta GeForce GT 230" },{ 0x10DE0A28, 0x18540807, "LG GeForce GT 230" },{ 0x10DE0A28, 0x1B0A903B, "Pegatron GeForce GT 230" },// 0A30 - 0A3F{ 0x10DE0A34, 0x10250200, "Acer GeForce GT 240M" },{ 0x10DE0A34, 0x10250201, "Acer GeForce GT 240M" },{ 0x10DE0A34, 0x1025020E, "Acer GeForce GT 240M" },{ 0x10DE0A34, 0x10250219, "Acer GeForce GT 240M" },{ 0x10DE0A34, 0x1025021E, "Acer GeForce GT 240M" },{ 0x10DE0A34, 0x10250252, "Acer GeForce GT 240M" },{ 0x10DE0A34, 0x10250259, "Acer GeForce GT 240M" },{ 0x10DE0A34, 0x1025026B, "Acer GeForce GT 240M" },{ 0x10DE0A34, 0x10250273, "Acer GeForce GT 240M" },{ 0x10DE0A34, 0x10250299, "Acer GeForce GT 240M" },{ 0x10DE0A34, 0x102802A2, "Dell GeForce GT 240M" },{ 0x10DE0A34, 0x10431AE2, "Asus GeForce GT 240M" },{ 0x10DE0A34, 0x1043202A, "Asus GeForce GT 240M" },{ 0x10DE0A34, 0x10432031, "Asus GeForce GT 240M" },{ 0x10DE0A34, 0x10432034, "Asus GeForce GT 240M" },{ 0x10DE0A34, 0x10432036, "Asus GeForce GT 240M" },{ 0x10DE0A34, 0x1043203A, "Asus GeForce GT 240M" },{ 0x10DE0A34, 0x10432040, "Asus GeForce GT 240M" },{ 0x10DE0A34, 0x104D905E, "Sony GeForce GT 240M" },{ 0x10DE0A34, 0x104D9060, "Sony GeForce GT 240M" },{ 0x10DE0A34, 0x10719072, "Mitac GeForce GT 240M" },{ 0x10DE0A34, 0x14621013, "MSi GeForce GT 240M" },{ 0x10DE0A34, 0x1462102E, "MSi GeForce GT 240M" },{ 0x10DE0A34, 0x14621031, "MSi GeForce GT 240M" },{ 0x10DE0A34, 0x14624570, "MSi GeForce GT 240M" },{ 0x10DE0A34, 0x14C00042, "Compal GeForce GT 240M" },{ 0x10DE0A34, 0x152D0828, "Quanta GeForce GT 240M" },{ 0x10DE0A34, 0x16423928, "Bitland GeForce GT 240M" },{ 0x10DE0A34, 0x1734118D, "Fujitsu GeForce GT 240M" },{ 0x10DE0A34, 0x1734118E, "Fujitsu GeForce GT 240M" },{ 0x10DE0A34, 0x17AA2144, "Lenovo GeForce GT 240M" },{ 0x10DE0A34, 0x17AA38CD, "Lenovo GeForce GT 240M" },{ 0x10DE0A34, 0x17AA38FD, "Lenovo GeForce GT 240M" },{ 0x10DE0A34, 0x17AA38FF, "Lenovo GeForce GT 240M" },{ 0x10DE0A34, 0x17C010D0, "Wistron GeForce GT 240M" },{ 0x10DE0A34, 0x17C0208D, "Wistron GeForce GT 240M" },// 0A40 - 0A4F// 0A50 - 0A5F// 0A60 - 0A6F{ 0x10DE0A64, 0x1025063C, "Acer ION" },{ 0x10DE0A64, 0x103C2AAD, "HP ION" },{ 0x10DE0A64, 0x10430010, "Asus ION2" },{ 0x10DE0A64, 0x1043841F, "Asus ION" },{ 0x10DE0A64, 0x1043842F, "Asus ION" },{ 0x10DE0A64, 0x10438455, "Asus ION" },{ 0x10DE0A64, 0x1043845B, "Asus ION" },{ 0x10DE0A64, 0x1043845E, "Asus ION" },{ 0x10DE0A64, 0x17AA3605, "Lenovo ION" },{ 0x10DE0A64, 0x18490A64, "ASRock ION" },{ 0x10DE0A64, 0x1B0A00CE, "Pegatron ION" }, { 0x10DE0A64, 0x1B0A00D7, "Pegatron ION" },{ 0x10DE0A65, 0x10438334, "Asus GeForce 210" },{ 0x10DE0A65, 0x10438353, "Asus GeForce 210" },{ 0x10DE0A65, 0x10438354, "Asus GeForce 210" },{ 0x10DE0A65, 0x10DE0794, "nVidia GeForce 210" },{ 0x10DE0A65, 0x10DE0847, "nVidia GeForce 210" },{ 0x10DE0A65, 0x145834D5, "GigaByte GeForce 210" },{ 0x10DE0A65, 0x145834EF, "GigaByte GeForce 210" },{ 0x10DE0A65, 0x16822941, "XFX GeForce 210" },{ 0x10DE0A6C, 0x1028040B, "Dell NVS 3100M" },{ 0x10DE0A6C, 0x17AA2142, "Lenovo NVS 3100M" },// 0A70 - 0A7F{ 0x10DE0A70, 0x10438458, "Asus GeForce 310M" },{ 0x10DE0A70, 0x10438459, "Asus GeForce 310M" },{ 0x10DE0A70, 0x17AA3605, "Lenovo ION" },{ 0x10DE0A73, 0x17AA3607, "Lenovo ION" },{ 0x10DE0A73, 0x17AA3610, "Lenovo ION" },{ 0x10DE0A74, 0x16423940, "Bitland GeForce G210M" },{ 0x10DE0A74, 0x1B0A903A, "Pegatron GeForce G210" },{ 0x10DE0A75, 0x10DE0798, "nVidia GeForce 310M" },{ 0x10DE0A75, 0x17AA3605, "Lenovo ION" },// 0A80 - 0A8F// 0A90 - 0A9F// 0AA0 - 0AAF// 0AB0 - 0ABF// 0AC0 - 0ACF// 0AD0 - 0ADF// 0AE0 - 0AEF// 0AF0 - 0AFF// 0B00 - 0B0F// 0B10 - 0B1F// 0B20 - 0B2F// 0B30 - 0B3F// 0B40 - 0B4F// 0B50 - 0B5F// 0B60 - 0B6F// 0B70 - 0B7F// 0B80 - 0B8F// 0B90 - 0B9F// 0BA0 - 0BAF// 0BB0 - 0BBF// 0BC0 - 0BCF// 0BD0 - 0BDF// 0BE0 - 0BEF// 0BF0 - 0BFF// 0C00 - 0C0F// 0C10 - 0C1F// 0C20 - 0C2F// 0C30 - 0C3F// 0C40 - 0C4F// 0C50 - 0C5F// 0C60 - 0C6F// 0C70 - 0C7F// 0C80 - 0C8F// 0C90 - 0C9F// 0CA0 - 0CAF{ 0x10DE0CA3, 0x10438326, "Asus GeForce GT 240" },{ 0x10DE0CA3, 0x10438328, "Asus GeForce GT 240" },{ 0x10DE0CA3, 0x1043832A, "Asus GeForce GT 240" },{ 0x10DE0CA3, 0x1043832E, "Asus GeForce GT 240" },{ 0x10DE0CA3, 0x10438335, "Asus GeForce GT 240" },{ 0x10DE0CA3, 0x145834E2, "GigaByte GeForce GT 240" },{ 0x10DE0CA3, 0x145834E5, "GigaByte GeForce GT 240" },{ 0x10DE0CA3, 0x145834E6, "GigaByte GeForce GT 240" },{ 0x10DE0CA3, 0x14621900, "MSi GeForce GT 230" },{ 0x10DE0CA3, 0x14621913, "MSi GeForce GT 230" },{ 0x10DE0CA3, 0x14622070, "MSi GeForce GT 240" },{ 0x10DE0CA3, 0x14622072, "MSi GeForce GT 240" },{ 0x10DE0CA3, 0x14622073, "MSi GeForce GT 240" },{ 0x10DE0CA3, 0x14628010, "MSi GeForce GT 240" },{ 0x10DE0CA3, 0x14628041, "MSi VN240GT-MD1G" },{ 0x10DE0CA3, 0x16423926, "Bitland GeForce GT 230" },{ 0x10DE0CA3, 0x196E0010, "PNY GeForce GT 240" },{ 0x10DE0CA3, 0x196E069D, "PNY GeForce GT 240" },{ 0x10DE0CA3, 0x196E075B, "PNY GeForce GT 240" },{ 0x10DE0CA3, 0x19DA1142, "Zotac GeForce GT 240" },{ 0x10DE0CA3, 0x19DA1143, "Zotac GeForce GT 240" },{ 0x10DE0CA3, 0x19DA1144, "Zotac GeForce GT 240" },{ 0x10DE0CA3, 0x19DA2130, "Zotac GeForce GT 240" },{ 0x10DE0CA3, 0x19DA2134, "Zotac GeForce GT 240" },{ 0x10DE0CA9, 0x16423942, "Bitland GeForce GTS 250M" },{ 0x10DE0CAF, 0x10DE0782, "nVidia GeForce GT 335M" },// 0CB0 - 0CBF{ 0x10DE0CB0, 0x10250367, "Acer GeForce GTS 350M" },{ 0x10DE0CB0, 0x10250368, "Acer GeForce GTS 350M" },{ 0x10DE0CB0, 0x10250422, "Acer GeForce GTS 350M" },{ 0x10DE0CB0, 0x10250463, "Acer GeForce GTS 350M" },{ 0x10DE0CB0, 0x10DE080D, "nVidia GeForce GTS 350M" },{ 0x10DE0CB0, 0x1179FD30, "Toshiba GeForce GTS 350M" },{ 0x10DE0CB0, 0x1179FF50, "Toshiba GeForce GTS 350M" },{ 0x10DE0CB0, 0x15580511, "Clevo GeForce GTS 350M" },{ 0x10DE0CB0, 0x15580512, "Clevo GeForce GTS 350M" },{ 0x10DE0CB0, 0x15588687, "Clevo GeForce GTS 350M" },{ 0x10DE0CB0, 0x15588689, "Clevo GeForce GTS 350M" },// 0CC0 - 0CCF// 0CD0 - 0CDF// 0CE0 - 0CEF// 0CF0 - 0CFF// 0D00 - 0D0F// 0D10 - 0D1F// 0D20 - 0D2F// 0D30 - 0D3F// 0D40 - 0D4F// 0D50 - 0D5F// 0D60 - 0D6F// 0D70 - 0D7F// 0D80 - 0D8F// 0D90 - 0D9F// 0DA0 - 0DAF// 0DB0 - 0DBF// 0DC0 - 0DCF{ 0x10DE0DC0, 0x10DE082D, "nVidia GeForce GT 440" },{ 0x10DE0DC0, 0x14622310, "MSi GeForce GT 440" },{ 0x10DE0DC0, 0x14622311, "MSi GeForce GT 440" },{ 0x10DE0DC0, 0x14622312, "MSi GeForce GT 440" },{ 0x10DE0DC0, 0x16423A28, "Bitland GeForce GT 440" },{ 0x10DE0DC0, 0x174B1178, "PC Partner GeForce GT 440" },{ 0x10DE0DC0, 0x174B2178, "PC Partner GeForce GT 440" },{ 0x10DE0DC4, 0x10438365, "Asus GeForce GTS 450" },{ 0x10DE0DC4, 0x1043837A, "Asus GeForce GTS 450" },{ 0x10DE0DCD, 0x10280491, "Dell GeForce GT 555M" },{ 0x10DE0DCD, 0x102804B7, "Dell GeForce GT 555M" },{ 0x10DE0DCD, 0x102804B8, "Dell GeForce GT 555M" },{ 0x10DE0DCD, 0x146210A2, "MSi GeForce GT 555M" },{ 0x10DE0DD1, 0x102802A2, "Dell GeForce GTX 460M" },{ 0x10DE0DD1, 0x1028048F, "Dell GeForce GTX 460M" },{ 0x10DE0DD1, 0x10280490, "Dell GeForce GTX 460M" },{ 0x10DE0DD1, 0x10280491, "Dell GeForce GTX 460M" },{ 0x10DE0DD1, 0x102804BA, "Dell GeForce GTX 460M" },{ 0x10DE0DD1, 0x1043203D, "Asus GeForce GTX 460M" },{ 0x10DE0DD1, 0x1043203E, "Asus GeForce GTX 460M" },{ 0x10DE0DD1, 0x10432040, "Asus GeForce GTX 460M" },{ 0x10DE0DD1, 0x10432041, "Asus GeForce GTX 460M" },{ 0x10DE0DD1, 0x10432042, "Asus GeForce GTX 460M" },{ 0x10DE0DD1, 0x10432043, "Asus GeForce GTX 460M" },{ 0x10DE0DD1, 0x10432044, "Asus GeForce GTX 460M" },{ 0x10DE0DD1, 0x10432045, "Asus GeForce GTX 460M" },{ 0x10DE0DD1, 0x10432046, "Asus GeForce GTX 460M" },{ 0x10DE0DD1, 0x10432047, "Asus GeForce GTX 460M" },{ 0x10DE0DD1, 0x10432048, "Asus GeForce GTX 460M" },{ 0x10DE0DD1, 0x1043204A, "Asus GeForce GTX 460M" },{ 0x10DE0DD1, 0x1043204B, "Asus GeForce GTX 460M" },{ 0x10DE0DD1, 0x10438465, "Asus GeForce GTX 460M" },{ 0x10DE0DD1, 0x10DE10DE, "nVidia GeForce GTX 460M" },{ 0x10DE0DD1, 0x1179FC00, "Toshiba GeForce GTX 460M" },{ 0x10DE0DD1, 0x1179FC01, "Toshiba GeForce GTX 460M" },{ 0x10DE0DD1, 0x1179FC05, "Toshiba GeForce GTX 460M" },{ 0x10DE0DD1, 0x1179FCB0, "Toshiba GeForce GTX 460M" },{ 0x10DE0DD1, 0x1179FF50, "Toshiba GeForce GTX 460M" },{ 0x10DE0DD1, 0x1179FFD6, "Toshiba GeForce GTX 460M" },{ 0x10DE0DD1, 0x1179FFD7, "Toshiba GeForce GTX 460M" },{ 0x10DE0DD1, 0x1179FFD8, "Toshiba GeForce GTX 460M" },{ 0x10DE0DD1, 0x14621083, "MSi GeForce GTX 460M" },{ 0x10DE0DD1, 0x15585102, "Clevo/Kapok GeForce GTX 460M" },{ 0x10DE0DD1, 0x15587100, "Clevo/Kapok GeForce GTX 460M" },{ 0x10DE0DD1, 0x15587200, "Clevo/Kapok GeForce GTX 460M" },{ 0x10DE0DD1, 0x15588100, "Clevo/Kapok GeForce GTX 460M" },{ 0x10DE0DD1, 0x15588687, "Clevo/Kapok GeForce GTX 460M" },{ 0x10DE0DD1, 0x17AA3620, "Lenovo GeForce GTX 460M" },{ 0x10DE0DD1, 0x17C010EA, "Wistron GeForce GTX 460M" },{ 0x10DE0DD6, 0x10280010, "Dell GeForce GT 550M" },{ 0x10DE0DD6, 0x102804B7, "Dell GeForce GT 550M" },{ 0x10DE0DD6, 0x102804B8, "Dell GeForce GT 550M" },{ 0x10DE0DD8, 0x103C084A, "HP nVidia Quadro 2000" },{ 0x10DE0DD8, 0x10DE084A, "nVidia Quadro 2000" },{ 0x10DE0DD8, 0x10DE0914, "nVidia Quadro 2000D" },{ 0x10DE0DDE, 0x1043203D, "Asus GF106-ES" },{ 0x10DE0DDE, 0x1043203E, "Asus GF106-ES" },{ 0x10DE0DDE, 0x10432040, "Asus GF106-ES" },{ 0x10DE0DDE, 0x10432041, "Asus GF106-ES" },// 0DE0 - 0DEF{ 0x10DE0DE0, 0x10DE0828, "nVidia GeForce GT 440" },{ 0x10DE0DE1, 0x1043836D, "Asus GeForce GT 430" },{ 0x10DE0DE1, 0x38421430, "EVGA GeForce GT 430" },{ 0x10DE0DE2, 0x1043835F, "Asus GeForce GT 420" },{ 0x10DE0DE2, 0x14622302, "MSi GeForce GT 420" },{ 0x10DE0DE2, 0x16423A26, "Bitland GeForce GT 420" },{ 0x10DE0DE2, 0x174B1162, "PC Partner GeForce GT 420" },{ 0x10DE0DE2, 0x174B2162, "PC Partner GeForce GT 420" },{ 0x10DE0DE2, 0x1B0A9083, "Pegatron GeForce GT 420" },{ 0x10DE0DE2, 0x1B0A9085, "Pegatron GeForce GT 420" },{ 0x10DE0DE2, 0x1B0A9089, "Pegatron GeForce GT 420" },{ 0x10DE0DE3, 0x1043100D, "Asus GeForce GT 635M" },{ 0x10DE0DE3, 0x10431477, "Asus GeForce GT 635M" },{ 0x10DE0DE3, 0x10431587, "Asus GeForce GT 635M" },{ 0x10DE0DE9, 0x10250487, "Acer GeForce GT 630M" },{ 0x10DE0DE9, 0x10250488, "Acer GeForce GT 630M" },{ 0x10DE0DE9, 0x10250505, "Acer GeForce GT 630M" },{ 0x10DE0DE9, 0x10250507, "Acer GeForce GT 630M" },{ 0x10DE0DE9, 0x10250512, "Acer GeForce GT 630M" },{ 0x10DE0DE9, 0x10250573, "Acer GeForce GT 630M" },{ 0x10DE0DE9, 0x10250574, "Acer GeForce GT 630M" },{ 0x10DE0DE9, 0x10250575, "Acer GeForce GT 630M" },{ 0x10DE0DE9, 0x1028055E, "Dell GeForce GT 630M" },{ 0x10DE0DE9, 0x10280563, "Dell GeForce GT 630M" },{ 0x10DE0DE9, 0x103C181A, "HP GeForce GT 630M" },{ 0x10DE0DE9, 0x103C181B, "HP GeForce GT 630M" },{ 0x10DE0DE9, 0x103C181D, "HP GeForce GT 630M" },{ 0x10DE0DE9, 0x103C1837, "HP GeForce GT 630M" },{ 0x10DE0DE9, 0x10431477, "Asus GeForce GT 630M" },{ 0x10DE0DE9, 0x104310AC, "Asus GeForce GT 630M" },{ 0x10DE0DE9, 0x104310BC, "Asus GeForce GT 630M" },{ 0x10DE0DE9, 0x104310CC, "Asus GeForce GT 630M" },{ 0x10DE0DE9, 0x10431407, "Asus GeForce GT 630M" },{ 0x10DE0DE9, 0x10431447, "Asus GeForce GT 630M" },{ 0x10DE0DE9, 0x10431497, "Asus GeForce GT 630M" },{ 0x10DE0DE9, 0x10432104, "Asus GeForce GT 630M" },{ 0x10DE0DE9, 0x10432106, "Asus GeForce GT 630M" },{ 0x10DE0DE9, 0x10432110, "Asus GeForce GT 630M" },{ 0x10DE0DE9, 0x10432113, "Asus GeForce GT 630M" },{ 0x10DE0DE9, 0x10432114, "Asus GeForce GT 630M" },{ 0x10DE0DE9, 0x10432128, "Asus GeForce GT 630M" },{ 0x10DE0DE9, 0x1043212E, "Asus GeForce GT 630M" },{ 0x10DE0DE9, 0x10432131, "Asus GeForce GT 630M" },{ 0x10DE0DEF, 0x104310AC, "Asus N13P-NS1-A1" },{ 0x10DE0DEF, 0x104310BC, "Asus N13P-NS1-A1" },{ 0x10DE0DEF, 0x104310CC, "Asus N13P-NS1-A1" },{ 0x10DE0DEF, 0x10431407, "Asus N13P-NS1-A1" },{ 0x10DE0DEF, 0x10431447, "Asus N13P-NS1-A1" },{ 0x10DE0DEF, 0x17AA21F3, "Lenovo NVS 5400M" },{ 0x10DE0DEF, 0x17AA21F4, "Lenovo NVS 5400M" },{ 0x10DE0DEF, 0x17AA21F5, "Lenovo NVS 5400M" },{ 0x10DE0DEF, 0x17AA21F6, "Lenovo NVS 5400M" },{ 0x10DE0DEF, 0x17AA5005, "Lenovo NVS 5400M" },// 0DF0 - 0DFF{ 0x10DE0DF0, 0x1B0A9077, "Pegatron GeForce GT 425M" },{ 0x10DE0DF0, 0x1B0A909A, "Pegatron GeForce GT 425M" },{ 0x10DE0DF1, 0x1025035A, "Acer GeForce GT 420M" },{ 0x10DE0DF1, 0x1025036C, "Acer GeForce GT 420M" },{ 0x10DE0DF1, 0x1025036D, "Acer GeForce GT 420M" },{ 0x10DE0DF1, 0x10250370, "Acer GeForce GT 420M" },{ 0x10DE0DF1, 0x10250371, "Acer GeForce GT 420M" },{ 0x10DE0DF1, 0x10250374, "Acer GeForce GT 420M" },{ 0x10DE0DF1, 0x10250375, "Acer GeForce GT 420M" },{ 0x10DE0DF1, 0x10250379, "Acer GeForce GT 420M" },{ 0x10DE0DF1, 0x1025037C, "Acer GeForce GT 420M" },{ 0x10DE0DF1, 0x1025037D, "Acer GeForce GT 420M" },{ 0x10DE0DF1, 0x1025037E, "Acer GeForce GT 420M" },{ 0x10DE0DF1, 0x10250382, "Acer GeForce GT 420M" },{ 0x10DE0DF1, 0x1025040A, "Acer GeForce GT 420M" },{ 0x10DE0DF1, 0x10250413, "Acer GeForce GT 420M" },{ 0x10DE0DF1, 0x10250415, "Acer GeForce GT 420M" },{ 0x10DE0DF1, 0x10250417, "Acer GeForce GT 420M" },{ 0x10DE0DF1, 0x1025041E, "Acer GeForce GT 420M" },{ 0x10DE0DF1, 0x10250423, "Acer GeForce GT 420M" },{ 0x10DE0DF1, 0x10250424, "Acer GeForce GT 420M" },{ 0x10DE0DF1, 0x10250434, "Acer GeForce GT 420M" },{ 0x10DE0DF1, 0x10250450, "Acer GeForce GT 420M" },{ 0x10DE0DF1, 0x10250464, "Acer GeForce GT 420M" },{ 0x10DE0DF1, 0x10250485, "Acer GeForce GT 420M" },{ 0x10DE0DF1, 0x10250486, "Acer GeForce GT 420M" },{ 0x10DE0DF1, 0x10250487, "Acer GeForce GT 420M" },{ 0x10DE0DF1, 0x10250488, "Acer GeForce GT 420M" },{ 0x10DE0DF1, 0x10250499, "Acer GeForce GT 420M" },{ 0x10DE0DF1, 0x1025049A, "Acer GeForce GT 420M" },{ 0x10DE0DF1, 0x10280468, "Dell GeForce GT 420M" },{ 0x10DE0DF1, 0x1028046E, "Dell GeForce GT 420M" },{ 0x10DE0DF1, 0x144DC08E, "Samsung GeForce GT 420M" },{ 0x10DE0DF1, 0x144DC093, "Samsung GeForce GT 420M" },{ 0x10DE0DF1, 0x144DC096, "Samsung GeForce GT 420M" },{ 0x10DE0DF1, 0x1B0A2036, "Pegatron GeForce GT 420M" },{ 0x10DE0DF1, 0x1B0A207A, "Pegatron GeForce GT 420M" },{ 0x10DE0DF1, 0x1BFD2003, "GeForce GT 420M" }, // SUBVENDOR?{ 0x10DE0DF2, 0x174B5162, "PC Partner GeForce GT 435M" },{ 0x10DE0DF3, 0x144DC08D, "Samsung GeForce GT 420M" },{ 0x10DE0DF3, 0x144DC095, "Samsung GeForce GT 420M" },{ 0x10DE0DF4, 0x1043105C, "Asus GeForce GT 540M" },{ 0x10DE0DF4, 0x104315E2, "Asus GeForce GT 540M" },{ 0x10DE0DF4, 0x104315F2, "Asus GeForce GT 540M" },{ 0x10DE0DF4, 0x10431642, "Asus GeForce GT 540M" },{ 0x10DE0DF4, 0x10431662, "Asus GeForce GT 540M" },{ 0x10DE0DF4, 0x10431672, "Asus GeForce GT 540M" },{ 0x10DE0DF4, 0x1043849E, "Asus GeForce GT 540M" },{ 0x10DE0DF4, 0x104384EE, "Asus GeForce GT 540M" },{ 0x10DE0DF4, 0x18490DF4, "ASRock GeForce GT 540M" },{ 0x10DE0DF5, 0x102804CA, "Dell GeForce GT 525M" },{ 0x10DE0DF5, 0x10280511, "Dell GeForce GT 525M" },{ 0x10DE0DF5, 0x10280521, "Dell GeForce GT 525M" },{ 0x10DE0DFE, 0x10431407, "Asus GF108 ES" },{ 0x10DE0DFE, 0x10431447, "Asus GF108 ES" },{ 0x10DE0DFE, 0x10431482, "Asus GF108 ES" },{ 0x10DE0DFE, 0x10431502, "Asus GF108 ES" },{ 0x10DE0DFE, 0x10431512, "Asus GF108 ES" },{ 0x10DE0DFE, 0x10431522, "Asus GF108 ES" },{ 0x10DE0DFE, 0x10431532, "Asus GF108 ES" },{ 0x10DE0DFE, 0x10431552, "Asus GF108 ES" },{ 0x10DE0DFE, 0x1B0A206C, "Pegatron GF108 ES" },// 0E00 - 0E0F// 0E10 - 0E1F// 0E20 - 0E2F{ 0x10DE0E22, 0x1043835D, "Asus GeForce GTX 460" },{ 0x10DE0E22, 0x10B00401, "Gainward GeForce GTX 460" },{ 0x10DE0E22, 0x10B00801, "Gainward GeForce GTX 460" },{ 0x10DE0E22, 0x10DE0804, "nVidia GeForce GTX 460" },{ 0x10DE0E22, 0x10DE0865, "nVidia GeForce GTX 460" },{ 0x10DE0E22, 0x145834FA, "GigaByte GeForce GTX 460" },{ 0x10DE0E22, 0x145834FC, "GigaByte GeForce GTX 460" },{ 0x10DE0E22, 0x14583501, "GigaByte GeForce GTX 460" },{ 0x10DE0E22, 0x14622321, "MSi GeForce GTX 460" },{ 0x10DE0E22, 0x14622322, "MSi GeForce GTX 460" },{ 0x10DE0E22, 0x14622381, "MSi GeForce GTX 460" },{ 0x10DE0E22, 0x19DA1166, "Zotac GeForce GTX 460" },{ 0x10DE0E22, 0x19DA2166, "Zotac GeForce GTX 460" },{ 0x10DE0E22, 0x38421362, "EVGA GeForce GTX 460" },{ 0x10DE0E22, 0x38421370, "EVGA GeForce GTX 460" },{ 0x10DE0E22, 0x38421372, "EVGA GeForce GTX 460" },{ 0x10DE0E22, 0x38421373, "EVGA GeForce GTX 460" },{ 0x10DE0E22, 0x38421380, "EVGA GeForce GTX 460" },{ 0x10DE0E23, 0x10B00401, "Gainward GeForce GTX 460" },// 0E30 - 0E3F// 0E40 - 0E4F// 0E50 - 0E5F// 0E60 - 0E6F// 0E70 - 0E7F// 0E80 - 0E8F// 0E90 - 0E9F// 0EA0 - 0EAF// 0EB0 - 0EBF// 0EC0 - 0ECF// 0ED0 - 0EDF// 0EE0 - 0EEF// 0EF0 - 0EFF// 0F00 - 0F0F// 0F10 - 0F1F// 0F20 - 0F2F// 0F30 - 0F3F// 0F40 - 0F4F// 0F50 - 0F5F// 0F60 - 0F6F// 0F70 - 0F7F// 0F80 - 0F8F// 0F90 - 0F9F// 0FA0 - 0FAF// 0FB0 - 0FBF// 0FC0 - 0FCF{ 0x10DE0FC2, 0x103C0936, "HP GeForce GT 630" },{ 0x10DE0FC2, 0x174B0630, "PC Panther GeForce GT 630" },// 0FD0 - 0FDF{ 0x10DE0FD1, 0x10280552, "Dell GeForce GT 650M" },{ 0x10DE0FD1, 0x10280566, "Dell GeForce GT 650M" },{ 0x10DE0FD1, 0x10280578, "Dell GeForce GT 650M" },{ 0x10DE0FD1, 0x146210C7, "MSi GeForce GT 650M" },{ 0x10DE0FD1, 0x146210CD, "MSi GeForce GT 650M" },{ 0x10DE0FD2, 0x1028055F, "Dell GeForce GT 640M" },{ 0x10DE0FD2, 0x144DC0D5, "Samsung GeForce GT 640M" },{ 0x10DE0FD3, 0x10250713, "Acer GeForce GT 640M LE" },{ 0x10DE0FD3, 0x10250717, "Acer GeForce GT 640M LE" },{ 0x10DE0FD3, 0x104D909A, "Sony GeForce GT 640M LE" },{ 0x10DE0FD3, 0x104D909C, "Sony GeForce GT 640M LE" },{ 0x10DE0FD4, 0x10280551, "Dell GeForce GTX 660M" },{ 0x10DE0FD4, 0x1028057B, "Dell GeForce GTX 660M" },{ 0x10DE0FD4, 0x146210D7, "MSi GeForce GTX 660M" },{ 0x10DE0FDB, 0x104310AC, "Asus GK107-ESP-A1" },{ 0x10DE0FDB, 0x10431447, "Asus GK107-ESP-A1" },{ 0x10DE0FDB, 0x10432103, "Asus GK107-ESP-A1" },{ 0x10DE0FDB, 0x10432105, "Asus GK107-ESP-A1" },{ 0x10DE0FDB, 0x10432115, "Asus GK107-ESP-A1" },{ 0x10DE0FDB, 0x10432116, "Asus GK107-ESP-A1" },{ 0x10DE0FDB, 0x10432117, "Asus GK107-ESP-A1" },{ 0x10DE0FDB, 0x10432118, "Asus GK107-ESP-A1" },{ 0x10DE0FDB, 0x1043212D, "Asus GK107-ESP-A1" },{ 0x10DE0FDB, 0x1179FB12, "Toshiba GK107-ESP-A1" },{ 0x10DE0FDB, 0x1179FB18, "Toshiba GK107-ESP-A1" },{ 0x10DE0FDB, 0x1179FB1A, "Toshiba GK107-ESP-A1" },// 0FE0 - 0FEF// 0FF0 - 0FFF// 1000 - 100F// 1010 - 101F// 1020 - 102F// 1030 - 103F// 1040 - 104F{ 0x10DE1040, 0x104383A0, "Asus GeForce GT 520" },{ 0x10DE1040, 0x104383BD, "Asus GeForce GT 520" },{ 0x10DE1040, 0x104383C1, "Asus GeForce GT 520" },{ 0x10DE1040, 0x14622592, "MSi GeForce GT 520" },{ 0x10DE1040, 0x14622593, "MSi GeForce GT 520" },{ 0x10DE1040, 0x16423A98, "Bitland GeForce GT 520" },{ 0x10DE1040, 0x16423B42, "Bitland GeForce GT 520" },{ 0x10DE1040, 0x174B3214, "PC Partner GeForce GT 520" },{ 0x10DE1040, 0x196E0915, "PNY GeForce GT 520" },{ 0x10DE1040, 0x19DA1215, "Zotac GeForce GT 520" },{ 0x10DE1040, 0x19DA1222, "Zotac GeForce GT 520" },{ 0x10DE1040, 0x1ACC5213, "Point of View GeForce GT 520" },{ 0x10DE1040, 0x1ACC5214, "Point of View GeForce GT 520" },{ 0x10DE1040, 0x1ACC522C, "Point of View GeForce GT 520" },{ 0x10DE1040, 0x1B0A90AA, "Pegatron GeForce GT 520" },{ 0x10DE1042, 0x14622595, "MSi GeForce 510" },{ 0x10DE1042, 0x14622596, "MSi GeForce 510" },{ 0x10DE1050, 0x10250487, "Acer GeForce GT 520M" },{ 0x10DE1050, 0x10250488, "Acer GeForce GT 520M" },{ 0x10DE1050, 0x10250501, "Acer GeForce GT 520M" },{ 0x10DE1050, 0x10250503, "Acer GeForce GT 520M" },{ 0x10DE1050, 0x10250505, "Acer GeForce GT 520M" },{ 0x10DE1050, 0x10250507, "Acer GeForce GT 520M" },{ 0x10DE1050, 0x10250509, "Acer GeForce GT 520M" },{ 0x10DE1050, 0x10250512, "Acer GeForce GT 520M" },{ 0x10DE1050, 0x1025053A, "Acer GeForce GT 520M" },{ 0x10DE1050, 0x1025054E, "Acer GeForce GT 520M" },{ 0x10DE1050, 0x10250550, "Acer GeForce GT 520M" },{ 0x10DE1050, 0x1025055A, "Acer GeForce GT 520M" },{ 0x10DE1050, 0x1025055C, "Acer GeForce GT 520M" },{ 0x10DE1050, 0x10250568, "Acer GeForce GT 520M" },{ 0x10DE1050, 0x1025056A, "Acer GeForce GT 520M" },{ 0x10DE1050, 0x1025056B, "Acer GeForce GT 520M" },{ 0x10DE1050, 0x1025056C, "Acer GeForce GT 520M" },{ 0x10DE1050, 0x10250570, "Acer GeForce GT 520M" },{ 0x10DE1050, 0x10250572, "Acer GeForce GT 520M" },{ 0x10DE1050, 0x10250573, "Acer GeForce GT 520M" },{ 0x10DE1050, 0x10250574, "Acer GeForce GT 520M" },{ 0x10DE1050, 0x10250575, "Acer GeForce GT 520M" },{ 0x10DE1050, 0x10250576, "Acer GeForce GT 520M" },{ 0x10DE1050, 0x10250578, "Acer GeForce GT 520M" },{ 0x10DE1050, 0x10250579, "Acer GeForce GT 520M" },{ 0x10DE1050, 0x1025057A, "Acer GeForce GT 520M" },{ 0x10DE1050, 0x1025057B, "Acer GeForce GT 520M" },{ 0x10DE1050, 0x10250580, "Acer GeForce GT 520M" },{ 0x10DE1050, 0x10250581, "Acer GeForce GT 520M" },{ 0x10DE1050, 0x1025058B, "Acer GeForce GT 520M" },{ 0x10DE1050, 0x1025058C, "Acer GeForce GT 520M" },{ 0x10DE1050, 0x10250593, "Acer GeForce GT 520M" },{ 0x10DE1050, 0x1025060D, "Acer GeForce GT 520M" },{ 0x10DE1050, 0x1025060F, "Acer GeForce GT 520M" },{ 0x10DE1050, 0x10250611, "Acer GeForce GT 520M" },{ 0x10DE1050, 0x10280522, "Dell GeForce GT 520M" },{ 0x10DE1050, 0x103C184D, "HP GeForce GT 520M" },{ 0x10DE1050, 0x103C338A, "HP GeForce GT 520M" },{ 0x10DE1050, 0x103C338B, "HP GeForce GT 520M" },{ 0x10DE1050, 0x103C338C, "HP GeForce GT 520M" },{ 0x10DE1050, 0x10431622, "Asus GeForce GT 520M" },{ 0x10DE1050, 0x10431652, "Asus GeForce GT 520M" },{ 0x10DE1050, 0x10431662, "Asus GeForce GT 520M" },{ 0x10DE1050, 0x10431682, "Asus GeForce GT 520M" },{ 0x10DE1050, 0x104316F2, "Asus GeForce GT 520M" },{ 0x10DE1050, 0x10431722, "Asus GeForce GT 520M" },{ 0x10DE1050, 0x10431732, "Asus GeForce GT 520M" },{ 0x10DE1050, 0x10431742, "Asus GeForce GT 520M" },{ 0x10DE1050, 0x104384CF, "Asus GeForce GT 520M" },{ 0x10DE1050, 0x104D9089, "Sony GeForce GT 520M" },{ 0x10DE1050, 0x104D908A, "Sony GeForce GT 520M" },{ 0x10DE1050, 0x104D908B, "Sony GeForce GT 520M" },{ 0x10DE1050, 0x10CF1635, "Fujitsu GeForce GT 520M" },{ 0x10DE1050, 0x10CF3655, "Fujitsu GeForce GT 520M" },{ 0x10DE1050, 0x1179FC01, "Toshiba GeForce GT 520M" },{ 0x10DE1050, 0x1179FC31, "Toshiba GeForce GT 520M" },{ 0x10DE1050, 0x1179FC50, "Toshiba GeForce GT 520M" },{ 0x10DE1050, 0x1179FC61, "Toshiba GeForce GT 520M" },{ 0x10DE1050, 0x1179FC71, "Toshiba GeForce GT 520M" },{ 0x10DE1050, 0x1179FC81, "Toshiba GeForce GT 520M" },{ 0x10DE1050, 0x1179FC90, "Toshiba GeForce GT 520M" },{ 0x10DE1050, 0x1179FCC0, "Toshiba GeForce GT 520M" },{ 0x10DE1050, 0x1179FCD0, "Toshiba GeForce GT 520M" },{ 0x10DE1050, 0x1179FCE2, "Toshiba GeForce GT 520M" },{ 0x10DE1050, 0x1179FCF2, "Toshiba GeForce GT 520M" },{ 0x10DE1050, 0x1179FD16, "Toshiba GeForce GT 520M" },{ 0x10DE1050, 0x1179FD40, "Toshiba GeForce GT 520M" },{ 0x10DE1050, 0x1179FD50, "Toshiba GeForce GT 520M" },{ 0x10DE1050, 0x1179FD52, "Toshiba GeForce GT 520M" },{ 0x10DE1050, 0x1179FD61, "Toshiba GeForce GT 520M" },{ 0x10DE1050, 0x1179FD71, "Toshiba GeForce GT 520M" },{ 0x10DE1050, 0x1179FDD0, "Toshiba GeForce GT 520M" },{ 0x10DE1050, 0x1179FDD2, "Toshiba GeForce GT 520M" },{ 0x10DE1050, 0x144DC0A0, "Samsung GeForce GT 520M" },{ 0x10DE1050, 0x144DC0B2, "Samsung GeForce GT 520M" },{ 0x10DE1050, 0x144DC0B6, "Samsung GeForce GT 520M" },{ 0x10DE1050, 0x144DC597, "Samsung GeForce GT 520M" },{ 0x10DE1050, 0x14581132, "Gigabyte GeForce GT 520M" },{ 0x10DE1050, 0x1462108C, "MSi GeForce GT 520M" },{ 0x10DE1050, 0x14621094, "MSi GeForce GT 520M" },{ 0x10DE1050, 0x17AA3652, "Lenovo GeForce GT 520M" },{ 0x10DE1050, 0x17AA397D, "Lenovo GeForce GT 520M" },{ 0x10DE1050, 0x17AA397F, "Lenovo GeForce GT 520M" },{ 0x10DE1050, 0x17C010E5, "Wistron GeForce GT 520M" },{ 0x10DE1050, 0x17C010EC, "Wistron GeForce GT 520M" },{ 0x10DE1050, 0x17C010F3, "Wistron GeForce GT 520M" },{ 0x10DE1050, 0x18540865, "LG GeForce GT 520M" },{ 0x10DE1050, 0x18540871, "LG GeForce GT 520M" },{ 0x10DE1050, 0x18541791, "LG GeForce GT 520M" },{ 0x10DE1050, 0x18543001, "LG GeForce GT 520M" },{ 0x10DE1050, 0x19915584, "GeForce GT 520M" },{ 0x10DE1050, 0x1BAB2002, "GeForce GT 520M" },{ 0x10DE1050, 0x1BFD8005, "GeForce GT 520M" },{ 0x10DE1054, 0x10280511, "Dell GeForce 410M" },{ 0x10DE1054, 0x10CF1656, "Fujitsu GeForce 410M" },{ 0x10DE1054, 0x10CF1657, "Fujitsu GeForce 410M" },{ 0x10DE1054, 0x1179FCC0, "Toshiba GeForce 410M" },{ 0x10DE1054, 0x14581100, "GigaByte GeForce 410M" },{ 0x10DE1054, 0x14581125, "GigaByte GeForce 410M" },{ 0x10DE1055, 0x104D908A, "Sony GeForce 410M" },{ 0x10DE1055, 0x104D908B, "Sony GeForce 410M" },{ 0x10DE1058, 0x10431457, "Asus GeForce 610M" },{ 0x10DE105A, 0x10432129, "Asus GeForce 610M" },// 1060 - 106F// 1070 - 107F{ 0x10DE107D, 0x103C094E, "HP NVS 310" },// 1080 - 108F{ 0x10DE1080, 0x104383BB, "Asus GeForce GTX 580" },{ 0x10DE1080, 0x10B00401, "Gainward GeForce GTX 580" },{ 0x10DE1080, 0x1458351B, "Gigabyte GeForce GTX 580" },{ 0x10DE1080, 0x14622550, "MSi GeForce GTX 580" },{ 0x10DE1080, 0x196E086A, "PNY GeForce GTX 580" },{ 0x10DE1080, 0x19DA2203, "Zotac GeForce GTX 580" },{ 0x10DE1080, 0x38421582, "EVGA GeForce GTX 580" },{ 0x10DE1080, 0x38421584, "EVGA GeForce GTX 580" },{ 0x10DE1081, 0x10438383, "Asus GeForce GTX 570" },{ 0x10DE1081, 0x10DE087E, "nVidia GeForce GTX 570" },{ 0x10DE1081, 0x14583513, "GigaByte GeForce GTX 570" },{ 0x10DE1081, 0x14622551, "MSi GeForce GTX 570" },{ 0x10DE1081, 0x38421570, "EVGA GeForce GTX 570" },{ 0x10DE1081, 0x38421572, "EVGA GeForce GTX 570" },{ 0x10DE1082, 0x10DE0873, "nVidia GeForce GTX 560 Ti" },{ 0x10DE1082, 0x174B5207, "PC Partner GeForce GTX 560 Ti" },{ 0x10DE1084, 0x14622570, "MSi GeForce GTX 560" },{ 0x10DE1084, 0x14622571, "MSi GeForce GTX 560" },{ 0x10DE1084, 0x16423A96, "Bitland GeForce GTX 560" },{ 0x10DE1086, 0x10438387, "Asus GeForce GTX 570" },{ 0x10DE1086, 0x10DE0871, "Inno3D GeForce GTX 570" },{ 0x10DE1086, 0x14583513, "GigaByte GeForce GTX 570" },{ 0x10DE1086, 0x14622224, "MSi GeForce GTX 570" },{ 0x10DE1086, 0x174B1207, "PC Partner GeForce GTX 570" },{ 0x10DE1086, 0x196E0871, "PNY GeForce GTX 570" },{ 0x10DE1086, 0x19DA1207, "Zotac GeForce GTX 570" },{ 0x10DE1086, 0x38421571, "EVGA GeForce GTX 570" },{ 0x10DE1086, 0x38421573, "EVGA GeForce GTX 570" },{ 0x10DE1087, 0x104383D6, "Asus ENGTX560Ti448 DCII" },{ 0x10DE1087, 0x1458353A, "Gigabyte GeForce GTX 560 Ti-448" },{ 0x10DE1087, 0x19DA2207, "Zotac GeForce GTX 560 Ti-448" },{ 0x10DE1087, 0x38422066, "EVGA GeForce GTX 560 Ti-448" },{ 0x10DE1088, 0x104383A3, "Asus GeForce GTX 590" },{ 0x10DE1088, 0x10DE0868, "nVidia GeForce GTX 590" },{ 0x10DE1088, 0x38421598, "EVGA GeForce GTX 590" },{ 0x10DE108B, 0x10438391, "Asus GeForce GTX 590" },// 1090 - 109F{ 0x10DE1091, 0x10DE0887, "nVidia Tesla M2090" },{ 0x10DE1091, 0x10DE088E, "nVidia Tesla X2090" },{ 0x10DE1091, 0x10DE0891, "nVidia Tesla X2090" },{ 0x10DE1094, 0x10DE0888, "nVidia Tesla M2075" },{ 0x10DE109B, 0x10DE0918, "nVidia Quadro 7000" },// 10A0 - 10AF// 10B0 - 10BF// 10C0 - 10CF{ 0x10DE10C4, 0x17AA3605, "Lenovo ION" },{ 0x10DE10C5, 0x1043838D, "Asus GeForce 405" },{ 0x10DE10C5, 0x1043839C, "Asus GeForce 405" },{ 0x10DE10C5, 0x14621834, "MSi GeForce 405" },{ 0x10DE10C5, 0x14621835, "MSi GeForce 405" },{ 0x10DE10C5, 0x14621837, "MSi GeForce 405" },{ 0x10DE10C5, 0x1462183B, "MSi GeForce 405" },{ 0x10DE10C5, 0x14622298, "MSi GeForce 405" },{ 0x10DE10C5, 0x16423899, "Bitland GeForce 405" },{ 0x10DE10C5, 0x16423958, "Bitland GeForce 405" },{ 0x10DE10C5, 0x174B3150, "PC Partner GeForce 405" },{ 0x10DE10C5, 0x1B0A908E, "Pegatron GeForce 405" },{ 0x10DE10C5, 0x1B0A90A9, "Pegatron GeForce 405" },{ 0x10DE10C5, 0x1B0A90AB, "Pegatron GeForce 405" },{ 0x10DE10C5, 0x1B0A90AC, "Pegatron GeForce 405" },{ 0x10DE10C5, 0x1B0A90AF, "Pegatron GeForce 405" },// 10D0 - 10DF{ 0x10DE10D8, 0x103C0862, "HP NVS 300" },{ 0x10DE10D8, 0x103C0863, "HP NVS 300" },{ 0x10DE10D8, 0x10DE0862, "nVidia NVS 300" },{ 0x10DE10D8, 0x10DE0863, "nVidia NVS 300" },// 10E0 - 10EF// 10F0 - 10FF// 1100 - 110F// 1110 - 111F// 1120 - 112F// 1130 - 113F// 1140 - 114F{ 0x10DE1140, 0x1025064A, "Acer GeForce GT 620M" },{ 0x10DE1140, 0x1025064C, "Acer GeForce GT 620M" },{ 0x10DE1140, 0x10250680, "Acer GeForce GT 620M" },{ 0x10DE1140, 0x10250692, "Acer GeForce GT 620M" },{ 0x10DE1140, 0x10250694, "Acer GeForce GT 620M" },{ 0x10DE1140, 0x10250702, "Acer GeForce GT 620M" },{ 0x10DE1140, 0x10250719, "Acer GeForce GT 620M" },{ 0x10DE1140, 0x10250725, "Acer GeForce GT 620M" },{ 0x10DE1140, 0x10250728, "Acer GeForce GT 620M" },{ 0x10DE1140, 0x1025072B, "Acer GeForce GT 620M" },{ 0x10DE1140, 0x1025072E, "Acer GeForce GT 620M" },{ 0x10DE1140, 0x10250732, "Acer GeForce GT 620M" },{ 0x10DE1140, 0x10280565, "Dell GeForce GT 630M" },{ 0x10DE1140, 0x10280568, "Dell GeForce GT 630M" },{ 0x10DE1140, 0x144DC0D5, "Samsung GeForce GT 630M" },{ 0x10DE1140, 0x17AA3901, "Lenovo GeForce GT 610M" },{ 0x10DE1140, 0x17AA3903, "Lenovo GeForce GT 610M" },{ 0x10DE1140, 0x17AA3983, "Lenovo GeForce GT 610M" },{ 0x10DE1140, 0x17AA500D, "Lenovo GeForce GT 620M" },{ 0x10DE1140, 0x1B0A20DD, "Pegatron GeForce GT 620M" },{ 0x10DE1140, 0x1B0A20FD, "Pegatron GeForce GT 620M" },// 1150 - 115F// 1160 - 116F// 1170 - 117F// 1180 - 118F{ 0x10DE1180, 0x104383F0, "Asus GTX680-2GD5" },{ 0x10DE1180, 0x104383F7, "Asus GTX 680 Direct CU II" },{ 0x10DE1180, 0x10DE0969, "nVidia GTX 680" },{ 0x10DE1180, 0x10DE097A, "nVidia GeForce GTX 680" },{ 0x10DE1180, 0x118010B0, "Gainward GTX 680" },{ 0x10DE1180, 0x1458353C, "GV-N680OC-2GD WindForce GTX 680 OC" },{ 0x10DE1180, 0x14622830, "MSi GTX 680 Lightning" },{ 0x10DE1180, 0x15691180, "Palit GTX 680 JetStream" },{ 0x10DE1180, 0x15691189, "Palit GTX 680 JetStream" },{ 0x10DE1180, 0x174B1255, "PC Partner GeForce GTX 680" },{ 0x10DE1180, 0x19DA1255, "Zotac GTX 680" },{ 0x10DE1180, 0x38421582, "EVGA GTX 680" },{ 0x10DE1180, 0x38422680, "EVGA GTX 680" },{ 0x10DE1180, 0x38422682, "EVGA GTX 680 SC" },{ 0x10DE1185, 0x174B2260, "PC Partner GeForce GTX 660" },{ 0x10DE1188, 0x10438406, "Asus GeForce GTX 690" },{ 0x10DE1188, 0x10DE095B, "nVidia GeForce GTX 690" },{ 0x10DE1188, 0x38422690, "EVGA GeForce GTX 690" },{ 0x10DE1189, 0x10438405, "Asus GTX 670 Direct CU II TOP" },{ 0x10DE1189, 0x10DE097A, "nVidia GeForce GTX 670" },{ 0x10DE1189, 0x14583542, "Gigabyte GeForce GTX 670" },{ 0x10DE1189, 0x15691189, "Palit GTX 670 JetStream" },{ 0x10DE1189, 0x174B1260, "PC Partner GeForce GTX 670" },{ 0x10DE1189, 0x19DA1255, "Zotac GTX 670 AMP! Edition" },{ 0x10DE1189, 0x38422672, "EVGA GTX 670" },{ 0x10DE1189, 0x38422678, "EVGA GTX 670" },// 1190 - 119F// 11A0 - 11AF// 11B0 - 11BF// 11C0 - 11CF// 11D0 - 11DF// 11E0 - 11EF// 11F0 - 11FF// 1200 - 120F{ 0x10DE1200, 0x1043838B, "Asus GeForce GTX 560 Ti" },{ 0x10DE1200, 0x10438390, "Asus GeForce GTX 560 Ti" },{ 0x10DE1200, 0x104383BF, "Asus GeForce GTX 560 Ti" },{ 0x10DE1200, 0x10B00801, "Gainward GeForce GTX 560 Ti" },{ 0x10DE1200, 0x14583515, "Gigabyte GeForce GTX 560 Ti" },{ 0x10DE1200, 0x1458351C, "Gigabyte GeForce GTX 560 Ti" },{ 0x10DE1200, 0x14622601, "MSi GeForce GTX 560 Ti" },{ 0x10DE1200, 0x196E0898, "PNY GeForce GTX 560 Ti" },{ 0x10DE1200, 0x38421567, "EVGA GeForce GTX 560 Ti" },{ 0x10DE1200, 0x38421568, "EVGA GeForce GTX 560 Ti" },{ 0x10DE1201, 0x104383B4, "Asus GeForce GTX 560" },{ 0x10DE1201, 0x10DE0895, "nVidia GeForce GTX 560" },{ 0x10DE1201, 0x14622383, "MSi GeForce GTX 560" },{ 0x10DE1206, 0x10DE0958, "nVidia GeForce GTX 555" },{ 0x10DE1210, 0x10431487, "Asus GeForce GTX 570M" },{ 0x10DE1210, 0x10432104, "Asus GeForce GTX 570M" },{ 0x10DE1210, 0x1179FB12, "Toshiba GeForce GTX 570M" },{ 0x10DE1210, 0x1179FB18, "Toshiba GeForce GTX 570M" },{ 0x10DE1210, 0x1179FB1A, "Toshiba GeForce GTX 570M" },{ 0x10DE1210, 0x146210BD, "MSi GeForce GTX 570M" },{ 0x10DE1211, 0x1028048F, "Dell GeForce GTX 580M" },{ 0x10DE1211, 0x10280490, "Dell GeForce GTX 580M" },{ 0x10DE1211, 0x102804BA, "Dell GeForce GTX 580M" },{ 0x10DE1211, 0x146210A9, "MSi GeForce GTX 580M" },{ 0x10DE1211, 0x15580270, "Clevo GeForce GTX 580M" },{ 0x10DE1211, 0x15580271, "Clevo GeForce GTX 580M" },{ 0x10DE1211, 0x15585102, "Clevo GeForce GTX 580M" },{ 0x10DE1211, 0x15587100, "Clevo GeForce GTX 580M" },{ 0x10DE1211, 0x15587101, "Clevo GeForce GTX 580M" },{ 0x10DE1211, 0x15587200, "Clevo GeForce GTX 580M" },{ 0x10DE1212, 0x1028057B, "Dell GeForce GTX 675M" },{ 0x10DE1212, 0x144DC0D0, "Samsung GeForce GTX 675M" },{ 0x10DE1212, 0x146210CB, "MSi GeForce GTX 675M" },{ 0x10DE1213, 0x102804BA, "Dell GeForce GTX 670M" },{ 0x10DE1213, 0x10432119, "Dell GeForce GTX 670M" },{ 0x10DE1213, 0x10432120, "Dell GeForce GTX 670M" },{ 0x10DE1213, 0x1179FB12, "Toshiba GeForce GTX 670M" },{ 0x10DE1213, 0x1179FB18, "Toshiba GeForce GTX 670M" },{ 0x10DE1213, 0x1179FB1A, "Toshiba GeForce GTX 670M" },{ 0x10DE1213, 0x146210CB, "MSi GeForce GTX 670M" },{ 0x10DE1241, 0x10DE091D, "nVidia GeForce GT 545" },{ 0x10DE1243, 0x10438508, "Asus GeForce GT 545" },{ 0x10DE1243, 0x14622315, "MSi GeForce GT 545" },{ 0x10DE1243, 0x14622316, "MSi GeForce GT 545" },{ 0x10DE1243, 0x16423A28, "Bitland GeForce GT 545" },{ 0x10DE1243, 0x174B5178, "PC Partner GeForce GT 545" },{ 0x10DE1243, 0x174B6178, "PC Partner GeForce GT 545" },{ 0x10DE1244, 0x104383BC, "Asus GeForce GTX 550 Ti" },{ 0x10DE1244, 0x1458351A, "GigaByte GeForce GTX 550 Ti" },{ 0x10DE1244, 0x19DA5194, "Zotac GeForce GTX 550 Ti" },{ 0x10DE1244, 0x1B0A90A2, "Pegatron GeForce GTX 550 Ti" },{ 0x10DE1244, 0x38421556, "EVGA GeForce GTX 550 Ti" },{ 0x10DE1246, 0x10280570, "Dell GeForce GT 550M" },{ 0x10DE1246, 0x10280571, "Dell GeForce GT 550M" },{ 0x10DE1247, 0x10431407, "Asus GeForce GT 555M" },{ 0x10DE1247, 0x10431752, "Asus GeForce GT 635M" },{ 0x10DE1247, 0x10432050, "Asus GeForce GT 555M" },{ 0x10DE1247, 0x10432051, "Asus GeForce GT 555M" },{ 0x10DE1247, 0x10432119, "Asus GeForce GT 670M" },{ 0x10DE1247, 0x10432120, "Asus GeForce GT 670M" },{ 0x10DE1247, 0x1043212A, "Asus GeForce GT 635M" },{ 0x10DE1247, 0x1043212B, "Asus GeForce GT 635M" },{ 0x10DE1247, 0x1043212C, "Asus GeForce GT 635M" },{ 0x10DE1247, 0x14581532, "GigaByte GeForce GT 555M" },{ 0x10DE1247, 0x14586744, "GigaByte GeForce GT 555M" },{ 0x10DE1247, 0x152D0930, "Quanta GeForce GT 635M" },{ 0x10DE1248, 0x152D0930, "Quanta GeForce GT 635M" },{ 0x10DE1248, 0x17C010E7, "Wistron GeForce GT 555M" },{ 0x10DE1248, 0x17C010E8, "Wistron GeForce GT 555M" },{ 0x10DE1248, 0x17C010EA, "Wistron GeForce GT 555M" },{ 0x10DE1248, 0x18540890, "LG GeForce GT 555M" },{ 0x10DE1248, 0x18540891, "LG GeForce GT 555M" },{ 0x10DE1248, 0x18541795, "LG GeForce GT 555M" },{ 0x10DE1248, 0x18541796, "LG GeForce GT 555M" },{ 0x10DE124B, 0x10438540, "Asus GeForce GT 640" },{ 0x10DE124B, 0x14622319, "MSi GeForce GT 640" },{ 0x10DE124B, 0x174B0640, "PC Partner GeForce GT 640" },{ 0x10DE124D, 0x10280491, "Dell GeForce GT 555M" },{ 0x10DE124D, 0x10280570, "Dell GeForce GT 555M" },{ 0x10DE124D, 0x10280571, "Dell GeForce GT 555M" },{ 0x10DE124D, 0x1462108D, "MSi GeForce GT 555M" },{ 0x10DE124D, 0x146210CC, "MSi GeForce GT 635M" },{ 0x10DE1251, 0x102802A2, "Dell GeForce GTX 560M" },{ 0x10DE1251, 0x102802F8, "Dell GeForce GTX 560M" },{ 0x10DE1251, 0x1028048F, "Dell GeForce GTX 560M" },{ 0x10DE1251, 0x10280490, "Dell GeForce GTX 560M" },{ 0x10DE1251, 0x102804BA, "Dell GeForce GTX 560M" },{ 0x10DE1251, 0x104313B7, "Asus GeForce GTX 560M" },{ 0x10DE1251, 0x1043204A, "Asus GeForce GTX 560M" },{ 0x10DE1251, 0x1043204B, "Asus GeForce GTX 560M" },{ 0x10DE1251, 0x10432100, "Asus GeForce GTX 560M" },{ 0x10DE1251, 0x10432101, "Asus GeForce GTX 560M" },{ 0x10DE1251, 0x104384BA, "Asus GeForce GTX 560M" },{ 0x10DE1251, 0x1179FC00, "Toshiba GeForce GTX 560M" },{ 0x10DE1251, 0x1179FC01, "Toshiba GeForce GTX 560M" },{ 0x10DE1251, 0x1179FC05, "Toshiba GeForce GTX 560M" },{ 0x10DE1251, 0x146210A9, "MSi GeForce GTX 560M" },{ 0x10DE1251, 0x15585102, "Clevo/Kapok GeForce GTX 560M" },{ 0x10DE1251, 0x15587100, "Clevo/Kapok GeForce GTX 560M" },{ 0x10DE1251, 0x15587101, "Clevo/Kapok GeForce GTX 560M" },{ 0x10DE1251, 0x15587200, "Clevo/Kapok GeForce GTX 560M" },{ 0x10DE1251, 0x15588000, "Clevo/Kapok GeForce GTX 560M" },// 1260 - 126F// 1270 - 127F// 1280 - 128F// 1290 - 129F// 12A0 - 12AF// 12B0 - 12BF// 12C0 - 12CF// 12D0 - 12DF// 12E0 - 12EF// 12F0 - 12FF /* ------ Specific DeviceID and Generic SubDevID. ------ */// 0000 - 0040// 0040 - 004F{ 0x10DE0040, NV_SUB_IDS, "GeForce 6800 Ultra" },{ 0x10DE0041, NV_SUB_IDS, "GeForce 6800" },{ 0x10DE0042, NV_SUB_IDS, "GeForce 6800 LE" },{ 0x10DE0043, NV_SUB_IDS, "GeForce 6800 XE" },{ 0x10DE0044, NV_SUB_IDS, "GeForce 6800 XT" },{ 0x10DE0045, NV_SUB_IDS, "GeForce 6800 GT" },{ 0x10DE0046, NV_SUB_IDS, "GeForce 6800 GT" },{ 0x10DE0047, NV_SUB_IDS, "GeForce 6800 GS" },{ 0x10DE0048, NV_SUB_IDS, "GeForce 6800 XT" },{ 0x10DE004D, NV_SUB_IDS, "Quadro FX 3400" },{ 0x10DE004E, NV_SUB_IDS, "Quadro FX 4000" },// 0050 - 005F// 0060 - 006F// 0070 - 007F// 0080 - 008F// 0090 - 009F{ 0x10DE0090, NV_SUB_IDS, "GeForce 7800 GTX" },{ 0x10DE0091, NV_SUB_IDS, "GeForce 7800 GTX" },{ 0x10DE0092, NV_SUB_IDS, "GeForce 7800 GT" },{ 0x10DE0093, NV_SUB_IDS, "GeForce 7800 GS" },{ 0x10DE0095, NV_SUB_IDS, "GeForce 7800 SLI" },{ 0x10DE0098, NV_SUB_IDS, "GeForce Go 7800" },{ 0x10DE0099, NV_SUB_IDS, "GeForce Go 7800 GTX" },{ 0x10DE009D, NV_SUB_IDS, "Quadro FX 4500" },// 00A0 - 00AF// 00B0 - 00BF// 00C0 - 00CF{ 0x10DE00C0, NV_SUB_IDS, "GeForce 6800 GS" },{ 0x10DE00C1, NV_SUB_IDS, "GeForce 6800" },{ 0x10DE00C2, NV_SUB_IDS, "GeForce 6800 LE" },{ 0x10DE00C3, NV_SUB_IDS, "GeForce 6800 XT" },{ 0x10DE00C8, NV_SUB_IDS, "GeForce Go 6800" },{ 0x10DE00C9, NV_SUB_IDS, "GeForce Go 6800 Ultra" },{ 0x10DE00CC, NV_SUB_IDS, "Quadro FX Go1400" },{ 0x10DE00CD, NV_SUB_IDS, "Quadro FX 3450/4000 SDI" },{ 0x10DE00CE, NV_SUB_IDS, "Quadro FX 1400" },// 00D0 - 00DF// 00E0 - 00EF// 00F0 - 00FF{ 0x10DE00F1, NV_SUB_IDS, "GeForce 6600 GT" },{ 0x10DE00F2, NV_SUB_IDS, "GeForce 6600" },{ 0x10DE00F3, NV_SUB_IDS, "GeForce 6200" },{ 0x10DE00F4, NV_SUB_IDS, "GeForce 6600 LE" },{ 0x10DE00F5, NV_SUB_IDS, "GeForce 7800 GS" },{ 0x10DE00F6, NV_SUB_IDS, "GeForce 6800 GS/XT" },{ 0x10DE00F8, NV_SUB_IDS, "Quadro FX 3400/4400" },{ 0x10DE00F9, NV_SUB_IDS, "GeForce 6800 Series GPU" },// 0100 - 010F// 0110 - 011F// 0120 - 012F// 0130 - 013F// 0140 - 014F{ 0x10DE0140, NV_SUB_IDS, "GeForce 6600 GT" },{ 0x10DE0141, NV_SUB_IDS, "GeForce 6600" },{ 0x10DE0142, NV_SUB_IDS, "GeForce 6600 LE" },{ 0x10DE0143, NV_SUB_IDS, "GeForce 6600 VE" },{ 0x10DE0144, NV_SUB_IDS, "GeForce Go 6600" },{ 0x10DE0145, NV_SUB_IDS, "GeForce 6610 XL" },{ 0x10DE0146, NV_SUB_IDS, "GeForce Go 6600 TE/6200 TE" },{ 0x10DE0147, NV_SUB_IDS, "GeForce 6700 XL" },{ 0x10DE0148, NV_SUB_IDS, "GeForce Go 6600" },{ 0x10DE0149, NV_SUB_IDS, "GeForce Go 6600 GT" },{ 0x10DE014A, NV_SUB_IDS, "Quadro NVS 440" },{ 0x10DE014C, NV_SUB_IDS, "Quadro FX 550" },{ 0x10DE014D, NV_SUB_IDS, "Quadro FX 550" },{ 0x10DE014E, NV_SUB_IDS, "Quadro FX 540" },{ 0x10DE014F, NV_SUB_IDS, "GeForce 6200" },// 0150 - 015F// 0160 - 016F{ 0x10DE0160, NV_SUB_IDS, "GeForce 6500" },{ 0x10DE0161, NV_SUB_IDS, "GeForce 6200 TurboCache™" },{ 0x10DE0162, NV_SUB_IDS, "GeForce 6200SE TurboCache™" },{ 0x10DE0163, NV_SUB_IDS, "GeForce 6200 LE" },{ 0x10DE0164, NV_SUB_IDS, "GeForce Go 6200" },{ 0x10DE0165, NV_SUB_IDS, "Quadro NVS 285" },{ 0x10DE0166, NV_SUB_IDS, "GeForce Go 6400" },{ 0x10DE0167, NV_SUB_IDS, "GeForce Go 6200" },{ 0x10DE0168, NV_SUB_IDS, "GeForce Go 6400" },{ 0x10DE0169, NV_SUB_IDS, "GeForce 6250" },{ 0x10DE016A, NV_SUB_IDS, "GeForce 7100 GS" },{ 0x10DE016C, NV_SUB_IDS, "NVIDIA NV44GLM" },{ 0x10DE016D, NV_SUB_IDS, "NVIDIA NV44GLM" },// 0170 - 017F// 0180 - 018F// 0190 - 019F{ 0x10DE0191, NV_SUB_IDS, "GeForce 8800 GTX" },{ 0x10DE0193, NV_SUB_IDS, "GeForce 8800 GTS" },{ 0x10DE0194, NV_SUB_IDS, "GeForce 8800 Ultra" },{ 0x10DE0197, NV_SUB_IDS, "Tesla C870" },{ 0x10DE019D, NV_SUB_IDS, "Quadro FX 5600" },{ 0x10DE019E, NV_SUB_IDS, "Quadro FX 4600" },// 01A0 - 01AF// 01B0 - 01BF// 01C0 - 01CF// 01D0 - 01DF{ 0x10DE01D0, NV_SUB_IDS, "GeForce 7350 LE" },{ 0x10DE01D1, NV_SUB_IDS, "GeForce 7300 LE" },{ 0x10DE01D2, NV_SUB_IDS, "GeForce 7550 LE" },{ 0x10DE01D3, NV_SUB_IDS, "GeForce 7300 SE/7200 GS" },{ 0x10DE01D6, NV_SUB_IDS, "GeForce Go 7200" },{ 0x10DE01D7, NV_SUB_IDS, "Quadro NVS 110M / GeForce Go 7300" },{ 0x10DE01D8, NV_SUB_IDS, "GeForce Go 7400" },{ 0x10DE01D9, NV_SUB_IDS, "GeForce Go 7450" },{ 0x10DE01DA, NV_SUB_IDS, "Quadro NVS 110M" },{ 0x10DE01DB, NV_SUB_IDS, "Quadro NVS 120M" },{ 0x10DE01DC, NV_SUB_IDS, "Quadro FX 350M" },{ 0x10DE01DD, NV_SUB_IDS, "GeForce 7500 LE" },{ 0x10DE01DE, NV_SUB_IDS, "Quadro FX 350" },{ 0x10DE01DF, NV_SUB_IDS, "GeForce 7300 GS" },// 01E0 - 01EF// 01F0 - 01FF{ 0x10DE01F0, NV_SUB_IDS, "GeForce4 MX" },// 0200 - 020F// 0210 - 021F{ 0x10DE0211, NV_SUB_IDS, "GeForce 6800" },{ 0x10DE0212, NV_SUB_IDS, "GeForce 6800 LE" },{ 0x10DE0215, NV_SUB_IDS, "GeForce 6800 GT" },{ 0x10DE0218, NV_SUB_IDS, "GeForce 6800 XT" },// 0220 - 022F{ 0x10DE0221, NV_SUB_IDS, "GeForce 6200" },{ 0x10DE0222, NV_SUB_IDS, "GeForce 6200 A-LE" },{ 0x10DE0228, NV_SUB_IDS, "NVIDIA NV44M" },// 0230 - 023F// 0240 - 024F{ 0x10DE0240, NV_SUB_IDS, "GeForce 6150" },{ 0x10DE0241, NV_SUB_IDS, "GeForce 6150 LE" },{ 0x10DE0242, NV_SUB_IDS, "GeForce 6100" },{ 0x10DE0243, NV_SUB_IDS, "NVIDIA C51" },{ 0x10DE0244, NV_SUB_IDS, "GeForce Go 6150" },{ 0x10DE0245, NV_SUB_IDS, "Quadro NVS 210S / GeForce 6150LE" },{ 0x10DE0247, NV_SUB_IDS, "GeForce Go 6100" },// 0250 - 025F{ 0x10DE025B, NV_SUB_IDS, "Quadro4 700 XGL" },// 0260 - 026F// 0270 - 027F// 0280 - 028F// 0290 - 029F{ 0x10DE0290, NV_SUB_IDS, "GeForce 7900 GTX" },{ 0x10DE0291, NV_SUB_IDS, "GeForce 7900 GT/GTO" },{ 0x10DE0292, NV_SUB_IDS, "GeForce 7900 GS" },{ 0x10DE0293, NV_SUB_IDS, "GeForce 7950 GX2" },{ 0x10DE0294, NV_SUB_IDS, "GeForce 7950 GX2" },{ 0x10DE0295, NV_SUB_IDS, "GeForce 7950 GT" },{ 0x10DE0298, NV_SUB_IDS, "GeForce Go 7900 GS" },{ 0x10DE0299, NV_SUB_IDS, "GeForce Go 7900 GTX" },{ 0x10DE029A, NV_SUB_IDS, "Quadro FX 2500M" },{ 0x10DE029B, NV_SUB_IDS, "Quadro FX 1500M" },{ 0x10DE029C, NV_SUB_IDS, "Quadro FX 5500" },{ 0x10DE029D, NV_SUB_IDS, "Quadro FX 3500" },{ 0x10DE029E, NV_SUB_IDS, "Quadro FX 1500" },{ 0x10DE029F, NV_SUB_IDS, "Quadro FX 4500 X2" },// 02A0 - 02AF// 02B0 - 02BF// 02C0 - 02CF// 02D0 - 02DF// 02E0 - 02EF{ 0x10DE02E0, NV_SUB_IDS, "GeForce 7600 GT" },{ 0x10DE02E1, NV_SUB_IDS, "GeForce 7600 GS" },{ 0x10DE02E2, NV_SUB_IDS, "GeForce 7300 GT" },{ 0x10DE02E3, NV_SUB_IDS, "GeForce 7900 GS" },{ 0x10DE02E4, NV_SUB_IDS, "GeForce 7950 GT" },// 02F0 - 02FF// 0300 - 030F{ 0x10DE0301, NV_SUB_IDS, "GeForce FX 5800 Ultra" },{ 0x10DE0302, NV_SUB_IDS, "GeForce FX 5800" },{ 0x10DE0308, NV_SUB_IDS, "Quadro FX 2000" },{ 0x10DE0309, NV_SUB_IDS, "Quadro FX 1000" },// 0310 - 031F{ 0x10DE0311, NV_SUB_IDS, "GeForce FX 5600 Ultra" },{ 0x10DE0312, NV_SUB_IDS, "GeForce FX 5600" },{ 0x10DE0314, NV_SUB_IDS, "GeForce FX 5600XT" },{ 0x10DE031A, NV_SUB_IDS, "GeForce FX Go5600" },{ 0x10DE031B, NV_SUB_IDS, "GeForce FX Go5650" },{ 0x10DE031C, NV_SUB_IDS, "Quadro FX Go700" },// 0320 - 032F{ 0x10DE0320, NV_SUB_IDS, "GeForce FX 5200" },{ 0x10DE0321, NV_SUB_IDS, "GeForce FX 5200 Ultra" },{ 0x10DE0322, NV_SUB_IDS, "GeForce FX 5200" },{ 0x10DE0323, NV_SUB_IDS, "GeForce FX 5200 LE" },{ 0x10DE0324, NV_SUB_IDS, "GeForce FX Go5200" },{ 0x10DE0325, NV_SUB_IDS, "GeForce FX Go5250" },{ 0x10DE0326, NV_SUB_IDS, "GeForce FX 5500" },{ 0x10DE0328, NV_SUB_IDS, "GeForce FX Go5200 32M/64M" },{ 0x10DE0329, NV_SUB_IDS, "GeForce FX Go5200" },{ 0x10DE032A, NV_SUB_IDS, "Quadro NVS 55/280 PCI" },{ 0x10DE032B, NV_SUB_IDS, "Quadro FX 500/600 PCI" },{ 0x10DE032C, NV_SUB_IDS, "GeForce FX Go53xx Series" },{ 0x10DE032D, NV_SUB_IDS, "GeForce FX Go5100" },// { 0x10DE032F, NV_SUB_IDS, "NVIDIA NV34GL" },// 0330 - 033F{ 0x10DE0330, NV_SUB_IDS, "GeForce FX 5900 Ultra" },{ 0x10DE0331, NV_SUB_IDS, "GeForce FX 5900" },{ 0x10DE0332, NV_SUB_IDS, "GeForce FX 5900XT" },{ 0x10DE0333, NV_SUB_IDS, "GeForce FX 5950 Ultra" },{ 0x10DE0334, NV_SUB_IDS, "GeForce FX 5900ZT" },{ 0x10DE0338, NV_SUB_IDS, "Quadro FX 3000" },{ 0x10DE033F, NV_SUB_IDS, "Quadro FX 700" },// 0340 - 034F{ 0x10DE0341, NV_SUB_IDS, "GeForce FX 5700 Ultra" },{ 0x10DE0342, NV_SUB_IDS, "GeForce FX 5700" },{ 0x10DE0343, NV_SUB_IDS, "GeForce FX 5700LE" },{ 0x10DE0344, NV_SUB_IDS, "GeForce FX 5700VE" },// { 0x10DE0345, NV_SUB_IDS, "NVIDIA NV36.5" },{ 0x10DE0347, NV_SUB_IDS, "GeForce FX Go5700" },{ 0x10DE0348, NV_SUB_IDS, "GeForce FX Go5700" },{ 0x10DE0349, NV_SUB_IDS, "NV36M Pro" },{ 0x10DE034B, NV_SUB_IDS, "NV36MAP" },{ 0x10DE034C, NV_SUB_IDS, "Quadro FX Go1000" },{ 0x10DE034E, NV_SUB_IDS, "Quadro FX 1100" },// { 0x10DE034F, NV_SUB_IDS, "NVIDIA NV36GL" },// 0350 - 035F// 0360 - 036F// 0370 - 037F// 0380 - 038F{ 0x10DE038B, NV_SUB_IDS, "GeForce 7650 GS" },// 0390 - 039F{ 0x10DE0390, NV_SUB_IDS, "GeForce 7650 GS" },{ 0x10DE0391, NV_SUB_IDS, "GeForce 7600 GT" },{ 0x10DE0392, NV_SUB_IDS, "GeForce 7600 GS" },{ 0x10DE0393, NV_SUB_IDS, "GeForce 7300 GT" },{ 0x10DE0394, NV_SUB_IDS, "GeForce 7600 LE" },{ 0x10DE0395, NV_SUB_IDS, "GeForce 7300 GT" },{ 0x10DE0397, NV_SUB_IDS, "GeForce Go 7700" },{ 0x10DE0398, NV_SUB_IDS, "GeForce Go 7600" },{ 0x10DE0399, NV_SUB_IDS, "GeForce Go 7600 GT"},{ 0x10DE039A, NV_SUB_IDS, "Quadro NVS 300M" },{ 0x10DE039B, NV_SUB_IDS, "GeForce Go 7900 SE" },{ 0x10DE039C, NV_SUB_IDS, "Quadro FX 560M" },{ 0x10DE039E, NV_SUB_IDS, "Quadro FX 560" },// 03A0 - 03AF// 03B0 - 03BF// 03C0 - 03CF// 03D0 - 03DF{ 0x10DE03D0, NV_SUB_IDS, "GeForce 6150SE nForce 430" },{ 0x10DE03D1, NV_SUB_IDS, "GeForce 6100 nForce 405" },{ 0x10DE03D2, NV_SUB_IDS, "GeForce 6100 nForce 400" },{ 0x10DE03D5, NV_SUB_IDS, "GeForce 6100 nForce 420" },{ 0x10DE03D6, NV_SUB_IDS, "GeForce 7025 / nForce 630a" },// 03E0 - 03EF// 03F0 - 03FF// 0400 - 040F{ 0x10DE0400, NV_SUB_IDS, "GeForce 8600 GTS" },{ 0x10DE0401, NV_SUB_IDS, "GeForce 8600 GT" },{ 0x10DE0402, NV_SUB_IDS, "GeForce 8600 GT" },{ 0x10DE0403, NV_SUB_IDS, "GeForce 8600 GS" },{ 0x10DE0404, NV_SUB_IDS, "GeForce 8400 GS" },{ 0x10DE0405, NV_SUB_IDS, "GeForce 9500M GS" },{ 0x10DE0406, NV_SUB_IDS, "GeForce 8300 GS" },{ 0x10DE0407, NV_SUB_IDS, "GeForce 8600M GT" },{ 0x10DE0408, NV_SUB_IDS, "GeForce 9650M GS" },{ 0x10DE0409, NV_SUB_IDS, "GeForce 8700M GT" },{ 0x10DE040A, NV_SUB_IDS, "Quadro FX 370" },{ 0x10DE040B, NV_SUB_IDS, "Quadro NVS 320M" },{ 0x10DE040C, NV_SUB_IDS, "Quadro FX 570M" },{ 0x10DE040D, NV_SUB_IDS, "Quadro FX 1600M" },{ 0x10DE040E, NV_SUB_IDS, "Quadro FX 570" },{ 0x10DE040F, NV_SUB_IDS, "Quadro FX 1700" },// 0410 - 041F{ 0x10DE0410, NV_SUB_IDS, "GeForce GT 330" },// 0420 - 042F{ 0x10DE0420, NV_SUB_IDS, "GeForce 8400 SE" },{ 0x10DE0421, NV_SUB_IDS, "GeForce 8500 GT" },{ 0x10DE0422, NV_SUB_IDS, "GeForce 8400 GS" },{ 0x10DE0423, NV_SUB_IDS, "GeForce 8300 GS" },{ 0x10DE0424, NV_SUB_IDS, "GeForce 8400 GS" },{ 0x10DE0425, NV_SUB_IDS, "GeForce 8600M GS" },{ 0x10DE0426, NV_SUB_IDS, "GeForce 8400M GT" },{ 0x10DE0427, NV_SUB_IDS, "GeForce 8400M GS" },{ 0x10DE0428, NV_SUB_IDS, "GeForce 8400M G" },{ 0x10DE0429, NV_SUB_IDS, "Quadro NVS 140M" },{ 0x10DE042A, NV_SUB_IDS, "Quadro NVS 130M" },{ 0x10DE042B, NV_SUB_IDS, "Quadro NVS 135M" },{ 0x10DE042C, NV_SUB_IDS, "GeForce 9400 GT" },{ 0x10DE042D, NV_SUB_IDS, "Quadro FX 360M" },{ 0x10DE042E, NV_SUB_IDS, "GeForce 9300M G" },{ 0x10DE042F, NV_SUB_IDS, "Quadro NVS 290" },// 0430 - 043F// 0440 - 044F// 0450 - 045F// 0460 - 046F// 0470 - 047F// 0480 - 048F// 0490 - 049F// 04A0 - 04AF// 04B0 - 04BF// 04C0 - 04CF{ 0x10DE04C0, NV_SUB_IDS, "NVIDIA G78" },{ 0x10DE04C1, NV_SUB_IDS, "NVIDIA G78" },{ 0x10DE04C2, NV_SUB_IDS, "NVIDIA G78" },{ 0x10DE04C3, NV_SUB_IDS, "NVIDIA G78" },{ 0x10DE04C4, NV_SUB_IDS, "NVIDIA G78" },{ 0x10DE04C5, NV_SUB_IDS, "NVIDIA G78" },{ 0x10DE04C6, NV_SUB_IDS, "NVIDIA G78" },{ 0x10DE04C7, NV_SUB_IDS, "NVIDIA G78" },{ 0x10DE04C8, NV_SUB_IDS, "NVIDIA G78" },{ 0x10DE04C9, NV_SUB_IDS, "NVIDIA G78" },{ 0x10DE04CA, NV_SUB_IDS, "NVIDIA G78" },{ 0x10DE04CB, NV_SUB_IDS, "NVIDIA G78" },{ 0x10DE04CC, NV_SUB_IDS, "NVIDIA G78" },{ 0x10DE04CD, NV_SUB_IDS, "NVIDIA G78" },{ 0x10DE04CE, NV_SUB_IDS, "NVIDIA G78" },{ 0x10DE04CF, NV_SUB_IDS, "NVIDIA G78" },// 04D0 - 04DF// 04E0 - 04EF// 04F0 - 04FF// 0500 - 050F// 0510 - 051F// 0520 - 052F// 0530 - 053F{ 0x10DE0530, NV_SUB_IDS, "GeForce 7190M / nForce 650M" },{ 0x10DE0531, NV_SUB_IDS, "GeForce 7150M / nForce 630M" },{ 0x10DE0533, NV_SUB_IDS, "GeForce 7000M / nForce 610M" },{ 0x10DE053A, NV_SUB_IDS, "GeForce 7050 PV / nForce 630a" },{ 0x10DE053B, NV_SUB_IDS, "GeForce 7050 PV / nForce 630a" },{ 0x10DE053E, NV_SUB_IDS, "GeForce 7025 / nForce 630a" },// 0540 - 054F// 0550 - 055F// 0560 - 056F// 0570 - 057F// 0580 - 058F// 0590 - 059F// 05A0 - 05AF// 05B0 - 05BF// 05C0 - 05CF// 05D0 - 05DF// 05E0 - 05EF{ 0x10DE05E0, NV_SUB_IDS, "GeForce GTX 295" },{ 0x10DE05E1, NV_SUB_IDS, "GeForce GTX 280" },{ 0x10DE05E2, NV_SUB_IDS, "GeForce GTX 260" },{ 0x10DE05E3, NV_SUB_IDS, "GeForce GTX 285" },{ 0x10DE05E4, NV_SUB_IDS, "NVIDIA GT200" },{ 0x10DE05E5, NV_SUB_IDS, "NVIDIA GT200" },{ 0x10DE05E6, NV_SUB_IDS, "GeForce GTX 275" },{ 0x10DE05E7, NV_SUB_IDS, "nVidia Tesla C1060" },{ 0x10DE05E8, NV_SUB_IDS, "NVIDIA GT200" },{ 0x10DE05E9, NV_SUB_IDS, "NVIDIA GT200" },{ 0x10DE05EA, NV_SUB_IDS, "GeForce GTX 260" },{ 0x10DE05EB, NV_SUB_IDS, "GeForce GTX 295" },{ 0x10DE05EC, NV_SUB_IDS, "NVIDIA GT200" },{ 0x10DE05ED, NV_SUB_IDS, "Quadroplex 2200 D2" },{ 0x10DE05EE, NV_SUB_IDS, "NVIDIA GT200" },{ 0x10DE05EF, NV_SUB_IDS, "NVIDIA GT200" },// 05F0 - 05FF{ 0x10DE05F0, NV_SUB_IDS, "NVIDIA GT200" },{ 0x10DE05F1, NV_SUB_IDS, "NVIDIA GT200" },{ 0x10DE05F2, NV_SUB_IDS, "NVIDIA GT200" },{ 0x10DE05F3, NV_SUB_IDS, "NVIDIA GT200" },{ 0x10DE05F4, NV_SUB_IDS, "NVIDIA GT200" },{ 0x10DE05F5, NV_SUB_IDS, "NVIDIA GT200" },{ 0x10DE05F6, NV_SUB_IDS, "NVIDIA GT200" },{ 0x10DE05F7, NV_SUB_IDS, "NVIDIA GT200" },{ 0x10DE05F8, NV_SUB_IDS, "Quadroplex 2200 S4" },{ 0x10DE05F9, NV_SUB_IDS, "NVIDIA Quadro CX" },{ 0x10DE05FA, NV_SUB_IDS, "NVIDIA GT200" },{ 0x10DE05FB, NV_SUB_IDS, "NVIDIA GT200" },{ 0x10DE05FC, NV_SUB_IDS, "NVIDIA GT200" },{ 0x10DE05FD, NV_SUB_IDS, "Quadro FX 5800" },{ 0x10DE05FE, NV_SUB_IDS, "Quadro FX 4800" },{ 0x10DE05FF, NV_SUB_IDS, "Quadro FX 3800" },// 0600 - 060F{ 0x10DE0600, NV_SUB_IDS, "GeForce 8800 GTS 512" },{ 0x10DE0601, NV_SUB_IDS, "GeForce 9800 GT" },{ 0x10DE0602, NV_SUB_IDS, "GeForce 8800 GT" },{ 0x10DE0603, NV_SUB_IDS, "GeForce GT 230" },{ 0x10DE0604, NV_SUB_IDS, "GeForce 9800 GX2" },{ 0x10DE0605, NV_SUB_IDS, "GeForce 9800 GT" },{ 0x10DE0606, NV_SUB_IDS, "GeForce 8800 GS" },{ 0x10DE0607, NV_SUB_IDS, "GeForce GTS 240" },{ 0x10DE0608, NV_SUB_IDS, "GeForce 9800M GTX" },{ 0x10DE0609, NV_SUB_IDS, "GeForce 8800M GTS" },{ 0x10DE060A, NV_SUB_IDS, "GeForce GTX 280M" },{ 0x10DE060B, NV_SUB_IDS, "GeForce 9800M GT" },{ 0x10DE060C, NV_SUB_IDS, "GeForce 8800M GTX" },{ 0x10DE060D, NV_SUB_IDS, "GeForce 8800 GS" },{ 0x10DE060F, NV_SUB_IDS, "GeForce GTX 285M" },// 0610 - 061F{ 0x10DE0610, NV_SUB_IDS, "GeForce 9600 GSO" },{ 0x10DE0611, NV_SUB_IDS, "GeForce 8800 GT" },{ 0x10DE0612, NV_SUB_IDS, "GeForce 9800 GTX" },{ 0x10DE0613, NV_SUB_IDS, "GeForce 9800 GTX+" },{ 0x10DE0614, NV_SUB_IDS, "GeForce 9800 GT" },{ 0x10DE0615, NV_SUB_IDS, "GeForce GTS 250" },{ 0x10DE0617, NV_SUB_IDS, "GeForce 9800M GTX" },{ 0x10DE0618, NV_SUB_IDS, "GeForce GTX 170M" },{ 0x10DE0619, NV_SUB_IDS, "Quadro FX 4700 X2" },{ 0x10DE061A, NV_SUB_IDS, "Quadro FX 3700" },{ 0x10DE061B, NV_SUB_IDS, "Quadro VX 200" },{ 0x10DE061C, NV_SUB_IDS, "Quadro FX 3600M" },{ 0x10DE061D, NV_SUB_IDS, "Quadro FX 2800M" },{ 0x10DE061E, NV_SUB_IDS, "Quadro FX 3700M" },{ 0x10DE061F, NV_SUB_IDS, "Quadro FX 3800M" },// 0620 - 062F{ 0x10DE0620, NV_SUB_IDS, "NVIDIA G94" },{ 0x10DE0621, NV_SUB_IDS, "GeForce GT 230" },{ 0x10DE0622, NV_SUB_IDS, "GeForce 9600 GT" },{ 0x10DE0623, NV_SUB_IDS, "GeForce 9600 GS" },{ 0x10DE0624, NV_SUB_IDS, "NVIDIA G94" },{ 0x10DE0625, NV_SUB_IDS, "GeForce 9600 GSO 512"},{ 0x10DE0626, NV_SUB_IDS, "GeForce GT 130" },{ 0x10DE0627, NV_SUB_IDS, "GeForce GT 140" },{ 0x10DE0628, NV_SUB_IDS, "GeForce 9800M GTS" },{ 0x10DE0629, NV_SUB_IDS, "NVIDIA G94" },{ 0x10DE062A, NV_SUB_IDS, "GeForce 9700M GTS" },{ 0x10DE062B, NV_SUB_IDS, "GeForce 9800M GS" },{ 0x10DE062C, NV_SUB_IDS, "GeForce 9800M GTS" },{ 0x10DE062D, NV_SUB_IDS, "GeForce 9600 GT" },{ 0x10DE062E, NV_SUB_IDS, "GeForce 9600 GT" },{ 0x10DE062F, NV_SUB_IDS, "GeForce 9800 S" },// 0630 - 063F{ 0x10DE0630, NV_SUB_IDS, "GeForce 9700 S" },{ 0x10DE0631, NV_SUB_IDS, "GeForce GTS 160M" },{ 0x10DE0632, NV_SUB_IDS, "GeForce GTS 150M" },{ 0x10DE0633, NV_SUB_IDS, "NVIDIA G94" },{ 0x10DE0634, NV_SUB_IDS, "NVIDIA G94" },{ 0x10DE0635, NV_SUB_IDS, "GeForce 9600 GSO" },{ 0x10DE0636, NV_SUB_IDS, "NVIDIA G94" },{ 0x10DE0637, NV_SUB_IDS, "GeForce 9600 GT" },{ 0x10DE0638, NV_SUB_IDS, "Quadro FX 1800" },{ 0x10DE0639, NV_SUB_IDS, "NVIDIA G94" },{ 0x10DE063A, NV_SUB_IDS, "Quadro FX 2700M" },{ 0x10DE063B, NV_SUB_IDS, "NVIDIA G94" },{ 0x10DE063C, NV_SUB_IDS, "NVIDIA G94" },{ 0x10DE063D, NV_SUB_IDS, "NVIDIA G94" },{ 0x10DE063E, NV_SUB_IDS, "NVIDIA G94" },{ 0x10DE063F, NV_SUB_IDS, "NVIDIA G94" },// 0640 - 064F{ 0x10DE0640, NV_SUB_IDS, "GeForce 9500 GT" },{ 0x10DE0641, NV_SUB_IDS, "GeForce 9400 GT" },{ 0x10DE0642, NV_SUB_IDS, "GeForce 8400 GS" },{ 0x10DE0643, NV_SUB_IDS, "GeForce 9500 GT" },{ 0x10DE0644, NV_SUB_IDS, "GeForce 9500 GS" },{ 0x10DE0645, NV_SUB_IDS, "GeForce 9500 GS" },{ 0x10DE0646, NV_SUB_IDS, "GeForce GT 120" },{ 0x10DE0647, NV_SUB_IDS, "GeForce 9600M GT" },{ 0x10DE0648, NV_SUB_IDS, "GeForce 9600M GS" },{ 0x10DE0649, NV_SUB_IDS, "GeForce 9600M GT" },{ 0x10DE064A, NV_SUB_IDS, "GeForce 9700M GT" },{ 0x10DE064B, NV_SUB_IDS, "GeForce 9500M G" },{ 0x10DE064C, NV_SUB_IDS, "GeForce 9650M GT" },// 0650 - 065F{ 0x10DE0650, NV_SUB_IDS, "NVIDIA G96-825" },{ 0x10DE0651, NV_SUB_IDS, "GeForce G 110M" },{ 0x10DE0652, NV_SUB_IDS, "GeForce GT 130M" },{ 0x10DE0653, NV_SUB_IDS, "GeForce GT 120M" },{ 0x10DE0654, NV_SUB_IDS, "GeForce GT 220M" },{ 0x10DE0655, NV_SUB_IDS, "GeForce GT 120" },{ 0x10DE0656, NV_SUB_IDS, "GeForce 9650 S" },{ 0x10DE0657, NV_SUB_IDS, "NVIDIA G96" },{ 0x10DE0658, NV_SUB_IDS, "Quadro FX 380" },{ 0x10DE0659, NV_SUB_IDS, "Quadro FX 580" },{ 0x10DE065A, NV_SUB_IDS, "Quadro FX 1700M" },{ 0x10DE065B, NV_SUB_IDS, "GeForce 9400 GT" },{ 0x10DE065C, NV_SUB_IDS, "Quadro FX 770M" },{ 0x10DE065D, NV_SUB_IDS, "NVIDIA G96" },{ 0x10DE065E, NV_SUB_IDS, "NVIDIA G96" },{ 0x10DE065F, NV_SUB_IDS, "GeForce G210" },// 0660 - 066F// 0670 - 067F// 0680 - 068F// 0690 - 069F// 06A0 - 06AF{ 0x10DE06A0, NV_SUB_IDS, "NVIDIA GT214" },// 06B0 - 06BF{ 0x10DE06B0, NV_SUB_IDS, "NVIDIA GT214" },// 06C0 - 06CF{ 0x10DE06C0, NV_SUB_IDS, "GeForce GTX 480" },{ 0x10DE06C3, NV_SUB_IDS, "GeForce GTX D12U" },{ 0x10DE06C4, NV_SUB_IDS, "GeForce GTX 465" },{ 0x10DE06CA, NV_SUB_IDS, "GeForce GTX 480M" },{ 0x10DE06CD, NV_SUB_IDS, "GeForce GTX 470" },// 06D0 - 06DF{ 0x10DE06D1, NV_SUB_IDS, "Tesla C2050 / C2070" },{ 0x10DE06D2, NV_SUB_IDS, "Tesla M2070 / X2070" },{ 0x10DE06D8, NV_SUB_IDS, "Quadro 6000" },{ 0x10DE06D9, NV_SUB_IDS, "Quadro 5000" },{ 0x10DE06DA, NV_SUB_IDS, "Quadro 5000M" },{ 0x10DE06DC, NV_SUB_IDS, "Quadro 6000" },{ 0x10DE06DD, NV_SUB_IDS, "nVidia Quadro 4000" },{ 0x10DE06DE, NV_SUB_IDS, "nVidia Tesla S2050" },{ 0x10DE06DF, NV_SUB_IDS, "Tesla M2070Q" },// 06E0 - 06EF{ 0x10DE06E0, NV_SUB_IDS, "GeForce 9300 GE" },{ 0x10DE06E1, NV_SUB_IDS, "GeForce 9300 GS" },{ 0x10DE06E2, NV_SUB_IDS, "GeForce 8400" },{ 0x10DE06E3, NV_SUB_IDS, "GeForce 8400 SE" },{ 0x10DE06E4, NV_SUB_IDS, "GeForce 8400 GS" },{ 0x10DE06E5, NV_SUB_IDS, "GeForce 9300M GS" },{ 0x10DE06E6, NV_SUB_IDS, "GeForce G100" },{ 0x10DE06E7, NV_SUB_IDS, "GeForce 9300 SE" },{ 0x10DE06E8, NV_SUB_IDS, "GeForce 9200M GS" },{ 0x10DE06E9, NV_SUB_IDS, "GeForce 9300M GS" },{ 0x10DE06EA, NV_SUB_IDS, "Quadro NVS 150M" },{ 0x10DE06EB, NV_SUB_IDS, "Quadro NVS 160M" },{ 0x10DE06EC, NV_SUB_IDS, "GeForce G 105M" },{ 0x10DE06ED, NV_SUB_IDS, "NVIDIA G98" },{ 0x10DE06EF, NV_SUB_IDS, "GeForce G 103M" },// 06F0 - 06FF{ 0x10DE06F0, NV_SUB_IDS, "NVIDIA G98" },{ 0x10DE06F1, NV_SUB_IDS, "GeForce G105M" },{ 0x10DE06F2, NV_SUB_IDS, "NVIDIA G98" },{ 0x10DE06F3, NV_SUB_IDS, "NVIDIA G98" },{ 0x10DE06F4, NV_SUB_IDS, "NVIDIA G98" },{ 0x10DE06F5, NV_SUB_IDS, "NVIDIA G98" },{ 0x10DE06F6, NV_SUB_IDS, "NVIDIA G98" },{ 0x10DE06F7, NV_SUB_IDS, "NVIDIA G98" },{ 0x10DE06F8, NV_SUB_IDS, "Quadro NVS 420" },{ 0x10DE06F9, NV_SUB_IDS, "Quadro FX 370 LP" },{ 0x10DE06FA, NV_SUB_IDS, "Quadro NVS 450" },{ 0x10DE06FB, NV_SUB_IDS, "Quadro FX 370M" },{ 0x10DE06FC, NV_SUB_IDS, "NVIDIA G98" },{ 0x10DE06FD, NV_SUB_IDS, "Quadro NVS 295" },{ 0x10DE06FE, NV_SUB_IDS, "NVIDIA G98" },{ 0x10DE06FF, NV_SUB_IDS, "HICx16 + Graphics" },// 0700 - 070F// 0710 - 071F// 0720 - 072F// 0730 - 073F// 0740 - 074F// 0750 - 075F// 0760 - 076F// 0770 - 077F// 0780 - 078F// 0790 - 079F// 07A0 - 07AF// 07B0 - 07BF// 07C0 - 07CF// 07D0 - 07DF// 07E0 - 07EF{ 0x10DE07E0, NV_SUB_IDS, "GeForce 7150 / nForce 630i" },{ 0x10DE07E1, NV_SUB_IDS, "GeForce 7100 / nForce 630i" },{ 0x10DE07E2, NV_SUB_IDS, "GeForce 7050 / nForce 630i" },{ 0x10DE07E3, NV_SUB_IDS, "GeForce 7050 / nForce 610i" },{ 0x10DE07E5, NV_SUB_IDS, "GeForce 7050 / nForce 620i" },// 07F0 - 07FF// 0800 - 080F// 0810 - 081F// 0820 - 082F// 0830 - 083F// 0840 - 084F{ 0x10DE0840, NV_SUB_IDS, "GeForce 8200M" },{ 0x10DE0844, NV_SUB_IDS, "GeForce 9100M G" },{ 0x10DE0845, NV_SUB_IDS, "GeForce 8200M G" },{ 0x10DE0846, NV_SUB_IDS, "GeForce 9200" },{ 0x10DE0847, NV_SUB_IDS, "GeForce 9100" },{ 0x10DE0848, NV_SUB_IDS, "GeForce 8300" },{ 0x10DE0849, NV_SUB_IDS, "GeForce 8200" },{ 0x10DE084A, NV_SUB_IDS, "nForce 730a" },{ 0x10DE084B, NV_SUB_IDS, "GeForce 9200" }, // nVidia GeForce 8200 ??{ 0x10DE084C, NV_SUB_IDS, "nForce 980a/780a SLI" },{ 0x10DE084D, NV_SUB_IDS, "nForce 750a SLI" },{ 0x10DE084F, NV_SUB_IDS, "GeForce 8100 / nForce 720a" },// 0850 - 085F// 0860 - 086F{ 0x10DE0860, NV_SUB_IDS, "GeForce 9300" },{ 0x10DE0861, NV_SUB_IDS, "GeForce 9400" },{ 0x10DE0862, NV_SUB_IDS, "GeForce 9400M G" },{ 0x10DE0863, NV_SUB_IDS, "GeForce 9400M" },{ 0x10DE0864, NV_SUB_IDS, "GeForce 9300" },{ 0x10DE0865, NV_SUB_IDS, "GeForce 9300" },{ 0x10DE0866, NV_SUB_IDS, "GeForce 9400M G" },{ 0x10DE0867, NV_SUB_IDS, "GeForce 9400" },{ 0x10DE0868, NV_SUB_IDS, "nForce 760i SLI" },{ 0x10DE0869, NV_SUB_IDS, "GeForce 9400" },{ 0x10DE086A, NV_SUB_IDS, "GeForce 9400" },{ 0x10DE086C, NV_SUB_IDS, "GeForce 9300 / nForce 730i" },{ 0x10DE086D, NV_SUB_IDS, "GeForce 9200" },{ 0x10DE086E, NV_SUB_IDS, "GeForce 9100M G" },{ 0x10DE086F, NV_SUB_IDS, "GeForce 8200M G" },// 0870 - 087F{ 0x10DE0870, NV_SUB_IDS, "GeForce 9400M" },{ 0x10DE0871, NV_SUB_IDS, "GeForce 9200" },{ 0x10DE0872, NV_SUB_IDS, "GeForce G102M" },{ 0x10DE0873, NV_SUB_IDS, "GeForce G205M" },{ 0x10DE0874, NV_SUB_IDS, "ION 9300M" },{ 0x10DE0876, NV_SUB_IDS, "ION 9400M" },{ 0x10DE087A, NV_SUB_IDS, "GeForce 9400" },{ 0x10DE087D, NV_SUB_IDS, "ION 9400M" },{ 0x10DE087E, NV_SUB_IDS, "ION LE" },{ 0x10DE087F, NV_SUB_IDS, "ION LE" },// 0880 - 088F// 0890 - 089F// 08A0 - 08AF{ 0x10DE08A0, NV_SUB_IDS, "GeForce 320M" },// { 0x10DE08A1, NV_SUB_IDS, "NVIDIA MCP89-MZT" },{ 0x10DE08A2, NV_SUB_IDS, "GeForce 320M" },{ 0x10DE08A3, NV_SUB_IDS, "GeForce 320M" },{ 0x10DE08A4, NV_SUB_IDS, "GeForce 320M" },{ 0x10DE08A5, NV_SUB_IDS, "GeForce 320M" },// 08B0 - 08BF// { 0x10DE08B0, NV_SUB_IDS, "MCP83 MMD" },{ 0x10DE08B1, NV_SUB_IDS, "GeForce 300M" },// { 0x10DE08B2, NV_SUB_IDS, "NVIDIA MCP83-MJ" },// { 0x10DE08B3, NV_SUB_IDS, "NVIDIA MCP89 MM9" },// 08C0 - 08CF// 08D0 - 08DF// 08E0 - 08EF// 08F0 - 08FF// 0900 - 090F// 0910 - 091F// 0920 - 092F// 0930 - 093F// 0940 - 094F// 0950 - 095F// 0960 - 096F// 0970 - 097F// 0980 - 098F// 0990 - 099F// 09A0 - 09AF// 09B0 - 09BF// 09C0 - 09CF// 09D0 - 09DF// 09E0 - 09EF// 09F0 - 09FF// 0A00 - 0A0F// { 0x10DE0A00, NV_SUB_IDS, "NVIDIA GT212" },// 0A10 - 0A1F// { 0x10DE0A10, NV_SUB_IDS, "NVIDIA GT212" },// 0A20 - 0A2F{ 0x10DE0A20, NV_SUB_IDS, "GeForce GT 220" },// { 0x10DE0A21, NV_SUB_IDS, "NVIDIA D10M2-20" },{ 0x10DE0A22, NV_SUB_IDS, "GeForce 315" },{ 0x10DE0A23, NV_SUB_IDS, "GeForce 210" },{ 0x10DE0A26, NV_SUB_IDS, "GeForce 405" },{ 0x10DE0A27, NV_SUB_IDS, "GeForce 405" },{ 0x10DE0A28, NV_SUB_IDS, "GeForce GT 230M" },{ 0x10DE0A29, NV_SUB_IDS, "GeForce GT 330M" },{ 0x10DE0A2A, NV_SUB_IDS, "GeForce GT 230M" },{ 0x10DE0A2B, NV_SUB_IDS, "GeForce GT 330M" },{ 0x10DE0A2C, NV_SUB_IDS, "NVS 5100M" },{ 0x10DE0A2D, NV_SUB_IDS, "GeForce GT 320M" },// 0A30 - 0A3F{ 0x10DE0A30, NV_SUB_IDS, "GeForce GT 330M" },{ 0x10DE0A32, NV_SUB_IDS, "GeForce GT 415" },{ 0x10DE0A34, NV_SUB_IDS, "GeForce GT 240M" },{ 0x10DE0A35, NV_SUB_IDS, "GeForce GT 325M" },{ 0x10DE0A38, NV_SUB_IDS, "Quadro 400" },{ 0x10DE0A3C, NV_SUB_IDS, "Quadro FX 880M" },{ 0x10DE0A3D, NV_SUB_IDS, "NVIDIA N10P-ES" },// { 0x10DE0A3F, NV_SUB_IDS, "NVIDIA GT216-INT" },// 0A40 - 0A4F// 0A50 - 0A5F// 0A60 - 0A6F{ 0x10DE0A60, NV_SUB_IDS, "GeForce G210" },// { 0x10DE0A61, NV_SUB_IDS, "NVIDIA NVS 2100" },{ 0x10DE0A62, NV_SUB_IDS, "GeForce 205" },{ 0x10DE0A63, NV_SUB_IDS, "GeForce 310" },{ 0x10DE0A64, NV_SUB_IDS, "ION" },{ 0x10DE0A65, NV_SUB_IDS, "GeForce 210" },{ 0x10DE0A66, NV_SUB_IDS, "GeForce 310" },{ 0x10DE0A67, NV_SUB_IDS, "GeForce 315" },{ 0x10DE0A68, NV_SUB_IDS, "GeForce G105M" },{ 0x10DE0A69, NV_SUB_IDS, "GeForce G105M" },{ 0x10DE0A6A, NV_SUB_IDS, "NVS 2100M" },{ 0x10DE0A6C, NV_SUB_IDS, "NVS 3100M" },{ 0x10DE0A6E, NV_SUB_IDS, "GeForce 305M" },{ 0x10DE0A6F, NV_SUB_IDS, "ION" },// 0A70 - 0A7F{ 0x10DE0A70, NV_SUB_IDS, "GeForce 310M" },{ 0x10DE0A71, NV_SUB_IDS, "GeForce 305M" },{ 0x10DE0A72, NV_SUB_IDS, "GeForce 310M" },{ 0x10DE0A73, NV_SUB_IDS, "GeForce 305M" },{ 0x10DE0A74, NV_SUB_IDS, "GeForce G210M" },{ 0x10DE0A75, NV_SUB_IDS, "GeForce G310M" },{ 0x10DE0A76, NV_SUB_IDS, "ION" },{ 0x10DE0A78, NV_SUB_IDS, "Quadro FX 380 LP" },// { 0x10DE0A79, NV_SUB_IDS, "N12M-NS-S" },{ 0x10DE0A7A, NV_SUB_IDS, "GeForce 315M" },{ 0x10DE0A7B, NV_SUB_IDS, "GeForce 505" },{ 0x10DE0A7C, NV_SUB_IDS, "Quadro FX 380M" },// { 0x10DE0A7D, NV_SUB_IDS, "NVIDIA GT218-ES" },// { 0x10DE0A7E, NV_SUB_IDS, "NVIDIA GT218-INT-S" },// { 0x10DE0A7F, NV_SUB_IDS, "NVIDIA GT218-INT-B" },// 0A80 - 0A8F// 0A90 - 0A9F// 0AA0 - 0AAF// 0AB0 - 0ABF// 0AC0 - 0ACF// 0AD0 - 0ADF// 0AE0 - 0AEF// 0AF0 - 0AFF// 0B00 - 0B0F// 0B10 - 0B1F// 0B20 - 0B2F// 0B30 - 0B3F// 0B40 - 0B4F// 0B50 - 0B5F// 0B60 - 0B6F// 0B70 - 0B7F// 0B80 - 0B8F// 0B90 - 0B9F// 0BA0 - 0BAF// 0BB0 - 0BBF// 0BC0 - 0BCF// 0BD0 - 0BDF// 0BE0 - 0BEF// 0BF0 - 0BFF// 0C00 - 0C0F// 0C10 - 0C1F// 0C20 - 0C2F// 0C30 - 0C3F// 0C40 - 0C4F// 0C50 - 0C5F// 0C60 - 0C6F// 0C70 - 0C7F// 0C80 - 0C8F// 0C90 - 0C9F// 0CA0 - 0CAF{ 0x10DE0CA0, NV_SUB_IDS, "GeForce GT 330 " },{ 0x10DE0CA2, NV_SUB_IDS, "GeForce GT 320" },{ 0x10DE0CA3, NV_SUB_IDS, "GeForce GT 240" },{ 0x10DE0CA4, NV_SUB_IDS, "GeForce GT 340" },{ 0x10DE0CA5, NV_SUB_IDS, "GeForce GT 220" },{ 0x10DE0CA7, NV_SUB_IDS, "GeForce GT 330" },{ 0x10DE0CA8, NV_SUB_IDS, "GeForce GTS 260M" },{ 0x10DE0CA9, NV_SUB_IDS, "GeForce GTS 250M" },{ 0x10DE0CAC, NV_SUB_IDS, "GeForce GT 220" },// { 0x10DE0CAD, NV_SUB_IDS, "NVIDIA N10E-ES" },// { 0x10DE0CAE, NV_SUB_IDS, "NVIDIA GT215-INT" },{ 0x10DE0CAF, NV_SUB_IDS, "GeForce GT 335M" },// 0CB0 - 0CBF{ 0x10DE0CB0, NV_SUB_IDS, "GeForce GTS 350M" },{ 0x10DE0CB1, NV_SUB_IDS, "GeForce GTS 360M" },{ 0x10DE0CBC, NV_SUB_IDS, "Quadro FX 1800M" },// 0CC0 - 0CCF// 0CD0 - 0CDF// 0CE0 - 0CEF// 0CF0 - 0CFF// 0D00 - 0D0F// 0D10 - 0D1F// 0D20 - 0D2F// 0D30 - 0D3F// 0D40 - 0D4F// 0D50 - 0D5F// 0D60 - 0D6F// 0D70 - 0D7F// 0D80 - 0D8F// 0D90 - 0D9F// 0DA0 - 0DAF// 0DB0 - 0DBF// 0DC0 - 0DCF{ 0x10DE0DC0, NV_SUB_IDS, "GeForce GT 440" },// { 0x10DE0DC1, NV_SUB_IDS, "D12-P1-35" },// { 0x10DE0DC2, NV_SUB_IDS, "D12-P1-35" },{ 0x10DE0DC4, NV_SUB_IDS, "GeForce GTS 450" },{ 0x10DE0DC5, NV_SUB_IDS, "GeForce GTS 450" },{ 0x10DE0DC6, NV_SUB_IDS, "GeForce GTS 450" },// { 0x10DE0DCA, NV_SUB_IDS, "GF10x" },// { 0x10DE0DCC, NV_SUB_IDS, "N12E-GS" },{ 0x10DE0DCD, NV_SUB_IDS, "GeForce GT 555M" },{ 0x10DE0DCE, NV_SUB_IDS, "GeForce GT 555M" },// { 0x10DE0DCF, NV_SUB_IDS, "N12P-GT-B" },// 0DD0 - 0DDF// { 0x10DE0DD0, NV_SUB_IDS, "N11E-GT" },{ 0x10DE0DD1, NV_SUB_IDS, "GeForce GTX 460M" },{ 0x10DE0DD2, NV_SUB_IDS, "GeForce GT 445M" },{ 0x10DE0DD3, NV_SUB_IDS, "GeForce GT 435M" },{ 0x10DE0DD6, NV_SUB_IDS, "GeForce GT 550M" },{ 0x10DE0DD8, NV_SUB_IDS, "Quadro 2000" },{ 0x10DE0DDA, NV_SUB_IDS, "Quadro 2000M" },{ 0x10DE0DDE, NV_SUB_IDS, "GF106-ES" },// { 0x10DE0DDF, NV_SUB_IDS, "GF106-INT" },// 0DE0 - 0DEF{ 0x10DE0DE0, NV_SUB_IDS, "GeForce GT 440" },{ 0x10DE0DE1, NV_SUB_IDS, "GeForce GT 430" },{ 0x10DE0DE2, NV_SUB_IDS, "GeForce GT 420" },{ 0x10DE0DE3, NV_SUB_IDS, "GeForce GT 635M" },{ 0x10DE0DE4, NV_SUB_IDS, "GeForce GT 520" },{ 0x10DE0DE5, NV_SUB_IDS, "GeForce GT 530" },{ 0x10DE0DE8, NV_SUB_IDS, "GeForce GT 620M" },{ 0x10DE0DE9, NV_SUB_IDS, "GeForce GT 630M" },{ 0x10DE0DEA, NV_SUB_IDS, "GeForce GT 610M" },{ 0x10DE0DEB, NV_SUB_IDS, "GeForce GT 555M" },{ 0x10DE0DEC, NV_SUB_IDS, "GeForce GT 525M" },{ 0x10DE0DED, NV_SUB_IDS, "GeForce GT 520M" },{ 0x10DE0DEE, NV_SUB_IDS, "GeForce GT 415M" },{ 0x10DE0DEF, NV_SUB_IDS, "N13P-NS1-A1" },// 0DF0 - 0DFF{ 0x10DE0DF0, NV_SUB_IDS, "GeForce GT 425M" },{ 0x10DE0DF1, NV_SUB_IDS, "GeForce GT 420M" },{ 0x10DE0DF2, NV_SUB_IDS, "GeForce GT 435M" },{ 0x10DE0DF3, NV_SUB_IDS, "GeForce GT 420M" },{ 0x10DE0DF4, NV_SUB_IDS, "GeForce GT 540M" },{ 0x10DE0DF5, NV_SUB_IDS, "GeForce GT 525M" },{ 0x10DE0DF6, NV_SUB_IDS, "GeForce GT 550M" },{ 0x10DE0DF7, NV_SUB_IDS, "GeForce GT 520M" },{ 0x10DE0DF8, NV_SUB_IDS, "Quadro 600" },{ 0x10DE0DF9, NV_SUB_IDS, "Quadro 500M" },{ 0x10DE0DFA, NV_SUB_IDS, "Quadro 1000M" },{ 0x10DE0DFC, NV_SUB_IDS, "NVS 5200M" },{ 0x10DE0DFE, NV_SUB_IDS, "GF108 ES" },// { 0x10DE0DFF, NV_SUB_IDS, "GF108 INT" },// 0E00 - 0E0F// 0E10 - 0E1F// 0E20 - 0E2F{ 0x10DE0E21, NV_SUB_IDS, "D12U-25" },{ 0x10DE0E22, NV_SUB_IDS, "GeForce GTX 460" },{ 0x10DE0E23, NV_SUB_IDS, "GeForce GTX 460 SE" },{ 0x10DE0E24, NV_SUB_IDS, "GeForce GTX 460" },// { 0x10DE0E25, NV_SUB_IDS, "D12U-50" },{ 0x10DE0E28, NV_SUB_IDS, "GeForce GTX 460" },// 0E30 - 0E3F{ 0x10DE0E30, NV_SUB_IDS, "GeForce GTX 470M" },{ 0x10DE0E31, NV_SUB_IDS, "GeForce GTX 485M" },// { 0x10DE0E32, NV_SUB_IDS, "N12E-GT" },{ 0x10DE0E38, NV_SUB_IDS, "GF104GL" },{ 0x10DE0E3A, NV_SUB_IDS, "Quadro 3000M" },{ 0x10DE0E3B, NV_SUB_IDS, "Quadro 4000M" },// { 0x10DE0E3E, NV_SUB_IDS, "GF104-ES" },// { 0x10DE0E3F, NV_SUB_IDS, "GF104-INT" },// 0E40 - 0E4F// 0E50 - 0E5F// 0E60 - 0E6F// 0E70 - 0E7F// 0E80 - 0E8F// 0E90 - 0E9F// 0EA0 - 0EAF// 0EB0 - 0EBF// 0EC0 - 0ECF// 0ED0 - 0EDF// 0EE0 - 0EEF// 0EF0 - 0EFF// 0F00 - 0F0F{ 0x10DE0F00, NV_SUB_IDS, "GeForce GT 630" },{ 0x10DE0F01, NV_SUB_IDS, "GeForce GT 620" },// 0F10 - 0F1F// 0F20 - 0F2F// 0F30 - 0F3F// 0F40 - 0F4F// 0F50 - 0F5F// 0F60 - 0F6F// 0F70 - 0F7F// 0F80 - 0F8F// 0F90 - 0F9F// 0FA0 - 0FAF// 0FB0 - 0FBF// 0FC0 - 0FCF{ 0x10DE0FC0, NV_SUB_IDS, "GeForce GT 640" },{ 0x10DE0FC1, NV_SUB_IDS, "GeForce GT 640" },{ 0x10DE0FC2, NV_SUB_IDS, "GeForce GT 630" },// 0FD0 - 0FDF{ 0x10DE0FD1, NV_SUB_IDS, "GeForce GT 650M" },{ 0x10DE0FD2, NV_SUB_IDS, "GeForce GT 640M" },{ 0x10DE0FD3, NV_SUB_IDS, "GeForce GT 640M LE" },{ 0x10DE0FD4, NV_SUB_IDS, "GeForce GTX 660M" },{ 0x10DE0FD5, NV_SUB_IDS, "GeForce GT 650M" },{ 0x10DE0FDB, NV_SUB_IDS, "GK107-ESP-A1" },// 0FE0 - 0FEF{ 0x10DE0FE0, NV_SUB_IDS, "GeForce GTX 660M" },// 0FF0 - 0FFF{ 0x10DE0FFB, NV_SUB_IDS, "Quadro K2000M" },{ 0x10DE0FFC, NV_SUB_IDS, "Quadro K1000M" },{ 0x10DE0FFF, NV_SUB_IDS, "Quadro 410" },// 1000 - 100F// 1010 - 101F// 1020 - 102F// 1030 - 103F// 1040 - 104F{ 0x10DE1040, NV_SUB_IDS, "GeForce GT 520" },// { 0x10DE1041, NV_SUB_IDS, "D13M1-45" },{ 0x10DE1042, NV_SUB_IDS, "GeForce 510" },{ 0x10DE1048, NV_SUB_IDS, "GeForce 605" },{ 0x10DE1049, NV_SUB_IDS, "GeForce GT 620" },{ 0x10DE104A, NV_SUB_IDS, "GeForce GT 610" },// 1050 - 105F{ 0x10DE1050, NV_SUB_IDS, "GeForce GT 520M" },{ 0x10DE1051, NV_SUB_IDS, "GeForce GT 520MX" },{ 0x10DE1052, NV_SUB_IDS, "GeForce GT 520M" },{ 0x10DE1054, NV_SUB_IDS, "GeForce GT 410M" },{ 0x10DE1055, NV_SUB_IDS, "GeForce 410M" },{ 0x10DE1056, NV_SUB_IDS, "Quadro NVS 4200M" },{ 0x10DE1057, NV_SUB_IDS, "Quadro NVS 4200M" },{ 0x10DE1058, NV_SUB_IDS, "GeForce 610M" },{ 0x10DE1059, NV_SUB_IDS, "GeForce 610M" },{ 0x10DE105A, NV_SUB_IDS, "GeForce 610M" },// 1060 - 106F// 1070 - 107F{ 0x10DE107D, NV_SUB_IDS, "NVS 310" },// { 0x10DE107E, NV_SUB_IDS, "GF119-INT" },// { 0x10DE107F, NV_SUB_IDS, "GF119-ES" },// 1080 - 108F{ 0x10DE1080, NV_SUB_IDS, "GeForce GTX 580" },{ 0x10DE1081, NV_SUB_IDS, "GeForce GTX 570" },{ 0x10DE1082, NV_SUB_IDS, "GeForce GTX 560 Ti" },{ 0x10DE1083, NV_SUB_IDS, "D13U" },{ 0x10DE1084, NV_SUB_IDS, "GeForce GTX 560" },{ 0x10DE1086, NV_SUB_IDS, "GeForce GTX 570" },{ 0x10DE1087, NV_SUB_IDS, "GeForce GTX 560 Ti-448" },{ 0x10DE1088, NV_SUB_IDS, "GeForce GTX 590" },{ 0x10DE1089, NV_SUB_IDS, "GeForce GTX 580" },{ 0x10DE108B, NV_SUB_IDS, "GeForce GTX 590" },// { 0x10DE108C, NV_SUB_IDS, "D13U" },{ 0x10DE108E, NV_SUB_IDS, "Tesla C2090" },// 1090 - 109F{ 0x10DE1091, NV_SUB_IDS, "nVidia Tesla M2090" },{ 0x10DE1094, NV_SUB_IDS, "Tesla M2075 Dual-Slot Computing Processor Module" },{ 0x10DE1096, NV_SUB_IDS, "Tesla C2075" },{ 0x10DE1098, NV_SUB_IDS, "D13U" },{ 0x10DE109A, NV_SUB_IDS, "Quadro 5010M" },{ 0x10DE109B, NV_SUB_IDS, "Quadro 7000" },// 10A0 - 10AF// 10B0 - 10BF// 10C0 - 10CF{ 0x10DE10C0, NV_SUB_IDS, "GeForce 9300 GS" },{ 0x10DE10C3, NV_SUB_IDS, "GeForce 8400 GS" },{ 0x10DE10C4, NV_SUB_IDS, "NVIDIA ION" },{ 0x10DE10C5, NV_SUB_IDS, "GeForce 405" },// 10D0 - 10DF{ 0x10DE10D8, NV_SUB_IDS, "NVS 300" },// 10E0 - 10EF// 10F0 - 10FF// 1100 - 110F// 1110 - 111F// 1120 - 112F// 1130 - 113F// 1140 - 114F{ 0x10DE1140, NV_SUB_IDS, "GeForce GT 610M" },{ 0x10DE1141, NV_SUB_IDS, "GeForce 610M" },{ 0x10DE1142, NV_SUB_IDS, "GeForce 620M" },// { 0x10DE1143, NV_SUB_IDS, "N13P-GV" },// { 0x10DE1144, NV_SUB_IDS, "GF117" },// { 0x10DE1145, NV_SUB_IDS, "GF117" },// { 0x10DE1146, NV_SUB_IDS, "GF117" },// { 0x10DE1147, NV_SUB_IDS, "GF117" },// { 0x10DE1149, NV_SUB_IDS, "GF117-ES" },// { 0x10DE114A, NV_SUB_IDS, "GF117-INT" },// { 0x10DE114B, NV_SUB_IDS, "PCI-GEN3-B" },// 1150 - 115F// 1160 - 116F// 1170 - 117F// 1180 - 118F{ 0x10DE1180, NV_SUB_IDS, "GeForce GTX 680" },{ 0x10DE1185, NV_SUB_IDS, "GeForce GTX 660" },{ 0x10DE1188, NV_SUB_IDS, "GeForce GTX 690" },{ 0x10DE1189, NV_SUB_IDS, "GeForce GTX 670" },// 1190 - 119F// 11A0 - 11AF// 11B0 - 11BF// 11C0 - 11CF// 11D0 - 11DF// 11E0 - 11EF// 11F0 - 11FF// 1200 - 120F{ 0x10DE1200, NV_SUB_IDS, "GeForce GTX 560 Ti" },{ 0x10DE1201, NV_SUB_IDS, "GeForce GTX 560" },{ 0x10DE1202, NV_SUB_IDS, "GeForce GTX 560 Ti" },{ 0x10DE1203, NV_SUB_IDS, "GeForce GTX 460 SE v2" },{ 0x10DE1205, NV_SUB_IDS, "GeForce GTX 460 v2" },{ 0x10DE1206, NV_SUB_IDS, "GeForce GTX 555" },{ 0x10DE1207, NV_SUB_IDS, "GeForce GT 645" },{ 0x10DE1208, NV_SUB_IDS, "GeForce GTX 560 SE" },{ 0x10DE1210, NV_SUB_IDS, "GeForce GTX 570M" },{ 0x10DE1211, NV_SUB_IDS, "GeForce GTX 580M" },{ 0x10DE1212, NV_SUB_IDS, "GeForce GTX 675M" },{ 0x10DE1213, NV_SUB_IDS, "GeForce GTX 670M" },{ 0x10DE1240, NV_SUB_IDS, "GeForce GT 620M" },{ 0x10DE1241, NV_SUB_IDS, "GeForce GT 545" },{ 0x10DE1243, NV_SUB_IDS, "GeForce GT 545" },{ 0x10DE1244, NV_SUB_IDS, "GeForce GTX 550 Ti" },{ 0x10DE1245, NV_SUB_IDS, "GeForce GTS 450" },{ 0x10DE1246, NV_SUB_IDS, "GeForce GTX 550M" },{ 0x10DE1247, NV_SUB_IDS, "GeForce GT 635M" },{ 0x10DE1248, NV_SUB_IDS, "GeForce GTX 555M" },{ 0x10DE1249, NV_SUB_IDS, "GeForce GTS 450M" }, // no M?{ 0x10DE124B, NV_SUB_IDS, "GeForce GT 640" },{ 0x10DE124D, NV_SUB_IDS, "GeForce GTX 555M" },// { 0x10DE1250, NV_SUB_IDS, "GF116-INT" },{ 0x10DE1251, NV_SUB_IDS, "GeForce GTX 560M" },// 1260 - 126F// 1270 - 127F// 1280 - 128F// 1290 - 129F// 12A0 - 12AF// 12B0 - 12BF// 12C0 - 12CF// 12D0 - 12DF// 12E0 - 12EF// 12F0 - 12FF}; B. How to find your own graphics card hardware matching device ID number using Windows :1. Open Device Manager using:In Windows XP:Control Panel >>>> System >>>> Hardware >>>> Device ManagerControl Panel >>>> Administrative Tools >>>> Computer Management >>>> Device ManagerIn Windows Vista:Control Panel >>>> Classic View >>>> Device ManagerControl Panel >>>> Default View >>>> System and Maintenance >>>> Device ManagerIn Windows 7:Control Panel >>>>> View By: either Large or Small icons >>>> Device ManagerControl Panel >>>>> View By: Category >>>> Hardware and Sound >>>> Devices and Printers >>>> Device ManagerAlternatively, in XP, Vista or Windows7, in the Run/Start search/Search programs and files box type devmgmt.msc., and additionally, for Vista and Windows7, in the Programs pop-up window, select and click on devmgmt.msc.2. In Device Manager window go to Display adapters and either click on the active triangle or + tab or double-click on the Display adapters icon.....your graphics card(s) icon(s) should appear3. Right-click on the graphics card icon and in the pop-up window that appears select Properties4. In the Properties pop-up window >>>> Details tab >>>> Property drop-down menu >>>> Matching device idAn alphanumeric string like pci\ven_10de&dev_0614 gives the information required......the complete hardware matching device ID number has two components:Vendor ID number (prefixed with VEN)Device ID number (prefixed with DEV)In the example above, the Vendor ID is 10de and the Device ID is 0614.....C. How to find your own graphics card hardware matching device ID number using OS X:This can be done from OS X as follows, depending on which version of OS X you are running on your OSX86 (Hackintosh) PC:Install and run DPCIManager v0.3 by AnV (and cparm for resizeable window), which has versions that run on Tiger, Leopard, and Snow Leopard (Snow Leopard version works in Mountain Lion and Lion too): DPCIManager v0.3 AnV_cparm.zipThe DPCIManager output is in the following form:10de:0614 nVidia Corporation G92 [GeForce 9800 GT] but unfortunately the output can only be saved as a "window capture" using Grab....Alternatively, install the lspci port to Snow Leopard by the EvOX86 Team, lspci V1.1.pkg (which works in Lion too):lspci V1.1.zipand in Terminal typelspci -nnThe Terminallspci -nn command output is in the following form:01:00.0 VGA compatible controller [0300]: nVidia Corporation G92 [GeForce 9800 GT] [10de:0614] (rev a2)which can be very usefully copied/saved/exported as a text file.......D. Relevant nVidia graphics kexts in OS X Mountain Lion (and OS X Lion and OS X Snow Leopard):In OS X Mountain Lion, the nVidia graphics kexts are:GeForce.kextNVDAGF100Hal.kextNVDAGK100Hal.kextNVDANV50Hal.kextNVDAResman.kextNVSMU.kextwhereas in OS X Lion, they are:GeForce.kextGeForce7xxx.kextNVDAGF100Hal.kextNVDANV40HalG7xxx.kextNVDANV50Hal.kextNVDAResman.kextNVDAResmanG7xxx.kextNVSMU.kextwhereas in Snow Leopard, they are:GeForce.kextNVDANV40Hal.kextNVDANV50Hal.kextNVDAResman.kextNVSMU.kext.......the older NVDANV10Hal, NVDANV20Hal, NVDANV30Hal, GeForce7xxx, NVDANV40HalG7xxx, and NVDAResmanG7xxx kexts are not present in Mountain Lion (having already been removed from Snow Leopard and/or Lion).E. nVidia graphics kexts functions :Mountain Lion GeForce.kext - enables CI/QE support for GeForce graphics cards (excluding in OS X Lion the same graphics cards as identified by NVDANV40HalG7xxx.kext in OS X Lion and NVDANV40Hal.kext in OS X Snow Leopard )GeForce7xxx.kext - enables CI/QE support in OS X Lion for the same graphics cards as identified by NVDANV40HalG7xxx.kext in OS X Lion and NVDANV40Hal.kext in OS X Snow LeopardMountain Lion NVDAGF100Hal.kext - provides support for nVidia graphics cards with hardware matching device ID numbers falling within its specified device ID & mask ID range under <key>IOPCIPrimaryMatch</key>Mountain Lion NVDAGF100Hal.kext - provides support for nVidia graphics cards with hardware matching device ID numbers falling within its specified device ID & mask ID range under <key>IOPCIPrimaryMatch</key>NVDANV40HalG7xxx.kext - provides support in OS X Lion for the same nVidia GeForce graphics cards with hardware matching device ID numbers falling within the specified device ID & mask ID range under <key>IOPCIPrimaryMatch</key> in NVDANV40Hal.kextNVDANV50Hal.kext - provides support for nVidia graphics cards with hardware matching device ID numbers falling within its specified device ID & mask ID range under <key>IOPCIPrimaryMatch</key>NVDANV40Hal.kext - provides support in OS X Snow Leopard for nVidia graphics cards with hardware matching device ID numbers falling within its specified device ID & mask ID range under <key>IOPCIPrimaryMatch</key>Mountain Lion NVDAResman.kext - provides display resolution change management for GeForce graphics cards (excluding in OS X Lion the same graphics cards as identified by NVDANV40HalG7xxx.kext in OS X Lion and NVDANV40Hal.kext in OS X Snow Leopard )NVDAResmanG7xxx.kext - provides display resolution change management in OS X Lion for the same graphics cards as identified by NVDANV40HalG7xxx.kext in OS X Lion and NVDANV40Hal.kext in OS X Snow LeopardNVSMU.kext - provides firmware matching in a personality by specifying a value for the IONameMatch key, specifically:pci10de,aa3 = nVidia Corporation MCP79 Co-processorpci10de,7da = NVIDIA nForce System Management ControllerThus, quoting for a real Mac: Open Firmware Matching A PCI device driver can use Open Firmware matching in a personality by specifying a value for the IONameMatch key. The value is either a single string or an array of strings, which are compared against the values for the Open Firmware device properties name, compatible, device_type, or model.If any of the values for the IONameMatch key match any of the Open Firmware properties, the match is considered a success and an instance of the driver is created for the personality. The name that resulted in a match is stored as a property in the driver’s I/O Registry entry in the IONameMatched key (kIONameMatchedKey). For more information on name matching, you should consult the documentation for the IOService class.F. Understanding the device ID register and mask ID relationship in the <key>IOPCIPrimaryMatch</key> entry of the NVDAGF100Hal.kext, NVDAGK100Hal.kext, NVDANV40HalG7xxx.kext, NVDANV50Hal.kext and NVDANV40Hal.kext (and also older NVDANVxxHal.kexts used in pre-Snow Leopard OS X versions)In all these kexts, the Info.plist file will have in the <string></string> for <key>IOPCIPrimaryMatch</key> an array of strings:NVDAGF100HAL<key>IOPCIPrimaryMatch</key><string>0x06c010de&0xffe0ffff0x0dc010de&0xffc0ffff0x0e2010de&0xffe0ffff0x0ee010de&0xffe0ffff0x0f0010de&0xffc0ffff0x104010de&0xffc0ffff0x124010de&0xffc0ffff</string>NVDAGK100HAL<key>IOPCIPrimaryMatch</key><string>0x0fc010de&0xffc0ffff0x118010de&0xffc0ffff0x11c010de&0xffc0ffff</string>NVDANV40HALG7xxx<key>IOPCIPrimaryMatch</key><string>0x004010de&0xfff0ffff0x00f010de&0xfff0ffff0x022010de&0xfff0ffff0x014010de&0xfff0ffff0x016010de&0xfff0ffff0x009010de&0xfff0ffff0x01d010de&0xfff0ffff0x039010de&0xfff0ffff0x029010de&0xfff0ffff</string>NVDANV50HAL<key>IOPCIPrimaryMatch</key><string>0x00f010de&0xfff0ffff0x019010de&0xfff0ffff0x040010de&0xfff0ffff0x042010de&0xfff0ffff0x05e010de&0xfff8ffff0x05f010de&0xfff0ffff0x060010de&0xffe0ffff0x062010de&0xffe0ffff0x064010de&0xffe0ffff0x06e010de&0xfff0ffff0x086010de&0xffe0ffff0x08a010de&0xffe0ffff0x0a2010de&0xffa0ffff0x0ca010de&0xffe0ffff</string>NVDANV40HAL<key>IOPCIPrimaryMatch</key><string>0x004010de&0xfff0ffff0x00f010de&0xfff0ffff0x022010de&0xfff0ffff0x014010de&0xfff0ffff0x016010de&0xfff0ffff0x009010de&0xfff0ffff0x01d010de&0xfff0ffff0x039010de&0xfff0ffff0x029010de&0xfff0ffff</string>so, now to the explanations:1. Meaning of &The mask ID is attached to the device ID register value using the bitwise AND operator, which is a single ampersand& However, the bitwise AND operator must be encoded as& in XML if you are editing it directly as a XML Property List file, e.g. using TextEdit, Textmate, TextWrangler, Dashcode etc. If you are using Xcode or Property List Editor, the & escape is represented simply as an ampersand (&). Thus, the device ID register value and the mask ID taken together via the bitwise AND operator.2. Meaning of 0xffe0ffff, 0xffc0ffff, 0xfff0ffff, 0xfff8ffff, 0xffa0ffff0xffe0ffff, 0xffc0ffff, 0xfff0ffff, 0xfff8ffff, 0xffa0ffff are mask IDs......simply put, they specify what range of device IDs related to the pivotal device ID register can be loaded by the kext, or as Krazubu says, "it is the 'tolerancy' of the device ID"Thus, matching the device ID overhead the mask ID:0x 06 c0 10 de0x ff e0 ff ff0x 0d c0 10 de0x ff c0 ff ff0x 00 40 10 de0x ff f0 ff ff0x 05 e0 10 de0x ff f8 ff ff0x 0a 20 10 de0x ff a0 ff ffthe scheme becomes clearer:f - keep the same hexadecimal value as the pivotal device ID register digit value0 - can be any hexadecimal value from 0 1 2 3 4 5 6 7 8 9 a b c d e fa - can be +/- 1 or +/- 2 or +/- 3 or +/- 4 or +/- 5 value-steps added to the pivotal device ID register digit valueb - can be +/- 1 or +/- 2 or +/- 3 or +/- 4 value-steps added to the pivotal device ID register digit valuec - can be +/- 1 or +/- 2 or +/- 3 value-steps added to the pivotal device ID register digit valued - can be +/- 1 or +/- 2 value-steps added to the pivotal device ID register digit valuee - can be +/- 1 value-step added to the pivotal device ID register digit value8 - can be any hexadecimal value from 0 1 2 3 4 5 6 7 8Thus, for example, in:0x06c010de&0xffe0ffff, c could be replaced by b or d, and 0 by any one of 1 2 3 4 5 6 7 8 9 a b c d e f0x0e2010de&0xffe0ffff, 2 could be replaced by 1 or 3, and 0 by any one of 1 2 3 4 5 6 7 8 9 a b c d e f0x0dc010de&0xffc0ffff, c could be replaced by 9 or a or b or d or e or f, and 0 by any one of 1 2 3 4 5 6 7 8 9 a b c d e f0x124010de&0xffc0ffff, 4 could be replaced by 1 or 2 or 3 or 5 or 6 or 7, and 0 by any one of 1 2 3 4 5 6 7 8 9 a b c d e f0x0f0010de&0xffc0ffff, 0 could be replaced by 1 or 2 or 3, and 0 by any one of 1 2 3 4 5 6 7 8 9 a b c d e f (Could/would 0 here be replaced f or e or d as the - 1 or - 2 or - 3 value-steps......?)My understanding as expressed above is based on my study of the list compiled by thorzine74, but I am happy to be corrected on this, as I want learn and have the correct understanding.....thorzine74 compiled the following list of what NVIDIA GPUs are supported in Snow Leopard 10.6.1 according to kexts, whose thinking was that it could be useful to know what is supported and what is not. It does not mean it should work, it just means their device IDs are recognized by the kexts, so with a proper injector method (kext, EFI string, DSDT modding, Chameleon with GraphicsEnabley = Yes) it may work.List of NVIDIA GPUs supported in Snow Leopard 10.6.1:The list is formatted as:Device id mask:Code: Device-id Core [Chipset name]Chipsets Supported by NVDANV40Hal.kext [v1.6.2.35 (18.6.5f11)]:0x004010de&0xfff0ffffCode: 0040 NV40 [GeForce 6800 Ultra] 0041 NV40 [GeForce 6800] 0042 NV40.2 [GeForce 6800 LE] 0043 NV40.3 [GeForce 6800 XE] 0044 NV40 [GeForce 6800 XT] 0045 NV40 [GeForce 6800 GT] 0046 NV45 [GeForce 6800 GT] 0047 NV40 [GeForce 6800 GS] 0048 NV40 [GeForce 6800 XT] 0049 NV40GL 004d NV40GL [Quadro FX 4000] 004e NV40GL [Quadro FX 4000]0x00f010de&0xfff0ffffCode: 00f0 NV40 [GeForce 6800 Ultra] 00f1 NV43 [GeForce 6600 GT] 00f2 NV43 [GeForce 6600] 00f3 NV43 [GeForce 6200] 00f4 NV43 [GeForce 6600 LE] 00f5 G70 [GeForce 7800 GS] 00f6 NV43 [GeForce 6800 GS] 00f8 NV45GL [Quadro FX 3400/4400] 00f9 NV45 [GeForce 6800 GTO] 00fa NV36 [GeForce PCX 5750] 00fb NV35 [GeForce PCX 5900] 00fc NV37GL [Quadro FX 330/GeForce PCX 5300] 00fd NV37GL [Quadro PCI-E Series] 00fe NV38GL [Quadro FX 1300] 00ff NV18 [GeForce PCX 4300]0x022010de&0xfff0ffffCode: 0221 NV44A [GeForce 6200] 0222 NV44 [GeForce 6200 A-LE]0x014010de&0xfff0ffffCode: 0140 NV43 [GeForce 6600 GT] 0141 NV43 [GeForce 6600] 0142 NV43 [GeForce 6600 LE] 0143 NV43 [GeForce 6600 VE] 0144 NV43 [GeForce Go 6600] 0145 NV43 [GeForce 6610 XL] 0146 NV43 [Geforce Go 6600TE/6200TE] 0147 NV43 [GeForce 6700 XL] 0148 NV43 [GeForce Go 6600] 0149 NV43 [GeForce Go 6600 GT] 014a NV43 [Quadro NVS 440] 014c NV43 [Quadro FX 540 MXM] 014d NV43GL [Quadro FX 550] 014e NV43GL [Quadro FX 540] 014f NV43 [GeForce 6200]0x016010de&0xfff0ffffCode: 0160 NV44 [GeForce 6500] 0161 NV44 [GeForce 6200 TurboCache™] 0162 NV44 [GeForce 6200SE TurboCache ™] 0163 NV44 [GeForce 6200 LE] 0164 NV44 [GeForce Go 6200] 0165 NV44 [Quadro NVS 285] 0166 NV43 [GeForce Go 6400] 0167 NV43 [GeForce Go 6200/6400] 0168 NV43 [GeForce Go 6200/6400] 0169 NV44 [GeForce 6250] 016a NV44 [GeForce 7100 GS]0x009010de&0xfff0ffffCode: 0090 G70 [GeForce 7800 GTX] 0091 G70 [GeForce 7800 GTX] 0092 G70 [GeForce 7800 GT] 0093 G70 [GeForce 7800 GS] 0095 G70 [GeForce 7800 SLI] 0098 G70 [GeForce Go 7800] 0099 G70 [GeForce Go 7800 GTX] 009d G70GL [Quadro FX 4500]0x01d010de&0xfff0ffffCode: 01d0 G72 [GeForce 7350 LE] 01d1 G72 [GeForce 7300 LE] 01d3 G72 [GeForce 7300 SE/7200 GS] 01d6 G72M [GeForce Go 7200] 01d7 G72M [Quadro NVS 110M/GeForce Go 7300] 01d8 G72M [GeForce Go 7400] 01da G72M [Quadro NVS 110M] 01db G72M [Quadro NVS 120M] 01dc G72GL [Quadro FX 350M] 01dd G72 [GeForce 7500 LE] 01de G72GL [Quadro FX 350] 01df G71 [GeForce 7300 GS]0x039010de&0xfff0ffffCode: 0390 G73 [GeForce 7650 GS] 0391 G73 [GeForce 7600 GT] 0392 G73 [GeForce 7600 GS] 0393 G73 [GeForce 7300 GT] 0394 G73 [GeForce 7600 LE] 0395 G73 [GeForce 7300 GT] 0397 G73 [GeForce Go 7700] 0398 G73 [GeForce Go 7600] 0399 G73 [GeForce Go 7600 GT] 039b G73 [GeForce Go 7900 SE] 039c Quadro FX 550M 039e G73GL [Quadro FX 560]0x029010de&0xfff0ffffCode: 0290 G71 [GeForce 7900 GTX] 0291 G71 [GeForce 7900 GT/GTO] 0292 G71 [GeForce 7900 GS] 0293 G71 [GeForce 7900 GX2] 0294 G71 [GeForce 7950 GX2] 0295 G71 [GeForce 7950 GT] 0297 G71 [GeForce Go 7950 GTX] 0298 G71 [GeForce Go 7900 GS] 0299 G71 [GeForce Go 7900 GTX] 029a G71 [Quadro FX 2500M] 029b G71 [Quadro FX 1500M] 029c G71 [Quadro FX 5500] 029d G71GL [Quadro FX 3500] 029e G71 [Quadro FX 1500] 029f G70 [Quadro FX 4500 X2]Chipsets supported by NVDANV50Hal.kext [v1.6.2.35 (18.6.5f11)]:0x00f010de&0xfff0ffffCode: 00f0 NV40 [GeForce 6800 Ultra] 00f1 NV43 [GeForce 6600 GT] 00f2 NV43 [GeForce 6600] 00f3 NV43 [GeForce 6200] 00f4 NV43 [GeForce 6600 LE] 00f5 G70 [GeForce 7800 GS] 00f6 NV43 [GeForce 6800 GS] 00f7 ? 00f8 NV45GL [Quadro FX 3400/4400] 00f9 NV45 [GeForce 6800 GTO] 00fa NV36 [GeForce PCX 5750] 00fb NV35 [GeForce PCX 5900] 00fc NV37GL [Quadro FX 330/GeForce PCX 5300] 00fd NV37GL [Quadro PCI-E Series] 00fe NV38GL [Quadro FX 1300] 00ff NV18 [GeForce PCX 4300]0x019010de&0xfff0ffffCode: 0190 ? 0191 G80 [GeForce 8800 GTX] 0192 ? 0193 G80 [GeForce 8800 GTS] 0194 G80 [GeForce 8800 Ultra] 0195 ? 0196 ? 0197 Tesla S870 (Compute Server Component) 0198 ? 0199 ? 019a ? 019b ? 019c ? 019d G80 [Quadro FX 5600] 019e G80 [Quadro FX 4600] 019f ?0x040010de&0xfff0ffffCode: 0400 G84 [GeForce 8600 GTS] 0401 G84 [GeForce 8600GT] 0402 G84 [GeForce 8600 GT] 0403 G84 [GeForce 8600 GS] 0404 G84 [GeForce 8400 GS] 0405 G84 [GeForce 9500M GS] 0406 ? 0407 G84 [GeForce 8600M GT] 0408 G84 [GeForce 9650M GS] 0409 G84 [GeForce 8700M GT] 040a G84 [Quadro FX 370] 040b Quadro NVS 320M 040c Quadro FX 570M 040d Quadro FX 1600M 040e G84 [Quadro FX 570] 040f G84 [Quadro FX 1700]0x042010de&0xfff0ffffCode: 0420 G86 [GeForce 8400 SE] 0421 G86 [GeForce 8500 GT] 0422 G86 [GeForce 8400 GS] 0423 G86 [GeForce 8300 GS] 0424 G86 [GeForce 8400 GS] 0425 G86 [GeForce 8600M GS] 0426 G86 [GeForce 8400M GT] 0427 G86 [GeForce 8400M GS] 0428 G86 [GeForce 8400M G] 0429 Quadro NVS 140M 042a Quadro NVS 130M 042b Quadro NVS 135M 042c G86 [GeForce 9400 GT] 042d Quadro FX 360M 042e G86 [GeForce 9300M G] 042f G86 [Quadro NVS 290]0x05e010de&0xfff8ffffCode: 05e0 GT200b [GeForce GTX 295] 05e1 GT200 [GeForce GTX 280] 05e2 GT200 [GeForce GTX 260] 05e3 GT200b [GeForce GTX 285] 05e4 ? 05e5 ? 05e6 GT200b [GeForce GTX 275] 05e7 GT200 [Tesla C1060]0x05f010de&0xfff0ffffCode: 05f0 ? 05f1 ? 05f2 ? 05f3 ? 05f4 ? 05f5 ? 05f6 ? 05f7 ? 05f8 GT200GL [Quadro Plex 2200 S4] 05f9 GT200GL [Quadro CX] 05fa ? 05fb ? 05fc ? 05fd GT200GL [Quadro FX 5800] 05fe GT200GL [Quadro FX 4800] 05ff ?0x060010de&0xffe0ffffCode: 0600 G92 [GeForce 8800 GTS 512] 0601 G92 [GeForce 9800 GT] 0602 G92 [GeForce 8800 GT] 0603 ? 0604 G92 [GeForce 9800 GX2] 0605 G92 [GeForce 9800 GT] 0606 G92 [GeForce 8800 GS] 0607 ? 0608 G92 [GeForce 9800M GTX] 0609 G92 [GeForce 8800M GTS] 060a GT200 [GeForce GTX 280M] 060b G92 [GeForce 9800M GT] 060c G92 [GeForce 8800M GTX] 060d G92 [GeForce 8800 GS] 060e ? 060f ? 0610 ? [...] 061f ?0x062010de&0xffe0ffffCode: 0620 ? 0621 ? 0622 G94 [GeForce 9600 GT] 0623 G94 [GeForce 9600 GS] 0624 ? 0625 G94 [GeForce 9600 GSO 512] 0626 G94 [GeForce GT 130] 0627 G94 [GeForce GT 140] 0628 G94 [GeForce 9800M GTS] 0629 ? 062a G94 [GeForce 9700M GTS] 062b G94 [GeForce 9800M GS] 062c G94 [GeForce 9800M GTS] 062d ? 062e ? 062f ? 0630 ? [...] 063f ?0x064010de&0xffe0ffffCode: 0640 G96 [GeForce 9500 GT] 0641 G96 [GeForce 9400 GT] 0642 ? 0643 G96 [GeForce 9500 GT] 0644 G96 [GeForce 9500 GS] 0645 G96 [GeForce 9500 GS] 0646 G96 [GeForce GT 120] 0647 G96 [GeForce 9600M GT] 0648 G96 [GeForce 9600M GS] 0649 G96 [GeForce 9600M GT] 064a G96 [GeForce 9700M GT] 064b G96 [GeForce 9500M G] 064c G96 [GeForce 9650M GT] 064d ? 064e ? 064f ? 0650 ? 0651 G96 [GeForce G 110M] 0652 G96 [GeForce GT 130M] 0653 G96M [GeForce GT 120M] 0654 ? 0655 ? 0656 ? 0657 ? 0658 G96 [Quadro FX 380] 0659 G96 [Quadro FX 580] 065a ? 065b G96 [GeForce 9400 GT] 065c G96M [Quadro FX 770M] 065d ? 065e ? 065f ?0x06e010de&0xfff0ffffCode: 06e0 G98 [GeForce 9300 GE] 06e1 G98 [GeForce 9300 GS] 06e2 G98 [GeForce 8400] 06e3 G98 [GeForce 8300 GS] 06e4 G98 [GeForce 8400 GS] 06e5 G98 [GeForce 9300M GS] 06e6 G98 [GeForce G100] 06e7 G98 [GeForce 9300 SE] 06e8 G98 [GeForce 9200M GS] 06e9 G98 [GeForce 9300M GS] 06ea G86M [Quadro NVS 150M] 06eb G98M [Quadro NVS 160M] 06ec G98M [GeForce G 105M] 06ed ? 06ec ? 06ef G98M [GeForce G 103M]0x086010de&0xffe0ffffCode: 0860 C79 [GeForce 9300] 0861 C79 [GeForce 9400] 0862 C79 [GeForce 9400M G] 0863 C79 [GeForce 9400M] 0864 C79 [GeForce 9300] 0865 C79 [GeForce 9300] 0866 C79 [GeForce 9400M G] 0867 C79 [GeForce 9400] 0868 C79 [nForce 760i SLI] 0869 ? 086a C79 [GeForce 9400] 086b ? 086c C79 [GeForce 9300 / nForce 730i] 086d C79 [GeForce 9200] 086e C79 [GeForce 9100M G] 086f C79 [GeForce 9200M G] 0870 C79 [GeForce 9400M] 0871 C79 [GeForce 9200] 0872 C79 [GeForce G102M] 0873 C79 [GeForce G102M] 0874 ? 0875 ? 0876 ? 0877 ? 0878 ? 0879 ? 087a C79 [Quadro FX 470] 087b ? 087c ? 087d ION VGA 087e ? 087f C79 [Quadro FX 470M]0x0a2010de&0xffa0ffffCode: 0a20 GT200 [GeForce GT 220] [...] 0a2f ? 0a30 ? [...] 0a3f ? 0a60 GT200 [GeForce G210] 0a61 ? 0a62 ? 0a63 ? 0a64 ? 0a65 GT200 [GeForce 210] [...] 0a6f ? 0a70 ? [...] 0a7f ?0x0ca010de&0xffe0ffff(No device ids in the database from these ones at all,so I googled around and found some info but its probably incorrect...)Code: 0ca0 GT215 [?] 0ca1 ? 0ca2 ? 0ca3 GT230 [?] 0ca4 D10P-40 [?] 0ca5 D10P2-50 [?] 0ca6 ? 0ca7 ? 0ca8 ? [GeForce GTS 260M] 0ca9 ? [GeForce GTS 250M] 0caa ? 0cab ? 0cac 0cad N10E-ES [?] 0cae 0caf ? [GeForce GT 335M] 0cb0 ? [GeForce GTS 350M] 0cb1 ? [GeForce GTS 360M] 0cb2 0cb3 0cb4 0cb5 0cb6 0cb7 0cb8 0cb9 0cba 0cbb 0cbc N10P-GLM4 [?] 0cbd 0cbe 0cbfEdit 2009/10/15: added all device ids that match,in case some cards exist with them but are not in the pci database."[...]" means everything between xxx0 to xxxf is missing from the db. This understanding is that expressed I believe by VooD as well, and here is his list of what he believes are NVDAGF100Hal.kext supported graphics cards (with no guarantees!):0x06c010de&0xffe0ffff06C0 = "NVIDIA GeForce GTX 480"06C4 = "NVIDIA GeForce GTX 465"06CD = "NVIDIA GeForce GTX 470"06D1 = "NVIDIA Tesla C2050 / C2070"06D2 = "NVIDIA Tesla M2070"06D2 = "NVIDIA Tesla X2070"06D8 = "NVIDIA Quadro 6000"06D9 = "NVIDIA Quadro 5000"06DC = "NVIDIA Quadro 6000 "06DD = "NVIDIA Quadro 4000"06DE = "NVIDIA Tesla T20 Processor"06DE = "NVIDIA Tesla S2050"06DE = "NVIDIA Tesla M2050"06DE = "NVIDIA Tesla X2070 "06DF = "NVIDIA Tesla M2070-Q"0x0dc010de&0xffc0ffff0DC0 = "NVIDIA GeForce GT 440"0DC4 = "NVIDIA GeForce GTS 450"0DC5 = "NVIDIA GeForce GTS 450 "0DC6 = "NVIDIA GeForce GTS 450 "0DD8 = "NVIDIA Quadro 2000"0DE0 = "NVIDIA GeForce GT 440 "0DE1 = "NVIDIA GeForce GT 430"0DDA = "NVIDIA Quadro 2000M"0DF0 = "NVIDIA GeForce GT 425M"0DF4 = "NVIDIA GeForce GT 540M "0DF5 = "NVIDIA GeForce GT 525M"0DF7 = "NVIDIA GeForce GT 520M"0DFA = "NVIDIA Quadro 1000M"0DE2 = "NVIDIA GeForce GT 420"0DE5 = "NVIDIA GeForce GT 530"0DF8 = "NVIDIA Quadro 600"0x0e2010de&0xffe0ffff0E22 = "NVIDIA GeForce GTX 460"0E23 = "NVIDIA GeForce GTX 460 SE"0E24 = "NVIDIA GeForce GTX 460 "0x104010de&0xffc0ffff1040 = "NVIDIA GeForce GT 520"1050 = "NVIDIA GeForce GT 520M "1056 = "NVIDIA NVS 4200M"1057 = "NVIDIA NVS 4200M "0x124010de&0xffc0ffff1241 = "NVIDIA GeForce GT 545"1243 = "NVIDIA GeForce GT 545 "1244 = "NVIDIA GeForce GTX 550 Ti"1245 = "NVIDIA GeForce GTS 450 " but while the above is interesting from a knowledge and understanding perspective (at least to me anyhow..... ), the real point of this section is to show how to enter the nVidia graphics card directly into the <key>IOPCIPrimaryMatch</key> string array, and so, understanding how the mask ID argument functions is not a necessity..... F. Editing Info.plist files of nVidia graphics kexts in OS X Mountain Lion (and OS X Lion and OS X Snow Leopard) :NVEnabler 64.kext as an example of an graphics injector kext that may require the inserting of your nVidia graphics card(s) hardware matching device ID numbers into the Info.plist file <key>IOPCIPrimaryMatch</key> string array of of the following kexts:In OS X Mountain Lion:NVDAResman.kext, and NVDAGF100Hal.kext or NVDAGK100Hal.kext or NVDANV50Hal.kext In OS X Lion:NVDAResman.kext or NVDAResmanG7xxx.kext, and NVDANV40HalG7xxx.kext or NVDANV50Hal.kext or NVDAGF100Hal.kextIn Snow Leopard:NVDAResman.kext, and NVDANV40Hal.kext or NVDANV50Hal.kextshould the NVEnabler 64.kext placed in /Extra/Extensions/, or in /System/Library/Extensions, not function without doing so.Your nVidia graphics card(s) hardware matching device ID numbers will determine which of the above kexts it needs to be, by checking thorazine74's list to find a card whose matching device ID number is very similar to your card(s) number....see Part E. above.....It is worth noting that, at least in OS X Snow Leopard (and OS X Leopard), if you attempt to use some other graphics injector kexts, you may have to also add your nVidia graphics card(s) hardware matching device ID numbers into the injector kext's Info.plist file, and at the same time, insert the correct NVCAP string for your graphics card(s) and change the IOProbeScore value to 0 in the injector kext's Info.plist file.....To get to the Info.plist file in each kext:1. Navigate to /System/Library/Extensions2. Find each kext one at a time and make a backup copy in a safe location on your HDD3. Right-click on the chosen kext icon, choosing "Show Package Contents", then open Contents folder to find Info.plist.4. Open the Info.plist file via Terminal using sudo nano etc., or right-click, choosing "Open With", and selecting your preferred Text Editor app; e.g.Text Edit, TextMate, TextWrangler, Property List Editor, or PlistEdit Pro etc. that is capable of the string data in hexadecimal form.....5. Make the changes to each Info.plist file and save the modified files......So, using10de:0614 nVidia Corporation G92 [GeForce 9800 GT] just as a visual example (applicable or not), the GeForce 9800 GT hardware matching device ID numbers have to be written in the following form for insertion into the Info.plist files:0x061410de (the 0x denotes that the number that follows is in hexadecimal format)as follows: (where RED TEXT denotes inserted alphanumeric text, i.e. alphanumeric text not in the original Info.plist file)NVDAResman.kext in OS X Mountain Lion:Note the absence of the <key>IOPCIPrimaryMatch</key> and its <string></string> below the <key>IONameMatch</key> string array<?xml version="1.0" encoding="UTF-8"?><!DOCTYPE plist PUBLIC "-//Apple//DTD PLIST 1.0//EN" "http://www.apple.com...yList-1.0.dtd"><plist version="1.0"><dict><key>CFBundleDevelopmentRegion</key><string>English</string><key>CFBundleExecutable</key><string>NVDAResman</string><key>CFBundleGetInfoString</key><string>NVDAResman 8.0.51 295.30.00f01</string><key>CFBundleIdentifier</key><string>com.apple.NVDAResman</string><key>CFBundleInfoDictionaryVersion</key><string>6.0</string><key>CFBundleName</key><string>NVIDIA Resman Kernel Extension</string><key>CFBundlePackageType</key><string>KEXT</string><key>CFBundleShortVersionString</key><string>8.0.51</string><key>CFBundleSignature</key><string>????</string><key>CFBundleVersion</key><string>8.0.0</string><key>IOKitPersonalities</key><dict><key>NVRM</key><dict><key>CFBundleIdentifier</key><string>com.apple.NVDAResman</string><key>IOClass</key><string>NVDA</string><key>IOMatchCategory</key><string>IOFramebuffer</string><key>IONameMatch</key><array><string>NVDA,NVMac</string></array><key>IOPCIPrimaryMatch</key><string>0x061410de</string><key>IOParentMatch</key><dict><key>IOPropertyMatch</key><dict><key>NVCLASS</key><string>NVDA</string></dict><key>IOProviderClass</key><string>IOPCIDevice</string></dict><key>IOProbeScore</key><integer>60000</integer><key>IOProviderClass</key><string>IONDRVDevice</string></dict><key>NvNdrvGpu</key><dict><key>CFBundleIdentifier</key><string>com.apple.NVDAResman</string><key>IOClass</key><string>NVDAPreset</string><key>IOMatchCategory</key><string>IOFramebuffer</string><key>IOPCIClassMatch</key><string>0x03000000&0xff000000</string><key>IOPCIMatch</key><string>0x000010de&0x0000ffff</string><key>IOProbeScore</key><integer>60000</integer><key>IOProviderClass</key><string>IOPCIDevice</string></dict></dict><key>OSBundleCompatibleVersion</key><string>1.2.0</string><key>OSBundleLibraries</key><dict><key>com.apple.iokit.IOGraphicsFamily</key><string>1.5</string><key>com.apple.iokit.IONDRVSupport</key><string>1.5</string><key>com.apple.iokit.IOPCIFamily</key><string>2.4</string><key>com.apple.kpi.bsd</key><string>9.0.0</string><key>com.apple.kpi.iokit</key><string>9.0.0</string><key>com.apple.kpi.libkern</key><string>9.0.0</string><key>com.apple.kpi.mach</key><string>9.0.0</string></dict><key>OSBundleRequired</key><string>Safe Boot</string></dict></plist>NVDAResman.kext in OS X Lion:Note the absence of the <key>IOPCIPrimaryMatch</key> and its <string></string> below the <key>IONameMatch</key> string array<?xml version="1.0" encoding="UTF-8"?><!DOCTYPE plist PUBLIC "-//Apple//DTD PLIST 1.0//EN" "http://www.apple.com...yList-1.0.dtd"><plist version="1.0"><dict><key>CFBundleDevelopmentRegion</key><string>English</string><key>CFBundleExecutable</key><string>NVDAResman</string><key>CFBundleGetInfoString</key><string>NVDAResman 7.4.10 270.05.05f01</string><key>CFBundleIdentifier</key><string>com.apple.NVDAResman</string><key>CFBundleInfoDictionaryVersion</key><string>6.0</string><key>CFBundleName</key><string>NVIDIA Resman Kernel Extension</string><key>CFBundlePackageType</key><string>KEXT</string><key>CFBundleShortVersionString</key><string>7.4.10</string><key>CFBundleSignature</key><string>????</string><key>CFBundleVersion</key><string>7.0.4</string><key>IOKitPersonalities</key><dict><key>NVRM</key><dict><key>CFBundleIdentifier</key><string>com.apple.NVDAResman</string><key>IOClass</key><string>NVDA</string><key>IOMatchCategory</key><string>IOFramebuffer</string><key>IONameMatch</key><array><string>NVDA,NVMac</string></array><key>IOPCIPrimaryMatch</key><string>0x061410de</string><key>IOParentMatch</key><dict><key>IOPropertyMatch</key><dict><key>NVCLASS</key><string>NVDA</string></dict><key>IOProviderClass</key><string>IOPCIDevice</string></dict><key>IOProbeScore</key><integer>60000</integer><key>IOProviderClass</key><string>IONDRVDevice</string></dict></dict><key>OSBundleCompatibleVersion</key><string>1.2.0</string><key>OSBundleLibraries</key><dict><key>com.apple.iokit.IOGraphicsFamily</key><string>1.5</string><key>com.apple.iokit.IONDRVSupport</key><string>1.5</string><key>com.apple.iokit.IOPCIFamily</key><string>2.4</string><key>com.apple.kpi.bsd</key><string>9.0.0</string><key>com.apple.kpi.iokit</key><string>9.0.0</string><key>com.apple.kpi.libkern</key><string>9.0.0</string><key>com.apple.kpi.mach</key><string>9.0.0</string></dict><key>OSBundleRequired</key><string>Safe Boot</string></dict></plist>NVDAResman.kext in OS X Snow Leopard:Note the absence of the <key>IOPCIPrimaryMatch</key> and its <string></string> below the <key>IONameMatch</key> string array<?xml version="1.0" encoding="UTF-8"?><!DOCTYPE plist PUBLIC "-//Apple//DTD PLIST 1.0//EN" "http://www.apple.com...yList-1.0.dtd"><plist version="1.0"><dict><key>CFBundleDevelopmentRegion</key><string>English</string><key>CFBundleExecutable</key><string>NVDAResman</string><key>CFBundleGetInfoString</key><string>NVDAResman 1.6.36.10 (256.00.35f11)</string><key>CFBundleIdentifier</key><string>com.apple.NVDAResman</string><key>CFBundleInfoDictionaryVersion</key><string>6.0</string><key>CFBundleName</key><string>NVIDIA Resman Kernel Extension</string><key>CFBundlePackageType</key><string>KEXT</string><key>CFBundleShortVersionString</key><string>1.6.36</string><key>CFBundleSignature</key><string>????</string><key>CFBundleVersion</key><string>6.3.6</string><key>IOKitPersonalities</key><dict><key>NVRM</key><dict><key>CFBundleIdentifier</key><string>com.apple.NVDAResman</string><key>IOClass</key><string>NVDA</string><key>IOMatchCategory</key><string>IOFramebuffer</string><key>IONameMatch</key><array><string>NVDA,NVMac</string></array><key>IOPCIPrimaryMatch</key><string>0x061410de</string><key>IOParentMatch</key><dict><key>IOPropertyMatch</key><dict><key>NVCLASS</key><string>NVDA</string></dict><key>IOProviderClass</key><string>IOPCIDevice</string></dict><key>IOProbeScore</key><integer>60000</integer><key>IOProviderClass</key><string>IONDRVDevice</string></dict></dict><key>OSBundleCompatibleVersion</key><string>1.2.0</string><key>OSBundleLibraries</key><dict><key>com.apple.iokit.IOGraphicsFamily</key><string>1.5</string><key>com.apple.iokit.IONDRVSupport</key><string>1.5</string><key>com.apple.iokit.IOPCIFamily</key><string>2.4</string><key>com.apple.kpi.bsd</key><string>9.0.0</string><key>com.apple.kpi.iokit</key><string>9.0.0</string><key>com.apple.kpi.libkern</key><string>9.0.0</string><key>com.apple.kpi.mach</key><string>9.0.0</string></dict><key>OSBundleRequired</key><string>Safe Boot</string></dict></plist>versus the NVDAResman.kext in OS X Leopard:Note the presence of the <key>IOPCIPrimaryMatch</key> and its <string></string> below the <key>IONameMatch</key> string array<?xml version="1.0" encoding="UTF-8"?><!DOCTYPE plist PUBLIC "-//Apple//DTD PLIST 1.0//EN" "http://www.apple.com...yList-1.0.dtd"><plist version="1.0"><dict><key>CFBundleDevelopmentRegion</key><string>English</string><key>CFBundleExecutable</key><string>NVDAResman</string><key>CFBundleGetInfoString</key><string>NVDAResman 1.5.36.25 (17.3.5f14)</string><key>CFBundleIdentifier</key><string>com.apple.NVDAResman</string><key>CFBundleInfoDictionaryVersion</key><string>6.0</string><key>CFBundleName</key><string>NVIDIA Resman Kernel Extension</string><key>CFBundlePackageType</key><string>KEXT</string><key>CFBundleShortVersionString</key><string>1.5.36</string><key>CFBundleSignature</key><string>????</string><key>CFBundleVersion</key><string>5.3.6</string><key>IOKitPersonalities</key><dict><key>NVidiaRM</key><dict><key>CFBundleIdentifier</key><string>com.apple.NVDAResman</string><key>IOClass</key><string>NVDA</string><key>IOMatchCategory</key><string>IOFramebuffer</string><key>IONameMatch</key><array><string>MNCA,GeForce2MX</string><string>NVDA,NVMac</string></array><key>IOProbeScore</key><integer>60000</integer><key>IOProviderClass</key><string>IOPCIDevice</string></dict><key>NVidiaRMPCIMatch</key><dict><key>CFBundleIdentifier</key><string>com.apple.NVDAResman</string><key>IOClass</key><string>NVDA</string><key>IOMatchCategory</key><string>IOFramebuffer</string><key>IONameMatched</key><string>NVDA,NVMac</string><key>IOPCIPrimaryMatch</key><string>0x061410de 0x011010de&0xfff8ffff 0x017010de&0xfff8ffff 0x017910de 0x018010de&0xfff8ffff 0x018810de 0x018910de 0x020010de&0xfff8ffff 0x025010de&0xfff8ffff 0x028010de&0xfff8ffff 0x030010de&0xfff8ffff 0x031010de&0xfff8ffff 0x031910de 0x034910de</string><key>IOProbeScore</key><integer>50000</integer><key>IOPropertyMatch</key><dict><key>name</key><string>display</string></dict><key>IOProviderClass</key><string>IOPCIDevice</string></dict><key>NVidiaRMTwinView</key><dict><key>CFBundleIdentifier</key><string>com.apple.NVDAResman</string><key>IOClass</key><string>NVDA</string><key>IOMatchCategory</key><string>IOFramebuffer</string><key>IONameMatch</key><array><string>MNCA,GeForce2MX</string><string>NVDA,NVMac</string></array><key>IOProbeScore</key><integer>60000</integer><key>IOProviderClass</key><string>IONDRVDevice</string></dict></dict><key>OSBundleCompatibleVersion</key><string>1.2.0</string><key>OSBundleLibraries</key><dict><key>com.apple.iokit.IOGraphicsFamily</key><string>1.5</string><key>com.apple.iokit.IONDRVSupport</key><string>1.5</string><key>com.apple.iokit.IOPCIFamily</key><string>2.4</string><key>com.apple.kpi.bsd</key><string>9.0.0</string><key>com.apple.kpi.iokit</key><string>9.0.0</string><key>com.apple.kpi.libkern</key><string>9.0.0</string><key>com.apple.kpi.mach</key><string>9.0.0</string></dict><key>OSBundleRequired</key><string>Safe Boot</string></dict></plist>At present, I am not sure if OS X Mountain Lion, OS X Lion or OS X Snow Leopard would ever require the insertion, below the <key>IONameMatch</key> string array, of the <key>IOPCIPrimaryMatch</key> and its <string></string> containing a graphics card hardware matching device ID, in order for NVEnabler64.kext to be loaded and to work with the given nVidia graphics card in OS X Mountain Lion, OS X Lion, or OS X Snow Leopard, as shown above.I say this because with my own Inno3D GeForce 9800 GT 512MB [G92] graphics card, I can use NVEnabler64.kext in /Extra/Extensions/, or in /system/Library/Extensions/, in OS X Mountain Lion, OS X Lion, and OS X Snow Leopard with full CI/QE and resolution switching, without having to insert the GeForce 9800 GT hardware matching device ID (0x061410de) into NVDANV50Hal.kext, let alone in NVDAResman.kext as well......thus, I cannot do any testing......if you would like to test, then PM me your results.....OS X Mountain Lion NVDAGF100Hal.kext:<?xml version="1.0" encoding="UTF-8"?><!DOCTYPE plist PUBLIC "-//Apple//DTD PLIST 1.0//EN" "http://www.apple.com...yList-1.0.dtd"><plist version="1.0"><dict><key>CFBundleDevelopmentRegion</key><string>English</string><key>CFBundleExecutable</key><string>NVDAGF100Hal</string><key>CFBundleGetInfoString</key><string>NVDAGF100Hal 8.0.51 295.30.00f01</string><key>CFBundleIdentifier</key><string>com.apple.nvidia.nvGF100hal</string><key>CFBundleInfoDictionaryVersion</key><string>6.0</string><key>CFBundleName</key><string>NVIDIA GF100 Resman Kernel Extension</string><key>CFBundlePackageType</key><string>KEXT</string><key>CFBundleShortVersionString</key><string>8.0.51</string><key>CFBundleSignature</key><string>????</string><key>CFBundleVersion</key><string>8.0.0</string><key>IOKitPersonalities</key><dict><key>NVidiaRM</key><dict><key>CFBundleIdentifier</key><string>com.apple.nvidia.nvGF100hal</string><key>IOClass</key><string>NVDAGF100HAL</string><key>IOMatchCategory</key><string>IOService</string><key>IOPCIClassMatch</key><string>0x03000000&0xff000000</string><key>IOPCIPrimaryMatch</key><string>0x061410de0x06c010de&0xffe0ffff0x0cc010de&0xffe0ffff0x0ce010de&0xffe0ffff0x0dc010de&0xffe0ffff0x0de010de&0xffe0ffff0x0e0d10de&0xffffffff0x0e2010de&0xffe0ffff0x0e4010de&0xffe0ffff0x0e8010de&0xffe0ffff0x0ee010de&0xffe0ffff0x0f0010de&0xffe0ffff0x0f2010de&0xffe0ffff0x0fa010de&0xffffffff0x0fa210de&0xffffffff0x108010de&0xffe0ffff0x10a010de&0xffe0ffff0x110010de&0xffc0ffff0x120010de&0xffc0ffff0x124010de&0xffc0ffff</string><key>IOProbeScore</key><integer>60000</integer><key>IOProviderClass</key><string>IOPCIDevice</string></dict></dict><key>OSBundleCompatibleVersion</key><string>1.2.0</string><key>OSBundleLibraries</key><dict><key>com.apple.NVDAResman</key><string>1.2.0</string><key>com.apple.iokit.IOPCIFamily</key><string>2.4</string><key>com.apple.kpi.iokit</key><string>9.0.0</string><key>com.apple.kpi.libkern</key><string>9.0.0</string></dict><key>OSBundleRequired</key><string>Safe Boot</string></dict></plist>OS X Mountain Lion NVDAGK100Hal.kext:<?xml version="1.0" encoding="UTF-8"?><!DOCTYPE plist PUBLIC "-//Apple//DTD PLIST 1.0//EN" "http://www.apple.com...yList-1.0.dtd"><plist version="1.0"><dict><key>CFBundleDevelopmentRegion</key><string>English</string><key>CFBundleExecutable</key><string>NVDAGK100Hal</string><key>CFBundleGetInfoString</key><string>NVDAGK100Hal 8.0.51 295.30.00f01</string><key>CFBundleIdentifier</key><string>com.apple.nvidia.nvGK100hal</string><key>CFBundleInfoDictionaryVersion</key><string>6.0</string><key>CFBundleName</key><string>NVIDIA GK100 Resman Kernel Extension</string><key>CFBundlePackageType</key><string>KEXT</string><key>CFBundleShortVersionString</key><string>8.0.51</string><key>CFBundleSignature</key><string>????</string><key>CFBundleVersion</key><string>8.0.0</string><key>IOKitPersonalities</key><dict><key>NVidiaRM</key><dict><key>CFBundleIdentifier</key><string>com.apple.nvidia.nvGK100hal</string><key>IOClass</key><string>NVDAGK100HAL</string><key>IOMatchCategory</key><string>IOService</string><key>IOPCIClassMatch</key><string>0x03000000&0xff000000</string><key>IOPCIPrimaryMatch</key><string>0x061410de0x0fc010de&0xffc0ffff0x118010de&0xffc0ffff0x11c010de&0xffc0ffff</string><key>IOProbeScore</key><integer>60000</integer><key>IOProviderClass</key><string>IOPCIDevice</string></dict></dict><key>OSBundleCompatibleVersion</key><string>1.2.0</string><key>OSBundleLibraries</key><dict><key>com.apple.NVDAResman</key><string>1.2.0</string><key>com.apple.iokit.IOPCIFamily</key><string>2.4</string><key>com.apple.kpi.iokit</key><string>9.0.0</string><key>com.apple.kpi.libkern</key><string>9.0.0</string></dict><key>OSBundleRequired</key><string>Safe Boot</string></dict></plist>OS X Mountain Lion NVDANV50Hal.kext:<?xml version="1.0" encoding="UTF-8"?><!DOCTYPE plist PUBLIC "-//Apple//DTD PLIST 1.0//EN" "http://www.apple.com...yList-1.0.dtd"><plist version="1.0"><dict><key>CFBundleDevelopmentRegion</key><string>English</string><key>CFBundleExecutable</key><string>NVDANV50Hal</string><key>CFBundleGetInfoString</key><string>NVDANV50Hal 8.0.51 295.30.00f01</string><key>CFBundleIdentifier</key><string>com.apple.nvidia.nv50hal</string><key>CFBundleInfoDictionaryVersion</key><string>6.0</string><key>CFBundleName</key><string>NVIDIA NV50 Resman Kernel Extension</string><key>CFBundlePackageType</key><string>KEXT</string><key>CFBundleShortVersionString</key><string>8.0.51</string><key>CFBundleSignature</key><string>????</string><key>CFBundleVersion</key><string>8.0.0</string><key>IOKitPersonalities</key><dict><key>NVidiaRM</key><dict><key>CFBundleIdentifier</key><string>com.apple.nvidia.nv50hal</string><key>IOClass</key><string>NVDANV50HAL</string><key>IOMatchCategory</key><string>IOService</string><key>IOPCIClassMatch</key><string>0x03000000&0xff000000</string><key>IOPCIPrimaryMatch</key><string>0x061410de0x019010de&0xfff0ffff0x040010de&0xfff0ffff0x041010de&0xfff0ffff0x041010de&0xfff0ffff0x042010de&0xfff0ffff0x043010de&0xfff0ffff0x046010de&0xfff0ffff0x052010de&0xfff0ffff0x05c010de&0xffe0ffff0x05e010de&0xffe0ffff0x060010de&0xffe0ffff0x062010de&0xffe0ffff0x064010de&0xffe0ffff0x086010de&0xffe0ffff0x08a010de&0xffe0ffff0x0a0010de&0xffe0ffff0x0a2010de&0xffe0ffff0x0a6010de&0xffe0ffff0x0ca010de&0xffe0ffff0x0d4010de&0xffe0ffff0x10c010de&0xffe0ffff</string><key>IOProbeScore</key><integer>60000</integer><key>IOProviderClass</key><string>IOPCIDevice</string></dict></dict><key>OSBundleCompatibleVersion</key><string>1.2.0</string><key>OSBundleLibraries</key><dict><key>com.apple.NVDAResman</key><string>1.2.0</string><key>com.apple.iokit.IOPCIFamily</key><string>2.4</string><key>com.apple.kpi.iokit</key><string>9.0.0</string><key>com.apple.kpi.libkern</key><string>9.0.0</string></dict><key>OSBundleRequired</key><string>Safe Boot</string></dict></plist>6. Now reset the kext ownership and permissions and re-create the kernelcache....Open Terminal and type:sudo chown -R root:wheel /System/Library/Extensions/ sudo chmod -R 755 /System/Library/Extensions/ sudo touch /System/Library/Extensions/ exit Close Terminal and then go to /System/Library/Caches/com.apple.kext.caches/Startup and delete the files within Startup….IOKitPersonalities_i386.ioplist.gzIOKitPersonalities_x86_64.ioplist.gzkernelcacheKextPropertyValues_OSBundleHelper_i386.plist.gzKextPropertyValues_OSBundleHelper_x86_64.plist.gz7. Reboot.....************************************************************* Link to comment https://www.insanelymac.com/forum/topic/281665-nforce-os-x-mountain-lion-108-app-store-download-install-guide-on-a-series-6-or-7-nforce-chipset-intel-cpu-mobo/#findComment-1842802 Share on other sites More sharing options...
verdant Posted August 10, 2012 Author Share Posted August 10, 2012 ************************************************************* Generating and Modifying the DSDT.aml File for Your Own nForce MOBO ************************************************************* The modifications described below are what works for my Asus P5N32-E SLI Plus MOBO, and some are the same as those in the DSDT.aml files that I have for a nForce 790i MOBO and a nForce 680i MOBO..... HOWEVER, the DSDT.aml is invariably MOBO brand/model specific and so what I have written below may well need adapting for use in your own nForce chipset MOBO, unless of course, it is also a Asus P5N32-E SLI Plus MOBO...... For gaining a clearer understanding of DSDT.aml modification procedures, be prepared to do a lot of reading in the DSDT Forum.....starting with the links in the now discontinued MaLd0n's DSDT Auto-Patcher topic........but also see olnapalm's DSDT editor and patcher (credit to el coniglio, who did the hard work writing the app).......however, for those lacking the knowledge and/or confidence to use DSDT editor and patcher and/or the time to manually do what DSDT editor and patcher does, see iHackintosh_PT's DSDT Auto-Patcher....... ************************************************************* 1. Device (RTC) fix for the CMOS Reset issue ************************************************************* A modified DSDT.aml is required to fix the CMOS reset bug in Snow Leopard as discovered by Stellarola; namely to edit the RTC section in the file so as to decrease the length of the IO segment from 4 to 2. RTC stands for Real Time Clock. Assuming that you do not already have a basic fixed DSDT.aml, then run fassl's DSDT Patcher Version 1.0.1e (also see Stage 1 below and ) because as well as extracting your original DSDT, it will also perform some basic fixes providing a good base for further DSDT modification. Here is the DSDT Patcher Readme: DSDT Patcher args:-f force the compiling -newHPET overwrites the fixed HPET with one that should work for all somefile.dsl lets point you to another dsl file that should be patched Version 1.0.1e -added Mute fix by mackerintel -added OSI emulation by mackerintel thx for this Version 1.0.1d -added the -newHPET function -fixed an issue in the search Routine Version 1.0.1c -The patcher uses now getDSDT.sh for obtaining the DSDT through ioreg, since GetDSDT Tool does'nt work for some people -added _T_ variable fix by mackertinel -fixed CPU Aliases fix once again (everything that pointed to the alias had to be patched too) Version 1.0.1b -fixed a patching routine issue which caused non-compiling dsdt -added "Method local variable is not initialized (Local0)" fix Version 1.0.1a -fixed CPU Aliases fix Version 1.0.1 -added CPU Aliases fix -added some device name fix This should fix your DSDT so you should be able to run AppleIntelCPUPowerManagement.kext and the upcoming AppleRTC.kext which will panic otherwise. This will not patch your BIOS or whatever, so if you cant boot anymore after this, just delete the /DSDT.aml file and you should be fine. But still, try this at your own risk. You need to install the Chameleon Bootloader with DSDT override from: http://www.insanelym...howtopic=132757 for this, use the newest version. To patch your DSDT just double-click the DSDT Patcher, the fixed DSDT should now be dsdt.aml in the Patcher directory. Install the new bootloader and put the resulting ./DSDT.aml in your Root / Thanks to all Chameleon/OSX Developers who make such things possible, especially zef, kabyl and modbin for helping me at any time and share their work/knowledge, keep it up thanks. Cheers fassl The steps you have to go through will generate a dsdt.aml file that is specific to your PC, which then needs to be de-compiled to the corresponding dsdt.dsl file, that you can then edit using the Terminal nano editor...... You can use its search function or keyboard arrow keys to find your dsdt.dsl file's device (RTC) section and change the two or one IO segment length value(s) you see to 0x02.....then save the modified dsdt.dsl file, which is then re-compiled to give you your modified dsdt.aml file, that you then copy/rename as DSDT.aml file for later use in your / or /Extra directories e.g. on the USB stick and HDD...... For this, you will need OS X Leopard or OS X Snow Leopard or OS X Lion running on the PC onto which you plan to install OS X Mountain Lion..... Stage 1. Generating dsdt.aml, dsdt.dsl files: 1. Copy fassl's DSDT_Patcher1.0.1e.zip file to the Desktop and double click it to extract it. 2. Open a Terminal window (Application -> Utilities) and then type the following commands: cd ~/Desktop/DSDT_Patcher1.0.1e ./DSDT\ Patcher Please do not forget the \ after DSDT and the space before Patcher 3. At this point a question about which platform you wish to emulate will appear. Choose 0 (zero) to emulate Darwin. The program will then generate a number of files in folders within the DSDT_Patcher1.0.1e directory on the Desktop, and also may issue a few warnings that can be ignored safely at this stage. Stage 2. To edit the dsdt.dsl file: 4. Type in the same Terminal window: nano Debug/dsdt.dsl 5. This will open an editor window to enable you to decrease the length of the IO segment parameter in the Device (RTC) section in the dsdt.dsl file from 4 to 2. Note that your dsdt.dsl file Device (RTC) section may not look the same as the example below (from my 650i Asus P5N32-E SLI Plus MOBO)......some MOBOs do not have a ATT1, ResourceTemplate, only a ATT0, ResourceTemplate and/or the IO segment length may be 0x08 rather than 0x04...... Device (RTC) { Name (_HID, EisaId ("PNP0B00")) Name (ATT0, ResourceTemplate () { IO (Decode16, 0x0070, // Range Minimum 0x0070, // Range Maximum 0x00, // Alignment 0x04, // Length ) }) Name (ATT1, ResourceTemplate () { IO (Decode16, 0x0070, // Range Minimum 0x0070, // Range Maximum 0x00, // Alignment 0x04, // Length ) Change 0x04 to 0x02, and when you have finished the editing, press Control-O (i.e. press the Control key plus the letter "O" at the same time) and then RETURN to save the file. Then press Control-X to exit the nano text editor. 6. Back in the Terminal window, type: ./DSDT\ Patcher Debug/dsdt.dsl Please do not forget the \ after DSDT and the space before Patcher Which will create a file in the current directory called dsdt.aml but in doing so, you may see a few errors about pre-existing files; you can safely ignore these. Stage 3. To produce the DSDT.aml file 7. Copy this dsdt.aml file (and rename it as DSDT.aml) to the Desktop cp dsdt.aml /Users/"your username"/Desktop/DSDT.aml Please note that DSDT must be in uppercase for the file to be loaded/work. NOTE: The same procedure can be used to edit/modify the CMOS reset fix modded DSDT.aml file further as required........ ************************************************************* 2. DTGP Method patch to enable use of other patches in the DSDT.aml file ************************************************************* As an alternative to using fassl's DSDT Patcher in conjunction with a Terminal text editor such as nano (see above) to modify your DSDT.aml file, you can use EVOSx86 Team's DSDTSE DSDTSE.zip on OS X, or XP_DSDT running in Windows, or whatever method you prefer to use, perhaps using a separate DSDT extractor, DSDT compiler/decompiler and DSDT patcher...... In the original DSDT.aml file for my Asus P5N32-E SLI Plus MOBO, near to the top of the dsdt.dsl file, there is the following: GP49, 8 } Name (VSTA, 0x01) Name (OSFX, 0x01) Name (OSFL, 0x01) Method (STRC, 2, NotSerialized) Insert the DTGP Method patch between Name (OSFL, 0x01) and Method (STRC, 2, NotSerialized), i.e. before the first Method in the DSDT.aml file..... Hence, after patching with the code in red, you should have: Name (OSFL, 0x01) Method (DTGP, 5, NotSerialized) { If (LEqual (Arg0, Buffer (0x10) { /* 0000 */ 0xC6, 0xB7, 0xB5, 0xA0, 0x18, 0x13, 0x1C, 0x44, /* 0008 */ 0xB0, 0xC9, 0xFE, 0x69, 0x5E, 0xAF, 0x94, 0x9B })) { If (LEqual (Arg1, One)) { If (LEqual (Arg2, Zero)) { Store (Buffer (One) { 0x03 }, Arg4) Return (One) } If (LEqual (Arg2, One)) { Return (One) } } } Store (Buffer (One) { 0x00 }, Arg4) Return (Zero) } Method (STRC, 2, NotSerialized) ************************************************************* 3. Device (HPET) fix to enable the removal of NullCPUPowerManagement.kext from /Extra/Extensions/ and loading of AppleIntelCPUPowerManagement.kext ************************************************************* Special thanks go to Volcacius, who patched his 790i DSDT.aml file to enable working C-states (learning from Master Chief.....see here too.....) and posted it for me to see.......saving me a lot of time as the HPET fix he used also works for me! The HPET fix enables you to remove NullCPUPowerManagement.kext from /Extra/Extensions/ and enables the AppleHPET.kext to load, so that the AppleIntelCPUPowerManagement.kext and AppleIntelCPUPowerManagementClient.kext can load without a kernel panic being generated...... "no HPETs available ... CPU(s) configured incorrectly\n"@/SourceCache/AppleIntelCPUPowerManagement/AppleIntelCPUPowerManagement-......." Removing NullCPUPowerManagement.kext from /Extra/Extensions/ and hence loading the AppleIntelCPUPowerManagement.kext enables you to employ Intel SpeedStepping using Chameleon 2.0 RC5 as explained in 3. below. HPET stands for High Precision Event Timer. My original Device (HPET) section [above device (RTC)] was: Device (HPET) { Name (_HID, EisaId ("PNP0103")) Name (ATT3, ResourceTemplate () { IRQNoFlags () {0} IRQNoFlags () {8} Memory32Fixed (ReadWrite, 0xFEFF0000, // Address Base 0x00000400, // Address Length ) }) Name (ATT4, ResourceTemplate () { }) Method (_STA, 0, NotSerialized) { If (LEqual (OSFX, 0x03)) { If (HPTF) { Return (0x0F) } Else { Return (Zero) } } Else { Return (Zero) } } Method (_CRS, 0, NotSerialized) { If (LEqual (OSFX, 0x03)) { If (HPTF) { Return (ATT3) } Else { Return (ATT4) } } Else { Return (ATT4) } } } Device (RTC) and I replaced everything in { } belonging to Device (HPET) with: Device (HPET) { Name (_HID, EisaId ("PNP0103")) Name (_CID, EisaId ("PNP0C01")) Name (ATT3, ResourceTemplate () { IRQNoFlags () {0} IRQNoFlags () {8} Memory32Fixed (ReadWrite, 0xFEFF0000, // Address Base 0x00000400, // Address Length ) }) Name (ATT4, ResourceTemplate () { }) Method (_STA, 0, NotSerialized) { If (LGreaterEqual (OSFX, 0x03)) { If (HPTF) { Return (0x0F) } } Else { If (HPTF) { Return (0x0B) } } Return (Zero) } Method (_CRS, 0, NotSerialized) { If (HPTF) { Return (ATT3) } Return (ATT4) } } Return (ATT4) } } Device (RTC) ************************************************************* 4. Device (LPCB) patch insertion into the DSDT.aml file to enable Native Power Management in OS X ************************************************************* To enable native power management you need to have: [1] The appropriate Mac Model for your CPU, e.g. in my case MacPro3,1: MacPro3,1 >>> Intel Xeon 5400 series ("Harpertown") / Use for Core2Quad [2] In your BIOS you must have: Enhanced C1 (C1E) [ENABLED] Enhanced Intel Speedstep Technology [ENABLED] HPET Support [ENABLED] [3] To enable C-States you must have the equivalent of AppleLPC working on your system. This is because the AppleLPC.kext has to load to enable native power management in OS X (and incidentally, for the `Start up automatically after a power failure' option to appear in the Energy Saver window in System Preferences) However, for AppleLPC.kext to load the DSDT.aml file has to have a LPC patch inserted as explained below: The LPC bus was introduced by Intel in 1998 as a substitute for the Industry Standard Architecture (ISA) bus. LPC stands for Low Pin Count and modern Super-I/O chips use the Low Pin Count (LPC) bus instead of ISA for communication with the CPU via an LPC interface on the Southbridge chip of the MOBO. This is the starting point for inserting the LPC patch into your DSDT.aml file. Since the LPC bus has replaced the ISA bus, and install Evosx86 Team's Snow Leopard x64 version v1.1 of the UNIX lspci utility: lspci V1.1.zip and then type in Terminal: lspci -nn and look for the ISA bridge entry, e.g. in my case: 00:0a.0 ISA bridge [0601]: nVidia Corporation MCP55 LPC Bridge [10de:0360] (rev a2) What you are looking for are the digits at start of the line, i.e. Field 1, which is 00:0a.0 above. Field 1 : 00:0a.0 : bus number (00), device number (0a) and function (0) In the DSDT.aml file, addresses have 8 digits after 0x (0x signifies that the number that follows is a hexadecimal number), thus 00:0a.0 is equivalent to the 0x000a0000, i.e. 00:0 is 000; a is a, and .0 is written as 0000. Now search the dsdt.dsl or dsdt.aml file using 0x000a0000 as the Search Term until you find a Device section with Name (_ADR, 0x000A0000) immediately below it. In my dsdt file, Name (_ADR, 0x000A0000) appeared below the Device (LEG0). This was double-checked by searching for LEG0 in the OS X IORegistry using IORegistryExplorer (found in Xcode Developer folder >>>> Applications >>>> Utilities) to confirm its location in IOReg under AppleACPIPlatformExpert >>>> PCI0@0 >>>> AppleACPIPCI. Now copy AppleLPC.kext to the Desktop and right-click on it and select Show Package Contents, then go to Contents >>>> Info.plist. Open Info.plist using TextEdit, Property List Editor, TextMate or your favourite .plist file text editor, and look under AppleLPC CFBundleIdentifier com.apple.driver.AppleLPC IOClass AppleLPC and note the IONameMatch array; of particular interest are the entries with the nVidia vendor ID, i.e. 10de. pci8086,2811 pci8086,2815 pci8086,27b9 pci8086,27bd pci8086,2670 pci8086,8119 pci8086,2916 pci8086,3a18 pci8086,3b00 pci8086,3b01 pci8086,3b02 pci8086,3b09 pci10de,aac pci10de,aae pci10de,aaf pci10de,d80 pci10de,d81 pci10de,d82 pci10de,d83 Although there are no entries matching, or very similar to, the ISA bus device ID 10de:0360, it has been found that for nForce chipset MOBOs under OS X, the device ID in the bold entry functions as an equivalent device ID to 0360. I have personally found this to be true as I do not need to use a Info.plist only kext to inject the ISA bus device ID 10de:0360 via the following: key>AppleLPC CFBundleIdentifier com.apple.driver.AppleLPC IOClass AppleLPC IONameMatch pci10de,360 Nevertheless, here is the LPC_injector.kext posted by iLeopod: LPC_injector.kext.zip 2.33K 33 downloads Thus aae becomes (written in reverse order): 0xAE, 0x0A, 0x00, 0x00 Back in the DSDT.aml file, Device (LEG0) becomes Device (LPCB) and all other instances of LEG0 are replaced by LPCB. Now the relevant part of what was formely Device (LEG0), now named Device (LPCB) is: Device (LEG0) { Name (_ADR, 0x000A0000) OperationRegion (PIO0, PCI_Config, 0x04, 0x20) Scope (\) { Field (\_SB.PCI0.LEG0.PIO0, ByteAcc, NoLock, Preserve) { SMEN, 8, Offset (0x0C), Offset (0x0D), SMIO, 8 } } Scope (\) { OperationRegion (SCPP, SystemIO, 0x142E, One) Field (SCPP, ByteAcc, NoLock, Preserve) { SMIP, 8 } } Method (^_INI, 0, NotSerialized) because the LPC Method patch needs to be inserted between the lower Scope (/) { } section and Method (^_INI, 0, NotSerialized) section, as follows: Device (LPCB) { Name (_ADR, 0x000A0000) OperationRegion (PIO0, PCI_Config, 0x04, 0x20) Scope (\) { Field (\_SB.PCI0.LPCB.PIO0, ByteAcc, NoLock, Preserve) { SMEN, 8, Offset (0x0C), Offset (0x0D), SMIO, 8 } } Scope (\) { OperationRegion (SCPP, SystemIO, 0x142E, One) Field (SCPP, ByteAcc, NoLock, Preserve) { SMIP, 8 } } Method (_DSM, 4, NotSerialized) { Store (Package (0x02) { "device-id", Buffer (0x04) { 0xAE, 0x0A, 0x00, 0x00 } }, Local0) DTGP (Arg0, Arg1, Arg2, Arg3, RefOf (Local0)) Return (Local0) } Method (^_INI, 0, NotSerialized) ************************************************************* 5. Device (TMR) and Device (PIC) fixes to prevent audio "stuttering" when Native Power Management in OS X is enabled, i.e. after SpeedStepping with C-states is enabled ************************************************************* The relevant section of Device (TMR) is shown here: Device (TMR) { Name (_HID, EisaId ("PNP0100")) Name (ATT5, ResourceTemplate () { IO (Decode16, 0x0040, // Range Minimum 0x0040, // Range Maximum 0x00, // Alignment 0x04, // Length ) IRQNoFlags () {0} }) Name (ATT6, ResourceTemplate () { IO (Decode16, 0x0040, // Range Minimum 0x0040, // Range Maximum 0x00, // Alignment 0x04, // Length ) }) Note the presence of IRQNoFlags () {0} - the fix is simply to remove IRQNoFlags () {0} from this section: Device (TMR) { Name (_HID, EisaId ("PNP0100")) Name (ATT5, ResourceTemplate () { IO (Decode16, 0x0040, // Range Minimum 0x0040, // Range Maximum 0x00, // Alignment 0x04, // Length ) }) Name (ATT6, ResourceTemplate () { IO (Decode16, 0x0040, // Range Minimum 0x0040, // Range Maximum 0x00, // Alignment 0x04, // Length ) }) The relevant section of Device (PIC) is shown here: Device (PIC) { Name (_HID, EisaId ("PNP0000")) Name (_CRS, ResourceTemplate () { IO (Decode16, 0x0020, // Range Minimum 0x0020, // Range Maximum 0x01, // Alignment 0x02, // Length ) IO (Decode16, 0x00A0, // Range Minimum 0x00A0, // Range Maximum 0x01, // Alignment 0x02, // Length ) IRQNoFlags () {2} }) } Note the presence of IRQNoFlags () {2} - the fix is simply to remove IRQNoFlags () {2} from this section: Device (PIC) { Name (_HID, EisaId ("PNP0000")) Name (_CRS, ResourceTemplate () { IO (Decode16, 0x0020, // Range Minimum 0x0020, // Range Maximum 0x01, // Alignment 0x02, // Length ) IO (Decode16, 0x00A0, // Range Minimum 0x00A0, // Range Maximum 0x01, // Alignment 0x02, // Length ) }) } ************************************************************* Link to comment https://www.insanelymac.com/forum/topic/281665-nforce-os-x-mountain-lion-108-app-store-download-install-guide-on-a-series-6-or-7-nforce-chipset-intel-cpu-mobo/#findComment-1842809 Share on other sites More sharing options...
verdant Posted August 10, 2012 Author Share Posted August 10, 2012 ************************************************************* How to Enable Natural Power Management ("vanilla SpeedStepping") in OS X Mountain Lion (and OS X Lion and OS X Snow Leopard) on an nForce chipset + Intel CPU MOBO ************************************************************* [1] Ensure that you have the appropriate Mac Model identifier for your CPU, e.g. MacPro3,1 [2] In your BIOS check that you have: Enhanced C1 (C1E) [ENABLED] Enhanced Intel Speedstep Technology [ENABLED] HPET Support [ENABLED] [3] Assuming that you do not already have a basic fixed DSDT.aml, then run fassl's DSDT Patcher Version 1.0.1e (also see post #4) because as well as extracting your original DSDT, it will also perform some basic fixes providing a good base for further DSDT modification: DSDT_Patcher1.0.1e.zip Here is the DSDT Patcher Readme: DSDT Patcher args: -f force the compiling -newHPET overwrites the fixed HPET with one that should work for all somefile.dsl lets point you to another dsl file that should be patched Version 1.0.1e -added Mute fix by mackerintel -added OSI emulation by mackerintel thx for this Version 1.0.1d -added the -newHPET function -fixed an issue in the search Routine Version 1.0.1c -The patcher uses now getDSDT.sh for obtaining the DSDT through ioreg, since GetDSDT Tool does'nt work for some people -added _T_ variable fix by mackertinel -fixed CPU Aliases fix once again (everything that pointed to the alias had to be patched too) Version 1.0.1b -fixed a patching routine issue which caused non-compiling dsdt -added "Method local variable is not initialized (Local0)" fix Version 1.0.1a -fixed CPU Aliases fix Version 1.0.1 -added CPU Aliases fix -added some device name fix This should fix your DSDT so you should be able to run AppleIntelCPUPowerManagement.kext and the upcoming AppleRTC.kext which will panic otherwise. This will not patch your BIOS or whatever, so if you cant boot anymore after this, just delete the /DSDT.aml file and you should be fine. But still, try this at your own risk. You need to install the Chameleon Bootloader with DSDT override from: http://www.insanelym...howtopic=132757 for this, use the newest version. To patch your DSDT just double-click the DSDT Patcher, the fixed DSDT should now be dsdt.aml in the Patcher directory. Install the new bootloader and put the resulting ./DSDT.aml in your Root / Thanks to all Chameleon/OSX Developers who make such things possible, especially zef, kabyl and modbin for helping me at any time and share their work/knowledge, keep it up thanks. Cheers fassl [4] Modify the Device (HPET) section and insert the Device (LPCB) section into the DSDT.aml file as described in post #3 on Generating and Modifying the DSDT.aml File for Your Own nForce MOBO [5] Fix the Device (TMR) and Device (PIC) sections in the fixed HPET and LPCB patched DSDT.aml file, as described simply in post #3 on Generating and Modifying the DSDT.aml File for Your Own nForce MOBO, in order to to prevent audio "stuttering" when Native Power Management in OS X is enabled, i.e. after SpeedStepping with C-states is enabled [6] Ensure you are running Chameleon v2.1svn r2042, or an even later revision if it working 100% for you, when installing OS X Mountain Lion [7] Modify org.chameleon.Boot.plist by adding: <key>GeneratePStates</key> <string>Yes</string> <key>GenerateCStates</key> <string>Yes</string> N.B. The P-States and C-States generated by Chameleon are exported to the system via additional SSDTs, so if your BIOS has native SSDTs with _CST methods you should use "DropSSDT" = "Yes" option in org.chameleon.Boot.plist as follows: <key>DropSSDT</key> <string>Yes</string> <key>GeneratePStates</key> <string>Yes</string> <key>GenerateCStates</key> <string>Yes</string> Likewise, if you have a modded DSDT with _CST methods you should remove them or there will be a kernel panic on system start. [8] Remove NullCPUPowerManagement.kext from /Extra/Extensions/ [9] Reboot If you are booting Snow Leopard in 32bit mode you can use VoodooMonitor to check if you are speedstepping: and you can carry out a CPU load test using CPUTest (CPUTest should work with OS X 10.3 and up, as CPUTest is a Universal binary app.) CPUTest.zip With thanks to aschar1, the mark-i application can also be used (32bit and 64bit mode): mark_i.zip You can check if speedstepping is working with mark-i app (works in32bit and 64bit mode). Do not install the ringaccess.kext permanently in /S/L/E. Just kextload it in terminal.download the attached zip file and unzip in a folder on your desktop. in Terminal a. type cd then drag the folder with mark-i and ringacces.kext into the terminal b. in Terminal: sudo chown -R root:wheel RingAccess.kext c. sudo chmod -R 755 RingAccess.kext d. sudo kextload RingAccess.kext e. start the mark-i app You can also confirm that speed stepping is working in OS X Snow Leopard, OS X LIon and OS X Mountain Lion by installing and running SMC Monitor.app and/or smcK-Stat-i.app (both of these apps are included in the verdant_Mountain Lion_Support_Files_v1.0 folder, which you can download by clicking on the Sendspace link in post #1.) Whether you are using mark-i.app, SMC Monitor.app or SMC Monitor.app, in all cases if speed stepping is working properly, you should see the CPU core frequencies changing dynamically with CPU load, e.g. when scrolling windows rapidly, browsing the Internet etc., i.e. cycling between your listed P-states....... ************************************************************* Link to comment https://www.insanelymac.com/forum/topic/281665-nforce-os-x-mountain-lion-108-app-store-download-install-guide-on-a-series-6-or-7-nforce-chipset-intel-cpu-mobo/#findComment-1842826 Share on other sites More sharing options...
verdant Posted August 10, 2012 Author Share Posted August 10, 2012 ************************************************************* OS X Mountain Lion Installation / Boot / Operation Issues ************************************************************* Note: I will indicate if I have experienced any of these issues with a * in front of Issue, and hence will say which if any of the proposed solutions have worked for me..... If there is no * then because I may not be able to generate or replicate the issue on my system, I cannot vouch that any of the proposed solutions will work for you....... Issue 1. [PCI configuration begin] bootup error Some OSx86 / Hackintosh users see the following error when trying to install OS X Lion (note: some users have had the same issue after updating to version 10.6.8): 'MAC Framework successfully initialised using 16384 Buffer headers and 10240 cluster IO Buffer headers IOAPIC: Version 0x20 Vectors 64:87 ACPI: System State [s0 s3 s4 s5] (s3) PFM64 0xF10000000 0xF10000000 [PCI Configuration begin]' the key element being the appearance of [PCI Configuration begin] on screen, followed by a freeze..... However, regarding the [PCI Configuration begin] problem, there are two distinct issues with different solutions: Case 1. Computer freeze at PCI Bus Start message, [PCI Configuration begin]..... The apparent solution is given by THe KING in the Project OS X Forum in the Hpcompaq Mini 311, HPCompaq Mini 311 Development topic (post #328)......it involves a DSDT mod......the _BBN method must be removed from the PCI0 device and added to the IXVE bridge and root ports, and FakeSMC plugins removed too..... Case 2. There is a display freeze after PCI Configuration Begin but booting continues with a problem until the Desktop shows, meaning that you can no longer use Single User Mode nor follow the boot process in verbose mode.......nor see anything else onscreen until the Desktop appears...... Here in Issue 1. I am dealing with Case 2...... There are various proposed solutions, which I will list in order of being easiest to try: Solution 1: Modify org.chameleon.Boot.plist Have you tried this proposed solution in OS X Mountain Lion 10.8 and does it work? Please let me know by PM. Insert npci=0x2000 (or if that does not work, try npci=0x3000) into Kernel Flags string of org.chameleon.Boot.plist in Extra of the USB flash drive installer (and of the target OS X Mountain Lion HDD volume if the same problem is found to occur when later booting from the OS X Mountain Lion HDD volume). Change Kernel Flags of org.chameleon.Boot.plist as follows; from <key>Kernel Flags</key> <string>-v</string> to <key>Kernel Flags</key> <string>-v npci=0x2000</string> Solution 2: Rollback 10.8 AppleACPIPlatform.kext and IOPCIFamily.kext to the 10.6.7 versions Have you tried this proposed solution in OS X Mountain Lion 10.8 and does it work? Please let me know by PM. 1. Copy the 10.6.7 AppleACPIPlatform.kext and IOPCIFamily.kext to your Desktop 2. In Terminal type: sudo mv /System/Library/Extensions/AppleACPIPlatform.kext /System/Library/Extension /AppleACPIPlatform.kext.orig sudo mv sudo mv /System/Library/Extensions/IOPCIFamily.kext /System/Library/Extensions/IOPCIFamily.kext.orig exit 3. Then type sudo -s at the $ prompt and at the resulting bash-3.2# prompt, type: cp -R /Users/"User Name"/Desktop/AppleACPIPlatform.kext /System/Library/Extensions/ chown -R root:wheel /System/Library/Extensions/AppleACPIPlatform.kext chmod -R 755 /System/Library/Extensions/AppleACPIPlatform.kext cp -R /Users/"User Name"/Desktop/IOPCIFamily.kext /System/Library/Extensions/ chown -R root:wheel /System/Library/Extensions/IOPCIFamily.kext chmod -R 755 /System/Library/Extensions/IOPCIFamily.kext touch /System/Library/Extensions exit and back at the $ prompt, to force the next sudo command to be reauthenticated via a password check, type sudo -k exit Then close Terminal and go to /System/Library/Caches/com.apple.kext.caches/Startup and delete the files within Startup…. IOKitPersonalities_i386.ioplist.gz IOKitPersonalities_x86_64.ioplist.gz kernelcache KextPropertyValues_OSBundleHelper_i386.plist.gz KextPropertyValues_OSBundleHelper_x86_64.plist.gz and then reboot..... Alternatively, you can use janek202's Kext Wizard for a Terminal-free life....... Solution 3: Install Oleg's v2 Patched IOPCIFamily.kext Have you tried this proposed solution in OS X Mountain Lion 10.8 and does it work? Please let me know by PM. 1. Download Oleg's v2 of his patched IOPCIFamily.kext onto your Desktop IOPCIFamilyv2.kext.zip and install it as follows: 2. In Terminal type: sudo mv /System/Library/Extensions/IOPCIFamily.kext /System/Library/Extensions/IOPCIFamily.kext.orig exit 3. Then type sudo -s at the $ prompt and at the resulting bash-3.2# prompt, type: cp -R /Users/"User Name"/Desktop/IOPCIFamily.kext /System/Library/Extensions/ chown -R root:wheel /System/Library/Extensions/IOPCIFamily.kext chmod -R 755 /System/Library/Extensions/IOPCIFamily.kext touch /System/Library/Extensions exit and back at the $ prompt, to force the next sudo command to be reauthenticated via a password check, type sudo -k exit Then close Terminal and go to /System/Library/Caches/com.apple.kext.caches/Startup and delete the files within Startup…. IOKitPersonalities_i386.ioplist.gz IOKitPersonalities_x86_64.ioplist.gz kernelcache KextPropertyValues_OSBundleHelper_i386.plist.gz KextPropertyValues_OSBundleHelper_x86_64.plist.gz and then reboot..... Alternatively, you can use janek202's Kext Wizard for a Terminal-free life....... Solution 4: Install nawcom's EvilIOPCIFamily.kext and EvilAppleACPIPlatform.kext Have you tried this proposed solution in OS X Mountain Lion 10.8 and does it work? Please let me know by PM. Download nawcom's two kexts onto your Desktop legacy_kexts_by_nawcom.zip and install them into /Extra/Extensions/ by 'dragging and dropping'. If that does, not work then try with them installed in /System/Library/Extensions/. To install them there, type sudo -s at the $ prompt and at the resulting bash-3.2# prompt, type: cp -R /Users/"User Name"/Desktop/EvilIOPCIFamily.kext /System/Library/Extensions/ chown -R root:wheel /System/Library/Extensions/EvilIOPCIFamily.kext chmod -R 755 /System/Library/Extensions/EvilIOPCIFamily.kext cp -R /Users/"User Name"/Desktop/EvilAppleACPIPlatform.kext /System/Library/Extensions/ chown -R root:wheel /System/Library/Extensions/EvilAppleACPIPlatform.kext chmod -R 755 /System/Library/Extensions/EvilAppleACPIPlatform.kext touch /System/Library/Extensions exit and back at the $ prompt, to force the next sudo command to be reauthenticated via a password check, type sudo -k exit Then close Terminal and go to /System/Library/Caches/com.apple.kext.caches/Startup and delete the files within Startup…. IOKitPersonalities_i386.ioplist.gz IOKitPersonalities_x86_64.ioplist.gz kernelcache KextPropertyValues_OSBundleHelper_i386.plist.gz KextPropertyValues_OSBundleHelper_x86_64.plist.gz and then reboot..... Alternatively, you can use janek202's Kext Wizard for a Terminal-free life....... Solution 5: Patch your DSDT.aml file Have you tried this proposed solution in OS X Mountain Lion 10.8 and does it work? Please let me know by PM. Some propose replacing Name (_ADR, Zero) with Name (_UID, Zero), while some propose adding Name (_ADR, Zero) before Name (_UID, Zero), below: Device (PCI0) { Name (_HID, EisaId ("PNP0A08")) Name (_CID, EisaId ("PNP0A03")) Name (_ADR, Zero) but before Name (_BBN, Zero) to give Name (_HID, EisaId ("PNP0A08")) Name (_CID, EisaId ("PNP0A03")) Name (_ADR, Zero) Name (_UID, Zero) Name (_BBN, Zero) rather than Name (_HID, EisaId ("PNP0A08")) Name (_CID, EisaId ("PNP0A03")) Name (_UID, Zero) Name (_BBN, Zero) However, it is it is interesting to note that I have never experienced the [PCI Configuration begin] error with my Asus P5N32E SLI Plus (nForce 650i) MOBO, in either 10.6.8, or when installing OS X Lion 10.7, or when booting OS X Lion 10.7 on the HDD......and, that my DSDT.aml Device (PCI0) entry reads as follows: Device (PCI0) { Name (_HID, EisaId ("PNP0A08")) Name (_CID, EisaId ("PNP0A03")) Name (_ADR, Zero) Name (_UID, One) Name (_BBN, Zero) Name (PCIA, Zero) Method (_REG, 2, NotSerialized) { If (LEqual (Arg0, 0x02)) { Store (Arg1, PCIA) } } and in my DSDT.aml is placed after Device (PWRB) { Name (_HID, EisaId ("PNP0C0C")) Method (_STA, 0, NotSerialized) { Return (0x0B) } } and before OperationRegion (BRCR, PCI_Config, 0xA4, 0x04) Scope (\) { Field (\_SB.PCI0.BRCR, ByteAcc, NoLock, Preserve) { GPUB, 32 } } Device (MBIO) Note that it contains Name (_UID, One) and not Name (_UID, Zero)....so, it may be worth your trying both: Device (PCI0) { Name (_HID, EisaId ("PNP0A08")) Name (_CID, EisaId ("PNP0A03")) Name (_ADR, Zero) Name (_UID, Zero) Name (_BBN, Zero) or Device (PCI0) { Name (_HID, EisaId ("PNP0A08")) Name (_CID, EisaId ("PNP0A03")) Name (_ADR, Zero) Name (_UID, One) Name (_BBN, Zero) To do the DSDT.aml patching you can use EVOSx86 Team's DSDTSE on OS X: DSDTSE.zip or XP_DSDT running in Windows, or whatever method you prefer to use, perhaps using a separate DSDT extractor, DSDT compiler/decompiler and DSDT patcher...... ************************************************************* Issue 2. Setting up Builtin Ethernet manually / LAN0 / (en0) Solution 1: Setting up an Ethernet device-properties string in org.chameleon.boot.plist Have you tried this proposed solution in OS X Mountain Lion 10.8 and does it work? Please let me know by PM. 1. Boot into 64bit Snow Leopard system or into Lion and run EFIStudio v1.1 (if not installed then download) EFIStudio.1.1.zip and select Ethernet in 'Select Device' in place of Display: 2. With the the following highlighted under Device Type | Device Path Ethernet PciRoot(0x1)/....... click on the Add Device button alongside 'Add your device:' and you should see the following Editor window appear: which you should leave open. 3. Then click on the Save hex button to save the hexadecimal output in the bottom half of the Editor window to your chosen backup directory/folder, and then click on the Save XML window to save the XML output in the top half of the Editor window to the same chosen backup directory/folder (note they are equivalent). 4. Open org.chameleon.Boot.plist using your favourite your preferred Text Editor app; e.g.Text Edit, TextMate, TextWrangler, Property List Editor, or PlistEdit Pro etc. and then: [1] Change <key>EthernetBuiltIn</key> <string>Yes</string> to <key>EthernetBuiltIn</key> <string>No</string> [2] Add the following entry <key>device-properties</key> <string>4b00000001000000010000003f0000000100000002010c00d041030a0100000001010600000f01.....</string> and then between <string> and </string> add the hexadecimal string that you can copy from the bottom half of the open Editor window....... For example, the following string: 4b00000001000000010000003f0000000100000002010c00d041030a0100000001010600000f01 01060000077fff0400160000006200750069006c0074002d0069006e0000000500000001 is equivalent to: <?xml version="1.0" encoding="UTF-8"?> <!DOCTYPE plist PUBLIC "-//Apple//DTD PLIST 1.0//EN" "http://www.apple.com/DTDs/PropertyList-1.0.dtd"> <plist version="1.0"> <dict> <key>PciRoot(0x1)/Pci(0xf,0x0)/Pci(0x7,0x0)</key> <dict> <key>built-in</key> <string>0x01</string> </dict> </dict> </plist> This solution is reported to solve both App Store and FaceTime issues..... Solution 2: Adding Device LAN0 patch to your DSDT.aml (Under construction and testing....) Have you tried this proposed solution in OS X Mountain Lion 10.8 and does it work? Please let me know by PM. 1. Boot into 64bit Snow Leopard system or Lion and run IORegistryExplorer (if not already available, then download and install XCode, then look in Developer folder in / directory, and go to Applications, then to Utilities) and enter LAN in the Search box: 2. Search your dsdt.dsl or dsdt.aml files for the Device (XXXXX) sections containing your LAN Devices.....in this example, Device (MMAC) and Device (MAC1): Device (MMAC) { Name (_ADR, 0x00110000) Name (_PRW, Package (0x02) { 0x0B, 0x05 }) } Device (MAC1) { Name (_ADR, 0x00120000) Name (_PRW, Package (0x02) { 0x0A, 0x05 }) } which are within the Device (PCI0) section...... 3. Now depending on which LAN port you connect to the internet with, you should change, in this example, either Device (MMAC) or Device (MAC1) to Device (LAN0) and insert the following patch after Name (_ADR, 0x00110000) or Name (_ADR, 0x00120000), respectively: Name (_PRW, Package (0x02) { 0x09, 0x03 }) Method (_DSM, 4, NotSerialized) { Store (Package (0x02) { "location", Buffer (0x02) { "1" } }, Local0) DTGP (Arg0, Arg1, Arg2, Arg3, RefOf (Local0)) Return (Local0) } giving in the case of Device (MMAC): Device (LAN0) { Name (_ADR, 0x00110000) Name (_PRW, Package (0x02) { 0x09, 0x03 }) Method (_DSM, 4, NotSerialized) { Store (Package (0x02) { "location", Buffer (0x02) { "1" } }, Local0) DTGP (Arg0, Arg1, Arg2, Arg3, RefOf (Local0)) Return (Local0) } } 4. Now change all remaining occurrences of MMAC in the DSDT.aml file to LAN0, i.e. change Notify (\_SB.PCI0.MMAC, 0x02) to Notify (\_SB.PCI0.LAN0, 0x02) ************************************************************* Link to comment https://www.insanelymac.com/forum/topic/281665-nforce-os-x-mountain-lion-108-app-store-download-install-guide-on-a-series-6-or-7-nforce-chipset-intel-cpu-mobo/#findComment-1842842 Share on other sites More sharing options...
verdant Posted August 10, 2012 Author Share Posted August 10, 2012 ************************************************************* Getting Audio Working in OS X Mountain Lion ************************************************************* This guide will hopefully include in time, more reports of successful attempts to get different audio chipsets/codecs working on different nForce chipset + Intel CPU MOBOs.........but I am starting with what enables audio on my Asus P5N32-E SLI Plus MOBO...... 1. Asus SupremeFX II Audio Card (Analog Devices AD1988B 8-Channel High Definition Audio chipset/CODEC) with oldnapalm's patched (for AD1988B 7.1) VoodooHDA.kext v2.7.2 for OS X Snow Leopard/Lion/Mountain Lion: In OS X Mountain Lion 10.8 on on my Asus P5N-32E SLI Plus MOBO and Asus SupremeFX II Audio Card using a modified version of oldnapalm's original version VooddoHDA.kext for AD1988B, that has a default association of 0x02214050 for node 17 in the VoodooHDA.kext Info.plist file rather than the original of 0x0221401f, the System Report for Audio shows: Devices: Line-out (Green Rear): Default Output Device: Yes Default System Output Device: Yes Manufacturer: Voodoo Output Channels: 2 Current SampleRate: 192000 Transport: Unknown Microphone (Pink Rear): Default Input Device: Yes Input Channels: 2 Manufacturer: Voodoo Current SampleRate: 192000 Transport: Unknown Microphone (Pink Front): Input Channels: 2 Manufacturer: Voodoo Current SampleRate: 192000 Transport: Unknown Line-in (Blue Rear): Input Channels: 2 Manufacturer: Voodoo Current SampleRate: 192000 Transport: Unknown Headphones (Green Front): Manufacturer: Voodoo Output Channels: 2 Current SampleRate: 192000 Transport: Unknown Line-out (Black Rear): Manufacturer: Voodoo Output Channels: 2 Current SampleRate: 192000 Transport: Unknown Line-out (Orange Rear): Manufacturer: Voodoo Output Channels: 2 Current SampleRate: 192000 Transport: Unknown Line-out (Grey Rear): Manufacturer: Voodoo Output Channels: 2 Current SampleRate: 192000 Transport: Unknown SPDIF-out (Rear): Manufacturer: Voodoo Output Channels: 4 Current SampleRate: 192000 Transport: Unknown Now and then two sound assertion messages (albeit both at line 397) are listed during verbose booting: Sound assertion in AppleHDAController at line 397 Sound assertion in AppleHDAController at line 397 but the audio always works.....although there is a 'pop' sound on booting/shutdown, and while there is a working volume slider and I can mute / unmute, I get a 'pop' sound doing it......also, decreasing the slider (volume) to minimum (zero) volume causes a 'pop' sound and increasing slowly generates a 'pop' just above zero level but increasing it quickly to 75% volume generates a 'pop' sound before going to 100% volume..... Oldnapalm posts that as far as he is aware, the "pop" sound on startup/shutdown and mute/unmute cannot be fixed by plist editing..... However, setting a default association of 0x02214050 for node 17 in the VoodooHDA.kext Info.plist file has enabled the front green port for headphones but not with autodetect..... <dict> <key>Codec</key> <integer>0</integer> <key>Config</key> <string>0x02214050</string> <key>Node</key> <integer>17</integer> </dict> instead of <key>Codec</key> <integer>0</integer> <key>Config</key> <string>0x0221401f</string> <key>Node</key> <integer>17</integer> </dict> My System Preferences then displays: Sound Output: - Headphones (Green Front) - Working via manual selection in sound prefs - Line-out (Black Rear) - not tested - Line-out (Green Rear) - working via manual selection in sound prefs - Line-out (Grey Rear) - not tested - Line-out (Orange Rear) - not tested - SPDIF-out (rear) - not tested Sound Input: - Line-in (Blue Rear) - not tested - Microphone (Pink Front) - working via manual selection in sound prefs - Microphone (Pink Rear) - not tested fully as not convenient to use Despite the sound 'pops' on on startup/shutdown and mute/unmute, having both the Front Headphones (green front) and the Front Microphone (pink front) working via manual selection in Sound Preferences is very useful should you want to use FaceTime and/or Skype etc..... The results of oldnapalm's original version VooddoHDA.kext for AD1988B on my Asus P5N-32E SLI Plus MOBO and Asus SupremeFX II Audio Card using OS X Lion before and after setting a default association of 0x02214050 for node 17 in the VoodooHDA.kext Info.plist file are described here...... ************************************************************* ************************************************************* 3. Realtek ALC885/889a 7.1+2 Channel High Definition Audio Codec via DSDT Modding: To enable sound from the Realtek ALC885 (but also ALC889a) in Lion.....including the Front Panel audio......requires the following Device (HDEF) patch in your DSDT.aml file and the AppleHDA.kext (1.7.9a4), which is the OS X Snow Leopard 10.6.2 version AppleHDA.kext.zip and LegacyHDA.kext LegacyHDA.kext.zip All thanks for this solution goes to abhilash who had been trying from the release of the Lion OS Developer Preview to get audio working in OS X Lion on his XFX nForce 680i LT SLI MOBO...... 1. abhilash Device (HDEF) patch: Device ( HDEF) { Name (_ADR, 0x000F0001) <------ Your _ADR value here may be different Method (_DSM, 4, NotSerialized) { Store (Package (0x0A) { "built-in", Buffer (One) { 0x01 }, "codec-id", Buffer (0x04) { 0x85, 0x08, 0xEC, 0x10 }, "layout-id", Buffer (0x04) { 0x75, 0x03, 0x00, 0x00 }, "device-type", Buffer (0x12) { "Realtek ALC889A" }, "PinConfigurations", Buffer (0x28) { /* 0000 */ 0x10, 0x90, 0xA1, 0x01, 0x20, 0x90, 0xA1, 0x02, /* 0008 */ 0x80, 0x30, 0x81, 0x01, 0x90, 0x40, 0x21, 0x02, /* 0010 */ 0x30, 0x40, 0x11, 0x01, 0x40, 0x40, 0x01, 0x01, /* 0018 */ 0x50, 0x60, 0x01, 0x01, 0x60, 0x20, 0x01, 0x01, /* 0020 */ 0x70, 0x61, 0x4B, 0x01, 0xA0, 0x01, 0xCB, 0x01 } }, Local0) DTGP (Arg0, Arg1, Arg2, Arg3, RefOf (Local0)) Return (Local0) } Name (_PRW, Package (0x02) { 0x0D, 0x03 }) } You need to search your DSDT for the presence of either Device (AZA) or Device (AZAL) or Device (AZAD) and replace AZA, AZAL, or AZAD with HDEF, giving Device (HDEF) and insert the HDEF patch. If the device is not present, it must be added......according to THe KiNG, in most other cases the audio device is apparently in DSDT on _ADR 0x001B0000 and the device is often named Device (AZAL)......or Device (AZA). In abhilash's DSDT, the audio device has this address: _ADR, 0x000F0001.....BUT your _ADR value here may be different, so find the Name (_ADR, "your _ADR value").......and REMEMBER TO KEEP the line Name (_ADR, "your _ADR value") in the DSDT... Replace all other other occurrences of AZA, AZAL, or AZAD in your DSDT.aml file with HDEF,e.g. replace XXXX, where XXXX is AZA, AZAL, or AZAD, with HDEF in "Notify (_SB.PCI0.XXXX, 0x02)" to give "Notify (_SB.PCI0.HDEF, 0x02)" 2. Install the OS X Snow Leopard v10.6.2 AppleHDA.kext (1.7.9a4) in /System/Library/Extensions/ and the repair the Extensions ownership and permissions and kernelcache recreation via Terminal by typing: sudo chown -R 0:0 /System/Library/Extensions sudo chmod -R 755 /System/Library/Extensions sudo touch /System/Library/Extensions 3. Install LegacyHDA.kext in /Extra/Extensions/ 4. Reboot and check in System report, OS X top menu bar (Loudspeaker should be 'black' not 'gray' and the volume slider should work) and System Preferences >>>> Sound to check that your audio is fully functioning..... sound.png input.png output.png Instead of abhilash's LegacyHDA.kext in /Extra/Extensions/, you can use the iLeopod Info.plist-only ALC885.kext in /Extra/Extensions/......compared withthis ALC885 llegacy kest, LegacyHDA has BuiltinHDA addition and configdata is different. Here it is: iLeopod_ALC885.kext.zip iLeopod's update: ALC885.kext_test.zip With this updated version, iLeopod says that hot-plugging should work via auto-detect like before. Try if front mic is working maybe Built in HDA its he solution for that (not yet added). Should you see the following when booting up: Kext com.apple.driver.AppleHDAController might not load - kextd is currently unavailable.Sound assertion "0 == pciVendorProductID" failed in "/SourceCache/AppleHDA/AppleHDA-179.1.4/AppleHDAController/AppleHDAController.cpp" at line 2682 goto Exit this sound assertion issue can be solved, according to iLeopod, by adding one of these subsystem ids to Device (HDEF) in your DSDT: "subsystem-id",Buffer (0x04) { 0x79, 0xCB, 0x00, 0x00 }, "subsystem-vendor-id", Buffer (0x04) { 0xDE, 0x10, 0x00, 0x00 }, or "subsystem-id",Buffer (0x04) { 0xA0, 0x00, 0x00, 0x00 }, "subsystem-vendor-id", Buffer (0x04) { 0x6B, 0x10, 0x00, 0x00 }, The first version is preferred by iLeopod....... Be careful with Store (Package (0x08) entry of Device (HDEF).......just remove the numbers and let the DSDT compiler deal with it......like this: Store (Package () giving as shown in iLeopod's Device (HDEF) section: Device ( HDEF ) { Name (_ADR, 0x000F0001) <------ Your _ADR value here may be different Method (_DSM, 4, NotSerialized) { Store (Package () { "built-in", Buffer (One) { 0x00 }, "subsystem-id", Buffer (0x04) { 0x79, 0xCB, 0x00, 0x00 }, "subsystem-vendor-id", Buffer (0x04) { 0xDE, 0x10, 0x00, 0x00 }, "codec-id", Buffer (0x04) { 0x85, 0x08, 0xEC, 0x10 }, "platformFamily", Buffer (One) { 0x00 }, "layout-id", Buffer (0x04) { 0x75, 0x03, 0x00, 0x00 }, "device-type", Buffer (0x0F) { "Realtek ALC885" }, "PinConfigurations", Buffer (Zero) {} }, Local0) DTGP (Arg0, Arg1, Arg2, Arg3, RefOf (Local0)) Return (Local0) } Name (_PRW, Package (0x02) { 0x0D, 0x03 }) } } N.B. According to abhilash, sound is not working with AppleHDA.kext version 10.6.7 (1.9.9f12) plus LegacyHDA or ALC885....... I have noted the following: AppleHDA version 10.6.2 = 1.7.9a4 AppleHDA version 10.6.3 = 1.8.4fc3 AppleHDA version 10.6.4 = 1.8.7f1 AppleHDA version 10.6.5 = 1.9.9f12 AppleHDA version 10.6.6 = 1.9.9f12 AppleHDA version 10.6.7 = 1.9.9f12 AppleHDA version 10.6.8 = 2.0.5f13/f14 AppleHDA version 10.7.0 = 2.1.1f11 AppleHDA version 10.7.1 = 2.1.1f12 VCH888 has posted in his ALC889A (Gigabyte, Intel) topic here, that getting working sound in 10.6.8 and 10.7.x only requires putting his ALC885_889a.kext Info.plist-only kext in /S/L/E and copying layout885.xml and Platforms.xml into the 10.7.x AppleHDA.kext, or AppleHDA.kext version 2.0.0 or higher (in /S/L/E/) Resources folder......but that method (replacing LegacyHDA/ALC885 with ALC885_889a) is not working for abhilash on his nforce MOBO....... ************************************************************* N. B. iLeopod has posted some interesting information about the AppleHDA.kext..... Interesting fact that that some boards Have Audio codec with address 2 (Like the Gigabyte and original Apple ) and zero Like mine and others. There are different Pros and Cons about using the old open 10.6.2 AppleHDA (Open for All codecs, working Frontpanel) or a later one (HDMI Audio for GFX with integrated HDMI audio). With codec Address (first Number in pinconfig) 2 u can use the new AppleHDA. Using the Lion Apple HDA is not recommend because there are a lot of sound assertions and it take 1 min. or more till you hear sth. ************************************************************* Link to comment https://www.insanelymac.com/forum/topic/281665-nforce-os-x-mountain-lion-108-app-store-download-install-guide-on-a-series-6-or-7-nforce-chipset-intel-cpu-mobo/#findComment-1842852 Share on other sites More sharing options...
verdant Posted August 10, 2012 Author Share Posted August 10, 2012 (edited) *************************************************************Peripheral Devices on nForce chipset + Intel CPU MOBOs*************************************************************Device 1. Asmedia 106x SATA Controller Ver 0.95 AHCI ModeThis device is referring to any PCI-e card with the asmedia ASM1061 chipset on it. This chipset has the follow SATA features:2 port Serial ATA PHY for 1.5, 3.0 and 6.0GHz signalling (2 eSATA, or 2 SATA, or 1 eSATA + 1SATA; set via jumper block)Supports Native Command Queue (NCQ)Supports Gen 1m and 2m SATA PHYSupports a Port MultiplierSee here for a topic on its use with OS X on x86 hacks.......Here is an interesting comparison of alternative SATA III controllers for connecting up SSDs.I have overcome my nForce chipset issue with my SATA DVDRW by using two ASM1061 chipset PCI-e SATA III cards (2 eSATA, or 2 SATA, or 1 eSATA and 1 SATA port). I have put one card in a spare x16 PCI-e slot and one card in a spare x8 PCI-e slot. Issue 1. Displayed in System Report as "Unknown AHCI Standard Controller:" and "Vendor: Unknown"This is happening because Apple's GenericAHCI device in the AppleAHCIPort.kext is being used by OS X to recognise and support this device. Consequently, if you installed another PCI-e card SATA controller with a different chipset that is also recognised and supported by OS X Apple's GenericAHCI device in the AppleAHCIPort.kext, it too would display as "Unknown AHCI Standard Controller:" and "Vendor: Unknown".Thus, there is no point in making use of a LegacyAppleAHCIPort.kext to make the System Report display the ASM1061 chipset PCI-e card, for example, as "Asmedia 106x SATA Controller Ver 0.95 AHCI Mode", which would involve editing the Info.plist file of the legacy kext to be installed in /S/L/E/, by modifying the GenericAHCI device section.This is because the resultant change in the System Report/Hardware/Serial-ATA/ window,would as explained above, be just a superficial and purely cosmetic change......and if these changes were made, both PCI-e SATA Controllers would then display as being "Asmedia 106x SATA Controller Ver 0.95 AHCI Mode" and "Vendor: Asmedia Technology" when they are not.....Furthermore, why worry about such cosmetic touches, when running OS X on your x86 Hack will never be the same as running it on a'real' Mac....... Issue 2. Updating the ASM1061 firmware from version 0.89 to version 0.95 and then 0.95.1If your purchased PCI-e card with the asmedia ASM1061 chipset shows up as "Asmedia 106x SATA Controller Ver 0.89 AHCI Mode" when booting your PC, you can update the ASM1061 firmware from version 0.89 to the current latest version 0.95 and then to revision 0.95.1 as follows:1. Get access to a Windows OS and download and run Rufus v1.3.4 in Windows, in order to create an MS-DOS bootable USB flash drive:rufus_v1.3.4.exe.zip2. Download the following zipped folder:ASMedia 1061 Firmware.zip3. Unzip it and you should see a folder called ASMedia 1061 Firmware, that contains the folders N095 and N0951, which are extracted from the .zip and compressed .exe files. respectively. The N095 folder contains: 106N095.BIN106spi.exeAHCI.BATahci95A1.romdos4gw.exedriver, bios, firmware, utilities.urlIDE.BATide95A1.romReadMe.txt while the N0951 folder contains: 106N0951.BIN 106spi.exe AHCI.BAT ahci0951.rom dos4gw.exe IDE.BAT ide0951.rom 4. Copy the contents of folder N095 onto the MS-DOS bootable USB flash drive, and boot the PC using the MS-DOS bootable flash drive5. When the black boot screen is displayed, at the C:> prompt, type AHCI.bat and press Return.......the ASM1061 chipset firmware should then be updated to version 0.95.6. Re-boot the PC and check that the following is displayed onscreen:Asmedia 106x SATA Controller Ver 0.95 AHCI Mode7. Replace these files on the MS-DOS bootable flash drive 106N095.BIN106spi.exeAHCI.BATahci95A1.romdos4gw.exeIDE.BATide95A1.rom with all the files in folder N0951 106N0951.BIN 106spi.exe AHCI.BAT ahci0951.rom dos4gw.exe IDE.BAT ide0951.rom and boot the PC using the MS-DOS bootable flash drive8. When the black boot screen is displayed, at the C:> prompt, type AHCI.bat and press Return.......the ASM1061 chipset firmware should then be updated to version 0.951. 9. Re-boot the PC and check that the following is displayed onscreen: Asmedia 106x SATA Controller Ver 0.951 AHCI Mode Issue 3. Resolvable Issues when the Asmedia SATA Controller is connected to one or more SATA Optical DrivesWhen you have one or more SATA optical drive connected to the ASM1061 chipset PCI-e card, the optical drive tray(s) will open and close during the boot up process, and then when you reach the Desktop and put a disc in the tray(s), the drive(s) will stay inactive and a message will appear to say that ' blank DVD has been inserted into the drive', and the disc(s) will not appear on the Desktop.I get around this quirky issue by placing one of my undamaged "coaster" CDs or DVDs in the SATA DVDRW before I boot into OS X and before I shut down OS X......i.e. I keep a CD/DVD in the SATA DVDRW all the time.....once OS X is booted and running, I have had no problems and simply put whatever CD/DVDRW I need to/want to use in the DVDRW........but when I want to shut OS X down I first put my "coaster" disc in the drive......************************************************************* Edited August 28, 2013 by verdant Link to comment https://www.insanelymac.com/forum/topic/281665-nforce-os-x-mountain-lion-108-app-store-download-install-guide-on-a-series-6-or-7-nforce-chipset-intel-cpu-mobo/#findComment-1842861 Share on other sites More sharing options...
Stormed Posted August 16, 2012 Share Posted August 16, 2012 Thank you for a great guide. I have been trying to get my gts 250 to work but have no luck. I will try the DSDT patch and will let you know if this will help solved my problem. Link to comment https://www.insanelymac.com/forum/topic/281665-nforce-os-x-mountain-lion-108-app-store-download-install-guide-on-a-series-6-or-7-nforce-chipset-intel-cpu-mobo/#findComment-1844510 Share on other sites More sharing options...
abhilash Posted August 16, 2012 Share Posted August 16, 2012 Great guide again Link to comment https://www.insanelymac.com/forum/topic/281665-nforce-os-x-mountain-lion-108-app-store-download-install-guide-on-a-series-6-or-7-nforce-chipset-intel-cpu-mobo/#findComment-1844537 Share on other sites More sharing options...
verdant Posted August 16, 2012 Author Share Posted August 16, 2012 @ Stormed @ abhilash Glad you both like the guide. At present I am preparing [1] my BootDVD for Mountain Lion and the accompanying [2] Mountain Lion Install DVD contents before writing up Parts E and F....... 1 Link to comment https://www.insanelymac.com/forum/topic/281665-nforce-os-x-mountain-lion-108-app-store-download-install-guide-on-a-series-6-or-7-nforce-chipset-intel-cpu-mobo/#findComment-1844613 Share on other sites More sharing options...
Peter_sm Posted August 19, 2012 Share Posted August 19, 2012 This guide is great, I'm working to get my GeForce GT 230M 1024 MB to work, but it's not so easy im ML as in LION, where it's works flawless :-) //Peter Link to comment https://www.insanelymac.com/forum/topic/281665-nforce-os-x-mountain-lion-108-app-store-download-install-guide-on-a-series-6-or-7-nforce-chipset-intel-cpu-mobo/#findComment-1845400 Share on other sites More sharing options...
OMEGA_RAZER Posted August 19, 2012 Share Posted August 19, 2012 Thank you for a great guide. I have been trying to get my gts 250 to work but have no luck. I will try the DSDT patch and will let you know if this will help solved my problem. Did you do any modifications to kexts at all? both mine are working with just graphics enabler on. P.S. I've since replaced my nForce board but they were working before I did. Link to comment https://www.insanelymac.com/forum/topic/281665-nforce-os-x-mountain-lion-108-app-store-download-install-guide-on-a-series-6-or-7-nforce-chipset-intel-cpu-mobo/#findComment-1845589 Share on other sites More sharing options...
verdant Posted August 20, 2012 Author Share Posted August 20, 2012 @ OMEGA_RAZER Out of interest what is your replacement system......? If my nForce MOBO fails (which I have had since 2007 - my first personal PC having always owned Macs by preference) at any point between now and OS X 10.9 (or OS X 11.0), or if my MOBO does not fail but OS X 10.9 (or OS X 11.0) does not support my Quad Core Q6600 CPU, then this will be my last nForce guide.......at which point, I will have decide whether to go for a new Intel MOBO + CPU Hack, or go for a 2nd/3rd user real Intel Mac Pro with 6 or 12 cores...... @ Stormed If the GTS250 worked for OMEGA_RAZER, it may be because he was using Chimera 1.9.2....? Perhaps you could try a Mountain Lion compatible version of Chimera.....? Link to comment https://www.insanelymac.com/forum/topic/281665-nforce-os-x-mountain-lion-108-app-store-download-install-guide-on-a-series-6-or-7-nforce-chipset-intel-cpu-mobo/#findComment-1845617 Share on other sites More sharing options...
OMEGA_RAZER Posted August 20, 2012 Share Posted August 20, 2012 (edited) @ OMEGA_RAZER Out of interest what is your replacement system......? If my nForce MOBO fails (which I have had since 2007 - my first personal PC having always owned Macs by preference) at any point between now and OS X 10.9 (or OS X 11.0), or if my MOBO does not fail but OS X 10.9 (or OS X 11.0) does not support my Quad Core Q6600 CPU, then this will be my last nForce guide.......at which point, I will have decide whether to go for a new Intel MOBO + CPU Hack, or go for a 2nd/3rd user real Intel Mac Pro with 6 or 12 cores...... Thanks for reminding me I still need to update my sig here's my new specs though:OS': OS X 10.8.1, Win 7 x64 Ultimate. Bootloader: Chimera 1.11.1 MOBO: ASUS P8Z77-V Pro/Thunderbolt CPU: Intel i7-3770s RAM: Corsair Vengeance 16GB (4x4GB) Sys Disks: OCZ Agility3 120GB SSD and Kingston HyperX 120GB SSD Graphics: EVGA GTS250 x 2 PSU: Zalman ZM850-HP It's running awesome though with the modded bios that's out there it runs native power management and the only thing that's not quite working for me is the USB3... it works when I have my USB3 enclosure plugged in but not anything with USB2... That and I need to find a good Blu-Ray player since VLC doesn't seem to work EDIT: forgot about the WiFi-Go card not working either but its not a huge priority as I have my router set up to do the same currently. Edited August 20, 2012 by OMEGA_RAZER Link to comment https://www.insanelymac.com/forum/topic/281665-nforce-os-x-mountain-lion-108-app-store-download-install-guide-on-a-series-6-or-7-nforce-chipset-intel-cpu-mobo/#findComment-1845653 Share on other sites More sharing options...
JohnnyFikCock Posted August 21, 2012 Share Posted August 21, 2012 hy verdant, first thanks again for another beautiful guide from you. i installed Lion with your help and now i want MountainLion^^ but at the moment i cant boot/install it. i'm getting sill waiting for root device but i dont know how to solve... i thought it has something todo with USB so i tested some boot flags: USBfix=Yes EHCIacquire=YES UHCIreset=No but none of them helped me, maybe you have an idea Link to comment https://www.insanelymac.com/forum/topic/281665-nforce-os-x-mountain-lion-108-app-store-download-install-guide-on-a-series-6-or-7-nforce-chipset-intel-cpu-mobo/#findComment-1846114 Share on other sites More sharing options...
verdant Posted August 21, 2012 Author Share Posted August 21, 2012 @ JohnnyFiCock Glad you like the guide....... If you have not already done so, try the following: 1. Transfer ALL kexts in /Extra/Extensions/ to /System/Library/Extensions/, leaving /Extra/Extensions/ empty. 2. Modify your org.chameleon.Boot.plist file to include <key>UseKernelCache</key> <string>Yes</string> 3. Reset /System/Library/Extensions/ kext ownership and permissions and force kernelcache re-creation via these Terminal commands: sudo chown -R root:wheel /System/Library/Extensions/ sudo chmod -R 755 /System/Library/Extensions/ sudo touch /System/Library/Extensions/ 4. For good measure, manually delete the kernelcache and other cache files in /System/Library/Caches/com.apple.kext.caches/Startup/ 5. Reboot into OS X 10.7.3.........and use Disk Utility to repair system permissions...... Link to comment https://www.insanelymac.com/forum/topic/281665-nforce-os-x-mountain-lion-108-app-store-download-install-guide-on-a-series-6-or-7-nforce-chipset-intel-cpu-mobo/#findComment-1846118 Share on other sites More sharing options...
Kilopopo Posted August 27, 2012 Share Posted August 27, 2012 hi verdant i am having problems with pci configuration begins lock up i followed all your guides about the problem pci configuration begins. Do you have any other working versions of AppleACPIPlatform.kext? Thanks Link to comment https://www.insanelymac.com/forum/topic/281665-nforce-os-x-mountain-lion-108-app-store-download-install-guide-on-a-series-6-or-7-nforce-chipset-intel-cpu-mobo/#findComment-1847998 Share on other sites More sharing options...
verdant Posted August 27, 2012 Author Share Posted August 27, 2012 @ Kilopopo At present I am not aware of other versions of IOPCIFamily.kext and AppleACPIPlatform.kext for resolving this issue, other than nawcom's legacy kexts, or oleg's patched IOPCIFamily.kext...... For some users having this issue, whether on nForce or Intel chipset MOBOs, it seems to be PCI/PCI-e hardware device related, e.g. for some changing their Graphics card either caused the "PCI config begin" problem or resolved it, whereas for others, changing their WLAN card either caused the "PCI config begin" problem or resolved it...... So have you tried to see if it may be related to your having two 8600GT graphics cards installed.....i.e. do you have the same problem with just one graphics card in slot one.....? What "graphics driver" method are you using to run your dual graphics cards......? At least one person has reported on IM that they used pci=off npci=0x3000 GraphicsEnabler=No to overcome their "PCI config begin" problem...... I assume that you have trawled through mboy's PCI Configuration Begin topic .......? What about the Project OS X Forums.....? Link to comment https://www.insanelymac.com/forum/topic/281665-nforce-os-x-mountain-lion-108-app-store-download-install-guide-on-a-series-6-or-7-nforce-chipset-intel-cpu-mobo/#findComment-1848126 Share on other sites More sharing options...
Kilopopo Posted August 28, 2012 Share Posted August 28, 2012 thanks verdant will try that Actually I used Olegs patched IOPCIFamily.kext . but i get RPCout problems. Ill tell you the detailed errors when i load it back to ML Thanks again Link to comment https://www.insanelymac.com/forum/topic/281665-nforce-os-x-mountain-lion-108-app-store-download-install-guide-on-a-series-6-or-7-nforce-chipset-intel-cpu-mobo/#findComment-1848293 Share on other sites More sharing options...
Kilopopo Posted August 29, 2012 Share Posted August 29, 2012 I was able to get pass PCI Configuration Begin by using legacy kext EvilAppleACPIPlatform.kext from nawcom. Now I want my lan connection to work but the problem is it does not get recognized in ML I used nforcelan 64.5 and 64.6 but no luck instead can you help me patch my dsdt for the lan? what do i need in able to do this? thanks Link to comment https://www.insanelymac.com/forum/topic/281665-nforce-os-x-mountain-lion-108-app-store-download-install-guide-on-a-series-6-or-7-nforce-chipset-intel-cpu-mobo/#findComment-1848677 Share on other sites More sharing options...
verdant Posted August 29, 2012 Author Share Posted August 29, 2012 @ Kilopopo Good to know that nawcom's legacy ACPIPlatform kext enables you to get past "PCI config begin"....... I have no problems using v0.64.5 nForceLAN.kext on my 650i nForce MOBO. Exactly how and where have you installed the nForceLAN.kext? The v0.64.5 kext for Leopard should be installed manually into /S/L/E (v0/64.6 is not recommended as many have problems with using it), and also, for good measure, rename nvenet.kext as nvenet.kext_Bad. Then reset the ownwership and permissions of /S/L/E/ via Terminal: sudo chown -R root:wheel /System/Library/Extensions sudo chmod -R 755 /System/Library/Extensions sudo touch /System/Library/Extensions exit and then go to /System/Library/Caches/com.apple.kext.caches/Startup and delete these files within Startup…. IOKitPersonalities_i386.ioplist.gz IOKitPersonalities_x86_64.ioplist.gz kernelcache KextPropertyValues_OSBundleHelper_i386.plist.gz KextPropertyValues_OSBundleHelper_x86_64.plist.gz Reboot and check if the nForceLAN.kext is being loaded by booting with -v and also by entering the kextstat command in Terminal..... Link to comment https://www.insanelymac.com/forum/topic/281665-nforce-os-x-mountain-lion-108-app-store-download-install-guide-on-a-series-6-or-7-nforce-chipset-intel-cpu-mobo/#findComment-1848722 Share on other sites More sharing options...
JohnnyFikCock Posted August 30, 2012 Share Posted August 30, 2012 @ JohnnyFiCock Glad you like the guide....... If you have not already done so, try the following: 1. Transfer ALL kexts in /Extra/Extensions/ to /System/Library/Extensions/, leaving /Extra/Extensions/ empty. 2. Modify your org.chameleon.Boot.plist file to include <key>UseKernelCache</key> <string>Yes</string> 3. Reset /System/Library/Extensions/ kext ownership and permissions and force kernelcache re-creation via these Terminal commands: sudo chown -R root:wheel /System/Library/Extensions/ sudo chmod -R 755 /System/Library/Extensions/ sudo touch /System/Library/Extensions/ 4. For good measure, manually delete the kernelcache and other cache files in /System/Library/Caches/com.apple.kext.caches/Startup/ 5. Reboot into OS X 10.7.3.........and use Disk Utility to repair system permissions...... no luck with this steps :-( you have other advices for me? i dont see my Problem... Link to comment https://www.insanelymac.com/forum/topic/281665-nforce-os-x-mountain-lion-108-app-store-download-install-guide-on-a-series-6-or-7-nforce-chipset-intel-cpu-mobo/#findComment-1848941 Share on other sites More sharing options...
verdant Posted August 30, 2012 Author Share Posted August 30, 2012 @ JohnnyFiCock I suggest you disconnect all USB devices except your USB keyboard and USB mouse and then try to boot OS X Lion.........if that does not work, then further disconnect all HDDs except your OS X HDD, and try booting again.........and report back what happens........ Link to comment https://www.insanelymac.com/forum/topic/281665-nforce-os-x-mountain-lion-108-app-store-download-install-guide-on-a-series-6-or-7-nforce-chipset-intel-cpu-mobo/#findComment-1848958 Share on other sites More sharing options...
Kilopopo Posted August 31, 2012 Share Posted August 31, 2012 Verdant I got the lan working by using nForceLAN.0.64.5.kext from 10.7.2 installation that i have now I am tinkering with my alc 883 audio thanks a lot verdant Link to comment https://www.insanelymac.com/forum/topic/281665-nforce-os-x-mountain-lion-108-app-store-download-install-guide-on-a-series-6-or-7-nforce-chipset-intel-cpu-mobo/#findComment-1849188 Share on other sites More sharing options...
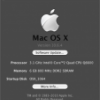
Recommended Posts