
How to Fix Corrupted MOV Video Files on Mac
MOV file corruption is a common problem responsible for many lost video moments. Fortunately, you can repair a corrupt MOV file on a Mac using the five methods I’ll describe in this article. The same methods have helped me and many other people repair MOV files on Mac in the past, and I’m sure they’ll help you too.
What Causes MOV Files to Become Corrupted?

I know I know, you’re itching to fix your corrupted MOV video file so that you can play it again and your patience for reading me explain how corruption happens in the first place is limited, but knowing why it occurs isn’t just about curiosity—it’s about prevention too.
You don’t want to repair one MOV file just to see another one become corrupted a few hours or even minutes later. So, with that said, let’s go through the most common causes of video corruption as quickly as possible:
- Device malfunction during video recording: Sometimes, your camera or smartphone might have a sudden hiccup while you’re capturing that perfect moment, which is exactly what happened to this unfortunate person on Reddit. These malfunctions can prevent the video file from being properly finalized, which leaves you with a corrupted file that won’t play.
- Power interruptions during file transfer: If you’re downloading a video file and your laptop’s battery reaches 0 percent of charge or something (or someone) flips the breaker in your house, then the file transfer will be interrupted and your file corrupted.
- Short circuit or device failure when saving files: Electronic devices can be temperamental sometimes. A short circuit or sudden failure while your device is in the middle of saving a video file is guaranteed to result in corruption.
- Software bugs leading to incomplete transfers: Even the most competent software developers make mistakes, and some of their mistakes make it into public releases and lead to costly problems. Depending on how severe the bug in question is, it can cause the software to crash or produce an error so severe that it interrupts the video file transfer process.
To deal with the consequences of MOV corruption (both avoidable and unavoidable), continue to the next section, where I describe five repair methods that can help you fix your corrupted video files.
3 Best Methods to Repair Corrupt MOV Files on Mac
Alright, let’s cut to the chase: your video is corrupted, and you want it fixed yesterday. To achieve the best repair results in the shortest amount of time possible, please follow the methods below in the order in which I present them. That way, you can start with the simplest and most effective solutions before moving on to more complex and less likely-to-succeed ones.
Method 1: Use a MOV Video Repair Tool for Mac
Video repair tools are specialized software solutions that can analyze the structure of your MOV file, identify the corrupted section, and attempt to bypass it (they don’t restore lost video frames).
You have two main options when it comes to video repair tools: online services and offline (downloadable) software. Each has its pros and cons:
- Online tools are typically easier to use and don’t require installation (so you can use them even on mobile devices), but they may pose privacy concerns since you’re uploading your video to a third-party server. That’s why it’s extra important to choose a reputable online video repair tool and just the first one you stumble across.
- Offline tools offer more privacy and control, but they can be more complex to use and may require some technical know-how. Also, many need to be installed, which is something users who don’t have administrator privileges, such as those trying to repair MOV files on a library computer, can’t do.
Let’s look at the two best online and offline video repair tools, one from each category and both completely free:
Option A: Use Clever Online Video Repair Service
Clever Online Video Repair service is the best completely free online solution for fixing corrupted MOV files, especially those resulting from improperly terminated recordings or interrupted downloads.
Unlike many other similar online tools, Clever Online Video Repair takes user privacy very seriously. All uploaded videos are automatically deleted from their servers, so you can rest assured, knowing your private moments won’t linger on some unknown server.
To use Clever Online Video Repair, you need to:
- Visit the Clever Online Video Repair website and drag your MOV video file onto the designated area.

- Provide a healthy sample video recorded by the same camera and using the exact same settings as the video you’re trying to repair. You can use an older video from your archive or record a new one to a different storage device than the one on which your corrupted video is located.

- Download the repaired video file to your computer.

You will be asked to sign in or create a user account to access the repaired video.
Option B: Try Untrunc
For those who prefer an offline solution, Untrunc with its optional graphical user interface is a solid choice. It’s an open-source tool that can repair MOV (and MP4, M4V, 3GP) files using a working video file as a reference.
Unfortunately, the GUI is included by default only with Windows builds, and macOS and Linux users are expected to build it themselves, which isn’t something even many power users can do. However, you can still use Untrunc on macOS via Terminal. While it’s not as convenient as the graphical interface, it’s a workable solution if you’re comfortable with the command-line. Here’s how to do it:
- First, download the latest version of Untrunc (download ZIP from GitHub). Next, download the latest version of Libav. Unzip both, and make sure to place the Libav contents inside the libav folder in Untrunc.

- Open Terminal, navigate to the libav folder inside the Untrunc directory, and run the following commands:
cd untrunc/libav
./configure
make
cd ..

- Now, compile Untrunc. In the main Untrunc directory, run:
g++ -o untrunc -I./libav file.cpp main.cpp track.cpp atom.cpp codec_*.cpp codecstats.cpp codec.cpp mp4.cpp log.cpp -L./libav/libavformat -lavformat -L./libav/libavcodec -lavcodec -L./libav/libavresample -lavresample -L./libav/libavutil -lavutil -lpthread -lz - After successful compilation, you can now use Untrunc. Place a working MOV file and the corrupted MOV video in the same folder. Run the command in Terminal:./untrunc working_file.mov broken_file.mov

- If successful, Untrunc will create a new file named something like broken_file_fixed.mov that you can then try to play.
While it may require a bit more effort than online tools, Untrunc can be very effective, and it won’t cost you any money to try it.
Method 2: Change the File Format to AVI and Play It Using VLC
This method involves a bit of file extension trickery and leveraging VLC Media Player’s built-in repair capabilities. It’s not guaranteed to work for severely corrupted files, but it’s quick, easy, and free to try.
Here’s how to do it:
- Make a copy of your original corrupted MOV file. We’re going to be messing with file extensions, and it’s always better to be safe than sorry.
- Take your copy and change its file extension from .MOV to .AVI. For example, “corrupted_video.mov” becomes “corrupted_video.avi”. To do this on a Mac, you can right-click the file, select “Get Info,” and then change the extension in the “Name & Extension” field.

- Download and install VLC Media Player from its official website. VLC is available for all major platforms, but only the Windows, macOS, and Linux versions have the repair feature we need—the mobile versions, for example, won’t help you.
- Launch VLC and open Preferences/Settings in the top-left corner of the screen. Navigate to Input/Codecs tab. Look for an option called Repair AVI Files. Make sure the option is set to Ask for action or Always fix.
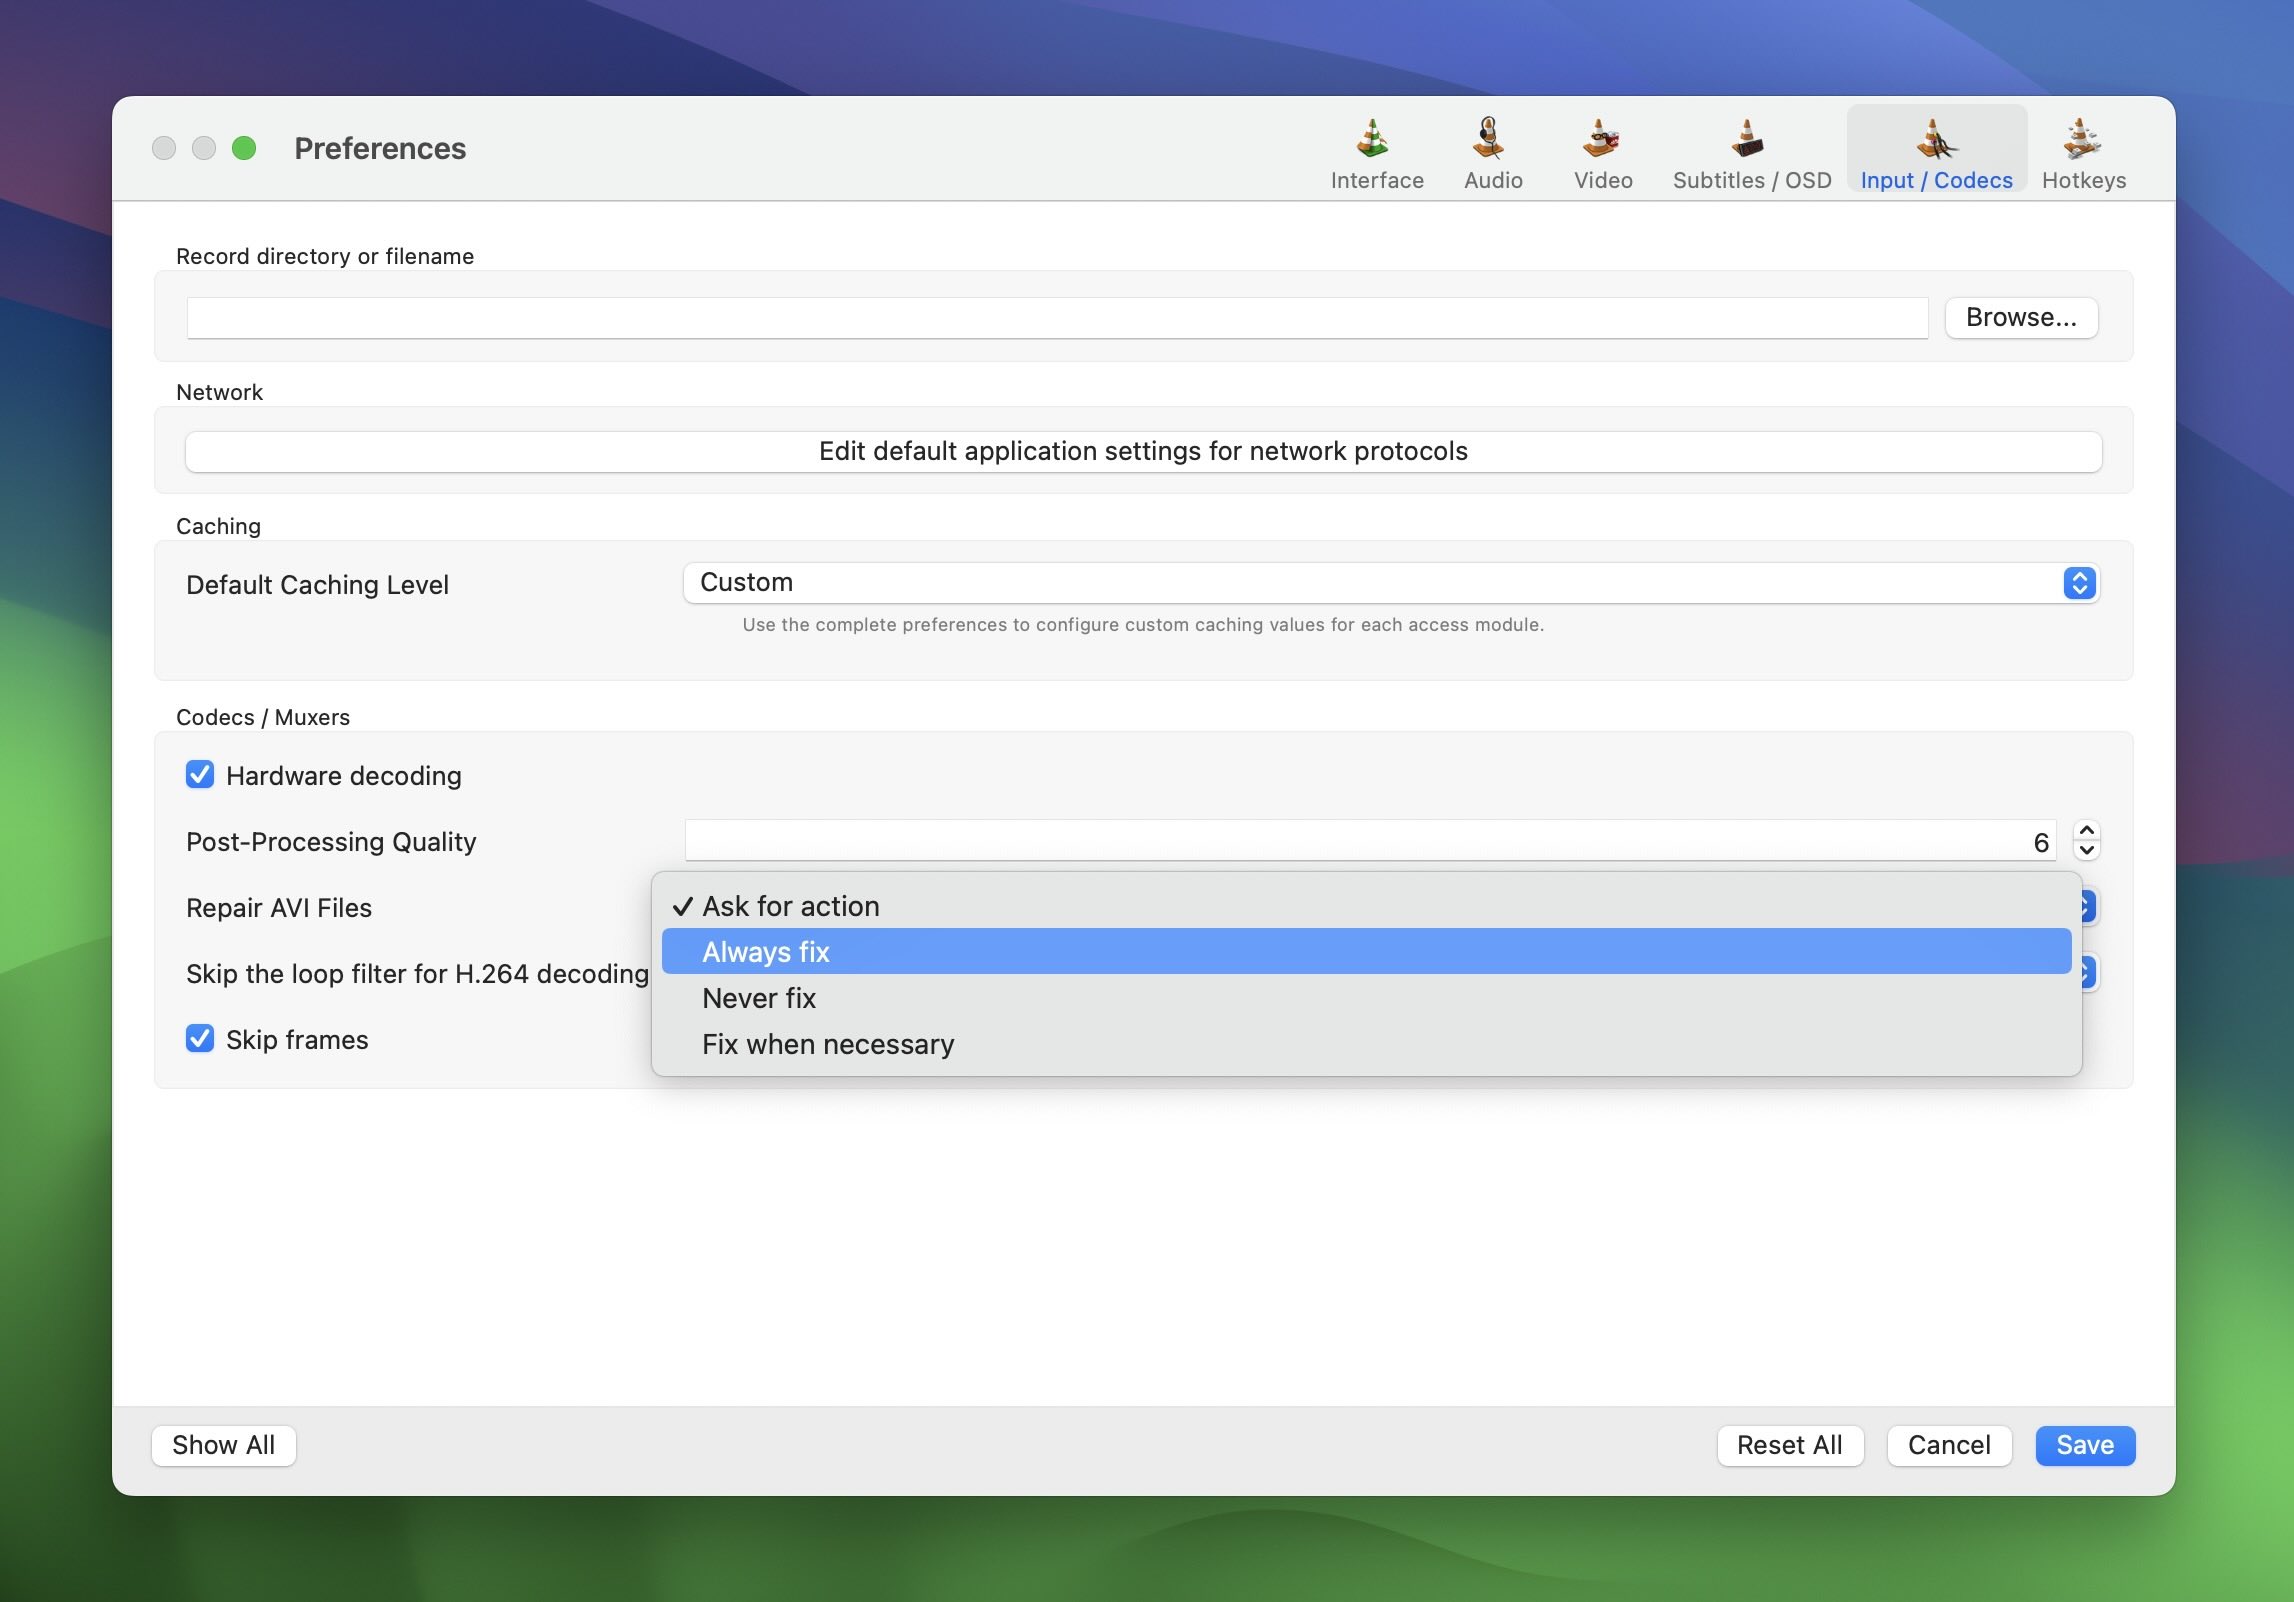
- Try playing your renamed file in VLC. If the Repair AVI Files option is set to Ask for action, you will also need to confirm the repair process. With any luck, VLC will repair the file and play it without any major issues. Unfortunately, I wasn’t lucky, and VLC didn’t manage to repair my video, as the screenshot below shows.

Note, however, that you might experience some skipping during playback. That’s because this method is telling VLC to try its hardest to play whatever data it can find in the file, even if it’s not perfectly structured. While this trick has saved many of my videos in the past, it’s not perfect.
Method 3: Re-Encode the Video with HandBrake
Re-encoding is the process of decoding the existing video data and then encoding it again from scratch. This can often bypass corruption issues and essentially rebuild the video file structure.
For this method, I recommend using HandBrake. It’s a powerful, open-source video transcoder that’s completely free and incredibly capable, which is why it’s loved by many and commonly recommended on online forums and question-answer sites.
Here’s how to use it:
- Download and install HandBrake for macOS from its official website.
- Launch HandBrake and click on “Open Source” to select your corrupted video file or drop it into the designated area.

- Choose a preset. For general use, “Fast 1080p30” is a good choice. You can adjust the Constant Quality slider in the Video tab if you want to. A value between 18-24 usually provides a good balance between quality and file size.
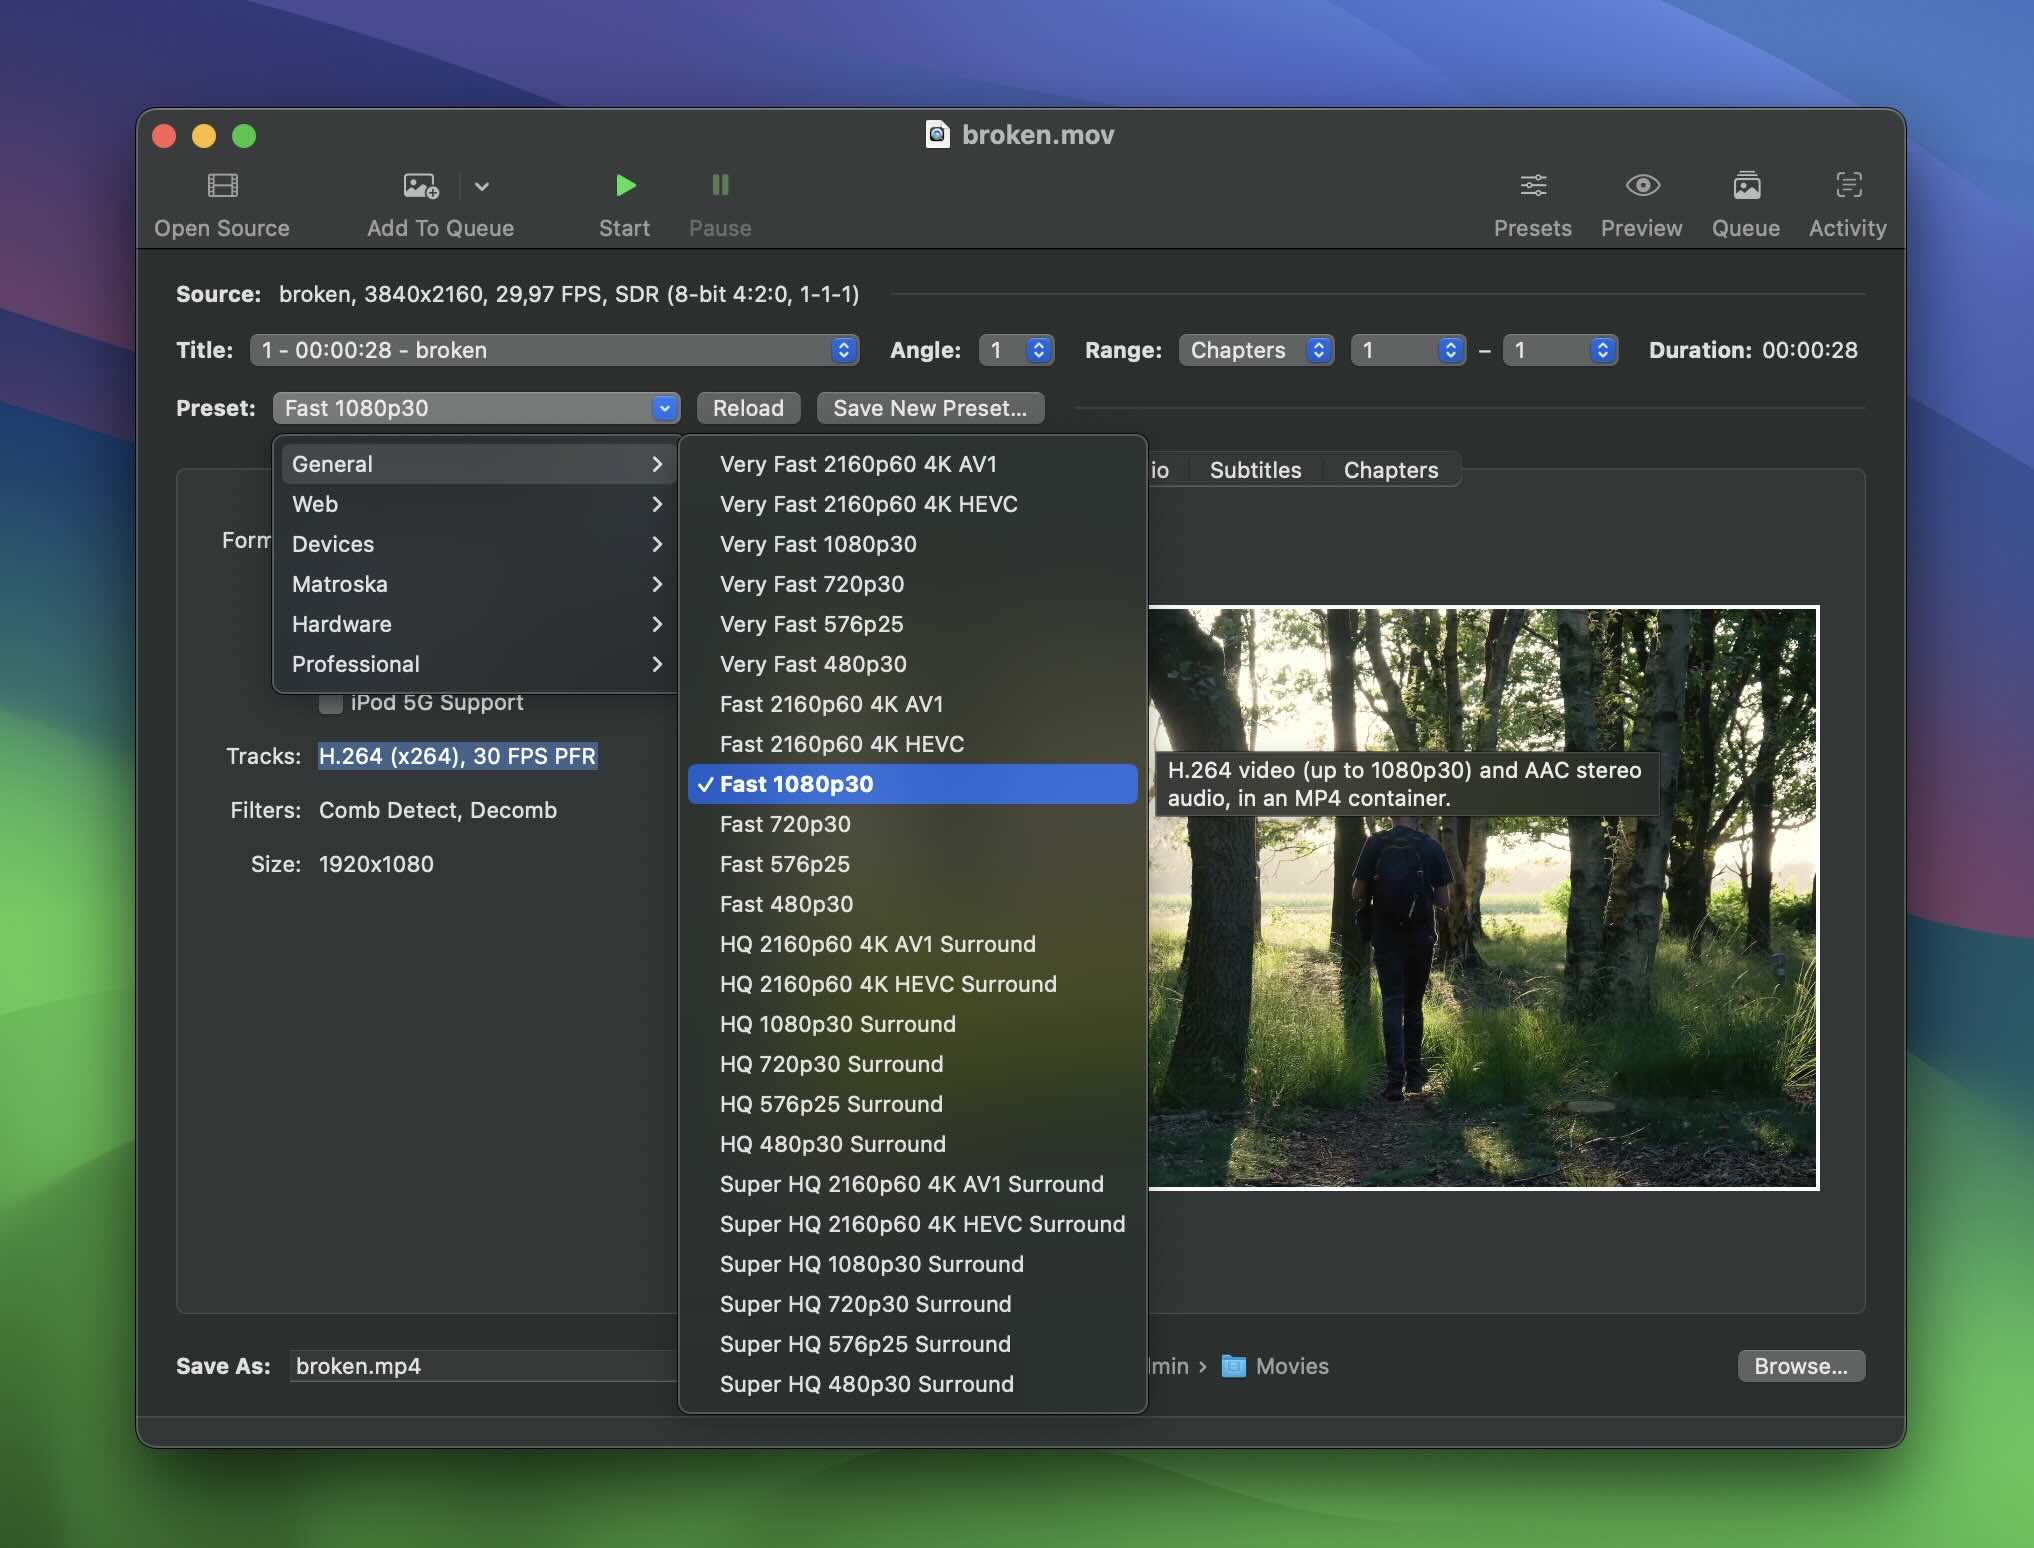
- In the Save As field, give your new video a name and choose where to save it.
- Click the Start Encode button to fix MOV video file on Mac.
How to Use Recovery Software to Recover Videos Lost During Recording Interruptions
Sometimes, the issue isn’t just corruption—your video file might be missing entirely because the logical references leading to its physical location on the storage device haven’t been recorded. Since there’s no visible file, there’s also nothing to repair.
The main one is that it’s incredibly user-friendly while still being powerful enough to recover lost video files in various scenarios. It supports a wide range of file formats, including MOV, and can recover files from virtually any storage device, be it your computer’s hard drive, an SD card from your camera, or even a USB flash drive.
To recover your missing MOV files using Disk Drill:
- Download and install Disk Drill for macOS from the official website.

- Connect the device where your video was being recorded (e.g., camera, phone, or memory card) to your computer.
- Launch Disk Drill and select the connected device from the list. Click the Search for lost data button to start scanning.

- Once the scan is complete, use the file type filter or simply type “.mov” into the search bar to display all MOV files Disk Drill found. You can also preview the videos to locate your lost recording. However, if the video is severely corrupted, you may only see the MOV icon in the preview, as shown in the screenshot.
- Select the video you want to recover and click the Recover button. Finally, choose a safe location on your computer to save the recovered video.

It’s important to understand that while Disk Drill can often recover lost videos, success isn’t guaranteed. The sooner you attempt recovery after the interruption, the better your chances.
Conclusion
If there’s something I’ve learned as a tech writer over the years, it’s that every issue has a solution. What’s great is that the solutions to common problems like the corruption of MOV files have been becoming easier and easier to use. Now, in 2025, just about anyone can repair video corruption thanks to online tools like Clever Online Video Repair service. Who knows, maybe in 5 years, you’ll be able to just tell your computer or smartphone what’s wrong with your video, and it’ll fix it automatically!
FAQ