Leaderboard


Popular Content
Showing content with the highest reputation on 06/12/2021 in all areas
-
Still checking stuff over. Some issues aren't related to AMD. Wifi not working ( Was using HS80211Family.kext in Big Sur, panics on Monterey. ). BT not working ( Don't use it much and needs upgraded anyway. ). Delay between booting and the login screen showing which I've seen plenty others comment on too.6 points
-
Well I'm back with a fresh install of macOS Monterey, after making an usb installer for macOS 12 beta. Yesterday I had an updated from BS installation, until all hell broke loose and I started to have random reboots, until I became angry and decided to start anew with an usb installer, and here I am again. Until this moment all works, sound, bluetooth, no purple stripes, let's see if it is solved...
 5 points
 -
Hi @chris1111 there is great news for our HD 4000 laptops, it seems that HD 4000 can now boot up and enable QE/CI with Metal in Monterey. https://forums.macrumors.com/threads/macos-12-monterey-on-unsupported-macs-thread.2299557/post-30008993 Cheers.3 points
-
It's working well so far. Bare metal install went without issues. CPU is showing thanks to RestricEvents.kext3 points
-
(These instructions are already posted on various Internet sites but from time to time they are requested by a user so I publish them in the guides). To add an entry in Misc> Entries of config.plist you need to know the path to the operating system boot loader. For a Windows disk, you must know the path to the BOOTX64.EFI file located in the EFI\BOOT folder into the EFI partition. This path must be in EFI format and must match the PCI device where BOOTX64.EFI is located. The simplest method to find out the path the is using the UEFI Shell (OpenShell.efi), an OpenCore tool that is usually displayed in the start menu. Selecting UEFI Shell, runs a shell in which we can write commands. On startup it displays a list of all detected EFI paths, they may have different prefixes: BLKX: they are all scanned disks / partitions. FSX: these are all file systems that can be browsed. PciRoot (0x0) / Pci (AxB, CxD) / Sata (or Nvme)... are disk types (SATA AHCI or NVMe). HD (X, GPT, <PARTUUID>, ...) or HD (X, MBR) are partitions where X is a number, GPT / MBR is the partitioning scheme followed by the partition identifier PARTUUID. To find which of those paths is the macOS EFI partition you must do so: 1. FSX command: (where X is a number starting from zero) places the prompt on that partition. For example, typing FS0: (note colon) the prompt is placed in the root directory of FS0. 2. To find out if it is what we are looking for, use the ls command to list files and folders (dir also works) and cd to change to a directory (cd.. go up one level in the directory). If there is an EFI folder, you have to enter it (cd EFI) to find out if it is the Windows folder (EFI> Microsoft> Boot). If there is no EFI folder or the one there is is not from Windows, we move to the next device with FS1: and repeat the process. Sometimes it is necessary to enter several devices to find the correct one (FS0:, FS1:, FS2:, FS3:, etc.). 3. Once the Windows EFI folder is located, its FSX number must be noted. 4. Run map> map_table.txt. This creates a text file map_table.txt where the prompt was located when using the map command. 5. Exit the Shell with exit and restart to enter macOS. Back on macOS, mount the volume that contains the map_table.txt file: diskutil list sudo diskutil mount disk0s1 (change disk0s1 by the real volume). Open map_table.txt with a text editor and locate the EFI path of the FSX device you noted in a previous step. The path to the Windows boot loader consists of 2 parts, an EFI path to the partition with the EFI folder + a path to the boot loader within the EFI folder. We already know that the path to the boot loader is EFI\BOOT\BOOTX64.EFI. The EFI path to the EFI partition is taken from map_table.txt by copying the line that corresponds to the Windows EFI folder. The line with the EFI path looks like this (example): PciRoot(0x0)/Pci(0x1D,0x0)/Pci(0x0,0x0)/NVMe(0x1,18-CC-1C-49-8B-44-1B-00)/HD(1,GPT,DF3F0348-A4F8-4A34-9C86-963B0E98F2BE,0x800,0x54747) The path to the boot loader is like this: EFI\BOOT\BOOTX64.EFI You have to join both paths by inserting a forward slash / and a backslash \ between the 2 strings: PciRoot(0x0)/Pci(0x1D,0x0)/Pci(0x0,0x0)/NVMe(0x1,18-CC-1C-49-8B-44-1B-00)/HD(1,GPT,DF3F0348-A4F8-4A34-9C86-963B0E98F2BE,0x800,0x54747)/\EFI\BOOT\BOOTX64.EFI This is the path to be entered in the Path key of the custom entry in Misc> Entries in the config.plist file. The custom entry would look like this (example): <key>Entries</key> <array> <dict> <key>Arguments</key> <string></string> <key>Auxiliary</key> <false/> <key>Comment</key> <string>Windows 10</string> <key>Enabled</key> <true/> <key>Flavour</key> <string>Windows10:Windows</string> <key>Name</key> <string>Windows</string> <key>Path</key> <string>PciRoot(0x0)/Pci(0x1D,0x0)/Pci(0x0,0x0)/NVMe(0x1,18-CC-1C-49-8B-44-1B-00)/HD(1,GPT,DF3F0348-A4F8-4A34-9C86-963B0E98F2BE,0x800,0x54747)/\EFI\BOOT\BOOTX64.EFI </string> <key>TextMode</key> <false/> </dict> </array> Note1: Notice that there are no spaces in the Path key. Note2: Notice that I have written the path to the Windows boot loader like this: EFI\BOOT\BOOTX64.EFI as it is in OpenCore's Sample.plist. But there is a backup copy of BOOTX64.EFI in EFI\Microsoft\Boot named bootmgfw.efi, so we can also write the Windows boot loader path in this way: EFI\Microsoft\Boot\bootmgfw.efi
 2 points
 -
This is why especially with a beta it’s best to have a separate install instead of trying a beta as a daily driver with no backup. Sent from my iPhone using Tapatalk2 points
-
There was indeed a bug with transparent icons and opencanopy, with clickable area (with opacity different than 0%) shifted, that was fixed in recent commit: https://github.com/acidanthera/OpenCorePkg/commit/02b994933c851211c623df503705fac70316e52c Updated discussion: https://github.com/acidanthera/bugtracker/issues/1679 Now with old theme version, clicking on transparent area do nothing, with updated theme all the 0% opacity zones inside the icons are replaced with 1% opacity, so "fake" transparent zones inside the icons are clickable.2 points
-
Like this
 2 points
 -
Yes create all .png and rename all files thens compress the all files, you will see after your Icons look a .icns2 points
-
RX580 needs zero patches2 points
-
Monterey Jack cheese is in da house!
 2 points
 -
OpenCore 0.7.0 EFI Update (Big Sur 11.5 Ready), 7th June 2021 (Use With Bios Revision F12K or Newer) The EFIs and DSDTs have now been updated to the my latest versions. Changes made include, Lilu 1.5.3, AppleALC 1.6.1, IntelMausi 1.0.6, VirtualSMC 1.2.4, WhateverGreen 1.5.0, OpenCore Updated to Revision 0.7.0 (Big Sur 11.5 Ready), SIP can now be toggled via OpenCanopy, New OpenCanopy Icons, HFSPlus Updated, Plus other minor tweaks and changes to all of the configs, OpenCore EFI Update v0.7.0 - 07/06/2021 OC 070 19,1 Z390 Pro EFI.zip - OpenCore v0.7.0, SMBios iMac19,1 OC 070 1,1 Z390 Pro EFI.zip - OpenCore v0.7.0, SMBios iMacPro1,1 (IGPU Disabled) OC 070 19,1 Z390 Pro iGPU ONLY EFI.zip - OpenCore v0.7.0, SMBios iMac19, IGPU ONLY Note - If your not using a 5700 XT or any other Navi GPU then remove agdpmod=pikera from the boot arguments. Note 2 - Do not try to carry across your old OpenCore Config.plist to the new EFI as to many changes have occurred in 0.6.9. Use the new Config.plist instead. For OpenCore Using PlistEdit Pro add your details by modifying the following Sadly this will be my last EFI update for this thread as my focus is no longer on the Intel side of life and it’s hard for me to keep up with little quirks and problems on the EFI side of life. Im still here to annoy you all though and the thread will stay alive. Enjoy and BigUps AG
 2 points
 -
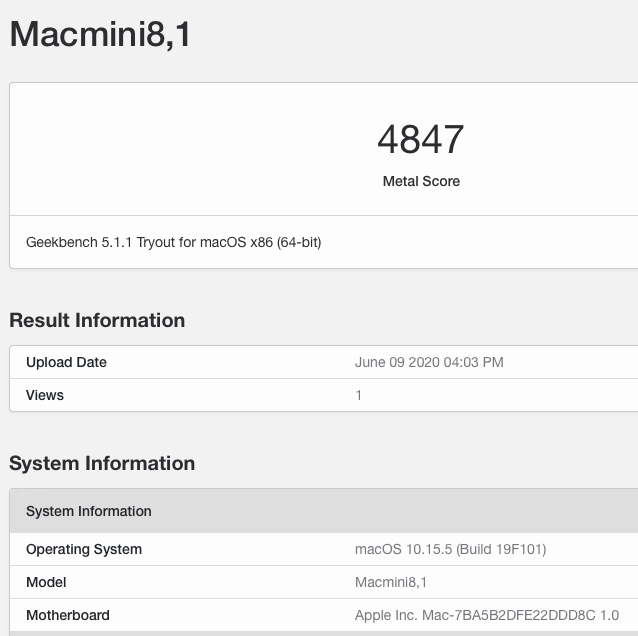
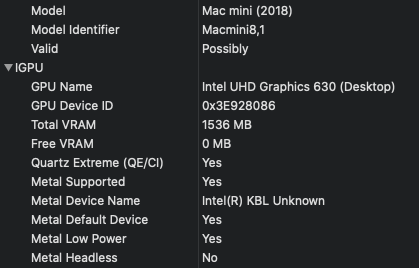
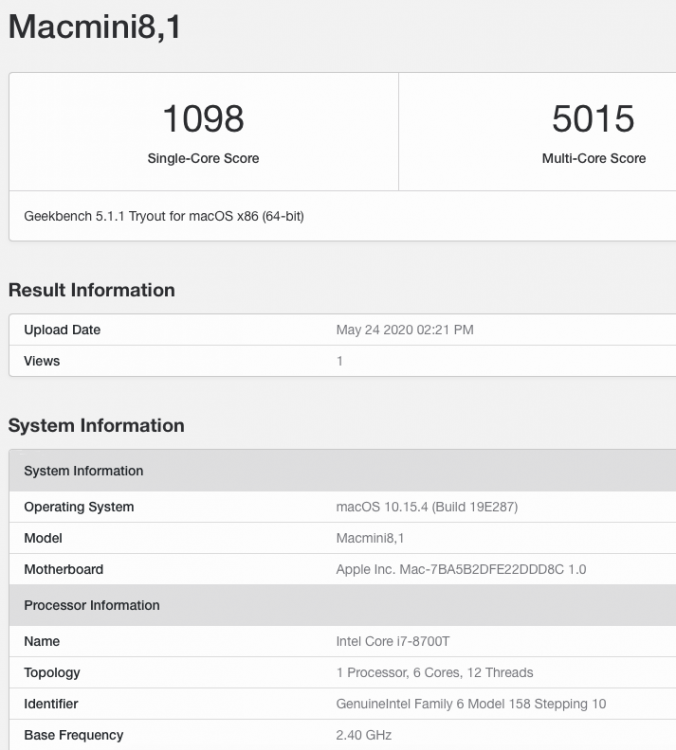
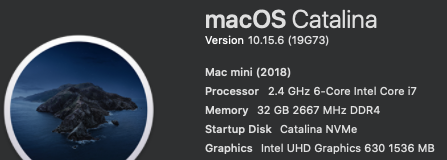
********************************************************************************** In this thread, I have fully documented the installation of macOS on my HP EliteDesk 800 G4 / G5 Mini. It is a PERFECT HackMini8,1 and is running very well for me without any issues. I hope this documentation helps you to install macOS on your hack. Please leave feedback if you think there is anything I can improve and let me know if you have any questions. ********************************************************************************** Background This is my first "modern" hack supporting UEFI and my first hack using Clover "on-the-fly" patches. My previous hacks Laptop: Thinkpad T61 / Nvidia NVS 140m Laptop: Dell Latitude E6410 / Nvidia G3100m Desktop: Gigabyte G31 / GeForce 9600 Desktop: Biostar TH55HD / Sapphire Pulse RX580 (Google "Catalina Biostar TH55HD" and look for user name deeveedee) are all perfectly running Catalina and I patched them all "manually" - all DSDT patches applied with MaciSL with virtually no Clover on-the-fly patching and all booted Legacy Clover. This UEFI hack was MUCH easier and took about 20 hours vs. a combined hundreds of hours for the old hacks. I wanted a hack that was a little more future proof and I think this is it. I hope you enjoy this as much as I am enjoying it. It is a perfect MacMini8,1. My system specs HP EliteDesk 800 G5 Mini (I9-9900 / UHD 630 / Q370 Chipset / 32GB DDR4 RAM) (also own 800 G5 Mini with i7-9700, 800 G4 Mini with i7-8700 and have owned 800 G4 Mini with i7-8700T - all work perfectly) 3 x DP Ports (connected to monitors using DP -> DVI adapters) 6 x USB 3.1 1 x USB Type-C 3.1 2 x NVMe SSD (M.2 PCIe x4 2280/2230 combo ports) 1 x SATA6 SSD 1 x Intel Ethernet RJ-45 Conexant CX20632 Audio Codec I am not using Wi-Fi. See below in "What is not tested" for Wi-Fi solutions. macOS Installation Important: You MUST BE LOGGED-IN to download attachments from this forum See macOS installation steps for OC and CLOVER here See Known Issues here for additional installation steps that may not yet be included in my attached config files See OC and CLOVER EFIs in attached to this post See BIOS configuration in attached BIOS configuration PDF document See how I developed my installation methodology here See references here See instructions here for installing two M.2 2280 NVMe SSDs and one SATA HD / SSD What is not working DRM (no hackintosh solution for DRM with UHD 630 iGPU) Everything else that I have tested is working perfectly What is not tested USB c 3.1 port (I have partially tested the USB 3 functionality of the port and it seems to be working fine with the USBPorts.kext in the attached EFI .zip archives) Wi-Fi / Bluetooth I am not currently using Wi-Fi/Bluetooth in this hack, but starting with Sonoma, Broadcom Wi-Fi is not supported without 3rd-party macOS root patches. I am not in favor of installing Open Core Legacy Patcher (OCLP) root-patches to enable Broadcom Wi-Fi (see my opinion here). If you need basic Wi-Fi/Bluetooth (and don't care about Apple-specific functions like Airdrop), I recommend Open Wireless project to enable Intel Wi-fi/Bluetooth. I don't believe that OCLP Wi-Fi root-patches are safe for secure computing operations (e.g., online banking or even accessing your Facebook page). If you prefer Broadcom Wi-Fi/Bluetooth, replace intel Wi-Fi with Broadcom Wi-Fi here and here. What is working Everything not mentioned above Sleep / Wake Multiple displays with IGPU graphics acceleration, hot pluggable display ports and DP->DVI adapters USB 3.1 ports Audio (internal speaker and headphone jack) Ethernet Microphone / front-right audio port (tested with CTIA-style 4-connector headset) Known Issues and their solutions - see here BIOS Version / Configuration Tested BIOS Versions for G4 Mini: 02.11.01 Rev.A or 02.12.00 Rev.A or 02.14.01 Rev.A, 02.15.00 Rev.A, 02.16.00 Rev.A, 02.17.00 Rev.A, 02.19.00 Rev.A, 02.20.01 Rev A, 02.21.00 Rev.A Tested BIOS Versions for G5 Mini: 02.07.01 Rev.A, 02.08.00 Rev.A, 02.09.00 Rev.A, 02.10.01 Rev.A, 02.11.00 Rev.A, 02.12.00 Rev.A, 02.12.10 Rev.A, 02.13.00 Rev.A, 02.14.01 Rev.A, 02.15.00 Rev.A See attached BIOS configuration in PDF document "HP EliteDesk 800 G4 Mini BIOS Configuration.pdf" Intel ME must be enabled for proper sleep / wake of UHD 630 UHD 630 Framebuffer Patching See here and here to understand my graphics properties for use with WhateverGreen.kext Read this to see my attempt at graphics patching without WhateverGreen.kext (WEG) to get a better understanding of what WEG is doing Current Versions Ventura 13.6.3 OpenCore 0.9.6 Lilu.kext 1.6.7 WhateverGreen.kext 1.6.6 AppleALC.kext 1.8.7 IntelMausi.kext 1.0.7 RestrictEvents.kext 1.1.3 VirtualSMC 1.3.2 NVMeFix.kext 1.1.1 Elements of this implementation that you may not see in other hacks HPET is disabled for the reason stated here RTC memory size is patched (like CLOVER's "Fix RTC") instead of using RtcMemoryFixup.kext for reasons here ScreenShots OC0.9.6-EFI-R001.zip HP EliteDesk 800 G4 Mini BIOS Configuration.pdf CLOVER-r5122-v6.zip


 1 point
 -
Hello, and welcome to InsanelyMac. 😃 Welcome to InsanelyMac! 🖖 Or, instead an end, may are we in the early days of a new beginning...? 🤔1 point
-
@miliuco it looks like macOS doesn't have an IOName match for pci8086,a305. The closest match is pci8086,a306. BTW - good use of the "spoiler!"1 point
-
To obtain the current OpenCore version, we can use the following command: nvram 4D1FDA02-38C7-4A6A-9CC6-4BCCA8B30102:opencore-version But sometimes Opencore version (even Opencore itself) cannot be detected and the request for this variable returns an error whose appearance is different depending on the method used for this task. From Terminal: nvram: Error getting variable - '4D1FDA02-38C7-4A6A-9CC6-4BCCA8B30102:opencore-version': (iokit/common) data was not found From Hackintool: OpenCore version x.x.x is available - you have 0.0.0. Would you like to download a newer version? From OpenCore Configurator (even with working NVRAM): The bootloader looks like it is not installed or your NVRAM isn't native. The key that handles the exposure of UEFI variables to the operating system by OpenCore is Misc -> Security -> ExposeSensitiveData By default, OpenCore does not announce its presence to the operating system. If ExposeSensitiveData is set to zero, this is the normal behaviour. Note: this is the reason why the EFI partition that contains the current booting OpenCore is not visible in the picker, and instead EFI partitions with other OpenCore installations can be displayed. ExposeSensitiveData (Number) From Configuration.pdf file: Description: Sensitive data exposure bitmask (sum) to operating system. 0x01 — Expose the printable booter path as an UEFI variable. 0x02 — Expose the OpenCore version as an UEFI variable. 0x04 — Expose the OpenCore version in the OpenCore picker menu title. 0x08 — Expose OEM information as a set of UEFI variables. Values that ExposeSensitiveData can have and what they mean: ExposeSensitiveData=0 -> OpenCore related UEFI variables are not exposed to macOS ExposeSensitiveData=1 -> Expose booter path as UEFI variable ExposeSensitiveData=3 -> Expose booter path and OpenCore version as UEFI variables ExposeSensitiveData=6 -> Expose OpenCore version as UEFI variable and OpenCore version in the picker ExposeSensitiveData=7 -> Expose booter path and OpenCore version as UEFI variables and OpenCore version in the picker ExposeSensitiveData=15 -> Expose booter path and OpenCore version as UEFI variables, OpenCore version in the picker and OEM information as a set of UEFI variables. Native NVRAM In the current version of OpenCore (assuming we have native NVRAM that works fine) the OpenCore not detected (or the OpenCore version not detected) error is usually related to ExposeSensitiveData=0. With values 3, 6, 7 or 15 in ExposeSensitiveData this error should not happen. Emulated NVRAM For emulated NVRAM to work, in addition to the value assigned to ExposeSensitiveData you have to act on 3 keys from Misc -> Security: LegacyEnable (Boolean) Description: Allows for NVRAM to be stored on nvram.plist for systems without working NVRAM. Enables loading a file named nvram.plist (with NVRAM variables) from the EFI volume root. LegacyOverwrite (Boolean) Description: Permits overwriting firmware variables in the nvram.plist file. Note: Only variables accessible from the operating system will be overwritten. LegacySchema (Dictionary) Description: Allows assigning nvram variables on systems without working NVRAM. These variables are written to the NVRAM.plist file. You also have to check a key in PlatformInfo: WriteFlash (Boolean)Description: Enables writing to flash memory for all added variables. When WriteFlash=False, the variable is written to RAM, not CMOS, and not preserved across the reboots. This is the difference between volatile and non-volatile variables. Questions 1. If we have Native NVRAM working, we shouldn't use any values for Emulated NVRAM, right? Yes, if we have native NVRAM then we must forget the settings of emulated NVRAM. 2. If I want, can I remove these entries at the LegacySchema and its content? 7C436110-AB2A-4BBB-A880-FE41995C9F82 and 8BE4DF61-93CA-11D2-AA0D-00E098032B8C. It is clear that LegacySchema is a set of NVRAM variables and that OpenCore compares these to the variables present in nvram.plist so in theory it would not be necessary when we have native NVRAM. But in the OpenCore documentation I have not found anything that says that we can delete LegacySchema when there is native NVRAM. If we have LegacyEnable=False and LegacyOverwrite=False it seems logical to think that LegacySchema is not used by OpenCore. And this is true, at least on my system, which has native NVRAM and boots perfectly without those 2 LegacySchema entries. Summary: we can delete the 2 LegacySchema entries if we have native NVRAM. What is always recommended is to have WriteFlash=True. Note: ResetNVRAM must be done at first boot each time OpenCore is updated to a different version.
 1 point
 -
I have tried Acrobat Pro , it did not work at first, then I reinstalled and it is now working.1 point
-
@miliuco I'm not sure, but that may be because your LPCB doesn't have an IOName match. Thanks for trying.1 point
-
@tonyx86 Nothing, it does not help, because in my system with Big Sur eficheck does not appear in ioreg or in the kexts with or without RestrictEvents. I don't see it anywhere.1 point
-
@tonyx86 PM sent. I'm going to boot without RestrictEvents.kext to see if eficheck is disabled or not. With RestrictEvents.kext, eficheck does not appear in ioreg. I will comment.1 point
-
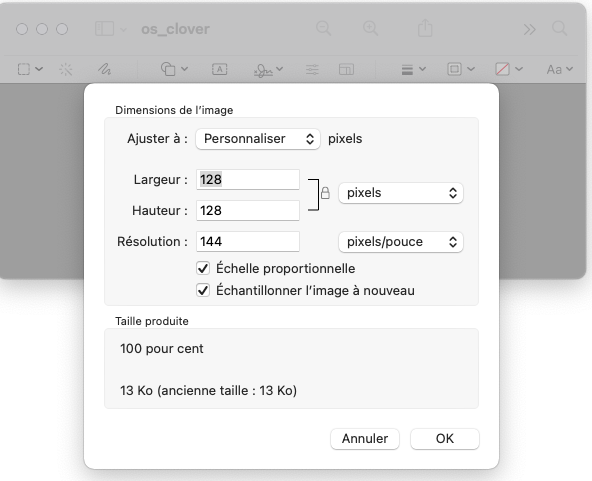
Thanks a lot, my Bro PNG 8bits without Alpha, I suppose !1 point
-
I managed to get my hack working with Monterey, for some reason it does not want to run big sur. i am installing Catalina now and hopefully upgrade to Big Sur that way. The reason i wanted the 11th gen board is that its so much faster and offers much more than the 9th gen that i have.1 point
-
@ caddash Gigabyte-Z490-Vision-D seems a trouble free motherboard1 point
-
Impressive! I had not read your thread but it seems to me a work of great merit and with much effort behind it. It is not for beginners, of course. Very very good.1 point
-
My RX580 is In my AMD rig which still needs patches. Not the GPU. Sorry I should have been more specific. Sent from my iPhone using Tapatalk1 point
-
My laptop has iGPU uhd 630 and it does not show in about this Mac either but it works just fine, the absence could be just cosmetic in first beta or related to hybrid graphics setup as my laptop also has a nvidia 1660 dGPU. I cannot comment on my RX580 yet as patches for Monterey are being tested. Sent from my iPhone using Tapatalk1 point
-
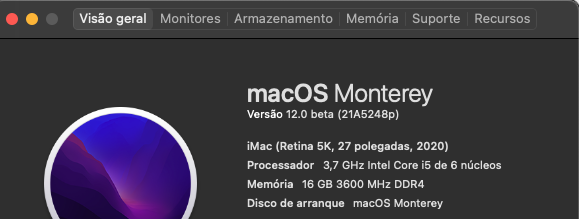
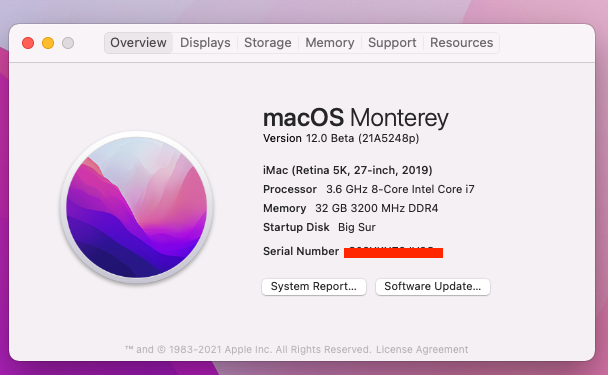
Although it has been commented that the absence of the graphics card in About this Mac is related to AMD dGPUs, I have tried booting with the Intel UHD 630 iGPU and the behavior is the same.
 1 point
 -
Those who enabled automatic login to boot fast as in Big Sur can now disable auto login to type in your password. However you have to change your login photo to Memoji to login fast similar to Big Sur. You will experience animation during your login.1 point
-
Worked OOB and don’t have WEG. I also have some device properties populated tho so might be it1 point
-
I'm dumb1 point
-
what is your setting to make your GPU appear ?1 point
-
If my memory serves me, I remember seeing that in my Snow Leopard days but then again my memory is in the age of cobwebs and dust.1 point
-
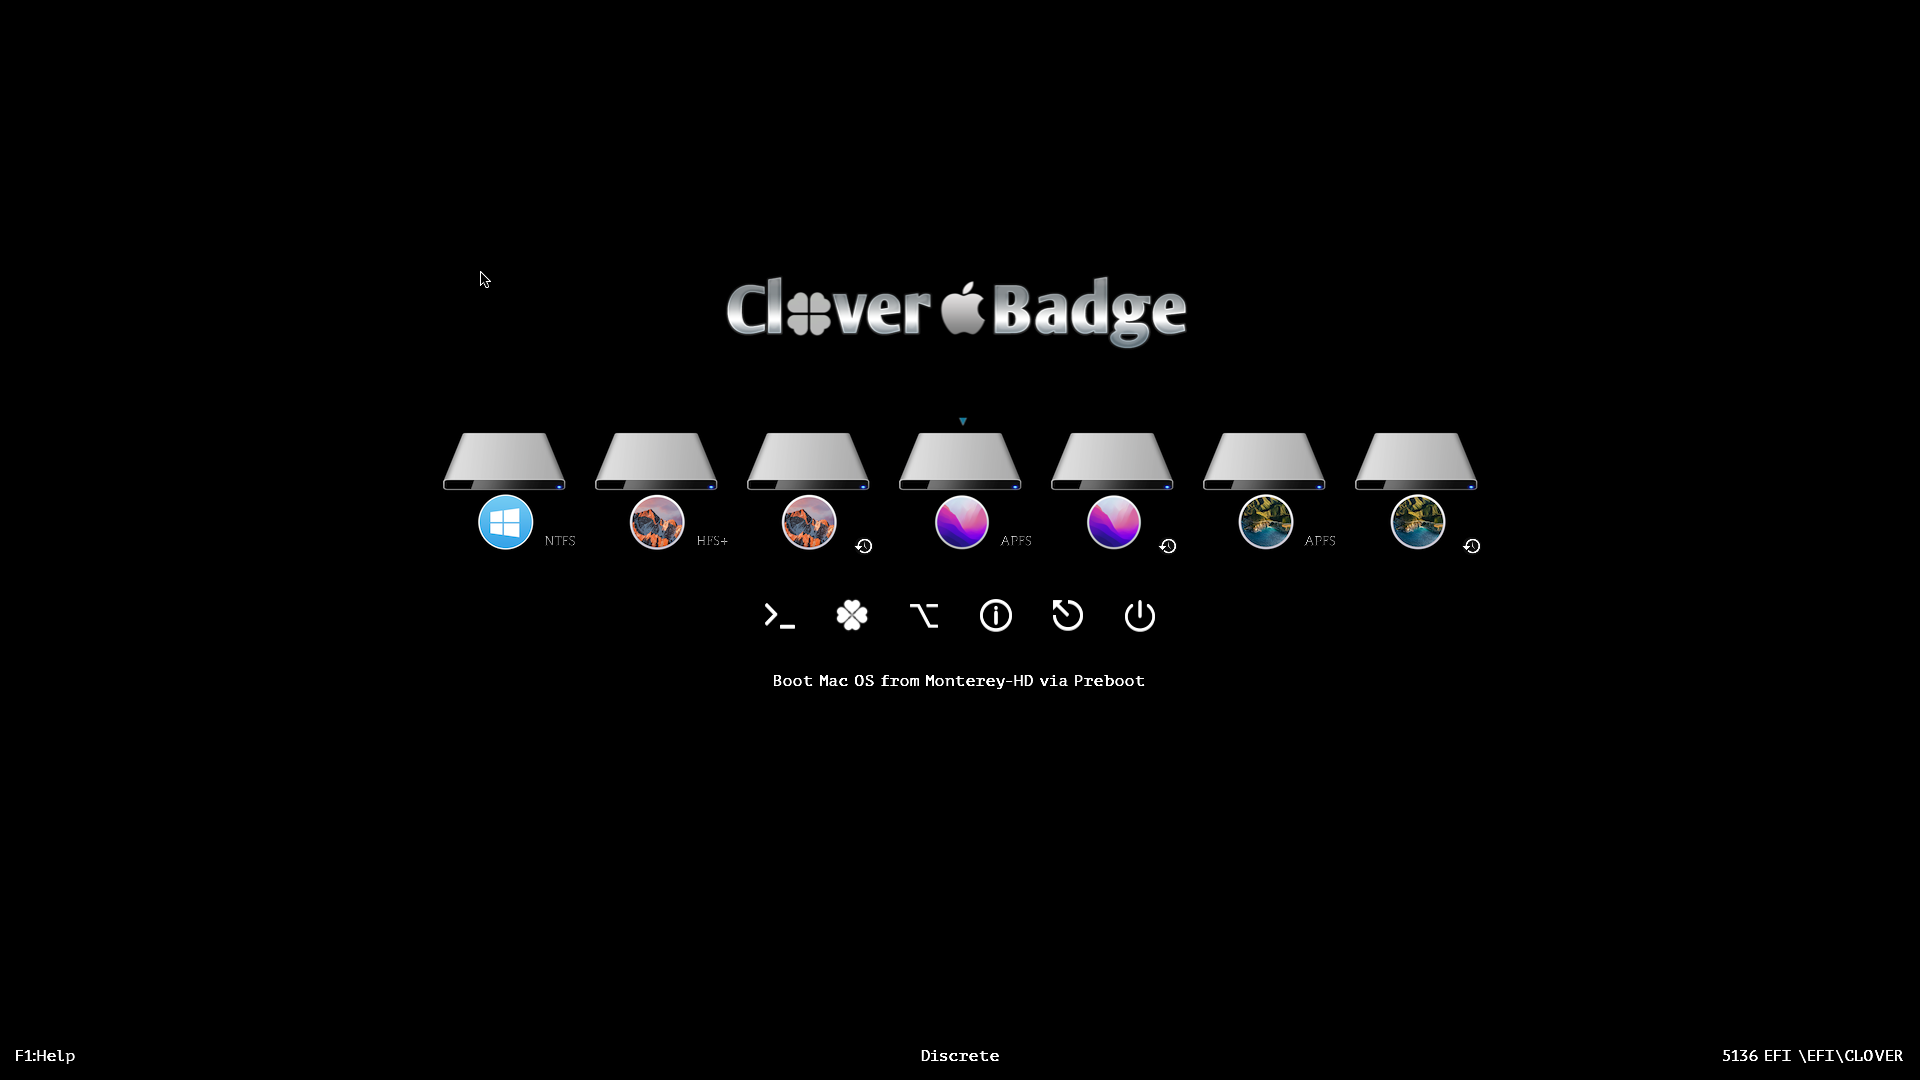
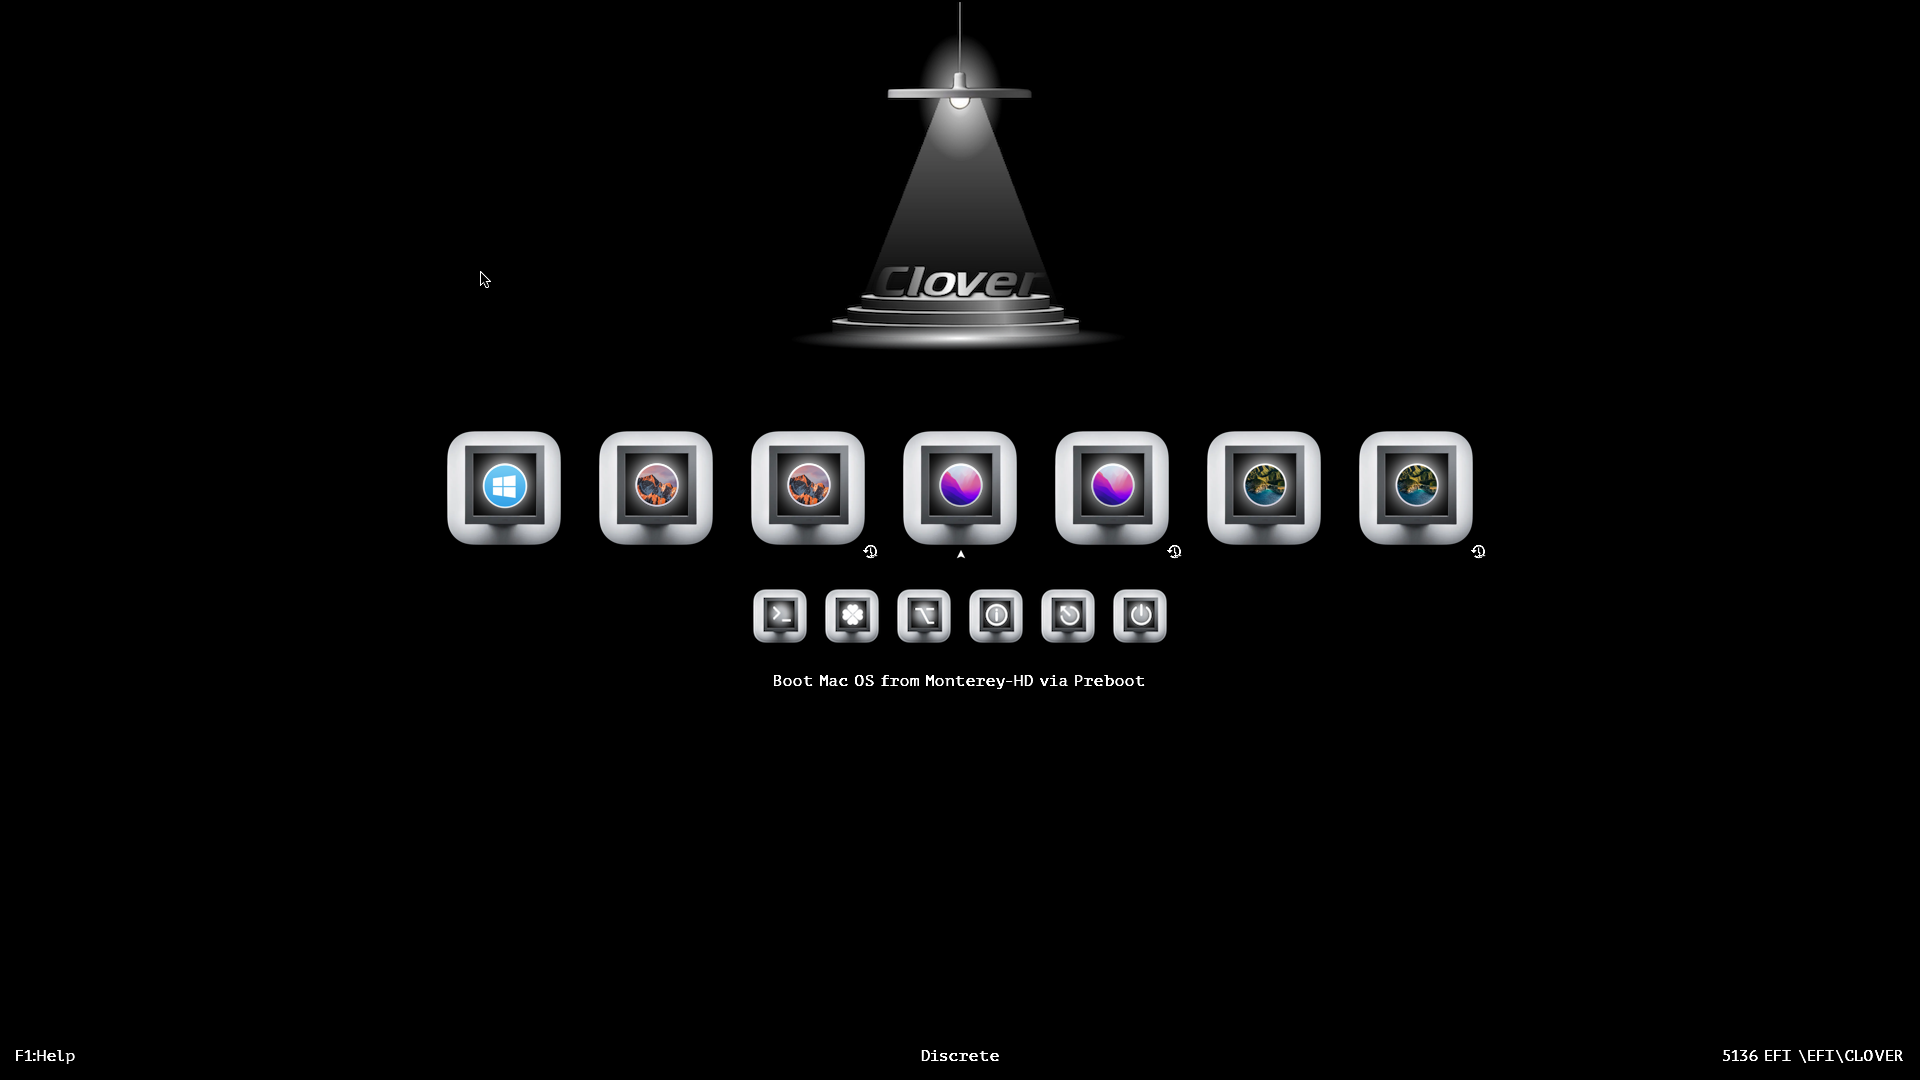
Thanks This two one is not bad to CloverBadge I just change the Selection_big.png of this theme CloverLight

 1 point
 -
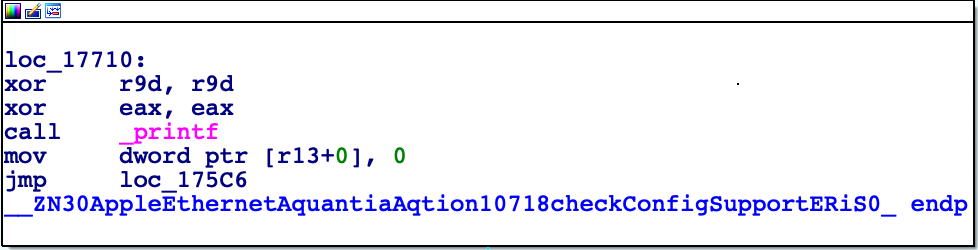
Obviously the code sequence has changed a bit but the structure remains the same: Therefore we've got to modify the patch too. You need to find 41 c7 45 00 00 00 00 00 e9 and replace it with 41 c7 45 00 01 00 00 00 e9 Good luck! Mieze
 1 point
 -
Thank you Rocky12. I'll keep you updated about my wrestling with BS on X58...1 point
-
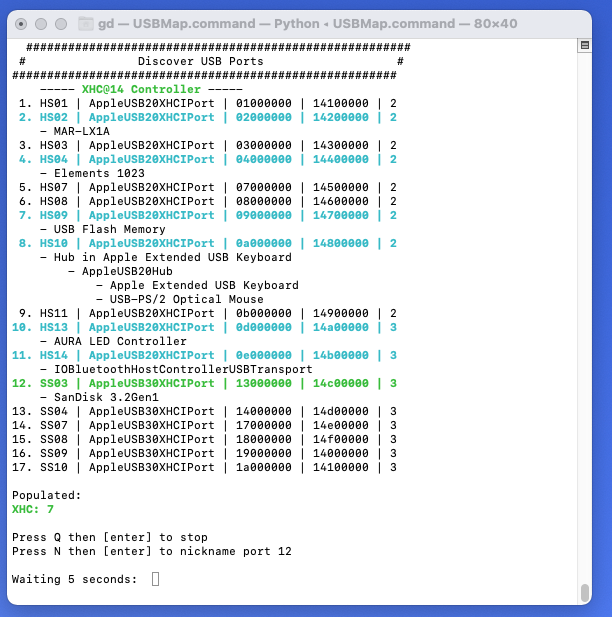
Solved: I managed to get all my USB PORTS working on BIG SUR 11.4 OPENCORE EFI: 1. Delete SSDT_RHUB.aml (also in config.plist with propertree - snapshot) 2. in config.plist under Kernel - Quirks set XhciPortLimit to False. save config.plist. 3. delete all USB related Kexts in OC-Kexts folder especially USBincejctall (also in config.plist with propertree - snapshot) Restart, reset NVRAM restart Download corpnewt / USBMap Open it with USBMap.command choose D - discover ports. Now you should see all your USB2.0 Ports. Plug in a USB2.0 !! Device into every USB port on your PC even into the USB 3.x and USB c ports. USBMap.command will populate all your USB 2.0 Ports. Set your Ports to USB 2.o as discribed here: https://dortania.github.io/OpenCore-Post-Install/usb/intel-mapping/intel.html (the T:2,4,6,7,8:2" - Thing) After you have populated all your ports, hit Q and then P in USBmap. Now you see all your USB Ports mapped (populated) Hit P to enable all populated Ports and then q for quit. Then in: OPENCORE EFI: 1. in config.plist under Kernel - Quirks set XhciPortLimit to TRUE save config.plist Restart, reset NVRAM restart Open USBmap with USBMap.command choose D - discover ports. Now you should see all your USB3.0 Ports. Plug in a USB3.0 !! Device into every USB port on your PC even into USB c ports. USBMap.command will populate all your USB 3.0 Ports. Set your Ports to USB 3.0 as discribed here: https://dortania.github.io/OpenCore-Post-Install/usb/intel-mapping/intel.html (the T:2,4,6,7,8:3" - Thing) After you have populated all your ports, hit Q and then P in USBmap. Now you see all your USB2.0 AND USB3.0 Ports mapped (populated) Hit P to enable all populated Ports Hit D to disable all empty ports. Hit K or L to built your USBMap.kext. depending on your MacOS Copy USBmap.kext into EFI - OC- Kexts Folder. open config.plist with propertree and make a snapshot to populate the new USBmap.kext in the config.plist Restart, reset nvram, restart. Voila, all Ports should work. Open USBmap with USBMap.command choose D - discover ports. Now you see: some people set Port 10 and 11 (Bluetooth) to 255 instead of "3" to make it an internal port. If your Bluetooth doesn#t work, you can try this. in config.plist under Kernel - Quirks set XhciPortLimit to False or true, it doesn#t really matter anymore. I have it on False because I have populated more than 15 Ports - However, I don#t know if that really matters or has any meaning and I do not care because: IT WORKS !!!
 1 point
 -
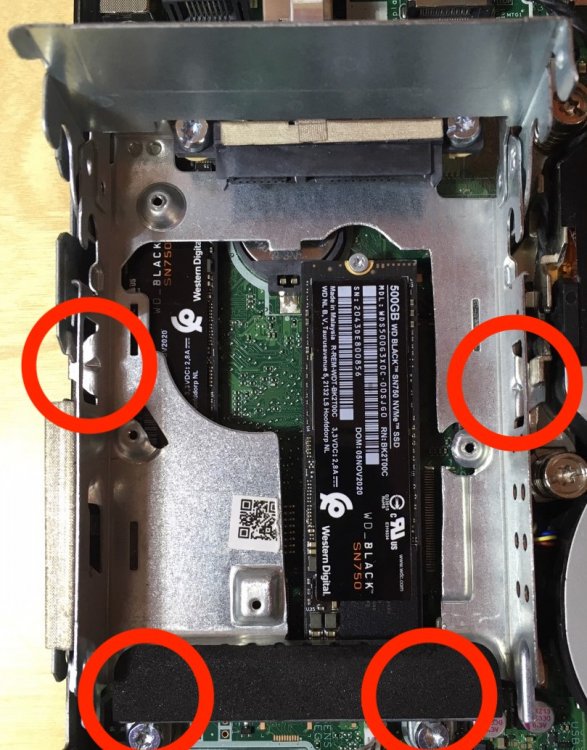
*** WARNING *** If you perform this drive caddy modification, make sure that you thoroughly clean the modified drive caddy so that you don't introduce metal fragments into your PC *** These instructions are a continuation of my original instructions here. I modified the SATA drive caddy in another 65W HP EliteDesk 800 G Mini in order to be able to install two M.2 NVMe SSDs and a 2.5" SATA HD. This mod was a bit more difficult than my first, so I'm sharing my lessons learned. 1. I needed to slightly bend the tabs circled here: I needed to bend the upper two tabs "down" toward the motherboard and the bottom two tabs "up" away from the motherboard, so that the top of drive caddy (top as viewed in the photo) sits a little higher (to provide clearance above the M.2 NVMe SSD). Bend the tabs a little at a time and assess your adjustment after each bend. The fan needs to clear the M.2 NVMe SSD so that it spins freely and the fan should sit flush on the mount points without wobbling. 2. I inserted cardboard washers under the caddy fan to raise the fan slightly as pictured here: With these mods, two M.2 NVMe SSDs and the 2.5" SATA HD fit perfectly in the 65W HP EliteDesk 800 G4/G5 Mini.
 1 point
 -
Creating Clover macOS Monterey Installer USB on Windows (Internet Recovery) (tested on Windows 10) (Updated 2021. Dec. 29.) Important! On Windows you can’t create a full installer, only Internet Recovery, so you need live internet connection when installing Monterey (either WiFi or Ethernet) First download (and install) the applications/files linked below: TransMac (HFS+ Disk Manager) MiniTool Partition Wizard (to mount USB EFI) PlistEDPlus (to edit config.plist) Explorer++ (to manage USB EFI) Python (needed to download macOS Recovery, select “Add Python to PATH” when installing) macrecovery.py (will download the macOS Recovery, right-click on “Raw”, “Save as…”) Clover Bootloader Downloading the macOS Monterey Recovery Install Python Select “Add Python to PATH” Create a new directory for the Recovery in the Downloads folder, for example “Monterey_Recovery” Open Command Prompt (cmd) Navigate to the newly created directory: cd Downloads\Monterey_Recovery Drag & Drop macrecovery.py to the cmd window Press space, paste the following: -b Mac-E43C1C25D4880AD6 -m 00000000000000000 download After it’s finished there will be two files in the directory: “BaseSystem.dmg” and “BaseSystem.chunklist” Creating macOS Monterey Internet Recovery Erase your USB drive in GPT (UEFI) mode You can do that with MiniTool Partition Wizard, right click on your drive, Delete all partitions (if MBR disk, "Initialise as GPT") Open up TransMac in administrator mode Right-click on the USB drive, “Restore with Disk Image” Select the downloaded “BaseSystem.dmg” Wait for it After finished, the macOS Monterey Internet Recovery USB is ready! We just need to create an EFI partition for installing Clover bootloader, and configure it Creating EFI partition for Clover Re-plug your USB drive after the finished BaseSystem.dmg restoration, and open up MiniTool Partition Wizard Right click on “Unallocated”, “Create”, Partition Label: EFI, File System: FAT32, Partition Size: 200 MB, “OK”, “Apply” and “Yes” That’s it, the USB Installer is ready for Installing Clover! Installing Clover to USB on Windows Download the latest CloverV2-5xxx.zip (where xxx is the version number, at time of writing 5143) and unzip it Download the next kexts: VirtualSMC.kext, AppleALC.kext, Lilu.kext, WhateverGreen.kext, USBInjectAll.kext You'll also need a kext for your Ethernet network card if you're planning to use that as your network source. You need to identify it and use the corresponding kext. Most commonly used kexts are IntelMausi.kext, RealtekRTL8111.kext, AtherosE2200Ethernet.kext If you have Intel WiFi use AirPortItlwm.kext, if you have Broadcom BCM94352 based card then you'll need AirportBrcmFixup.kext Download the next SSDT files: If your PC is desktop and Broadwell or older: SSDT-EC-DESKTOP.aml If your PC is notebook and Broadwell or older: SSDT-EC-LAPTOP.aml If your PC is desktop and Haswell or newer: SSDT-EC-USBX-DESKTOP.aml If your PC is notebook and Haswell or newer: SSDT-EC-USBX-LAPTOP.aml Mount USB EFI partition with MiniTool Partition Wizard (if it isn't already mounted): Right-click on the USB drive’s EFI partition, “Change Letter” (ex. E: ), OK, Apply, Yes Start Explorer++ in admin mode Navigate to your USB EFI partition Open a new tab with CTRL+T, navigate to the downloaded, unzipped Clover and copy & paste the EFI folder to the USB’s EFI partition Navigate to EFI\CLOVER and rename config-sample.plist to config.plist Navigate to EFI\CLOVER\drivers\UEFI Delete SMCHelper.efi Copy & Paste the next drivers from drivers\off\UEFI FileSystem\ApfsDriverLoader.efi and FileSystem\VboxHfs.efi MemoryFix\OpenRuntime.efi Navigate to EFI\CLOVER\ACPI\patched Copy & Paste here the downloaded SSDT-EC.aml file Navigate to EFI\CLOVER\kexts\Other Copy & Paste here the downloaded kexts VirtualSMC.kext, Lilu.kext, AppleALC.kext, WhateverGreen.kext, USBInjectAll.kext, and the kext for your Ethernet or WiFi card Open up the config.plist with PlistEDPlus At DSDT, rename “Fixes” to “#Fixes” At Boot/#Arguments, delete “#” before Arguments, and write the following to the string: -v debug=0x100 -no_compat_check Save config.plist That’s it! The Clover Recovery Installer is ready! Now you can boot from the USB. Notes: After the installation is finished, you need to generate a proper SMBIOS (do not log-in to iCloud before that), after that, you can delete "-no_compat_check" bootarg This is just a basic Clover configuration, most likely you'll need to tweak it to your system Depending on your network connection, the installation could take up hours to finish, be patient If you have a working EFI, then you can skip almost all the steps at "Installing Clover to USB on Windows", you just need to mount the USB's EFI with MiniTool, and place your EFI folder to the EFI partition with Explorer++1 point
-
Install macOS on HP EliteDesk 800 G4/G5 Mini with Open Core (OC). (See Catalina/CLOVER installation instructions later in this post) Rev 1.0.7 27-March-2024 **************************************************************** This guide is for installing macOS with Open Core (OC) boot loader on HP EliteDesk G4/G5 Minis. This guide is tested with the EliteDesk 800 G4/G5 Mini. Others have claimed that it works with ProDesk 600 Mini as well. This guide is not intended for other HP EliteDesk models. **************************************************************** IMPORTANT Pay close attention to the boot options you select from the OC boot picker to make sure that you complete all steps of the macOS installation. OC usually does a good job of picking the correct boot option, but you should still confirm each selected boot option each time the macOS installer reboots. This guide assumes that you are using an OC EFI.zip archive attached to Post #1. BEFORE installing macOS, edit the provided OC config.plist, replacing PlatformInfo>Generic> MLB, ROM, SystemSerialNumber, SystemUUID values with your own unique values. If you don’t already have your own unique values, use corpnewt/GenSMBIOS to create your own MLB, SystemSerialNumber and SystemUUID. User your rig's Ethernet MAC Address for your ROM. Use ONLY the OC version indicated in the name of the provided EFI.zip archive (e.g. use ONLY OC 0.6.7 with OC0.6.7-EFI-r001.zip). Configuring your BIOS with USB as your first UEFI boot device will simplify macOS installation, since you will be rebooting multiple times from the USB stick. Beginning with Big Sur 11.3, you must make sure that your USBPorts.kext (in EFI/OC/Kexts) has only 15 logical ports. Starting with EFI archive OCO.6.7-EFI-r001.zip, the included USBPorts.kext matches the included USBPorts-noHS14.kext (internal Bluetooth USB port HS14 is removed from the USB port map). The provided OC EFIs include USBPorts-16.kext that include all 16 available logical USB ports. After installing macOS, you may need to edit USBPorts-16.kext/Contents/Info.plist to create your own custom USBPorts.kext to enable/disable the ports that you require (while remaining within the 15-port limit). Creating your own USBPorts.kext will be important if your bluetooth requires port HS14. The BIOS configuration instructions attached to Post #1 indicate that M.2 USB / Bluetooth is disabled. Enable M.2 / USB Bluetooth in BIOS if you are using Bluetooth. The graphics DeviceProperties in the provided config.plist are for systems using DP->DVI adapters for their displays. You may need to edit your own config.plist DeviceProperties if you are using different displays (e.g. if you are using DP or HDMI ports without adapters). See here for example DeviceProperties that may be suitable for your graphics. The audio DeviceProperties in the provided config.plist have audio over DP/HDMI disabled (No-hda-gfx is defined). You will need to delete No-hda-gfx from the config.plist audio DeviceProperties to enable audio over DP/HDMI. Don't forget to review known issues and their solutions here. There may be some resolved issues that are not yet included in the provided EFI. ************************************ Configure your G4/G5 Mini BIOS as per the BIOS configuration attached to Post #1. Make sure your BIOS version matches one of the tested BIOS versions specified in Post #1 of this thread. If you want to replace your Intel Wi-Fi/Bluetooth with Broadcom, here is a tested option. Create a macOS USB Installer (follow instructions here) Copy one of the provided OC EFIs (attached to Post #1) to the EFI on your macOS USB Installer. Choosing the EFI with the latest OC version and latest rXX version is usually best if you don't have your own preference. After you copy the EFI to your USB drive, the EFI directory structure on your USB drive should be /Volumes/EFI/EFI containing folders BOOT and OC. Edit config.plist in the USB stick EFI/OC, replacing the PlatformInfo>Generic> MLB, ROM, SystemSerialNumber, SystemUUID values with your own values. If you don’t already have your own unique values, use corpnewt/GenSMBIOS to create your own MLB, SystemSerialNumber and SystemUUID. User your rig's Ethernet MAC Address for your ROM. Customize USBPorts.kext in OC/EFI with your own 15-port USBPorts.kext. If you are not sure which USB ports you need, you may start with the provided USBPorts.kext. Beginning with EFI archive OC0.6.7-EFI-r001, the provided USBPorts.kext matches USBPorts-NoHS14.kext (removes the internal Bluetooth USB port HS14). The provided EFI includes USBPorts-16.kext which defines all 16 available logical USB ports. You can edit USBPorts-16.kext/Contents/Info.plist to create your own custom USBPorts.kext. The BIOS configuration instructions attached to Post #1 indicate that M.2 USB / Bluetooth is disabled. Enable M.2 / USB Bluetooth in BIOS if you are using Bluetooth. The graphics DeviceProperties in the provided config.plist are for systems using DP->DVI adapters for their displays. You may need to edit your own config.plist DeviceProperties if you are using different displays (e.g. if you are using DP or HDMI ports without adapters). See here for example DeviceProperties that may be suitable for your graphics. Boot from the macOS Installer USB stick If booting for the first time after updating/changing your OC EFI, Reset NVRAM and reboot At the OC boot picker, select “Boot macOS Install” from the macOS installer USB stick If you are performing a new macOS installation, select Disk Utility from the macOS Utilities screen and click Continue. Erase the target disk with Format APFS and Scheme GUID Partition Map Exit Disk Utility Select Install macOS from the macOS Utilities screen and click Continue Click Continue and click Agree Select the target volume for your macOS installation and click Continue When the macOS installer reboots, boot from the USB stick At the OC boot picker, select “Boot macOS Install” from your macOS target disk (NOT the macOS installer on the USB stick) When the macOS installer reboots, boot from the USB stick At the OC boot picker, select “Boot macOS Install” from your macOS target disk (NOT the macOS installer on the USB stick). Note that you are selecting this same entry for the SECOND TIME. When the macOS installer reboots, boot from the USB stick At the macOS boot screen, select “Boot macOS” from your macOS target disk Follow the macOS configuration prompts Copy the OC EFI from your USB stick to your target disk EFI Eject / Remove the macOS installer USB stick Reboot and confirm that your new macOS installation starts and runs properly Use pmset to set hibernatemode and proximitywake to 0 to address potential sleep issues. You may use the attached poset-fix script to automate setting pmsettings. Chmod +X in order to be able to execute the script. Disable "Wake for Ethernet" and disable "Enable Power Nap" (System Preferences > Energy Saver) If necessary, modify USBPort.kext/Contents/Info.plist to customize your USB port map. Begining with Big Sur 11.3, USB port maps must include no more than 15 logical USB ports (port limit patching is no longer supported). The OC EFI.zip attached to Post #1 includes USBPorts-16.kext with all 16 available logical USB ports. Edit USBPorts-16.kext/Contents/Info.plist to remove one logical port that you are not using, rename it to USBPorts.kext and copy it to EFI/OC/Kexts. The audio DeviceProperties in the provided config.plist have audio over DP/HDMI disabled (No-hda-gfx is defined). You will need to delete No-hda-gfx from the config.plist audio DeviceProperties to enable audio over DP/HDMI. See my Known Issues here for solutions that have not yet been included in the provided EFI (you may need to apply these fixes yourself). If you have successfully created Device Properties for a Graphics/Audio configuration that is not listed here, please create a new post in this thread with your new Device Properties. See this post as an example for your post. Thank you! ============================================================================================= ============================================================================================= Install Catalina on HP EliteDesk 800 G4 Mini using CLOVER bootloader (these instructions assume CLOVER r5122 with Catalina) Rev 1.0 12-June-2020 ************************************ IMPORTANT Your displays may flash on and off during Catalina installation. If you have multiple displays, your displays may alternate during Catalina installation. Pay close attention to the options you select from the CLOVER boot screen to make sure that you complete all steps of the Catalina installation. Be sure to edit the provided CLOVER config.plist, replacing all XX-MASKED-XX values with your own unique values. Configuring your BIOS with USB as your first UEFI boot device will simplify Catalina installation, since you will be rebooting multiple times from the USB stick. Don't forget to review known issues and their solutions here. There may be some resolved issues that are not yet included in the configuration files attached to Post #1. ************************************ Configure your G4 Mini BIOS as per the BIOS configuration attached to Post #1 of this thread. Make sure your BIOS version matches the BIOS version specified in Post #1 of this threat. Create a “vanilla” Catalina USB Installer (follow instructions here) Install CLOVER boot loader on the Catalina Installer USB stick. Use the CLOVER configuration provided at the end of this post with the CLOVER version specified at the end of this post Copy CLOVER EFI from EliteDesk.zip archive (attached to Post #1 of this thread) to the USB stick EFI. Copy all kexts from the LE folder in the EliteDesk.zip archive to the USB stick EFI/CLOVER/kexts/Other. Edit config.plist in the USB stick EFI/CLOVER, replacing the XX-MASKED-XX values with your own values Boot your G4 Mini from the Catalina Installer USB stick At the Clover boot screen, select “Boot macOS Install” from the Catalina installer USB stick If upgrading an existing macOS installation, skip to Step 10 If you’re performing a new Catalina installation, select Disk Utility from the macOS Utilities screen and click Continue Erase the target disk with Format APFS and Scheme GUID Partition Map Exit Disk Utility Select Install macOS from the macOS Utilities screen and click Continue Click Continue and click Agree Select the target drive for your Catalina installation or upgrade and click Continue When the Catalina installer reboots, boot from the Catalina installer USB stick At the CLOVER boot screen, select “Boot macOS Install” from your Catalina target disk (NOT the Catalina installer on the USB stick) When the Catalina installer reboots, boot from the Catalina installer USB stick At the CLOVER boot screen, select “Boot macOS Install” from your Catalina target disk (NOT the Catalina installer on the USB stick). Note that you are selecting this same entry for the SECOND TIME. When the Catalina installer reboots, boot from the Catalina installer USB stick At the CLOVER boot screen, select “Boot macOS” from your Catalina target disk Follow the Catalina configuration prompts Welcome to Catalina! If performing an upgrade, confirm your new macOS version by viewing About This Mac If performing a new installation Install CLOVER boot loader on the Catalina target disk. Use the CLOVER configuration provided at the end of this post and the CLOVER version specified at the end of this post Copy CLOVER EFI from EliteDesk.zip archive (attached to Post #1 of this thread) to the Catalina target disk EFI. Edit config.plist in the Catalina target disk EFI/CLOVER, replacing the XX-MASKED-XX values with your own values PROPERLY INSTALL all kexts from the LE folder in the EliteDesk.zip archive to the /Library/Extensions folder on the Catalina target disk. Use Hackintool or your preferred 3rd-party kext installer. It is wrong to simply copy 3rd-party kexts to /Library/Extensions. If performing an upgrade, make sure that your target disk EFI and 3rd-party kexts in /Library/Extensions are updated using the EFI and LE folder contents in the EliteDesk.zip archive attached to Post #1 in this thread. Eject / Remove the Catalina installer USB stick Reboot and confirm that your new Catalina installation starts and runs properly Use pmset to set hibernatemode and proximitywake to 0 to address potential sleep issues Disable "Wake for Ethernet" and disable "Enable Power Nap" (System Preferences > Energy Saver) Delete hibernatefile ‘/var/vm/sleepimage’ and recreate “dummy” ‘/var/vm/sleepimage’ See my Known Issues here for solutions that have not yet been included in the CLOVER EliteDesk.zip archive attached to Post #1 (you may need to apply these fixes yourself). Clover Configuration (CLOVER r5122 will be my last CLOVER-based solution. I will be using OC as I migrate to Big Sur) Clover for UEFI booting only Install Clover in the ESP UEFI Drivers Recommended drivers DataHubDxe File System drivers ApfsDriverLoader VBoxHfs Memory fix drivers OcQuirks (replaces AptioMemoryFix) (Selecting OcQuirks in CLOVER config also installs OpenRuntime) Install RC scripts on target volume Themes Choose your desired theme 3xDP-to-DVI.plist.zip pmset-fix.zip1 point
-
Known Issues and Their Solutions Sonoma 14.4 will not install with the EFI attached to Post #1. The solution (so far) is to change Open Core's SecureBootModel to "Disabled." See here. VT-d is not enabled in BIOS - solution is to change VT-d to enabled in BIOS. With my OC EFIs starting with OC 0.9.6, my EFI modifies the ACPI DMAR table, so VT-d should be enabled in BIOS. At the time of this writing, I have not modified my BIOS configuration PDF attached to Post #1, so it still says to disable VT-d. (Solved - and included in posted EFI) macOS Volumes on USB devices do not appear in OC boot menu. Read more here. BCM94360NG Wi-Fi has reduced speed on 802.11ac (5 GHz). This is a macOS driver problem as stated here. See here for macOS Ventura Beta test updates (Solved and included in EFI attached to Post #1 starting with OC 0.8.2 EFI R002) If you are experiencing sleep issues with your hack, see solution here). (Solution here) If you are unable to create a bootable backup with Carbon Copy or other software, use DiskUtility as discussed here. (Solution here) If you are installing Big Sur or later on a SATA SSD, the macOS installer does not "see" the SATA SSD. See solution here. (Solution here) If you are unable to perform an HP EliteDesk 800 G4/G5 Mini BIOS update via the built-in BIOS updater, use the BIOS recovery procedure here. (Potential solution here) If you are experiencing "lost display" issues when running Microsoft Remote Desktop in macOS Monterey, try solution here. (Potential solution here) If you are experiencing Bluetooth connectivity issues with the BCM94360NG module, try the solution here and here. HackMIni8,1 freezes during upgrade from XCode 12.5.1 to XCode 13.2.1. See here. (Solved. Configure manually since this is not configured in posted EFI) Boot chime (startup audio) does not play after upgrading to OC 0.7.7. See UEFI audio configuration here. (Solved and included in EFI attached to Post #1 starting with OC 0.7.6 R002) Monterey does not support patched connector type Dual-Link DVI (<04000000>) which I had been using to enable displays with DP->DVI adapters. With connector type DVI, Monterey boots to black screens. Starting with Monterey, we must use patched connector type HDMI (<00080000>) with DP->DVI adapters as discussed here. (Solved and included in OC 0.7.6 and newer EFIs attached to Post #1) Apple's Intel GUC firmware update is not applied for increased iGPU performance. Solution is to add igfxfw=2 boot-arg as discussed here. (Solved - See solution here) Volumes names are incorrect in OC's boot menu and/or graphics boot picker. See solution here. (Solved - See solution here) Unable to upgrade XCode from 12.4 to 12.5+ after upgrading from Catalina to Big Sur. Solution is to perform a clean installation of Big Sur as described here. (Solved - See solution here) Unable to print from macOS to Windows shared printers (SMB). Problem was caused by a Microsoft and Apple updates as explained here. (Solved - Don't use Samsung SSDs) Samsung SSDs may cause problems in your system, even if they are not your primary boot device. The Dortania guide advises against the use of some Samsung SSD models here. Since there are alternatives (like Western Digital Black SSDs), I'm not recommending any Samsung SSDs for our hackintosh. More info here. (Solved and included in the latest OC EFI attached to Post #1) As discussed here, the _DSM->XDSM rename patch enabled in OC config.plist is unnecessary. This rename does not affect booting macOS with OC, but it may affect booting Windows with OC. Solution is to disable or remove this rename rule. (Solved and included in the OC EFI attached to Post #1) Either BIOS or macOS updates (maybe both?) may require a new rtcfx_exclude range for RtcMemoryFixup.kext. I don't like periodically having to find a new rtcfx_exclude range, so I'm abandoning RtcMemoryFixup and reverting to the RTC memory size patch employed by CLOVER (Fix RTC). According to Download-Fritz here, RtcMemoryFixup patches upper RTC memory for use with hibernate and FV2 unattended restart. I don't care about either of these, so RtcMemoryFixup.kext has no value for me. See here. (Solved. Remove AudioDXE driver and disable UEFI Audio Support in OC config.plist) If OpenCore startup times are long (delay before seeing the boot picker), try disabling the AudioDXE driver and disabling UEFI Audio Support in the OC config.plist. Currently, AudioDXE driver and UEFI Audio Support are enabled in the OC EFI attached to Post #1, so you will need to make this change yourself. (Solved. Switched to VirtualSMC.kext which is included in the OC EFI attached to Post #1) The 'old' FakeSMC.kext has compatibility issues with OC. If you like FakeSMC's HWMonitor.app/Sensors, there's a newer version of FakeSMC. See here. I suspect that the 'old' FakeSMC is responsible for a random restart that I experienced when updating BS 11.2 to BS 11.2.1 and that it was responsible for random restarts that I observed after upgrading my G4 Mini's BIOS from 2.14.01 to 2.15. If you're using VirtualSMC.kext (instead of FakeSMC), you can disregard this issue. (Solved and included in the EFI attached to Post #1) Big Sur update notifications do not appear via the normal 'Software Update' mechanism. Big Sur updates may require certain SIP levels. The OC EFI attached to Post #1 has SIP fully enabled (in OC config.plist, NVRAM>Add>7C436110-AB2A-4BBB-A880-FE41995C9F82>csr-active-config is <00000000>). If you have fully or partially disabled SIP, you may not be notified of Big Sur updates. (Solved. Not yet included in the EFI attached to Post #1) The Connector specified in USBPorts.kext may not be correct for the USB-C port on the front of the HP EliteDesk 800 G4 Mini. See here. (Solved. This will not be updated in the CLOVER EFI attached to Post #1 - I am switching to OC) CLOVER r5127 has known issues with Power Management when enabling CLOVER's SSDT->Generate->PluginType (see here). There are several ways to fix this CLOVER r5127 issue: 1) Disable CLOVER r5127's SSDT->Generate->PluginType and use an SSDT patch (like SSDT-PLUG that we use for OpenCore). -OR- 2) Add SSDT->PluginType=1 to CLOVER config.plist (in additon to SSDT->Generate->PluginType). -OR- 3) Upgrade to CLOVER r5128+ (I won't be testing, but this is apparently fixed in a release AFTER CLOVER r5128 (see commit here)). (Solved. This will not be updated in the CLOVER EFI attached to Post #1 - I am switching to OC) CLOVER r5122's "Fix SBUS" injects a bad SBUS.BUS0._DSM which causes an ACPI parse error at boot. See solution here. (This will not be updated in the EFI attached to Post #1. If applicable to your system, you will need to make this change in your own system.) If your system includes a SATA SSD, you may need to enable Kernel > Quirk > ThirdPartyDrives (in OC config.plist) or enable a CLOVER TRIM patch to enable TRIM on your 3rd-party SSD. NVMe SSDs do not require this. (Solved and included in the EliteDesk.zip archive attached to Post #1.) The SSD TRIM patch enabled in my CLOVER config.plist (KernelandKextPatches > KextsToPatch) is unnecessary for NVMe SSDs. SSD TRIM for the NVMe SSDs is still enabled without this patch. Solution is to disable this patch in the CLOVER config.plist. If you have a SATA SSD, you still need a solution to enable TRIM on non-Apple SATA SSDs. (Solved and included in the OC EFI attached to Post #1) Following a reboot during macOS install/upgrade, real time clock may be lost. The fix for this is RTCMemoryFixup.kext with a custom rtcfx_exclude range as noted here. Abandoned RtcMemoryFixup.kext and reverted to RTC memory size patch (0x02) which is the same as CLOVER's Fix RTX patch. (This will not be updated in the EFI attached to Post #1. If applicable to your system, you will need to make this change in your own system.) If you make SMBIOS changes while experimenting for best graphics/power management (e.g. change MacMini8,1 to iMac19,1), you will likely have to generate new USBPort mapping and delete extraneous com.apple.PowerManagement plists in /Library/Preferences. You may also need to reset keyboard modifier keys (if you changed any), reset Energy settings and check/reset power settings with Hackintool (e.g. proximitywake). (Solved and included in the EliteDesk.zip archive attached to Post #1) USBPorts.kext has wrong M.2 USB port type, wrong USB Type C port type and incorrect USB Sleep/Wake Power properties. SSDT-USBX.aml is not necessary when using USBPorts.kext. See here. (This will not be updated in the EFI attached to Post #1. If applicable to your system, you will need to make this change in your own system.) If you are applying this guide to an HP EliteDesk 800 G4/G5 that is NOT a mini and your system has more USB ports than the mini, the USB port mapping in this guide may not work for you. Your system may not boot with the USB port mapping in this guide. You will need to create your own USB port mapping. (Solved and included in the EliteDesk.zip archive attached to Post #1) When using AppleALC.kext for audio, the headphone port does not support CTIA style (4-connector) headset and microphone does not work. Solution is to upgrade to AppleALC.kext 1.5.5 as noted here. (Solved and included in the EliteDesk.zip archive attached to Post #1) The audio properties for the CX20632 do not recognize both the line out and headphone ports. AppleALC.kext v1.5.3 and layout-id 20 fix this as noted here. (Solved and included in the 'HP EliteDesk 800 BIOS Configuration.PDF' document attached to Post #1) It appears that I may have incorrectly configured 'Video Memory Size' (configured in BIOS) as described here. I am currently running with 'Video Memory Size' configured at 512MB (not 64MB). This change is reflected in the updated HP EliteDesk 800 BIOS Configuration PDF document attached to Post #1. (Solved and included in the EFI attached to Post #1) The patched ACPI files (EFI/CLOVER/ACPI/patched) in the EliteDesk.zip archive attached to Post #1 are specific to macOS. They have not been patched for Windows or any other OS. If you are multi-booting your PC, using a boot loader to load nonMac OSes and your boot loader passes the patched ACPI to the booted OS, you may have problems with OSes other than macOS. Note that I am dual-booting my system with macOS and Windows, but my boot order defaults to macOS and I press F9 to boot Windows. I do not use a boot loader to boot Windows, so my patched ACPI does not need to support Windows (or any nonMac OS). (This will not be updated in the EFI attached to Post #1. If applicable to your system, you will need to make this change in your own system.) The config.plist included in the EliteDesk.zip archive attached to Post #1 adds device property "no-hda-gfx" to HDEF ( PciRoot(0x0)/Pci(0x1F,0x3) ). I needed to add this to prevent an AppleALC kernel panic when waking from sleep, because I am using DP->DVI adapters. While this prevents the kernel panic, it also disables sound over DP. If you are using DP / HDMI connectors without adapters, you should remove the "no-hda-gfx" property so that sound works over DP / HDMI. (This will not be updated in the EFI attached to Post #1. If applicable to your system, you will need to make this change in your own system.) The config.plist included in the EliteDesk.zip archive attached to Post #1 specifies DigitalDVI connectors in the graphics device properties. If you are using different display connectors (e.g. HDMI or DP), you will need to change the connector types in your config.plist. If you do change connector types, you may need to change connector BusIDs as well (e.g. BusID 0x01 is not valid for DP connector type). (User action may be required) CPU Benchmarks may be less than those reported in this thread. CPU performance may be limited if your HP EliteDesk 800 G4 Mini has only one of the two memory slots populated as described here. (FOR CLOVER users ONLY: This will not be updated in the EFI attached to Post #1. If applicable to your system, you will need to make this change in your own system.) The config.plist included in the EliteDesk.zip archive attached to Post #1 specifies a Screen Resolution of 1680x1050. As described here, connecting displays with a native Screen Resolution other than 1680x1050 may result in booting to black screen. Solution is to change Screen Resolution in CLOVER config.plist to match the native Screen Resolution of the displays. (This will not be updated in the EFI attached to Post #1. If applicable to your system, you will need to make this change in your own system.) The SMBIOS MacModel 'MacMin8,1' in the EFI included in the EliteDesk800.zip archive attached to Post #1 is optimal for 8th gen Intel CPU power management. If your system has a 9th gen Intel CPU, you may need to change the SMBIOS MacModel in your config.plist (e.g. iMac19,1 may be a better SMBIOS MacModel for 9th gen Intel CPU power management). (Still testing. I am NOT offering any support for this.) Factory-installed Intel Wi-Fi / Bluetooth does not work. See possible solution here. (Solved and included in the EliteDesk.zip archive attached to Post #1) IORegistry Explorer reveals an unnamed device that is named XSPI on a real MacMini8,1. I suspect this is purely cosmetic. See solution here. (Solved and included in the EliteDesk.zip archive attached to Post #1) The SSDT-XOSI that I copied from the web has a typo. it incorrectly includes Windows Server 2008 ("Windows 2006.1"). I have removed "Windows 2006.1" and added newer versions of Windows 2010 in the SSDT-XOSI attached here. This is included in the EliteDesk.zip archive attached to Post #1. (Solved and included in the EliteDesk.zip archive attached to Post #1) Displays may remain dark after wake from sleep - especially after repeated sleep / wake cycles. Displays wake if power is cycled on one display. Solution is the addition of the igfxonln=1 boot arg as described here. (Solved and included in the EliteDesk.zip archive attached to Post #1) I replaced USBInjectAll.kext/SSDT-UIAC.aml with USBPorts.kext that includes the Bluetooth USB port. Originally, my SSDT-UIAC.aml USB port maps did not include the USB port for M.2 Bluetooth. This was intentional, because my system does not have a supported Wi-Fi/Bluetooth card. If you have a supported M.2 Wi-Fi / Bluetooth card, you will need to add the Bluetooth USB port mapping to SSDT-UIAC.aml. (Solved and included in the EliteDesk.zip archive attached to Post #1) There were unnecessary graphics device properties injected via my Clover config.plist as specified here. Solution is to remove these unnecessary properties. (Solved - see mechanical modification here) The HP EliteDesk 800 G4 Mini has a mechanical design flaw that prevents simultaneous installation of two M.2 2280 NVMe SSDs and a SATA HD / SSD. Solution is to modify the SATA drive caddy as shown here. (Solved - no further work required) After cloning my backup to a new NVMe SSD (using Carbon Copy), my displays did not work correctly. System would appear to boot properly, but after login, one display would go black. Solution is to rebuild kextcache as described here. (Solved and included in the BIOS Configuration PDF document attached to Post #1) When pressing F9 at start-up to display boot menu, the G4 Mini makes an annoying, loud beep. Solution is to disable startup sounds in BIOS configuration. (Solved and included in the EliteDesk.zip archive attached to Post #1) SSDT-UIAC.aml in EFI/CLOVER/ACPI/patched does not include port mappings for the USB 3.1 Type C port. The HS10 and SS03 mappings are added in the updated SSDT_UIAC.aml here and are included in the EliteDesk.zip archive attached to Post #1. (Solved and included in the EliteDesk.zip archive attached to Post #1) Audio "pop" during macOS startup (before login prompt). Solution is to uninstall CLOVER's AudioDxe.efi driver. This driver has been removed from EliteDesk.zip archive attached to Post #1. (Solved and included in the EliteDesk.zip archive attached to Post #1) When first configuring my Clover config.plist, I enabled "ResetHDA" (Devices > Audio Properties). It does not appear that this is necessary. This change is included in the EliteDesk.zip archive attached to Post #1. (Solved and included in the EliteDesk.zip archive attached to Post #1) A real MacMini 8,1 has ACPI Device (PPMC) but this device does not appear in the real MacMini8,1 IORegistry. I'm not sure why this device would be needed. The SSDT to inject Device (PPMC) is here and is included in the EliteDesk.zip archive attached to Post #1. (Solved and included in the EliteDesk.zip archive attached to Post #1) A real MacMini8,1 has ACPI Device (MCHC). Solution is to enable "Add MCHC" in Clover's config.plist. (Solved and included in the EliteDesk.zip archive attached to Post #1) Device (PMCR) is not loaded as viewed with IORegistry Explorer. The solution is to use the ACPI Device (PMCR) from a real MacMini8,1 (not a simplified fake Device (PMCR) ). With the real ACPI Device (PMCR), PMCR is loaded as viewed with IO Registry Explorer. See solution here. (Solved and included in the EliteDesk.zip archive attached to Post #1) USB Power properties are not defined. Solution is to add SSDT-USBX.aml to EFI/CLOVER/ACPI/patched, with power properties extracted from a real MacMini8,1 DSDT. (Solved. Cycle power on the new display) A new display may not be detected if the new display is plugged into an unused display port while the HP EliteDesk 800 G4 Mini is sleeping. Solution is to cycle power on the new display after waking the EliteDesk 800 G4 Mini. Cycling display power on the newly added display causes displays to be re-detected. (Solved. Problem resolves itself after a few boot cycles) After applying the Catalina 10.15.5.02 supplemental update, Catalina booted to a single display. After a few boot cycles, multi-display operation was restored to normal. (Solved and included in the EliteDesk.zip archive attached to Post #1) Unable to upgrade from 10.15.4 to 10.15.5 when using IntelMausiEthernet.kext. Solution is to switch to IntelMausi.kext (Rev 1.0.2 here). (Solved and included in the EliteDesk.zip archive attached to Post #1) Some USB devices were not recognized. My SSDT-UIAC.aml was incomplete and did not specify all required USB port types (missing SSxx ports). The attached EliteDesk.zip archive includes this fix. (No longer observed. Possibly resolved in a Clover fix.) Clover boot loader may default to Recovery volume after a normal shutdown. Work-around is to select your normal macOS volume. This may only happen when Clover is configured to boot LastBootedVolume and may be "fixable" by explicitly setting a boot volume (haven't tested this). (No longer observed) At least one display blanks (sleeps) when plugging / unplugging USB device (observed in front USB 3.1 ports). Display wakes immediately on keyboard and mouse activity, so this is a minor issue but may be indicative of another issue. (Solved - this is a BIOS setting and requires no macOS changes) Safari has problems loading insanelymac web pages after sleep / wake. I suspect that the problem is with the embedded video on the pages. Also observed video problem in AppStore after sleep/wake. Console: VideoDecodersUnavailable. Solution is to enable Intel ME in BIOS. (Solved and included in the EliteDesk.zip archive attached to Post #1) Display does not fully wake after resuming from sleep (needs an extra mouse or keyboard stimulus to fully wake). Solution is to change boot arg darkwake=0 to darkwake=2. Other values of darkwake may work as well, but this is the first I tried and it worked. (Solved and included in the EliteDesk.zip archive attached to Post #1) -disablegfxfirmware boot arg is not required with WEG. I inadvertently left this boot arg after I encountered an endless gfx firmware update boot loop while working on my FB patching. This boot arg is no longer necessary after completing FB patching with WEG. (Solved and included in the EliteDesk.zip archive attached to Post #1): Sometimes, CMOS time is lost on shutdown or restart. Solution is to enable Clover's Apple RTC fix in config.plist. (Solved and included in the attached EliteDesk.zip archive) headphone jack doesn't work. Solution is to change HDEF layout-id to 28. (Solved and included in the EliteDesk.zip archive attached to Post #1) System freezes on wake from sleep because of a kernel panic related to hda-gfx (my system does not have HDMI and my DP->DVI adapters do not drive monitor speakers). Solution is to add No-hda-gfx property to HDEF as described here. This property is recognized as a Lilu flag and prevents loading hda-gfx. (Solved and included in the EliteDesk.zip archive attached to Post #1) Device (PMCR) is not defined. Solution is a SSDT that "injects" the missing device. (Solved and included in the EliteDesk.zip archive attached to Post #1) eficheck is loaded (not sure why this is bad, but may be a privacy issue - see here). Solution is to add updated EFICheckDisabler kext that include Q370 chipset. See here.1 point