Leaderboard


Popular Content
Showing content with the highest reputation on 08/09/2020 in all areas
-
Hi @LIMITANT if you wanted, im share my EFI folder (im change only serials). Just don't forget the RESET NVRAM always that you change your EFI. If was possible, try put only one EFI in HD/SSD folder, and preserve in backup your EFI. If works, use without modified essentials. Another think is my desktop was similar of your... I hope help you and another with same chipsets... EFI-z170-i7-6700k-Opencore-AMD-RX.zip2 points
-
Not yet but ASAP2 points
-
@LIMITANT Is this happening at the beginning of the installation or half way through the installation? I had similar KP's after the sealing stage, which sort of kept failing with KP's. I got myself a faster USB drive, downloaded a fresh copy of the BS Public Beta and created the installer and never had to look back. Try a different USB drive after you ensure you have downloaded a good copy of the installer using CrazyBirdy's script. Ensure you have OC updated to the latest, with the kexts. Also try FakeSMC instead of VirtualSMC, sometimes, it works.2 points
-
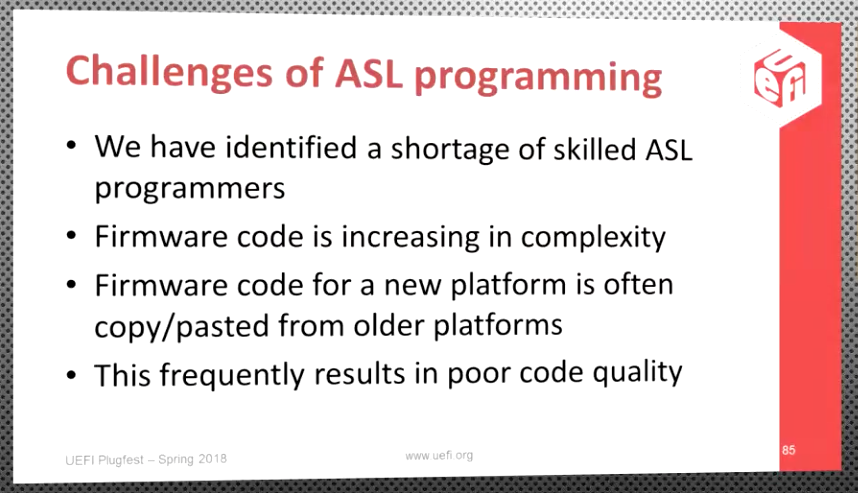
It is true and you are correct: real Apple hardware will boot Windows right off the picker, regardless of set on NVRAM or selected at boot time. Now, if Bootcamp does add or not ACPI patches during boot time to be loaded and interpreted by the Apple boot loader, or if patches its entire and primary ACPI tables, provided by Apple during their own firmware updates, I do not know: I understand that one way or another they have to, since Apple support only up to a certain version of Windows OS on a specific Apple device. So they too "fix" their own ACPI tables making them able to run the newer Windows OS, as they have done before. How they do it is unknown to me - my gut tells me this is done over firmware updates and not at boot load time. Which then brings us back to where we are. Since we want macOS on our non-supported, non-approved hardware, we are the ones that have to fix/provide what the hardware vendor should had done. The vendor never would as they cannot officially endorse running macOS on non-Apple hardware without being sued. And since OC follows Apple's loader behavior, we are on our own. A stance that has multiple problems. For one, something even the UEFI group recognizes as issues within their own world (see image below). And the risk of creating incompatible ACPI tables that works on macOS and not on Windows, which was exactly the problem we were trying to fix. So while yes, the "most versatile" option would be for OC to not enforce ACPI changes if _OSI is anything other than "Darwin", seeing how OC is also used on real Apple hardware, and with their approach of "vanilla", unless enough people would make them to change their minds... I don't speak by the Acidanthera team and I'm in no way related to the group. We can continue this discussion on the OpenCore section of this forum if needed so we don't sidetrack too much on the actual macOS Big Sur Beta topic.
 2 points
 -
Try this, take a shoot!! EFI-OC-Lenovo-E470-i5-7200u-Skylake.zip1 point
-
Hi, last year I finished my second mac case build, using a Mac G5 case. You can find the original post on https://linustechtips.com/main/topic/1088655-another-g5-build-black-rgb-edition/ I modified the frontal, adding a custom front white led power button, with a aluminium usb3 hub with card reader (the card reader has a small blue led inside). On the cdrom window, I used a lcd text screen that fits perfect for that size. The screen has an usb controller, so I used an internal usb3 cable to power the lcd screen and the frontal usb hub. On the Inside, a Ryzen 5 watercooled with a Corsair Hydro Series H100x, 3X 120mm rgb fan, and 2X 90mm rgb fan on the rear, using the original's case rear grid. (anyone noticed that it's hard to find good 90mm rgb fans?). The first 2 frontal 120mm fans are for the corsair water cooler, and the third one, gives extra fresh air for the Zotac 1080 amp extreme. The paint job was a disaster, because the paiting cracked after some layers, but next time I will use a professional paiting, I have some more mac cases to work with As a vintage addon for this build, I used cool old ibm power supply switch on the back, this way I can cut the power from the power supply. I hope you enjoy this build as I did In case someone is interested with the parts I used (the lcd screen is really cool) Links to parts I used: Aluminium case USB3 hub that I used in the frontal: Link Amazon Usb LCD text panel 40X2, with the same size of the superdrive cdrom front window Link Aliexpress Small power button in black with white led circle Link Aliexpress X3 120mm RGB with controller kit Link Aliexpress x2 90mm fixed color RGB fan, they can be buyed separated from the cooler. Link Aliexpress Video with rgb fans working1 point
-
Anyone knows how to make About this Mac to display my Intel(R) Core(TM) i9-7900X CPU @ 3.30GHz CPU to display it's name correctly? Right now it it displays under Processor 3.3Ghz That's it. No name. Just speed. It's cosmetic but would be great to learn how to spoof name under OpenCore.1 point
-
Brilliant! Thank you sir1 point
-
For information : I've just committed the removal of PoolPrint. Everything has been switch to SPrintf/SWPrintf. It touched a lot of files. It's possible that I've introduced a bug, of course. So please test before updating.1 point
-
@LIMITANT Try updating your O.C to 0.6.1 as @mnfesq has recommended and also try resetting your NVRAM before you start your install. See if that helps...1 point
-
To get Beta 4 to boot, I needed to use OC 0.6.1. My OC 0.6.0 did not work. The fact that your OC can boot Catalina and High Sierra means that you can use those versions of macOS to your heart's content but you may never be able to boot Big Sur. This thread exists because what worked for Catalina doesn't work for Big Sur. When you're ready, try it out and see. Also, I believe I got this error when I took a USB drive that I had created for Beta 3 and copied the Beta 4 app to it rather than using the createinstallmedia function to make a brand new USB drive. For me, shortcuts always lead to failure. Not saying this is what you did but it's what I did. When I made a new USB installer just for Beta 4, I didn't have the problem with the prelinked copy of kexts having a different UUID.1 point
-
@beidl, well, you do have the patched tables that Clover generates, so you could always inject them with OpenCore. Unfortunately Clover is very messed up, so it is almost impossible to say what exactly resolves the your issue in it.1 point
-
macOS and Windows 10 show up Intel 7th processor. This is not a macOS issue. DPCIManager uses a PCI ID base. Simply. There is no problem: it's cosmetic. This issue is OFF-TOPIC: you should have posted it on the Catalina topic. Please.1 point
-
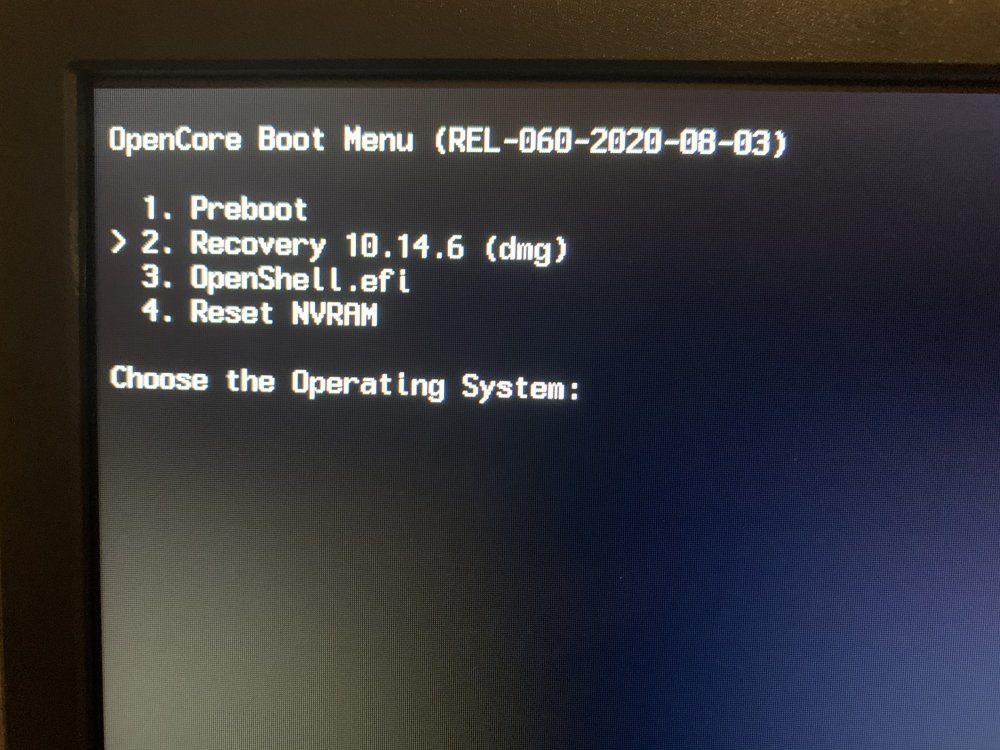
So a weird thing happened. I went back to Linux and wiped the drive then tried the installation again. This time, I was able to complete the installation, however only Preboot and Recovery are in my picker now: Progress!!
 1 point
 -
Download Clover from repo and launch Buildme. Xcode command line tools must be installed1 point
-
For you with a Radeon VII you are pegging the GPU performance in a big way having the igpu enabled. Your chew though a render much much quicker without using QuickTime. Your gpu is the perfect example of somebody that should be using smbios 1,1 not 19,1 TBH buddy. Do a side by side for yourself and your see what I mean. Also on a different flavour the igpu eats up a massive chunk of space in the nvram causing the odd boot failures, it’s no big deal but again it’s something else I don’t like. Lastly I’m a Overclocker and love to squeeze every drop of performance I can from the CPU and in windows the GPU too and that’s something that gets effected with the igpu enabled.1 point
-
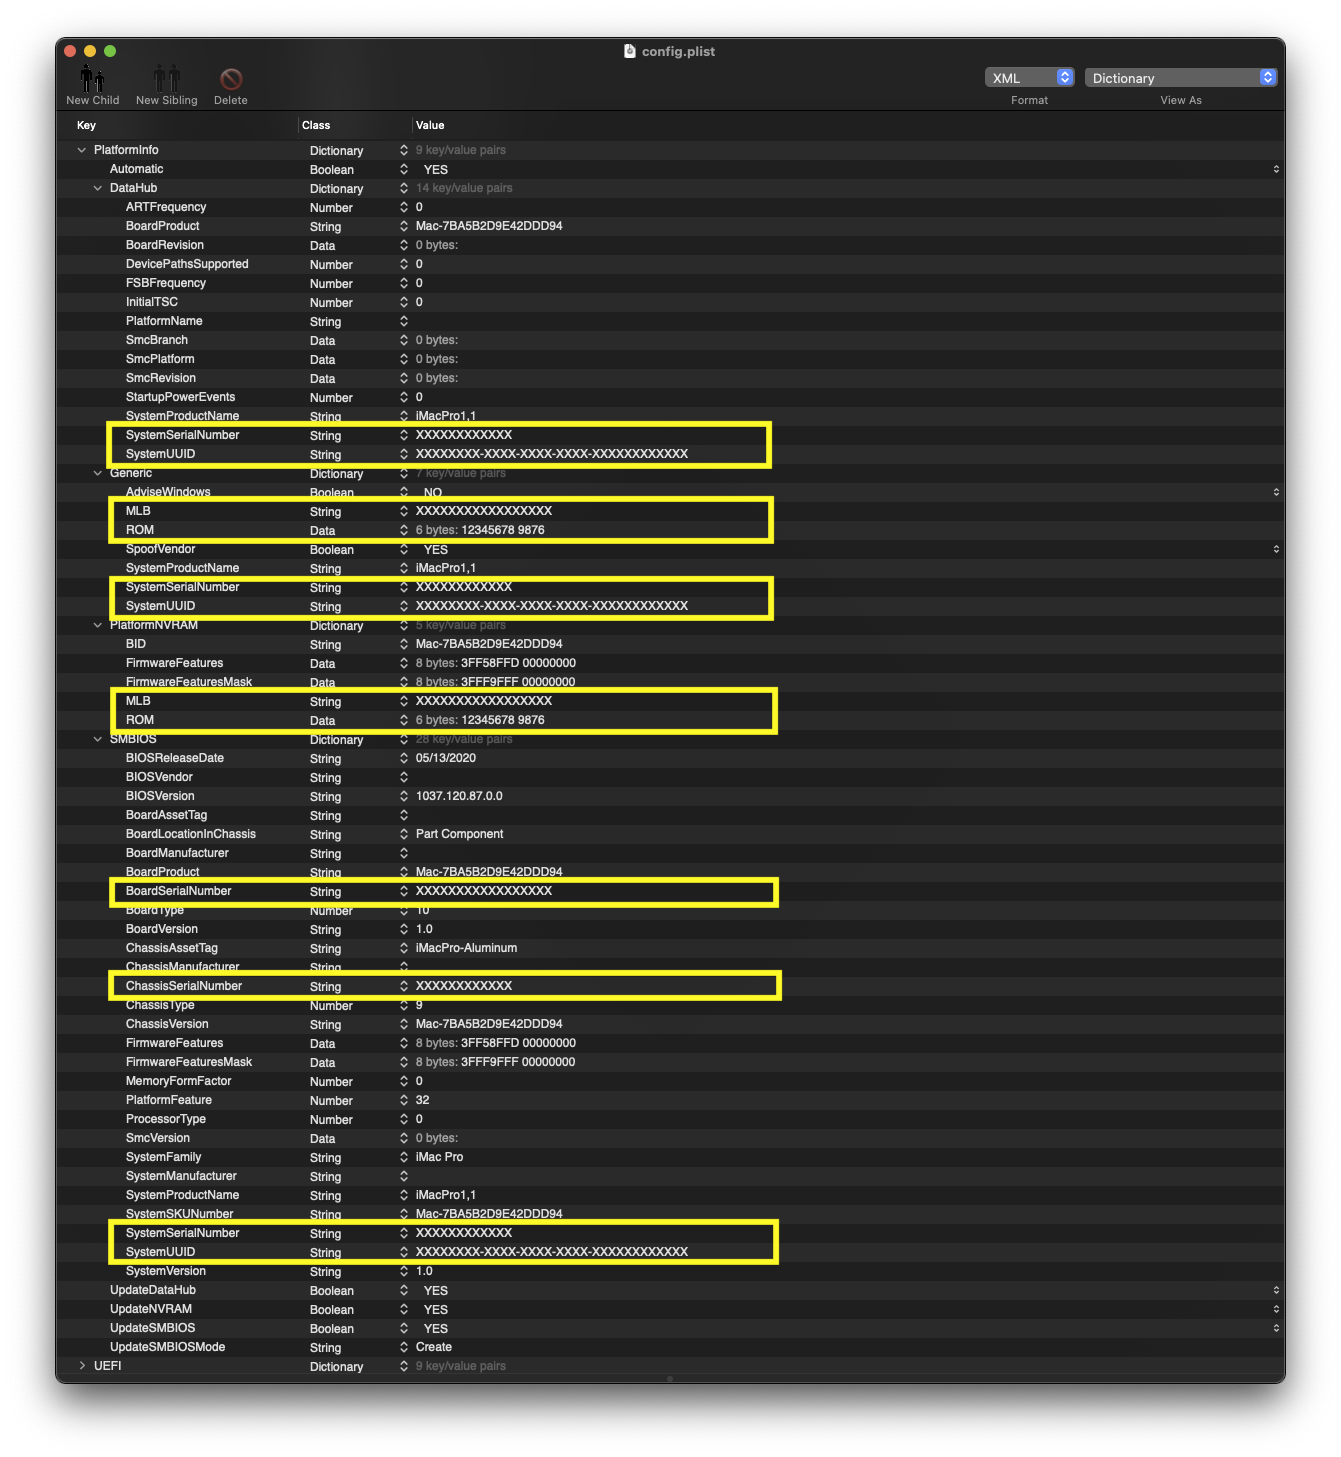
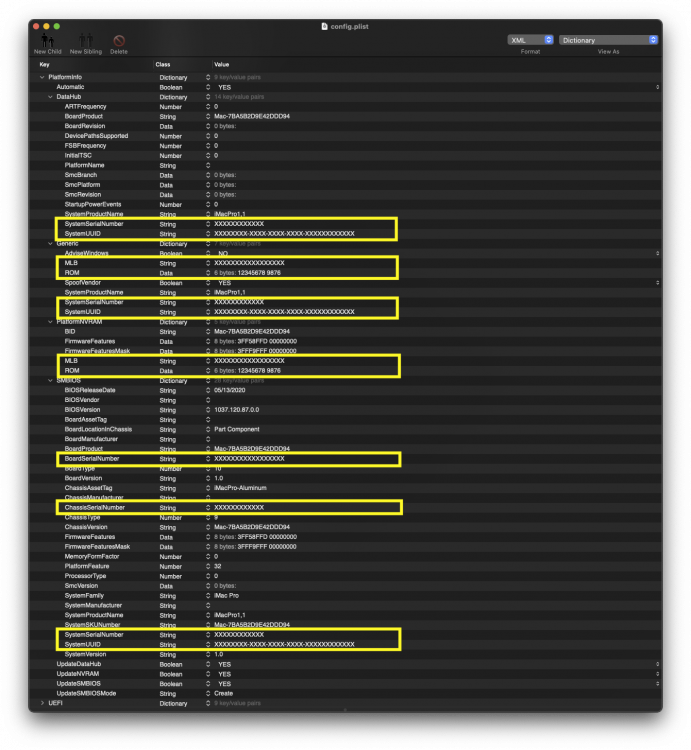
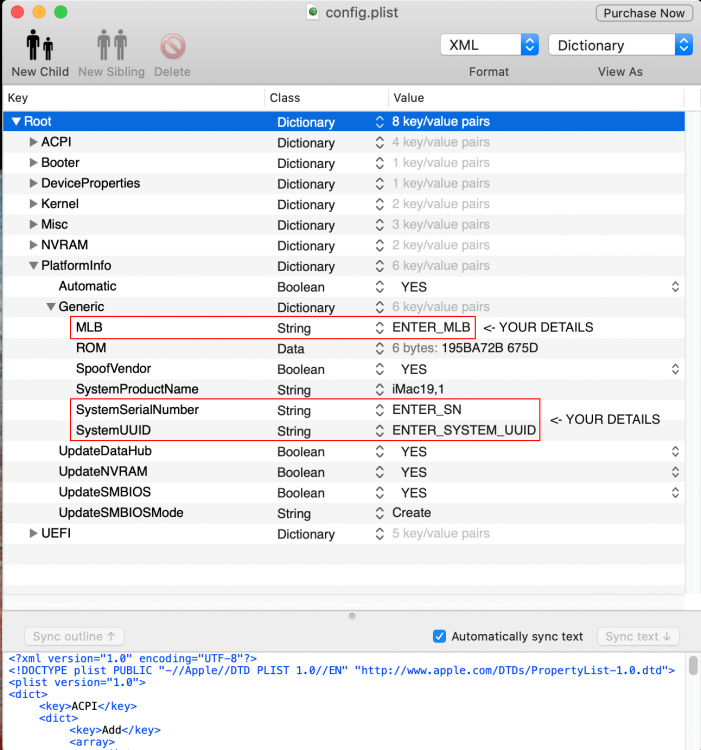
Here You are Sir! EFI Removed my personal datas in Platforminfo, but leaved the iMacPro1,1. You need to change the XXXXXXXXXX values that the picture shown to Yours and the 123456789876 ROM value to Your network cards MAC address.
 1 point
 -
You need to read the OC Guide to see exactly what kexts and SSDTs you need for your system.1 point
-
@manmo71 you could use the “show log” CLI command - or use a tool like Hackintool that has ways to show you your system logs since the last boot. These includes from the kernel load up to “where you are”. Then for “next logs” you can always use native Console app.1 point
-
@SavageAUS @Alex HQuest @Max.1974 Thank you for all your assistance. I finally managed to get BS Public Beta installed on my system (onto a separate m.2 SSD) from a USB. Things that I did Replaced the USB drive with a newly purchased one. Did a fresh download of the public beta installer. Created installer and did the install. Kexts and config.plist file was unchanged from the previous install. I noticed that this time that the drive sealing stage went through a bit slower and showed success message (previously I suspect there were errors, the verbose mode scrolls so fast that it is difficult to read) and the boot went through successfully. I think in my previous installs the sealing phase had failed, and thats what caused the KP as reported in my earlier posts. Is there a boot-arg or some hotkey that can enable a log of all that shows up on the -v (verbose screen during boot) up until the point we get to the desktop? I would like to see that and evaluate, to see if there are areas or error which can be eliminated.1 point
-
LOL - the OC install guide warns against using OC configurator1 point
-
@TrickyHunter It better be: the 2020 iMac 27" comes with a 5700XT card, so Apple will give this card a white glove treatment1 point
-
If it wasn't for Mald0n this thread would be staying closed so thank him not me for talking me around. A certain person (you know who you are) nearly spoilt it for everybody but the needs of the many outweigh the needs of the Few or the One. New EFIs for OC and Clover with new DSDTs today or tomorrow. Im just doing the master thread first then il turn over to here and do the same1 point
-
Clover & OpenCore EFI Updates (10.15.6 Ready), 4th August 2020 (Use With Bios Revision F11e or Newer) The EFIs and DSDTs have now been updated to the my latest versions. Changes made include, AppleALC 1.5.1 Lilu 1.4.6 WhateverGreen 1.4.1 VirtualSMC 1.1.5 AirportBrcmFixup 2.0.8 IntelMausi 1.0.3 New DSDTs For Clover For firmware F11e and above only OCQuirks Revision 23 (Clover) Clover Updated to Revision 5120 OpenCore Updated to Revision 0.6.0 (Big Sur Beta 4 Ready) OpenCanopy is now Enabled as Standard Plus other major tweaks and changes to all of the configs Clover EFI Update v5120 - 04/08/2020 - Use with Bios revision F11e or Higher Only or Replace with the older F11c/F10 DSDT if you don't want to update the bios EFI Clover VEGA Navi 030820.zip - Vega, Navi (5700, 5700XT etc), Radeon VII DSDT EFI EFI Clover Polaris NVIDIA 030820.zip - RX500 Polaris Series (RX590, 580, 570 etc) DSDT EFI Note - If your not using a 5700 XT or any other Navi GPU then remove agdpmod=pikera from the boot arguments. Please Note - I have now set KernelPM to No as standard so if you don’t have a unlocked MSR or not using my MSR Unlocked Bios Profile then go into the Clover Config.plist and set KernelPM to Yes or you won’t be able to boot up. An even better fix would be to unlock your MSR using my profile method. OpenCore EFI Update v0.6.0 - 04/08/2020 Myself and @texem have now created a OpenCore EFI done the way the OpenCore Devs intended it to be made, There is no DSDT in use so you can use this EFI on any supported GPU and the SSDTs have been made so they will not be used in any other Operating System apart from MacOS. OpenCore 060 Z390 Master 19,1 030820.zip - OpenCore v0.6.0, SMBios iMac19,1 OpenCore 060 Z390 Master 1,1 030820.zip - OpenCore v0.6.0, SMBios iMacPro1,1 (IGPU Disabled) Note - If your not using a 5700 XT or any other Navi GPU then remove agdpmod=pikera from the boot arguments. Note 2 - Do not try to carry across your old OpenCore Config.plist to the new EFI as to many changes have occurred in 0.6.0. Use the new Config.plist instead. For OpenCore Using PlistEdit Pro add your details by modifying the following PLEASE NOTE - These EFIs are setup to be used with your msr Unlocked so make sure you use the F11e Unlocked Profile but if for any reason you can not unlock MSR then just modify following in the OpenCore config.plist : Additional Downloads Z390AORUSMASTER.zip - Aorus Z390 Master Bios Firmware F11e PlistEdit Pro.zip - PlistEdit Pro (use to edit OpenCore) CFG Unlock (MSR) F11e BIOS Profile - The Easy Way I have made this bios profile for you all to use that will unlock CFG on your motherboard making it play alot more friendly with the NVRam. It also has all the bios settings listed on this guide pre done and saved onto the profile. F11e MSR Unlocked Profile.zip - Use with Bios Revision F11e ONLY 1 - Download the profile and save it to a USB Key 2 - Go into the bios, 3 - Load the profile, 4 - Save and exit 5 - Go straight back into the bios and save your bios to a new profile and name it Default CFG Unlocked or something like that. 6 - Boot back into Catalina go into your clover config and under Kernal and Kext Patches Uncheck KernalPM 7 - Save the changes and then restart and your done, your motherboard will now be CFG (MSR) Unlocked PLEASE NOTE - If you reset the bios or load bios defaults it will clear the Unlock making CFG Locked again.
 1 point
 -
this dsdt.aml setup might be usefull if u wanna use voodohda + applehda with this card + hdmi this is the voodohda dsdt setup for the internal sound card (dont really need a pin config here) Device (AZAL) { Name (_ADR, 0x001B0000) Method (_PRW, 0, NotSerialized) { Return (Package (0x02) { 0x05, 0x05 }) } Method (_DSM, 4, NotSerialized) { If (LEqual (Arg2, Zero)) { Return (Buffer (One) { 0x03 }) } Return (Package (0x02) { "layout-id", Buffer (0x04) { 0x0C, 0x00, 0x00, 0x00 } }) } } then for the oland card with hdau (not using pin id 1 gives me assertion errors) managed by applehda Device (PEG0) { Name (_ADR, 0x00010000) Device (GFX0) { Name (_ADR, Zero) Method (_DSM, 4, NotSerialized) { Store (Package (0x02) { "hda-gfx", Buffer (0x0A) { "onboard-1" } }, Local0) DTGP (Arg0, Arg1, Arg2, Arg3, RefOf (Local0)) Return (Local0) } Name (_SUN, One) } Device (HDAU) { Name (_ADR, One) Method (_DSM, 4, NotSerialized) { Store (Package (0x04) { "hda-gfx", Buffer (0x0A) { "onboard-1" }, "layout-id", Buffer (0x04) { 0x01, 0x00, 0x00, 0x00 } }, Local0) DTGP (Arg0, Arg1, Arg2, Arg3, RefOf (Local0)) Return (Local0) } } }1 point
-
I see it as a market battle between X86 and ARM technology especially on the battery-saving arena. If ARM will dominate the PC market one day, most of us will have ARM-hackintoch.1 point
-
I think most will depends on what Microsoft will do in the next few years. Windows 10 is already fully available for ARM64 ( you can download ISO images built together with the intel versions ) If the PC market will grow in that direction ( not happening for now... ) I'm sure that someone will find a way to run macOS ARM on PC as well. But this is the real problem: Will PC Market abandon intel architecture? I'm not so sure...1 point
-
I didn't know I was your mate - Never mind, you say you're able to block that ad under Catalina and not under Big Sur. Did you ever think it could be related to Big Sur and nothing do with us?1 point
-
No need to patch installer if your SMBIOS is officially supported in Big Sur (that patch is to allow install into older Macs, bypassing compatibility checks). IIRC, I only saw Preboot booting into the second stage install (the one with approx 30 minutes remaining). The final boot into the third stage shows only the Big Sur volume to boot from the OpenCore menu. Interrupting half way through the loading bar during this stage (when the progress bar slows to a crawl and the snapshot is being created) ---> Restart to OpenCore Menu now shows both "macOS Installer" and the Big Sur volume ---> Choose Big Sur Volume ---> 1 reboot, keep on choosing Big Sur volume, not the installer. For those getting error 66 trying to mount their root volume despite disabling SIP for authenticated root --> it means your system still has APFS System Snapshots enabled. These can be removed following the steps below (credit to guide on reddit) Fixing APFS Snapshot Procedure Boot into the Big Sur installer USB Open a terminal, type `csrutil disable` and reboot When back into the installer, run `diskutil list` to find the location of the "Macintosh HD" disk, such as disk2s5 Mount it using `diskutil mountDisk <disk identifier>` such as `diskutil mountDisk disk2s5` then run `mount -uw <volume mount point>` such as `mount -uw /Volumes/Macintosh\ HD/` to mount it as read write Run `/System/Library/Filesystems/apfs.fs/Contents/Resources/apfs_systemsnapshot -v <volume mount point> -r ""` Then, to delete the snapshots on the disk, run `diskutil apfs listSnapshots <volume mount point>` and take note of each UUID of the snapshots Run `diskutil apfs deleteSnapshot <volume mount point> -uuid <uuid of snapshot>` for all snapshots on the disk. Verify that there are no more snapshots by running `diskutil apfs listSnapshots <volume mount point>` it should return "No Snapshots for disk" Reboot into the Big Sur desktop and make sure that running `sudo mount -uw /` returns no errors and that running `diskutil info /` returns a disk such as disk2s5 and not a snapshot such as disk2s5s1 Here is actual real world example (output from terminal after booting into Big Sur Recovery or USB Installer). Note in this example, <volume mount point> was /Volumes/Big_Sur, UUID of snapshot was DD99DFC1-7FA2-4B1E-9F75-04380B0AFCA4... -bash-3.2# csrutil status System Integrity Protection status: disabled. -bash-3.2# csrutil authenticated-root status Authenticated Root status: enabled -bash-3.2# csrutil authenticated-root disable Successfully disabled authenticated root. Please restart the machine for the changes to take effect. //After rebooting back into the Big Sur Recovery or USB Installer, open terminal again and check SIP status now disabled... -bash-3.2# csrutil status System Integrity Protection status: disabled. -bash-3.2# csrutil authenticated-root status Authenticated Root status: disabled -bash-3.2# nvram csr-active-config csr-active-config w%08%00%00 -bash-3.2# diskutil list /dev/disk0 (internal, physical): #: TYPE NAME SIZE IDENTIFIER 0: GUID_partition_scheme *53.7 GB disk0 1: EFI EFI 209.7 MB disk0s1 2: Apple_APFS Container disk2 53.5 GB disk0s2 /dev/disk1 (internal, physical): #: TYPE NAME SIZE IDENTIFIER 0: GUID_partition_scheme *53.7 GB disk1 1: EFI EFI 209.7 MB disk1s1 2: Apple_APFS Container disk3 53.5 GB disk1s2 /dev/disk2 (synthesized): #: TYPE NAME SIZE IDENTIFIER 0: APFS Container Scheme - +53.5 GB disk2 Physical Store disk0s2 1: APFS Volume macOS — Data 14.7 GB disk2s1 2: APFS Volume Preboot 83.7 MB disk2s2 3: APFS Volume Recovery 528.8 MB disk2s3 4: APFS Volume VM 1.1 MB disk2s4 5: APFS Volume macOS 11.0 GB disk2s5 /dev/disk3 (synthesized): #: TYPE NAME SIZE IDENTIFIER 0: APFS Container Scheme - +53.5 GB disk3 Physical Store disk1s2 1: APFS Volume Big_Sur — Data 3.1 GB disk3s1 2: APFS Volume Preboot 320.6 MB disk3s2 3: APFS Volume Recovery 835.0 MB disk3s3 4: APFS Volume VM 1.1 GB disk3s4 5: APFS Volume Big_Sur 13.1 GB disk3s5 /dev/disk4 (disk image): #: TYPE NAME SIZE IDENTIFIER 0: GUID_partition_scheme +1.8 GB disk4 1: Apple_APFS Container disk5 1.8 GB disk4s1 /dev/disk5 (synthesized): #: TYPE NAME SIZE IDENTIFIER 0: APFS Container Scheme - +1.8 GB disk5 Physical Store disk4s1 1: APFS Volume macOS Base System 1.6 GB disk5s1 2: APFS Volume Preboot 130.0 MB disk5s2 -bash-3.2# mount -uw /Volumes/Big_Sur -bash-3.2# /System/Library/Filesystems/apfs.fs/Contents/Resources/apfs_systemsnapshot -v /Volumes/Big_Sur -r "" Attempting tagging of snapshot on volume: /Volumes/Big_Sur -bash-3.2# diskutil apfs listSnapshots /Volumes/Big_Sur Snapshot for disk3s5 (1 found) | +-- DD99DFC1-7FA2-4B1E-9F75-04380B0AFCA4 Name: com.apple.os.update-190312682FDBFD811EAF7E1DE7AA32CC00611E1594F50D161F143E85BF633A4C XID: 330 Purgeable: Yes NOTE: This snapshot limits the minimum size of APFS Container disk3 -bash-3.2# diskutil apfs deleteSnapshot /Volumes/Big_Sur -uuid DD99DFC1-7FA2-4B1E-9F75-04380B0AFCA4 Deleting APFS Snapshot DD99DFC1-7FA2-4B1E-9F75-04380B0AFCA4 "com.apple.os.update-190312682FDBFD811EAF7E1DE7AA32CC00611E1594F50D161F143E85BF633A4C" from APFS Volume disk3s5 Started APFS operation Finished APFS operation -bash-3.2# diskutil apfs listSnapshots /Volumes/Big_Sur No snapshots for disk3s5 Reboot into Big Sur proper and open terminal to install kext(s) eg say you want to replace original /S/L/E/IO80211Family.kext with attached IO80211Family.kext from High Sierra in your ~/Downloads folder fusion71au@fusion71aus-Mac-mini ~ % sudo mount -uw / Password: //Rename original /S/L/E/IO80211Family.kext and replace with older IO80211Family.kext from your ~/Downloads folder fusion71au@fusion71aus-Mac-mini ~ % sudo mv /System/Library/Extensions/IO80211Family.kext /System/Library/Extensions/IO80211Family.orig Password: fusion71au@fusion71aus-Mac-mini ~ % sudo mv ~/Downloads/IO80211Family.kext /System/Library/Extensions fusion71au@fusion71aus-Mac-mini ~ % sudo chown -R root:wheel /System/Library/Extensions/ fusion71au@fusion71aus-Mac-mini ~ % sudo chmod -R 755 /System/Library/Extensions/ fusion71au@fusion71aus-Mac-mini ~ % sudo kmutil install --update-all checking collections... updated extension 'com.apple.driver.AirPort.Brcm4360' found on disk at '/System/Library/Extensions/IO80211Family.kext/Contents/PlugIns/AirPortBrcm4360.kext' (mach-o UUID changed from <unknown> to 8DE38A76-B284-34D2-AF4E-DB727D7FF250) updated extension 'com.apple.driver.AirPort.Atheros40' found on disk at '/System/Library/Extensions/IO80211Family.kext/Contents/PlugIns/AirPortAtheros40.kext' (mach-o UUID changed from <unknown> to 9753F22E-5C85-3E95-B543-0870CF03838A) updated extension 'com.apple.driver.IO80211NetBooter' found on disk at '/System/Library/Extensions/IO80211Family.kext/Contents/PlugIns/IO80211NetBooter.kext' (mach-o UUID changed from C0A664A0-F3F6-3C63-919F-B33AA52EC96A to 22A50E20-A024-3B8D-9268-B69ECBA918A0) updated extension 'com.apple.iokit.IO80211Family' found on disk at '/System/Library/Extensions/IO80211Family.kext' (mach-o UUID changed from 99011013-0804-3EF6-B433-D33B216C05DB to A879B51A-4562-3B95-B6C3-A2472B508F2F) updated extension 'com.apple.driver.AirPort.BrcmNIC' found on disk at '/System/Library/Extensions/IO80211Family.kext/Contents/PlugIns/AirPortBrcmNIC.kext' (mach-o UUID changed from 1BFF3E8B-77F0-3C4B-A6C1-9DF06132B189 to 0F1637EA-51B0-3A81-9433-956A19427984) updated extension 'com.apple.driver.AirPort.Brcm4331' found on disk at '/System/Library/Extensions/IO80211Family.kext/Contents/PlugIns/AirPortBrcm4331.kext' (mach-o UUID changed from <unknown> to D4559F1A-005E-353C-B33F-3006C349EE5D) rebuilding release collections: boot, system rebuilding release collections: boot kernel collection system kext collection rebuilding local auxiliary collection kmutil done fusion71au@fusion71aus-Mac-mini ~ % sudo kcditto Copying deferred prelinked kernels in /... /AppleInternal/BuildRoot/Library/Caches/com.apple.xbs/Sources/kext_tools/kext_tools-685/kc_staging.m.279: Encountered error while inspecting path: Error Domain=NSCocoaErrorDomain Code=260 "The folder “PrelinkedKernels” doesn’t exist." UserInfo={NSFilePath=/Library/Apple/System/Library/PrelinkedKernels, NSUserStringVariant=( Folder ), NSUnderlyingError=0x7f8b16d078d0 {Error Domain=NSOSStatusErrorDomain Code=-43 "fnfErr: File not found"}} /AppleInternal/BuildRoot/Library/Caches/com.apple.xbs/Sources/kext_tools/kext_tools-685/kc_staging.m.279: Encountered error while inspecting path: Error Domain=NSCocoaErrorDomain Code=260 "The folder “PrelinkedKernels” doesn’t exist." UserInfo={NSFilePath=/Library/Apple/System/Library/PrelinkedKernels, NSUserStringVariant=( Folder ), NSUnderlyingError=0x7f8b16e07500 {Error Domain=NSOSStatusErrorDomain Code=-43 "fnfErr: File not found"}} Copying KCs in /... System Volume UUID: 3D41E3EC-D061-4315-BF1B-56B1DA8FF19A Volume Group UUID: 1DF588CB-10D4-48C2-BE99-71CF80DD2FBF Preboot disk: /dev/disk5s2 Preboot volume: /System/Volumes/Preboot Copying: /System/Library/KernelCollections/BootKernelExtensions.kc.elides -> /System/Volumes/Preboot/1DF588CB-10D4-48C2-BE99-71CF80DD2FBF/boot/System/Library/KernelCollections Copying: /System/Library/KernelCollections/BootKernelExtensions.kc -> /System/Volumes/Preboot/1DF588CB-10D4-48C2-BE99-71CF80DD2FBF/boot/System/Library/KernelCollections Copying: /System/Library/PrelinkedKernels/immutablekernel -> /System/Volumes/Preboot/1DF588CB-10D4-48C2-BE99-71CF80DD2FBF/System/Library/PrelinkedKernels Copying: /System/Library/PrelinkedKernels/prelinkedkernel -> /System/Volumes/Preboot/1DF588CB-10D4-48C2-BE99-71CF80DD2FBF/System/Library/PrelinkedKernels1 point
-
Hello again, Insanelymac I was contacted by @Allan and @fantomas to see if there is something i could do for the site. So here i am, but i don't have the same time i had back when i started here. As you might or might not know, i'm not the owner of the site but i can administer it. As @Poco mentioned several other times, the work to do here is much and our resources are limited. Administering a site this big is no joke and, as you noticed, requires constant supervision to make sure things don't fall apart. As i work full time, i'm not sure i can provide the attention and time this site needs with my own forces. With this said, i looked at the current issues. The actual issue is that the search is having problems, and it affects backround tasks. With background tasks not running properly, indices are not kept updated and the site became slower I didn't fix the original issue with the search but i adjusted the configuration so that it can produce some results and not block backgound indexing tasks. It will take some time for the operation to complete, but then the site should feel and perform a bit faster If there are other issues that i can resolve in reasonable time and without too much disruption, i can take a peek No promises tho Have a good day1 point
-
Thank you to both of you! I hadn't realized that I always batch installed all the voodoo kexts every time I reinstalled SL and that once voodoo battery was installed, I would have to remove it and start fresh with the kext max1974 mentioned. So... thanks to both of you. battery meter still isn't perfect because it doesn't dim the screen, but percentage changes to battery power instead of ac and that is good enough for me! I think the dimming is part of other power management stuff. I'm not too worried about it. Thanks again for the replies guys. This completes my snow hackintosh!1 point
-
KC consists of several mach bodies different by types. Type 2 - executable for example prelinkedkernel. Type 12 - KC, and type 11 == MH_KEXT_BUNDLE somehow related to kext. Each body begins with header followed by a chain of load commands. LC_SEGMENT_64 represents a some memory segment. For example _HIB is a starting point of kernel. Command LC_SYMTAB describes a symbols table which I used to find a symbol inside the kernel. This way I made symbolic patcher instead of find bytes patterns. BigSur introduced new mach body type 12 and new SEGMENTs. I found __TEXT_EXEC points to kernel body after KC. Segments __REGIONnnn with even numbers points to kext descriptions. The kext defined by UUID. For older method with prelinkedkernel we found PrelinkedInfo with is an array of plists "-PrelinkedInfoDictionary" where is item contains _PrelinkExecutableSourceAddr which is the kext binary. To inject our kext here we have to reallocate this array and add here our kext plist with real addresses. All this description has a lack of address shifts. For example if kext binary has virtual address 0xFFFFFF8001180000 then we will find in in real memory at address 01180000. Why? But I have mush more complex case with symbol tables which I found by binary search and the resulting address is not same as it should be.0 points