Leaderboard


Popular Content
Showing content with the highest reputation on 07/21/2020 in all areas
-
Looks like kernel patching is working but kext patching no.3 points
-
Yes, definitely use -disablegfxfirmware to get rid of the problem of the igpu boot loop.2 points
-
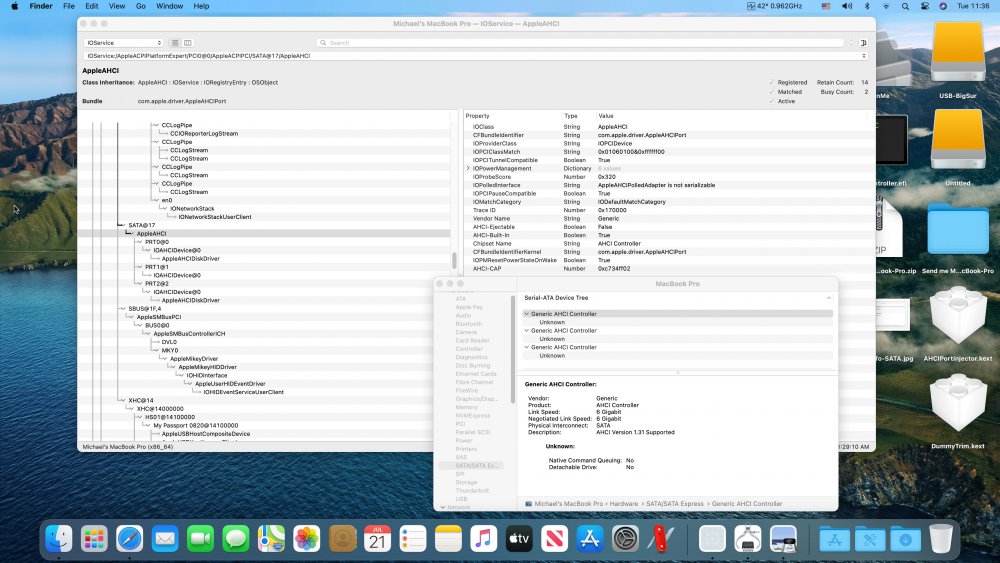
Using Catalina's IOAHCIFamily.kext has not been a complete failure. It took a few tries to get it to load but once it loaded, it was able to recognize the presence of the devices but could not recognize sufficient information to initialize them. Here's what I got: If anyone has suggestions as to where to go from here, let me know.
 2 points
 -
@lottenow @PC IT @hohoho @MICKHAEL It appears that at least 5 of us are all having the same problem - no ability to have Big Sur read our AHCI-connected drives. Since I have a fully-functioning installation on a USB drive, I swapped the IOAHCIFamily.kext from Catalina with the Big Sur version. I was able to boot to Big Sur on the USB drive but it didn't change anything - I couldn't see my internal drives. I will experiment with that a bit more before I rule it a complete failure and will report back.2 points
-
2 points
-
OC writes to NVRAM exactly what you configure it to, so read and understand your own config... your issue looks more like you either have borked NVRAM write or disabled it (DisableVariableWrite in OcQuirks or new Clobber)2 points
-
Sorry about my english is plain.. Scary i mean very complicate,.with to many SSDT,for sure u need a DSDT.. For example i upload my success oc from my MSI laptop with the same CPU i7-9750H I hope it helps you.. OC.zip2 points
-
Holly Cow! I beg you don’t be telling me to chill out seeing I didn’t say anything wrong to start with but since you have.... Your the one that needs to chill out dude and untwist you’re knickers as I never attacked you I just meant you were incorrect with your assumption, Also he used the example SSDT to create hes and again il repeat myself but I did mine from scratch using no guides or examples and mine is based on MaLd0ns way of doing it and not Acidanthera way so no they probably won’t be the same as I used a different method and way to create it. as for the bios I already explained in an earlier post why I recommend it so for you to advise after that not to do it or suggest it brings nothing to the table didn’t really make much sense to me but whatever. You would have to be extremely thick or stupid (I don’t mean you) to bork a Z390 Master Bios considering it’s a dual bios and can be reverted with ease. My real job is a system installer and Audio/Visual Engineer plus I also do custom builds for clients and manufactures for Displays and shows so I’m heavily connected to all the major players out there company wise and I like to think I know what I’m talking about (That or i am a dam good blagger, take your pick...lol) Manufactures recommend not using XMP as it voids the warranty of the cpu if you do so does that mean you leave XMP off too seeing intel advise against using it? Also for the record gigabyte say no such thing about bios updates in this modern day and age and if you don’t believe me speak to a gigabyte engineer and find out for yourself. Gibbo might have a z170 listed but he also uses a z390 Master, I know this as I have helped him out a few times before so yes it’s totally relevant for him my friend. Anyway Big Love Man, Big Love....I don’t want beef please mate so let’s just leave it there, smile and be cool ok. Toddles isn’t it? Hmmmmmm I think so2 points
-
Do you want to quickly find your boot log, or ever wanted to know which version of bootloader is installed on your disk(s), had the need to dump your BIOS from OS X, just curious about your own system setup or been asked to provide your setup information to others when asking for assistance? DarwinDumper is a useful collection of readily available tools, and scripts wrapped in an application framework giving you a convenient method to quickly gather a system overview of your hack or Mac. And rest assured that enabling the privacy option will mask sensitive data like the IOPlatformSerialNumber, IOPlatformUUID, IOMACAddress(s), USB Serial Number(s), SystemSerialNumber, serial-number, fmm-mobileme-token-FMM, MLB and ROM efi vars and CustomUUID in the dumped files and report. Current Release Version: 3.1.1 The system dumps are saved to a folder or your choice, but defaulting to the same directory as the main application. You can choose to setup a symlink to make it simple to run DarwinDumper from the Terminal. There is an option to create an html report showing a complete overview of the dumps. This report will mostly just contain the text dumps as you'll find in the main dump directory, but for some dumps there is extra processing to try to present the information in a better way. For example, the Disk Partitions and Unique ID's dump will show a visual map of the disk layout, and the DMI Tables (SMBIOS) dump will show the data split by table type. Note: The html report does not contain all files from a complete dump so if seeking assistance for a problem and you wish to send someone a DarwinDump then you will want to send the complete dump directory and not just the .html report file. The following can be read and dumped by DarwinDumper: - ACPI tables. - Audio codec and further info. - Boot loaders and configuration files. - CPU info. - Device-properties. - Disk partition structure / info. - Disk sectors (hex). - DMI (SMBIOS). - EDID. - I/O Kit Registry. - EFI Memory Map. - EFI vars (some). - Kernel information - Kexts - (list of currently loaded kexts). - Memory. - NVRAM (both Apple specific and UEFI firmware variables). - SMC Keys. - LSPCI (PCI vendor & device codes) dumps. - Power (Sleep/Hibernate) settings. - RTC. - System Profiler. - System BIOS. - System Log(s). - Video BIOS. License: DarwinDumper is licensed under GNU General Public License, version 3.0 (GPLv3). Tools included: AnalyseVBIOS Copyright: Not Known. License: Not known Source: http://www.insanelymac.com/forum/topic/211294-information-on-vesa-modes-in-atinvidia-bios/ Alt Link: https://www.dropbox.com/s/dnp903x2z9pqf8k/AnalyseVBIOS.zip?dl=0 AppleIntelInfo Copyright: © 2012-2017 Pike R. Alpha. All rights reserved. License: Creative Commons Attribution-NonCommercial Source: https://github.com/Piker-Alpha/AppleIntelInfo atomdis Copyright: Michael Larabel @ Phoronix.com License: GPL Version 2 Source: http://www.phoronix.com/scan.php?page=article&item=amd_atombios_dumper bgrep Copyright 2009 Felix Domke <tmbinc@elitedvb.net>. All rights reserved. Redistribution and use in source and binary forms, with or without modification, are permitted provided that the following conditions are met: 1. Redistributions of source code must retain the above copyright notice, this list of conditions and the following disclaimer. 2. Redistributions in binary form must reproduce the above copyright notice, this list of conditions and the following disclaimer in the documentation and/or other materials provided with the distribution. THIS SOFTWARE IS PROVIDED BY THE COPYRIGHT HOLDER ``AS IS'' AND ANY EXPRESS OR IMPLIED WARRANTIES, INCLUDING, BUT NOT LIMITED TO, THE IMPLIED WARRANTIES OF MERCHANTABILITY AND FITNESS FOR A PARTICULAR PURPOSE ARE DISCLAIMED. IN NO EVENT SHALL <COPYRIGHT HOLDER> OR CONTRIBUTORS BE LIABLE FOR ANY DIRECT, INDIRECT, INCIDENTAL, SPECIAL, EXEMPLARY, OR CONSEQUENTIAL DAMAGES (INCLUDING, BUT NOT LIMITED TO, PROCUREMENT OF SUBSTITUTE GOODS OR SERVICES; LOSS OF USE, DATA, OR PROFITS; OR BUSINESS INTERRUPTION) HOWEVER CAUSED AND ON ANY THEORY OF LIABILITY, WHETHER IN CONTRACT, STRICT LIABILITY, OR TORT (INCLUDING NEGLIGENCE OR OTHERWISE) ARISING IN ANY WAY OUT OF THE USE OF THIS SOFTWARE, EVEN IF ADVISED OF THE POSSIBILITY OF SUCH DAMAGE. The views and conclusions contained in the software and documentation are those of the authors and should not be interpreted as representing official policies, either expressed or implied, of the copyright holder. Source: https://github.com/tmbinc/bgrep bdmesg Copyright 2010 by Islam M. Ahmed Zaid. All rights reserved. License: GPL Version 2 Source: http://forge.voodooprojects.org/p/chameleon/source/tree/HEAD/trunk/i386/util/bdmesg.c Alt Link: https://sourceforge.net/p/cloverefiboot/code/1905/tree/CloverPackage/utils/bdmesg/bdmesg.c cmosDumperForOsx Created by rafirafi, revised extensively by STLVNUB License: Information not available Source: https://www.dropbox.com/s/bg1q0yho6g7u3xn/cmosDumperForOsxV0.1.zip?dl=0 csrstat Created by Piker-Alpha Copyright: © 2015-2017) by Pike R. Alpha License: Information not available Source: https://github.com/Piker-Alpha/csrstat dmidecode Original nongnu.org License: GPL Version 2 Now updated and hosted by acidanthera Source: https://github.com/acidanthera/dmidecode dumpACPI Created by blackosx. Idea taken from PHPdev32's MacIASL. Source: https://bitbucket.org/blackosx/dumpacpi edid-decode Created by Adam Jackson, revised by Andy Vandijck License: Information not available Original Source: http://cgit.freedesktop.org/xorg/app/edid-decode Revised Source: https://www.dropbox.com/s/l0htffnqzs9e1vg/edid-decode.zip?dl=0 fdisk440 Apple Computer, Inc. License: APSL v2.0 Original Source: http://www.opensource.apple.com/source/diskdev_cmds/diskdev_cmds-491/fdisk.tproj/mbr.h Modified by Zef Source: http://forge.voodooprojects.org/p/chameleonApplications/source/tree/HEAD/trunk/fdisk.tproj Alternate Link: https://www.dropbox.com/s/odl9kp38j3flla5/fdisk440.zip?dl=0 FirmwareMemoryMap script Amit Singh (showbootermemorymap) Further development by bcc9 and dmazar License: Information not available flashrom http://flashrom.org/Flashrom License: GPL Version 2 Source: https://www.dropbox.com/s/gfmqx2t7lvofs1v/flashrom.zip?dl=0 getcodecid Copyright © 2012 AnV Software. All rights reserved. License: Information not available Source: https://github.com/Gengik84/getcodecid getdump Created by fassl?, modifications by Slice and AutumnRain? License: Information not available Source: https://sourceforge.net/projects/voodoohda/files/ gfxutil Copyright 2008 mcmatrix. All rights reserved. License: Information not available Historic detail can be found at forum.netkas.org Source: https://github.com/acidanthera/gfxutil iasl Copyright © 2000 – 2014 Intel Corporation. License: Information not available Source for v20200110: https://www.acpica.org/node/176 ioregwv Apple Computer, Inc. License: APSL v2.0 Original Source: https://opensource.apple.com/source/IOKitTools/IOKitTools-86/ Modified by blackosx Source: https://bitbucket.org/blackosx/ioregwv lzma Copyright © 2013 Igor Pavlov. License: GNU Lesser General Public License Source: http://www.7-zip.org/sdk.html This build by Slice at insanelymac.com: https://www.insanelymac.com/forum/topic/311786-updated-lzma-utility-v1514/ lzvn Copyright: © 2014 Apple Computer, Inc. All rights reserved. License: APSL Credit: Piker-Alpha, Andy Vandijck, MinusZwei. https://github.com/Piker-Alpha/LZVN MacGap2 Created by Tim Debo. All rights reserved. License: MIT Source: https://github.com/MacGapProject/MacGap2 Macpmem driver (Macpmem.kext) Copyright © 2007-2011 Volatile Systems. Copyright 2013-2014 Google Inc. All Rights Reserved. License: GPL Version 2 Source Code: https://github.com/google/rekall/tree/master/tools/osx/MacPmem]https://github.com/google/rekall/tree/master/tools/osx/MacPmem nvram Apple Computer, Inc. License: APSL v2.0 Modified by blackosx Source: https://bitbucket.org/blackosx/nvram oclinfo Copyright © 2009 cmf License: GPL Version 2 Source: http://www.insanelymac.com/forum/topic/170796-opencl-info/ pciutils driver (DirectHW.kext) DirectHW is Copyright © 2008-2010 coresystems GmbH License: GPL Version 2 Source: https://github.com/CloverHackyColor/directhw Kext: Pre-built (Signed) Kext pciutils lspci Copyright © 1997--2008 Martin Mares License: GPL Version 2 Source Code: https://git.kernel.org/pub/scm/utils/pciutils/pciutils.git RadeonDump Created by Dong Luo. Copyright 2008. All rights reserved. Modified by Andy Vandijck License: Information not available Source: http://www.insanelymac.com/forum/topic/282794-darwindumper/page__st__120?do=findComment&comment=1920068 Alt Link: https://www.dropbox.com/s/5drpckxlmaot732/RadeonPCI.zip?dl=0 radeon_bios_decode Created by Dong Luo. Copyright 2008. All rights reserved. License: Information not available Source: http://www.insanelymac.com/forum/topic/282794-darwindumper/page__st__120?do=findComment&comment=1920068 SMC_util_FansOnly Copyright © 2006 devnull License: GPL Version 2 Source: https://www.dropbox.com/s/ra9h6gbjj6yhgol/SMC_util_FansOnly.zip?dl=0 smcutil Copyright © 2006 devnull License: GPL Version 2 Source: https://www.dropbox.com/s/0dgvexijx4oewfr/smcutil.zip?dl=0 VoodooHDA.kext Created by fassl?, modifications by Slice and AutumnRain? License: https://sourceforge.net/p/voodoohda/code/HEAD/tree/tranc/License.h]https://sourceforge.net/p/voodoohda/code/HEAD/tree/tranc/License.h Source: https://sourceforge.net/p/voodoohda/code/HEAD/tree/]https://sourceforge.net/p/voodoohda/code/HEAD/tree/ x86info Written to succeed CPUID by Phil Karn (KA9Q). Contributed to by various people. OS X compatability by Slice License: GPL Version 2 Original Source: https://github.com/kernelslacker/x86info Revised Source: https://github.com/CloverHackyColor/x86info Running DarwinDumper from the command line: From Terminal, you can initiate DarwinDumper by running the following script directly. /DarwinDumper.app/Contents/Resources/public/bash/script.sh To help with this, the UI has a Symlink option which you can click to create a symbolic link which points to the above script. DarwinDumper can then be subsequently run from the command-line by loading a new Terminal window and typing darwindumper followed by return. $ darwindumper usage: [-a zip,lzma,none] [-d acpi,appleintelinfo,audio,biosSystem,biosVideo,codecid,cpuinfo,devprop,diskLoaderConfigs,bootLoaderBootSectors,diskPartitionInfo,dmi,edid,bootlogF,bootlogK,firmmemmap,memory,ioreg,kernelinfo,kexts,lspci,rcscripts,nvram,opencl,power,rtc,sip,smc,sysprof] [-h] [-l] [-o html,private] [-p 1,2,3,4,5,6,7,8] [-v] Example: $ darwindumper -l Will re-run the last dump used options. Credits (in alphabetical order): acidanthera team, Adam Jackson, Amit Singh, Andy Vandijck, Apple Inc., arsradu, bcc9, blackosx, cmf, DieBuche, dmazar, Dong Luo, droplets, ErmaC, Felix Domke, Google Inc., Intel Corporation, InsanelyDeepak, JrCs, Kabyl, Kynnder, Martin Mareš, mcmatrix, Michael Larabel, Mickey1979, phcoder, Phil Karn, Piker-Alpha, rafirafi, гык-sse2, Slice ,sonotone, STLVNUB, THe KiNG, Trauma, Volatile Systems, xsmile, !Xabbu. DarwinDumper was originally inspired as an open project by Trauma, it has remained an open project and please keep it an open project, so if you make any changes or additions to it then please share your work here. Please report any feedback, requests or bugs. Known issues: v3.1.0 1 - When SIP File Protection is enabled, dumping disk partition info of non-APFS containers and disks which are not APFS physical stores may fail when running from DarwinDumper via the graphical interface. However, it's been known to succeed when using DarwinDumper from the command line. Something to do with osascript. 2 - lzma archive option has been known to fail on macOS 10.15 when running dumps requiring root privileges. macOS Version support: - v2.9.9.2 is for older macOS versions - v3.0.4 requires OS X 10.9 and newer to run in the Finder, though it should work from the command line okay on older OS versions. - v3.1.0 was updated for newer macOS versions and has been tested on 10.13 and 10.15. DarwinDumper Download1 point
-
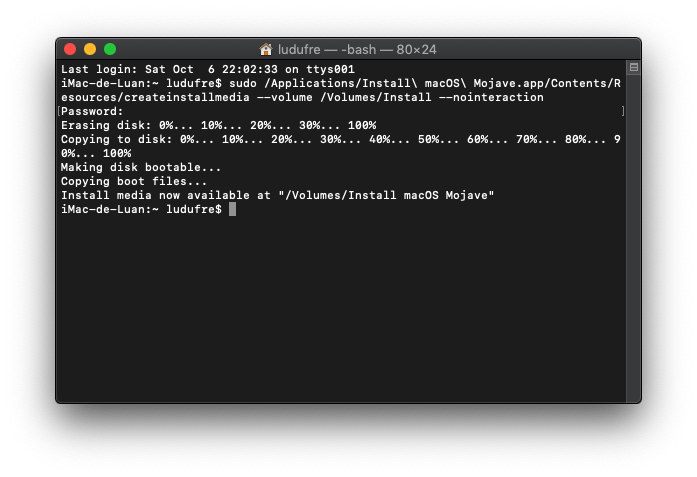
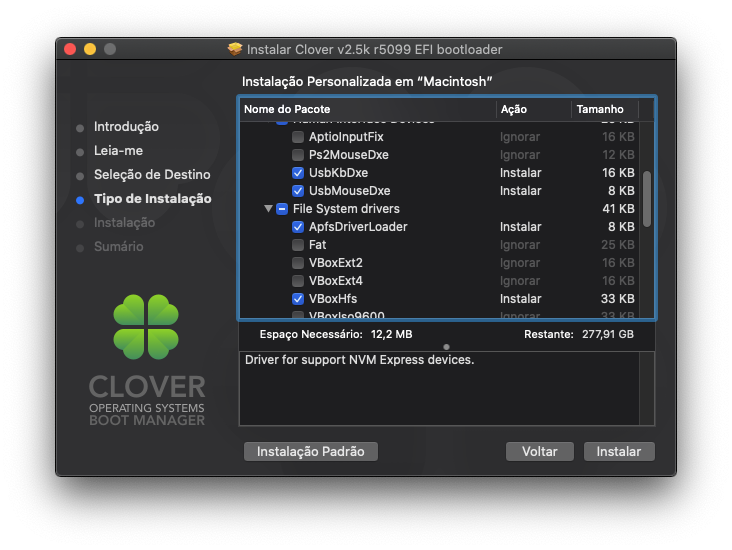
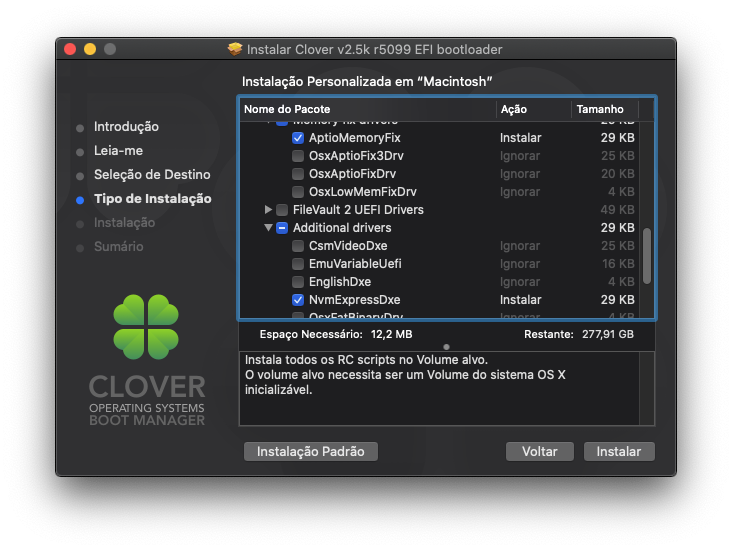
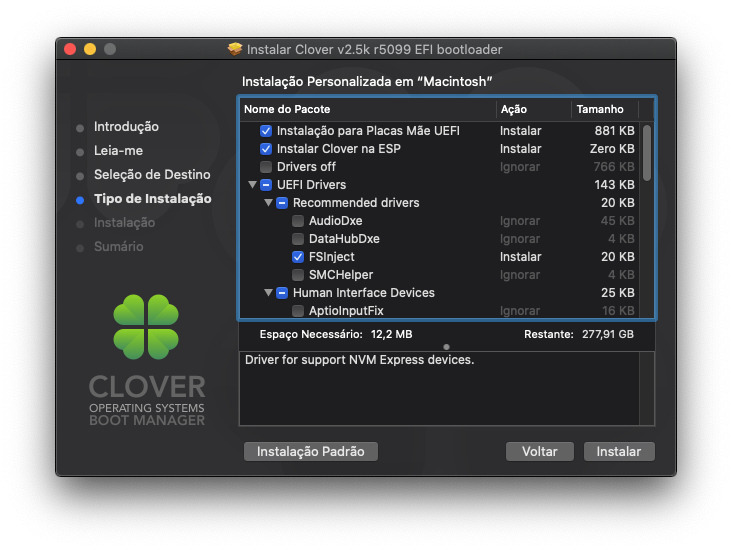
Installing macOS Catalina 10.15.5 on Gigabyte Z370N WIFI + i7 8700K + UHD 630 Changelog: 06/10/2020 14:51h GMT-0 - Fixed dual screen issue in 10.15.5. Thanks @khamsakamal48 05/27/2020 20:02h GMT-0 - Update instructions 10.15.5. 03/24/2020 20:23h GMT-0 - Update instructions 10.15.4. 01/30/2020 23:54h GMT-0 - Update instructions 10.15.3. 12/11/2019 03:58h GMT-0 - Update instructions 10.15.2. - Updated EFI folder attached. 11/30/2019 18:03h GMT-0 - Changed Device -> Graphics platform to fix dual HDMI monitor. - Updated EFI folder and config.plist 11/29/2019 21:28h GMT-0 - Added full EFI folder as requested. 11/27/2019 02:33h GMT-0 - Added BIOS profiles for ease. 11/25/2019 22:45h GMT-0 - Fixed wrong ethernet link (IntelMausi.kext). - Thanks to @MiMoHo 11/24/2019 04:56h GMT-0 - First version. What works and what does not - Processor: Intel Core i7-8700K -> Work. All SpeedStep stages.- Video Card: Intel UHD 630 -> Work. QE/CI and Metal.- Chipset: Intel Z370 -> Work.- HDMI 2.0 (1st) -> Work. - HDMI (2nd) -> Work. - DP -> Work. - Audio: ALC1220 -> Work. - HDMI Audio -> Work.- WiFi/Bluetooth -> Not work. Replaced with BCM94360CS2. - Ethernet (1st) -> Work.- Ethernet (2nd) -> Work.- USB3.0 -> Work.- Sleep -> Work. - Airdrop, Handoff, Instant Hotspot and Continuity -> Work after replaced wireless. Todo - Empty What you need to install - Running install of macOS- One USB flash drive of 8GB or bigger- macOS Catalina install app- Clover EFI - Clover Configurator - Some KEXTs and SSDT patchesHow create create the install flash drive Prepare install flash drive Format the flash drive with GUID partition mapping and name it "Install".- Open Disk Utility.- Click in View, then "Show All Devices".- Select the destination flash drive, then Erase.- Name: Install, Format: Mac OS Extended (Journaled) and Scheme: GUID Partition Map Create install flash driveOpen terminal and run this command: sudo /Applications/Install\ macOS\ Catalina.app/Contents/Resources/createinstallmedia --volume /Volumes/Install --nointeraction This will take about 30 minutes. Install bootloader Download the CloverEFI from official repository (used 5099) and install only with these options on "Install macOS Catalina": - Install for UEFI booting only- Install Clover in the ESP- UEFI Drivers - Recommended Drivers - FSInject (I still don't know if it's really necessary) - UEFI Drivers - File System drivers - ApfsDriverLoader (Support to APFS partitions) - UEFI Drivers - File System drivers - VBoxHfs (Support HFS/HFS+ partitions) - UEFI Drivers - Memory fix drivers - AptioMemoryFix (Fix the memory management of de UEFI/BIOS) - UEFI Drivers - Additional drivers - NvmExpressDxe (If you are going to use NVMe) FileVault 2 If you plan to use FileVault 2, you need to download additional drivers, since what comes with Clover is not up to date and use VirtualSMC instead of FakeSMC. Follow instructions bellow: From current Clover installation, check these options to USB keyboard/mouse work on password screen: - UEFI Drivers - Human Interface Devices - UsbKbDxe - UEFI Drivers - Human Interface Devices - UsbMouseDxe After Clover install will be created a partition named EFI and mounted in Desktop. Usually the path is /Volumes/EFI/. Download the versions 2.1.0 and 2.0.9 of AppleSupportPkg from: https://github.com/acidanthera/AppleSupportPkg/releases We need the last version of AppleGenericInput.efi that is inside 2.1.0 and last version of AppleUiSupport.efi that is inside 2.0.9. OR download attached bellow. Put in /Volumes/EFI/EFI/CLOVER/drivers/UEFI/ That's it! FileVault 2 will work without problems. Make things works After Clover install will be created a partition named EFI and mounted in Desktop. Usually the path is /Volumes/EFI/. - Replace the /Volumes/EFI/EFI/CLOVER/config.plist with mine attached below according to your processor version. - Put all SSDT-*.aml attached below in /Volumes/EFI/EFI/CLOVER/ACPI/patched/ Generate your Serial, MLB and SmUUID - Open the replaced config.plist with Clover Configurator (used 5.8.0.0) - Go to SMBIOS, click few times in "Generate New" in Serial Number and SmUUID. Copy the Clover Configurator to flash drive because you will need later. Download those Kexts and put in /Volumes/EFI/EFI/CLOVER/kexts/Other/ - Download the VirtualSMC.kext, SMCProcessor.kext, SMCSuperIO.kext and UEFI driver (put VirutalSmc.efi inside /Volumes/EFI/EFI/drivers/UEFI/). I used the version 1.0.9. - Download the Lilu.kext from here. I used the version 1.3.9. - Download the WhateverGreen.kext from here. I used the version 1.3.4. - Download the AppleALC.kext from here. I used the version 1.4.3. - Download the USBInjectAll.kext from here. I used the version 2018-1108. - Download the IntelMausi.kext from here. I used the version 1.0.2. - Download the SmallTree-Intel-211-AT-PCIe-GBE.kext attached bellow to enable second ethernet. Important! If you are coming from my previous Mojave guide, please note that I am using some kexts from other repositories / authors. Wifi and Bluetooth (BCM94360CS) Works out of box (plug 'n' play). Now you can start the installation without problem (I guess). How install UEFI Setup Configuration and InstallationUEFI configuration My BIOS is F10 (I use an 8th generation processor, so I don't need to upgrade) You can configure manually or load my BIOS profile. Manually: - Shutdown and insert the flash.- Power on with DEL pressed to enter BIOS setup.- Change value: BIOS - CSM Support to Disabled- Change value: BIOS - Secure Boot to Disabled- Change value: Peripherals - Initial Display to IGP- Change value: Chipset - VT-d to DISABLE- Change value: Chipset - Internal Graphics to ENABLE- Save & Exit Setup or, BIOS profile You can use one of my BIOS profiles attached bellow. It's two versions. One stock (Geekbench 4: 5840/27384) and another with overclock [5.0 GHz] (Geekbench 4: 6360/30348) - Put the profile in the root of the flash drive at EFI partition. - Restart with DEL pressed to enter BIOS setup. - Go to Save & Exit. - Select Load Profiles. - Select last option and then the flasdrive in the list. - And finally choose MACOS_STOCK or MACOS_5GHZ. - Save & Exit Setup Then: - Now, hold the F12 - In the list, select your flash drive. - Choose the flash drive (white icon). The installer will start. Format destination diskFormat the disk with GUID partition mapping and name it "Macintosh".- Select Disk Utility in the list, then press Continue.- Click in View, then "Show All Devices".- Select the destination Disk, then Erase.- Name: HD, Format: APFS and Scheme: GUID Partition MapClose Disk Utility.Select "Install macOS", then Continue.Follow instructions in screen.After installAfter first part install the system will reboot. Maybe you have to press ESC again and select the flash drive. Choose the internal disk (gray hdd icon) if not already selected. The second part of the installation will begin. This will take 16 minutes. Post installation Bootloader When the second part of install finish, the system will reboot again.After performing the user initial setup and go to the desktop, you need to make the system disk bootable.Open the Clover Configurator from flash drive that you copied before.Mount and open the flash drive EFI partition. (Inside Clover Configurator, Mount EFI -> Select flash drive in Efi Partitions list -> Mount Partition -> Open Partition) Copy the EFI folder to desktop. Go back to Clover Configurator, unmount the EFI partition of the flash drive and mount and open the EFI partition of internal disk. Move the EFI folder from Desktop to EFI partition of the internal disk. Eject the flash drive. Move all Kexts from EFI partition of internal disk to /Library/Extensions and make kext cache, with those commands in Terminal: sudo mv -R /Volumes/EFI/EFI/CLOVER/kexts/10.15/* /Library/Extensions/ sudo chmod -R 755 /Library/Extensions sudo chown -R root:wheel /Library/Extensions sudo kextcache -i / Restart the system. Last thing Run this command in Terminal to disable hibernation (doesn't work in macOS): sudo pmset -a hibernatemode 0 It's done! System Updates 10.15.2 Before install, update the following kexts: - Lilu.kext. I used version 1.4.0. - WhateverGreen.kext. I used version 1.3.5. - AppleALC.kext. I used version 1.4.4. (all download links above) Download the latest CLOVERX64.efi.zip build. I used version 5100. Mount EFI partition and unzip to: - /Volumes/EFI/EFI/CLOVER/CLOVERX64.efi - /Volumes/EFI/EFI/BOOT/BOOTX64.efi (rename the copy of CLOVERX64.efi to BOOTX64.efi Install update. Will reboot at least four time. 10.15.3 Updated with success without changing anything. 10.15.4 Before install, update the following kexts: - Lilu.kext. I used version 1.4.2. - WhateverGreen.kext. I used version 1.3.7. - AppleALC.kext. I used version 1.4.7. - VirtualSMC.kext. I used version 1.3.7. (all download links above) Download the latest CLOVER installer. I used version 5107. - Install respecting the configuration mentioned above in "Install bootloader" section. Install update. Will reboot at least four time. 10.15.5 - Same as usual, update all Kexts and Clover. - Install Update, reboot. If you like me, I had a problem with two monitors. I needed to roll back two Kexts of video from 10.15.4: FixGraphics10.15.5.zip After replace, fix permissions and cache. Change AAPL,ig-platform-id to 00009B3E to fix it. And last but not least I would like to thank the following community members, by making these dream possible:@crushers, @snatch, @apianti, @blackosx, @blusseau, @dmazar, @slice2009, @autumnrain, @phpdev32, @EMlyDinEsH, @RehabMan, @Scellow, @mitch_de, @Shailua, @Andy Vandijck, @maxfierke, @ArturXXX, @LexHimself, @brumas, @khamsakamal48 and all others members involved directly or indirectly. Attachments config.plist v2.zip EFI v4.zip Filevault 2 additional drivers.zip SmallTree-Intel-211-AT-PCIe-GBE.kext.zip SSDTs.zip MACOS_5GHZ MACOS_STOCK
 1 point
 -
Thanks for your suggestion but I was trying that weeks ago with no luck. I even tried removing all DSDT/SSDT's yesterday and it doesn't work. Period. I'm glad your system works OOB without any patches or modified kexts but that is not my experience nor the experience of the other 4 people I am working with to resolve this. If you have any ideas other than to try the vanilla method once again, I would appreciate your input.1 point
-
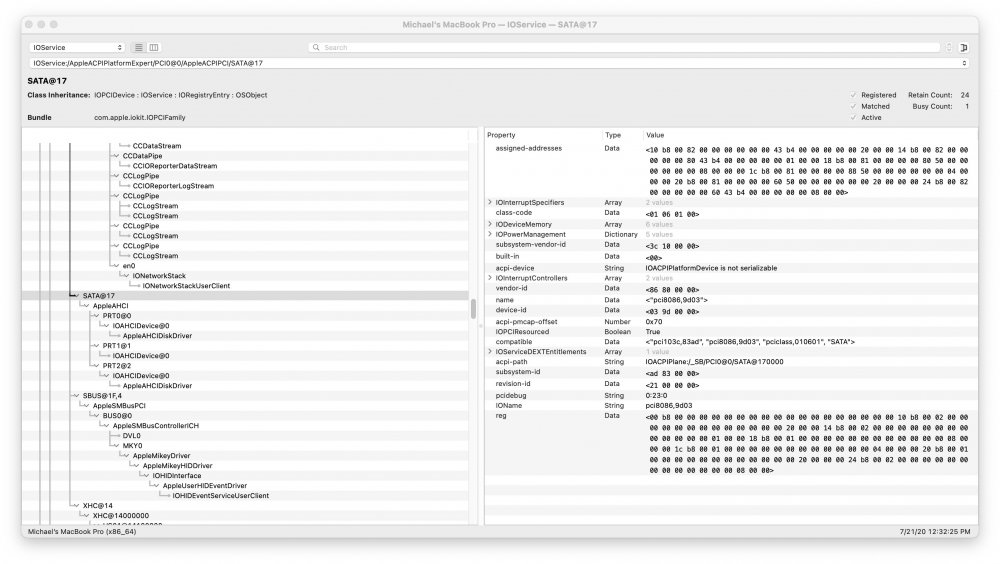
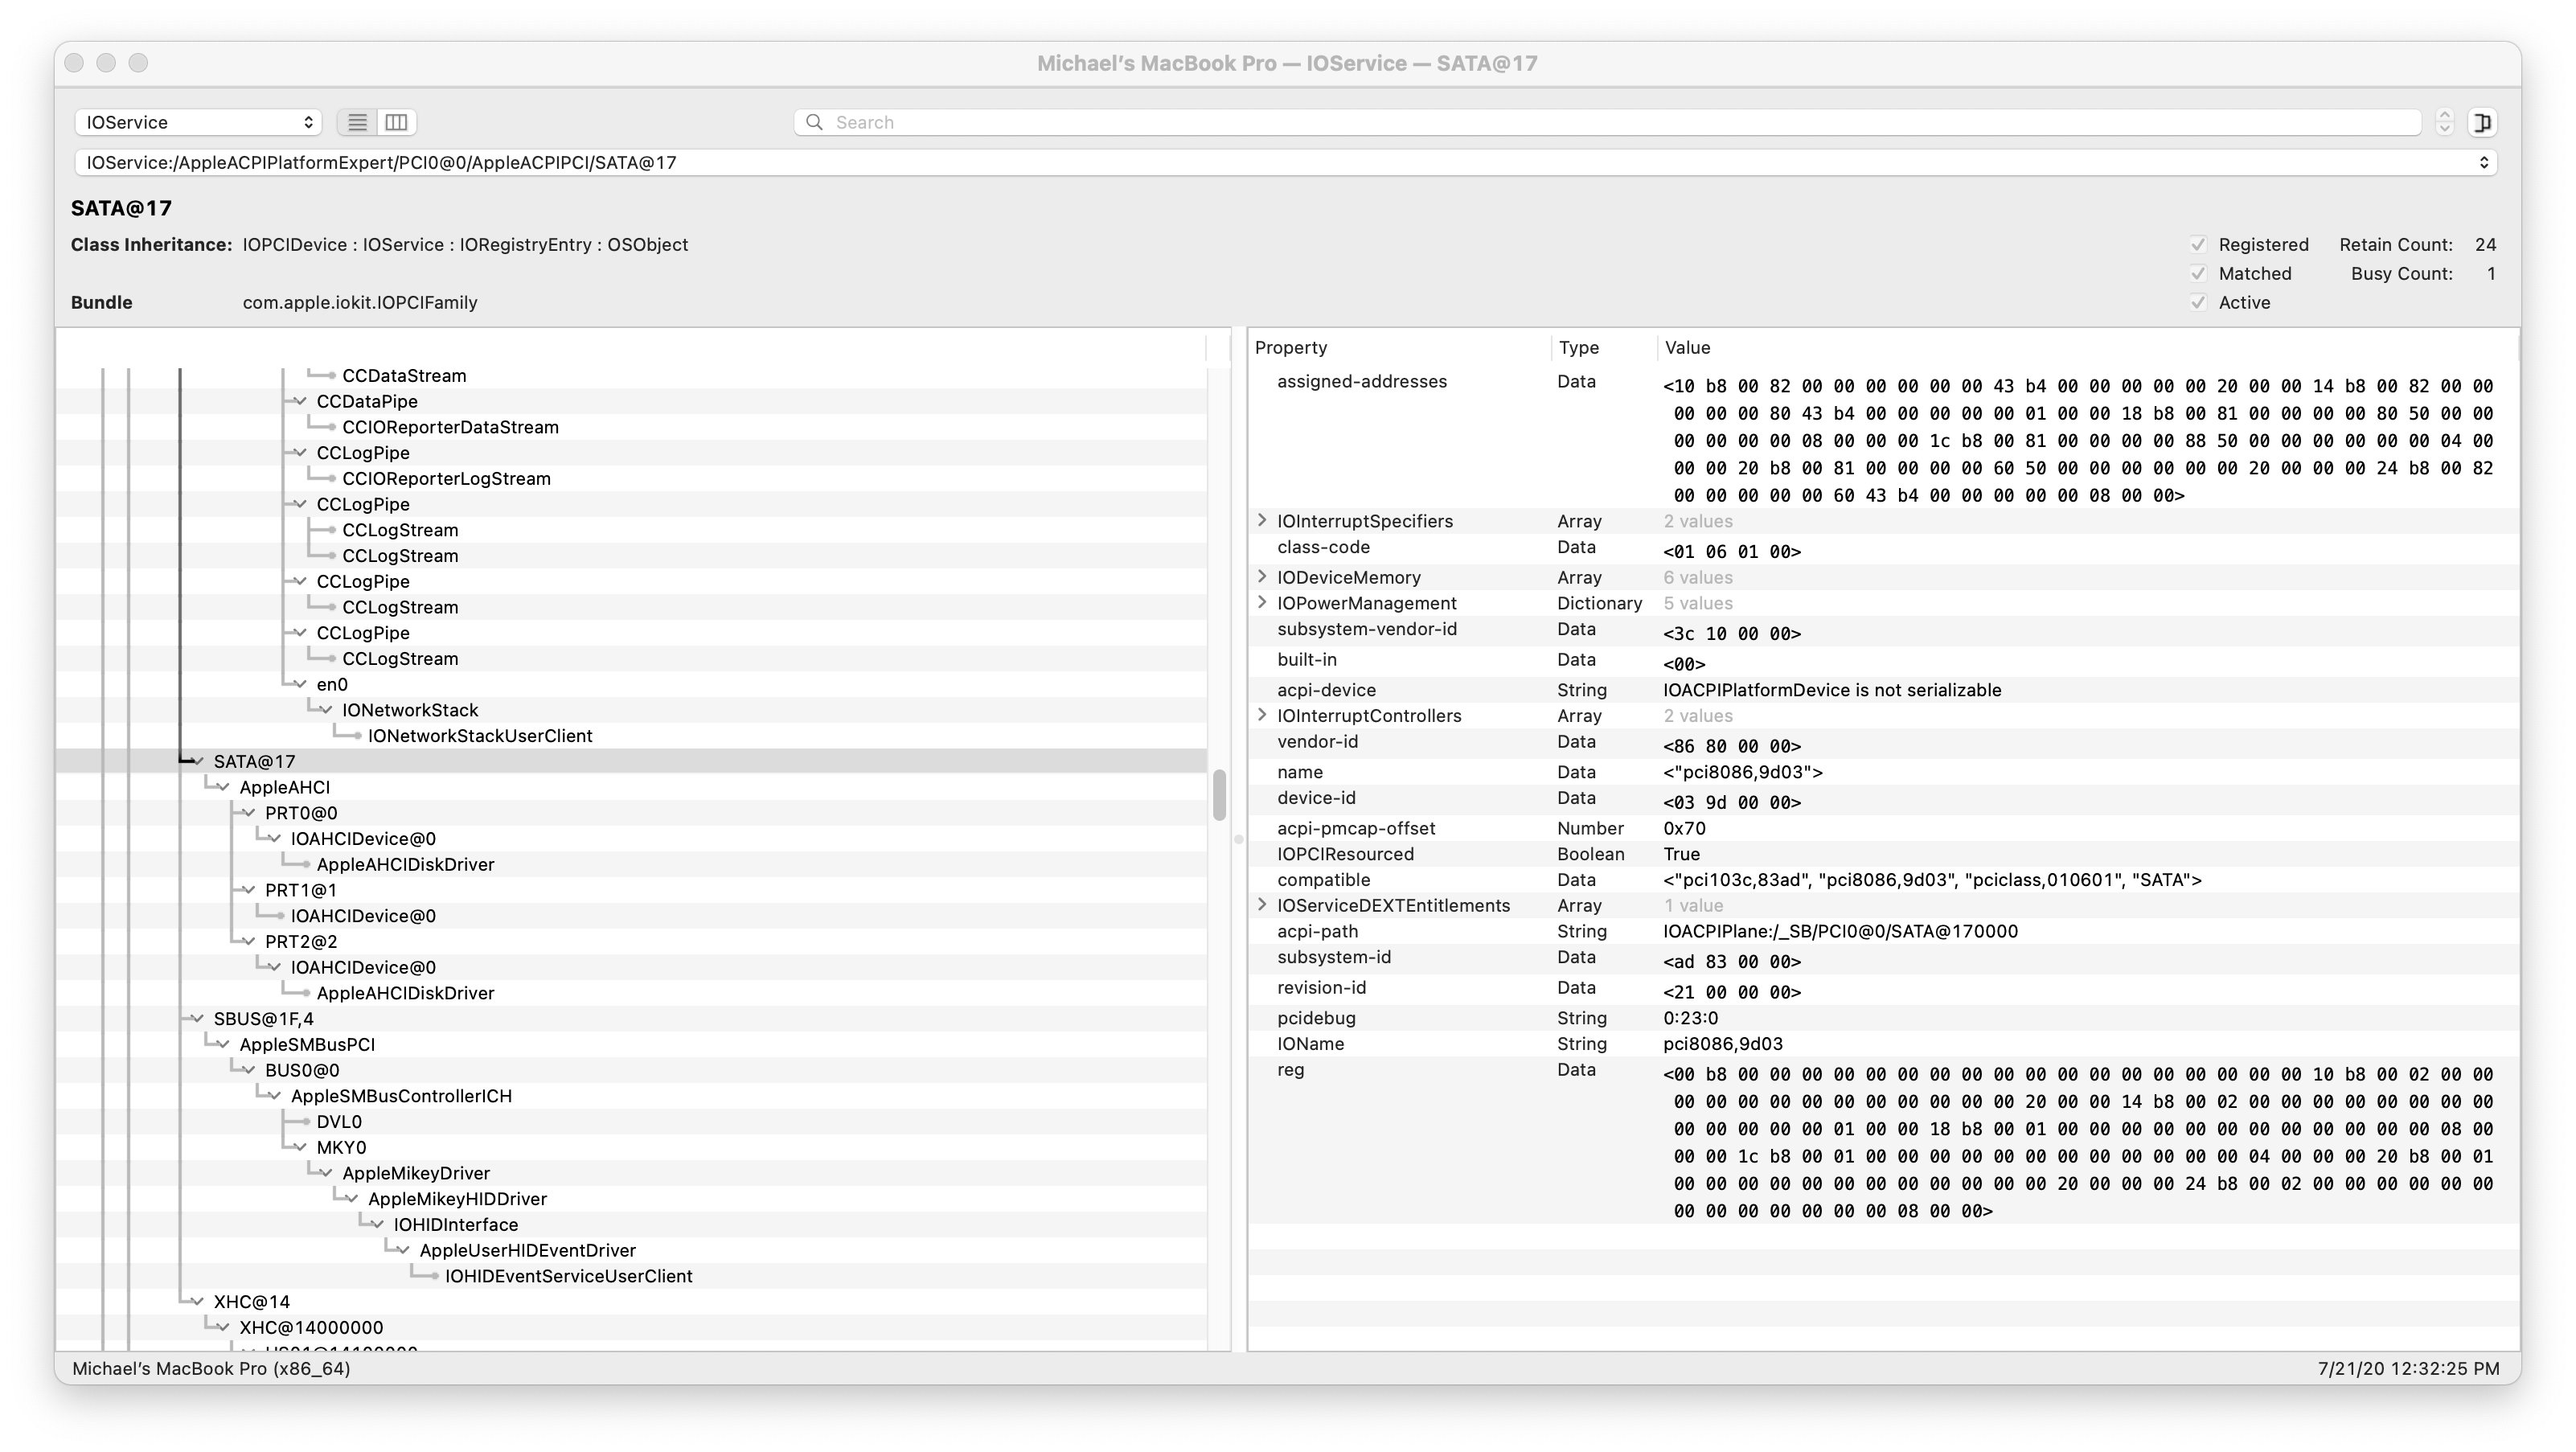
I am using Clover to boot to Big Sur although I am able to boot via OC as well. I did not need to unseal anything to use the Catalina version of IOAHCIFamily.kext. Since I have Big Sur on a USB drive, I booted to Catalina on my laptop with the USB drive connected and just copied the Catalina kext to Big Sur's S/L/E. Unsealing only applies to installers, not already-installed systems. As far as injection goes, it doesn't appear to be necessary. Big Sur properly identifies my VID/PID as 8086,9D03: So it might be as @ameenjuz suggested - that this is a bug in Big Sur that will need to be resolved in later beta versions. At least, I hope it will.
 1 point
 -
Thank you all for the efforts to solve the problem in Bigsur ahci not detected, testing many possible solutions, , even seal disable, never shows the ahci for skylake laptops, system boots well only from usb ssd disk, i am thinking to change the port name , sata1 to usb, we may need a patch for that , either rename in dsdt, or fake pci relector kext, also possible try is to have r/w bigsur disk image to try on our systems , we may find the difference, we are on the same boat, hope to find a sooner solution. can anyone who successfully installed bigsur with read/write, seal removed, make us a disk image so we can test? waiting help from others. thanks1 point
-
Look to the right, there is a compiled version 1.06 under the heading Releases. Since you are using OpenCore, there is some editing you will need to do to your config.plist1 point
-
I finally understood what changed between v1.2.8 and the following ones, and found a workaround: • the HDMI audio port of my NVidia GT210 is renamed to HDAU by AppleALC and probably the rename was not done until v1.2.8 • adding the following patch to hide HDMI restores normal behaviour. In Clover Configurator, I add a new line in KextsToPatch with values: Name: com.apple.driver.AppleHDAController Find: DE10E30B Replace: 00000000 No more long boots!1 point
-
Hello @dzontra! I had the same issue with my mobo GA-Z97-HD3 and I figured out the problem was related to using Bootstrap in OpenCore. The moment I changed the booting entry back to Bootx64.efi using EasyUEFI, the issue was gone. I read in the OC configuration that some system don’t react well to bootstrap and this may could have been a side effect of it. Maybe some of the moderators can give us some light about it. On a side note, my Big Sur beta 2 install booting with OC 0.6.0 in this mobo sometimes freezes after using it for about 15-20 minutes, experiencing the issue while trying to open different apps, not just one in particular. I was wondering if some of you are experiencing the same problem and if it can be just a bug of a beta or if there’s a setting or configuration in OC that needs a fix. I’ll upload my efi folder later today when I access my computer.1 point
-
Yeah, I get a Kernel Panic as the kext from Big Sur is pre-linked and I cannot get around it. Also, thanks for uploading this @MICKHAEL!1 point
-
I tried loading IOAHCIFamily.kext from Catalina with OC, but I could not boot as the IOAHCIFamily.kext is pre-loaded from Big Sur. I do not know how to work around that... I think Clover might allow to block certain kexts from loading with KextsToPatch? Is anyone able to upload/PM the IOAHCIFamily.kext from Big Sur? I would really appreciate it!1 point
-
Yeap for me it is absolutely necessary a DSDT to take boot on a Laptop.1 point
-
Show please previous lines as I see no errors.1 point
-
your english is fine, maybe better be blunt rather quoting scary well i thought it's better hotpatching SSDT rather than using a single DSDT, incase there will be a bios update or hardware change. so you could boot bigsur installer ? you are using smbios MBP15,2 rather than MBP16,1 for 9th gen any reason ? MBP15,2 supposed for 8th gen intel? and how about this boot flag agdpmod=vit9696 ? doesn't it for a pc ?1 point
-
There are packages with the same contents but for different installation methods. Old method assumed that you download only Clover_r5120.pkg and start it. Other method is for Windows Bootdisk Utility You have to download the utility and start it under Windows. The the utility will download *.iso.7z and use it to create a bootable stick. New method is using Clover.app Clover.app testing . you have to download Clover.app_v1.24.pkg and start the installation. This application will download CloverV2-5120.zip. And there is a single file which can be installed manually CLOVERX64.efi.zip if you already have older Clover installed.1 point
-
I agree. It is either this or OC. Most likely a bug. Would it be too big to ask for a copy of the kext from Big Sur so I can compare it to Catalina? You could zip it and attach it or PM it to me. Also, what is your Device Path and Ioreg Path name for the Sata controller under both Big Sur and Catalina? You can check this from Hackintool > PCIe. Thanks @ameenjuz!1 point
-
PCI and USB don't use the same vendor IDs. That's why there are two database websites. One for PCI and one for USB. While the USB database website doesn't seem to be working, you can still download the text file containing all the IDs (similar format to the PCI IDs text file). At the end of the PCI or USB IDs text file is the list of PCI or USB class codes. One problem though is that the list of devices doesn't tell you what class code they use.1 point
-
OC.zip1 point
-
This screen is not gIOLockscren screen when see again the gIOLockscren use -wegnoegpu boot flag. Yours EFI is a "scary" EFI, better to talk with @MaLd0n to fix for you a DSDT kexts use ONLY the absolutely necessary on this phase..1 point
-
format and try usb bootable with MBR mine is working Sunrise Point-LP SATA Controller (pci8086,9d03) repartition /dev/disk1 MBR, two partitions # first partition, "CLOVER EFI" FAT32, 200MiB # second partition, "install_osx", HFS+J, remainder diskutil partitionDisk /dev/disk3 2 MBR FAT32 "CLOVER EFI" 300Mi HFS+J "install_osx" R sudo /Applications/Install\ macOS\ Big\ Sur.app/Contents/Resources/createinstallmedia --volume /Volumes/install_osx i attached my Patched DSDT and config Compare your DSDT DSDT-Config.zip1 point
-
@lottenow and @PC IT: I have the Sunrise Point-LP SATA Controller (pci8086,9d03) (PciRoot(0x0)/Pci(0x17,0x0)). This is the controller for both my SATA drives (HDD and M.2-SSD) and my ATAPI drive (DVD). None of these drives can be detected when trying to boot to Big Sur. At times, I will get boot messages that say that Serial ATAPI drive could not be properly configured and, after 3 of these messages, it will say that Serial ATAPI did not respond and the operation is terminated. Sometimes, I will get a message that an HDD could not be read after 5 tries and that operation is terminated. Sometimes, I do not get these messages but the boot process stalls with the last boot message saying something about AppleIntelPCHSeries, which is the name of the AHCI controller. I do not believe it is related to an APFS volume because I have a HDD with an APFS volume but it also has a regular GUID partition that is formatted in HFS+ and that cannot be read/initialized either. I am advised that my SATA controller should work OOB so I don't think that device id injection will solve anything. I'm also unsure of what options to include in any SSDT patch for the SATA controller other than compatible ids. I'm taking a break from this for a while because I spent way too much of my work time trying to solve this problem. Please let me know if you have any breakthroughs. Also, see if you can capture @MaLd0n's interest in this issue. We may not have the collective expertise alone to resolve this.1 point
-
If anyone wants to give macOS BS a try, this patcher supports the hd3000 gpu: https://github.com/barrykn/big-sur-micropatcher I will keep my t420 on catalina for now because BS is glitchy and the process of installing it is annoying(most stuff has to be done manually) but i would love to hear how it's performing on a t420 if anyone is willing to try. Check this thread for instructions on how to get it to install(not noob-friendly at all, and the fact there are over 2000 posts already doesn't really help): https://forums.macrumors.com/threads/macos-11-big-sur-on-unsupported-macs-thread.2242172/ I could be wrong but i always thought you need a valid serial for iCloud stuff.1 point
-
@mnfesq: Hey, thanks for your sum up. So, here is what I have tried so far: 1) Using SATA-100-unsupported.kext only 2) Using SATA-unsupported.kext only 3) Injecting pci8086,a103 under DeviceProperty 4) Both 3) + 1) and 3) + 2) 5) Booting without any SATA-related kext or property 6) Injecting solely pci8086,a102 (SkyLake spoof) 7) Injecting solely pci8086,9d03 (Laptop spoof) None of the above seems to be working for me. I asked for more support from the OpenCore team on GitHub, but I do not have the required expertise to continue with what they are asking. What SATA controller does your machine have? You can find this in Windows > Device Manager or under macOS using Hackintool, PCIE list. It contains both the Device Path (PciRoot...) and the Property Name (pci8086,a103 in my case). Could it be that the APFS volume is somewhat sealed and therefore cannot be read by OC? I think the problem lies with OpenCore as I cannot boot in Catalina with the latest commits using the same configuration as for Big Sur. I have to use a different OC configuration for Catalina. Again, I do not have the required knowledge to debug this. Let me know your thoughts!1 point
-
And once your up and running you should be able to exclude that port if you choose to reconnect it. Sent from my iPhone using Tapatalk1 point
-
Thanks @Alex HQuest I disconnect Corsair’s CommanderPro Now Its worked. You save lots time for me.1 point
-
When opting for DoNotSeal true, for some reason, I cannot delete snapshot following @fusion71au's great guide. The system always returns with operation not permitted when trying to tag snapshot. Please do let me know, how yours goes. Thanks.1 point
-
Well.... interrupting an installation phase that shouldn't be interrupted is going to have unforeseen consequences.1 point
-
Thats not a kext injection issue, that's how wifi works in BigSur, you scan networks in the menu bar or in Network section of System Preferences.
 1 point
 -
apfs.efi is not needed with the latest OpenCore to boot into BS Recovery, only need to set JumpstartHotPlug to true/yes.1 point
-
@SavageAUS - No worries man, Big Sur can consume a lot of our free time leaving very little for anything else and wer'e still a way to go before the release of the Golden Master. I know exactly how you feel because for a time I resisted becoming another unofficial tester but felt left behind reading all the posts, some failures and some successes so I got on board too, not an easy journey by any stretch but got there in the end. Just hang in there Bro you'll get there as in the end.1 point
-
Rev 5119 commit 620401d Included OcQuirks and OpenRuntime into Clover repository. The drivers will be built at Clover compilation. Further they will be improved and included into package.1 point
-
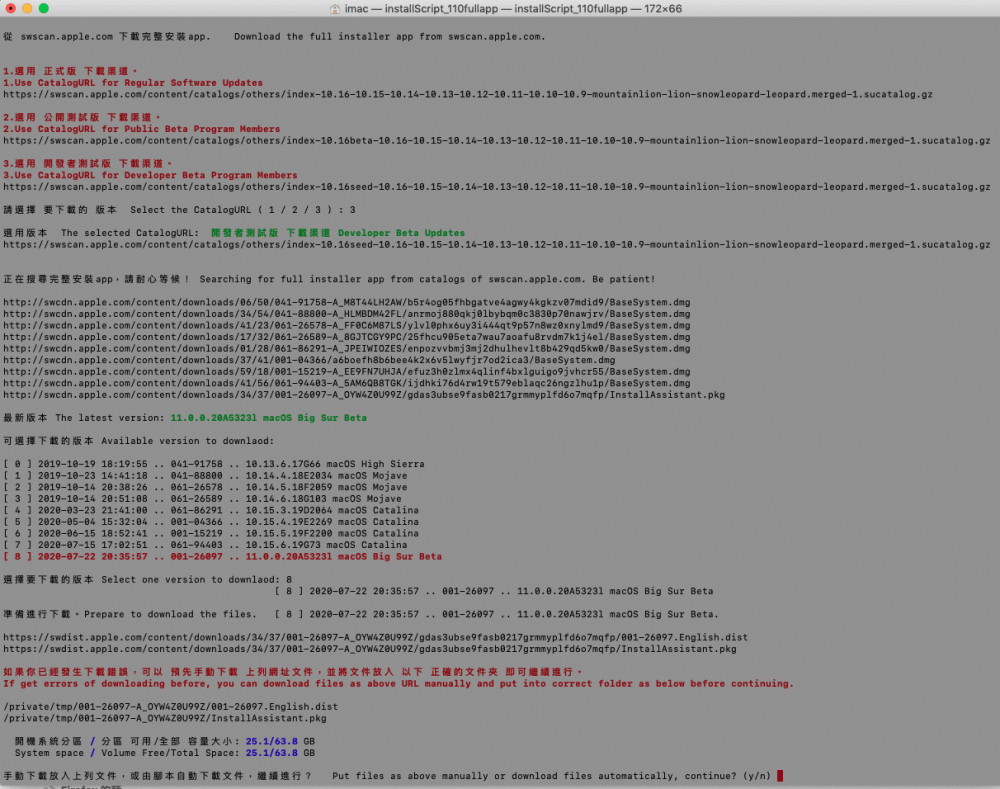
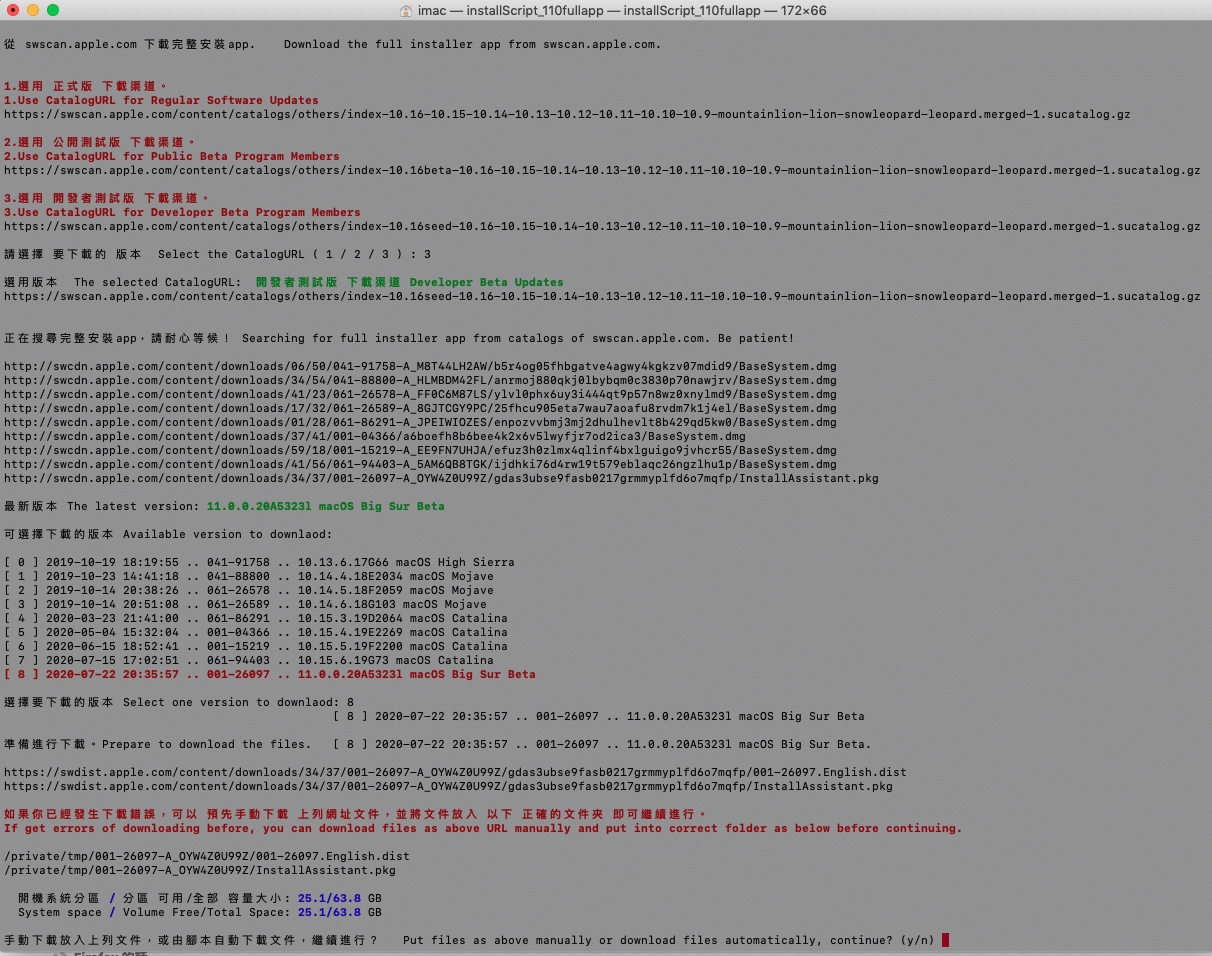
You can use this script to download full installer app from swscan.apple.com. installScript_110fullapp.zip
 1 point
 -
I use ApplePS2SmartTouchPad.kext for Elan PS2. But if it works too, it is good. I will check it later.1 point
-
DarwinDumper has been updated to v3.1.1 Download Changelog - Update getcodecid to v2.4 (Thanks Gengik84) - Remove SIP warning and notes for Memory dump - Add further detection for OpenCore (Requires root privileges)1 point
-
Thank you. Yes when I enter any number, large or small, the banner just disappears. I ended up cheating. I just created a black background that covers the screen, then centered the Apple logo. Then I hid the banner and moved the badges down. It is pretty close to what I had in mind. The screen blacks out from the transition from Clover to MacOS, but it's good enough. I won't upload it out of respect for Badruzeus -- it's just a modification of his outstanding theme. Thanks again! Ted
 1 point
 -
Hmmb, but I'm having different build error with GCC. This is from "Clover r5120 (SHA: 69e0e0327)":0 points


.thumb.png.a43579d9e280a5c4c80807bf93412ae7.png)