Leaderboard


Popular Content
Showing content with the highest reputation on 07/09/2020 in all areas
-
Lilu +AppleALC from master Lilu+AppleALC.zip6 points
-
Rev 5119 commit 620401d Included OcQuirks and OpenRuntime into Clover repository. The drivers will be built at Clover compilation. Further they will be improved and included into package.5 points
-
That's it done! Success USB Installer
 5 points
 -
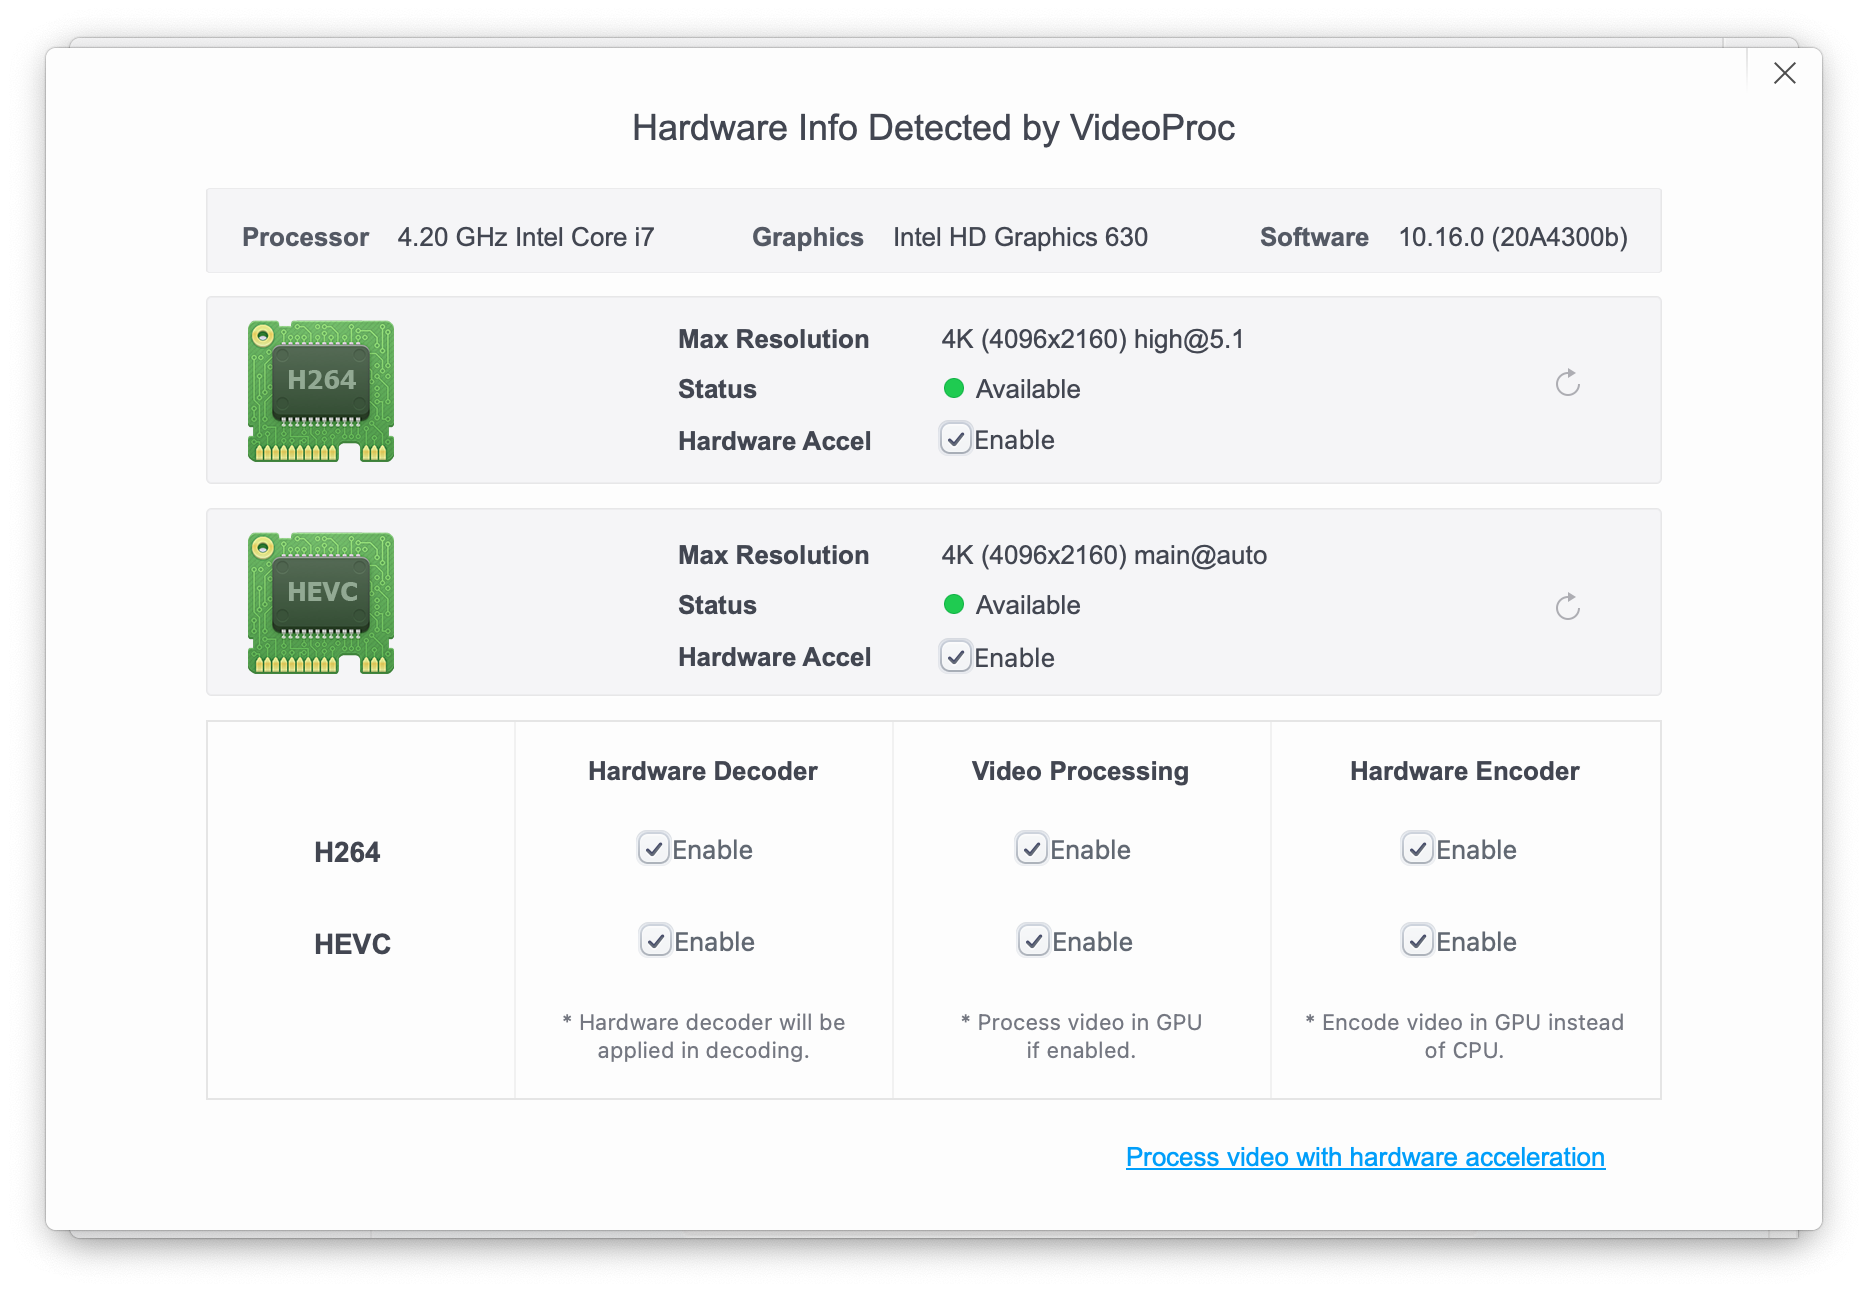
macOS Big Sur Beta 1 & 2 Vanilla Install Compiled 0.6.0 from source using OCBuilder(Release). Used my original settings from 0.5.9. for Coffee Lake. Installed Big Sur beta 1 then upgraded to beta 2 without issues. Beta 1 & 2 takes about 30-45 minutes each to install, You have to be very patient. Upgrading to beta 2 was very Smooth, macOS did everything automatically. Kext: AppleALC, IntelMausi, Lilu, SMCProcessor, SMCSuperIO, USBMap , VirtualSMC, WhateverGreen Boot- args: keepsyms=1, debug=0x100, alcid=1, slide=1, agdpmod=pikera ACPI: SSDT-EC-USBX, SSDT-PLUG, SSDT-PMC Drivers: HfsPlus.efi, OpenCanopy.efi, OpenRuntime.efi My assumption is if your EFI is configured correctly. All you need to do is compile a mirrored version to 0.6.0. and hopefully, it should work. Working: Ethernet Onboard Audio Sleep/Wake Hand-off iMessage App Store Handoff Bluetooth & Wi-Fi [Fenvi FV-HB1200 ] Airdrop AirPlay Continuity iTunes Movies Apple TV+ Power Nap Sidecar Hardware Acceleration4 points
-
It's easy - Mount your EFI Partition and right click and copy your EFI Folder and place it on the Desktop. Now open the folder you just place on the desktop. Go to your config.plist and open it with either Xcode or PlistEdit Pro and remove all your personal data i.e S/N, MLB, ROM. SmUUID etc, etc, now save the changes. Next Compress and Zip the whole Folder and upload3 points
-
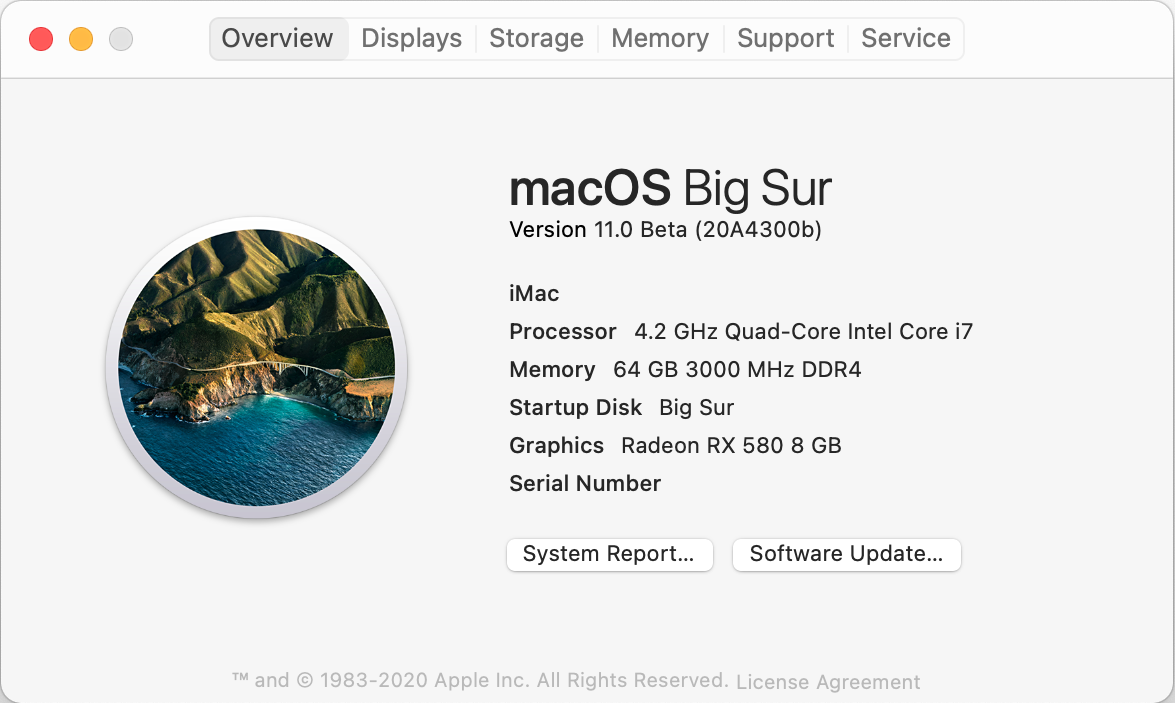
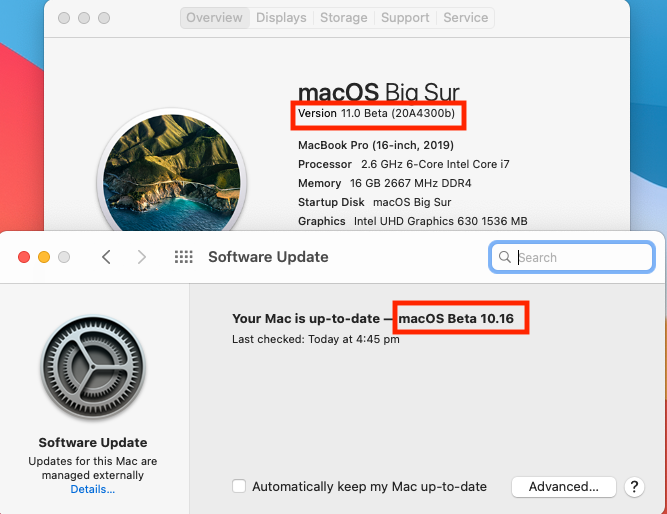
Even Apple cannot decide what version this is.
 3 points
 -
Hi everyone, quick question... Since I've reported my success upgrading from Catalina to Big Sur Beta 2, I got a few requests asking me to upload my EFI folder. Should I do it? I feel bad because it seems I don't want to help, however I'm afraid of someone else using my serial number or worst: My EFI folder screwing up someone else's Hackintosh...2 points
-
I've seen somewhere else something like: kmutil install --update-all kcditto Not sure if this is it or not.2 points
-
I Solved everything with a clean install on a fresh formatted drive! Thanks to all the developer for the amazing work! P.s. Is there an how to rollback wifi drivers? I got a Broadcom BCM43xx wifi card, bluetooth is working with firmware injection kexts on efi its the only thing still not working

 2 points
 -
Thank you. I got confused when you said run-efu-update. What you really meant was set run-efi-updater=NO. Also, with the latest Lilu.kext there's no need to use vsmcgen=1 as boot-args2 points
-
Unless it's only me, be careful with the new updated kexts. I now cannot boot back into my Catalina install but Big Sur still works.2 points
-
i have installed the beta2 succesfully... use oc 0.6.0,latest kexts,then i added the vsmcgen=1,run-efu-update into the old config.plist i use in the macos10.15.5...then boot from usb installer and finished the install...thanks @Cyberdevs2 points
-
i solved now internal disk is appeared and clean installed using usb installer if you using kabylake Sunrise point-Lp SATA Controller 8086 9d03 then remove SATA patch from DSDT and SSDT and config no need patch because 8086 9d03 SATA Controller nativelly supported2 points
-
So what is the go to WiFi chip for laptops for Big Sur and below? I have m.2 A/E key Broadcom BCM94360 or Broadcom BCM94352 Also new kexts just built from master. Pick what you need. New Kexts.zip2 points
-
Anyone of you have the new Lilu, build from master? Back from one more fresh install, the last one was gone at the first reboot, the apple logo appears and the loading bar was grey and empty... so I decided to star anew, and here I am...2 points
-
I'm back with a fresh install 5 reboot's and it's done... grabbed a copy of macOS Big Sur Beta 2 with the script from @crazybirdy, and tried to install that, but no dice... Then removed one of my ssds from my hack and grabbed an EFI from Olarila made by @MaLd0n and booted from it. At this moment I'm writing this from my new install... Many thanks to both, and to all that contribute and work for the community... PS: As you can see in the photo below, I'm now an iMac Pro...
 2 points
 -
vsmcgen=1 not needed with last Lilu from the master.2 points
-
I finally managed to get macOS Big Sur Beta 2 installed through a USB. The last time I reported a problem after stage 2 of the installation, my system went in through a reboot cycle because I had defined vsmcgen=1 as -vsmcgen=1 So, I wiped the target disk clean and started the install all over again but after correcting the boot-args to vsmcgen=1 This time the installation went through clean and smooth and finally was in the Big Sur screen for language selection. I have everything working, Graphics both Radeon RX580 and the headless iGPU, audio, USB, WiFi and bluetooth. So, persistence does pay off. Not the last but the least, I cannot thank enough all the members/administrators of this community and the developers who have worked hard to ensure the Hackintosh community continues to survive.
 2 points
 -
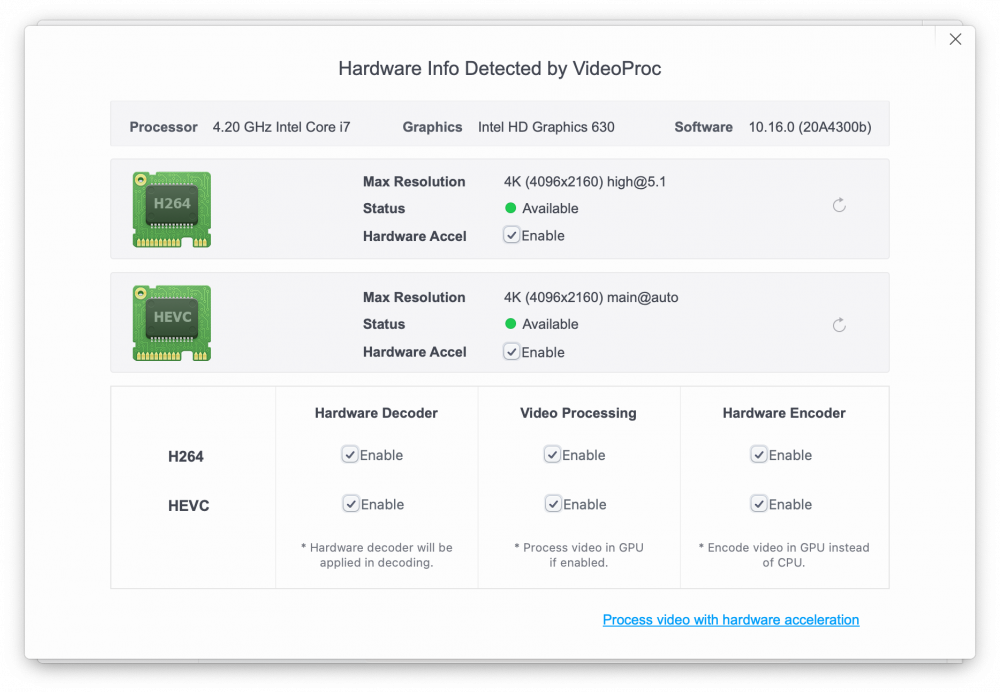
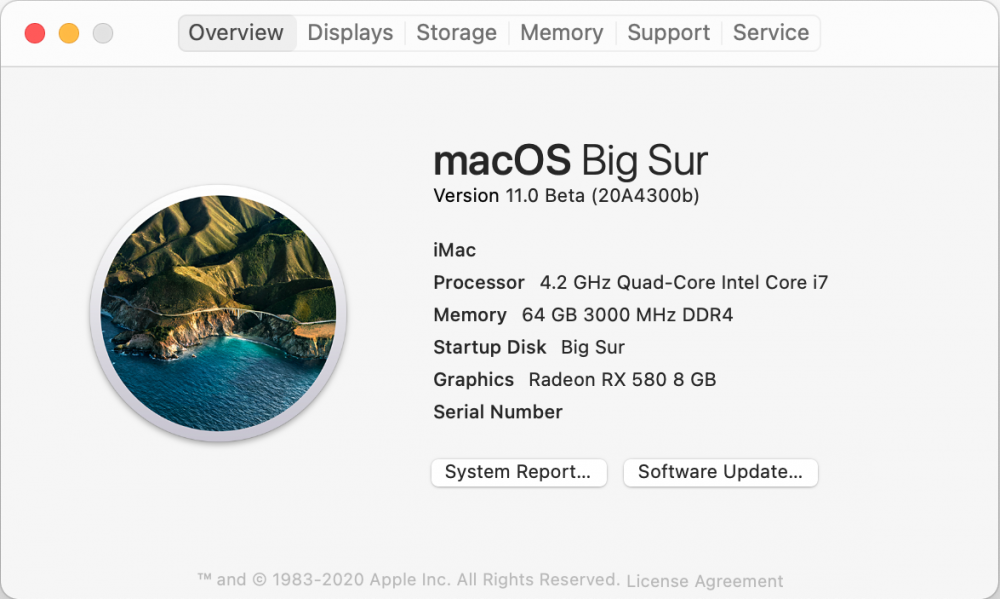
os_bigsur.png2 points
-
View File Bootdisk Utility Make bootable USB Flash Disk for MAC OS X with Latest Clover bootloader revision fast and easy by one click! under OS Windows. Special utility from cvad & russian MAC community for new hackintosh users. Enjoy... For more information and complete instructions please see this topic. Anyone who likes the program, please support its Community Score. Feel free to "Rate File" Submitter cvad Submitted 04/28/2013 Category Bootloaders1 point
-
1 -Create a USB bootable Use this tool and download Catalina or Big Sur from Apple servers Catalina installScript_allfullapp.zip Big Sur installScript_1016fullapp.zip Credits: crazybirdy Copy Catalina / Big Sur installer to Applications folder, open terminal and run Catalina Big Sur If you want check one step by step, check here -Opencore Vanilla Tutorial https://tinyurl.com/y2dmt5af 2- EFI folder USB installation -EFI OpenCore Folder Desktop 8/9/10th Intel Processors Paste this EFI folder in EFI partition in your USB STICK https://tinyurl.com/ybr968w3 -EFI Clover Folder Desktop 8/9/10th Intel Processors Paste this EFI folder in EFI partition in your USB STICK https://tinyurl.com/ybr968w3 3- EFI folder SSD -EFI OpenCore Folder Desktop 8/9/10th Intel Processors Paste this EFI folder in EFI partition SSD https://tinyurl.com/ybr968w3 -EFI Clover Folder Desktop 8/9/10th Intel Processors Paste this EFI folder in EFI partition SSD https://tinyurl.com/ybr968w3 4- Start Fine Tune Run this app and post full dump here for full ACPI solution RunMe.app https://tinyurl.com/y9562hz7 If you like a SSDT way, here we go (SSDT is a incomplete way) SSDT-OLARILA.aml.zip 5- USB Solution Use these kexts, enable XHCI port limit patch USB Solution.zip and follow this tutorial for remap USB ports --DSDT PATCHES-- -FIX ERRORS AND WARNINGS -FIX ACPI ERRORS -REMOVE UNUSED SCOPES / DEVICES -HIGH PRECISION EVENT TIMER -SATA SERIE ID -DMAC -REMOVE LINES, PROBLEMATIC and UNUSED -FIX K.P in REBOOT -NVRAM -REAL TIME CLOCK -SLPB -DARWIN / WINDOWS -XHCI -PLUGIN TYPE -HDEF -ARTC -IPIC -TIMR -SBUS -BUS1 -MCHC -ALS0 -SHUTDOWN -UAR1 -LAN -FWHD -USBX -PMCR -PPMC -XSPI -kUSBCompanionIndex -io-device-location -IMEI -EC -PNLF -ARPT -GFX0 -NVME -ACPI-WAKE-GPE -DTGP -HDMI / HDAU --SCREENSHOTS-- -If you want to buy me a beer - Donations with PayPalhttps://tinyurl.com/r2bvzm7 Big Thanks to XLR and your Badass Motherboard, Ultrafast CPU, Coolest Heatsink, Huge Graphics Card, Tonnes of RAM, Gigantic Hard Drive, Lightspeed Disk Burner, Professional Sound Card, Massive LCD Display. -Credits and thanks to the old and new people in the community who developed patches, kexts and bootloaders! Slice, Kabyl, usr-sse2, jadran, Blackosx, dmazar, STLVNUB, pcj, apianti, JrCs, pene, FrodoKenny, skoczy, ycr.ru, Oscar09, xsmile, SoThOr, RehabMan, Download-Fritz, Zenit432, cecekpawon, Intel, Apple, Oracle, Chameleon Team, crazybirdy, Mieze, Mirone, Oldnapalm, netkas, Elconiglio, artut-pt, ErmaC, Pavo, Toleda, Master Chief and family, bcc9, The King, PMheart, Sherlocks, Micky1979, vit9696, vandroiy2013, Voodoo Team, Pike R. Alpha, lvs1974, Austere.J, CVad, headkaze, onemanosx, erroruser, Jenny David, Sampath007, Facebook Hackintosh community, Facebook Olarila community, SchmockLord, daliansky and many, many, many others! We're all here to have fun and learn from each other!1 point
-
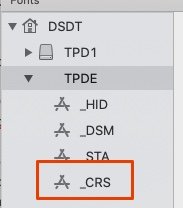
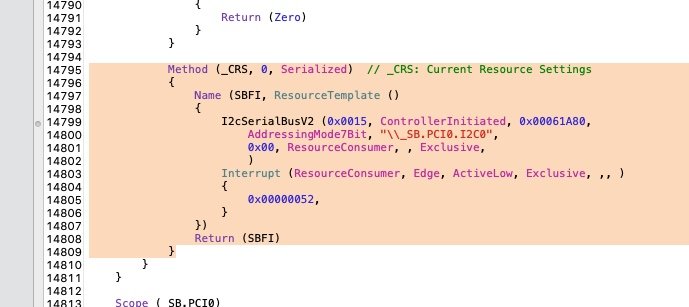
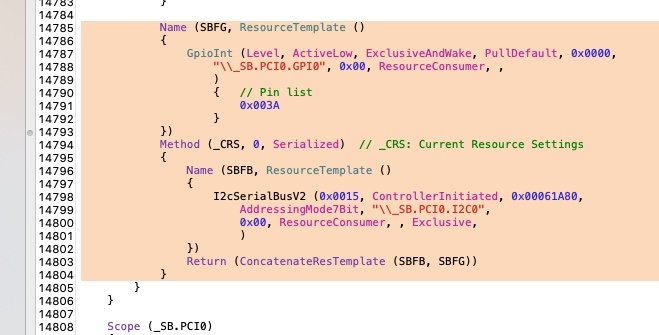
Esse post tem o propósito de documentar os patches necessários para a utilização da kext VoodooI2C e seu satélite VoodooI2CHID no notebook Acer Aspire F15 (ACER-F5-573G). VoodooI2C é um projeto que adiciona suporte para dispositivos que utilizam o barramento I2C. O trackpad ELAN0501 do notebook Acer Aspire F15 utiliza esse barramento internamente. As outras opções para ativar o trackpad neste notebook envolvem usar o VoodooPS2Controller ou o ApplePS2SmartTouchPad. O problema do primeiro é que... bem, ele não funciona. No momento em que o trackpad é tocado, o cursor pula pela tela toda sem parar. Já o segundo é o mais fácil pois funciona bem e é capaz de prover funções de multitoque e gestos. Porém, eu sempre achei alguns gestos do ApplePS2SmartTouchPad meio esquisitos, como a rolagem que não acompanha o toque precisamente como aconteceria em trackpads Synaptics no macOS. Então descobri que era possível usar o VoodooI2C com trackpads ELAN e resolvi tentar. Ao contrário do ApplePS2SmartTouchPad, o VoodooI2C necessita de muita configuração prévia, sendo o mais complicado o processo de GPIO pinning, mas fiquei bastante feliz com os resultados. Esse post documenta os patches usados. Meu hackintosh é baseado na EFI de johnnywolinger para macOS 10.14. Não o conheço, mas já deixo meus agradecimentos por ter facilitado minha vida. Como estou rodando o Catalina 10.15.5, tive que atualizar algumas kexts (WhateverGreen se não me engano) para evitar um KP durante o boot. A DSDT que eu estou utilizando veio do repositório dele. As únicas alterações que fiz foram os patches necessários ao VoodooI2C. PASSOS 1. Baixe o MaciASL neste link. 2. Abra a sua DSDT nele e aplique os patches [GPIO] GPIO Controller Enable [SKL+] e [Windows] Windows 10 Patch, conforme foto no spoiler. O propósito desses patches é explicado em detalhes no guia de instalação do VoodooI2C. Simplificando, o primeiro patch ativa os interrupts e o segundo permite que o macOS enxergue o dispositivo I2C. 3. A partir disso, é necessário aplicar os patches específicos de cada computador. No spoiler, eu explico o processo que usei para encontrar as informações. O texto só faz sentido se você já leu o guia de instalação original. Caso não esteja interessado nos detalhes, siga em frente. 4. Na DSDT, encontre o method _CRS, que está no final do dispositivo TPDE. 5. Encontrado o Method _CRS, copie o código abaixo. Name (SBFG, ResourceTemplate () { GpioInt (Level, ActiveLow, ExclusiveAndWake, PullDefault, 0x0000, "\\_SB.PCI0.GPI0", 0x00, ResourceConsumer, , ) { // Pin list 0x003A } }) Method (_CRS, 0, Serialized) // _CRS: Current Resource Settings { Name (SBFB, ResourceTemplate () { I2cSerialBusV2 (0x0015, ControllerInitiated, 0x00061A80, AddressingMode7Bit, "\\_SB.PCI0.I2C0", 0x00, ResourceConsumer, , Exclusive, ) }) Return (ConcatenateResTemplate (SBFB, SBFG)) } 6. Copiado, volte ao MaciASL e selecione todo o Method _CRS, conforme a foto. Selecione desde o "Method (_CRS" até aquela última chave que está no mesmo nível de Method. 7. Cole, substituindo todo o Method. Deverá ficar assim depois de colado. Note que temos um item chamado Name SBFG e um chamado Method _CRS. 8. Se estiver tudo certo, compile a DSDT e coloque na pasta EFI/ACPI/Patched, onde o Clover está instalado. Pra finalizar, basta instalar as kexts VoodooI2C e VoodooI2CHID na pasta de kexts do Clover. Ambas podem ser baixadas aqui. Se tudo der certo, ao reiniciar, o trackpad deverá estar funcionando corretamente. CONSIDERAÇÕES FINAIS Se isso parece difícil demais, não esquenta. A VoodooI2C nem é tão melhor que a ApplePS2SmartTouchPad assim. Fiz mais por curiosidade do que por necessidade. Se você quiser BAIXAR A DSDT PRONTA, acesse o repositório do johnnywolinger. Tem tudo lá. Por que usar VoodooI2CHID em vez de VoodooI2CELAN? Basicamente, a segunda não funciona. Eu testei tanto com o pin 0x3A quanto com o pin 0x9A. Aparentemente, ela só funciona com dispositivos ELAN mais antigos. Por fim, quero transformar esse patch num patch automático a ser utilizado no MaciASL, só que não sei como faz. Se eu aprender, edito o post.

 1 point
 -
I can confirm that all the mac os 11.0 DP1 patches are working perfectly on DP21 point
-
@MacNB that is right. no need this vsmcgen=11 point
-
Have you tried putting it in the EFI/OC/Kexts folder? Try this kext and make sure to add it to the config.plist IO80211Family.kext.zip1 point
-
Thanks to @Cyberdevs's efi and @eSaF's help, I managed to make beta 2 work! Since I'm on laptop (haswel), if I insert the kext for keyboard and touchbar with OC, there is a kernel panic (VoodooInput). Thanks for your help EDIT. I used the latest VoodooPS2 by acidanthera, and everything worked out!1 point
-
Yeah, Filevault 2 is working. Its not part of the build since with filevault configured you will be not able to install macos. Simply follow the Opencore Vanilla Guide (https://dortania.github.io/OpenCore-Desktop-Guide/post-install/security)1 point
-
Yea I am now seeing this in Safari, didn't happen in Beta1 - very strange, I think Apple broke something in Beta21 point
-
You should enable Intel VT or Virtualization option in BIOS/UEFI. It's literally what the error message says.1 point
-
Thanks for this. Installed Big Sure Beta 2 on my Thinkpad X260 using your OC config and then booted via modded Clover 5119 (I dual boot Windows so Clover works better for me). Everything working 100%, only issue was with SMCBatteryManager so I reverted to ACPIBatteryManager until it gets sorted. I'm attaching my EFI folder for the Thinkpad X260 i7-6600u with Bios 1.43. ThinkpadX260BigSurEFI.zip1 point
-
I got caught in the boot loop doing the install over beta 1 so I decided to make a USB installer with Beta 2, doing some work with the EFI, the USB installer booted and I was able to install a fresh copy onto a SSD, all working now, I did have to select RESET NVRAM after copying the EFI folder from the USB to the SSD but after that it booted fine. Everything working on the HP 800 G11 point
-
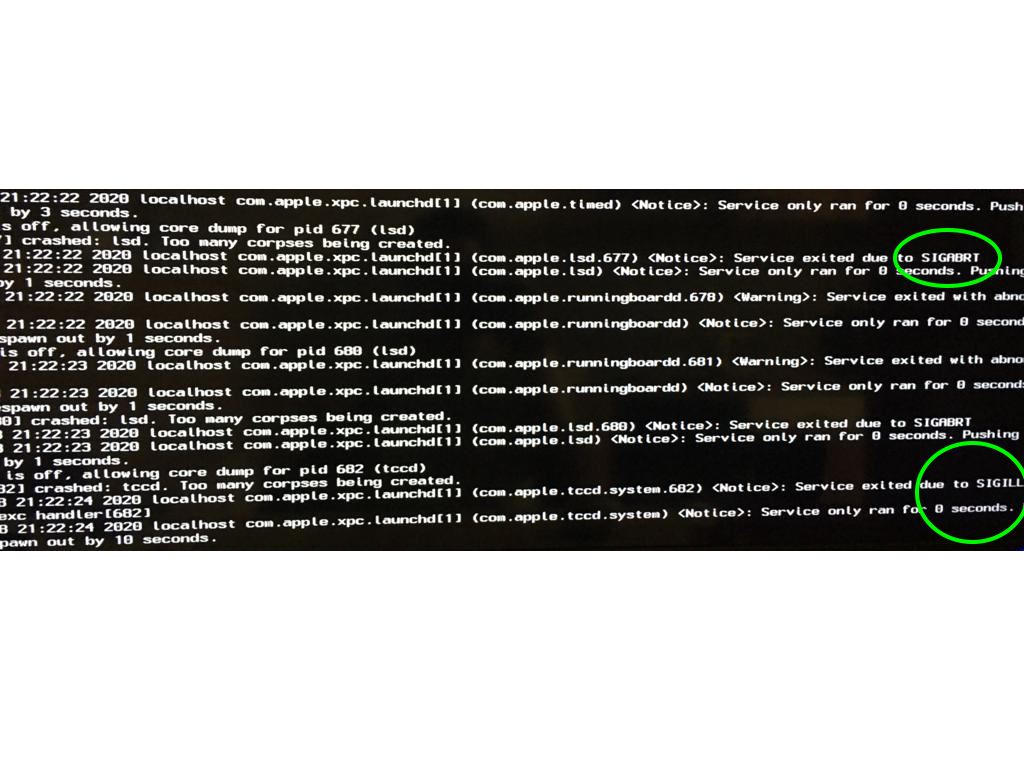
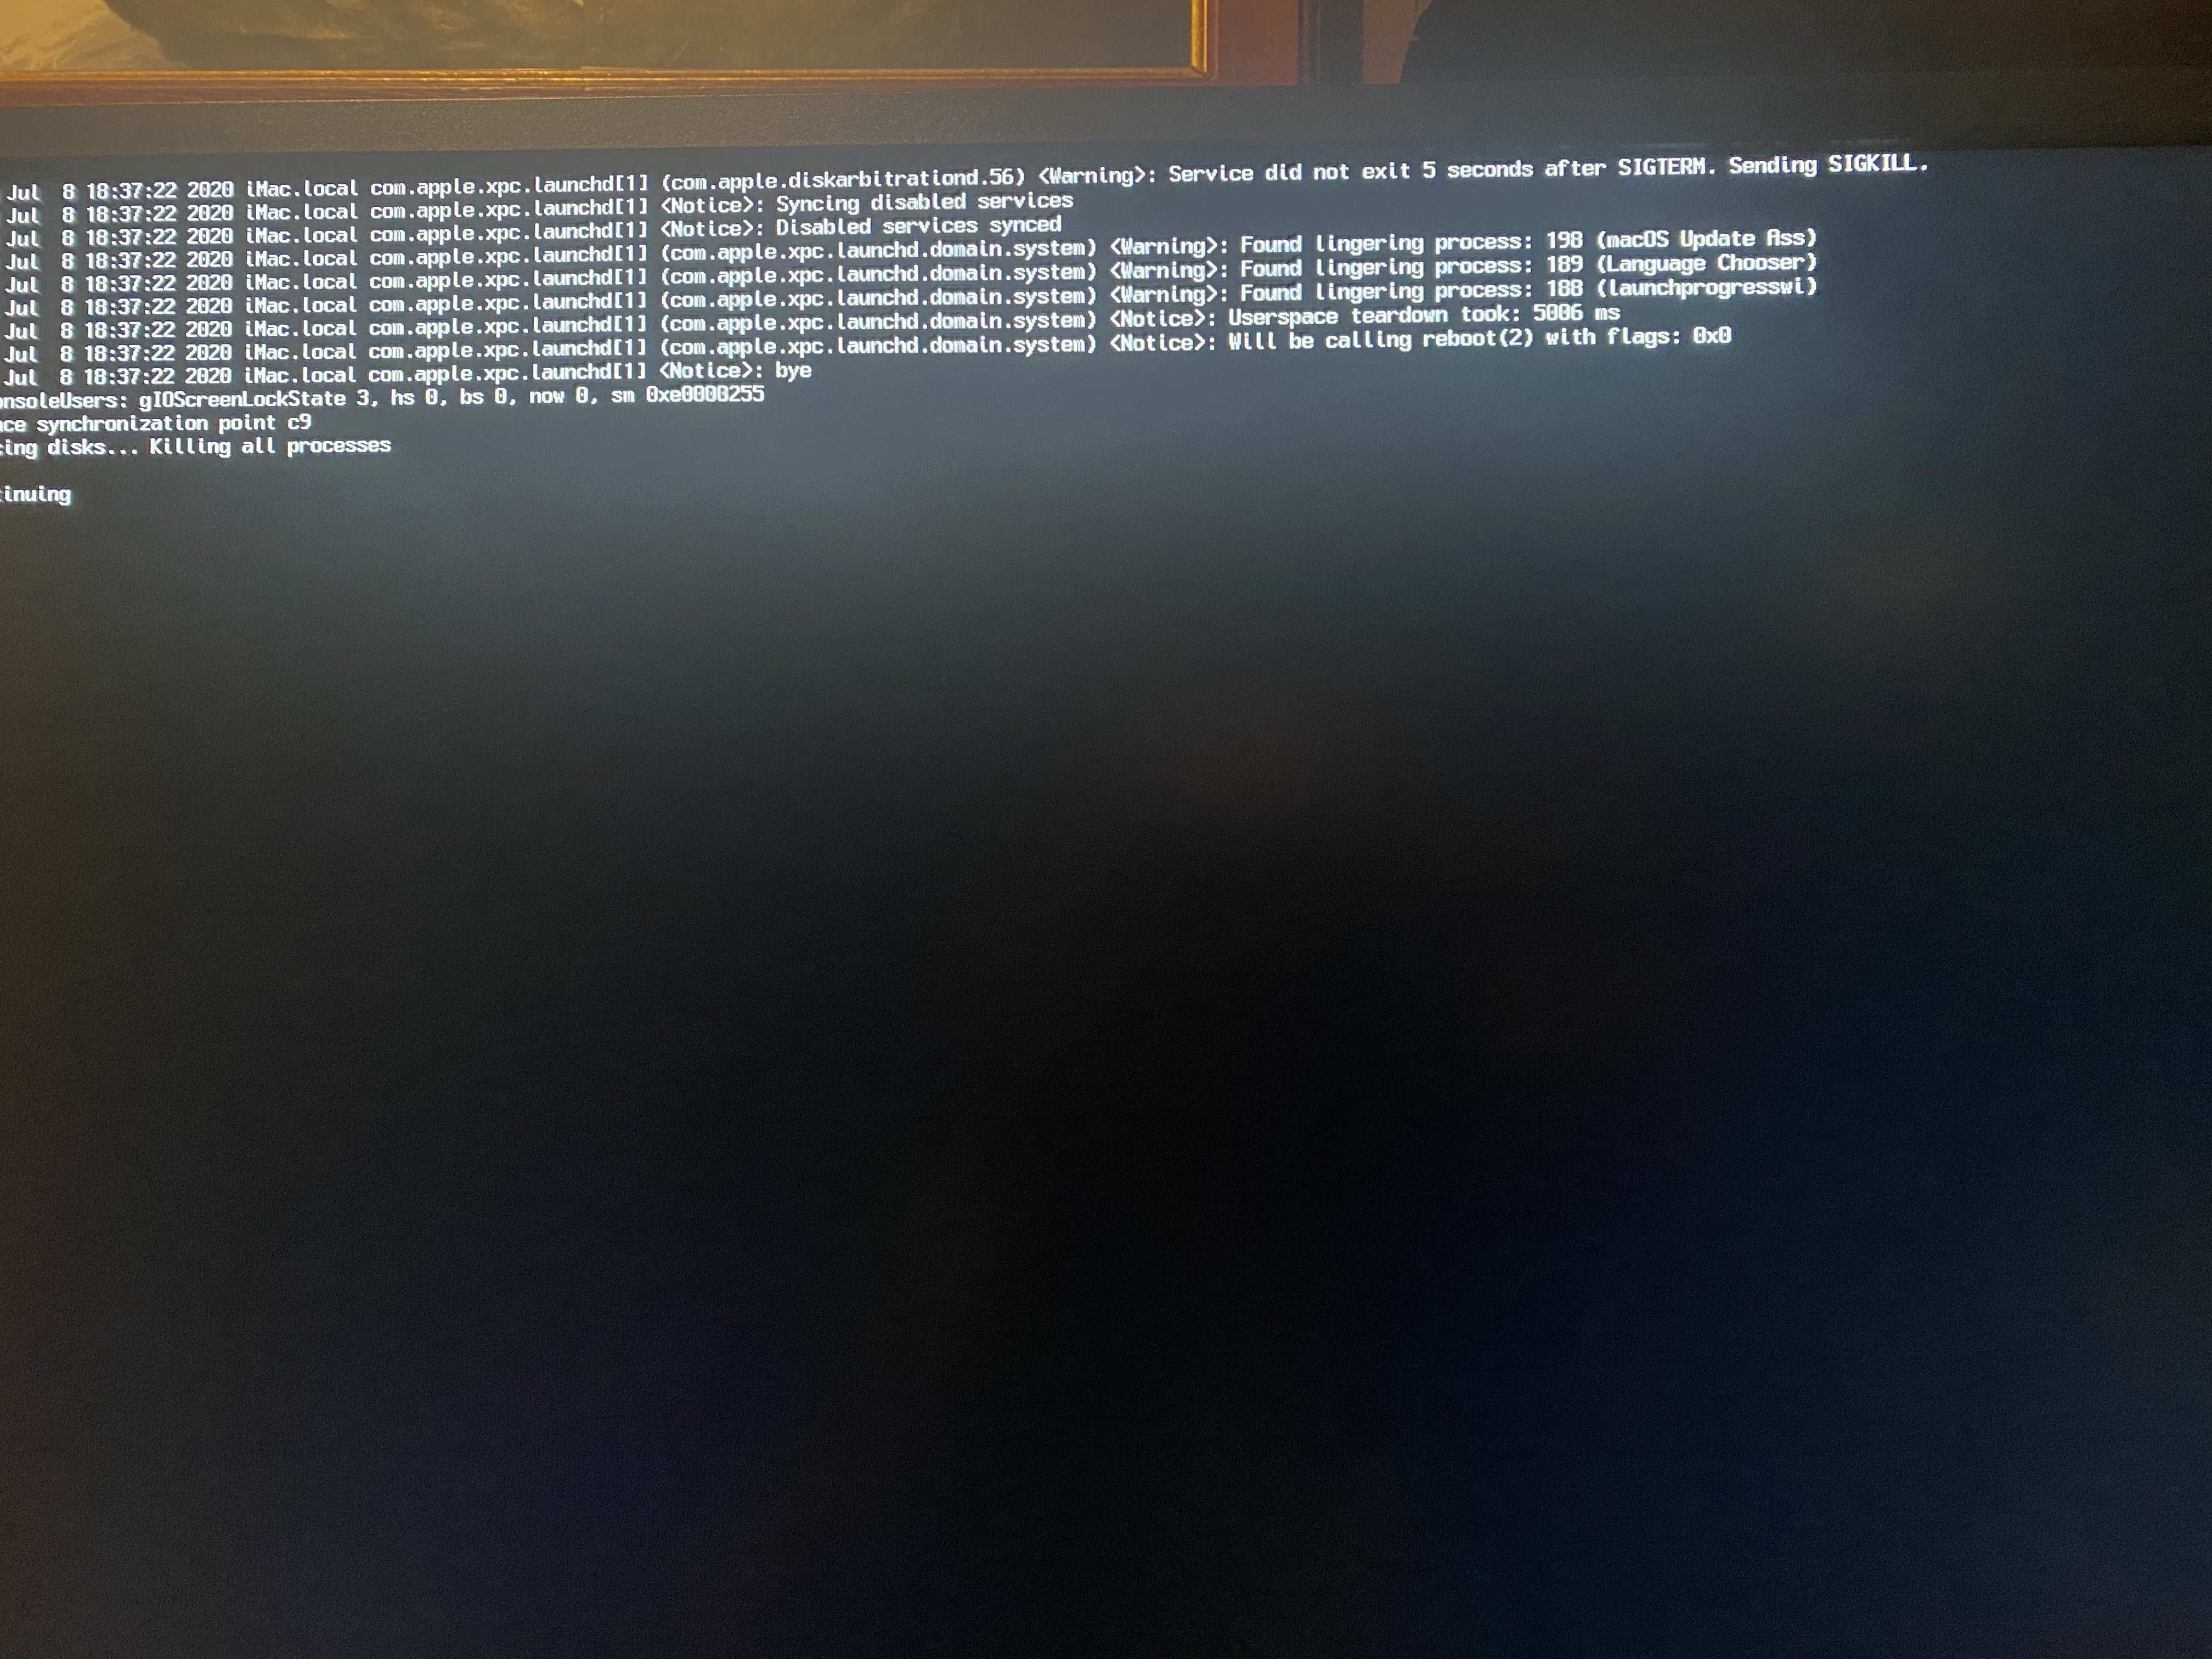
I'm trying to boot from Clover mod Big Sur beta 2 USB Installer but getting those errors service exited due to SIGABRT service exited due to SIGIL L
 1 point
 -
Thanks for the update. Building the new one right away. When I try to build WEG, it builds resource converter. What am I possibly doing wrong here?1 point
-
hey @vector sigma Good news but there’s no rush. Take your time1 point
-
wow, you really shouldn't have all those EFIs, use only 1 EFI. Do testing with a USB drive with the same EFI with slight modifications from the original EFI for testing.1 point
-
Just to keep you updated i am now updating the development branch of the TINU repo more frequently, so if you want to see what i am working on check it out: https://github.com/ITzTravelInTime/TINU/tree/development1 point
-
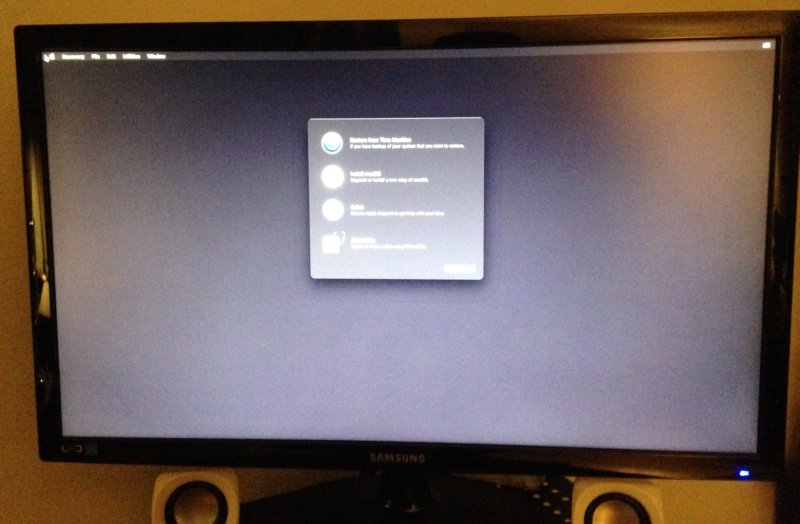
Reach BigSur beta2
 1 point
 -
Ha! Wasn't taking into account. I'm working on it, so I'll try to fix this. @blackosx, I made many of the changes we talked about but the work was not completed due to a lot of job-work (thankfully). Try to finish ..1 point
-
Strange still always black screen issues (Desktop Z390 + RX580), some kexts don't appear in verbose mode Very annoying this issues. Do you have a discrete card on your working config?1 point
-
Here. Folder for Skylake+. in some cases need change things in Booter Quirks EFI BigSur Skylake+.zip Some observations Boot from USB / Disable booter-fileset-kernel and booter-fileset-basesystem Boot from SSD / Enable these options if need Work in beta 2 too Create your USB stick with createinstallmedia and paste this EFI folder into EFI partition, reboot, Reset Nvram1 point
-
run this command on Terminal and choose image, if im not wrong its number 2 curl -O https://raw.githubusercontent.com/munki/macadmin-scripts/main/installinstallmacos.py && sudo /usr/bin/python installinstallmacos.py --raw --seedprogram DeveloperSeed
 1 point
 -
Finally I'm back and I did it... installed macOS Big Sur Beta with usb installer, it was a hard battle but I made it... my poor head is thankful that is over... LoL
 1 point
 -
Z370 update from beta 1 great suppositor OC 060 + kexts compiled todayat desktop also with Clover 5119 mod1 point
-
1 point
-
You can look on this site to configure OC: Dortania - Kaby Lake OC 0.5.91 point
-
Guys: Would you please stop quoting each other with the pictures attached? Please remove the pictures when you wanna quote someone. you can also mention the person you are quoting by using @ and the member's name and then they will be notified that someone is talking to them. Thanks.1 point
-
Is it just me, or is this developer beta surprisingly stable? Except small visual things, i even find it more stable than 10.15. Too bad it will take some time before some of my goto third party apps gets updated to support it. But it seem very promising for this OS, imo.1 point
-
Efi Agent still works fine for mounting ESP https://github.com/headkaze/EFI-Agent/releases/download/1.3.3/EFI.Agent.zip1 point
-
So let me be crystal clear about it in my turn... I perfectly know about AppleLife forum and its community. Most of the time, if not all of the time, they are the first in terms of work/research about hackintosh dealing but that is only my opinion. And they have all my respect for this. One of these wonderful people is Slice (just an example) and he's also a member of our forum staff. The IM forum has always supported the developers and we continue to do so, because they are at the heart of our community and without them, honestly, there would be no hackintosh. Now, it is that meaning that we could do everything and anything? That we are not concerning by the forum rules? Of course we are. The forum rules are for everyone. The link I removed has nothing to do with AppleLife forum itself but more with the links to modified dmgs that we do not allow (as explained in my previous post) . And if you disagree with this forum rule, please contact an administrator. Now if you wish to cease all kind of interaction with IM community, it is on your own, everyone is free to stay or go. But if it's a kind of threat, as some people did before, just know that it has no effect on me. If you think I said or did something that personally offended you, then I will invite you to contact me via PM and I will do my best to resolve the issue. BR fantomas1 point
-
@fantomas, let me be crystal clear about it. AppleLife is not an unknown blog but one of the locations Acidanthera team and related people are located. It is a local Russian community, so if anything, the userbase is not intersecting in the first place. Yet, even if it was not, when team members post links to authorised instructions (e.g. my posts), you can treat it similar to github.com/acidanthera. If understanding all that you believe that links to developer resources are improper on insanelymac, we may have to cease all kind of interaction with insanelymac community.1 point


.thumb.png.a43579d9e280a5c4c80807bf93412ae7.png)