Leaderboard


Popular Content
Showing content with the highest reputation on 07/05/2020 in all areas
-
Latest OpenCore commit is able to boot the installer and pre-existing installed macOS 11 Big Sur with kext injection without using prelinkedkernel nvram variables. It is now able to boot both with the new kernel collections method.10 points
-
Installer USB is working

 6 points
 -
6 points
-
Hello everyone, I am Manas Malla, a student of 10th grade. Finally, I have been able to install macOS Big Sur without all your help and support using the restoration image given as well as using VMWare Fusion to install macOS Big Sur on a Physical SSD/HDD and to help others who are facing issues or having trouble on how to get started, I made a small tutorial on the same. How to install macOS Big Sur on PC | Macintosh | Hackintosh Please watch it and provide your valuable suggestion and feedback. Also, don't forget to please like, share, and subscribe to help me grow and encourage me! Mainly thanks to @MaLd0n @ludufre @REKTIMU2 @mnfesq@Pavo @PC IT @Matgen84 @chris1111 for your support and immediate responses6 points
-
EFI.zip3 points
-
Sorry to see this. Could you please logout your account, clean the browser cache and see if the value increased? Thanks2 points
-
If I may, I have succeeded in getting my old Dell Inspiron 530 hack (Hack 2 in my signature) more or less working with OpenCore. My system does not have a working NVRAM and so have to use Legacy setting in the OC Config.plist. It was suggested to me by the devs that OenRuntime.efi does not work with Legacy boot and should be removed. Also, currently only way to set the default boot drive is to use Startup Disk from System Prefs. To view the the nvram variables, you have to use the full GUID of the variable. E.g. MacNB@iMac-530 ~ $ nvram -x 8BE4DF61-93CA-11D2-AA0D-00E098032B8C:BootOrder <?xml version="1.0" encoding="UTF-8"?> <!DOCTYPE plist PUBLIC "-//Apple//DTD PLIST 1.0//EN" "http://www.apple.com/DTDs/PropertyList-1.0.dtd"> <plist version="1.0"> <dict> <key>8BE4DF61-93CA-11D2-AA0D-00E098032B8C:BootOrder</key> <data> gAAAAAEAAgADAAQABQAGAAcA </data> </dict> </plist> MacNB@iMac-530 ~ $ See my attache config.plist and look at the way I setup the Legacy nvram Currently it all works but there's an issue with the legacy boot file that's gets installed by the legacy bootinstall.command. It may be specific to my system as it does not recognise any of my SATA drives. The devs are working on it to find a solution as it used to work but broke somewhere when they merged the Legacy Duet packaged into OpenCore. I am using an older version. If you are getting into the boot picker then your system does not have the issue. Also, in your config.plist, you are setting up the SMBIOS manually. When you do that, you have to be very very precise with the values you use. The only reason I use it manually is only for ONE reason: to set the ProcessorType (since I get an unknown CPU in About macOS). I have an old Xeon E5450 in my system and I am using iMac14,2 as the model-id which does not use a Xeon (hence unknown CPU because OC sets the CPU type to what a real iMac14,2 uses and not what is actually used). MacNB-2-config.plist2 points
-
Hello everyone, I am Manas Malla, a student of 10th grade. Finally, I have been able to install macOS Big Sur without all your help and support using the restoration image given as well as using VMWare Fusion to install macOS Big Sur on a Physical SSD/HDD and to help others who are facing issues or having trouble on how to get started, I made a small tutorial on the same. How to install macOS Big Sur on PC | Macintosh | Hackintosh Please watch it and provide your valuable suggestion and feedback. Also, don't forget to please like, share, and subscribe to help me grow and encourage me! Mainly thanks to @MaLd0n @ludufre @REKTIMU2 @mnfesq@Pavo @PC IT @Matgen84 @chris1111 for your support and immediate responses2 points
-
HI @Gigamaxx, im don't know if you fix that, but im had the same, and deleted first vmware created im fix that... run all commands again, and look the numbers of disks...2 points
-
Hi everyone, finally I am able to have my HP EliteBook 2570P fully working, except WiFi, but now the performance of Big Sur is very fast. The problem was that I didn´t complete the files from Catalina into ACPI/patched, and voila. Thanks for your help.
 2 points
 -
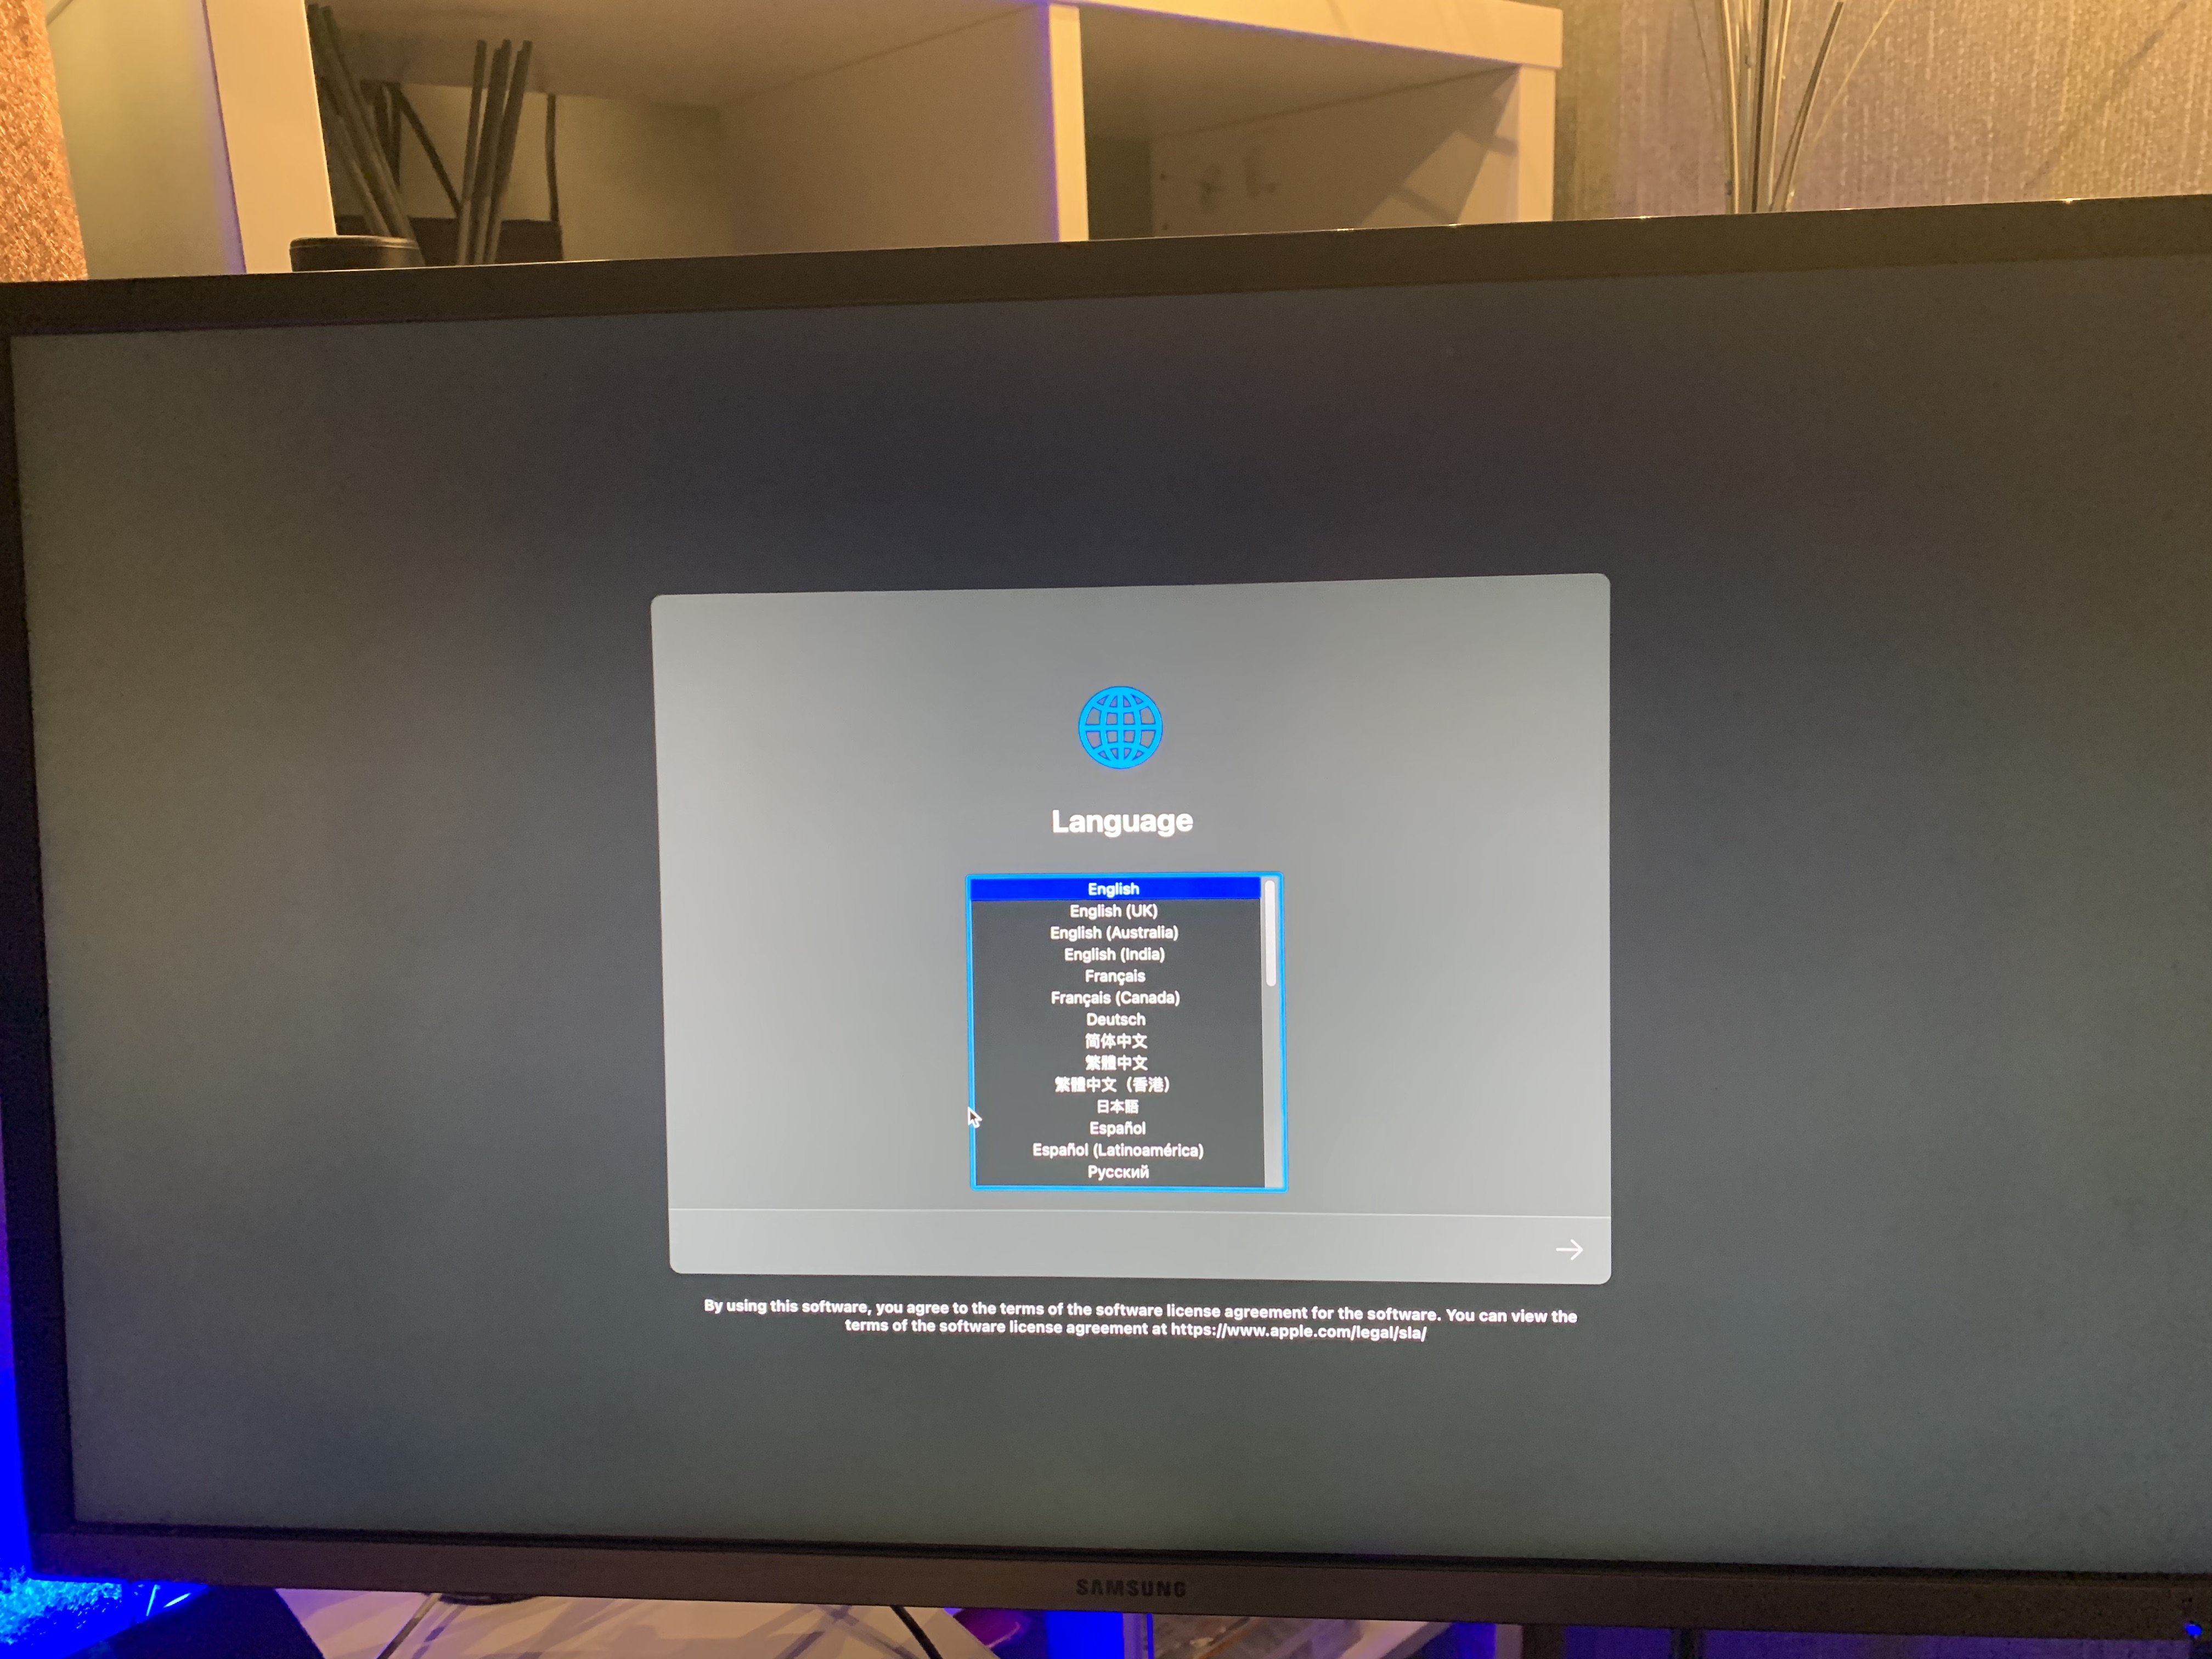
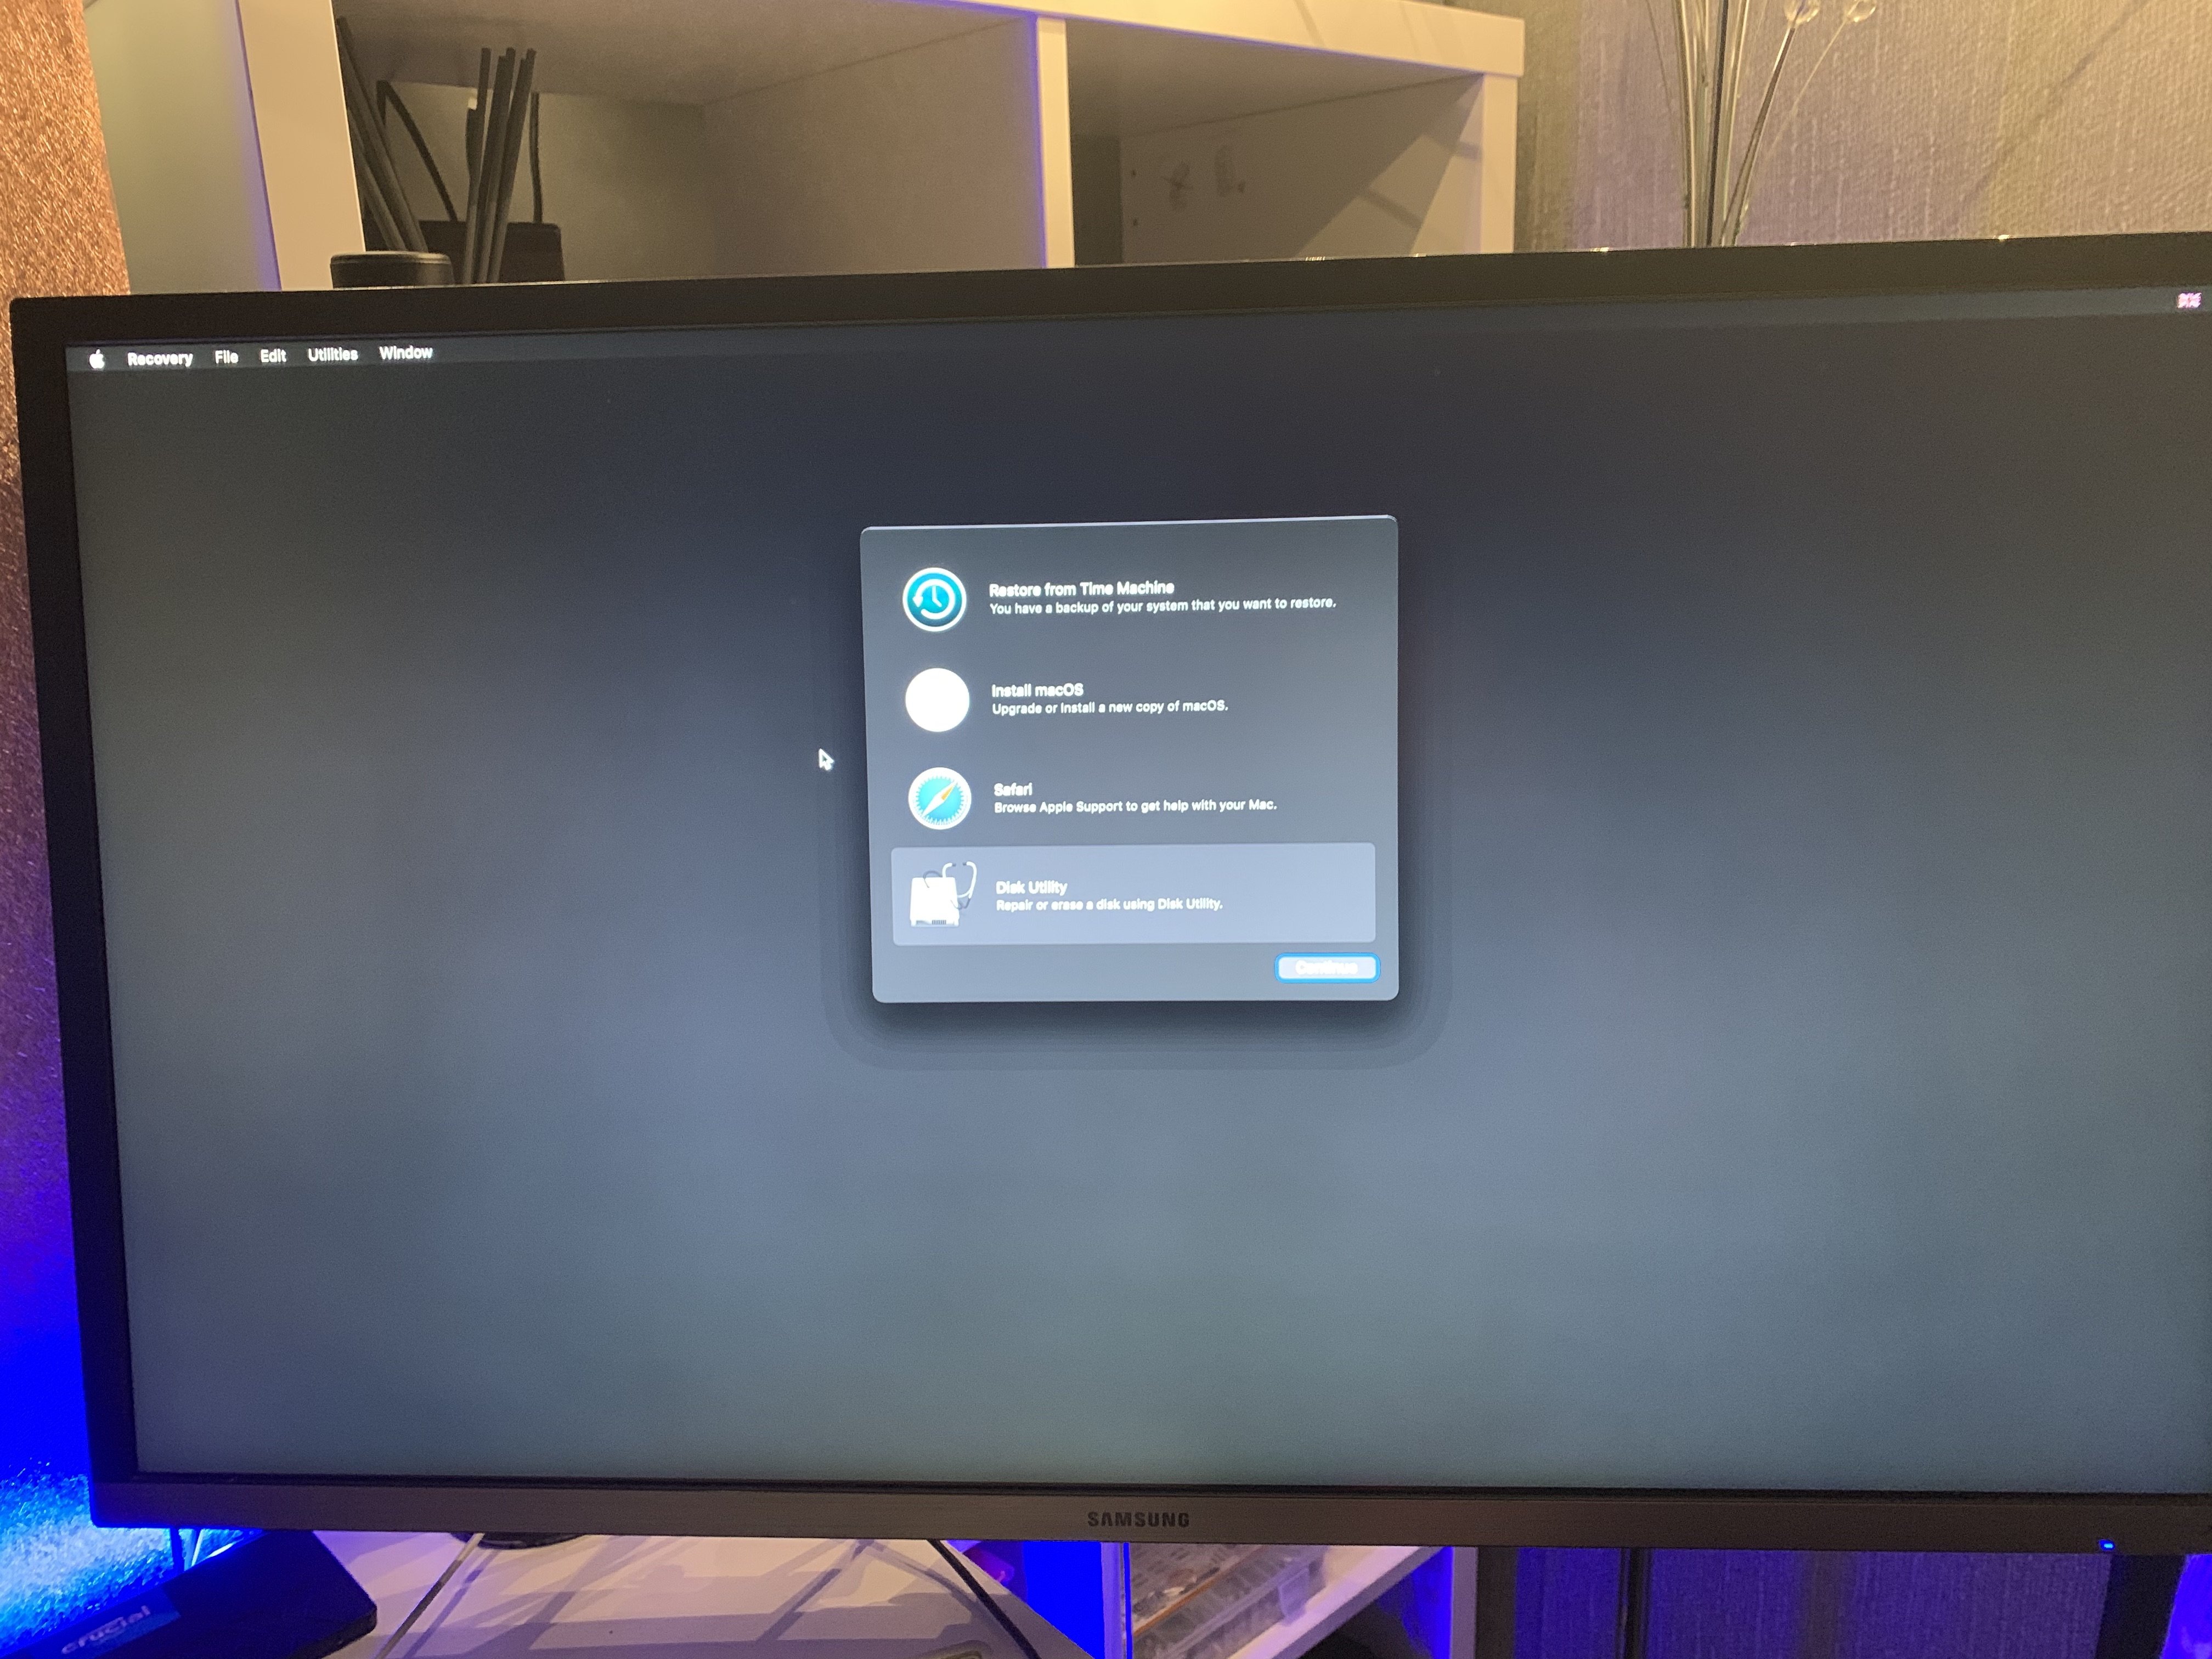
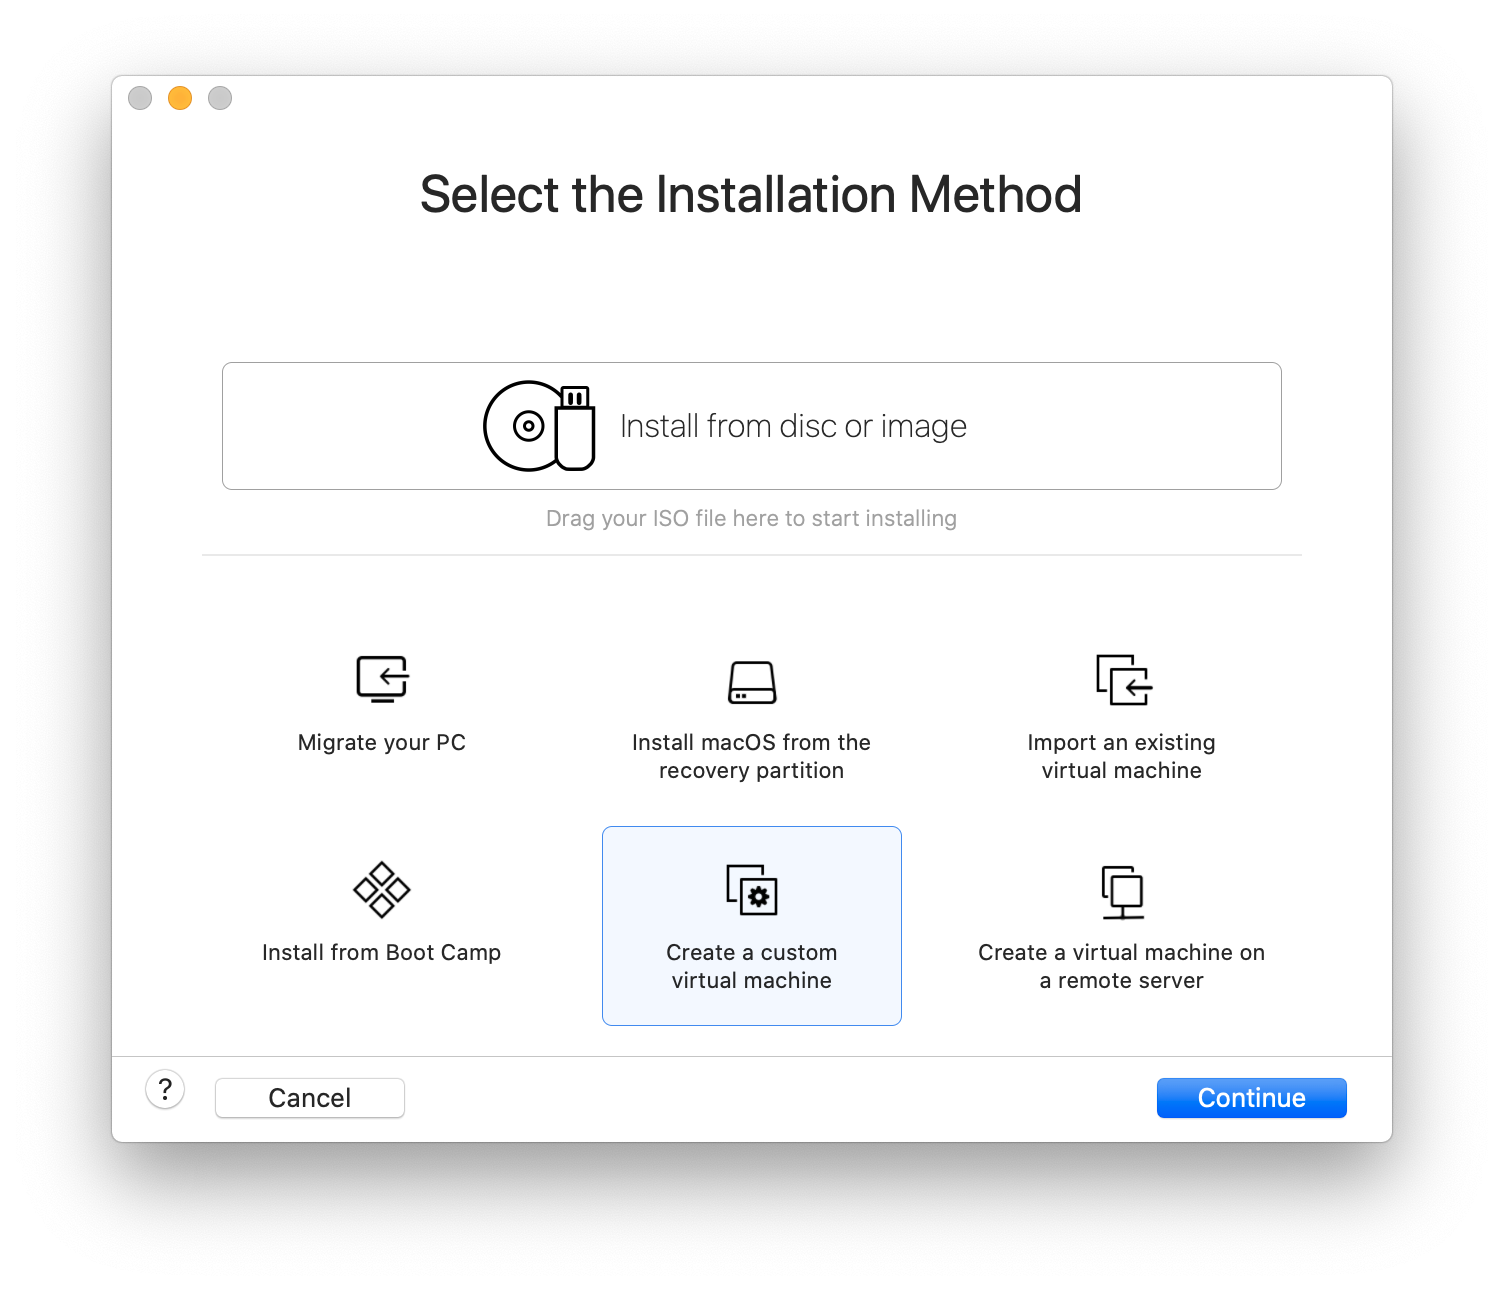
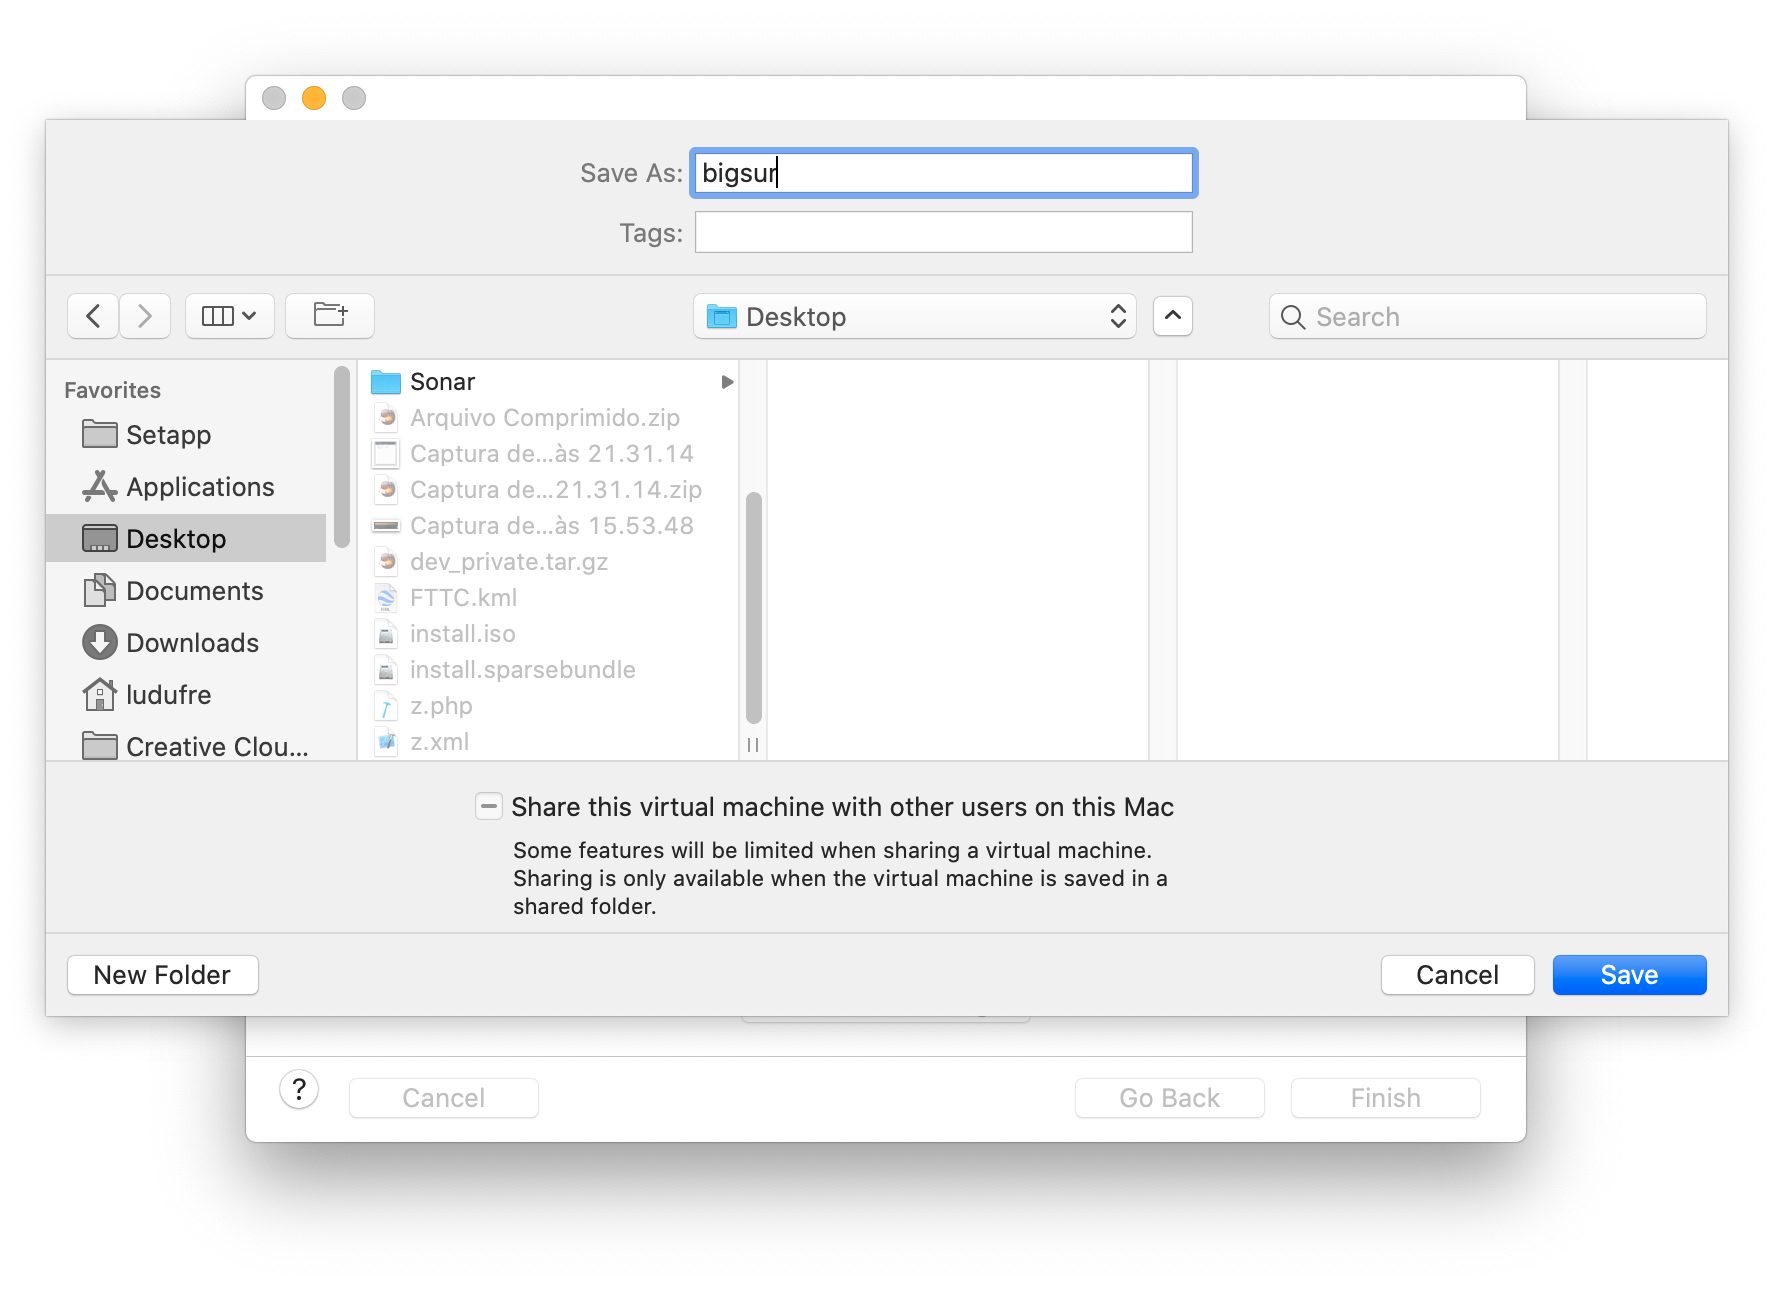
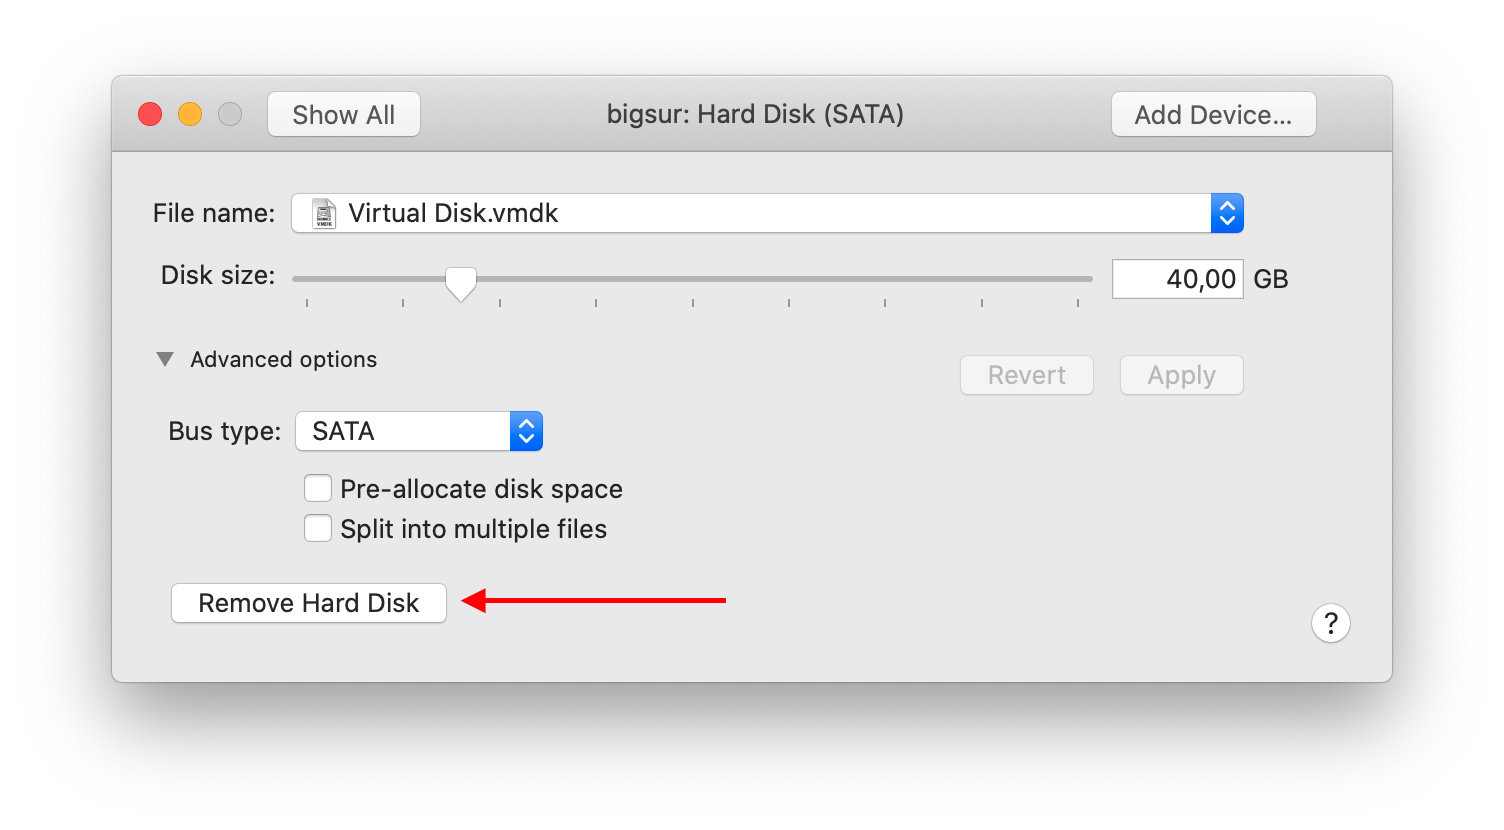
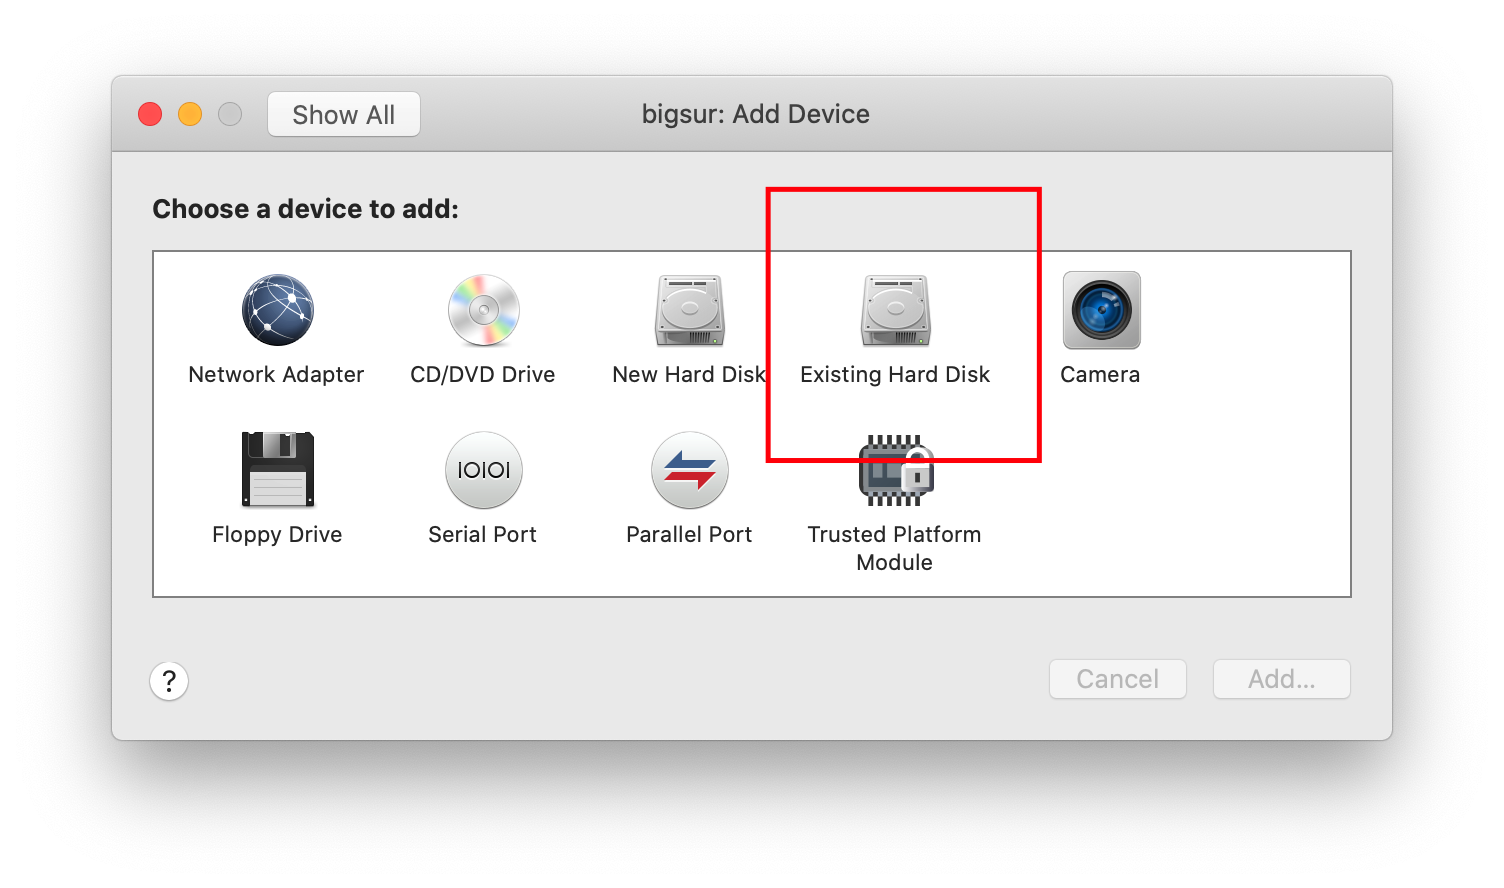
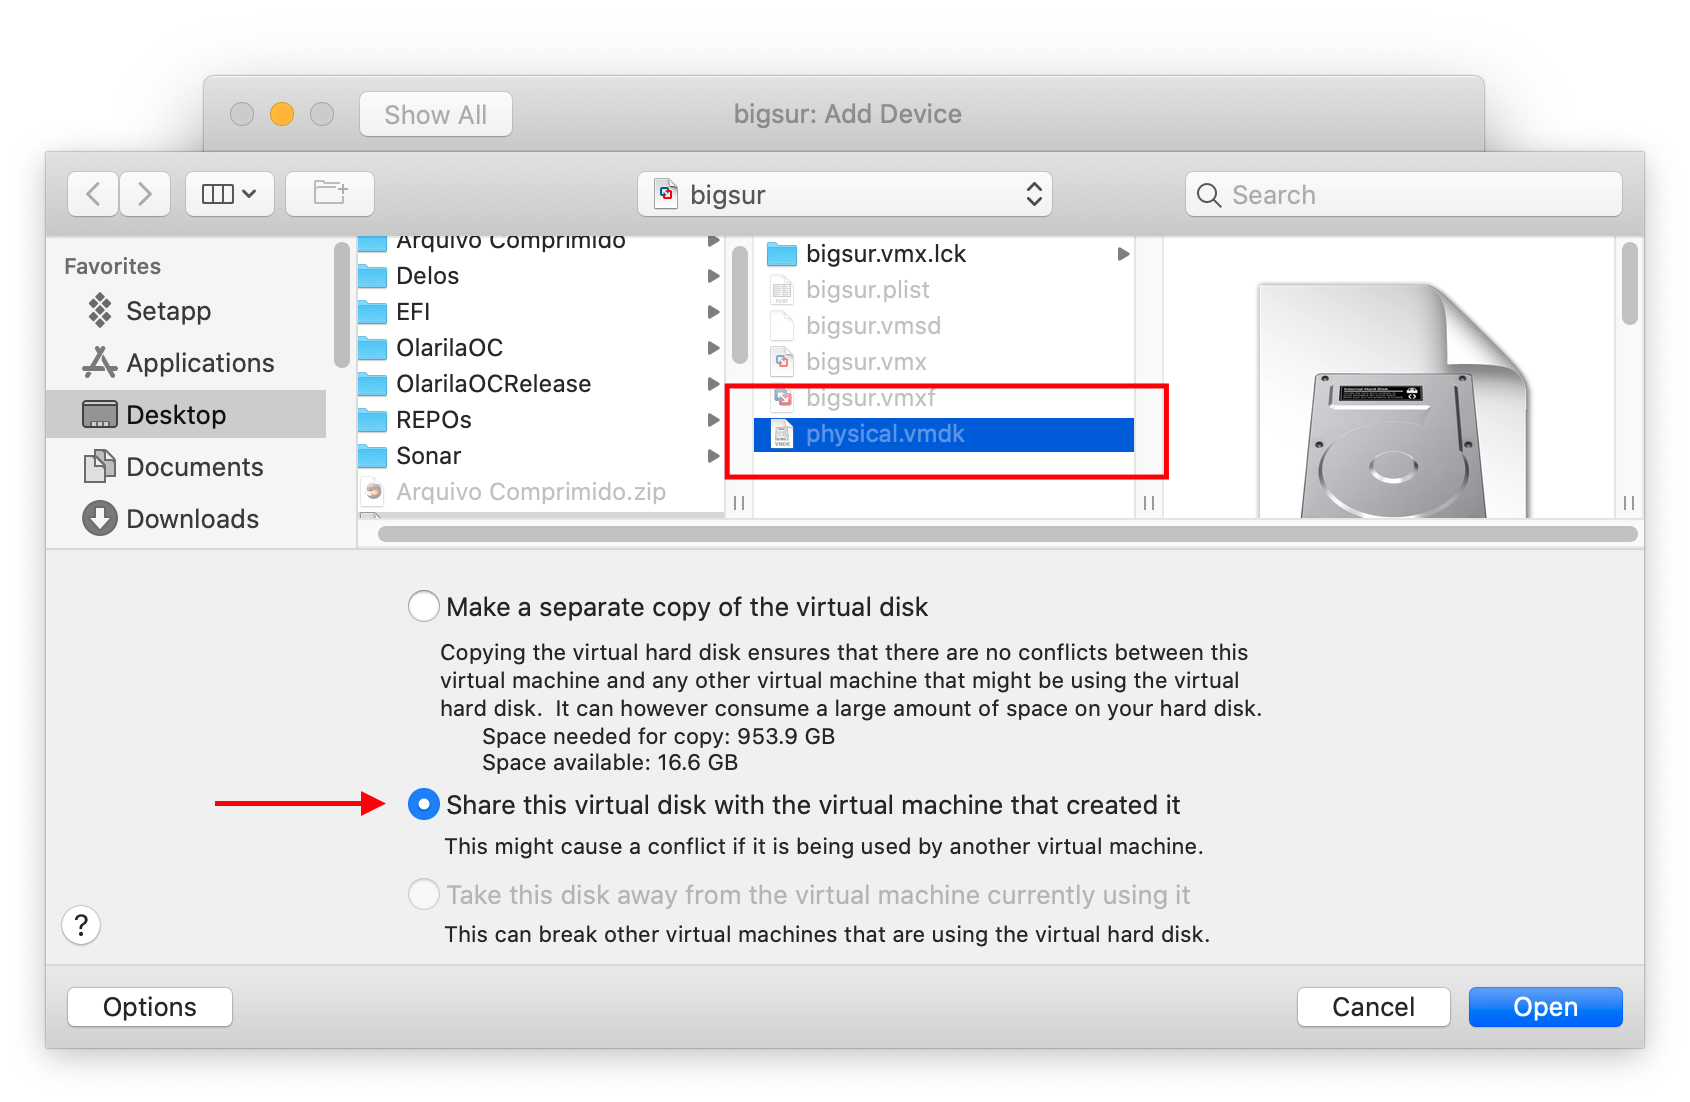
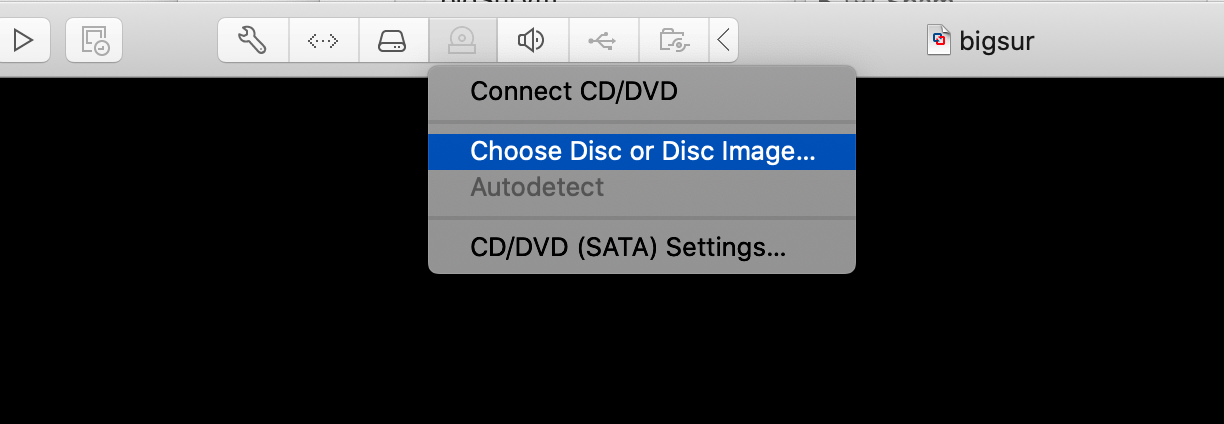
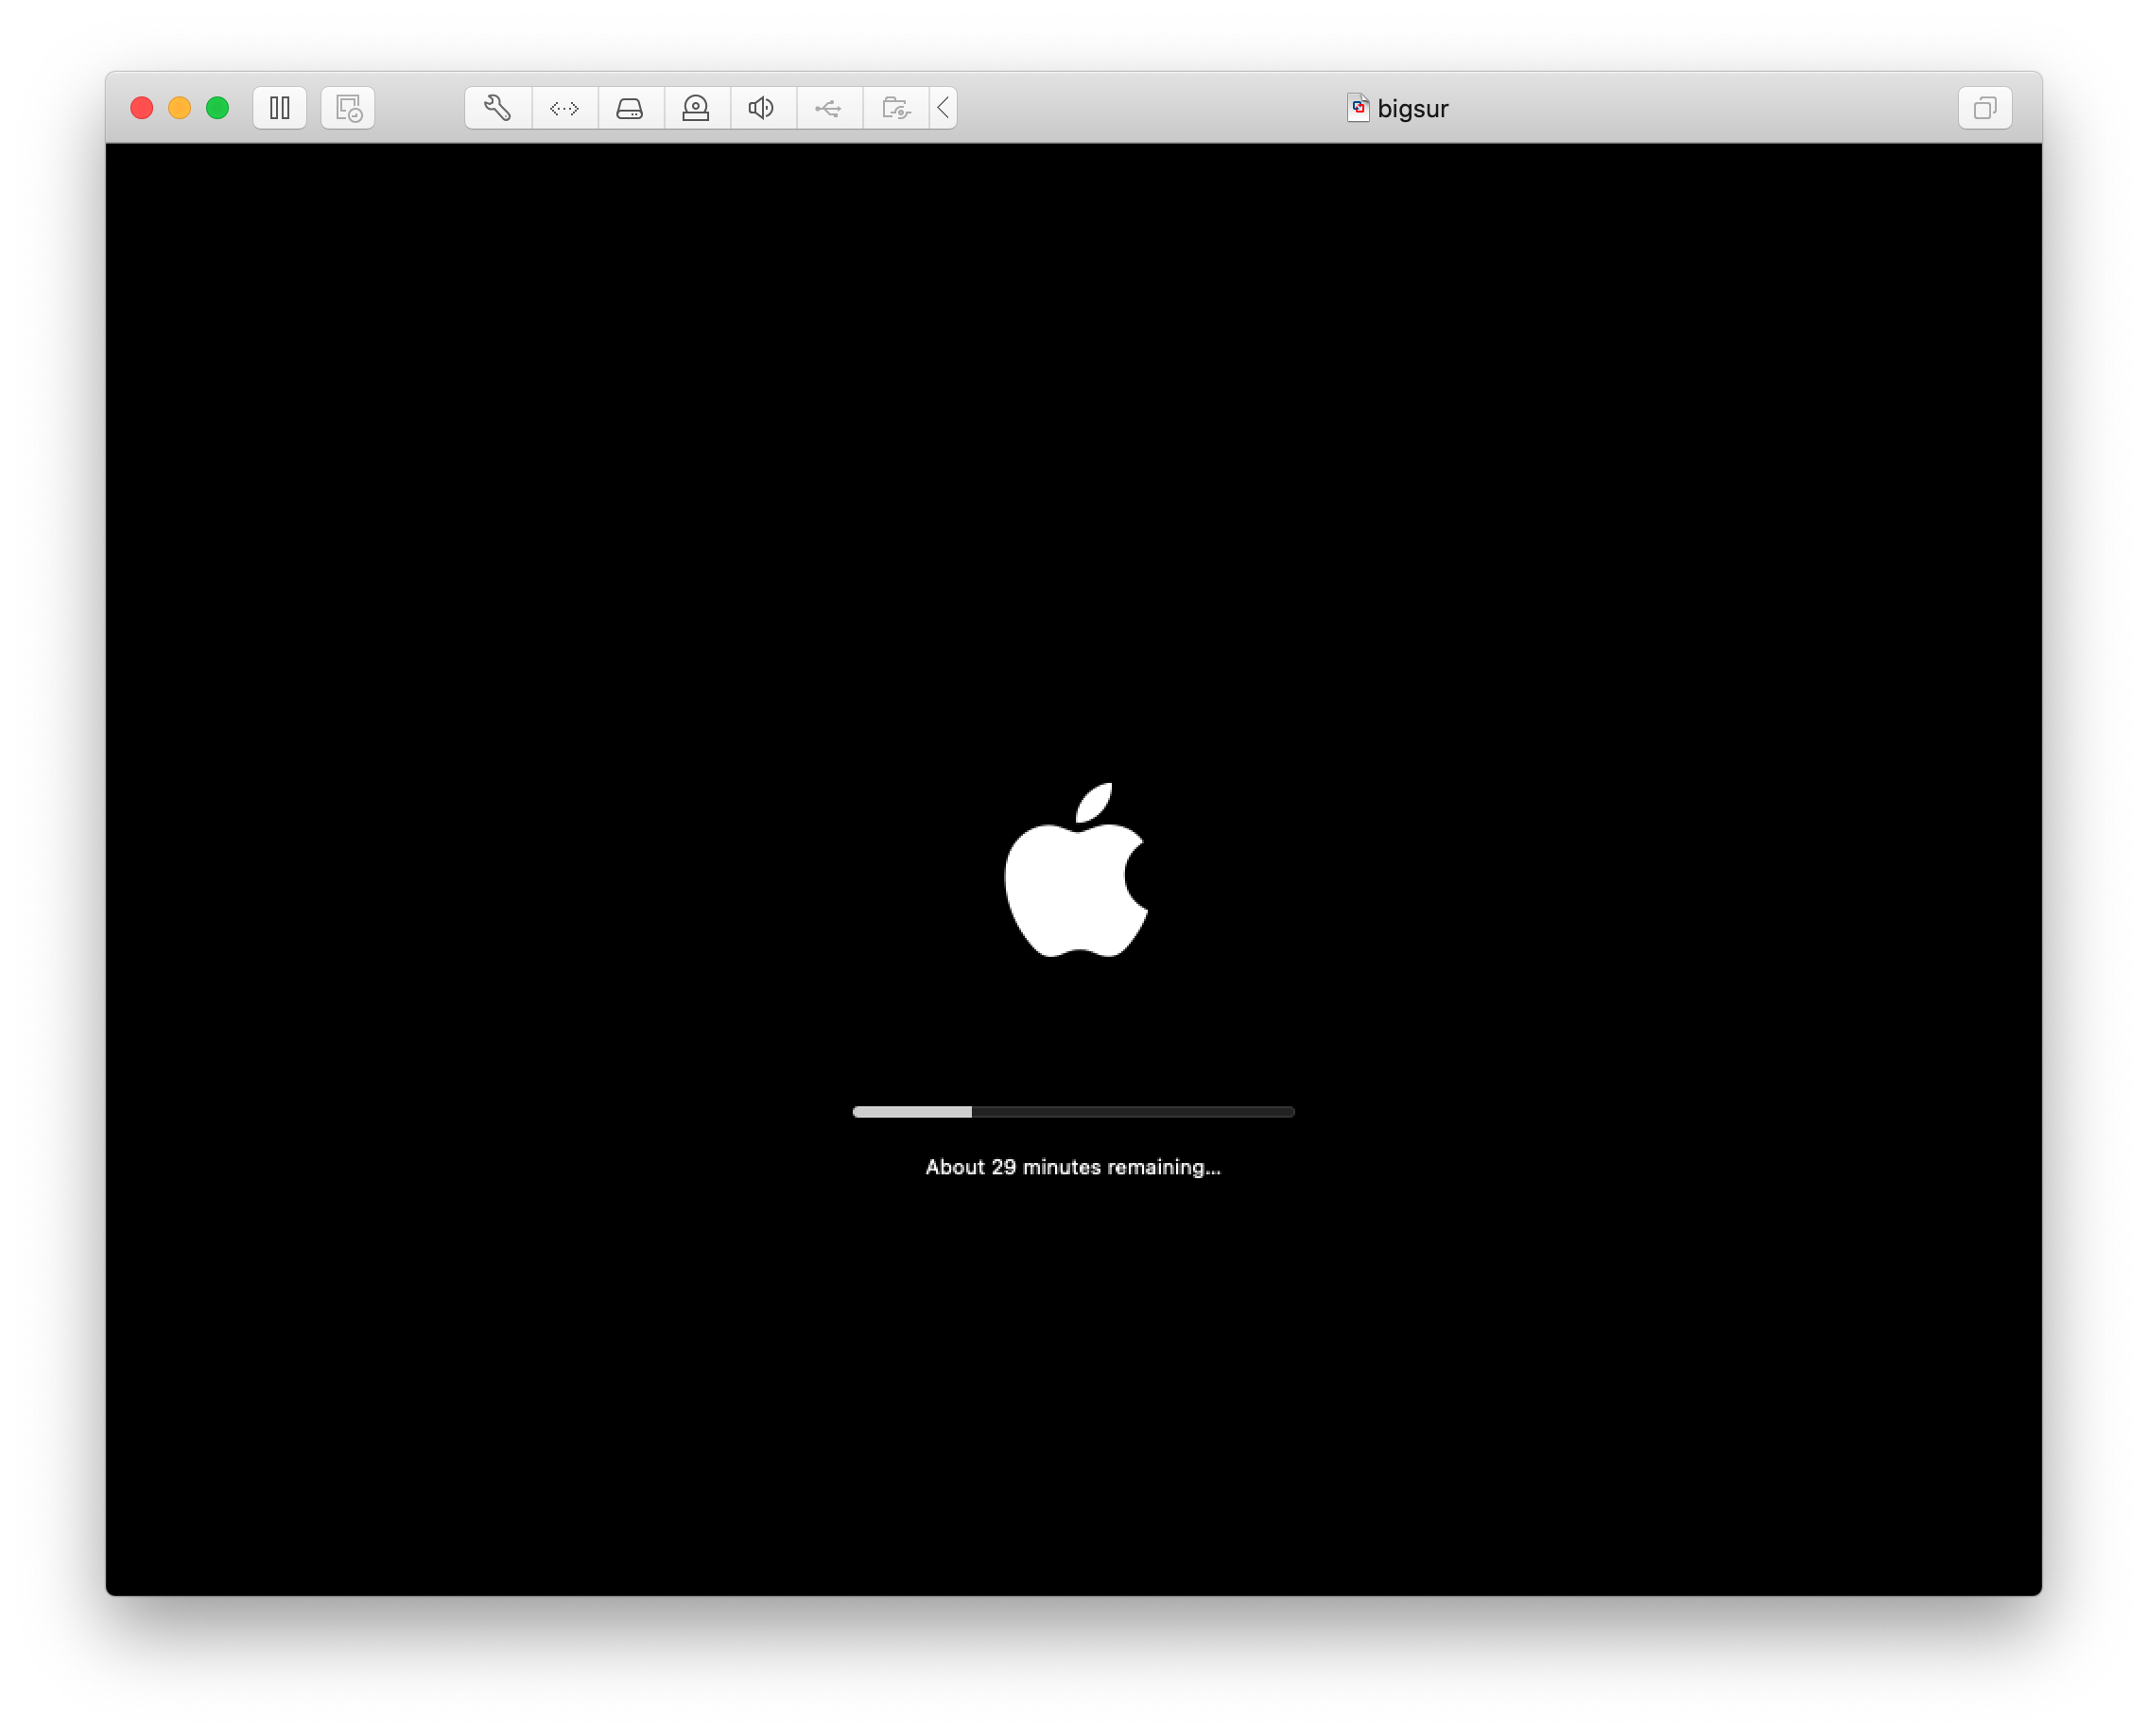
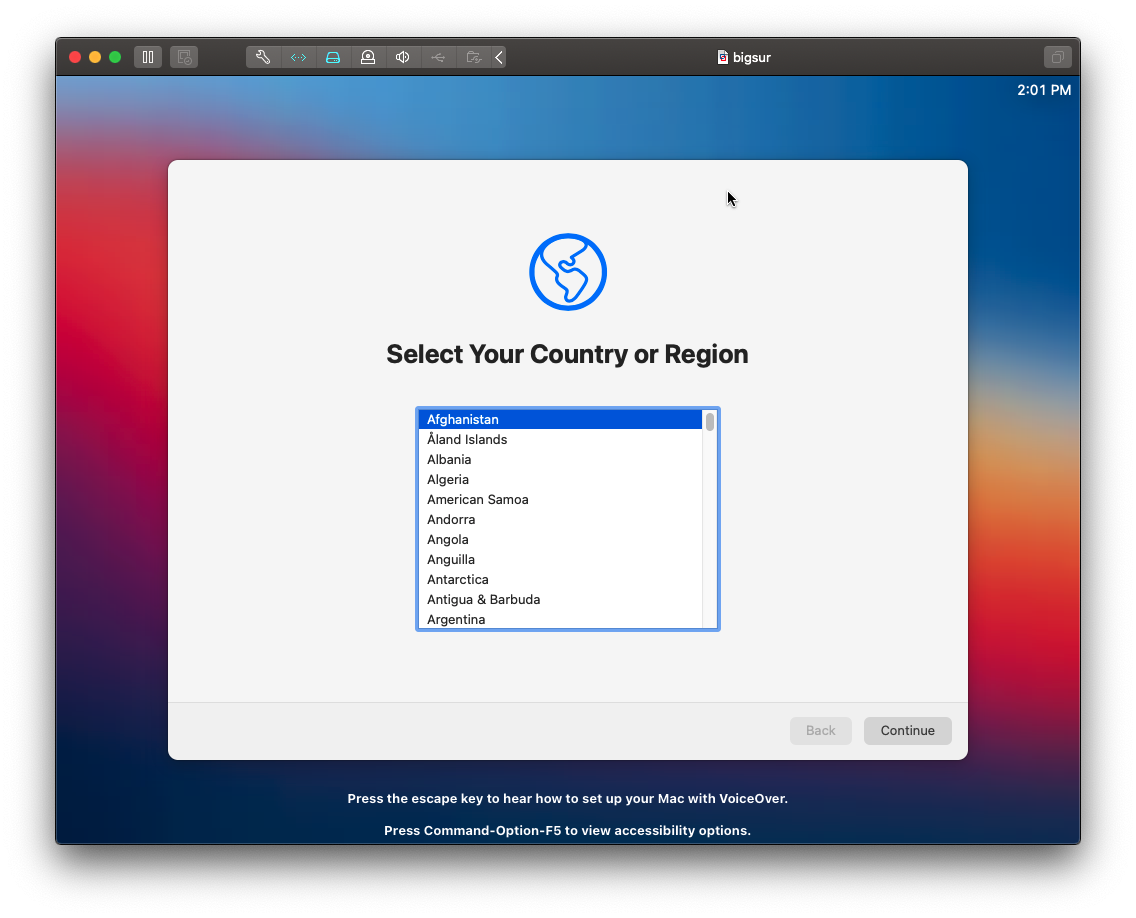
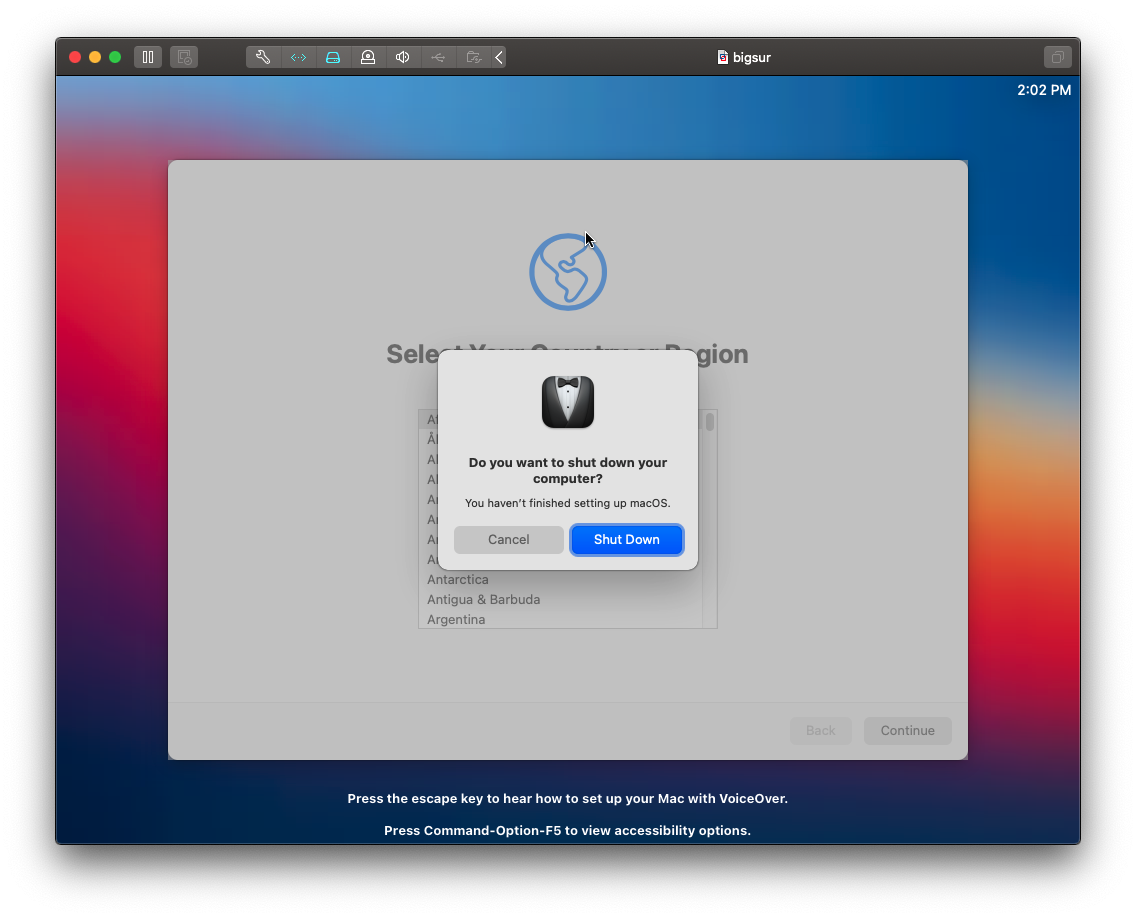
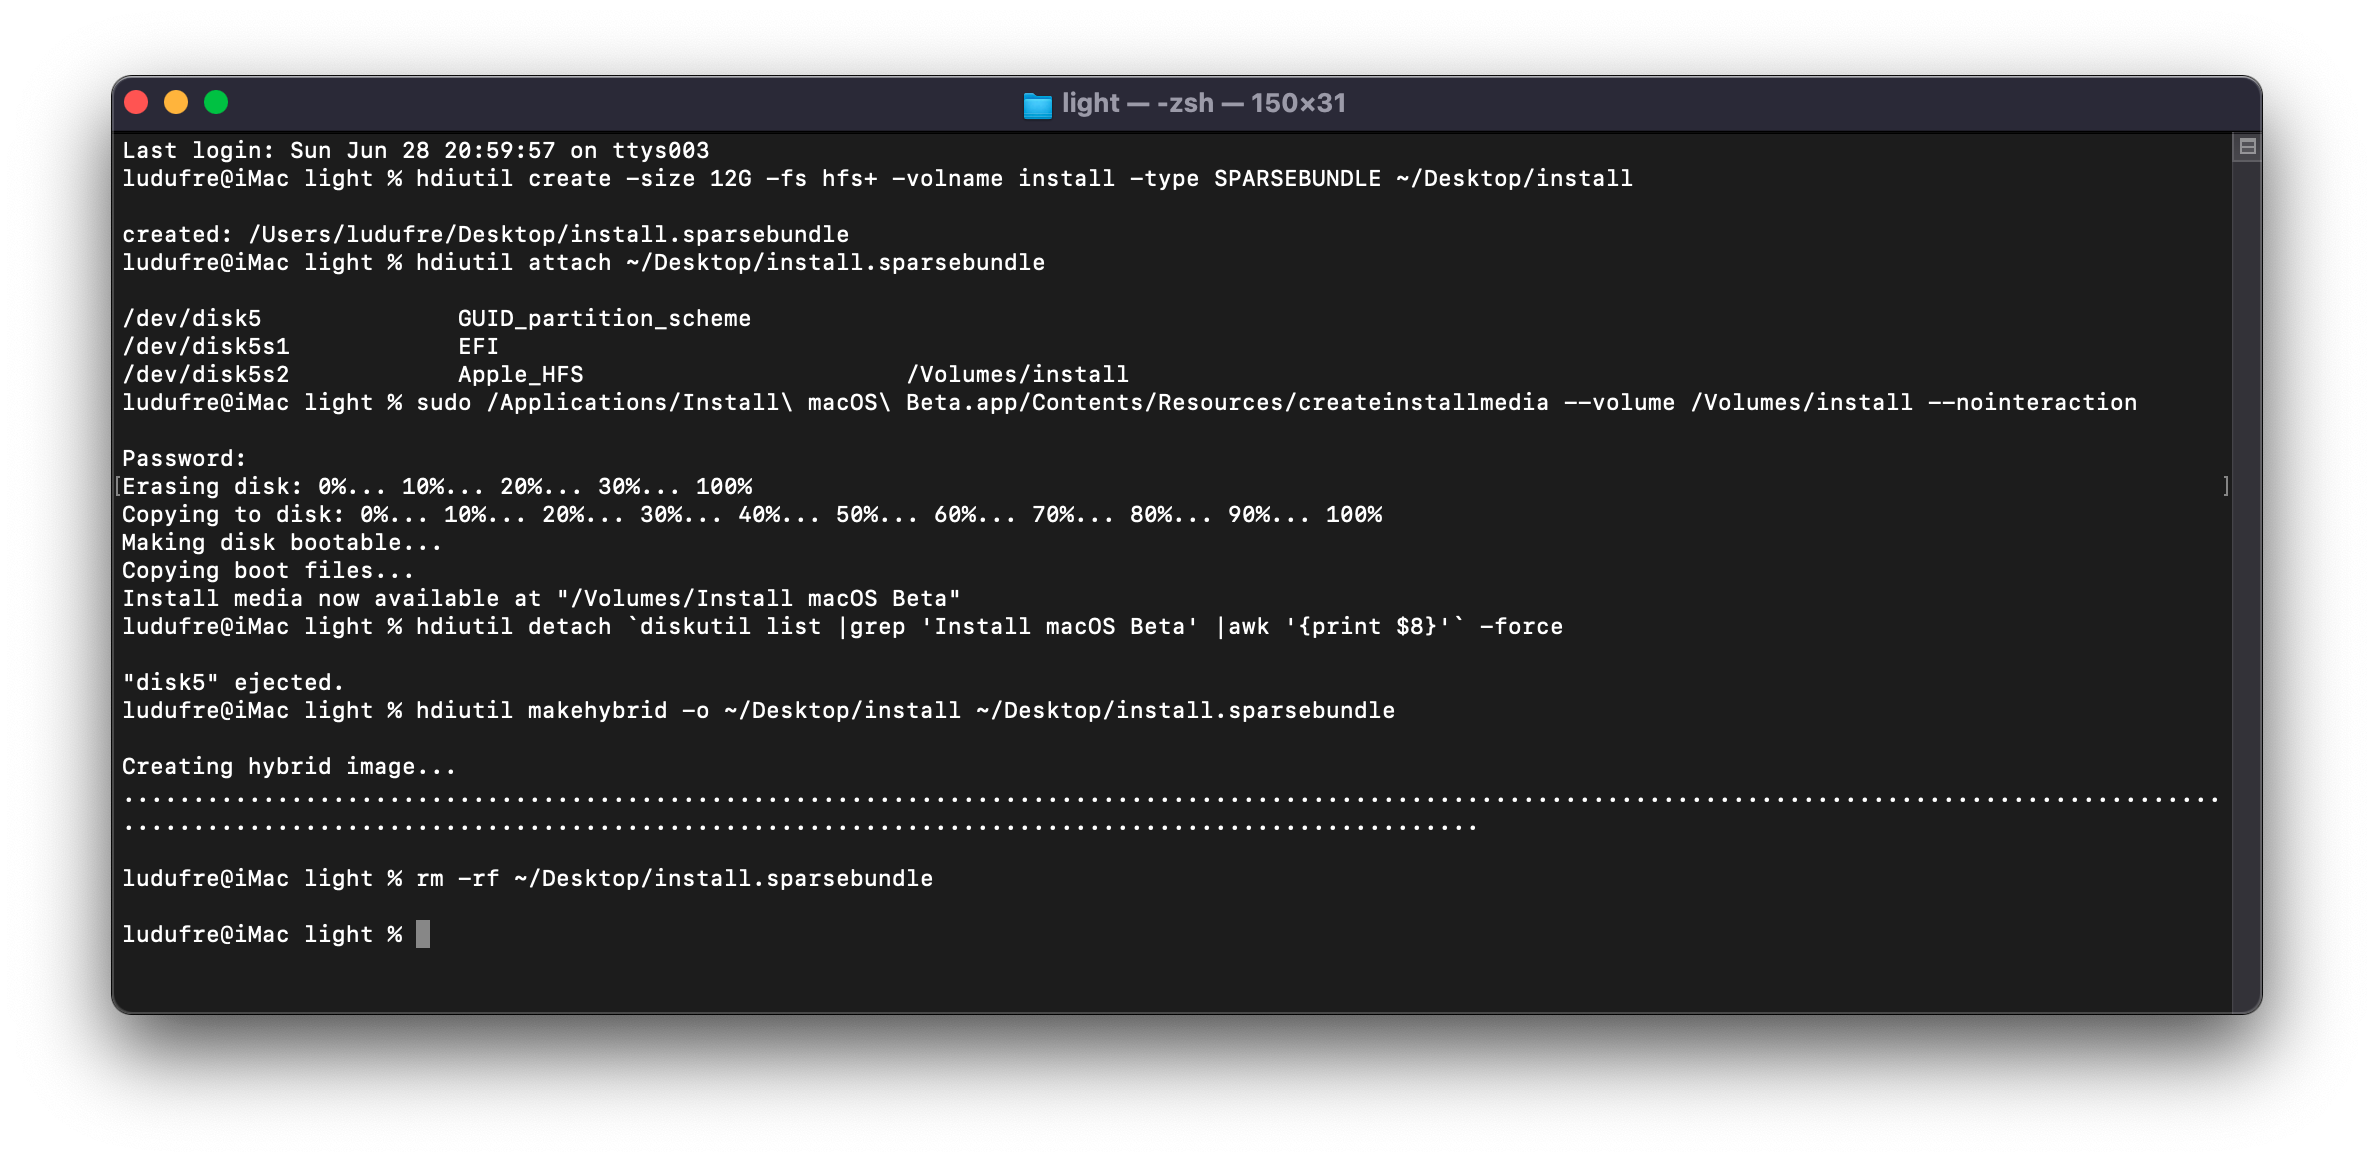
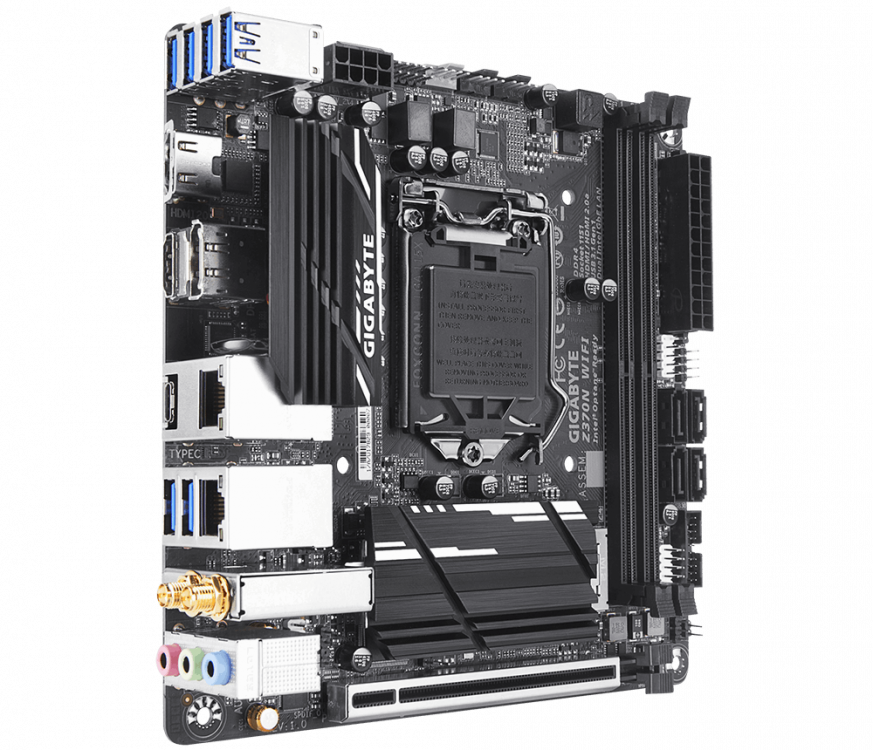
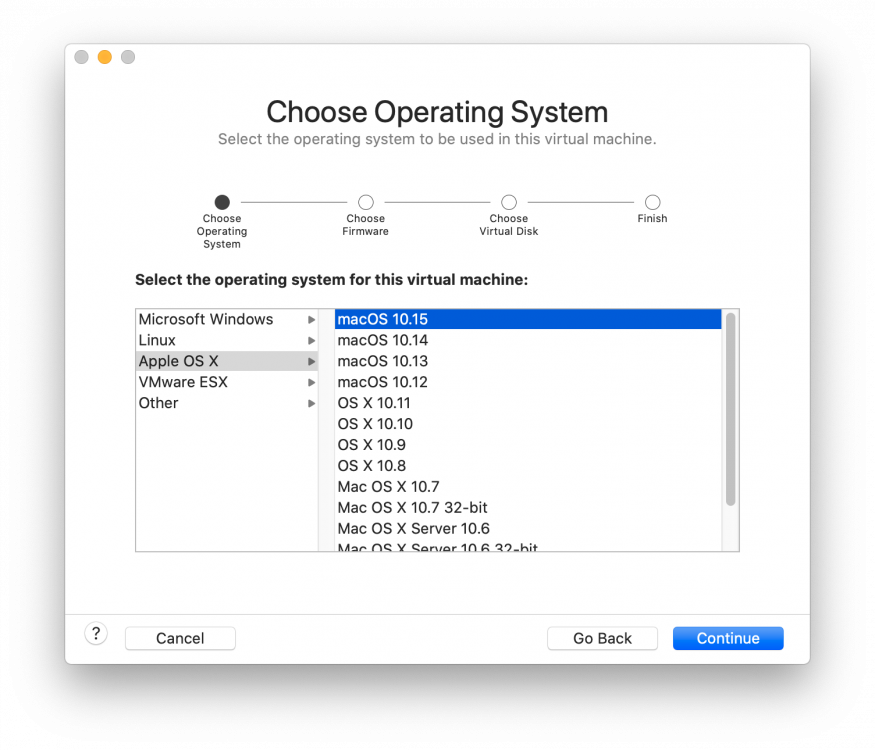
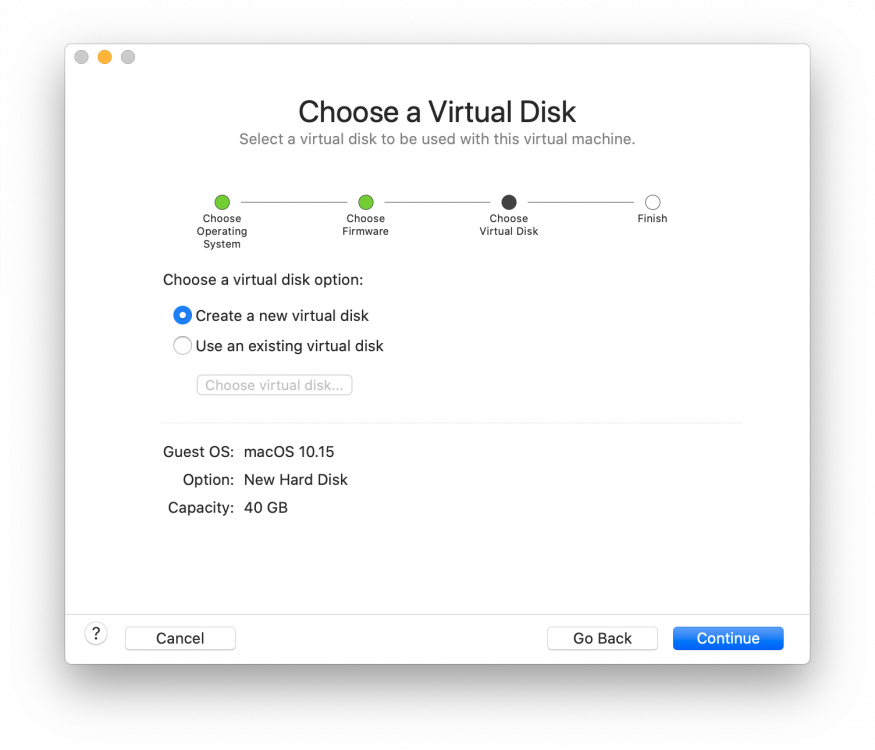
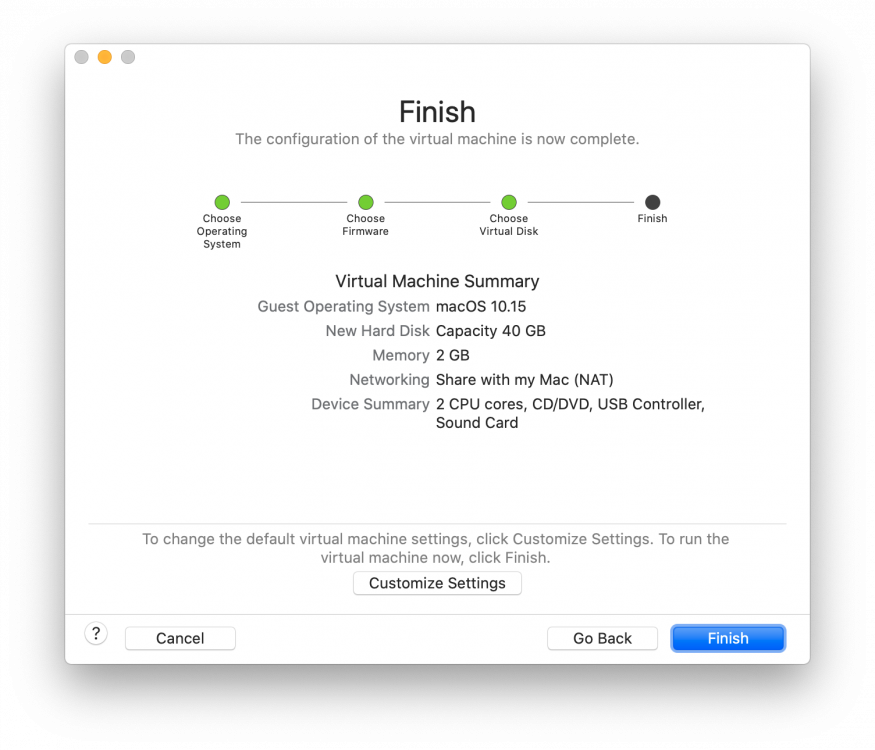
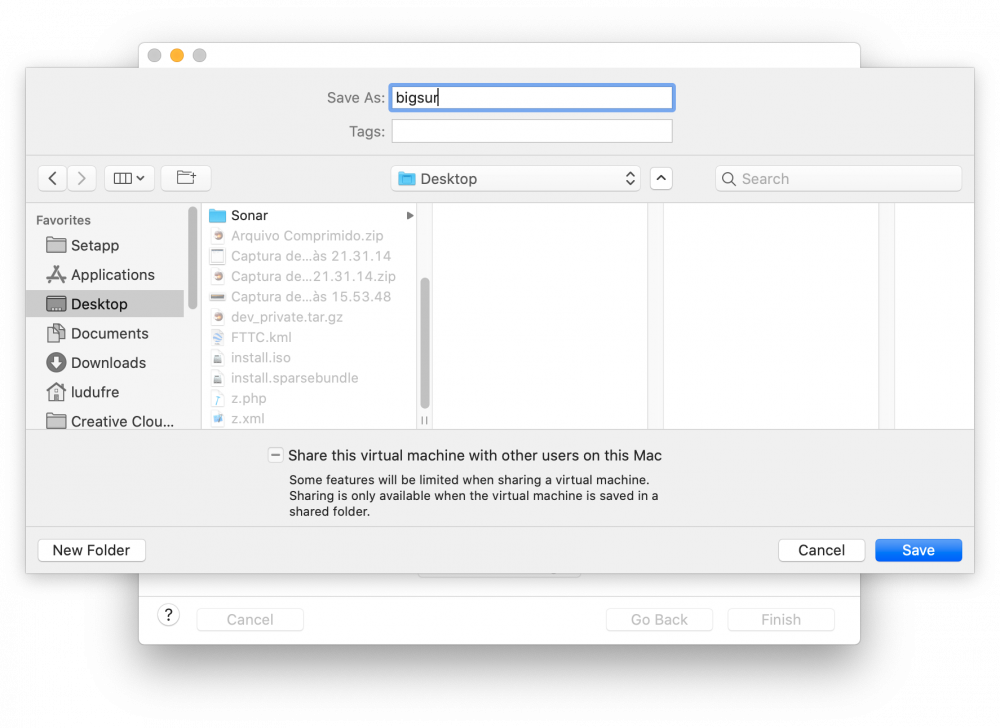
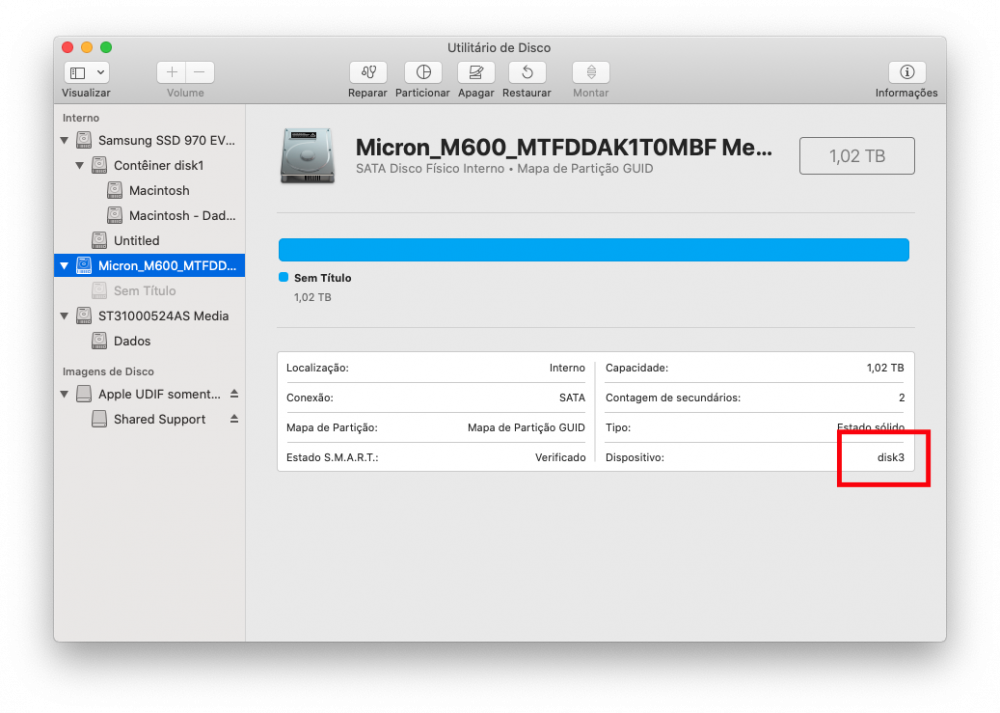
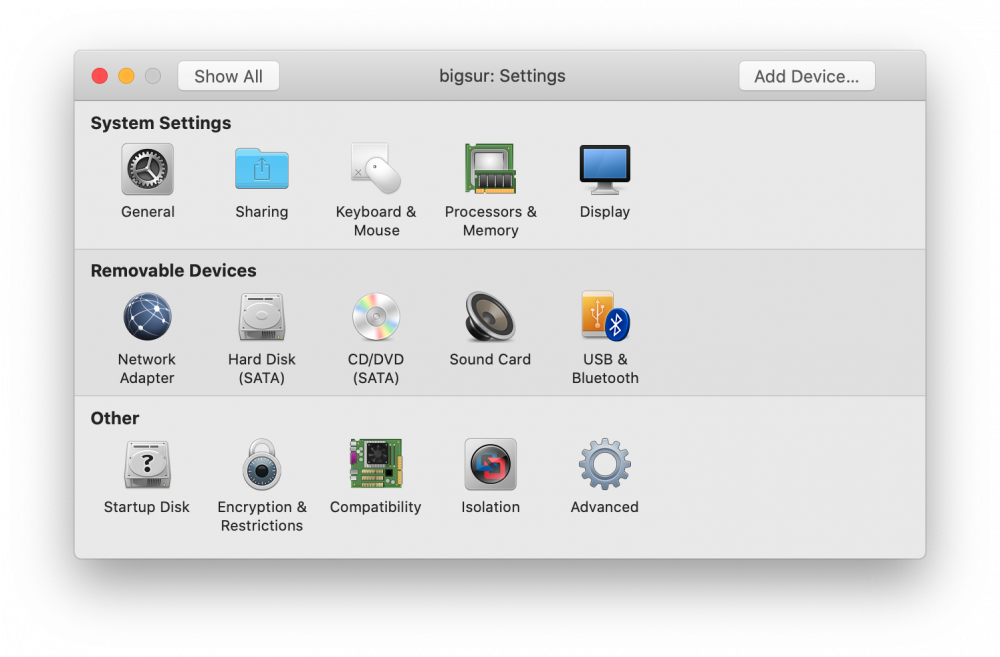
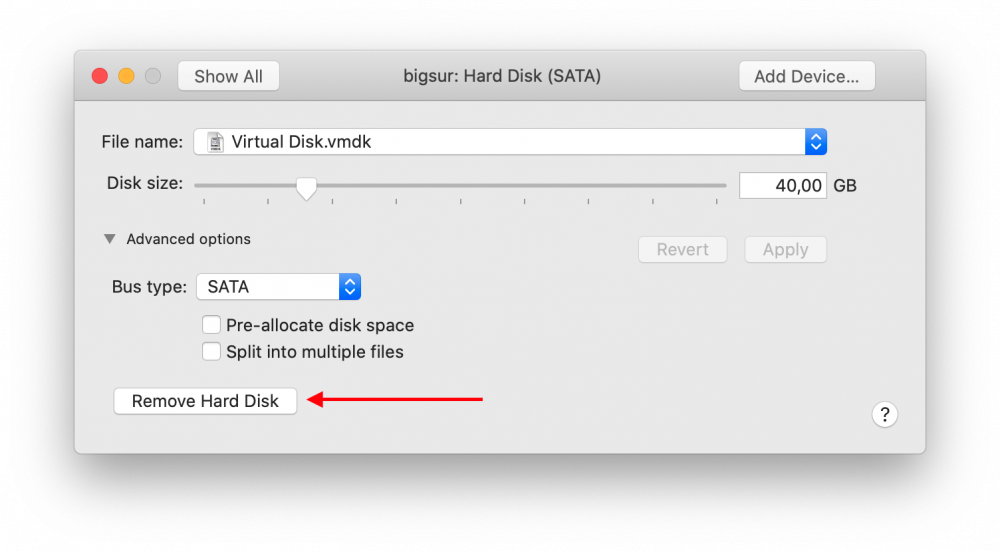
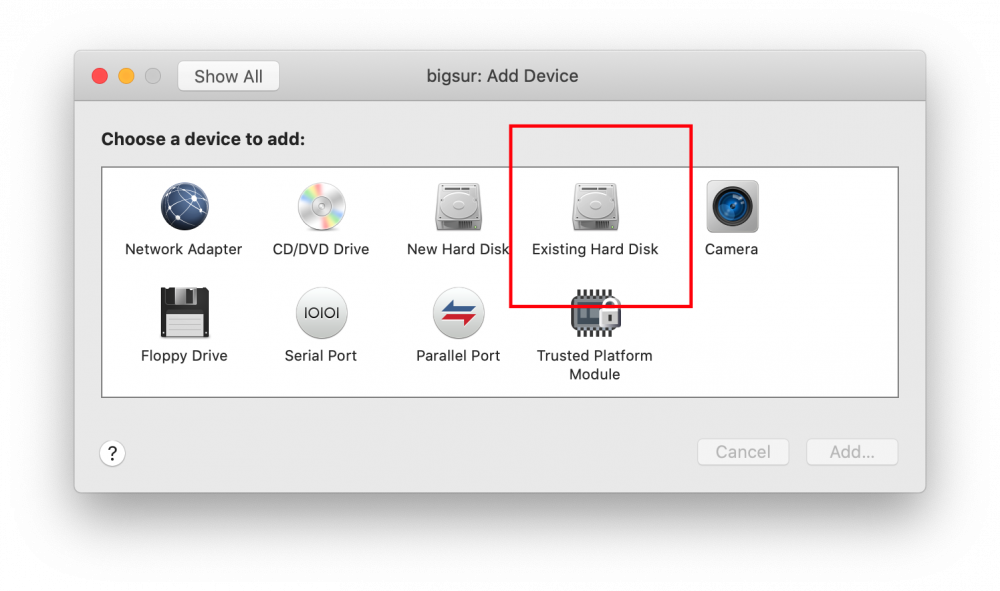
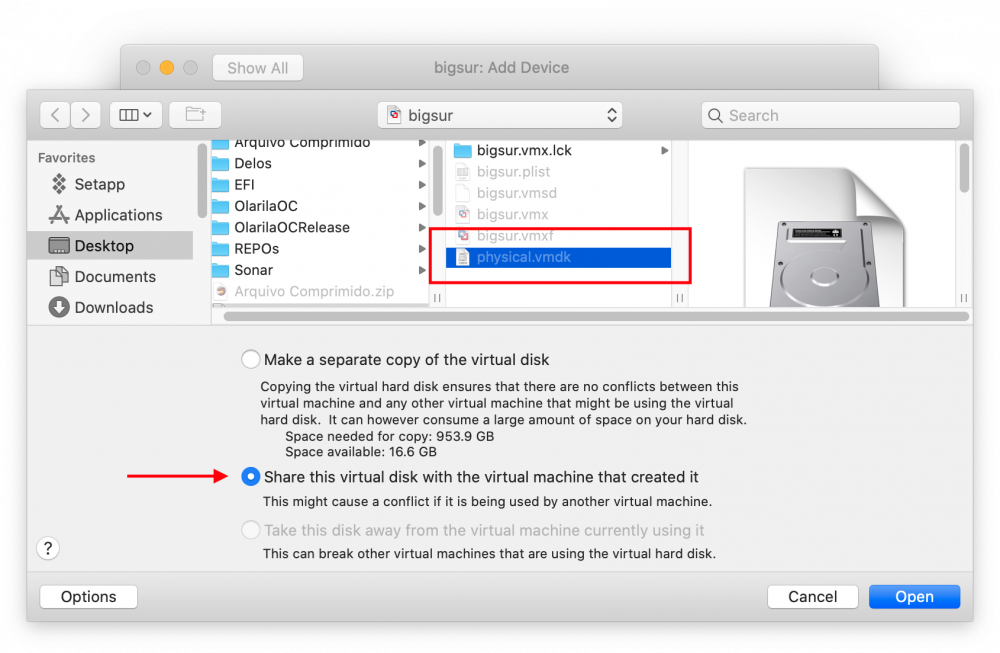
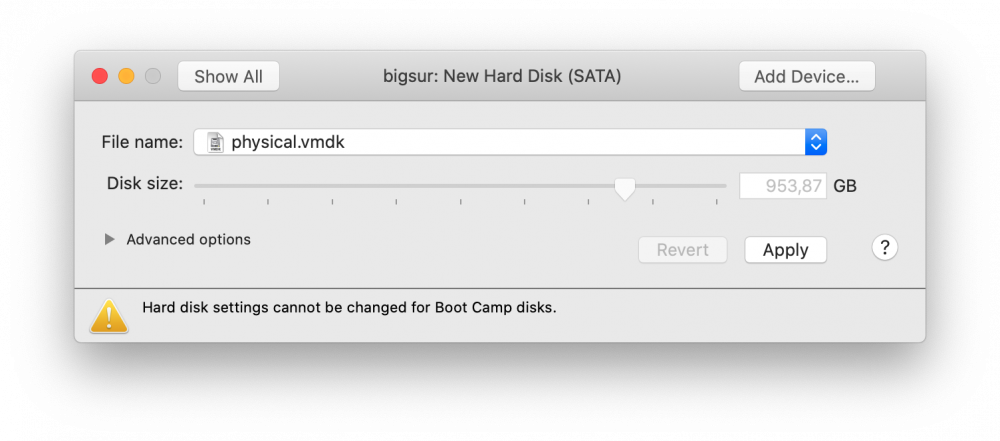
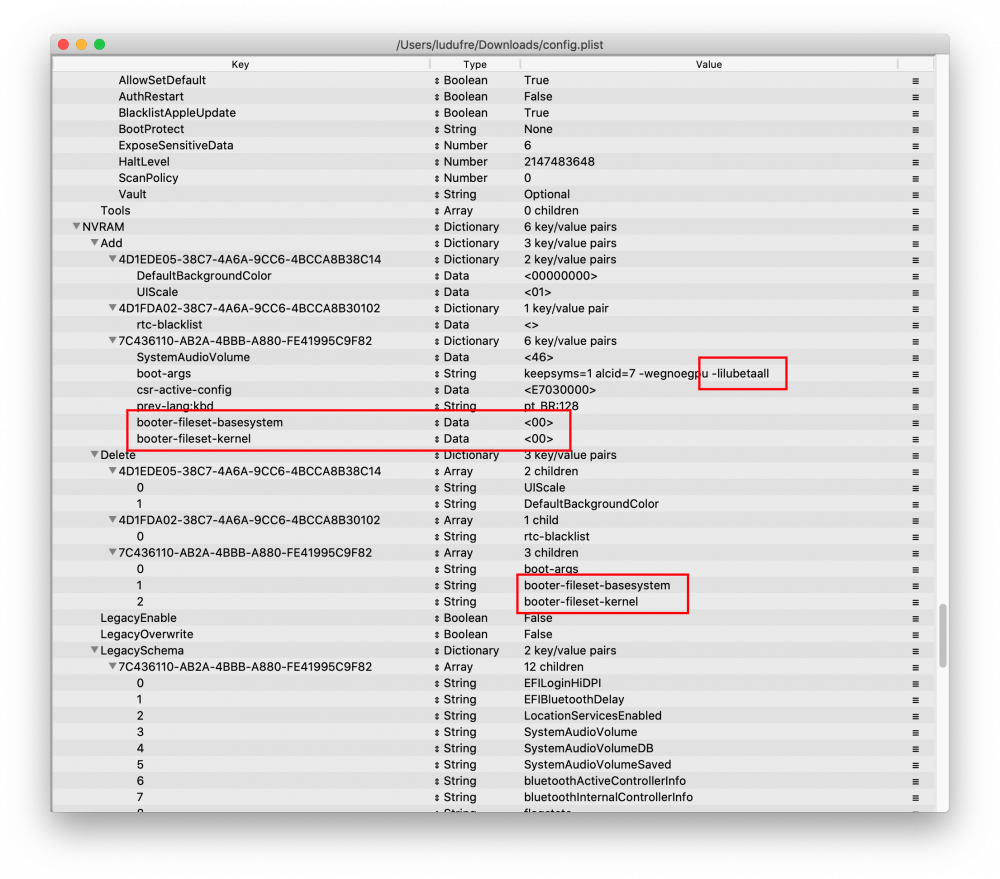
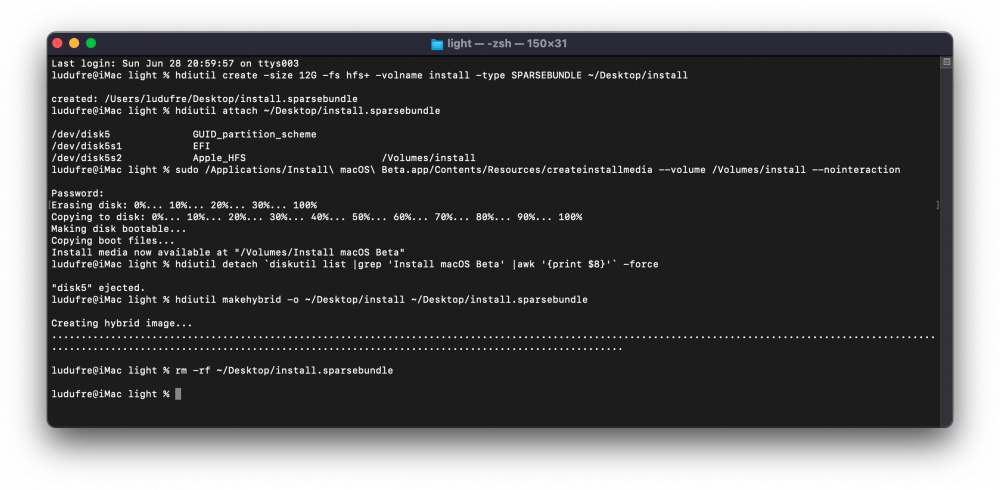
Installing macOS Big Sur 11.0 DP1 on Gigabyte Z370N WIFI + i7 8700K + UHD 630 Changelog: 06/28/2020 22:05h GMT-0 - Replaced detach command when creating ISO. - Thanks @ham4ever - Added instruction to run one line at time. 06/27/2020 02:37h GMT-0 - iMessage works too. Just not at first boot. 06/26/2020 18:54h GMT-0 - First version. What works and what does not - Processor: Intel Core i7-8700K -> Work. All SpeedStep stages.- Video Card: Intel UHD 630 -> Work. QE/CI and Metal.- Chipset: Intel Z370 -> Work.- HDMI 2.0 (1st) -> Work. - HDMI (2nd) -> Work. - DP -> Work. - Audio: ALC1220 -> Work. - HDMI Audio -> Work.- WiFi/Bluetooth -> Not work. Replaced with BCM94360CS2. - Ethernet (1st) -> Work.- Ethernet (2nd) -> Work.- USB3.0 -> Work.- Sleep -> Work. - Airdrop, Handoff, Instant Hotspot and Continuity -> Work after replaced wireless. Todo - Fix iMessage (other iServices works perfectly) - Nothing Disclaimer! Bootloaders are currently unable to start the installation. The solution is to use a virtual machine and use a physical disk (additional, USB or SATA, NVME) as a target in the installation. Change the OpenCore compiled from the source code, and add some entries in NVRAM through config.plist. This is not the best solution. But it is the only way at the moment. There are some ready-made images available out there, but I prefer not to use them and create a clean installation. What you need to install - Running install of macOS - Already working OpenCore with this setup - Create bootable ISO file - Spare Disk/SSD- macOS Big Sur DP1 install app- Latest OpenCore + Kexts compiled from sources - Some KEXTs and SSDT patches UEFI configuration My BIOS is F10 (I use an 8th generation processor, so I don't need to upgrade) You can configure manually or load my BIOS profile. Manually: - Shutdown and insert the flash.- Power on with DEL pressed to enter BIOS setup.- Change value: BIOS - CSM Support to Disabled- Change value: BIOS - Secure Boot to Disabled- Change value: Peripherals - Initial Display to IGP- Change value: Chipset - VT-d to DISABLE- Change value: Chipset - Internal Graphics to ENABLE- Save & Exit Setup or, BIOS profile You can use one of my BIOS profiles attached bellow. It's two versions. One stock and another with overclock [5.0 GHz] - Put the profile in the root of the flash drive at EFI partition. - Restart with DEL pressed to enter BIOS setup. - Go to Save & Exit. - Select Load Profiles. - Select last option and then the flasdrive in the list. - And finally choose MACOS_STOCK or MACOS_5GHZ. - Save & Exit Setup How create bootable ISO file Download Big Sur DP1 Run this command on Temrinal: sudo /System/Library/PrivateFrameworks/Seeding.framework/Resources/seedutil enroll DeveloperSeed Go to System Updater and download the Install macOS Beta app. Create ISO Then run on Terminal (One line at a time): hdiutil create -size 12G -fs hfs+ -volname install -type SPARSEBUNDLE ~/Desktop/install hdiutil attach ~/Desktop/install.sparsebundle sudo /Applications/Install\ macOS\ Beta.app/Contents/Resources/createinstallmedia --volume /Volumes/install --nointeraction hdiutil detach `diskutil list |grep 'Install macOS Beta' |awk '{print $8}'` -force hdiutil makehybrid -o ~/Desktop/install ~/Desktop/install.sparsebundle rm -rf ~/Desktop/install.sparsebundle Now you have install.iso on desktop. How create create the virtual machine and install to disk/SSD Download and install the trial version of the VMware Fusion from their site. I'm used the version 11.5.5. - Create a custom virtual machine - Operating System: Apple OS X - macOS 10.15 - Create a new virtual disk (The size doesn't matter, We'll delete later) - Click in "Customize Settings" - Save the VM on desktop with name: bigsur - Insert the spare disk/SSD on PC (reboot if necessary) and identify what /dev/diskX is. You can look on Disk Utility.app: - Create VMDK that point to it: sudo diskutil unmountDisk diskX /Applications/VMware\ Fusion.app/Contents/Library/vmware-rawdiskCreator create /dev/diskX fullDevice ~/Desktop/bigsur.vmwarevm/physical sata - Edit the virtual machine settings created previously - Click in Hard Disk (SATA) and delete it (Remove Hard Disk) - Then add the physical disk - There's a bug in Fusion. To select the physical.vmdk, right click then "Quick Look", then "Share virtual disk with the virtual machine that created it" - Click Apply. - Now mount de install.iso - Start the VM and install as usual until: Disk Utility, format GUID with APFS (VMware Virtual SATA Hard Drive Media), Install macOS, wait few reboots and stop at first boot wizard. This can take up to 45 minutes. It may seem like it is stopped, but it is not. - Press Command + Q and shutdown (usually WIN + Q) - Close VMware Fusion. Copy OpenCore to EFI - Mount the EFI with: sudo diskutil mount diskXs1 - Copy your current working OpenCore EFI to that mounted EFI. - Download mine attached or Update your OpenCore, Kexts and driver UEFI. - You can use the @MaLd0n script attached to compile all (OlarilaOC.command.zip) - If using mine add your MLB, ROM, SystemUUID and SystemSerialNumber. (see how to) - Add following items do config.plist: NVRAM -> Add -> 7C436110-AB2A-4BBB-A880-FE41995C9F82 -> boot-args -> -lilubetaall (append) NVRAM -> Add -> 7C436110-AB2A-4BBB-A880-FE41995C9F82 -> booter-fileset-basesystem + Data + <00> NVRAM -> Add -> 7C436110-AB2A-4BBB-A880-FE41995C9F82 -> booter-fileset-kernel + Data + <00> NVRAM -> Delete -> 7C436110-AB2A-4BBB-A880-FE41995C9F82 -> booter-fileset-basesystem NVRAM -> Delete -> 7C436110-AB2A-4BBB-A880-FE41995C9F82 -> booter-fileset-kernel Done! Boot from the new disk/SSD and finish de first boot wizard. And last but not least I would like to thank the following community members, by making these dream possible:@crushers, @snatch, @apianti, @blackosx, @blusseau, @dmazar, @slice2009, @autumnrain, @phpdev32, @EMlyDinEsH, @RehabMan, @Scellow, @mitch_de, @Shailua, @Andy Vandijck, @maxfierke, @ArturXXX, @LexHimself, @brumas, @khamsakamal48, @MaLd0n, @joedm and @vit9696 and all others members involved directly or indirectly. Attachments MACOS_5GHZ MACOS_STOCK OlarilaOC.command.zip EFI.zip


 1 point
 -
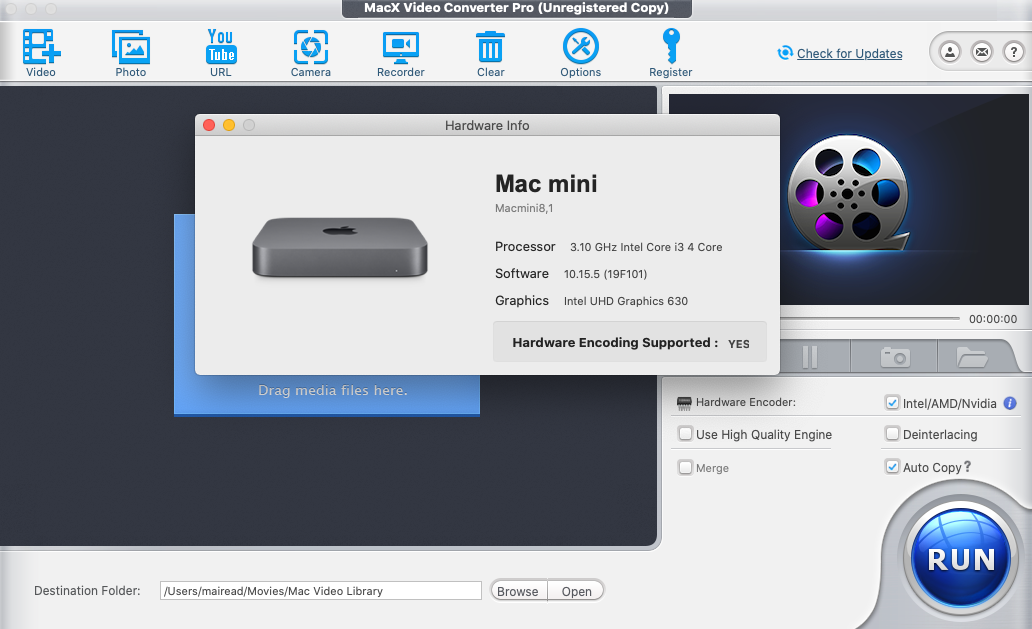
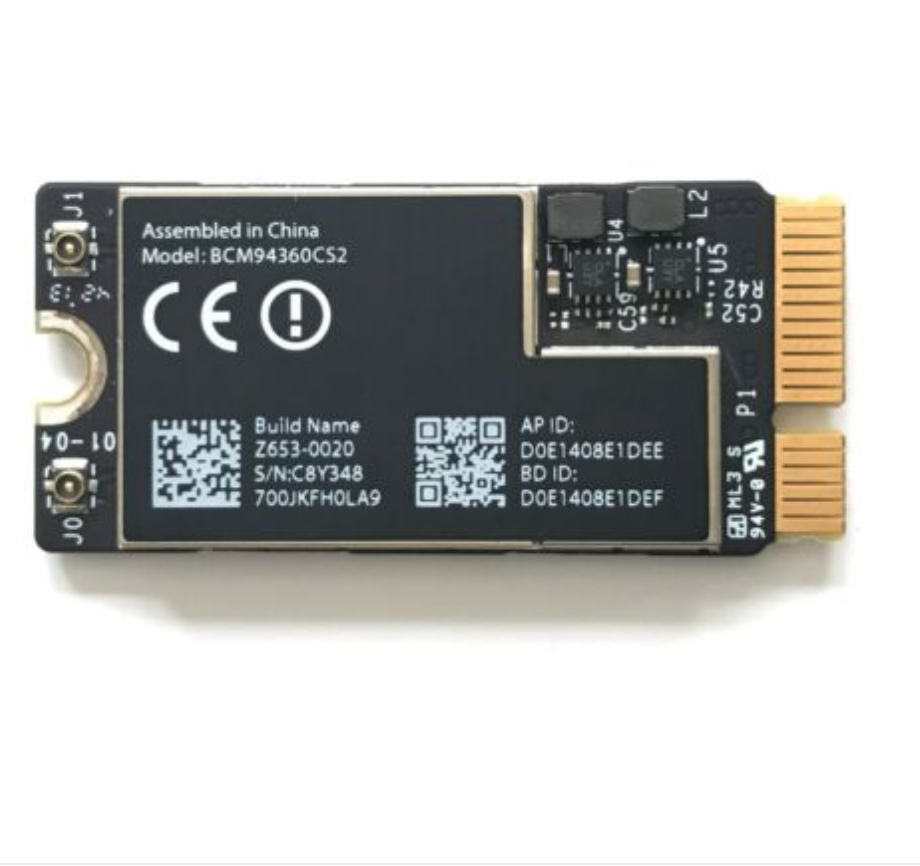
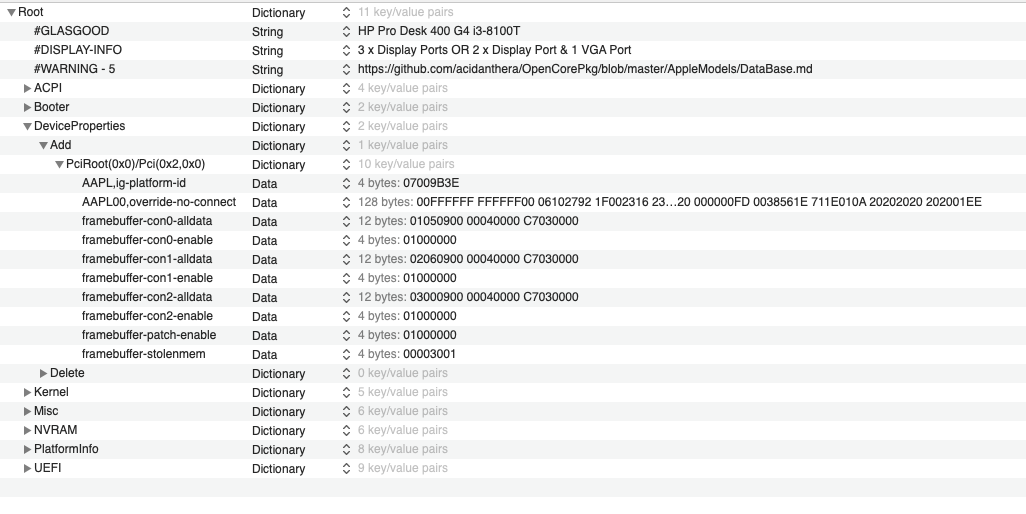
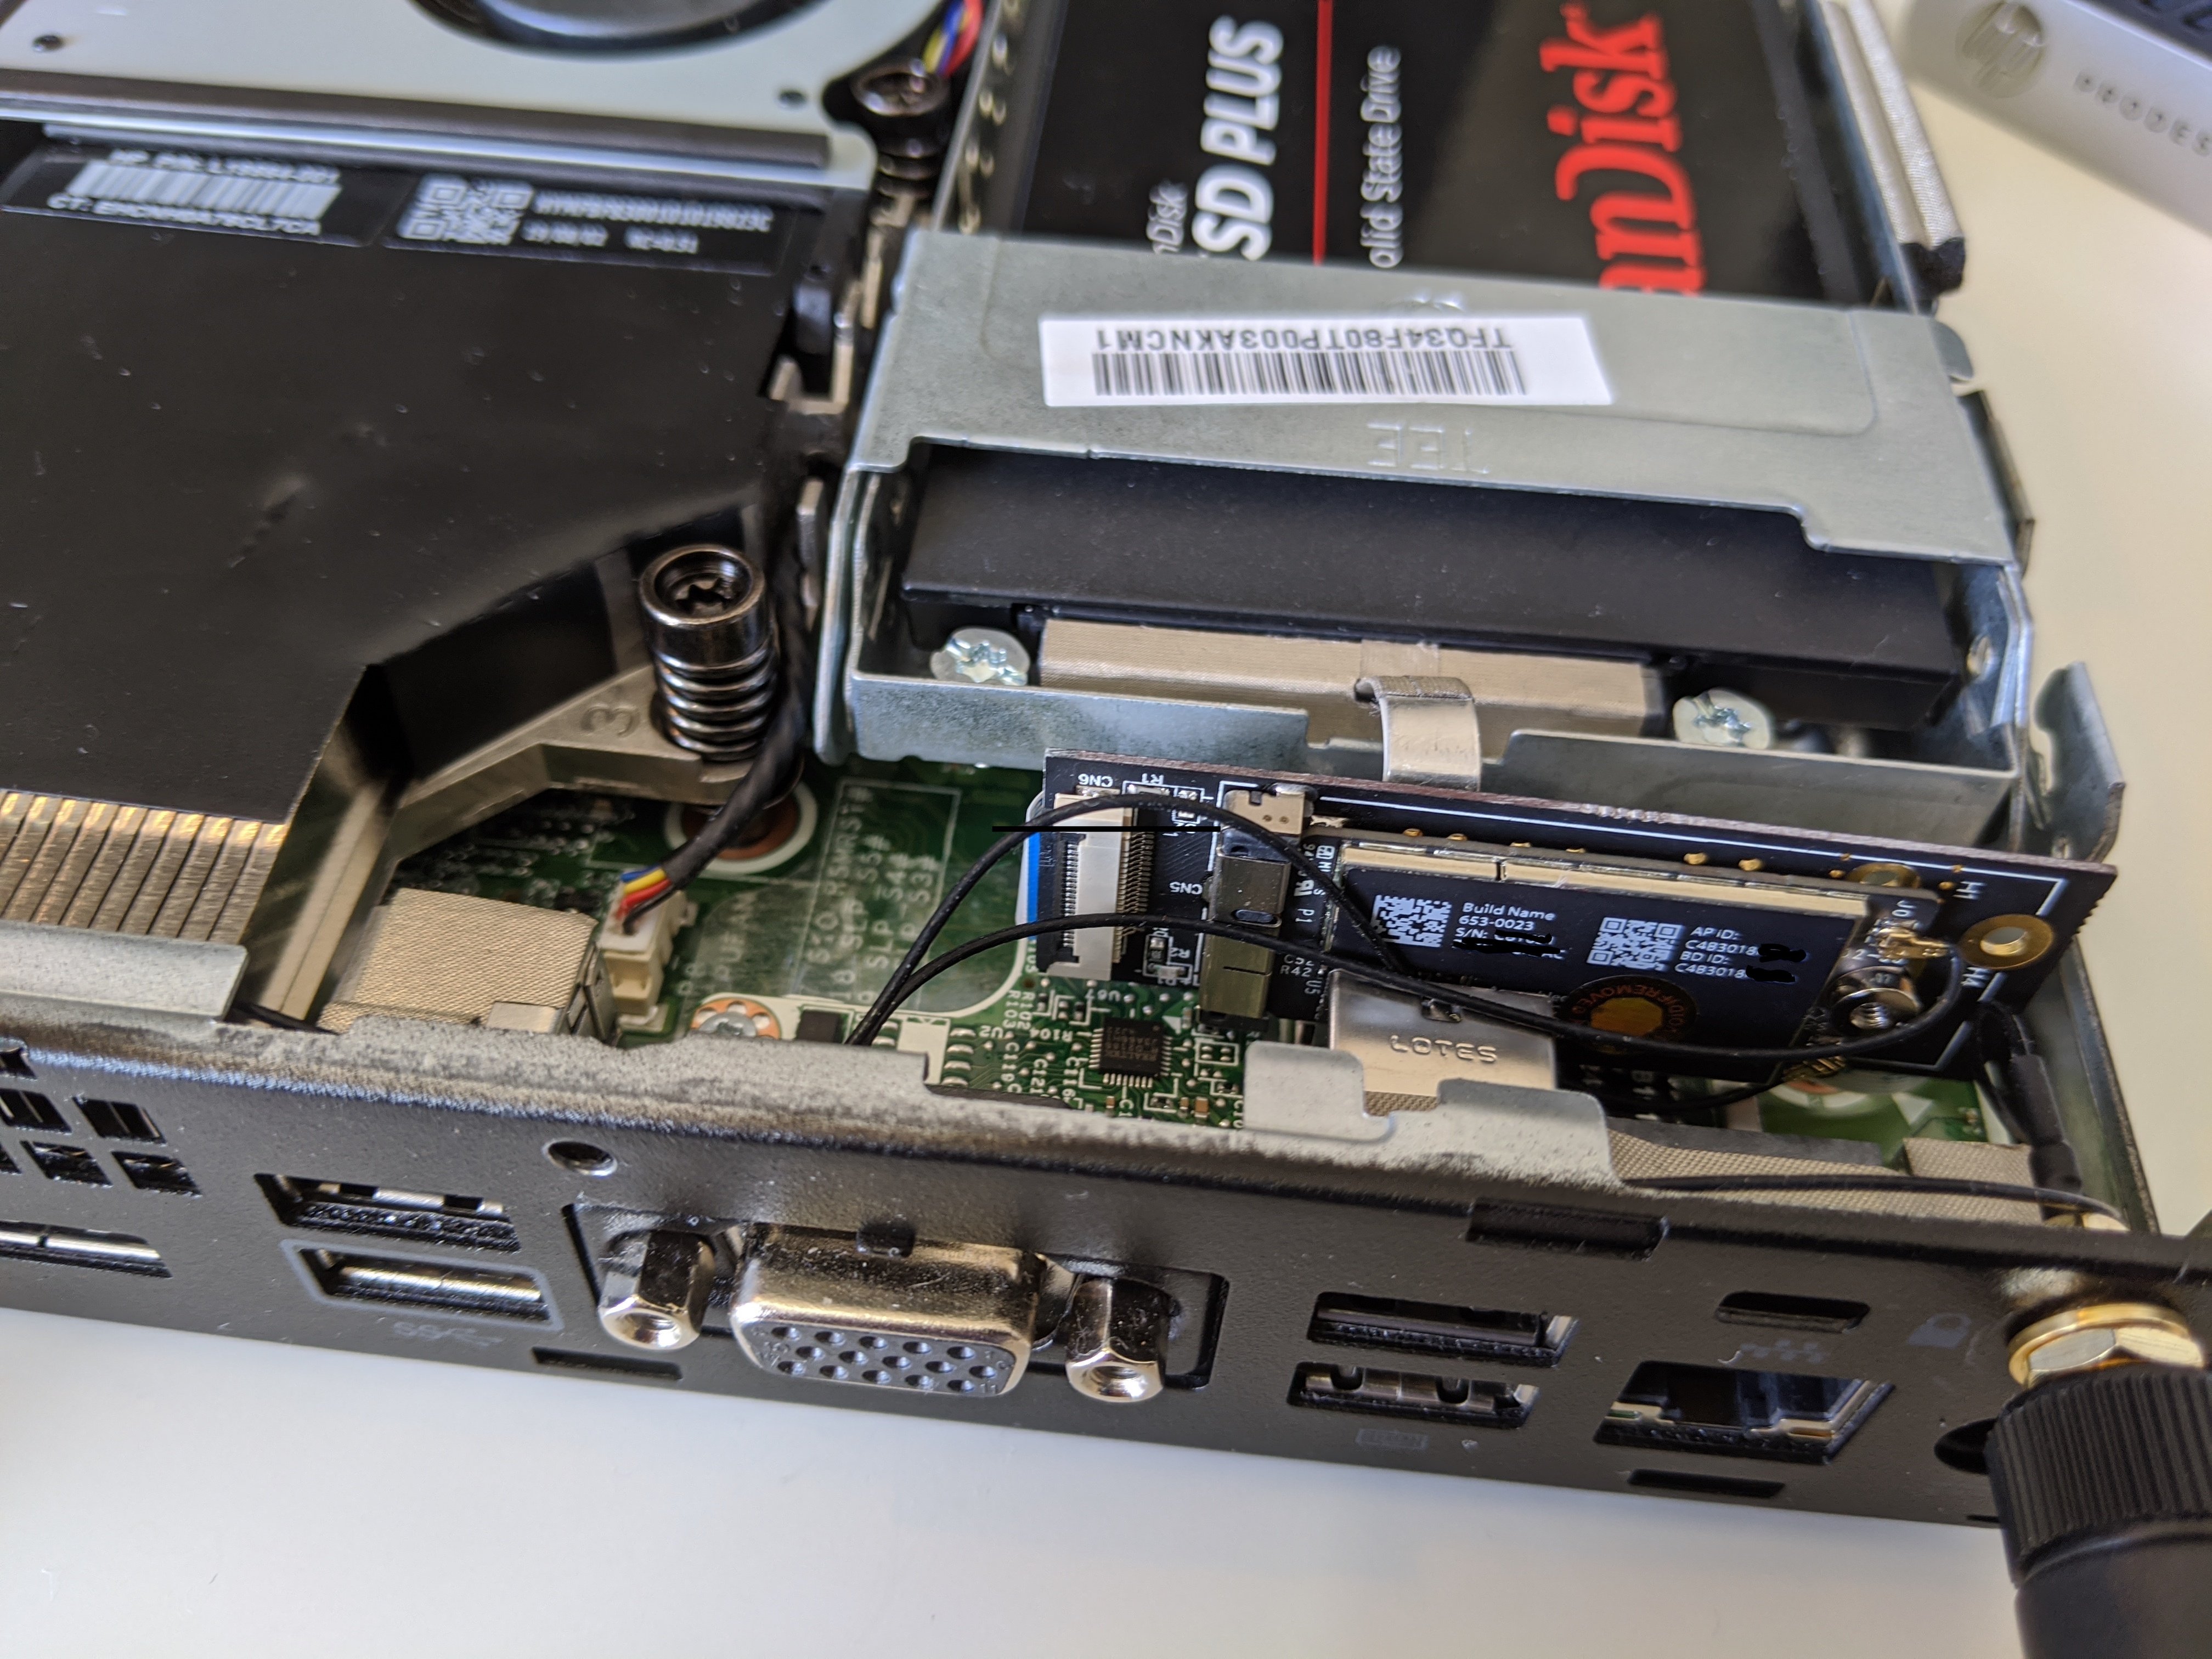
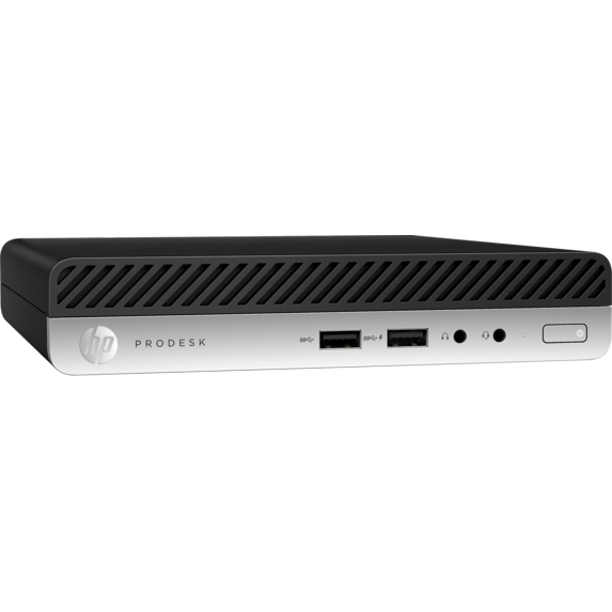
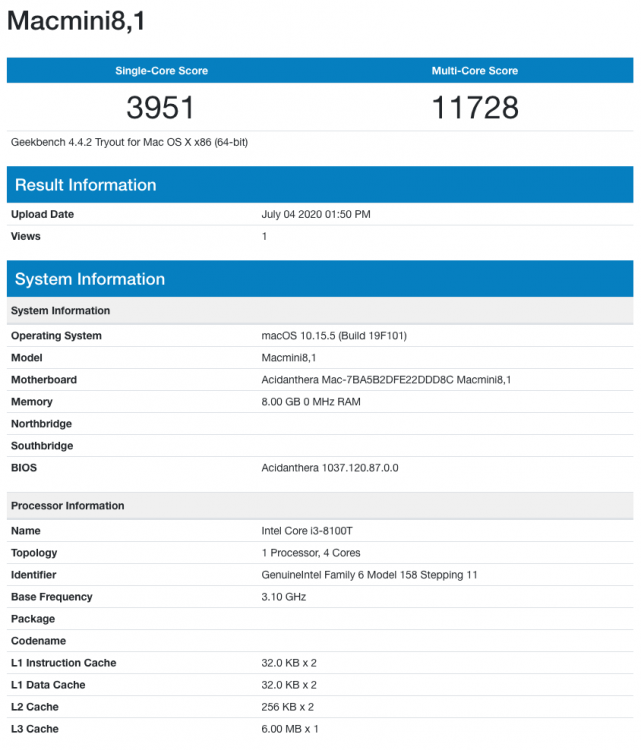
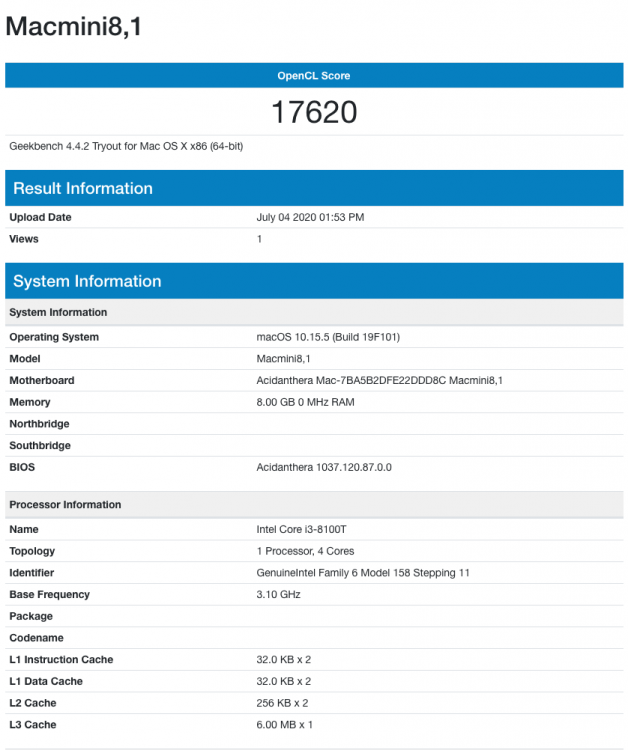
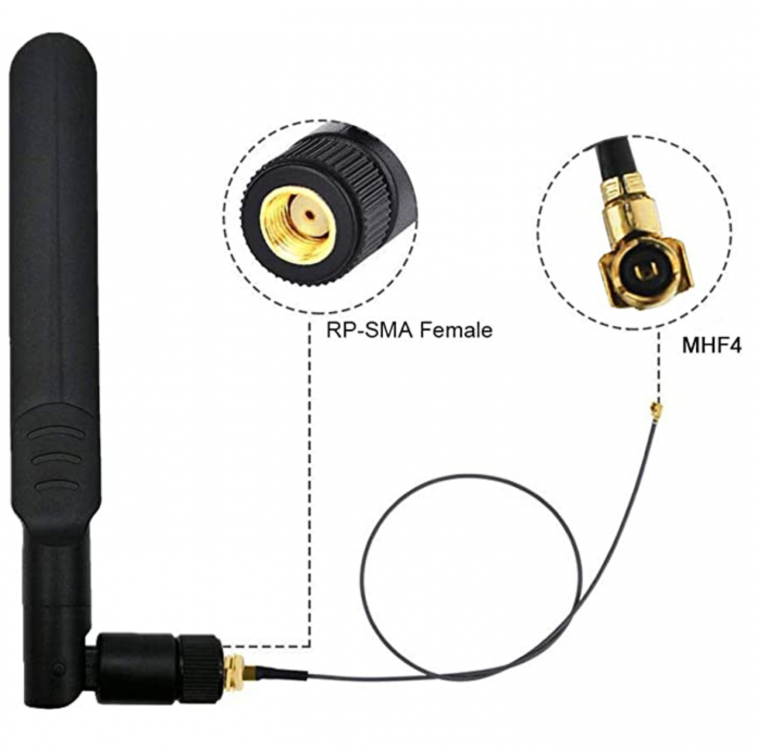
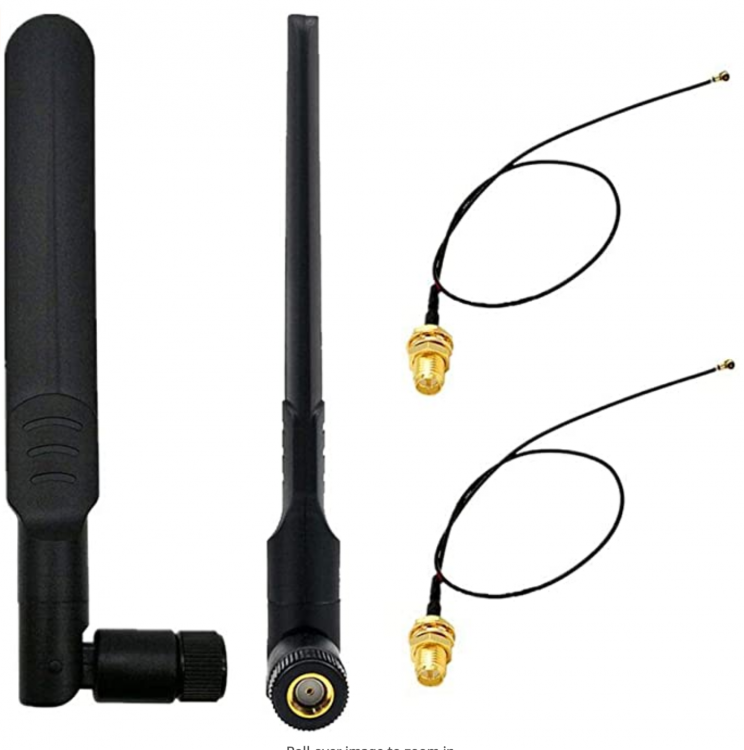
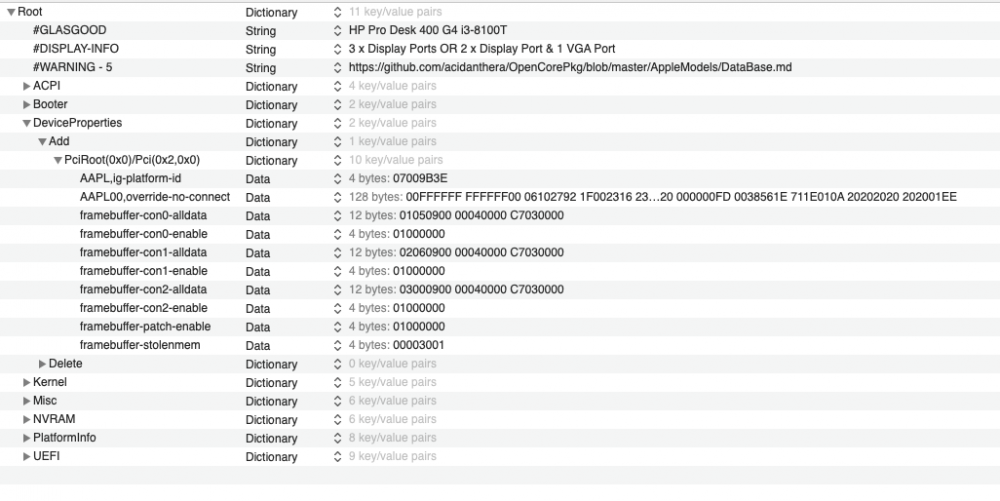
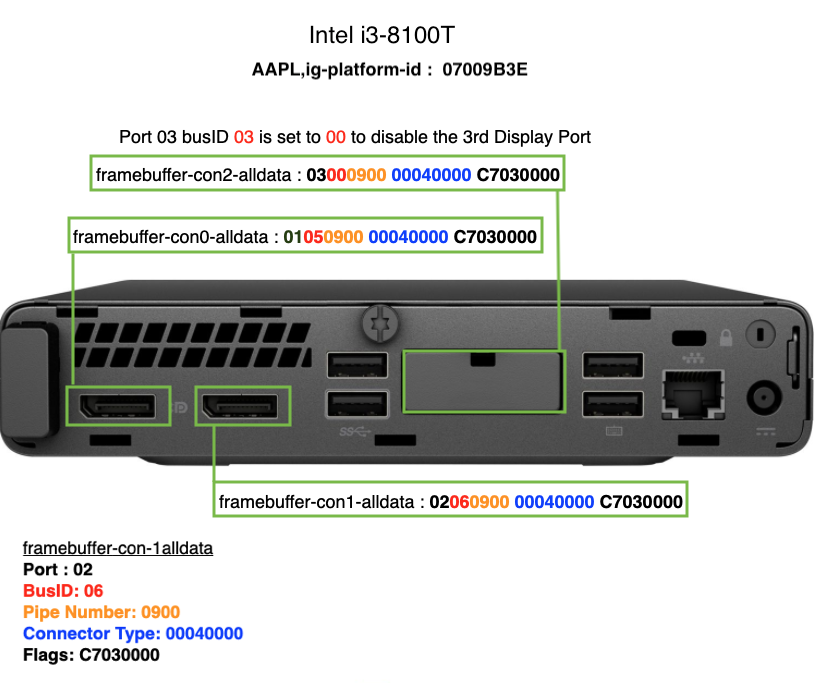
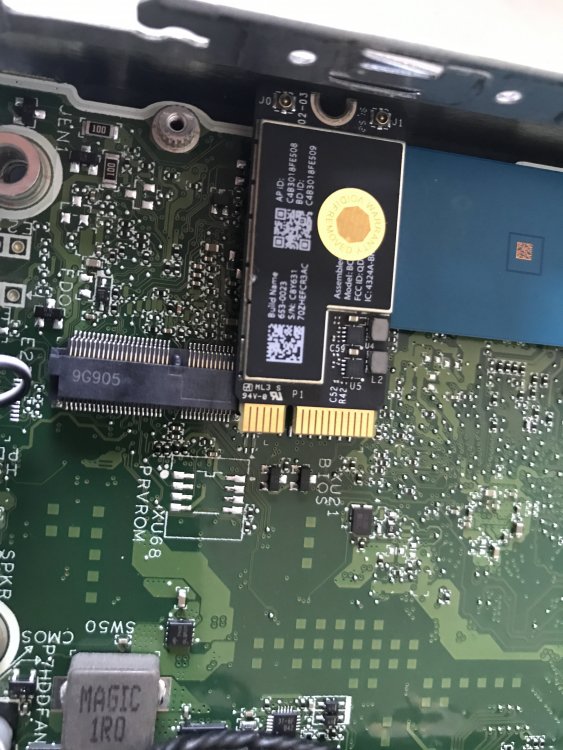
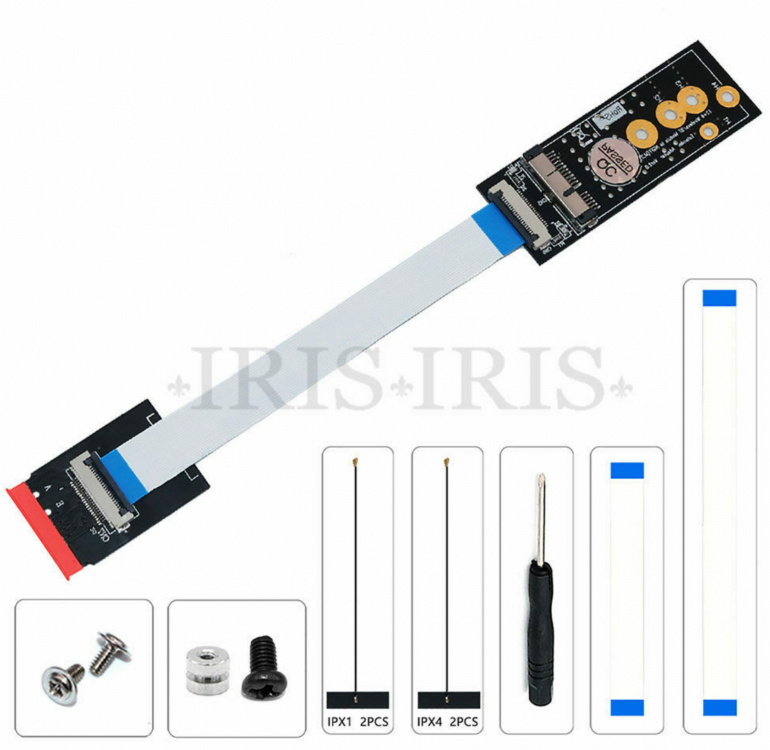
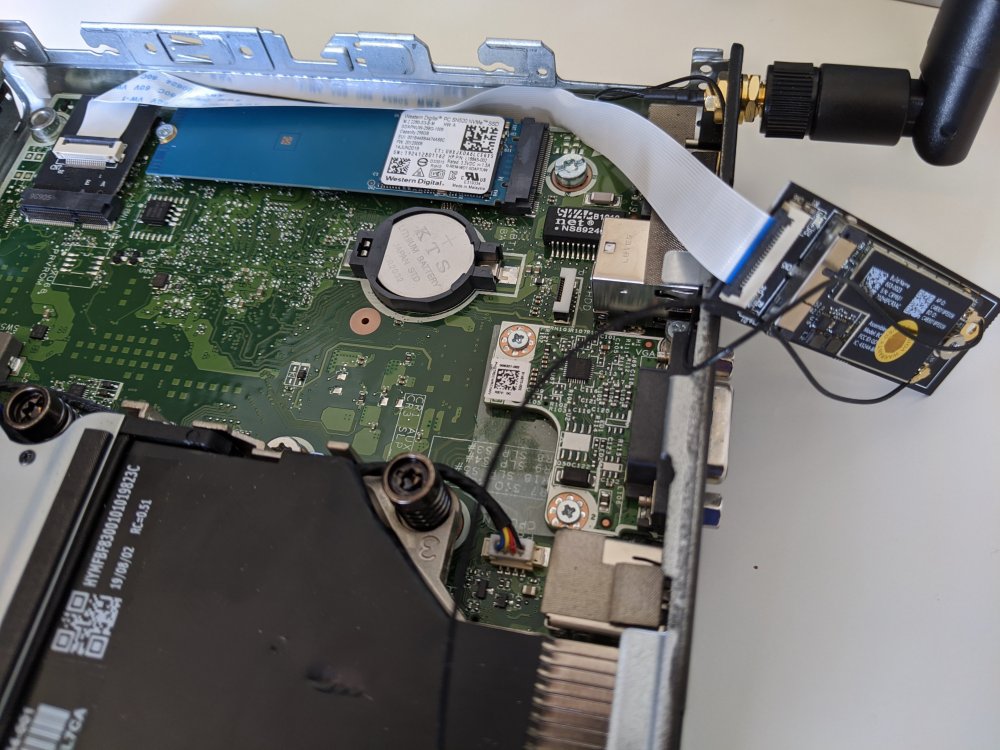
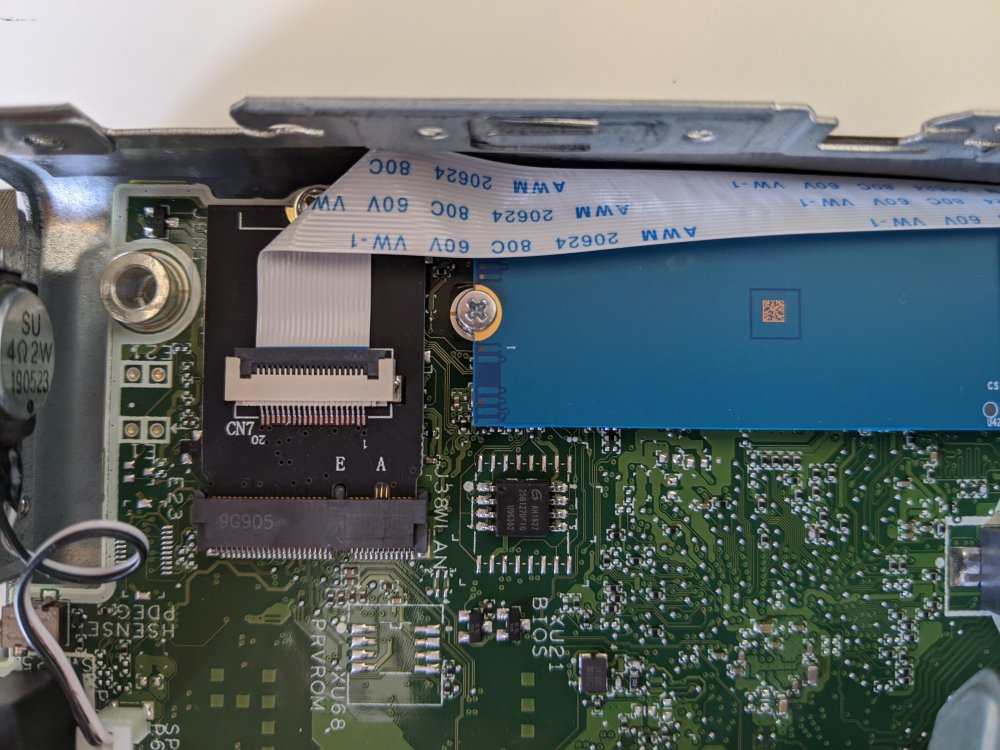
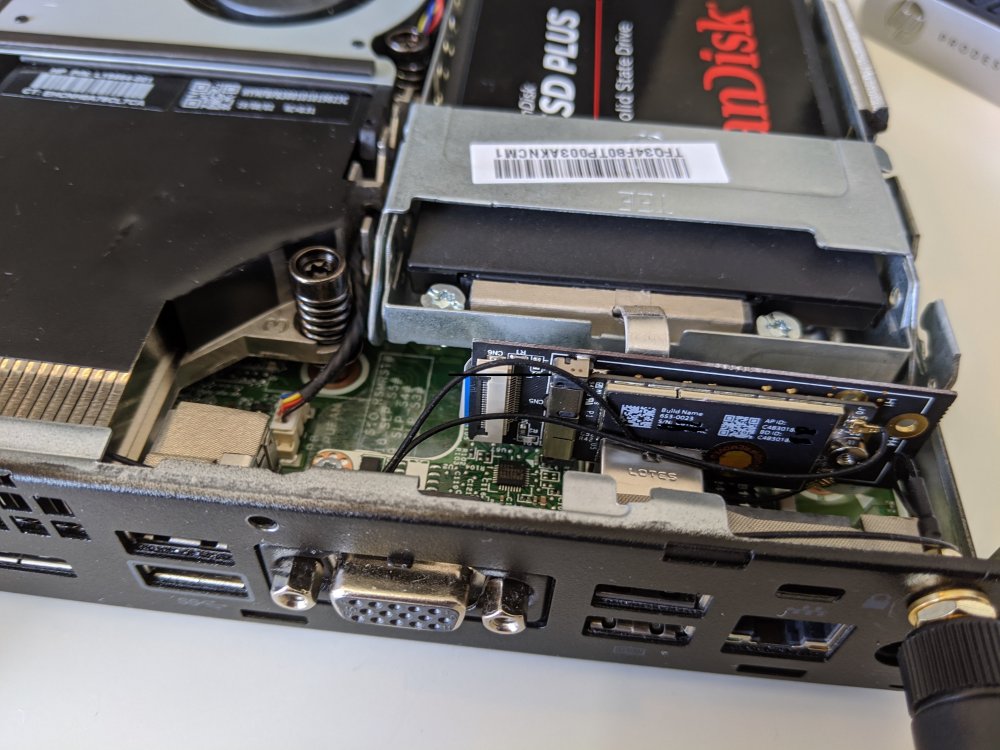
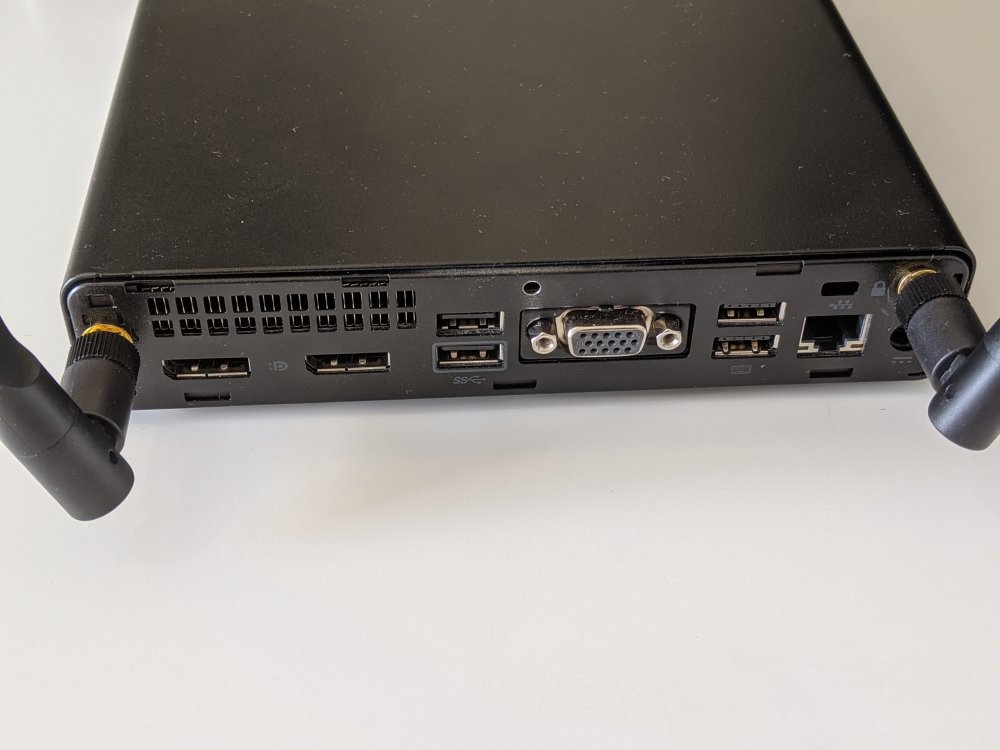
HP ProDesk 400 G4 Mini, MacMini8,1 [macOS Big Sir OpenCore v 0.6.3 EFI HP ProDesk 400 G4] 08/12/20 updated, here it is ==>> OC 063.zip [macOS Catalina OpenCore v 0.5.9 EFI HP ProDesk 400 G4] 07/07/20 updated, here it is 07/07/20 ==>> EFI.zip Just recently purchased this mini pc ( eBay bargain ) as a second machine and was wondering how easily it would be to install macOS Catalina, so I had a look around to see if a EFI existed for the HP ProDesk 400 G4 Mini and I found an excellent guide for the HP EliteDesk 800 G4 that was created by @tonyx86 here at InsanelyMac. By referencing this HP EliteDesk 800 G4 Mini Clover EFI guide I have now created an OpenCore EFI for the HP ProDesk 400 G4 Mini and now attached it to this post. On the surface both machines look very similar, but the HP ProDesk 400 G4 Mini has Intel B360 Chipset and a RTL811HSH-CG Ethernet controller. The HP EliteDesk 800 G4 has a Q370 chipset and uses the Intel 1219LM GbE Ethernet controller and comes with USB type C. I have posted the EFI above, mostly everything is working including iMessages and FaceTime. Please feel free to use this, adapt and share. This most likely will work with the HP EliteDesk 800 G4 too, but will require a custom USBPorts.kext using Hackintool, also RealtekRTL8111.kext would need to be replaced with IntelMausi.kext. System Specifications Intel i3-8100 Graphics Intel UHD 630 8 GB DDR4 RAM Ethernet - Realtek RTL8111HSH-CG Gbe Audio - Conexant CX20632 240GB Sandisk SSD ( macOS Catalina ) 256 GB NVMe SDD ( Windows 10 ) 4 x USB 3.x Ports 2 x USB 2.0 Ports Chipset Intel B360 HP ProDesk 400 G4 Mini PC - 4CZ91ET#ABU Use the BIOS settings from HP ELiteDesk 800 G4 ==> guide WIFI PARTS REQUIRED ADAPTER CARD WITH FLEXIBLE CABLE BCM94360CD/BCM94360CS2/BCM943224PCIEBT2 Card To M.2 Key A/E Cable BCM94360CS2 Genuine WiFi Card 653-0020 Macbook Air 13" A1466 Mid 2013 2017 / Early 2014 2015 Antenna 20cm IPEX to RP-SMA Female Pigtail Cable for NGFF Wireless Card & M.2 (NGFF) DO NOT USE THE NGFF M.2 Key A/E adapter as there is not enough room for this to fit! ( Card can length can't exceed 30mm ) A1398 BCM943602CS BCM94360CS wireless cards to NGFF M.2 Key A/E adapter fo D RC HOW TO INSTALL THE WIFI CARD AND ANTENNA IGPU BUS PATCHING CREDITS OpenCore Developers OpenCore Desktop Guide Insanelymac [GUIDE] Catalina on HP EliteDesk 800 G4 Mini - The perfect MacMini8,1 Hackintosh


 1 point
 -
Testate questi File mettete la patch in configplist e sost. il file CLOVERX64.efi e avviate Big Sur. è consigliato l'uso degli ultimi Driver UEFI . se serve configurare il FILE Plist trovate nella cartella , impostate come avete dettato sul Plist della vostra OC https://github.com/ReddestDream/OcQuirks/releases/tag/23 BigSur Clover KextInjection Package.zip IMG_3807.MOV IMG_3809.MOV Fonte originale https://www.hackintosh-forum.de/forum/thread/49311-macos-11-bigsur-dev-beta-clover-patch/?postID=619527#post619527


 1 point
 -
just update to latest commits and disable NVRAM entries for Kernel Collection Method, also add vsmcgen=1 for stage 3 fix.1 point
-
That's great news, so no more VMware needed for the moment.1 point
-
Glad to hear it.1 point
-
Hi @eSaF, I have it installed, with the MaLd0n method, but I'm trying to see if I can make this method work too. It's a case of much free time and pure curiosity... lol Hi @Pavo, This is good news and it means that it boots the usb install, with nothing installed? Thanks1 point
-
Not quite a 5gigs over clock but I'm happy with it
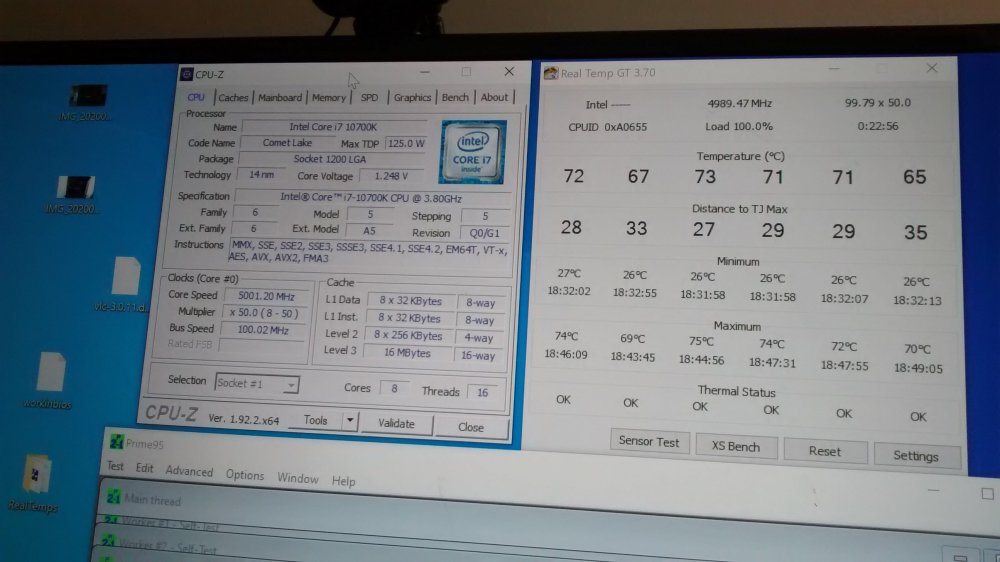 1 point
 -
I built my own version 0.6.0. The change from "Block" to "Delete" to release came in version 0.5.9. Yes some of the config items get changed, added, or removed from version to version so you always should check the differences.pdf. Also, in 0.6.0 there's a command line utility to check validity of your config.plist - it's called ocvalidate. In 0.5.9 it's called ConfigValidity. For both, you pass the path of your config.plist as a parameter.1 point
-
@MacNB May I know the version of OpenCore you use? In your config you use Delete instead of Block so I guess the version is different. From my experience the attribute name can vary from version to version.1 point
-
https://drive.google.com/file/d/1-3q306iSudxj2X5rwiSRGPueEXlfMCUp/view?usp=sharing here you go this opencore efi works on catalina and big sur just double check your bios settings my laptop is a dell latitude e7470 i7 6th gen 520 intel graphics if your laptop has any other type of graphics your going to have to configure that1 point
-
Thank you, @Allan After clean all history in Safari, Max total size again 10Mb1 point
-
@glasgood Excellent work! I'm glad my HP EliteDesk 800 G4 Mini guide helped you! You just may inspire me to learn and create an OC solution for my rig. Nice job!1 point
-
You can’t use spaces like that in terminal commands. Try Big\ Sur Sent from my iPhone using Tapatalk1 point
-
We have a WIFI Realtek for Big Sur with OpenCore Drivers for Realtek 802.11n and 802.11ac USB Wi-Fi adapters Check this out ☞ Wireless USB OC Big Sur Adapter1 point
-
I have used Alpine Ridge TB3 card and according to the old iMac2017 TB3 information to create a SSDT hope that someone can use on ;The only supports Alpine Ridge TB3 card。 SSDT-Thunder-C422-GC-APLNE-Slot-3.aml1 point
-
Thank you VERY much for your work on a Sunday morning, it works straight away with and without my Clover injection! First, I replaced the kext in Clover/Other and booted, while keeping the existing device-properties injected; booted OK sans KP. Then, I removed the device-properties completely, and booted again without issues. Works great for PCI ID 14e4:43a3 and subsystem ID 17aa:075a as ASPM is shown disabled in Hackintool, I also see pci-aspm-default set to 0 in IORegistryExplorer. I will keep testing the beta kext for stability checking. Currently, CPU idle utilisation seems as low as before. I hope this code-fix will make it to the official release! Here is my kernel output since boot time and attaching a screenshot of IORegistry Explorer for renamed device ARPT. Merci, thank you, gracias, Danke, graze, Спасибо, ευχαριστώ. BCM4350.log
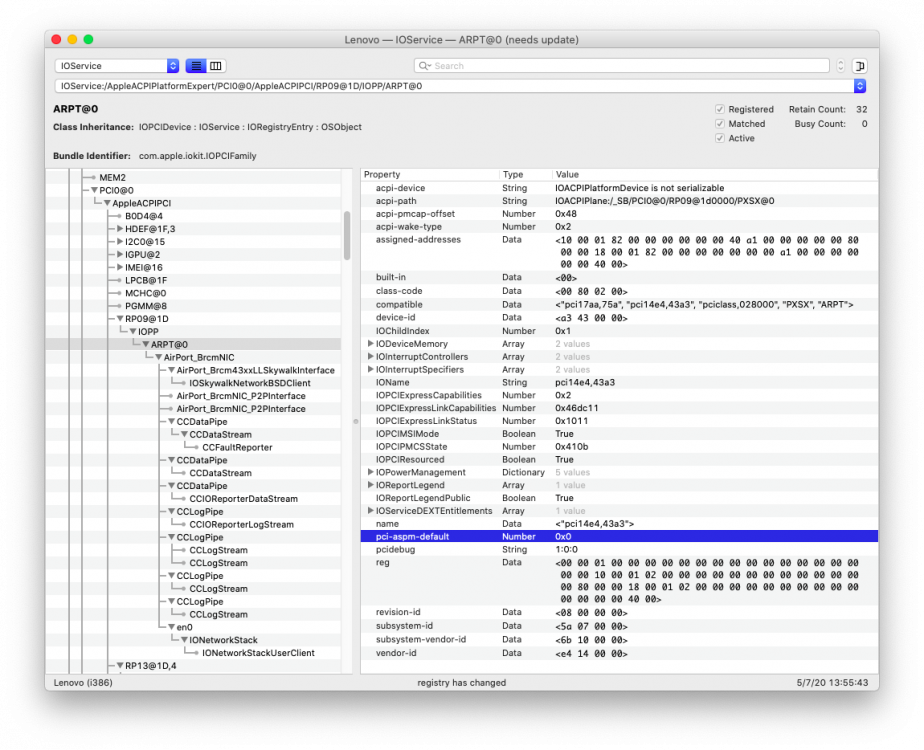 1 point
 -
Big Sur cannot be vanilla installed directly to a hdd/ssd yet (correct me if I’m wrong) still waiting for devs to come up with a work around. To test Big Sur you must use the VM method. Sent from my iPhone using Tapatalk1 point
-
Are you able to see the volumes on a TB connected drive in the UEFI shell ? If not perhaps you need drivers ? If it does show it could be you need to tweak what devices OC scans1 point
-
@MacKonsti: if (vendorID == 0x14e4 && deviceID == 0x43a3 && subSystemVendorID != 0x106b)1 point
-
1 point
-
It has been down in the latest commit, you can also test it with attached debug kext. AirportBrcmFixup-2.0.8-DEBUG.zip It was a bit harder than just setting pci-aspm-default to 0, since it is too late and PCI bus is already initialised by this moment (AirportBrcmFixup start) with non-zero ASPM. So, I had to call pciDevice->setASPMState(provider, 0) explicitly.1 point
-
How did you fix the black screen with just the mouse cruser? share your efi ?1 point
-
Thank you very much! I guess about the 2nd point, I didn't show my Apple id, just my name and many people are there with my name so I hope no problem. If I replace the video now I will have views problem, slowly this time due to god's grace I have 175+ views! Thanks anyhow for your support and help!1 point
-
Hi @Manas Malla. The video was great. Just three considerations: 1 - Don't need to be Apple Developer do download de Beta (see instructions on first post) 2 - Remove/hide your Apple ID or Apple can strike and suspended your developer account. 3 - I had to watch it very quickly and from what I understand you didn't copy the OC to the EFI of this HD after installation because you already had it on your boot disk. But I think it is ideal to include this extra step for those who are literally replacing the current disc with the new one running Big Sur. What do you think? Makes sense?1 point
-
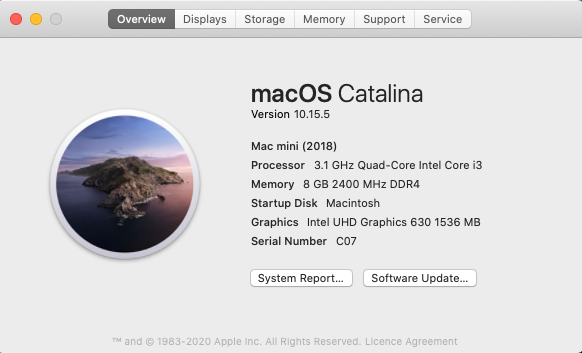
I Now Have internet working only from wifi but its cool for now. and sound via DESPLY port it a good start thanks for all you encouragement and help @eSaF Just updated to 10.15.5 and iMac shows up now
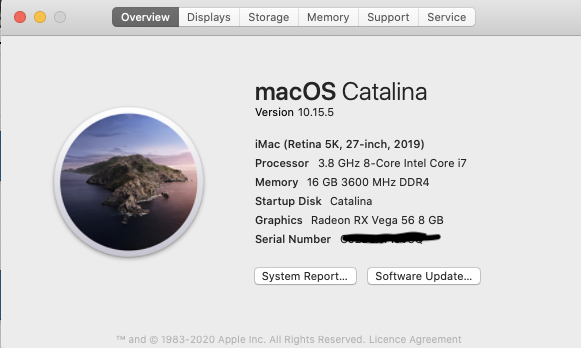 1 point
 -
First of all, I would Like to thank ludufre, for sharing his knowledge on how to install Big Sur update Now that I have had time to play around with Big Su. Setup CPU: Intel i7 9700k RAM: Corsair Vengeance RGB PRO 32 GB (4 x 8 GB) Motherboard: Gigabyte Z390 AORUS ULTRA Ethernet: Intel 1219V7 PCI Express Gigabyte Ethernet Graphics Card: Radeon RX 5700 XT 8 GB WIFI/BT Card: Fenvi FV-HB1200 SMBIOS: iMacPro1,1 Working Ethernet Onboard Audio Sleep/Wake Hand-off iMessage App Store Unlock with Apple Watch Handoff Bluetooth & Wi-Fi [Fenvi FV-HB1200 ] Airdrop AirPlay Continuity iTunes Movies Apple TV+ Power Nap1 point
-
@Milone Here it is. Sorry for the delay. I didn't progress much since the last update. I put it on the cloud as it is more than 10MB. I scrubbed some information like serial numbers and UUID, because I think you can use your own. Please share your progress here, 2 heads are better than 1 OpenCore 0.5.8 EFI folder https://app.box.com/s/p734usv9f7bd3f2dx42n7wkjjre5852u1 point
-
@ludufre thanks! I will test them now. - Ok the two Kext provided work and now my computer is working like it did under Catalina.1 point
-
Compiled with latest Lilu from repository. I think you'll need both kexts atatcheds. Arquivo Comprimido.zip1 point
-
My DW1560 have the same issue. I believe only native WifiCards+BT will work. The negotiation to activate Personal Access between macOS and iPhone is carried out via bluetooth. So it is related... :)1 point
-
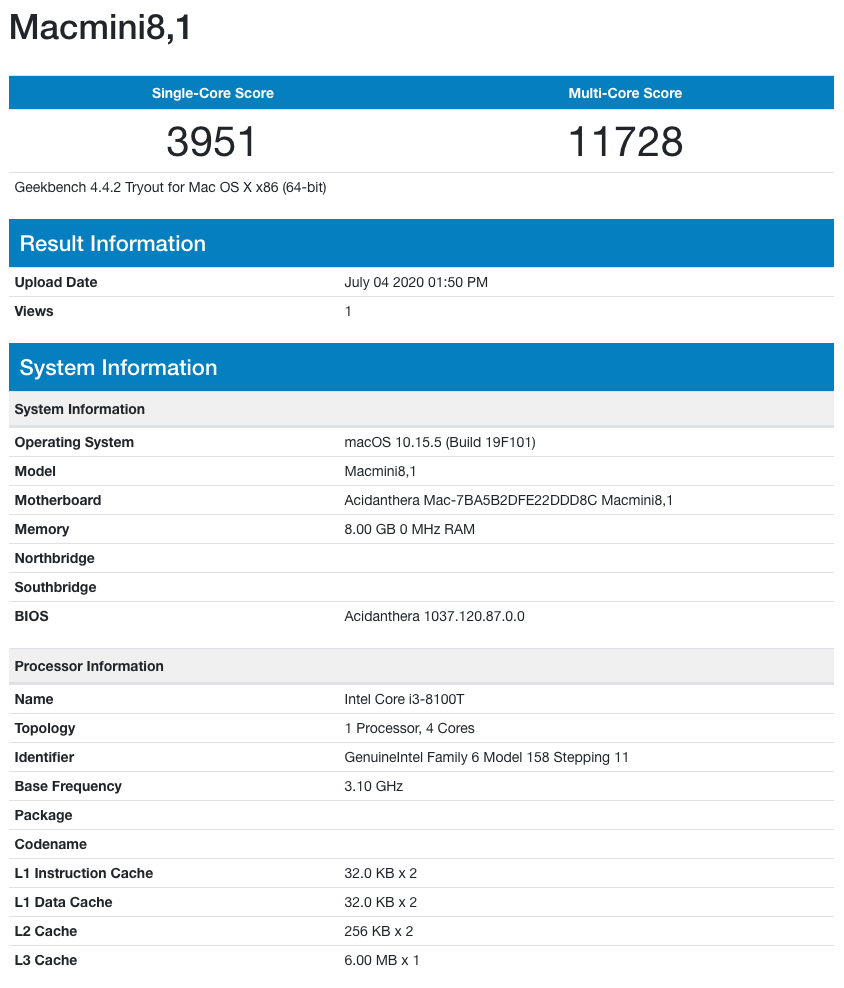
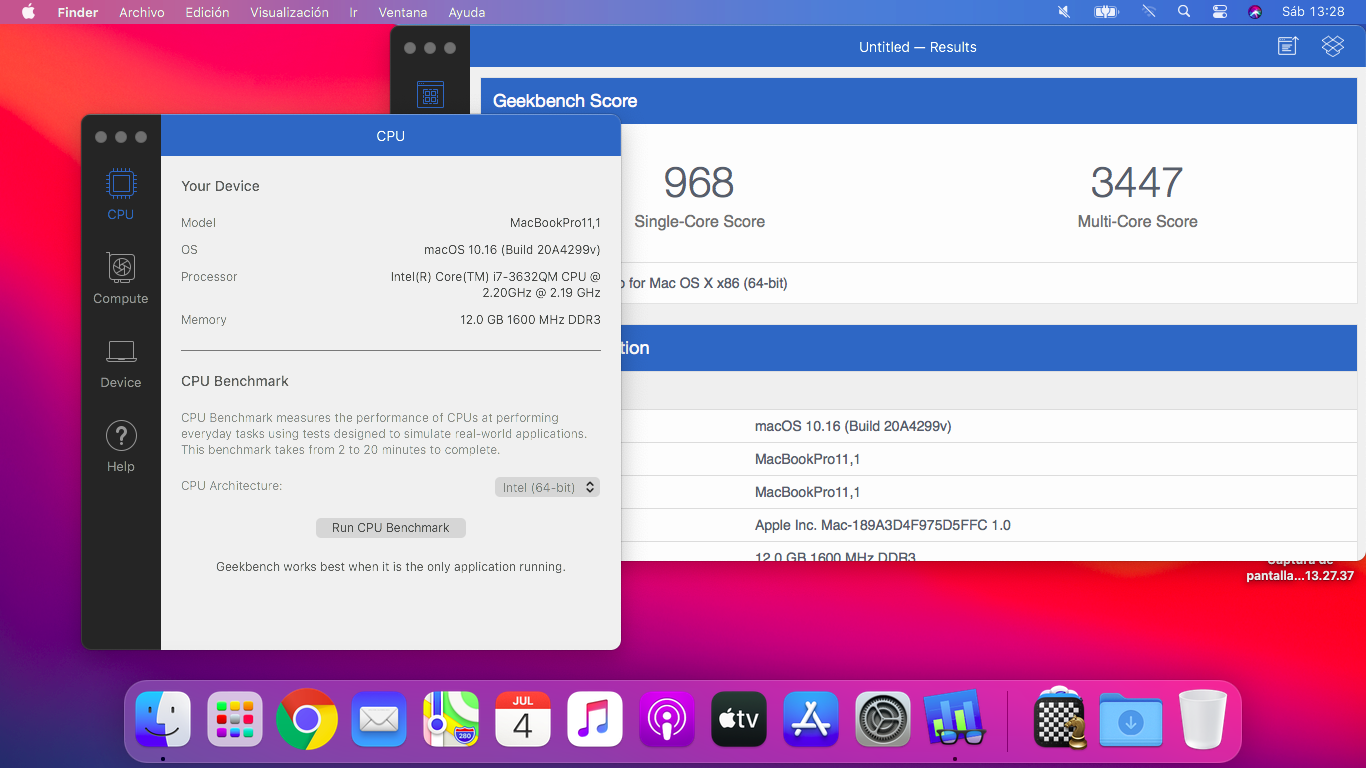
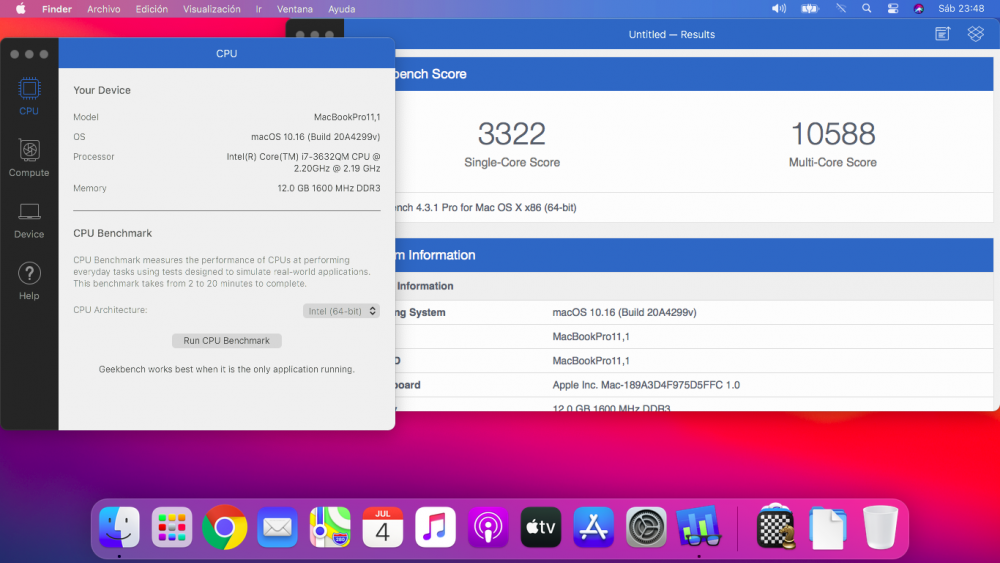
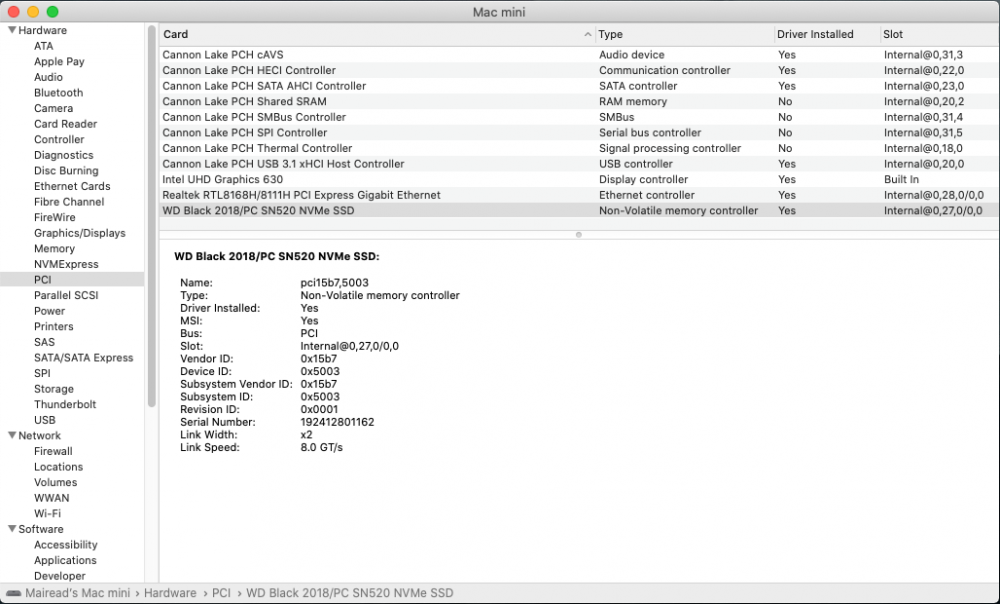
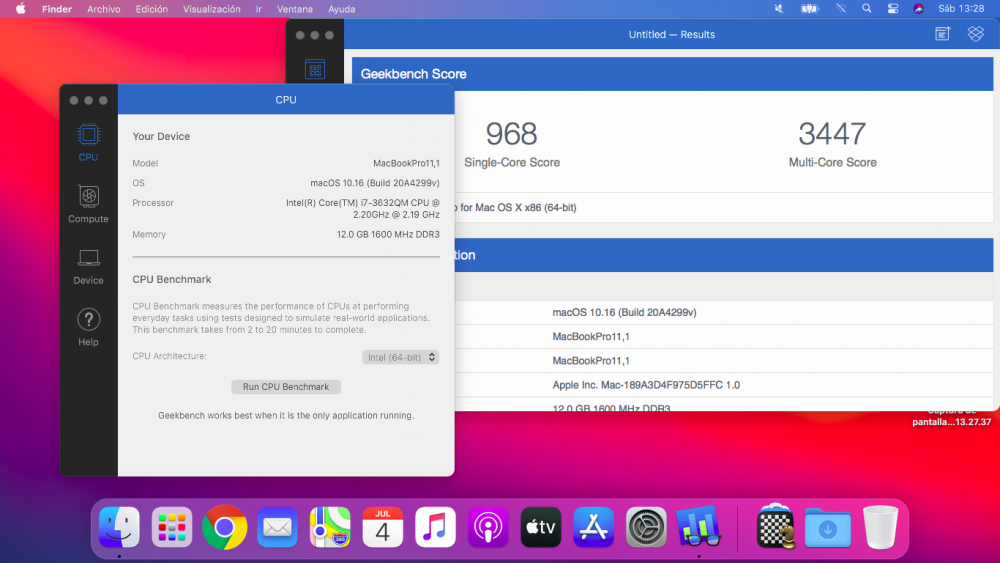
Hey Guys, finally I´m able to install macOS Big Sur through VmWare Fusion and boot up in one of my systems, is an HP EliteBook 2570P, which has an Intel Core i7-3632QM, 12 GB RAM DDR3L 1600 MHz, x2 SSD Kingston UV400 240 GB, and the HD4000 as IGPU, only remains audio and Wifi, I will see later, but the problem I´m experiencing is that in Big Sur the performance is very poor, than in Catalina, here I attach 2 pictures of Geekbench in Catalina and Big Sur, and there is 7.000 points of difference. I don´t know what is the cause. Thanks for your help. EFI_2570P_Clover_Big_Sur_V2.zip
 1 point
 -
Compare your config.plist kernel to patch and your quirks.plist with the attached. Plists.zip1 point
-
Thanks for the guide , works fine on my test X299 build.1 point
-
En 2020 mon petit sx79r5 a été modernisé ce matin et tourne sur mac osx Catalina version 10.15.6 Beta. la gestion du chipset usb3 d'origine ASMEDIA n'est pas stable. un petit adaptateur mini pci express vers usb3 fera l'affaire... belle durée de vie quand même ! On se retrouve quand j'aurai installé BIG SUR... les retraités ont du temps devant eux...1 point
-
Anyone wanting to boot an existing Big Sur install with Clover can do it now. Necessary files have been published and it got a little easier: https://www.hackintosh-forum.de/forum/thread/49311-macos-11-bigsur-dev-beta-clover-patch/?postID=619527#post619527 Make sure you have Big Sur already installed on your drive (Installer not working yet!) Use the Clover build attached to the post linked above Paste the kernel patches inside your config.plist Use latest OcQuirks, otherwise it won't boot If you don't know how to use that stuff, it isn't for you.1 point
-
What is the MaLdOn workaround? Sent from my iPhone using Tapatalk What is the MaLdOn workaround? Sent from my iPhone using Tapatalk1 point
-
I fixed it by downloading the kext from this place: https://github.com/the-darkvoid/XPS9360-macOS/issues/1401 point