Leaderboard


Popular Content
Showing content with the highest reputation on 07/04/2020 in all areas
-
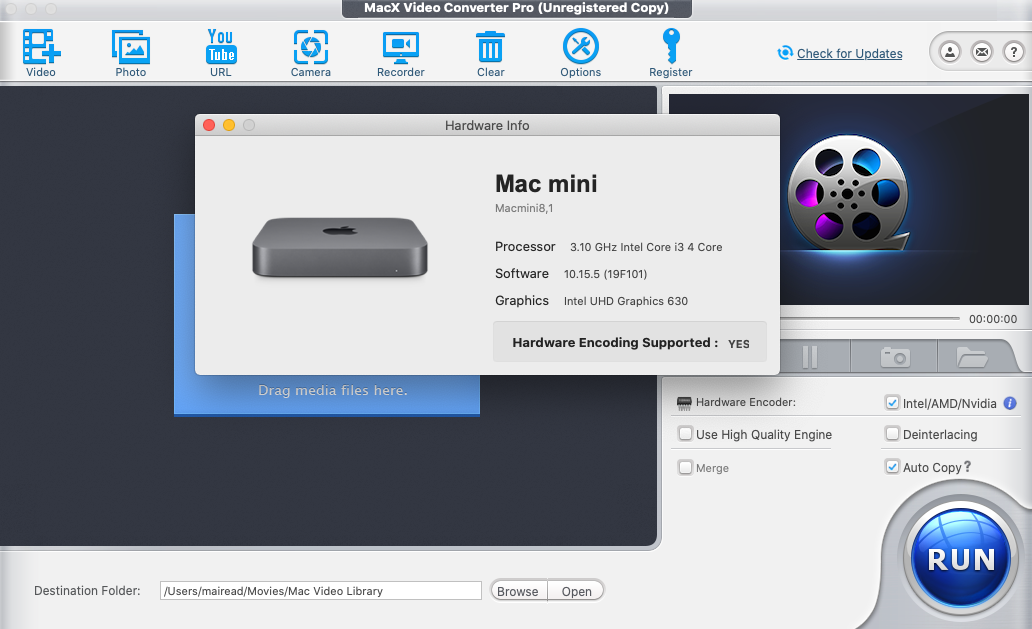
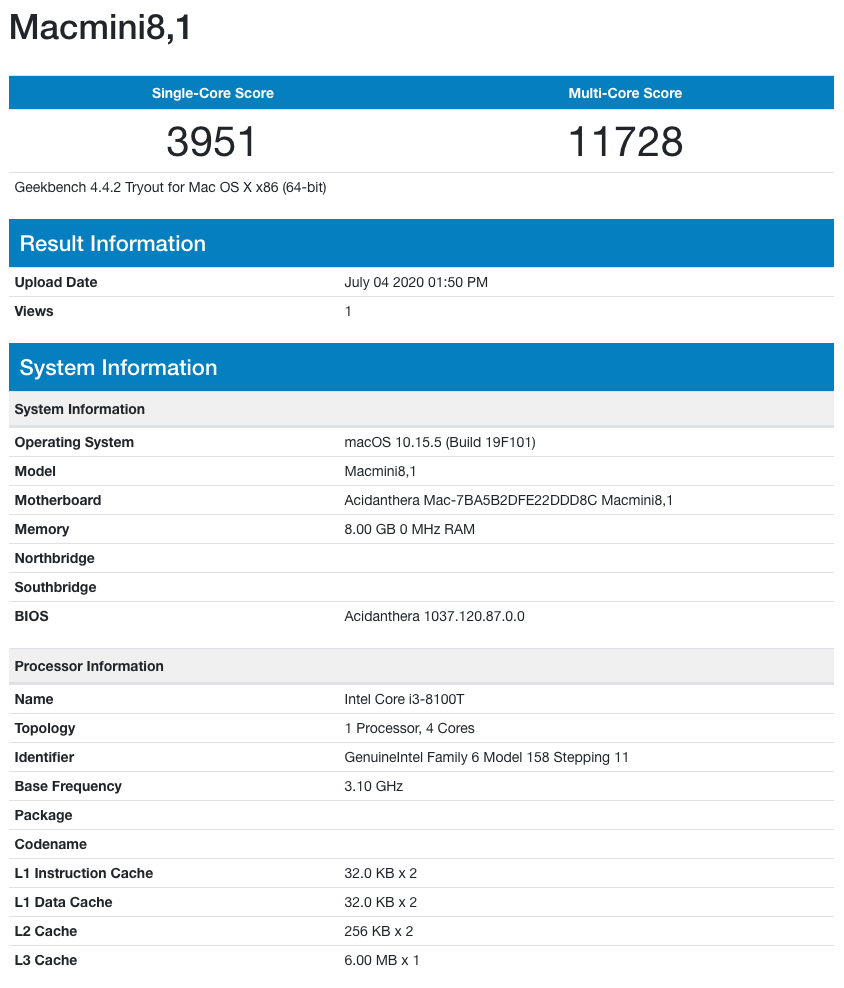
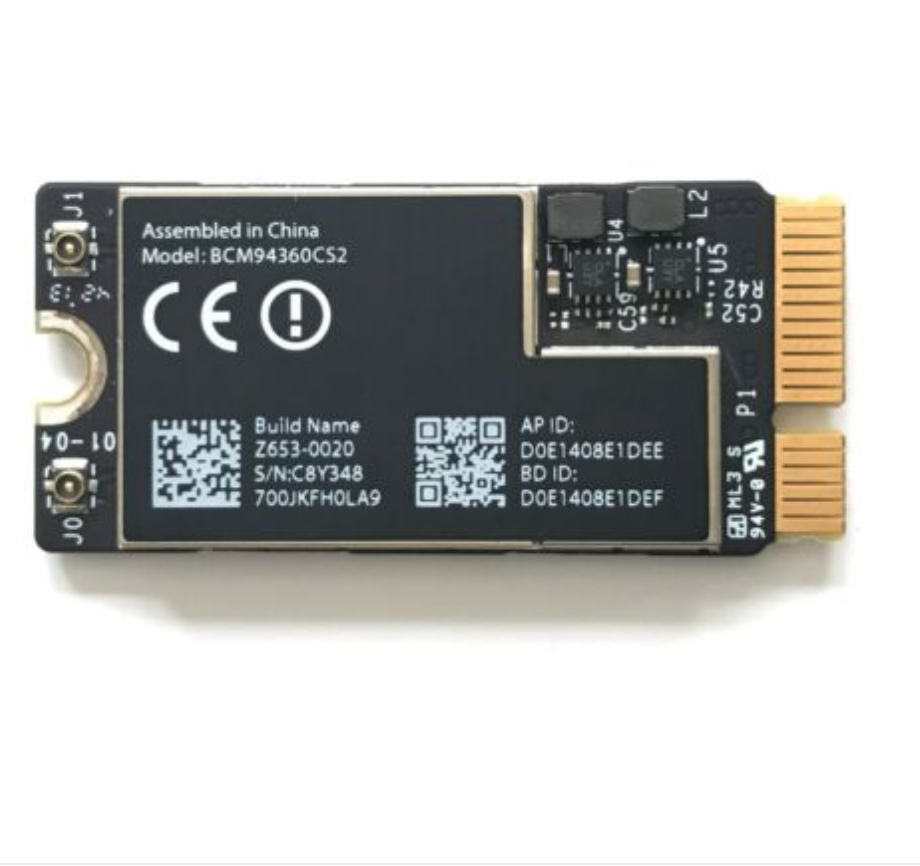
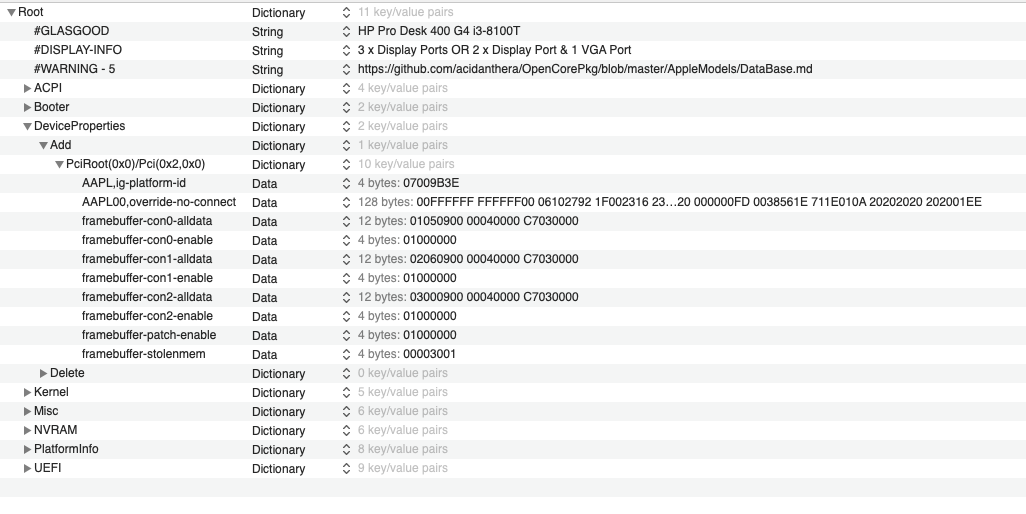
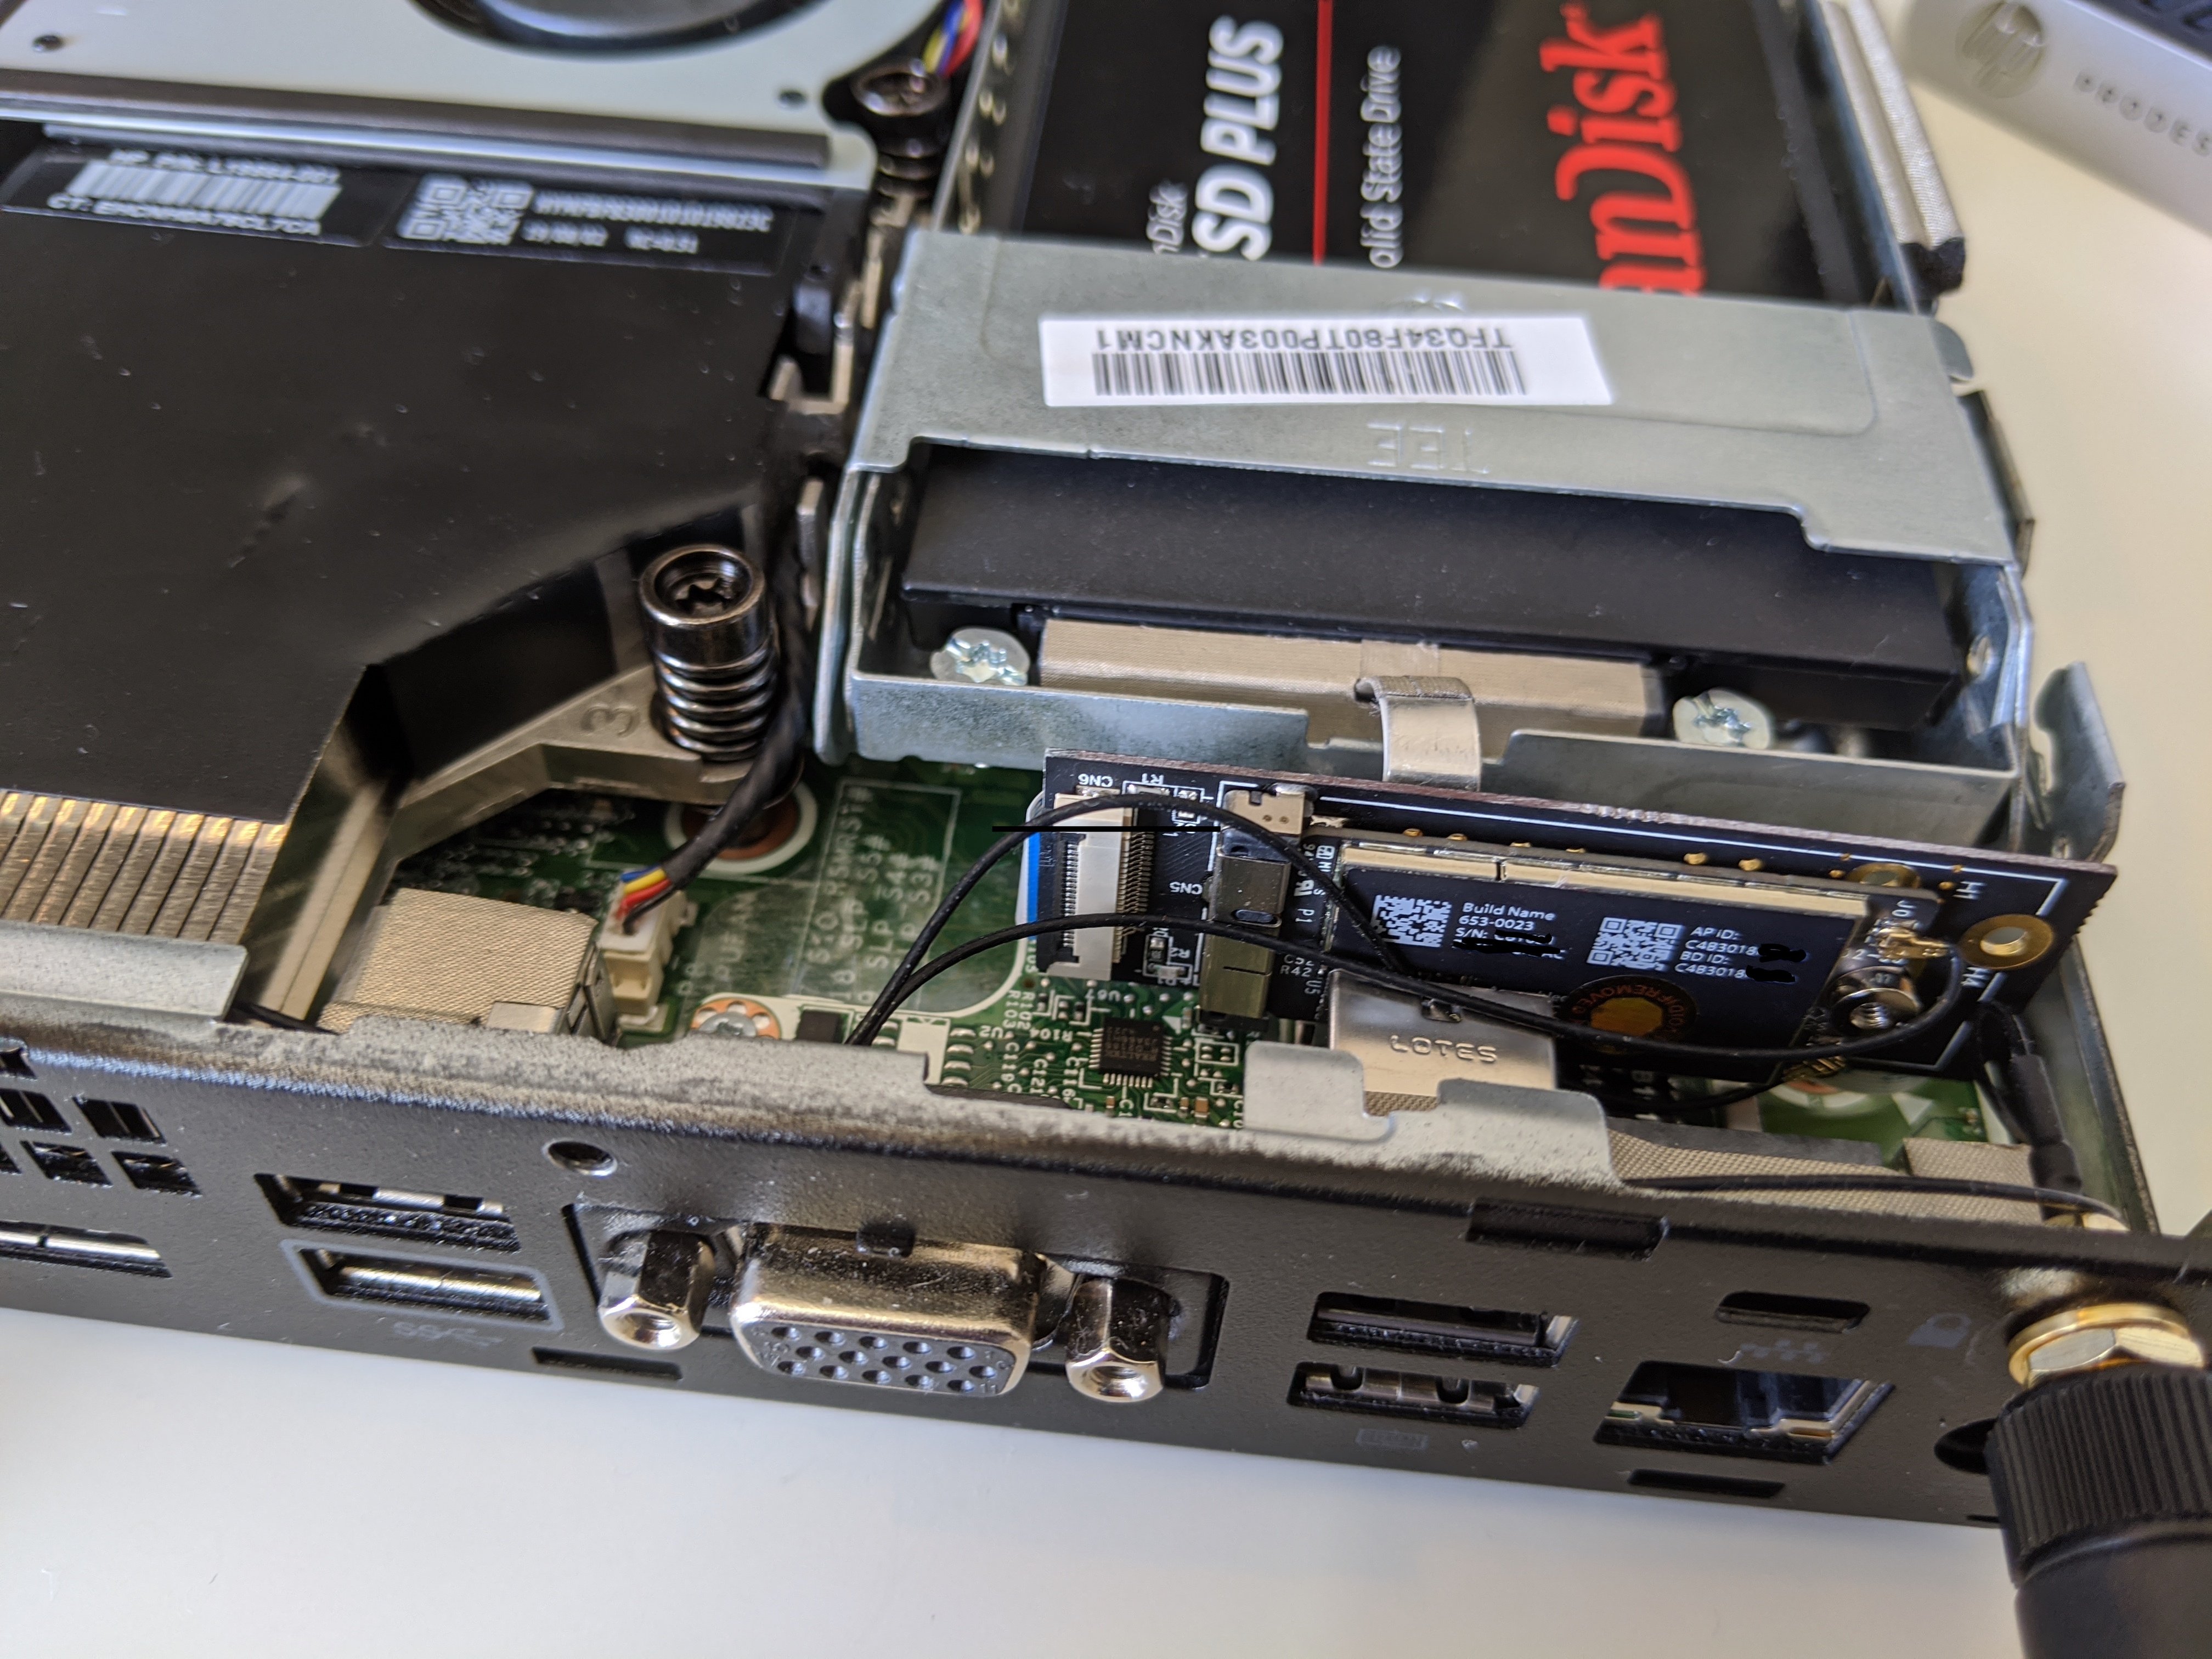
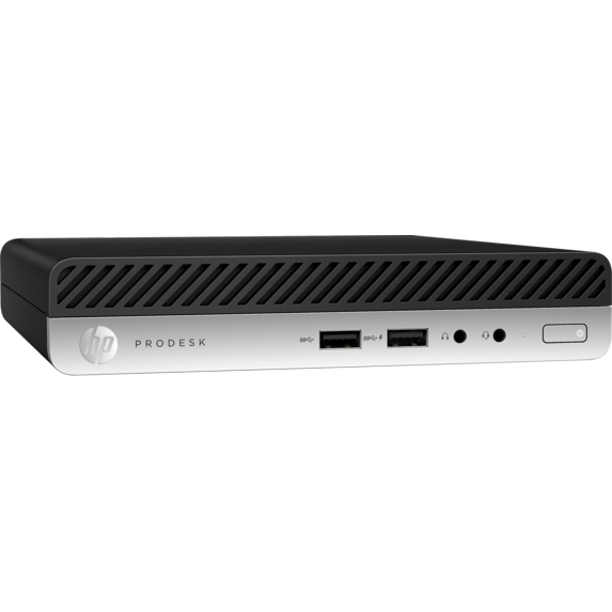
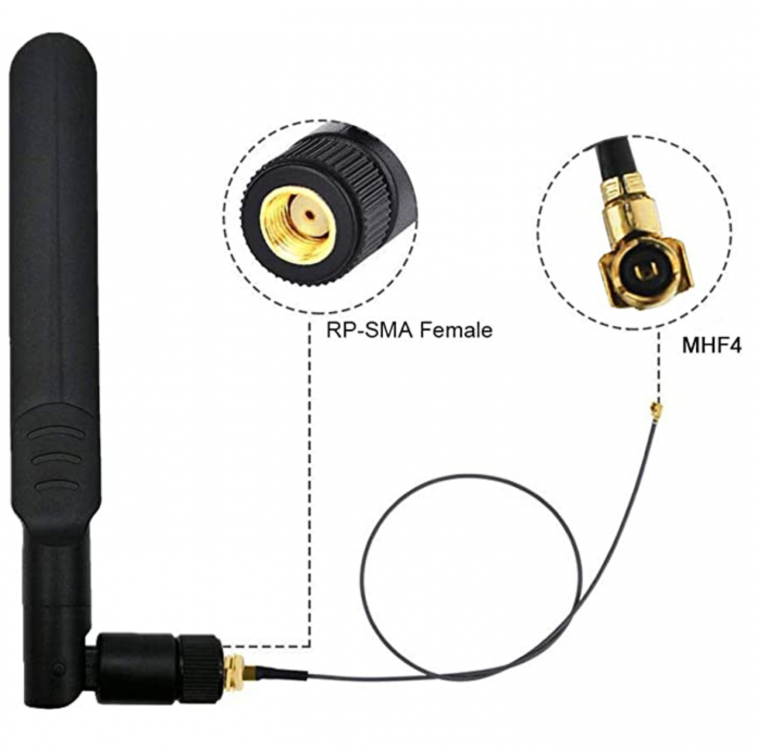
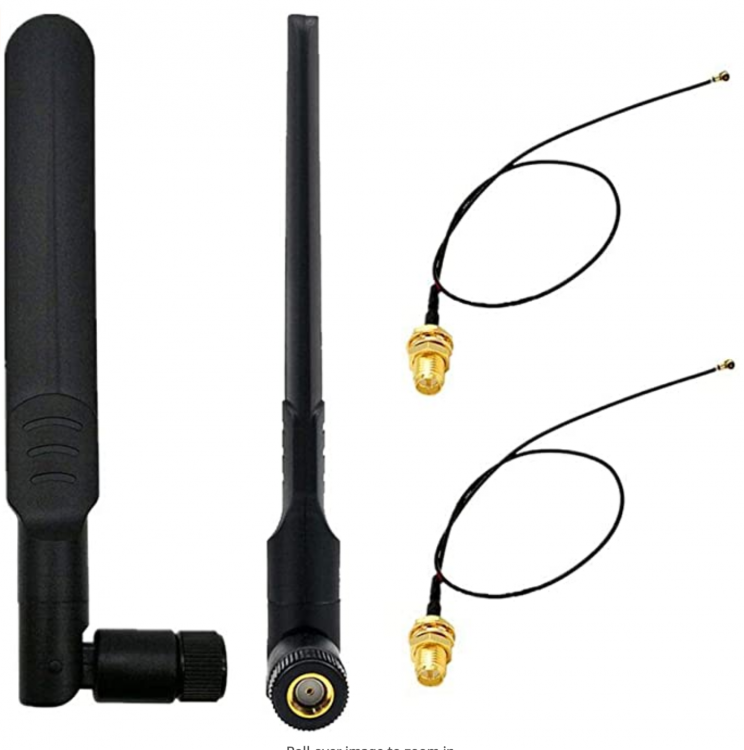
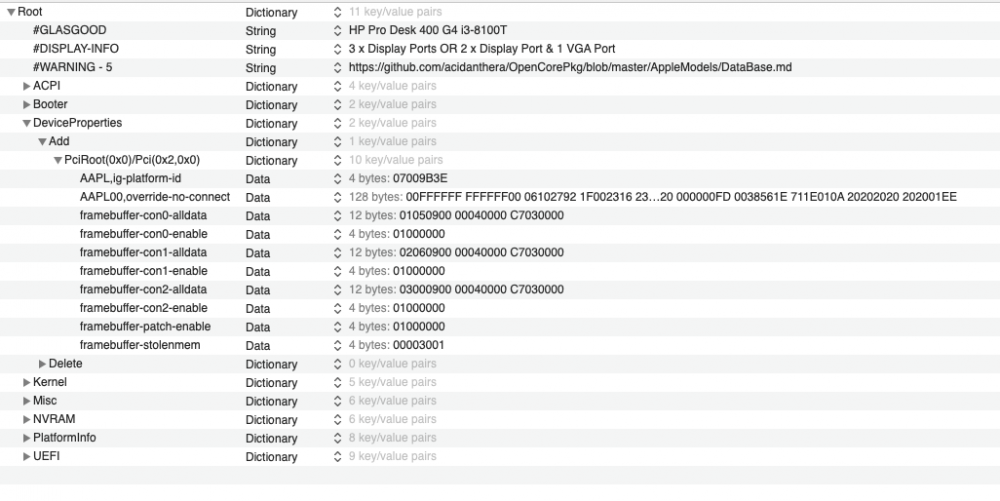
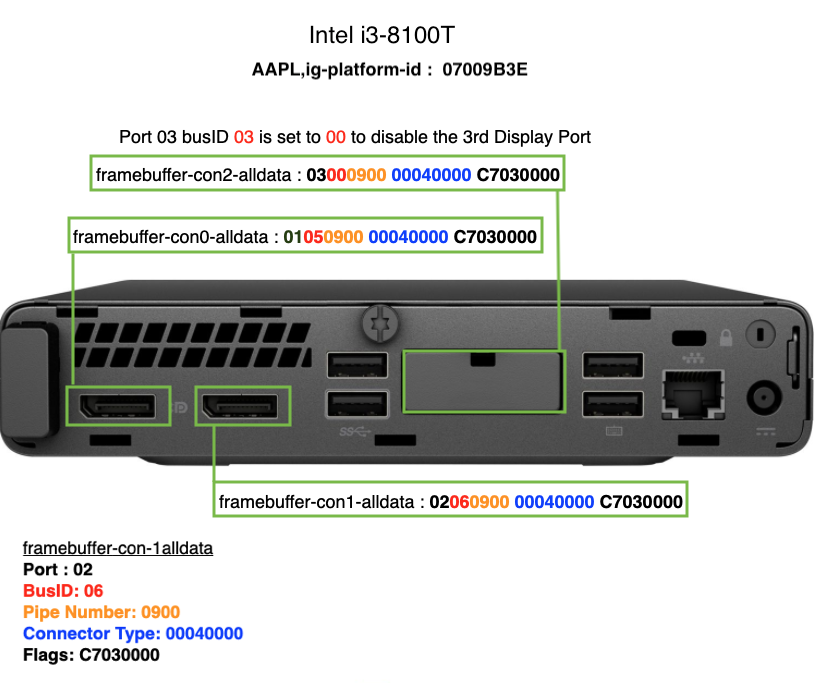
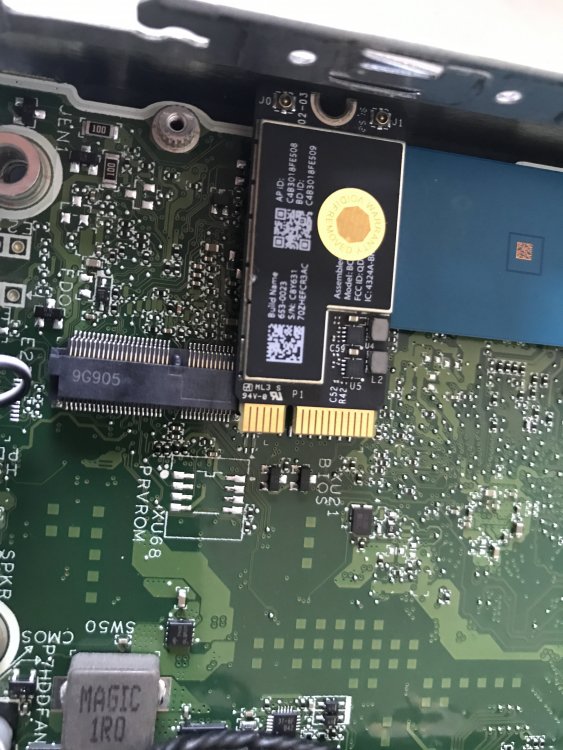
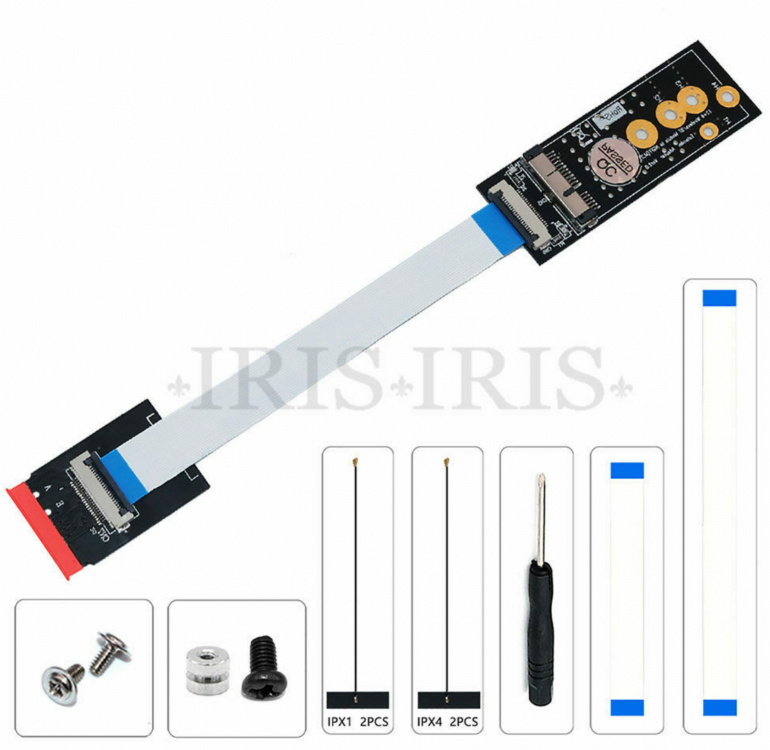
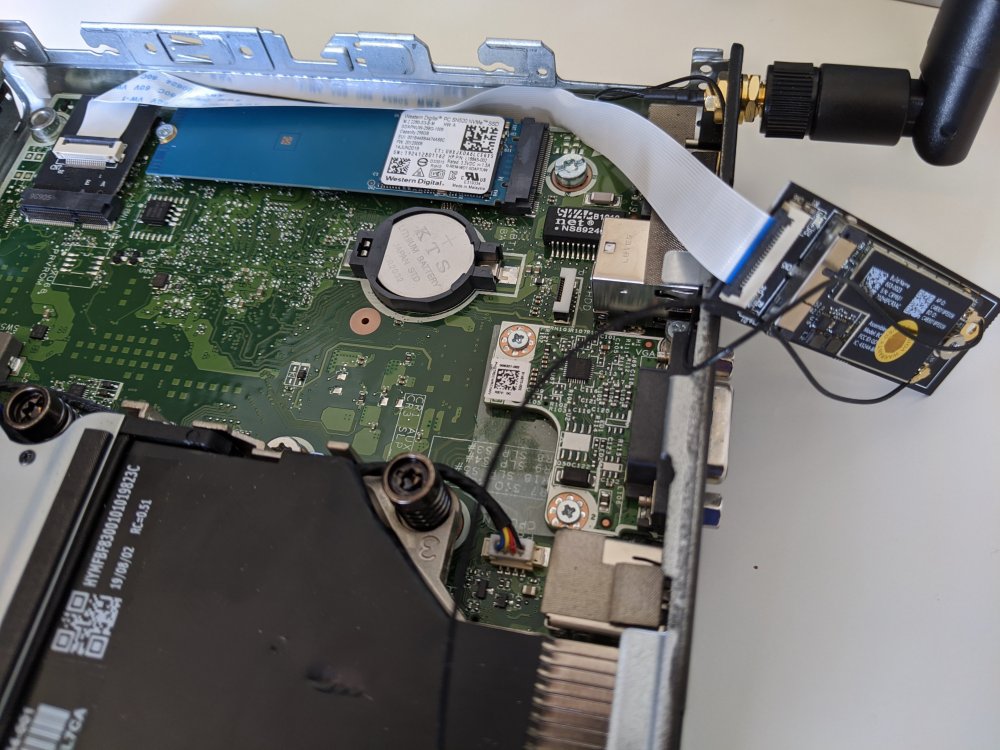
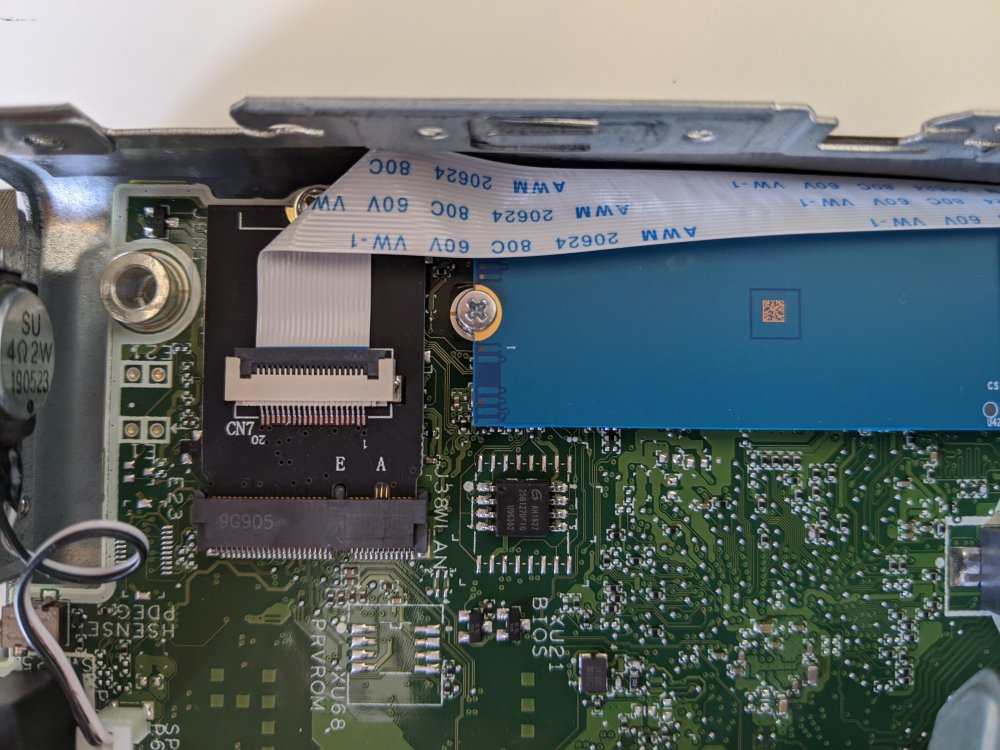
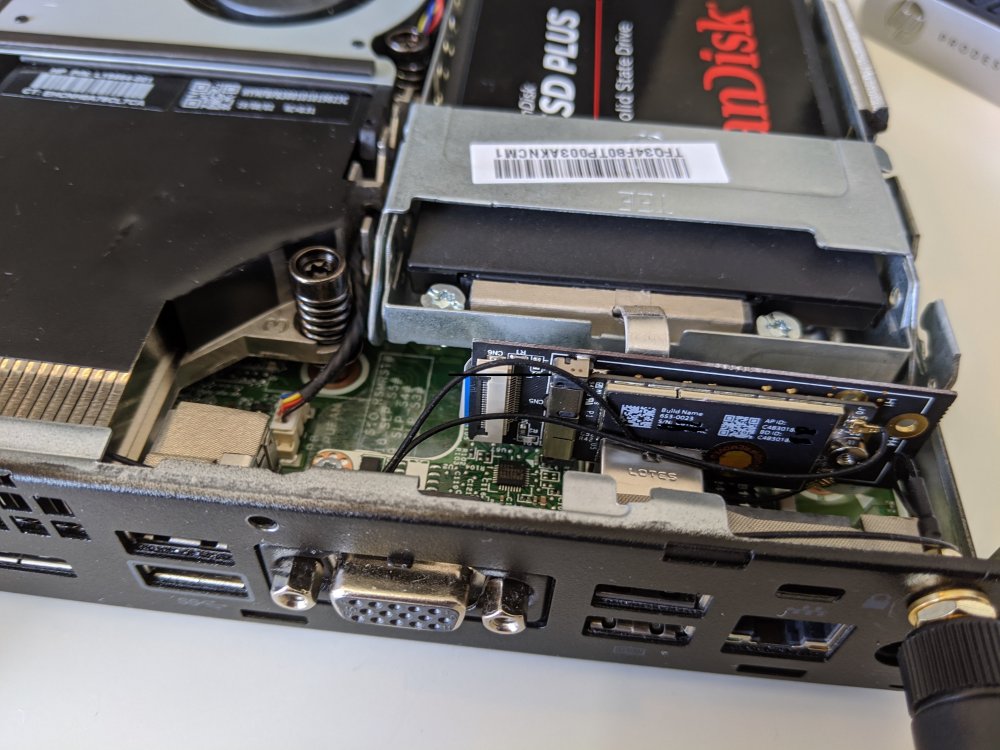
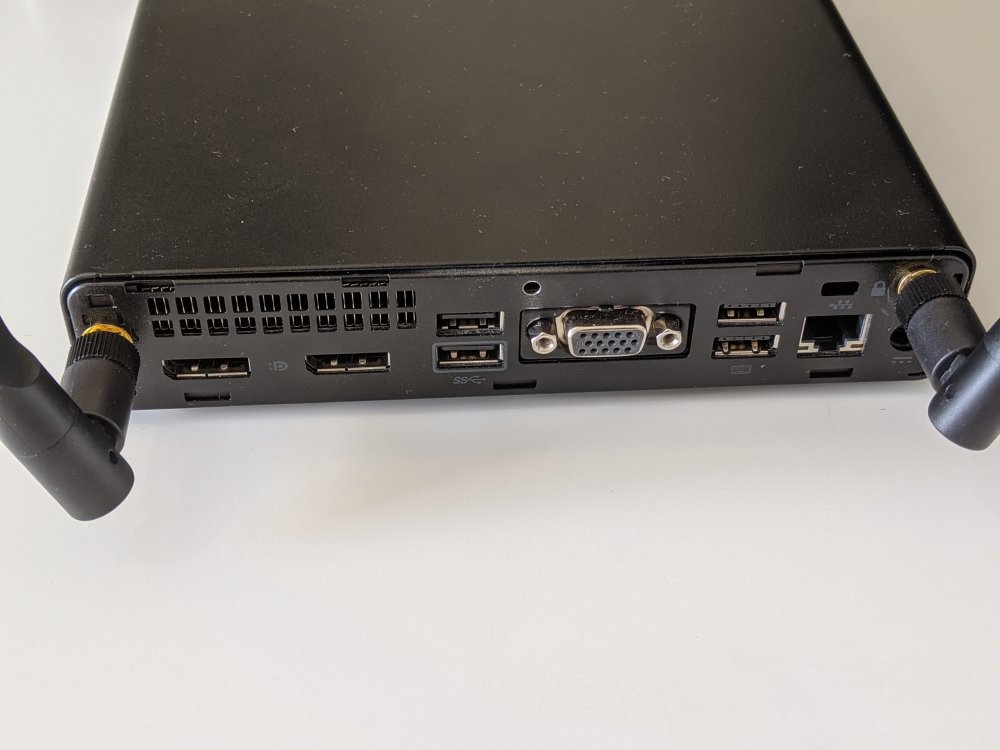
HP ProDesk 400 G4 Mini, MacMini8,1 [macOS Big Sir OpenCore v 0.6.3 EFI HP ProDesk 400 G4] 08/12/20 updated, here it is ==>> OC 063.zip [macOS Catalina OpenCore v 0.5.9 EFI HP ProDesk 400 G4] 07/07/20 updated, here it is 07/07/20 ==>> EFI.zip Just recently purchased this mini pc ( eBay bargain ) as a second machine and was wondering how easily it would be to install macOS Catalina, so I had a look around to see if a EFI existed for the HP ProDesk 400 G4 Mini and I found an excellent guide for the HP EliteDesk 800 G4 that was created by @tonyx86 here at InsanelyMac. By referencing this HP EliteDesk 800 G4 Mini Clover EFI guide I have now created an OpenCore EFI for the HP ProDesk 400 G4 Mini and now attached it to this post. On the surface both machines look very similar, but the HP ProDesk 400 G4 Mini has Intel B360 Chipset and a RTL811HSH-CG Ethernet controller. The HP EliteDesk 800 G4 has a Q370 chipset and uses the Intel 1219LM GbE Ethernet controller and comes with USB type C. I have posted the EFI above, mostly everything is working including iMessages and FaceTime. Please feel free to use this, adapt and share. This most likely will work with the HP EliteDesk 800 G4 too, but will require a custom USBPorts.kext using Hackintool, also RealtekRTL8111.kext would need to be replaced with IntelMausi.kext. System Specifications Intel i3-8100 Graphics Intel UHD 630 8 GB DDR4 RAM Ethernet - Realtek RTL8111HSH-CG Gbe Audio - Conexant CX20632 240GB Sandisk SSD ( macOS Catalina ) 256 GB NVMe SDD ( Windows 10 ) 4 x USB 3.x Ports 2 x USB 2.0 Ports Chipset Intel B360 HP ProDesk 400 G4 Mini PC - 4CZ91ET#ABU Use the BIOS settings from HP ELiteDesk 800 G4 ==> guide WIFI PARTS REQUIRED ADAPTER CARD WITH FLEXIBLE CABLE BCM94360CD/BCM94360CS2/BCM943224PCIEBT2 Card To M.2 Key A/E Cable BCM94360CS2 Genuine WiFi Card 653-0020 Macbook Air 13" A1466 Mid 2013 2017 / Early 2014 2015 Antenna 20cm IPEX to RP-SMA Female Pigtail Cable for NGFF Wireless Card & M.2 (NGFF) DO NOT USE THE NGFF M.2 Key A/E adapter as there is not enough room for this to fit! ( Card can length can't exceed 30mm ) A1398 BCM943602CS BCM94360CS wireless cards to NGFF M.2 Key A/E adapter fo D RC HOW TO INSTALL THE WIFI CARD AND ANTENNA IGPU BUS PATCHING CREDITS OpenCore Developers OpenCore Desktop Guide Insanelymac [GUIDE] Catalina on HP EliteDesk 800 G4 Mini - The perfect MacMini8,1 Hackintosh


 3 points
 -
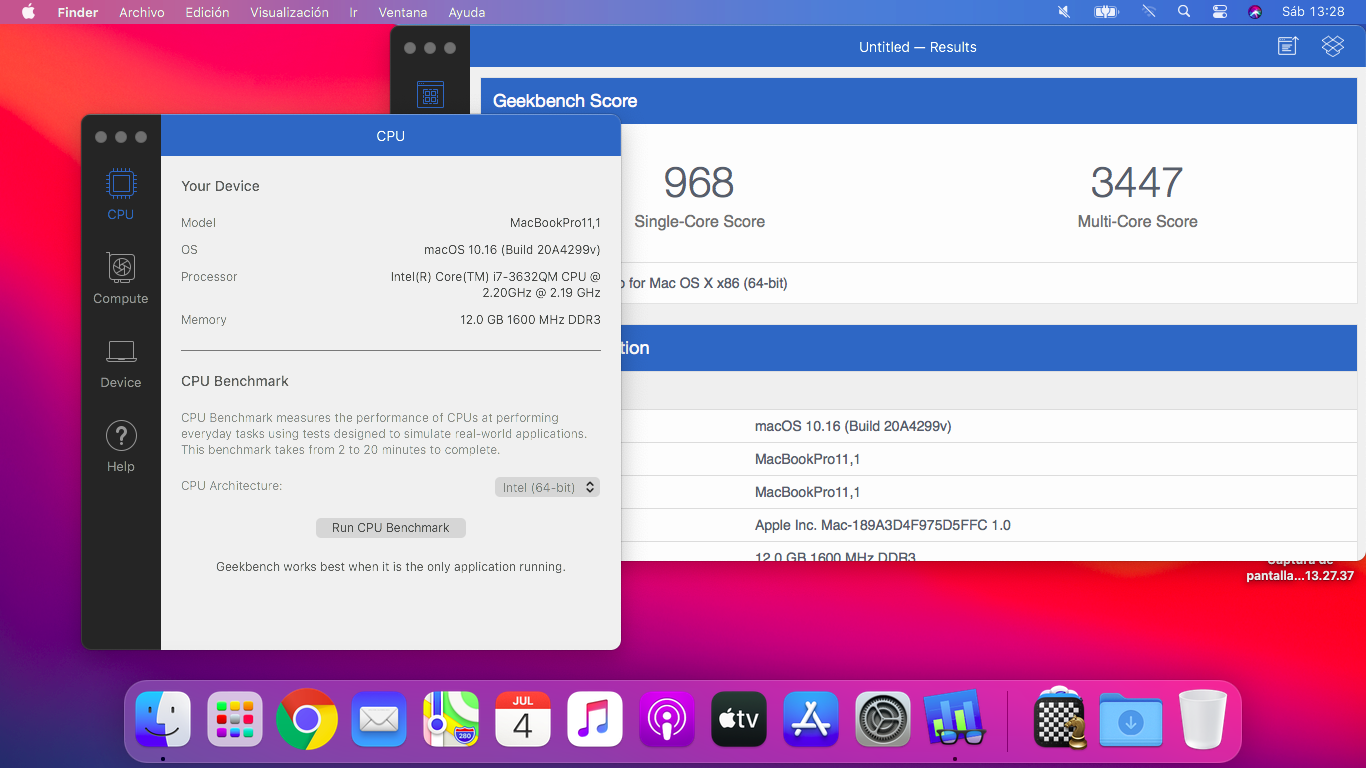
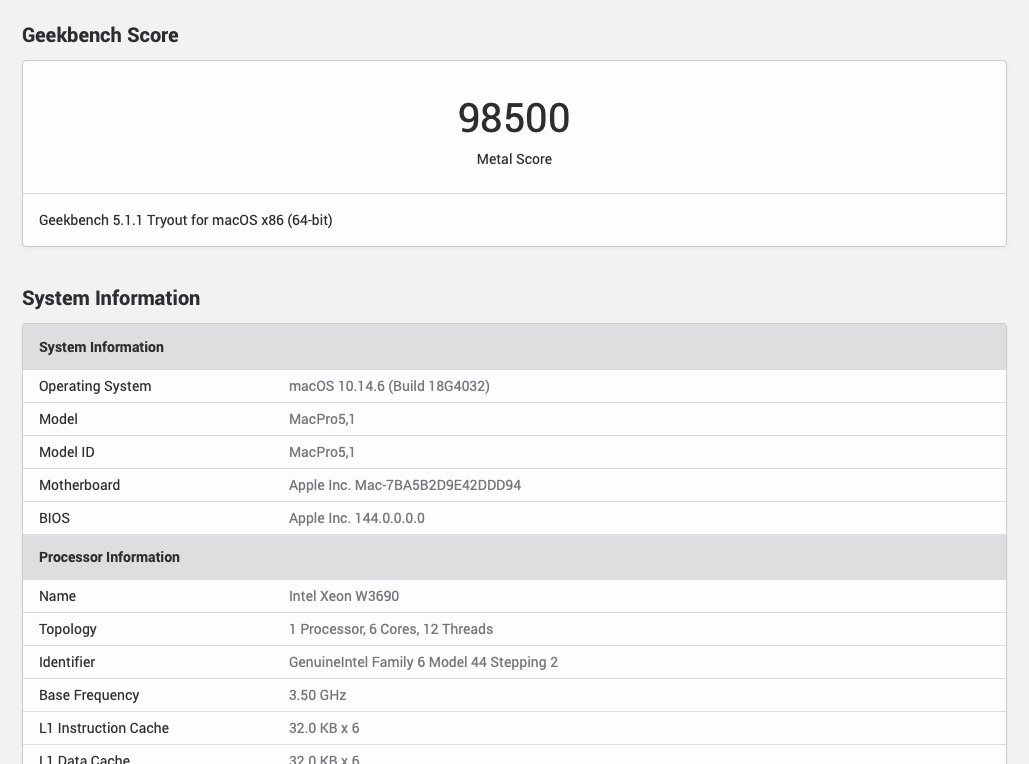
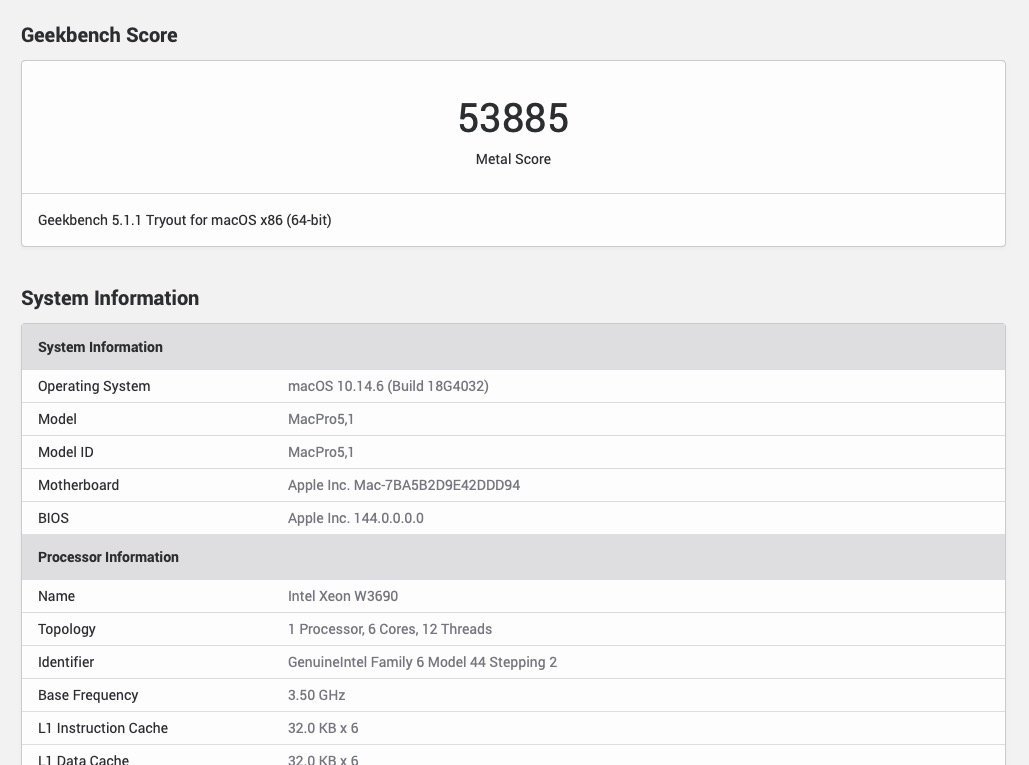
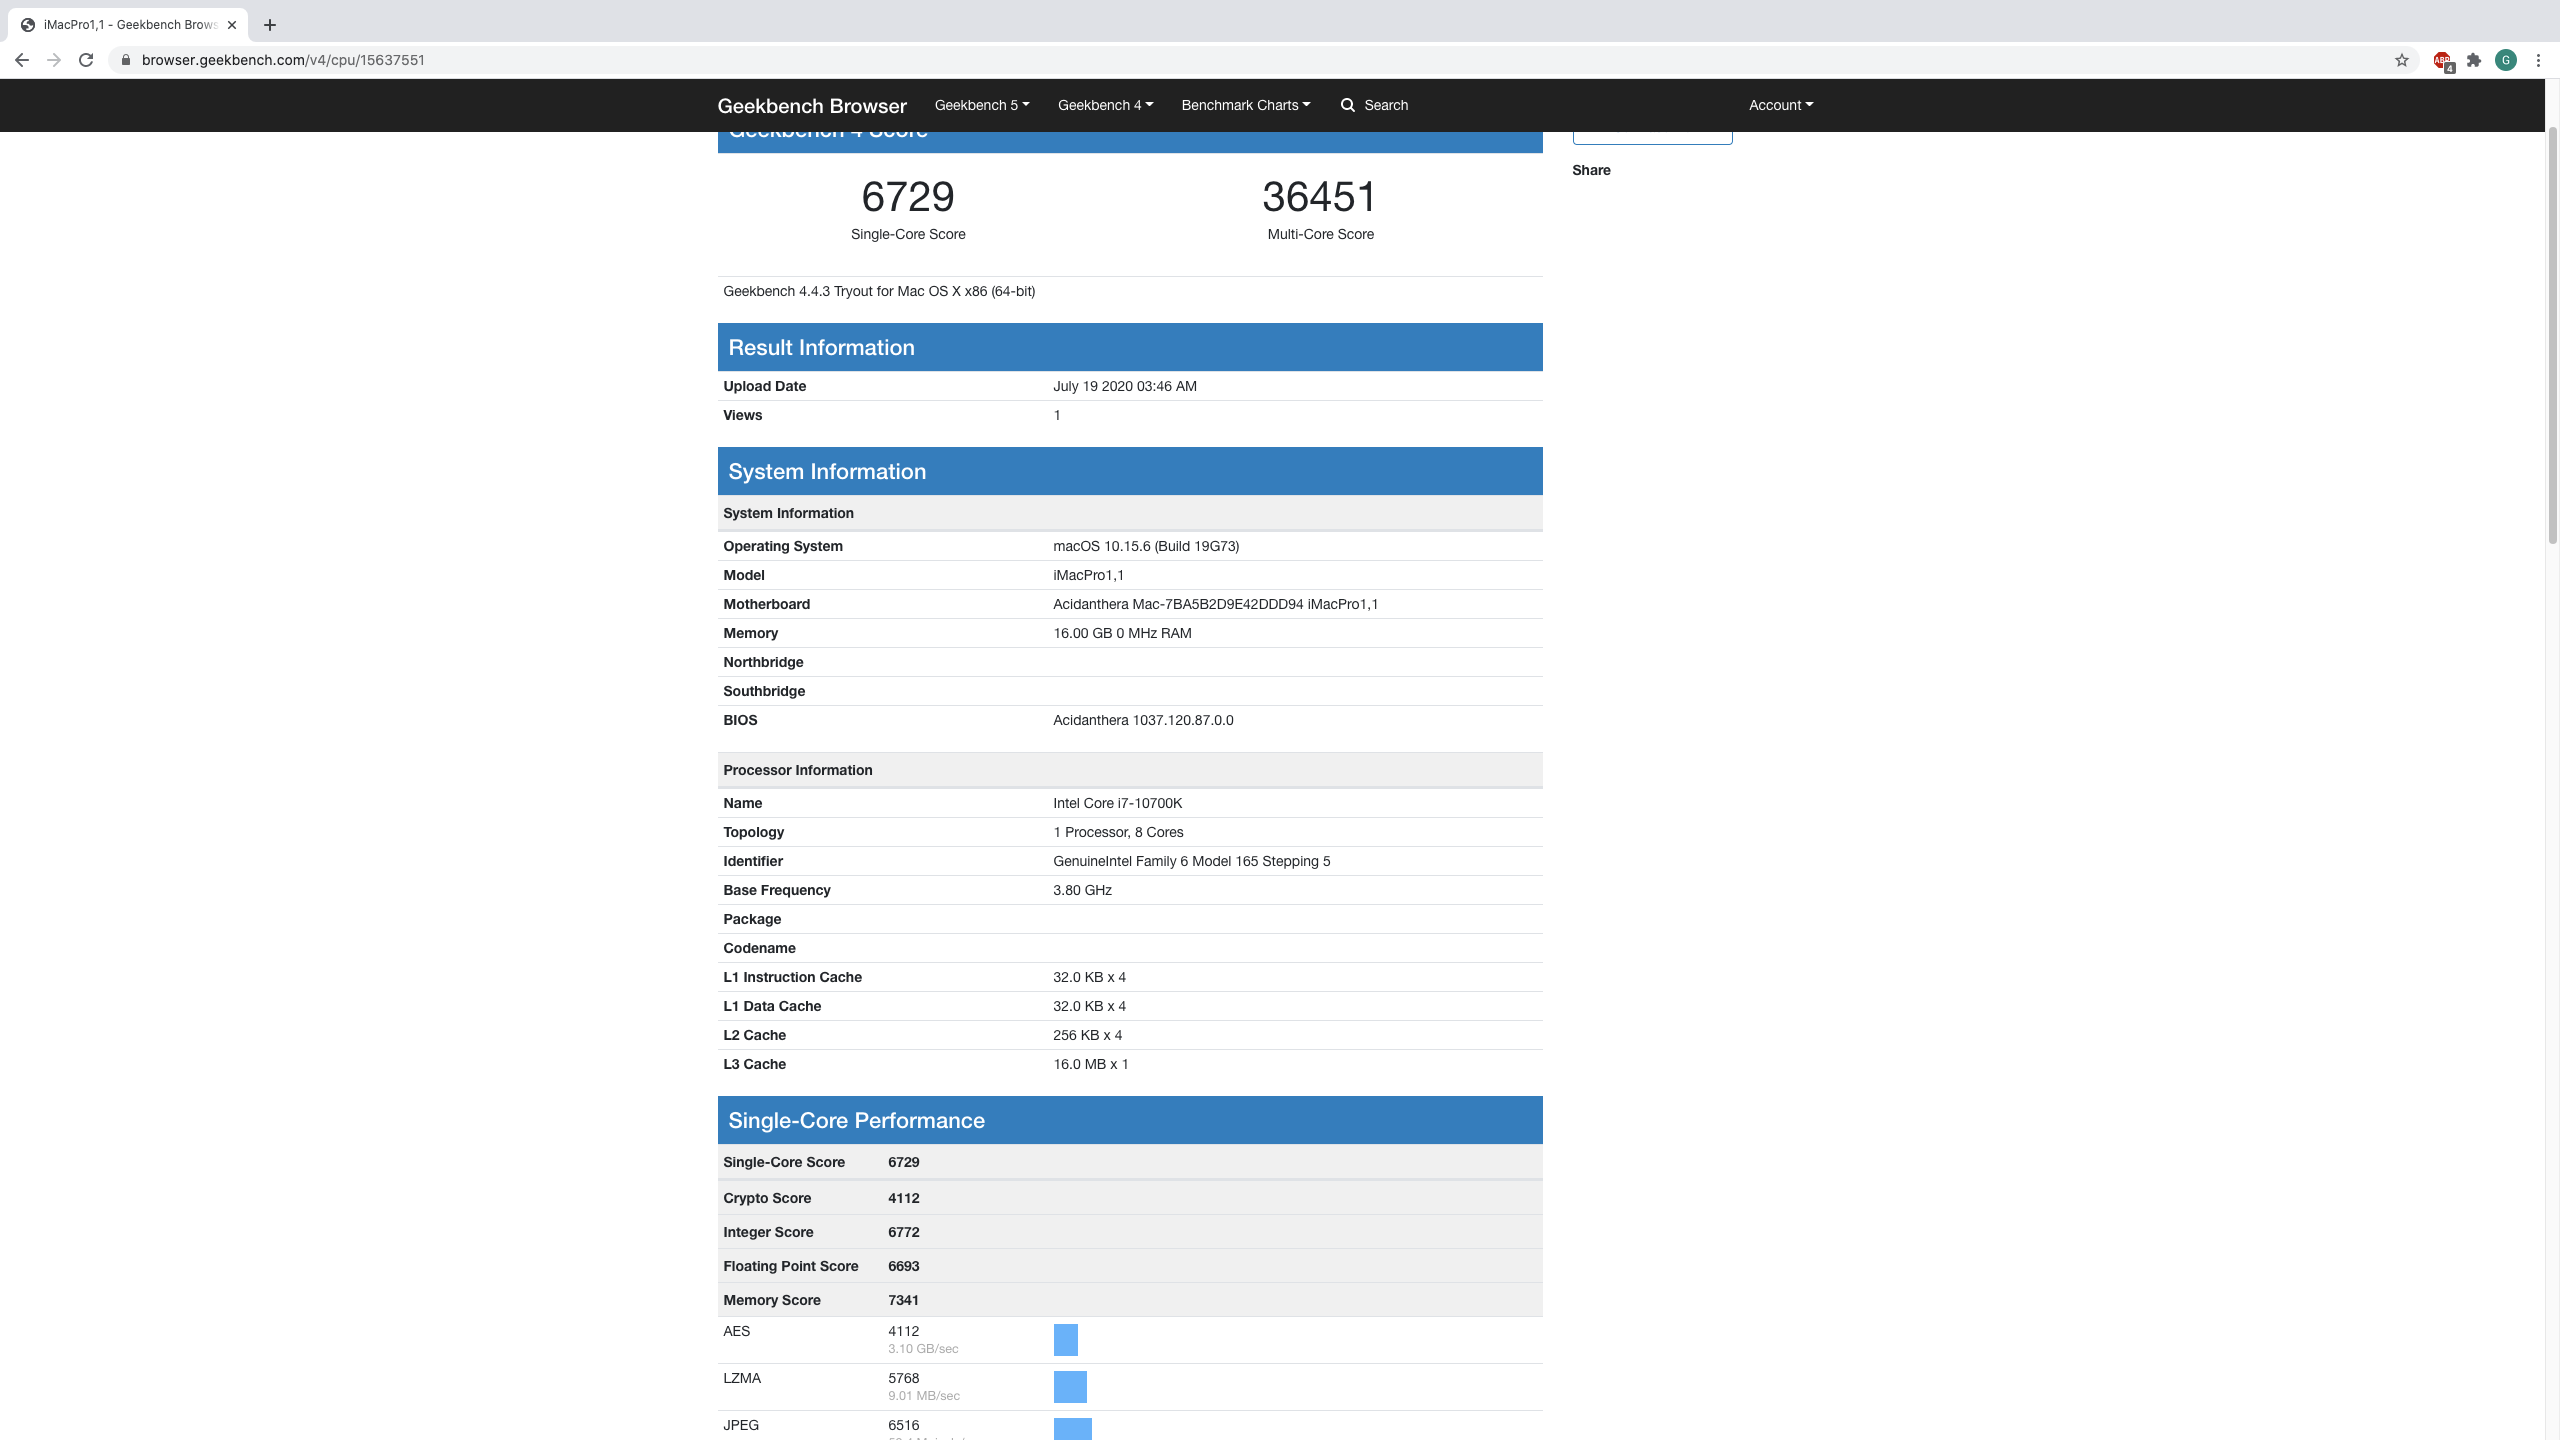
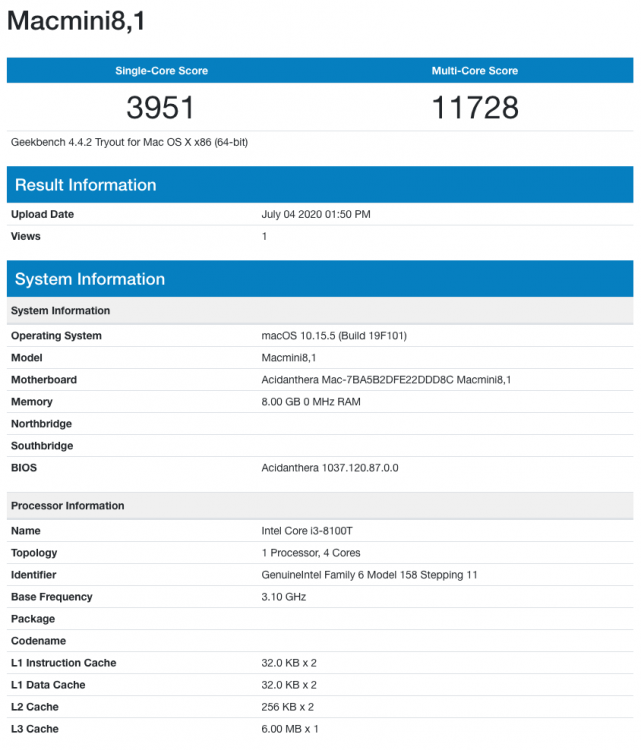
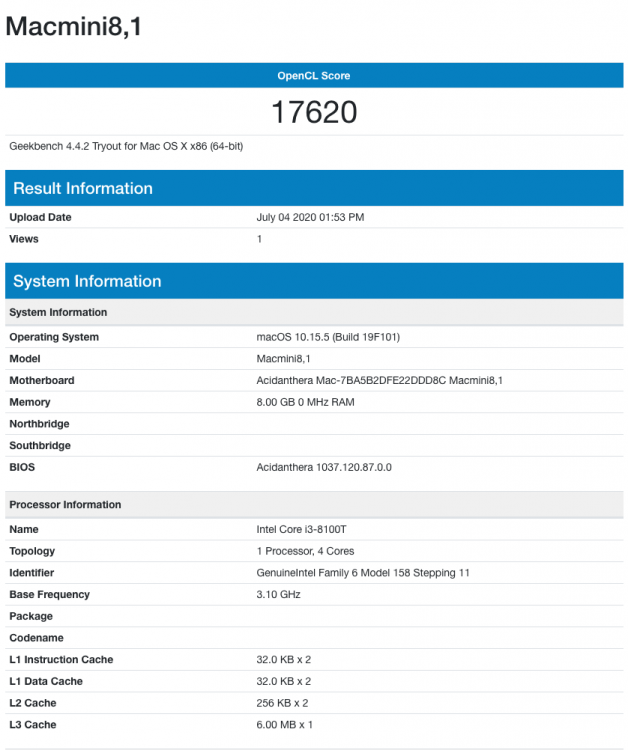
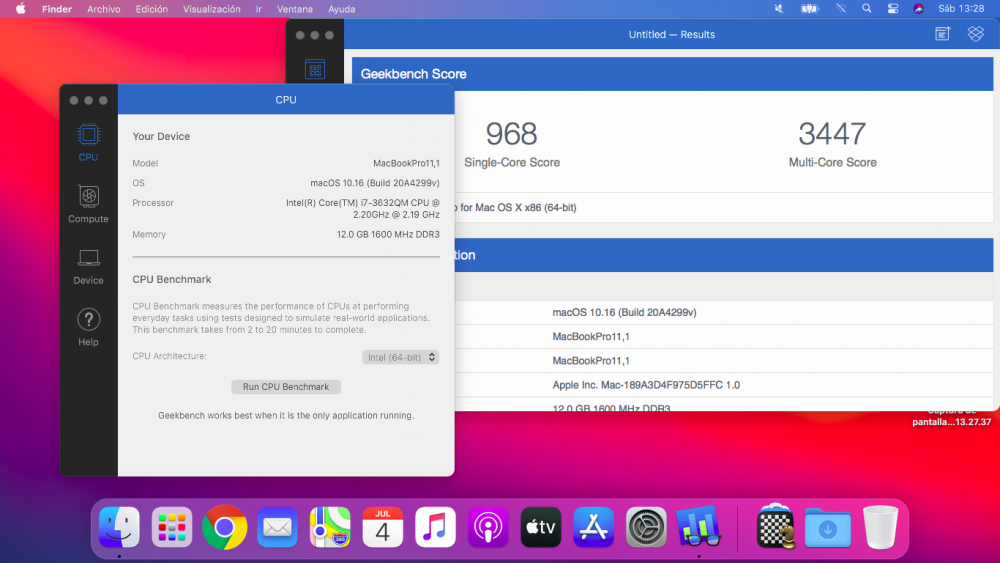
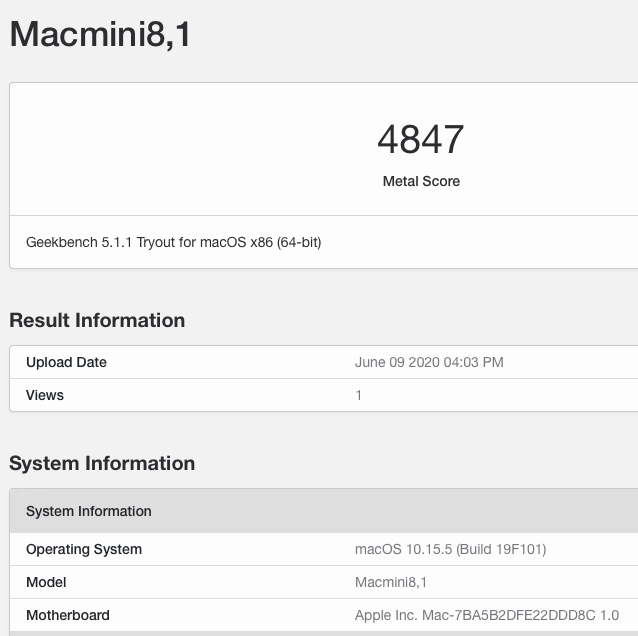
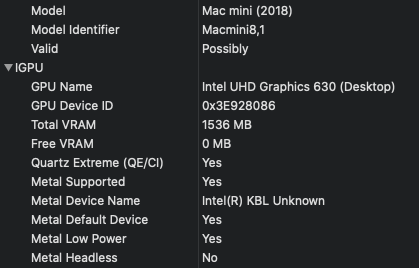
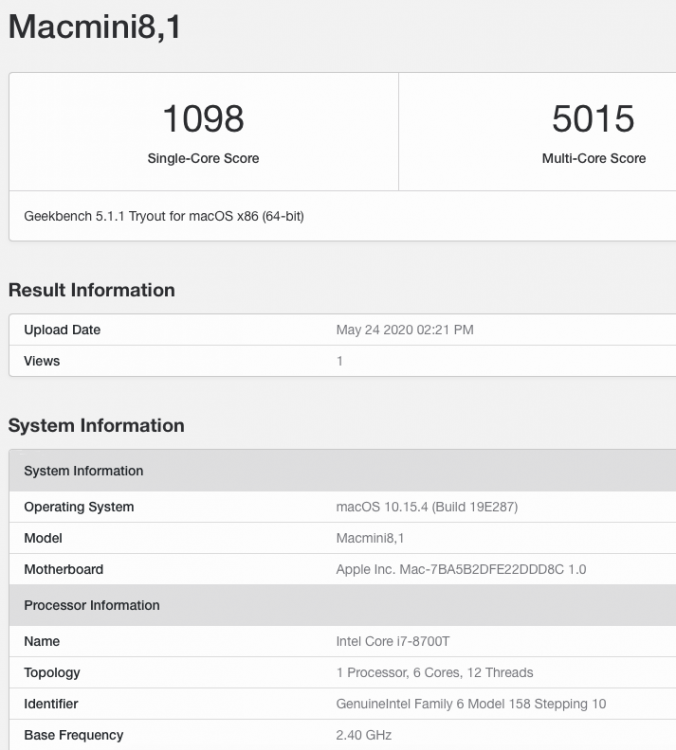
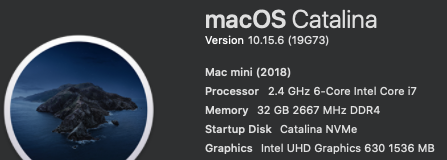
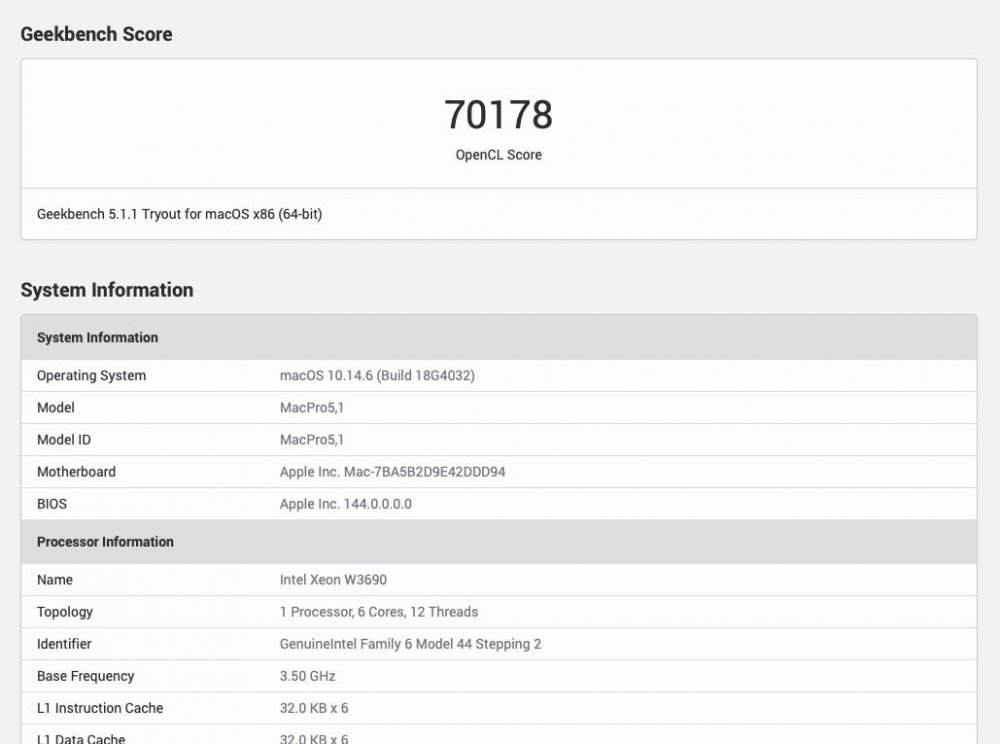
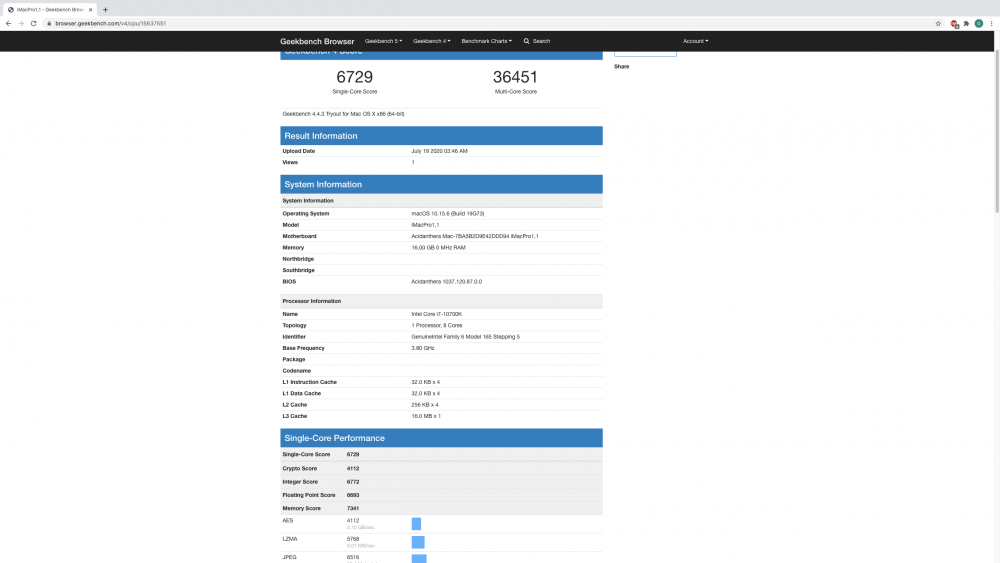
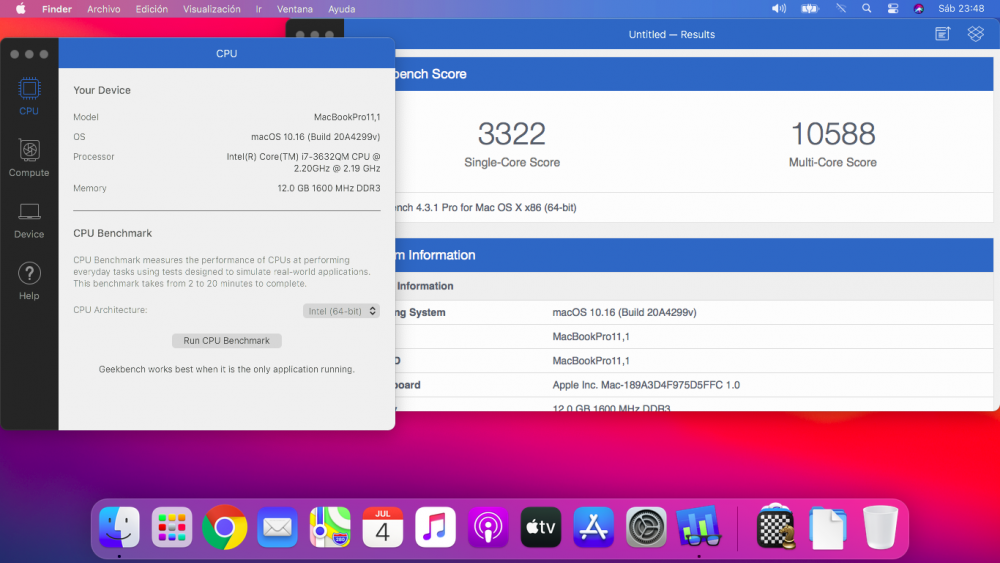
Hey Guys, finally I´m able to install macOS Big Sur through VmWare Fusion and boot up in one of my systems, is an HP EliteBook 2570P, which has an Intel Core i7-3632QM, 12 GB RAM DDR3L 1600 MHz, x2 SSD Kingston UV400 240 GB, and the HD4000 as IGPU, only remains audio and Wifi, I will see later, but the problem I´m experiencing is that in Big Sur the performance is very poor, than in Catalina, here I attach 2 pictures of Geekbench in Catalina and Big Sur, and there is 7.000 points of difference. I don´t know what is the cause. Thanks for your help. EFI_2570P_Clover_Big_Sur_V2.zip
 3 points
 -
non sono d'accordo, Clover ha ancora un team attivo dietro tra cui Slice e per come la vedo io meritano tutto il rispetto possibile nello stesso identico modo per Acidanthera. beh sono bootloader distinti, diciamo che ognuno fa il suo e segue le proprie "linee" di sviluppo.. Quello che spesso crea malintesi etc.. sono quelle che possiamo chiamare "le mode" nel percorso hackintosh3 points
-
Testate questi File mettete la patch in configplist e sost. il file CLOVERX64.efi e avviate Big Sur. è consigliato l'uso degli ultimi Driver UEFI . se serve configurare il FILE Plist trovate nella cartella , impostate come avete dettato sul Plist della vostra OC https://github.com/ReddestDream/OcQuirks/releases/tag/23 BigSur Clover KextInjection Package.zip IMG_3807.MOV IMG_3809.MOV Fonte originale https://www.hackintosh-forum.de/forum/thread/49311-macos-11-bigsur-dev-beta-clover-patch/?postID=619527#post619527


 2 points
 -
Exactly. That is what i experienced. I installed BS on a separate SSD and made the first drive in the Boot order in the BIOS. I have Win 10 + Catalina in another SSD which also has EFI on it. I shall remove the EFI soon. Since booting BS, OC 0.6.0 shows two entries for Win 10.2 points
-
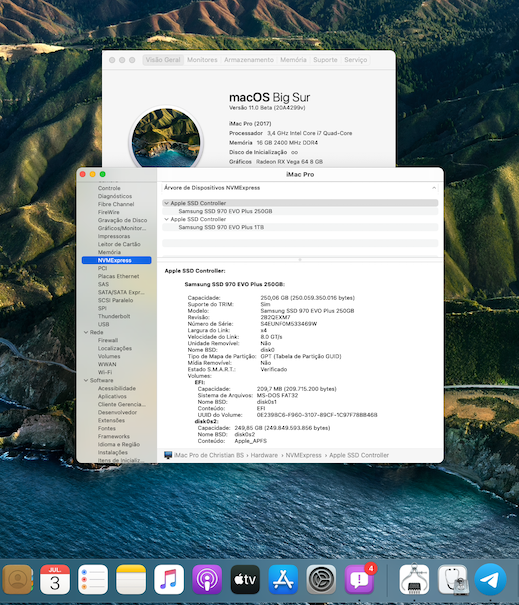
Hi all...finally, im get it install with @ludufre tutorial (apanhei pra cara...ca, mas tudo bem...kkkkk) e com o OC compilado pelo Señor @MaLd0n (hehe)!!! (Obrigado Lu, que Deus abençoe grandemente, e só queria dizer que sofri mas valeu a pena...aquela parada de deletar o bug que foi difícil...) Very fast now!!! Little small attach for Hervé not hit me...kkkk
 2 points
 -
********************************************************************************** In this thread, I have fully documented the installation of macOS on my HP EliteDesk 800 G4 / G5 Mini. It is a PERFECT HackMini8,1 and is running very well for me without any issues. I hope this documentation helps you to install macOS on your hack. Please leave feedback if you think there is anything I can improve and let me know if you have any questions. ********************************************************************************** Background This is my first "modern" hack supporting UEFI and my first hack using Clover "on-the-fly" patches. My previous hacks Laptop: Thinkpad T61 / Nvidia NVS 140m Laptop: Dell Latitude E6410 / Nvidia G3100m Desktop: Gigabyte G31 / GeForce 9600 Desktop: Biostar TH55HD / Sapphire Pulse RX580 (Google "Catalina Biostar TH55HD" and look for user name deeveedee) are all perfectly running Catalina and I patched them all "manually" - all DSDT patches applied with MaciSL with virtually no Clover on-the-fly patching and all booted Legacy Clover. This UEFI hack was MUCH easier and took about 20 hours vs. a combined hundreds of hours for the old hacks. I wanted a hack that was a little more future proof and I think this is it. I hope you enjoy this as much as I am enjoying it. It is a perfect MacMini8,1. My system specs HP EliteDesk 800 G5 Mini (I9-9900 / UHD 630 / Q370 Chipset / 32GB DDR4 RAM) (also own 800 G5 Mini with i7-9700, 800 G4 Mini with i7-8700 and have owned 800 G4 Mini with i7-8700T - all work perfectly) 3 x DP Ports (connected to monitors using DP -> DVI adapters) 6 x USB 3.1 1 x USB Type-C 3.1 2 x NVMe SSD (M.2 PCIe x4 2280/2230 combo ports) 1 x SATA6 SSD 1 x Intel Ethernet RJ-45 Conexant CX20632 Audio Codec I am not using Wi-Fi. See below in "What is not tested" for Wi-Fi solutions. macOS Installation Important: You MUST BE LOGGED-IN to download attachments from this forum See macOS installation steps for OC and CLOVER here See Known Issues here for additional installation steps that may not yet be included in my attached config files See OC and CLOVER EFIs in attached to this post See BIOS configuration in attached BIOS configuration PDF document See how I developed my installation methodology here See references here See instructions here for installing two M.2 2280 NVMe SSDs and one SATA HD / SSD What is not working DRM (no hackintosh solution for DRM with UHD 630 iGPU) Everything else that I have tested is working perfectly What is not tested USB c 3.1 port (I have partially tested the USB 3 functionality of the port and it seems to be working fine with the USBPorts.kext in the attached EFI .zip archives) Wi-Fi / Bluetooth I am not currently using Wi-Fi/Bluetooth in this hack, but starting with Sonoma, Broadcom Wi-Fi is not supported without 3rd-party macOS root patches. I am not in favor of installing Open Core Legacy Patcher (OCLP) root-patches to enable Broadcom Wi-Fi (see my opinion here). If you need basic Wi-Fi/Bluetooth (and don't care about Apple-specific functions like Airdrop), I recommend Open Wireless project to enable Intel Wi-fi/Bluetooth. I don't believe that OCLP Wi-Fi root-patches are safe for secure computing operations (e.g., online banking or even accessing your Facebook page). If you prefer Broadcom Wi-Fi/Bluetooth, replace intel Wi-Fi with Broadcom Wi-Fi here and here. What is working Everything not mentioned above Sleep / Wake Multiple displays with IGPU graphics acceleration, hot pluggable display ports and DP->DVI adapters USB 3.1 ports Audio (internal speaker and headphone jack) Ethernet Microphone / front-right audio port (tested with CTIA-style 4-connector headset) Known Issues and their solutions - see here BIOS Version / Configuration Tested BIOS Versions for G4 Mini: 02.11.01 Rev.A or 02.12.00 Rev.A or 02.14.01 Rev.A, 02.15.00 Rev.A, 02.16.00 Rev.A, 02.17.00 Rev.A, 02.19.00 Rev.A, 02.20.01 Rev A, 02.21.00 Rev.A Tested BIOS Versions for G5 Mini: 02.07.01 Rev.A, 02.08.00 Rev.A, 02.09.00 Rev.A, 02.10.01 Rev.A, 02.11.00 Rev.A, 02.12.00 Rev.A, 02.12.10 Rev.A, 02.13.00 Rev.A, 02.14.01 Rev.A, 02.15.00 Rev.A See attached BIOS configuration in PDF document "HP EliteDesk 800 G4 Mini BIOS Configuration.pdf" Intel ME must be enabled for proper sleep / wake of UHD 630 UHD 630 Framebuffer Patching See here and here to understand my graphics properties for use with WhateverGreen.kext Read this to see my attempt at graphics patching without WhateverGreen.kext (WEG) to get a better understanding of what WEG is doing Current Versions Ventura 13.6.3 OpenCore 0.9.6 Lilu.kext 1.6.7 WhateverGreen.kext 1.6.6 AppleALC.kext 1.8.7 IntelMausi.kext 1.0.7 RestrictEvents.kext 1.1.3 VirtualSMC 1.3.2 NVMeFix.kext 1.1.1 Elements of this implementation that you may not see in other hacks HPET is disabled for the reason stated here RTC memory size is patched (like CLOVER's "Fix RTC") instead of using RtcMemoryFixup.kext for reasons here ScreenShots OC0.9.6-EFI-R001.zip HP EliteDesk 800 G4 Mini BIOS Configuration.pdf CLOVER-r5122-v6.zip


 1 point
 -
OpenCanopy is a graphical user interface for OpenCore which is currently under development. To setup OpenCanopy 1 - See OpenCore documentation 2 - See Dortania GUI setup You should setup OpenCanopy using the source files from OCBinaryData to check all is working. These files will provide you a UI as close as possible to a real Mac by using Apple's own icons. Users wishing to deviate from Apple's boot icons for a more custom look, they're left with having to find their own icons from various places which can sometimes result in a not so consistent theme feel. To help, I am aiming to create families of 'similar' icons, amongst others, which may eventually lead to a more harmonious look when mixing/customising icons. The idea is that eventually there will be a large 'pick and mix' range of icons where the user can choose which ever ones they like whilst knowing they will all look like they're meant to be together. Of course, I could never come up with every permutation that someone could imagine so there will always be icons missing from the range, but over time I hope to grow the collection(s). For an overview of available media sets from different contributors, check the OpenCanopy-Gallery at dortania. OpenCanopyIcons GitHub Repository All icons are being hosted at https://github.com/blackosx/OpenCanopyIcons The front page of that repository contains links to previews of all the icon sets. Current number of icons in the repo: [Set1: 24] [Set2: 296] [Set3: 3,527] [Set4: 333] [Set5: 10,684] = 14,864 OpenCanopyIconsSet3Builder The beginnings of a tool to generate custom icon sets from the repo (Details) Current version: 0.2.0 (Updated for OpenCore 0.7.0) OpenCanopyIconsSet3Builder_v0.2.0.command.zip OpenCanopyIconsSet5Downloader The simple bash script to download individual icon sets from Set5 of the repo Current version: 0.1 (Updated for OpenCore 0.7.0) OpenCanopyIconsSet5Downloader_v0.1.command.zip Fonts OcFontFileGenerator (Mar 01 2021 - Bash script with dpfb and FTNTools to create font images) Aug 14 2020 - Initial look at OpenCanopy's support for AngelCode BMF Feb 28 2021 - Revised font files with fixed kerning pairs) QEMU Disk Image QemuDiskImage (Mar 6th 2021 - Virtual setup for testing icons in OpenCanopy. Now Updated to v0.6.7) Other noticeable posts in this thread IconsBuilder bash script (Sep 11 2020 - Bash script suggestion for Chris1111's Icnspack-Builder) OpenCanopyIconPacks LE Glow Sets (Feb 03 2021 - Preview and download links) Themes (Compatible with OpenCore v0.7.0) BsxDark1 BsxDarkFenceBlue1 And further alternative coloured themes based on the above BsxDarkFenceDarkGray1 | BsxDarkFenceGreen1 | BsxDarkFenceLight1 | BsxDarkFenceLightGrey1 | BsxDarkFenceOrangeRed1 | BsxDarkFencePinkPurple1 | BsxDarkFenceYellowGold1 | BsxDarkFenceYellowOrange1 BsxDarkSpace1 BsxImacBlue_ And further alternative coloured themes based on the above BsxImacGreen | BsxImacOrange | BsxImacPink | BsxImacPurple | BsxImacSilver | BsxImacYellow BsxM1 BsxOc1 BsxRedOldApple_ BsxDebossBluePlain BsxOsIcons3D BsxSet4Revisited BsxDarkRed BsxDarkUpLight BsxTexturedSquare Pre-made icon packs (No longer supported) I did start to collect individual icons in to packs and host them at OpenCanopyIconsPack GitHub repository. See this post from Aug 16 2020 with links to initial pre-made packs with previews. However, due to OpenCanopy still being experimental and subject to changing requirements and mandatory icons I feel this process can quickly lead to out of date icon packs which need time to rebuild. I will therefore no longer support these icon packs, instead will work on a programmed method to download icons from the main OpenCanopyIcons GitHub repository as a 'set' ready to use in OpenCanopy. The beginnings of this is the OpenCanopyIconsSetBuilder script above. For reference, the existing BOCIP_3 icon packs have been updated to include Left and Right icons for OpenCore 0.6.6, but all others are older and NOT up to date for recent versions of OpenCanopy.1 point
-
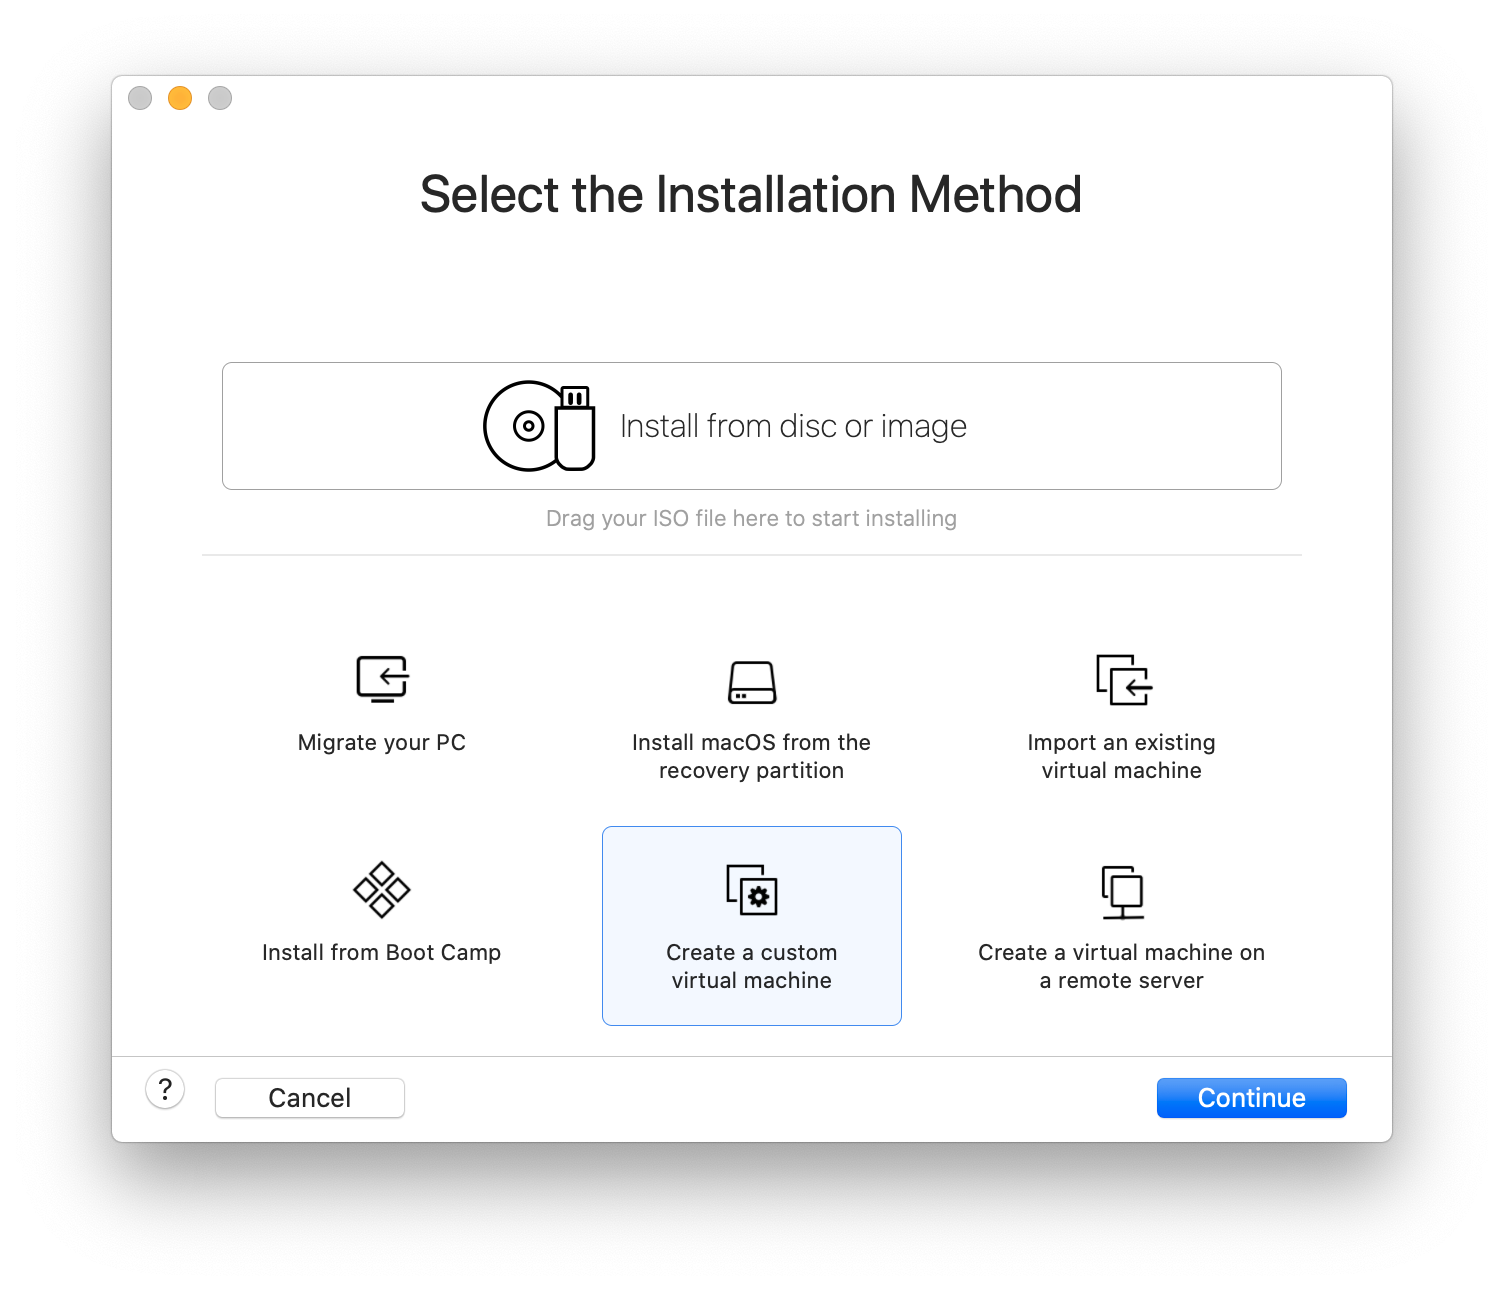
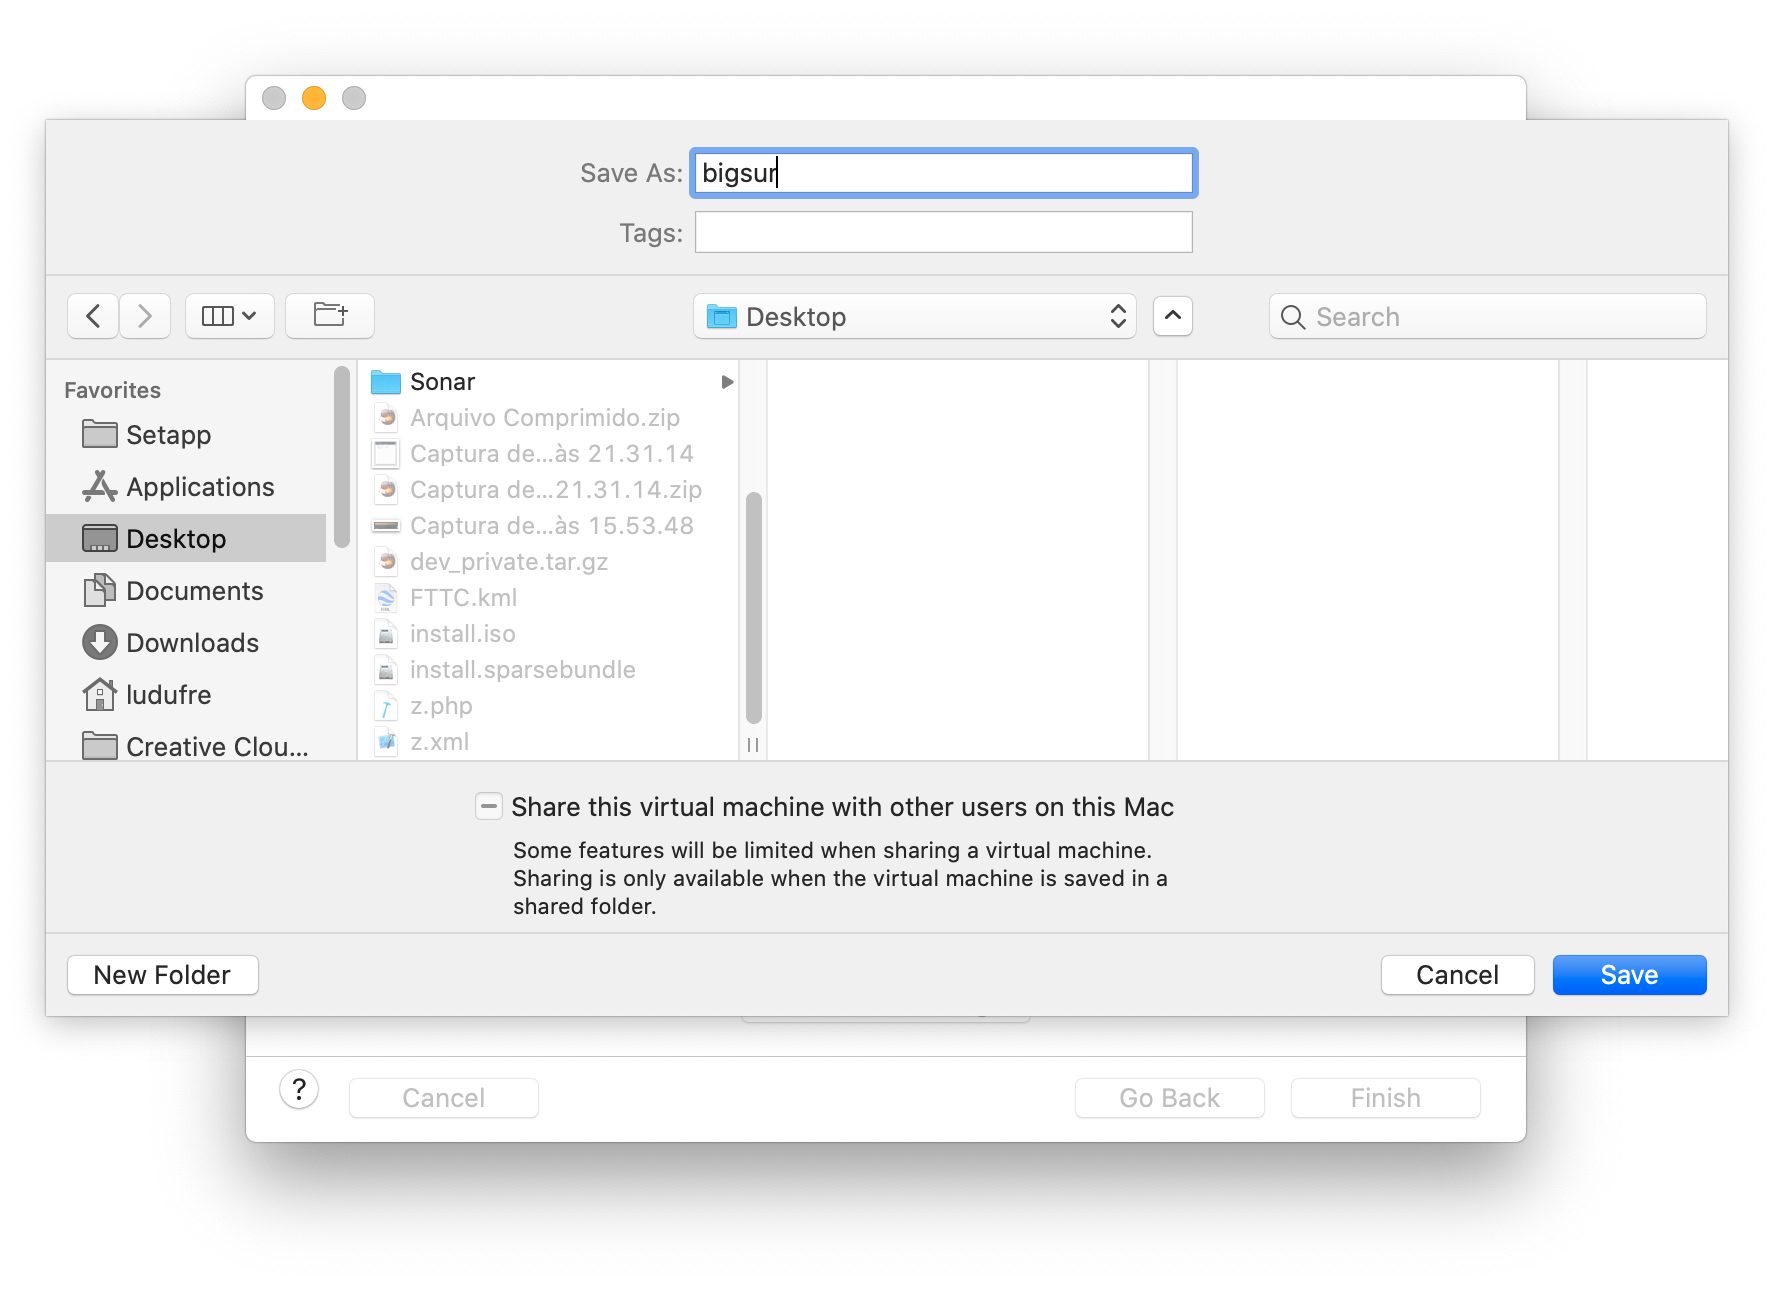
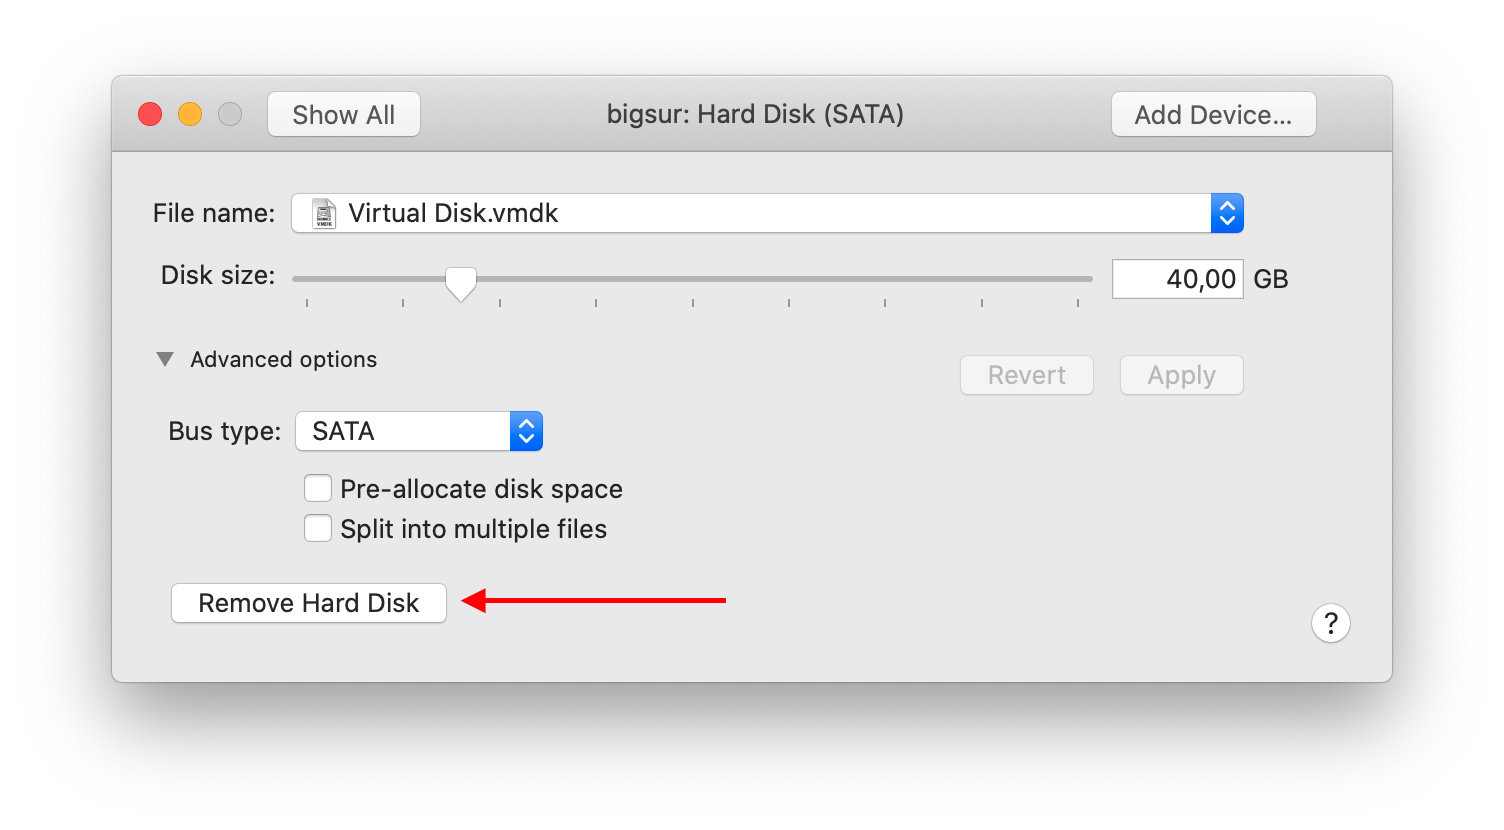
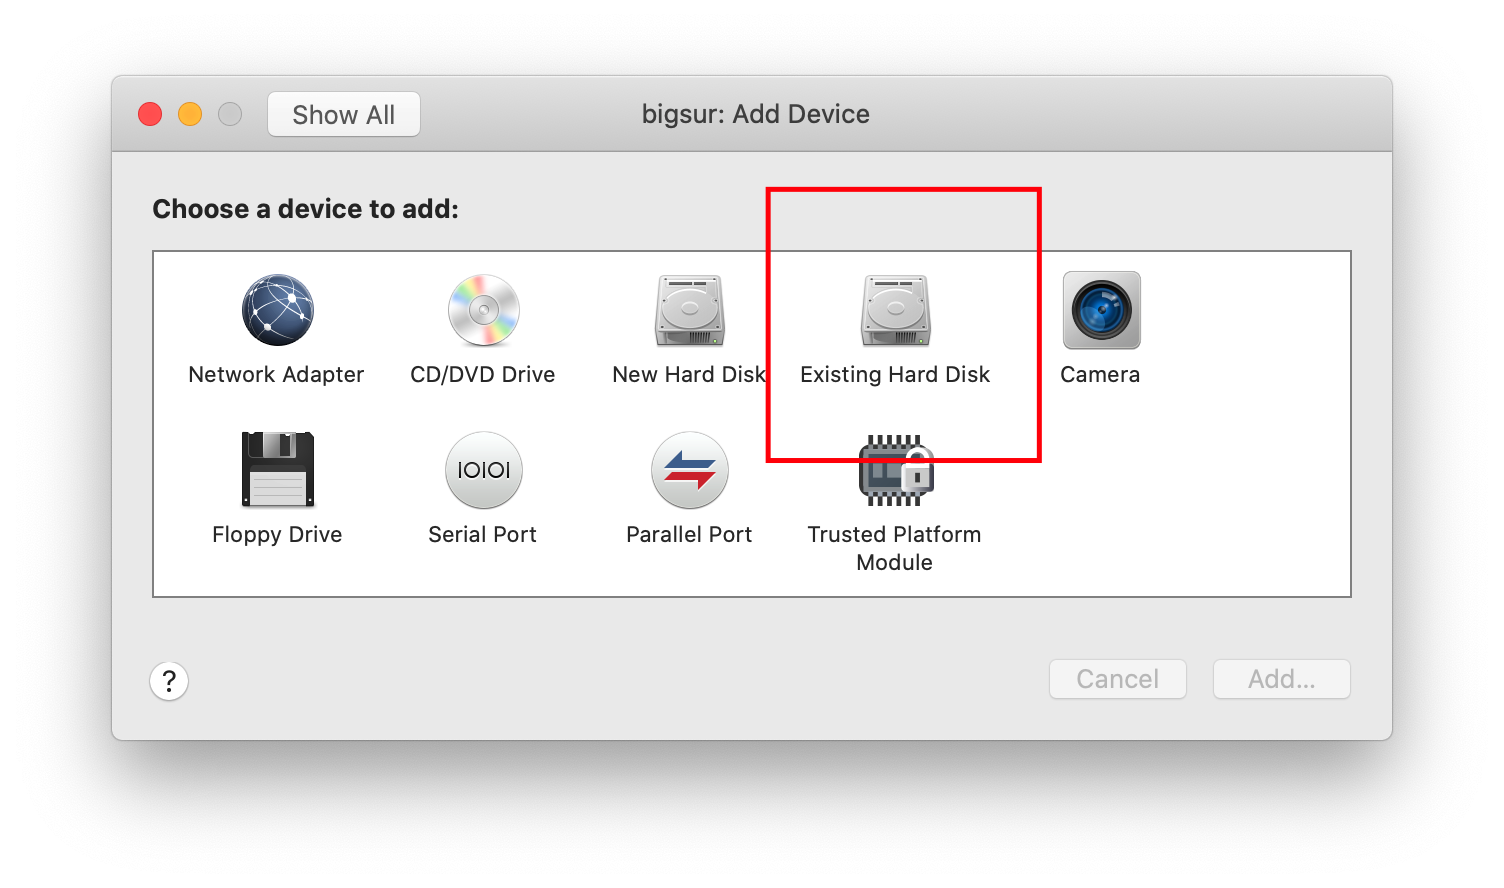
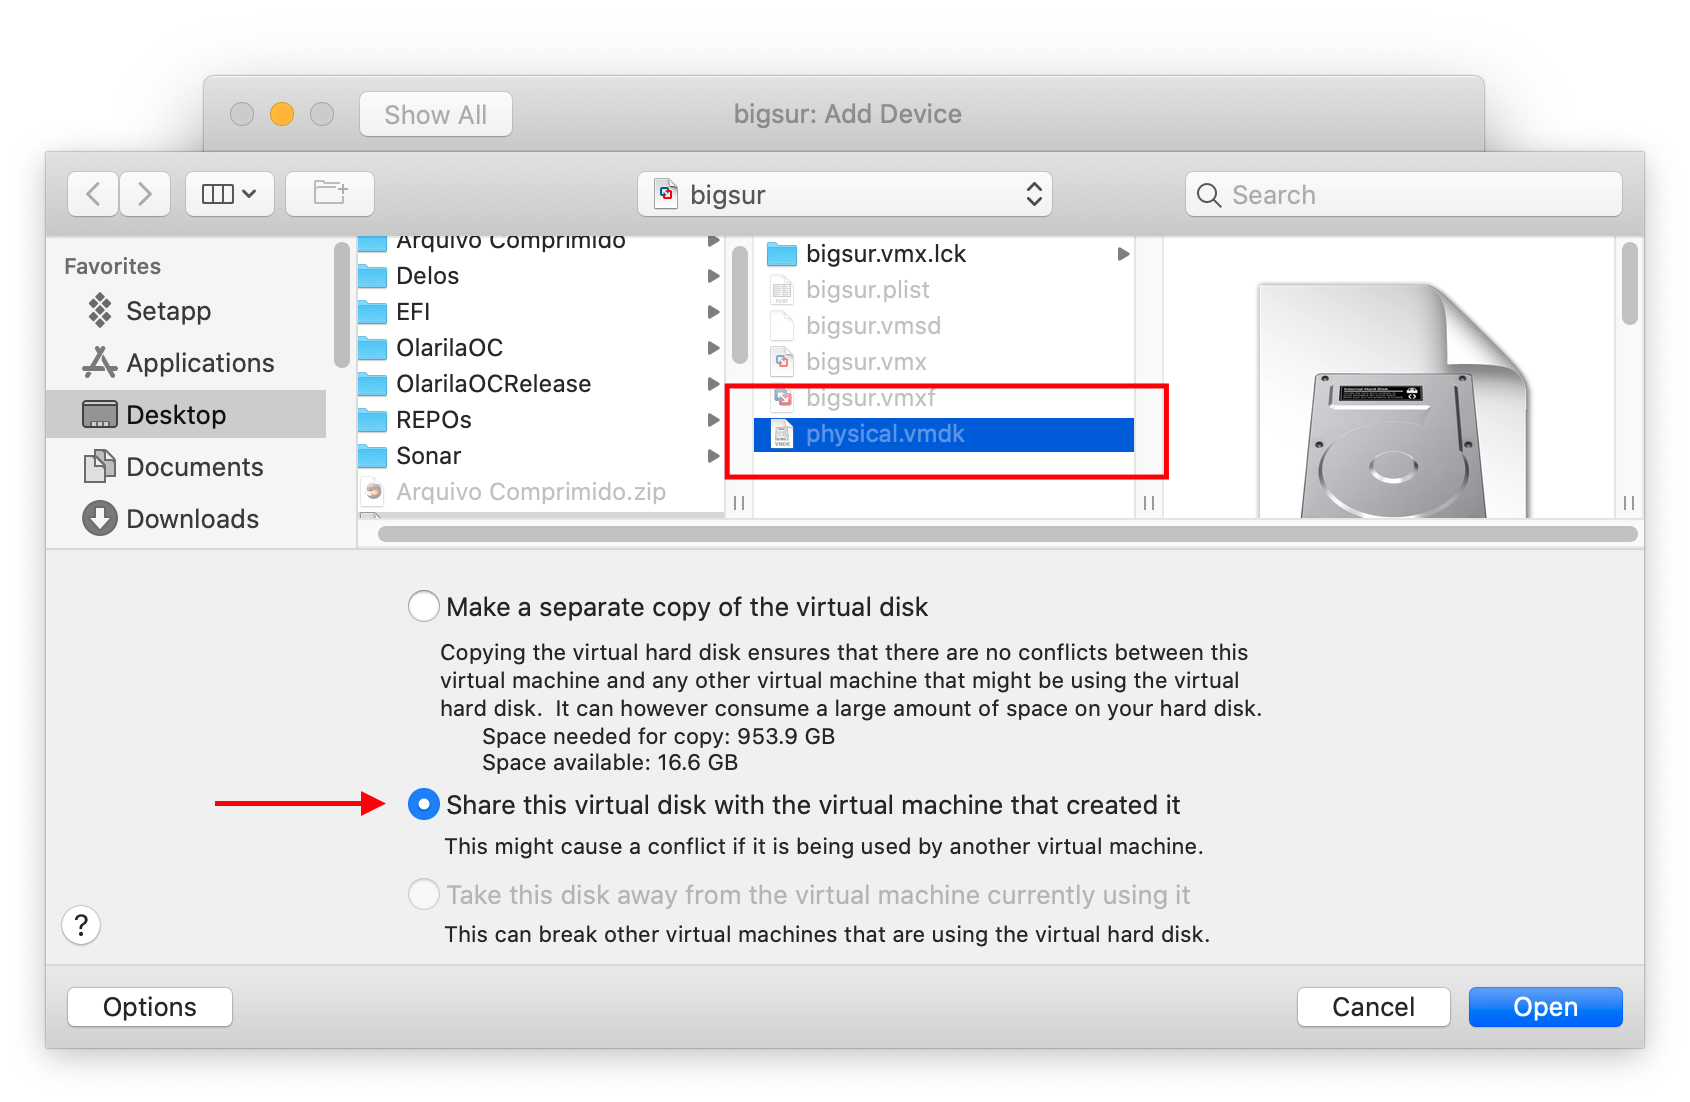
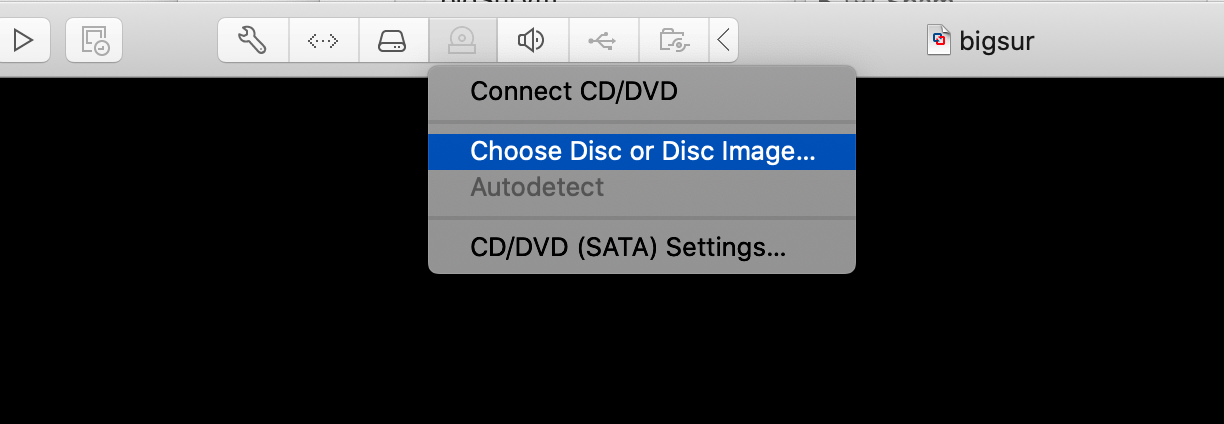
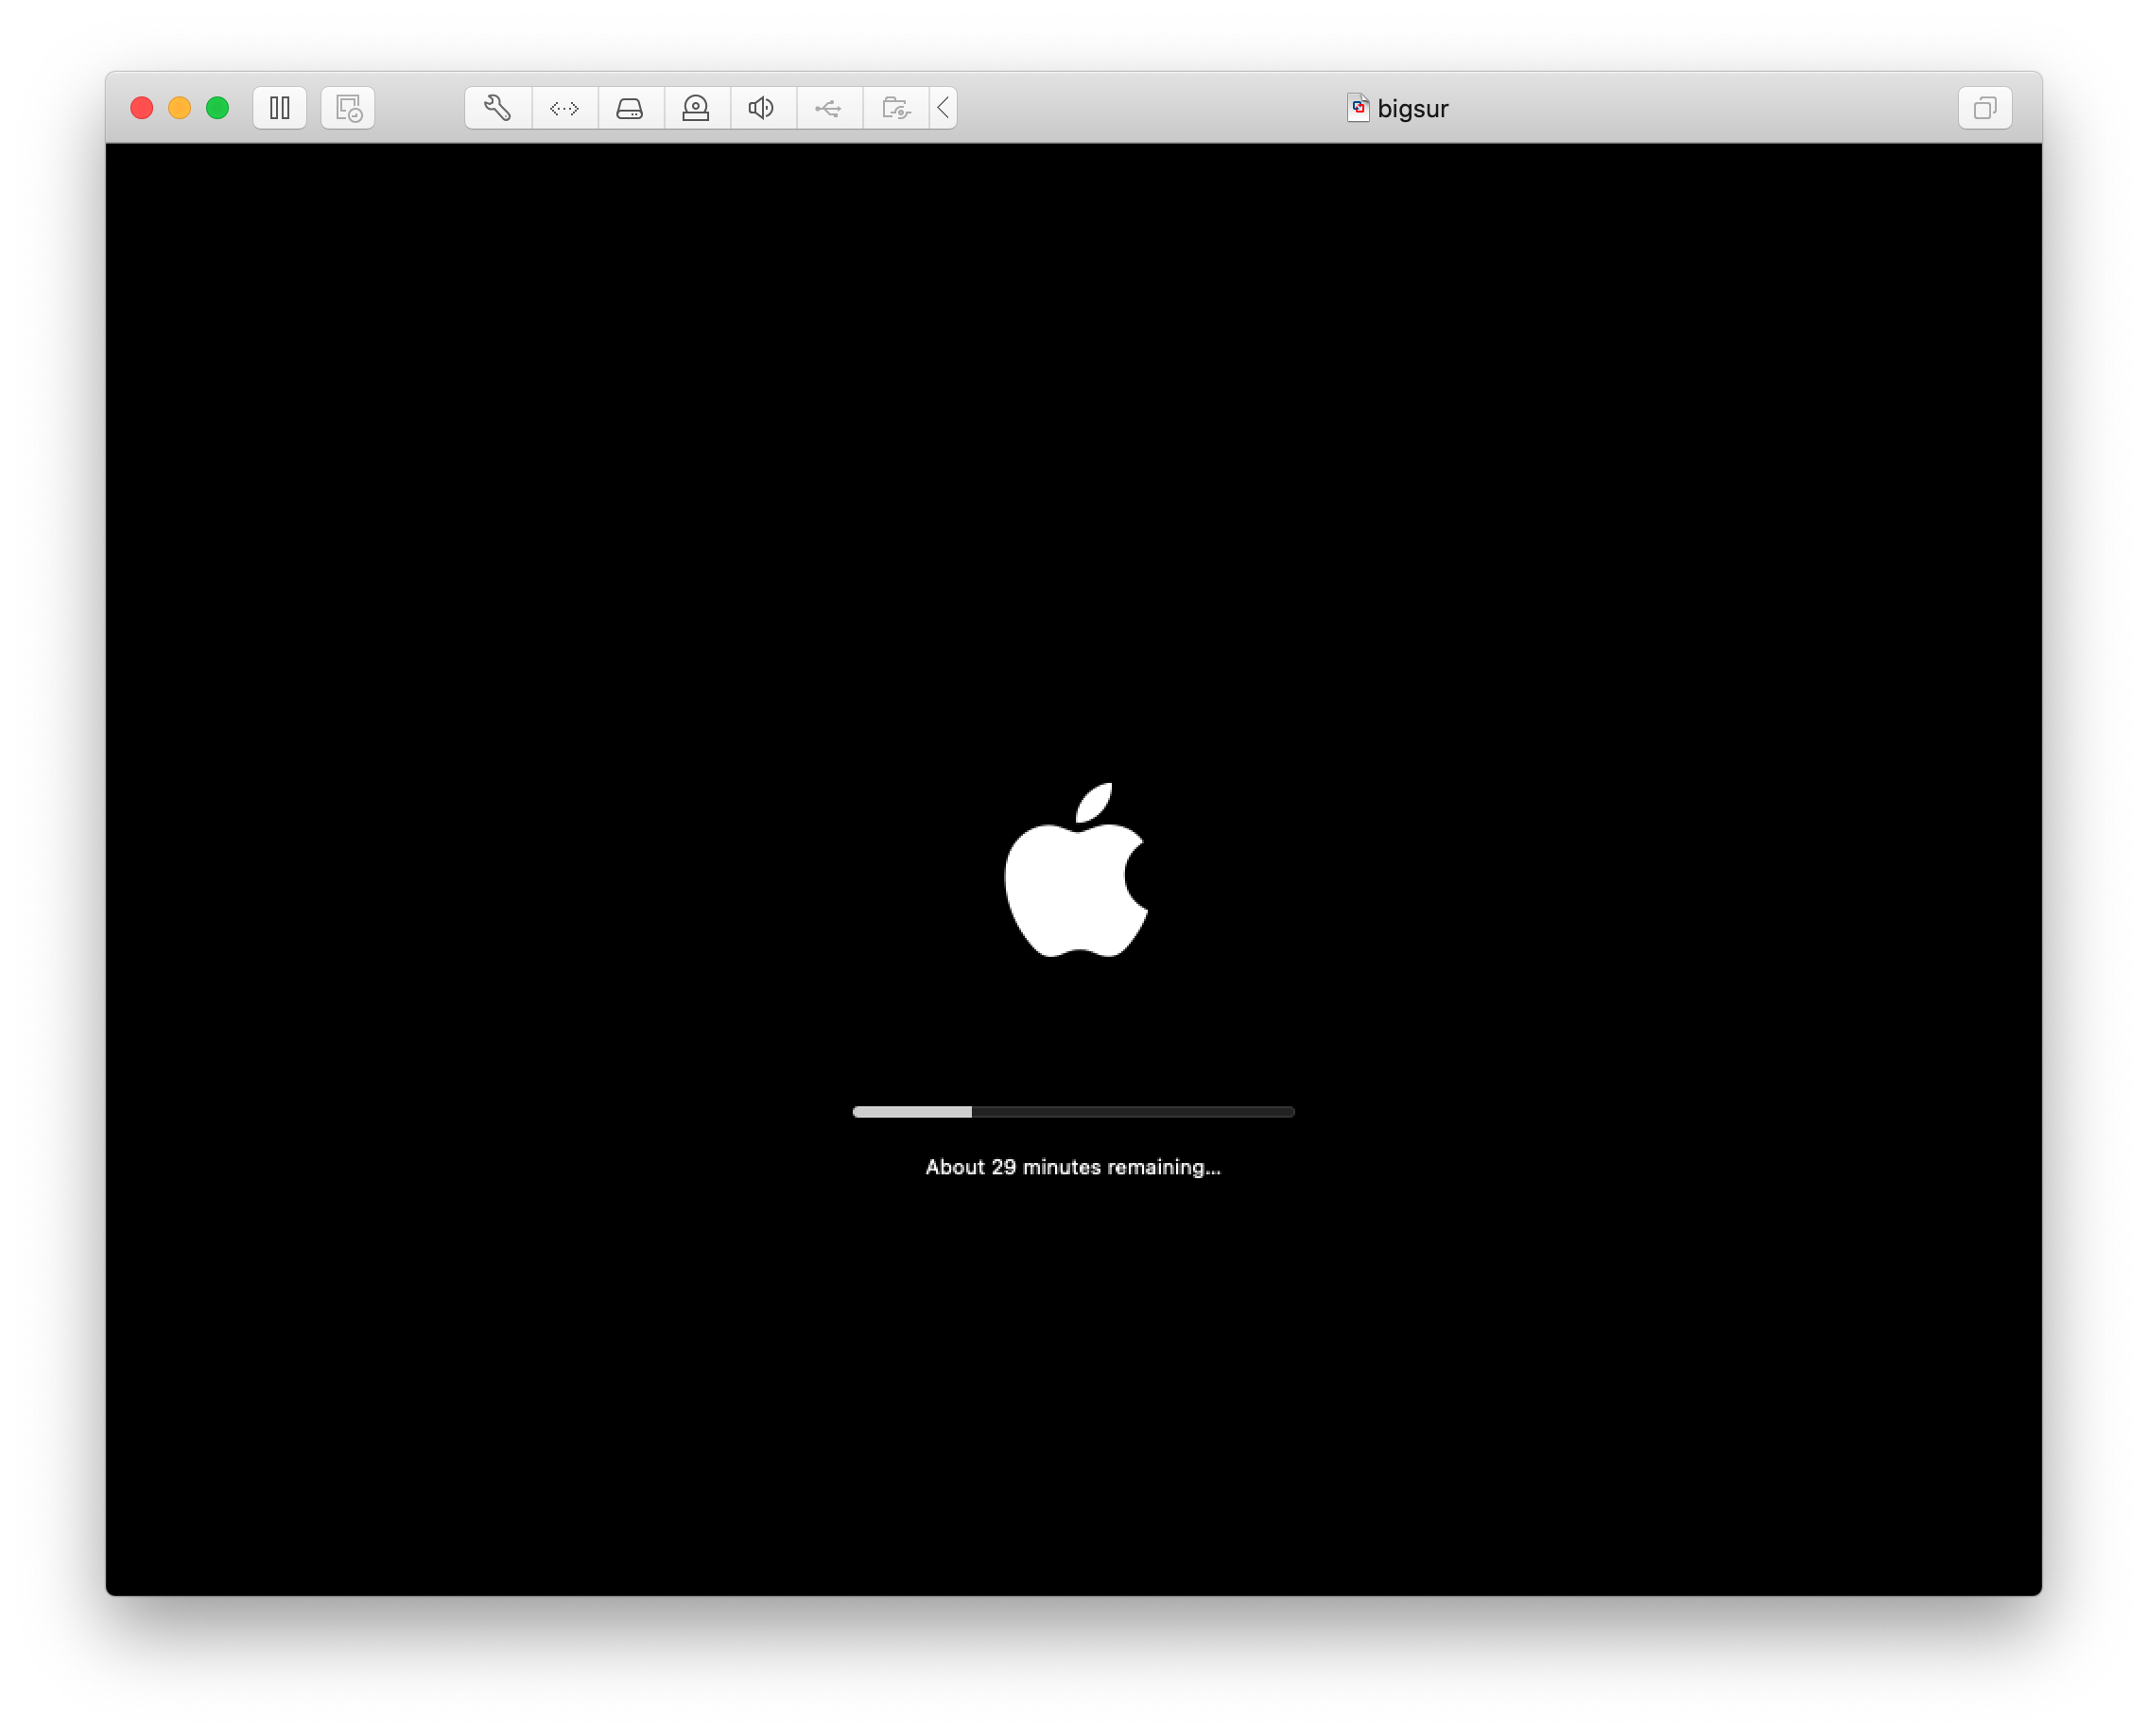
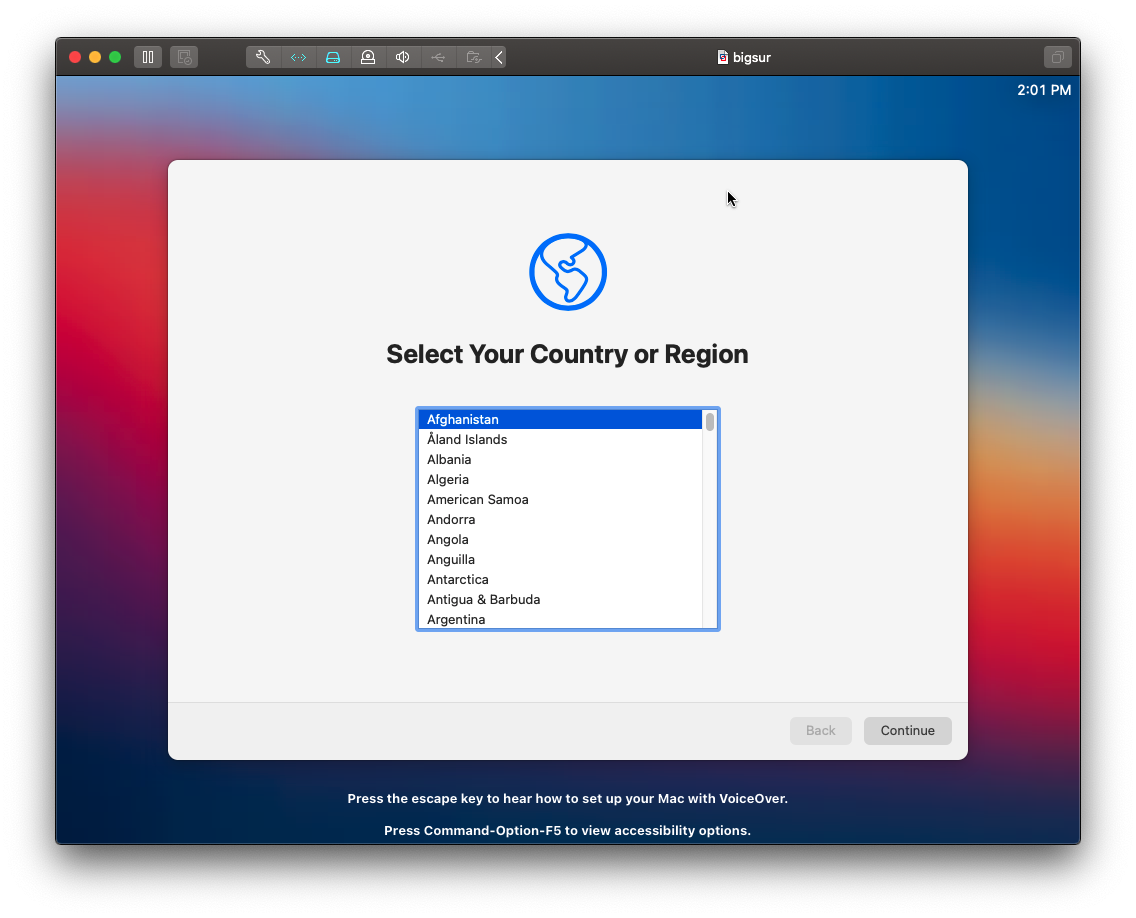
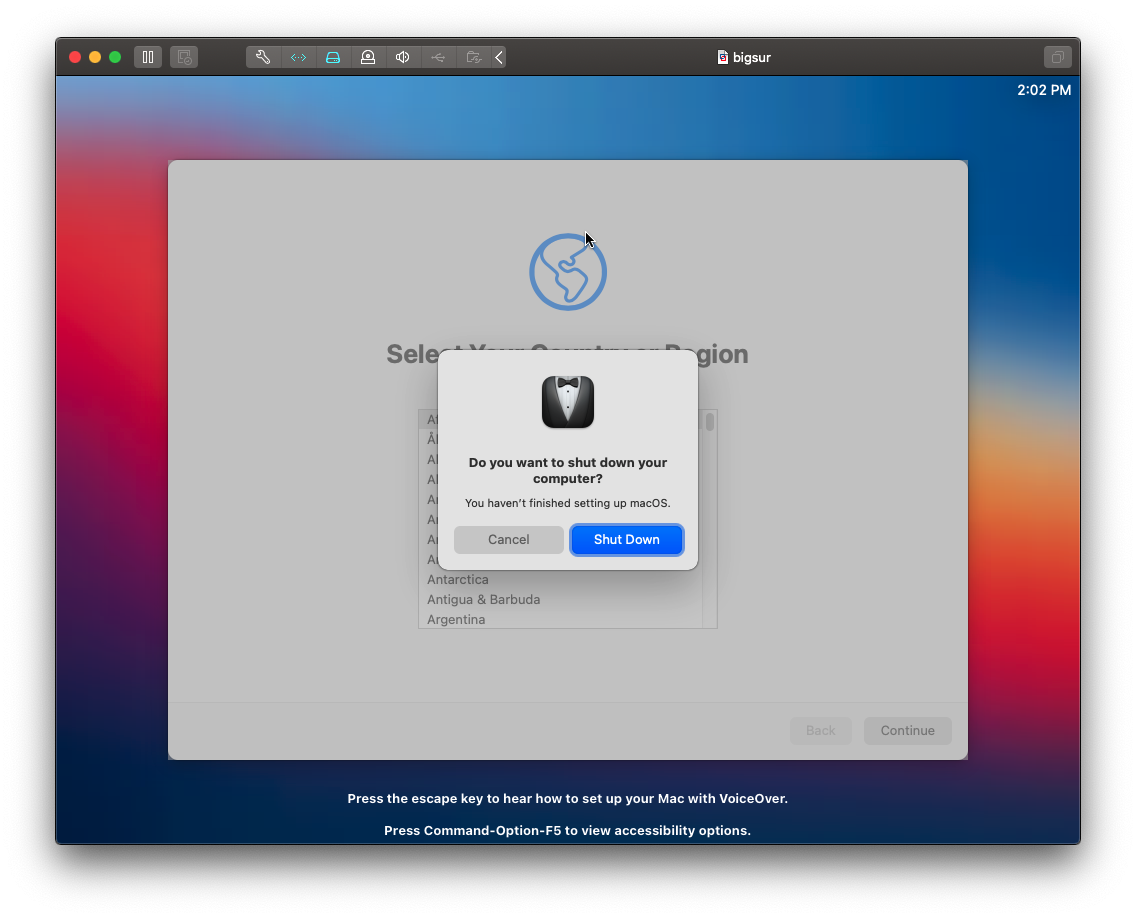
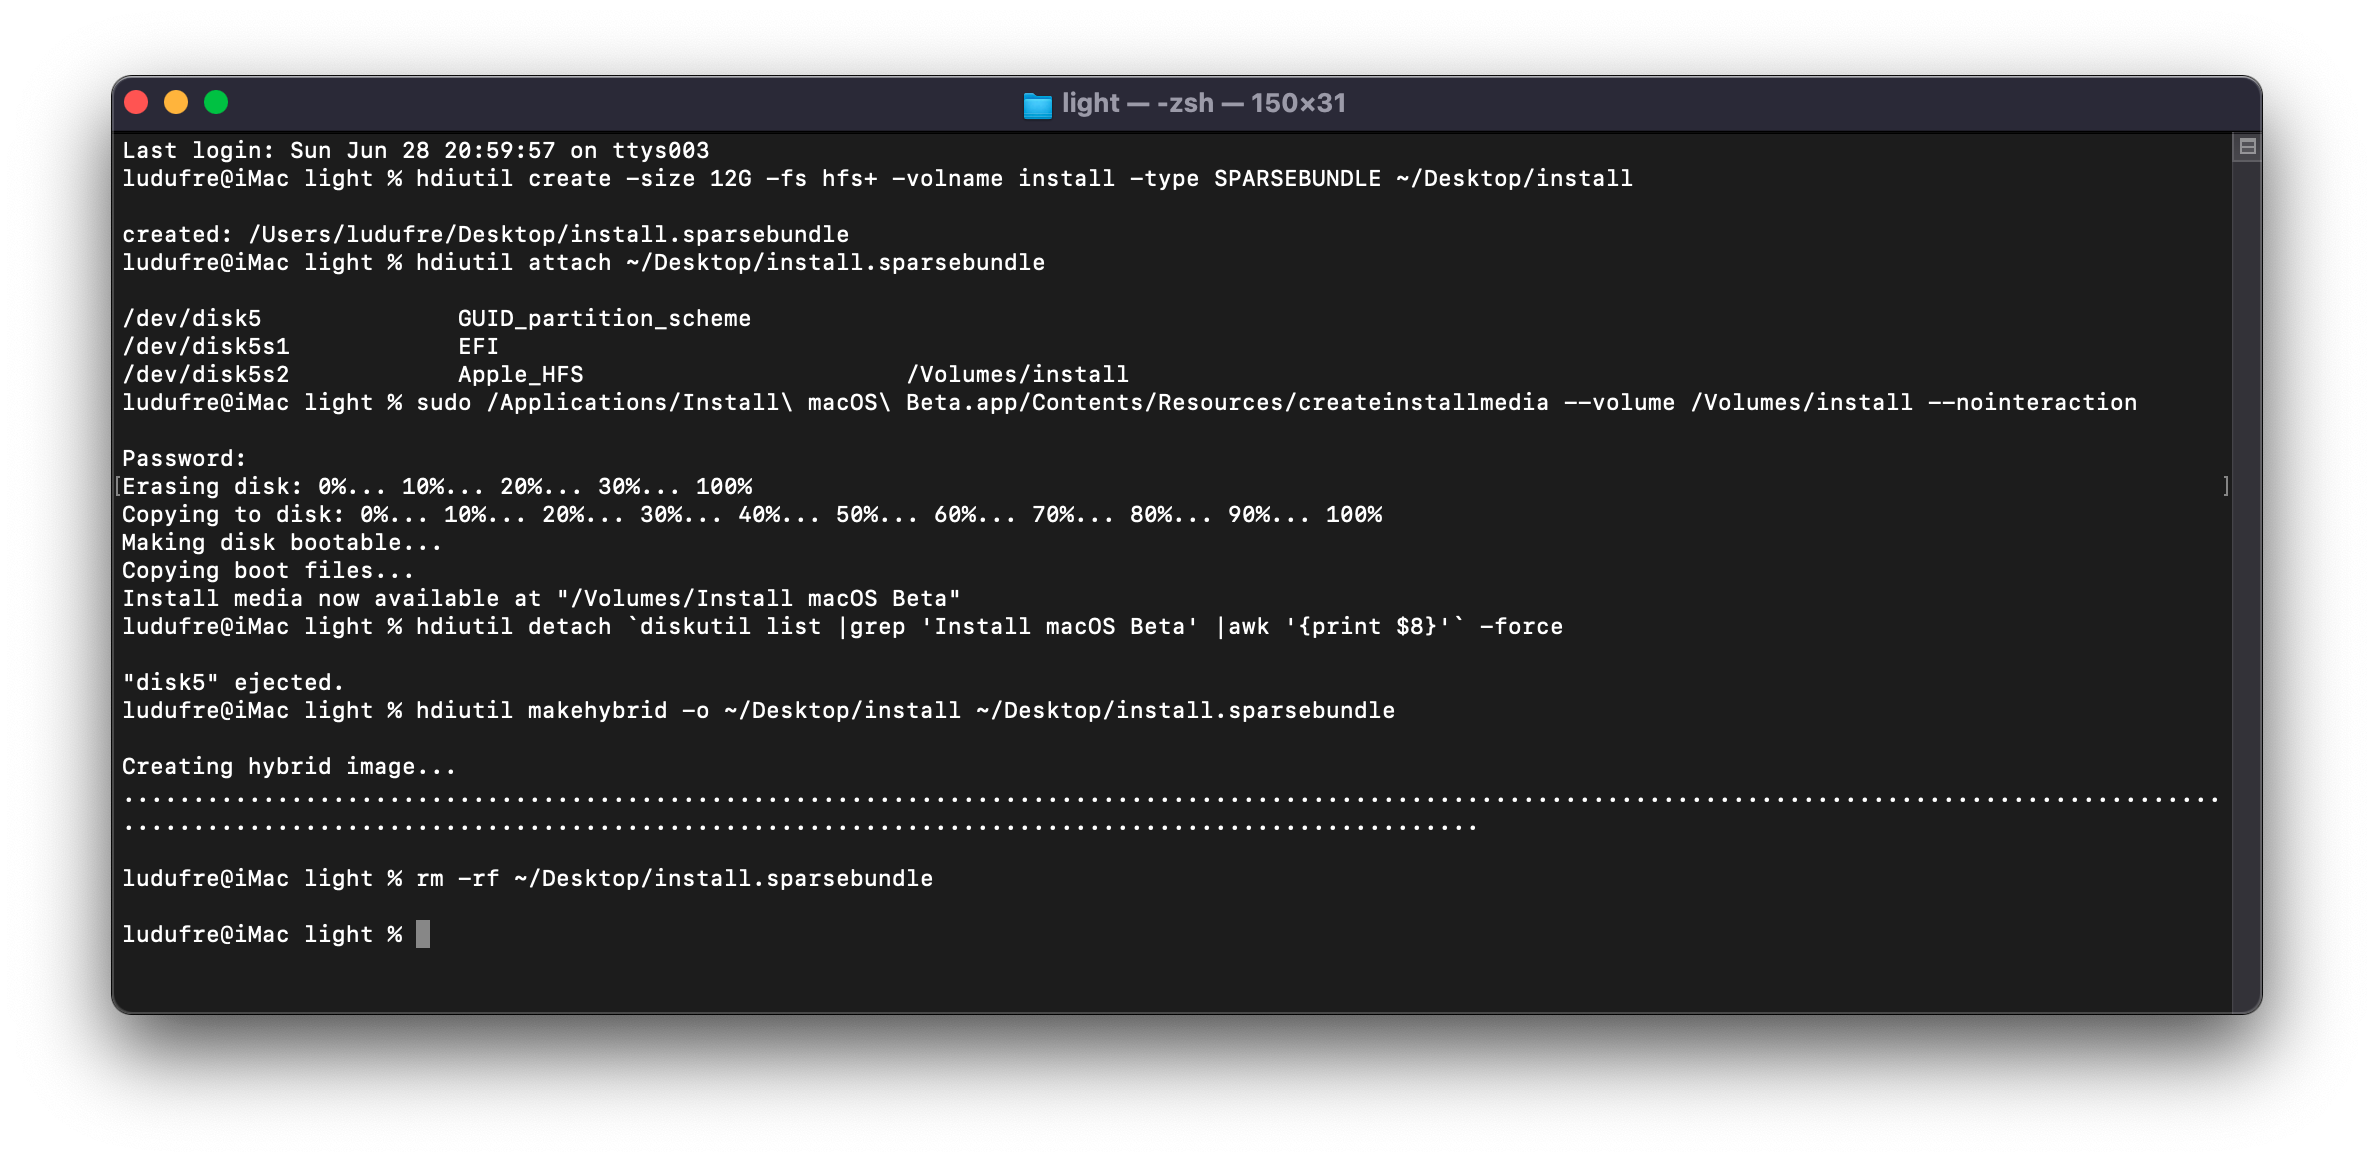
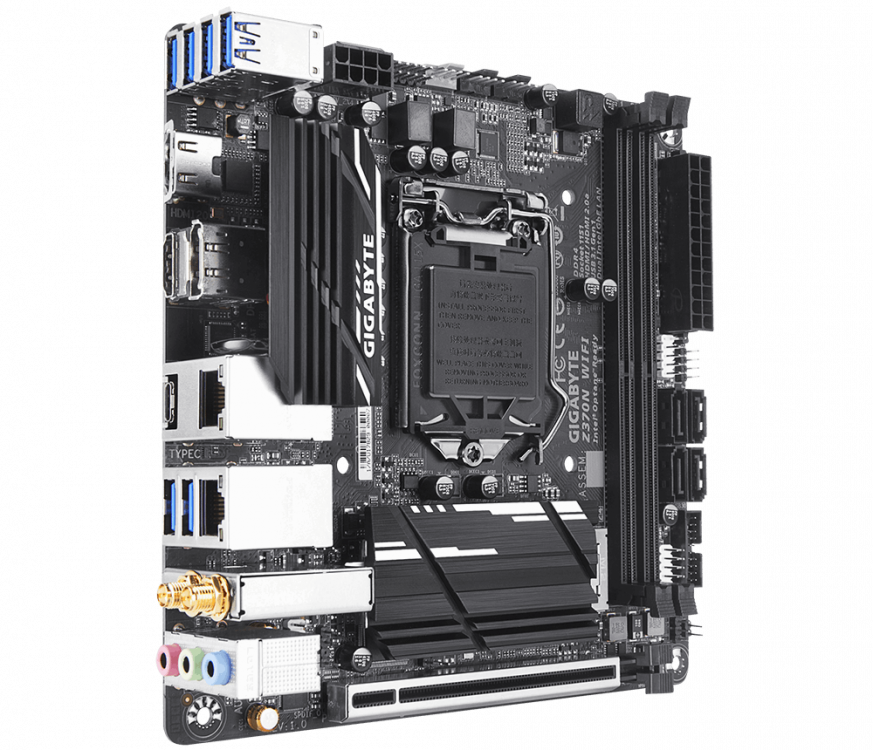
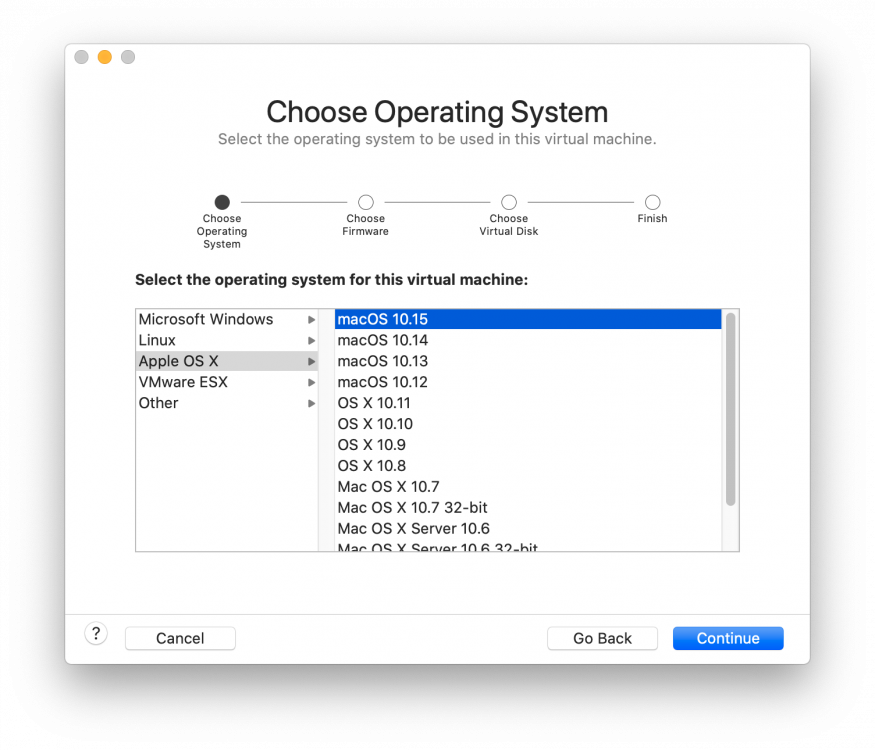
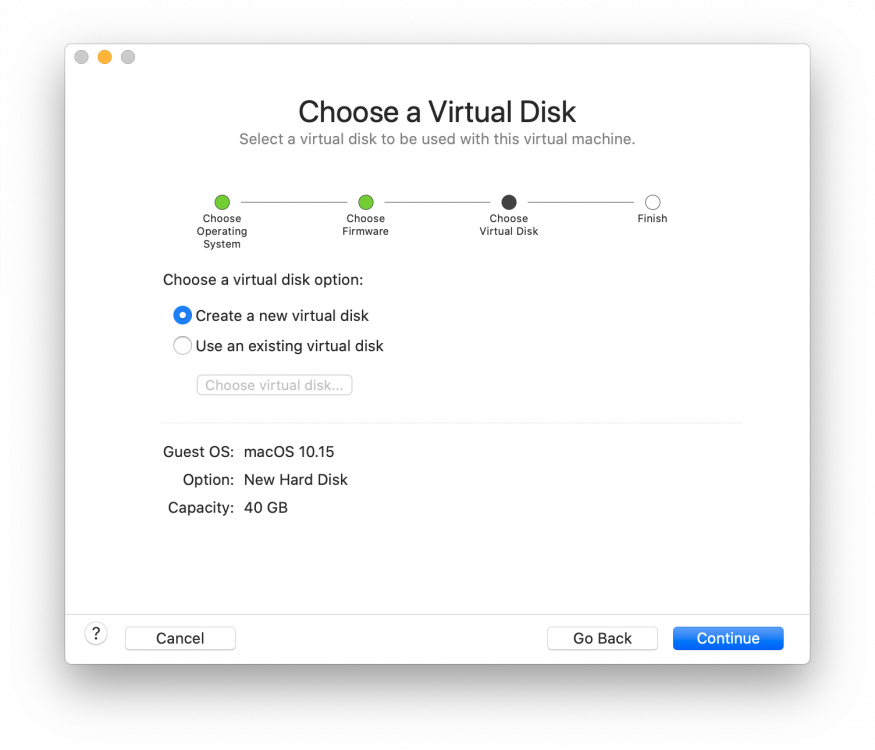
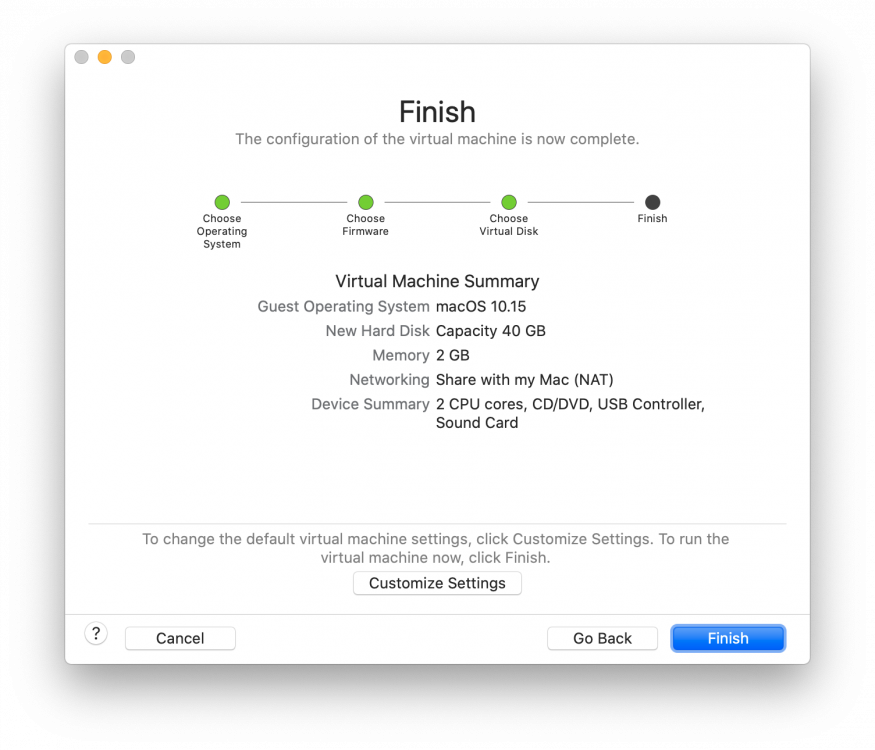
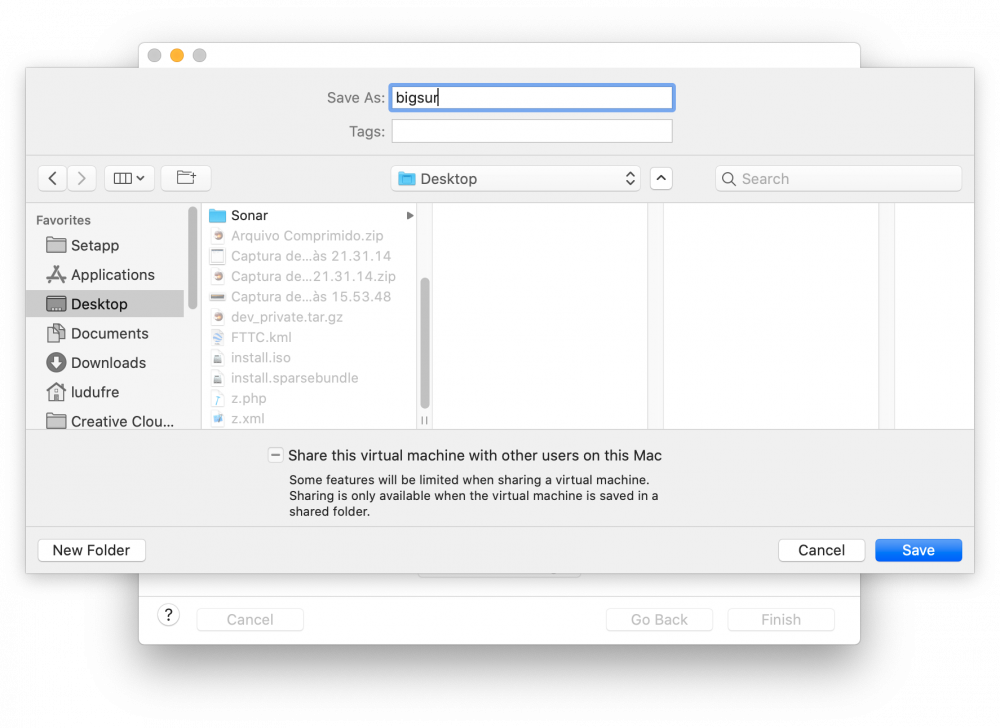
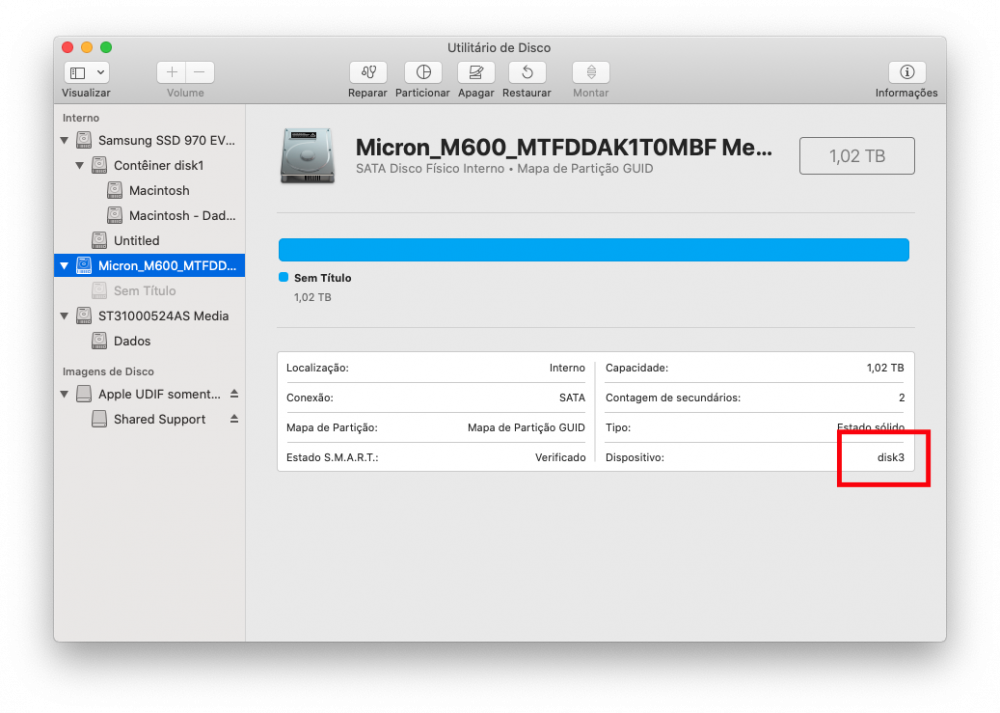
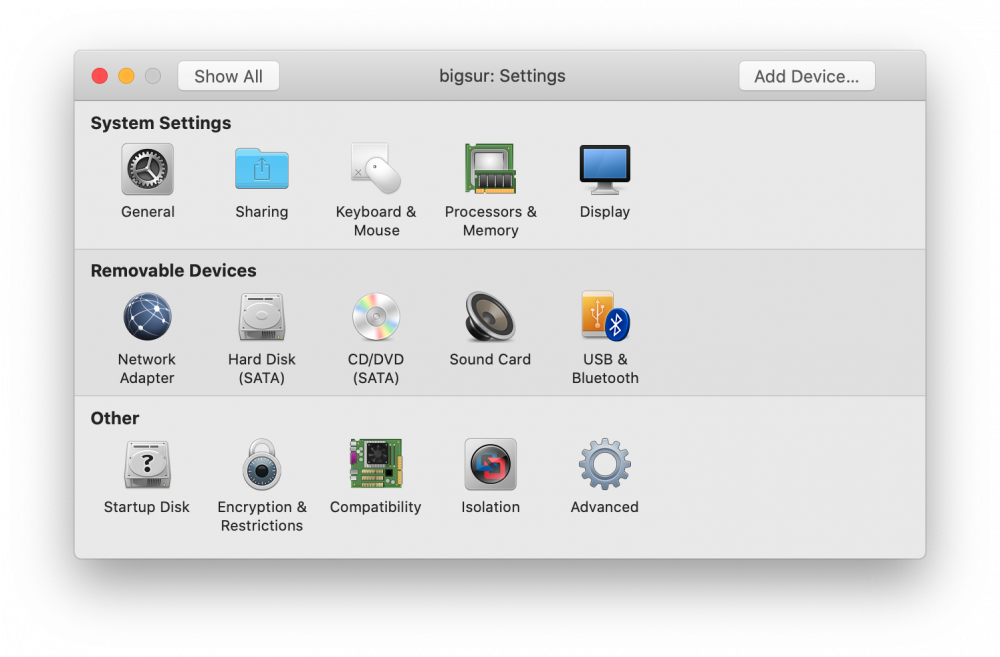
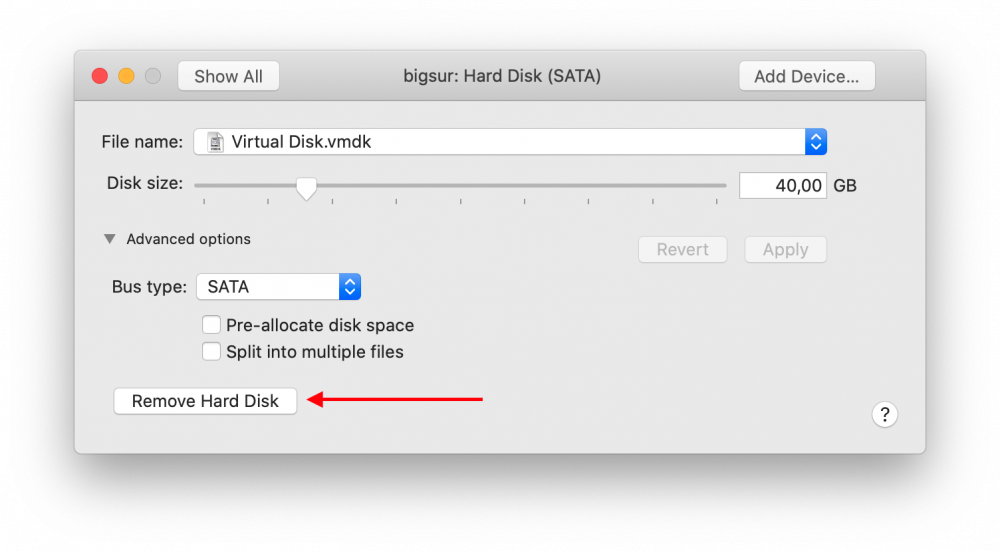
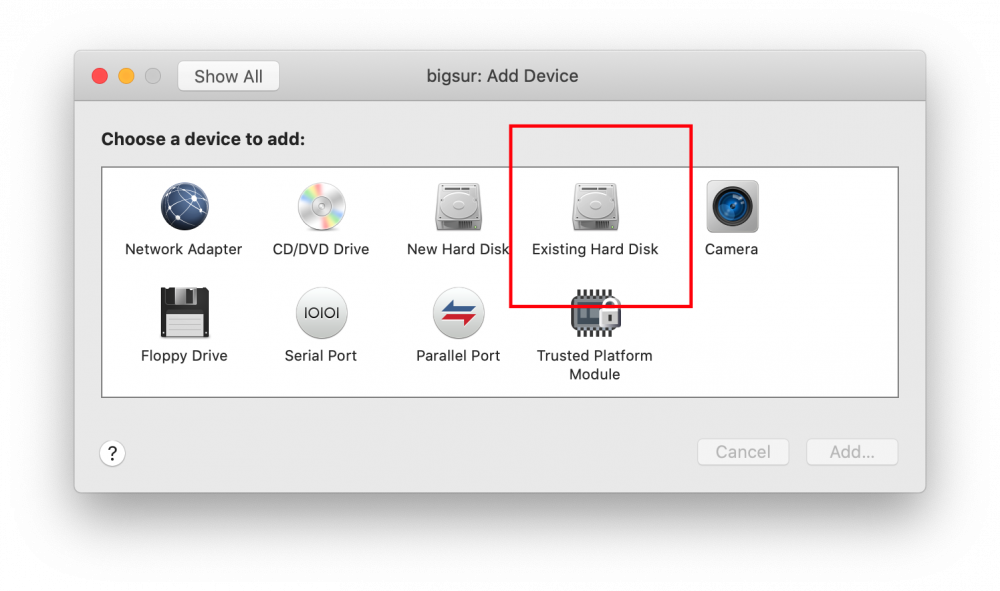
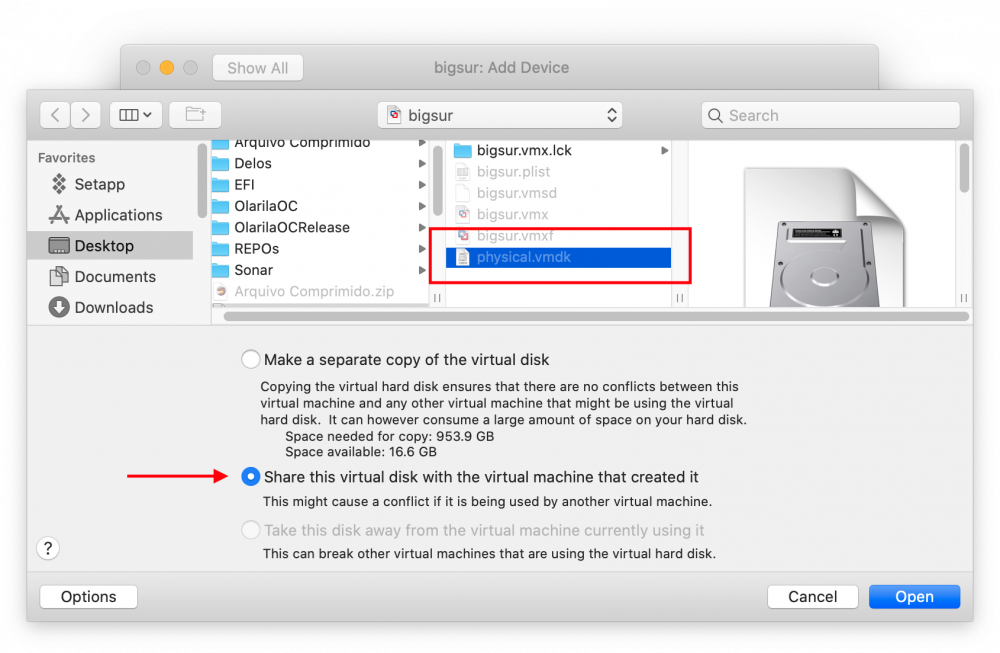
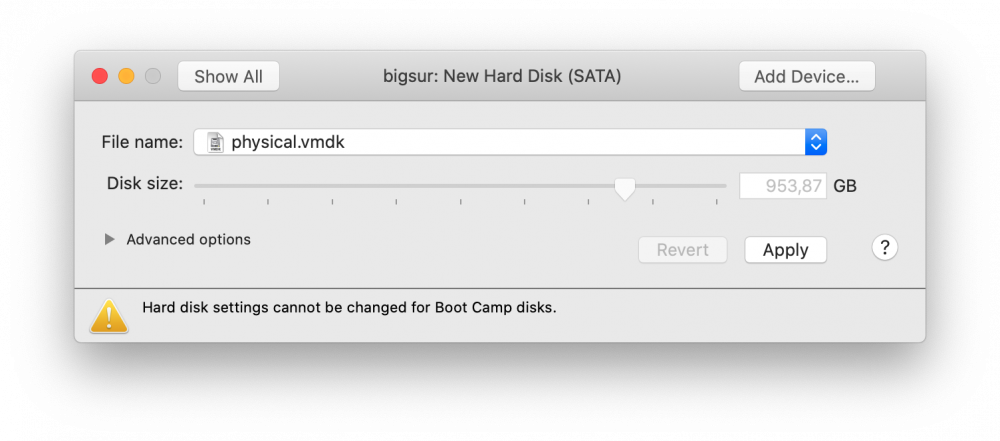
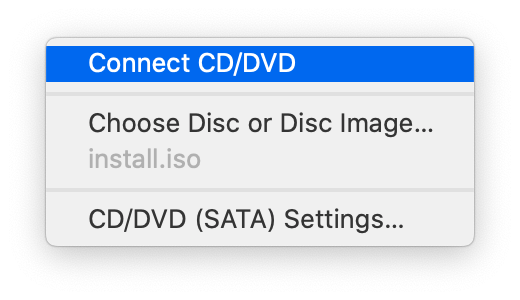
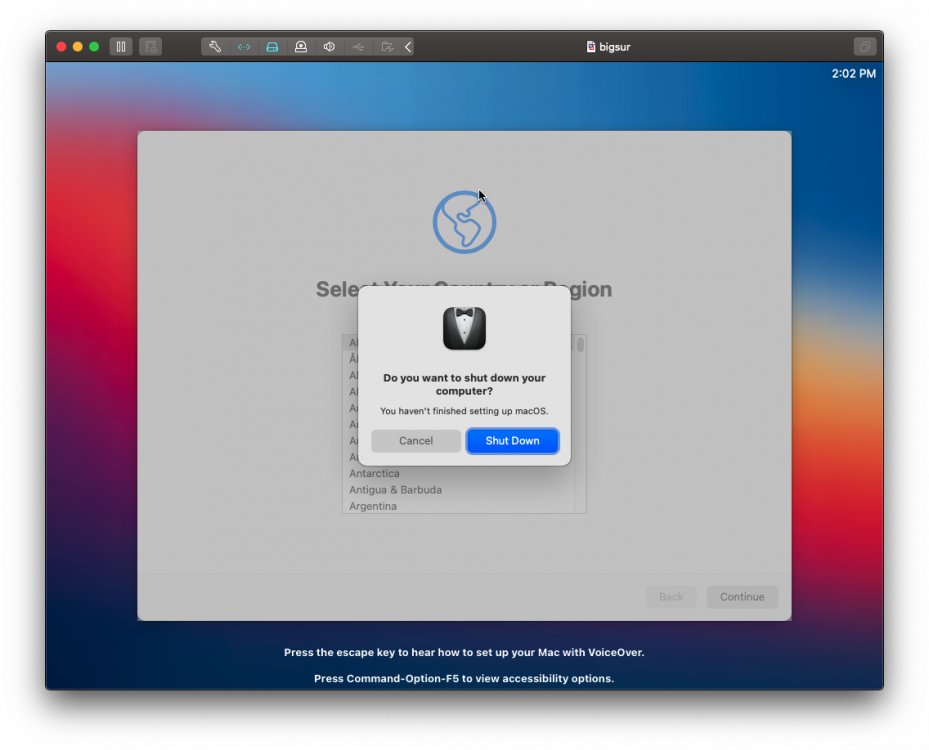
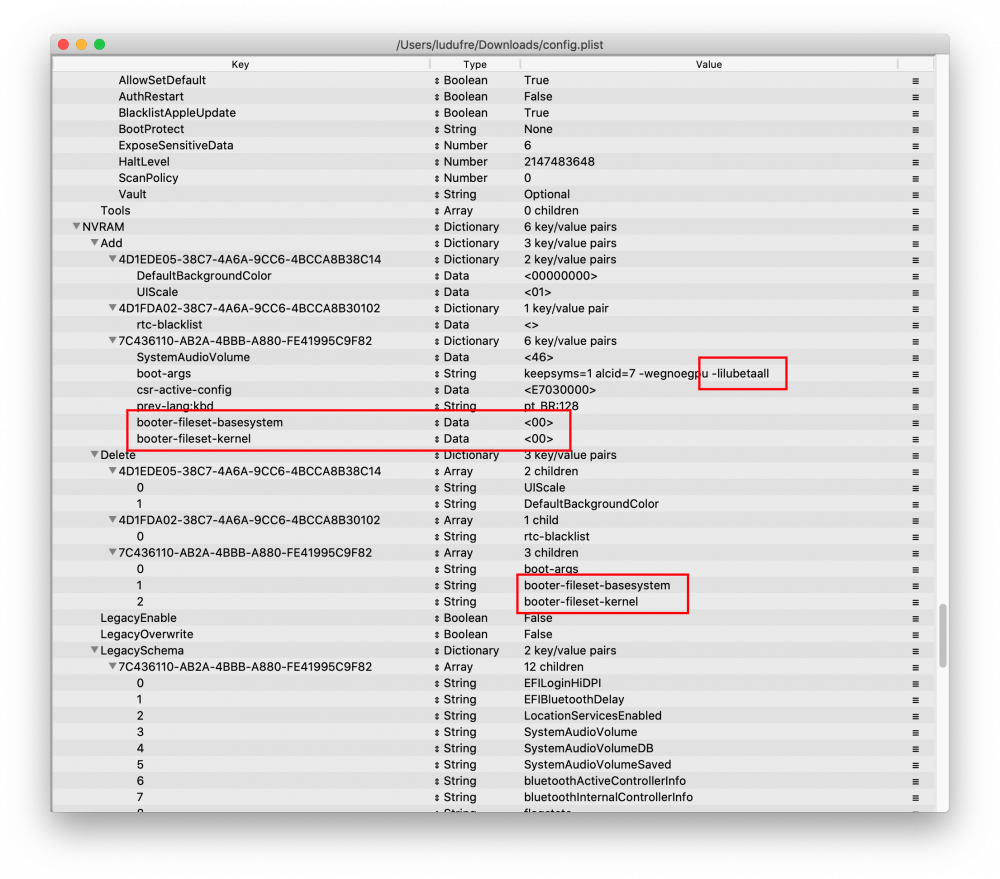
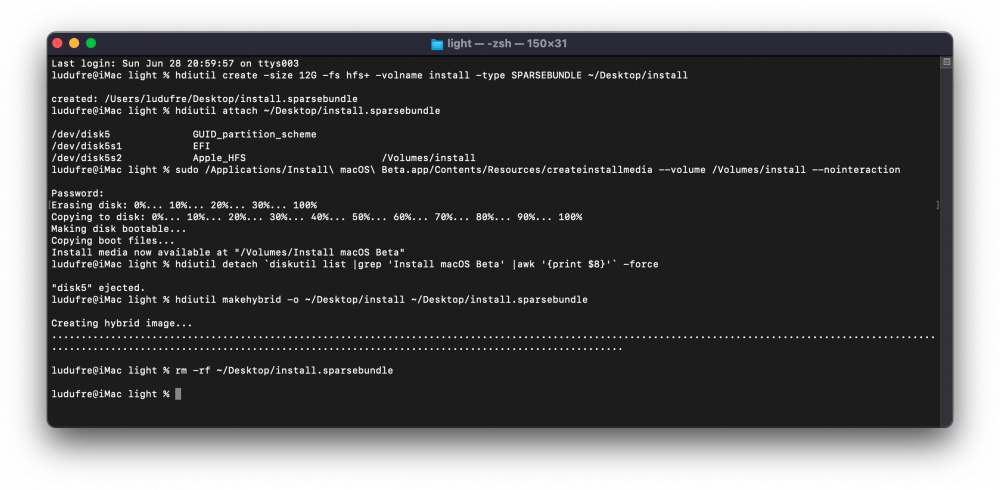
Installing macOS Big Sur 11.0 DP1 on Gigabyte Z370N WIFI + i7 8700K + UHD 630 Changelog: 06/28/2020 22:05h GMT-0 - Replaced detach command when creating ISO. - Thanks @ham4ever - Added instruction to run one line at time. 06/27/2020 02:37h GMT-0 - iMessage works too. Just not at first boot. 06/26/2020 18:54h GMT-0 - First version. What works and what does not - Processor: Intel Core i7-8700K -> Work. All SpeedStep stages.- Video Card: Intel UHD 630 -> Work. QE/CI and Metal.- Chipset: Intel Z370 -> Work.- HDMI 2.0 (1st) -> Work. - HDMI (2nd) -> Work. - DP -> Work. - Audio: ALC1220 -> Work. - HDMI Audio -> Work.- WiFi/Bluetooth -> Not work. Replaced with BCM94360CS2. - Ethernet (1st) -> Work.- Ethernet (2nd) -> Work.- USB3.0 -> Work.- Sleep -> Work. - Airdrop, Handoff, Instant Hotspot and Continuity -> Work after replaced wireless. Todo - Fix iMessage (other iServices works perfectly) - Nothing Disclaimer! Bootloaders are currently unable to start the installation. The solution is to use a virtual machine and use a physical disk (additional, USB or SATA, NVME) as a target in the installation. Change the OpenCore compiled from the source code, and add some entries in NVRAM through config.plist. This is not the best solution. But it is the only way at the moment. There are some ready-made images available out there, but I prefer not to use them and create a clean installation. What you need to install - Running install of macOS - Already working OpenCore with this setup - Create bootable ISO file - Spare Disk/SSD- macOS Big Sur DP1 install app- Latest OpenCore + Kexts compiled from sources - Some KEXTs and SSDT patches UEFI configuration My BIOS is F10 (I use an 8th generation processor, so I don't need to upgrade) You can configure manually or load my BIOS profile. Manually: - Shutdown and insert the flash.- Power on with DEL pressed to enter BIOS setup.- Change value: BIOS - CSM Support to Disabled- Change value: BIOS - Secure Boot to Disabled- Change value: Peripherals - Initial Display to IGP- Change value: Chipset - VT-d to DISABLE- Change value: Chipset - Internal Graphics to ENABLE- Save & Exit Setup or, BIOS profile You can use one of my BIOS profiles attached bellow. It's two versions. One stock and another with overclock [5.0 GHz] - Put the profile in the root of the flash drive at EFI partition. - Restart with DEL pressed to enter BIOS setup. - Go to Save & Exit. - Select Load Profiles. - Select last option and then the flasdrive in the list. - And finally choose MACOS_STOCK or MACOS_5GHZ. - Save & Exit Setup How create bootable ISO file Download Big Sur DP1 Run this command on Temrinal: sudo /System/Library/PrivateFrameworks/Seeding.framework/Resources/seedutil enroll DeveloperSeed Go to System Updater and download the Install macOS Beta app. Create ISO Then run on Terminal (One line at a time): hdiutil create -size 12G -fs hfs+ -volname install -type SPARSEBUNDLE ~/Desktop/install hdiutil attach ~/Desktop/install.sparsebundle sudo /Applications/Install\ macOS\ Beta.app/Contents/Resources/createinstallmedia --volume /Volumes/install --nointeraction hdiutil detach `diskutil list |grep 'Install macOS Beta' |awk '{print $8}'` -force hdiutil makehybrid -o ~/Desktop/install ~/Desktop/install.sparsebundle rm -rf ~/Desktop/install.sparsebundle Now you have install.iso on desktop. How create create the virtual machine and install to disk/SSD Download and install the trial version of the VMware Fusion from their site. I'm used the version 11.5.5. - Create a custom virtual machine - Operating System: Apple OS X - macOS 10.15 - Create a new virtual disk (The size doesn't matter, We'll delete later) - Click in "Customize Settings" - Save the VM on desktop with name: bigsur - Insert the spare disk/SSD on PC (reboot if necessary) and identify what /dev/diskX is. You can look on Disk Utility.app: - Create VMDK that point to it: sudo diskutil unmountDisk diskX /Applications/VMware\ Fusion.app/Contents/Library/vmware-rawdiskCreator create /dev/diskX fullDevice ~/Desktop/bigsur.vmwarevm/physical sata - Edit the virtual machine settings created previously - Click in Hard Disk (SATA) and delete it (Remove Hard Disk) - Then add the physical disk - There's a bug in Fusion. To select the physical.vmdk, right click then "Quick Look", then "Share virtual disk with the virtual machine that created it" - Click Apply. - Now mount de install.iso - Start the VM and install as usual until: Disk Utility, format GUID with APFS (VMware Virtual SATA Hard Drive Media), Install macOS, wait few reboots and stop at first boot wizard. This can take up to 45 minutes. It may seem like it is stopped, but it is not. - Press Command + Q and shutdown (usually WIN + Q) - Close VMware Fusion. Copy OpenCore to EFI - Mount the EFI with: sudo diskutil mount diskXs1 - Copy your current working OpenCore EFI to that mounted EFI. - Download mine attached or Update your OpenCore, Kexts and driver UEFI. - You can use the @MaLd0n script attached to compile all (OlarilaOC.command.zip) - If using mine add your MLB, ROM, SystemUUID and SystemSerialNumber. (see how to) - Add following items do config.plist: NVRAM -> Add -> 7C436110-AB2A-4BBB-A880-FE41995C9F82 -> boot-args -> -lilubetaall (append) NVRAM -> Add -> 7C436110-AB2A-4BBB-A880-FE41995C9F82 -> booter-fileset-basesystem + Data + <00> NVRAM -> Add -> 7C436110-AB2A-4BBB-A880-FE41995C9F82 -> booter-fileset-kernel + Data + <00> NVRAM -> Delete -> 7C436110-AB2A-4BBB-A880-FE41995C9F82 -> booter-fileset-basesystem NVRAM -> Delete -> 7C436110-AB2A-4BBB-A880-FE41995C9F82 -> booter-fileset-kernel Done! Boot from the new disk/SSD and finish de first boot wizard. And last but not least I would like to thank the following community members, by making these dream possible:@crushers, @snatch, @apianti, @blackosx, @blusseau, @dmazar, @slice2009, @autumnrain, @phpdev32, @EMlyDinEsH, @RehabMan, @Scellow, @mitch_de, @Shailua, @Andy Vandijck, @maxfierke, @ArturXXX, @LexHimself, @brumas, @khamsakamal48, @MaLd0n, @joedm and @vit9696 and all others members involved directly or indirectly. Attachments MACOS_5GHZ MACOS_STOCK OlarilaOC.command.zip EFI.zip


 1 point
 -
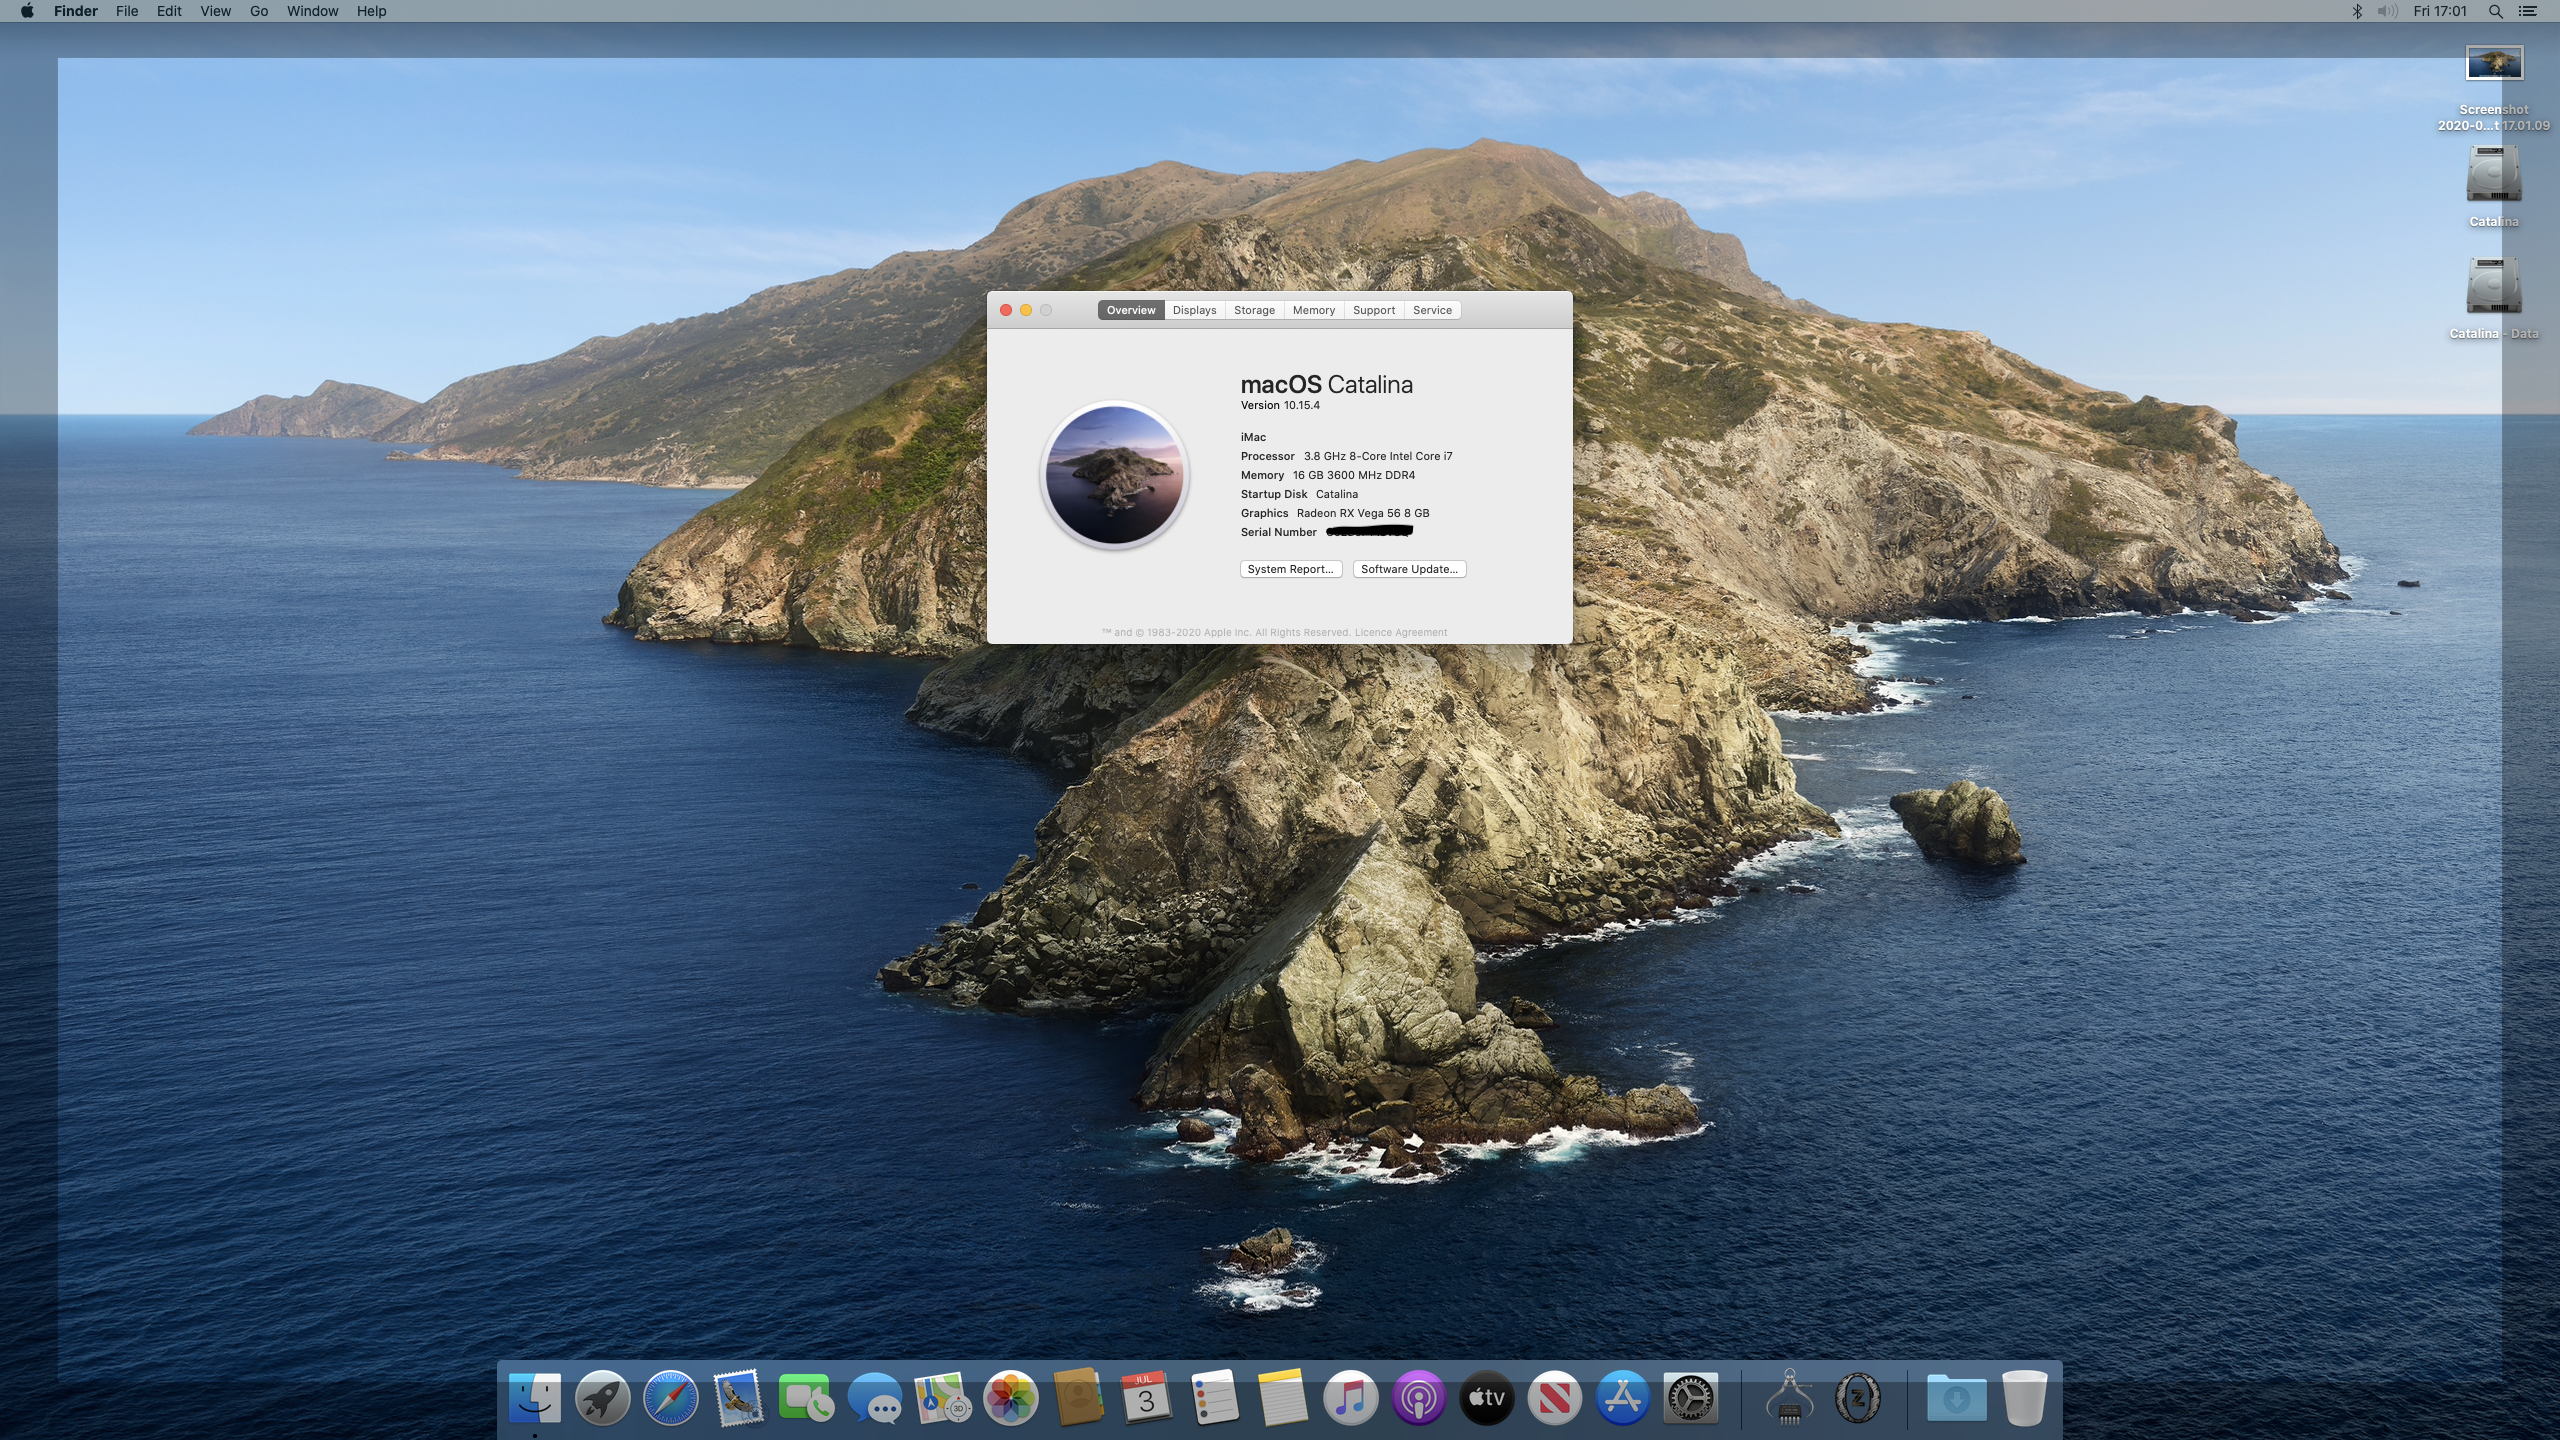
Hello everyone! Together with the help of @DSM2 I built a Kext aiming at removing limitations put in place by Apple for PC graphics cards that reduce performance in some benchmarks like Geekbench and some scenarios where memory bandwidth is crucial. Likely most of you already know the issue that some GPUs don't perform as expected in Geekbench. For example, a Radeon VII only scores around 50k to 60k points while on Windows it can easily reach the 82k range - with overclocking even more. This issue is not only affecting the Radeon VII but numerous other graphics cards as well. This problem started back when macOS 10.14.5 Mojave was released, introducing the fix for fan control on Vega 56 / 64 cards. As it turns out, Apple never fixed the fan issues but instead put a dirty workaround in place. Modern AMD GPUs utilize a so-called SMU firmware to manage some of the cards functions. This SMU firmware needs to be uploaded by the graphics driver. It looks like the Vega 56 / 64 fan control bug was caused by a faulty SMU firmware implementation by Apple. Instead of fixing it, all they did was to disable loading of SMU firmware on PC graphics cards. This can be verified by force loading the SMU firmware again on Vega 56 / 64 cards. The fan control bug will then be back. Not loading SMU firmware causes a number of issues and one of them is memory bandwidth being cut in half. Since Geekbench is very sensitive to memory bandwidth, this is what causes the low scores. So essentially, Apple scammed their customers here, putting a dirty fix in place that now affects a large amount of graphics cards. And of course this not only affects hackintosh users but also Mac Pro users or eGPU users, utilizing PC graphics cards on their Mac. Now this is where my RadeonBoost Kext comes in. It makes sure that SMU firmware is loaded again, removing the memory bandwidth limitations, making sure the GPU can be used to its fullest potential. The results really speak for themselves. Demo of the result: RadeonBoost.kext has been built with Hackintosh users in mind, but of course it does work on a real Mac as well. That includes both Mac Pros as well as Macs with an eGPU. You can either inject the kext via OpenCore or put it into /Library/Extensions, repair permissions and rebuild kext cache. Putting it inside /L/E of course requires SIP (System Integrity Protection) to be disabled since the Kext is not signed. Of course you can go ahead and edit the info.plist of RadeonBoost.kext to your likings. For example you can add your own properties. This comes handy if you want to additionally overclock or undervolt your GPU by using a PowerPlay Table, which of course can be added to the Kext as well. On a Hackintosh you of course can keep injecting them through the bootloader without having to edit the kext. List of supported GPUs: RX480, RX580, RX590 (!!! USE ALONG WHATEVERGREEN !!!) Radeon VII, RX 5500, RX 5500 XT, RX 5600, RX 5700, RX 5700 XT (WHATEVERGREEN NOT NECESSARY) Download & Changelog May 28 2020: V1.6 - Disabled SMU Firmware Loading for Navi10/14 due to broken SMU firmware starting from macOS 10.15.5, improved Polaris compatibility April 24 2020: V1.4 - Added target SMBIOSes for AGPM injector to prevent overriding of stock AGPM configuration on SMBIOSes that don't need an AGPM injector (e.g. iMac19,1 etc) April 20 2020: V1.3 Replaced "ATY,EFIVersion" with "ForceLoadFalconSmuFirmware" (thanks to Whatevergreen developers for discovery of this parameter), changed Polaris properties (RX480, 580, 590 users please re-test), removed Apple framebuffer properties (performance difference is minor) April 19 2020: V1.2 Removed support for Vega 56, Vega 64 and Vega Frontier (REASON) April 19 2020: V1.1 Removed unnecessary device properties, added embedded AGPM injector for SMBIOSes where it makes sense (iMacPro1,1; MacPro7,1; MacPro5,1; MacPro4,1) April 17 2020: V1.0 Initial Public Release For download of RadeonBoost.kext please check this posts attachements. Enjoy! RadeonBoost.kext.zip


 1 point
 -
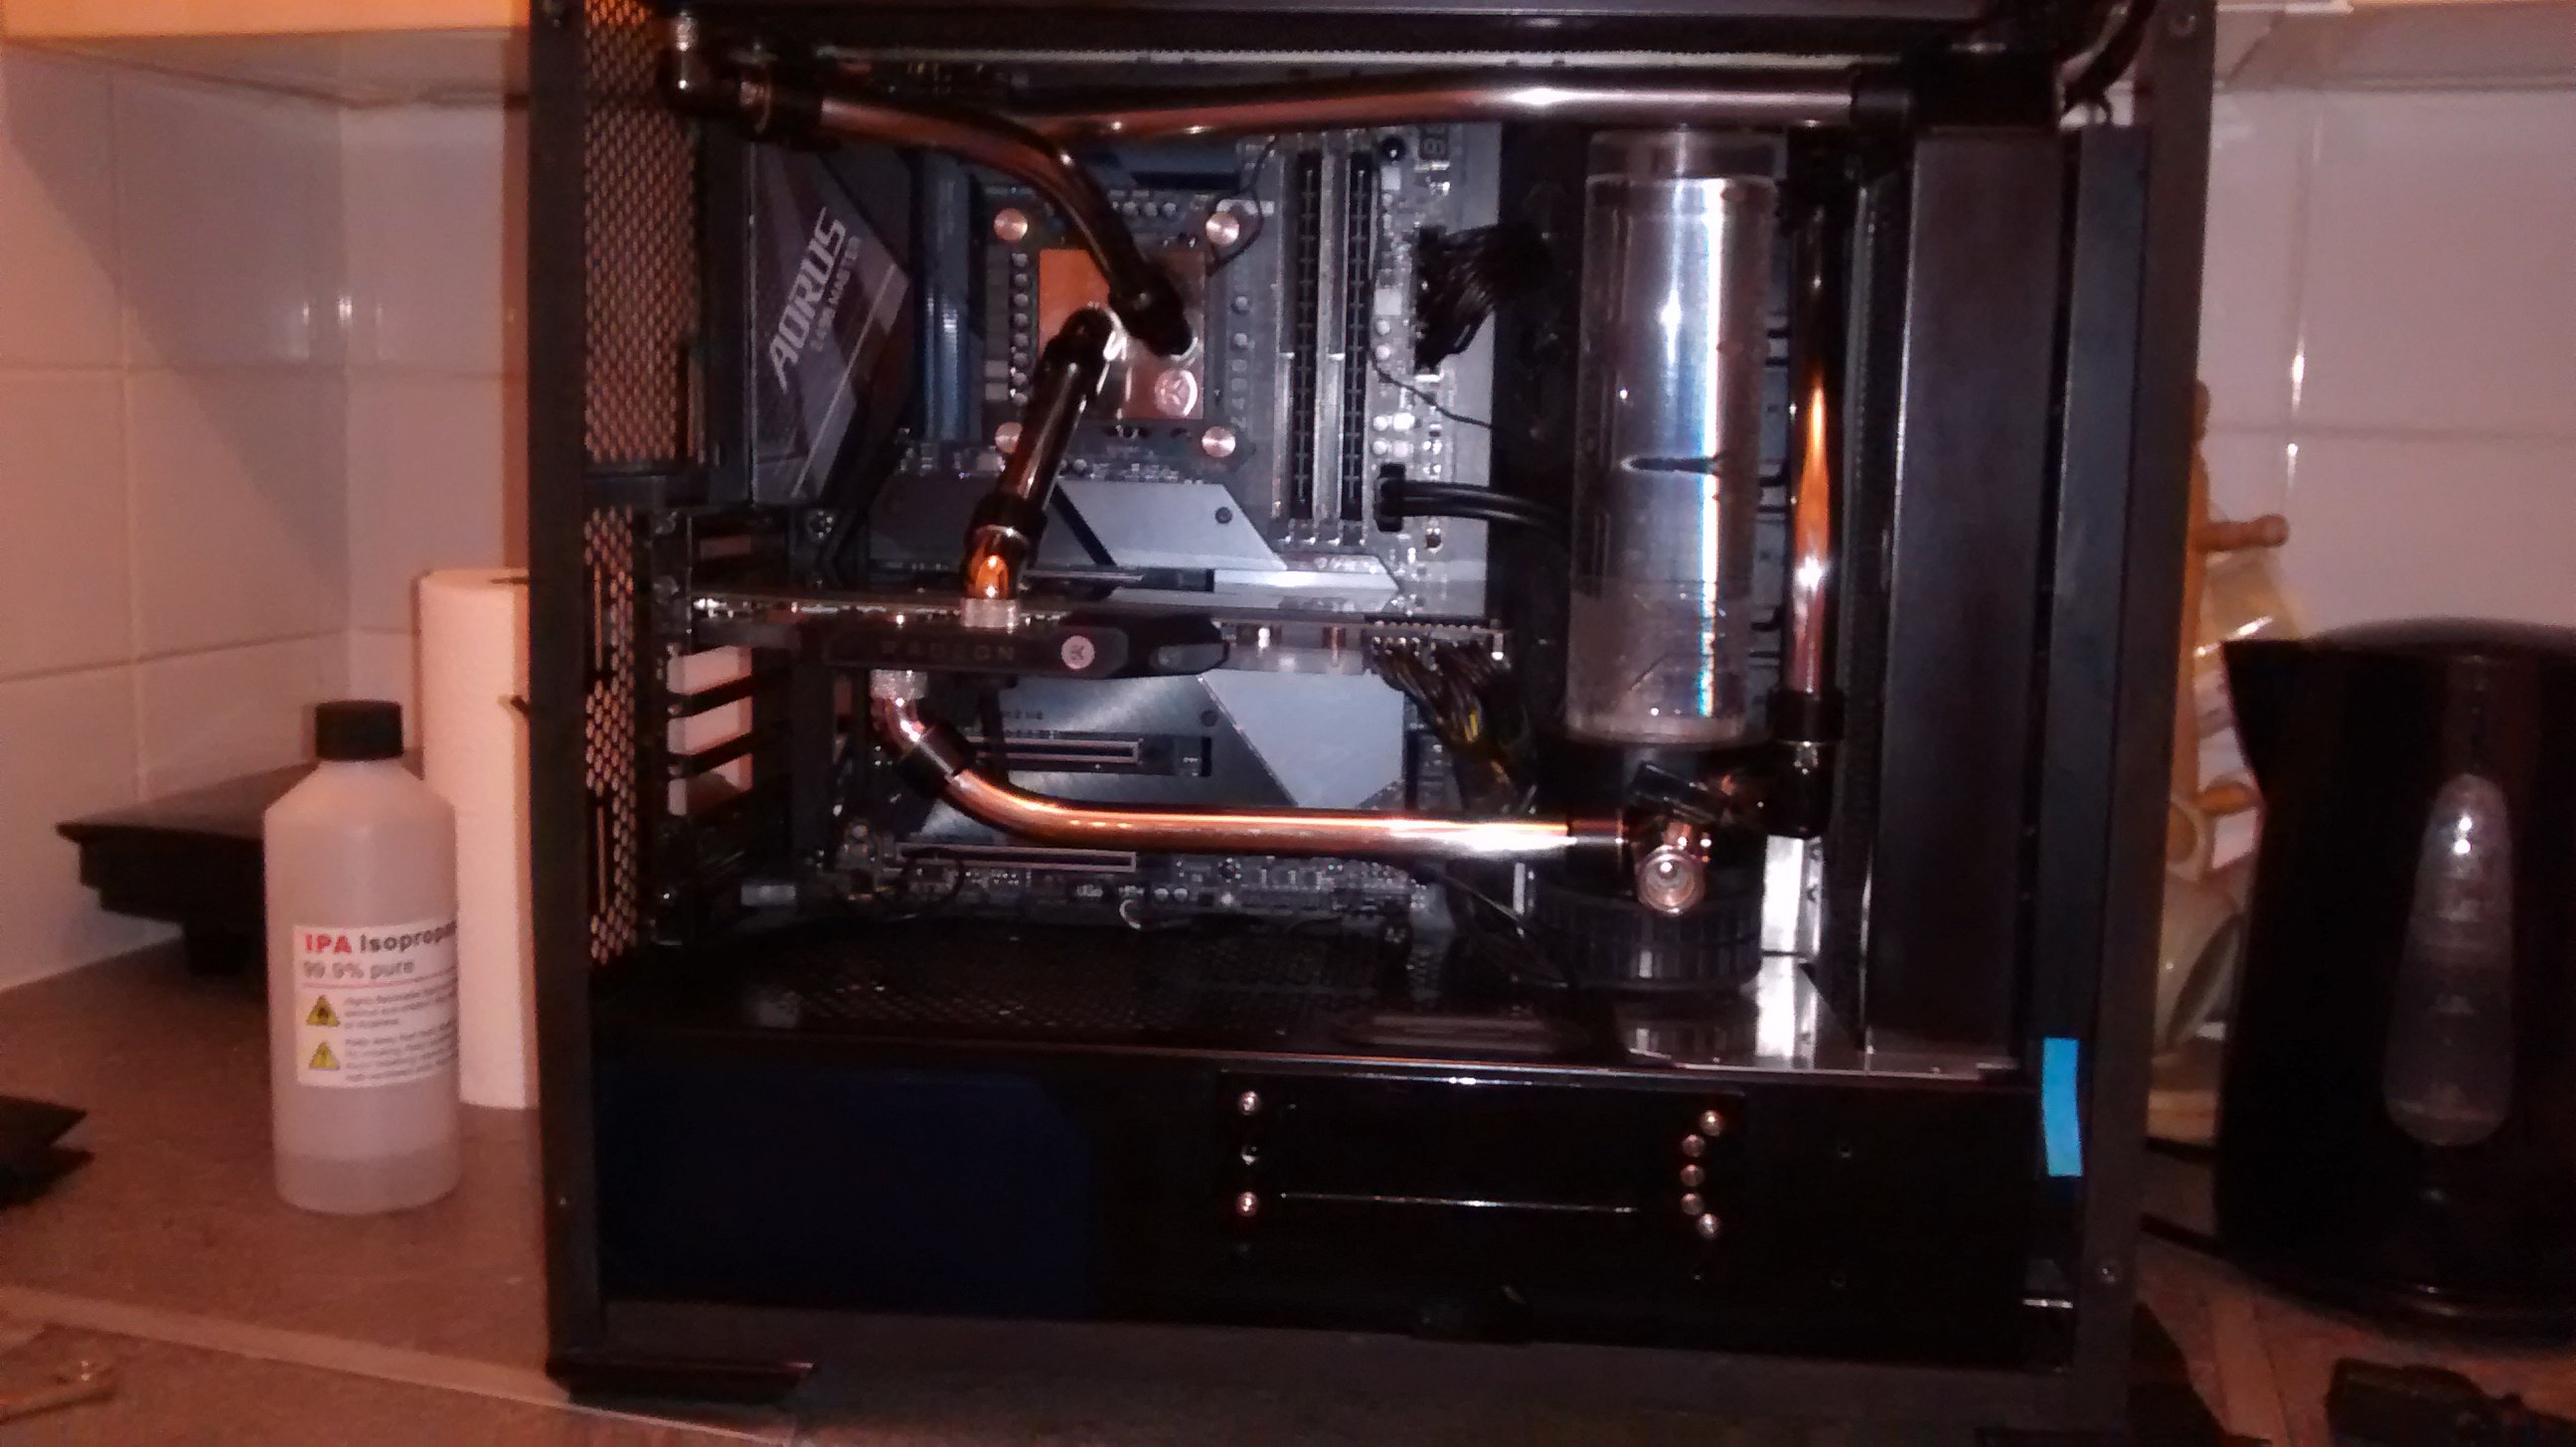
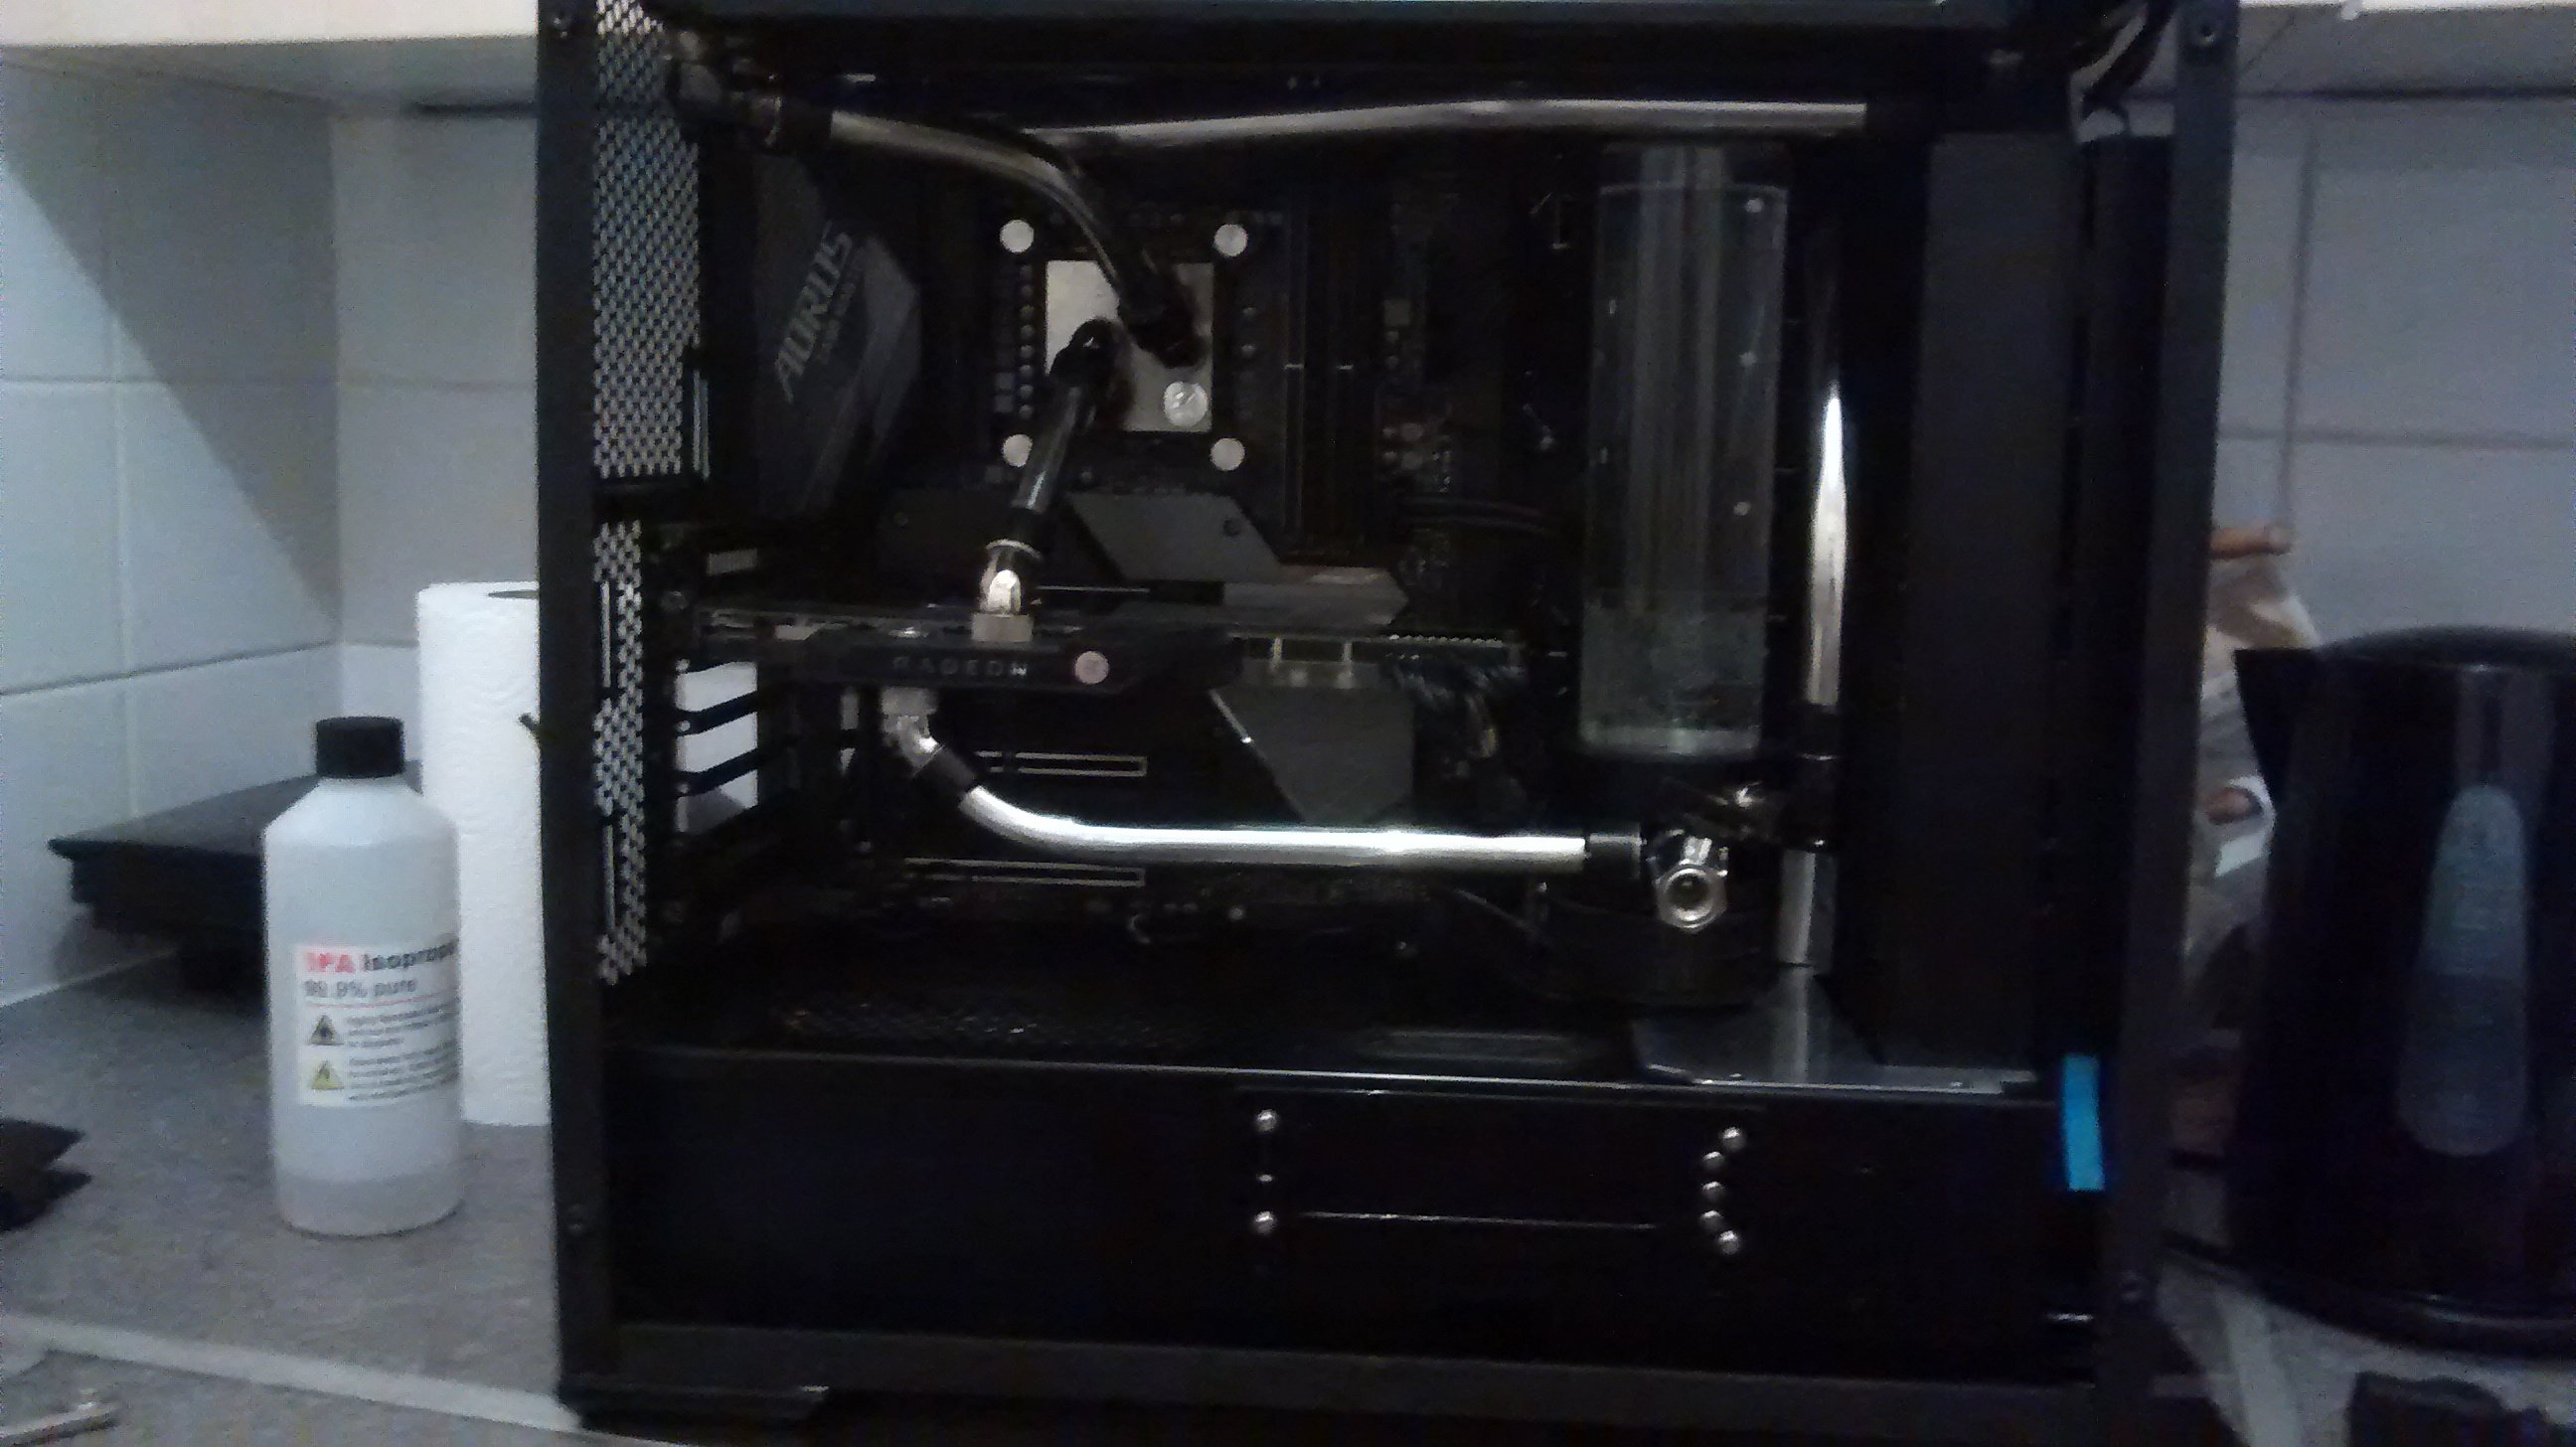
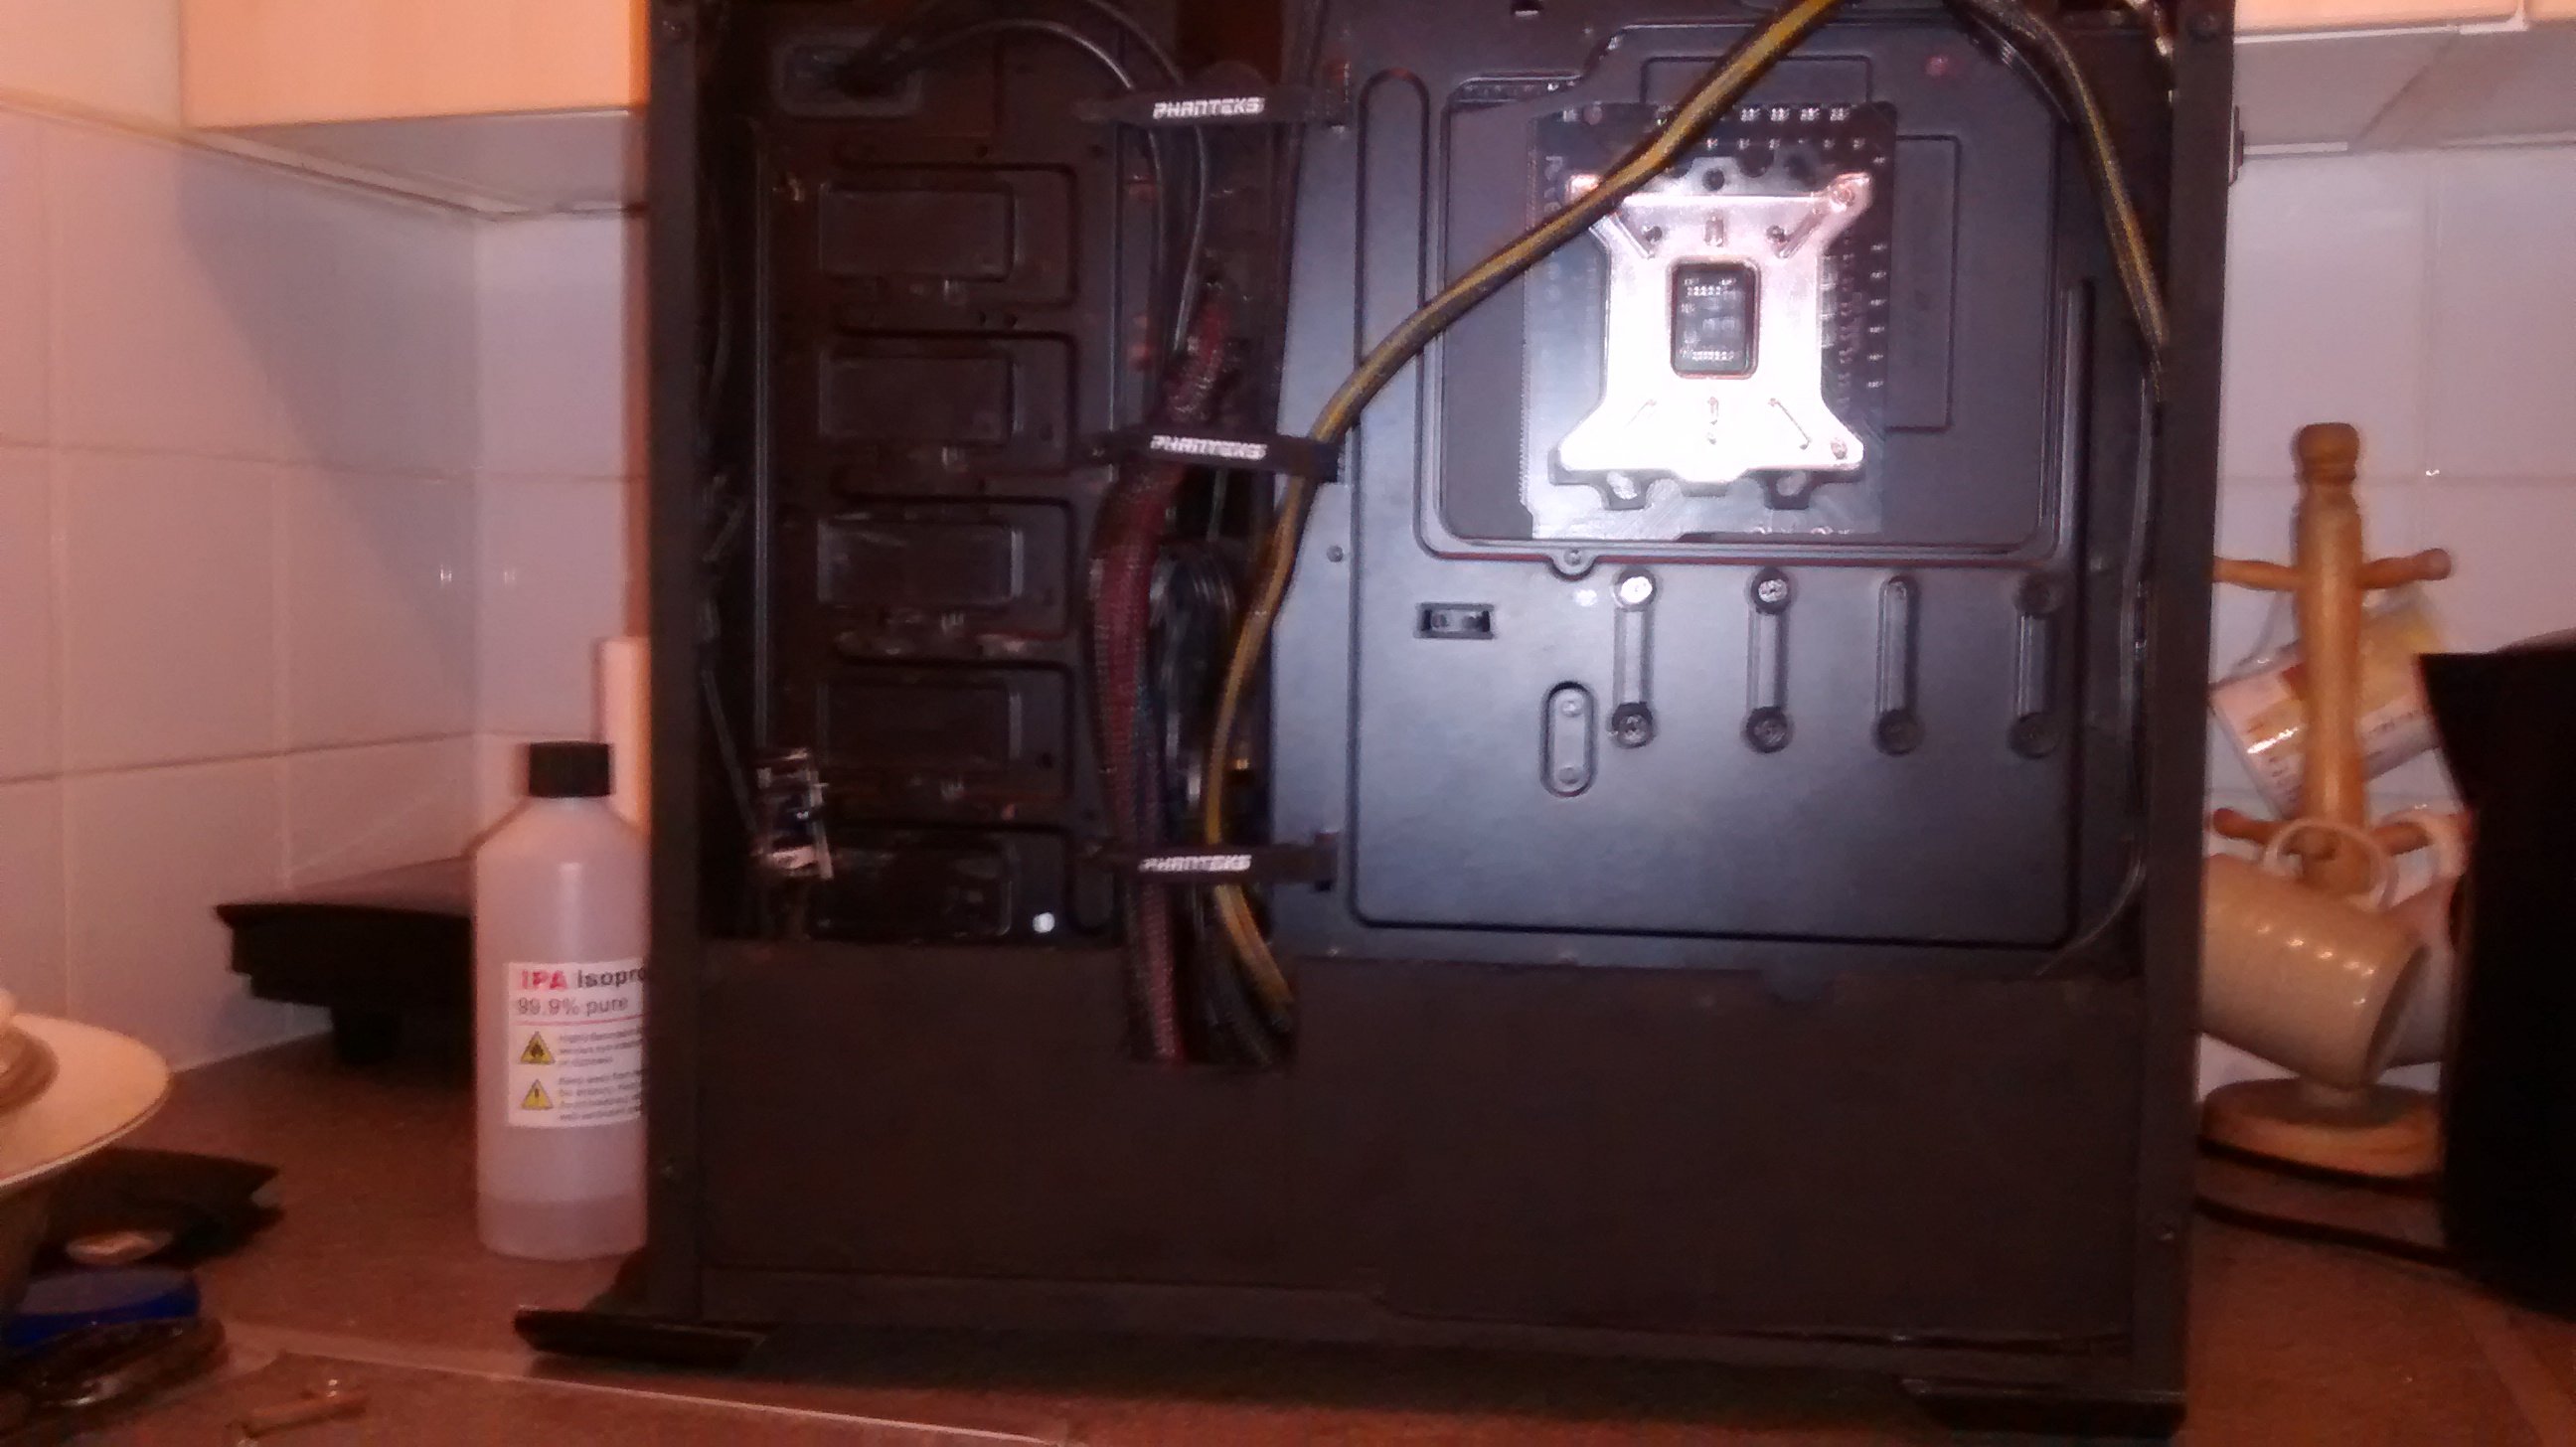
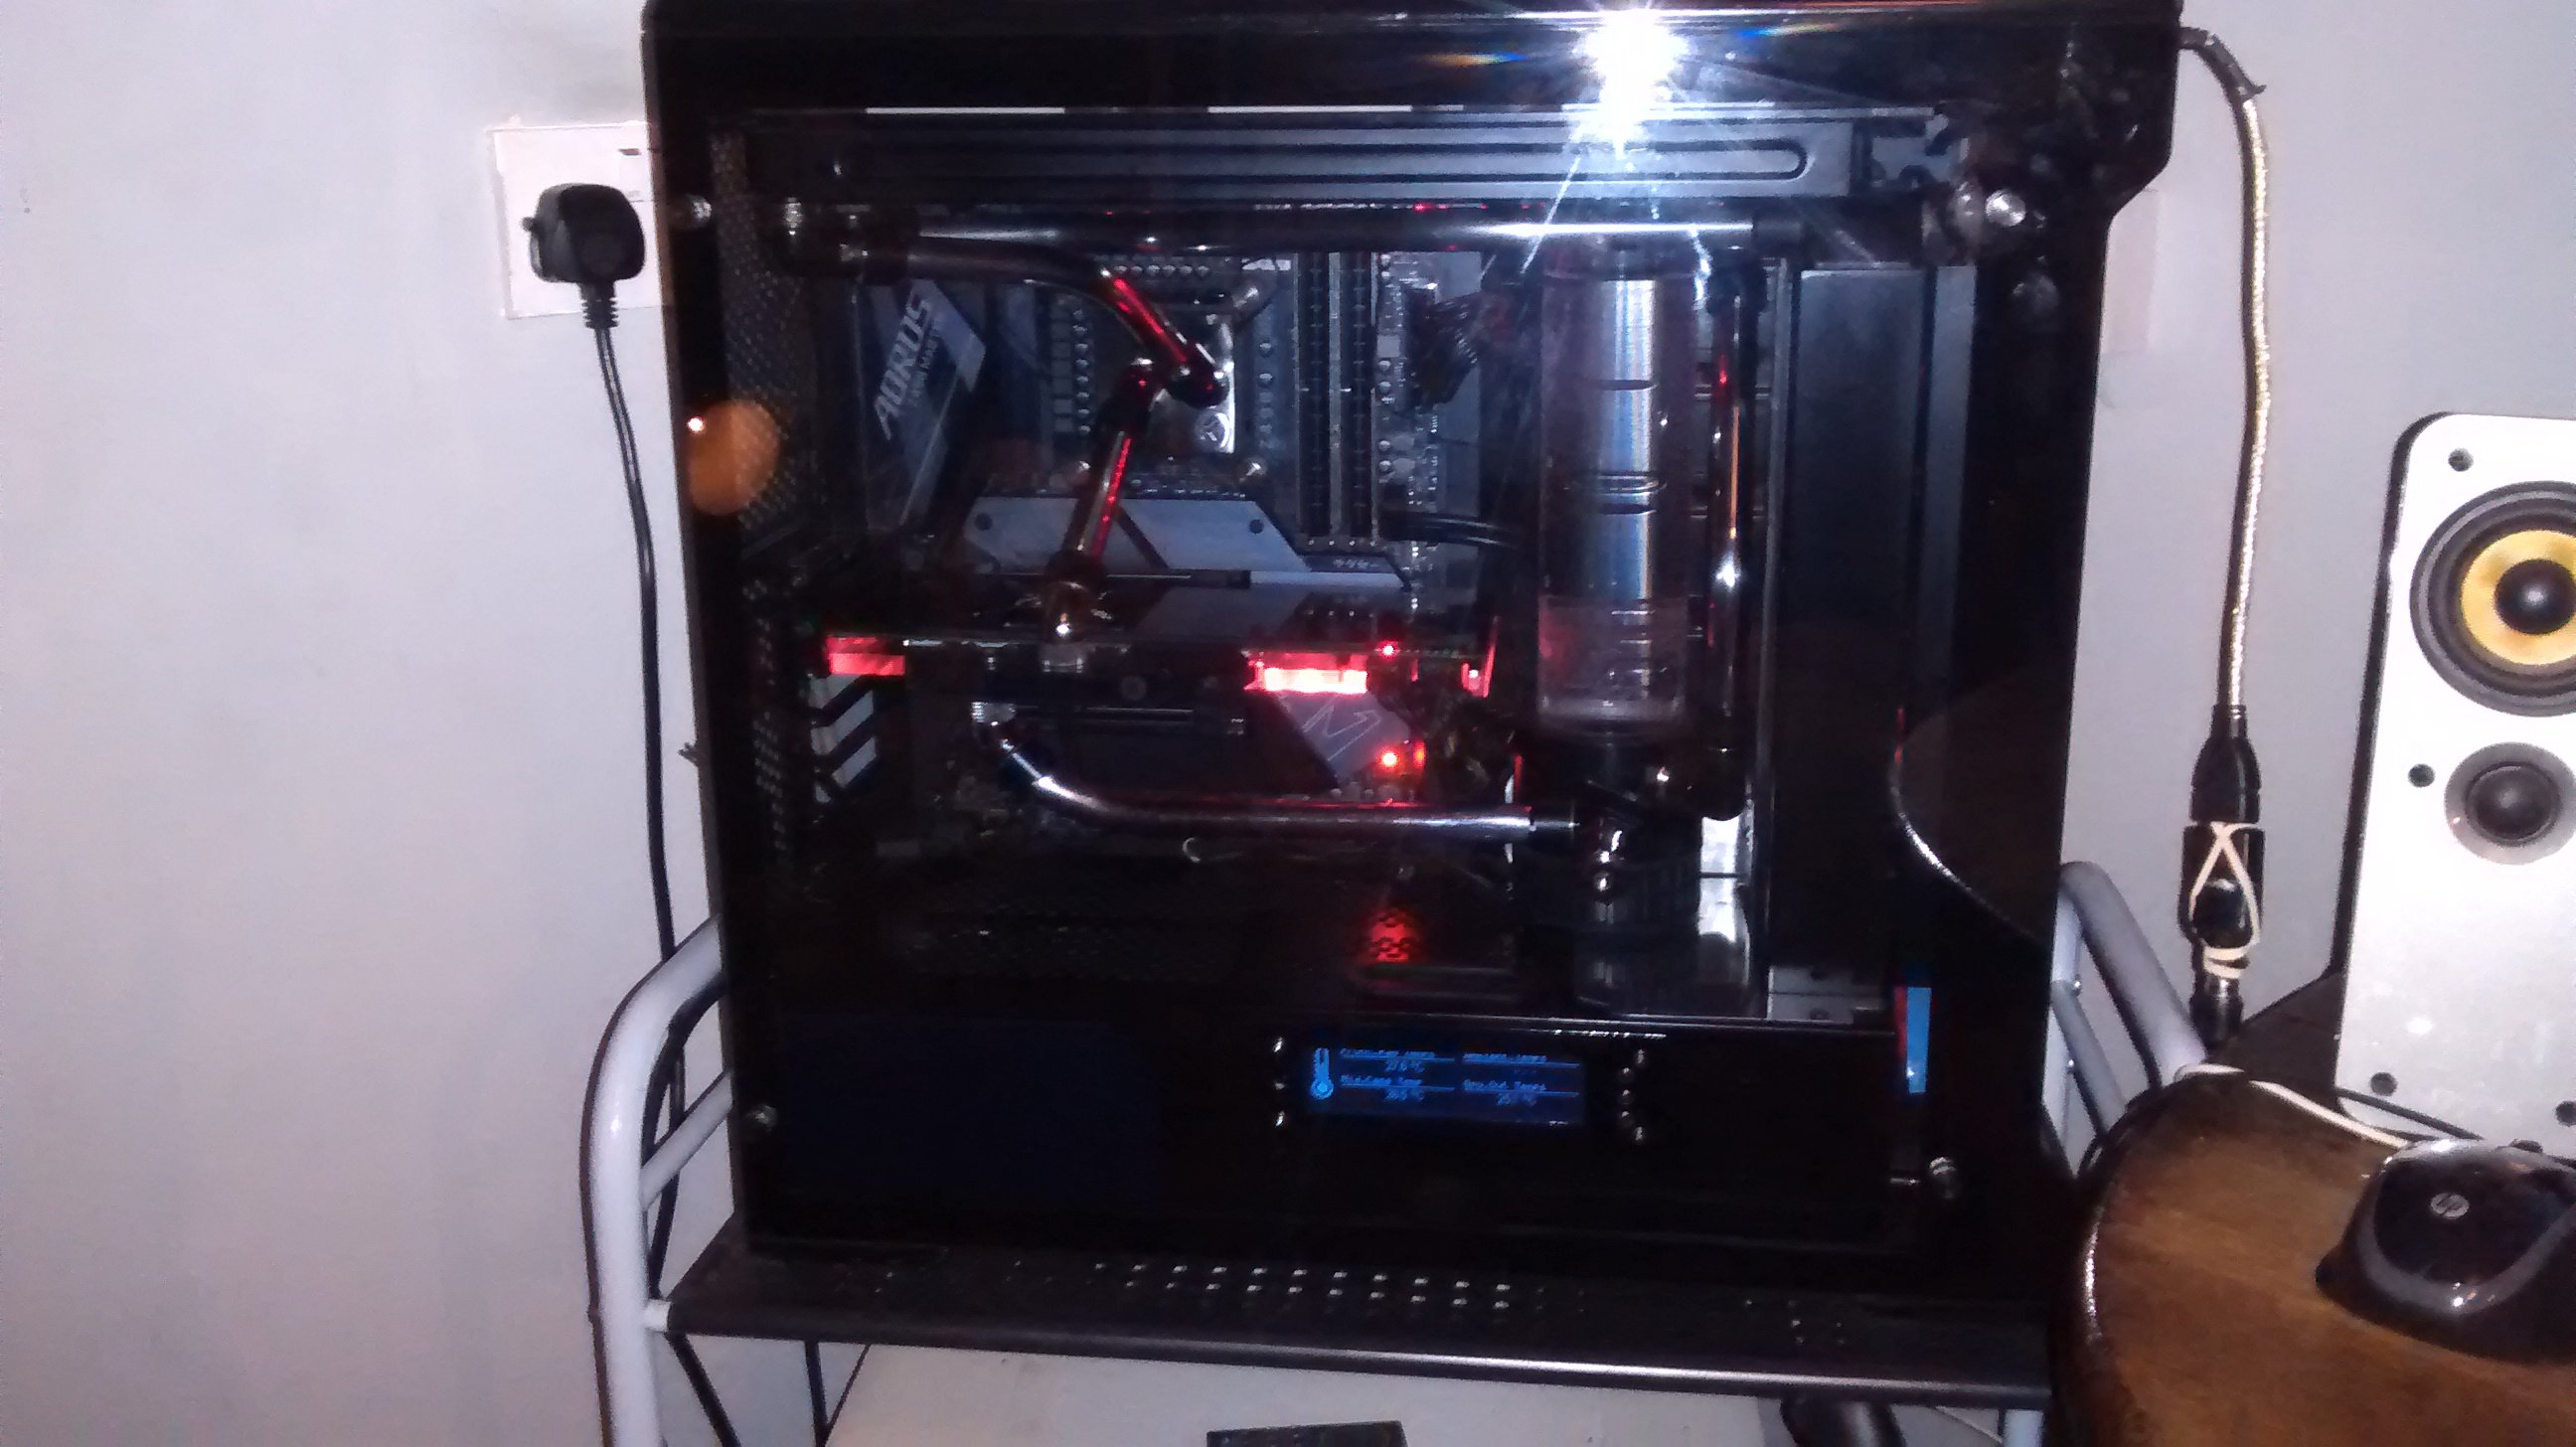
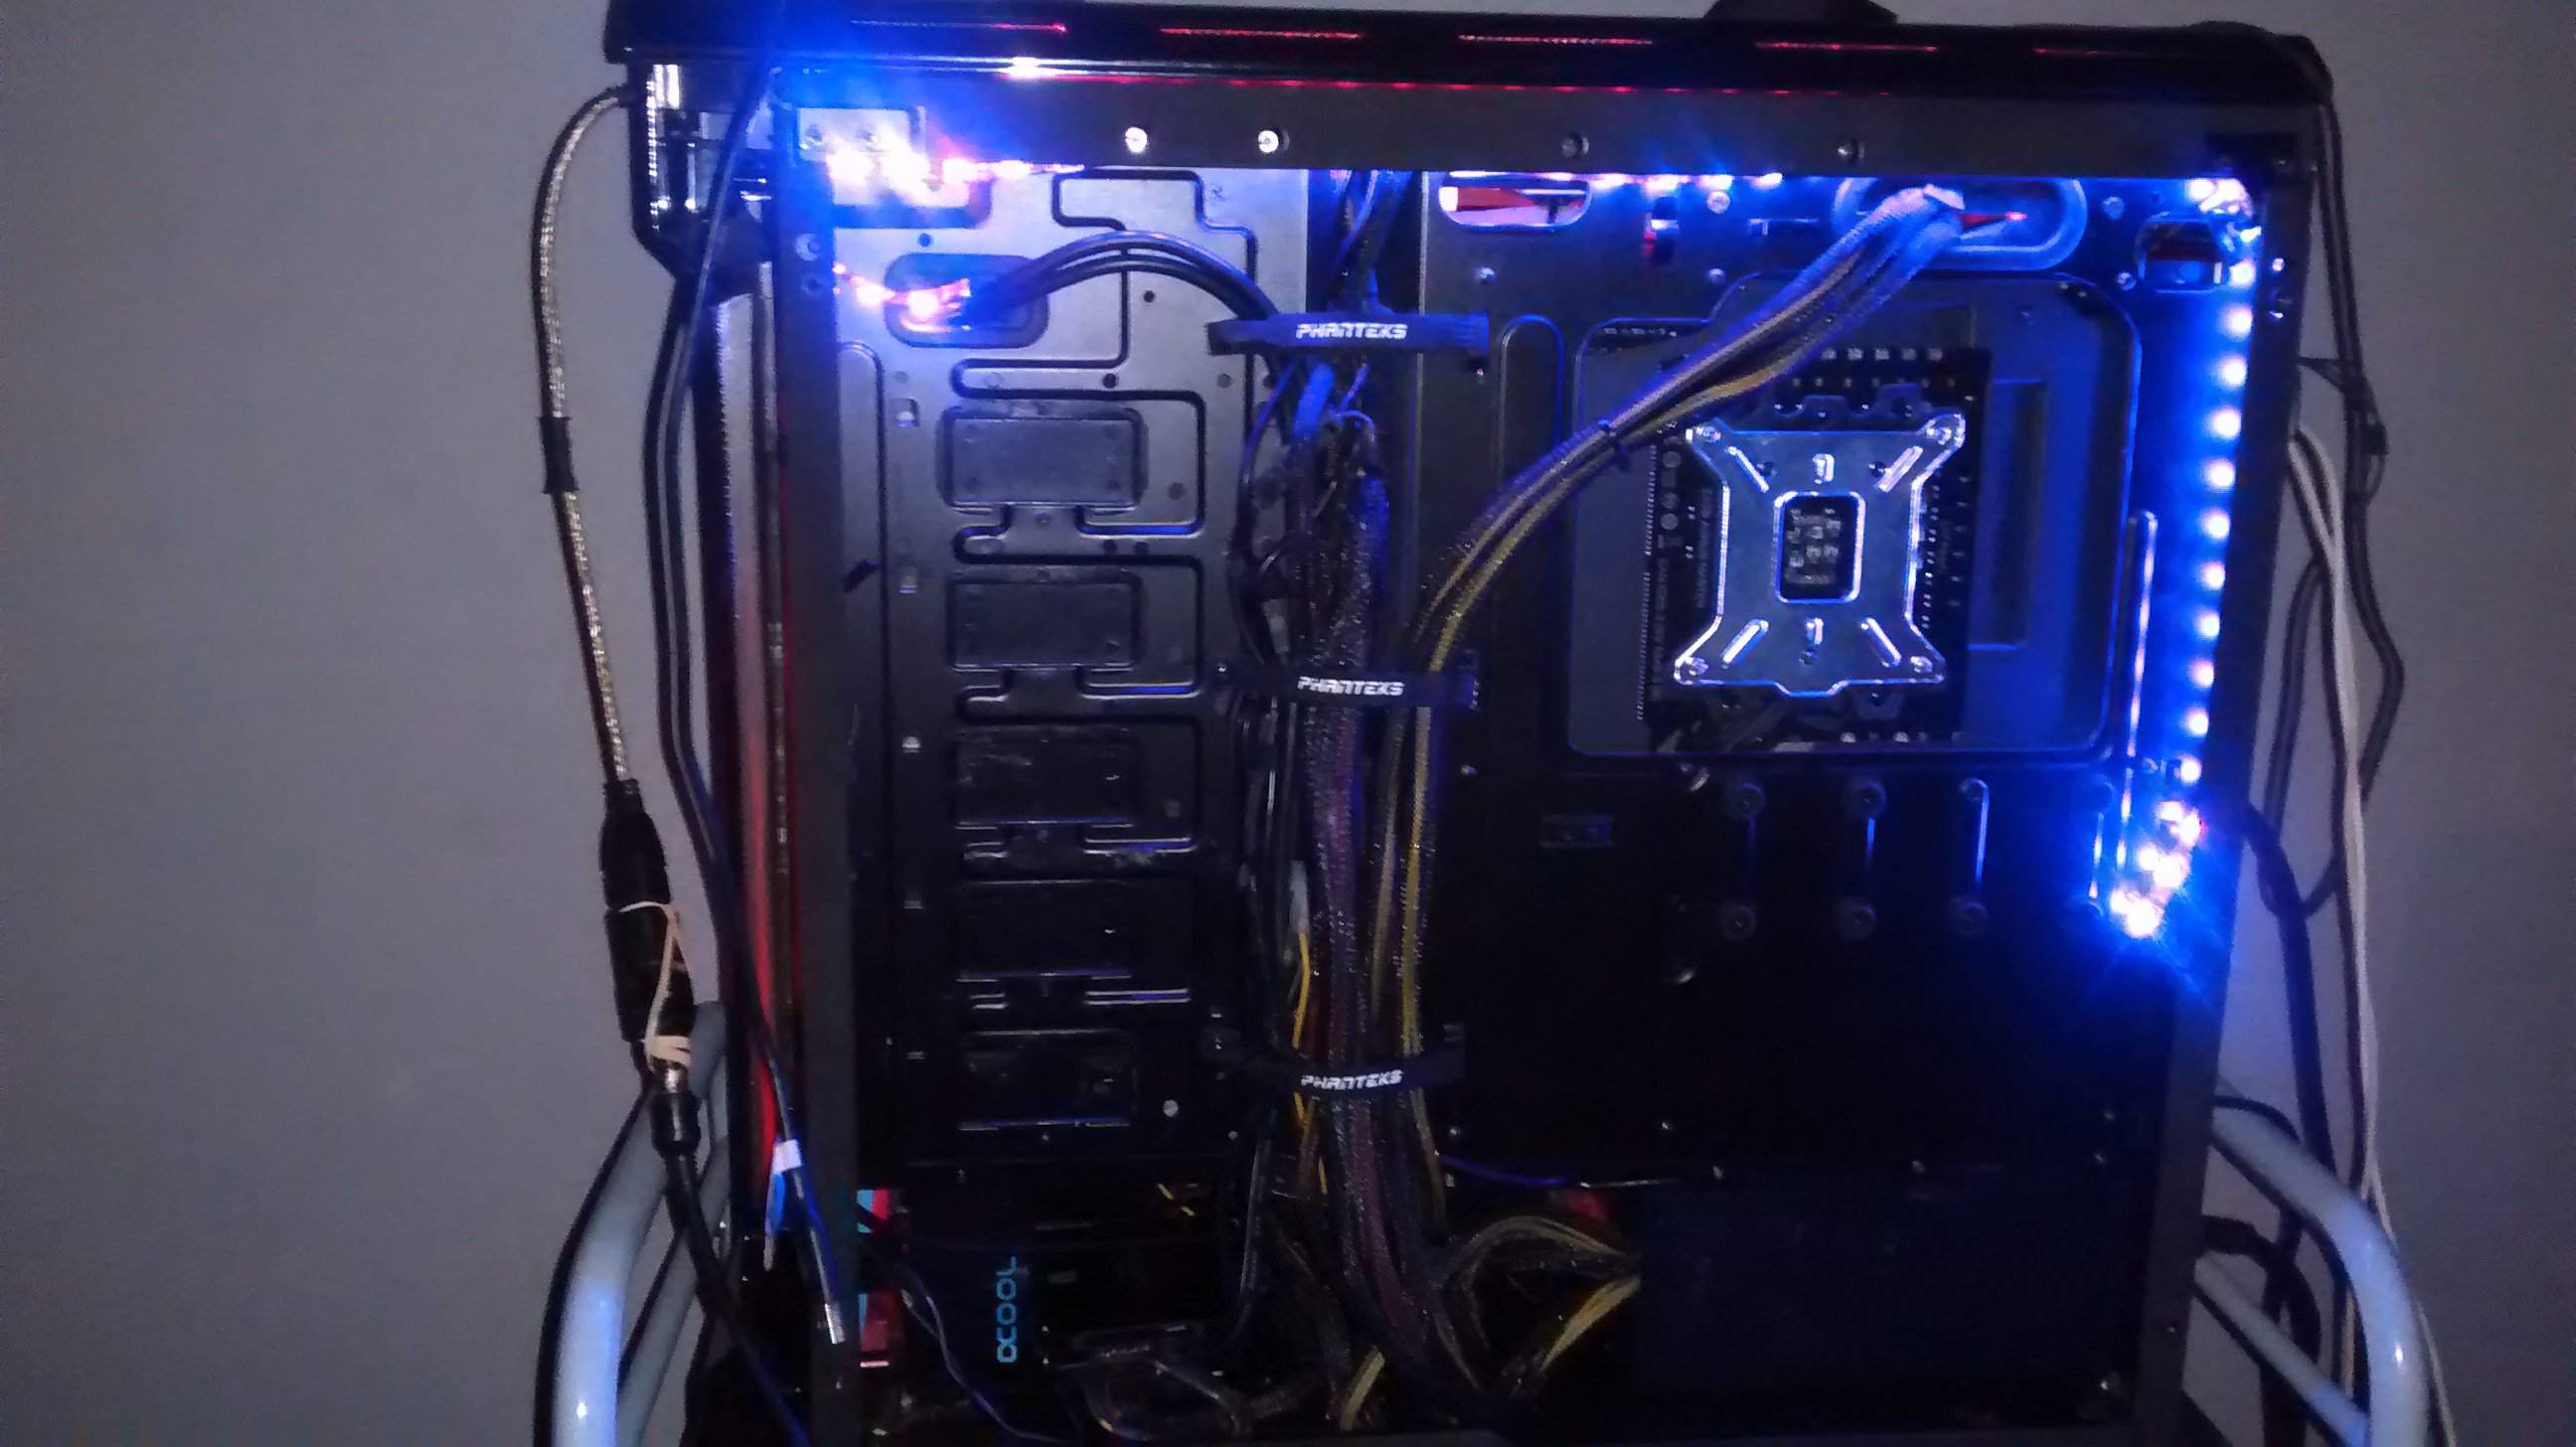
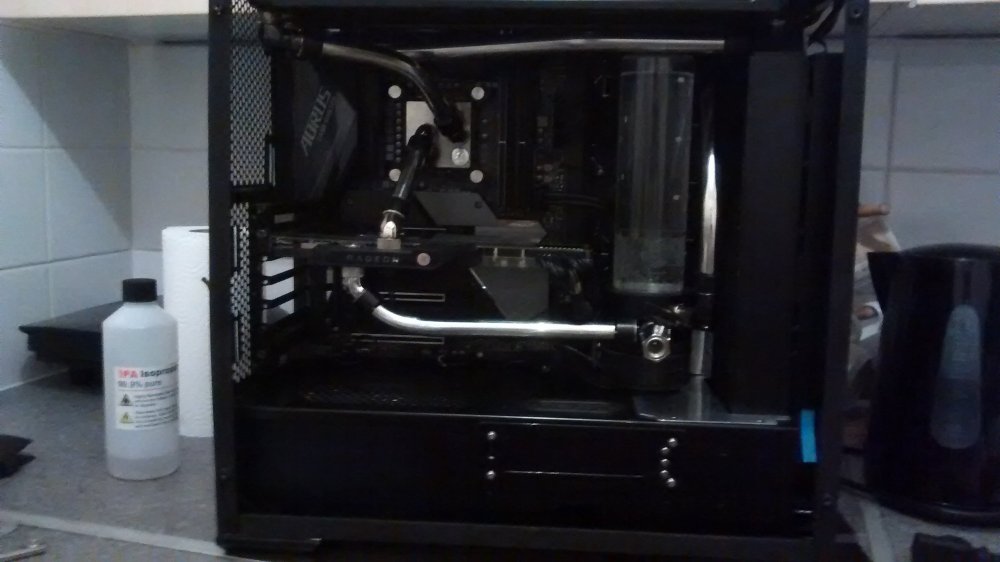
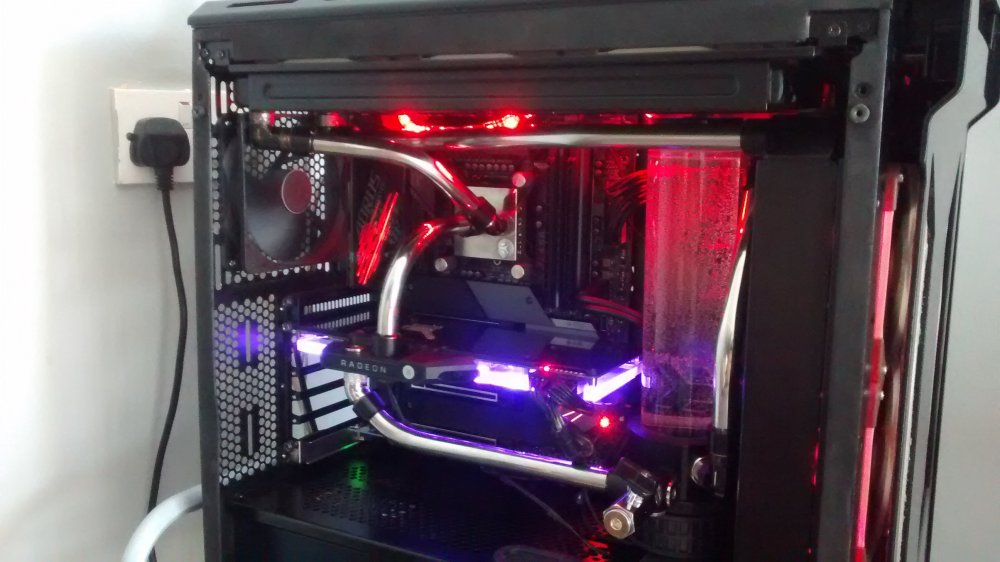
Hi all just posting my Gigabyte Master Z490. 19700k Hackintosh. im using opencore with a EFI Folder kindly given to me by MaLd0n i can see the sound icons but Sound works though Desplay port.but at the moment i dont have internet working so im writing this from windows. i have only just completed this build.over the last two days. as bending the stainless takes time. and im learning about this new bios layout hope you like the photographs 19/7/2020. now using big sur


 1 point
 -
Compiled with latest Lilu from repository. I think you'll need both kexts atatcheds. Arquivo Comprimido.zip1 point
-
My DW1560 have the same issue. I believe only native WifiCards+BT will work. The negotiation to activate Personal Access between macOS and iPhone is carried out via bluetooth. So it is related... :)1 point
-
Hi everyone, finally I am able to have my HP EliteBook 2570P fully working, except WiFi, but now the performance of Big Sur is very fast. The problem was that I didn´t complete the files from Catalina into ACPI/patched, and voila. Thanks for your help.
 1 point
 -
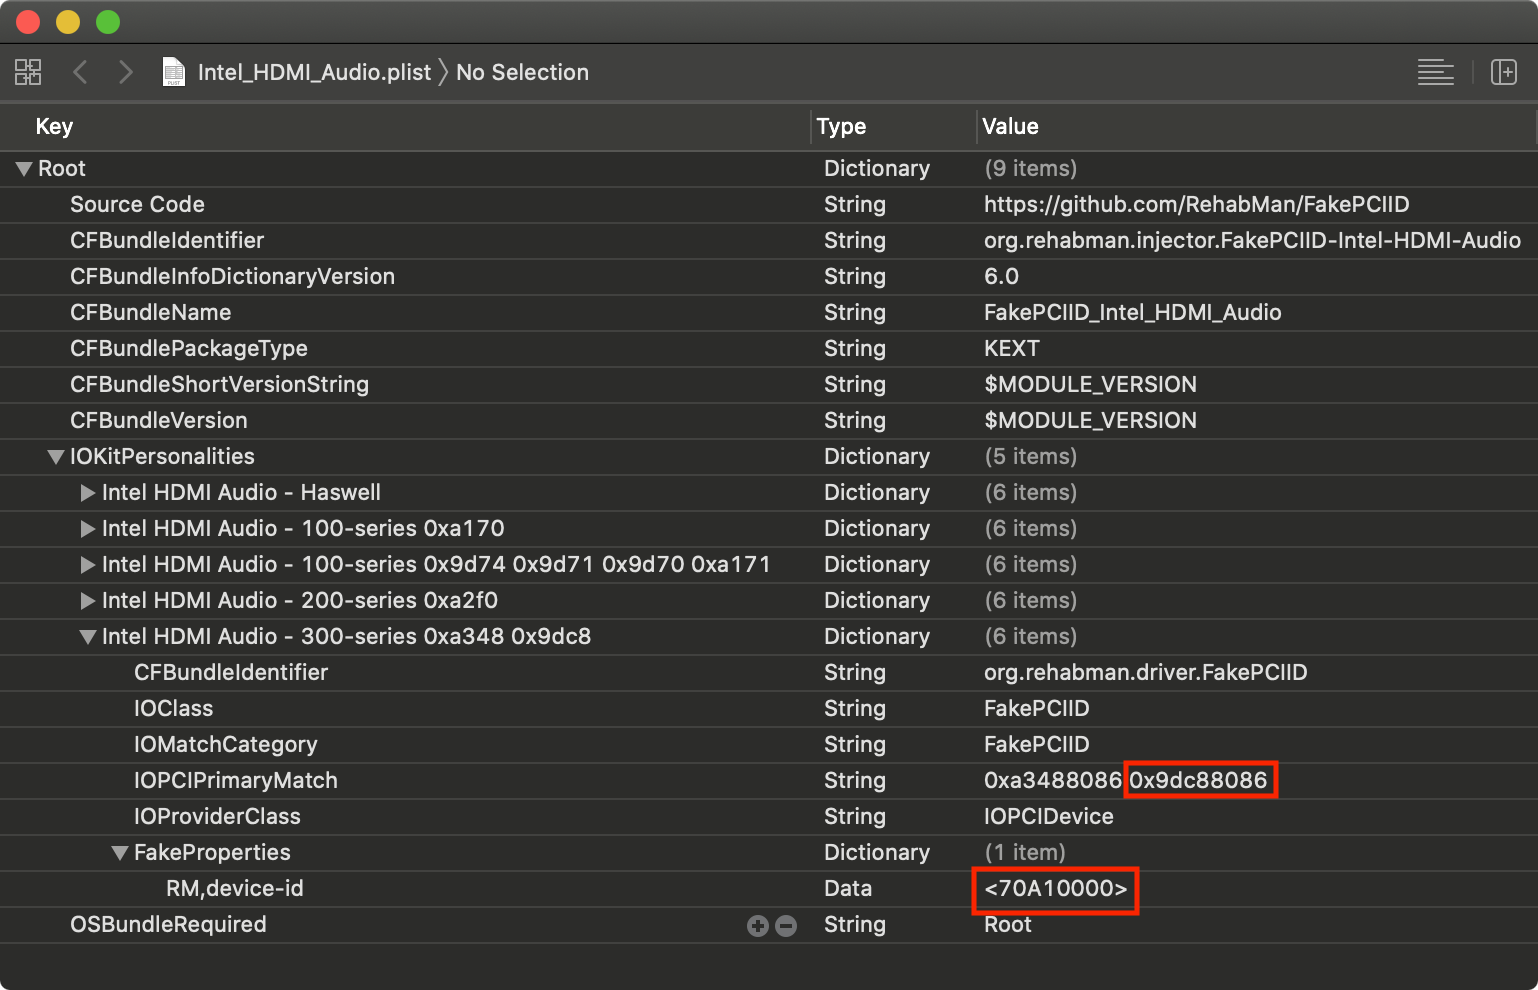
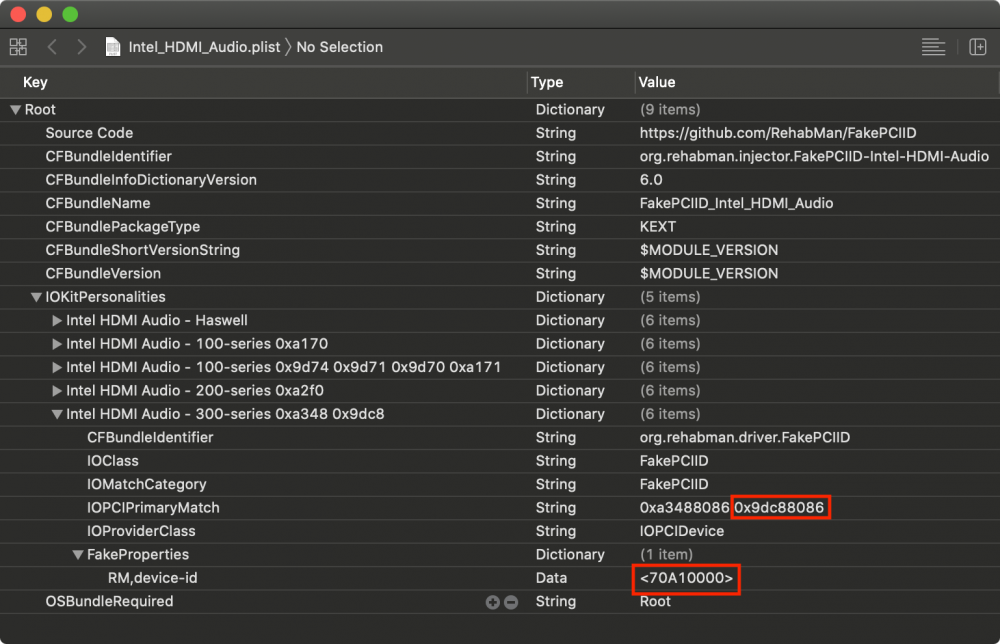
Yes, it's likely adding a device not spoofing so probably no way to do that using just Devices / Properties. I'm referring to this entry in Intel_HDMI_Audio.plist (which is used by FakePCIID_Intel_HDMI_Audio.kext). <key>Intel HDMI Audio - 300-series 0xa348 0x9dc8</key> <dict> <key>CFBundleIdentifier</key> <string>org.rehabman.driver.FakePCIID</string> <key>IOClass</key> <string>FakePCIID</string> <key>IOMatchCategory</key> <string>FakePCIID</string> <key>IOPCIPrimaryMatch</key> <string>0xa3488086 0x9dc88086</string> <key>IOProviderClass</key> <string>IOPCIDevice</string> <key>FakeProperties</key> <dict> <key>RM,device-id</key> <data>cKEAAA==</data> </dict> </dict> Check out the value in a plist editor (or convert the above Base64 to hex). So it's adding an a170 HDMI audio device. I don't know of any other way to add this device so you may have to keep using FakePCIID_Intel_HDMI_Audio.kext
 1 point
 -
@Rocky12 thanks a lot i hope i could fix my bcm4350 wifi on big sur1 point
-
Yes I´m using Clover 5119, with the OCQuirks method, and my battery kext is ACPI Battery Manager from Rehbmans.1 point
-
Testato e funzionante sulla Z370, ovviamente come precisato, grande supposta deve già essere installata1 point
-
You knowledgeable guys probably know this already but if you're Multi-Booting and testing Big Sur with each OS on respective drives, only use one EFI Folder on the drive that houses Big Sur to boot all OSs' specially if you're also booting Catalina. You will likely find Catalina cannot invoke BS booting to reach the desktop and will likely result in a kernel panic. One more thing, you need to make the BS Drive as the Start Up Disk also the first drive in the Boot order in the BIOS - This is with Opencore, don't know about Clover as I don't use it anymore but I dare say the same rules applies.1 point
-
Era già stato notificato Da sottolineare come già stato detto onde evitare false illusioni, che l'installazione non funziona. Funziona solo l'avvio di un sistema preesistente.1 point
-
@eSaF Thanks for comment. as i said The efi to make it possibul for me was kindly given by MaLd0n. so im still trying to get my head around things.(ie.the bois as changed alot since z97days) ive just orded a cheap usb wifi dongle. till next month and i will get a wifi card sorted.then. as i cant use macos on the internet i have to boot to windows for internet. i need to sort out some tool to build opencore.. i would like to do this in mac os. as the new on going project. for me. and it will evolve over time new on going project. and will evolve over time.1 point
-
@Max.19741 point
-
Hi @eSaF, works very fast and no glitches with my AMD RX 64 Vega GA.
 1 point
 -
@Max.1974 Congratulations! haahahahahahahh1 point
-
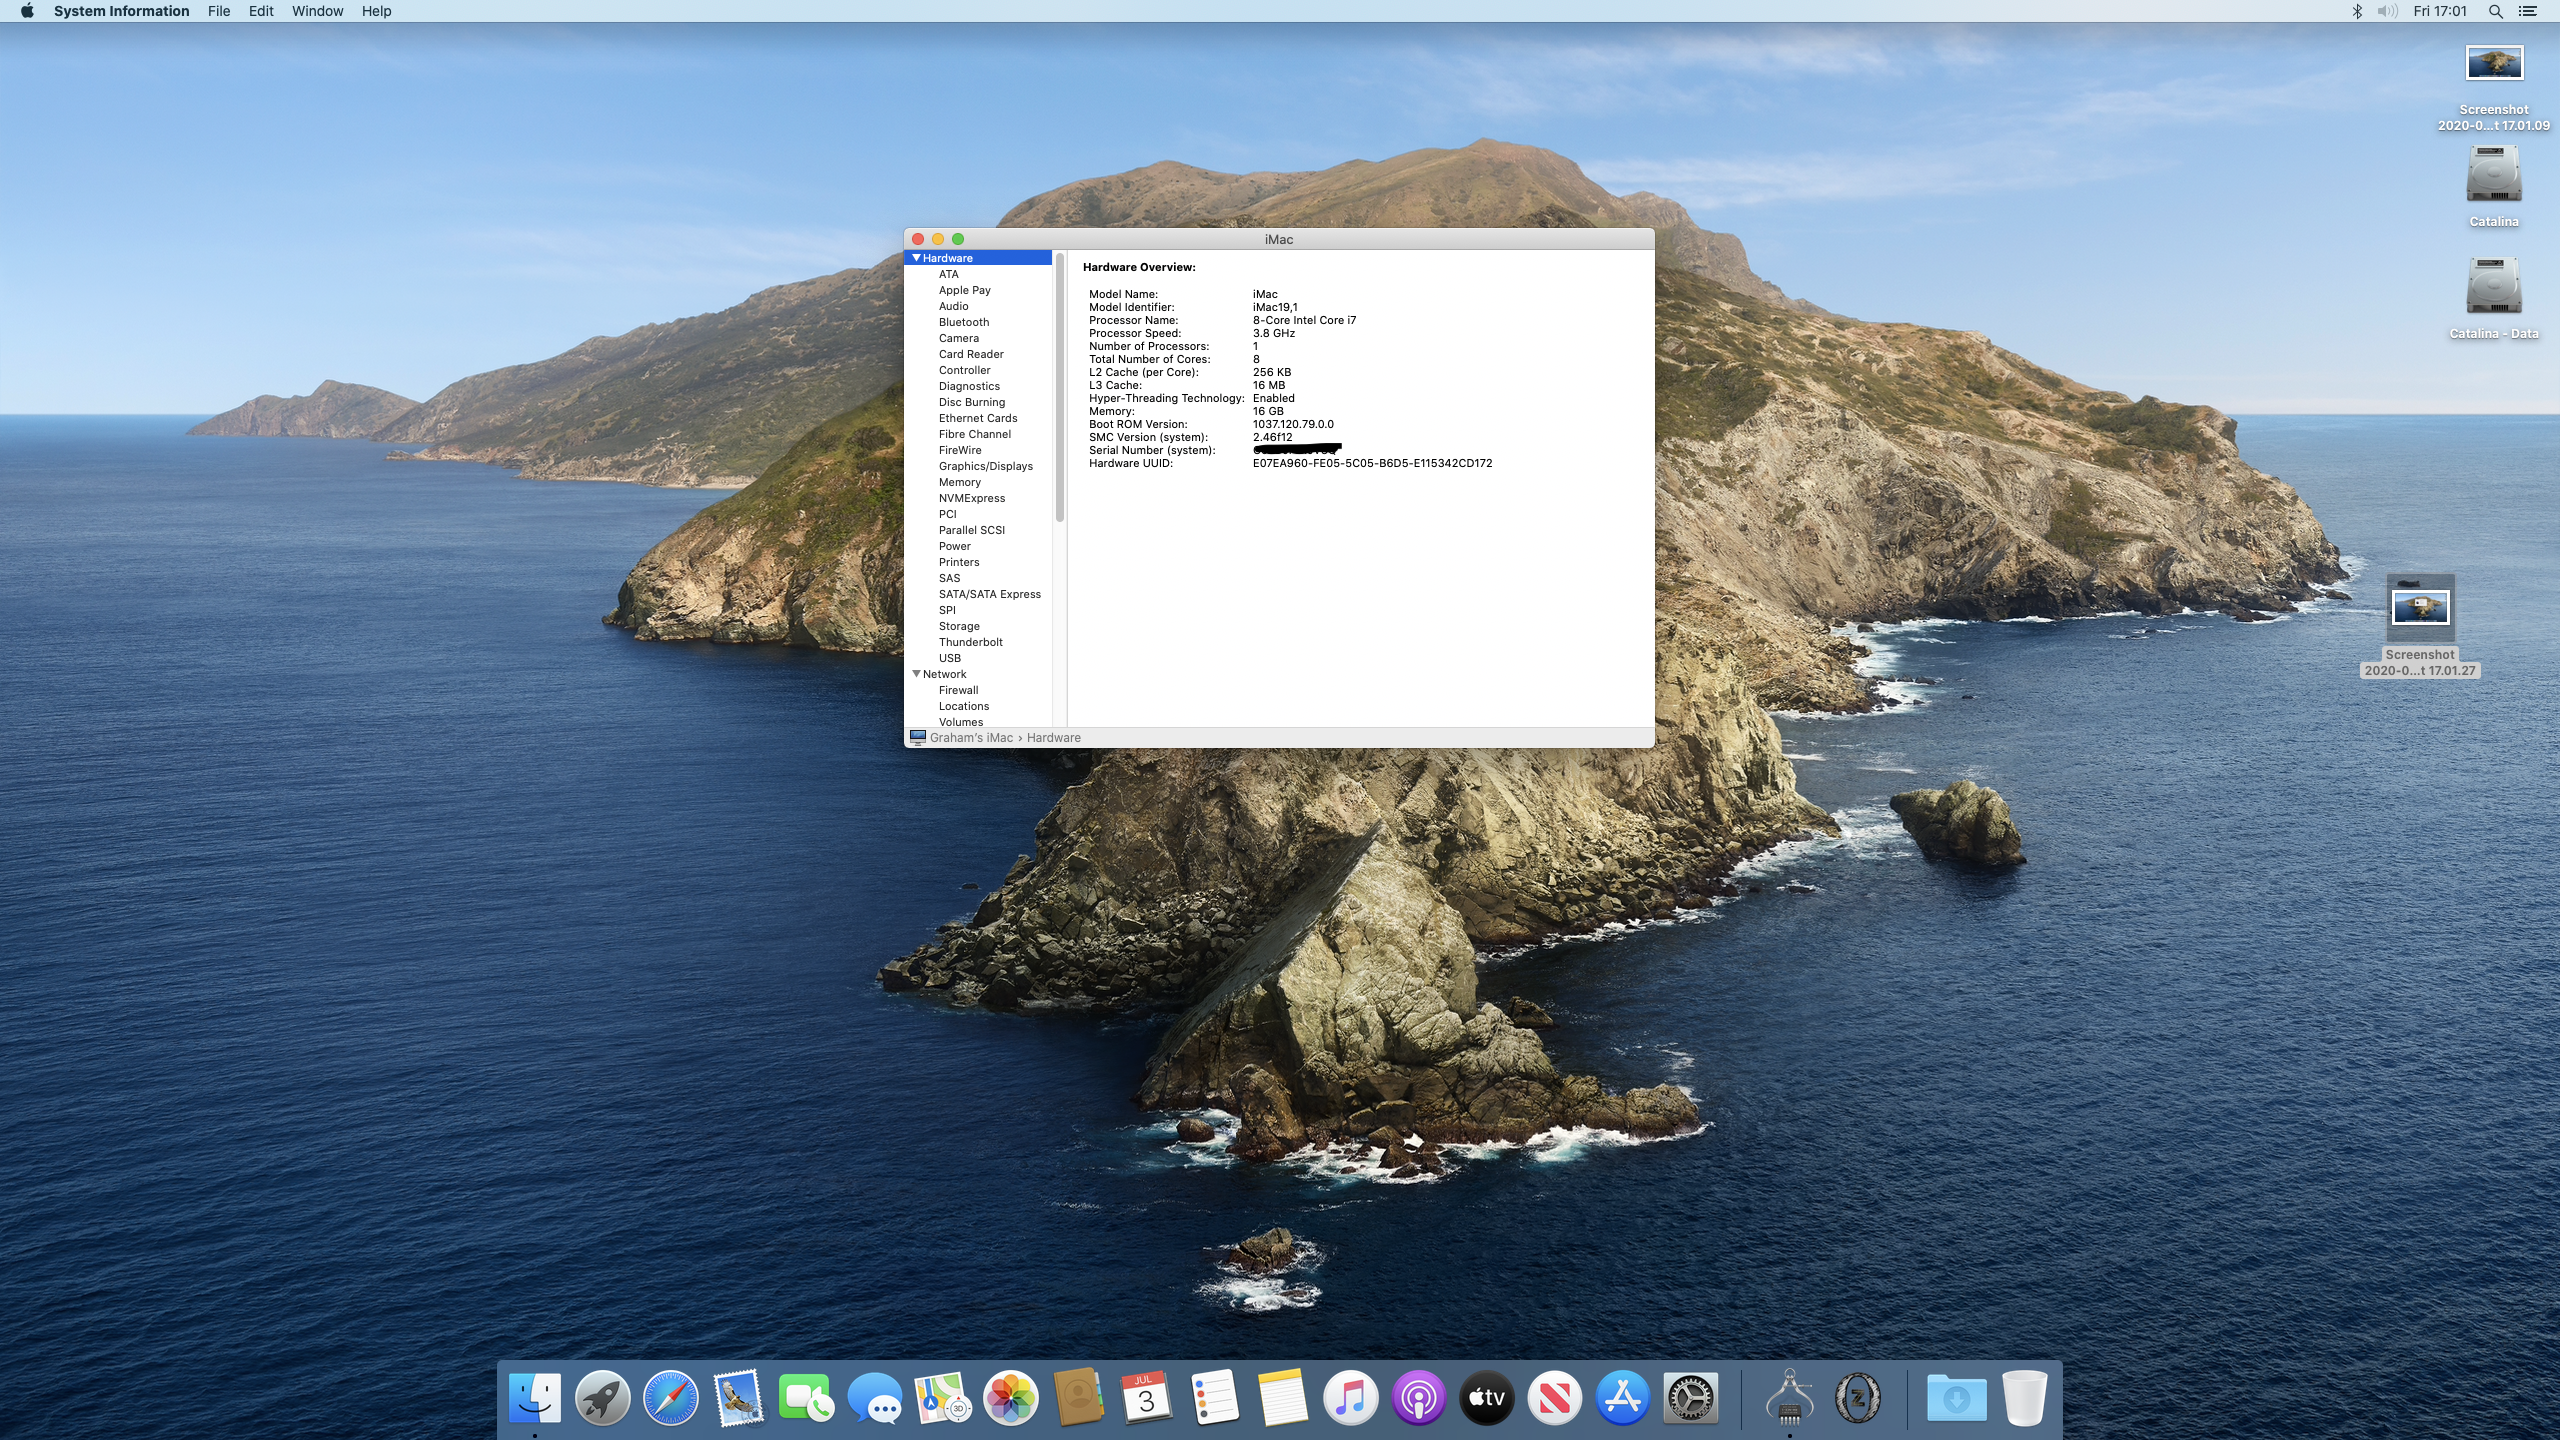
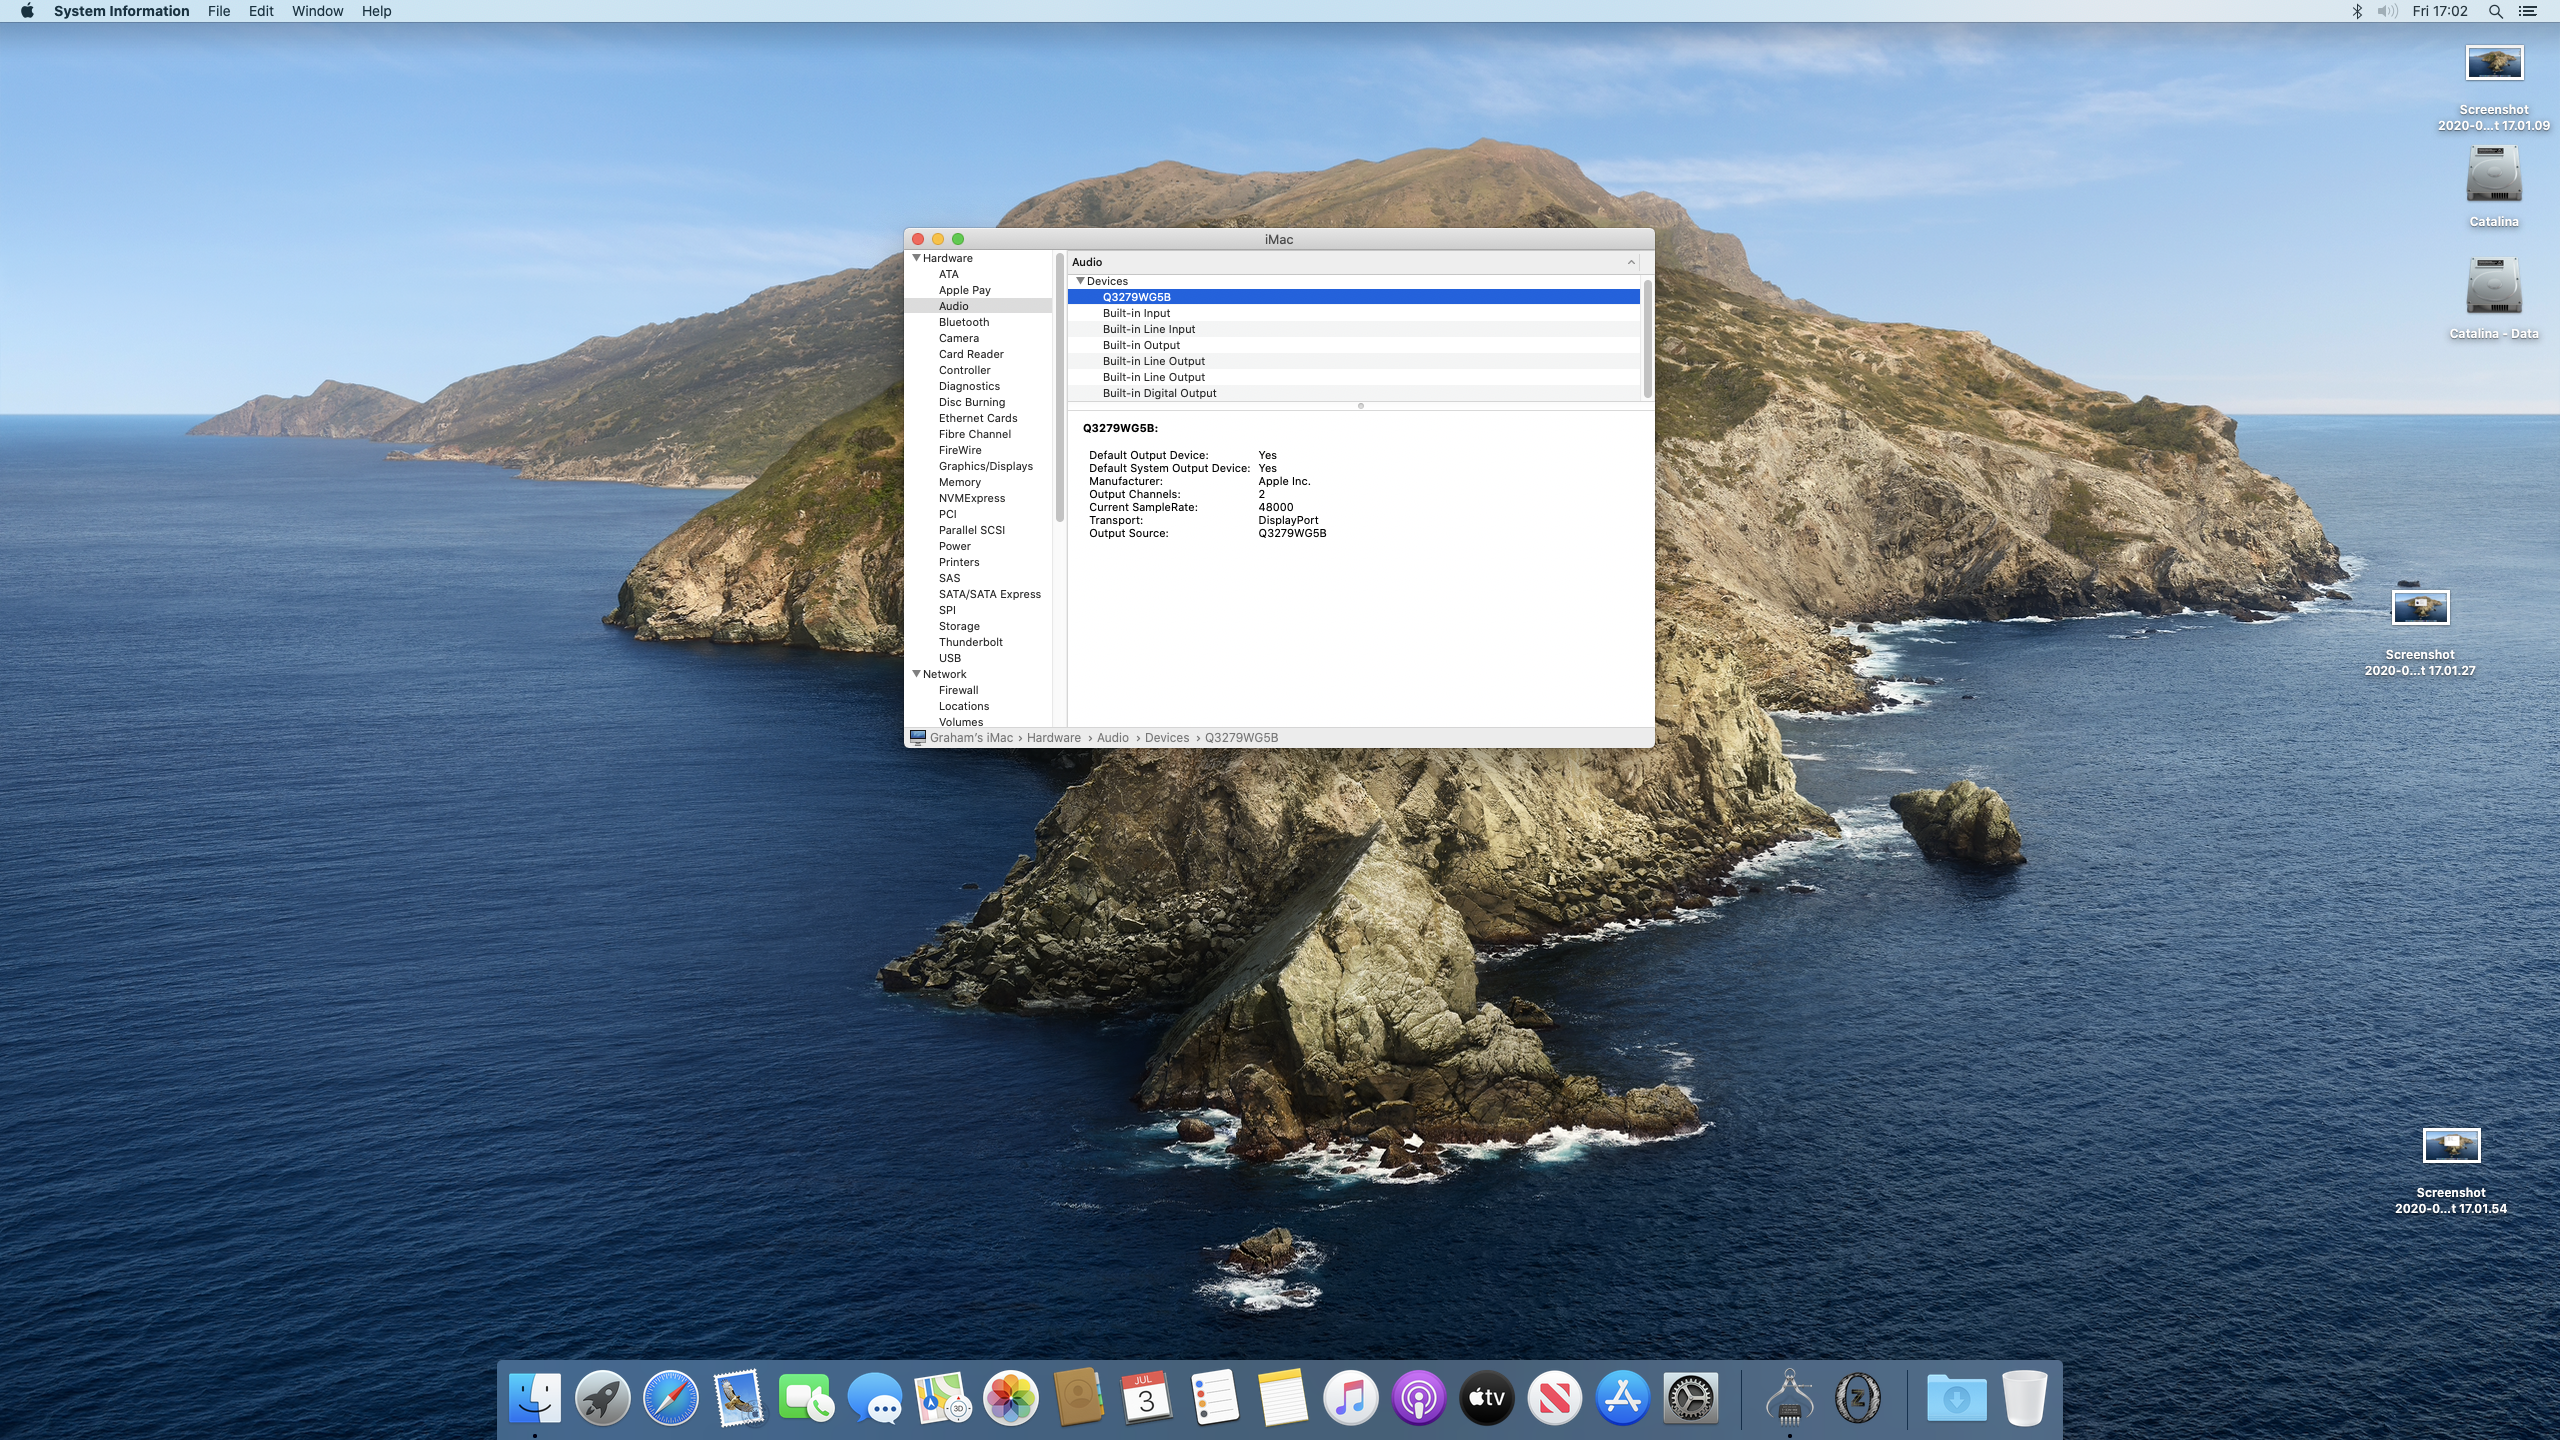
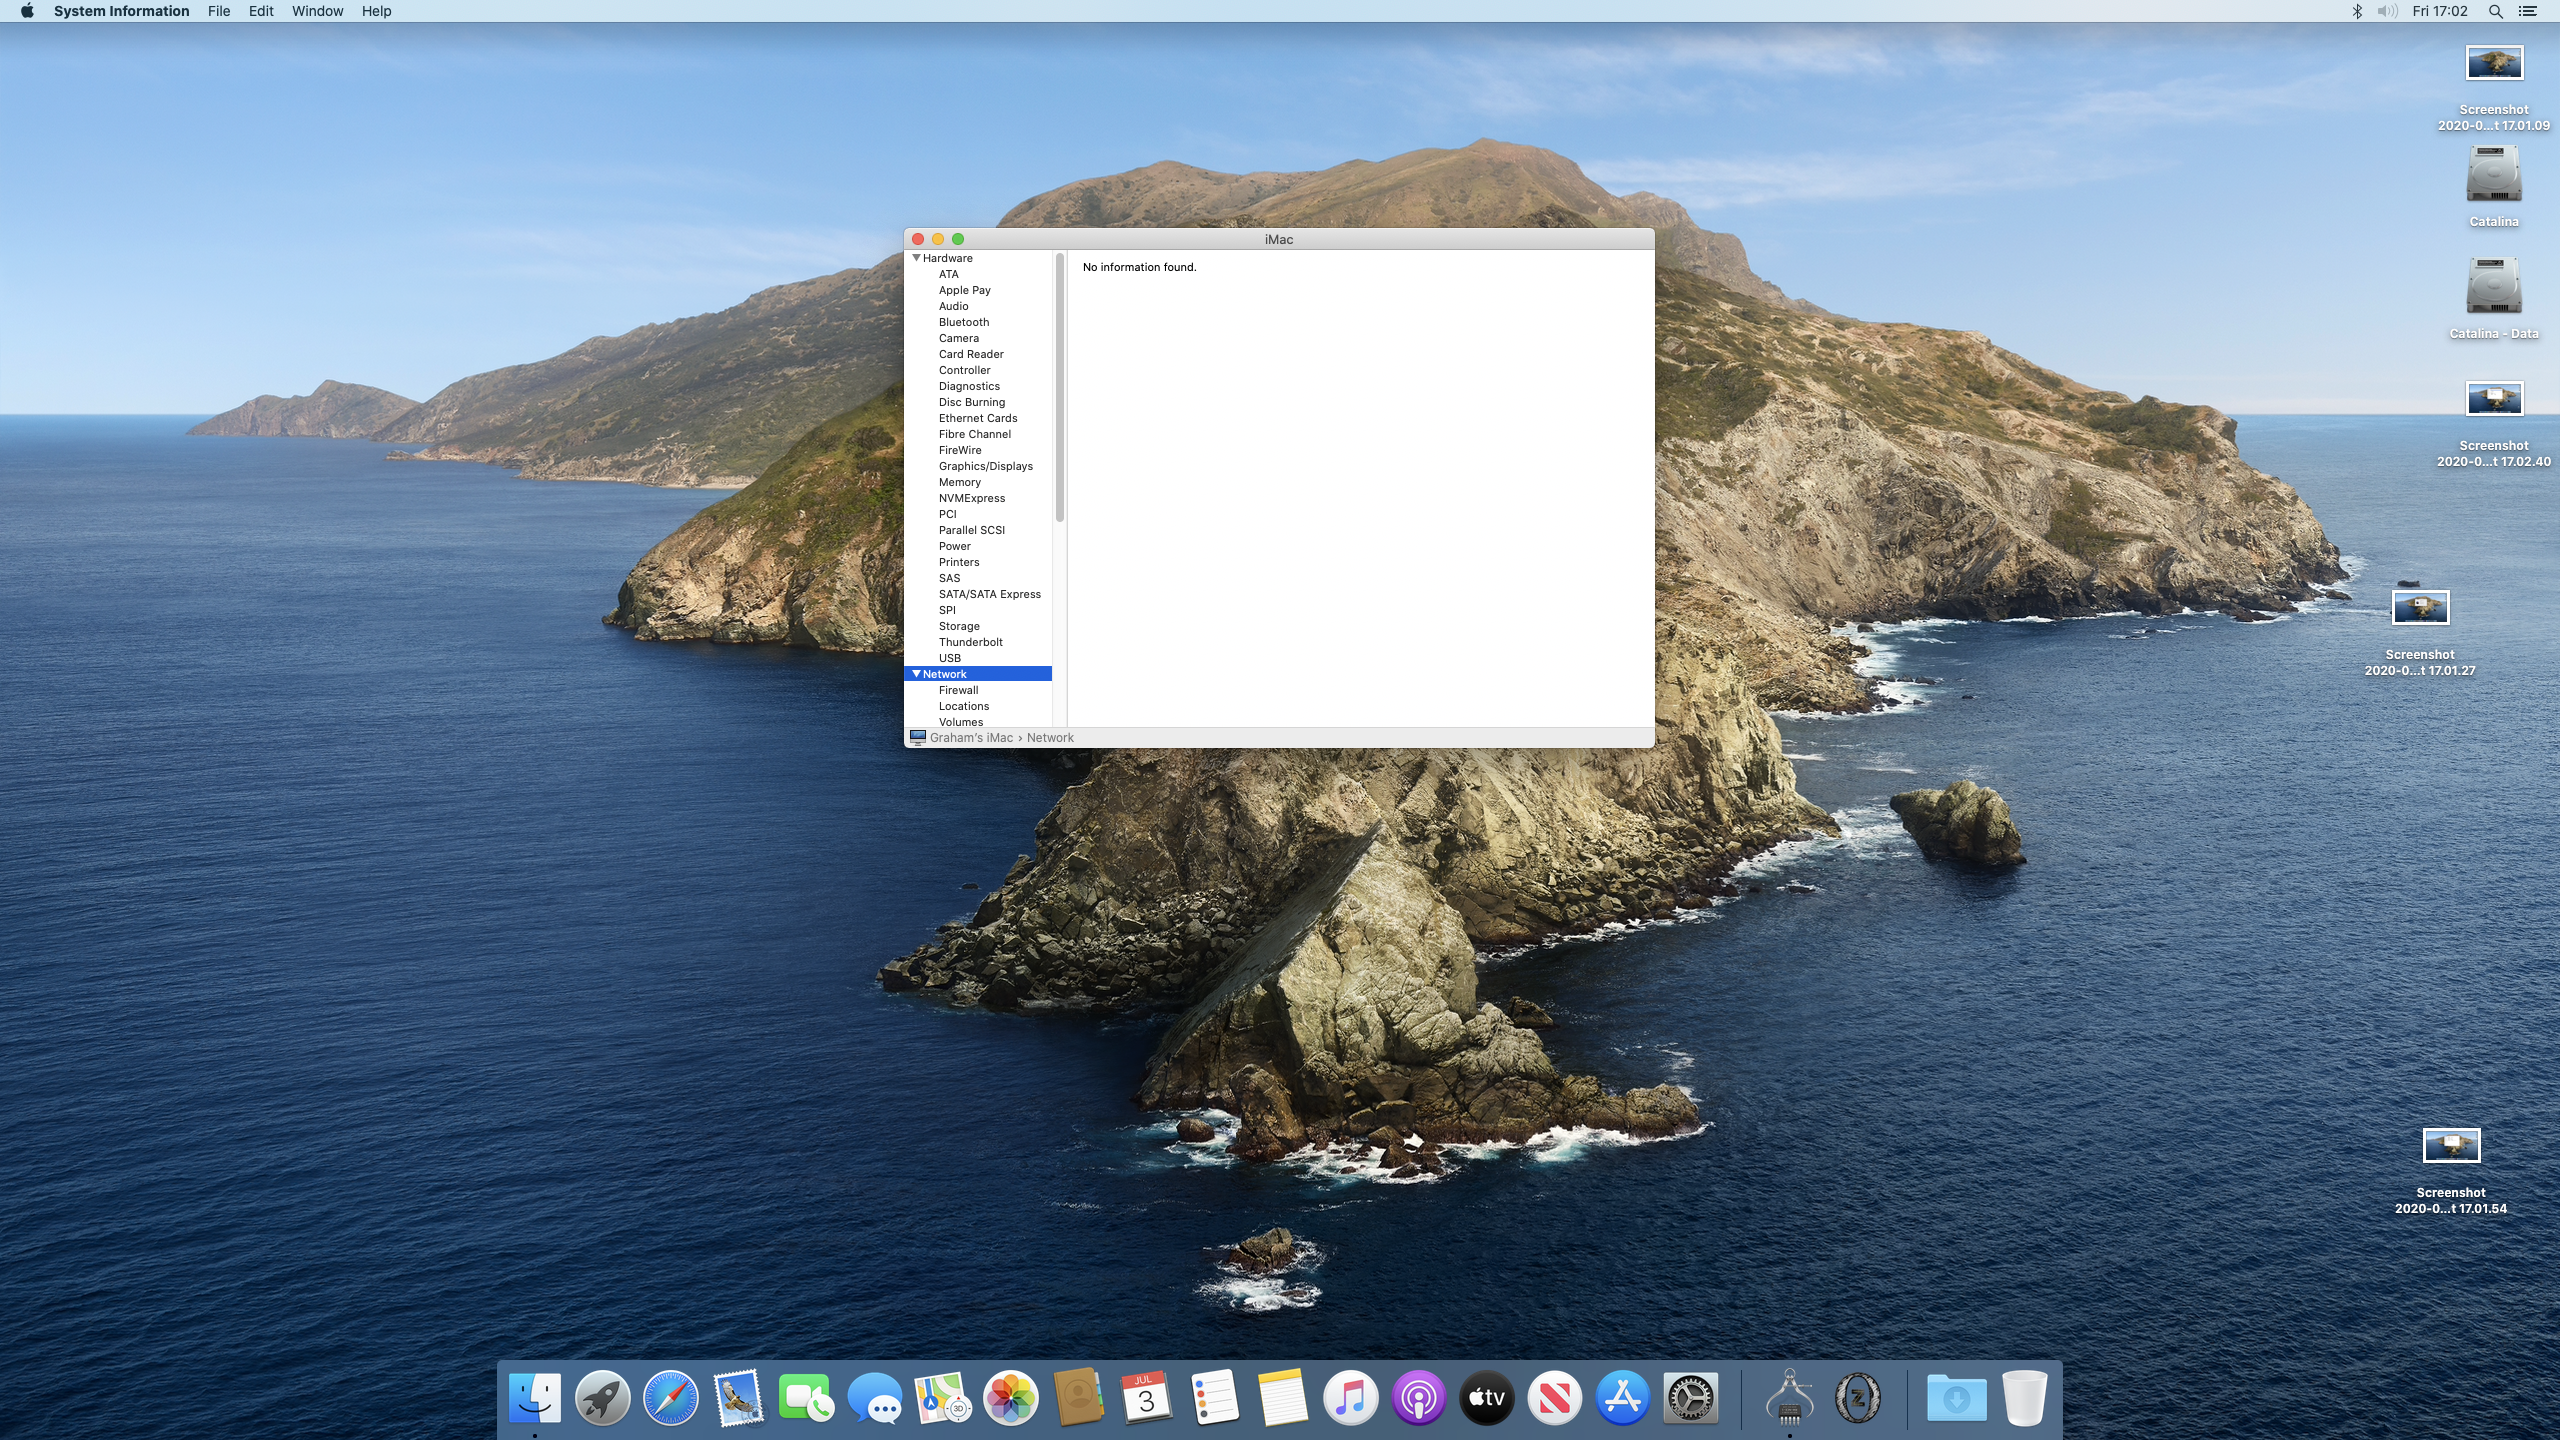
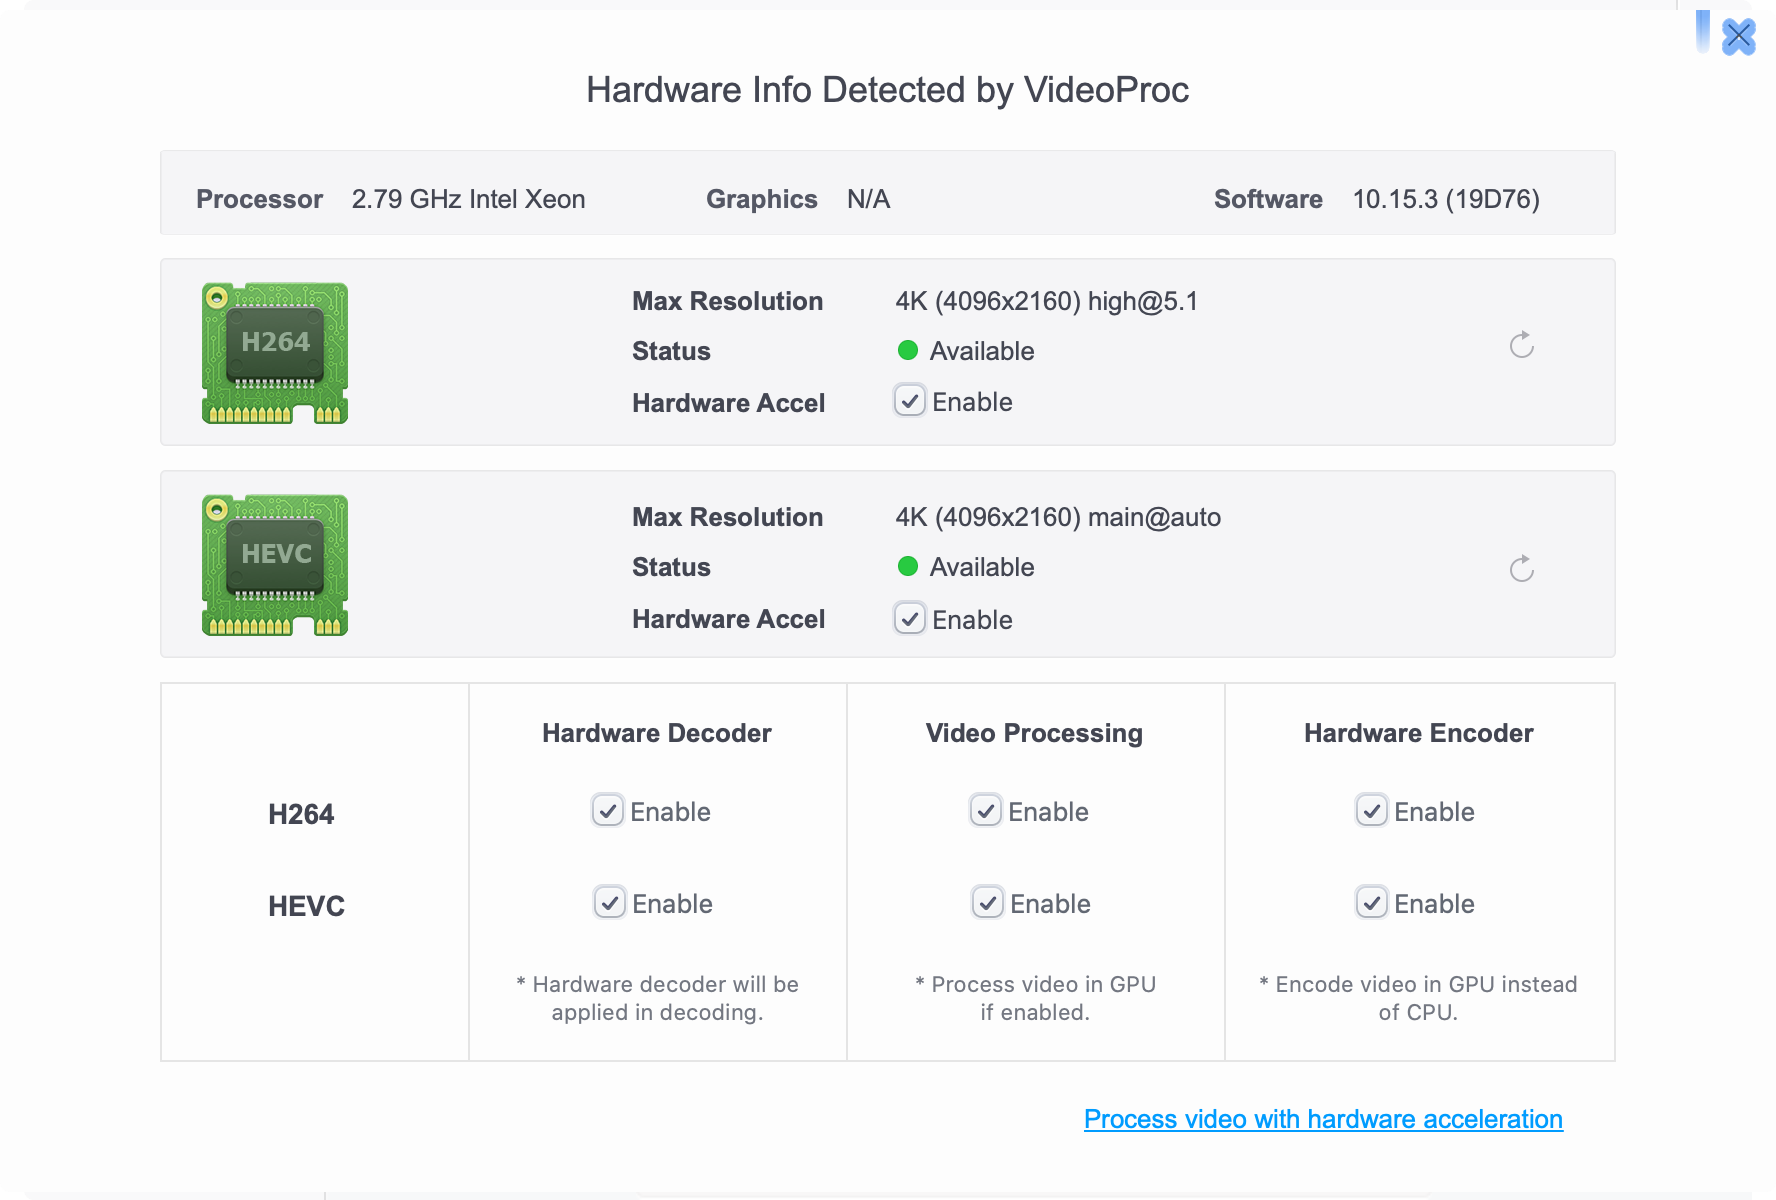
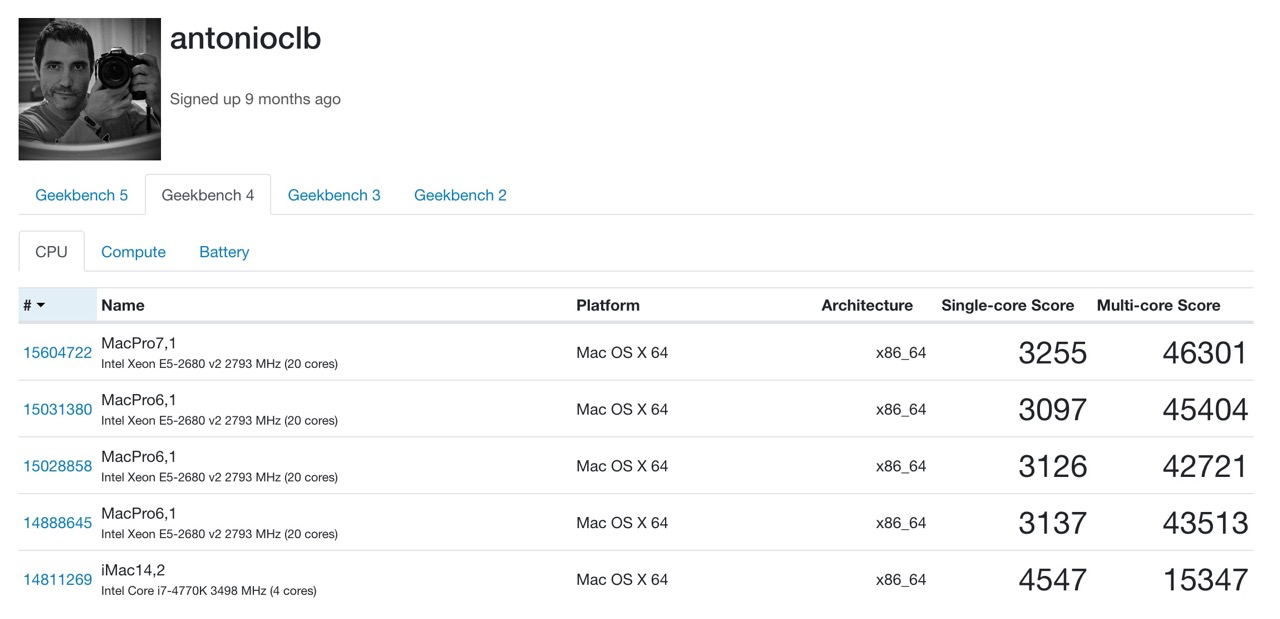
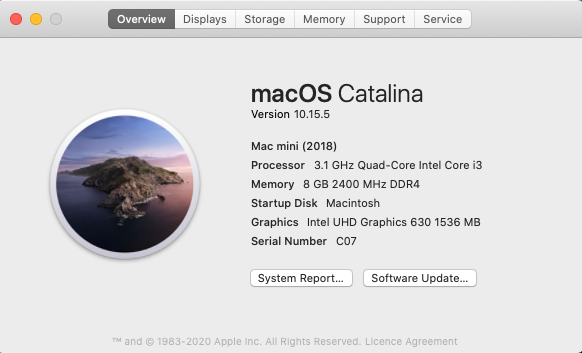
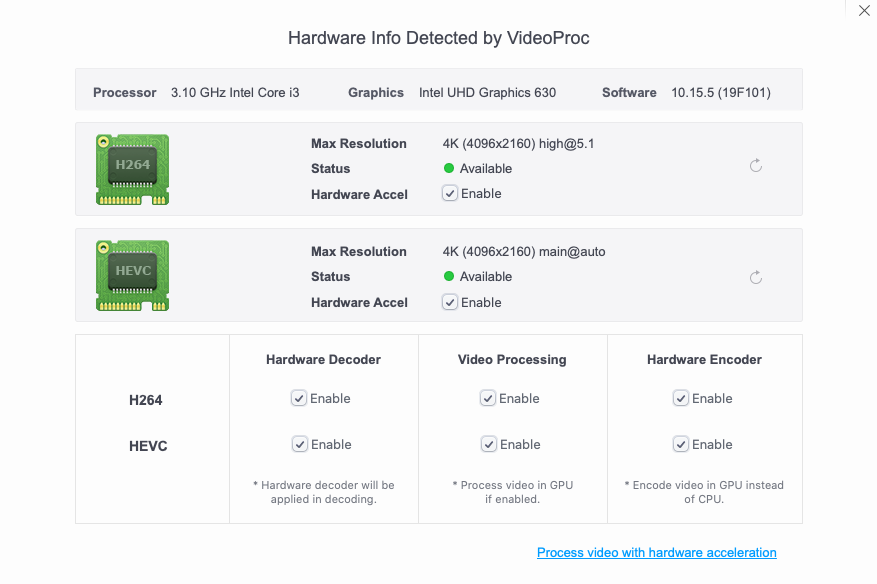
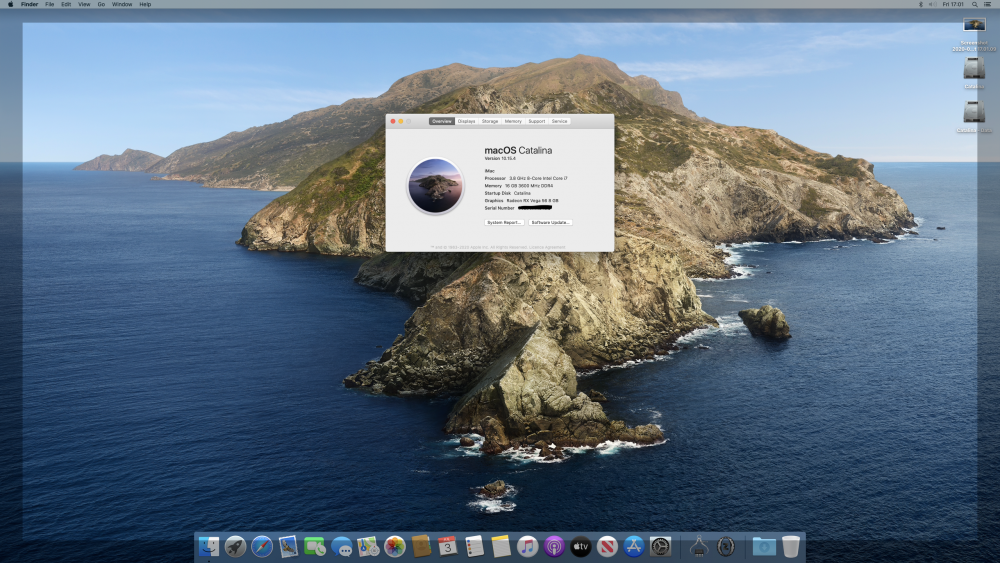
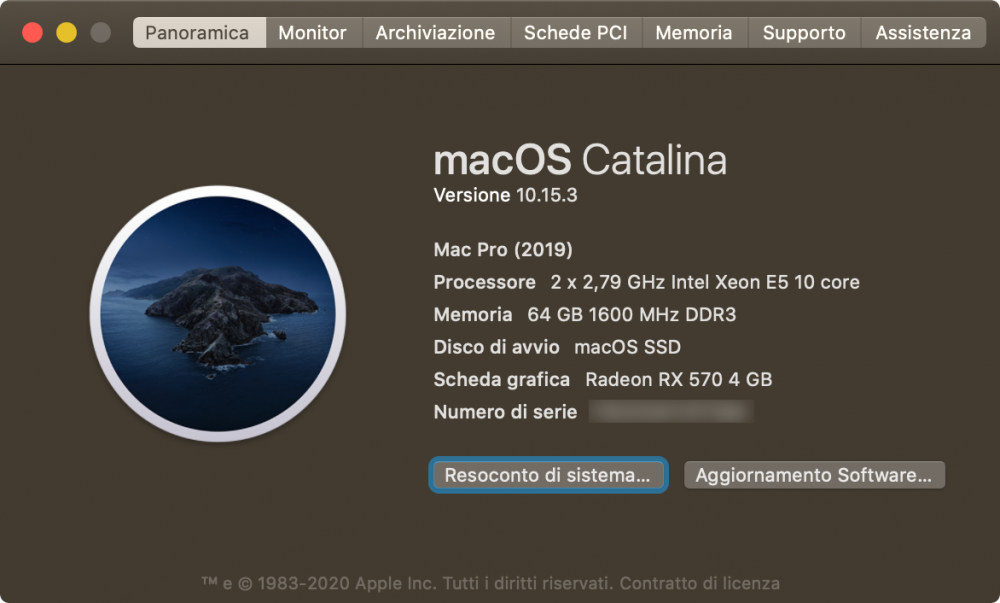
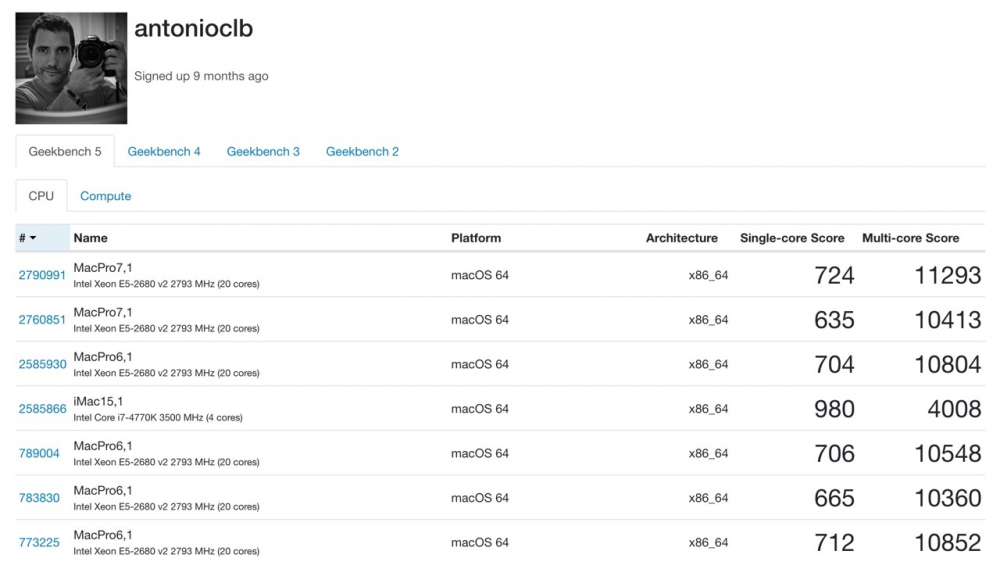
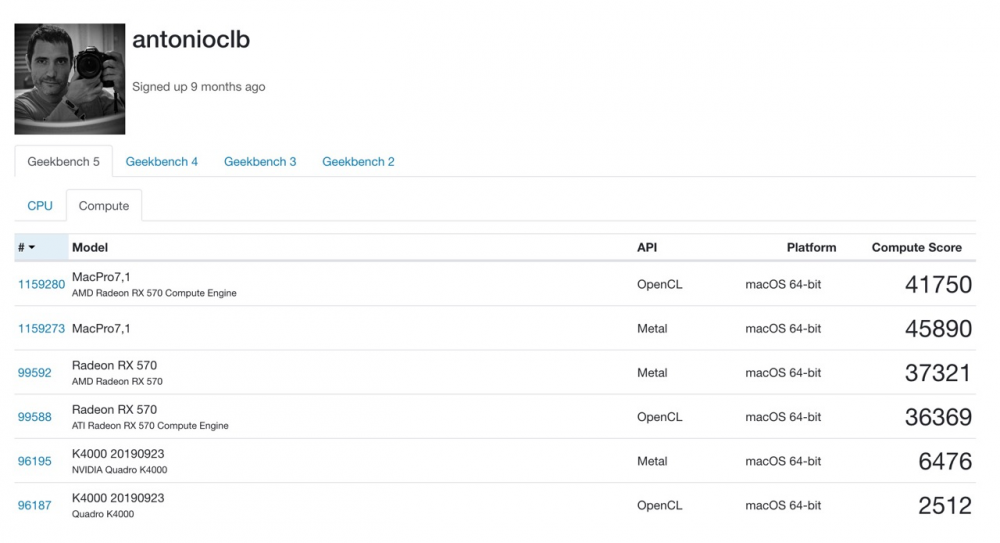
Hello to everybody! A quick update on my HP Z620 Catalina journey... In the past few days I've noticed that my Radeon RX570 HW encoding/decoding capabilities weren't available on Catalina 10.15.3: both Hackintool and Videoproc reported issues (VDA not supported and unavailable H.264/HEVC). After some research and LILU/WEG updates I've found that the issue was related to MacPro6,1 spec on my hackintosh so I decided to make some tests trying the MacPro7,1 SMBIOS and, with some USB issues, I managed to achieve full HW accelerated VDA according to Hackintool (VDA Decoder: Fully Supported) and Videproc (see screenshot): The backdraw is that onboard USB 2.0 is fully unoperational and USB 3.0 is super-slow (20-30 MBps) but still good for keyboard and other slow peripherals. I've a USB 3.1 card (ASM1142) that works perfectly and, maybe with the help of a good powered USB hub, I should be happy with this configuration. My specs (stuck on 10.15.3 for a couple of softwares not working on higher versions): You will need this kext to avoid the annoying memory misconfiguration message: https://github.com/IOIIIO/MacProMemoryNotificationDisabler The system looks stable and seems also more responsive than before... I'll keep you updated! EDIT: a couple of benchmarks confirm better system performances (don't consider 2760851 on the second row: system was not idle). Cool! Have fun! AC


 1 point
 -
OpenCanopy_Pick_and_Mix_Icons_6 Add some HardDrives with large macOS Roundels, and then the roundels without the drives underneath them to match the sizes of the large Linux ones in pack 5 (I think when they're on the drives they are definitely too large and will have to address that later on). I then realised the OS logos didn't have shadows so went back to re-made those. And then I noticed older External icons also didn't't have shadows so went back and re-made all those. So this pack has many duplicates from previous packs, but with shadows.1 point
-
successful Clover X58 i have just to say you guys are really awesome thank you so much Clover is on the way kuckuck du bist der hammer

 1 point
 -
Your SSDT edits, pared with Rehabmans VoodPS2Controller kext (1.9.2) makes the touchpad fully functional again in my t470s in OC! THANKS!! I successfully made the jump to Catalina 10.15.5 tonight without a hitch thanks to your OC EFI and this last mod. Everything working GREAT!1 point
-
It doesn't need to. The user can take any .icns file, rename it to .VolumeIcons.icns and place at the root of the volume, then set PickerAttributes in config.plist to a value that reads them. * Check OpenCore documentation for correct details.1 point
-
OpenCanopy_Pick_and_Mix_Icons_5 HardDrives with overly large OS icons (possibly too big, but trying to give the user choices). Also, OS icons on their own without the drive image.1 point
-
OpenCanopy_Pick_and_Mix_Icons_4 I have generated dark and light Microsoft Windows 10 and Apple HardDrive icons with stronger desktop images to give the user choice over the more subtler ones posted previously. There are now some internal and external generic Linux icons and also light and dark HardDrive icons for 15 Linux distro's.1 point
-
XCPM 10.16 /11.0 Beta (20A4299v) X99/X299 Before test uncheck your Config.plist Kernel-> Quirks-> AppleCpuPmCfgLock-No AppleXcpmExtraMsrs-No AppleXcpmForceBoost-No If you are using _xcpm_bootstrap patch you have to Emulate Original CPUID #Kernel->Emulate->Your CPU Original ID #CPUID Cascade Lake-X 0x050657 Cpuid1Data <-> 57060500 00000000 00000000 00000000 Cpuid1Mask <-> FFFFFFFF 00000000 00000000 00000000 #CPUID Skylake-X 0x050654 /Skylake-H 0x0406E3 Cpuid1Data <-> 54060500 00000000 00000000 00000000 Cpuid1Mask <-> FFFFFFFF 00000000 00000000 00000000 #CPUID 0x0306F2 Haswell-E/Haswell 0x0306C3 Cpuid1Data <-> F2060300 00000000 00000000 00000000 Cpuid1Mask <-> FFFFFFFF 00000000 00000000 00000000 #CPUID 0x0406F1 Broadwell-E/Broadwell 0x0306D4 Cpuid1Data <-> F1060400 00000000 00000000 00000000 Cpuid1Mask <-> FFFFFFFF 00000000 00000000 00000000 XCPM Patches 10.16 Beta Modify By N.Mano sysctl -x hw.cpufamily sysctl -x machdep.cpu.model sysctl -x machdep.xcpm.forced_idle_period sysctl -x machdep.xcpm.forced_idle_ratio sysctl -x machdep.xcpm.mode sysctl -x machdep.cpu.features sysctl -x hw.cputype #1 xcpm_core_scope_msrs © Pike R. Alpha Modify N.Mano Comment String <-> xcpm_core_scope_msrs Modify By N.Mano Count: 0 Enabled Boolean <-> Yes Find Data<-> 31D2E8FF E0FFFF Identifier: kernel Limit: 0 Mask: (LEAVE THIS EMPTY) MatchKernel: MinKernel: Replace Data<-> 31D29090 909090 ReplaceMask: (LEAVE THIS EMPTY) Skip: 0 #2 _xcpm_pkg_scope_msrs (c) Pike R. Alpha Modify By N.Mano Comment String <-> _xcpm_pkg_scope_msrs Modify By N.Mano Count: 0 Enabled Boolean <-> Yes Find Data<-> 31D2E8BD F1FFFF Identifier: kernel Limit: 0 Mask: (LEAVE THIS EMPTY) MatchKernel: MinKernel: Replace Data<-> 31D29090 909090 ReplaceMask: (LEAVE THIS EMPTY) Skip: 0 #3 Comment String <-> _xcpm_SMT_scope_msrs #1 Modify By N.Mano Count: 0 Enabled Boolean <-> Yes Find Data<-> BE060000 005DE908 000000 Identifier: kernel Limit: 0 Mask: (LEAVE THIS EMPTY) MatchKernel: MinKernel: Replace Data<-> BE060000 005DC390 909090 ReplaceMask: (LEAVE THIS EMPTY) Skip: 0 #4 Comment String <-> _xcpm_SMT_scope_msrs_2 Modify By N.Mano Count: 0 Enabled Boolean <-> Yes Find Data<-> 31D2E838 FDFFFF Identifier: kernel Limit: 0 Mask: (LEAVE THIS EMPTY) MatchKernel: MinKernel: Replace Data<-> 31D29090 909090 ReplaceMask: (LEAVE THIS EMPTY) Skip: 0 #5 Comment String <-> __xcpm_enable_pstate_patch Modify By N.Mano Count: 0 Enabled Boolean <-> Yes Find Data<-> 41C1E608 4963D689 D048C1EA 20 Identifier: kernel Limit: 0 Mask: (LEAVE THIS EMPTY) MatchKernel: MinKernel: Replace Data<-> 41C1E608 B800FF00 0031D290 90 ReplaceMask: (LEAVE THIS EMPTY) Skip: 0 #6 This patch for X99(Haswell-E) Comment String <-> xcpm_bootstrap HASwell-E Modify By N.Mano Count: 0 Enabled Boolean <-> Yes Find Data<-> 80C3C480 FB420F Identifier: kernel Limit: 0 Mask: (LEAVE THIS EMPTY) MatchKernel: MinKernel: Replace Data<-> 80C3C180 FB420F ReplaceMask: (LEAVE THIS EMPTY) Skip: 0 #7 This patch for X299(Skylake-X/Cascade Lake-X) Comment String <-> xcpm_bootstrap Skylake-X/Cascade Lake-X Modify By N.Mano Count: 0 Enabled Boolean <-> Yes Find Data<-> 80C3C480 FB420F Identifier: kernel Limit: 0 Mask: (LEAVE THIS EMPTY) MatchKernel: MinKernel: Replace Data<-> 80C3BD80 FB420F ReplaceMask: (LEAVE THIS EMPTY) Skip: 0 #8 This patch for X99(Broadwell-E) Comment String <-> xcpm_bootstrap Broadwell-E Modify By N.Mano Count: 0 Enabled Boolean <-> Yes Find Data<-> 80C3C480 FB420F Identifier: kernel Limit: 0 Mask: (LEAVE THIS EMPTY) MatchKernel: MinKernel: Replace Data<-> 80C3BC80 FB420F ReplaceMask: (LEAVE THIS EMPTY) Skip: 0 #9 Comment String <-> xcpm_bootstrap IvyBridge E Modify By N.Mano Count: 0 Enabled Boolean <-> Yes Find Data<-> 80C3C480 FB420F Identifier: kernel Limit: 0 Mask: (LEAVE THIS EMPTY) MatchKernel: MinKernel: Replace Data<-> 80C3C680 FB420F ReplaceMask: (LEAVE THIS EMPTY) Skip: 0 #10 Comment String <-> _C6/C7_If=E2-Enabled=0x7E000403 Modify By N.Mano Count: 0 Enabled Boolean <-> Yes Find Data<-> E2000000 4C000000 00000000 00000000 0F040000 00000000 0500001E Identifier: kernel Limit: 0 Mask: (LEAVE THIS EMPTY) MatchKernel: MinKernel: Replace Data<-> E2000000 4C000000 00000000 00000000 0F040000 00000000 0304007E ReplaceMask: (LEAVE THIS EMPTY) Skip: 0 #11 Comment String <-> xcpm MSR Patch 4206 By N.Mano Count: 0 Enabled Boolean <-> Yes Find Data<-> 42060000 DC330600 00000000 00000000 1F000000 00000000 18000000 00000000 00000000 00000000 00000000 00000000 Identifier: kernel Limit: 0 Mask: (LEAVE THIS EMPTY) MatchKernel: MinKernel: Replace Data<-> 42060000 00000000 00000000 00000000 1F000000 00000000 18000000 00000000 00000000 00000000 00000000 00000000 ReplaceMask: (LEAVE THIS EMPTY) Skip: 0 #12 Comment String <-> xcpm support /0x82D390/MSR_PP0_POLICY 0x63a Modify By N.Mano Count: 0 Enabled Boolean <-> Yes Find Data<-> 3A060000 DC330600 00000000 00000000 1F Identifier: kernel Limit: 0 Mask: (LEAVE THIS EMPTY) MatchKernel: MinKernel: Replace Data<-> 3A060000 00000000 00000000 00000000 1F ReplaceMask: (LEAVE THIS EMPTY) Skip: 0 #13 Disable panic kext logging on 10.16.x Release kernel +0x7700 Modify By N.Mano Comment String <-> Disable panic kext logging on Modify By N.Mano 10.16.x Count: 0 Enabled Boolean <-> Yes Find Data<-> 8A0284C0 740D Identifier: kernel Limit: 0 Mask: (LEAVE THIS EMPTY) MatchKernel: MinKernel: Replace Data<-> 8A0284C0 EB0D ReplaceMask: (LEAVE THIS EMPTY) Skip: 01 point
-
OpenCanopy_Pick_and_Mix_Icons_3 Building on the last set and slowly adding to the collection I've included the missing, non-mandatory, Other and External icons that OpenCanopy looks for. There are now also some white external drives, some Microsoft and Microsoft Windows 10 ones and a preliminary few internal drives with labels. I think it may be good to eventually have some kind of visual repository for these where it will be easy to scroll through and maybe just download the ones of interest... Anyway thats for later, for now I'll just keep posting a handful as I create them.1 point
-
Yes is RIGHT so we you write Mister @ham4ever Thank you for this Note. It's work and iso is successfully created1 point
-
OpenCanopy_Pick_and_Mix_Icons_2 These use the same icon models as OpenCanopy_Pick_and_Mix_Icons_1 but have different lighting and altered textures. There are now only light and dark internal images as I've dropped the mid grey. Shadows have been added to the light devices. The internal drive icons include extra variations with a subtle macOS image from 10.12 thru 10.16. There are three sets of recovery images with each set showing a different world region on the map, Americas, Europe, Asia. The Selector and Selection images are available in 9 different transparency levels. Then complete set of icons in OpenCanopy_Pick_and_Mix_Icons_21 point
-
OpenCanopy_Pick_and_Mix_Icons_1 (Previously Alt_Icons_Resources_v0.1) EDIT: Removed preview image of drives with labels as they have started to become real icons as of Pick_and_Mix_Icons_3.1 point
-
@MacKonsti, I looked around and found others who are not using WhateverGreen, so I'm not sure how to advise you. Maybe it's best for you not to use it? I am curious about your performance claims and would like to test my UHD 630 performance without WhateverGreen. I need to change the default connector types, but I haven't figured out how to change the default connector-type without WhateverGreen. I tried "@0,connector-type" thinking that it would duplicate WhateverGreen's framebuffer-con0-type property, but it did not change the connector type. Does anyone know how to change UHD 630 connector types without WhateverGreen? EDIT: I think this post should point me in the right direction? EDIT2: It looks like the clues are already in this guide. The guide gives the kext to patch (for Coffee Lake UHD 630, the kext is AppleIntelCFLGraphicsFramebuffer.kext) and it gives the hex to find. For Coffee Lake UHD 630 0x3e920000, its 00000800 02000000 98000000, 01050900 00040000 87010000, 02040A00 00040000 87010000.1 point
-
I got it working under High Sierra by placing these three RehabMan kexts in Clover kexts 10.13 folder. https://github.com/RehabMan/OS-X-BrcmPatchRAM
 0 points