Leaderboard


Popular Content
Showing content with the highest reputation on 06/26/2020 in all areas
-
@fantomas, let me be crystal clear about it. AppleLife is not an unknown blog but one of the locations Acidanthera team and related people are located. It is a local Russian community, so if anything, the userbase is not intersecting in the first place. Yet, even if it was not, when team members post links to authorised instructions (e.g. my posts), you can treat it similar to github.com/acidanthera. If understanding all that you believe that links to developer resources are improper on insanelymac, we may have to cease all kind of interaction with insanelymac community.18 points
-
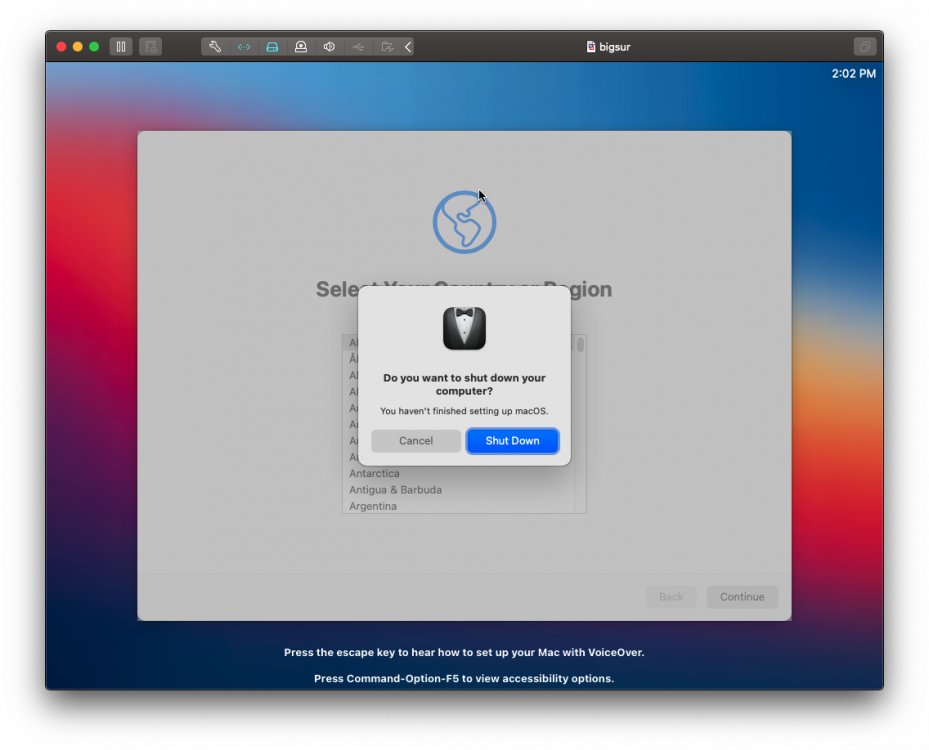
I see many 'new' users completely ignoring our forum rules. But also some 'older' members doing so. I would like you to pay attention to where you provide information. I see people sharing information from some unknown blogs which could appear just like promoting and this is something that we do not allow. As well as posting links for 'alternative' solutions to install macOS Big Sur that contain direct links for some kind of modified dmgs. I would like to remind you that ONLY links that came from Apple's servers are allowed to be posted on the forum. Any post which does not respect the forum rules will be deleted immediately and in the case of recidivism, the user sanctioned. Thank you for your understanding. BR fantomas9 points
-
To whom it may concern. I updated my guide to install Big Sur by creating your own installation using a virtual machine as installer. (With pictures) So you don't have to use ready-made DMG/DD. If you already have your Catalina working perfectly with OpenCore, it will theoretically work...6 points
-
I have no issues finding the solution's on the apple life site, google translate works perfectly fine @fantomas I don't mean to be rude, can I just say this website has been a mess for months and barely moderated, from SSL Cert issues and breaking pages, it's a little condescending to make a statement like that after all this time, its their development that's kept this site active. But that is my personal opinion.6 points
-
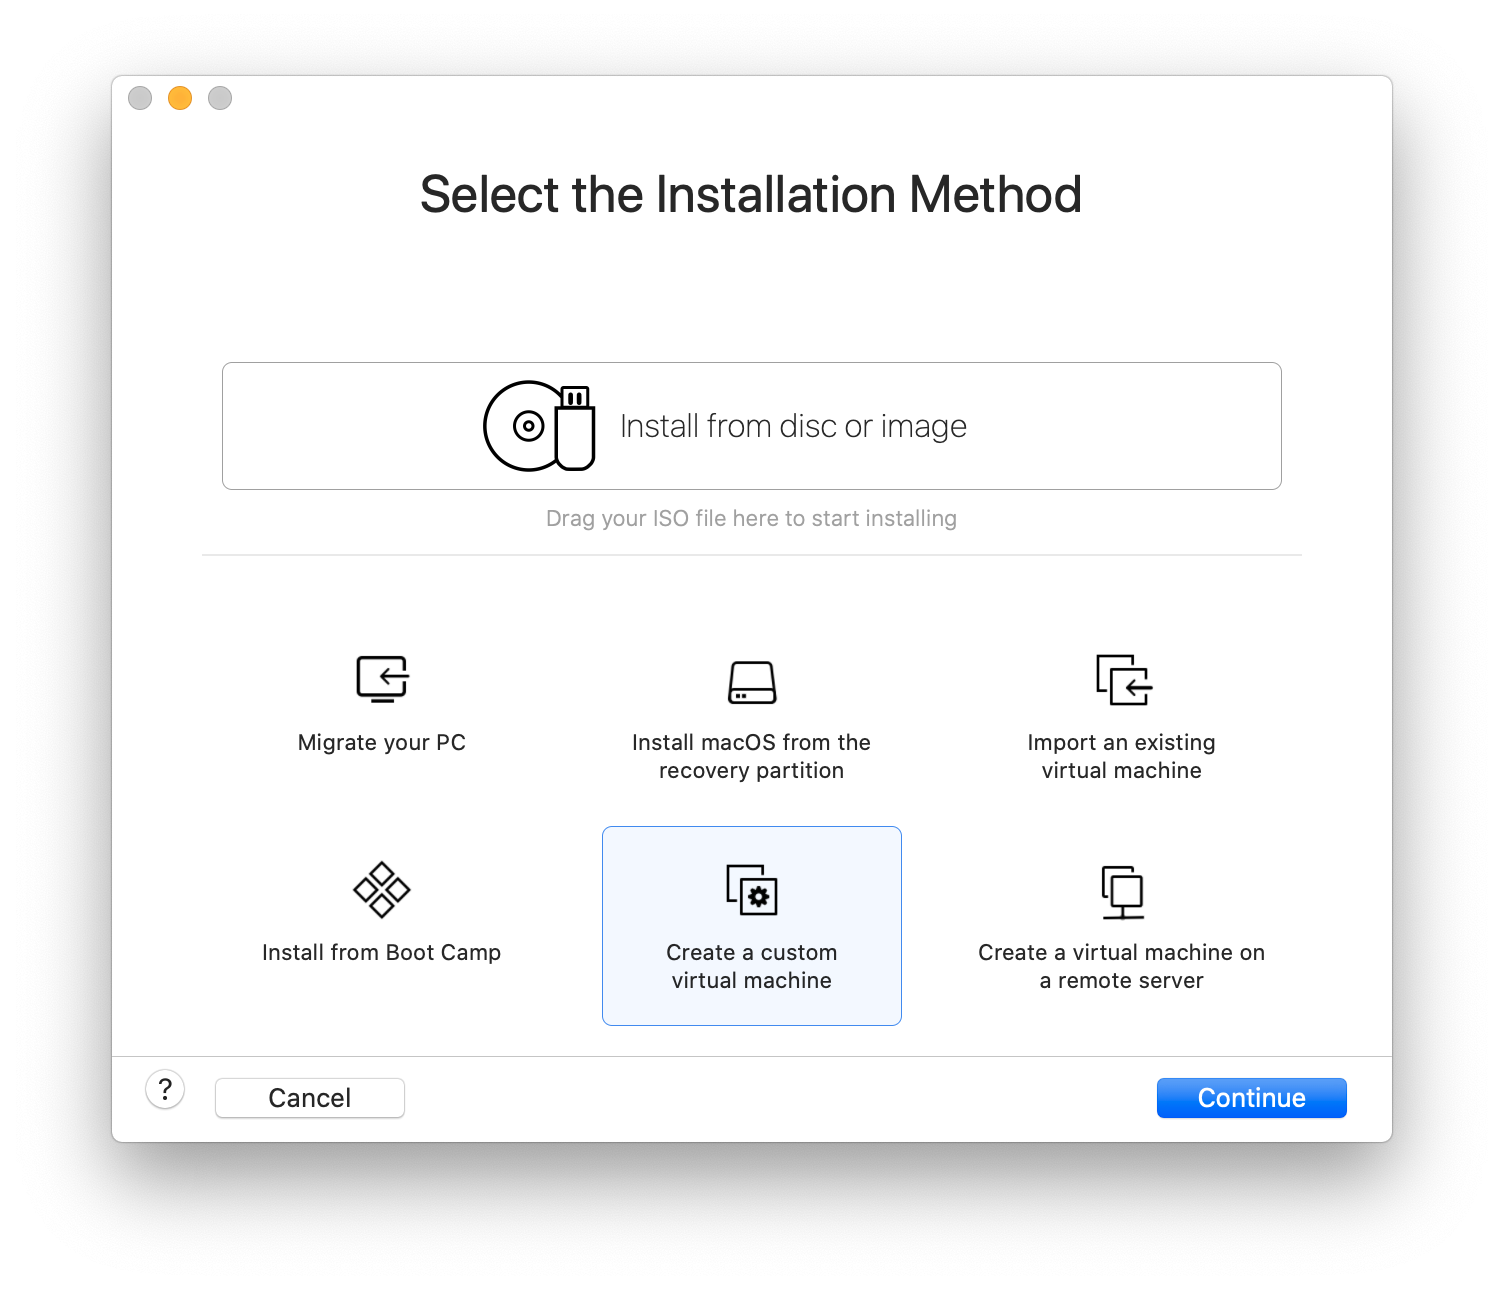
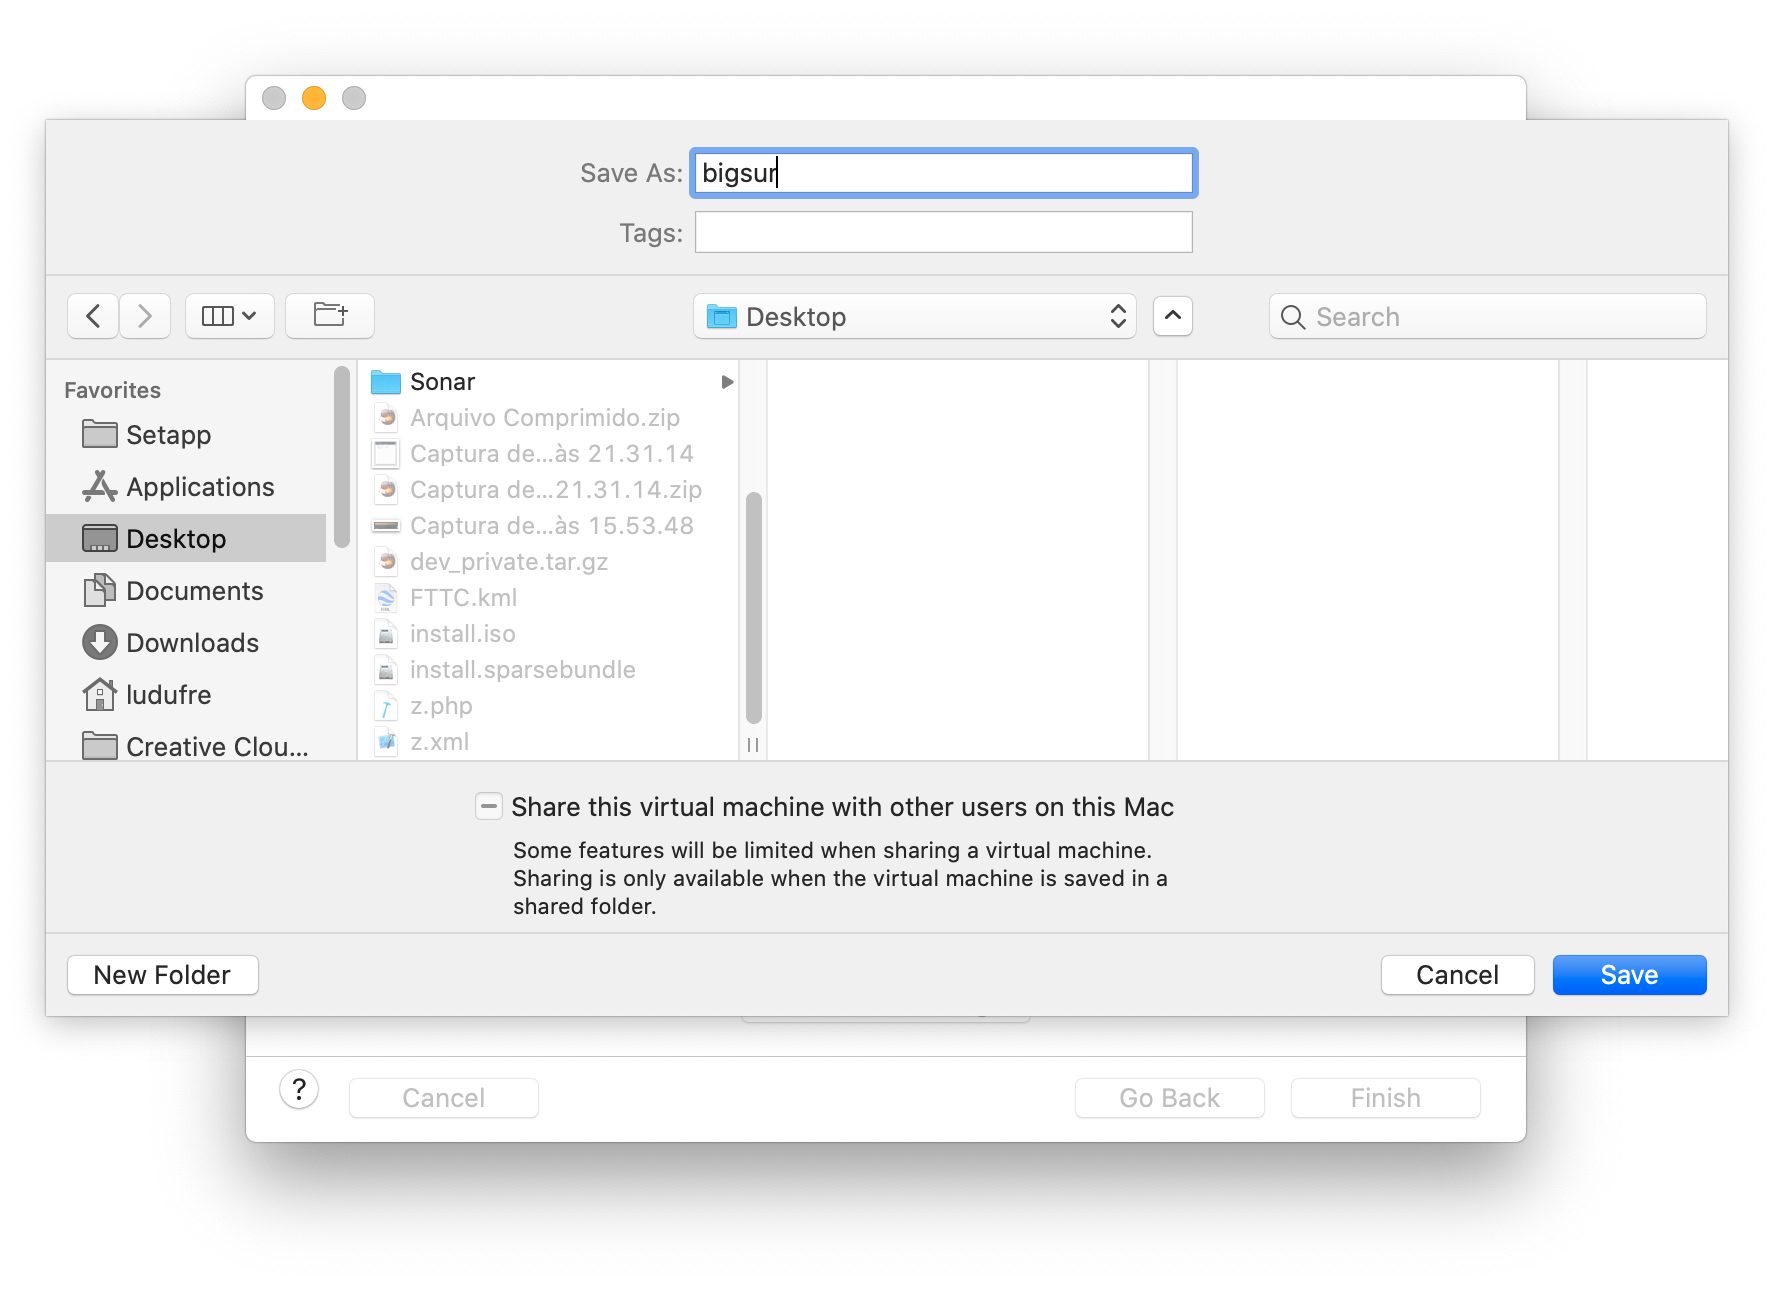
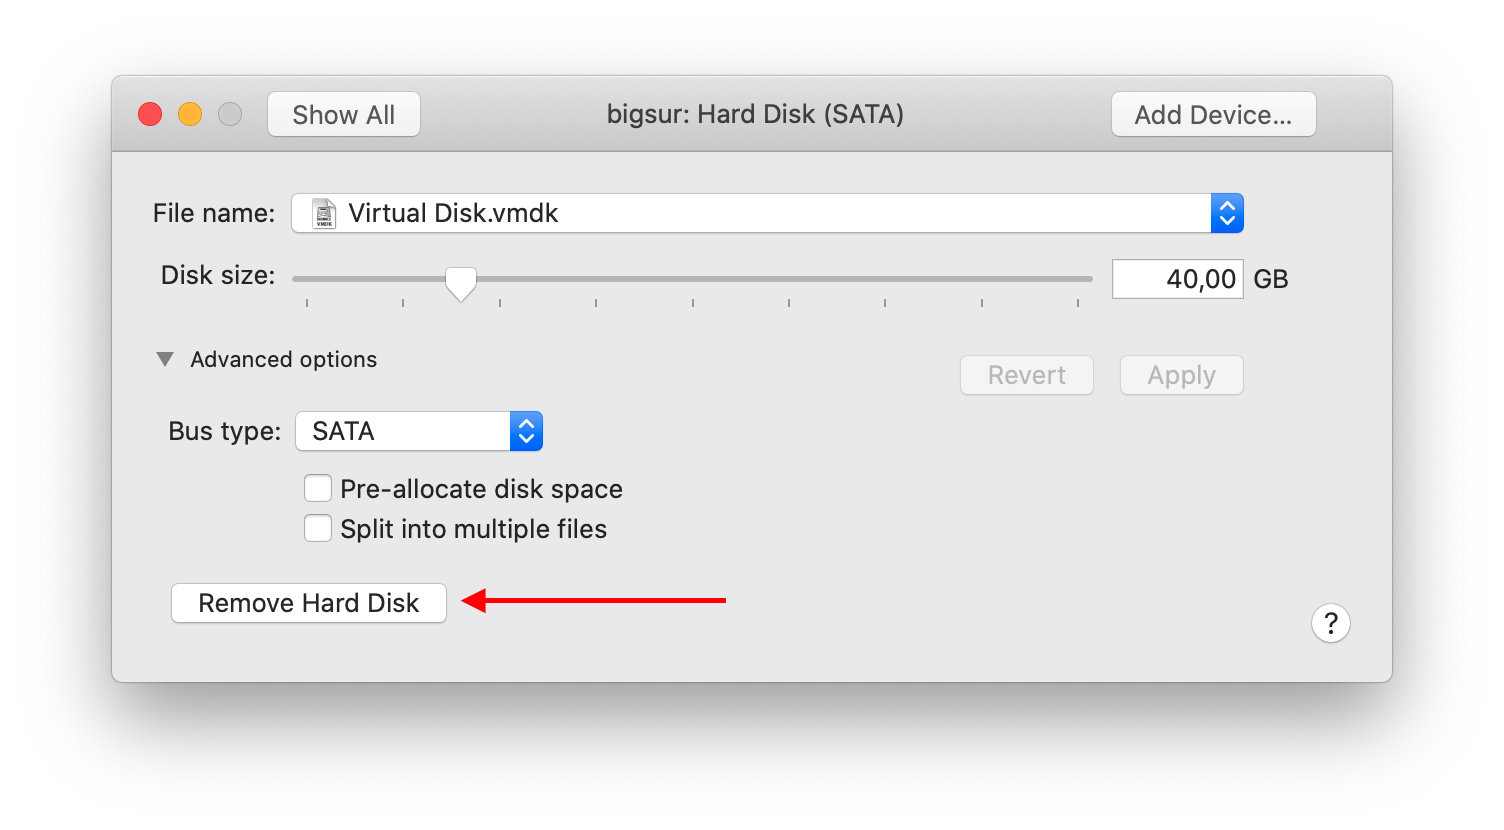
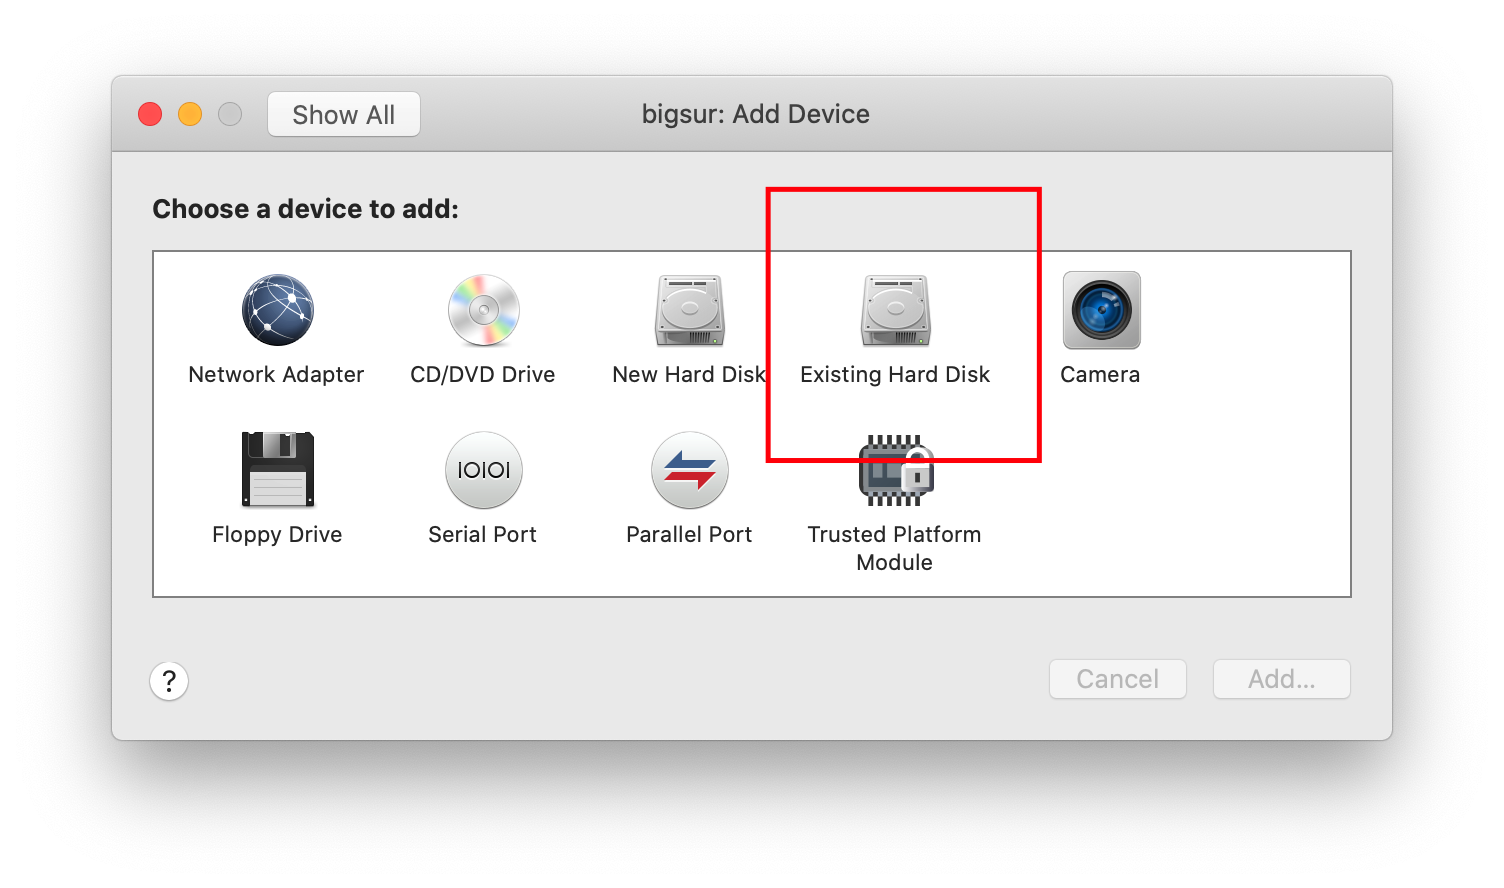
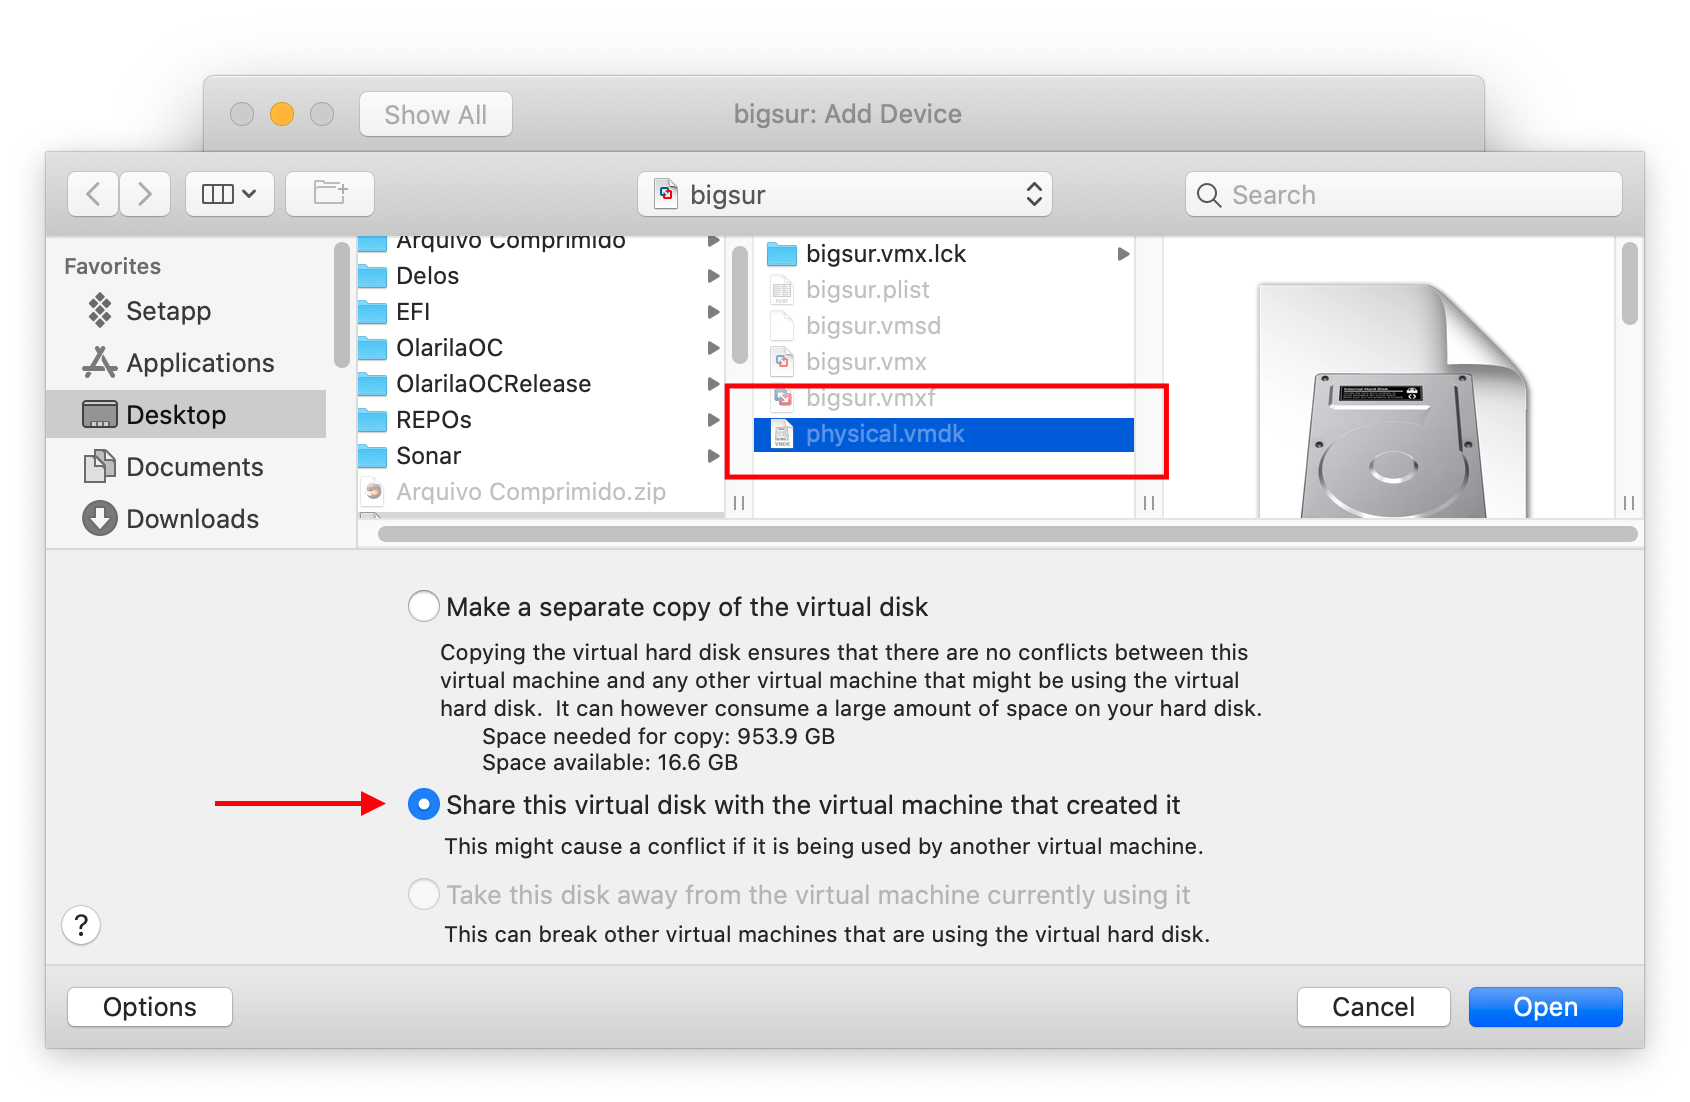
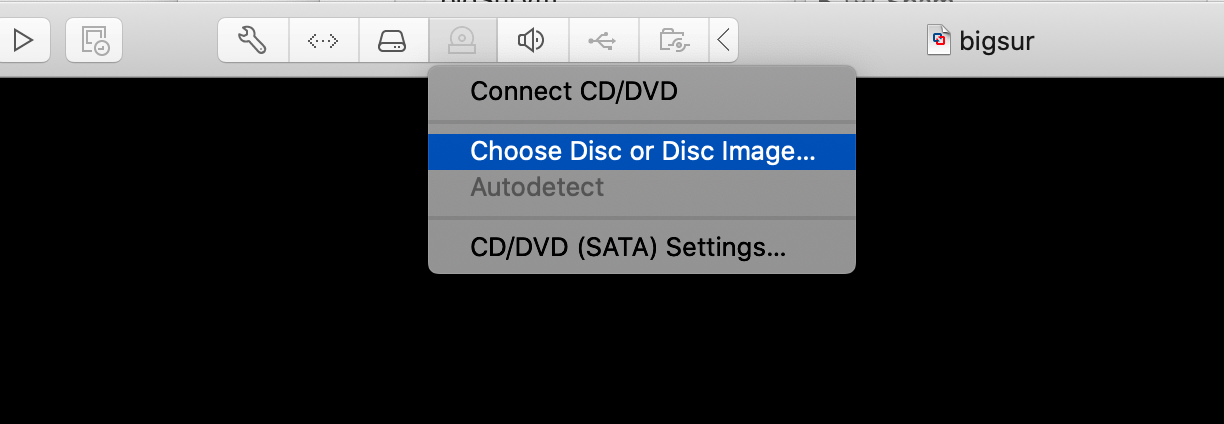
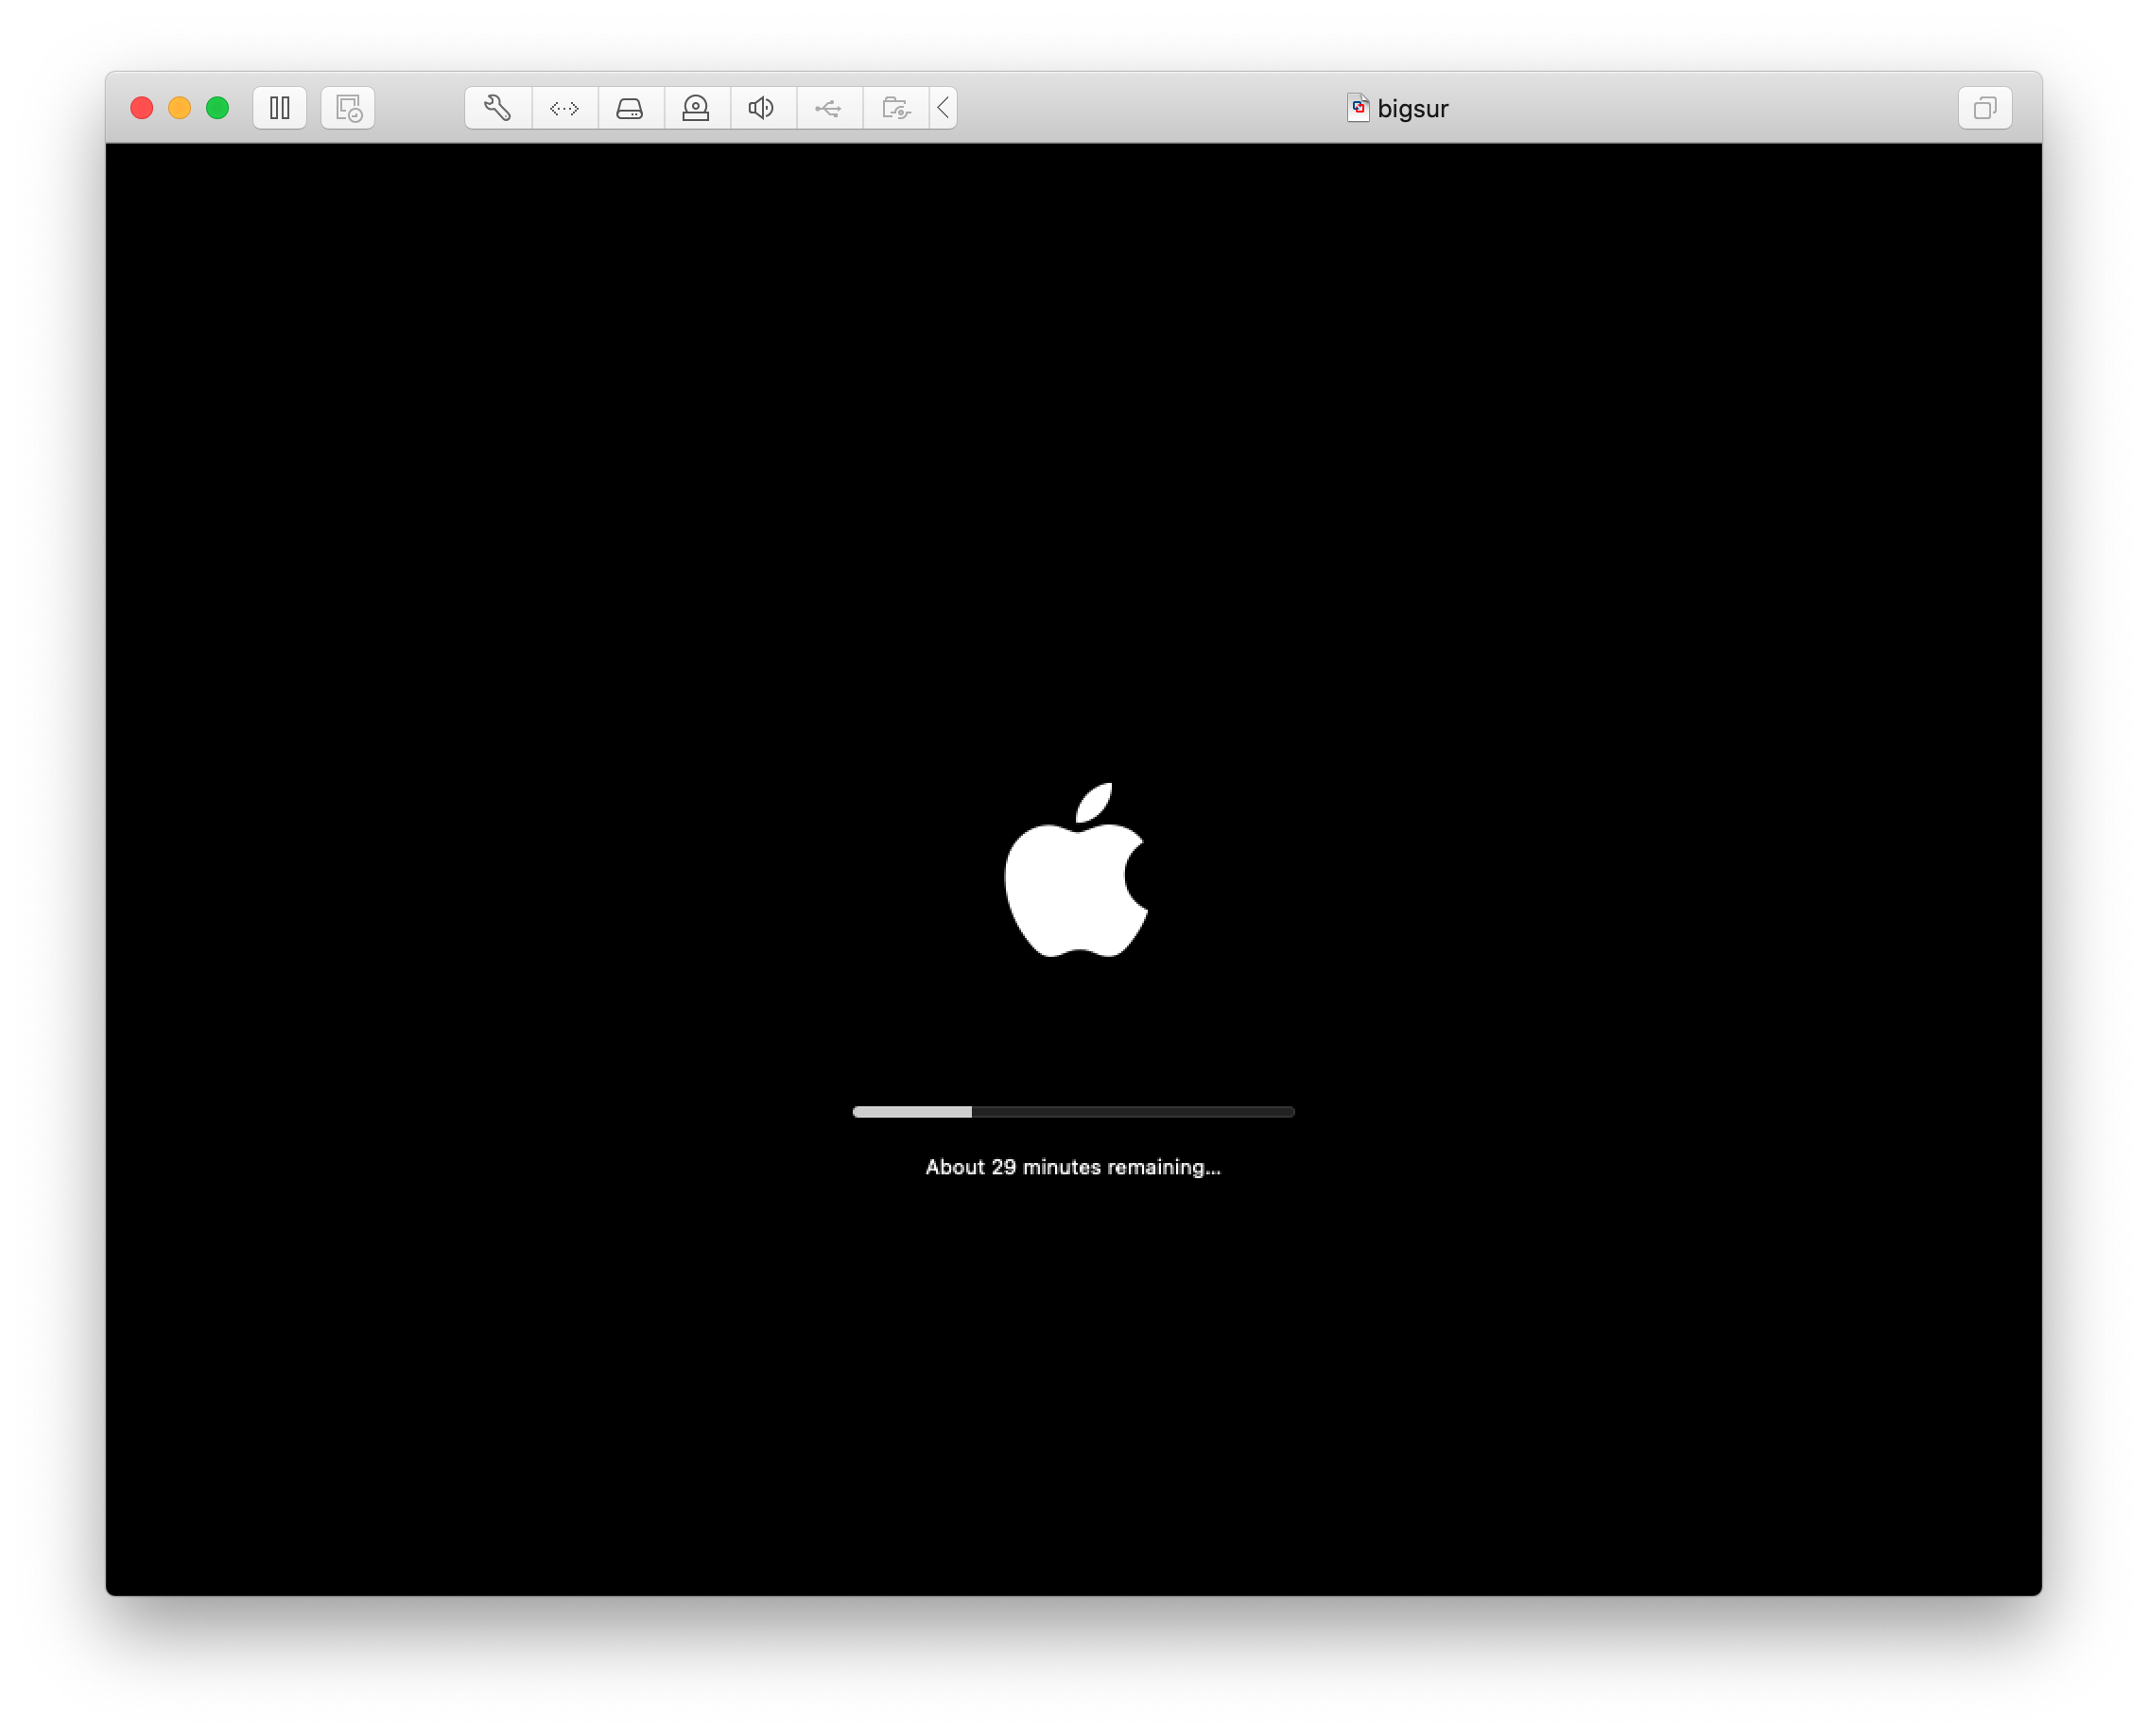
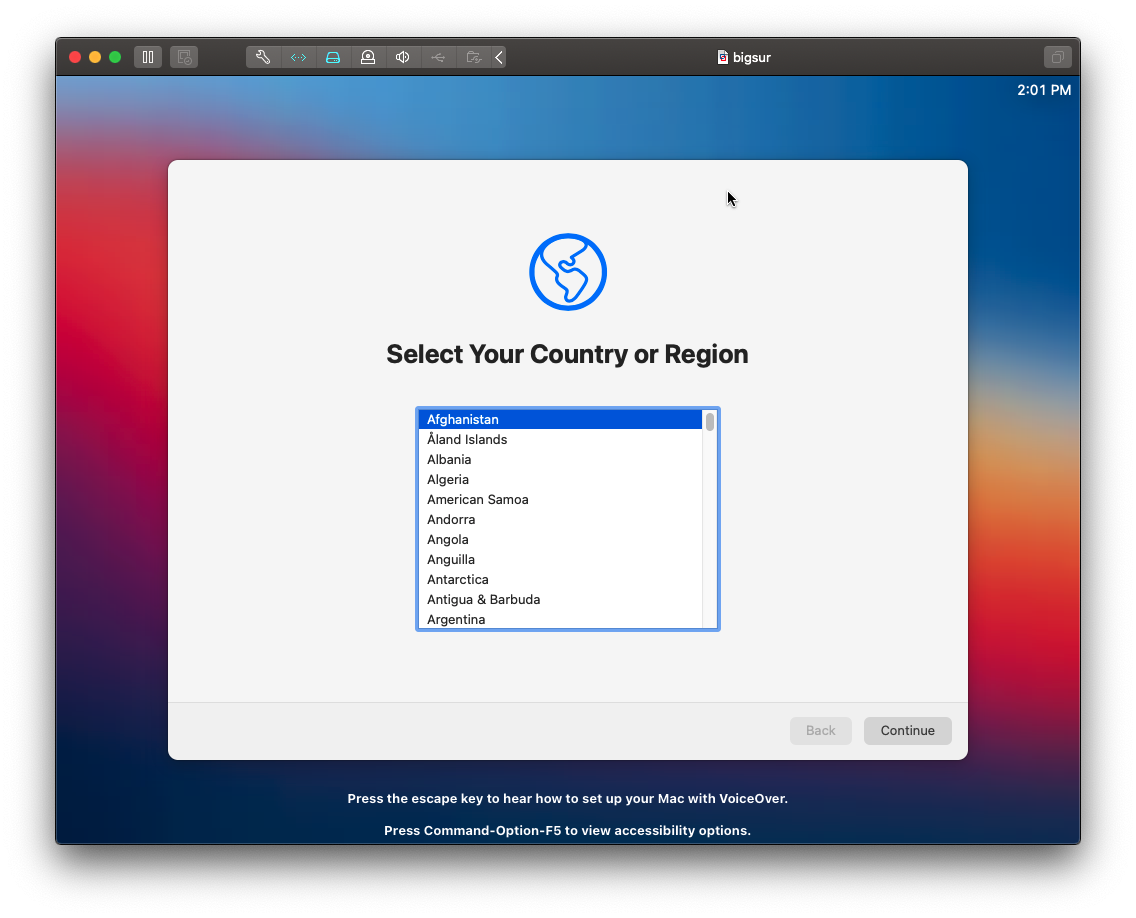
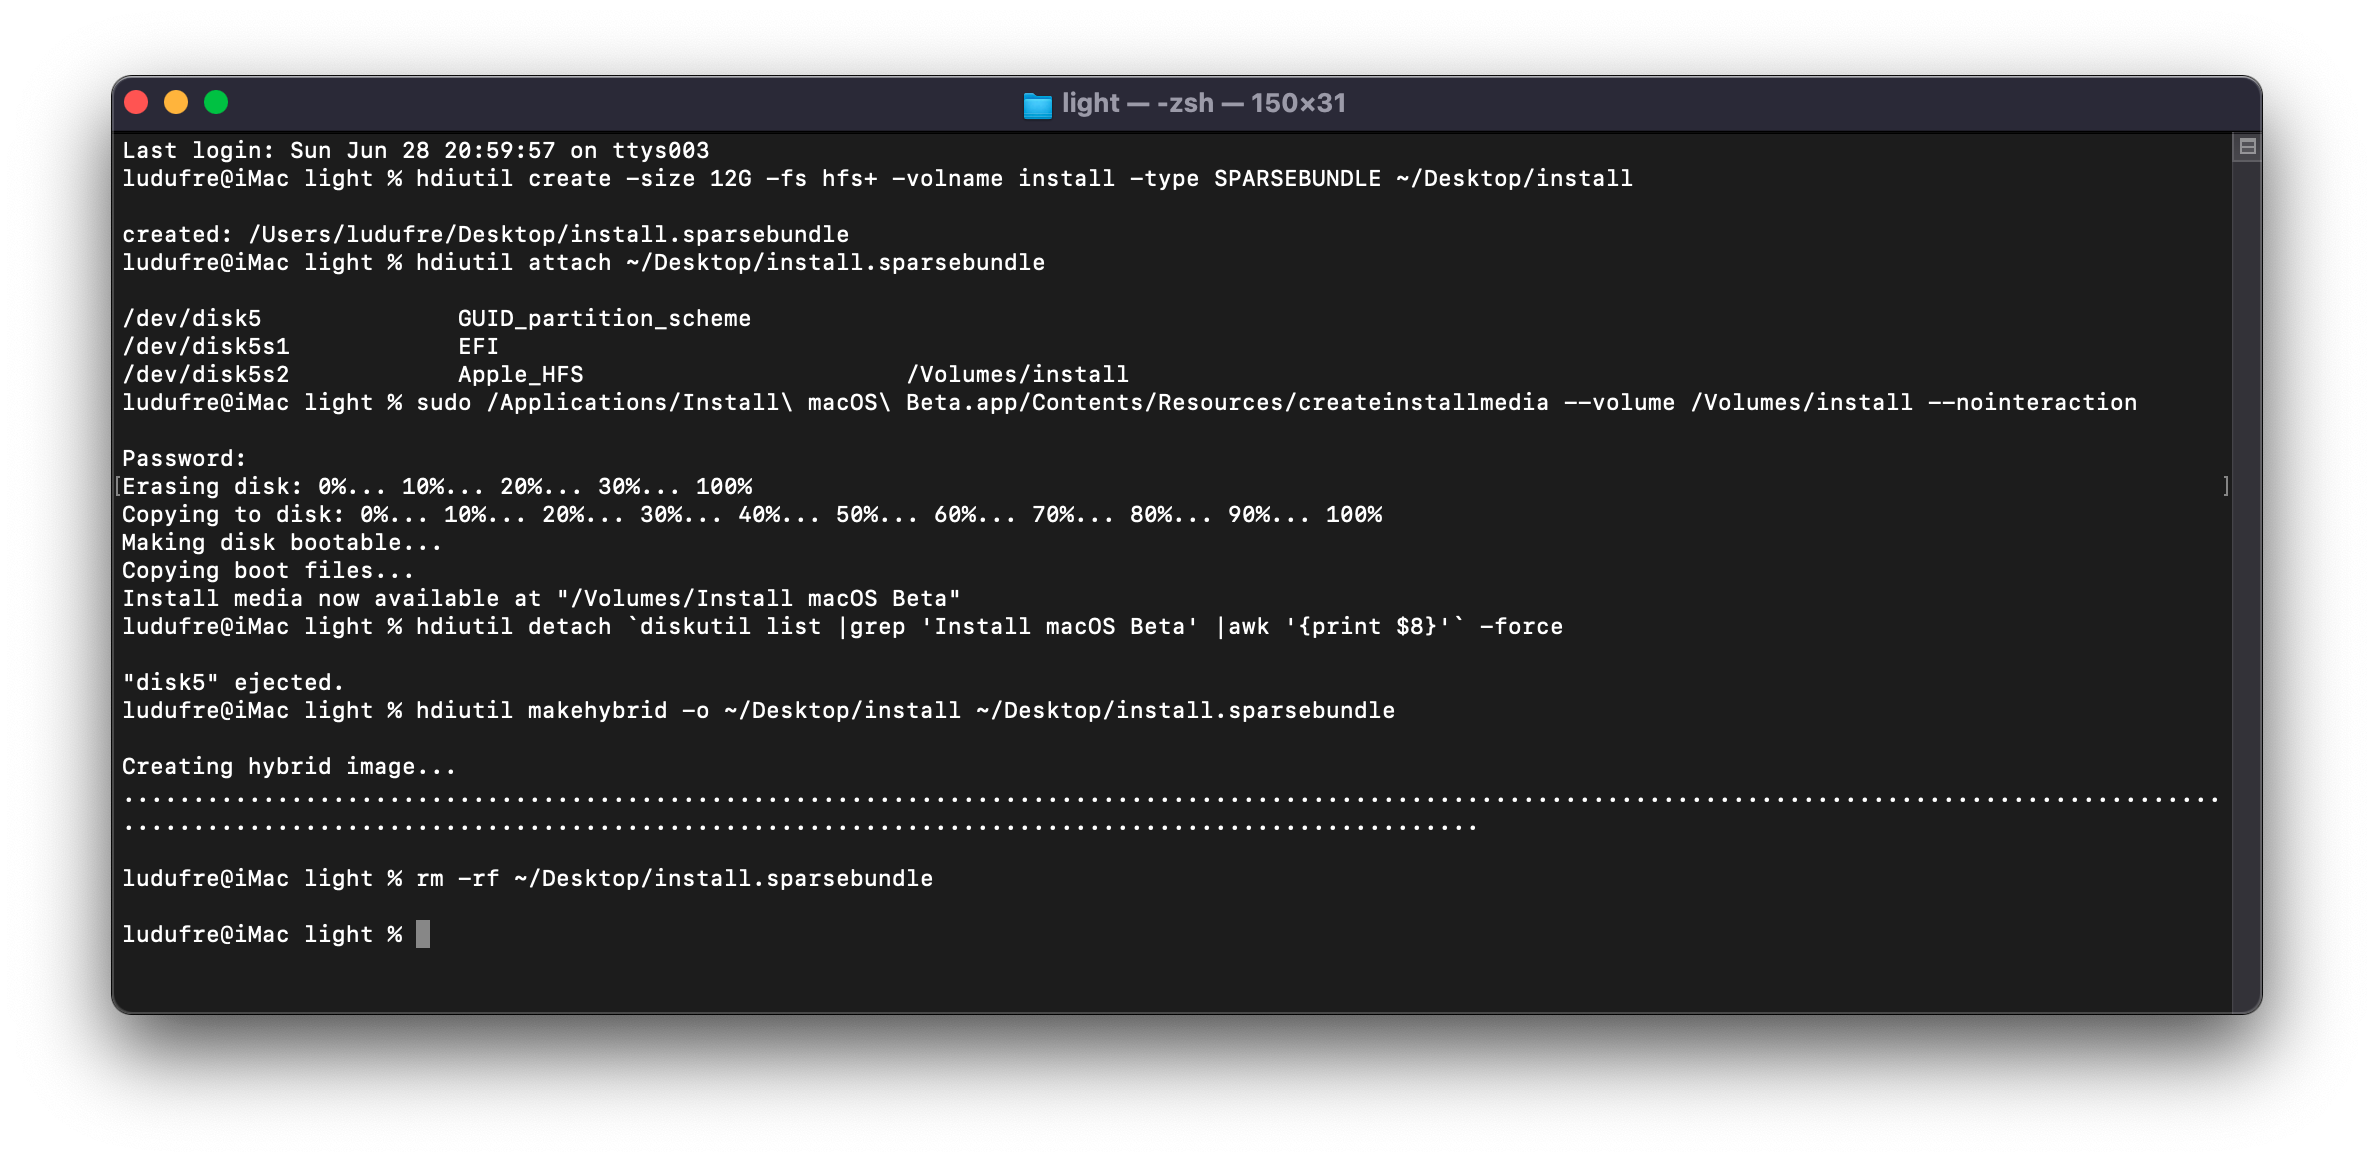
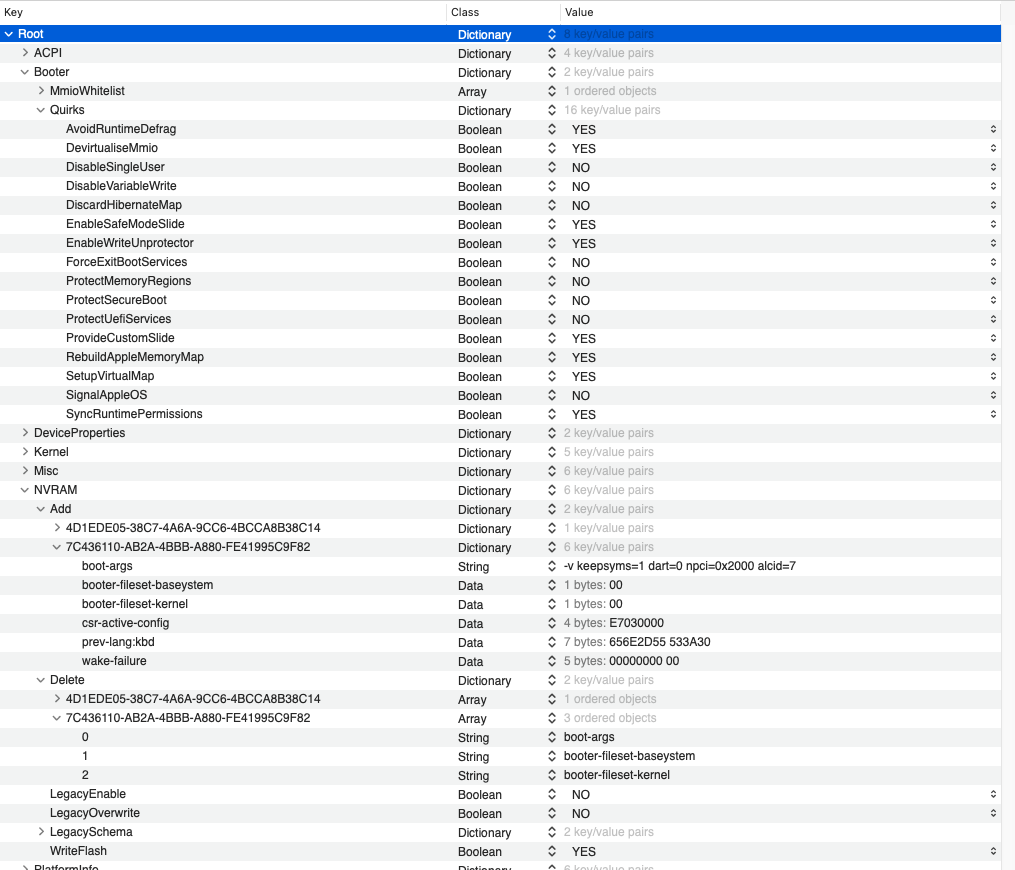
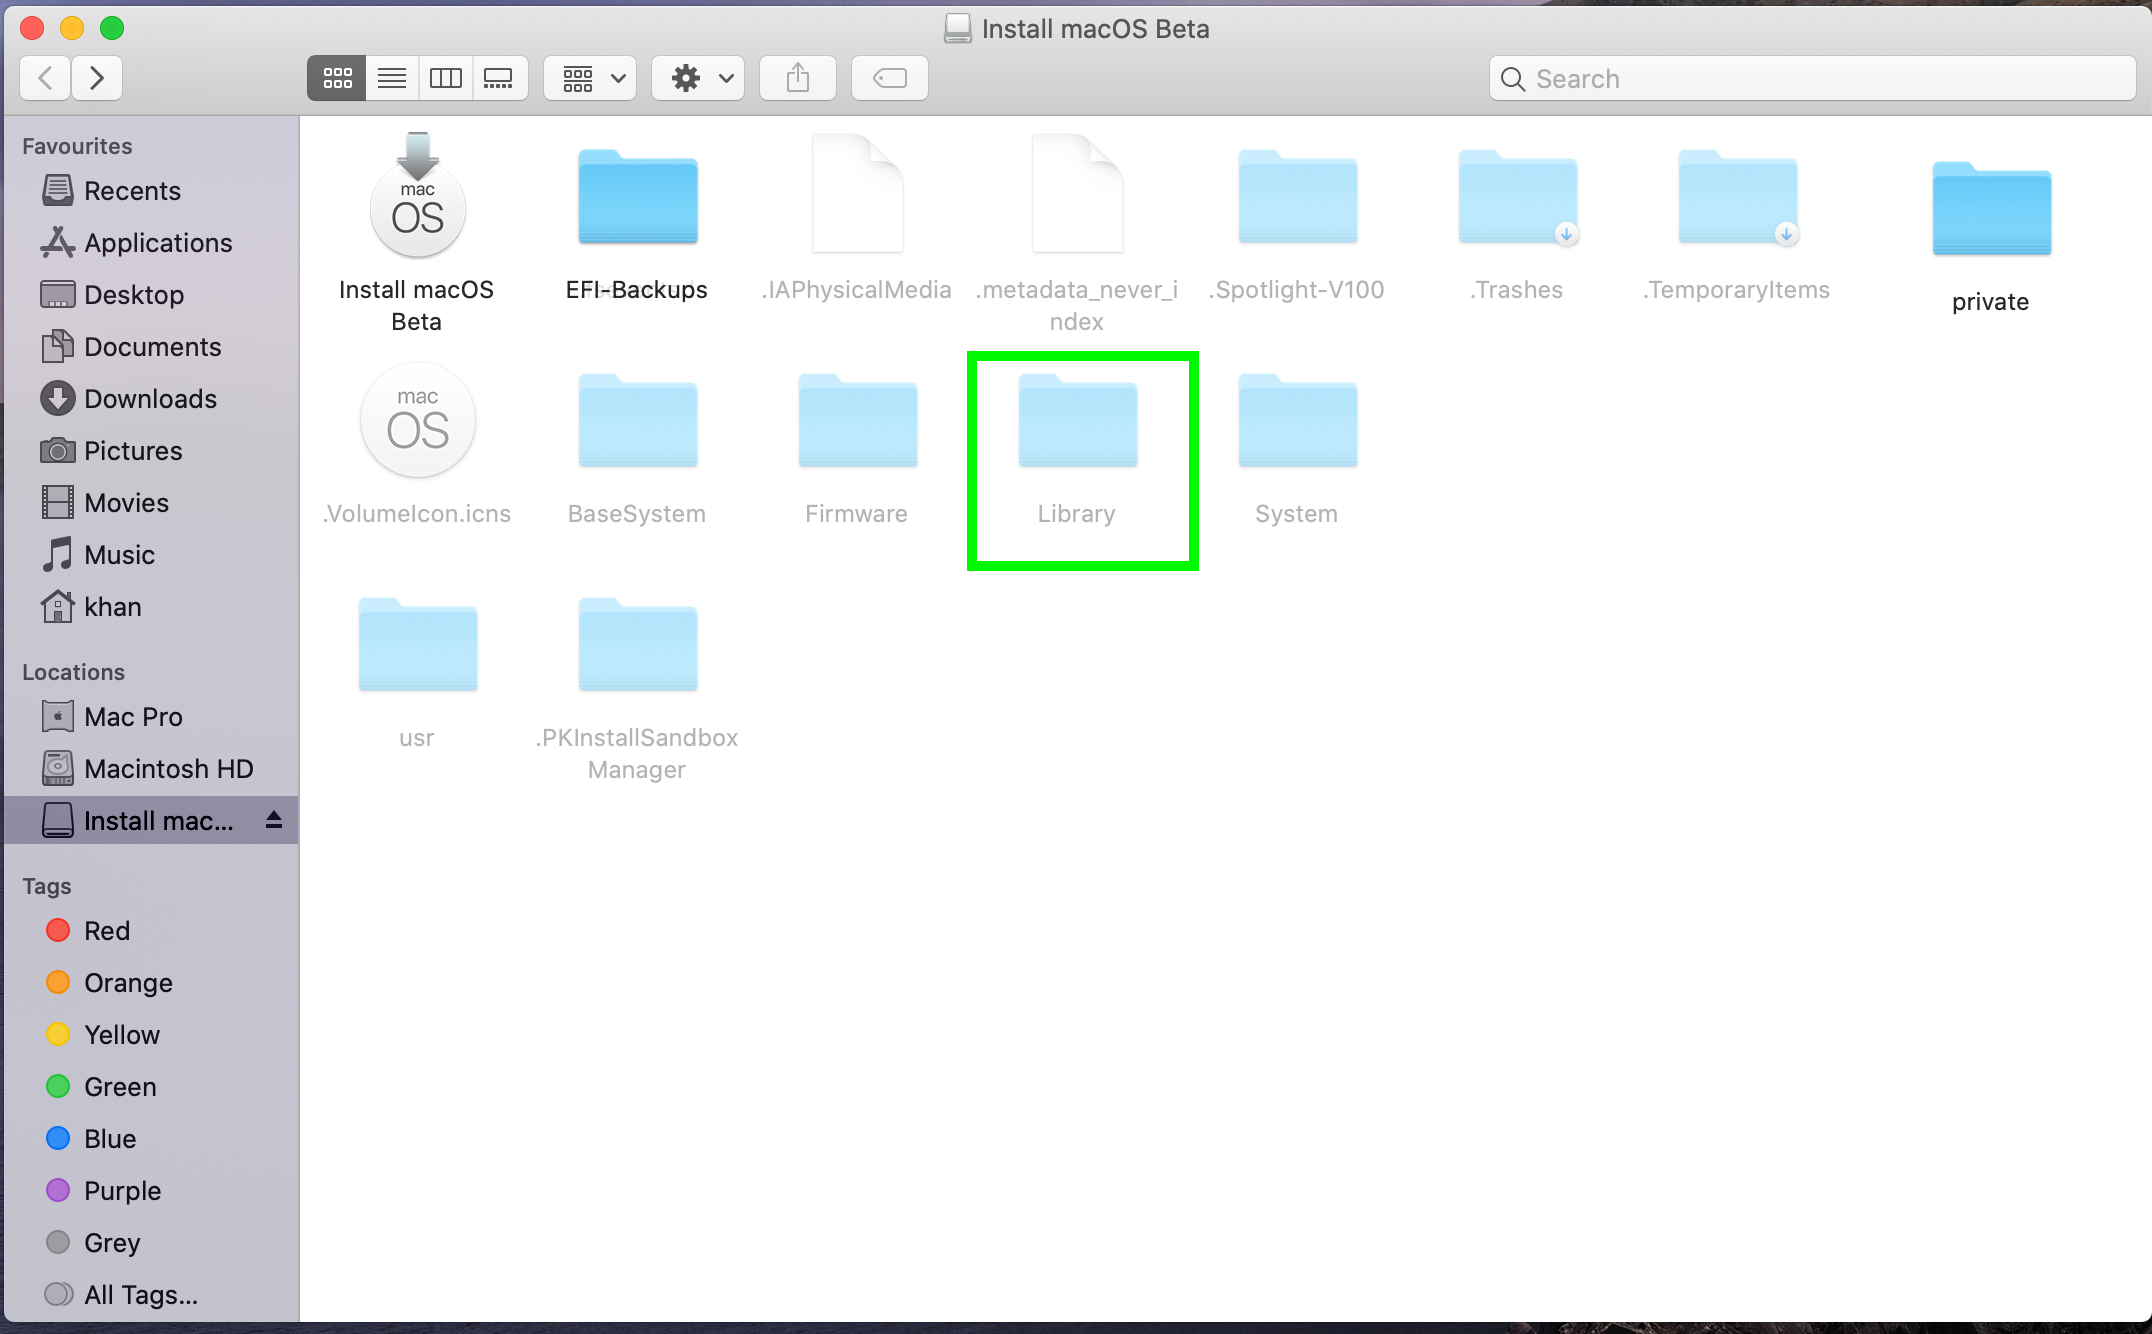
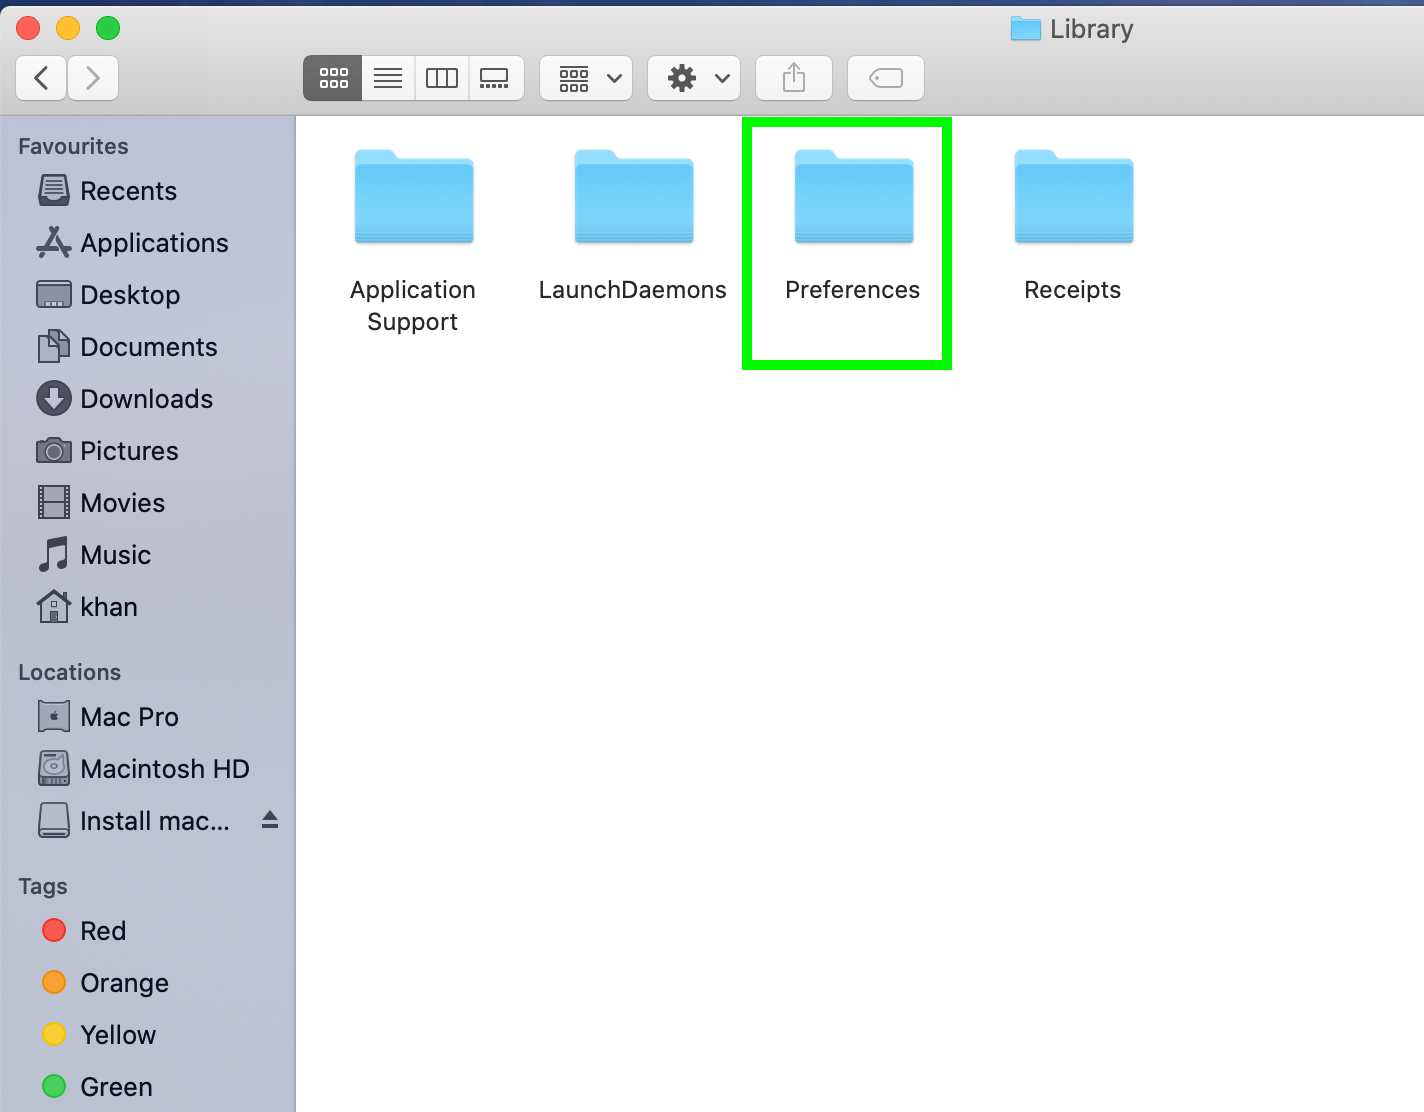
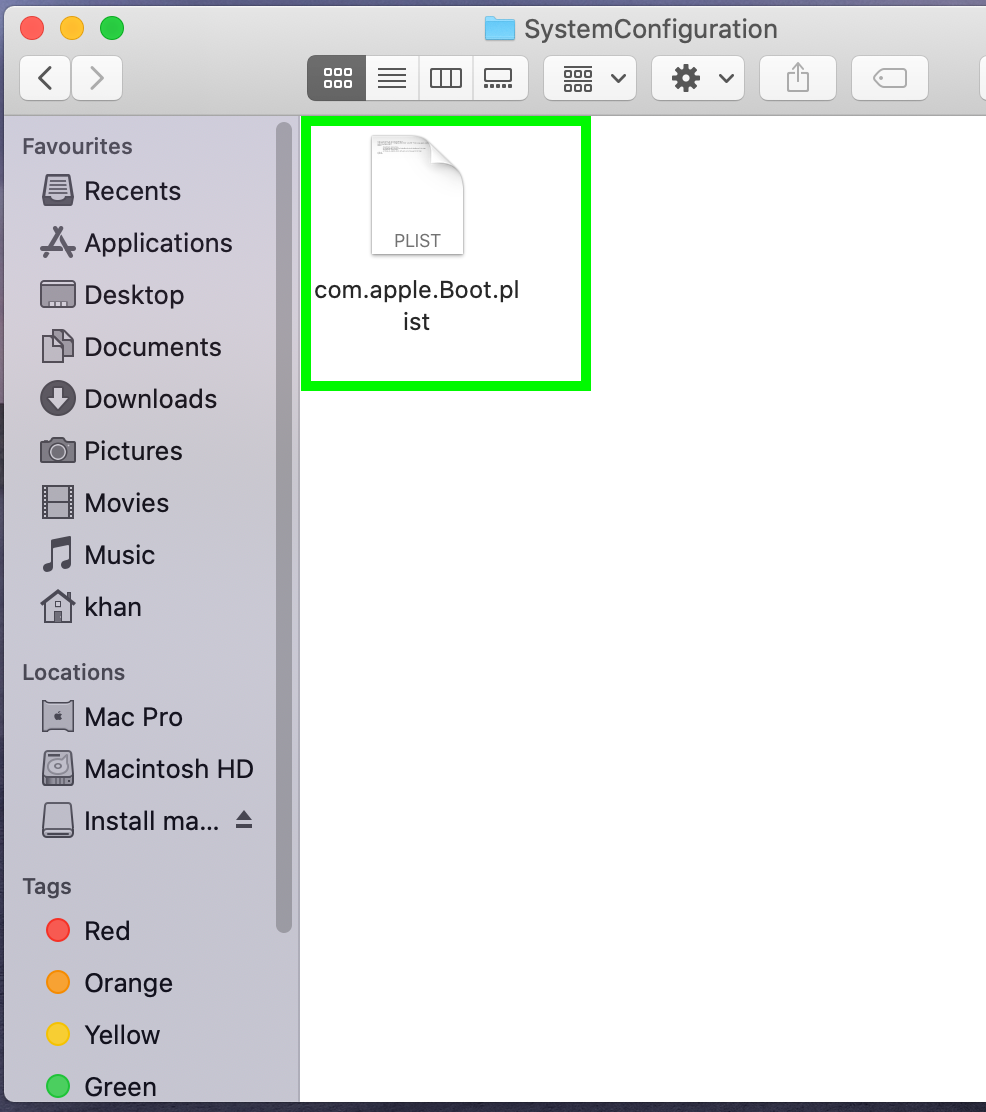
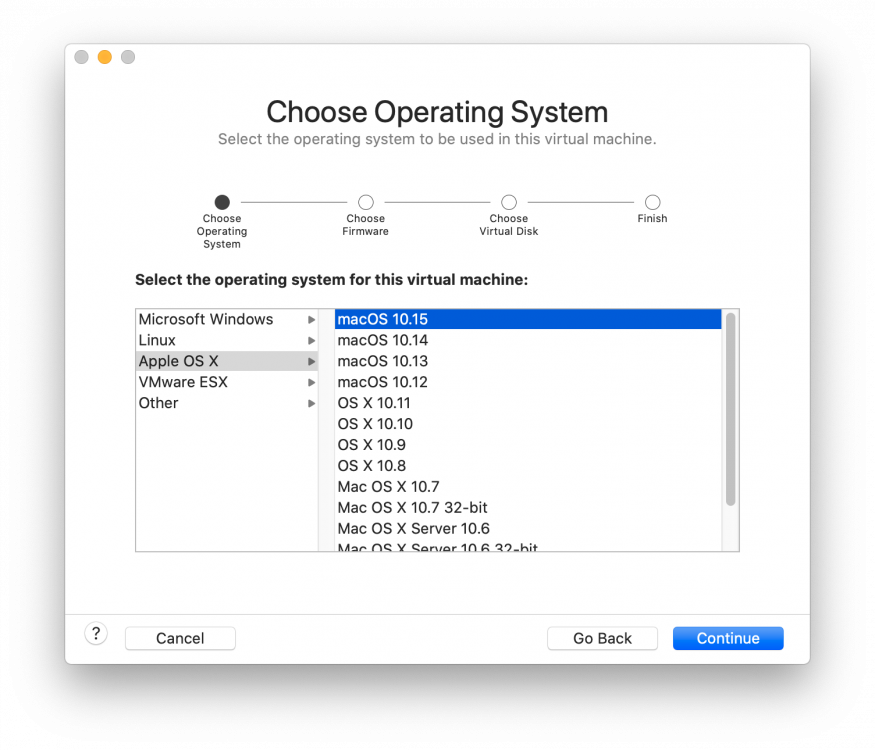
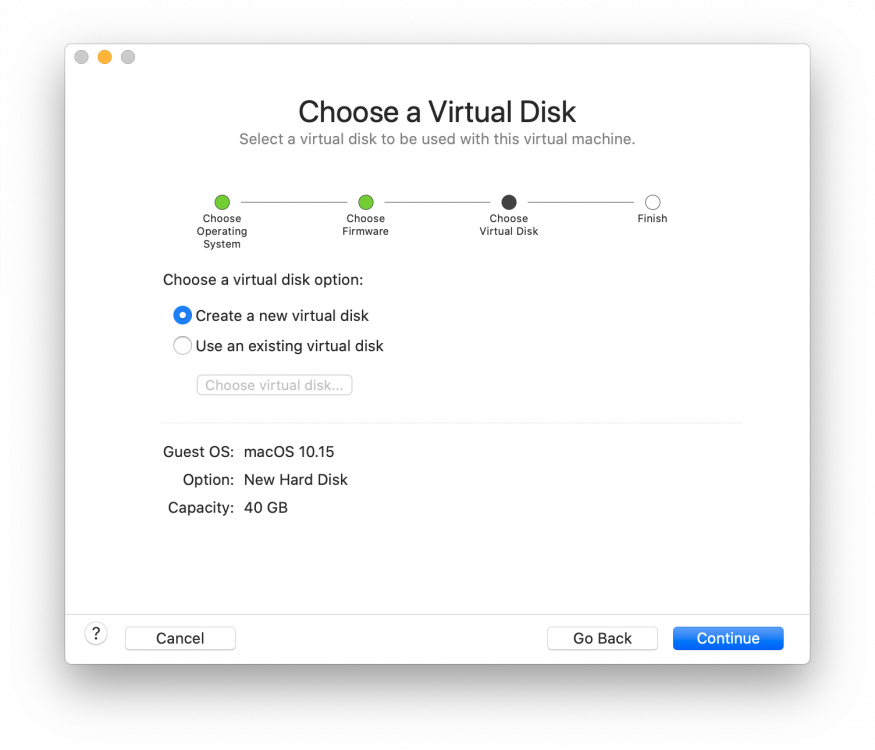
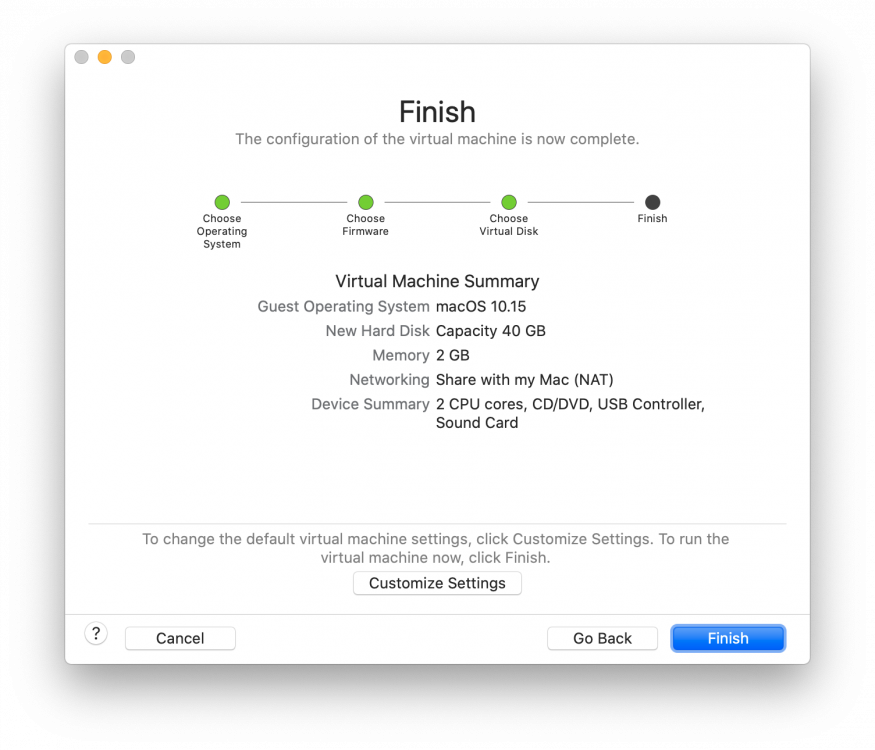
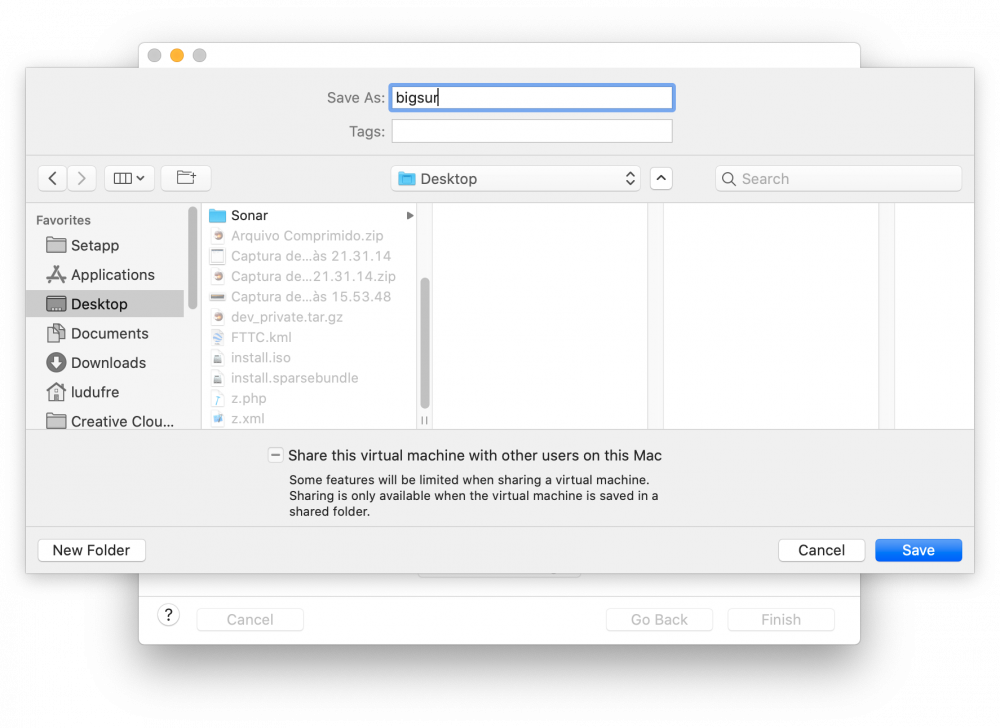
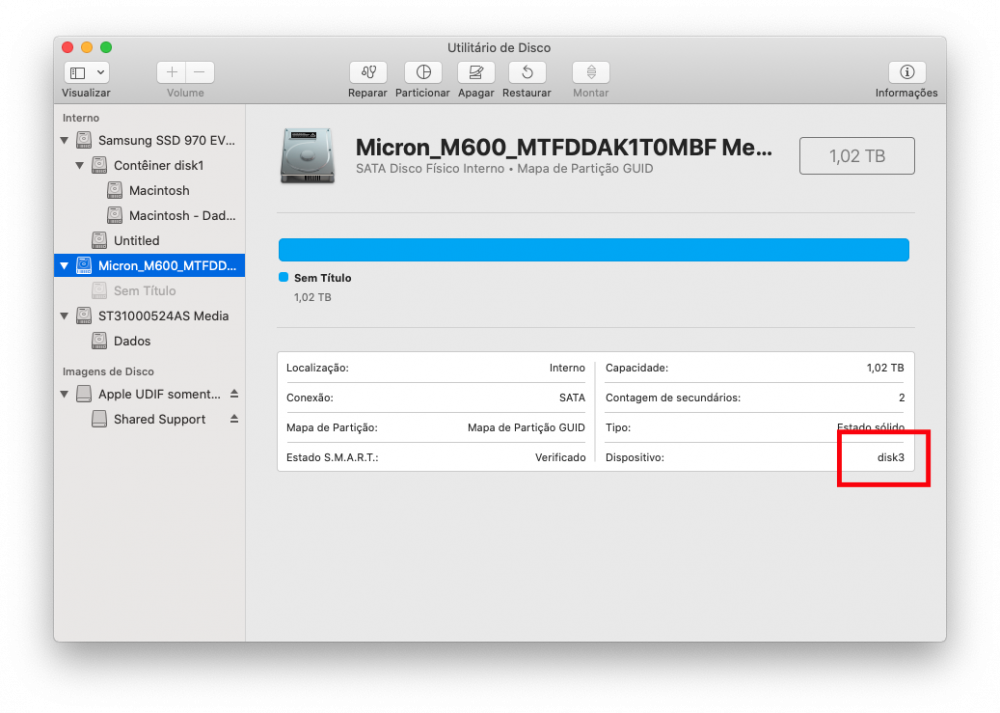
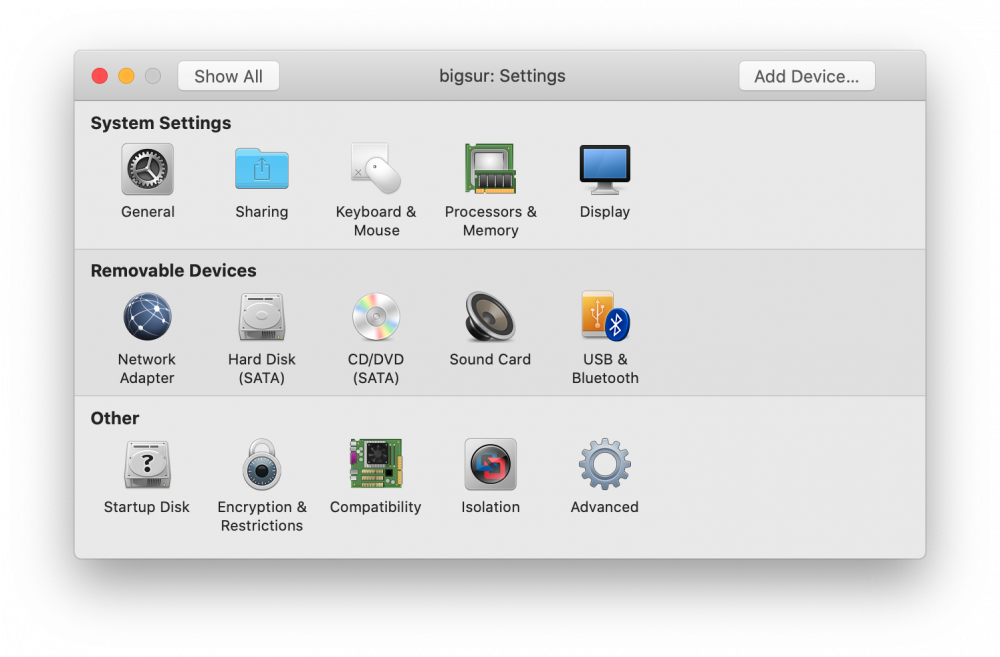
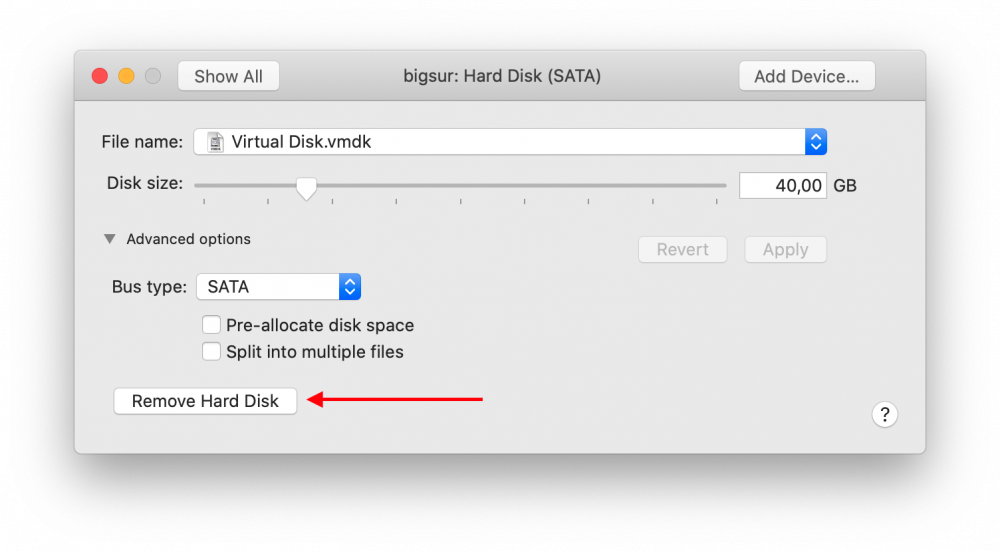
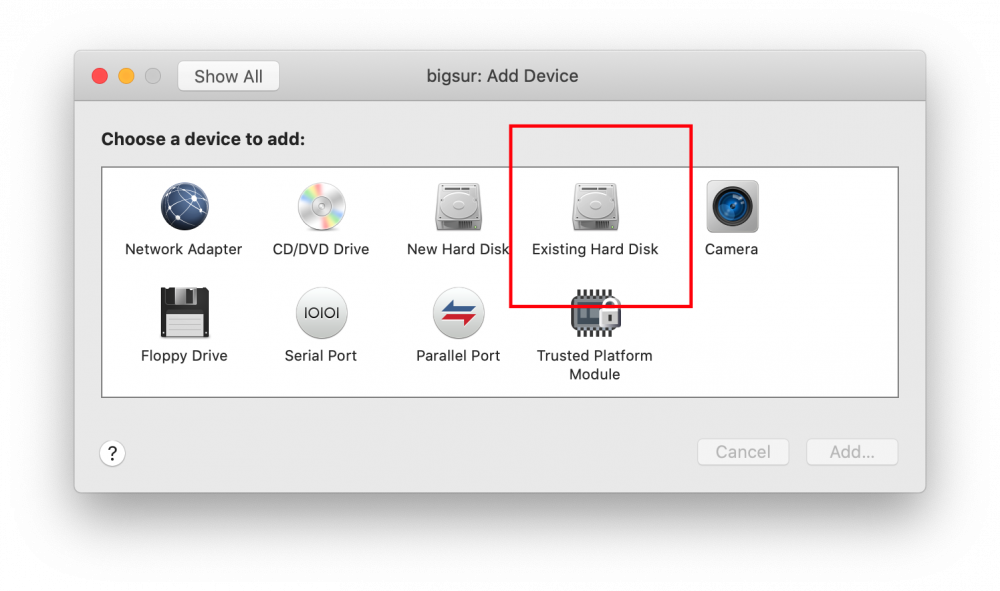
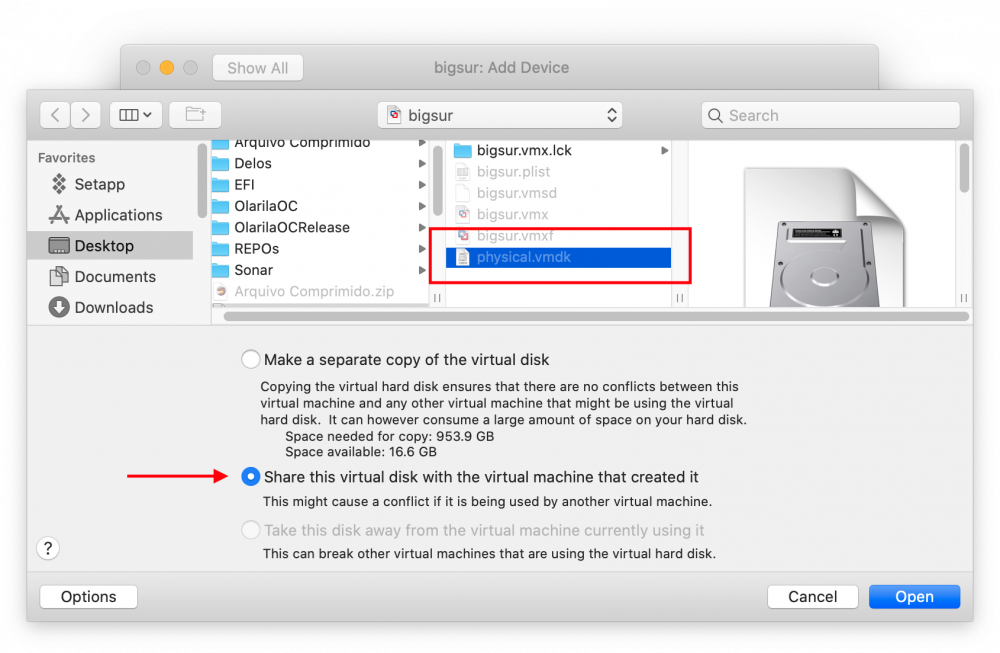
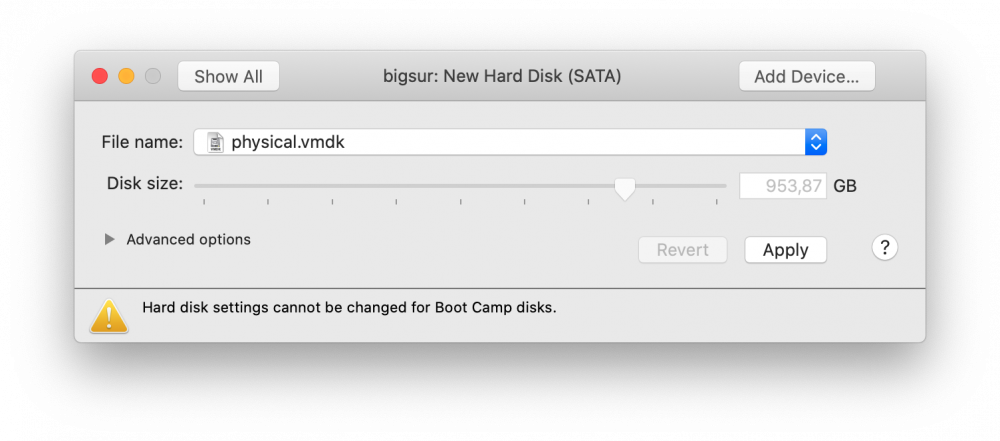
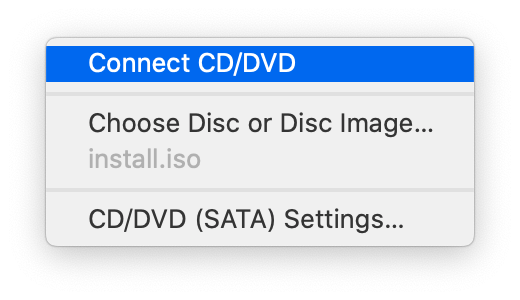
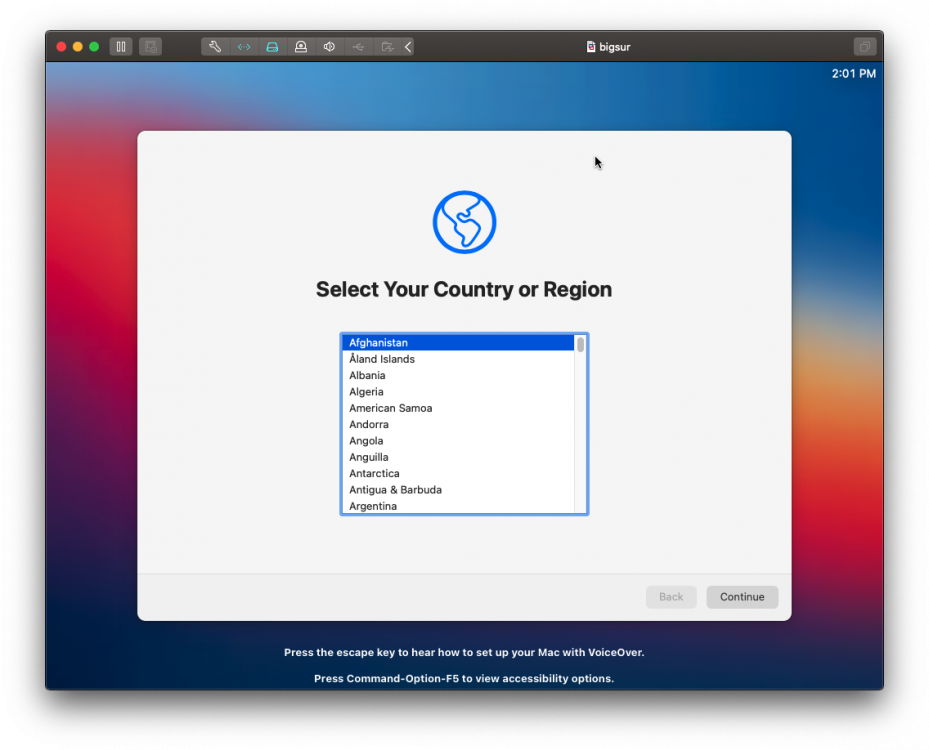
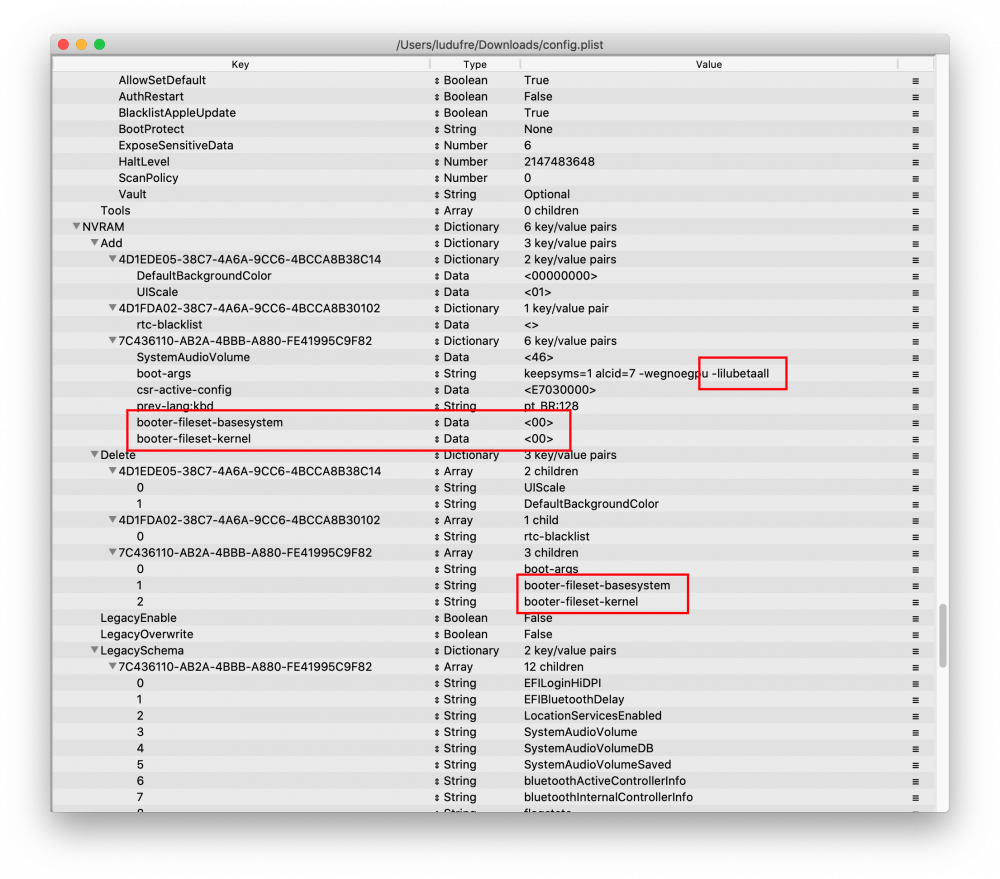
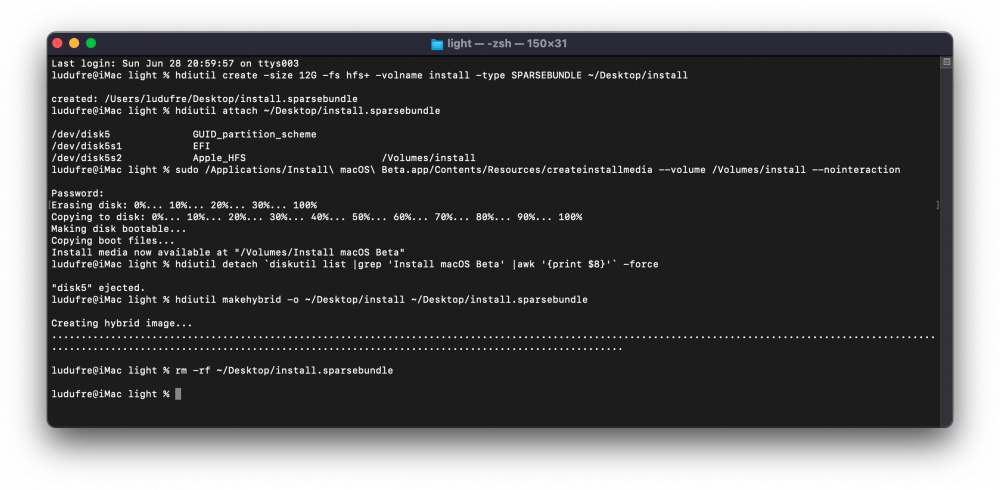
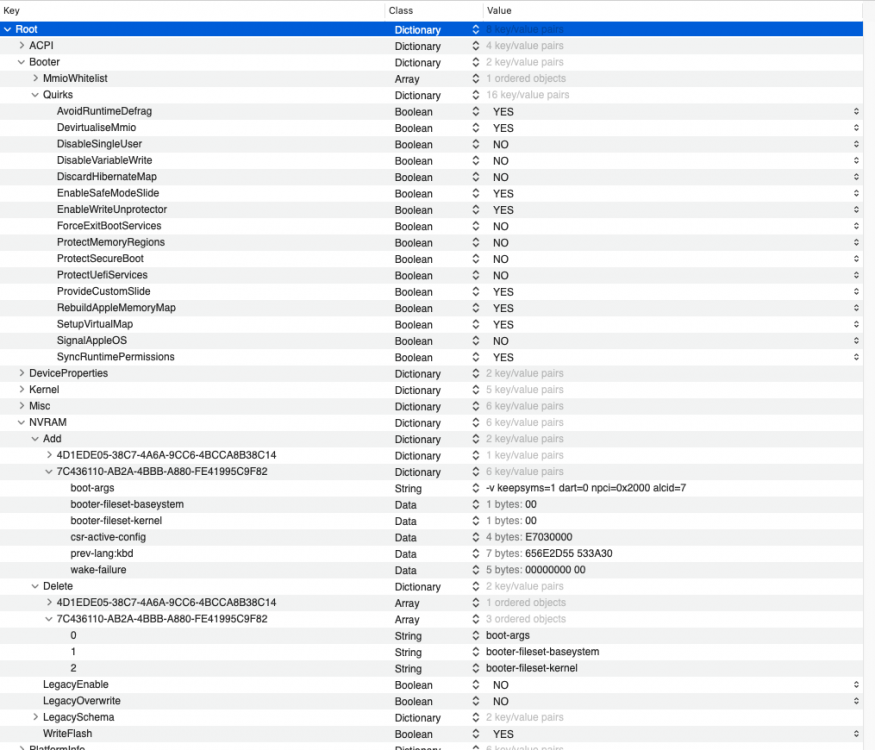
Installing macOS Big Sur 11.0 DP1 on Gigabyte Z370N WIFI + i7 8700K + UHD 630 Changelog: 06/28/2020 22:05h GMT-0 - Replaced detach command when creating ISO. - Thanks @ham4ever - Added instruction to run one line at time. 06/27/2020 02:37h GMT-0 - iMessage works too. Just not at first boot. 06/26/2020 18:54h GMT-0 - First version. What works and what does not - Processor: Intel Core i7-8700K -> Work. All SpeedStep stages.- Video Card: Intel UHD 630 -> Work. QE/CI and Metal.- Chipset: Intel Z370 -> Work.- HDMI 2.0 (1st) -> Work. - HDMI (2nd) -> Work. - DP -> Work. - Audio: ALC1220 -> Work. - HDMI Audio -> Work.- WiFi/Bluetooth -> Not work. Replaced with BCM94360CS2. - Ethernet (1st) -> Work.- Ethernet (2nd) -> Work.- USB3.0 -> Work.- Sleep -> Work. - Airdrop, Handoff, Instant Hotspot and Continuity -> Work after replaced wireless. Todo - Fix iMessage (other iServices works perfectly) - Nothing Disclaimer! Bootloaders are currently unable to start the installation. The solution is to use a virtual machine and use a physical disk (additional, USB or SATA, NVME) as a target in the installation. Change the OpenCore compiled from the source code, and add some entries in NVRAM through config.plist. This is not the best solution. But it is the only way at the moment. There are some ready-made images available out there, but I prefer not to use them and create a clean installation. What you need to install - Running install of macOS - Already working OpenCore with this setup - Create bootable ISO file - Spare Disk/SSD- macOS Big Sur DP1 install app- Latest OpenCore + Kexts compiled from sources - Some KEXTs and SSDT patches UEFI configuration My BIOS is F10 (I use an 8th generation processor, so I don't need to upgrade) You can configure manually or load my BIOS profile. Manually: - Shutdown and insert the flash.- Power on with DEL pressed to enter BIOS setup.- Change value: BIOS - CSM Support to Disabled- Change value: BIOS - Secure Boot to Disabled- Change value: Peripherals - Initial Display to IGP- Change value: Chipset - VT-d to DISABLE- Change value: Chipset - Internal Graphics to ENABLE- Save & Exit Setup or, BIOS profile You can use one of my BIOS profiles attached bellow. It's two versions. One stock and another with overclock [5.0 GHz] - Put the profile in the root of the flash drive at EFI partition. - Restart with DEL pressed to enter BIOS setup. - Go to Save & Exit. - Select Load Profiles. - Select last option and then the flasdrive in the list. - And finally choose MACOS_STOCK or MACOS_5GHZ. - Save & Exit Setup How create bootable ISO file Download Big Sur DP1 Run this command on Temrinal: sudo /System/Library/PrivateFrameworks/Seeding.framework/Resources/seedutil enroll DeveloperSeed Go to System Updater and download the Install macOS Beta app. Create ISO Then run on Terminal (One line at a time): hdiutil create -size 12G -fs hfs+ -volname install -type SPARSEBUNDLE ~/Desktop/install hdiutil attach ~/Desktop/install.sparsebundle sudo /Applications/Install\ macOS\ Beta.app/Contents/Resources/createinstallmedia --volume /Volumes/install --nointeraction hdiutil detach `diskutil list |grep 'Install macOS Beta' |awk '{print $8}'` -force hdiutil makehybrid -o ~/Desktop/install ~/Desktop/install.sparsebundle rm -rf ~/Desktop/install.sparsebundle Now you have install.iso on desktop. How create create the virtual machine and install to disk/SSD Download and install the trial version of the VMware Fusion from their site. I'm used the version 11.5.5. - Create a custom virtual machine - Operating System: Apple OS X - macOS 10.15 - Create a new virtual disk (The size doesn't matter, We'll delete later) - Click in "Customize Settings" - Save the VM on desktop with name: bigsur - Insert the spare disk/SSD on PC (reboot if necessary) and identify what /dev/diskX is. You can look on Disk Utility.app: - Create VMDK that point to it: sudo diskutil unmountDisk diskX /Applications/VMware\ Fusion.app/Contents/Library/vmware-rawdiskCreator create /dev/diskX fullDevice ~/Desktop/bigsur.vmwarevm/physical sata - Edit the virtual machine settings created previously - Click in Hard Disk (SATA) and delete it (Remove Hard Disk) - Then add the physical disk - There's a bug in Fusion. To select the physical.vmdk, right click then "Quick Look", then "Share virtual disk with the virtual machine that created it" - Click Apply. - Now mount de install.iso - Start the VM and install as usual until: Disk Utility, format GUID with APFS (VMware Virtual SATA Hard Drive Media), Install macOS, wait few reboots and stop at first boot wizard. This can take up to 45 minutes. It may seem like it is stopped, but it is not. - Press Command + Q and shutdown (usually WIN + Q) - Close VMware Fusion. Copy OpenCore to EFI - Mount the EFI with: sudo diskutil mount diskXs1 - Copy your current working OpenCore EFI to that mounted EFI. - Download mine attached or Update your OpenCore, Kexts and driver UEFI. - You can use the @MaLd0n script attached to compile all (OlarilaOC.command.zip) - If using mine add your MLB, ROM, SystemUUID and SystemSerialNumber. (see how to) - Add following items do config.plist: NVRAM -> Add -> 7C436110-AB2A-4BBB-A880-FE41995C9F82 -> boot-args -> -lilubetaall (append) NVRAM -> Add -> 7C436110-AB2A-4BBB-A880-FE41995C9F82 -> booter-fileset-basesystem + Data + <00> NVRAM -> Add -> 7C436110-AB2A-4BBB-A880-FE41995C9F82 -> booter-fileset-kernel + Data + <00> NVRAM -> Delete -> 7C436110-AB2A-4BBB-A880-FE41995C9F82 -> booter-fileset-basesystem NVRAM -> Delete -> 7C436110-AB2A-4BBB-A880-FE41995C9F82 -> booter-fileset-kernel Done! Boot from the new disk/SSD and finish de first boot wizard. And last but not least I would like to thank the following community members, by making these dream possible:@crushers, @snatch, @apianti, @blackosx, @blusseau, @dmazar, @slice2009, @autumnrain, @phpdev32, @EMlyDinEsH, @RehabMan, @Scellow, @mitch_de, @Shailua, @Andy Vandijck, @maxfierke, @ArturXXX, @LexHimself, @brumas, @khamsakamal48, @MaLd0n, @joedm and @vit9696 and all others members involved directly or indirectly. Attachments MACOS_5GHZ MACOS_STOCK OlarilaOC.command.zip EFI.zip


 5 points
 -
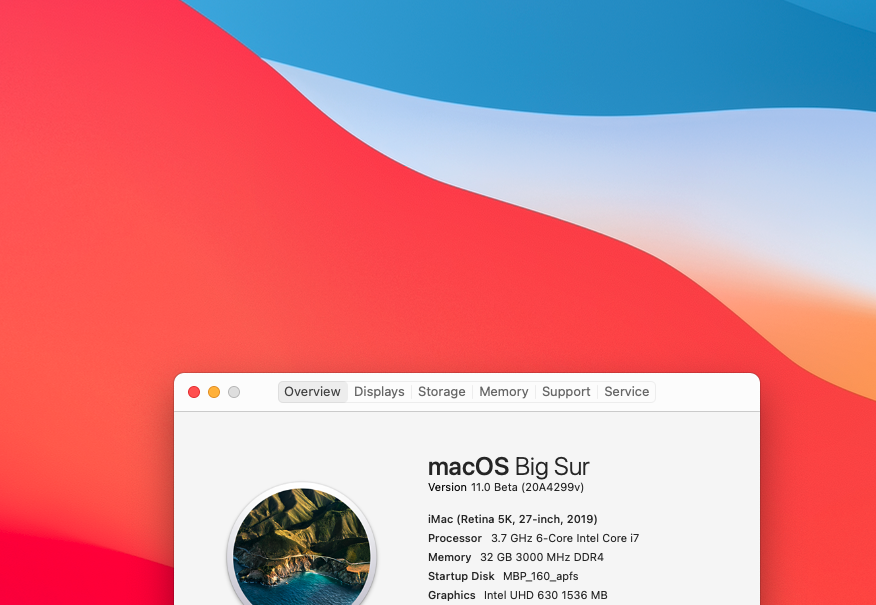
Hey Guys, I managed to get Big Sur working. Here's how I did it (Shout out to all the devs working on this, by the way) 1. Downloaded the MacOS11 pre-built dmg from the russian applelife.ru forum 2. Downloaded the prebuilt big sur Open Core bootloader (from a subreddit) (Z390 I believe) 3. Replaced the config in the prebuilt OC folder with my own (Since the existing config.plist wouldn't have been compatible with mine) 4. I opened my config in proper tree, used the cmd+shift+r to adapt it to the prebuilt folders (Kexts, drivers etc) and then added the bootloader 5. I added the booter args to my own config so OC boots into kext compatibility mode 6. I cloned the russian Big sur dmg to an external hard drive using terminal 7. I booted into OC and selected the external drive "Test" 8. I was able to boot into big sur no issues 9. I then cloned this complete install of Big Sur back to my original Catalina SSD and was able to boot no problem. Key Takeaways I strongly recommend using your config.plist as its specific to your machine. Using someone else's will rarely work Let me know if you need help, clarification. This method worked for me but who's to say it might work for you EDIT: I forgot to mention, you need to set the SMBios to iMac19,1 and generate a serial etc. I haven't tired MacPro7,1. That might work too

 5 points
 -
Clover is working for a new version https://github.com/CloverHackyColor/CloverBootloader/commit/1856b519e5f1fda3ca2d1a018a19119e50dd5ff05 points
-
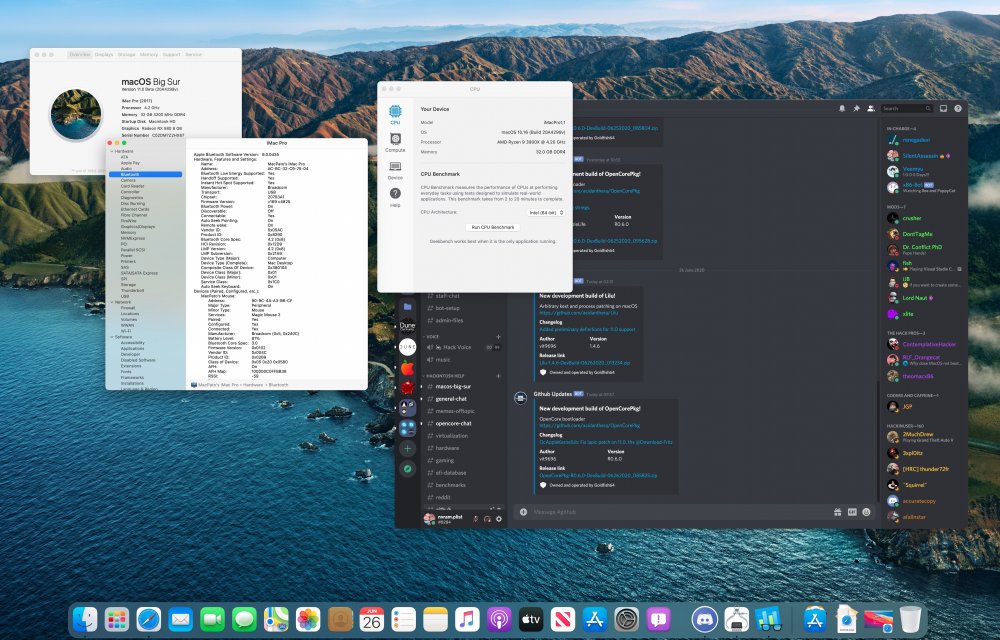
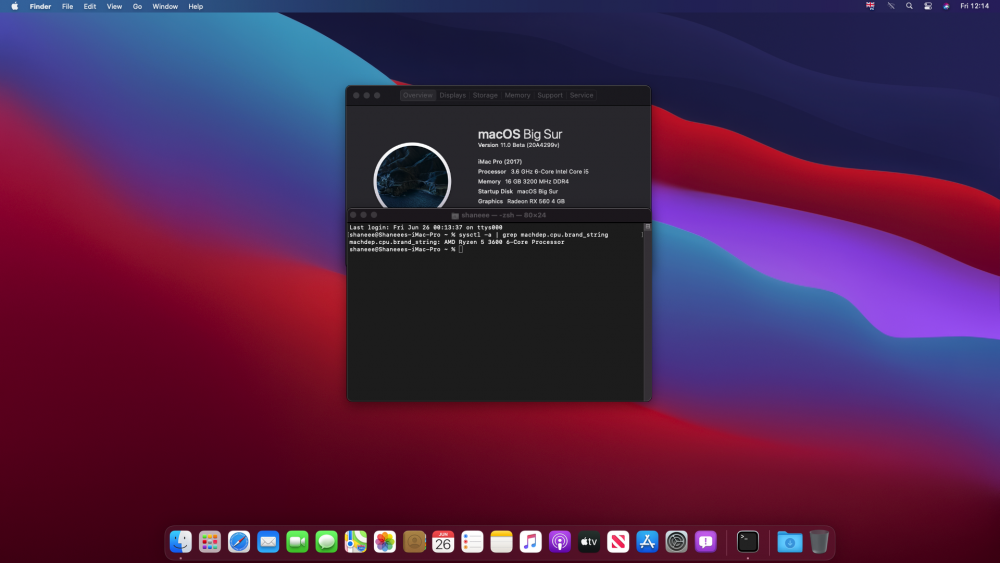
Massive Shout out to the legends that are Shannee, NoOne and Algrey and the amazing people at AMD-OSX for getting macOS 11 Big Sur running on AMD and so quickly. Fully Native Ryzentosh System and everything is working
 4 points
 -
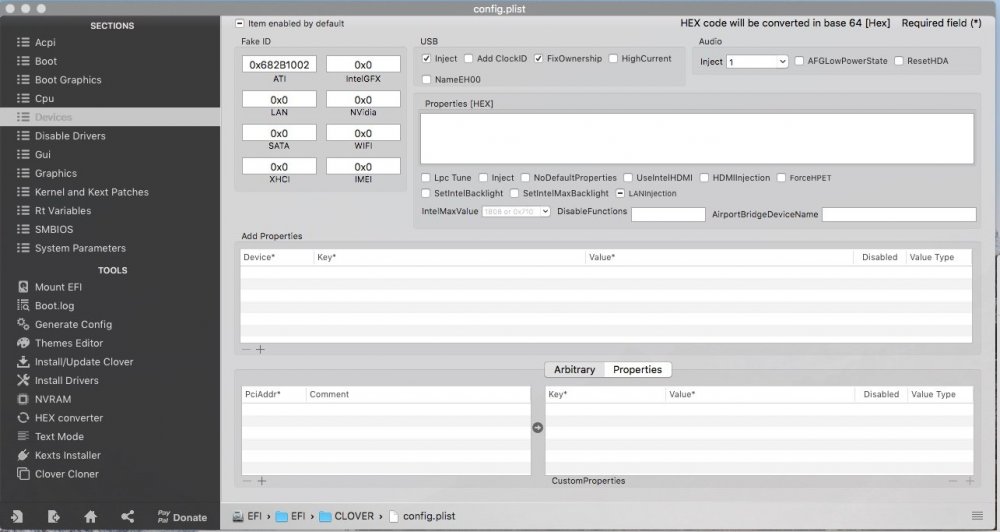
Please try my OpenCore 0.6.0 config.plist which can boot successfully to desktop in my Z370 mackintosh without major issue except Firefox lost audio output but normal in Safari. The original partition of this Big Sur beta was updated from real Mac in USB-external HDD. After trial and error I found my config.plist worked in Z370 mackintosh. Key point: 1.Booter/Quirks/AvoidRuntimeDefrag->True 2. NVRAM config.plist
 3 points
 -
Clover is so good, sorry said, but im not like OC, so much brain is needed to make works this "thing" from H*LL kkkk3 points
-
Long live AMD Hackintoshing Installed directly to HDD via VBox spoofing as an Intel CPU. Few patches updated using OC 0.6.0
 3 points
 -
Figured out how to resize the drive using the img method To resize the physical disk of BigSur when using the img dd method *Identify the physical disk you dd the img to X is example diskutil list *repair the physical disk partition sudo diskutil repairDisk diskX *Resize the physical disk container volume sudo diskutil apfs resizeContainer diskXs2 0 This can be done inside normal BigSur.2 points
-
If I can add my 2 cents, when the first person posted that he had installed Big Sur on a Chromebook, I was able to determine that the installation had been made to an external hard drive and surmised that it was created originally on a real Mac. It appears that, for now, that is the solution to getting Big Sur running on a PC. Many of our members were not around in the days when we had to use distros to install OS X because Apple had not made it freely available on its App Store. In those days, the most common ways of getting distros was from torrent sites like Pirate Bay and websites that linked to distros on torrent sites ran into problems with claims that they were promoting piracy. That is why we have the rule that prohibits references to distros or links to them. The pre-installed dmg file linked on the applelife forum is, technically, a distro. It is located on a google drive page but it still runs afoul of our rules. No one here is saying you can't take a chance and use the distro, just don't provide links to it in a public forum. But do realize that, at some point in the future, someone may take a preinstalled image of Big Sur and plant malware in it. That is the risk you take when you don't install everything yourself. It is a risk I am willing to take for now but with certain precautions because I am aware of the risk. The bottom line: Stay calm, use good sense and be careful.2 points
-
Can I ask what you're talking about? Please, do not add oil on the fire, stay focused on the topic. BR fantomas2 points
-
I don't understand why the solution is ONLY in a Russian website, made by people who are very intelligent, very good Eng speakers and very active members of this website. Anyway no reason to rush, bootloaders gonna be ready for this very soon, my only concern was if it boots at all and it does.2 points
-
I thank everyone for the support, thanks to those who introduced me to this world Hack, thanks to the guys I work with and thanks to the Hack BIGs for what they do, without you all this would be impossible. the OS Big Sur seems to have already been years of development, okay it is fluid fast and even on HD 5400 Rpm in APFS it has performances that Catalina dreams of ...... Baio772 points
-
Let's hope that apple silicon will make macs cheaper, i'd love if apple releases a macbook at a 500 USD price tag, apple definelly needs a cheap access point to the OS, for people like budget developers, if hackintosh will no longer be a thing in 5 to 7 years from now, we need to have cheaper macs. About clover any updates from the dev team?2 points
-
https://dortania.github.io/getting-started/ Sent from my iPhone using Tapatalk2 points
-
The commit is from two days ago. Probably it is under heavy testing.2 points
-
SUCCESSFULL !!! WORKING on my Hackintosh Z390M Gaming
 2 points
 -
Version 13.5
2,850 downloads
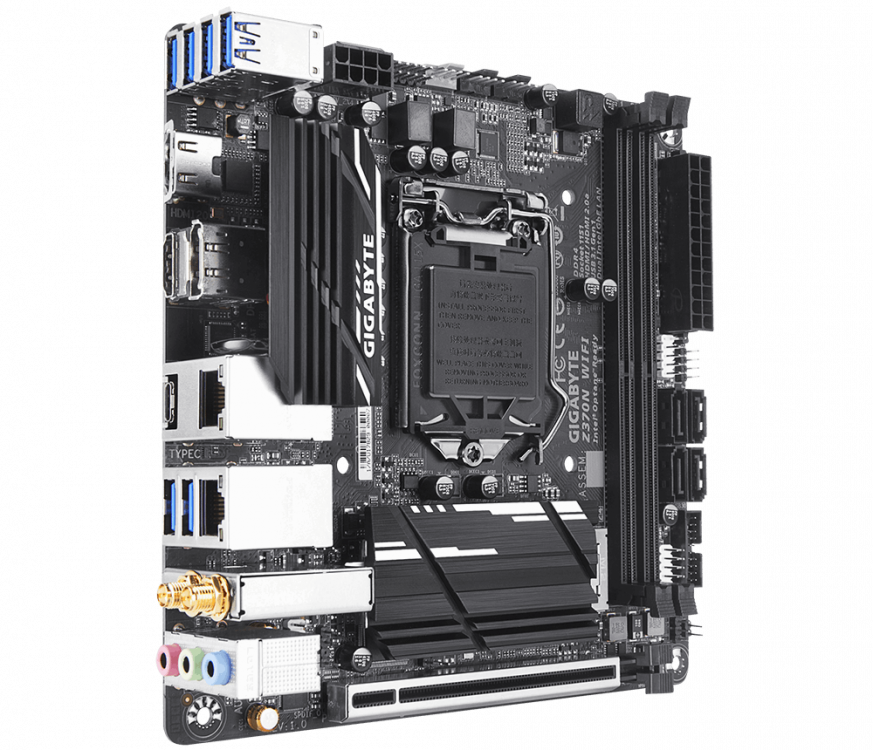
This is a pack that contains all the necessary OpenCore files for hackintoshes that use the MSI Z390 Gaming Plus motherboard or for new users who would like to purchase and use this motherboard to run macOS Catalina, macOS Big Sur, macOS Monterey, and macOS Ventura. This pack contains all the necessary drivers and configuration files for the following motherboard components: Realtek ALC892 Audio Ports Intel I219-V Gigabit LAN Ethernet Port USB (USB 2.0, USB 3.1 Gen1, USB 3.1 Gen2 Type-C & Type-A) Ports USB Internal (USB 2.0, USB 3.1 Gen1) Connectors HDMI (IGPU only) Port DVI-D (IGPU only) Port NOTE: The PS/2 port is not natively supported on macOS. If you want to enable the PS/2 port, refer to Acidanthera's VoodooPS2 kext for more information. Driver kexts be placed in the OpenCore's Kexts folder. For this pack to work, you must have the following components: 9th Generation Intel Core Processor (i3, i5, i7, i9) Intel UHD 630 Graphics (Optional if using dedicated GPU, however it is recommended to have it) Optionally, you can use a dedicated GPU if you do not want to use Intel UHD 630 Graphics. This pack was made for these types of dedicated GPUs: AMD Radeon RX Navi 10 Series 5xxx GPU AMD Radeon RX Navi 21 Series 68xx GPU AMD Radeon RX Navi 22 Series 6600 GPU NOTE: Different macOS versions will support specific AMD Radeon RX graphics card. It is recommended to upgrade to the latest macOS release as these will provide the most up to date compatibility. For the best graphics performance and experience, it is recommended to use both AMD Radeon RX Navi graphics card + Intel UHD 630 Graphics for macOS. The AMD Radeon RX Navi graphics card will be your primary display driver, however the Intel UHD 630 Graphics IGPU will enable accelerated hardware encoding/decoding (QuickSync) on macOS in headless mode. For those only using Intel UHD 630 Graphics IGPU, accelerated hardware encoding/decoding (QuickSync) is enabled by default. Inside the archive there will be two OpenCore folders. If you are using only the Intel UHD 630 Graphics IGPU, use the Intel UHD Graphics 630 folder. If you are only using an AMD Radeon RX Navi graphics card or if you are using it with Intel UHD 630 Graphics IGPU, use the AMD Radeon Navi + Intel UHD Graphics 630 folder. Installation Instructions NOTE: Do not sign onto your Apple ID. If you are signed in, sign out. This is to prevent iMessage issues. For this pack to work, you must have one of the following operating system installed: macOS Catalina 10.15+ macOS Big Sur 11.0+ macOS Monterey 12.0+ macOS Ventura 13.0+ You must also have OpenCore installed onto your main boot drive. NOTE: Alternatively, you can also use a separate USB flash drive with OpenCore installed if you prefer to use OpenCore on a flash drive instead (a good alternative to try and test OpenCore files to ensure compatibility before adding it to the main boot drive ). 1) Copy the OC folder from the archive. The OC folder is inside one of the two choices. 2) Delete the OC folder from your hard disk or USB installation media and replace it with the one you copied from the archive. That's it! Your MSI Z390 Gaming Plus motherboard should be working flawlessly on macOS! Post Installation Instructions NOTE: DO NOT SIGN ONTO YOUR APPLE ID YET! YOU CANNOT USE THE UUID AND SERIAL NUMBER IN THE CONFIG.PLIST FILE! AFTER INSTALLATION, YOU MUST USE OPENCORE CONFIGURATOR OR GENSMBIOS TO GENERATE A NEW UUID AND SERIAL NUMBER FOR YOUR HACKINTOSH. IF YOU ALREADY MADE A UNIQUE UUID, SERIAL NUMBER, AND ROM PREVIOUSLY, IGNORE THIS SECTION. One of the difficult tasks to do after post installation is getting iMessage and FaceTime working. These OpenCore files in the archive identify your hackintosh as a 2019 5K Retina 27-Inch iMac (19,1). However, the serial number and UUID inside the OpenCore config.plist file are samples. For this section, we will be using OpenCore Configurator as an example to generate a new platform info for your MSI Z390 Gaming Plus hackintosh. In OpenCore Configurator, load your OpenCore config.plist file. Then go to Platform Info section. Select desired SMBIOS version. For this guide, it is recommended to use iMac19,1. Now let's generate our ROM. Select System and select Mac. This tells the generator to use your ethernet's MAC address. Click Generate to generate your ROM. Verify that the serial number is not valid by pasting the serial number at checkcoverage.apple.com. If the serial number generated is valid, go back and generate a new one until the website says it is not invalid. Your Platform Info section is now finished! Once you are happy with the generated Platform Info, save your config.plist file and restart your hackintosh. Now you can begin to sign into your Apple ID and activate iMessage and FaceTime. NOTE: ONCE YOU HAVE SUCCESSFULLY ACTIVATED IMESSAGE AND FACETIME, YOU MUST USE THE EXACT SAME PLATFORM INFO FOR THE LIFE OF THE MOTHERBOARD. IF YOU CHANGE THE NUMBERS, APPLE MIGHT BLACKLIST YOUR HACKINTOSH. YOU SHOULD UPDATE YOUR USB INSTALLATION MEDIA TO USE THE NEWLY GENERATED PLATFORM INFO. Refer to Apple's Messages App guide to learn how to use the Messages app, including setting up text message forwarding between iPhone and Hackintosh: Use Messages with your Mac Remember, MSI motherboards do work with macOS, especially the ones that support 9th Gen Intel Processors. They just require a bit of tinkering but once someone finds out how to do it, its very easy to get it up and running! Great motherboard for budget builds! I've tried to make the most minimalist EFI folder and simplistic OpenCore config.plist file as much as possible. I have seen various EFI folders and config.plist files that have so much unnecessary options and kexts that it becomes hard to diagnose. If you have any questions or issues, let me know in the comments! USB Port Mapping NOTE: It is important that you take the time to properly USB port map your MSI MPG Z390 Gaming Plus motherboard. Otherwise, you are at risk of losing USB functionality at any time. A brief image of USB port mapping is provided. Not all JUSB motherboard ports are listed here as each hackintosh configuration with this motherboard is different. Remember, when USB port mapping, you can only have a maximum number of 15 ports. For example, a USB 2.0 port simply has an HSXX port. A USB 3.0 port or higher uses both HSXX and SSXX (HSXX if a 2.0 device is connected to a 3.0 port and SSXX if a 3.0 device is connected to a 3.0 port). For those using JUSB1 and JUSB2 motherboard ports, or to create a USB port map, use Hackintool or any other USB port mapping tool to properly find and configure your USB ports for macOS. Extra Information This pack uses OpenCore 0.9.4. Native NVRAM supported. Native CPU power management supported. Native Sleep/Wake supported. To enable Intel QuickSync or native hardware encoding/decoding capabilites using AMD Radeon RX Navi GPU, you must enable both IGPU and PEG in the BIOS settings. This enables the Intel UHD Graphics 630 to run in headless mode. All USB ports work by disabling the USB port limit. However, this is only a temporary solution. It is advised to create your own USB port map with Hackintool for your motherboard to comply with Apple's 15 USB port limit on macOS. For those only using Intel UHD Graphics 630, the framebuffer is patched on-the-fly to support the HDMI and DVI-D ports of the motherboard. This was done using Hackintool and mapping the correct Bus ID to ports 5, 6, and 7 and identifying them as HDMI. OpenCore flag agdpmod=pikera enables AMD Radeon RX navi graphics drivers to load. The DSDT included has been compiled with 0 errors. HDMI audio for dedicated graphics cards and HDMI audio for the HDMI (IGPU) port is not enabled by default since this depends on your Hackintosh configuration. iMac 19,1 is the default SMBIOS profile used for this configuration as it provides native support for Sidecar as well as Intel QuickSync (if applicable). XMP detection is enabled by default in config.plist, but requires XMP enabled in BIOS settings to enable maximum DDR4 RAM speeds claimed by your RAM manufacturer. OpenCore by default boots to a text based UI. To enable boot GUI, simply editing the config.plist file and under MISC > BOOT, set PICKERMODE to EXTERNAL. When using AMD Navi GPUs with OpenCore, you may experience a black screen after successful boot. This is usually caused by having OpenCore debug information enabled. By default, this pack does not enable debug information as this should not be necessary. Otherwise if you do need debug information, you may need to disable SERIAL port from the SUPER IO CONFIGURATION option in the BIOS to get past the black screen.1 point -
Apple lanzó el 23 de junio la próxima gran actualización de macOS en la Keynote del WWDC, su nombre macOS Big Sur . Esta actualización será gratuita y estará disponible para todos los dispositivos compatibles de la lista. Macs compatibles con macOS Big Sur MacBook de 2015 en adelante MacBook Air de 2013 en adelante MacBook Pro de 2013 en adelante Mac mini de 2014 en adelante iMac de 2014 en adelante iMac Pro de 2014 en adelante Mac Pro de 2013 en adelante Entre sus novedades se encuentran un nuevo diseño más cercano al de iOS e iPadOS, mejoras en Safari con más control sobre la privacidad o el nuevo software de traducción de Apple, que funciona de manera local sin necesidad de enviar la información a un servidor. Aplicación para descargar la prelanzamiento: https://www.insanelymac.com/applications/core/interface/file/attachment.php?id=351121 Lista de descarga de todas las versiones actuales: Copiar en Terminal curl -O https://raw.githubusercontent.com/munki/macadmin-scripts/main/installinstallmacos.py && sudo /usr/bin/python installinstallmacos.py --raw --seedprogram DeveloperSeed elegir: 3 Crear booteable en USB: Formatear un USB con nombre USB, de 16GB y crear el booteable. sudo /Applications/Install\ macOS\ Big\ Sur.app/Contents/Resources/createinstallmedia --volume /Volumes/USB --nointeraction Aplicación para generar el OC OC.Gen-X.app.zip Probar el config https://opencore.slowgeek.com/ OpenCore 0.6.3 OpenCore-0.6.3-RELEASE.zip Guía opencore en español. https://inyextciones.github.io/OpenCore-Install-Guide/ Clover 5126 CloverV2-5126.zip Este excelente vídeo me ayudó a crear el EFI opencore correctamente. OpenCore.zip
 1 point
 -
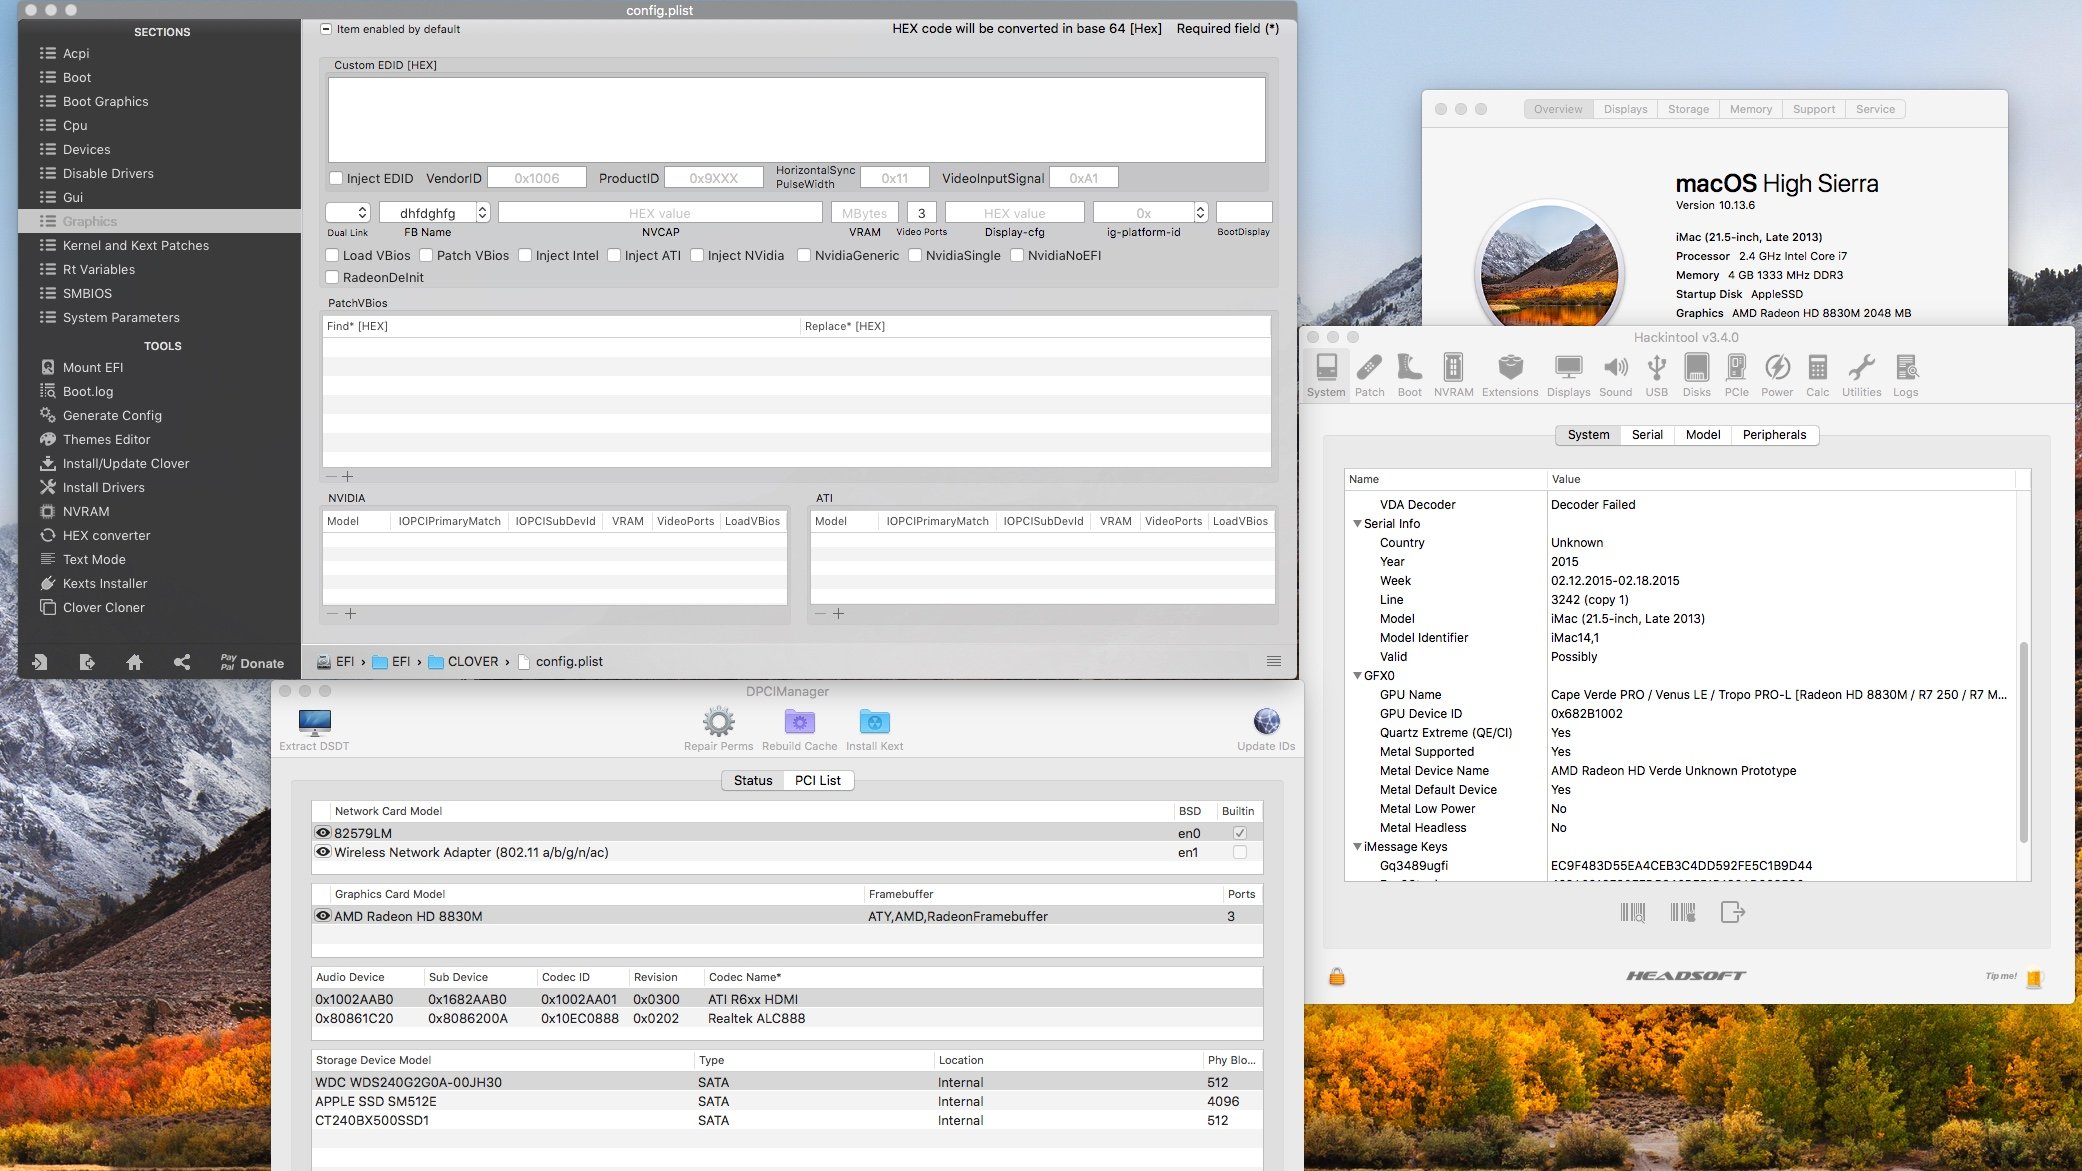
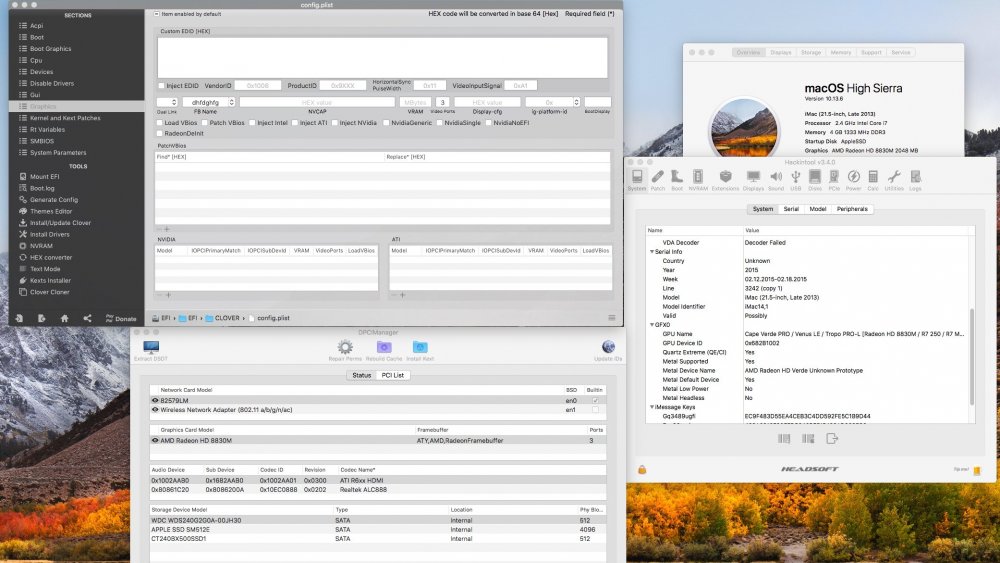
As AMD has done a lot of rebranding your card might not work OTB in OSX. While kexts like WhateverGreen offer solution for most but they don't cover all the cards. In my opinion it's much cleaner to use Apple native support by telling OSX which exactly chip you’re using. You only need to input correct fake ID for ATI in Clover Devices section. Here is example for mine R7 250 based on Oland XT chip. You must remove Inject ATI in the graphics section. Here is full list of AMD ID's supported in Mojave and corresponding customer cards (credit to u/csabikaa97) I will update the list if needed. AMD7000Controller.kext Raw identifier list: 0x67901002 0x67981002 0x679A1002 0x679E1002 0x67801002 0x68201002 0x68211002 0x68231002 0x68251002 0x68271002 0x682B1002 0x682D1002 0x682F1002 0x68351002 0x68391002 0x683B1002 0x683D1002 0x683F1002 0x68001002 0x68011002 0x68061002 0x68081002 0x68101002 0x68181002 0x68191002 GPU list: 0x67901002: Unknown 0x68391002: Unknown 0x683B1002: Unknown 0x67981002: Tahiti XT ( Radeon HD 7970, 8970, R9 280X ) 0x679A1002: Tahiti PRO ( Radeon HD 7950, 8950, R9 280 ) 0x679E1002: Tahiti LE ( Radeon HD 7870 XT ) 0x67801002: Tahiti XT GL ( FirePro W9000 ) 0x68201002: Venus XTX ( Radeon HD 8890M, R9 M275X / M375X ) 0x68211002: Venus XT ( Radeon HD 8870M, R9 M270X / M370X ) 0x68231002: Venus PRO ( Radeon HD 8850M, R9 M265X ) 0x68251002: Heathrow XT ( Radeon HD 7870M ) 0x69271002: Heathrow PRO ( Radeon HD 7850M / 8850M ) 0x682B1002: Cape Verde PRO / Venus LE / Tropo PRO-L ( Radeon HD 8830M, R7 250, R7 M465X ) 0x682D1002: Chelsea XT GL ( FirePro M4000 ) 0x682F1002: Chelsea LP ( Radeon HD 7730M ) 0x68351002: Cape Verde PRX ( Radeon R9 255 ) 0x683D1002: Cape Verde XT ( Radeon HD 7770, 8760, R7 250X ) 0x683F1002: Cape Verde PRO ( Radeon HD 7750, 8740, R7 250E ) 0x68001002: Wimbledon XT ( Radeon HD 7970M ) 0x68011002: Neptune XT ( Radeon HD 8970M ) 0x68061002: Neptune 0x68081002: Pitcairn XT GL ( FirePro W7000 ) 0x68101002: Curacao XT / Trinidad XT ( Radeon R7 370, R9 270X / 370X ) 0x68181002: Pitcairn XT ( Radeon HD 7870 GHz Edition ) 0x68191002: Pitcairn PRO ( Radeon HD 7850, R7 265, R9 270 - 1024 Stream Processor ) AMD8000Controller.kext Raw identifier list: 0x66401002 0x66411002 0x66461002 0x66471002 0x66501002 0x66511002 0x665C1002 0x665D1002 0x67B01002 GPU list: 0x66401002: Saturn XT ( FirePro M6100 ) 0x66411002: Saturn PRO ( Radeon HD 8930M ) 0x66461002: Bonaire XT ( Radeon R9 M280X ) 0x66471002: Bonaire PRO ( Radeon R9 M270X ) 0x66501002: Bonaire 0x66511002: Bonaire 0x665C1002: Bonaire XT ( Radeon HD 7790, 8770, R7 360, R9 260 / 360 ) 0x665D1002: Bonaire ( Radeon R7 200 series ) 0x67B01002: Hawaii XT / Grenada XT ( Radeon R9 290X / 390X ) AMD9000Controller.kext Raw identifier list: 0x69201002 0x69211002 0x69301002 0x69381002 0x69391002 0x73001002 0x730F1002 GPU list: 0x69201002: Unknown 0x69211002: Amethyst XT ( Radeon R9 M295X ) 0x69301002: Unknown 0x69381002: Tonga XT / Amethyst XT ( Radeon R9 380X, R9 M295X ) 0x69391002: Tonga PRO ( Radeon R9 285 / 380 ) 0x73001002: Fiji ( Radeon R9 FURY / NANO Series ) 0x730F1002: Unknown AMD9500Controller.kext Raw identifier list: 0x67E01002 0x67E31002 0x67E81002 0x67EB1002 0x67EF1002 0x67FF1002 0x67E11002 0x67E71002 0x67E91002 0x67C01002 0x67C11002 0x67C21002 0x67C41002 0x67C71002 0x67DF1002 0x67D01002 0x67C81002 0x67C91002 0x67CA1002 0x67CC1002 0x67CF1002 GPU list: 0x67E01002: Baffin ( Radeon PRO WX 4170 ) 0x67E31002: Baffin ( Radeon PRO WX 4100 ) 0x67E81002: Baffin ( Radeon PRO WX 4130 / 4150 ) 0x67EB1002: Baffin ( Radeon Pro V5300X ) 0x67EF1002: Baffin ( Radeon RX 460, 560D, Pro 450, 455, 460, 555, 555X, 560, 560X ) 0x67FF1002: Baffin ( Radeon RX 550 640 Stream Processor, RX 560, 560X ) 0x67E11002: Baffin ( Polaris11 ) 0x67E71002: Unknown 0x67E91002: Baffin ( Polaris11 ) 0x67C01002: Ellesmere ( Radeon PRO WX 7100 ) 0x67C11002: Unknown 0x67C21002: Ellesmere ( Radeon PRO V7300X ) 0x67C41002: Ellesmere ( Radeon PRO WX 7100 ) 0x67C71002: Ellesmere ( Radeon PRO WX 5100 ) 0x67DF1002: Ellesmere ( Radeon RX 470, 480, 570, 570X 580, 580X ) 0x67D01002: Ellesmere ( Radeon PRO V7300X / V7350x2 ) 0x67C81002: Unknown 0x67C91002: Unknown 0x67CA1002: Ellesmere ( Polaris10 ) 0x67CC1002: Ellesmere ( Polaris10 ) 0x67CF1002: Ellesmere ( Polaris10 ) AMD10000Controller.kext Raw identifier list: 0x68601002 0x68611002 0x68621002 0x68631002 0x68641002 0x68671002 0x68681002 0x68691002 0x686A1002 0x686B1002 0x686C1002 0x686D1002 0x686E1002 0x687F1002 0x69A01002 0x69A11002 0x69A21002 0x69A31002 0x69AF1002 0x66A01002 0x66A11002 0x66A21002 0x66A31002 0x66A71002 0x66AF1002 GPU list: 0x68601002: Vega 10 ( Radeon Instinct MI25 ( 0x68611002: Vega 10 XT ( Radeon PRO WX 9100 ) 0x68621002: Vega 10 XT ( Radeon PRO SSG ) 0x68631002: Vega 10 XTX ( Radeon Vega Frontier Edition ) 0x68641002: Vega 0x68671002: Vega 10 XL ( Radeon Pro Vega 56 ) 0x68681002: Vega 10 ( Radeon PRO WX 8100 ) 0x68691002: Unknown 0x686A1002: Unknown 0x686B1002: Unknown 0x686C1002: Vega 10 ( Radeon Instinct MI25 MxGPU ) 0x686D1002: Unknown 0x686E1002: Unknown 0x687F1002: Vega 10 XL/XT ( Radeon RX Vega 56 / 64 ) 0x69A01002: Vega 12 0x69A11002: Vega 12 0x69A21002: Vega 12 0x69A31002: Vega 12 0x69AF1002: Vega 12 0x66A01002 Vega 20 ( Radeon Instinct ) 0x66A11002: Vega 20 0x66A21002: Vega 20 0x66A31002: Vega 20 0x66A71002: Vega 20 ( Radeon Pro Vega 20 ) 0x66AF1002: Vega 20 AMDRadeonX4000.kext Raw identifier list: x67E01002 0x67E31002 0x67E81002 0x67EB1002 0x67EF1002 0x67FF1002 0x67E11002 0x67E71002 0x67E91002 GPU list: 0x67E01002: Baffin ( Radeon PRO WX 4170 ) 0x67E31002: Baffin ( Radeon PRO WX 4100 ) 0x67E81002: Baffin ( Radeon PRO WX 4130 / 4150 ) 0x67EB1002: Baffin ( Radeon Pro V5300X ) 0x67EF1002: Baffin ( Radeon RX 460, 560D, Pro 450, 455, 460, 555, 555X, 560, 560X ) 0x67FF1002: Baffin ( Radeon RX 550 640 Stream Processor, RX 560, 560X ) 0x67E11002: Baffin ( Polaris11 ) 0x67E71002: Unknown 0x67E91002: Baffin ( Polaris11 ) AMDRadeonX5000.kext Raw identifier list: 0x68601002 0x68611002 0x68621002 0x68631002 0x68641002 0x68671002 0x68681002 0x68691002 0x686A1002 0x686B1002 0x686D1002 0x686E1002 0x687F1002 0x686C1002 GPU list: 0x68601002: Vega 10 ( Radeon Instinct MI25 ( 0x68611002: Vega 10 XT ( Radeon PRO WX 9100 ) 0x68621002: Vega 10 XT ( Radeon PRO SSG ) 0x68631002: Vega 10 XTX ( Radeon Vega Frontier Edition ) 0x68641002: Vega 0x68671002: Vega 10 XL ( Radeon Pro Vega 56 ) 0x68681002: Vega 10 ( Radeon PRO WX 8100 ) 0x68691002: Unknown 0x686A1002: Unknown 0x686B1002: Unknown 0x686C1002: Vega 10 ( Radeon Instinct MI25 MxGPU ) 0x686D1002: Unknown 0x686E1002: Unknown 0x687F1002: Vega 10 XL/XT ( Radeon RX Vega 56 / 64 ) Here is my "unsupported" XFX R7 250A 2GB DDR3 based on Oland XT with full QE/CI and Metal: Note that I've input garbage as a Framebuffer name that tells OSX to use AMD Framebuffer. Let me know if this method works for you.
 1 point
 -
Try eject from the Finder This bunch of <feff> shouldn't be there. Copy and paste again. It needs to be exactly as written in the guide.1 point
-
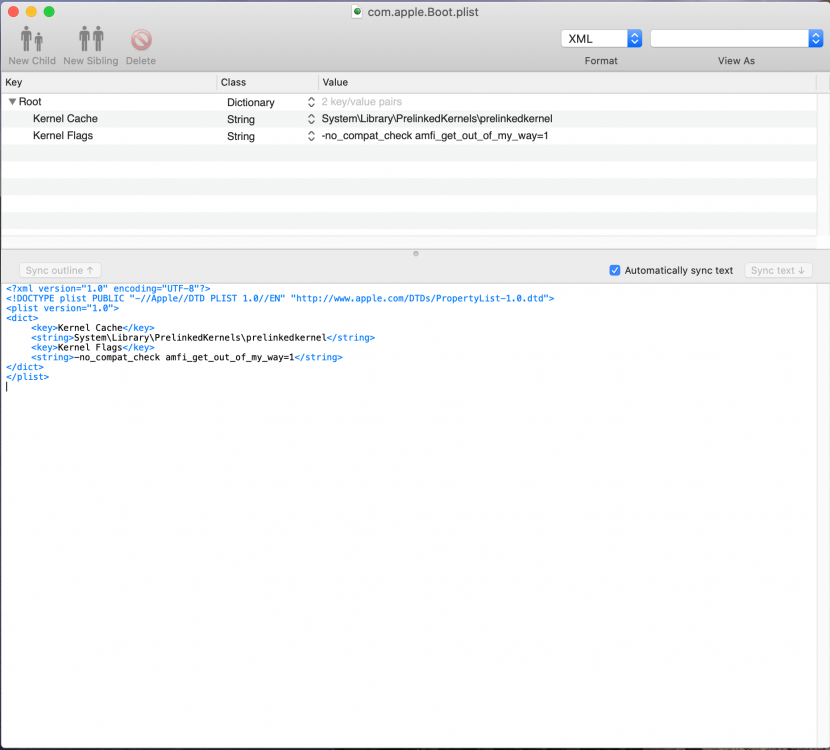
amfi_get_out_of_my_way=1 Is not get out of my way1 point
-
https://forums.macrumors.com/threads/macos-11-big-sur-on-unsupported-macs-thread.2242172/page-351 point
-
Appreciate this my very much. Will give this a try. Thanks for sharing.1 point
-
Post the link of the post please1 point
-
Honestly it’s way more fun having to work your way through beta season, learning new stuff along, finding hints clues, workarounds, giving us the challenge rather than the usual tapping of the update button, doing nothing but watch the loading bar move. And yes these are clean clean installs from the macOS Beta app, it’s just the longer way out using tools like Intel VT-x tech which also happens to be super fun and cool too.1 point
-
Anyone who is getting the OS to run is doing image installs Or installing on external drive on a real Mac just to try out the OS. I guess it’s cool an all, but what’s the fun in that if you can’t boot in to a clean install. Anyhow will keep waiting for the boot loader masters to do their magic till one can do a clean install via external media directly to a hack. “Sergey pamagi nam pajalusta”1 point
-
This is the key for those of you guys trying to use clover to boot from USB Big Tour


 1 point
 -
All of the commands can be found on Apple Life, or search for the video on yt.1 point
-
I repeat what I wrote, I installed the system from a real Mac on ssd and now I put it on my laptop and it gives me this problem.1 point
-
I solved in the crudest way with wi-fi, disabling SIP E703000 and putting 10.15 kext in S \ L \ E


 1 point
 -
Right, I don't have this USB problem when I use the USB2 ports on the back panel on Big Sur. USB3 work fine for Catalina.1 point
-
patches.plist bare in mind there is no support for these while its under beta1 point
-
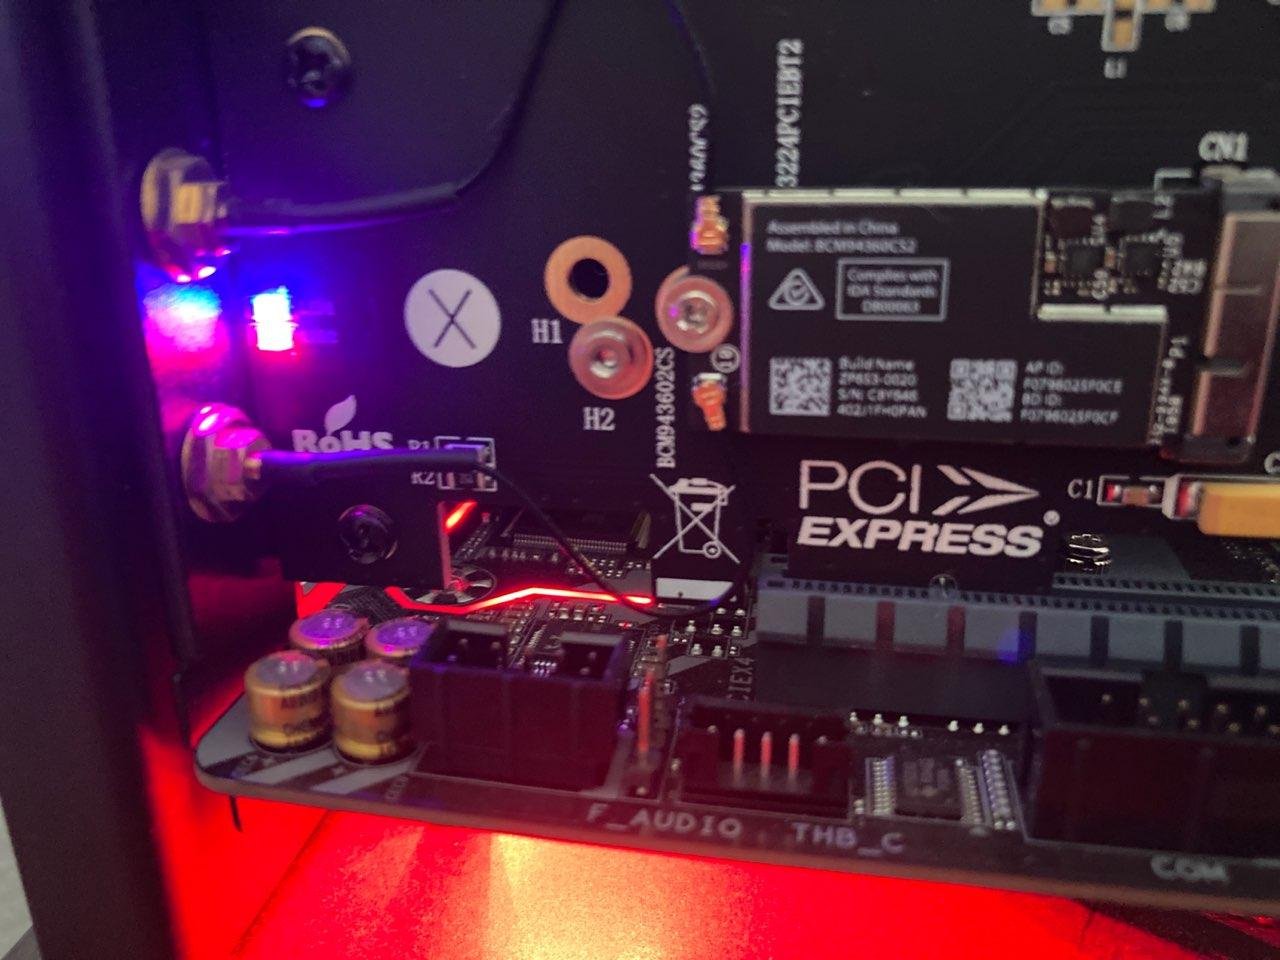
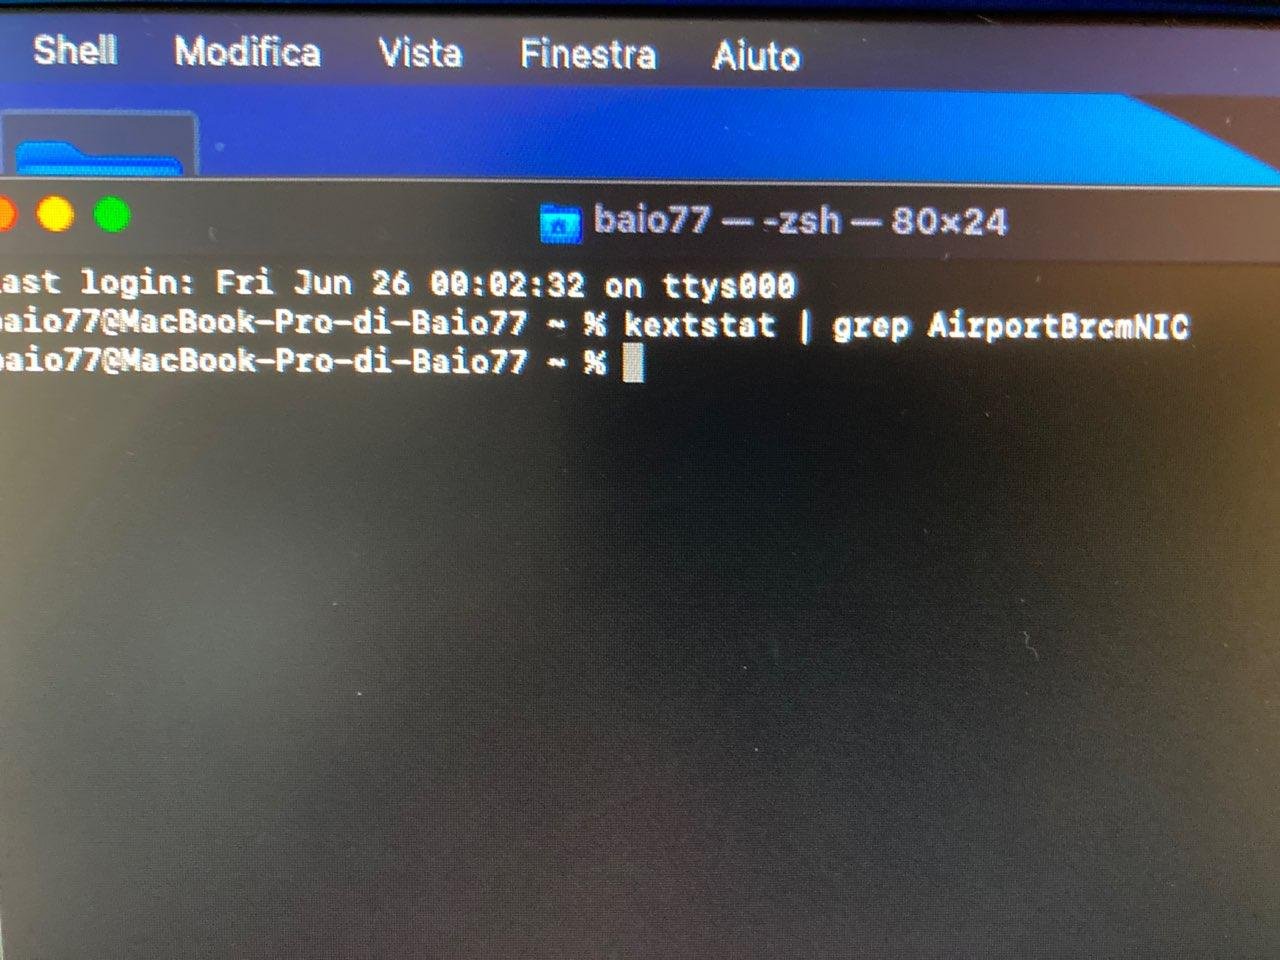
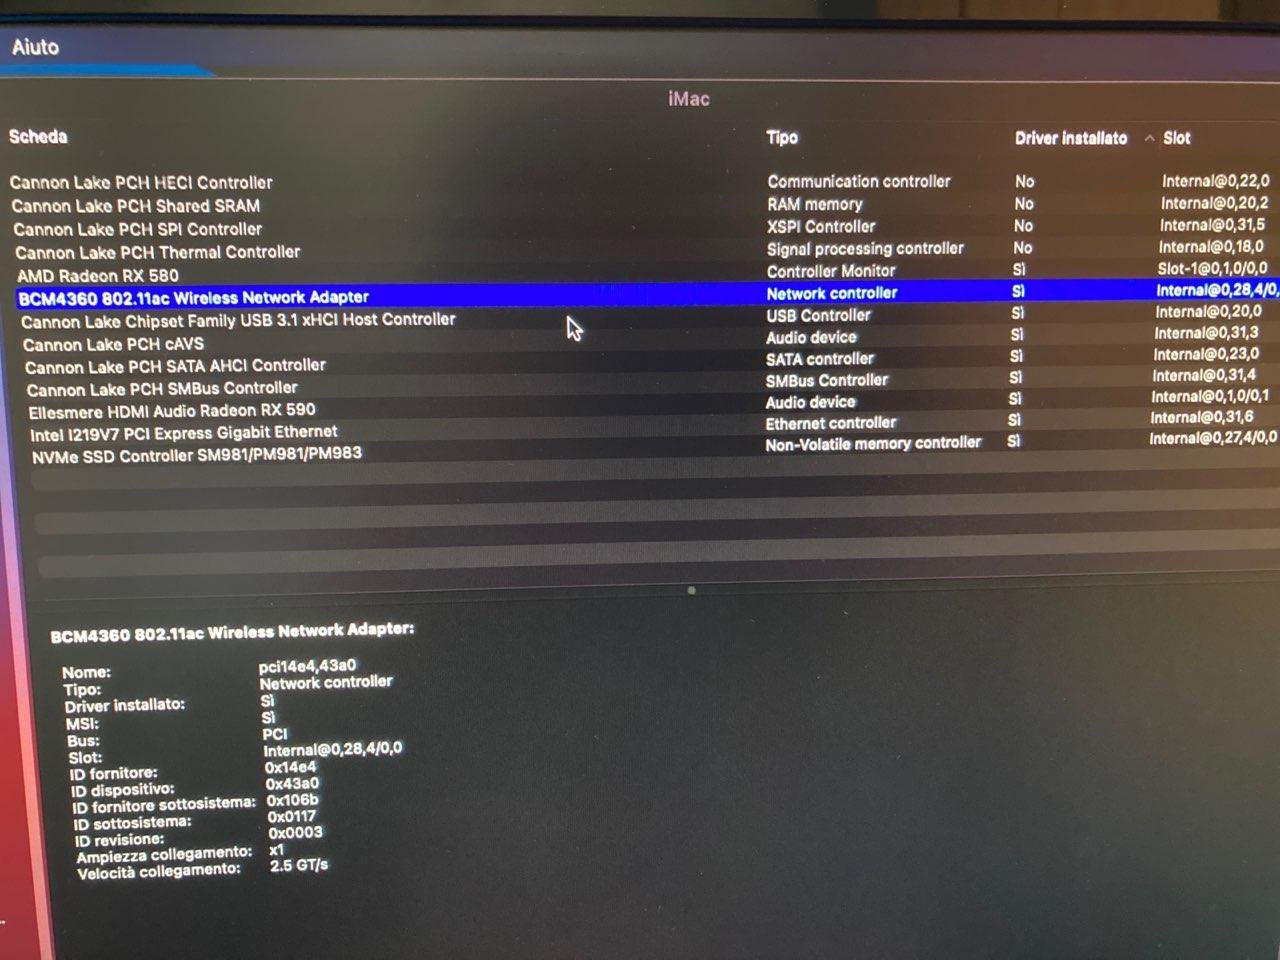
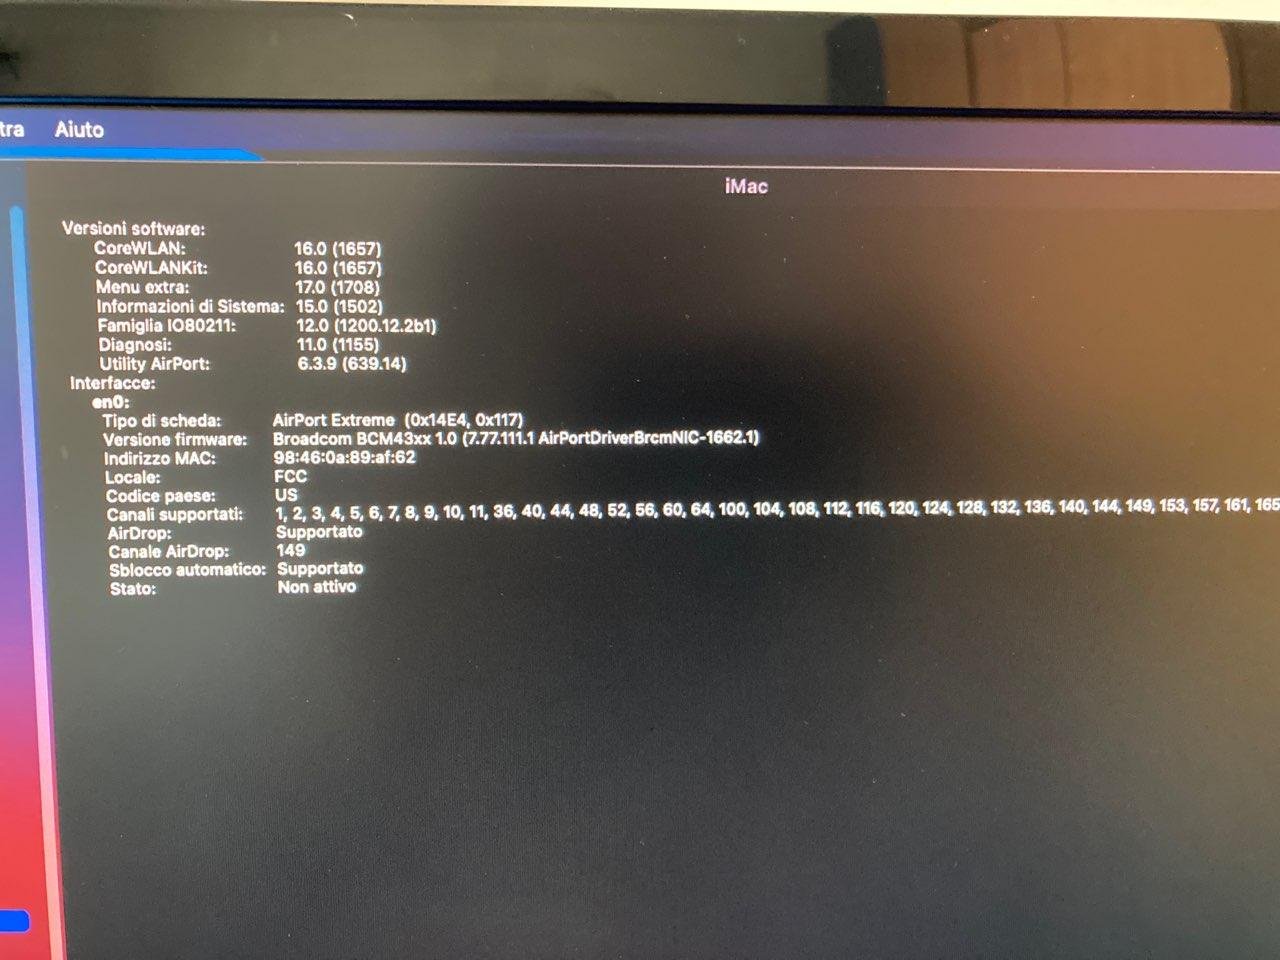
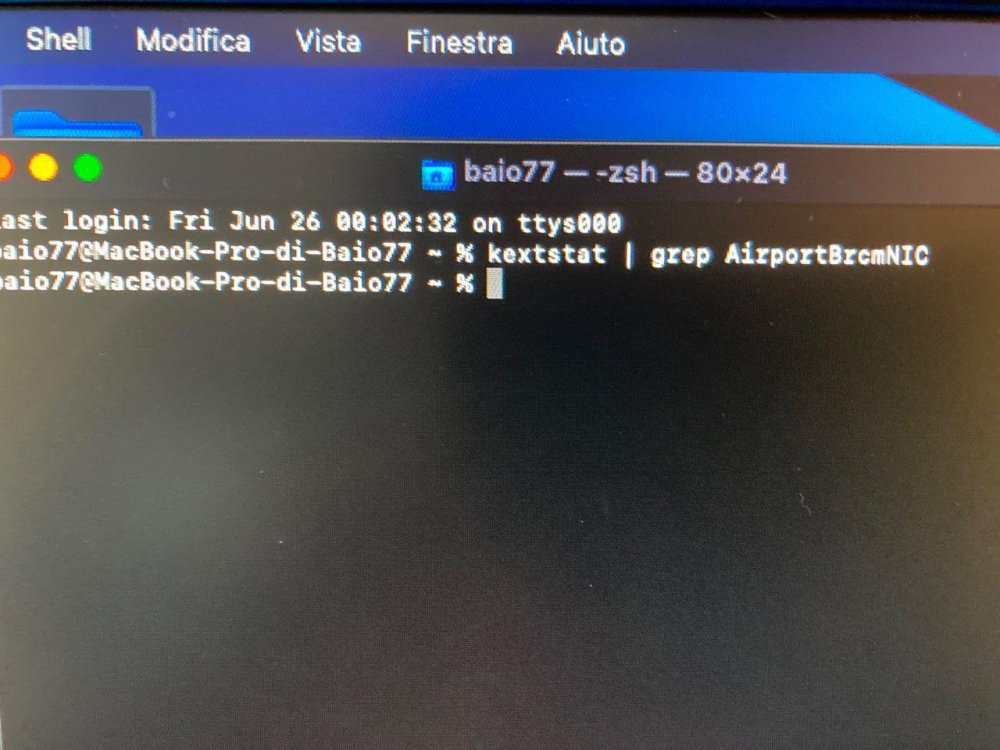
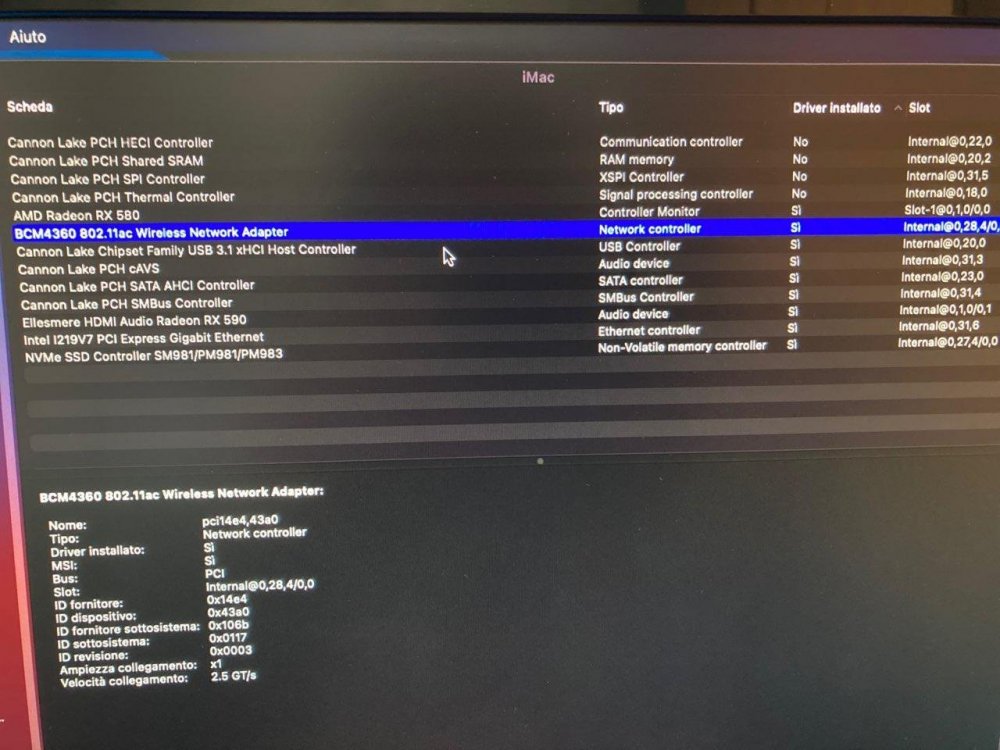
Guys, does this mean that BCM94360CS2 (and BCM94360CD which is the WiFi chipset soldered on the Fenvi T919) won't work on macOS Big Sur? Has anyone tested WiFi using Fenvi T919? Thanks1 point
-
So maybe then I'll be able to buy a real mac1 point
-
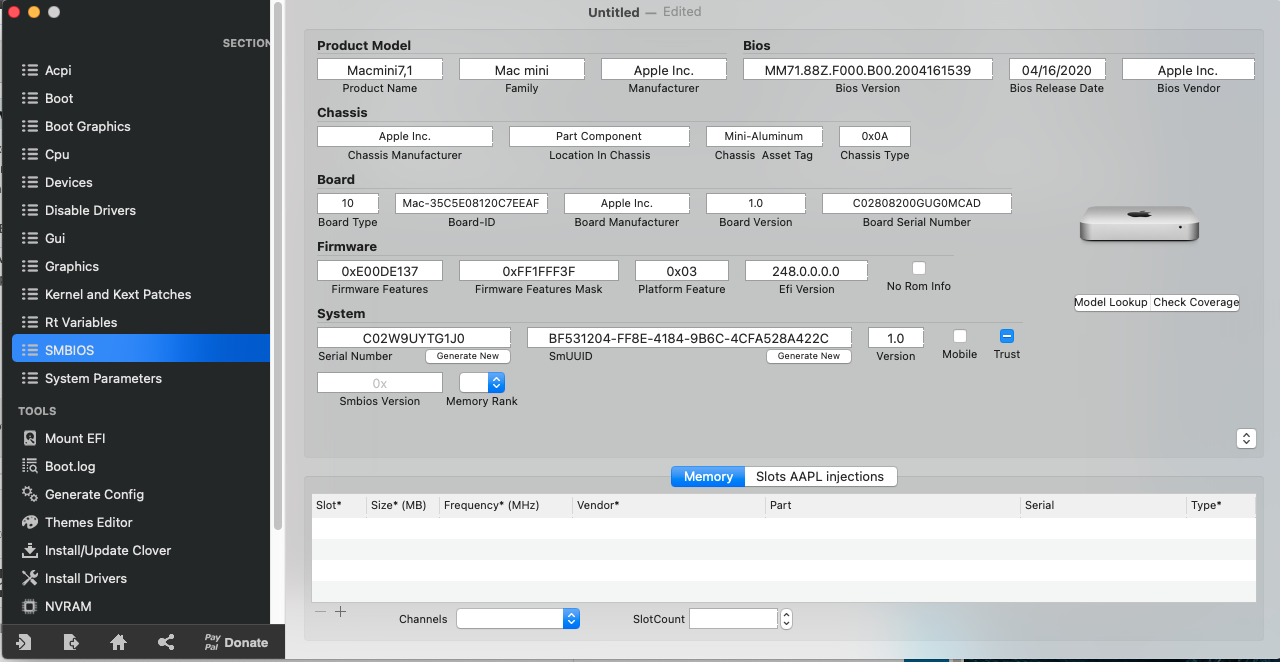
Yeah i'd download clover configurator and it does most of the legwork for you. Just mount your EFI, open your config.plist, select SMBios and where the double arrows are, click MacMini7,1 and click save. I've attached an example .
 1 point
 -
Try with these bootflags and see if they work? I also noticed the screen was black for a while and I had to wait and then the apple logo appeared and I booted in.
 1 point
 -
I try latest commit: stuck at +++++++++++++ I'm waiting for mew commit.1 point
-
You don't need to delete it this way, when you get to the interface of Opencore, just tap "Space" on your keyboard, you will see the option to Clear NVRAM. Make sure to update the config.plist accordingly. Those 2 lines are needed for booting the OS, but they are blocking the Installer. You will need to add them back once you've installed the OS.1 point
-
I had the same issue before, it was caused by the 2 booter-fileset items in NVRAM section of the config file. simply remove those items and clear NVRAM should solve it.1 point
-
Installer was via VBox without any patches. (CPU Spoofed) Installed system is bare metal with updated patches. Experimental patches will be shared on the AMD OS X github soon but no support will be given for Beta versions of macOS.1 point
-
This really explains why, for now, we are at a dead end with Clover and OpenCore. Neither can inject any kext into a snapshot. Without kext injection or the ability to write to S/L/E or L/E, we are stuck until someone can figure out how to add FakeSMC or VirtualSMC and other necessary startup kexts to a snapshot that can be used by the Big Sur installer.1 point
-
This debate is kind of an open one, to Trim or not to Trim. Some modern SSD Drives has builtin software that periodically gather and remove garbage so having Trim enabled is not needed and is reputed to actually slow down the performance of the Drive. I have Catalina installed on a NMVe Drive which is automatically Trimmed by Apple's inbuilt software so I don't need Trim enabled and it says 'Trim Enabled' for that drive in 'System Preferences'. At the end of the day it is up to the end user to decide if Trim is the way to go, also get hold of the data sheet for your drive and see if it contains inbuilt Trim software. Good luck.1 point
-
X79 IvyBridge Xeon 6 Core, Working full Name Support.

 1 point
 -
Initial set of patches for 11 is pushed to master. @btwise, that's Google domain, I strongly doubt it is down. Try calling your ISP support. If you think it is not your ISP, then ask Google or Tianocore. Our UDK is just a mirror of tianocore/edk2.1 point
-
I hope this means that Ivy Bridge systems might still work...one can only hope. My i7-3770 machine is still very capable these days.1 point
-
There is a huge difference - the panic now says the symbol name and offset relative to that symbol that the crash occurred. Its the difference between being blind in a pitch black room looking for a black cat that isn't there vs looking for a cat that has a GPS tracker collar and the cat is already sitting in your lap. See?1 point