Leaderboard


Popular Content
Showing content with the highest reputation on 06/15/2020 in all areas
-
@Brumbaer Thanks for tracking down this bug to it's origin. I'm going to rewrite chip recognition from scratch next week because Realtek's solution is not only confusing but also extremely ugly.5 points
-
This project is dedicated to Lucy, my lovely little Tyrannofelis Rex. LucyRTL8125Ethernet is an open source driver for the Realtek RTL8125 family of 2.5GBit Ethernet controllers. Key Features of the Driver Supports all versions of Realtek's RTL8125 2.5GBit Ethernet Controllers found on recent boards. Support for multisegment packets relieving the network stack of unnecessary copy operations when assembling packets for transmission. No-copy receive and transmit. Only small packets are copied on reception because creating a copy is more efficient than allocating a new buffer. TCP, UDP and IPv4 checksum offload (receive and transmit). TCP segmentation offload over IPv4 and IPv6. Support for TCP/IPv4, UDP/IPv4, TCP/IPv6 and UDP/IPv6 checksum offload. Supports jumbo frames up to 9000 bytes (strongly recommended for 2.5GBit operation). Fully optimized for Mojave and above. Note that older versions of macOS might not support 2.5GB Ethernet. Supports Wake on LAN (untested). Supports VLAN (untested). Support for Energy Efficient Ethernet (EEE) which can be disabled by setting enableEEE to NO in the drivers Info.plist without rebuild. The default is YES. The driver is published under GPLv2. Current Status The driver has been tested successfully under Catalina (10.15.4 and above) and, according to first tests, is working stable. I haven't experienced any Kernel Panics during my tests and is working stable on my primary work machine. The driver has been designed to work with Catalina but might also work with Mojave, provided you build from source with Xcode 10.. Please keep in mind that support for 2.5GBit Ethernet was introduced in Mojave (or maybe High Sierra?) so that there is no way to make it work with Sierra or below. Known Issues Using autoselect medium it seems to prefer negotiating a connection speed of 1Gbit with my switch so that I had to select 2.5GBit/s manually in order to achieve this speed but it might be different with other switches. This problem has been resolved in version 1.1.0. Installation You might want to install the driver to /L/E as usual but it's also ok to use Clover's or OC's injection function (installation in the EFI folder). Use your favorite kext installation tool for installation or perform the installation manually (for Clover or OC injection). It's your call! Help - I'm getting kernel panics! Well, before you start complaining about bugs after you upgraded macOS and ask me to publish a driver update, you should first try to resolve the issue on your own by cleaning the system caches. As the driver uses macOS's private network driver interface, which is supposed to be used by Apple provided drivers only, you might run into problems after an OS update because the linker may fail to recognize that IONetworking.kext has been updated and that the driver needs to be linked against the new version (Apple provided drivers avoid this problem because they are always updated together with IONetworking.kext). As a result, the linking process produces garbage and the driver may call arbitrary code when trying to call functions from IONetworking.kext. This usually results in unpredicted behavior or a kernel panic. In order to recover from such a situation, you should clean the System Caches forcing the linker to recreate it's caches: Delete all the files in /System/Library/Caches and it's subdirectories but leave the directories and the symbolic links intact. This is very important! Reboot. Recreate the kernel cache. Reboot again. Troubleshooting Make sure you have followed the installation instructions especially when you have issues with certain domains while the others are working fine. Use the debug version to collect log data when trying to track down problems. The kernel log messages can be retrieved with "log show --predicate "processID == 0" --debug" in order to retrieve kernel logs. Include the log data when asking for support or giving feedback. I'm an engineer, not a clairvoyant. Don't copy and paste large amounts of log data to your post. Create an archive with the log data and attach it to your post. In case you don't want to make your log data publicly accessible, contact me via PM and I will provide you a mail address to send it directly to me. Delete the following files: /Library/Preferences/SystemConfiguration/NetworkInterfaces.plist /Library/Preferences/SystemConfiguration/preferences.plist In Terminal run netstat -s in order to display network statistics. Carefully examine the data for any unusual activity like a high number of packets with bad IP header checksums, etc. In case auto-configuration of the link layer connection doesn't work it might be necessary to select the medium manually in System Preferences under Network for the interface. Use Wireshark to create a packet dump in order to collect diagnostic information. Keep in mind that there are many manufacturers of network equipment. Although Ethernet is an IEEE standard, different implementations may show different behavior causing incompatibilities. In case you are having trouble try a different switch or a different cable. Changelog Version 1.1.0 (2021-04-29) Changed version number to 1.1.0 to make it an official release. Version 1.1.0d12 (2021-04-25) Updated Linux sources to 9.005.01. Fixed auto-negotiation for all speeds (including 2.5 Gigabit). Added support for adaptive poll interval in 2.5 Gigabit mode. Version 1.0.0 (2020-08-14) Changed version number to make this the first official release. Version 1.0.0d6 (2020-06-14) Fixed chip recognition. Version 1.0.0d3 (2020-04-20) First working development release. Getting the driver Source code can be found on GitHub: https://github.com/Mieze/LucyRTL8125Ethernet You'll find the lastest prebuilt binary in the download section: https://www.insanelymac.com/forum/files/file/1004-lucyrtl8125ethernet/
 2 points
 -
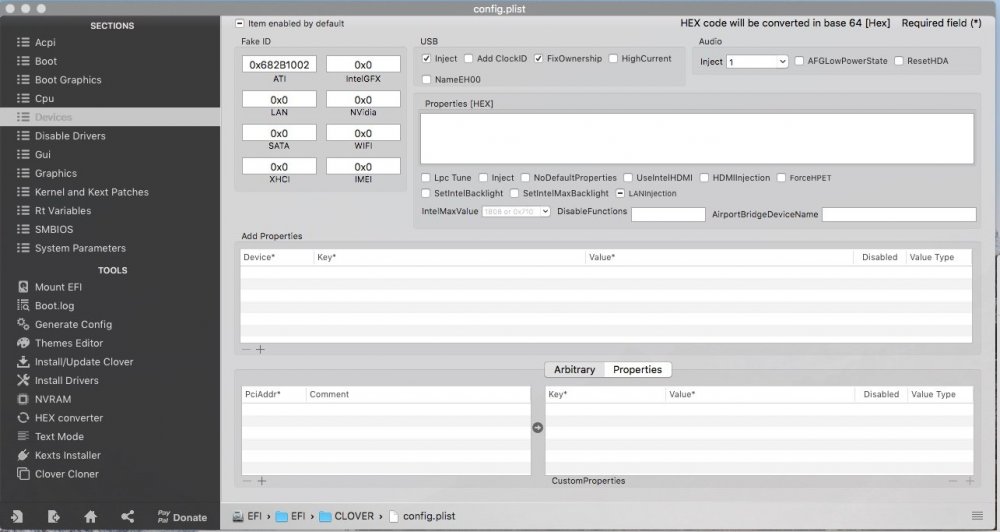
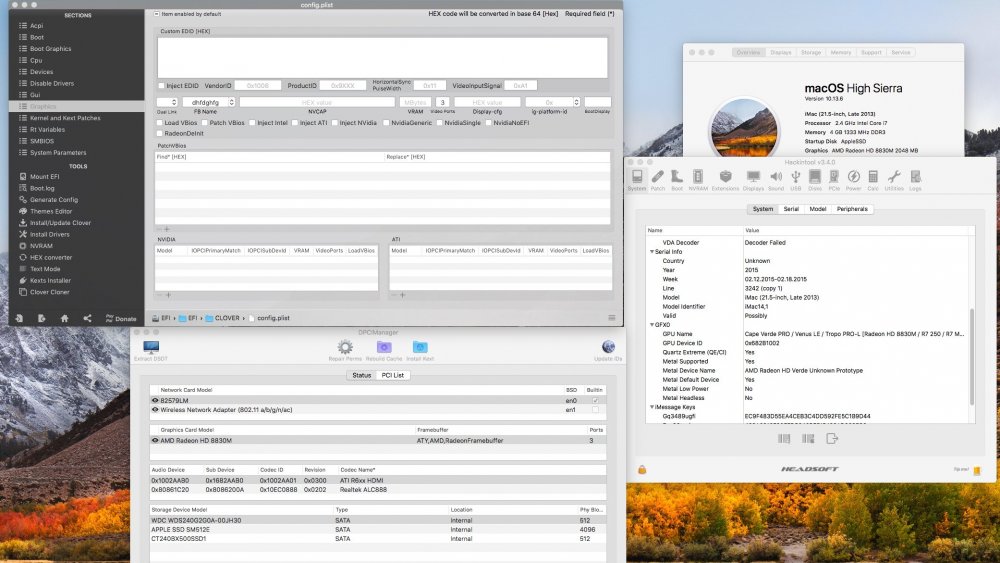
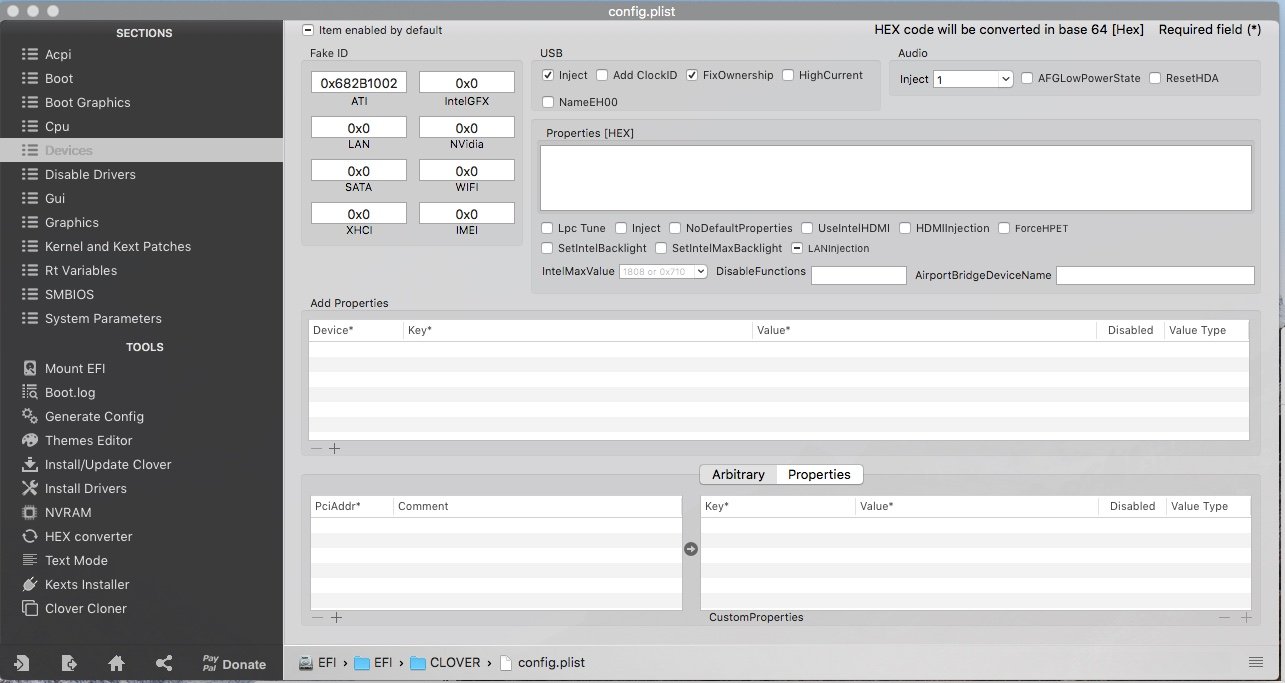
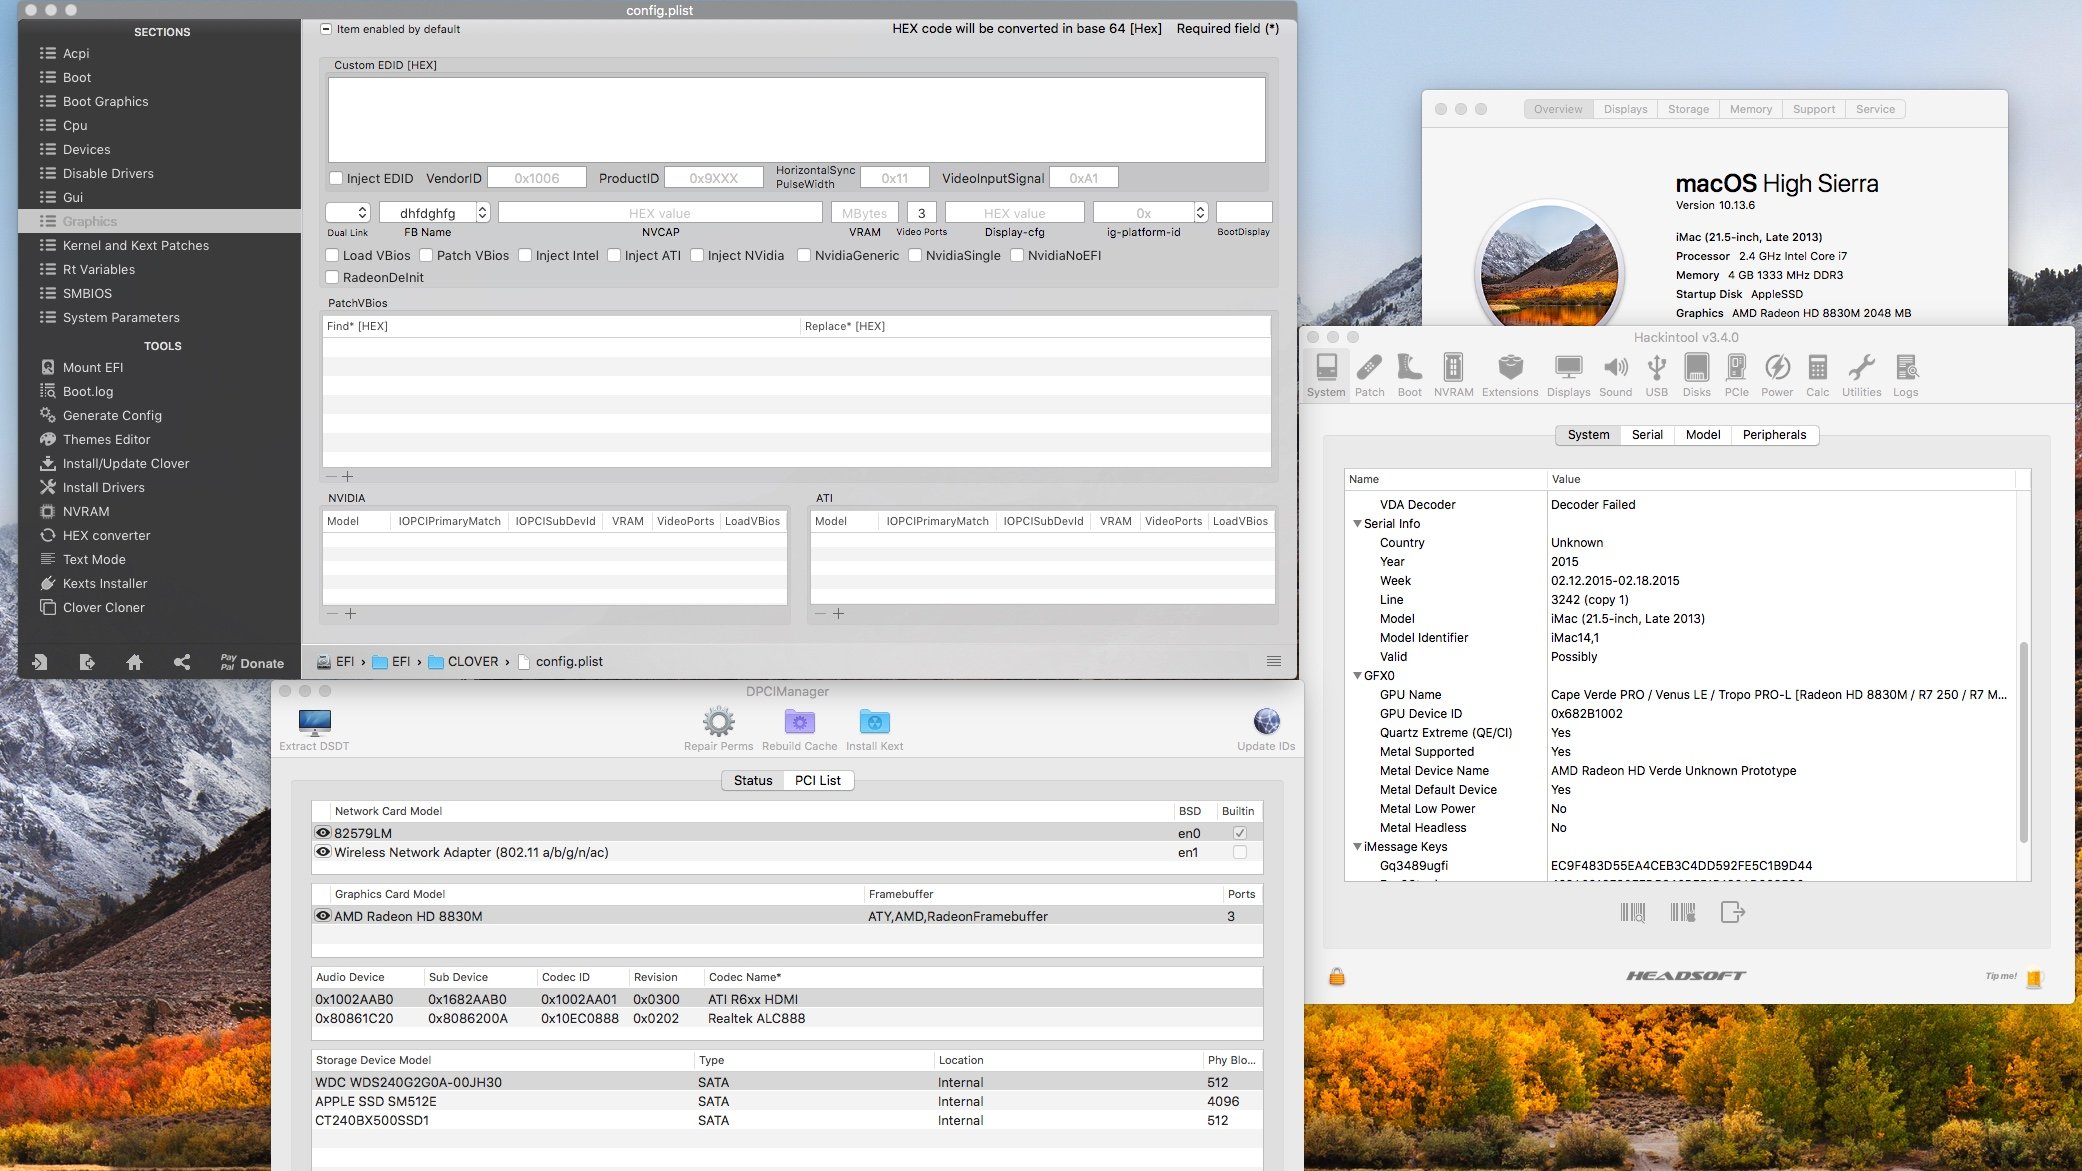
As AMD has done a lot of rebranding your card might not work OTB in OSX. While kexts like WhateverGreen offer solution for most but they don't cover all the cards. In my opinion it's much cleaner to use Apple native support by telling OSX which exactly chip you’re using. You only need to input correct fake ID for ATI in Clover Devices section. Here is example for mine R7 250 based on Oland XT chip. You must remove Inject ATI in the graphics section. Here is full list of AMD ID's supported in Mojave and corresponding customer cards (credit to u/csabikaa97) I will update the list if needed. AMD7000Controller.kext Raw identifier list: 0x67901002 0x67981002 0x679A1002 0x679E1002 0x67801002 0x68201002 0x68211002 0x68231002 0x68251002 0x68271002 0x682B1002 0x682D1002 0x682F1002 0x68351002 0x68391002 0x683B1002 0x683D1002 0x683F1002 0x68001002 0x68011002 0x68061002 0x68081002 0x68101002 0x68181002 0x68191002 GPU list: 0x67901002: Unknown 0x68391002: Unknown 0x683B1002: Unknown 0x67981002: Tahiti XT ( Radeon HD 7970, 8970, R9 280X ) 0x679A1002: Tahiti PRO ( Radeon HD 7950, 8950, R9 280 ) 0x679E1002: Tahiti LE ( Radeon HD 7870 XT ) 0x67801002: Tahiti XT GL ( FirePro W9000 ) 0x68201002: Venus XTX ( Radeon HD 8890M, R9 M275X / M375X ) 0x68211002: Venus XT ( Radeon HD 8870M, R9 M270X / M370X ) 0x68231002: Venus PRO ( Radeon HD 8850M, R9 M265X ) 0x68251002: Heathrow XT ( Radeon HD 7870M ) 0x69271002: Heathrow PRO ( Radeon HD 7850M / 8850M ) 0x682B1002: Cape Verde PRO / Venus LE / Tropo PRO-L ( Radeon HD 8830M, R7 250, R7 M465X ) 0x682D1002: Chelsea XT GL ( FirePro M4000 ) 0x682F1002: Chelsea LP ( Radeon HD 7730M ) 0x68351002: Cape Verde PRX ( Radeon R9 255 ) 0x683D1002: Cape Verde XT ( Radeon HD 7770, 8760, R7 250X ) 0x683F1002: Cape Verde PRO ( Radeon HD 7750, 8740, R7 250E ) 0x68001002: Wimbledon XT ( Radeon HD 7970M ) 0x68011002: Neptune XT ( Radeon HD 8970M ) 0x68061002: Neptune 0x68081002: Pitcairn XT GL ( FirePro W7000 ) 0x68101002: Curacao XT / Trinidad XT ( Radeon R7 370, R9 270X / 370X ) 0x68181002: Pitcairn XT ( Radeon HD 7870 GHz Edition ) 0x68191002: Pitcairn PRO ( Radeon HD 7850, R7 265, R9 270 - 1024 Stream Processor ) AMD8000Controller.kext Raw identifier list: 0x66401002 0x66411002 0x66461002 0x66471002 0x66501002 0x66511002 0x665C1002 0x665D1002 0x67B01002 GPU list: 0x66401002: Saturn XT ( FirePro M6100 ) 0x66411002: Saturn PRO ( Radeon HD 8930M ) 0x66461002: Bonaire XT ( Radeon R9 M280X ) 0x66471002: Bonaire PRO ( Radeon R9 M270X ) 0x66501002: Bonaire 0x66511002: Bonaire 0x665C1002: Bonaire XT ( Radeon HD 7790, 8770, R7 360, R9 260 / 360 ) 0x665D1002: Bonaire ( Radeon R7 200 series ) 0x67B01002: Hawaii XT / Grenada XT ( Radeon R9 290X / 390X ) AMD9000Controller.kext Raw identifier list: 0x69201002 0x69211002 0x69301002 0x69381002 0x69391002 0x73001002 0x730F1002 GPU list: 0x69201002: Unknown 0x69211002: Amethyst XT ( Radeon R9 M295X ) 0x69301002: Unknown 0x69381002: Tonga XT / Amethyst XT ( Radeon R9 380X, R9 M295X ) 0x69391002: Tonga PRO ( Radeon R9 285 / 380 ) 0x73001002: Fiji ( Radeon R9 FURY / NANO Series ) 0x730F1002: Unknown AMD9500Controller.kext Raw identifier list: 0x67E01002 0x67E31002 0x67E81002 0x67EB1002 0x67EF1002 0x67FF1002 0x67E11002 0x67E71002 0x67E91002 0x67C01002 0x67C11002 0x67C21002 0x67C41002 0x67C71002 0x67DF1002 0x67D01002 0x67C81002 0x67C91002 0x67CA1002 0x67CC1002 0x67CF1002 GPU list: 0x67E01002: Baffin ( Radeon PRO WX 4170 ) 0x67E31002: Baffin ( Radeon PRO WX 4100 ) 0x67E81002: Baffin ( Radeon PRO WX 4130 / 4150 ) 0x67EB1002: Baffin ( Radeon Pro V5300X ) 0x67EF1002: Baffin ( Radeon RX 460, 560D, Pro 450, 455, 460, 555, 555X, 560, 560X ) 0x67FF1002: Baffin ( Radeon RX 550 640 Stream Processor, RX 560, 560X ) 0x67E11002: Baffin ( Polaris11 ) 0x67E71002: Unknown 0x67E91002: Baffin ( Polaris11 ) 0x67C01002: Ellesmere ( Radeon PRO WX 7100 ) 0x67C11002: Unknown 0x67C21002: Ellesmere ( Radeon PRO V7300X ) 0x67C41002: Ellesmere ( Radeon PRO WX 7100 ) 0x67C71002: Ellesmere ( Radeon PRO WX 5100 ) 0x67DF1002: Ellesmere ( Radeon RX 470, 480, 570, 570X 580, 580X ) 0x67D01002: Ellesmere ( Radeon PRO V7300X / V7350x2 ) 0x67C81002: Unknown 0x67C91002: Unknown 0x67CA1002: Ellesmere ( Polaris10 ) 0x67CC1002: Ellesmere ( Polaris10 ) 0x67CF1002: Ellesmere ( Polaris10 ) AMD10000Controller.kext Raw identifier list: 0x68601002 0x68611002 0x68621002 0x68631002 0x68641002 0x68671002 0x68681002 0x68691002 0x686A1002 0x686B1002 0x686C1002 0x686D1002 0x686E1002 0x687F1002 0x69A01002 0x69A11002 0x69A21002 0x69A31002 0x69AF1002 0x66A01002 0x66A11002 0x66A21002 0x66A31002 0x66A71002 0x66AF1002 GPU list: 0x68601002: Vega 10 ( Radeon Instinct MI25 ( 0x68611002: Vega 10 XT ( Radeon PRO WX 9100 ) 0x68621002: Vega 10 XT ( Radeon PRO SSG ) 0x68631002: Vega 10 XTX ( Radeon Vega Frontier Edition ) 0x68641002: Vega 0x68671002: Vega 10 XL ( Radeon Pro Vega 56 ) 0x68681002: Vega 10 ( Radeon PRO WX 8100 ) 0x68691002: Unknown 0x686A1002: Unknown 0x686B1002: Unknown 0x686C1002: Vega 10 ( Radeon Instinct MI25 MxGPU ) 0x686D1002: Unknown 0x686E1002: Unknown 0x687F1002: Vega 10 XL/XT ( Radeon RX Vega 56 / 64 ) 0x69A01002: Vega 12 0x69A11002: Vega 12 0x69A21002: Vega 12 0x69A31002: Vega 12 0x69AF1002: Vega 12 0x66A01002 Vega 20 ( Radeon Instinct ) 0x66A11002: Vega 20 0x66A21002: Vega 20 0x66A31002: Vega 20 0x66A71002: Vega 20 ( Radeon Pro Vega 20 ) 0x66AF1002: Vega 20 AMDRadeonX4000.kext Raw identifier list: x67E01002 0x67E31002 0x67E81002 0x67EB1002 0x67EF1002 0x67FF1002 0x67E11002 0x67E71002 0x67E91002 GPU list: 0x67E01002: Baffin ( Radeon PRO WX 4170 ) 0x67E31002: Baffin ( Radeon PRO WX 4100 ) 0x67E81002: Baffin ( Radeon PRO WX 4130 / 4150 ) 0x67EB1002: Baffin ( Radeon Pro V5300X ) 0x67EF1002: Baffin ( Radeon RX 460, 560D, Pro 450, 455, 460, 555, 555X, 560, 560X ) 0x67FF1002: Baffin ( Radeon RX 550 640 Stream Processor, RX 560, 560X ) 0x67E11002: Baffin ( Polaris11 ) 0x67E71002: Unknown 0x67E91002: Baffin ( Polaris11 ) AMDRadeonX5000.kext Raw identifier list: 0x68601002 0x68611002 0x68621002 0x68631002 0x68641002 0x68671002 0x68681002 0x68691002 0x686A1002 0x686B1002 0x686D1002 0x686E1002 0x687F1002 0x686C1002 GPU list: 0x68601002: Vega 10 ( Radeon Instinct MI25 ( 0x68611002: Vega 10 XT ( Radeon PRO WX 9100 ) 0x68621002: Vega 10 XT ( Radeon PRO SSG ) 0x68631002: Vega 10 XTX ( Radeon Vega Frontier Edition ) 0x68641002: Vega 0x68671002: Vega 10 XL ( Radeon Pro Vega 56 ) 0x68681002: Vega 10 ( Radeon PRO WX 8100 ) 0x68691002: Unknown 0x686A1002: Unknown 0x686B1002: Unknown 0x686C1002: Vega 10 ( Radeon Instinct MI25 MxGPU ) 0x686D1002: Unknown 0x686E1002: Unknown 0x687F1002: Vega 10 XL/XT ( Radeon RX Vega 56 / 64 ) Here is my "unsupported" XFX R7 250A 2GB DDR3 based on Oland XT with full QE/CI and Metal: Note that I've input garbage as a Framebuffer name that tells OSX to use AMD Framebuffer. Let me know if this method works for you.
 2 points
 -
I still have to refresh every page 3 times before i can access it, using latest firefox... Certificate issues2 points
-
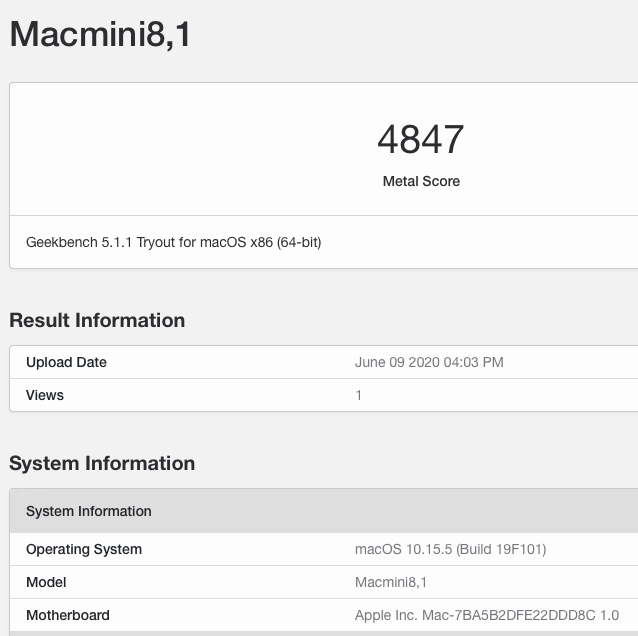
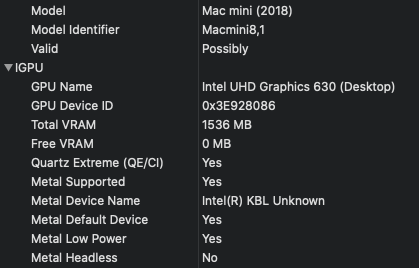
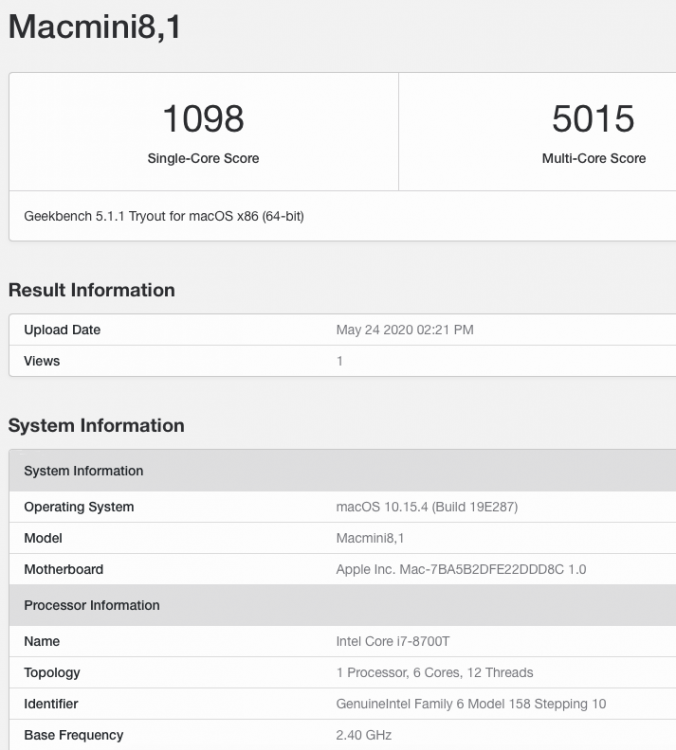
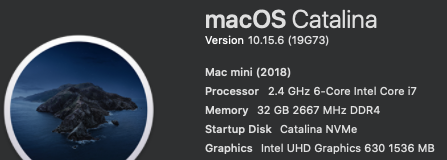
********************************************************************************** In this thread, I have fully documented the installation of macOS on my HP EliteDesk 800 G4 / G5 Mini. It is a PERFECT HackMini8,1 and is running very well for me without any issues. I hope this documentation helps you to install macOS on your hack. Please leave feedback if you think there is anything I can improve and let me know if you have any questions. ********************************************************************************** Background This is my first "modern" hack supporting UEFI and my first hack using Clover "on-the-fly" patches. My previous hacks Laptop: Thinkpad T61 / Nvidia NVS 140m Laptop: Dell Latitude E6410 / Nvidia G3100m Desktop: Gigabyte G31 / GeForce 9600 Desktop: Biostar TH55HD / Sapphire Pulse RX580 (Google "Catalina Biostar TH55HD" and look for user name deeveedee) are all perfectly running Catalina and I patched them all "manually" - all DSDT patches applied with MaciSL with virtually no Clover on-the-fly patching and all booted Legacy Clover. This UEFI hack was MUCH easier and took about 20 hours vs. a combined hundreds of hours for the old hacks. I wanted a hack that was a little more future proof and I think this is it. I hope you enjoy this as much as I am enjoying it. It is a perfect MacMini8,1. My system specs HP EliteDesk 800 G5 Mini (I9-9900 / UHD 630 / Q370 Chipset / 32GB DDR4 RAM) (also own 800 G5 Mini with i7-9700, 800 G4 Mini with i7-8700 and have owned 800 G4 Mini with i7-8700T - all work perfectly) 3 x DP Ports (connected to monitors using DP -> DVI adapters) 6 x USB 3.1 1 x USB Type-C 3.1 2 x NVMe SSD (M.2 PCIe x4 2280/2230 combo ports) 1 x SATA6 SSD 1 x Intel Ethernet RJ-45 Conexant CX20632 Audio Codec I am not using Wi-Fi. See below in "What is not tested" for Wi-Fi solutions. macOS Installation Important: You MUST BE LOGGED-IN to download attachments from this forum See macOS installation steps for OC and CLOVER here See Known Issues here for additional installation steps that may not yet be included in my attached config files See OC and CLOVER EFIs in attached to this post See BIOS configuration in attached BIOS configuration PDF document See how I developed my installation methodology here See references here See instructions here for installing two M.2 2280 NVMe SSDs and one SATA HD / SSD What is not working DRM (no hackintosh solution for DRM with UHD 630 iGPU) Everything else that I have tested is working perfectly What is not tested USB c 3.1 port (I have partially tested the USB 3 functionality of the port and it seems to be working fine with the USBPorts.kext in the attached EFI .zip archives) Wi-Fi / Bluetooth I am not currently using Wi-Fi/Bluetooth in this hack, but starting with Sonoma, Broadcom Wi-Fi is not supported without 3rd-party macOS root patches. I am not in favor of installing Open Core Legacy Patcher (OCLP) root-patches to enable Broadcom Wi-Fi (see my opinion here). If you need basic Wi-Fi/Bluetooth (and don't care about Apple-specific functions like Airdrop), I recommend Open Wireless project to enable Intel Wi-fi/Bluetooth. I don't believe that OCLP Wi-Fi root-patches are safe for secure computing operations (e.g., online banking or even accessing your Facebook page). If you prefer Broadcom Wi-Fi/Bluetooth, replace intel Wi-Fi with Broadcom Wi-Fi here and here. What is working Everything not mentioned above Sleep / Wake Multiple displays with IGPU graphics acceleration, hot pluggable display ports and DP->DVI adapters USB 3.1 ports Audio (internal speaker and headphone jack) Ethernet Microphone / front-right audio port (tested with CTIA-style 4-connector headset) Known Issues and their solutions - see here BIOS Version / Configuration Tested BIOS Versions for G4 Mini: 02.11.01 Rev.A or 02.12.00 Rev.A or 02.14.01 Rev.A, 02.15.00 Rev.A, 02.16.00 Rev.A, 02.17.00 Rev.A, 02.19.00 Rev.A, 02.20.01 Rev A, 02.21.00 Rev.A Tested BIOS Versions for G5 Mini: 02.07.01 Rev.A, 02.08.00 Rev.A, 02.09.00 Rev.A, 02.10.01 Rev.A, 02.11.00 Rev.A, 02.12.00 Rev.A, 02.12.10 Rev.A, 02.13.00 Rev.A, 02.14.01 Rev.A, 02.15.00 Rev.A See attached BIOS configuration in PDF document "HP EliteDesk 800 G4 Mini BIOS Configuration.pdf" Intel ME must be enabled for proper sleep / wake of UHD 630 UHD 630 Framebuffer Patching See here and here to understand my graphics properties for use with WhateverGreen.kext Read this to see my attempt at graphics patching without WhateverGreen.kext (WEG) to get a better understanding of what WEG is doing Current Versions Ventura 13.6.3 OpenCore 0.9.6 Lilu.kext 1.6.7 WhateverGreen.kext 1.6.6 AppleALC.kext 1.8.7 IntelMausi.kext 1.0.7 RestrictEvents.kext 1.1.3 VirtualSMC 1.3.2 NVMeFix.kext 1.1.1 Elements of this implementation that you may not see in other hacks HPET is disabled for the reason stated here RTC memory size is patched (like CLOVER's "Fix RTC") instead of using RtcMemoryFixup.kext for reasons here ScreenShots OC0.9.6-EFI-R001.zip HP EliteDesk 800 G4 Mini BIOS Configuration.pdf CLOVER-r5122-v6.zip


 1 point
 -
I reworked chip identification in version 1.0.0d6 to fix the issue. Attached you'll find debug and release builds for Mojave and Catalina. Mieze LucyRTL8125Ethernet-V1.0.0d6.zip1 point
-
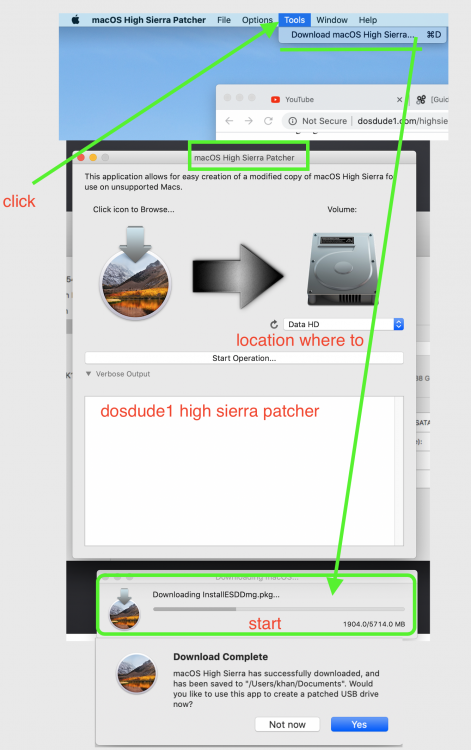
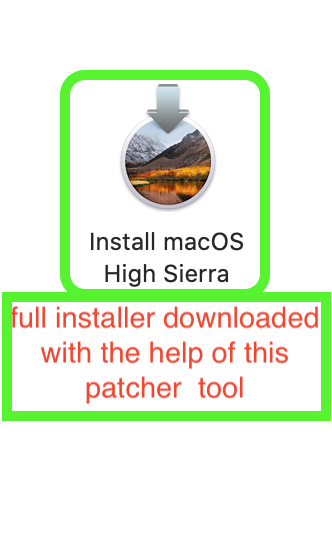
Thank you Rockey!!! . I figured out the mystery. After a lot of time searching, I read is Apple forums that Applestore app , detect if you hace the app (whatever) in the HD, to show "open" or "download". And I realized that I had mounted the usb installer, with its macos installer app. The fix is simply, unmount the usb, and "download" button shows up. Anyway, trying form other OS versions, Appstore doesn't open the link. Sometimes because is a old appstore (el capitan), or sometimes because is the new appstore (mojave). Even I tried to do from my old Sierra HD and the link didn't work either. That's mean, that we need High Sierra to download a High Sierra dmg. Seriously, Apple is, with every passing day, a more retarded company . I managed to install High Sierra with expired certifies, using a tip with the system date. The problem is updates wont install in a system with expired certifies. But , from this High Sierra installed, I copuld download the new updated dmg . Those who appreciatte your stuff of SO, updates, etc, should download again all installers with renovated certifies.1 point
-
@Slice, what if the Wiki run inside Clover.app, or even better the wiki can also edit the config.plist so that explanations will always be visible?1 point
-
"OSX86 is doomed..." https://www.macrumors.com/2020/06/15/16-inch-macbook-pro-5600m-graphics/ Except the same "old" hardware is not only still being sold, it is getting upgrades today. We might see a few units, perhaps, running ARM, but there is a long way until ARM can take over x86 architecture. It makes sense for ultra portable, very long battery life units (read: iPad Pro), but for real world workhorses such as MBPs, iMacs, Mac Pros and even the Mac mini, the x86 platform should last for quite a while.1 point
-
What motherboard do you have? Every motherboard has a “Press X to enter bios” (X is an example but more examples are (escape key, F2, F10, F12 or even del (delete)). The best method is to look up your motherboard on google for example Gigabyte X570 Aorus Pro WiFi and add the words “bios key” to it. Once you find which key you need power off your machine, power it back on and mash (press the key lots, don’t hold it down unless your manual says too) the key to enter your bios. Once in bios, find boot options and select the drive/partition opencore is on. Mine shows up as UEFI OS (insert drive name here). Sent from my iPhone using Tapatalk1 point
-
Works here, Thanks1 point
-
What are you talking about - Boot sticks, circle of dots and space bar!!!!!!!!!!!!! Listen carefully, read your your Motherboard's manual on how to boot into the BIOS (without the aid of boot sticks and other utter nonsense) until you do, I will not offer any more on the subject. Somehow I think you're rushing into building a Hackintosh without doing any kind of research clearly evident by your lack of not knowing how to boot into a p/c's BIOS.1 point
-
And I bet if you did a clean boot none of that would happen. what I’m trying to tell you is your problems are not because of OpenCore but are exclusive to you and you alone so to lay blame on the bootloader is just simply ridiculous. simple as that really buddy how can me saying IF you have a overclock be a red herring, What you trying to say there fella? I don’t know your setup or what your using and you have no signature togo by so I’m going to say whatever problems I can think of that will be connected to it. Red herring meaning a clue or piece of information which is or is intended to be misleading or distracting. (How absolutely rude of you) One more point in all of this, you are one of many many hundreds of users using any of my EFIs and none bar you with any problems using OpenCore. I know it hurts to be told you have something wrong with your setup be it hardware or instal but fact are facts I’m afraid. And I was also just informing you about using the right smbios not telling you it was part of the problem. (I was trying to helpful and nothing more) Trying to be helpful one last time, I’m gonna take a shot in dark and guess that you have been using installs from over at the red tomato site. If you have then it would explain the problems straight away, if you haven’t then It was just a guess so don’t shot me for guessing wrong!1 point
-
In develop https://github.com/kprinssu/VoodooPS2/tree/elan-ps21 point
-
http://dosdude1.com/highsierra/
 1 point
 -
Hey, @Balamut Any progress? Are you planning to continue topic?1 point
-
What idiots, You can't do what they are trying to do and think your get away with it. apple will take your behind to the cleaners. i don’t understand why it’s got you miffed though? That is unless your flogging hacks to people as well and then in that case you wanna think twice. Apple don’t mind users making hacks, they turn a blind eye to it and I know this as a fact but start trying to make money off it and it’s a whole new angle and game. p.s that’s the exact kind of thing that will ruin it for everybody. And how dare the company use the OpenCore name. What a total and utter Liberty and pizz take!1 point
-
lets start again of course I know how to get into bios and redirect to what ever setting but the question still stands how to set up dual boot before when I had my mgfw.efi renamed to something else and config.plist misc section didnt exactly knew where that file was oc booted just fine I had no keyboard or mouse usage but windows menu was there in the external choser but didnt go anywhere because I didnt change the file name that misc->entries where I specified bootmgfw.efi- to be boot from but still it keeps on booting into windows that tells me that oc is telling it how to do it because bootmgfw.efi is not named properly for windows to boot by itself but rather through opencore. so I am back to squre one now does every one follow what i am saying0 points
-
Hi again at boot there’s no ac menu or anything but the stupid circle of dots yes I can get into machine using boot stick but that’s not the point and no nothing happens when I press space bar . If I press f2 if I need to get to bios and boot from usb not ssd0 points
-
Not directly on-topic for this thread, but also pertinent to why we're here at all: Dunno if you guys have read this yet. https://www.macrumors.com/2020/06/13/opencore-hackintosh/ Definitely got me a bit miffed.0 points


.thumb.png.a43579d9e280a5c4c80807bf93412ae7.png)