Leaderboard


Popular Content
Showing content with the highest reputation on 05/11/2020 in all areas
-
Basically you're gonna need OpenCanopy.efi and the Resources folder. Min OC version: 0.5.7. PickerMode set to External. More info here. I also tried getting boot chime, but...while it did work, there were some delays booting because of that, so I disabled it for now. I might give it another try at a later time. But for now, I don't really mind it that much. I just wanted to see if I can get it to sound the chime. Which I did. So that was good enough for me.3 points
-
Hi Slice CloverThemeManager has not been maintained in the last year and therefore still uses old Sourceforge repo. I know Vector Sigma has created clover.app with included theme manager but to be honest I have not spent much time with it yet but if it works with the new git repo then yes, it makes sense to retire CloverThemeManager. No point in having two utilities for the same function. Maybe I'll get to look at Clover Theme in the future.3 points
-
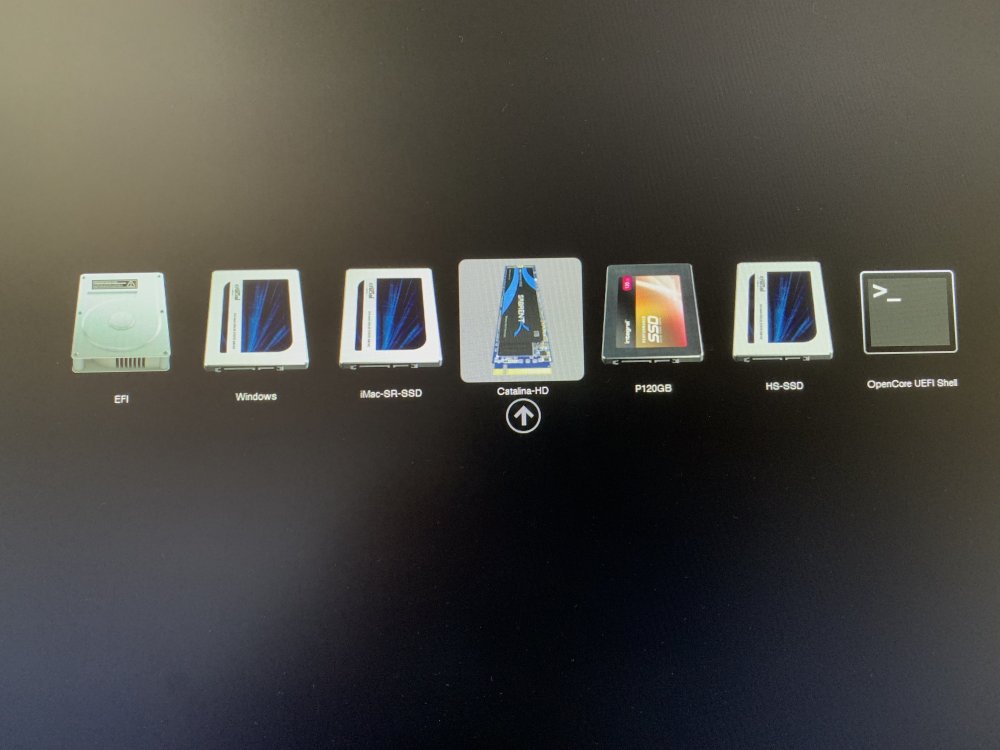
Yes OpenCanopy works well even though it's early days. You can set custom Drive icons in macOS and it shows up in the boot picker: Icons file names should be .VolumeIcon.icns For HFS+ drives, they should be placed in the root of the drive. For APFS drives, they should be placed in the preboot partition. For Windows drives, they should be placed int he EFI partition where the Microsoft boot manager is placed. Until released 0.5.8 I had an issue with boot time playback. It would play 2 to 3 times back-to-back...like a bad mix and would delay the booting. But now with 0.5.8 release version, it plays perfect and no delay in boot. In fact, the apple logo seems appears just slightly before it's finished playing the chime.
 2 points
 -
2 points
-
And bingo was my name. Thanks eSaF! I guess changing the count to 1 did the trick.2 points
-
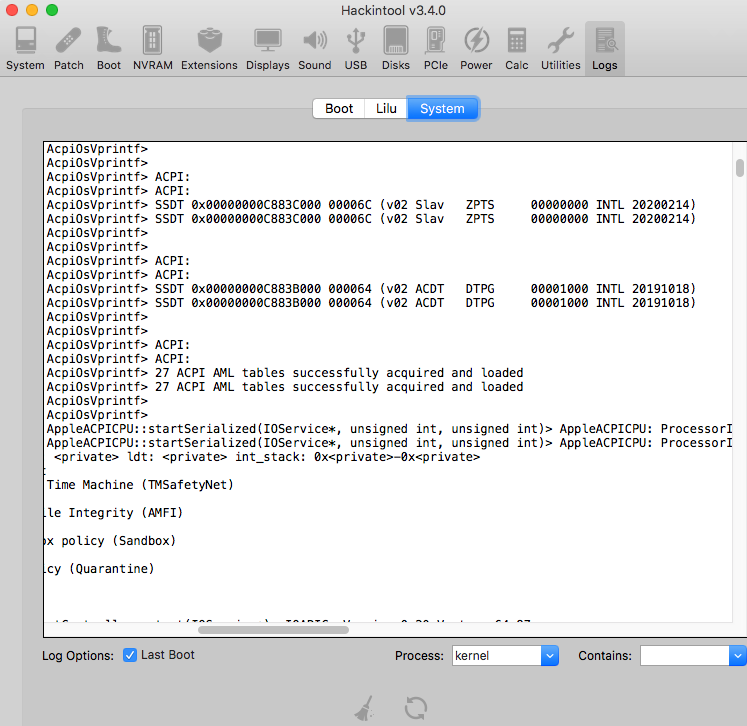
Without rename this SSDT won’t load. Check log with Hackintool>logs>System if it applied correctly. Fix_Shutdown.zip
 2 points
 -
This is how mine works in this example.
 2 points
 -
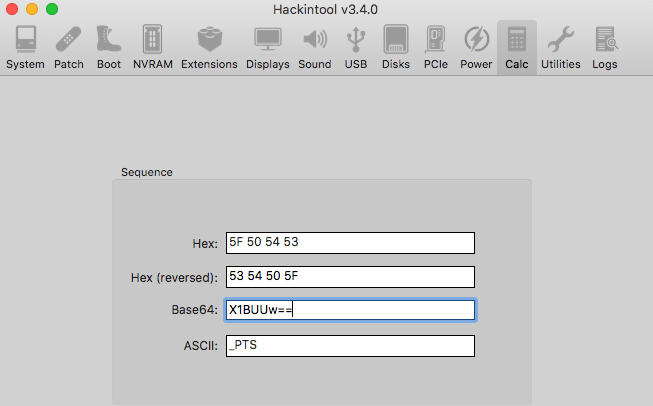
For the FIND field you need to enter HEX: 5F505453 For the REPLACE field you need to enter HEX: 5A505453 What plist editor are you using ? If you use PlistEdit Pro, you can VIEW the field as ASCII and enter _PTS and ZPTS instead of Base64 or Hex2 points
-
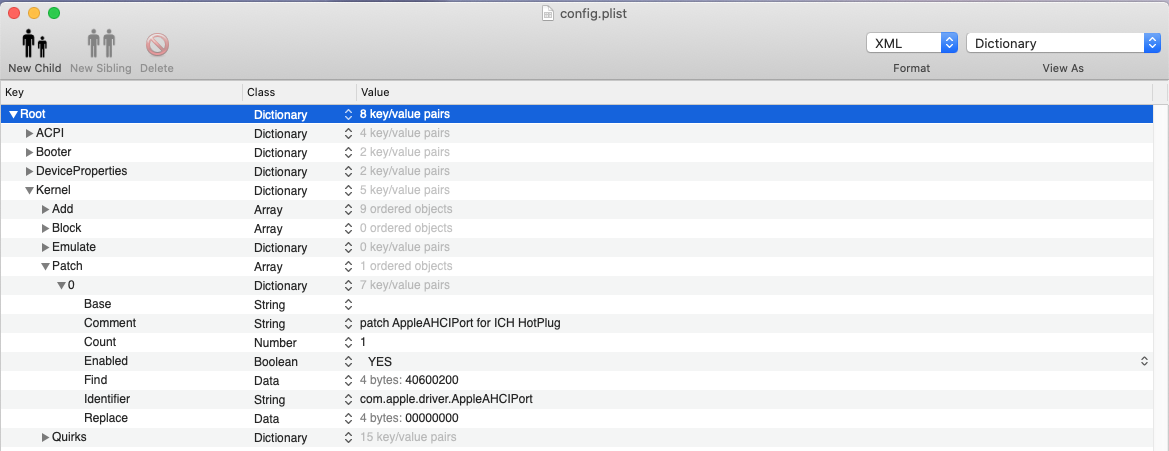
Rev 5116 commit d5305c8cc858254dede21f59dd8964980b1ce56a Exclude KernelCPU patch. This technology introduced at 10.6 system to prevent kernel crash on unsupported CPU. It patched CPUID and erases SSE3 features check. It is wrong. There are many other places with check and many utilities is a system uses SSE3 command. The right way is using FakeCPUID and in the case of old CPU using CPU commands emulator (embedded in special kernel or as separate kext). So I excluded this patch from Clover. Rev 5116 commit 0b7eed38f14400c8501228a30dcc023e1132cec3 Exclude DropOEM_DSM methods. OEM DSDT often has own _DSM methods which is written for Windows and not reliable for macOS. These methods can't be present if we want to write own _DSM methods. Double method causes crash. Old Clover patch DropOEM_DSM assumes user to check what DSM he want to drop. Nobody uses it! The right way is always drop. And mostly the best way is to rename all OEM methods <key>DSDT</key> <dict> <key>Patches</key> <array> <dict> <key>Find</key> <data>X0RTTQ==</data> <key>Comment</key> <string>Rename oem _DSM to ZDSM</string> <key>Replace</key> <data>WkRTTQ==</data> </dict>2 points
-
@Matgen84 thanks for the information. @shhbz is it better to use FixShutdown-USB-SSDT.aml?2 points
-
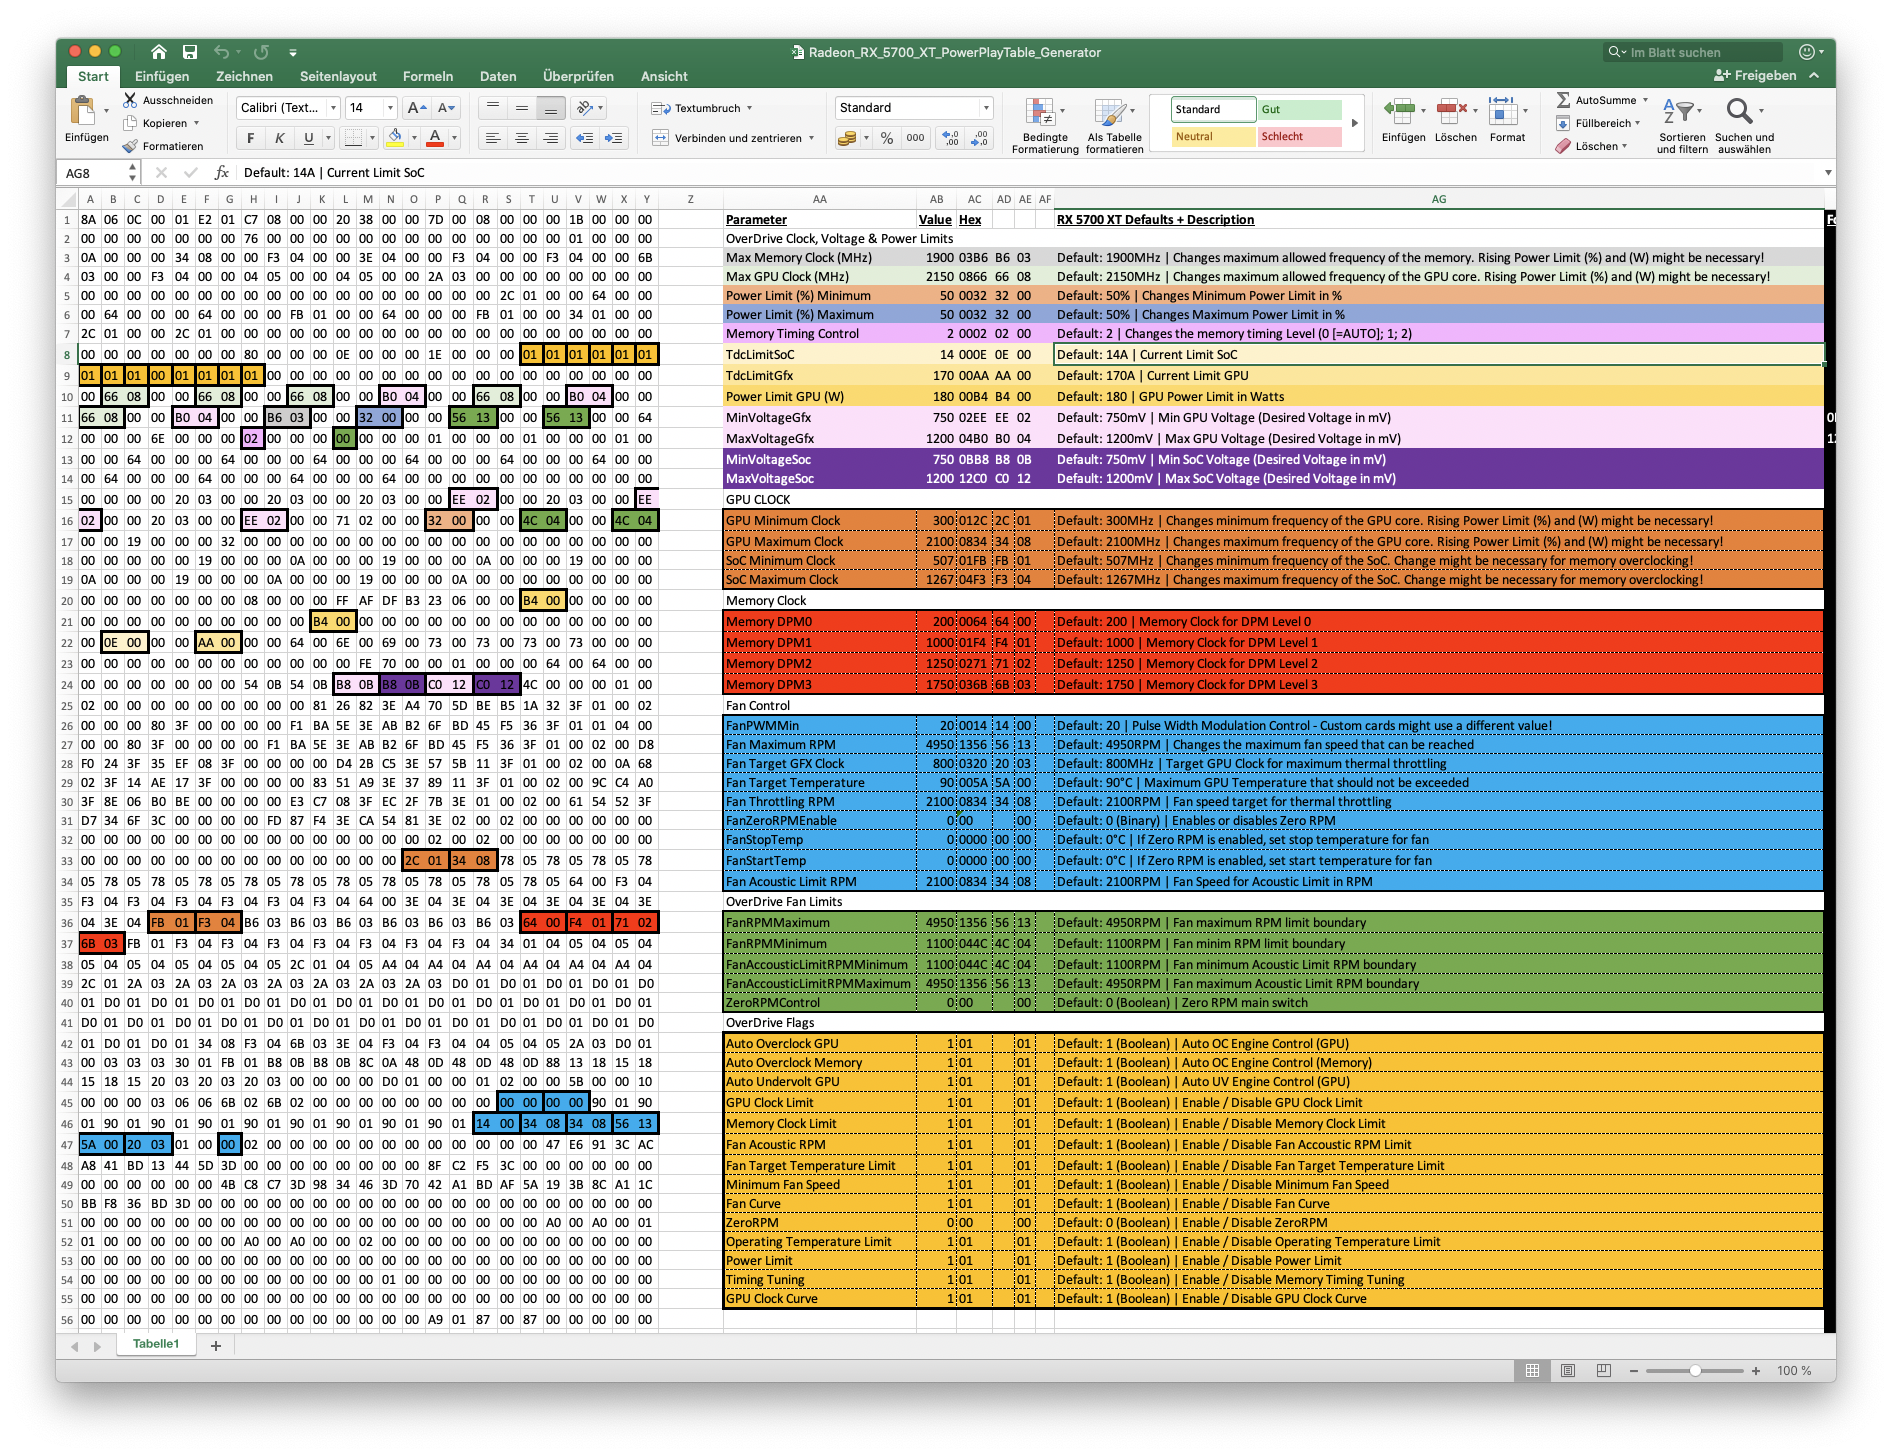
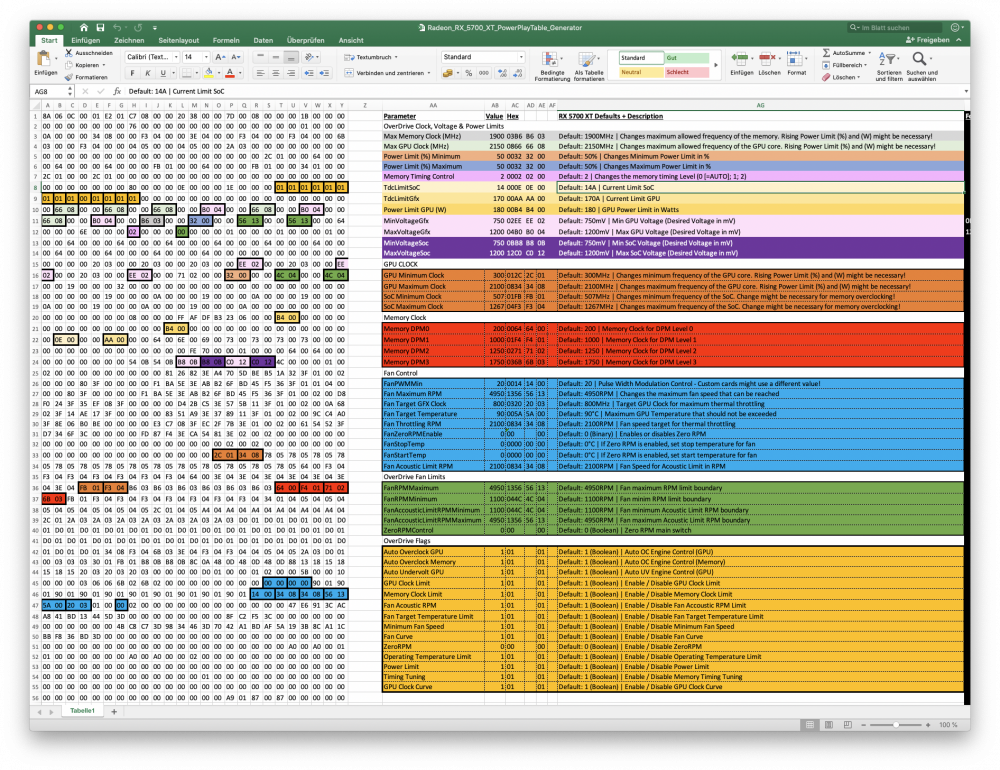
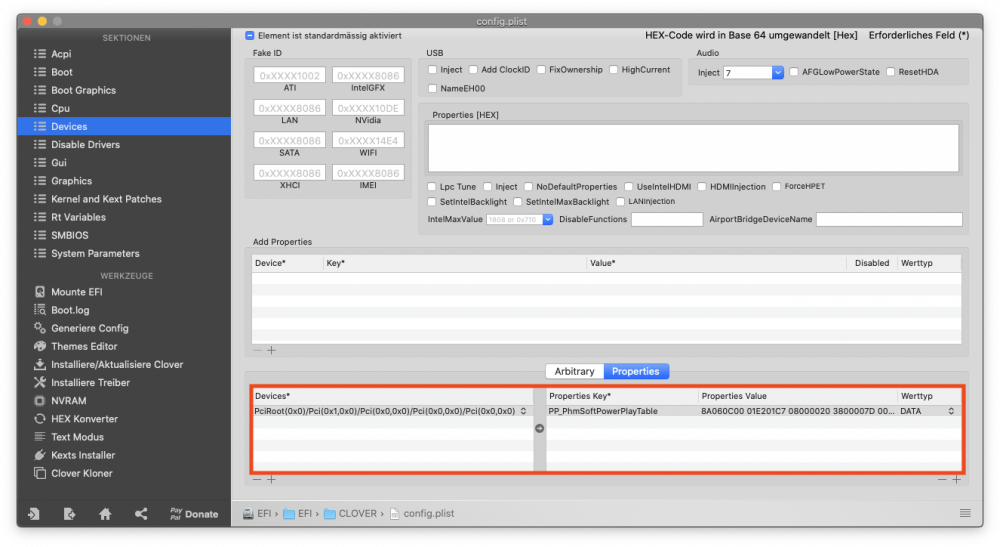
I did it again! With the release of the Navi drivers for macOS by Apple I bought a card and ported my popular PowerPlay Table generators to the RX 5700 and RX 5700 XT. Some might know I already did the same for V56/64 and Radeon VII. This tool allows you to change GPU, SoC and Memory Clocks, voltages for GPU and SoC (for undervolting or overvolting), adjust Power and TDC limits and customizing fan control. The whole thing is based in a simple Excel spreadsheet and provides you with a long Hex string you can then inject to your graphics card via Clover device properties. If you want to use it on a real Mac (eGPU or Mac Pro) you can use a Dummy Kext to inject the PowerPlay Table. Please make sure that you only run this spreadsheet in Excel! iWork, OpenOffice and Libre Office are known to do wrong calculations. Release: AMD Radeon RX 5700 (XT) PowerPlay Table Generator V1.0 (October 27 2019) Changelog 1.0: Initial Release RX 5700 Download: Radeon_RX_5700_PowerPlayTable_Generator.xlsx.zip RX 5700 XT Download: Radeon_RX_5700_XT_PowerPlayTable_Generator.xlsx.zip WARNING: Use this this tool at your own risk! I am not responsible for your mistakes. Wrong / too high values can potentially damage or destroy your card.
 1 point
 -
thank you1 point
-
This is Good! no additional folder created only shots into misc. Thanks1 point
-
I need many screenshots to illustrate Clover possibility. And yes, commit a4ac6daf9 is right.1 point
-
yeh I do the same. I just kept the En audio files. It would be nice if the GitHub repository for the Resources folder were packaged in the folders by language so it was easy to delete unwanted languages. In fact (as my eye sight is ok at the moment) when I updated to 0.5.8, only kept the chime file...which I replaced with my own...for fun OCEFIAudio_VoiceOver_Boot.wav1 point
-
Following your post, I thought I'd give boot chime another try. And yeah, it's ok now. Also, Volume 70 was still waaay too loud for me. :)) So I set it to 20. Much better now. Quick tip: if you want to decrease the size of that Resources folder, you can go through the audio files (seems those take the most amount of space), and remove the ones you don't need. For example I removed all the audio files for languages I know I'll never use. And only kept most of the ones for Europe. The difference was really visible. From 96MB to 55MB. And I could have removed more of it. Actually, if you only want the boot chime, you only need one file: OCEFIAudio_VoiceOver_Boot.wav. But since I'm still testing stuff with OC, I thought I'd keep some of the other files, too. But removed the languages I know I'll never need.1 point
-
I wonder if the Devs of Opencore knows we now have a hybrid of Clover/Opencore - Dual Booting definitely gone a step too far judging from the post above1 point
-
Ho risolto da solo, grazie lo stesso. Per i posteri: da Recovery: lanciare il terminale - inserite il comando “diskutil list" inserite il comando “diskutil verifydisk disk0” restituirà un errore inserite il comando “diskutil repairdisk disk0" quando vi verrà chiesto: “y” ed invio. Fatto. EFI riparata. Ciao.1 point
-
No, I have separate threads for the master and the pro with all the correct firmwares and files on there. (They are also all listed and marked as too whats for what in the notice a few posts back)1 point
-
@arsradu, please keep an eye on docs, bugtracker, and 0.5.9 changelog.1 point
-
@haroldju It's off-topic but your KP is most likely the result of a link error. You should clean system caches as described in post#1 of this thread. Go to /System/Library/Caches and delete all the files inside (including those in it's subdirectories) but leave the subdirectories and symbolic links untouched. After that, reboot and recreate the kernel cache. Mieze1 point
-
Thanks @Rocky12! I read you needed to chnage the smbios for at least the upgrade/install, is that right? Also out of interest which clover version are you using with catalina? Will definitely install on an experemental disk for now! Cheers J1 point
-
Out of curiosity, could you post untouched DSDT from 3006.1 point
-
Try to find users with success on exactly the same motherboard + CPU. before change CPU. But ACPI error from your screen is very similar to my one on BIOS v3003. In this BIOS ASUS used new RTC standard named AWAC instead old RTC. MacOS still remained on RTC. Some motherboards has bios switcher for old/new RTC device. If not(as in my MoBo), you can try SSDT to fix this(credit @hardcorehenry) SSDT-AWAC.aml1 point
-
1 point
-
You have to use both: rename(find & repleace) + FixShutdown-USB-SSDT.aml(also added to ACPI>Add in config.plist)1 point
-
Just a quick update, once i installed the same series graphics card as your original build its been completely stable and dual boots windows and mac.. I've actually set it up in a configuration that it runs mac os server and can house and control 32 x HDD's using an internal ARECA PCI Card with SAS. I've set it as JBOD but it will do raid also. You can access this card from windows or mac. The drives show up as usable volumes in whatever format you choose. Only issue im having is the graphics card isn't stable in windows and i'd rather remove it entirely and use the IGPU (server so don't need acceleration) but it won't boot if i remove the card at all... Also got a StarTech ST10000SPEX 10gbe ethernet PCI card for it but can't get that to work at all, 1gb is ok for now.
 1 point
 -
Check this: https://dortania.github.io/OpenCore-Desktop-Guide/extras/gui.html#setting-up-opencores-gui But mind that it’s work in progress, hotkeys do not work and generally not recommended yet.1 point
-
Or use Hackintool>Utilities>Click Get AppleIntelInfo button at bottom left and look for: MSR_PMG_CST_CONFIG_CONTROL........(0xE2) : 0x7E000008 ------------------------------------------ - I/O MWAIT Redirection Enable......... : 0 (not enabled) - CFG Lock............................. : 0 (MSR not locked)1 point
-
Yeah, I saw the mention when setting up FV2. I thought I didn't need to set anything (so I left that to 0) since it was a different motherboard (similar generation, but still different). But now that you mentioned it, I did try values 3000 and 5000 just in case... No difference. By the way, awesome job guys, with documenting everything in the pdfs and also making those tutorials on Dortania. They are incredibly useful! When upgrading OC, I'm also upgrading Docs. And keeping them in the EFI folder, just to have them always at hand. Anyway. So, on your system, what happens exactly? Do you have the transparent screen all the way to the Desktop (like on the real Macs)...? Or...? Switches off for a second (that black gap I was talking about before), then back to transparent? To be honest, I don't even know what should I expect in this case? :)) Cause I don't know what can and can't be done. Also, I was thinking maybe the resolution could have something to do with it...? Since I've got a 4K monitor, but the resolution in the OS is set to about 2K (since the text is waaaay too small in full 4K to be able to actually read anything). But I tried switching it to 4K, too...and no change. Also, OC's resolution is set to Max. Maybe we need to match that in the OS...? I don't think so, but...I don't know. What do you think? Is there any point digging further into this scenario? Also, something else that crossed my mind (which is probably stupid, but I'm putting it out there, in case there could be something to it), since I'm using an RX 580 with WhateverGreen, could this be something that WEG could help with....? Or maybe something that needs to be updated over there?1 point
-
Now made the move to Mojave, all well. (sleep, speedstep, turbo etc), have also overclocked the CPU to 3.8 GHZ. May now experiment with catalina. I know i will have to change the SMBIOS away form the old faithfull macpro5,1 i guess i'll need to be careful to not break the cpu power management.
 1 point
 -
I've bundled Cardpeek 0.8.5 with a modern version of GTK3. I also improved the CCID driver for OS X. I also made an NFC reader driver for OS X. I improved the Belgian EID apps and drivers. Sources for the Belgian EID stuff: https://github.com/vampirecat35/eid-mw Other download for the Belgian EID binaries: https://github.com/vampirecat35/eid-mw-osx Binaries are attached and ready. Enjoy cardpeek.zip eid-mw-osx.zip1 point
-
I think you are right, i have simplified SSDT-PLUG.dsl sample, removed all the if statements and references irrelevant to my cpu (PR.CPU0). It’s working as intended and it looks like this: DefinitionBlock ("", "SSDT", 2, "ACDT", "CpuPlug", 0x00003000) { External (_PR_.CPU0, ProcessorObj) Scope (\_PR.CPU0) { Method (_DSM, 4, NotSerialized) // _DSM: Device-Specific Method { If ((Arg2 == Zero)) { Return (Buffer (One) { 0x03 // . }) } Return (Package (0x02) { "plugin-type", One }) } } }1 point
-
Version 2.1.0
36,912 downloads
macOS Unlocker for VMware V2.1 ============================== +-----------------------------------------------------------------------------+ | IMPORTANT: | | ========== | | | | Always uninstall the previous version of the Unlocker before using a new | | version. Failure to do this could render VMware unusable especially ESXi. | | | +-----------------------------------------------------------------------------+ 1. Introduction --------------- Unlocker 2.1 is designed for Workstation 11/12/14, Player 7/12/14, ESXi 6.5 and Fusion 7/8/10. If you are using an earlier product please continue using Unlocker 1 and use Unlcoker 2.0 for ESXi 6.0 Version 2 has been tested against: * Workstation 11/12/14 on Windows and Linux * Workstation Player 7/12/14 on Windows and Linux * Fusion 7/8/10 on Sierra * ESXi 6.5U1 The patch code carries out the following modifications dependent on the product being patched: * Fix vmware-vmx and derivatives to allow macOS to boot * Fix vmwarebase .dll or .so to allow Apple to be selected during VM creation * Fix libvmkctl.so on ESXi 6 to allow use with vCenter * Download a copy of the latest VMware Tools for macOS Note that not all products recognise the darwin.iso via install tools menu item. You will have to manually mount the darwin.iso for example on Workstation 11 and Player 7. The vmwarebase code does not need to be patched on macOS or ESXi so you will see a message on those systems telling you that it will not be patched. In all cases make sure VMware is not running, and any background guests have been shutdown. The code is written in Python as it makes the Unlocker easier to run and maintain on ESXi. 2. Prerequisites ---------------- The code requires Python 2.7 to work. Most Linux distros, ESXi and macOS ship with a compatible Python interpreter and should work without requiring any additional software. Windows Unlocker has a packaged version of the Python script using PyInstaller, and so does not require Python to be installed. 3. Limitations -------------- If you are using VMware Player or Workstation on Windows you may get a core dump. Latest Linux and ESXi products are OK and do not show this problem. +-----------------------------------------------------------------------------+ | IMPORTANT: | | ========== | | | | If you create a new VM using version 11, 12 or 13 hardware VMware may stop | | and create a core dump. There are two options to work around this issue: | | | | 1. Change the VM to be HW 10 - this does not affect performance. | | 2. Edit the VMX file and add: | | smc.version = "0" | | | +-----------------------------------------------------------------------------+ 4. Windows ---------- On Windows you will need to either run cmd.exe as Administrator or using Explorer right click on the command file and select "Run as administrator". win-install.cmd - patches VMware win-uninstall.cmd - restores VMware win-update-tools.cmd - retrieves latest macOS guest tools 5. Linux --------- On Linux you will need to be either root or use sudo to run the scripts. You may need to ensure the Linux scripts have execute permissions by running chmod +x against the 2 files. lnx-install.sh - patches VMware lnx-uninstall.sh - restores VMware lnx-update-tools.cmd - retrieves latest macOS guest tools 6. macOS -------- On macOS you will need to be either root or use sudo to run the scripts. This is really only needed if you want to use client versions of macOS. You may need to ensure the macOS scripts have execute permissions by running chmod +x against the 2 files. osx-install.sh - patches VMware osx-uninstall.sh - restores VMware 7. ESXi ------- You will need to transfer the zip file to the ESXi host either using vSphere client or SCP. Once uploaded you will need to either use the ESXi support console or use SSH to run the commands. Use the unzip command to extract the files. <<< WARNING: use a datastore volume to store and run the scripts >>> Please note that you will need to reboot the host for the patches to become active. The patcher is embbedded in a shell script local.sh which is run at boot from /etc/rc.local.d. You may need to ensure the ESXi scripts have execute permissions by running chmod +x against the 2 files. esxi-install.sh - patches VMware esxi-uninstall.sh - restores VMware There is a boot option for ESXi that disables the unlocker if there is a problem. At the ESXi boot screen press shift + o to get the boot options and add nounlocker. Note: 1. Any changes you have made to local.sh will be lost. If you have made changes to that file, you will need to merge them into the supplied local.sh file. 2. The unlocker needs to be re-run after an upgrade or patch is installed on the ESXi host. 3. The macOS VMwwre tools are no longer shipped in the image from ESXi 6.5. They have to be downloaded and installed manually onto the ESXi host. For additional details see this web page: https://blogs.vmware.com/vsphere/2016/10/introducing-vmware-tools-10-1-10-0-12.html 8. Thanks --------- Thanks to Zenith432 for originally building the C++ unlocker and Mac Son of Knife (MSoK) for all the testing and support. Thanks also to Sam B for finding the solution for ESXi 6 and helping me with debugging expertise. Sam also wrote the code for patching ESXi ELF files and modified the unlocker code to run on Python 3 in the ESXi 6.5 environment. History ------- 10/10/17 2.1.0 - New version to support ESXi 6.5, Workstation/Player 14 and Fusion 10 - Removed support for ESXi 6.0 - Added ESXi boot option to disable unlocker (nounlocker) © 2011-2017 Dave Parsons1 point -
--------------> Piccola nota per Post Installazione Quando avete installato,in caso di necessità di aiuto per post installazione, aprite un topic nella sezione corretta Ricordatevi, se non l'avete già fatto, di mettere in firma il vostro hardware in modo dettagliato, per farlo andate sul vostro profilo, voce signature. Scaricate Hack_Info (1).zip Doppio click sopra...attendete che abbia terminato. Allegate sul vostro topic lo zip che avrà creato su vostro desktop --> HackInfo_Report Scaricate IORegistryExplorer.zip aprite l'app su file, save as, salvate comprimete e postate l'output Scaricate DPCIManager.zip fate la foto alla parte Status e PCI list,postale entrambe Tutto questo fornisce informazioni utili a chi vorrà aiutarvi a risolvere i vostri problemi -------------------------------------------------------------------------------------------------------------------------------------------------1 point
-
@Slice thanks, build is fine now, misc.png folder still present into Clover after screenshot --> there is another 2 curious behaviors with buildme (hope @vector sigma can take a look) 1_ ) if menu 5 (build app with clover) is selected the script exit. (meaning no sym folder has been found) this ONLY happen when first cloning and building clover from git 2_ ) if using menu 4 (build app) this error does not occurs, BUT it will act as menu 5 (build app and clover) no big deal, just to inform you.
 0 points
 -
Same here in both case compile error then multiple misc creation when selecting F10 multiple shot0 points
-
@Pene Hi can I ask you please to make a little test with F10? I just noticed a curious behaviour when taking a screenshot, it ofc place the screenshot into misc folder, but also strangely create an empty folder called misc.png... (running v5116, not the latest commit) in case you already noticed and modified this, well nevermind... i will build and test with latest commit also EDIT: tried to build Clover r5116 (SHA: 9fae59d10) and got this (XCODE8) /Users/labyone/src/Clover/rEFIt_UEFI/Platform/AcpiPatcher.cpp:2053:3: error: use of undeclared identifier 'dropDSM' dropDSM = 0xFFFF; //by default we drop all OEM _DSM. They have no sense for us. ^ [CC] NvmExpress [CC] PcatIsaAcpi 1 error generated. make: *** [/Users/labyone/src/Clover/Build/Clover/RELEASE_XCODE8/X64/rEFIt_UEFI/refit/OUTPUT/Platform/AcpiPatcher.obj] Error 1 build.py... : error 7000: Failed to execute command make tbuild [/Users/labyone/src/Clover/Build/Clover/RELEASE_XCODE8/X64/rEFIt_UEFI/refit] build.py... : error F002: Failed to build module /Users/labyone/src/Clover/rEFIt_UEFI/refit.inf [X64, XCODE8, RELEASE] - Failed - Build end time: 13:35:58, May.11 2020 Build total time: 00:00:08 logout Saving session... ...copying shared history... ...saving history...truncating history files... ...completed. [Process completed]0 points
-
hi did you consider putting -v in your boot to see what exactly succeed and what did and for how much0 points
-
We wish that @n.d.k. is just busy by real life things and wishing him good health0 points