Leaderboard


Popular Content
Showing content with the highest reputation on 02/28/2020 in all areas
-
Take it easy, guys. Let's focus on the good work that is being done here. If all collaborators claimed copyright, the hackintosh would not exist. ALL inside bootloaders, patches, etc is a hard work from many many people for long years. Just Enjoy!7 points
-
I did a Clear NVRAM from OC's BootPicker too, though. Will do. By the way I noticed that something flashes for a fraction of a second before the OC's picker appears. Took a video and made out a screenshot out of it. The message reads: No schema for UsePicker at 9 index! So what I did was build OC from the master branch and updated BOOTx64.efi and OpenCore.efi and it worked. I guess the OC version I had was a tid older, did not support UsePicker yet. Thanks for your time and effort @texem, @Matgen84, @btwise, @Pavo
 3 points
 -
I just did a test on NDKbootpicker. R14, it seems working Ok. Maybe, you missed something..2 points
-
It's fixed, now..thanks for discover this bug...not everyone have a hidden entry in index 0...2 points
-
In the case of the original OC with scanpolicy=0, the Bootcamp Windows entry is always in the first entry, even if the custom entry is set, it is always in the first entry, so there is no way to determine if it is the same problem as the fork version! So I only see this problem in the FORK version!2 points
-
@cele_82 his is my Clover folder for my Dell Optiplex 780 MT / CPU Q9400 / GT710 2GB for Metal Mojave / Catalina. Serials are deleted and must be created again. CLOVER.zip2 points
-
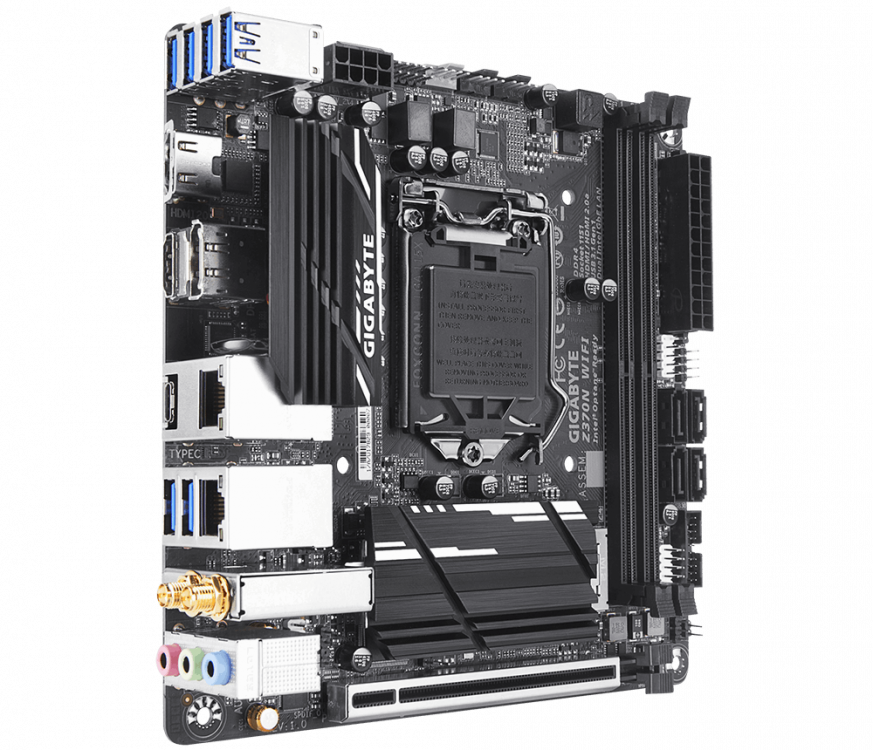
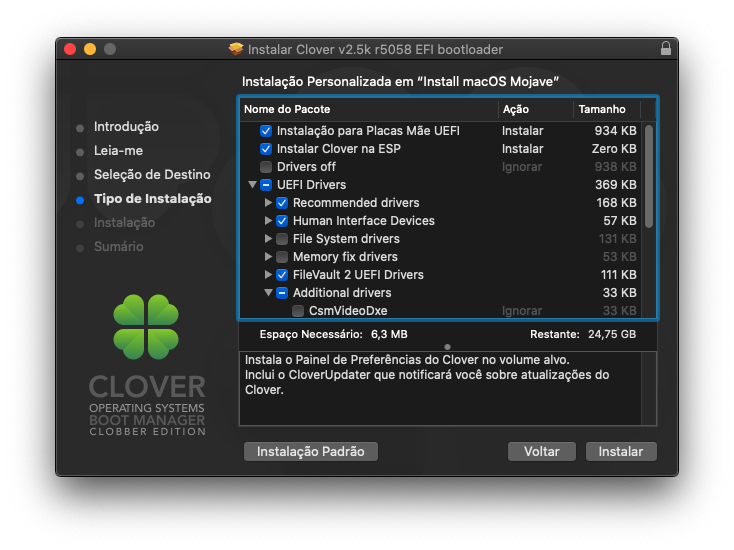
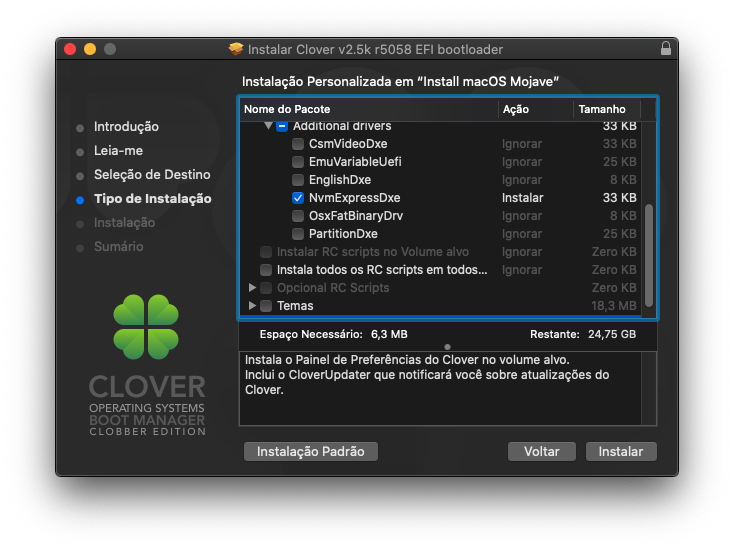
New guide available for macOS Catalina 10.15! Installing macOS Mojave 10.14.6 on Gigabyte Z370N WIFI + i7 8700K + UHD 630 Changelog: 09/01/2019 15:57h GMT-0 - Updated to 10.14.6. 06/10/2019 00:44h GMT-0 - Completely rewritten. 10/17/2018 08:12h GMT-0 - Fix Kexts permissions commands adjusted. - Removed FrameBuffer patch that is not needed. - Added audio solution and HDMI. - Unfortunately DisplayPort does not work. - Replaced Wifi/BT with DW1560 (BCM94352Z) 10/11/2018 04:15h GMT-0 - Added USB 3.0 patch. - Adjusted some steps. - Changed text formatting. 10/11/2018 03:42h GMT-0 - Added missing UEFI configuration. 10/07/2018 00:36h GMT-0 - First version. What works and what does not - Processor: Intel Core i7-8700K -> Work. All SpeedStep stages.- Video Card: Intel UHD 630 -> Work. QE/CI and Metal.- Chipset: Intel Z370 -> Work.- HDMI 2.0 (1st) -> Work. - HDMI (2nd) -> Work. - DP -> Not tested yet. - Audio: ALC1220 -> Work. - HDMI Audio -> Work.- WiFi/Bluetooth -> Not work. Replaced with BCM94360CS2. - Ethernet (1st) -> Work.- Ethernet (2nd) -> Work.- USB3.0 -> Work.- Sleep -> Work. - Airdrop, Handoff, Instant Hotspot and Continuity -> Work after replaced wireless. Todo - Make audio work. - Make HDMI audio work. - Test DisplayPort. - Make second ethernet work. - Replace Wifi/Bluetooth. - Test DP. What you need to install- Running install of macOS- One USB flash drive of 8GB or bigger- macOS Mojave install app - Clover Configurator- Clover EFI - Clover Configurator - Some KEXTs and SSDT patchesHow create create the install flash drive Prepare install flash drive Format the flash drive with GUID partition mapping and name it "Install".- Open Disk Utility.- Click in View, then "Show All Devices".- Select the destination flash drive, then Erase.- Name: Install, Format: Mac OS Extended (Journaled) and Scheme: GUID Partition Map Create install flash driveOpen terminal and run this command: sudo /Applications/Install\ macOS\ Mojave.app/Contents/Resources/createinstallmedia --volume /Volumes/Install --nointeraction This will take about 30 minutes. / 8 minutes with USB 3.0 Install bootloaderDownload the CloverEFI (used 5058, from Automated Clover Builds) and install with this options on "Install macOS Mojave": - Install for UEFI booting only- Install Clover in the ESP- UEFI Drivers - Recommended drivers (check all)- UEFI Drivers - Human Interface Devices (check all) - UEFI Drivers - FileVault 2 UEFI Drivers (check all, If you are going to use FileVault) - UEFI Drivers - Additional drivers - NvmExpressDxe (if you are going to use NVMe) Make things works We'll make a full working flash drive, so follow these instructions: Will be mounted the EFI partition of the flash drive. Open the the /Volumes/EFI/CLOVER/config.plist inside this new partition with Clover Configurator (used 5.5.0.0) Important modifications config.plist ACPI Page - Check: SSDT - PluginType BOOT Page - Add: Arguments - darkwake=2 - Check: Legacy - XMPDetection=Yes KERNEL AND KEXT PATCHES Page - Check: KernelPm RT VARIABLES Page - Change: CsrActiveConfig - 0x3E7 SMBIOS Page - Change: Macmini8,1 - Mac mini (Late 2018) | Intel Core i7-8700B @ 3.20 GHz - Click: Generate New (few times in the two buttons) Need some Kexts in the folder /EFI/CLOVER/kexts/Other/ - Download the HWSensors 3 from here. I used the FakeSMC.kext, ACPIMonitor.kext, ITEIT87x.kext and IntelCPUMonitor.kext inside of DMG version r240. - Download the Lilu.kext from here. I used the version 1.3.8. Intel UHD 630 ACPI Page - Uncheck: Fixes - AddHDMI - Uncheck: Fixes - FixDisplay - Uncheck: Fixes - FixHDA GUI Page - Change: Screen Resolution - 3840x2160 (My monitor is 4K) Need a Kext in the folder /EFI/CLOVER/kexts/Other/ - Download the WhateverGreen.kext from here. I used the version 1.3.1. Audio ALC 1220 and HDMI audio BOOT Page - Add: Arguments - alcid=11 DEVICES Page - Change: Audio - Inject - 11 - Uncheck: Audio - AFGLowPowerState - Uncheck: Audio - ResetHDA Need a Kext in the folder /EFI/CLOVER/kexts/Other/ - Download the AppleALC.kext from here. I used the version 1.4.0. All USBs (2.0, 3.0, Type-C, internal) KERNEL AND KEXT PATCHES Page - KextsToPatch - Name*: com.apple.iokit.IOUSBHostFamily - Find* [HEX]: 83FB0F0F - Replace* [HEX]: 83FB3F0F - Comment: USB Port Limit Patch 1 PMHeart/DalianSky - MatchOS: 10.14.x - Name*: com.apple.iokit.IOUSBHostFamily - Find* [HEX]: 83FB0F0F - Replace* [HEX]: 83FB3F0F - Comment: USB Port Limit Patch 2 PMHeart/DalianSky - MatchOS: 10.14.x - Name*: com.apple.driver.usb.AppleUSBXHCI - Find* [HEX]: 83FB0F0F - Replace* [HEX]: 83FB3F0F - Comment: USB Port Limit Patch 3 PMHeart/DalianSky - MatchOS: 10.14.x - Name*: com.apple.driver.usb.AppleUSBXHCI - Find* [HEX]: 83FF0F0F - Replace* [HEX]: 83FF3F0F - Comment: USB Port Limit Patch 4 PMHeart/DalianSky - MatchOS: 10.14.x Need a Kext in the folder /EFI/CLOVER/kexts/Other/ - Download the USBInjectAll.kext from here. I used the version 2018-1108. Need SSDT patch in the folder /EFI/CLOVER/ACPI/patched/ - Download the SSDT-EC.aml, SSDT-UIAC.aml and SSDT-USBX attached bellow. Wifi and Bluetooth (BCM94360CS) Works out of box (plug 'n' play). LAN Cards Need a Kext for feach card in the folder /EFI/CLOVER/kexts/Other/ - Download the IntelMausiEthrenet.kext from here. I used the version 2018-1031. - Download the SmallTreeIntel82576.kext attached bellow. I do not remember where I found it. Now you can start the instalation without problem (I guess). How install UEFI Setup Configuration and InstallationUEFI configuration - Shutdown and insert the flash.- Power on with DEL pressed to enter BIOS setup.- Change value: Periphelrals - Initial Display to IGP- Change value: Periphelrals - USB Configuration - XHCI Hand-off to ENABLE- Change value: Chipset - VT-d to DISABLE- Change value: Chipset - Internal Graphics to ENABLE- Change value: Chipset - DVMT Pre-Allocated to 128M - Save & Exit Setup - Now, hold the F12 - In the list, select your flash drive. - It will show twice. One with UEFI prefix and another without. - Select with UEFI prefix. Ie.: "UEFI: Sandisk Cruzer" The installer will start. Format destination diskFormat the disk with GUID partition mapping and name it "HD".- Select Disk Utility in the list, then press Continue.- Click in View, then "Show All Devices".- Select the destination Disk, then Erase.- Name: HD, Format: APFS and Scheme: GUID Partition MapClose Disk Utility.Select "Install macOS", then Continue.Follow instructions in screen.After installAfter first part install the system will reboot.The second part of the installation will begin. This will take 16 minutes. Post installationInstall bootloader When the second part of install finish, the system will reboot again.After performing the user initial setup and go to the desktop, you need to install Clover on internal disk.Open the Clover installer inside flash drive that you copied before.Use same options above but choose the system partition this time.Now you need to replace the EFI folder inside your destination disk EFI parittion, with EFI folder inside flash card EFI partition.If the flash drive EFI partition of your destination disk or flash drive is unmounted: Mount with terminal "sudo diskutil mount /dev/rdiskXs1". To know what X is, use "diskutil list", most likely is 0 for destination disk and 1 for flash drive. Then, eject the flash drive. Last step Move all Kexts from EFI partition to /Library/Extensions, with those commands in Terminal: sudo cp -R /Volumes/EFI/EFI/CLOVER/kexts/10.14/* /Library/Extensions/ sudo chmod -R 755 /Library/Extensions sudo chown -R root:wheel /Library/Extensions sudo kextcache -i / Restart the system. It's done! Updates System update 10.14.6 - Download and open latest CloverConfigurator - Open Mount EFI and click in Mount Partition in EFI Partitions list - Click in Open Partition that appears - Go to EFI -> CLOVER - Backup config.plist and ACPI folder to desktop - Go back and delete CLOVER folder (If you restart now you can't boot in macOS - DON'T RESTART) - Download latest Clover and install (link and config above) - Replace config.plist and ACPI folder from your desktop - Update Lilu.kext, AppleALC.kext, WhateverGreen.kext, HWSensors kexts (FakeSMC, ACPIMonitor, IntelCPUMonitor, ITEIT87x) in /Library/Extensions/ - Run: sudo chmod -R 755 /Library/Extensions sudo chown -R root:wheel /Library/Extensions sudo kextcache -i / - Install macOS Update 10.14.6 and restart And last but not least I would like to thank the following community members, by making these dream possible:@crushers, @snatch, @apianti, @blackosx, @blusseau, @dmazar, @slice2009, @autumnrain, @phpdev32, @EMlyDinEsH, @RehabMan, @Scellow, @mitch_de, @Shailua, @Andy Vandijck, @maxfierke, @ArturXXX, @LexHimself, @brumas and all others members involved directly or indirectly. Z370N-WIFI v2.zip


 1 point
 -
I've created a branch called c++_noglobals to show that a C++ compiler is a C compiler with object added. Contrary of what a lot of people think, the object mechanism does NOT need a runtime or library. Because calls to method internally become calls to function with an added parameter : "this" (this is a pointer to a struct containing all members variables). C++ was first implemented with the C preprocessor. Now C++ added 2 things that can't be compiled as normal code : rtti and exceptions. Well, I just deactivated them, problem solved. Please have a look at what I committed : there is no trick, no library, the compilation process is untouched, the link command is untouched. It compiles with XCODE5 and GCC53. The only catch is that the global variables of object type are not initialised. Var of simple type are initialised like in C. I'll explain in an other post and commit a version that will initialise globals variables of an object type. @Slice and Clover developer : switching to a C++ compiler and start introducing few simple objects (string, buffer, array, date) is just a PLUS. It'll make the code more reliable and easy to read. The only problem C++ compiler can cause is for some developer to want to use very advanced C++ features that makes the code unreadable at the end. You've already understood that we must not do that! But using a string as we use an int without worrying about allocation, reallocation and destruction is just very nice. PS : the names "cpp_utils, XStringW" can change, I just forgot to rename them.1 point
-
@MacPeetit looks like you are trying to push directly to the acid anthera repo from your local account. for that to work whoever is in charge of applealc would have to add you as a dev on the repo. for a push request you would have to fork the repo under your own github account repo fork then send the request1 point
-
Removing battery does not reset nvram, it only reset CMOS.1 point
-
yes test it now with latest OC upstream working good (i was testing with older build) thanks1 point
-
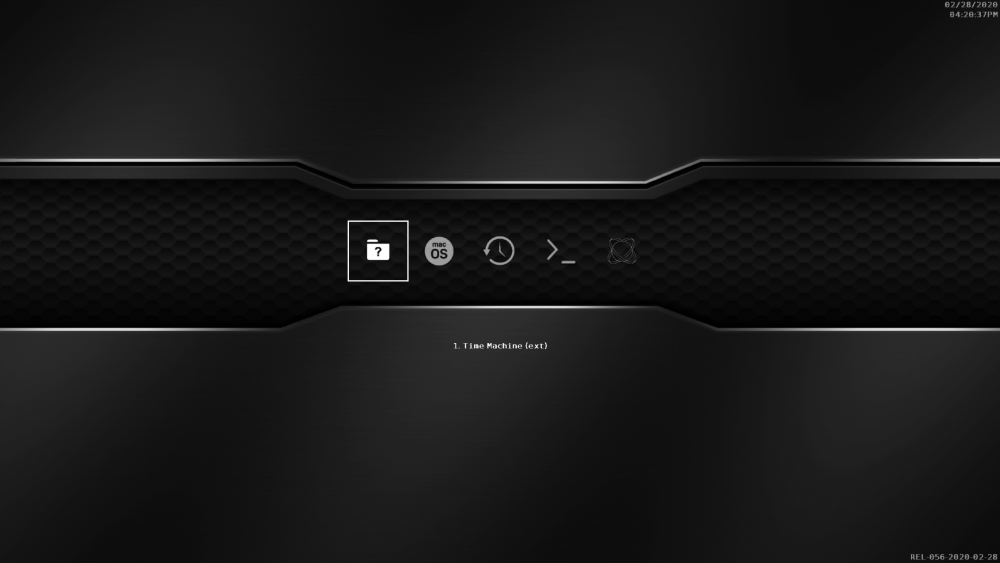
anyone noticed a new looking text coming up before the normal verbose bootup ? trying to capture it somehow otherwise all looking good here i7-9700 w rx5500 (navi 14) on B3651 point
-
Yes, of course. Why did I forgot that ???1 point
-
I was facing similar issues as well. Let me know if you'd like an alternative approach. Sent from my SM-N975U1 using Tapatalk1 point
-
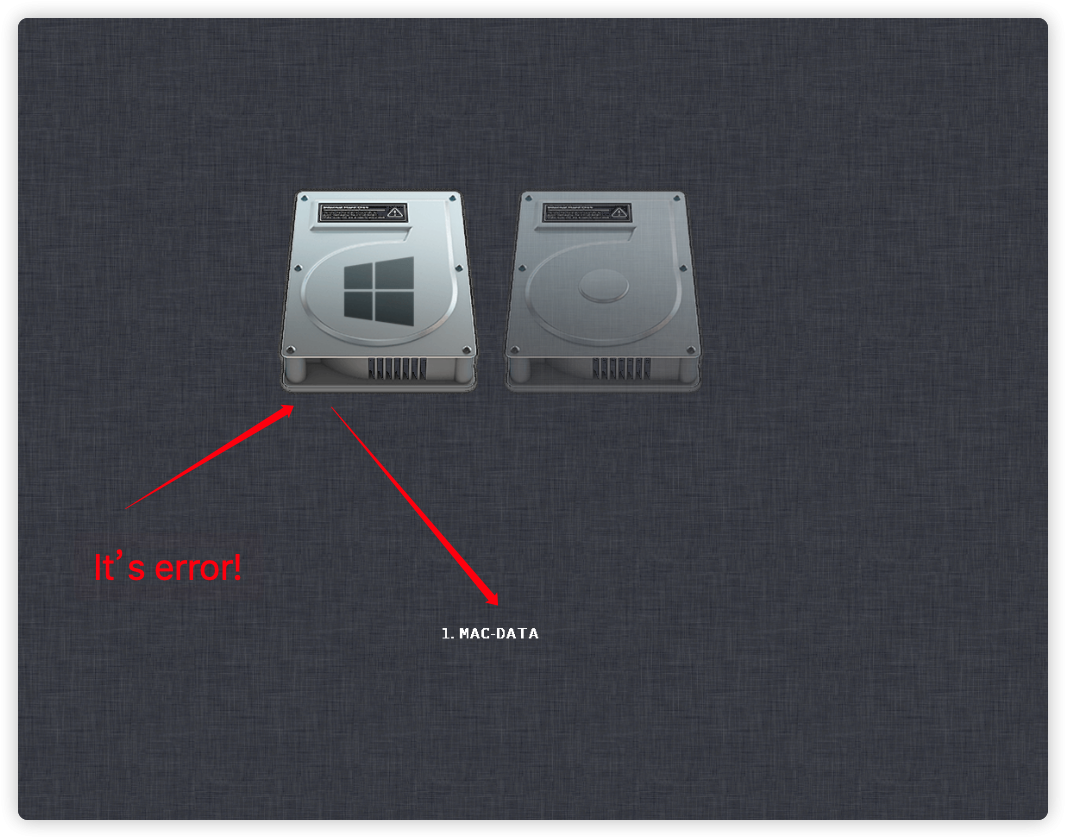
@n.d.k In the GUI interface, if you press the right cursor key continuously, the hidden item content will be displayed, not corresponding to the icon, but if you press the left cursor key, this problem will not occur! "Mac-data" is a hidden entry that is in the first entry if you press the space bar!
 1 point
 -
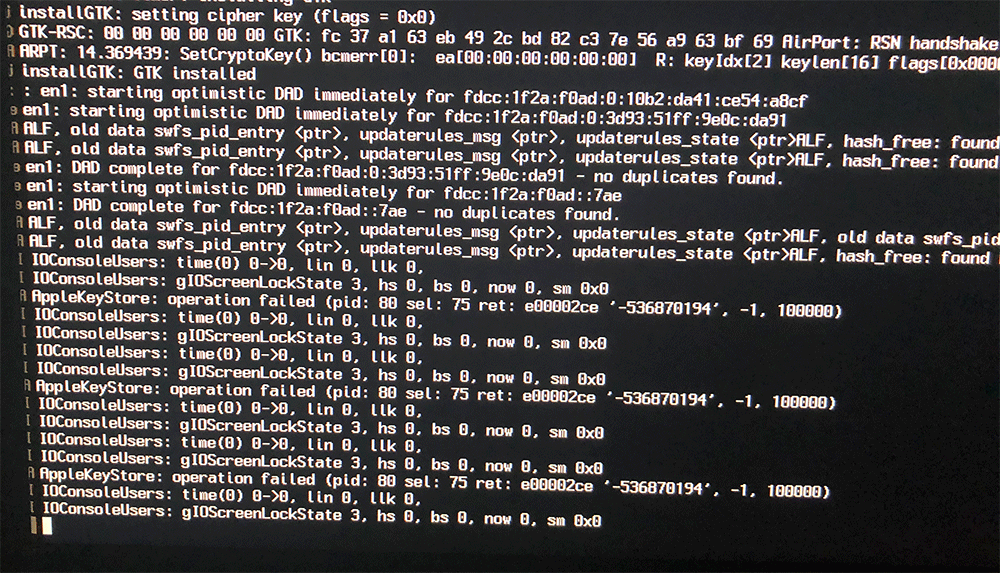
Hi! Thanx for great topic! My build is ASUS X99 Deluxe + Intel 5960x + GT 740. I used attached EFI from the first post. Everything seems to boot properly, but in the end I stuck on gIOScreenLockState 3... I know this is GPU related, but can anyone tell me please where to dig? Thanks! p.s. CSM disabled in BIOS.
 1 point
 -
https://github.com/Pavo-IM/ocbuilder/releases latest build works fine.z390-EFI.zip1 point
-
Solved with this commit https://github.com/acidanthera/OcSupportPkg/commit/479a3dd65986230686c329a768ae078498fd2744 Thanks1 point
-
some updates: in preparation of the new driver release i have updated the first post of this thread with some more precise and updated info. In the mean while i am working to finish my new driver by just checking everything i did, so i can devliver the driver to you without it being broken, and i am also writing some info about new additions like the new reworked boot args or new supported smapling rates and multiple bit depths. I think you will appreciate this new release.1 point
-
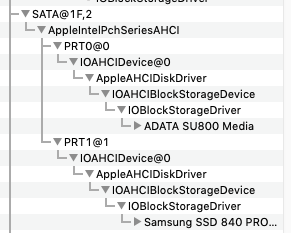
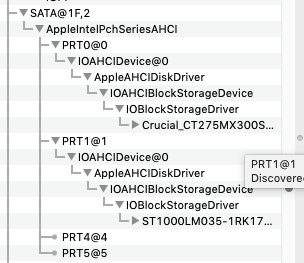
@unilock After I posted my comment below, I realized that the additional SATA ports may be a port expander / docking station or that you have enabled eSATA ports in BIOS. Are you performing your testing with your laptop in a docking station or with eSATA enabled? If so, this would be a big difference between your configuration and mine. I never examined the DSDT (let alone tested) with a docking station or with eSATA enabled. If that's the case, try testing "undocked" and/or with eSATA disabled in BIOS to see if that affects operation of your aux bay drive. ------------------------------------------------------------------------- @unilock I finished reviewing your posted files to see if there's anything I can learn from your previously posted configurations. I'm not sure if those configurations accurately represent your current state, but if they do, this might offer a clue about your SATA problem. There's one IORegistry difference that leads me to believe we have different BIOS settings, so I'd encourage you to review the BIOS settings I listed in Post #1 and compare to yours. If you look at the two IORegistry screenshots attached to this post, the screenshot of my IOReg lists only two SATA PRT "ports": PRT0 (my primary SSD) and PRT1 (my aux bay SSD). Your IOReg lists two additional SATA "ports" that I don't have listed on my laptop: PRT4 and PRT5. It's possible that if you can determine the difference between your SATA configuration and mine, this might provide a clue for you.
 1 point
 -
Nonsense, pure nonsense. NDK has only made changes for himself and to help people who want to use a dsdt etc etc and not be affected by it when using other OS plus other small changes that he wanted in Oc but weren’t there. He then changed the boot picker to make it less like the original OC and keep the devs happy and now he’s moved into a graphical interface and it’s a work in progress and again it keeps it different from the original and very good OpenCore so to say he’s running ahead of the locomotive is just simply wrong really. It’s great we have a choice now instead of clover only and I have nothing but love for everybody’s work but it really baffles me to why there has to be a intel/AMD style battle with tons of trolling. Can’t everybody just be happy for all the hard and very awesome work going on by everybody out there? All I have is ultimate respect for all you so please don’t be offended by my words and just try to see the good hard work going on by everybody instead.1 point
-
Russian saying: it isn't necessary to run ahead of the locomotive. I am not sure that you understand this saying, but ndk runs ahead of the locomotive.1 point
-
CLOVER DRIVER UPDATE 26/02/20 OcQuirks Revision 16 & FwRunTimeServices Latest Versions. OcQuirks R16.zip1 point
-
Add VoodooTSCSync.kext Add npci=0x20001 point
-
Rev 5104 Clover switched to C++ programming language. Thanks to Jief_Machak. C++ proposition Programming tips will follow.1 point
-
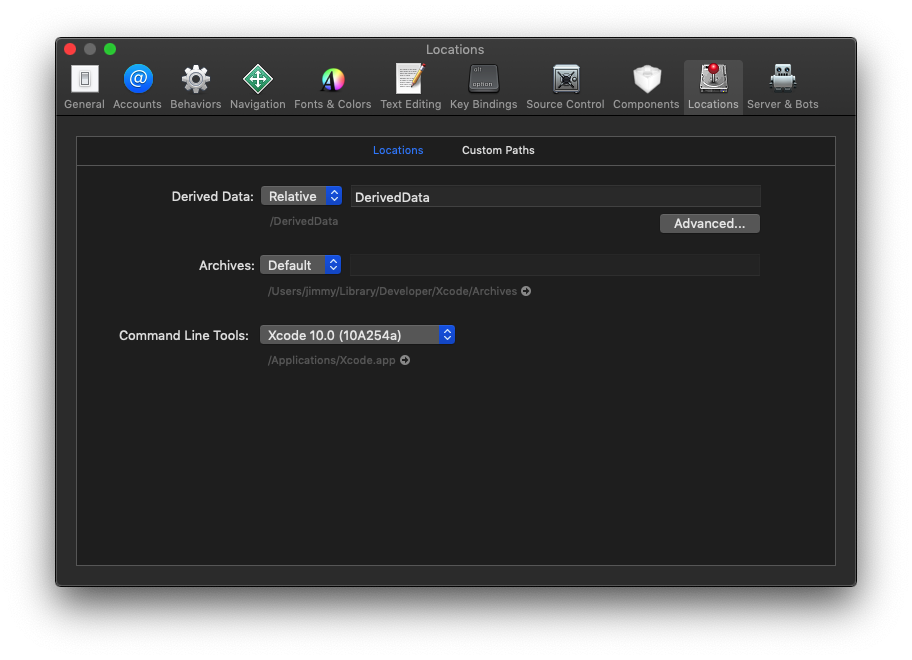
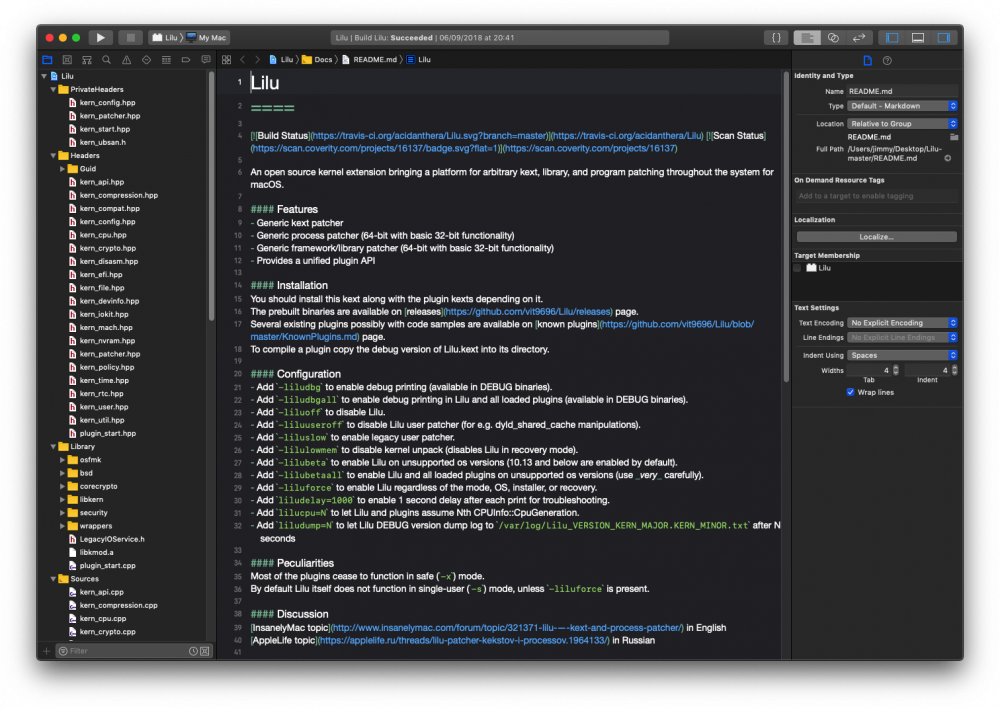
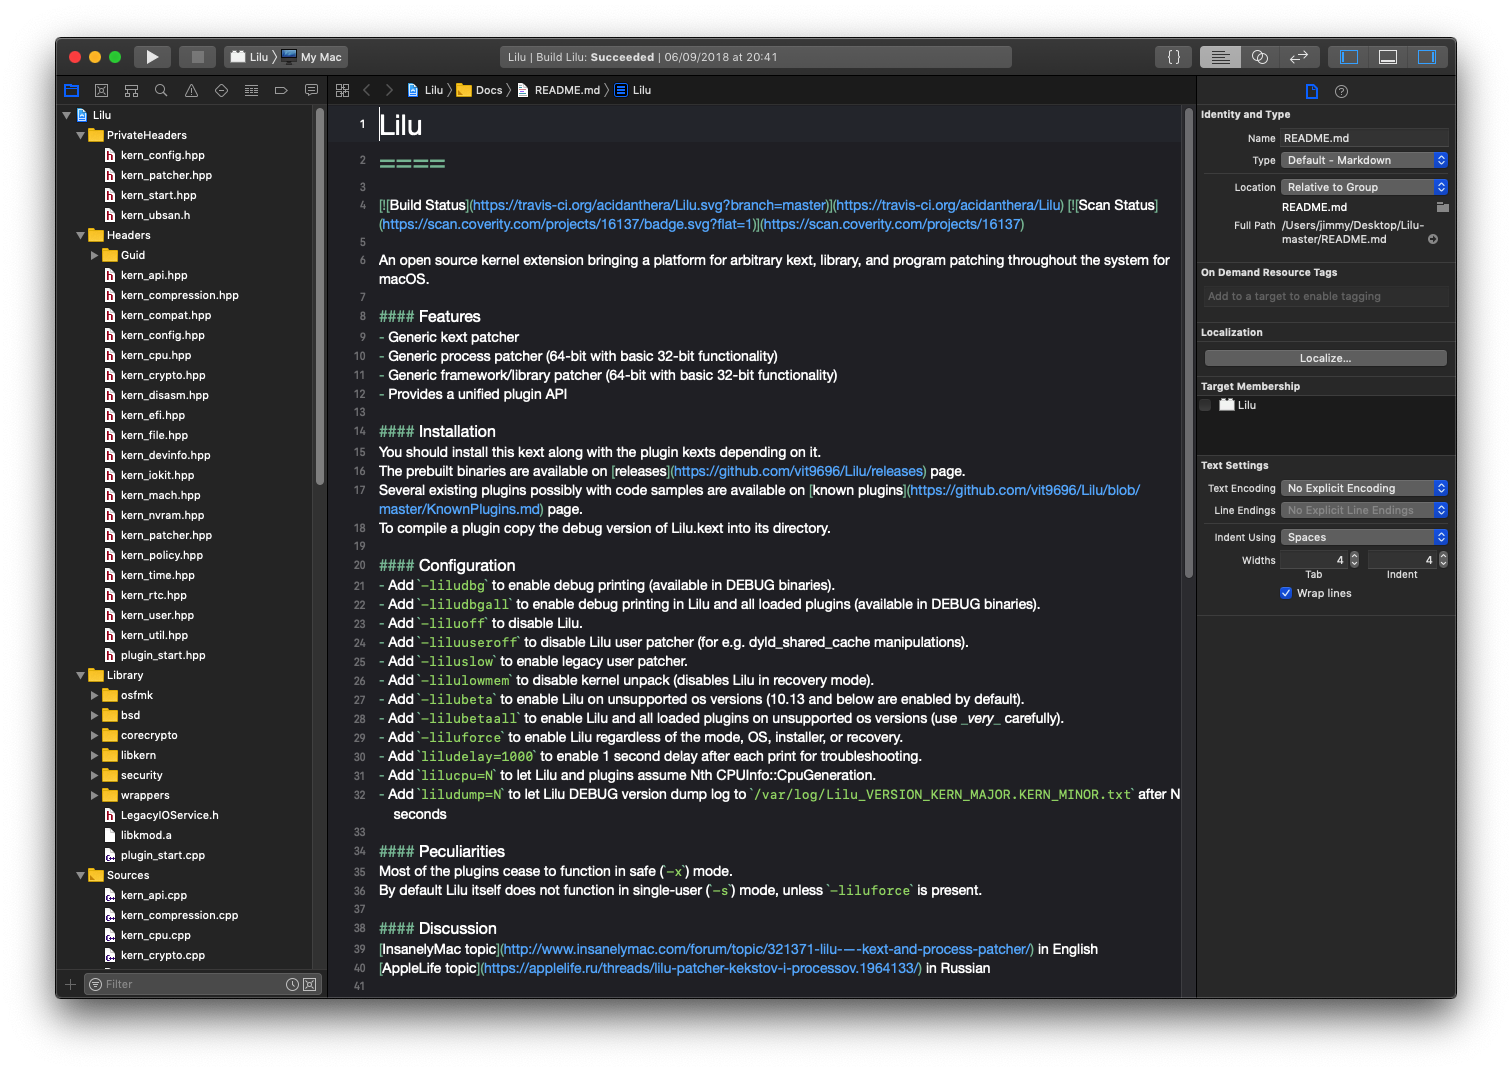
1. Get Xcode 2. Go to Xcode -> Preferences -> Locations 3. Set Derived Data to Relative like in the screenshot below. This will create a DerivedData folder inside your kext source folder and will make it easier to find the resulting kext file after compiling. 4. Download BOTH Lilu sources and AppleALC sources, unzip them and place them somewhere handy (Desktop for example). 5. Compile Lilu first (double click the Lilu.xcodeproj file from Lilu-master folder to load it in Xcode, and click the Play button on the top panel to start compiling). Make sure there are no errors and the build is completed successfully. 6. Go to /Lilu-master/DerivedData/Lilu/Build/Products/Debug 7. Rename the existing Lilu.kext into anything else you want, such as Lilu_release.kext 8. Unzip the 1.2.x (DEBUG).zip file 9. Copy-paste the resulting debug kext into the root of the AppleALC-master folder 10. Compile AppleALC (the same way you compiled Lilu) 11. Go to /AppleALC-master/DerivedData/AppleALC/Build/Products/Debug 12. Copy-paste the AppleALC.kext (NOT debug) into /Clover/kexts/Other alongside Lilu_release.kext from point 7 (you can rename it to Lilu.kext if you want). Reboot and enjoy.
 1 point
 -
OS: High Siera Xcode: 10.1 Commit: 328 Toolchain XCODE8 Getting this error: Building CloverPrefpane preference... [XCODE] ================= Making all in boot1-install ================= [XCODE] boot1-install ================= Making all in partutil ================= [XCODE] partutil ================= Making all in bdmesg ================= [XCODE] bdmesg ================= Making all in clover-genconfig ================= [XCODE] clover-genconfig ** INSTALL FAILED ** The following build commands failed: CompileC /Users/ella/src/CloverBootloader/CloverPackage/sym/build/clover-genconfig/clover-genconfig.build/Release/clover-genconfig.build/Objects-normal/x86_64/clover-genconfig.o /Users/ella/src/CloverBootloader/CloverPackage/utils/clover-genconfig/clover-genconfig.c normal x86_64 c com.apple.compilers.llvm.clang.1_0.compiler (1 failure) make[2]: *** [/Users/ella/src/CloverBootloader/CloverPackage/sym/utils/clover-genconfig] Error 65 make[1]: *** [all-recursive] Error 1 make: *** [pkg] Error 2 iMac:~ ella$0 points
-
macbuild.tool fatal error; how can I fix that?
 0 points


.thumb.png.a43579d9e280a5c4c80807bf93412ae7.png)


.thumb.jpeg.7082d67b3394c9399e80144027a7b397.jpeg)