Leaderboard


Popular Content
Showing content with the highest reputation on 01/24/2020 in all areas
-
macOS Catalina 10.15.3 beta 3 (19D75a)3 points
-
I received my RTL8125 add-in card before Christmas but as I have to take several exams in university in February and March, I'm busy studying at the moment so that there is no time left for hacking but I will start working on a driver in March, when the exam period is over. Keep your fingers crossed for me! Mieze3 points
-
ryzentosh
 2 points
 -
Wait, you're right, than is a good Idea!2 points
-
Yeah, you need OcQuirks or some fix, because that is what adjusts everything for proper system configuration. Also why you need FwRuntimeServices, because that is what actually does all that stuff. Weirdly, I read that link and then inspected my ACPI tables real quick, the device with "PNP0C02" HID and "PCHRESV" UID is a temperature sensor.... The only devices I have under "PNP0C02" HID are temperature sensors. Strange. EDIT: I have only one reservation for the memory range 0xFC800000 to 0xFE7FFFFF.2 points
-
amd não tem suporte nativo, mesmo funcionando nunca será um hack realmente perfeito DSDT.aml.zip use my efi folder for serie 300 and apply a video patch and my dsdt https://olarila.com/forum/viewtopic.php?f=28&t=82222 points
-
Hi @Rene204, Research and more research and trying this and that, until I solved the problem... One more update made ...
 1 point
 -
No, ACPIMonitor is developed only for FakeSMC.1 point
-
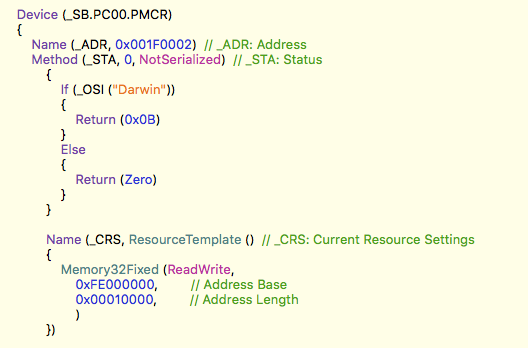
But what about this? https://github.com/acidanthera/OpenCorePkg/blob/master/Docs/AcpiSamples/SSDT-PMC.dsl * Intel 300-series PMC support for macOS * * Starting from Z390 chipsets PMC (D31:F2) is only available through MMIO. * Since there is no standard device for PMC in ACPI, Apple introduced its * own naming "APP9876" to access this device from AppleIntelPCHPMC driver. * To avoid confusion we disable this device for all other operating systems, * as they normally use another non-standard device with "PNP0C02" HID and * "PCHRESV" UID. * * On certain implementations, including APTIO V, PMC initialisation is * required for NVRAM access. Otherwise it will freeze in SMM mode. * The reason for this is rather unclear. Note, that PMC and SPI are * located in separate memory regions and PCHRESV maps both, yet only * PMC region is used by AppleIntelPCHPMC: * 0xFE000000~0xFE00FFFF - PMC MBAR * 0xFE010000~0xFE010FFF - SPI BAR0 * 0xFE020000~0xFE035FFF - SerialIo BAR in ACPI mode * * PMC device has nothing to do to LPC bus, but is added to its scope for * faster initialisation. If we add it to PCI0, where it normally exists, * it will start in the end of PCI configuration, which is too late for * NVRAM support.1 point
-
Signature items added, forgot to mention realtek wireless lan.1 point
-
Method STA & Name CRS must be outside Method DSM
 1 point
 -
I think you can't. Slice made possible for Dell only, but usually laptop's fans can't be controlled, or at least is not clear how. But if you want only to show them, you should take a look at ACPIMonitor.kext, but require acpi knowledge and skills.1 point
-
Thanks, but wait a moment. If we are going to create a database, we need rules naming things: 1) SYS_FAN2 or Sys Fan 2? What is CPU_OPT? What to do with unconnected sensors? My NTC sensor has more fans than the motherboard have, so I'm going to skip the sensor: Is that the case for your CPU_OPT? I mean, if the LPC chip has has an unused line (no connector on the motherboard), this must be skipped.... my 2 cents. 2) if we have a convention for naming things, and we follow it, the app can translate SYS_FAN2 (or Sys fan 2) into your native language. What do you think? It can be done at app initialization, in alphabetical order, what ever will be. I'll take a look on it when I have more time with out priority.
 1 point
 -
Same as ever, "Solved" is very good for You, but it could be useful for the Others... What you have done to solve your Problem..?1 point
-
Ok, so I got a reply from the OpenCore developer: https://github.com/acidanthera/bugtracker/issues/6811 point
-
thanks Andrey1970 worked Recovery partition with HfsPlus.efi I have second issue that when I play 60fps video 1080p with QuickTime player then little screen flickering black nothing issue with 30fps only issue is 60fps I think this is Shiki related bug how can I solve this? any idea1 point
-
I figured out what was my problem. The Firevalult kexts cause the weird keyboard issue and the allocation problem. Today I will try to clean install catalina again, dont know if Firevault is working without the proper kexts from the Advanced folder. Battery: in macos my battery status indicating that the condition is around 50% which is awful but in the other hand windows 10 does treat it well. For example if I watch a movie in macos battery percentage often drops significally to 0% but in windows there is no such issue.1 point
-
Yes, as usual. You also may use alternatives OsxAptioFix3Drv or OcQuirks if they works.1 point
-
1 point
-
I didnt test with AptioMemoryFix cause this efi always giving an allocation error for me. I am using it with OcQuircks+FwRuntime.1 point
-
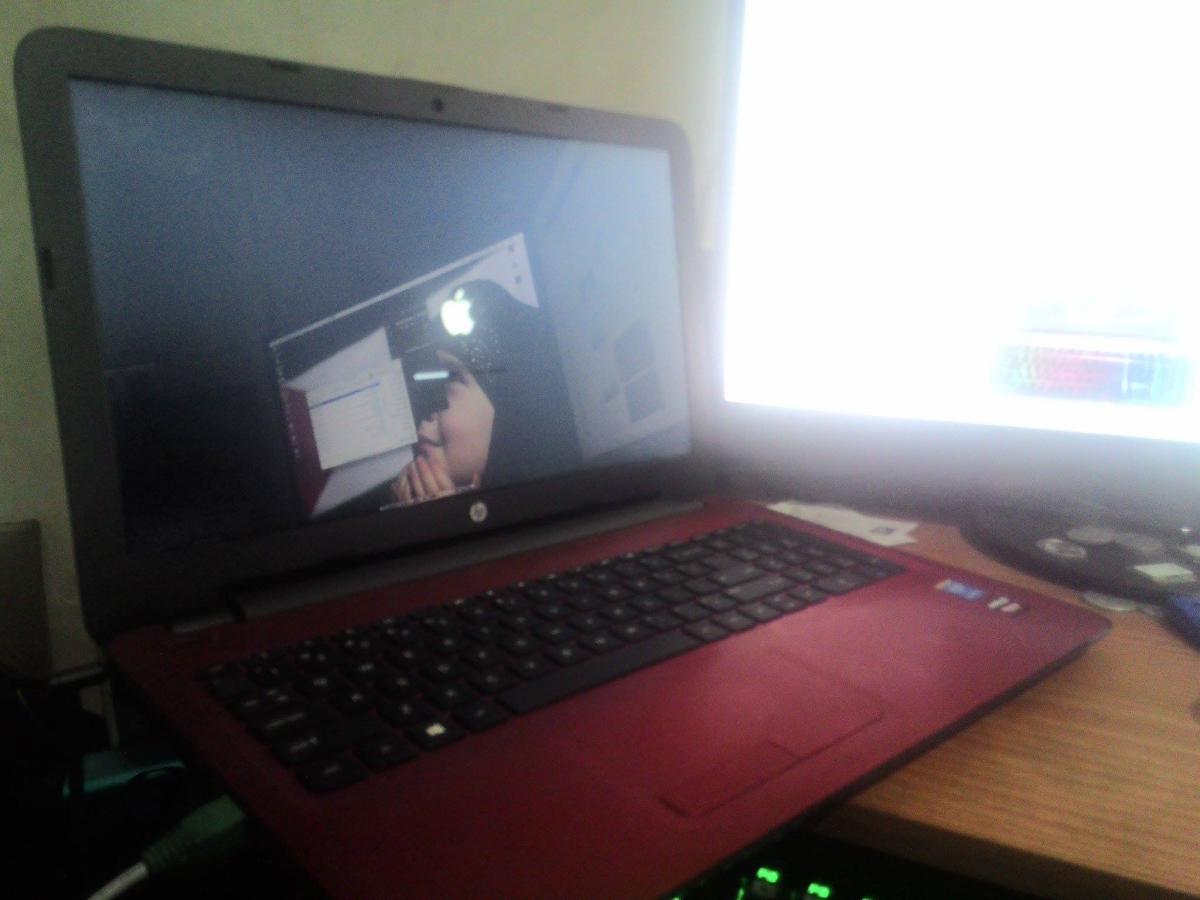
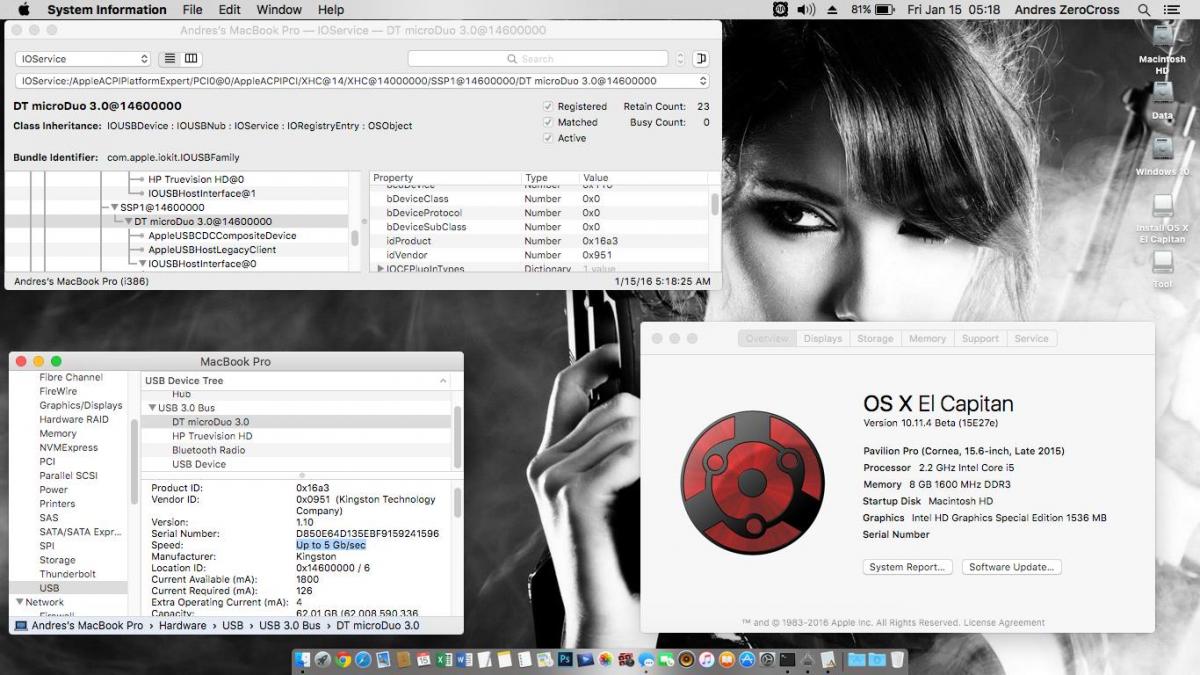
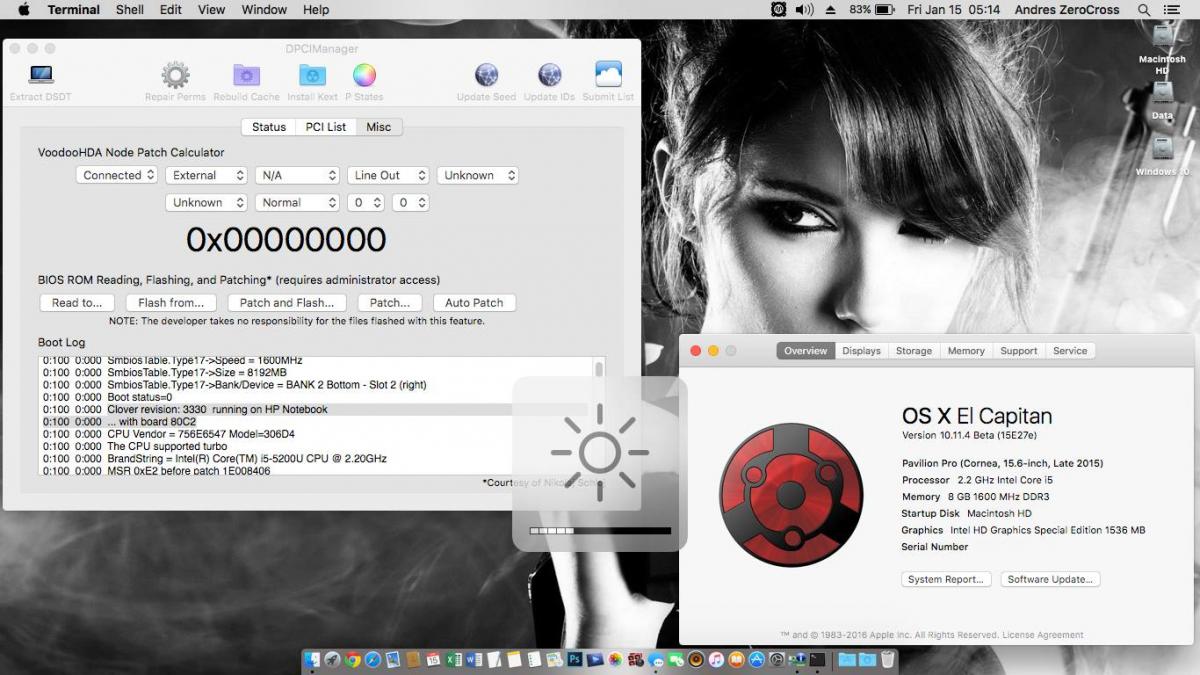
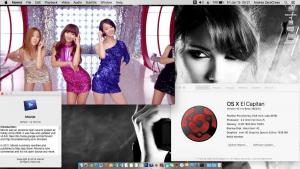
Specification : Processor : Intel Core i5 5200 RAM : 8GB PC12800 DDR3L (Use 1 Slot) HDD : 1TB Hitachi Optical Drive : DVD/RW VGA : Intel HD Graphics 5500 + AMD RADEON R5 M330 2GB Display : 15.6" Internal Display LED Sound : Realtek ALC282 Tools and Softwares 1. USB FlashDrive with 8GB 2. "Install OS X El Capitan.app" from AppStore, i downloaded 10.11.2 version 3. Use CreateInstallMedia method 4. Clover R3330 5. UEFI Mode Special Problem : 1. We can't unlock DVMT Pre-Allocation memory with Shell Command, there is error notification about "can't change value with EFI" so just use PATCH Binary for "AppleIntelBDWGraphicsFramebuffer" with Clover. What's working 1. Shutdown, Restart and Good Sleep 2. Close LID for Sleep and Open LID for Wake 3. Working Ethernet 4. Working iMessage (I used "ROM" and "MLB" of Real Mac ) 5. FN Brightness Fix, Check this 6. Sound via AppleHDA Patching (All Working,, Input dan output) 7. Battery Indicator 8. Super Speed USB 3.0 (5Gb/s) and all of USB Port 9. HDMI Audio and HDMI Output 10. Webcam Camera Tutorials 1. Format your USB to HFS+ and GPT Format then open terminal and use this command "sudo /Applications/Install\ OS\ X\ El\ Capitan.app/Contents/Resources/createinstallmedia --volume /Volumes/Untitled --applicationpath /Applications/Install\ OS\ X\ El\ Capitan.app —no-interaction" 2. After that Install Clover R3330 and choose - Install for UEFI booting Only - Install Clover in the ESP - Select theme (i choose "Shield" theme") - For Drivers64UEFI (DataHubDxe-64, EmuVariableUefi-64, OsxAptioFixDrv-64, PartitonDxe-64) then install 3. Open Config.plist at your EFI Partition of USB Installer (EFI/Clover/) with Clover Configurator and select this - ACPI (FixHPET, AddDTGP, FixUSB, Fix Darwin, FixIPIC, NewWay, FixRegions, FIX_RTC, FIX_TMR, DeleteUnused, AddPNLF, DropTables for DMAR&Cpu0Ist&CpuPm, Generate PStates, Generate Cstates), don't ask me why i choose this, because it work for my system for installing - Boot (-v, dart=0 or DropDMAR, XMPDetection=Yes, PBR, NeverHibernate) - Devices (Inject USB, AddClockID USB, FixOwnerShip USB, AFGLowPowerState and write "3" as LayoutID of Audio/HDEF) - Graphics (Inject Intel), never write your ig-platform-id or you will face Kernel Panic about "AppleIntelBDWGraphicsFramebuffer.kext", we will write it later - Kernel and Kext Patches (AppleRTC, Kernel LAPIC, KernelPm). We will set "KextsToPatch" later - Rt Variables (BooterConfig=0x28, CsrActiveConfig=0x67) - SMBios, for this one i google it and look for "MacBookPro12,1". You won't found "MacBookPro12,1" with this tool or see my Config.plist at my attachment file. Don't forget to change serial - System Parameters (InjectKexts=Detects, Inject System ID) 4. Just boot from your USB and make instalation like normal. (I make 3 partiton for my Harddrive. Partition1=Macintosh HD, Partition2=Windows, Partitio3=Data). Just install to Macintosh HD 5 After get to desktop screen i realize that there is Active CoreStorage at my Harddrive, so open terminal and use this command "diskutil corestorage revert disk1" then restart 6. Try to Install Clover R3330 to your Harddrive but with some adding at Clover Option Installer Menu - Install RC scripts on target volume - Install all RC Scripts on all other bootable volume - Optional RC Scripts - Install Clover Preference Pane 7. After that,, mount your EFI partition of USB Installer and Copy Clover Folder then paste it at EFI Folder of your harddrive (same directory as your USB Flashdrive) 8. Now open config.plist at your EFI/CLOVER/ on your harddrive with Clover Configurator and write this "kextToPatch" at "Kernel and Kext Patches" - Name=AppleIntelBDWGraphicsFramebuffer, Find=4139C4763E, Replace=4139C4EB3E, Comment=Up to you 9. Now go to Graphics Section and write this value at "ig-platforms-id" 0x16260006 10. Reboot, and you will get QE/CI for Intel HD 5500 11. For Audio, just need to use "AppleHDA Patcher" and select "Realtek ALC282 Ver2". Thanks to Micky1979 and Mirone. With their data i can use it for "Abxite Method" (patch XML to ZML, use info.plist injection, and binary patch for Clover) 12. Now you have good device running Hackintosh Fix and Patches 1. Extract and edit your DSDT, Use rehabman repo for patch 2. For Full Working USB 2.0 and USB 3.0 (5Gb/s), i use rehabman USB Injection all with some modifications and change "EHC1 to EH01" and "EHC2 to EH02". See my USB Injection kext at "Clover/kexts/10.11". I attach it 3. To activate HDMI Audio then write this to KextToPatch of config.plist - Name=AppleIntelBDWGraphicsFramebuffer, Find=02000001050B00000400000705000002040B00000400000705, Replace=02000001050B00000800000705000002040B00000400000705, Comment= Up To You 4. To Fix Second Stage Glitch, then write this to KextToPatch at config.plist - Name=IOGraphicsFamily, Find=0100007517, Replace=0100007417, Comment=Up to You 5. After install Windows with UEFI Mode then you will never boot to Clover GUI. We can't change Boot Entry via Shell Command or Bios Setup. There is no option for this. Solution is - Boot with your USB Installer, then mount EFI Partition of Your Harddrive and go to "EFI/Microsoft/Boot" and change "bootmgfw.efi" to "bootmgfw-orig.efi". - Then go to "EFI/CLOVER/" and Copy "CLOVERX64.efi" and paste at "EFI/Microsoft/Boot" then rename it to "bootmgfw.efi" - Restart and you can boot in to CLOVER GUI again Special Note : Just use my DSDT and all SSDT if you have got to desktop screen. Don't use my files at INSTALLING PART, or you will face "Kernel Panic" about "AppleIntelBDWGraphicsFramebuffer". Because i patch Ig-platform-id at my DSDT. You still can use kexts, SMBIOS Setting. I tick none at DSDT Fix at Config.plist because i have Patched DSDT. Do it with your own risk. Sorry for my Bad English guys


 0 points