Leaderboard


Popular Content
Showing content with the highest reputation on 11/11/2019 in all areas
-
It is very interesting find. Clover doesn't do anything with the field // // Add for smbios 2.6 // UINT8 Attributes; because it was developed very long ago for older macs with Smbios 2.4. We can add this line newSmbiosTable.Type17->MemoryErrorInformationHandle = 0xFFFF; + newSmbiosTable.Type17->Attributes = 0x0B; mHandle17[gRAMCount++] = LogSmbiosTable(newSmbiosTable); } We have to know if it will not break anything else. Make this patch conditional through config.plist?4 points
-
No, Clover WILL NOT REMOVE nvram.plist anywhere. It cleans variables from memory.2 points
-
Thanks! swift 5 is strictly required, and to use last Catalina feautures you need Xcode 11. Thanks! t The last app versionis always at github and i can grow the revision when i made changes to the app. The CloverDaemonNew has its own version since it run separately by the app (you can choose to stay with an old revision, so to track bugs is good to know if and when a new version is better or not of the old one) Thanks! I'll add it as soon I've done some tests.2 points
-
hello the app in Portuguese translation is good , nice work vector sigma good hack
 2 points
 -
hello vector sigma Portuguese translation pt_PT.strings.zip thanks2 points
-
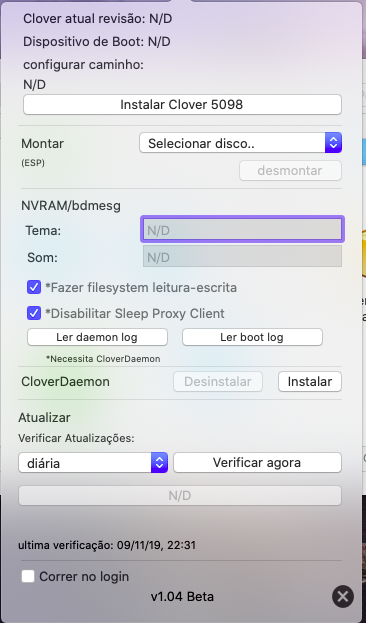
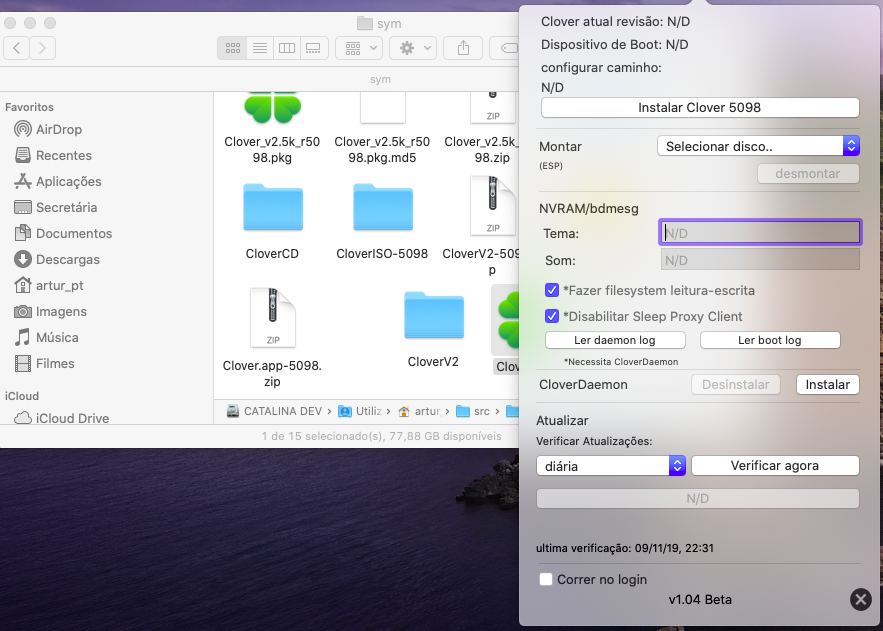
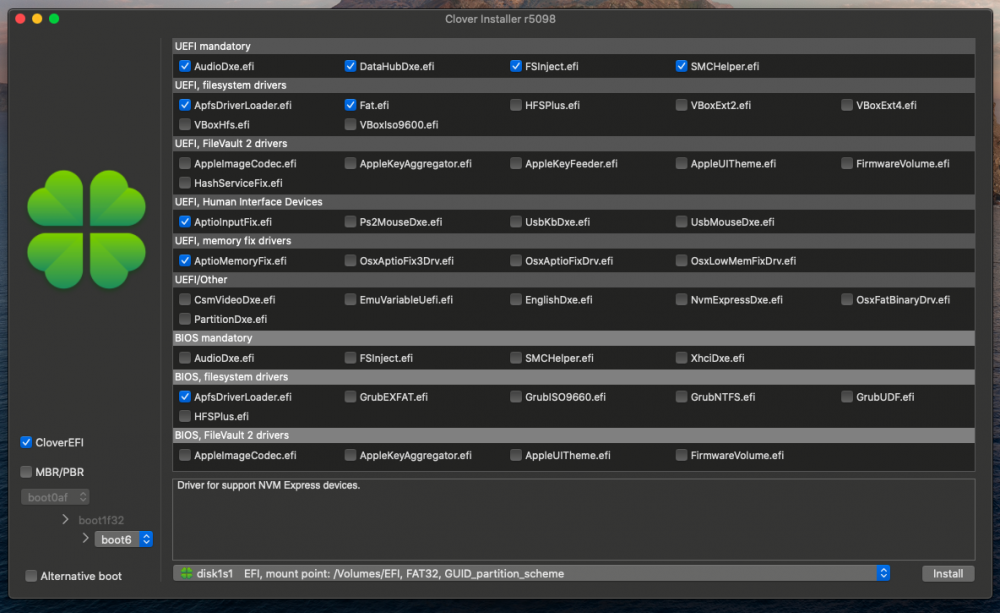
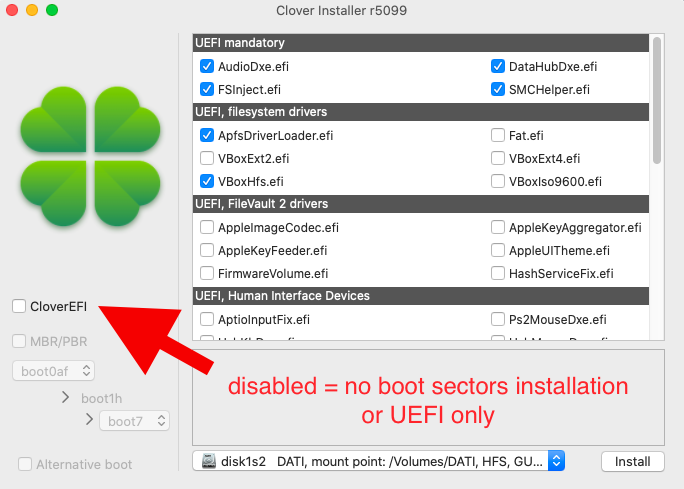
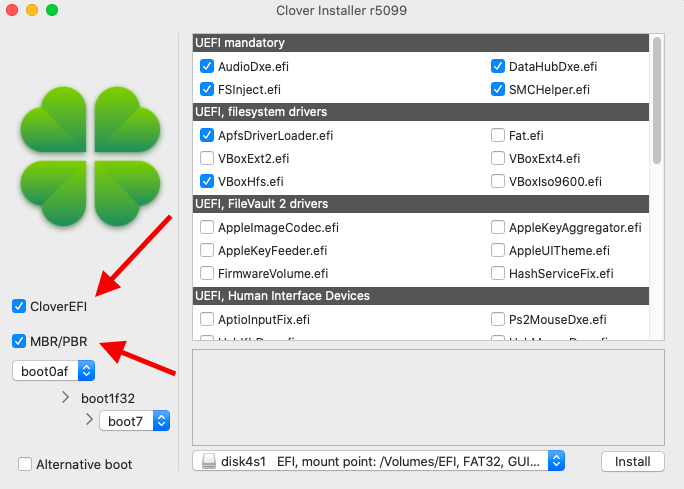
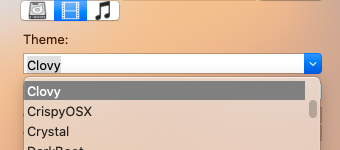
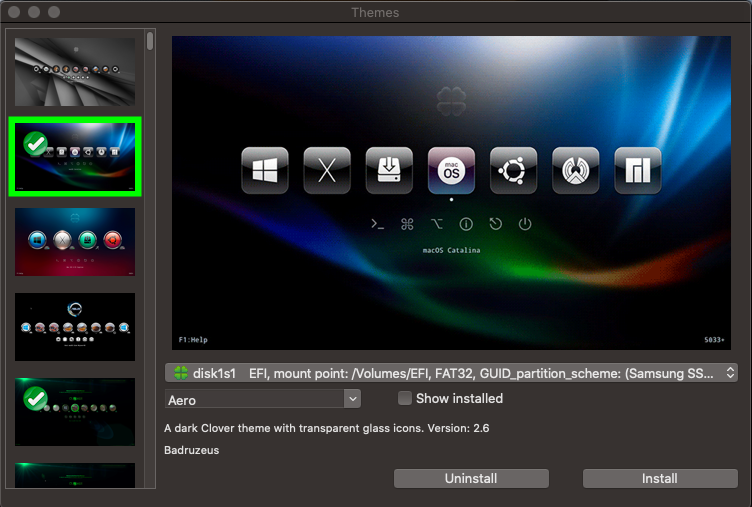
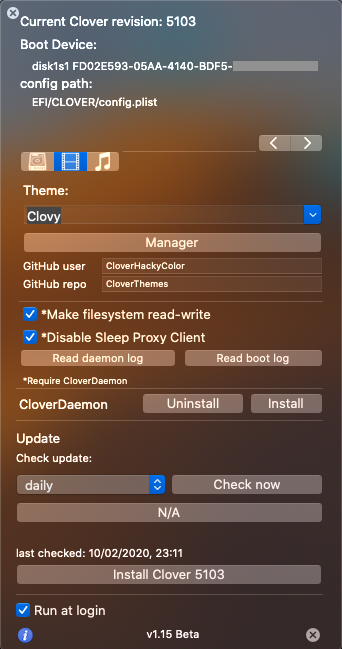
Hi, I've created a new GUI agent application to assist Clover bootloader. Its name is "Clover.app". Made to run in 10.9 and newer. What it does (or should do)? Give prominent info about the current revision in use, the Boot Device (disk where Clover is) and the the config.plist used. Install Clover in UEFI and legacy mode with a new way to store preferences and with out a pain searching for the correct ESP. Prevent target like Catalina-Dati from another OS (and ruin it) or read-only volumes, as this is not allowed. Provide essential NVRAM management for most used things such Theme and sound used. Ability to search any (correctly formatted) ESP in the system and mount/open them. As well the ability to umount. Auto mount for the chosen ESP. Get rid of RC Scripts... Yes, no more, just a new daemon (CloverDaemonNew) written in Swift and controllable by the NVRAM. Dump the nvram in the ESP, boot device takes precedence, otherwise the first available Internal) EFI System Partition. Root partition as last resource. Easily read the boot log (and the daemon log.. w/o mess the System log). Checking for updates whithout installing preferences panes here and there: just one app. Themes Manager embedded which doesn't require git to be installed. About installing drivers Unlike the package you have more control about what you are installing: Selected drivers are just the mirror of what is it really present in your EFI/CLOVER/drivers folders, and in fact, checkboxes get activated only if the driver is really present. Unknown drivers, i.e. ones not included in the current installer, are listed as well. Of course the app will not be able to update drivers that doesn't own. Be aware that deselecting a driver means (unlike the pkg) to delete the driver! A back up is always made to ~/Desktop/CloverBackUp/ .. so you can handle the back up immediately by your self. Warning: old drivers64 and drivers64UEFI directories aren't taken into account, only new ones (drivers/UEFI and drivers/BIOS). For some time the package was updated to migrate old directory structure to a new one with also the renaming of drivers with the old -64 suffix (as Clover is 64-bit only for some time.. so no need to specify again and again). Clover bootloader Updates Updates are online, but will show up only if the online version is greater then installed one. Based on the update intervall you set in the GUI, otherwise monthly as default. Clover.app Updates When a new release will be published it will appear a window that will inform you about it. Based on the update intervall you set in the GUI, monthly as default otherwise. Testing Clover.app is in a Beta stage, and is going to be promoted as "stable". Update: installation of legacy Clover looks really good. (thanks to @Rodion2010 for testing the installation) Update: since v1.11 is now compatible with 10.9 Mavericks and newer. Tested in 10.9, 10.10, 10.11, 10.12, 10.14 and 10.15. As soon someone will test successfuly it in 10.13 the Beta stage will ends. But why waiting for a test in 10.13.. there are problems otherwise? No, no problems. The code is written in swift 5 (whith stable ABI) and I did not expect something different for the code I wrote, but the difference can reside in the Cocoa.framework shipped with the OS: starting in 10.10 Apple introduced some new stuff for the interfaces like dark mode, Visual effect views (with vibrancy appearance) and problems can reside because many Apple-bugs where introduced and only fixed later. For this some graphical issues can show up (like a dark background with a dark text where you are able to see nothing). In the mentioned OSes all is fine (or at least perfectable), so just High Sierra is missing .... FAQs How to find the correct partition to update/install Clover? When you select a disk, the one with the Clover image... is the partition where Clover started. Easy no? Why you can't see other disks under "Mount (ESP)"? Because there, the app show only ESPs (EFI System Partition) and if a disk did not show up here... it's because the partition you are looking for is not an EFI System Partition. Why you can't see all the partition you have in the Installer? Because to install Clover it's required a filesystem to be FAT16, FAT32, EXFAT or HFS. Other ones are simply not taken into account. Example: if your ESP is formmated with FAT16 filesystem, BIOS options will not get activate because Clover doesn't have boot secotors for the ol fat filesystem! Warning, FAT16 can be good for UEFI loading, but for example my firmware simply ignore it. FAT32 is higly recommended for ESP, you're warned. What Make filesystem read-write" does? It is irreversible? This function add an nvram key that the daemon can read when the system starts so that can made the filesystem writable, if isn't, by invoking "mount -uw /". As you know starting from 10.15 the root filesystem is read-only and this functionality can help if you want to write to the System partition, like the case if you want to disable the Bonjour Sleep proxy Client, or to dump the nvram in / using EmuVariableUefi.efi, or using kexts like HibernationFixUp. It is a permanent change? No, mount -u means update an already mounted file system, so disabling the functionality the filesystem will stay as per default. The change is applied at next start up. What does "Disable Sleep Proxy Client? If your computer wake itself from sleep each n hours it's probably due to the Bonjour service called "Sleep Proxy Client". If you don't want this to happen you may want to disable it. In 10.15+ this functionality require the filesystem to be writable to add a special argument to the mDNSResponder launch daemon. By disabling the checkbox the service get re-enabled as per default, but then will require a read-write filesystem, at least for the next reboot. Note: if the filesystem is not writable the daemon will try to make it read-write to do the modification even if "Make filesystem read-write" is turned off. CloverDaemonNew is a complete replacement for the RC Scripts? Yes. It does every things done by rc scripts but without installing additional scripts into the System directories. Warning: the CloverDaemonNew is not compatible with old rc scripts and for this reason, since v1.07, Clover.app remove them. For the same reason the package remove CloverDaemonNew if you install back the rc scripts (since commit d447228 of november 29 2019). Big thanks to @Sherlocks for helping me to make it work. Themes Since v1.15 Clover.app has a Theme Manager. Unlike CloverThemeManager.app git is not mandatory, and in fact it doesn't use it. The requirement it is a Github repository instead. The main repo for Clover.app is https://github.com/CloverHackyColor/CloverThemes but the app allow you to chose a fork by specifying the GitHub user name and the GitHub repository name: A requirement for users repository is that your will contains themes in the root of it, and not in a sub directory. After themes are indexed (if you ever run the Theme Manager) a list of all themes is listed below: (You can type anything you want, and auto completion is available) ..so you can switch the theme to use by set its name in NVRAM. This way Clover override what is set in the config.plist. Sound Since v1.13 (with Clover r5102+) Clover.app is able to handle the volume level and the device for the the start up sound: No sound? Ensure the volume is audible (100%) and the device it is really connected to speakers. Of course your theme must contains the sound file. How to install Clover in UEFI only? Simply by not selecting "CloverEFI" (which means legacy Clover) and without play with MBR/PBR (Master Boot Record/Partition Boot Record). "CloverEFI" it's replaced by "BIOS". How can you install Clover in legacy mode? Simply by selecting "CloverEFI" (which means legacy Clover). MBR/PBR (Master Boot Record/Partition Boot Record) must be enabled the first time to make your disk bootable, and when this happened once there is no need to install boot sectors again. "CloverEFI" it's replaced by "BIOS". "Alternative boot" means that the installer will installs more then one boot loader you can chose by pressing the relative number (boot3, boot5, boot6, boot7, boot9) while booting. To do that the installer use a special boot 1 sector that wait 2 seconds to wait you for a key to be pressed. kernel panic installing bootsectors to a hfs partition (Clover legacy) During my tests with Clover.app I run in to a kernel panic installing boot sectors in a hfs formatted pen drive (and I realize some users had already run into this problem with the pkg) . After studying the problem, the conclusion is that the hfs driver panics when the journaling is enabled, so Clover.app take the step to disable the journal just before the installation. Of course the app re enable it as soon sectors are installed. Will the package installer no longer be supported? No. The package is still supported, also because Clover.app doesn't support old OSes like 10.8, 10.7 etc. and older. However the pkg has reached some limits by installing on Catalina. Can the Clover updater coexist? Yes, but why? With the package you have to install Clover to update them (in all partitions you have) to get access to it. With Clover.app you need only one app for all, ok, unless you have really old OSes. The Clover preferences panel? The idea is that you have every things you need by make Clover.app run at login. In how many languages it is translated? Actually in English (me) Italian (me) Russian (Slice) Portoguese (artur_pt) Korean (Sherlocks) German (Mork vom Ork) Simplified Chinese (Steve Zheng) Indonesian (Badruzeus) Serbian (crusher) French (Ellybz) But it can be translated in any language supported by macOS, so just start translating the en.strings and post the file here. Or make a pull request at github. Is it open source? Of course yes! Changes committed at github. How to compile? Xcode 11+ and swift 5+ both required. buildme do it for you. Last Release here


 1 point
 -
Hi there, This guide will enable your Intel addon NIC (EXPI9301CT) to fully support the Apple drivers and behave like a native Apple NIC. I wanted a solution for my trusted Intel NIC without having to use any third party kexts to get it working and also wanted it to be fully UEFI compatible. So I researched a little and would like to share my results in this short guide. Caution: This guide will only work for Intel Desktop CT NICs with PCI device ID 10D3. Also I only used OSX Yosemite to verify the results, but it should work in Mavericks, too. 1) Optional: Remove third party kext for the NIC Please remove any other third party kext you may have installed for your Intel NIC. We do not want any conflicts here later on. 2) Create a bootable DOS USB drive I used Rufus Boot USB Disk with an Image of Win98 DOS bootfiles to create it under Windows. The original ISO for the Win98 DOS Boot files can be found here http://goo.gl/WOaQi (Windows 98 DOS Boot). Any other DOS compatible Boot environment should work, too. 3) Download Intel Preboot files PREBOOT.EXE from http://goo.gl/ppSRzo 4) Copy the necessary files to the USB drive Extract the the download and copy the following files the bootable DOS USB drive Copy BOOTIMG.FLB from PREBOOT\APPS\BootUtil Copy BootUtil.EXE from PREBOOT\APPS\BootUtil\DOS 5) Restart and boot from the USB-Stick You will temporarily have to change the UEFI-BIOS settings to be able to boot from a DOS environment. I had to set the following options: Legacy USB = Enable SecureBoot = Other FastBoot = Off 6) Flash the NIC with EFI-ROM After Booting from the DOS USB drive please use the following commands in the given order. Backup the original ROM BootUtil -SAVEIMAGE -FILE=Backup.FLB Enable flash write capability on NIC BootUtil -FE -ALL Update NIC with EFI-ROM BootUtil -UP=EFI -ALL -FILE=BOOTIMG.FLB 7) Change PCI device ID with ethtool Congratulations, your Intel NIC is now UEFI compatible and should already show up in your UEFI BIOS. We now will have to change the device ID from the NIC, so that OSX can use the native driver. Boot from a Linux Live Boot environment (e.g. Ubuntu) and change the PCI device ID from 10D3 to 10F6 with ethtool. Please ensure your Intel NIC is eth0. We do not want to patch any other NICs by mistake. sudo -s apt-get install ethtool ethtool -E eth0 magic 0x10D38086 offset 0x16 value 0x00 ethtool -E eth0 magic 0x10D38086 offset 0x17 value 0x00 ethtool -E eth0 magic 0x10D38086 offset 0x1A value 0xF6 8) Start OSX and enjoy your native Apple Intel NIC Reboot and don't forget to change the UEFI-Settings back from step 4 to their original values. After this you can start OSX and the NIC should be recognized. Windows will pick up the NIC without any problems, so no worries if you want to switch back to Windows sometime later on. Disclaimer: Please note, this procedure solved a very specific problem for me and the guide is certainly not perfect. I do not take any responsibility for anything that may go wrong if you follow it. I hope this guide may be useful for someone and please feel free to give any suggestions that may improve it. Cheers, Maroder1 point
-
ur processor don't have igpu, u can try with iMacPro1,1 smbios or MacPro7,1 use last system version, catalina 10.15.11 point
-
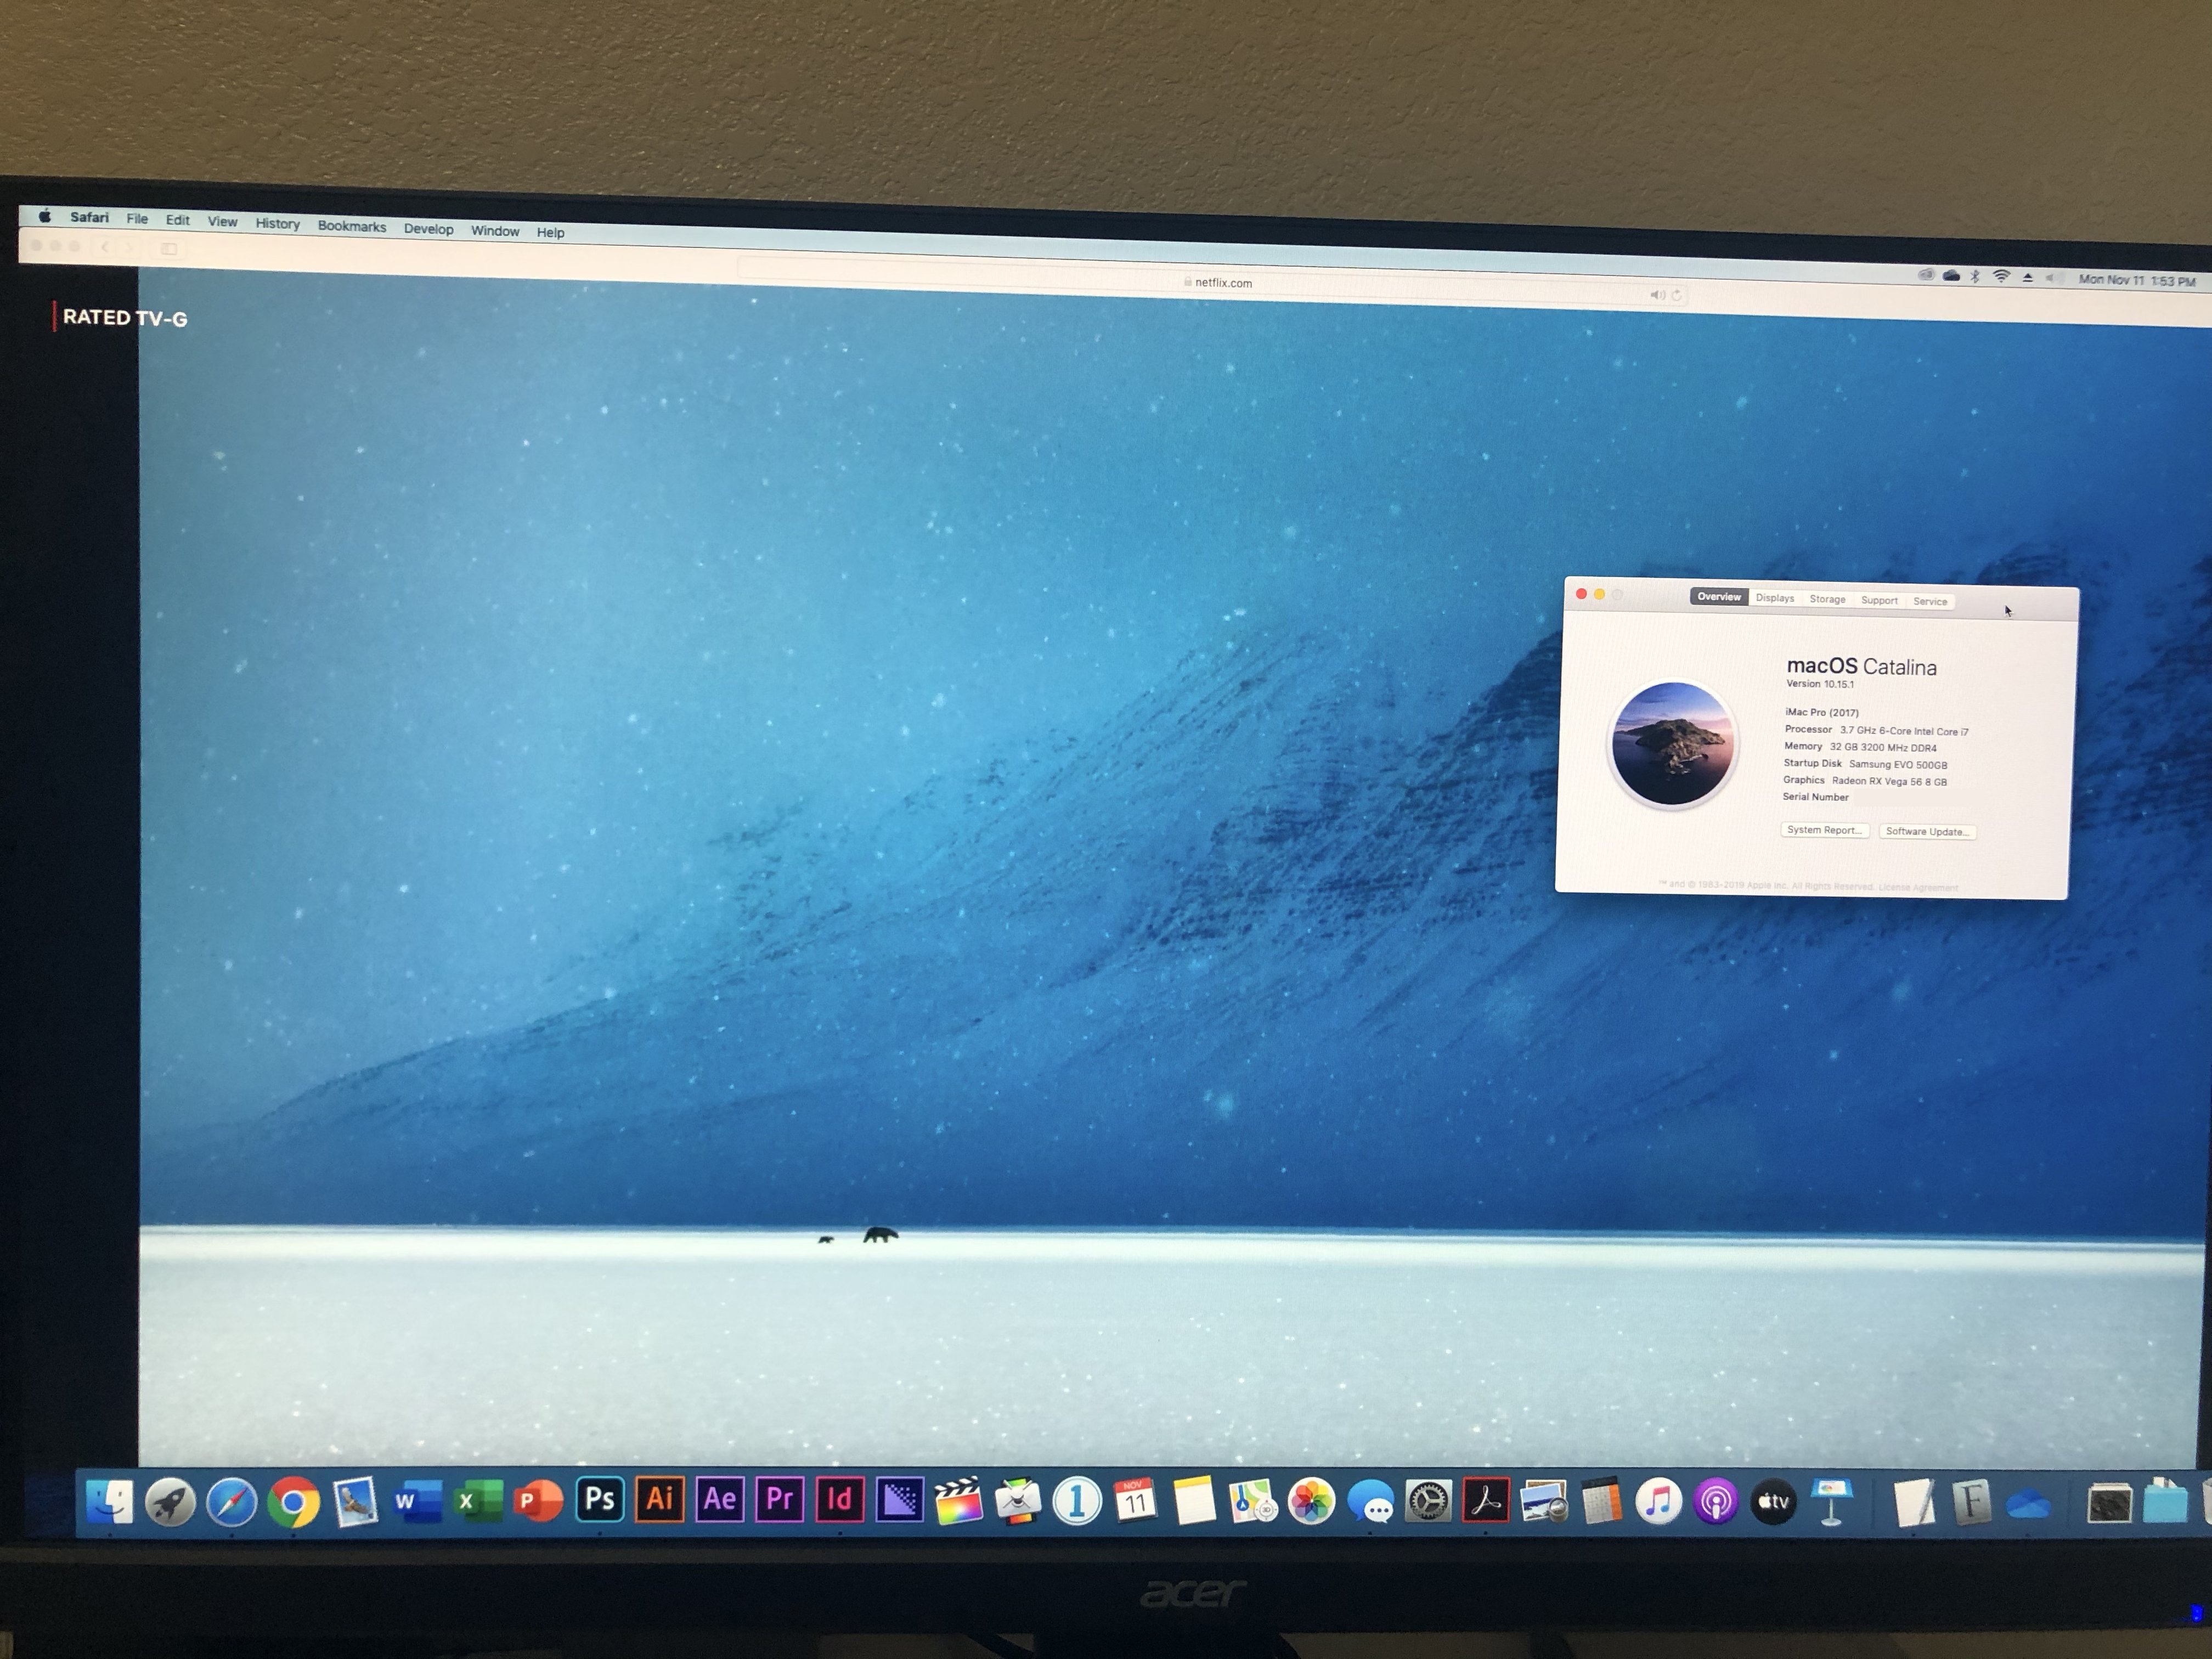
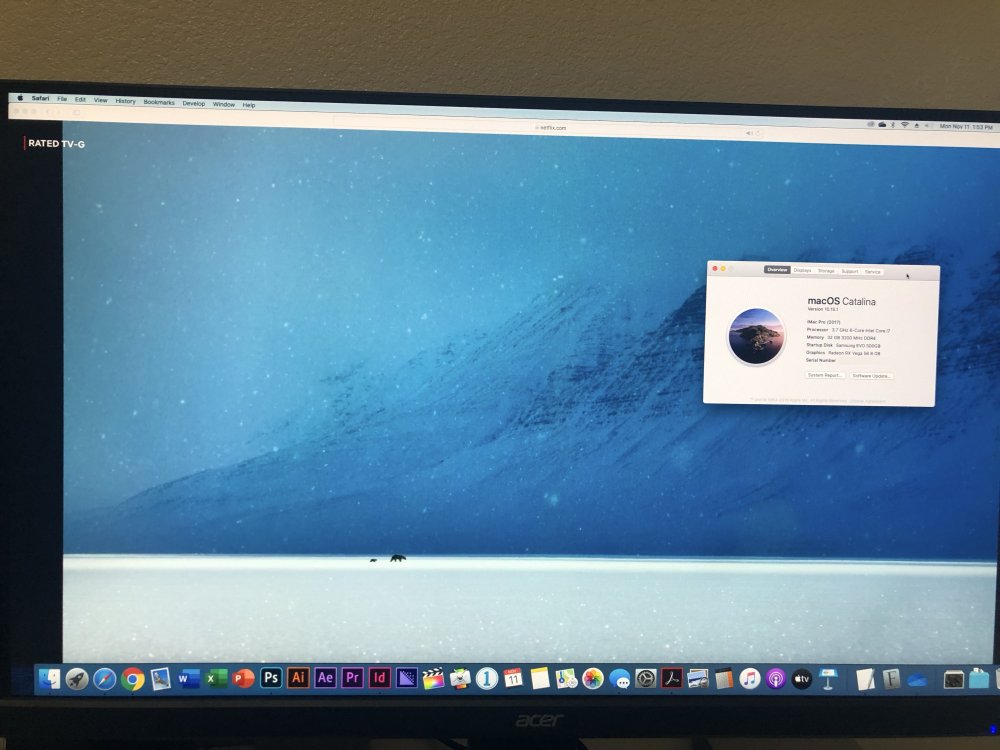
@ilcondannato Surprise people still using safari have you tried using chrome? I'm watching DRM content just fine on safari, and I'm on Pro 1,1: If you're in Pro 1,1. you should disable the iGPU.
 1 point
 -
post one full dump --Run_Me RunMe.app https://www.youtube.com/watch?v=k9wmIfGLe3A1 point
-
To be clear it start working after shut down/restart, but then the nvram will be dumped when you will turn off your pc again. Why you see it work after two reboots. Thanks to you
 1 point
 -
OK, nevermind. At least, for now it' s enough for me to test Indonesian id.string with current Xcode 10,1. Nice work @vector sigma, it seems just need few adaptions from prev. Clover *.pot / id.po Have a nice day and I'll let you know once I've done. Thanks.1 point
-
the first time yes. Then it will be ok. Can I have the log please?1 point
-
Ok I forgot this. Anyway did you check this build? It is currently unused as I plane to use it to call mount with a special argument.1 point
-
New code written in swift 5 will not compile in swift 4.2 (while it does the opposite), and "raw string literal" which I'm using for some delicate tasks cannot be used in old versions. Not sure the snapshot is recent and ABI compatible, while the one included in Xcode is for sure.1 point
-
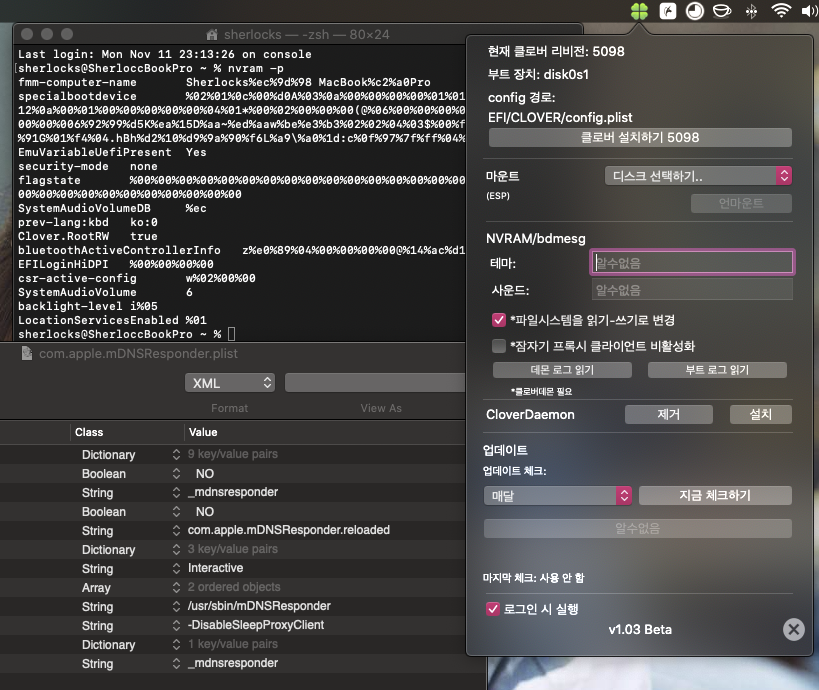
Yep just like the pkg there was no way to re enable the service, but now there is. I the latest daemon all the errors where send to a null device while the attached one has little modifications to understand the problem (so it will show probably some garbage). To manually install it place it to the ~/Desktop and then: sudo ~/Desktop/CloverDaemonNew --install The date is localized, and it should print in your native language but since is not a reach text format shows artifacts. I'll fix it later. P.S. sorry for too much tests, but here always work, no matter the modifications I made to it, otherwise I'll didn't propose you to test it.1 point
-
Serbian language SR.strings.zip1 point
-
Reboot twice1 point
-
Hello and thanks, committed! At first post you can find the updated Clover.app that speak Portoguese!1 point
-
Hi Slice, Thank you for the response. But I think I didn't explain myself well. 0Bh is the location of of the "Attributes", not it's content. The content is newSmbiosTable.Type17->Attributes = 1 in case of Single-Rank DIMMs and newSmbiosTable.Type17->Attributes = 2 in case of Dual-Rank DIMMs. But this information is *already present* in SMBIOS, without us doing anything special in Clover. He sent me two dmidecodes from a booted Mac, for each case, with the different DIMMs installed. Look: This is the non-working case with the Single-Rank DIMMS: (notice the RANK: 1, it is present in smbios and read from the Attributes address at 0Bh): Handle 0x1101, DMI type 17, 40 bytes Memory Device Array Handle: 0x1000 Error Information Handle: No Error Total Width: 64 bits Data Width: 64 bits Size: 8192 MB Form Factor: DIMM Set: 1 Locator: DIMM0 Bank Locator: BANK 1 Type: DDR4 Type Detail: Synchronous Unbuffered (Unregistered) Speed: 2998 MT/s Manufacturer: Corsair Serial Number: 0000000000000000 Asset Tag: Not Specified Part Number: CMW16GX4M2C3000C15 Rank: 1 Configured Clock Speed: 2133 MT/s Minimum Voltage: 1.2 V Maximum Voltage: 1.2 V Configured Voltage: 1.2 V And this is the non-working case with the Dual-Rank DIMMS: (notice the RANK: 2, it is present in smbios and read from the Attributes address at 0Bh): Handle 0x1100, DMI type 17, 40 bytes Memory Device Array Handle: 0x1000 Error Information Handle: No Error Total Width: 64 bits Data Width: 64 bits Size: 8192 MB Form Factor: DIMM Set: 1 Locator: DIMM0 Bank Locator: BANK 0 Type: DDR4 Type Detail: Synchronous Unbuffered (Unregistered) Speed: 3200 MT/s Manufacturer: G Skill Intl Serial Number: 0000000000000000 Asset Tag: Not Specified Part Number: F4-3200C16-8GTZB Rank: 2 Configured Clock Speed: 2133 MT/s Minimum Voltage: 1.2 V Maximum Voltage: 1.2 V Configured Voltage: 1.2 V This is the only real difference between the chips. He has two pairs of chips that it is working OK for install with them (one pair is 2x8GB - GSKILL the other is 2x16GB - CORSAIR). Both of these are working OK for install and both are with "Rank: 2". He has only one pair with "Rank: 1" (they are more rare I think), but install keeps giving the error with them in all cases, also if using only a single DIMM, also when using both DIMMs. I don't know what we should be doing with this information, I was mentioning it as maybe together we can understand what is going on here... I tried, on my system, to add: newSmbiosTable.Attributes = 1 Just to see if it makes me also get the error (as my Rank also was 2) - but the error did not appear on my System (I don't actually have single-rank DIMMs to test with them, so I tried only to fake the rank). There are many reports on the net (at other sites) about this issue, no one mentioned the Rank, but in most cases it was closed by using other DIMMs or moving the DIMMs in other slots (on boards that have more slots). So this is a memory issue, and in my opinion is is somehow related to the Rank.1 point
-
Install on what ? You not give mutch information EDIT *** Anyway open an issue on GitHub if you have trouble1 point
-
So that was the trick that fixed basically everything! After I installed everything (Catalina, kexts etc.) I booted again from the usb stick I created that had the Catalina installer. This time I run the macOS Post Install (last option in the list). Then, I clicked the Force Cache Rebuild and finally Restart. Thank you all for the support! I’ve learned something today!
 1 point
 -
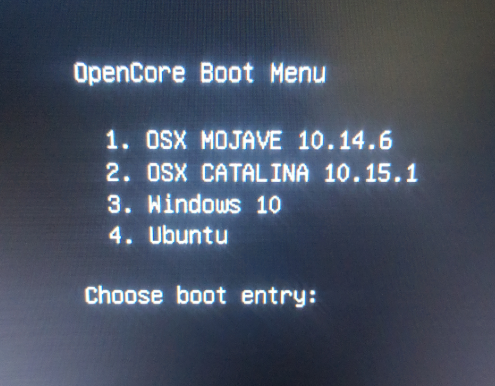
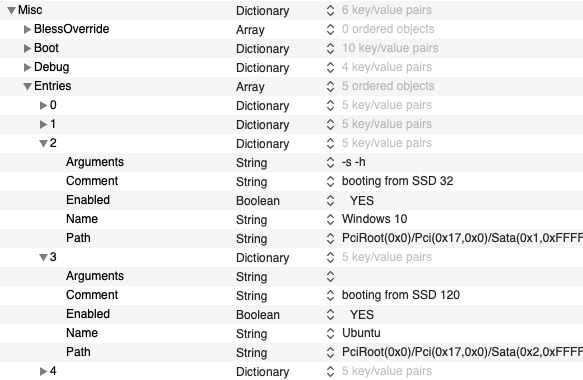
Also for those interested. Quadruple boot with OpenCore: ( Catalina, Mojave, Windows, Ubuntu ) Smooth experience My path entry for Ubuntu is: PciRoot(0x0)/Pci(0x17,0x0)/Sata(0x2,0xFFFF,0x0)/HD(1,GPT,6764064E-FA1D-4FC7-AEF5-C94FAE30F973,0x28,0x64000)/\EFI\ubuntu\grubx64.efi SCANPOLICY: 2689795
 1 point
 -
@jl4c Yes, check the PDF for "BootEntries"1 point
-
Following this problem, I have narrowed it down to the rank of DIMMs used. This error appears during install when he is trying to install with Single-Rank DIMMs (2x8GB). The error does not appear, and he can install successfully, when trying to install with Dual-Rank DIMMs (also 2x8GB). The memory rank information appears in SMBIOS, at Type17->Attributes (0Bh), maybe it needs to be taken into consideration for something? (currently we are not doing anything with it within Clover) It still baffles me though how it can affect the installer to give this error. Also, if the Single-Rank DIMMs are put back after macOS is already installed, everything seems to be functioning properly.1 point
-
Test, it works for me Except USR1/USR21 point
-
Thank you, CMMChris for releasing this! I've just moved to OpenCore and decided to put also this in test, and it works great!1 point
-
https://support.apple.com/guide/mac-help/mchl732d3c0a/mac1 point
-
Great and thanks! Finally everything working on Catalina. I am running OS X 10.15.1 with this card: LENOVO YOGA 3 PRO/2 13/710/Y50-70/Touch 04X6020 BCM94352Z To get bluetooth to work I had to put these kexts inside EFI/CLOVER/kexts/Other BrcmBluetoothInjector.kext BrcmPatchRAM3.kext BrcmFirmwareData.kext First I tried with BrcmPatchRAM2.kext but bluetooth was not working. I have a little different versions than you have: USB--> BCM20702A0: Product ID: 0x6417 Vendor ID: 0x0a5c (Broadcom Corp.) Version: 1.12 Bluetooth--> Firmware version: v14 c5876 These cards are getting expensive. I see they are twice the price on ebay as when I bought. I have had great success with Dell DW1560 but they are also very expensive. If you don't have room (height) for a MacBookAir wifi card with adapter I would would go for that or the Lenovo card. The 1820A is cheaper but gave me too many challenges to get to work.1 point
-
I just uploaded the prebuilt binaries of version 2.5.0 to the downloads section here on IM. Have fun!1 point
-
Just pitching in with my freshly installed Catalina 10.15.0 T460: I got Wifi on a Dell DW1560 working with tlucks three kexts and the new AirportBrcmFixup.kext. Also, the SD card reader works with Sineteks kext (both attached to this post) Sinetek-rtsx.kext.zip Wifi and BTW DW1560 T460.zip1 point
-
It doesn't work here. My GPU works perfectly in Sierra, but can't boot to Mojave installer. I get black screen. I am wondering how come you don't have Whatevergreen and Lilu kexts? HP Z420 Workstation Intel Xeon E-1620v2 ATI Radeon Sapphire Nitro RX570 4 Gb 8 Gb unbuffered ECC RAM Is your your monitor connected with Display Port cabel?1 point
-
problem solved iMac19,1 GIGABYTE Z390-M-GAMING: (AptioMemoryFix.efi) iGPU is enabled in BIOS (not Auto); Dedicated memory is set to 32Mb; Above 4G Decoding is enabled in BIOS.0 points
-
Hello! Perhaps this article could help you out: https://www.securityweek.com/macs-infected-new-monero-mining-malware Have fun.0 points